-
Intel High Definition Audio HDMI
Версия:
6.10.01.2089
(15 мар 2010)
Файл *.inf:
intchdmi.inf
Windows Vista
x86,
7
x86,
8
x86,
8.1
x86,
10/11
x86
-
Intel High Definition Audio HDMI
Версия:
6.10.01.2089
(15 мар 2010)
Файл *.inf:
intchdmi.inf
Windows Vista
x64,
7
x64,
8
x64,
8.1
x64,
10/11
x64
В каталоге нет драйверов для Intel High Definition Audio HDMI под Windows.
Скачайте DriverHub для автоматического подбора драйвера.
Драйверы для Intel High Definition Audio HDMI собраны с официальных сайтов компаний-производителей и других проверенных источников.
Официальные пакеты драйверов помогут исправить ошибки и неполадки в работе Intel High Definition Audio HDMI (звуковые карты).
Скачать последние версии драйверов на Intel High Definition Audio HDMI для компьютеров и ноутбуков на Windows.
HDMI (High Definition Multimedia Interface), the default audio/video connection standard, can bump into issues sometimes. Many would wonder if they can update their HDMI driver on their Windows 10/11 PC to fix problems like HDMI no signal, no sound, or not working at all. Is there a driver for your HDMI port?
Actually, you don’t need a driver for your HDMI port or HDMI cable. The HDMI port will work normally when all the connected components are communicating properly.
You may experience problems with your HDMI if the graphics driver is outdated, corrupted, or incompatible with your operating system. Therefore, you just need to make sure the graphics card driver is up to date.
There are two ways you can update your HDMI related drivers (the graphics driver) on Windows 10:
Option 1 — Manually — You’ll need some computer skills and patience to update your driver this way because you need to find exactly the right driver online, download it and install it step by step.
OR
Option 2 — Automatically (Recommended) — This is the quickest and easiest option. It’s all done with just a couple of mouse clicks – easy even if you’re a computer newbie.
Option 1 – Download and install the driver manually
Your graphics adapter manufacturer keeps updating drivers. To get them, you need to go to its website, find the exact graphics driver corresponding with your specific flavor of Windows version (for example, Windows 10 64 bit) and download the driver manually.
Once you’ve downloaded the correct driver for your system, double-click on the downloaded file and follow the on-screen instructions to install the driver.
Option 2 – Automatically update the graphics driver
If you don’t have the time, patience, or computer skills to update the graphics driver manually, you can do it automatically with Driver Easy.
Driver Easy will automatically recognize your system and find the correct drivers for it. You don’t need to know exactly what system your computer is running, you don’t need to risk downloading and installing the wrong driver, and you don’t need to worry about making a mistake when installing.
You can update your drivers automatically with either the FREE or the Pro version of Driver Easy. But with the Pro version it takes just 2 clicks:
1) Download and Install Driver Easy.
2) Run Driver Easy and click the Scan Now button. Driver Easy will then scan your computer and detect any problem drivers.
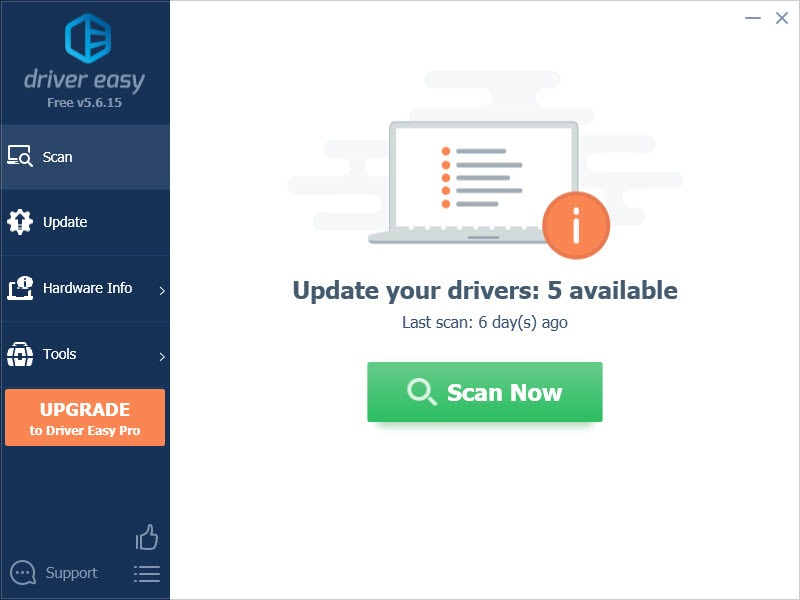
3) Click Update All to automatically download and install the correct version of all the drivers that are missing or out of date on your system to make your system work to its tip-top condition (this requires the Pro version – you’ll be prompted to upgrade when you click Update All).
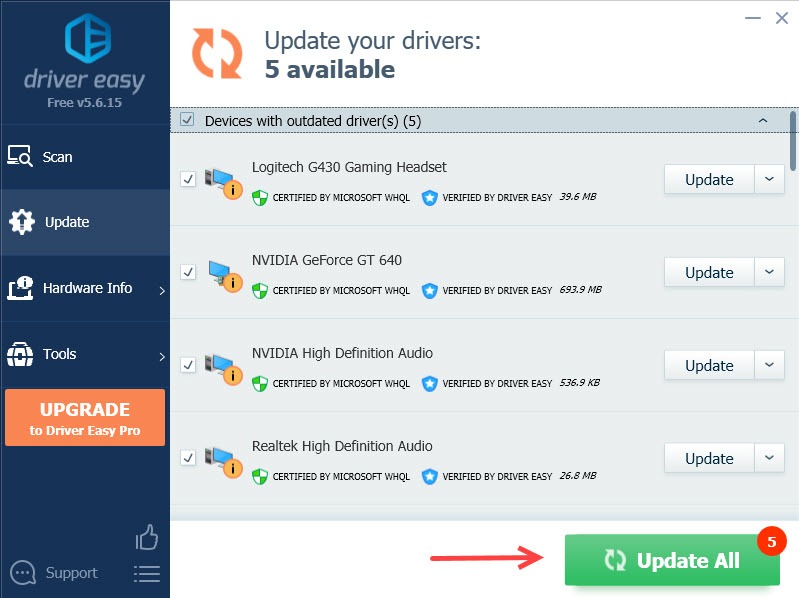
Or you can click the Update button next to your graphics driver (NVIDIA GeForce GT 640 in my case) to update the graphics driver (it’s partially manually).
The Pro version of Driver Easy comes with full technical support.
If you need assistance, please contact Driver Easy’s support team at support@drivereasy.com.
4) Once the driver is successfully installed, restart your PC for the changes to take effect.
Is HDMI still not working?
Updating your graphics driver can fix some HDMI issues, but if this method didn’t do the trick, you might want to try the following troubleshooting steps:
Step 1 – Change display settings
1) On your keyboard press the Windows logo key and P to check your computer display settings.
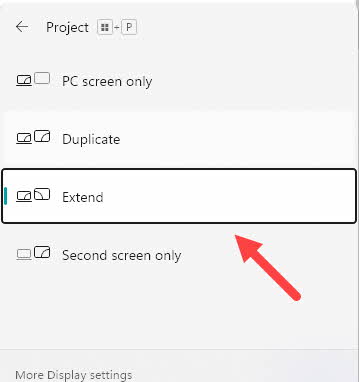
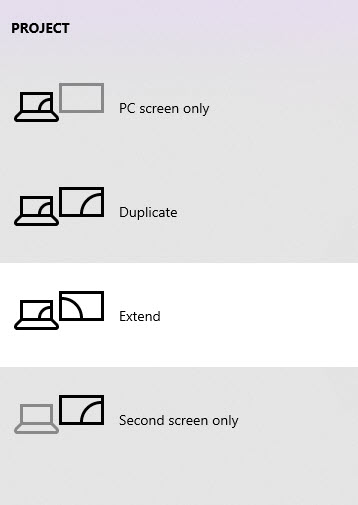
- PC screen/Computer only — Only using the first monitor.
- Duplicate — Displaying the same content on both monitors.
- Extend — Using both monitors to display an extended desktop.
- Second screen/Projector only — Only using the second monitor.
2) Experiment with each mode, and you will be able to see images on the screen connected via HDMI when the display settings are correct.
Step 2 – Restart and reconnect everything
1) Disconnect all your HDMI cables from your ports.
2) Shut down all your devices (your computer, monitor, and TV) completely and unplug their power cables (and battery if you are using a laptop).
3) Grab a cup of coffee and wait for 3 to 5 minutes.
4) Plug the power cables (and the battery) back in.
5) Connect the HDMI cables back to your devices.
6) Power on the devices.
Hope the methods above help you resolve the problem. Please feel free to leave your comments if you have any questions or suggestions.
10
10 people found this helpful
Table of Contents
HDMI Driver for Windows 10:
If you’re having problems with your HDMI connection, it may be time to download and install a new HDMI driver for Windows 10. First, go to the official website of the hardware manufacturer. From there, select the specific version of Windows that you’re running and click the ‘Download’ button. To download the latest version of the HDMI driver, you can use the search bar to enter the component’s name. After that, reboot your PC to ensure that the new driver is installed correctly.
Download the latest HDMI Driver for Windows 10:
You can also download the latest HDMI driver for Windows 10 by using a free driver update utility. This software scans your computer for outdated or missing Drivers and automatically installs the latest compatible version. You can also set the driver as the default device by right-clicking the mouse on the Sound window. Once you’ve installed the updated driver, restart your PC and make sure that it matches the new hardware. It will also allow you to set the device as your default audio device.
Update the HDMI Driver:
Another popular method to update the HDMI driver for Windows 10 is to update your operating system. This can fix a number of issues, including the inability to connect to HDMI devices. However, it’s important to make sure that the new driver is compatible with your device. You can download the latest version of the HDMI driver from the manufacturer’s website. Then, restart your PC. Then, open your HDMI device and connect it to the laptop.
Download and install the HDMI Driver:
Next, you can download and install the latest HDMI driver for Windows 10 and try it out. This is a very simple process, and if you want to save time, you can also download the latest version of the software. The latest version should be compatible with your current system. Just make sure you check the model number of your HDMI audio device before downloading the updated driver. If you still have issues, you can run the Program Compatibility Troubleshooter to see if your new driver is compatible with your device. If all else fails, reboot your PC again and it should start working again.
Resolve the HDMI Driver problem:
You can also download and install the HDMI driver for Windows 10 using the Device Manager. This is a useful tool for fixing many problems with HDMI output. It will automatically update the driver for your device. If the driver is not compatible, you can uninstall it and manually install it instead. If your device is not recognized by the operating system, you should uninstall the driver. If it is not, you can try reinstalling the HDMI driver by visiting the manufacturer’s website.
Manually installation of the latest driver:
If the driver does not work, you can update the driver manually through the Device Manager. To update the driver, you can right-click on the device and choose “Update Driver.” If the problem persists, you can uninstall the driver and download the latest version. Then, reinstall it to fix the problem. If the new HDMI driver doesn’t work, you can manually install it by installing it from the manufacturer’s website.
NVIDIA HDMI Audio Windows drivers were collected from official vendor’s websites and trusted sources. This software will let you to fix NVIDIA HDMI Audio or NVIDIA HDMI Audio errors and make your stuff work. Here you can download all latest versions of NVIDIA HDMI Audio drivers for Windows devices with Windows 11, 10, 8.1, 8, and 7 (32-bit/64-bit). You can download all drivers for free. We check all files and test them with antivirus software, so it’s 100% safe to download. Get the latest WHQL certified drivers that works well.
NVIDIA HDMI Audio Drivers: A Comprehensive Guide
The NVIDIA HDMI Audio drivers are software programs that enable communication between the operating system on your computer and devices. These drivers play a crucial role in ensuring optimal performance and stability of your PC.
Installing the NVIDIA HDMI Audio Drivers
To install the NVIDIA HDMI Audio drivers, follow these steps:
- Visit the official website of the developer and navigate to the Drivers section.
- Use the search bar or select your device model from the list.
- Choose your operating system and click on «Search.»
- Click on the «Download» button next to the latest version of the drivers compatible with your system.
- Once downloaded, double-click on the installer file and follow the on-screen instructions to complete the installation process.
Updating the NVIDIA HDMI Audio Drivers
To update the NVIDIA HDMI Audio drivers, you can follow these steps:
- Open the Device Manager on your computer.
- Expand the category and locate your NVIDIA HDMI Audio driver.
- Right-click on the driver and select «Update Driver.»
- Choose the option to search for updated driver software automatically.
- If an update is available, follow the prompts to download and install it.
Reinstalling the NVIDIA HDMI Audio Drivers
If you need to reinstall the NVIDIA HDMI Audio drivers for any reason, here’s what you can do:
- Open the Device Manager on your computer.
- Expand the necessary category and locate your NVIDIA HDMI Audio driver.
- Right-click on the driver and select «Uninstall device.»
- Follow the prompts to complete the uninstallation process.
- Visit the official developer website and download the latest version of the driver for your needs.
- Run the installer and follow the instructions to complete the installation process.
Rolling Back or Downgrading the NVIDIA HDMI Audio Drivers
If you encounter any issues with the latest version of the NVIDIA HDMI Audio drivers, you can roll back or downgrade to a previous version by following these steps:
- Open the Device Manager on your computer.
- Expand the necessary category and locate your NVIDIA HDMI Audio driver.
- Right-click on the driver and select «Properties.»
- Go to the «Driver» tab and click on «Roll Back Driver.»
- Follow the prompts to complete the process.
Uninstalling the NVIDIA HDMI Audio Drivers
If you need to uninstall the NVIDIA HDMI Audio drivers completely, here’s what you can do:
- Open the Device Manager on your computer.
- Expand the necessary category and locate your NVIDIA HDMI Audio driver.
- Right-click on the driver and select «Uninstall device.»
- Follow the prompts to complete the uninstallation process.
- Restart your computer.
It is essential always to have the latest version of the NVIDIA HDMI Audio drivers installed for optimal performance and stability.
Уже подготовил несколько инструкций по подключению телевизора к компьютеру по HDMI кабелю, и заметил, что есть одна очень популярная проблема, с которой сталкиваются многие. Проблема заключается в том, что после подключения телевизора к компьютеру, или ноутбуку, нет звука на телевизоре. То есть, звук не воспроизводится через HDMI кабель, а продолжает звучать с динамиков ноутбука, или акустической системы.
Мы знаем, что через HDMI кабель, звук передается. Значит, он должен звучать с динамиков телевизора. Да и как правило, звук на телевизоре намного лучше и качественнее, чем на том же ноутбуке. Поэтому, есть смысл все таки настроить звук через HDMI кабель на телевизоре. Я когда писал инструкции по подключению, сам сталкивался с проблемой, когда не было звука на телевизоре. Но эта проблема решается очень просто. Нужно всего лишь сменить некоторые настройки на вашем ноутбуке, или ПК. Причем, в Windows 7 и Windows 10 эти настройки практически одинаковые. А если у вас Windows 11, то смотрите отдельную статью: Windows 11 не выводит звук через HDMI на телевизор или монитор.
Сразу даю ссылки на подробные статьи, по подключению телевизора по HDMI:
- Как подключить ноутбук к телевизору через HDMI? На примере телевизора LG
- Как в Windows 10 подключить телевизор к ноутбуку по Wi-Fi, или HDMI кабелю?
Кстати, в этих статьях, я писал о проблемах со звуком. Там все подробно описано. В одной статье на примере Windows 7, а во второй, на примере Windows 10.
Настройка звука по HDMI для телевизора в Windows 7 и Windows 10
В Windows 10, эти настройки выглядят точно так же.
Соедините свой компьютер с телевизором с помощью HDMI кабеля. Выберите на телевизоре нужный HDMI вход в качестве источника, что бы появилось изображение с компьютера. Проверьте, не скручен и не выключен ли звук на самом телевизоре.
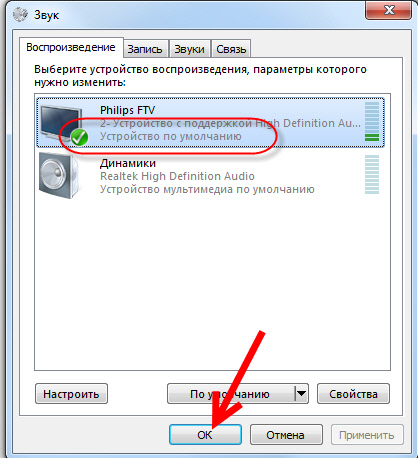
Дальше, на компьютере, нажмите правой кнопкой мыши на значок управления звуком на панели уведомлений. Выберите пункт «Устройств воспроизведения».

Чтобы открыть эти настройки в Windows 10, нужно сначала зайти в параметры звука и там уже перейти в «Панель управления звуком».

Дальше параметры отличаться не будут.
В новом окне, в списке доступных устройств, вы увидите свой телевизор, или устройство «Цифровое аудио (HDMI)». У меня, например, Philips. У вас там может быть написано LG, Samsung, Sony и т. д. Нажмите на него правой кнопкой мыши, и выберите «Использовать по умолчанию».

Все, звук заработает на телевизоре. Выбранное нами устройство, будет использоваться по умолчанию. Нажмите Ok, что бы закрыть окно.
Как видите, нужно было просто сменить устройство воспроизведения, и звук сразу начал звучать с телевизора. Таким же способом, можно обратно переключится на динамики ноутбука, или колонки. После отключения HDMI кабеля, звук автоматически будет звучать с динамиков. А при повторном подключении телевизора, звук сам будет работать по HDMI.
Если вам нужно одновременно выводить звук на колонки компьютера и динамики телевизора, то можете попробовать настроить все по этой инструкции.
Проверяем Контроллер High Definition Audio (Microsoft, AMD, NVIDIA, Intel)
В комментариях Андрей поделился информацией, что у него телевизор Samsung (думаю, без разницы какой ТВ), тоже не отображался в списке «Устройства воспроизведения».
Проблема оказалась в контроллере High Definition Audio (Microsoft), который по какой-то причине был отключен в диспетчере устройств.
Поэтому, идем в диспетчер устройств, открываем вкладку «Системные устройства», находим там «Контроллер High Definition Audio (Microsoft)» и смотрим, нет ли возле него каких-то значков. Если есть, нажимаем правой кнопкой мыши и пробуем включить.
Так же можно открыть свойства, и посмотреть, нормально ли работает это устройство. В крайнем случае можно его отключить, перезагрузить компьютер и заново включить. Удалять не советую. Нет гарантии, что после перезагрузки он будет установлен автоматически. Можно вообще без звука остаться. Не только по HDMI.

Так же проверьте вкладку «Звуковые, игровые и видеоустройства». Там может быть адаптер «NVIDIA High Definition Audio», или AMD. Это уже зависит от установленной видеокарты.

У меня, например, монитор с колонками подключен по HDMI отображается на вкладке «Аудиовходы и аудиовыходы». Обязательно смотрим эту вкладку. Может там отображается телевизор, который по HDMI подключен и на который звук не выводится. В моем случае, это «Аудио Intel для дисплеев».

Так что обязательно проверяем эти три раздела в диспетчере устройств. Может у вас там действительно какой-то адаптер отключен и из-за этого все проблемы со звуком на телевизоре, или мониторе.
Обновление: кабель подключен в порт HDMI (DVI) v1.3, через который звук не передается
Отвечая на комментарий посетителя к другой статье (которая связанная с проблемами вывода изображения по HDMI), выяснил один интересный момент.
Обычно, возле HDMI-входа на телевизоре, кроме номера порта в скобках указана еще дополнительная информация (DVI, STB, ARC, MHL). В большинстве случаев эти порты отличаются некоторым функционалом. Но сейчас не об этом. Нас интересует порт HDMI (DVI). Этот порт предназначен для подключения компьютеров и ноутбуков, когда телевизор выступает в роли монитора, где вывод звука вроде как не нужен.
Так вот, если в вашем телевизоре порт HDMI (DVI) версии 1.3 и вы в этот порт подключили компьютер, то звук выводится не будет! В HDMI версии 1.4 этот порт уже получил поддержку вывода звука.
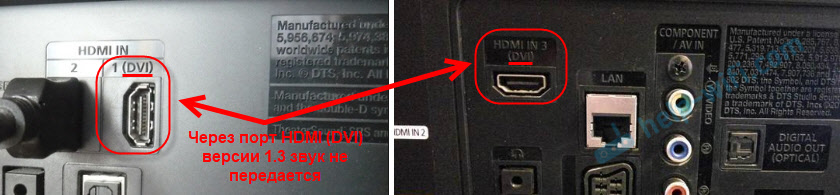
Я подумал, что это может быть причиной проблемы, решению которой посвящена эта статья. Особенно на устаревших телевизорах. Подключите кабель в другой порт. Который подписан просто HDMI IN, или HDMI (STB).
Обновление: включаем отображение отключенных и отсоединенных устройств
В комментариях подсказали еще один способ. Откройте «Устройств воспроизведения», и нажмите правой кнопкой мыши на пустую область в окне. Поставьте галочки возле двух пунктов: «Показать отключенные устройства» и «Показать отсоединенные устройства».

Обновление: переустановка драйвера
В комментариях Виталий посоветовал способ, который помог ему решить эту проблему. И судя по отзывам помог не только ему.
Суть заключается в том, чтобы обновить драйвер (видео, аудио) через программу DriverPack Solution с подключенным по HDMI телевизором. Честно говоря, я против этих программ. Они могут такой драйвер подсунуть, что потом не разгребешь. Но если это помогает, и народ пишет что все работает, то решил добавить этот способ в статью.
Обновление: удаляем звуковую карту в диспетчере устройств
Еще один совет из комментариев. Сам я это не проверял, но есть отзывы, что способ рабочий.
Телевизор должен быть подключен к компьютеру, или ноутбуку. Дальше нужно зайти в диспетчер устройств, и открыть там вкладку «Звуковые, игровые и видеоустройства». Там должны быть звуковые адаптеры, которые нужно удалить (пробуйте по очереди). В зависимости от компьютера (ноутбука), названия могут отличатся. У меня это скорее всего «Аудио Intel(R) для дисплеев», или «Realtek High Definition Audio».
Просто нажимаем на адаптер правой кнопкой мыши и выбираем «Удалить». Когда устройство будет удалено, нажимаем на кнопку «Обновить конфигурацию оборудования». Или перезагрузите компьютер.

После этого адаптер должен установится заново, а звук на телевизоре по HDMI должен заработать.
Обновление: диагностика неполадок
Подключите свой телевизор к компьютеру по HDMI кабелю. Проверьте все советы, о которых я писал выше. Если ничего не помогает, то нужно запустить диагностику неполадок. Это можно сделать через панель управления в Windows 10, 8, 7 (Панель управления\Все элементы панели управления\Устранение неполадок\Оборудование и звук). Или нажав правой кнопкой мыши на значок звука и выбрав «Диагностика неполадок со звуком».

Возможно, Windows обнаружит и исправит некоторые неполадки. После этого выполните действия, о которых я писал в начале этой статьи.
Обновление: отключите Блютуз
В комментариях поделились очередным решением. Помогло отключение Bluetooth на ноутбуке. После этого звук на телевизоре появился. Как это вообще может быть связано – не знаю. Можно попробовать отключить Bluetooth в настройках системы, или же отключить адаптер в диспетчере устройств.
Обновление: смена режима загрузки в BIOS
Казалось бы, как может быть связана передача звука по HDMI с каким-то там режимом загрузки, который устанавливается в BIOS. Но в комментариях поделились решением, и судя по отзывам, оно работает. Проверено только на ноутбуке Lenovo. Но это не значит, что на других не работает.
Если в настройках BIOS установлен режим загрузки Legacy Support» и «Legacy First», то звука через HDMI может не быть.
Решение – установить режим загрузки UEFI. Выглядит это примерно так:

Если не можете разобраться с настройками, то найдите инструкцию для своего производителя ноутбука. Можно использовать такой запрос (для примера): «как включить UEFI на ASUS».
Если у вас остались какие-то вопросы по этой статье, то задавайте их в комментариях. Удачи!