Try clearing the Windows Defender/Security scan history files
by Sagar Naresh
Sagar is a web developer and technology journalist. Currently associated with WindowsReport and SamMobile. When not writing, he is either at the gym sweating it out or playing… read more
Updated on
- Windows Defender is an in-built security system on Windows PC that protects you from unwanted threats.
- The protection history lets you view the blocked programs and allows you to unblock the ones that you trust.
- Some users have reported that for them the protection history isn’t showing anything.
- You can try to resolve this issue by resetting or re-registering Windows Security.
XINSTALL BY CLICKING THE DOWNLOAD
FILE
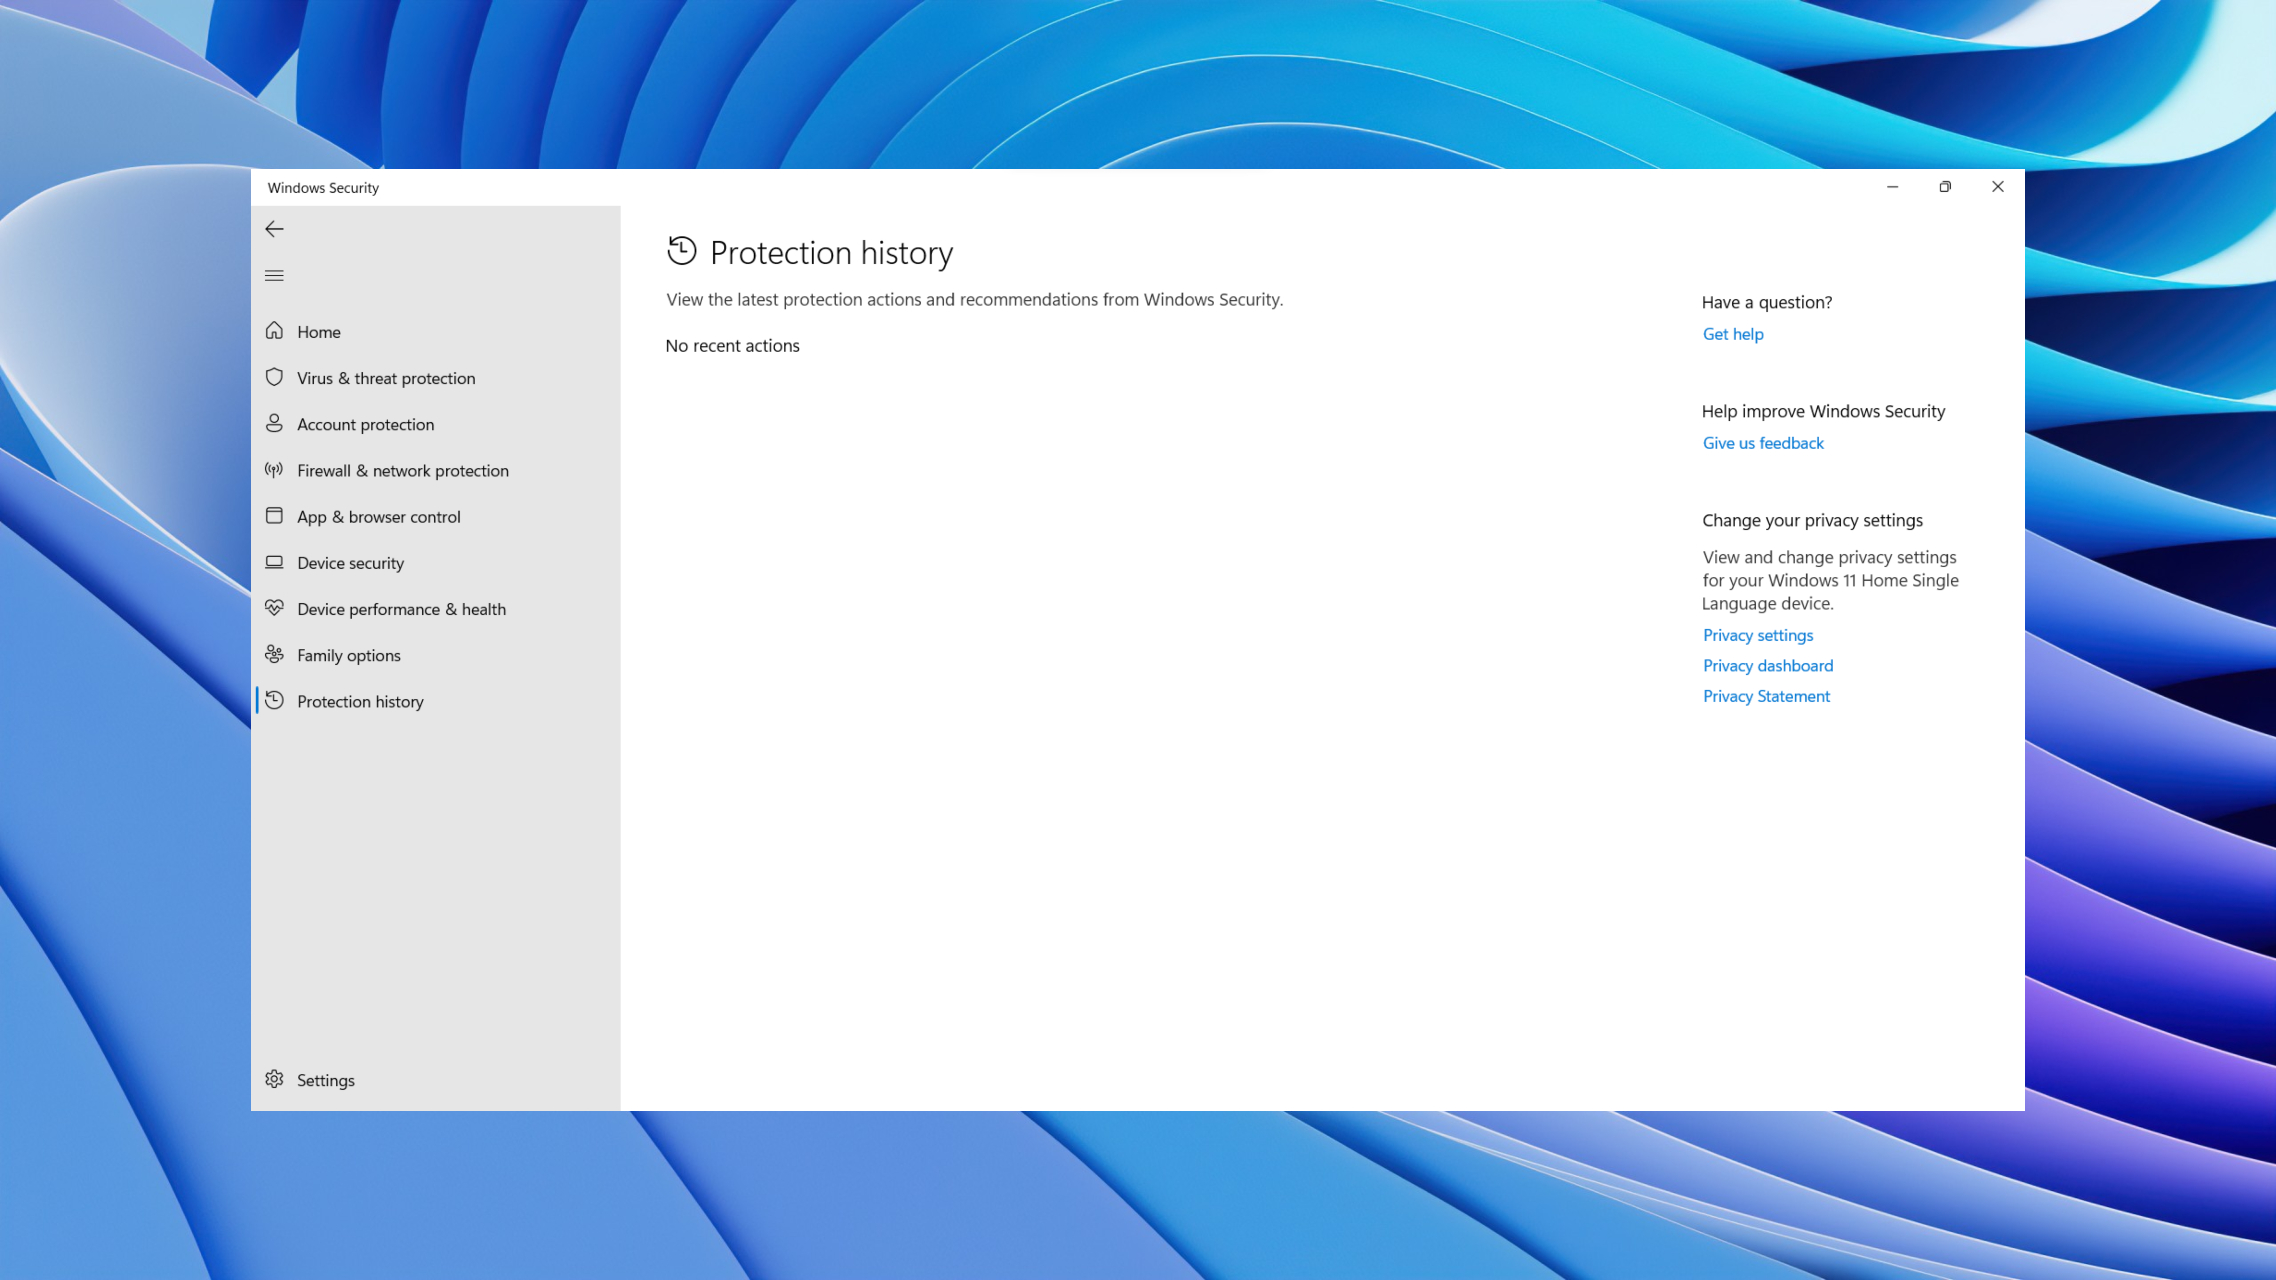
Several users have reported that the Windows Security protection history is missing or empty for them. Notably, the protection history shows nothing and it is blank. However, the users are getting notifications that the programs are being blocked.
This annoying issue prevents the users from unblocking the mistakenly blocked programs. If you are also experiencing the same issue, this guide is for you. Here we will share with you a bunch of solutions to resolve the Windows 11 protection history empty issue.
Why is the Windows 11 Security protection history empty or missing?
We did some digging and found a bunch of reasons which is why the Windows 11 Security protection history is empty, missing, or not working.
- Updates aren’t installed: If your PC isn’t updated, then chances are an underlying bug is causing the Windows Security protection history to be empty or missing.
- Corrupt system files: Chances are the important system files are corrupt or missing from your PC causing the programs to misbehave.
- Windows Defender issue: Often, programs can run into trouble if a third-party app or something else has changed important files related to Windows Defender.
- Corrupt Defender history files: Users have also pointed out that because of the presence of corrupt Defender history files, they weren’t able to see anything inside the protection history.
Let us now apply the solutions and fix the issue of the Windows Defender protection history empty.
How can I resolve the Windows Defender protection history empty problem?
- Why is the Windows 11 Security protection history empty or missing?
- How can I resolve the Windows Defender protection history empty problem?
- 1. Install the latest updates
- 2. Delete Defender scans history
- 3. Re-register Windows Defender
- 4. Run the system file checker
- 5. Reset Windows Defender/Security
- Where is the protection history in Windows Defender and how to clear it?
1. Install the latest updates
- Press the Win + I keys to open the Settings menu.
- Click on Windows Update on the left.

- Hit the Check for updates button.

- Click on the Download and Install option to get the latest updates.
- Restart your PC.

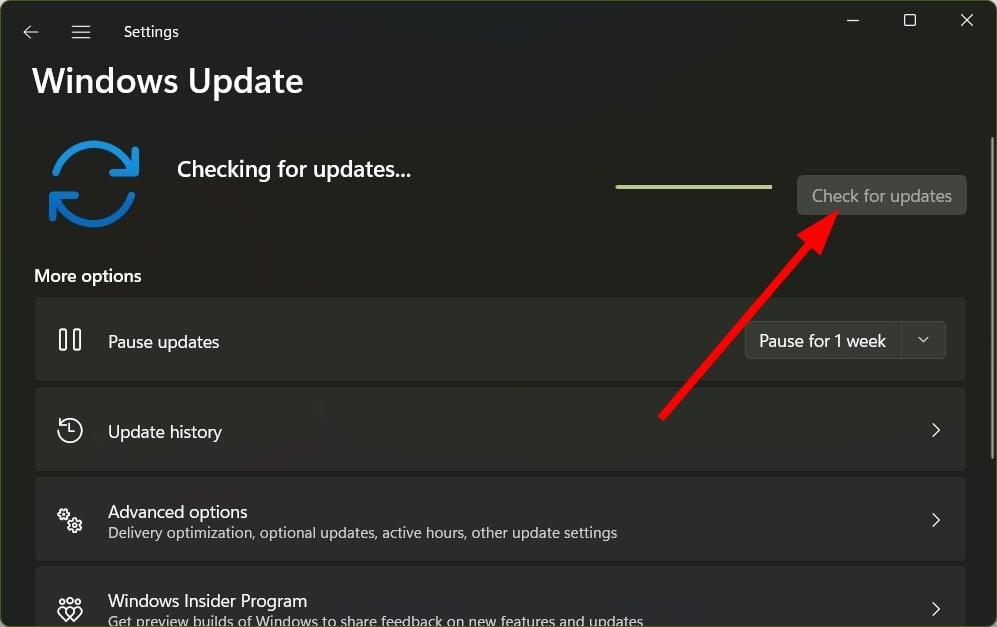
You should ensure that your PC is running the latest update. Updates not only bring new features for you but also lets you fix the bugs that are associated with the programs. You can install the latest update and check if this resolves the Windows 11 protection history empty issue.
How we test, review and rate?
We have worked for the past 6 months on building a new review system on how we produce content. Using it, we have subsequently redone most of our articles to provide actual hands-on expertise on the guides we made.
For more details you can read how we test, review, and rate at WindowsReport.
2. Delete Defender scans history
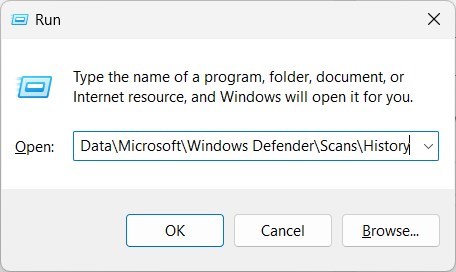
- Press the Win + R keys to open the Run dialogue.
- Type C:\ProgramData\Microsoft\Windows Defender\Scans\History and click on OK.

- Open the Service Folder.
- Press Ctrl + A to select all files.

- Hit the Delete button on your keyboard.
- Restart your PC.
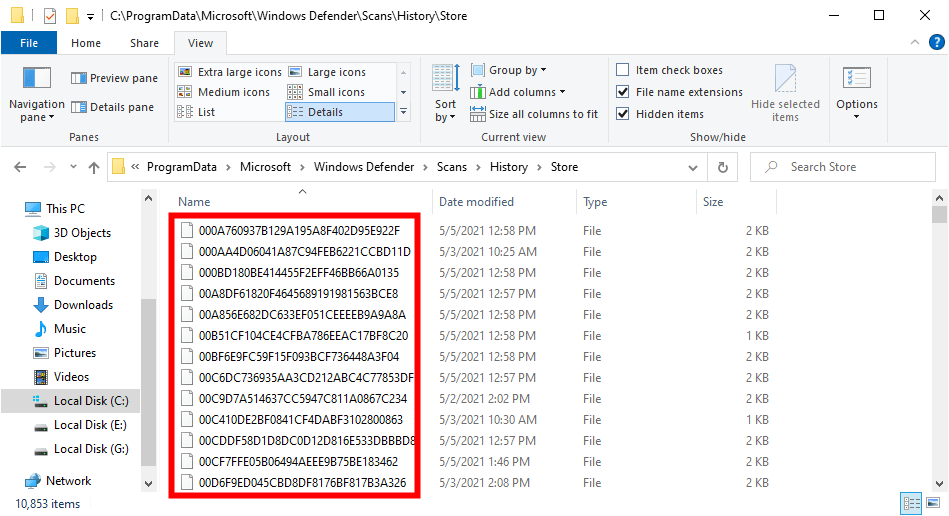
This solution was suggested by one user on the official Microsoft forum. Apparently, this has helped several users fix the problem of Windows Defender protection history empty.
- Fix: Monitor is Stuck at 60Hz on Windows 11
- Fix: EXCEPTION_ILLEGAL_INSTRUCTION Error on Windows 11
- Delayed Write Failed Error on Windows 11: How to Fix it
3. Re-register Windows Defender
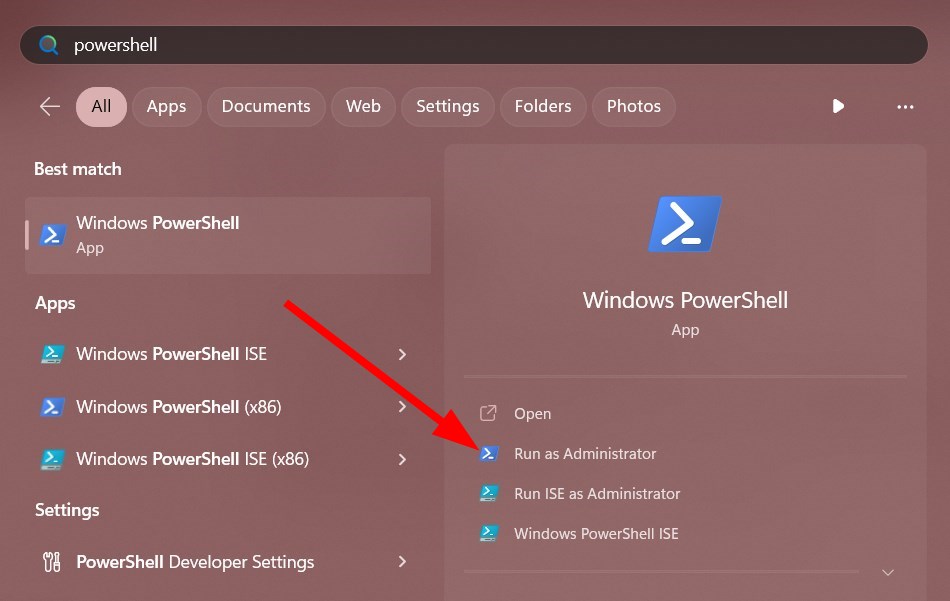
- Open the Start menu by pressing the Win key.
- Open Windows PowerShell as an admin.

- Type the below command and press Enter.
Get-AppxPackage Microsoft.SecHealthUI -AllUsers | Reset-AppxPackage
- After the process completes, reboot your PC
- Open the Start menu by pressing the Win key.
- Open Windows PowerShell as an admin.
- Type the below command and press Enter.
Add-AppxPackage -Register -DisableDevelopmentMode "C:\Windows\SystemApps\Microsoft.Windows.SecHealthUI_cw5n1h2txyewy\AppXManifest.xml" - Once the process finishes, close the PowerShell.
- Restart your PC.

This solution was also suggested by one user on the Microsoft Forums, and it has helped users overcome the Windows Security protection history missing problem. You can also follow the above steps and check if this helps you resolve the issue or not.
4. Run the system file checker
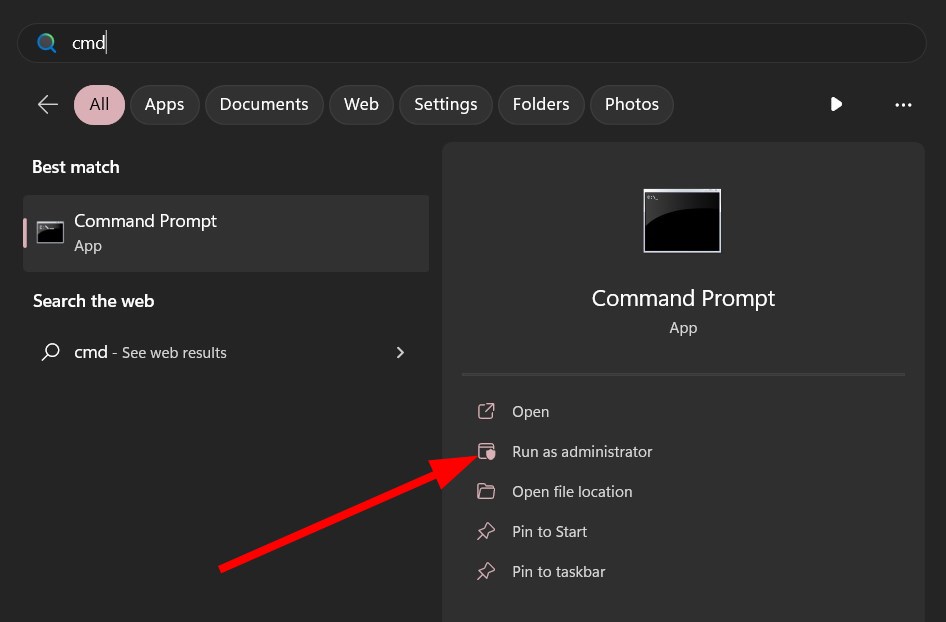
- Press the Win key to open the Start menu.
- Open Command Prompt as an admin.

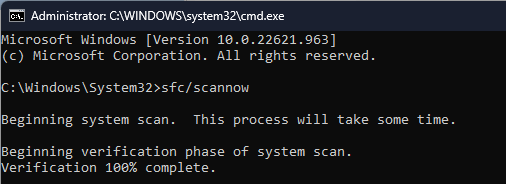
- Type the below command and press Enter.
sfc /scannow
- Wait for the process to complete.
- Type the below commands and press Enter after each one.
DISM /Online /Cleanup-Image /CheckHealthDISM /Online /Cleanup-Image /ScanHealthDISM /Online /Cleanup-Image /RestoreHealth - Restart your PC.
You can fix the corrupt or missing system files using the built-in functions such as SFC Scan and DISM commands.
However, often these aren’t that effective in solving issues. For such situations, we advise you to use a dedicated tool named Fortect. With this tool, you will be able to fix Windows errors, fix BSoD errors, or even detect and remove malware from your PC.
⇒ Get Fortect
5. Reset Windows Defender/Security
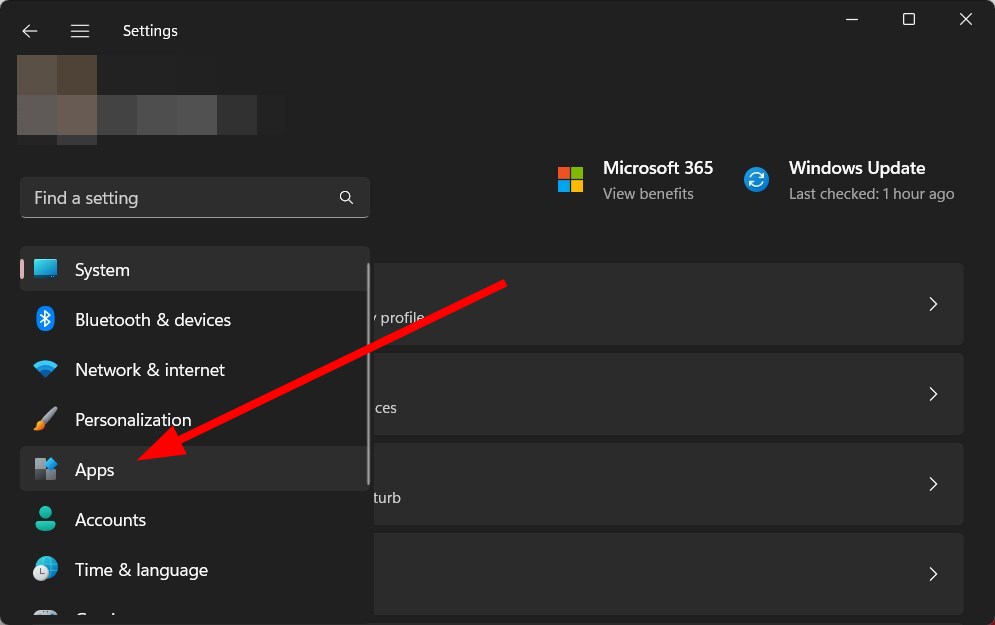
- Press the Win + I keys to open the Settings menu.
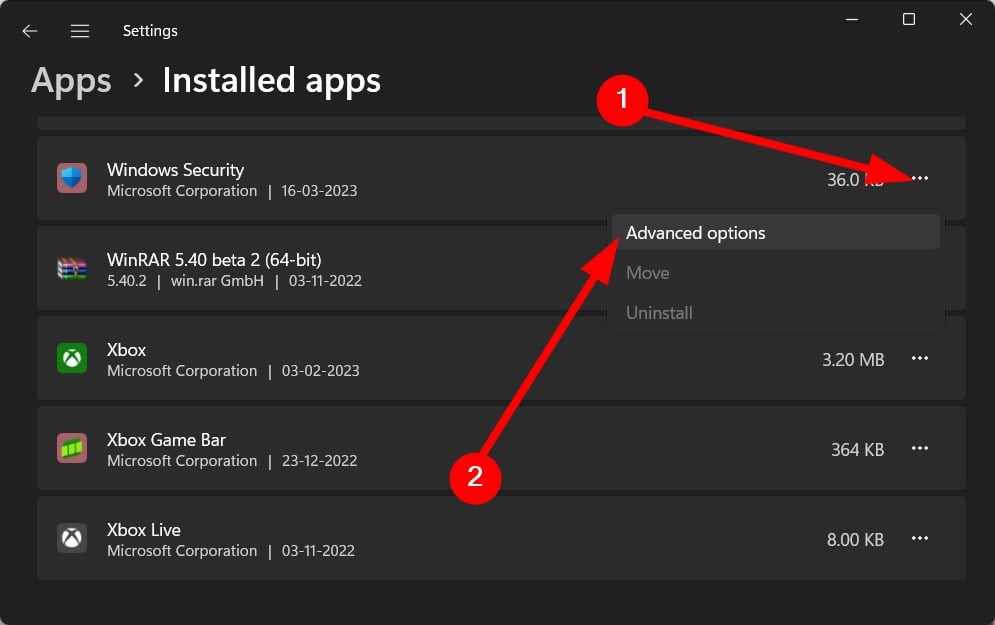
- Click on Apps.
- Select Installed apps.
- Locate Windows Security.
- Click on the 3-dot icon and select Advanced options.
- Scroll down and hit the Reset button.
- Click on Reset again.
- Restart your PC.

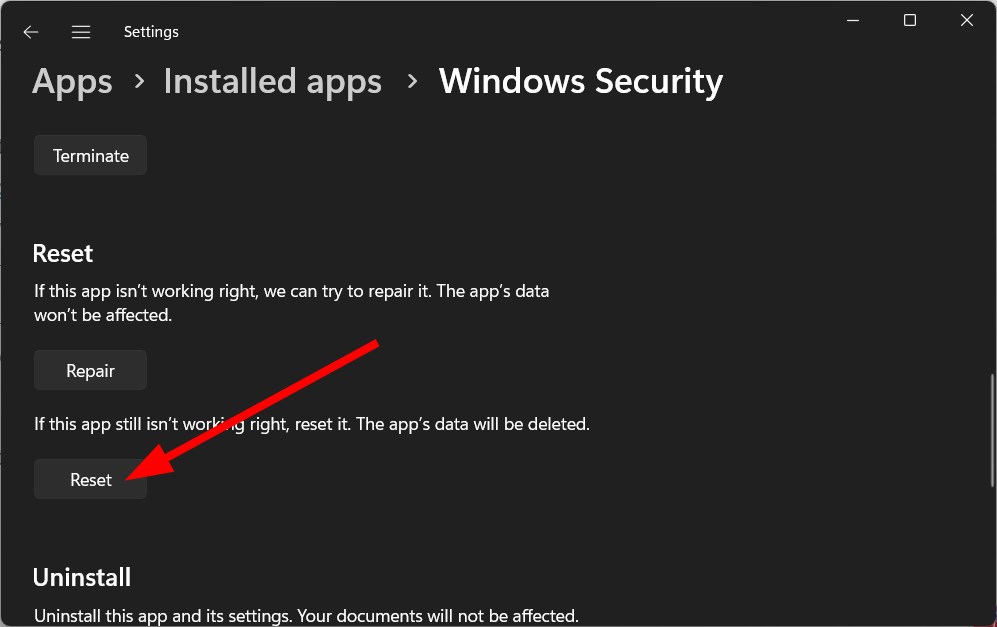
Resetting the Windows Defender or Security will re-install all the files from scratch. This would also negate any other issues with the program as well.
Where is the protection history in Windows Defender and how to clear it?
- Press the Win + I key to open the Settings menu.
- Select Update & Security.

- Click on Windows Security on the left.
- Select Virus & threat protection.
- Click on Threat history.
- Hit the Remove all button.


That is it from us in this guide. The above steps guide you on how to clear your protection history in Windows Security or Windows Defender. For users coming across Windows Defender scan issues, we have a guide that lists some effective solutions to fix the problem.
Recently users have started reporting getting the Microsoft Defender threat service has stopped the problem. This annoying error can be resolved by following the dedicated guide.
Several users have also pointed out the Windows Defender Engine unavailable issue. We have a guide that explains in detail what this error means and how you can fix it.
Let us know in the comments below which one of the above solutions resolved the Windows Security protection history missing problem
![]()
Журнал защиты Windows 10 отображает информацию о действиях защиты компьютера, таких как блокировка программ, контроль доступа и действия антивирусных программ. Если журнал защиты Windows 10 пустой, это может быть связано с несколькими причинами:
1. Журнал защиты отключен. Для включения журнала следуйте инструкциям:
— Нажмите на клавиатуре комбинацию клавиш Win + R и введите «services. msc» в поле «Выполнить». Нажмите «ОК».
— Найдите службу «Журнал событий Windows», щелкните правой кнопкой мыши и выберите «Свойства».
— В разделе «Состояние службы» нажмите кнопку «Запустить», а затем установите тип запуска на «Автоматически».
— Нажмите на кнопку «Применить» и «ОК».
2. Журнал заполнен. Если в журнале защиты уже есть записи, он может просто быть заполнен до предела. В таком случае требуется очистить журнал.
— Нажмите на клавиатуре комбинацию клавиш Win + X и выберите «Панель управления».
— Выберите «Администрирование» и затем «Журналы событий».
— Щелкните правой кнопкой мыши на журнале защиты, выберите «Свойства» и перейдите на вкладку «Общие».
— Нажмите на кнопку «Очистить журнал», а затем подтвердите удаление записей.
3. Не установлены антивирусные программы. Журнал защиты может оставаться пустым, если на компьютере не установлены антивирусные программы или они не работают правильно. Установите надежный антивирус и проверьте его настройки.
4. Неисправность жесткого диска. Если журнал защиты всегда пуст, возможно, на жестком диске возникают ошибки, которые мешают правильной работе системы. В этом случае обратитесь к специалисту для проверки жесткого диска.
Если ни одно из вышеперечисленных решений не помогло, следует обратиться за помощью к специалисту.
Журнал защиты — это часть приложения «Безопасность Windows», в котором отображаются действия и рекомендации по угрозам в Windows 11 и 10. На странице представлены элементы, помещенные в карантин, элементы, удаленные, удаленные элементы, разрешенные элементы, удаленные элементы, заблокированные действия и серьезность угрозы. Параметр «Заблокированные действия» имеет 3 подменю: «Блокировать доступ к папке», «Заблокированные элементы» и «Блокировать на основе правил». Точно так же параметр «Серьезность» имеет 4 элемента: «Тяжелая высокая», «Умеренная» и «Низкая». Но иногда люди жалуются на отсутствие истории защиты.
История защиты Защитника Windows пуста или пуста, и на странице ничего не видно, когда возникает проблема. Сразу после запуска «Быстрого сканирования», «Полного сканирования», «Выборочного сканирования» или «Автономного сканирования Microsoft Defender» пользователь обычно переходит к истории защиты. Но он разочаровывается и обнаруживает себя из ниоткуда, когда оказывается незанятым, потому что он не может узнать статус угроз или устранить их на своем компьютере с Windows 11. К счастью, есть решения этой проблемы. См. — Исправление: пустые, пустые или отсутствующие параметры программы предварительной оценки в Windows 10.
Вот как исправить историю защиты, отсутствующую в Windows 11 или 10 —
Способ 1: отключить Защитник Windows и перезагрузить компьютер
Чтобы нормально получить доступ к соответствующим настройкам, вы можете пройти — Как просмотреть историю защиты в Windows 10, но в этом случае содержимое этой страницы отсутствует. Отключение Защитника Windows и удаление файлов mpcache работает как чудо, чтобы решить проблему —
- Ударил – Окна и р.
- Тип – cmd.exe.
- Нажимать Ctrl + Сдвиг + Входить.
- Выбирать Да когда откроется всплывающее окно настройки контроля учетной записи пользователя.
- Введите последовательно следующие команды и нажмите Enter.
del “C:\ProgramData\Microsoft\Windows Defender\Scans\History\Service\DetectionHistory\*” del “C:\ProgramData\Microsoft\Windows Defender\Scans\mpenginedb.db”
- Нажмите на Поиск.
- Тип Безопасность Windows.
- Нажимать Входить.
- Выбирать – Защита от вирусов и угроз.
- Теперь нажмите на Управление настройками связь.
- На следующей странице отключите Защита в режиме реального времени и Облачная защита.
- Теперь откройте Проводник (Win+E).
- Перейдите на диск (C:).
- Дважды щелкните по Данные программы.
- Открыть Майкрософт папка.
- Входить Защитник Windows и запуск Сканы папка.
- Путь будет следующим –
C:\ProgramData\Microsoft\Защитник Windows\Сканирование
- Найти все файлы с префиксом mpcache и удалите их.
- На моем компьютере Сканы папка имеет следующие файлы, которые я удаляю –
mpcache-8B71EC38EE6CA744C8B3D9719F943BEFDB9392A9.bin mpcache-8B71EC38EE6CA744C8B3D9719F943BEFDB9392A9.bin.01 mpcache-8B71EC38EE6CA744C8B3D9719F943BEFDB9392A9.bin.6C mpcache-8B71EC38EE6CA744C8B3D9719F943BEFDB9392A9.bin.7C mpcache-8B71EC38EE6CA744C8B3D9719F943BEFDB9392A9.bin.7E mpcache-8B71EC38EE6CA744C8B3D9719F943BEFDB9392A9.bin.67 mpcache-8B71EC38EE6CA744C8B3D9719F943BEFDB9392A9.bin.79 mpcache-8B71EC38EE6CA744C8B3D9719F943BEFDB9392A9 .bin.80 mpcache-8B71EC38EE6CA744C8B3D9719F943BEFDB9392A9.bin.83 mpcache-8B71EC38EE6CA744C8B3D9719F943BEFDB9392A9.bin.87 mpcache-8B71EC38EE6CA744C8B3D9719F943BEFDB9392A9.bin.A0 mpcache-8B71EC38EE6CA744C8B3D9719F943BEFDB9392A9.bin.DB mpcache-8B71EC38EE6CA744C8B3D9719F943BEFDB9392A9.bin.E6
- Иногда вы не сможете удалить файлы mpcache и получите сообщение «Действие не может быть выполнено, так как файл открыт в антивирусной службе Microsoft Defender».
- В этом случае нажмите Ctrl+Shift+Esc.
- В диспетчере задач найдите процессы, связанные с Widows Security и Защитником Windows.
- Щелкните правой кнопкой мыши на каждом из них и выберите Завершить задачу.
- Теперь попробуйте удалить файлы mpcache.
- Перезагрузите компьютер, если вы можете восстановить отсутствующую историю защиты в Защитнике Windows.
Способ 2: удалить файлы mpcache с помощью команды cmd, чтобы исправить отсутствующую историю угроз безопасности Windows.
II вы не можете удалить файлы mpcache даже после отключения защиты в реальном времени и использования «Завершить задачу» в диспетчере задач, тогда может помочь команда cmd.
- Запустите командную строку от имени администратора (шаги указаны в первом способе)
- Введите следующую команду –
del “C:\ProgramData\Microsoft\Windows Defender\Scans\mpcache*” /s > NUL 2>&1
- Наконец, перезагрузите компьютер, чтобы увидеть отсутствующую историю защиты в Windows 11 или 10.
Методы:
Способ 1: отключить Защитник Windows и перезагрузить компьютер
Способ 2: удалить файлы mpcache с помощью команды cmd
Вот и все!!
Безопасность Windows предлагает встроенную защиту для систем Windows, чтобы обеспечить безопасность вашего компьютера и файлов без дополнительных затрат. Однако иногда, когда вы пытаетесь открыть приложение, он показывает пустой экран.
Защитник Windows обычно подвержен уязвимости из-за наличия другого антивируса на вашем компьютере. Здесь мы обсудим несколько шагов по устранению неполадок, которые помогут вам быстро решить эту проблему в Windows 10.
Как упоминалось ранее, безопасность Windows обычно снижается, если на вашем компьютере установлен сторонний антивирус. И когда вы удаляете антивирус, важно использовать его инструмент удаления, чтобы полностью завершить работу.
Отключенная или отсутствующая антивирусная служба Защитника Windows в службах также может вызвать эту проблему. В таких случаях вам, возможно, придется выполнить ремонтное обновление, чтобы устранить проблему. Повреждение системного файла – еще одна распространенная причина этой проблемы, и для ее решения может потребоваться выполнить обновление, сброс настроек или чистую установку.
Если у вас возникла эта проблема, вот как ее устранить и устранить навсегда.
1. Перезапустите службу центра обеспечения безопасности Windows.
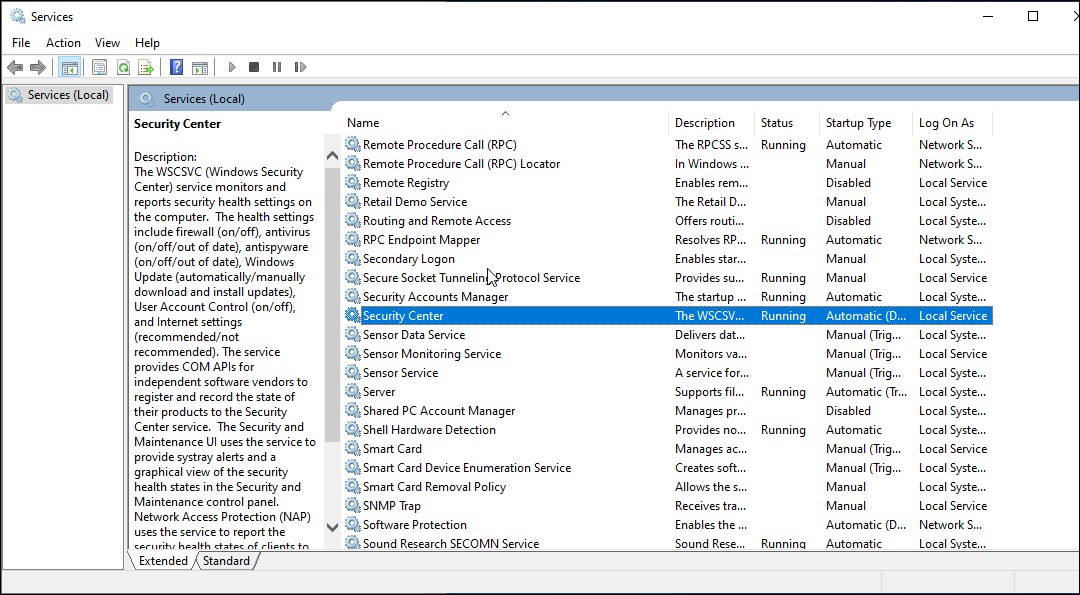
Служба Windows Security Center является важным аспектом ОС. Он обнаруживает и уведомляет пользователей об ожидающих обновлениях и проблемах безопасности, таких как отключенный антивирус и т. Д. Если служба закрыта или настроена на запуск вручную, попробуйте перезапустить ее, чтобы посмотреть, поможет ли это.
Чтобы перезапустить службу Windows Security Center:
- Нажмите Win + R, чтобы открыть Выполнить .
- Введите services.msc и нажмите ОК.
- В окне « Службы» прокрутите вниз и найдите службу « Центр безопасности» .
- Проверить статус услуги. Если он не запущен, щелкните правой кнопкой мыши и выберите «Перезагрузить».
- Закройте службы и проверьте наличие улучшений.
2. Проверьте наличие ожидающих обновлений Windows.
Если ошибка или сбой вызывают сбои в работе системы безопасности Windows, проверьте, доступно ли исправление в обновлениях Windows.
Чтобы проверить и загрузить обновления Windows:
- Перейдите в Пуск> Настройки> Обновления Windows.
- Нажмите Проверить наличие обновлений.
- Затем загрузите и установите все ожидающие обновления.
- Перезагрузите компьютер и проверьте, решена ли проблема.
3. Обратитесь к администратору.
Если вы используете рабочий компьютер, возможно, администратор заблокировал доступ к некоторым настройкам Windows 10. Проверьте записи групповой политики и реестра, чтобы найти и исправить любые проблемы с безопасностью Windows.
Если возможно, попробуйте выполнить обновление на месте до последней доступной версии. Обновление с Windows 10 до 11 приведет к переустановке ОС без удаления ваших приложений и файлов.
4. Запустите средство проверки системных файлов.
Поврежденные системные файлы могут привести к прекращению работы одной или нескольких функций в Windows 10. Средство проверки системных файлов, развернутое с помощью команды sfc / scannow, просканирует все защищенные системные файлы и заменит поврежденные новой кэшированной копией.
Чтобы запустить средство проверки системных файлов:
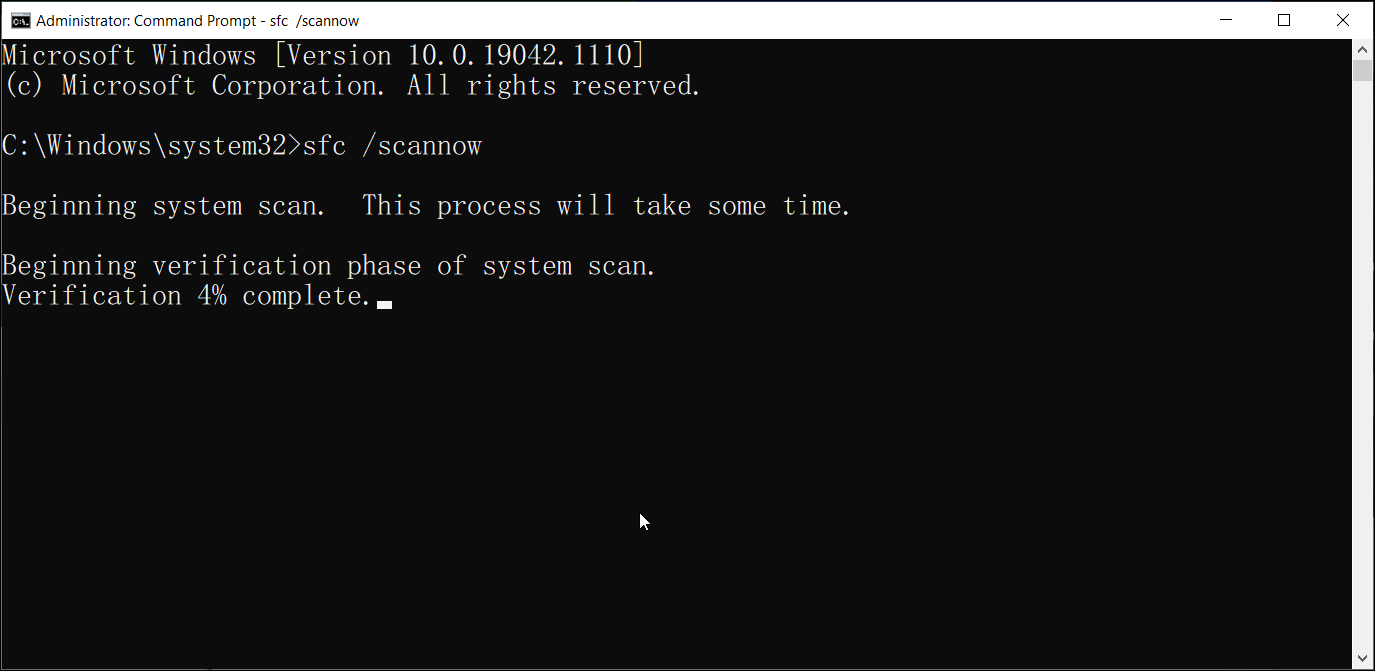
- Введите cmd в строку поиска Windows.
- Щелкните правой кнопкой мыши параметр « Командная строка» и выберите « Запуск от имени администратора».
- В окне командной строки введите следующую команду и нажмите ввод:
sfc /scannow - Процесс проверки может занять некоторое время, поэтому подождите, пока он не будет завершен на 100%.
После завершения процесса вы получите одно из следующих сообщений:
- Защита ресурсов Windows не обнаружила нарушений целостности. Это означает, что средство проверки системных файлов не обнаружило никаких проблем с вашими системными файлами.
- Защита ресурсов Windows обнаружила поврежденные файлы и успешно их восстановила.
- Защита ресурсов Windows обнаружила поврежденные файлы, но не смогла исправить некоторые из них.
- Windows Resource Protection не смогла выполнить запрошенную загрузку – в этом случае запустите средство проверки системных файлов в безопасном режиме, чтобы устранить эту ошибку.
Если ошибка обнаружена и исправлена, перезагрузите компьютер и проверьте, решена ли проблема с пустым экраном безопасности Windows.
4. Проверьте наличие стороннего антивируса.
По умолчанию Windows Security будет отключена при наличии стороннего антивируса. Однако это не повлияет на функциональность Window Defender.
Некоторые антивирусные программы, например Malwarebytes, позволяют отключить защиту и выйти из приложения. В противном случае вам, возможно, придется удалить антивирус, чтобы посмотреть, поможет ли это.
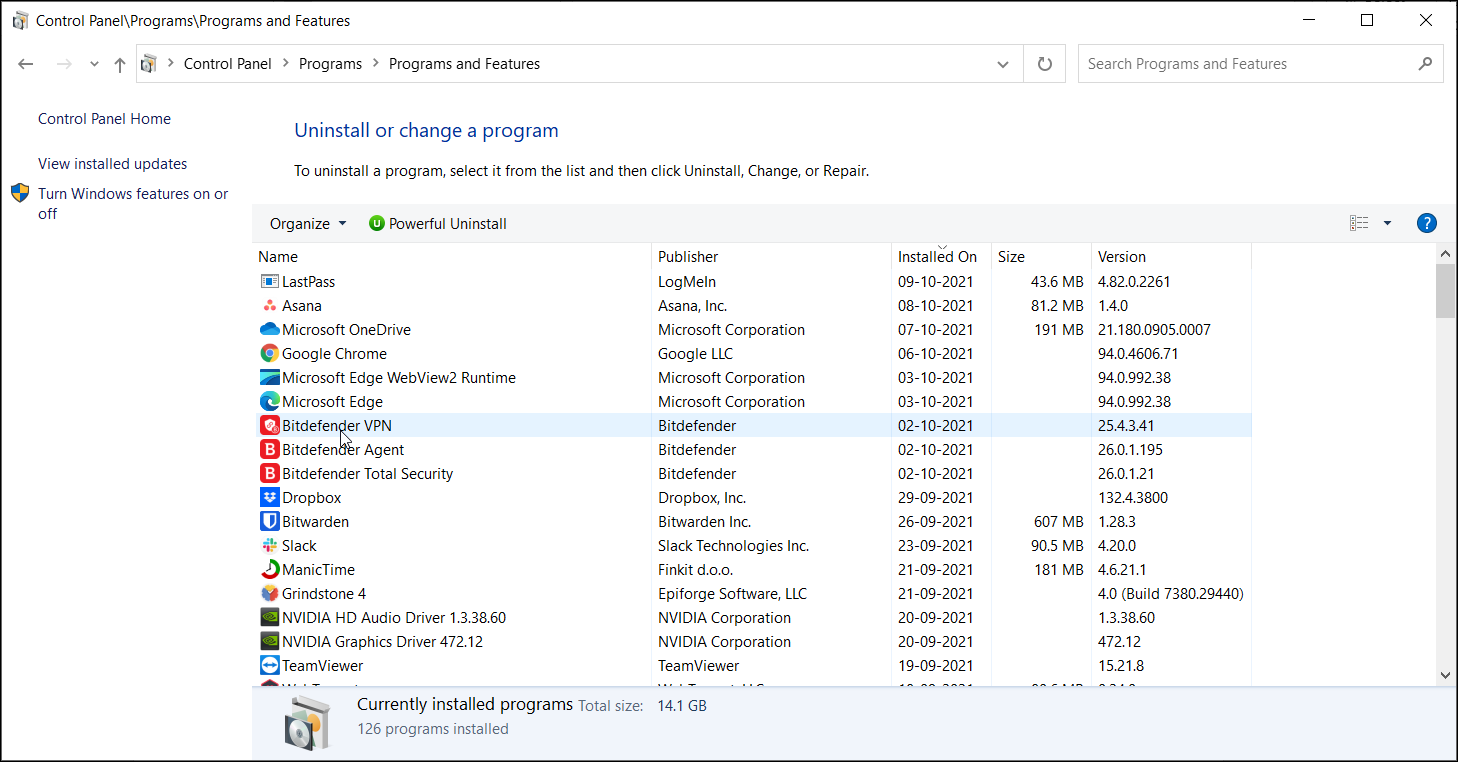
Чтобы проверить, установлен ли у вас сторонний антивирус:
- Нажмите Win + R, чтобы открыть Выполнить.,
- Введите appwiz.cpl и нажмите OK, чтобы открыть панель управления.
- Просмотрите установленные приложения и найдите любой сторонний антивирус.
Большинство антивирусных компаний предлагают инструмент для полного удаления программного обеспечения с компьютера пользователя. Перейдите на официальный сайт вашей антивирусной компании и загрузите инструмент. Запустите установщик и следуйте инструкциям на экране, чтобы удалить антивирусное программное обеспечение.
В крайнем случае выполните сброс настроек, чтобы переустановить Windows 10, не затрагивая личные файлы и папки. Однако это приведет к удалению всех сторонних приложений, установленных на вашем компьютере, поэтому обязательно создайте резервную копию, прежде чем перезагружать компьютер .
Чтобы перезагрузить компьютер:
- Зайдите в Пуск и откройте Настройки .
- Откройте Обновление и безопасность.
- Откройте вкладку Восстановление на левой панели.
- Прокрутите вниз до раздела « Расширенный запуск » и нажмите « Перезагрузить сейчас».
- Windows не загружается в среду восстановления Windows.
- Выберите Устранение неполадок, а затем нажмите Сбросить этот компьютер .
- В разделе « Сбросить этот компьютер» нажмите « Сохранить мои файлы». Этот вариант переустановит Windows 10 с сохранением ваших личных файлов. Однако он удалит сторонние приложения и настройки.
- После перезагрузки компьютера выберите учетную запись пользователя и введите пароль, связанный с вашей учетной записью Microsoft.
- Нажмите « Продолжить», чтобы продолжить.
- В разделе Как вы хотите переустановить Windows? На экране выберите один из следующих вариантов: Загрузка из облака: требуется быстрое подключение к Интернету и может использоваться до 4 ГБ данных для загрузки необходимых файлов Windows. Локальная переустановка: это позволяет переустановить Windows с существующего устройства. Выберите этот вариант, если у вас нет стабильного интернет-соединения.
- Прочтите описание, отображаемое на экране, и нажмите кнопку « Сброс» , чтобы подтвердить действие.
Процесс сброса может занять от нескольких минут до нескольких часов. Оставьте компьютер подключенным к источнику питания во время процесса сброса.
В большинстве случаев сброс компьютера до заводских настроек по умолчанию должен исправить Windows Security, показывающую проблемы с пустым экраном в системах Windows 10 и Windows 11. В противном случае вам придется выполнить чистую установку Windows 10/11 с загрузочного диска.
Исправление безопасности Windows, показывающего пустой экран в Windows 10
Безопасность Windows показывает, что проблемы с пустым экраном могут возникать из-за повреждения файла и обычно решаются с помощью восстановительной установки или обновления до последней версии ОС Windows. Перед этим попробуйте устранить неполадки, перезапустив основные службы Защитника Windows и проверив наличие стороннего антивирусного вмешательства.
Если сброс или переустановка Windows 10 невозможны, рассмотрите возможность использования специального стороннего антивирусного решения для вашей системы в качестве альтернативы Защитнику Windows.
Is your «Security at a glance» screen not actually giving you a glance? Here’s how to fix a blank Windows 10 security screen.

Windows Security offers built-in protection for Windows systems to keep your computer and files secure at no extra cost. However, at times when you try to open the app, it shows a blank screen.
Windows Defender is usually affected due to the presence of another antivirus in your PC. Here we discuss a few troubleshooting steps to help you resolve this issue in Windows 10 quickly.
Why Is Windows Security Showing a Blank Screen?
As mentioned earlier, Windows Security is usually affected if you have a third-party antivirus installed on your PC. And when you uninstall an antivirus, it is important to use its removal tool to fully complete the job.
Disabled or missing Windows Defender Antivirus Service in Services can also trigger this problem. In such instances, you may have to perform a Repair Upgrade to fix the issue. System file corruption is another common cause for this issue and may require you to perform an upgrade, reset, or clean install to resolve the issue.
If you experience this issue, here is how to troubleshoot and fix the problem for good.
1. Restart Windows Security Center Service
The Windows Security Center service is an essential aspect of the OS. It detects and notifies the users about the pending updates and security issues such as disabled antivirus, etc. If the service is closed or set to run manually, try restarting it to see if that helps.
To restart Windows Security Center Service:
- Press Win + R to open Run.
- Type services.msc and click OK.
- In the Services window, scroll down and locate the Security Center service.
- Check the status of the service. If it is not running, right-click and select Restart.
- Close Services and check for any improvements.
2. Check for Pending Windows Updates
If a bug or glitch is causing Windows Security to malfunction, check if a fix is available in the Windows Updates.
To check and download Windows updates:
- Go to Start > Settings > Windows Updates.
- Click on Check for updates
- Next, download and install all the pending updates.
- Restart your PC and check if the issue is resolved.
3. Check with your Administrator
If you are using a work computer, the administrator may have blocked access to some Windows 10 settings. Verify the Group Policy and Registry entries to find and fix any issues with Windows Security.
If available, try performing an in-place upgrade to the latest available version. A Windows 10 to 11 upgrade will reinstall the OS without removing your apps and files.
4. Run the System File Checker Tool
Corrupt system files can cause one or more features to stop working in Windows 10. The System File Checker tool deployed with the sfc /scannow command will scan all protected system files and replace corrupted ones with a fresh cached copy.
To run System File Checker tool:
- Type cmd in the Windows search bar.
- Right-click on the Command Prompt option and select Run as administrator.
- In the Command Prompt window, type the following command and hit enter:
sfc /scannow - The verification process may take some time, so wait till it is 100% complete.
After the process is complete, you will receive one of the following messages:
- Windows Resource Protection did not find any integrity violations—This means the System File Checker did not find any issues with your system files.
- Windows Resource Protection found corrupted files and successfully repaired them.
- Windows Resource Protection found corrupted files but was unable to fix some of them.
- Windows Resource Protection could not perform the requested potation—In this stance, run the System File Checker in Safe Mode to resolve this error.
If the error is found and fixed, reboot the computer and check if the Windows Security blank screen issue is resolved.
4. Check for the Presence of Third-Party Antivirus
By design, Windows Security will be disabled in the presence of a third-party antivirus. Though, it will not affect the Window Defender functionalities.
Some antivirus software like Malwarebytes allows you to turn off the protection and exit the app. If not, you may have to uninstall your antivirus to see if that helps.
To check if you have a third-party antivirus installed:
- Press Win + R to open Run.,
- Type appwiz.cpl and click OK to open the Control Panel.
- Go through the installed apps and look for any third-party antivirus installed.
Most antivirus companies offer a removal tool to completely remove the software from the user’s computer. Head over to your antivirus company’s official website and download the tool. Run the installer and follow on-screen instructions to delete your antivirus software.
As a last resort, perform a reset to reinstall Windows 10 without affecting your personal files and folders. However, this will remove all the third-party apps installed on your computer, so make sure to create a backup before resetting your PC.
To reset your PC:
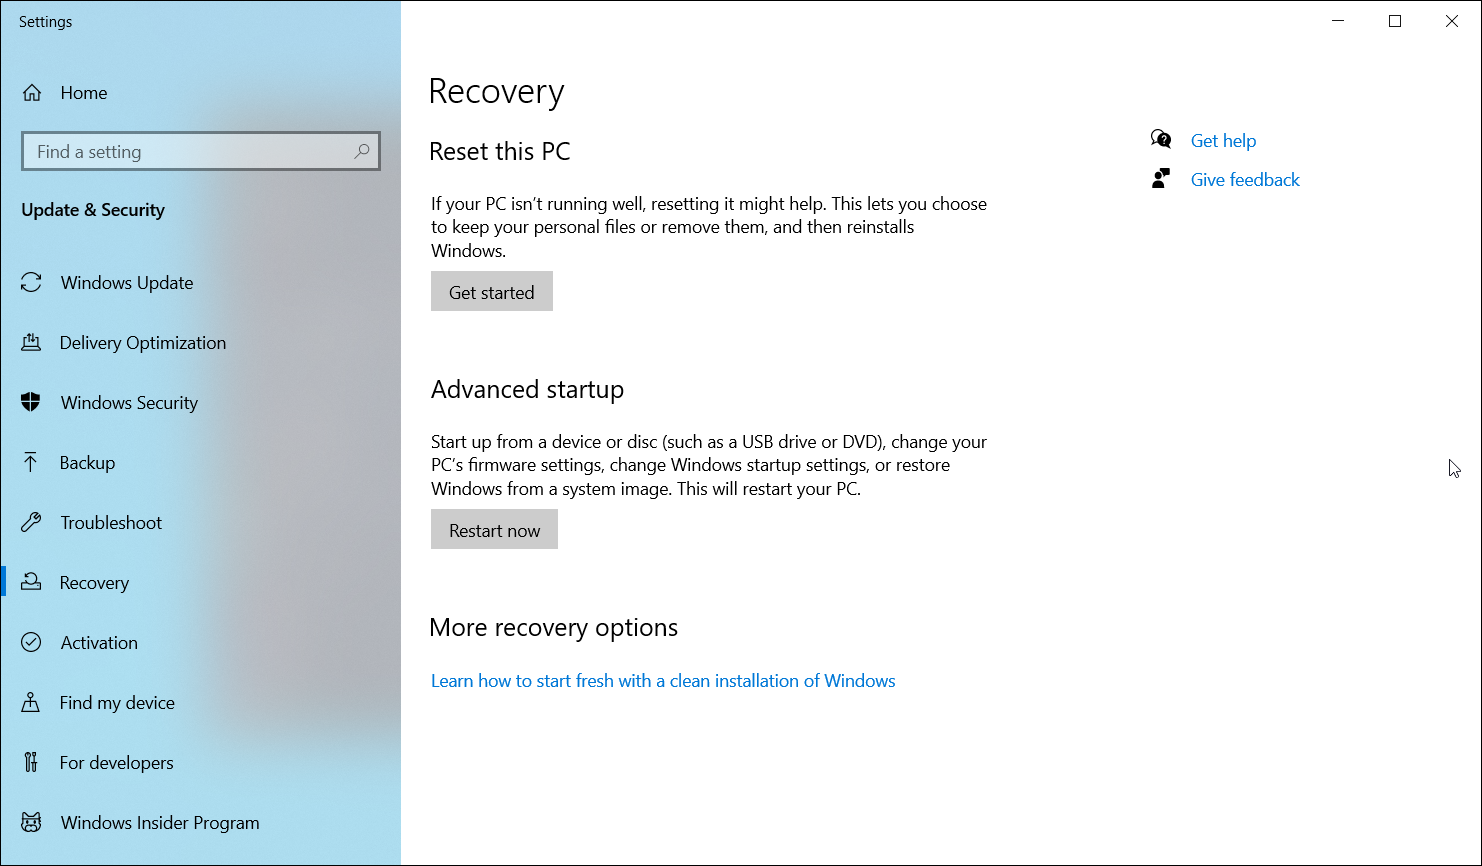
- Go to Start and open Settings.
- Open Update & Security.
- Open the Recovery tab from the left pane.
- Scroll down to the Advanced startup section and click on Restart Now.
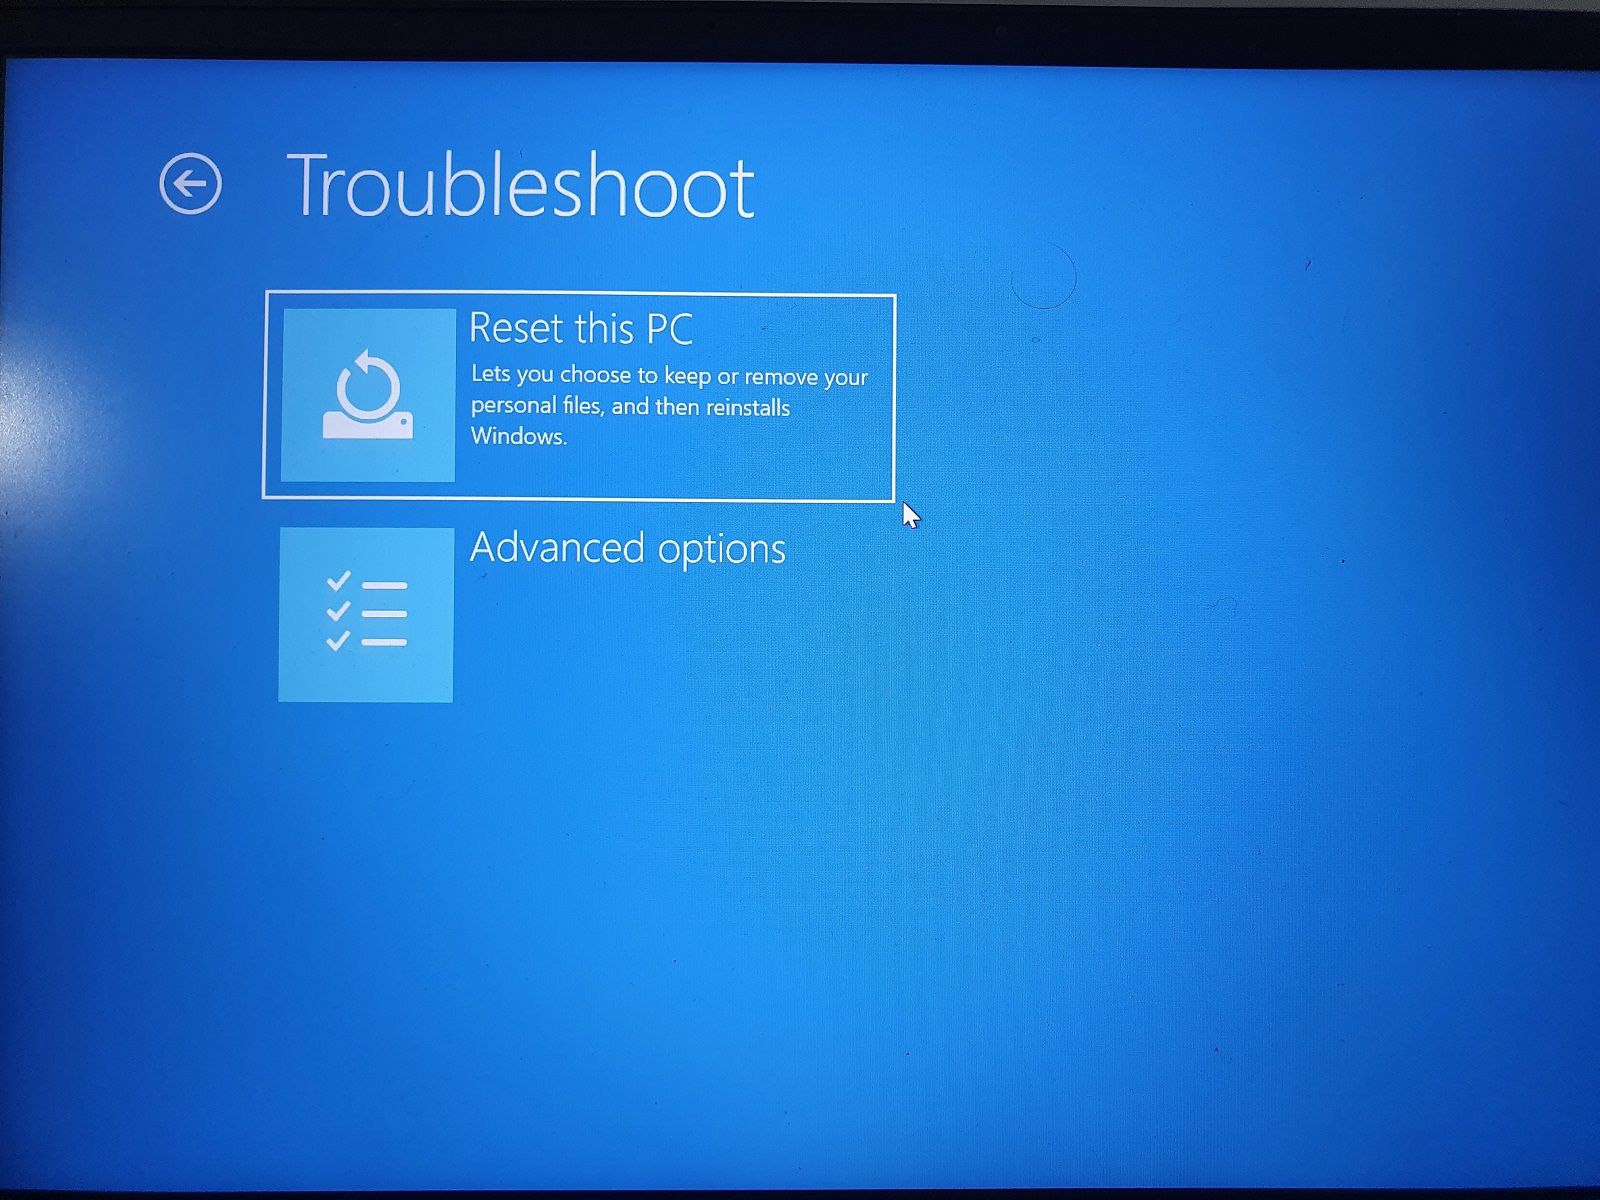
- Windows will not boot into the Windows Recovery Environment.
- Select Troubleshoot and then click on Reset this PC.

- Under Reset this PC, click on Keep My files. This option will reinstall Windows 10 while keeping your personal files. However, it will remove third-party apps and settings.
- Once your PC restarts, select the user account and enter the password associated with your Microsoft account.
- Click Continue to proceed.
- In the How would you like to reinstall Windows? screen, select one of the following: Cloud Download: Requires a fast internet connection and can use up to 4GB of data to download required Windows files. Local reinstall: This allows you to reinstall Windows from your existing device. Select this option if you don’t have a stable internet connection.
- Read the description displayed on the screen and click the Reset button to confirm the action.
The reset process may take a few minutes to a few hours to complete. Leave your computer connected to a power source during the resetting process.
In most cases, resetting the PC to factory default should fix Windows Security showing blank screen problems in Windows 10 and Windows 11 systems. If not, you will have to clean install Windows 10/11 with a bootable drive.
Fixing Windows Security Showing Blank Screen in Windows 10
Windows Security showing blank screen issues can occur due to file corruption and is usually resolved with a repair install or upgrade to the latest version of the Windows OS. Before that, try to troubleshoot by restarting essential Windows Defender services, and checking for third-party antivirus interference.
If resetting or reinstalling Windows 10 is not an option, consider using a dedicated third-party antivirus solution for your system as a Windows Defender alternative.