Windows needs to be activated for you to use this feature
by Loredana Harsana
Loredana is a passionate writer with a keen interest in PC software and technology. She started off writing about mobile phones back when Samsung Galaxy S II was… read more
Updated on
- In Windows 11, it is not uncommon for the lock screen slideshow to encounter issues.
- It requires a custom lock screen slideshow setup if the default configuration doesn’t work.
- You can also create a slideshow of images in folders that you want to display.
XINSTALL BY CLICKING THE DOWNLOAD
FILE
Due to the large number of processes that must run in the background to make it happen, the lock screen slideshow or Windows Spotlight may stop working for no apparent reason at times.
Windows 11, like Windows 10, allows you to customize the lock screen by displaying a slideshow of personal images. Despite the fact that Windows Spotlight retrieves images from the Bing search engine, the Slideshow feature retrieves images from your local hard disk.
Many factors could be at play when the Windows 11 lock screen slideshow is not working, and we’ve compiled a list of all the alternative options you might want to consider.
How do I fix Windows 11 lock screen slideshow not working issue?
- How do I fix Windows 11 lock screen slideshow not working issue?
- 1. Enable the lock screen slideshow manually
- 2. Check your images
- 3. Re-add folders and images
- 4. Don’t turn off screen after slideshow
- 5. Open Power Options
- 6. Check indexing settings
- 7. Check lock screen blocking in Registry Editor
- 8. Allow lock screen slideshow in GPEDIT
- Why is Windows activation important?
- What does the Windows Spotlight feature do?

NOTE
Make sure that Windows is activated before attempting any other option, as failing to do so would prevent any slideshow from appearing.
1. Enable the lock screen slideshow manually
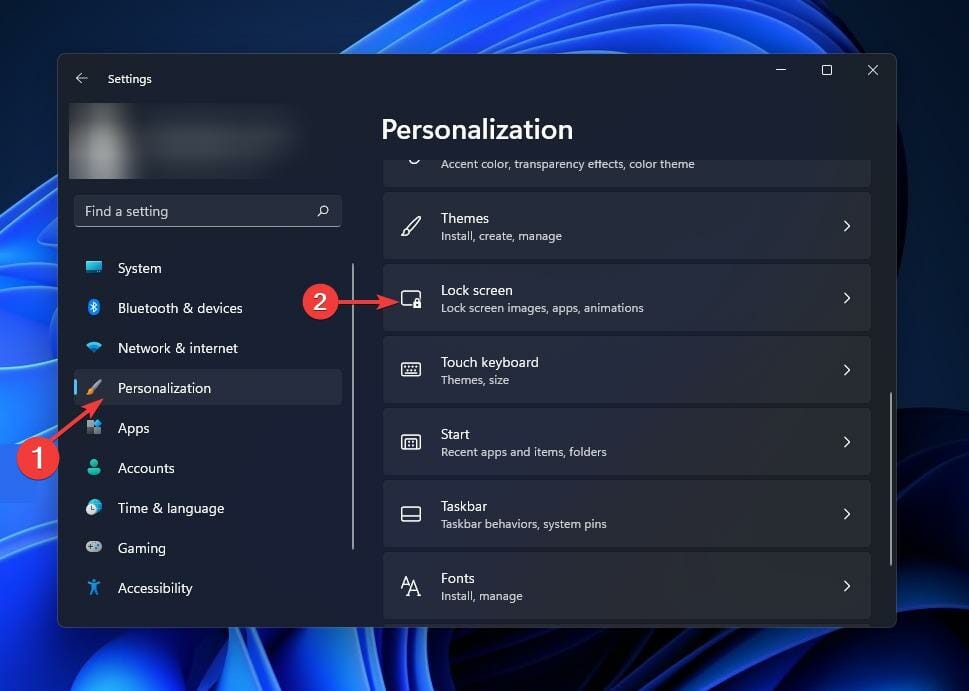
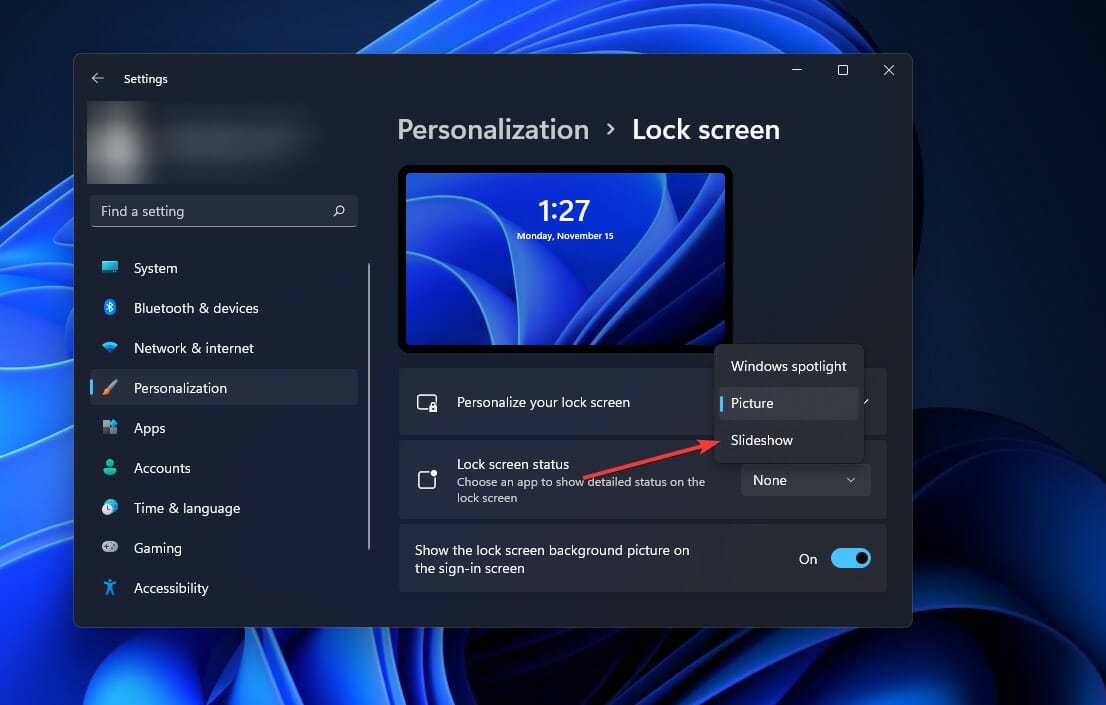
- Press the Windows key + I to open Windows Settings and go to Personalization, then to Lock screen.

- On the right side, you will see a drop-down button named Picture. Expand the list and select the Slideshow option.

Images from the Pictures folder are automatically gathered when the program starts. In other words, you may want to include some images there in order for them to be displayed in the lock screen slideshow.
2. Check your images
By default, Windows 11 include some photographs in the Pictures folder, allowing you to create a slideshow on the lock screen by selecting Show Slideshow on Lock Screen from the Start menu.
How we test, review and rate?
We have worked for the past 6 months on building a new review system on how we produce content. Using it, we have subsequently redone most of our articles to provide actual hands-on expertise on the guides we made.
For more details you can read how we test, review, and rate at WindowsReport.
Although this is the case, if any of those photographs are accidentally destroyed, you may find yourself in this situation from time to time.
As a point of reference, this Pictures folder is the Library folder that appears when you first boot up your computer or create a new user account in Windows.
3. Re-add folders and images
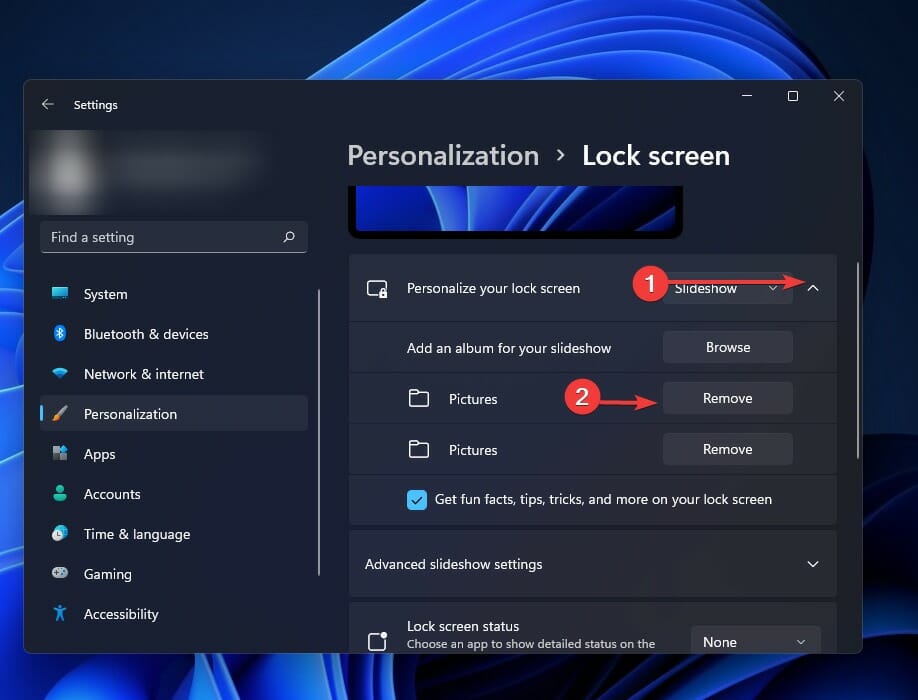
- Press the Windows key + I to open the Windows Settings panel and go to Personalization, then to Lock Screen.
- Click on the carrot arrow to expand the Personalize your lock screen drop-down menu and remove from the list the folders with pictures, by clicking on the Remove button next to them.

- Next, click on the Browse button and choose the folder with images.


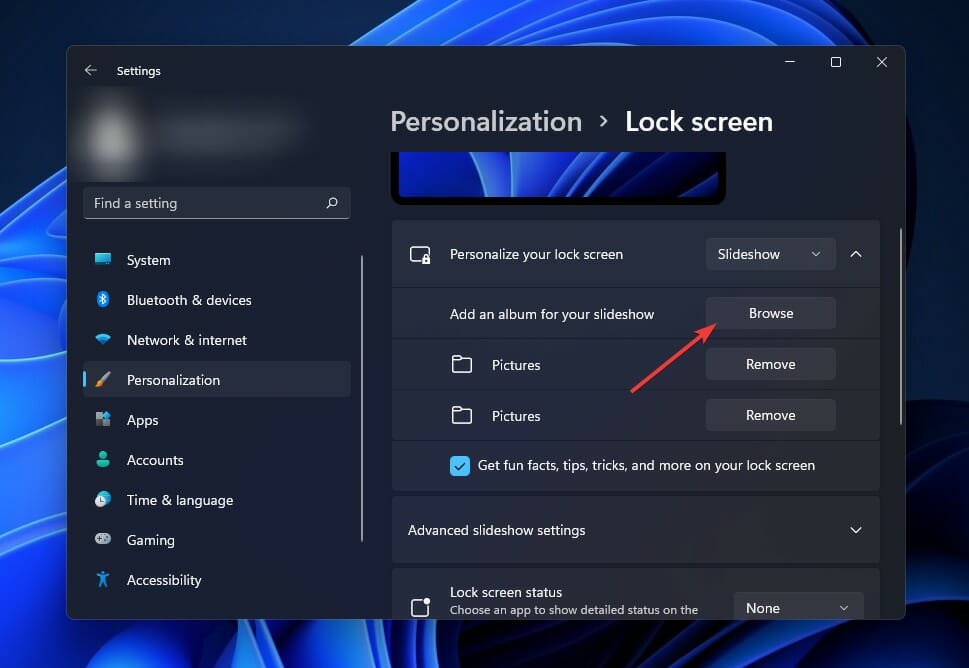
At the end of the process, restart your computer to see if it has resolved your problem.
4. Don’t turn off screen after slideshow
- Press the Windows key + I to open the Windows Settings panel and go to Personalization, then to Lock Screen.
- Click on Advanced slideshow settings to expand it, navigate to Turn off the screen after the slideshow has played for and select the Don’t turn off option.


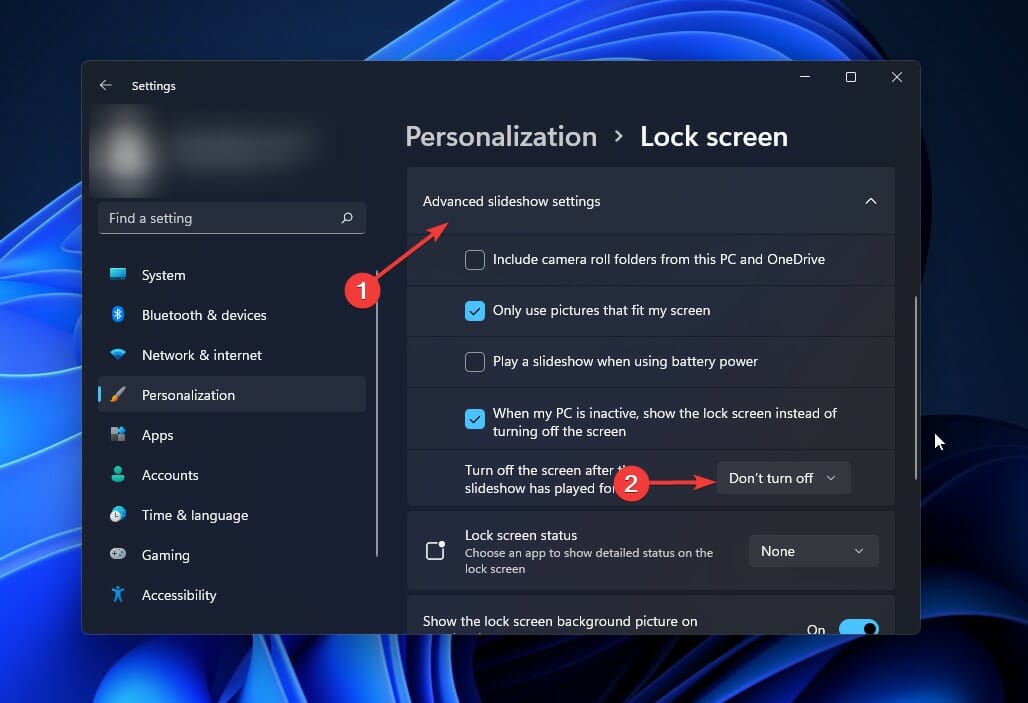
When the slideshow is over, Windows 11 automatically turns off the screen in order to conserve energy. By following the methods outlined above, you can avoid the need to conserve energy.
5. Open Power Options
- Press the Windows key + S and search for Control Panel. Click on the most relevant result.

- Go to Power options and click on the Change when the computer sleeps option.

- Select Change advanced power settings.

- Expand the Desktop background settings then Slide slow, expand the list, and select the Available option.

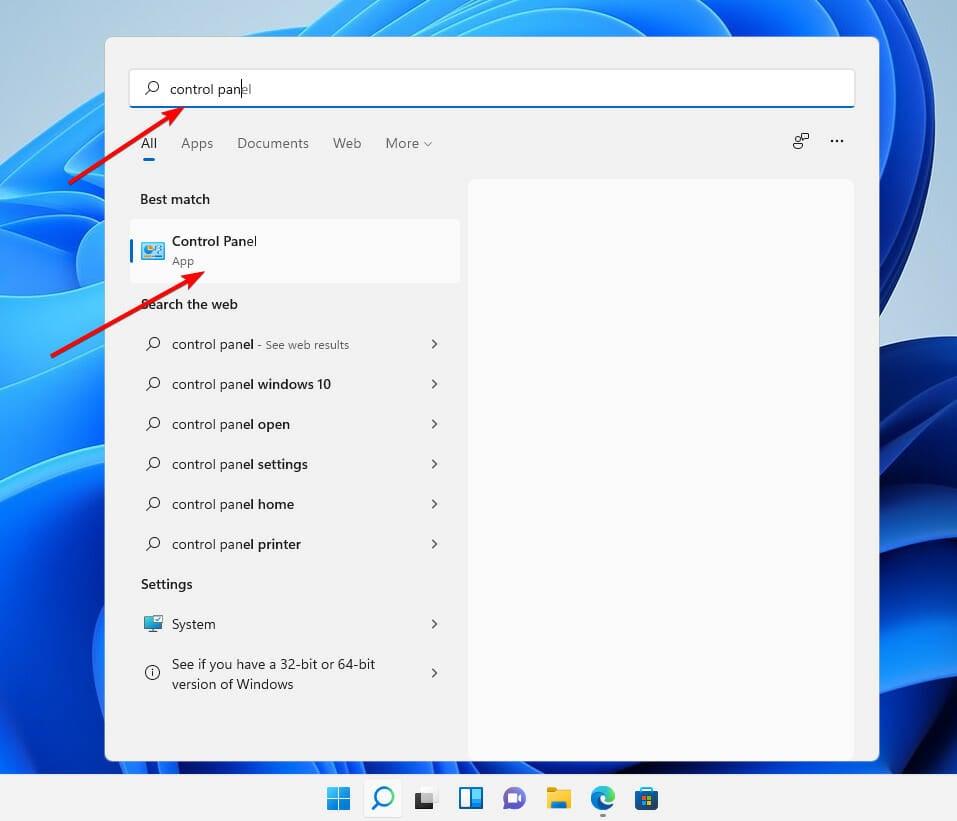
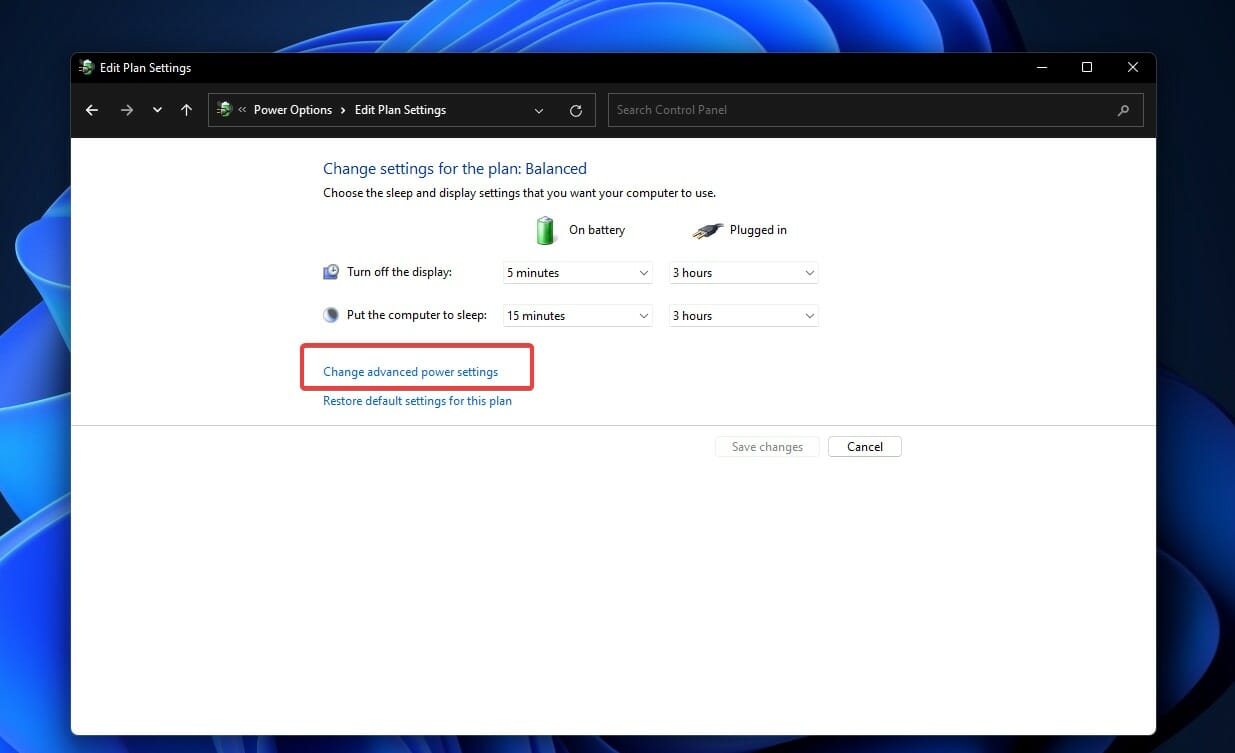
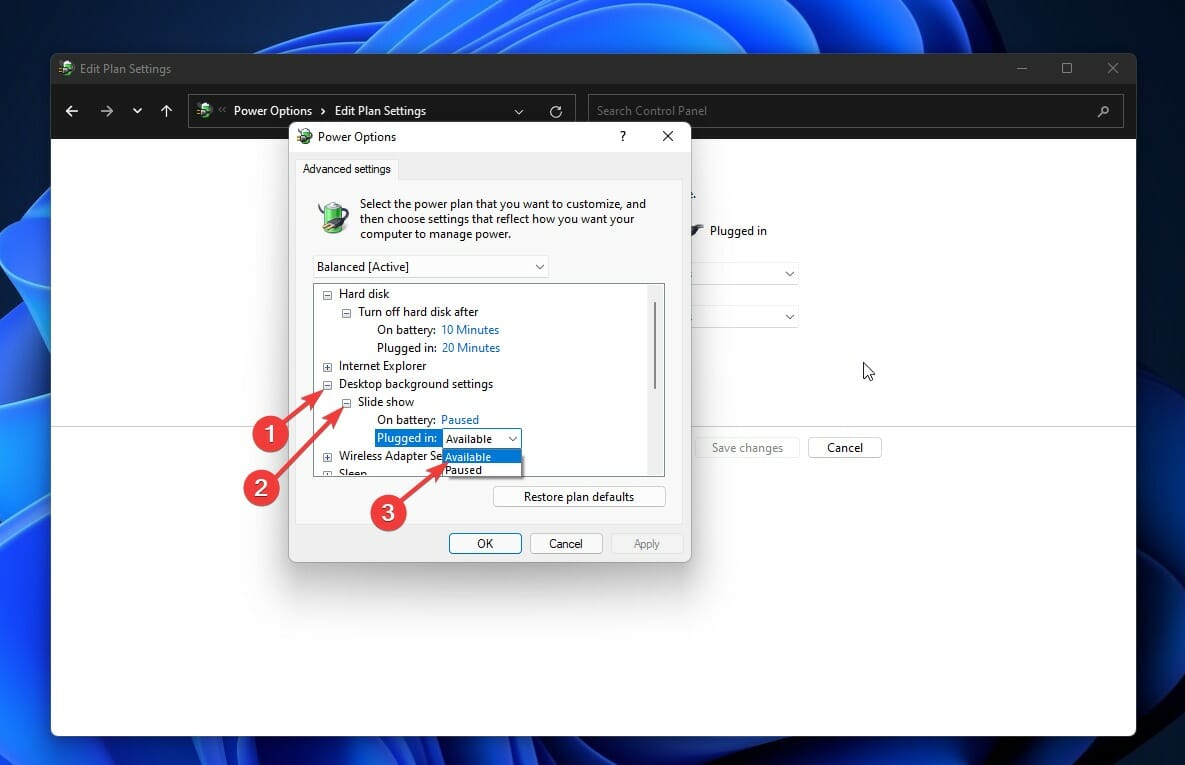
When using a laptop, it is possible to enable or disable the slideshow depending on your power plan in order to conserve battery life. That being said, it can be causing the problem at hand with Windows 11.
6. Check indexing settings
- Press the Windows key + S and search for indexing options. Click on the most relevant result to open it.

- Press the Advanced button and switch to the File Types tab.

- Look up the PNG and JPG options and make sure that both of them are ticked. If not, check the boxes next to them and click the OK button to save the changes made.

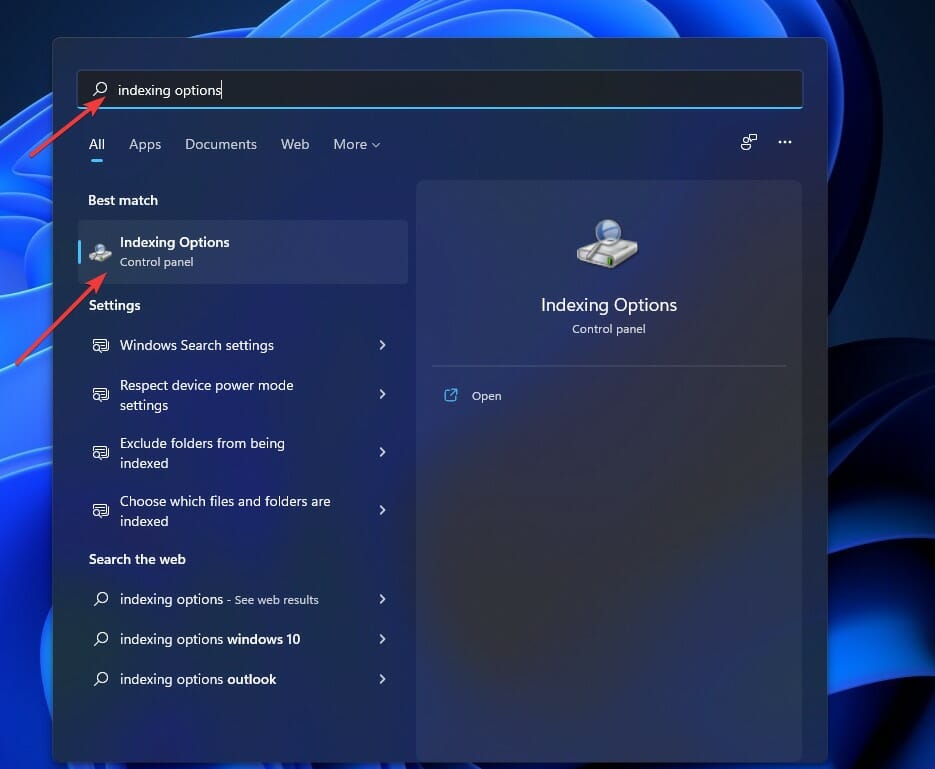
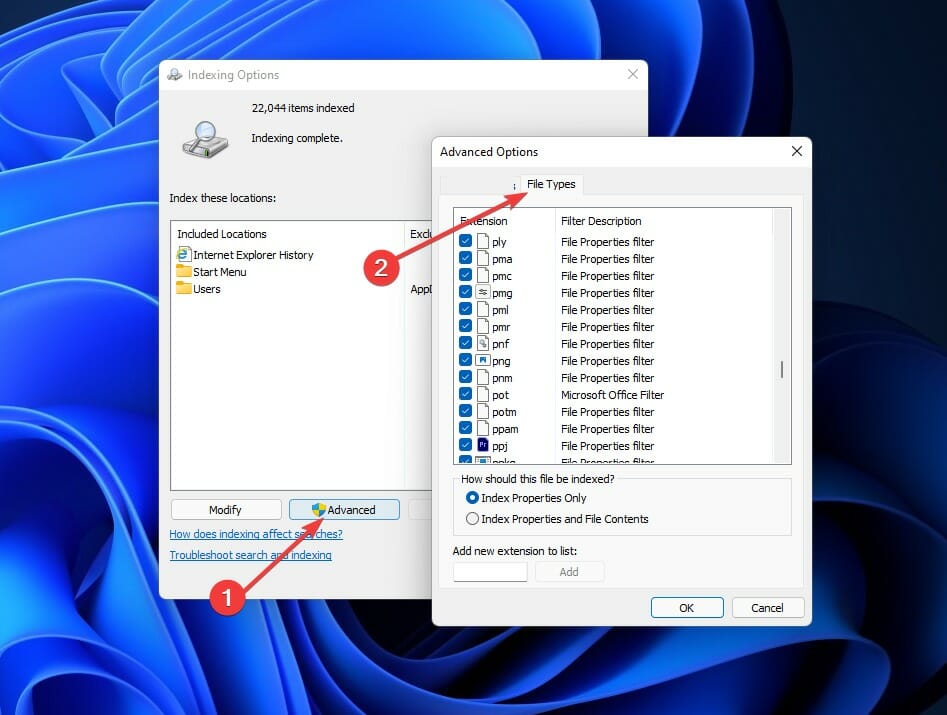
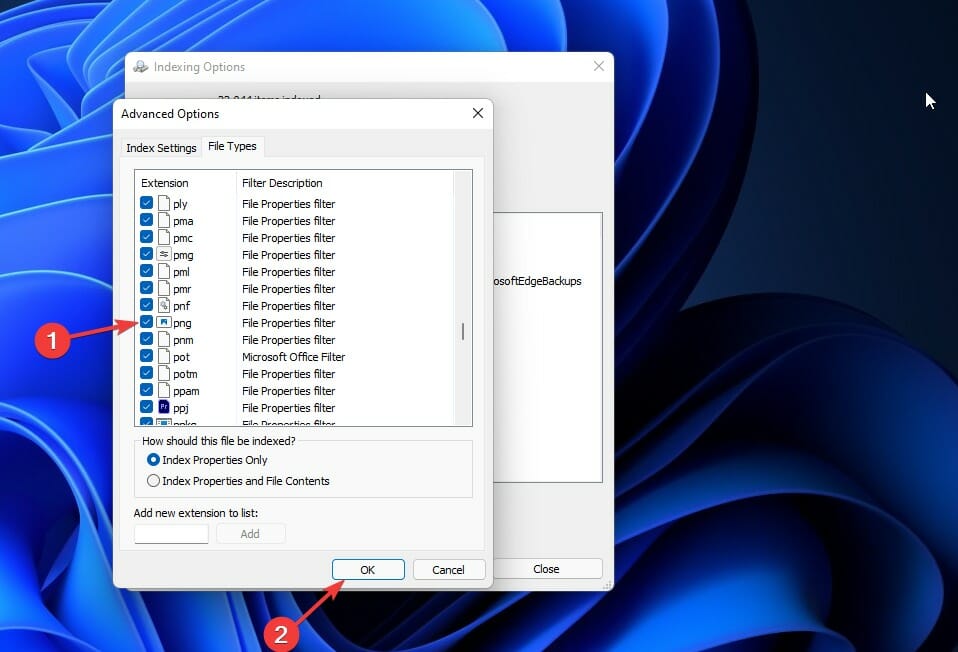
Windows may fail to index a specific path or folder or kind of file as a result of malware, virus, and other malicious software.
Alternatively, if the photos you’ve chosen are PNG or JPG and Windows 11 isn’t indexing those file formats, you may experience problems.
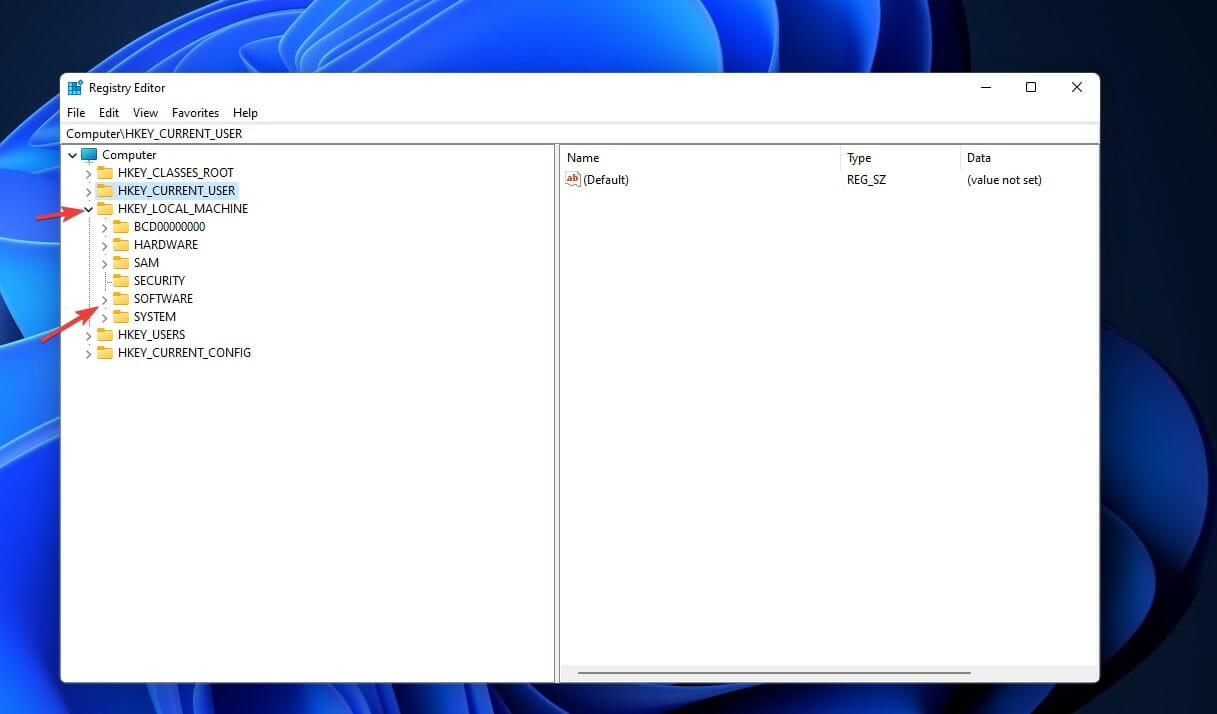
7. Check lock screen blocking in Registry Editor
- Press the Windows key + R , then type regedit and press Enter.

- Navigate to HKEY_LOCAL_MACHINE, then to Software and Policies. Go to Microsoft, then to Windows followed by Personalization.

- You may find a REG_DWORD named NoLockScreenSlideshow. If so, right-click on it and select the Delete option.

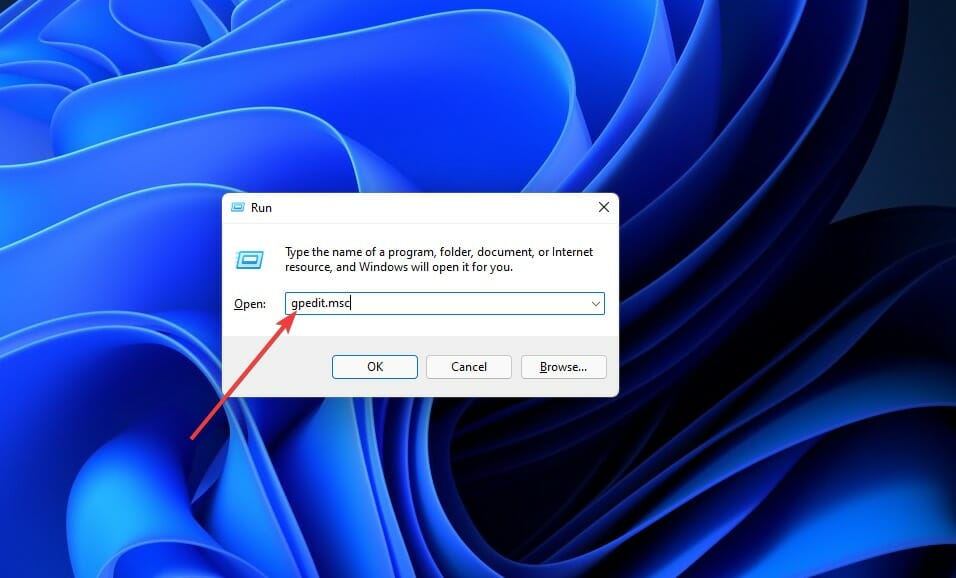
8. Allow lock screen slideshow in GPEDIT
- Press the Windows key + R , then type gpedit.msc and press the Enter button.

- Navigate to Computer Configuration, then to Administrative Templates. Go to Control Panel followed by Personalization.

- Double click on the Prevent enabling lock screen slide show setting and select either Not Configured or Disabled option, followed by the OK bottom.

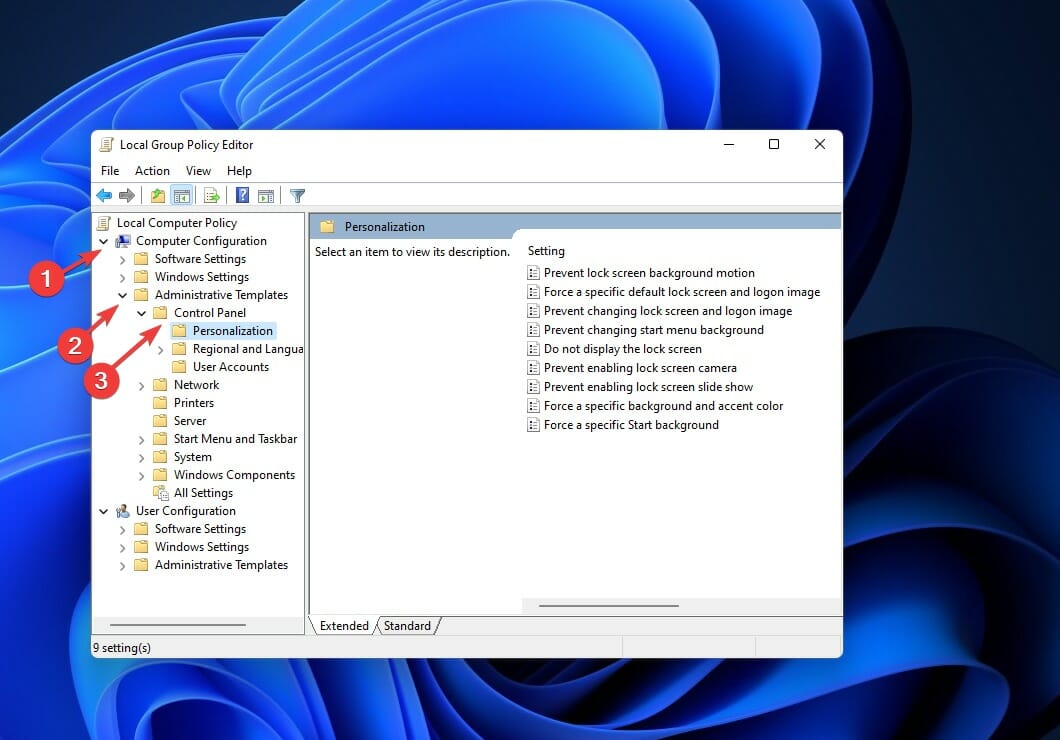
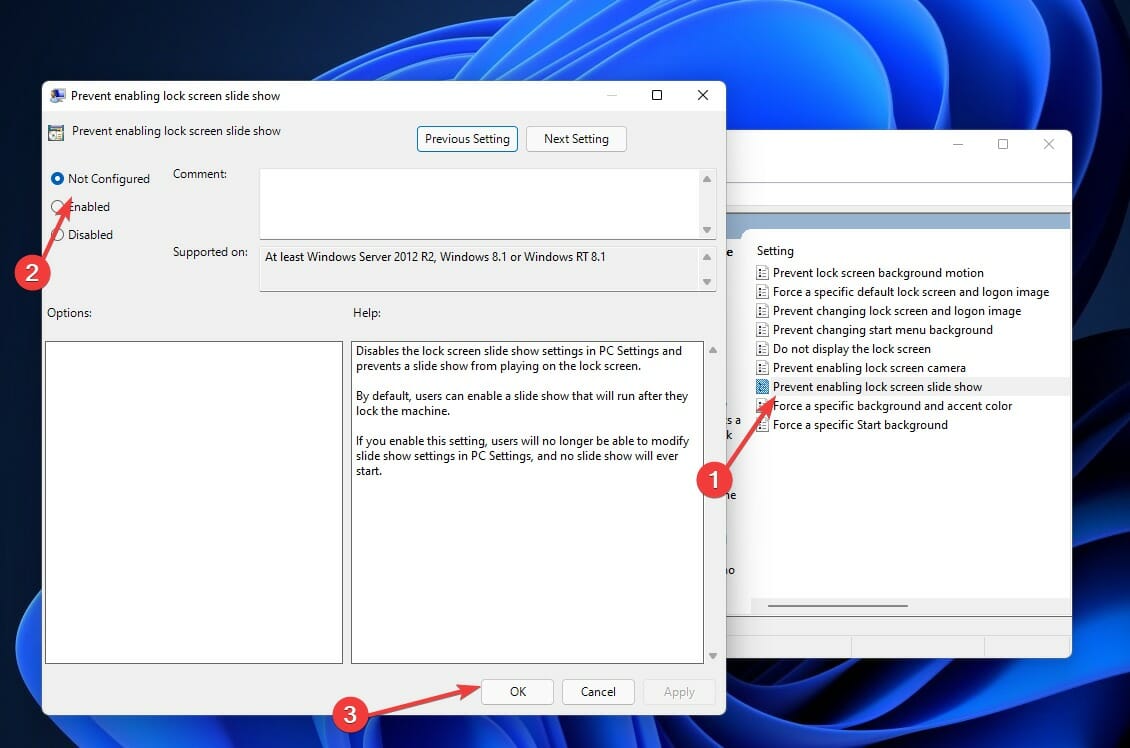
If you have this option selected, you will be unable to change the lock screen slideshow on Windows 11. As a result, it is necessary to double-check the settings to ensure that they are correct.
Confirm the removal, then restart your computer to make the changes take effect. Check to see if the slideshow is now functioning properly.
Why is Windows activation important?
Activation helps verify that your copy of Windows is genuine and hasn’t been used on more devices than the Microsoft Software License Terms allow.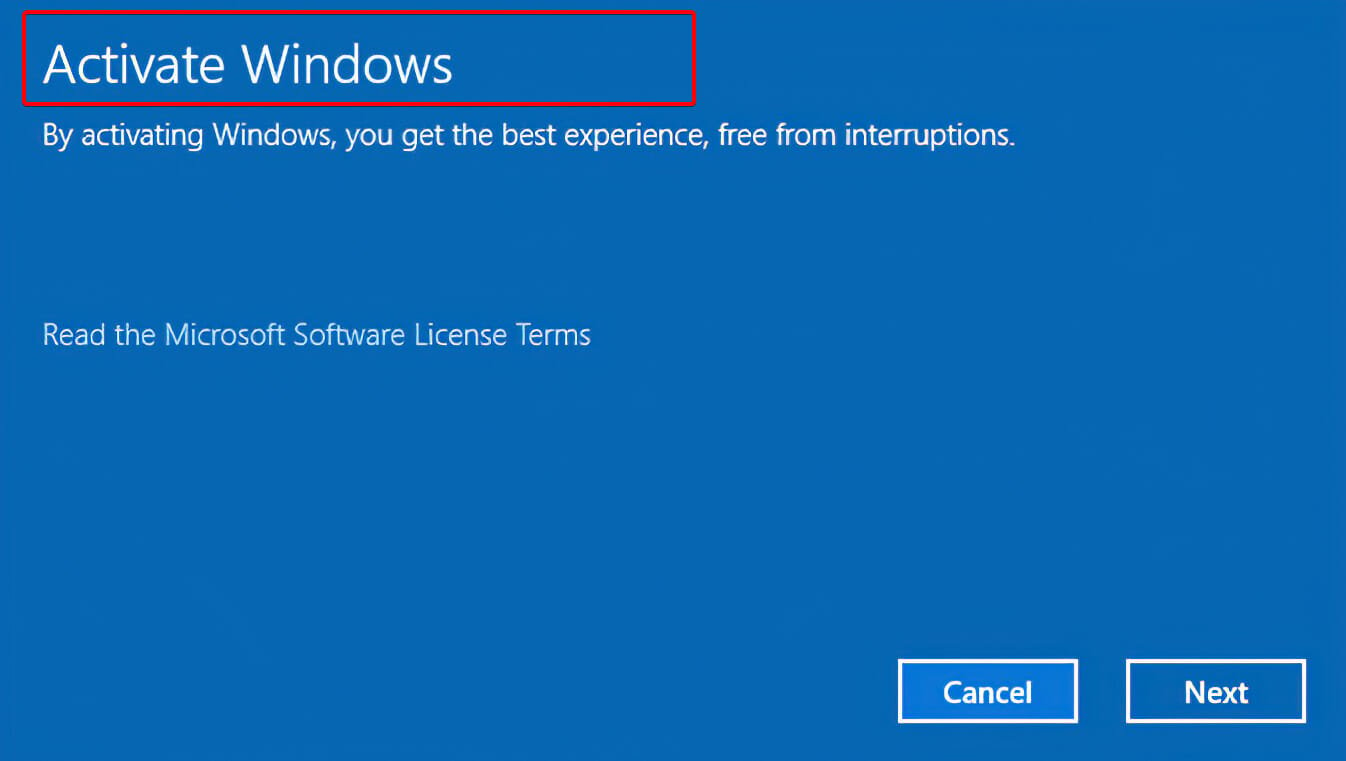
The activation process is distinct from the installation one, which requires a product code to proceed. It also differs from post-installation registration in another way.
A licensed copy of Windows and a specific computer system are linked together through the process of Windows activation.
In principle, creating such a link should prevent the same copy of Windows from being installed on more than one computer, as was previously allowed with older versions of the operating system.
So, what exactly happens if you don’t activate your Windows 11 operating system? It’s true that nothing bad happens. There will be virtually minimal disruption in system functionality. The only thing that will be unavailable in this situation is personalization such as the slideshow one.
What does the Windows Spotlight feature do?
Using the Microsoft Bing site as an example, Windows Spotlight will display your photographs and allow you to vote on which image should be used as the lock screen background on your computer’s Windows 11 operating system.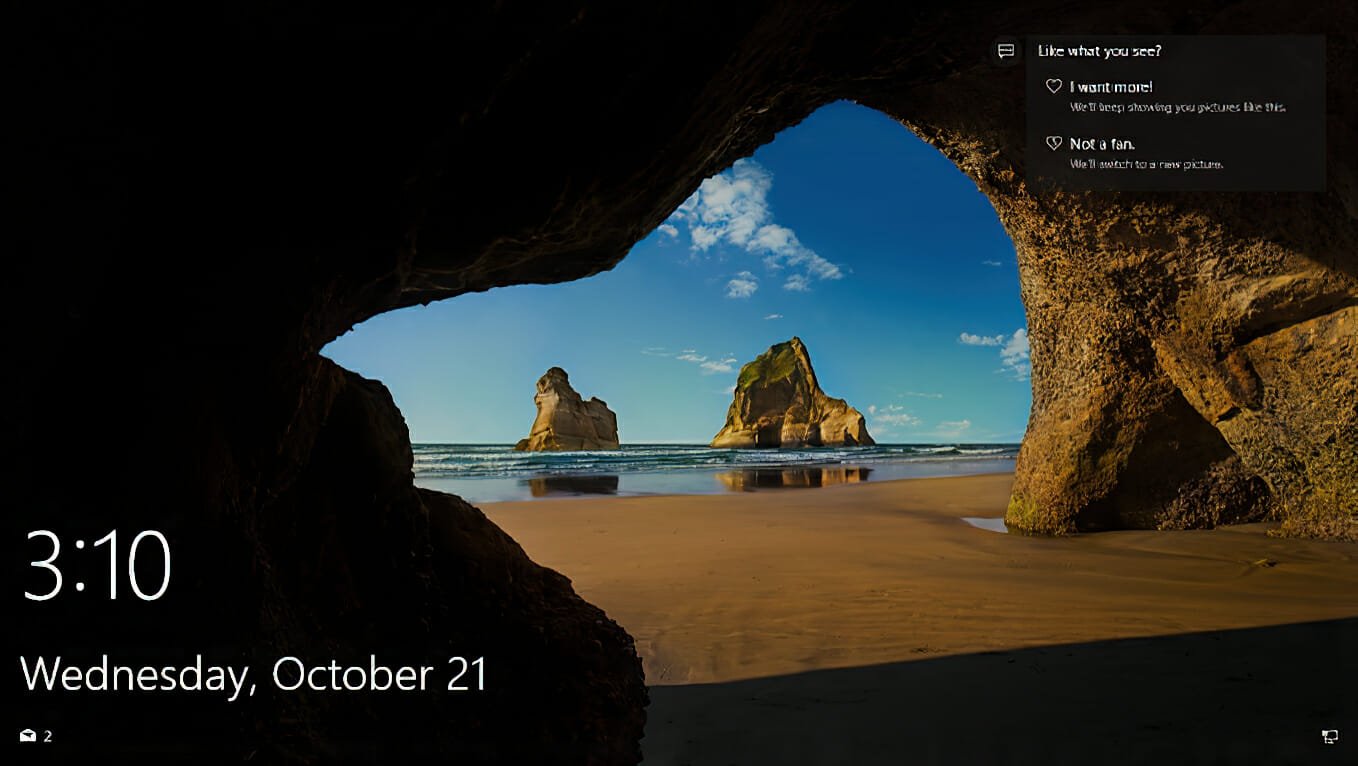
This enables Windows Spotlight to customize the appearance of the lock screen based on the preferences of each individual user.
The Windows Spotlight service may also learn from the apps and services that you use, and over time, it can provide recommendations about which apps you should try out or which features of the Windows 11 operating system you should take advantage of.
The images typically depict identifiable, well-known locations such as famous historical or natural landmarks and rarely show any human beings. Location information is occasionally provided, while photo credits are typically not.
If you were paying attention to the Windows slideshow and enjoyed it, you might be interested in learning how to set a live wallpaper in Windows 11. The live aspect of the desktop has proven to be extremely popular among users.
Using the themes and skins that Microsoft Windows 11 provides, you can further tailor your desktop experience even more. Check out the top ten greatest Windows 11 themes and skins to download, all of them are available for free download.
Alternatively, if you miss how the previous user interface looked like, you can make Windows 11 look like Windows 10 again.
Let us know in the comments section below which approach worked best for you, as well as which feature of Windows 11 you enjoy the most.
![]()
Экран блокировки — это первое, что вы видите при запуске компьютера с Windows 11 или при его блокировке вручную. Он отображает фоновое изображение, а иногда также включает полезную информацию, такую как время, дата и уведомления. Но знаете ли вы, что вы можете настроить фон экрана блокировки и даже отображать слайд-шоу из нескольких изображений?
Функция слайд-шоу на экране блокировки в Windows 11 позволяет вам настроить ротацию изображений для отображения на экране блокировки, что дает вам новый визуальный опыт каждый раз, когда вы входите в систему. Вы можете выбрать свои изображения или использовать коллекцию отобранных изображений, предоставленных Окна. С другой стороны, если вы предпочитаете более статичный фон экрана блокировки, вы также можете легко отключить функцию слайд-шоу и вместо этого установить одно изображение.
В этой статье мы расскажем вам, как включить или отключить функцию слайд-шоу на экране блокировки в Windows 11. Хотите ли вы добавить индивидуальности на экран блокировки или сделать его простым и оптимизированным, у нас есть вы накрыли.
Читайте также: Как сбросить и очистить список «Уведомления от приложений и других отправителей» в Windows 11
1. Измените слайд-шоу на экране блокировки с помощью Reg File.
Чтобы включить слайд-шоу на экране:
Чтобы включить показ слайдов на экране блокировки для всех пользователей, выполните следующие действия.
Шаг 1: Во-первых, вам нужно скачать REG-файл нажав на прикрепленную ссылку.
Шаг 2: Теперь вам нужно сохранить загруженный файл на рабочий стол.
Шаг 4: После этого вам нужно дважды щелкнуть файл Reg, чтобы разблокировать его. Позже, после утверждения слияния, нажмите «Выполнить», выберите «Да» в приглашении контроля учетных записей, затем выберите «Да» и «ОК», чтобы завершить процесс. После этого не стесняйтесь удалить загруженный файл .reg.
Читайте также — Удаленная помощь с помощью приложения Quick Assist в Windows 11 — Полное руководство
Чтобы отключить слайд-шоу на экране:
Чтобы отключить его, просто загрузите прилагаемый РЕГ-файл. И следуйте той же процедуре или шагам, указанным выше, для включения слайд-шоу на экране блокировки.
Примечание. По данным Microsoft, доступ к редактору локальной групповой политики возможен только в выпусках Windows 10/11 Pro, Enterprise и Education. Если вы используете другую версию Windows, у вас может не быть доступа к этой функции.
Также читайте — Как изменить тему в приложении «Блокнот» в Windows 11
2. Измените слайд-шоу на экране блокировки с помощью редактора групповой политики.
- Во-первых, вам необходимо запустить редактор локальной групповой политики. Вы можете сделать это, введя «gpedit.msc» в поле поиска на панели задач.
- После того, как вы завершили предыдущий шаг, перейдите в левую часть редактора и получите доступ к следующему каталогу политик. После этого выберите «Конфигурация компьютера», затем «Административные шаблоны» и, наконец, «Панель управления» > «Персонализация».
- Найдите политику «Запретить показ слайдов на экране блокировки» на правой панели раздела «Персонализация» в редакторе локальной групповой политики и дважды щелкните ее, чтобы открыть параметры политики.
Включите слайд-шоу на экране блокировки:
Чтобы включить показ слайдов на экране блокировки для всех пользователей, выберите параметр «Не настроено», затем нажмите «ОК».
Отключить слайд-шоу на экране блокировки:
Чтобы отключить слайд-шоу на экране блокировки для всех пользователей, выберите параметр «Включено», затем нажмите «ОК».
Вот и все! Вот как вы можете включить или отключить слайд-шоу на экране блокировки в Windows 11.
Windows 11 принесла значительные изменения по сравнению со своей предшественницей Windows 10, но Microsoft не останавливается на достигнутом. Постоянно добавляя новые функции в Windows 11, одним из недавних дополнений является Windows Spotlight. Он предлагает подборку ежедневных обоев, отобранных Microsoft для отображения в качестве фона рабочего стола. Если вы не знакомы с этой функцией и хотите узнать, как ее использовать, вы можете выполнить приведенный ниже процесс для включения Windows Spotlight на ПК с Windows 11.
Читайте также: Как изменить политику выполнения скриптов PowerShell в Windows 11
Установите Windows Spotlight для экрана блокировки
Если вы являетесь пользователем Windows 11 и хотите добавить изюминку на фон рабочего стола, вы можете попробовать функцию Windows Spotlight. Тем не менее, прежде чем включить его, убедитесь, что ваш компьютер обновлен. Если ваш текущий номер сборки падает ниже 22000.706, вы должны перейти в раздел Центра обновления Windows и начать процесс загрузки самых последних обновлений.
Кроме того, вы можете установить Windows Spotlight для экрана блокировки, хотя это должно быть значением по умолчанию. Чтобы проверить настройки экрана блокировки, выполните следующие несколько простых шагов:
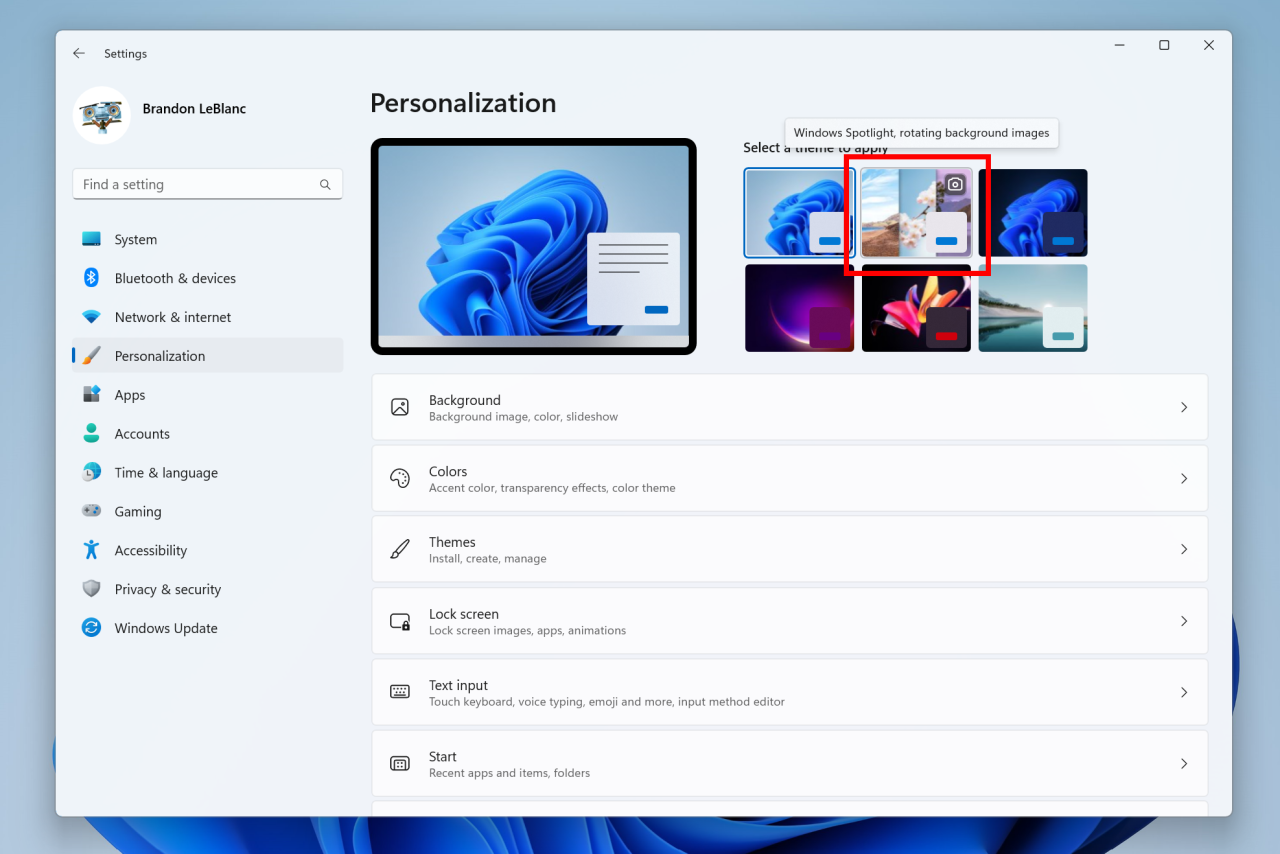
- Во-первых, вам нужно открыть приложение «Настройки». Затем перейдите к «Персонализация» в боковом меню и выберите «Экран блокировки».
- На экране блокировки вы увидите параметр «Персонализация экрана блокировки». Нажмите на раскрывающееся меню, вы увидите параметры Windows Spotlight, Picture и Slideshows.
- Наконец, выберите Windows Spotlight, и все готово!
После выполнения этих шагов вы увидите последние обои Windows Spotlight на рабочем столе вместе с новым значком. Это позволяет вам сообщить Microsoft, нравится ли вам изображение, и посмотреть, где оно было взято. Кроме того, если вы хотите отключить эту функцию или изменить фон рабочего стола, вернитесь на ту же страницу и выберите другой фон.
Читайте также: Как посмотреть секунды в часах Windows 11
С недавнего времени функция Windows Spotlight в Windows 11 может автоматически обновлять не только изображение экрана блокировки, но и обои рабочего стола. Фактически это бесконечный источник красивых изображений, которые скачиваются с серверов Microsoft. Чтобы функция начала обновлять обои рабочего стола, необходимо зайти в раздел «Персонализация» -> «Фон» и выбрать «Windows: интересное» в пункте «Персонализируйте фон».
К счастью, Microsoft понимает, что это не очень удобный способ включения функции, поэтому начиная со сборки 25169 (канал Dev) в системе появилась новая тема под названием Windows Spotlight. Эта тема отображается на главной странице раздела «Персонализация», так что вам достаточно просто выбрать её из списка.
В своём блоге Microsoft не упоминала, что тема Windows Spotlight проходит A/B-тестирование, так что она должна быть доступна всем участникам программы Windows Insider. Если она у вас не появилась, то вы можете воспользоваться утилитой ViVeTool и принудительно включить тему Windows Spotlight на своём устройстве.
Инструкция
- Скачайте утилиту ViVeTool по этой ссылке. Это новая версия ViveTool 0.3.1, подробности о которой мы рассказали в нашем материале.
- Распакуйте скачанный архив в любое место на вашем компьютере (например, можно создать папку ViVeTool в корне диска C и поместить файлы туда).
- Откройте командную строку от имени администратора (например, набрав CMD в поиске и выбрав соответствующий пункт).
- В командной строке перейдите в папку с ViVeTool с помощью команды cd /d <путь к папке>, после чего нажмите Enter. Например:
cd /d "C:\ViVeTool" - Введите команду
vivetool /enable /id:39258685 /store:bothи нажмите Enter. - Убедитесь, что в командной строке появилось сообщение «Successfully set feature configuration»
- Перезагружать компьютер не обязательно, так как мы воспользовались параметром
/store:both.
Do you find working on your Windows 11 computer boring? It may be because you left the customizations in their default settings, or perhaps configured the theme and color preferences ages ago to the same old wavy background that Microsoft offers for Windows.
It is about time you made your work computer fun as well! No, we are not saying that you install games. But simply add more color and life to it.
Table of contents
- Why Not Set Live Wallpaper as Your Background
- Download and Install Lively Wallpaper App
- How to Set Live Animated Wallpapers on Multiple Monitors
- Set YouTube Video/GIF as Desktop Wallpaper in Windows 11
- How to Turn Off Live Wallpaper in Windows 11
- More Live Wallpaper Applications for Windows 11
- DeskScapes
- Wallpaper Engine
- WinDynamicDesktop
- Final Thoughts
By default, Windows 11 only offers 5 static desktop backgrounds, the same ones used in the 6 themes that are offered. So it does not leave you with many options to choose from.
Themes and Desktop Backgrounds can be set from the Settings app >> Personalization in Windows.

But we are going to show you how you can set live, interactive wallpapers, also known as “animated wallpapers” on your PC. Not only that, but you can also have a GIF, or even a YouTube video running as your desktop wallpaper.
Lively Wallpaper is a free application that the Microsoft Store offers that can be used to customize your desktop background. You can perform the following using this app:
- Set up interactive wallpapers
- Configure wallpaper on one or multiple display devices, as per preference
- Set up a video from YouTube as a desktop background
- Set GIF animation as desktop background
- Play audio on live wallpaper when the desktop is in focus
- Customize the Taskbar theme
- Manage live wallpaper in different conditions (Battery-saving mode, Remote Desktop, etc.)
Continue reading to download and install the app, and then move on to customizing your desktop background. But before you do, there are a few downsides to setting up a live wallpaper on any device.
Why Not Set Live Wallpaper as Your Background
Live animated wallpapers indeed bring some color and magic to your PC. However, it also has a few cons you must consider.
Since the live wallpapers are continuously running in the background, they consume a huge amount of processor and memory that affects system performance. This consequently also affects the amount of power consumption, which is not ideal if you are using a laptop on battery.
Another thing to consider is the continuous shifts of the pixels on your device. This not only consumes the battery but could be dangerous for the screen if too many color changes occur.
That said, if you are still willing to take the risk, the sections below illustrate how to configure live wallpaper on your Windows 11 computer.
Download and Install Lively Wallpaper App
Let us begin by installing the free application.
- Open the Lively Wallpaper Microsoft Store page and click Get.

- Now click Open Microsoft Store from the popup at the top of the browser.
- The Microsoft Store application will now launch with Lively Wallpaper displayed. Click Get again.

- The application will now begin downloading and then installing. When it does, launch the application.
- On the first welcome screen, click Next.

- On the next screen, choose whether you want to run the app (and the live wallpaper) as soon as the computer starts, or run it later manually. Then click Next.
- Now choose how you would like to customize the Taskbar from the dropdown menu under Taskbar Theme. Click Next when selected.
- On the next screen, you will have a little pictorial of how to manage your wallpaper directly from the Taskbar. Click OK.


The Lively Wallpaper application is now ready for you to begin your personalization. You will be presented with the Home screen/Library where you can find the live wallpaper to choose from. Click on the background that you wish to set.

Note that this will only set the live background on the primary screen if you have more than one connected. Continue to the next section to learn how to manage the wallpaper across multiple screens.
How to Set Live Animated Wallpapers on Multiple Monitors
As we said, the application only sets the live wallpaper to the primary display device if more than one is connected. However, you can configure it to either duplicate across all screens, or expand it. Here is how:
- Click on the monitor icon at the top of the Lively Wallpaper app to open the Display Control Panel.

- From the Control Panel, under the Placement method section, select whether you would like the wallpaper to span across screens or Duplicate the same wallpaper.
- Now close the Control Panel to save the settings.


You can choose which live wallpaper to set on these multiple display devices before or after performing the steps above.
Set YouTube Video/GIF as Desktop Wallpaper in Windows 11
If you find that the default animated wallpaper offered by the Lively Wallpaper application is insufficient, you can add your GIF or a video from YouTube to the wallpaper library and have it running as your desktop background.
- Click on the “+” (plus) sign on the menu to the left of the app.
- On the next screen, click Browse and then navigate to the downloaded GIF to set it as live wallpaper. Or, paste a YouTube video link in the text field under “Enter URL” to set a video as your background, and then click the arrow button in front of it.
- If you enter a YouTube video URL in the last step, then you will be presented with a popup such as the one below. Click OK.


The GIF/Video will now commence playing in the background and repeat itself when it finishes.
How to Turn Off Live Wallpaper in Windows 11
If you are running live wallpaper in the background and think that they are consuming too much of your system resources, you can simply close the Lively Wallpaper application to revert your preferences to the way they were configured through the Windows Settings app.
Simply right-click on the Lively Wallpaper icon in the Taskbar and click Exit on the context menu to remove the close the app, and consequently remove the live wallpaper.

More Live Wallpaper Applications for Windows 11
There are other applications online that you can use to set up live animated wallpapers on your computer. However, some of them are either paid apps or offer only a limited trial period.
DeskScapes
DeskScapes is a paid application that you can use to set and adjust live wallpapers on your computer. However, you can try it out for 30 days before purchasing it as it offers a trial period with all the same options as the fully-paid version. It is compatible with Windows 11 as well as Windows 10 and 8.
After choosing a live wallpaper, you can then add special customized effects to it and also adjust the color saturation according to your preferences.
Wallpaper Engine
Wallpaper Engine is another paid application that you can use to set live wallpapers on your Windows PC. This application costs USD 2.79 at the time of writing. However, it doesn’t offer a trial period.
It provides one of the best live animated wallpapers that you can then customize as well. Another great feature this application offers is that it pauses the live wallpaper whilst you’re playing a game, freeing up system resources.
WinDynamicDesktop
WinDynamicDesktop is a free application that is also available through the Microsoft Store. It does not provide any interactive wallpaper. The only reason this app made it top the list is that it brings the wallpaper from the MacOS to Windows with the day and night effects.
The app synchronizes itself with your sunrise and sunset timing and changes the theme of the wallpaper accordingly.
Final Thoughts
Having a good desktop background wallpaper is not only important aesthetically, but also keeps your mind fresh in case you are working long hours on a screen.
Not too long ago, Microsoft released 2 special backgrounds for the Insiders which you can also try out if you do not wish to put any extra load on your processor or your RAM.
 В ранних версиях Windows функция установки экранной заставки или скринсейвера была на виду, поскольку считалось разумным использовать её для исключения выгорания CRT (ЭЛТ) мониторов. В современных версиях системы, включая Windows 11, опция сохранилась, но редко используется. Хотя, не исключено, что по мере распространения OLED-дисплеев, также подверженных выгоранию, будет использоваться чаще.
В этой пошаговой инструкции подробно о том, как включить заставку в Windows 11, а также дополнительная информация, которая может быть полезной, если вы решите добавить собственные скринсейверы.
Включение экранной заставки или скринсейвера Windows 11
Для того, чтобы включить и настроить скринсейвер или заставку в Windows 11 достаточно выполнить следующие шаги:
- Зайдите в Параметры — Персонализация — Экран блокировки и нажмите «Заставка» в разделе «Сопутствующие параметры».

- Если пункт не активен, нажмите правой кнопкой мыши по кнопке «Пуск», выберите пункт «Выполнить», введите команду
control desk.cpl,,@screensaver
и нажмите Enter.
- Откроется окно «Параметры экранной заставки».

- В поле «Заставка» выберите один из предустановленных скринсейверов, используйте кнопку «Параметры», чтобы назначить параметры текущего скринсейвера (они отличаются в зависимости от конкретной заставки), установите интервал — время, по прошествии которого будет автоматически запускаться заставка, если компьютер или ноутбук не используется.
- Для предварительного просмотра скринсейвера нажмите кнопку «Просмотр» в окне параметров экранной заставки.


После настройки достаточно не пользоваться компьютером в течение времени, заданного в поле «Интервал», чтобы заставка автоматически включилась при условии, что по истечении этого же интервала времени не настроены другие действия, например выключение экрана или спящий режим.
Файлы заставок имеют расширение .scr и хранятся в папке C:\Windows\System32. Если вы где-то скачаете заставку и скопируете в эту папку, а потом зайдете в окно «Параметры экранной заставки» — вы увидите новую заставку там.
Будьте осторожны и загружайте скринсейверы только с проверенных ресурсов (и, желательно, проверяйте их антивирусом), поскольку файлы .scr по своей сути являются обычным исполняемым файлом и потенциально могут содержать в себе что-то не самое полезное.