Windows Defender is a built-in antivirus software developed by Microsoft for Windows-based computers. It is designed to detect and remove computer viruses, spyware, rootkits, and other malicious software.
As with any other antivirus product, there is always the potential for conflict between Windows Defender and other antivirus programs. In some cases, these conflicts can lead to system stability issues, performance issues, or even data loss. However, in most cases, it is possible to install, run, and maintain multiple antivirus programs at the same time without any major issues.
The primary cause of conflict between different antivirus programs is usually due to the fact that they all have their own ways of detecting and removing threats. Different programs use different methods to protect the system, so if two programs are running at the same time, they may end up conflicting with each other and affecting each other’s performance.
One way to prevent these conflicts is to make sure that you only install one antivirus program at a time. This will ensure that only one program is actively scanning and protecting your system, thereby reducing the chance of conflicts. If you must use multiple antivirus programs, it’s important to make sure that they use compatible databases and that they are all up to date with the latest virus definitions.
It is also important to keep in mind that many antivirus programs are designed to work alongside each other, meaning that they can share information and coordinate their actions. However, this is not always the case, so it’s important to check with the manufacturers of both programs to make sure that they are compatible.
If you do experience conflicts between Windows Defender and other antivirus programs, the best thing to do is to disable one of the programs, then restart the system and see if the conflict has been resolved. If not, it’s likely that the two programs just aren’t compatible with each other and you should consider uninstalling one or both of them.
In general, it is best to avoid running multiple antivirus programs at the same time if possible. If you must use multiple programs, make sure that they are all compatible with each other and up to date before turning them on. Otherwise, you may be faced with conflicts, system instability, and worse.
When you launch Windows Security on Windows 11, you may see a message You’re using other antivirus providers. This prevents you from activating the
Real-time protection of Windows Defender against different malware & other threats.
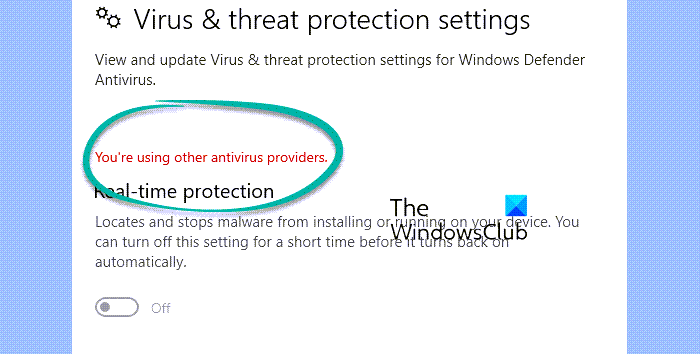
While for some, the Real-time protection option is missing and shows the error; for others, it may be available but does not turn on. Also, sometimes, the error may be preceded by another message, Microsoft Defender Antivirus is snoozed.
What’s frustrating is this message shows up even when you have no third-party antivirus installed on your PC!
Why do you see You’re using other antivirus providers message?
While there’s a long list of Microsoft Defender error codes arising due to different reasons, the error “You’re using other antivirus providers” may arise due to a faulty Windows Management Instrumentation (WMI) database.
The WMI database is an infrastructure that stores data related to Windows settings, configuration statistics, and also for the Windows Defender real-time protection. When this database corrupts, you may encounter this error.
You may also encounter the error due to remnants of software (files and registry keys) that were not properly removed, for example, McAfee antivirus.
Fix You’re using other antivirus providers error in Windows Security
Before you geing troubleshooting, you may want to try a few basic steps like restarting your PC and removing any 3rd party antivirus using an Antivirus software remover. If the above steps do not work, you can proceed to try the main methods below.
- Delete registry entries via Command Prompt
- Completely remove the antivirus
- Rebuild the WMI database
- Enable Windows Defender
- Reset the WMI database
- Perform a system restore
1] Delete registry entries via Command Prompt
You may need to remove the Microsoft Defender or Endpoint Manager Policies. Before you begin, please backup your registry, since you will be running some registry commands.
Press the Win + R keys together to launch the Run console.
Type in cmd in the search bar, and press the Ctrl + Shift + Enter shortcut keys to open the elevated Command Prompt.
Now, run the below commands one after another in the Command Prompt (Admin) window, and hit Enter after each one:
reg delete "HKLM\Software\Microsoft\Windows\CurrentVersion\Policies" /f

reg delete "HKLM\Software\Microsoft\WindowsSelfHost" /f

reg delete "HKLM\Software\Policies" /f

reg delete "HKLM\Software\WOW6432Node\Microsoft\Policies" /f

reg delete "HKLM\Software\WOW6432Node\Microsoft\Windows\CurrentVersion\Policies" /f

reg delete "HKLM\SOFTWARE\Policies\Microsoft\Windows Defender" /v DisableAntiSpyware

reg delete "HKCU\Software\Microsoft\Windows\CurrentVersion\Policies" /f

reg delete "HKCU\Software\Microsoft\WindowsSelfHost" /f

reg delete "HKCU\Software\Policies" /f

reg delete "HKLM\Software\Microsoft\Policies" /f
Please note that even if you receive an error for a command, ignore that and continue to the next command.
Once the commands have executed successfully, close the Command Prompt, restart your PC, and check if you still encounter the Windows Defender error.
2] Completely remove the antivirus
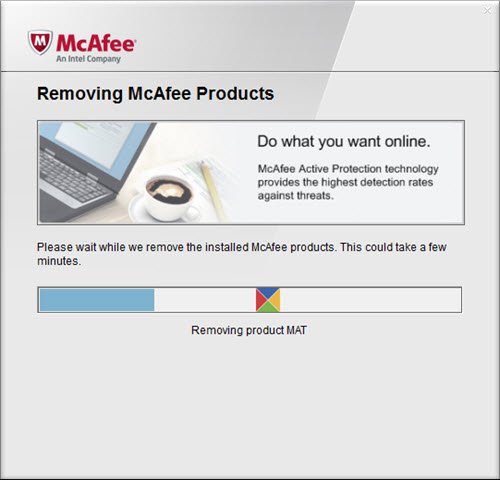
You need to remove every trace of the previously installed antivirus.
If your McAfee uninstallation is incomplete, then you may have to reinstall McAfee and the completely uninstall McAfee.
Likewise, for any other antivirus like Avast, BitDefender, Kaspersky, etc., you can use the dedicated antivirus uninstaller tools. uninstaller.
3] Rebuild the WMI database
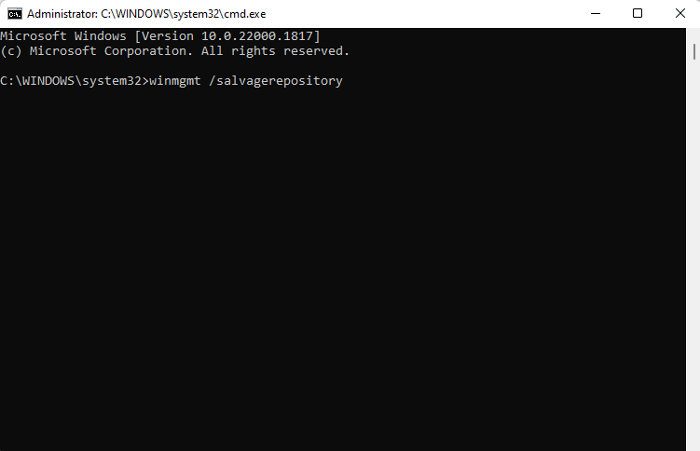
It could be possible that the WMI repository is out-of-date and hence, you are facing the issue, hence, it’s recommended to update the database to avoid the error.
To do so, right-click on Start and select Windows Terminal (Admin) to open the Command Prompt window with admin rights. Then run the below command and hit Enter:
winmgmt /salvagerepository
This will refresh and rebuild the WMI database in case it detects any inconsistency and this should fix the “You’re using other antivirus providers” error in Windows 11.
4] Enable Windows Defender
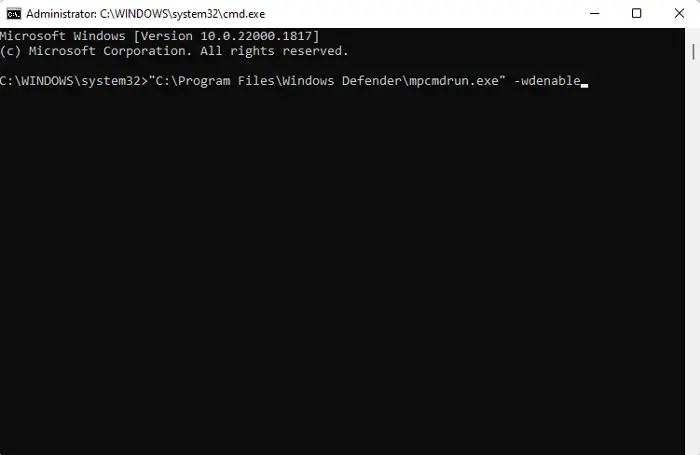
It could be possible that the previously installed third-party antivirus interfered with the Windows Defender service and hence, it was disabled. In such a case, it’s advised to re-enable Windows Defender, so that you can enable Real-time protection to stay protected from online threats.
Press the Win + R keys to open the Run dialog, type cmd and press the Ctrl + Shift + Enter keys together to open the Command Prompt (Admin) window. Next, run the below command and hit Enter:
"C:\Program Files\Windows Defender\mpcmdrun.exe" -wdenable
You can replace “C:” with the drive where Windows is installed. Now, restart your PC and check if you still encounter the Windows Defender error.
Read: Cannot Turn on Windows Defender
5] Reset the WMI database

In some cases, the WMI database is damaged and hence, to resolve the issue, you would need to reset it to its factory settings. But before you proceed, please note that resetting the repository can lead to accidental damage to the system and make it unstable. In this case, it’s better that you create a system restore point that can help you to revert to the previous working state in case there’s damage.
Now, select Windows Terminal (Admin) from the Start menu to run Command Prompt as Administrator, type the below command and hit Enter:
winmgmt /resetrepository
Once done, close Command Prompt and reboot your PC to check if the issue is resolved.
Read: WMI Repository reset failed
6] Perform a system restore
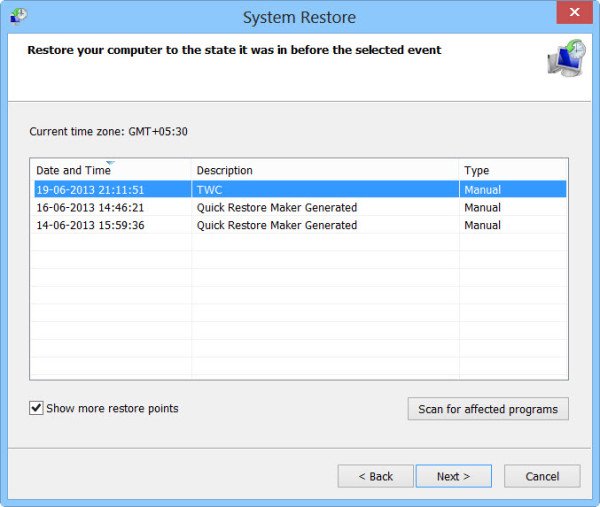
However, if all of the above methods fail to work, you can proceed to perform a system restore, using the system restore point that you created previously. This will help you to revert your PC to a previously working state, and you can continue to use Windows Defender normally:
- Press the Win + R keys together to launch the Run dialog.
- Type rstrui in the search bar and hit Enter to open the System Restore window
- Select Recommended restore or Choose a different restore point based on your requirement and press Next.
- Next, select the restore point from the list and press Next.
- Now, follow the on-screen instructions to restore your computer.
Alternatively, you can try installing another antivirus software for the moment.
Read: Where are System Restore Points stored?
How do I turn off other antivirus providers in Windows 11?
If you have a third-party antivirus installed on your PC and you want to avoid conflict with the Windows Defender app, you can disable the app to avoid any errors. Simply navigate to the taskbar, expand the system tray, right-click on the third-party antivirus app icon, and select Shut Down Protection. Press Yes to confirm. But, if you want to disable Microsoft Defender, simply turn off the Real-time protection option.
Why does my antivirus keep turning on Windows 11?
Windows Defender antivirus may keep turning on your PC if the software license for the antivirus has expired. In this situation, Windows will detect that your PC is not protected and it will automatically enable the Windows Defender service. Therefore, you need to update the third-party antivirus to the latest version and renew its software license to continue to stay protected.
Иногда пользователи Windows 10 сталкиваются с невозможностью установки стороннего антивируса. Давайте разберемся, в чем может быть причина, и рассмотрим пути решения такой проблемы.
Причина 1: компьютер заражен вирусами
Если мастер установки антивируса не запускается, закрывается через некоторое время или при установке возникают ошибки, например, ошибка 1304 может появится при установке антивирусных программ «Лаборатории Касперского», вероятно, ваш компьютер подвергся заражению, и его необходимо проверить на наличие вирусов. Сделать это можно с помощью стандартного антивируса Windows 10 — «Защитника Windows» или скачать портативный антивирусный сканер.
Проверка на вирусы в «Защитнике Windows»
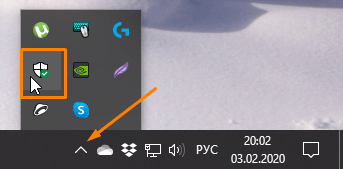
- Откроем «Центр безопасности Защитника Windows». Для этого кликнем на значок с изображением щита в системном трее на панели задач. Если значок скрыт, воспользуемся стрелкой.
Запускаем «Центр безопасности Защитника Windows»
- Другой способ открыть окно «Защитника Windows» — воспользоваться системным поиском. Нажмем на значок лупы в панели задач или горячие клавиши «Windows» + «S» и напечатаем название приложения «Центр безопасности Защитника Windows». Когда нужное наименование будет найдено, кликнем по нему.
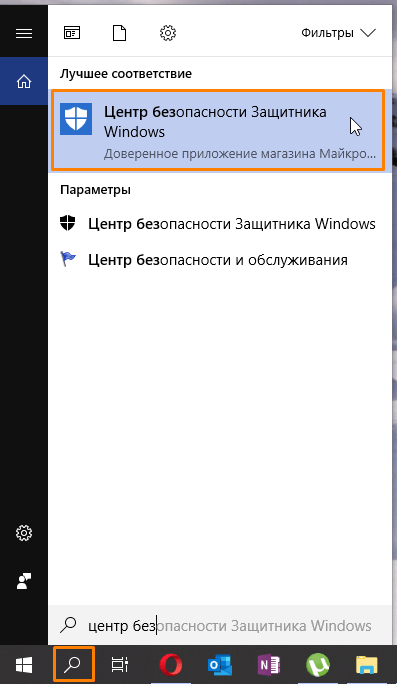
Ищем «Центр безопасности Защитника Windows» через системный поиск
- Нас интересует раздел «Защита от вирусов и угроз».
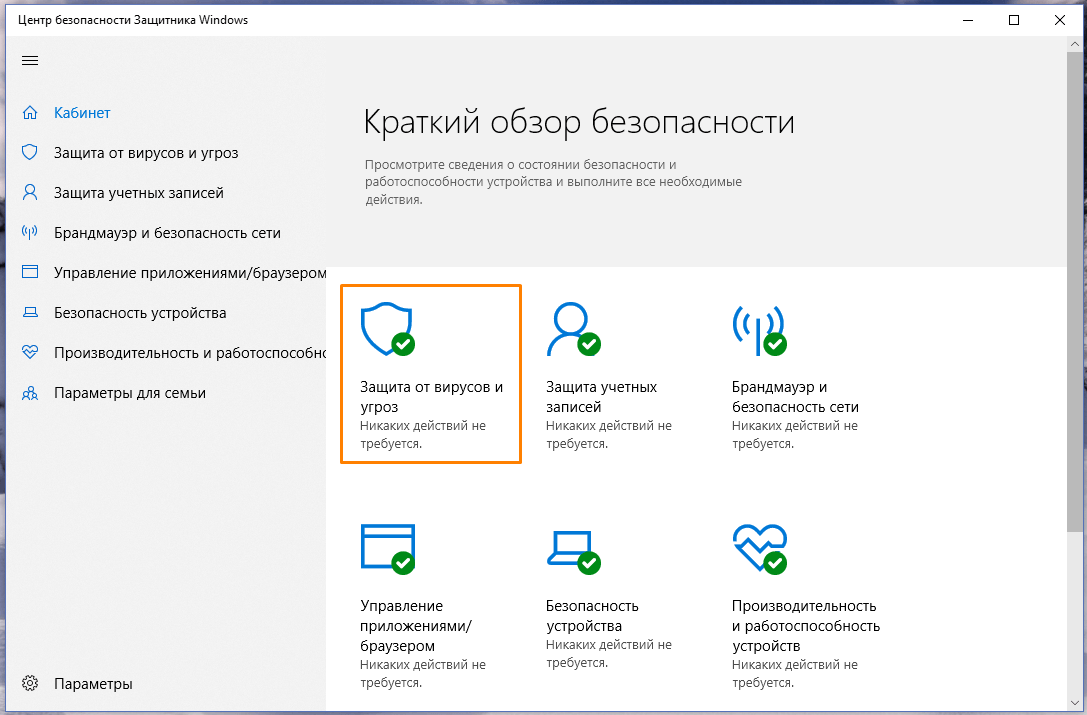
Открываем раздел «Защита от вирусов и угроз»
- Выбираем пункт «Запустить новое расширенное сканирование».
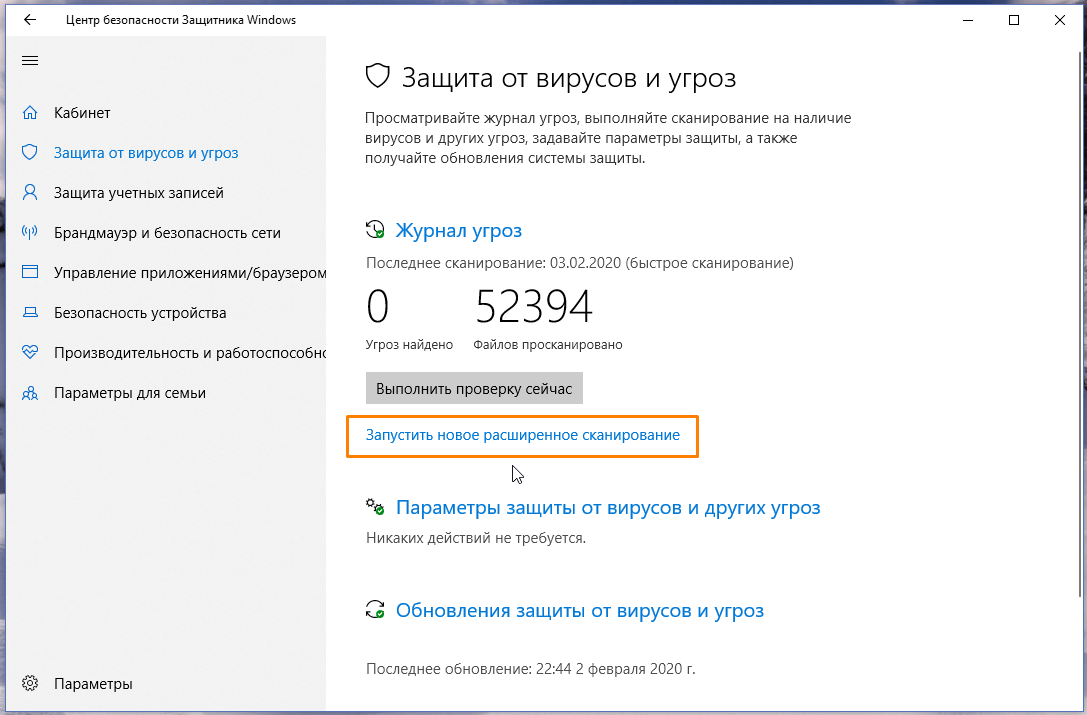
Запускаем расширенное сканирование
- В следующем окне выбираем вариант «Полное сканирование» и нажимаем кнопку «Выполнить сканирование сейчас».
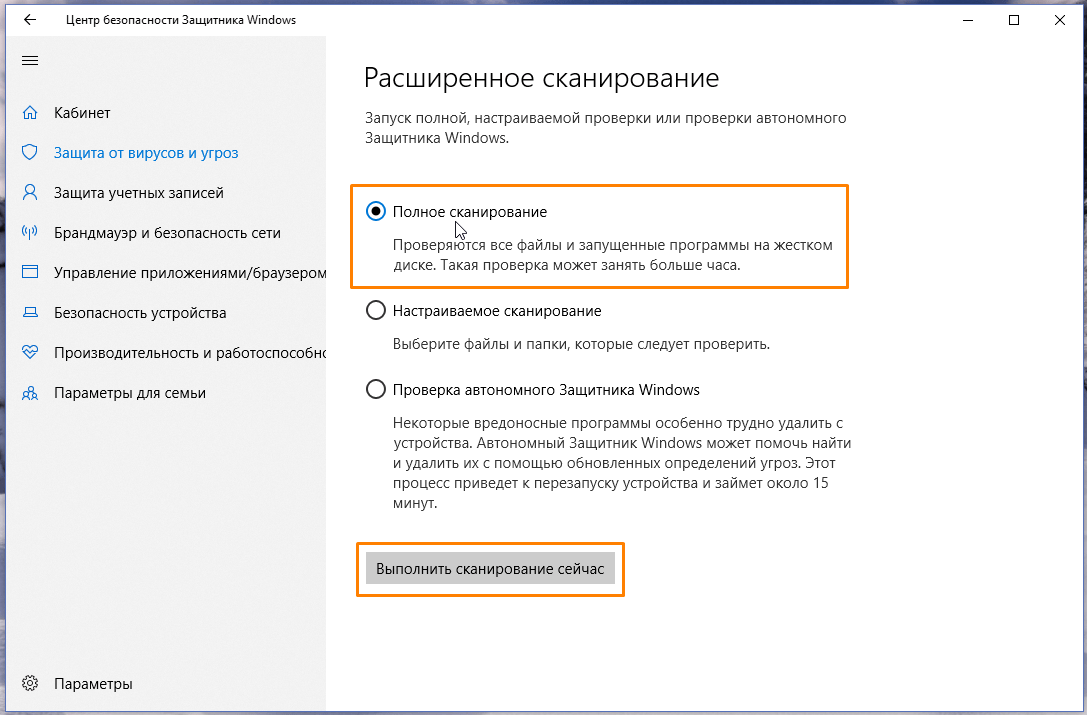
Выбираем полное сканирование и запускаем процесс
- Начнется проверка на вирусы, которая может занять продолжительное время. Программа покажет, сколько приблизительно осталось до окончания проверки.
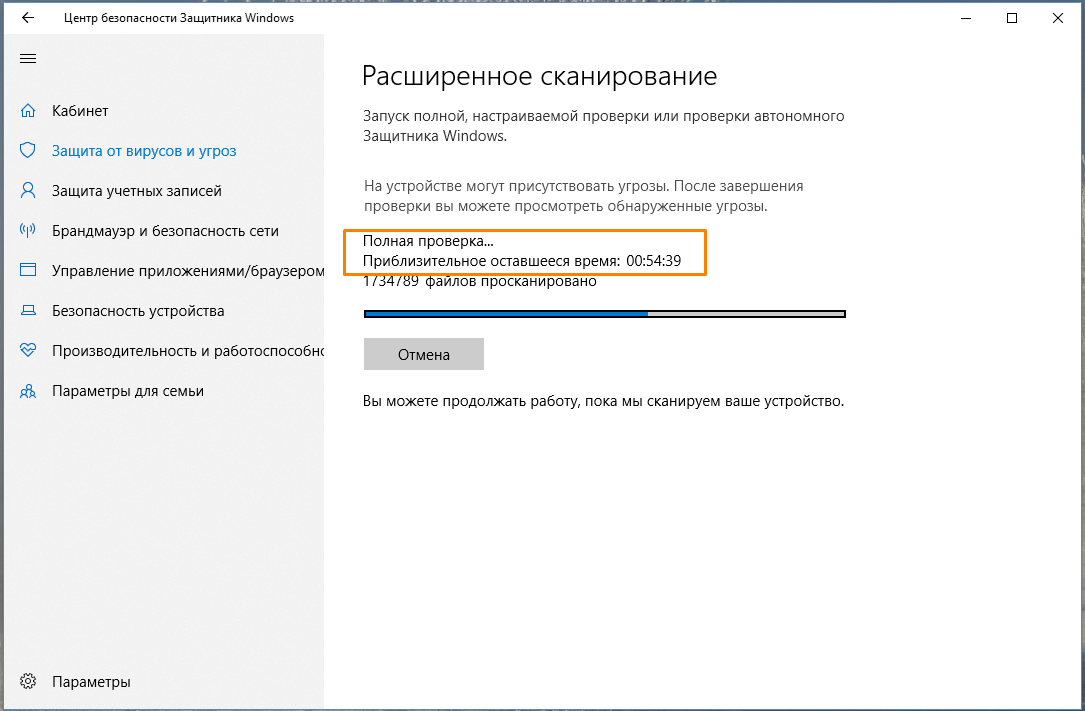
Дожидаемся окончания проверки
- При обнаружении любых угроз необходимо поместить их в карантин или удалить, выбрав соответствующие пункты и нажав кнопку «Запуск действий».
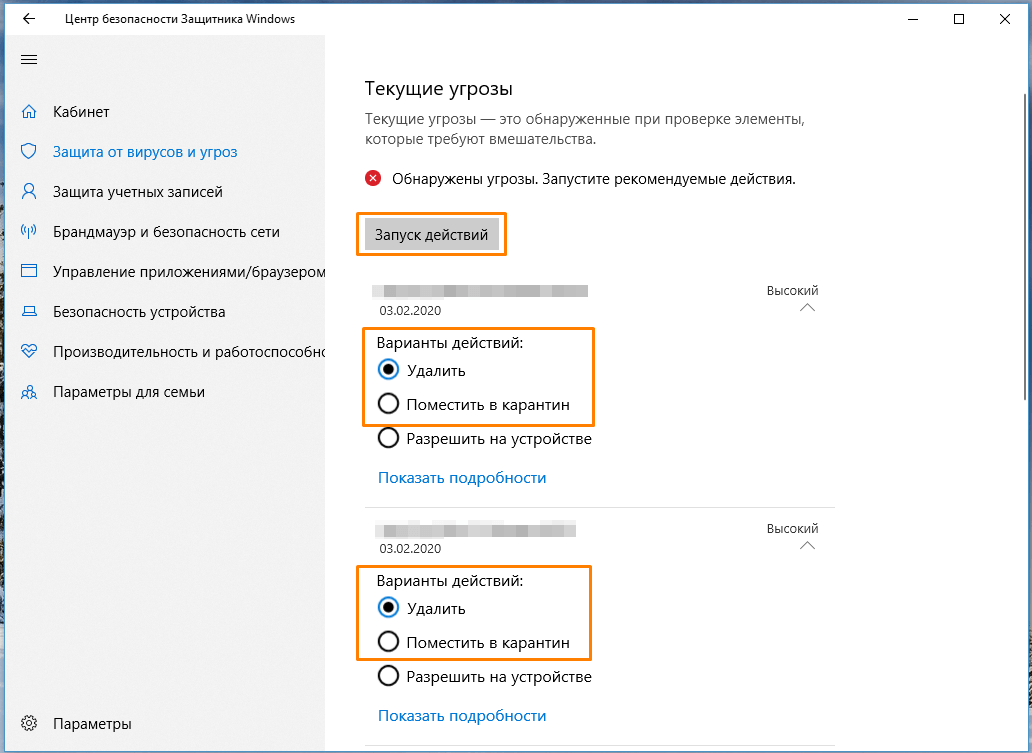
По завершении проверки выбираем действия для каждой найденной угрозы
Проверка на вирусы сторонним сканером
Кроме встроенного в Windows 10 антивируса можно загрузить бесплатный сканер с сайта разработчика антивирусного ПО и проверить компьютер на наличие угроз. Устанавливать программу для этого не требуется, достаточно скачать ее и после запуска сразу начать проверку. Чтобы загрузить такое приложение от «Лаборатории Касперского» — «Kaspersky Virus Removal Tool» — перейдите по ссылке и нажмите кнопку «Скачать».
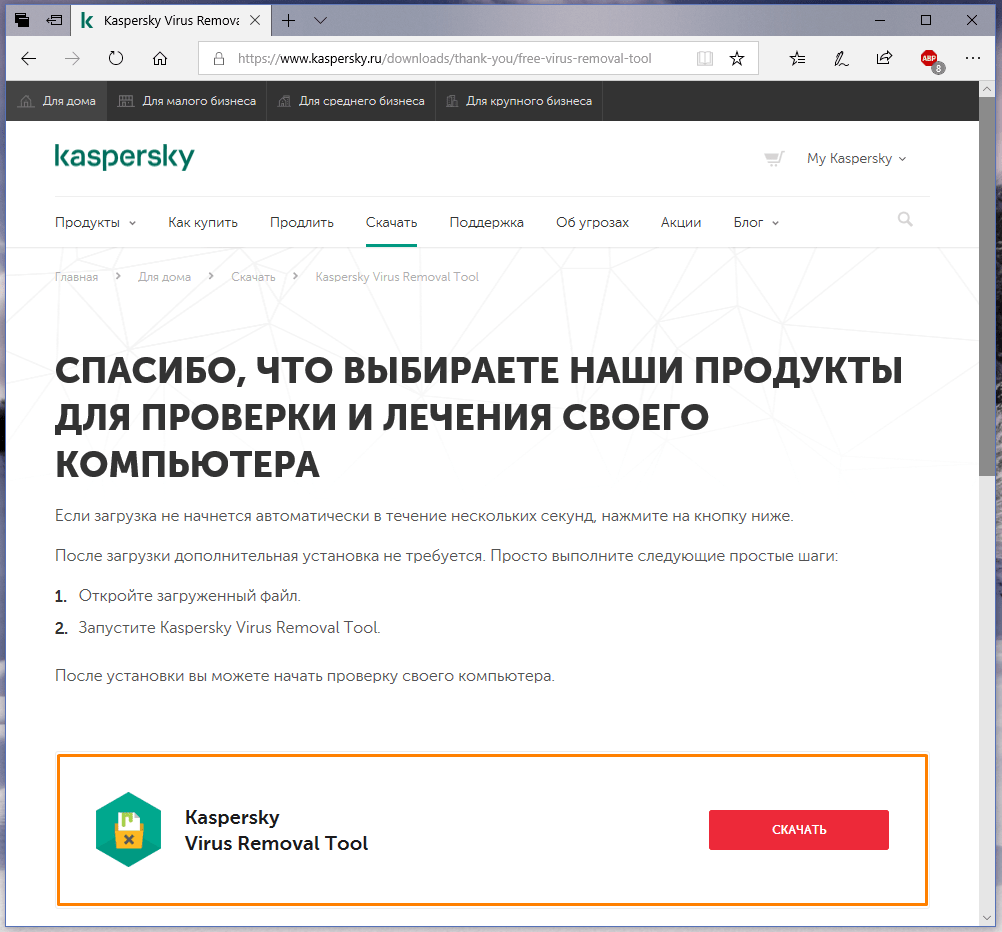
Скачиваем «Kaspersky Virus Removal Tool» с официального сайта
Причина 2: конфликт между антивирусами
Встроенный антивирус Windows 10 «Защитник Windows» не препятствует установке стороннего антивирусного ПО, он просто отключается при появлении в системе нового антивируса. Чего нельзя сказать о продуктах других разработчиков. Если вы попытаетесь установить на один компьютер два или более сторонних антивируса, это неизбежно приведет к конфликтам. Поэтому, если вы решили поменять антивирус, сначала следует полностью удалить предыдущий антивирусный пакет. Сделать это можно с помощью штатных средств Windows 10 либо воспользоваться специальной утилитой-деинсталлятором.
Удаляем старый антивирус через «Параметры» Windows
- Кликаем правой кнопкой мыши на кнопку «Пуск» и выбираем пункт «Приложения и возможности».
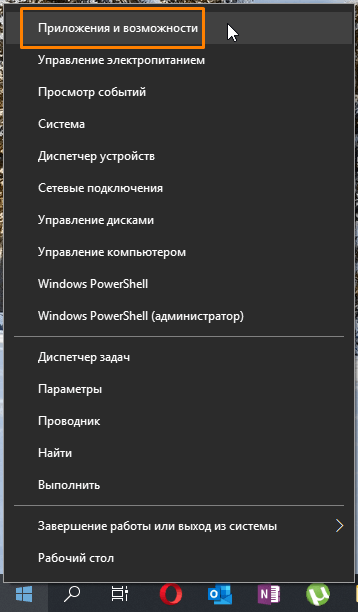
Открываем раздел «Параметров» Windows «Приложения и возможности»
- В списке установленных программ находим антивирус, который собираемся деинсталлировать, кликаем на него и нажимаем кнопку «Удалить».
- Подтверждаем удаление и после его завершения перезагружаем компьютер.
Удаляем старый антивирус с помощью утилиты «Revo Uninstaller»
Описанный ранее способ удаления программ не всегда бывает эффективен, так как после деинсталляции могут остаться данные на жестком диске и в реестре Windows. Поэтому надежнее воспользоваться сторонней утилитой, специально созданной для удаления приложений, например, «Revo Uninstaller». Скачать ее бесплатную версию «Revo Uninstaller Free» можно по этой ссылке с официального сайта разработчика.
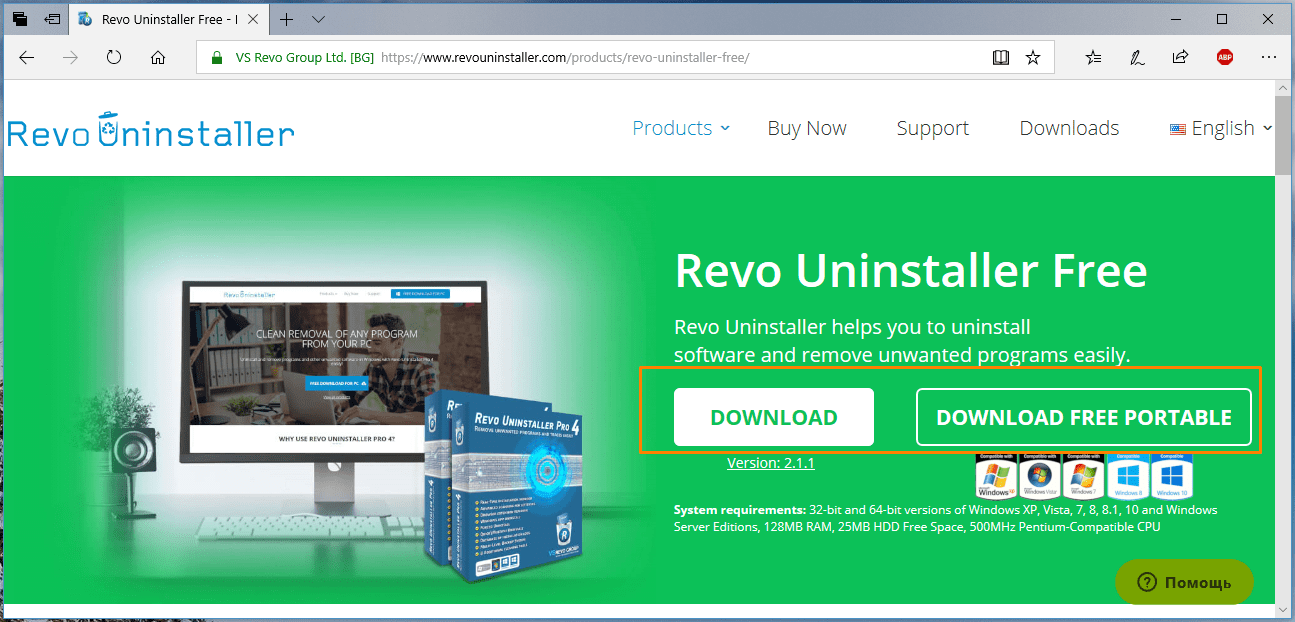
Загружаем утилиту-деинсталлятор «Revo Uninstaller Free»
- После установки программы «Revo Uninstaller Free» запускаем ее (если вы скачали портативную версию, то установка не потребуется) и находим в списке программ наш антивирус. Выбираем его, нажимаем кнопку «Удалить» на панели сверху и подтверждаем наши намерения, нажав кнопку «Да».

Выбираем антивирус и жмем кнопку «Удалить»
- Утилита запустит деинсталлятор программы. По окончании удаления проводим поиск оставшихся файлов, папок и пунктов в реестре. Для этого выбираем «Продвинутый» режим сканирования и нажимаем кнопку «Сканировать».
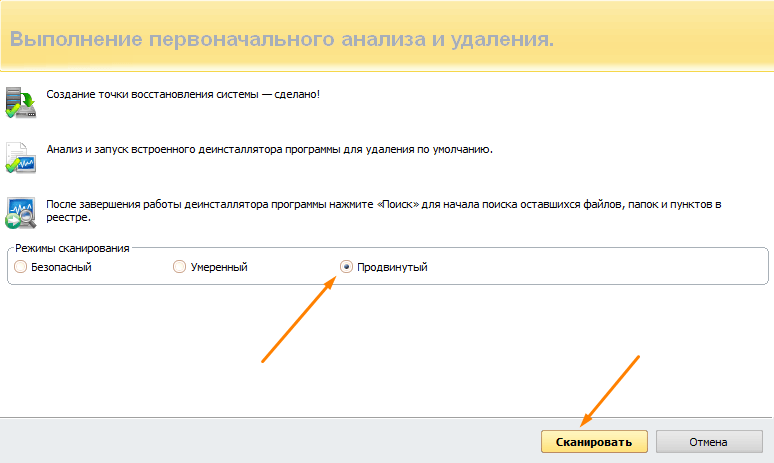
Включаем «Продвинутый» режим сканирования
- Чтобы удалить обнаруженные остаточные данные, нажимаем на пункт «Выбрать все», а затем на «Удалить», после чего закрываем программу и перезагружаем компьютер.
Удаляем старую версию антивируса Kaspersky с помощью утилиты от разработчика
Если при установке антивирусных продуктов Kaspersky появляется сообщение, что в системе установлены другие продукты этого разработчика, мешающие установке, воспользуйтесь утилитой «Kavremover», специально созданной для удаления программ «Лаборатории Касперского». Перейдите на страницу приложения на официальном сайте и нажмите кнопку «Скачать».
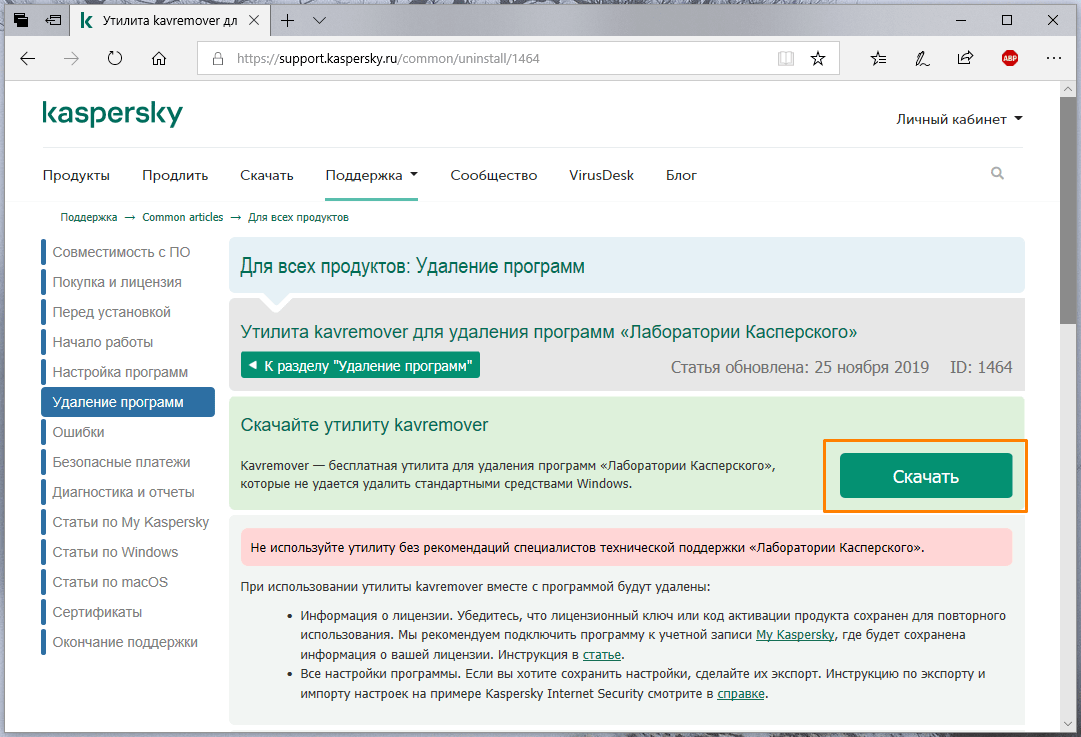
Скачиваем «Kavremover» с официального сайта
После запуска программа сама должна обнаружить установленные на компьютере продукты «Лаборатории Касперского». Также можно выбрать продукт из списка. Затем следует ввести указанный в верхней части окна код и нажать кнопку «Удалить».
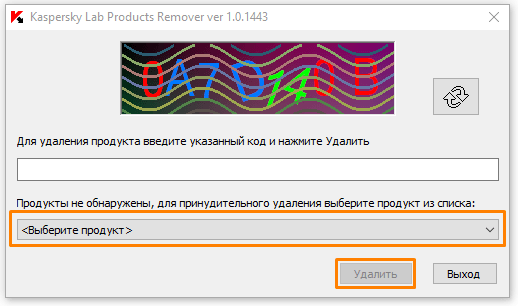
Удаляем выбранный продукт «Лаборатории Касперского»
Заключение
Наши инструкции должны помочь вам решить проблему с установкой антивируса. И напоследок еще несколько рекомендаций: если вы удалили старый антивирус, перед установкой нового обязательно перезагружайте компьютер, скачивайте антивирусное ПО только с официальных сайтов и не забывайте удостовериться, что загруженная версия полностью совместима с установленной на вашем ПК версией Windows 10.
![]() Загрузка …
Загрузка …
Post Views: 9 771
Microsoft Defender и Kaspersky являются двумя популярными антивирусными программами, которые предназначены для защиты компьютеров от вредоносных программ. Однако при использовании этих программ вместе могут возникать конфликты, которые необходимо устранить.
Конфликты при использовании Microsoft Defender и Kaspersky
Основными проблемами, которые возникают при использовании Microsoft Defender и Kaspersky вместе, являются следующие:
- Низкая производительность компьютера. При одновременном запуске обеих программ может произойти сильное падение производительности компьютера, так как каждая программа будет сканировать файлы и процессы на наличие вредоносных программ.
- Конфликт в расписании проверок. При наличии двух антивирусных программ может возникнуть конфликт при расписании проверок. Одна программа может начать проверку в момент, когда на другой запланирована проверка, что приведет к конфликту и снижению защиты компьютера.
- Ложные срабатывания. При наличии двух антивирусных программ может возникнуть ситуация, когда одна программа будет считать файл вредоносным, в то время как другая — безопасным. Это может привести к ложным срабатываниям и удалению полезных файлов.
Решения конфликтов при использовании Microsoft Defender и Kaspersky
Существует несколько способов решения конфликтов при использовании Microsoft Defender и Kaspersky вместе:
- Отключение одной из программ. Если вы хотите использовать только одну программу, то можно отключить другую. Для этого нужно зайти в настройки соответствующей программы и отключить ее работу.
- Смена времени расписания проверок. Если вы хотите использовать обе программы, то можно настроить расписание проверок таким образом, чтобы они не конфликтовали между собой.
- Отключение одной из функций. Если вы хотите использовать обе программы, то можно отключить одну из функций, которые приводят к конфликту. Например, можно отключить функцию сканирования в режиме реального времени.
Заключение
Microsoft Defender и Kaspersky являются двумя отличными антивирусными программами, которые могут защитить ваш компьютер от вредоносных программ. Однако при их совместном использовании могут возникнуть конфликты, которые необходимо устранить. С помощью вышеуказанных решений вы сможете использовать эти программы вместе и получить максимальную защиту своего компьютера.
Если вы используете стороннюю антивирусную программу, например, Kaspersky Internet Security или Dr. Web Security Spaсe, ОС Windows, как правило, должна автоматически отключить встроенный агент Защитника Windows 10. Причина: два антивирусных сканера при параллельной работе будут друг другу мешать.

Если отключения Защитника не произошло и вы видите его иконку в трее, то выключить его следует вручную. Для этого откройте меню «Пуск» и перейдите в «Параметры». Кликните по разделу «Обновление и безопасность», а в открывшемся окне нажмите на строку «Защитник Windows».
В правой области нажмите на «Ограниченное периодическое сканирование» и переведите его в положение «Откл.».
Также сделайте и с другими доступными опциями. После этого Защитник будет деактивирован полностью. Если у вас появится необходимость проверить ПК на вирусы встроенным средством, щелкните по «Открыть Защитник Windows» и в нем — «Включить».