Eyestrain is a condition that affects many people, especially those who work on their computers every day. If you’ve ever experienced a headache, blurry vision, or irritated eyes after a long day of work, your digital screen may be the culprit. Some efficient ways to minimize the risk of eyestrain are to reduce your screen use and make a few adjustments to the way you use your device. Learn how you can change your Windows 11 settings to make it easier to look at your screen.
How does your computer cause eyestrain?
Excessive computer use is often associated with eyestrain. Because of the connection between the two, it’s commonly referred as “digital eyestrain” and “computer vision syndrome.” When we use computers, our eyes become so focused on the contents of the screen that they can become fatigued. Computer screens are also very bright, and concentrating on a bright screen for several hours can irritate your eyes. If your eyes tend to feel dry after looking at your screen, you may not be blinking enough throughout the day. Screen use can cause you to blink less, which can lead to dry, burning eyes.
How to combat eyestrain on Windows 11
If you are frequently experiencing symptoms of eyestrain, you can take matters into your own hands by utilizing Windows 11 features. Here are some tips you can try:
Switch to dark mode
Dark mode is a popular option in many apps, and it’s available in Windows 11 as well. The default background for Windows is light mode, which can be too bright for some users. To access dark mode, select the Windows key and navigate to Settings > Personalization > Colors. You’ll see an option called Choose your mode, and from there you can select Dark under the dropdown menu.
Use the night light feature
Computer screens give off blue light, which can exacerbate eyestrain symptoms and make it harder to fall asleep at night. The night light feature in Windows 11 changes the colors on your screen to make it easy to look at. You can turn night light on by going to Settings > System > Display > Night light. The strength and timing of night light can be adjusted manually based on your preferences.
Turn off content adaptive brightness control
A new feature that’s available in some Windows 11 PCs is content adaptive brightness control, which adjusts the brightness of your screen based on what’s playing on your monitor. This means that your brightness level can rise abruptly when your monitor is showing something bright. If this feature bothers your eyes, you can turn it off by going to Settings > System > Display > Brightness and de-selecting Help improve battery by optimizing the content shown and brightness. You can also manually adjust your brightness settings through your keyboard or in settings.
Taking breaks from your screen coupled with these options in Windows 11 can help prevent your eyes from getting strained. Upgrade to Windows 11 today to get access to the most up-to-date Windows settings.
Studies have shown that the blue light from your devices’ screen can cause various issues like eye strain, blurry vision, dry eye, etc. Since most of us now spend hours in front of one device or another, whether for work or entertainment, there is a high probability of facing these issues. Luckily, most devices allow you to filter this light and ensure that eye health is not affected. This tutorial will show you how to enable a blue light filter on Windows 11 systems.
Enable Blue Light Filter Windows 11
The process to enable this filter is very simple. Just follow the steps below:
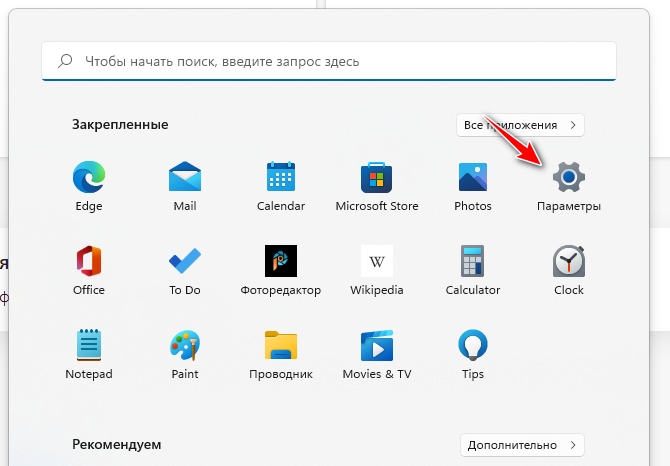
Step-1: Click on the Windows icon on the taskbar. Then select the Settings cog. (You can also open the Settings app using the shortcut keys: Win + I)

Step-2: Ensure that you are in the System Settings from the left pane.
Step-3: In the System settings, select the Display option from the right pane.

Step-4: Turn the toggle switch On next to Night Light. Once you turn the switch On, your screen will immediately shift to warmer colors.

Customize Filter
If you wish to enhance the warmth, reduce it or even schedule the filter, you can easily do it.

- Follow all the steps above 1-3.
- Click on the Night Light option. (Do not click on the toggle switch)

- Use the slide bar next to Strength to change the warmth of the filter. You can choose anything from 0-100. At 100, your screen will be very orangish.
- Turn the toggle switch On next to the Schedule night light.
- Select the hours you wish to have the night light filter on.
[As you can see from the image below that you can set hours according to what you want, and you can also choose the Sunset to Sunrise option depending on your location. For the latter option, ensure that your location is On]
- After you are satisfied, close the Settings app.


I hope this helps improve your sleep cycle and your eye health issues in the future. Let us know in the comments below.
Возможно вы сталкивались с такой проблемой, что ваши глаза начинают болеть или слезиться после долгой работы за компьютером. Это связано с тем, что ваши глаза напрягаются из-за синего цвета, когда вы смотрите на экран компьютера или смартфона.
Для решения этой проблемы в Windows 11 существует функция, под названием фильтр синего цвета. Эта настройка существует с Windows 10 и позволяет настроить цветовую температуру экрана так, чтобы уменьшить количество синего цвета. В этой статье расскажу, как включить фильтр синего на Windows.
Содержание
- Включение фильтра синего в Windows 11
- Как включить фильтр синего в Windows 7, Windows 8/8.1
Как включить фильтр синего в Windows 11
Фильтр синего в Windows также называется ночным светом и включается этот режим довольно просто. Для этого открываем меню Пуск и переходим в параметры.
Далее открываем раздел Дисплей.

И пункт Ночной свет.
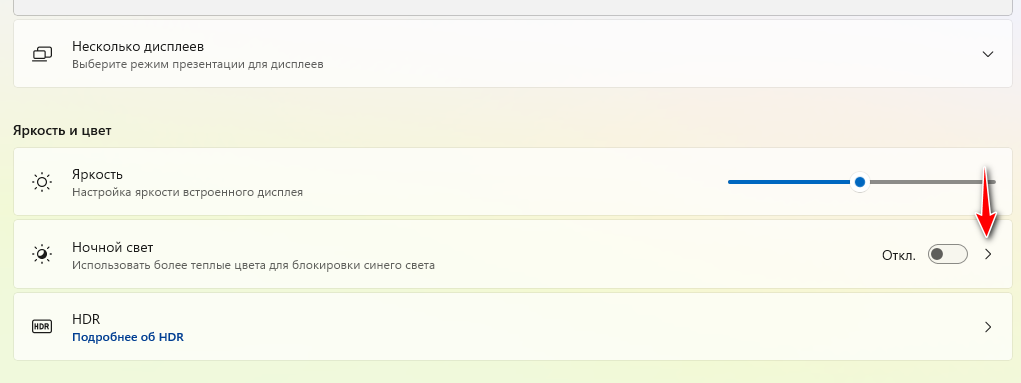
В этом разделе можно настроить фильтр синего.
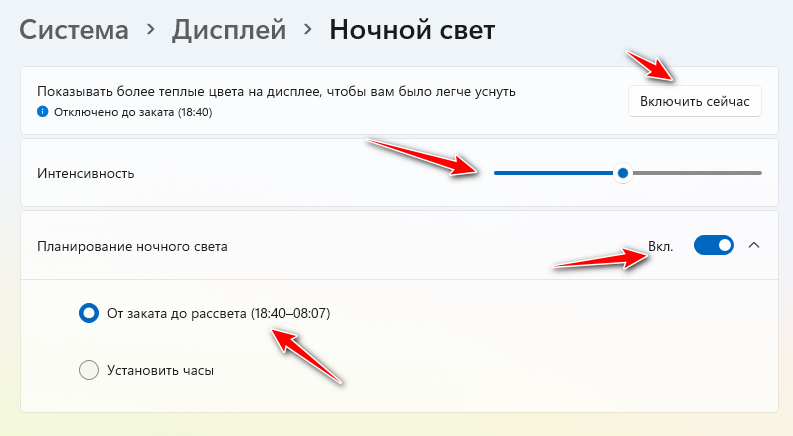
Ночной свет можно включить как сразу, по кнопке Включить сейчас, так и настроить по расписанию. Это довольно удобно, когда вы не хотите днем работать в этом режиме.
Для того, чтобы фильтр синего включался по расписанию в Windows, включите пункт Планирование ночного света и установите необходимые часы его работы.
Как включить фильтр синего в Windows 7, Windows 8
Включить фильтр синего в Windows 7 или Windows 8 стандартными средствами не получится. Поэтому можно воспользоваться специальной программой f.lux.
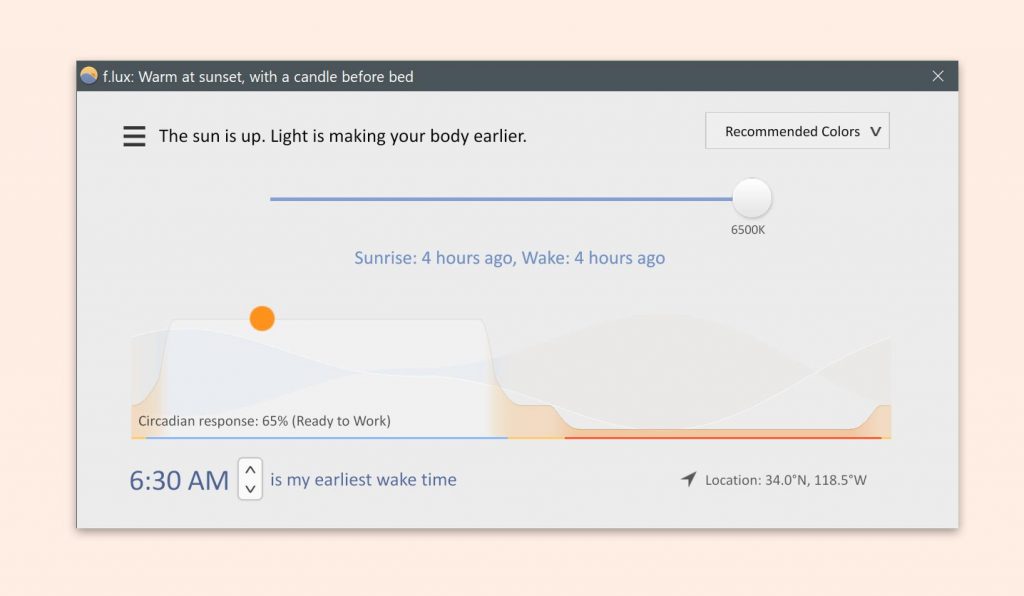
Эта бесплатная программа сама все сделает и обладает настройками, с помощью которых можно настроить фильтр синего по расписанию. Так же в ней можно выключить фильтр для определенных программ, чего нельзя сделать с помощью стандартных средств Windows.

Исследования показали, что синий свет от экрана ваших устройств может вызывать различные проблемы, такие как усталость глаз, нечеткое зрение, сухость глаз и т. Д. высока вероятность столкнуться с этими проблемами. К счастью, большинство устройств позволяют фильтровать этот свет и гарантировать, что это не повлияет на здоровье глаз. Из этого туториала Вы узнаете, как включить фильтр синего света в системах Windows 11.
Включить фильтр синего света Windows 11
Процесс включения этого фильтра очень прост. Просто следуйте инструкциям ниже:
Шаг 1. Щелкните значок Windows на панели задач. Затем выберите шестеренку настроек. (Вы также можете открыть приложение «Настройки» с помощью сочетания клавиш: Win + I)

Шаг 2: Убедитесь, что вы находитесь в Системных настройках на левой панели.
Шаг 3: В настройках системы выберите параметр « Отображение» на правой панели.

Шаг 4: Поверните переключатель на рядом ночник. Как только вы включите переключатель, ваш экран сразу же переключится на более теплые цвета.

Настроить фильтр
Если вы хотите усилить теплоту, уменьшить ее или даже запланировать фильтр, вы можете легко это сделать.
- Выполните все шаги, указанные выше 1-3.
- Нажмите на опцию Night Light. (Не нажимайте на тумблер)

- Используйте ползунок рядом с параметром « Сила», чтобы изменить теплоту фильтра. Вы можете выбрать что угодно от 0 до 100. На 100 ваш экран будет очень оранжевым.
- Поверните переключатель на рядом с Schedule ночного света.
- Выберите часы, в которые вы хотите включить фильтр ночного света.
[Как вы можете видеть на изображении ниже, вы можете установить часы в соответствии с вашими предпочтениями, а также выбрать вариант от заката до восхода в зависимости от вашего местоположения. Для последнего варианта убедитесь, что ваше местоположение включено]

- После того, как вы будете удовлетворены, закройте приложение «Настройки».
Я надеюсь, что это поможет улучшить ваш цикл сна и улучшить здоровье глаз в будущем. Дайте нам знать в комментариях ниже.
- Chromebook Camera Not Working? 7 Fixes to Try
- Microsoft confirms Windows Copilot isn’t available for everyone on Windows 11
- How to uninstall an update in Windows 11 manually
- Apple Music Not Showing Lyrics? 9 Fixes to Try
Don’t miss out on any hot news from the world of gaming and technology! Subscribe to our unique newsletter and be the first to learn about exclusive releases, exciting guides, and the latest in the world of technology.
Join our community of gamers and tech enthusiasts to stay up-to-date with the most important events! Are your fingers itching with anticipation? Subscribe right now and discover the thrilling world of games and technology with us!
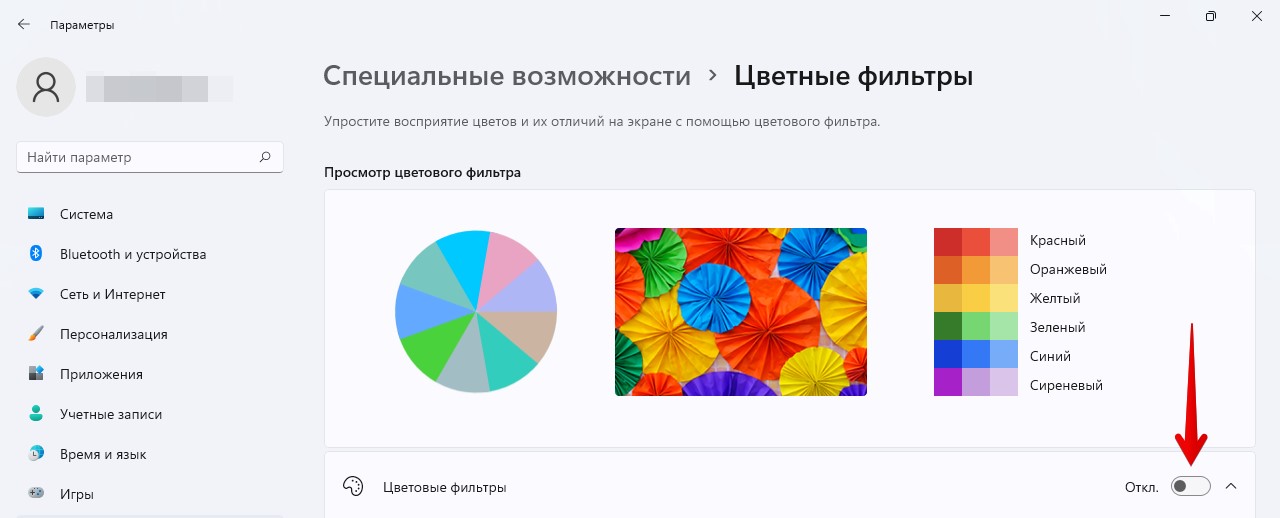
Цветные фильтры — это невероятно полезная функция в операционной системе Windows 11, которая упрощает восприятие цветов и их отличий на экране. Цветовые фильтры в первую очередь предназначены для пользователей с дальтонизмом.
В этой статье рассмотрим, как быстро включить и использовать цветные фильтры в операционной системе Windows 11.
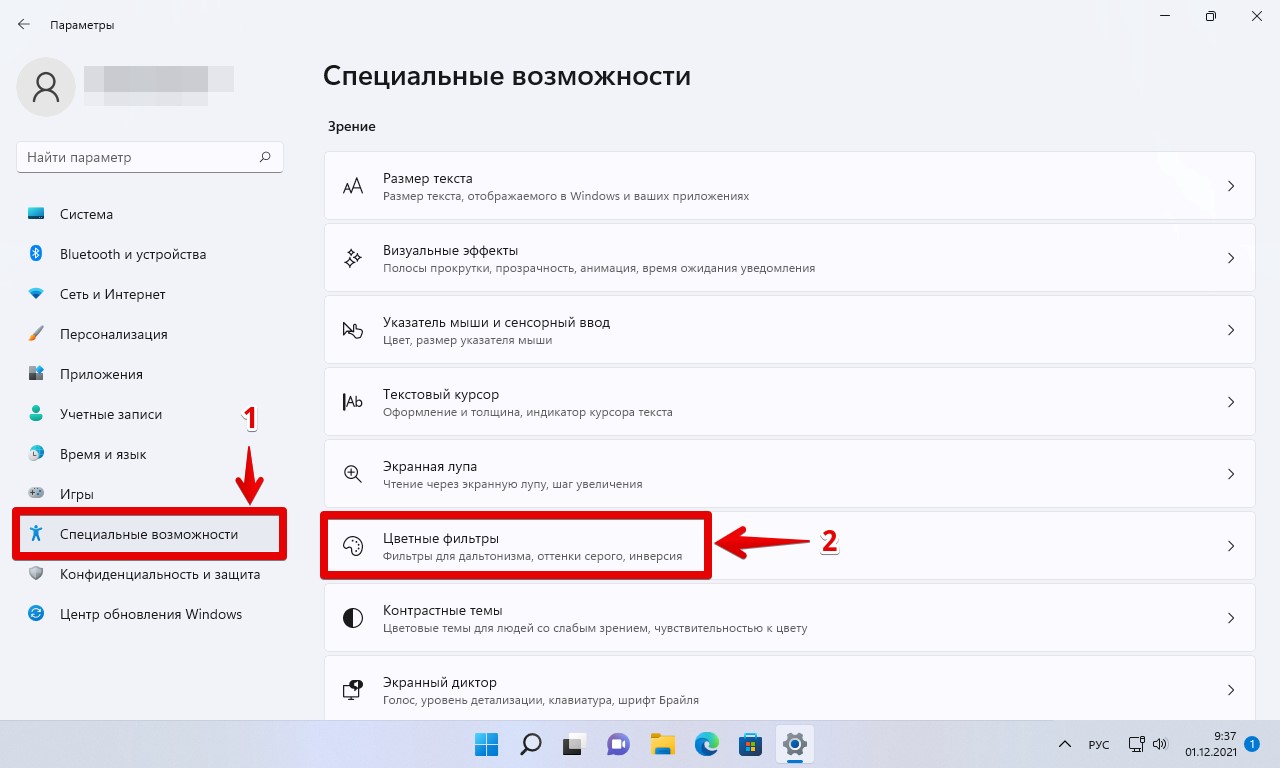
Сначала запускаем приложение «Параметры» — нажимаем кнопку «Windows» на клавиатуре или на значок «Пуск» на панели задач, затем в меню «Пуск» щелкаем по иконке «Параметры». Либо используем горячие клавиши «Win+I» для запуска приложения «Параметры».
Теперь переходим в раздел «Специальные возможности» в левой части окна, а затем в раздел «Зрение», где щелкаем по настройке «Цветные фильтры».
Напротив функции «Цветовые фильтры» переводим переключатель в положение «ВКЛ» для активации «Дальтонизма».
Windows 11 предлагает в общей сложности 6 цветовых фильтров:
- Красно-зеленый (нарушение восприятия зеленого цвета, дейтеранопия)
- Красно-зеленый (нарушение восприятия красного цвета, протанопия)
- Сине-желтый (тританопия)
- Оттенки серого
- Инвертированные оттенки серого
- Инвертированные
Выбираем подходящий цветовой фильтр, щелкнув переключатель перед опцией.
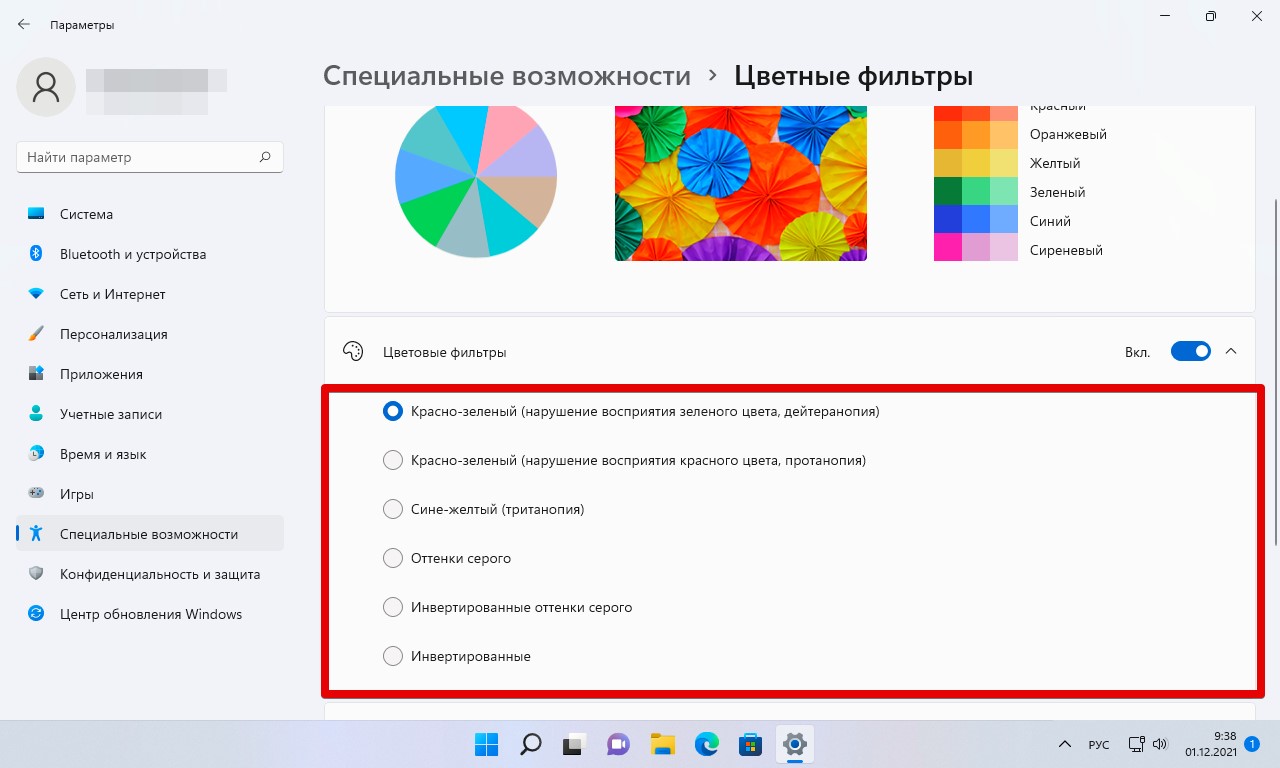
Выбор сразу отразится на экране. Надеюсь статья была для вас полезной. Удачи.