The step by step guide to configure Network Access Protection (NAP), in Windows Server 2012 R2.. The NAP is a Microsoft technology for controlling network access of a computer, based on its health. With NAP, system administrators of an organization can define policies for system health requirements. For instance System health requirements are whether the computer has the most recent operating system updates installed. The computer host based firewall is installed and enabled etc.
The NAP is completely removed from Windows server 2016. It will be replace with Direct Access and new network policy feature Web Application Proxy. Also the DHCP servers are no longer capable of enforcing NAP policies.
The above screenshot is Network Policy Server in Windows Server 2016 without Network Access Protection. It shows that you must get ready to migrate from NAP to DirectAccess and Windows Web Application Proxy in Server 2016. I didn’t want to write this article, so it must be written for new admins in Windows Server 2008 and 2012 R2.
This post is going to configure network access protection. If you don’t know the installation, read the below article about installation of NAP in Windows server 2012 R2.
- Installing Network Policy Server (NPS) on Windows Server 2012 R2
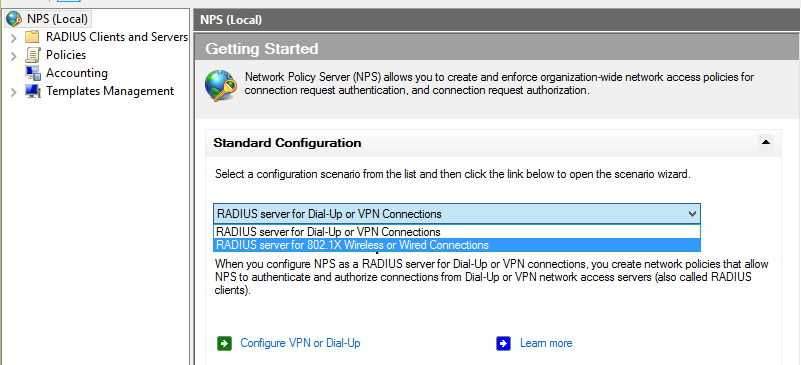
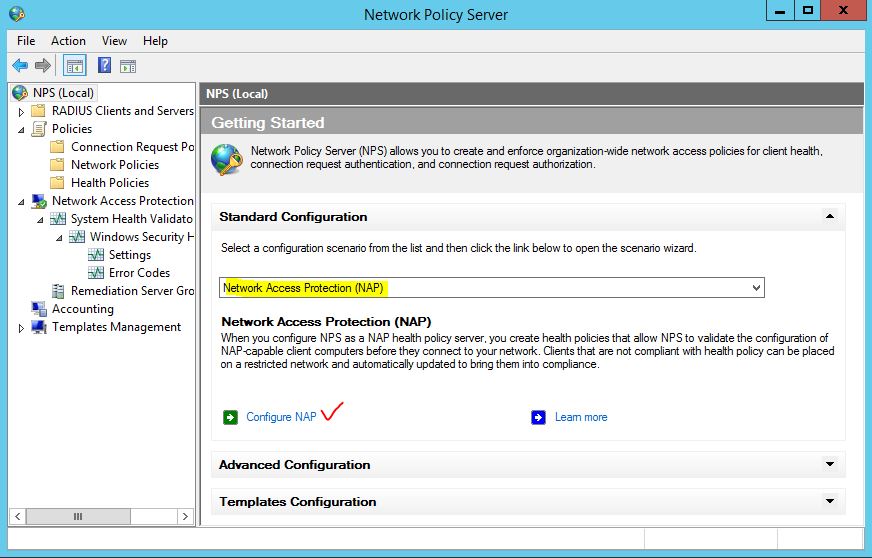
- To configure network access protection, open network policy server from server manager.
- On the network policy server page, from right side select NPS (Local) then select Network Access Protection (NAP) from Standard Configuration section and click Configure NAP link.
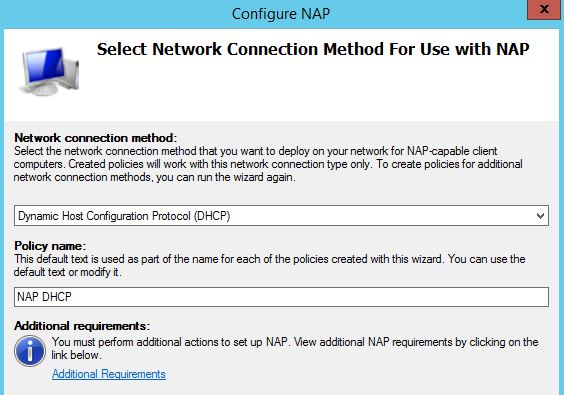
3. On the network connection method for use with NAP page, select Dynamic Host Configuration Protocol (DHCP) from Network connection method section then click Next.
4. On the Specify NAP Enforcement Server Running DHCP Server page, just click Next. Then click Next on the Specify DHCP Scopes page. Do click Next on Configure Machine Group also.
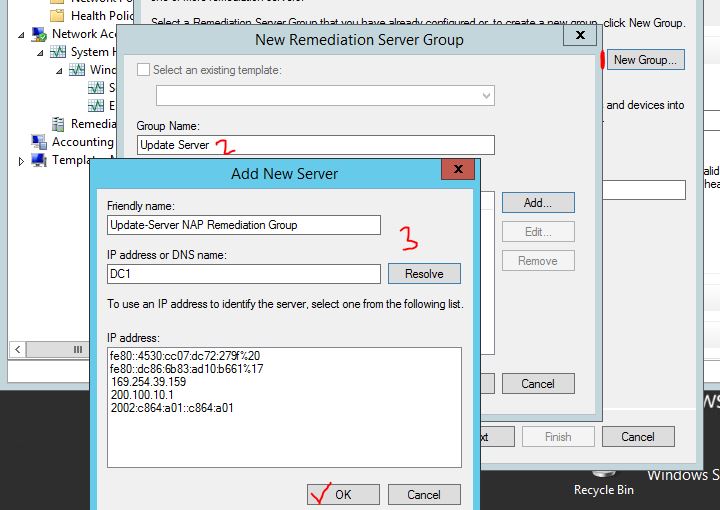
5. On the Specify a NAP Remediation Server Group and URL click New Group and type a meaningful name for Group Name. Then click Add to specify a name for Freindly name and name or IP address of Remediation server. When complete, click OK to close the pages.
6. Now type the help page url address on Troubleshooting URL and click Next.
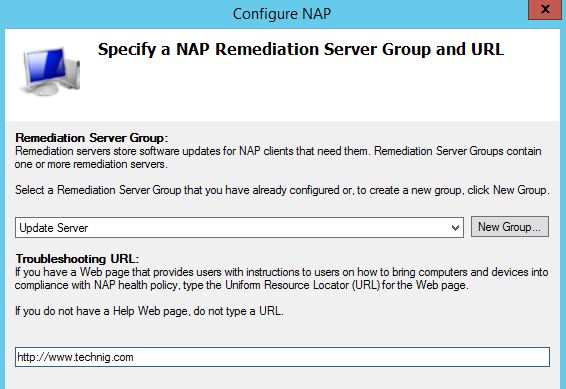
The Remediation Server Groups are the servers that will be made accessible to non-compliant clients. These servers can be used to patch clients to a compliant status.
7. Click Next on Define NAP Health Policy page.
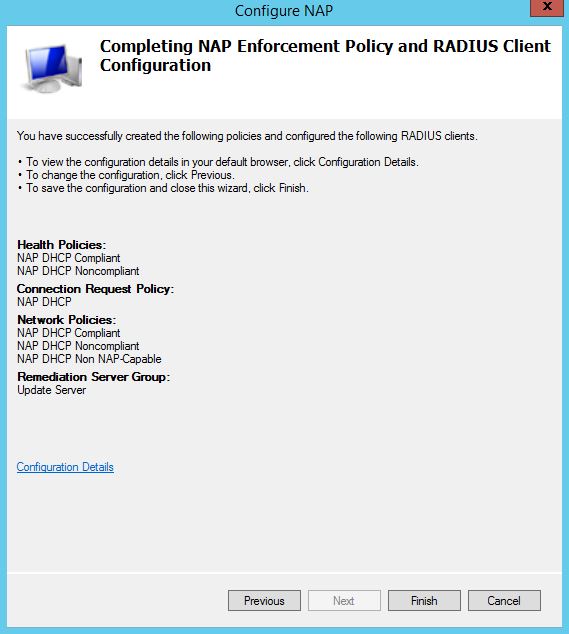
8. Finally click Finish to complete the NAP enforcement policy and RADIUS client configuration.
9. Navigate to Network Policies and Health Polices to check whether the polices are ready for serving NAP.

So, everything good.
Configure Group Policy and Services for NAP
After installing and configuration of NAP, you should enable DHCP Client enforcement from group policy management.
- Type “gpmc.msc” on the run and press enter to open Group Policy Management.
- Expand Forest, Domain, and domain name. Then create a new group policy object, and named NAP enforcement.
- Now right click on the new created GPO and click Edit to edit it.
- Navigate to NAP Client Configuration and select Enforcement Clients. Finally right click DHCP Quarantine Enforcement Client and enable it. Do it like below screenshot.
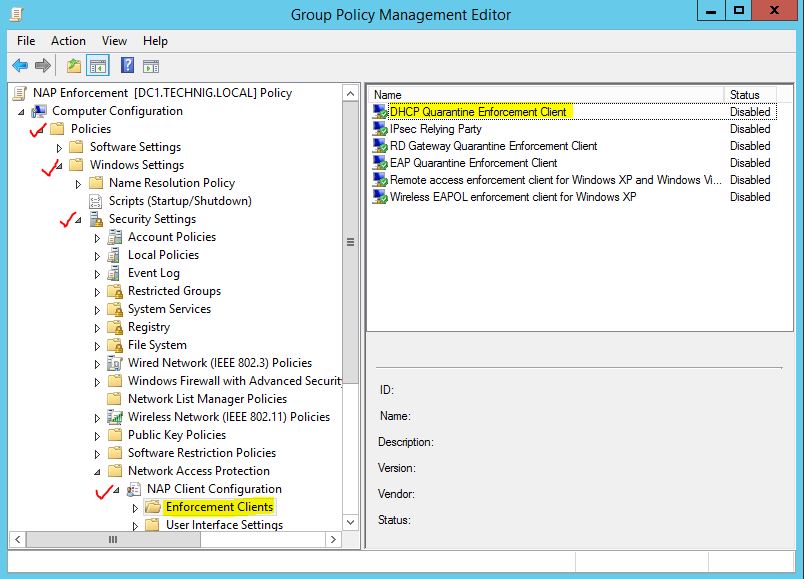
5. Navigate to System Services and find Network Access Protection Agent then enable it.
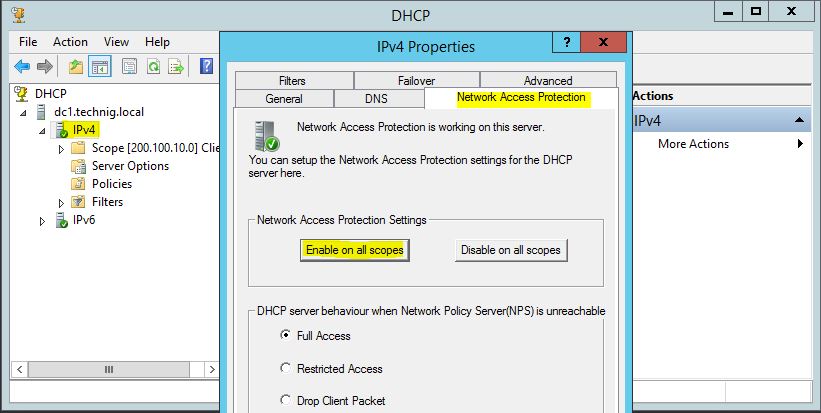
6. Go to DHCP, right click IPv4 then select Properties. Now on the Network Access Protection tab, click Enable on all scopes.
That’s all, but don’t forget to configure the Windows Security Health Validator for clients. The default policy is require the Firewall and Auto Update should be enabled, Anti Virus, Spyware Protection must be installed on the client systems.
OK, hope you find this article helpful. Any question? Ask through comment sections. So have a nice and great time as system admin.
In this post, we’ll learn the steps to configure Network Policy Server (NPS). In the previous post, we learned the steps to install the Network Policy Server in Windows Server 2012 R2. NPS allows you to create Network Access Protection (NA) for client health. Through NAP, we can restrict the network access or provide limited network access to the unhealthy clients from using organization’s network.
Let’s take a scenario, we have an OU naming Sales in Active Directory Users and Computers. We have to apply the Network Access Policy on the client computers in the Sales OU. NAP policy will verify if Firewall is enable on the client computers. If Firewall is not enable then it would block or restrict the network access. However, we can also define the policy to verify Antivirus and Anti spyware applications.
How to configure Network Access Protection in Network Policy Server
Step 1. Open Network Policy Server from the Administrative Tools in Start menu.
Step 2. On Network Policy Server console, click on “Configure NAP” to configure the NAP policy server.

Step 3. On Select Network Connection Method For Use with NAP console, select the Dynamic Host Configuration Protocol (DHCP) from the options in the drop-down menu of Network connection method.
Enter the Policy name and click on Next to continue.
In this practical, we have entered “NAP DHCP” as the policy name.

Step 4. On Specify NAP Enforcement Servers Running DHCP Server console, click on Add to configure Radius clients.
Remote Authentication Dial-In User Service (RADIUS) is set of rules that authorize and authenticate users when they connect to a network.
As DHCP Server services are running on this server therefore we can skip this setting and click on Next to continue.

Step 5. On Specify DHCP Scopes console, click on Add to enable the NAP policy on DHCP scope. We can do this later also.
If you don’t specify any scope here then this policy would be enabled on all the NAP enabled DHCP scopes.
Click on Next to continue.

Step 6. On Configure Machine Groups console, click on Add to add the group of machines to grant or deny access to the computers.
If no groups are selected then this policy applies to all computers.
Click on Next to continue.

Step 7. On Specify a NAP Remediation Server Group and URL console, enter the name of the Remediation Server Group, if we already have any configured in our environment.
Click on New Group to create a new Remediation Server Group.
Enter the URL of the web page, if a web page is configured to instruct the users for complying their devices with the NAP health policy.
As for Firewall it is not required therefore we can click on Next to continue.

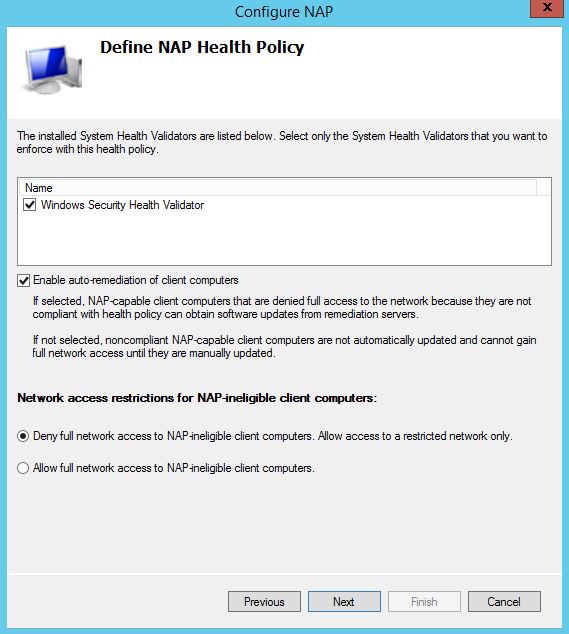
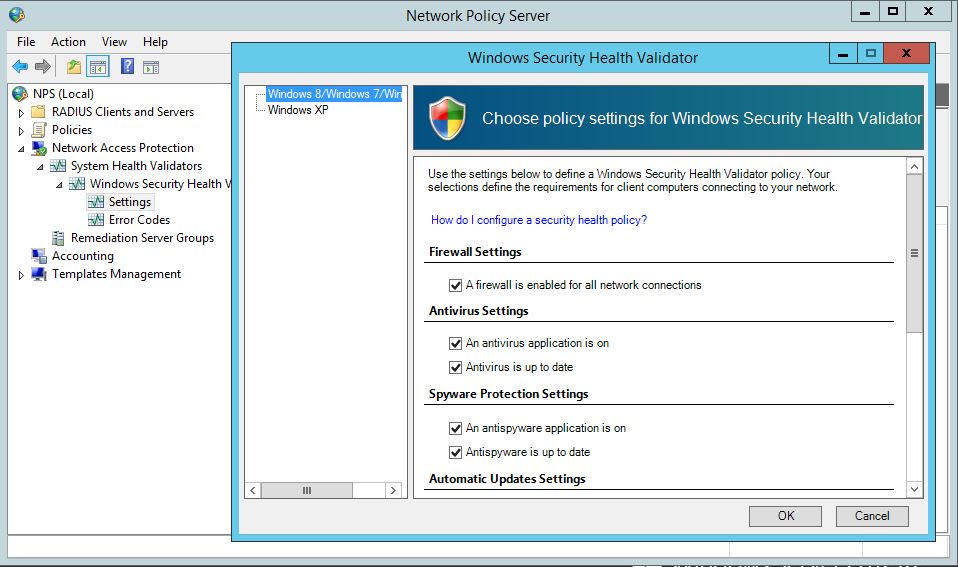
Step 8. On Define Nap Health Policy console, all the installed system health validators are listed. Select the System Health Validator that we want to enforce with the health policy.
In this practical, we have selected “Windows Security Health Validator“.
Check “Enable auto-remediation of client computers” this will grant limited network access to NAP-capable client computers so that they can obtain software updates from remediation server.
If this option is not selected then the client computers cannot update automatically. We have to manually update them for full network access.
Check the option “Deny full network access to NAP-ineligible client computers.
Allow access to restricted network only“. So that, NAP-ineligible client computers can access restricted network for automatic updates from remediation server.
Click on Next to continue.

Step 9. On Completing NAP Enforcement Policy and RADIUS Client Configuration console, we can verify the options and policies that we have selected on previous consoles.
Click on Finish to complete this configuration.

Step 10. To configure Network Policy server, on the console, under Network Access Protection expand System Health Validators.
Now, expand Windows Security Health Validator. Under Settings, double click on “Default Configuration” to modify its settings.

Step 11. On Windows Security Health Validator console, choose policy settings for Windows Security Health Validator.
Here, we can define the settings for Windows8/Windows7/Windows Vista clients.
For Windows XP clients we can define it separately.
Here, we have to only enable “A firewall is enabled for all network connections” option for Windows 8/Windows 7/Windows Vista clients. Click on Ok.
This policy would check if Firewall is enabled for the client computers or not. If Firewall is not enabled then it would try to Enable the Firewall automatically else it would grant restricted access to user.
Step 12. To configure Network Policy Server, on the NPS console, expand Policies and click on Network Policies.
Now, click on NAP DHCP Noncompliant to modify the policy settings.

Step 13. On NAP DHCP Noncompliant Properties console, under Access Permission setting, the first option is “Grant access.
Grant access if the connection request matches this policy“.
When this option is enabled then the client computer connects to the network only when the connection request matches this policy.
The second option is “Deny access. Deny access if the connection request matches this policy“.
When this option is enabled then client computers cannot connect to the network if connection request matches this policy.
In this practical, we have selected the first option i.e. Grant Access. Click on Ok.

Step 14. Now go to DHCP Server, we have already configured a DHCP server and a scope is also defined to assign IP addresses.
We have to define our NAP policy on DHCP scopes.
On DHCP console, right-click on IPv4 and then click Properties.

Step 15. To configure Network Policy Server, on IPv4 Properties console, under Network Access Protection settings click on “Enable on all scopes” and select “Restricted Access” under the setting of DHCP server behavior when NPS is unavailable.
Click on Apply and Ok.

Step 16. To configure Network Policy server GPO needs to be created. On Group Policy Management console, right-click on the OU “Sales“.
Then click on “Create a GPO in this domain, and Link it here“.

Step 17. On New GPO console, enter the GPO name and click on OK.
In this practical, the name of our GPO is “NPS“.

Step 18. To configure Network Policy Server, right click on the GPO “NPS” and click on Edit to modify the GPO settings.

Step 19. To configure Network Policy Server, on Group Policy Management Editor console, we have to modify four policy settings for this GPO.
Following are the four policies:
- The path of first policy is “Computer Configuration\Policies\Windows Settings\Security Settings\Network Access Protection\NAP Client Configuration\Enforcement Clients“. Right click on “DHCP Quarantine Enforcement Client” and click on Enable.

- The path of second policy is “Computer Configuration\Policies\Administrative Templates\Windows Components\Security Center“. Double click on “Turn on Security Center (Domain PCs only)” and click on Enabled to enable this policy.

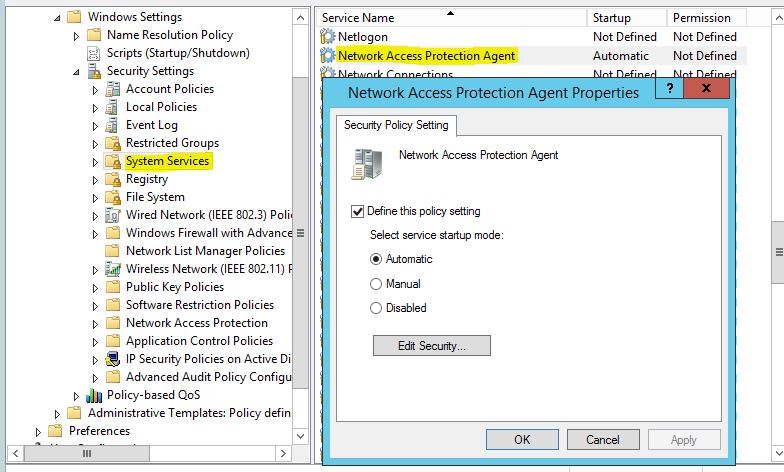
- The path of third policy is “Computer Configuration\Policies\Windows Settings\Security Settings\System Services”. Double click on “Network Access Protection Agent” to modify its settings. On Network Access Protection Agent Properties console, select the option of “Define this policy setting” and select Automatic as service startup mode. Click on Apply and OK.

- The path of fourth policy is “Computer Configuration\Policies\Administrative Templates\Windows Components\Network Access Protection“. Double click on “Allow the Network Access Protection client to support the….” and click on Enabled to enable the policy.

Step 20. Now, go to any client computer that is part of OU “Sales” and is receiving the IP address from DHCP server.
Verify that the firewall is on.
If we try to turn off the firewall then NAP would again automatically turns on the Firewall because of NAP policies.

Hope you understood the steps to configure Network Policy Server for Firewall policies. Please share your experience, comments and suggestions in the comment section.
Introduction
Firewalls have become an essential part of every network that has access to the Internet. Without firewalls, anyone would be able to access your network and servers and infect them with malicious software. Properly configured, a firewall can substantially decrease undesirable network communications in a local network.
The article will explain how to create a firewall rule using firewall MMC and Windows PowerShell. We are using Windows Server 2012, but the procedure applies to other versions of Windows, with slight variations.
What is a Firewall?
A firewall is a piece of hardware or software that controls the flow of data packets, and it is critical on modern computer systems. It protects private networks and devices from malicious actions coming from public networks in the same way a physical firewall prevents fire from spreading from one area to another. A firewall acts as a defense mechanism which controls network traffic according to the implemented firewall rules.
Computers behind a firewall cannot receive data until the data passes all filters. This enhances security by a large margin and reduces the risk of unauthorized access to private networks. A proper firewall configuration provides your system with a crucial layer of security and lowers the risk of successful hacking attacks. Firewalls can perform many tasks:
- Protect the data on your computer by creating a barrier that blocks any undesired incoming or outgoing traffic.
- Notify you if there are any connection requests from other computers.
- Log activity for later inspection and warn you if any application tries to connect to another computer.
How Windows Server Firewalls Work
As the name suggests, a firewall acts like a barrier between your local devices and the external network. When you send a connection request to your computer or server over the internet, a hacker can interrupt that connection and try to gain access to your private network. With a firewall in place, only the network traffic that matches firewall rules can get through.
The sets of firewall rules you define in the firewall settings review every packet for flagged information. To make the most out of your firewall, you should precisely define both inbound and outbound rules in order to avoid any unwanted connections.
For example, you can set an inbound rule defining that the data communicated through a specific port, such as TCP port 80, can pass the firewall. That means if the firewall sees a packet coming towards any other port, it will drop it and the data will not reach its intended destination.
Windows Firewall Server 2012 with Advanced Security
Windows Firewall with Advanced Security is the management console which stores all Windows Firewall configurations. Windows Firewall is a host-based firewall solution embedded with virtually all current Windows operating systems.
Windows Firewall with Advanced Security provides safer inbound and outbound network communications by enforcing rules that control traffic flow for its local machine. There are three available firewall profiles:
- Domain. It is used when a computer connects to the corporate network. It is a network where the device can detect its domain controller.
- Private. We use this profile for computers that connect to a private network, such as home or office. In private networks, the users are always behind a device and not directly exposed to the Internet.
- Public. This profile is used when a computer connects to a public network, such as libraries, airports and other public hotspots. The firewall configurations should be the most restrictive for this profile since these networks are the least secure.
The benefits of using Windows Server Firewall with Advanced Security are numerous:
- It is ready out-of-the-box. It comes preinstalled with personal Microsoft Windows operating systems as well as Server editions. It is also active by default, protecting your operating system from the very first startup.
- It does not need a special license or additional hardware. Once you obtain your copy of a Windows operating system, there are no additional costs.
- It is highly flexible. It offers many advanced functionalities and different levels of controls for the firewall services.
What is the Difference between Windows Firewall and Windows Firewall with Advanced Security?
The difference between the two is the level of functionality available to the end-user, that is, the interface itself. Both of them are the same firewall service. The Windows Firewall is easier to use and more consumer-friendly. It is located in the Control Panel and allows you to perform basic firewall configurations.
The Windows Firewall with Advanced Security offers granular control over the inbound and outbound rules, as well as the default firewall profiles. You can modify all advanced firewall configurations using the Microsoft Management Console (MMC) or Windows PowerShell.
How to Launch Windows Firewall with Advanced Security Console?
You can access the Windows Firewall with Advanced Security console in a few different ways. Whichever method you choose, it will open Windows Firewall MMC where you can make further firewall configurations for all profiles.
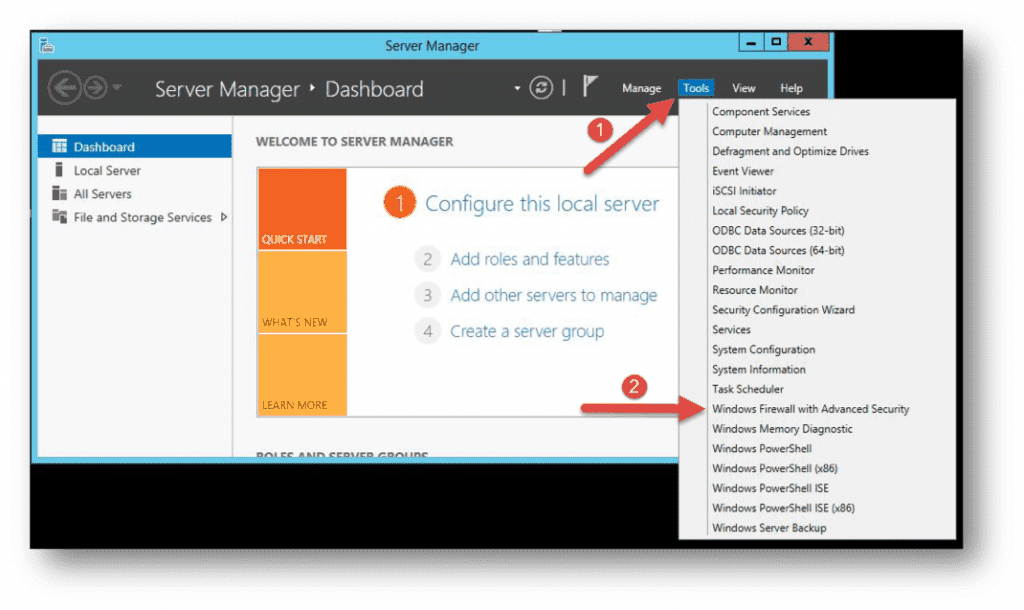
- Use the Server Manager to access the firewall MMC. Once the window opens, go to Tools on the top right side, and locate the Windows Firewall with Advanced Security option toward the bottom of the list.
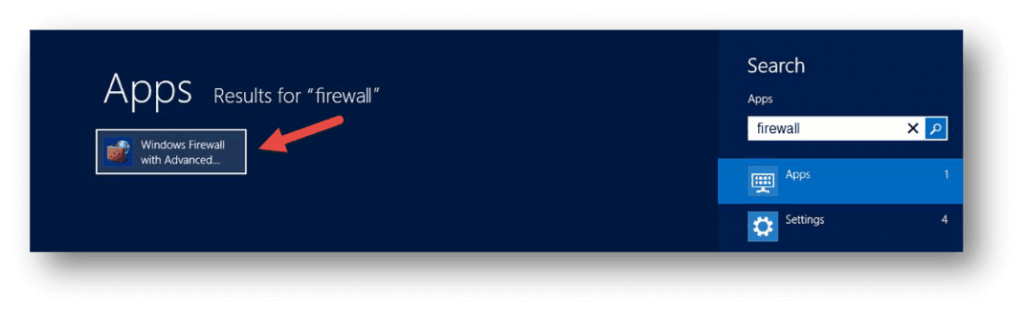
- Open the Start menu (use the Windows key on your keyboard) and type “firewall”. You should see the Windows Firewall with Advanced Security icon appear as one of the search results.
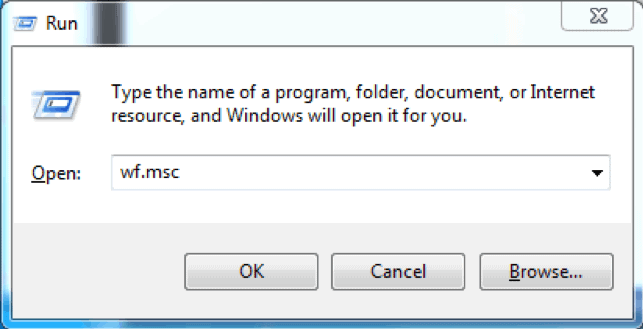
- Use the Run box to launch Windows Firewall with Advanced Security. Press Win + R keys, type in msc and hit Enter to load the console. You can also use Command Prompt or Windows PowerShell to run this command.
Now that you have the Windows Firewall with Advanced Security console open, in the middle you can see the summary of the three firewall profiles. Their default configuration is to permit the outgoing traffic and to limit incoming traffic.
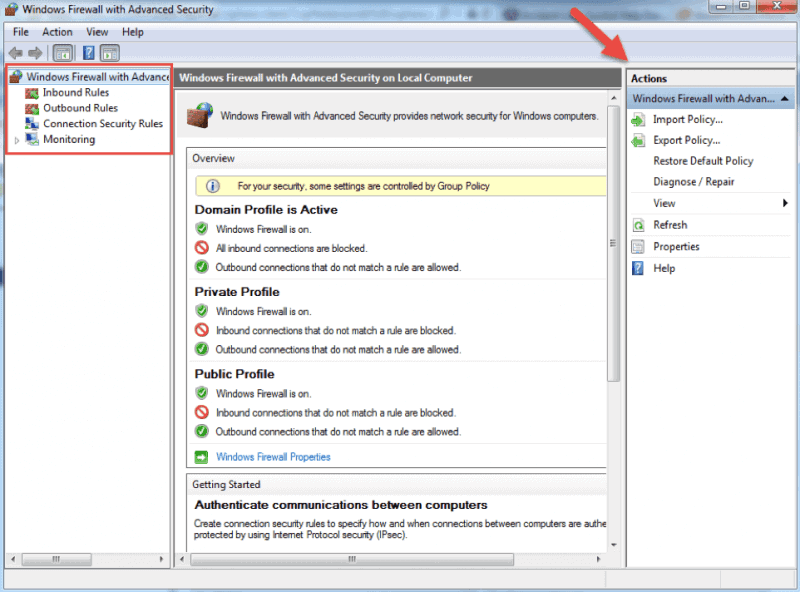
When you select an option from the menu on the left side of the window, you will see its details in the middle section. On the right side, the menu will show the available actions for the option you previously selected.
The Windows Firewall with Advanced Security console allows you to configure inbound and outbound rules, as well as the Internet Protocol security (IPSec) connections. The Monitoring tab allows you to view the active firewall rules and connection security rules for that server.
Firewall Rules
Windows firewall rules allow you to state whether to permit or block specific incoming or outgoing network connections. You can choose between multiple parameters and settings for each individual inbound or outbound rule. This includes selecting a program, a TCP or UDP port, protocol, service, or profile that a rule will apply to.
The procedure is the same when creating inbound rules and outbound rules with Windows Firewall with Advanced Security. I will list the steps for creating an inbound rule and you can follow them in the same order when you want to create an outbound rule.
How to Create Inbound Rules
Launch the Windows Firewall with Advanced Security MMC using the method you prefer. You may want to pin the shortcut to the start menu if you use the console on a regular basis.
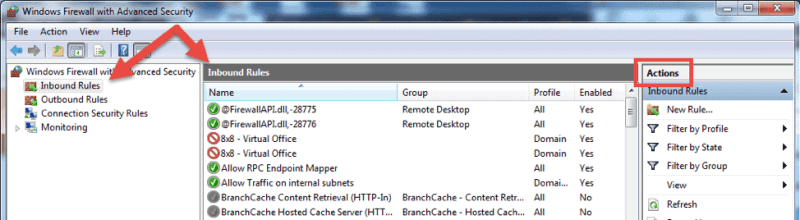
- On the home screen, select the Inbound Rules The console will show all inbound rules in the middle section and available actions in the right pane. You can filter the list by using the available choices.
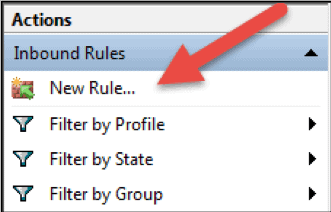
- Click on New Rule… to start the New Inbound Rule Wizard.The wizard will let you choose the type of rule you want to create. You can choose one out of four types.
- This rule allows or blocks connections for a user-defined program. It allows you to select a path to an executable (*.exe) file. It does not require to insert any program-specific settings.
- A rule based on port settings allows you to permit or block a connection depending on the TCP or UDP port number it uses. You can state multiple ports to apply to this firewall rule.
- This rule contains a list of the most common Windows programs and services. You can select one to allow or block connections for it.
- Custom. This is the most flexible rule in the Wizard. It allows you to create a tailor-made rule with configurations that previous options do not provide. I will proceed with listing the steps for this rule since it covers the most settings.
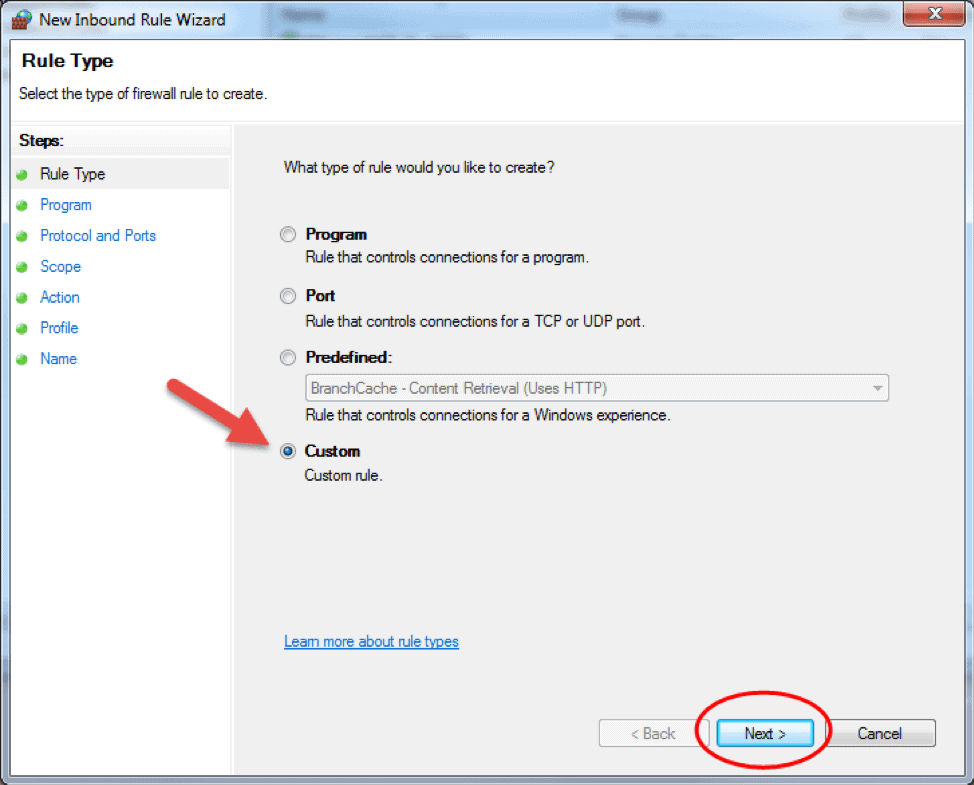
- Click on Custom and click Next to proceed.
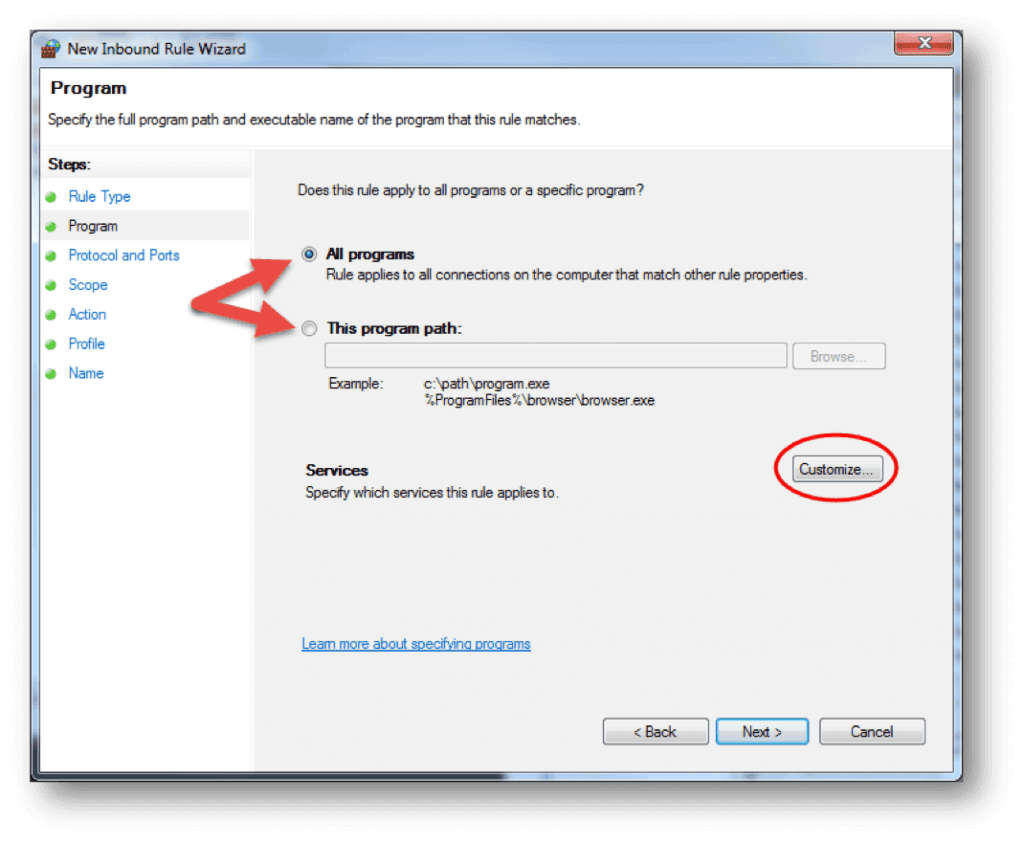
- Choose if the rule will apply to connections for All programs or a specific program on the local machine and click Next. You can click Customize… to select additional settings for the processes of the program you selected.
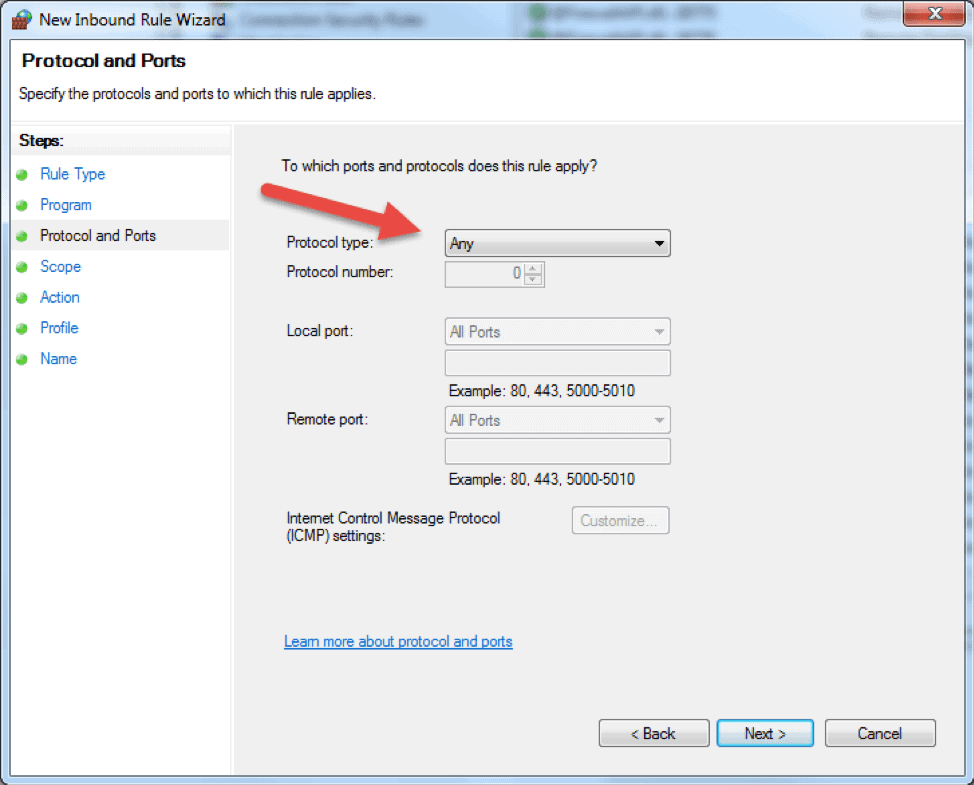
- The following step will allow you to specify the protocol and port for the traffic that this firewall rule will filter. Click Next after you select a protocol type and configure the settings.
- Protocol type. Click on the bar and select the protocol from the dropdown list. You can always select Custom to manually configure the port number. If you select TCP or UDP, you will need to specify local and remote port.
- Protocol number. This field populates automatically after you select a protocol type, and you cannot change it. In order to insert your own port, select Custom in the ‘Protocol type’ dropdown menu.
- Local port. This represents the port on the local machine where you are creating this rule. This section becomes editable if you select TCP or UDP in the ‘Protocol type’ dropdown. Select one of the options from the dropdown box. Note that RPC Endpoint Mapper and RPC Dynamic Ports are available only for TCP inbound rules, and IPHTTPS is available for TCP only. Edge Traversal is available for UDP inbound rules.
- Remote port. This is the port on a remote machine that is trying to establish a connection with the local machine. This section becomes editable if you select TCP or UDP in the ‘Protocol type’ dropdown. Select one of the options from the dropdown box. Note that RPC Endpoint Mapper and RPC Dynamic Ports are available only for TCP inbound rules, and IPHTTPS is available for TCP only. Edge Traversal is available for UDP inbound rules.
- Internet Control Message Protocol (ICMP) settings. You can customize the ICMP settings if you select ICMPv4 or ICMPv6 in the ‘Protocol type’ dropdown list.
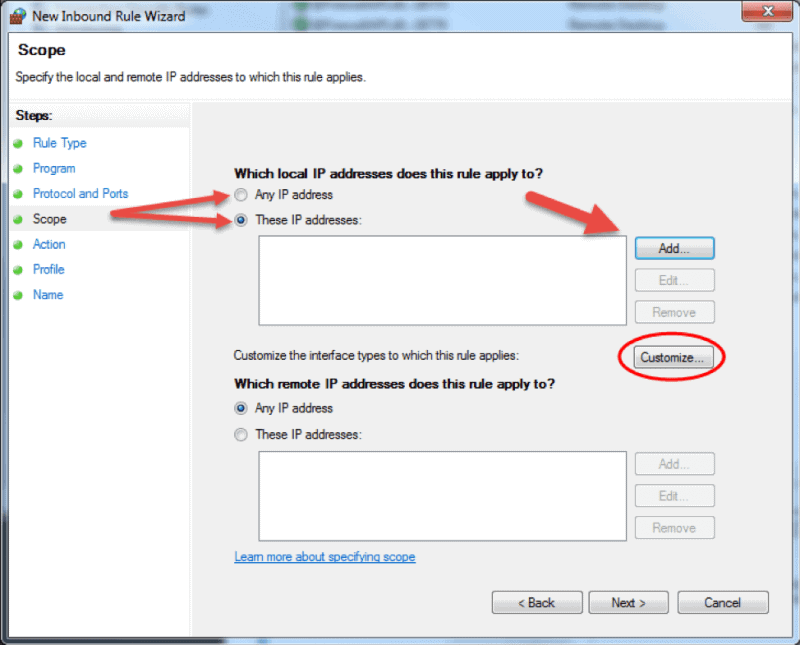
- The Scope step of the wizard allows you to input local and remote IP addresses whose network traffic applies to the current rule.
- Local. If you select ‘Any IP address’ in the local IP addresses section, then the rule applies to the traffic going through the network device that uses a local IP address. This is always the case with the machine where you are creating the rule. Select ‘These IP addresses’ to state that the rule applies to the packets with an address specified in the list. Click Add to insert the IP address to match. You can later edit or remove any of the IP addresses in the list. You can also apply this rule to a specific interface. Click Customize… and select to apply the rule to connections on all interfaces or chose one of the available interfaces listed in the box.
- Remote. If you select ‘Any IP address’ in the remote IP addresses section, then the rule applies to the traffic coming from any IP address included in the list. Select ‘These IP addresses’ to insert the remote IP addresses to which the rule applies. Click Add to specify the IP address to match. You can later edit or remove any of the IP addresses in the list.
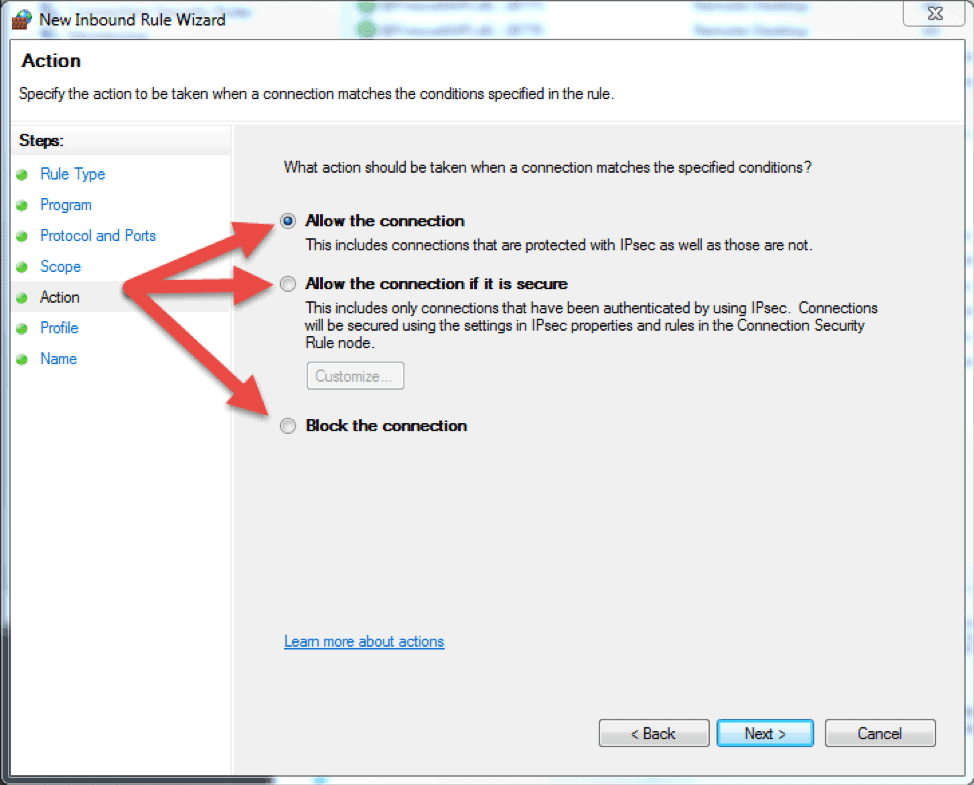
- The next step lets you chose the action the firewall takes when a connection matches the inbound rule configuration. You can select one of the three available options and then click Next to continue.
- Allow the connection. If the connection matches the inbound or the outbound rule configuration, the packets can go through the firewall.
- Allow the connection if it is secure. Select this option to allow only IPSec connections. If you chose this option, two more steps will appear in the wizard: Users and Computers. The additional steps let you chose users and computers you want to block or grant them access. Click on ‘Customize…’ to configure the authentication and integrity requirements.
- Block the connection. This option blocks all network traffic that matches the firewall rule configuration. If a similar rule with ‘allow’ action is in place, then the block action has the priority unless otherwise is stated in the other rule.
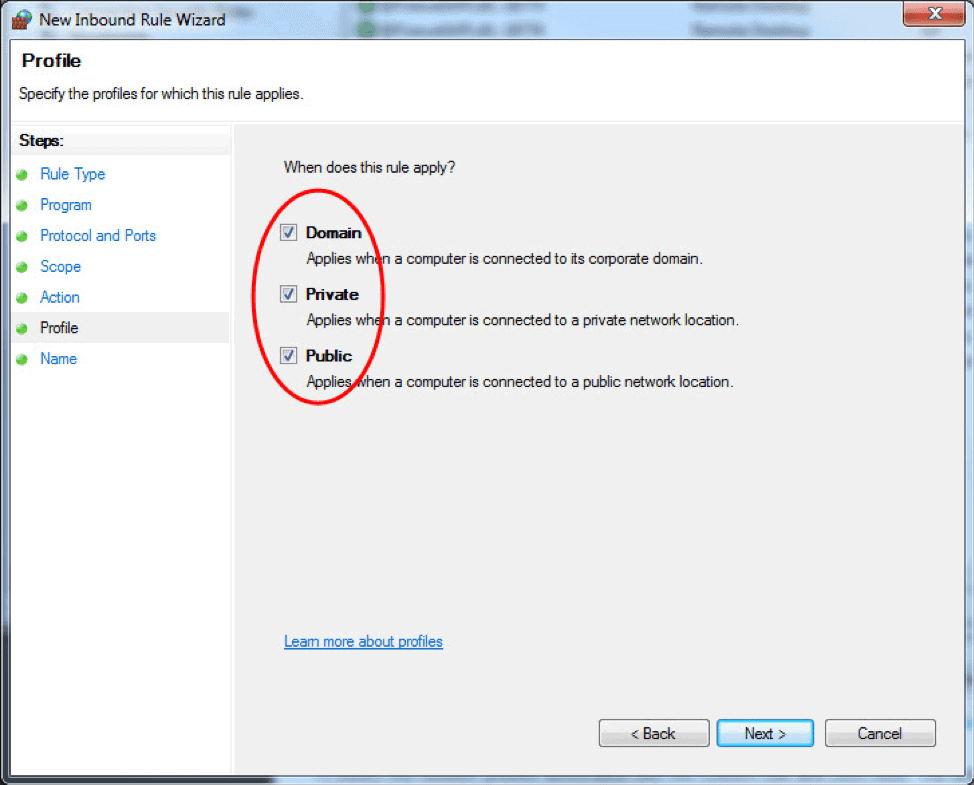
- The Profile step lets you choose the firewall profile the rule will apply to. You can leave everything selected or uncheck a profile that you do not want to include. Click Next to proceed to the final step.
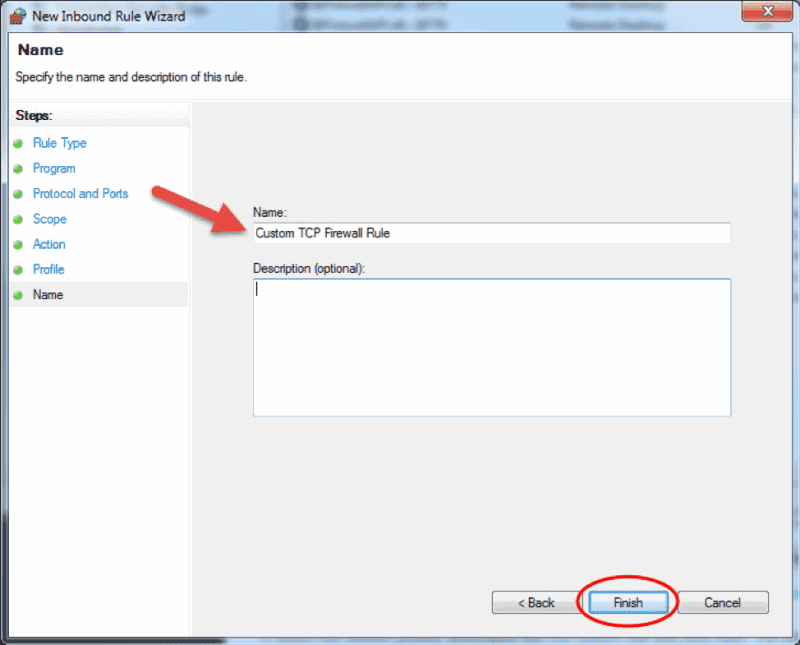
- In the final step, enter the desired name and optional description for this firewall rule, and click Finish.
When you close the wizard, the rule will take effect immediately. You can find the rule in the firewall console when you click on the Inbound rules option. Enabled rules have green checkmark icon while disabled are with grey icons.
How to Edit a Firewall Rule
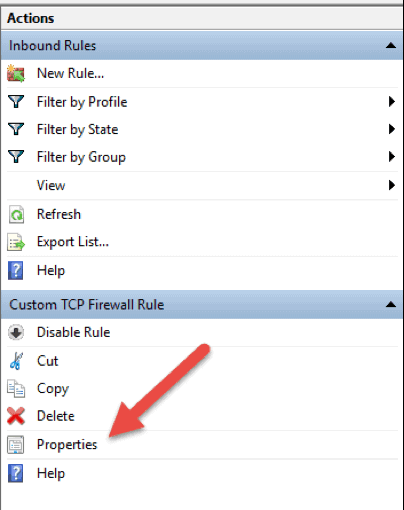
To edit any existing rule and make additional configuration, open the Windows Firewall with Advanced Security console and select Inbound Rules or Outbound Rules option. Locate and click a rule to see the actions specific to it in the right pane. Select Properties and another window will load where you can edit the rule settings.
You can also disable, cut, copy, or delete the rule you selected. Make sure you highlight the correct rule to avoid changing firewall configurations for wrong rules.
Tip: you can double click a rule to directly open the Properties window.
How to Create a Firewall Rule with Windows PowerShell
1. Launch the PowerShell command line. You can do so by searching for “powershell” in the start menu, or press Win + R keys on your keyboard and type in “powershell” in the Run box.
2. Insert the following command and hit enter:
New-NetFirewallRule -DisplayName "TCP custom inbound rule" -Enabled:True -Profile Private -Direction Inbound -Action Allow -Protocol TCP -LocalPort 1234New-NetFirewallRule. This command creates a rule. It is followed by a string of parameters and their values.-DisplayName. Specifies the display name of the rule.-Enabled. Enables the rule if set to true. If you omit this parameter, it defaults to true.-Profile. Assigns the rule to the specified profile: Domain, Private, orPublic.-Direction. States if the rule applies to inbound or outbound connections. If you leave it out, it defaults to Inbound.-Action.Specify if the firewall rule will block or allow the connection. If you do not state the action, it defaults to Allow.-Protocol. Specify the protocol for the rule. In this case, we used TCP. Omitting the protocol defaults the setting to Any.-LocalPort. Insert the port where the traffic can go through on the local server. Omitting the port number defaults the setting to Any.
This is only one example of how to add a firewall rule using the Windows PowerShell command line. You can find more examples in the Microsoft PowerShell Documentation.
Conclusion
This article explains the basic functions and different types of firewall and details the steps for managing the Windows Server Firewall within the Windows Firewall with Advanced Security interface. The Windows Firewall Management Console is a powerful tool that allows for creating detailed configurations. If you carefully followed the instructions in the article, you are now able to manage the firewall on your Windows Server.
As promised, today lets go through my Part 1 of 7, step by step on how to deploy Network Access Protection in Windows Server 2012 R2.
I can promise you this deployment will be major, so many step to go through, and for that reason, i prepare 7 parts of the Step by Step so that you as a IT Administrator can understand the flow of the deployment and please take time to read more on the NAP.
a little bit of information about NAP :
NAP is a policy-enforcement platform that is built into all Windows client computers beginning with the WinXP SP3, and all server-based operating systems beginning with the Windows Server 2008.
You can use NAP to protect network assets more strongly by enforcing compliance with system-health requirements. NAP provides the necessary software components to help ensure that computers connected or connecting to your network remain
manageable, and so that they do not become a security risk to your enterprise’s network and other attached computers.
Understanding the functionality and limitations of NAP will help you protect your network from the security risks posed by noncompliant computers.
For more information on the NAP : http://technet.microsoft.com/en-us/network/bb545879.aspx
In this Part 1, lets go through how to configure Server and Client Certificate Requirements / Health Policies before we jump into NAP deployment…
1 – On OSI-ADDS01 server, open Server Manager, click Tools, and then click Certification Authority…
** in case you do not have Certificate Authority installed, please log in to my previous post : Installing Certificate Authority on Windows Server 2012 R2 (https://mizitechinfo.wordpress.com/2014/07/19/step-by-step-installing-certificate-authority-on-windows-server-2012-r2/)

2 – In the certsrv management console, double click osi-ADDS01-CA, right-click Certificate Templates, and then
select Manage on the context menu…

3 – In the Certificate Templates Console, right-click Computer, and then click Properties…

4 – In the Computer Properties box, click the Security tab, select Authenticated Users, an then in the Permissions for Authenticated Users, tick Allow check box for the Enroll permission, and then click OK.

5 – Next, in certsrv – [Certification Authority (Local)] console, right-click osi-ADDS01-CA, point to All Tasks, and then click Stop Service…

6 – Next, right-click osi-ADDS01-CA again, point to All Tasks, and then click Start Service…

7 – Next, log in to another server (OSI-NPS), in this new server we are going to enroll new certificate from AD into this OSI-NPS Server :
– On the OSI-NPS Server, open MMC…

8 – On the OSI-NPS Server, click File menu, click Add/Remove Snap-in…

9 – Next, in the Add or Remove Snap-ins dialog box, click Certificates, click Add, select Computer account, click Next, and then click Finish…


10 – In the Add or Remove Snap-ins dialog box, click OK…

11 – In the console1 tree, expand Certificates, right-click Personal, point to All Tasks, and then click Request New Certificate…

12 – In the Certificate Enrollment dialog box, click Next to proceed…

13 – Next on the Select Certificate Enrollment Policy interface, click Active Directory Enrollment Policy, and then click Next…

14 – Next, select the Computer check box, and then click Enroll…

15 – Verify the status of certificate installation as Succeeded, and then click Finish…

Another useful source for viewing information about IPsec policy changes for Windows Firewall with Advanced Security is the operational log found in Event Viewer:
Applications and Services Logs/Microsoft/Windows/Windows Firewall with
Advanced Security/ConnectionSecurity
You can also enable the ConnectionSecurityVerbose operational log if you need more detailed information about IPsec policy events.
Lesson summary
![]() IPsec involves a number of different concepts, mechanisms, and technologies that you should understand before you attempt to implement it in your production environment.
IPsec involves a number of different concepts, mechanisms, and technologies that you should understand before you attempt to implement it in your production environment.
![]() IPsec can provide authentication, data integrity, data encryption, or any combination of the three to protect network traffic.
IPsec can provide authentication, data integrity, data encryption, or any combination of the three to protect network traffic.
![]() You can configure IPsec settings on a computer by using the Windows Firewall with Advanced Security snap-in, Group Policy, or Windows PowerShell.
You can configure IPsec settings on a computer by using the Windows Firewall with Advanced Security snap-in, Group Policy, or Windows PowerShell.
![]() Connection security rules can be of the isolation, authentication exemption, server-to-server, tunnel, or custom type.
Connection security rules can be of the isolation, authentication exemption, server-to-server, tunnel, or custom type.
![]() You can create and manage connection security rules using the Windows Firewall with Advanced Security snap-in, Group Policy, or Windows PowerShell.
You can create and manage connection security rules using the Windows Firewall with Advanced Security snap-in, Group Policy, or Windows PowerShell.
![]() Authenticated bypass allows matching network traffic that has been authenticated as coming from an authorized and trusted user or computer.
Authenticated bypass allows matching network traffic that has been authenticated as coming from an authorized and trusted user or computer.
![]() You can monitor main mode and quick mode security associations by using the Windows Firewall with Advanced Security snap-in or Windows PowerShell.
You can monitor main mode and quick mode security associations by using the Windows Firewall with Advanced Security snap-in or Windows PowerShell.
Lesson review
Answer the following questions to test your knowledge of the information in this lesson. You can find the answers to these questions and explanations of why each answer choice is correct or incorrect in the “Answers” section at the end of this chapter.
1. Diffie–Hellman Group 14 is an example of what?
A. An IPsec authentication method
B. An IPsec data-integrity algorithm
C. An IPsec data-encryption algorithm
D. An IPsec key-exchange algorithm
2. You want to use IPsec to protect communications between a server and computers on a specific subnet of your network. Which type of connection security rule can you create to do this? (Choose all that apply.)
A. Isolation rule
B. Authentication exemption rule
C. Server-to-server rule
D. Custom rule
3. When creating connection security rules, which authentication option would you typically use in an environment that includes computers unable to use the IPsec authentication methods available with Windows Firewall with Advanced Security?
A. Request Authentication For Inbound And Outbound Connections
B. Require Authentication For Inbound Connections And Request Authentication For Outbound Connections
C. Require Authentication For Inbound And Outbound Connections
D. Do Not Authenticate
Practice exercises
The goal of this section is to provide you with hands-on practice with the following:
![]() Configuring firewall rules
Configuring firewall rules
![]() Implementing IPsec
Implementing IPsec
To perform the following exercises, you need at least two domain-joined installations of Windows Server 2012 R2 using the Server With A GUI installation option. For example, one of the servers could be a domain controller in the corp.fabrikam.com domain and the other server could be a member server in the same domain. The servers can be either physical servers or virtual machines. You should be logged on to each server using a user account that is a member of the Domain Admins group. For the purposes of these exercises, the names of the servers are assumed to be HOST4 and HOST7 and their IP addresses are, respectively, 172.16.11.230 and 172.16.11.240. If your servers have different names or IP addresses, you should modify the steps in these exercises accordingly.
Exercise 1: Configuring firewall rules
In this exercise, you create and configure firewall rules and examine what happens when firewall rules conflict with one another.
1. Log on to HOST4 and use Server Manager to install the Web Server (IIS) role on the computer.
2. Use the Local Server page of Server Manager to turn off the IE Enhanced Security Configuration for Administrators.
3. Launch Internet Explorer and verify that you can open the default IIS8 home page of the Default Web Site on the local computer by typing http://localhost into the address bar.
4. Log on to HOST7 and use the Local Server page of Server Manager to turn off the IE Enhanced Security Configuration for Administrators.
5. Launch Internet Explorer and verify that you can open the default IIS8 home page of the Default Web Site on HOST4 by typing http:// followed by the host’s IP address (for example http://172.16.11.230) into the address bar.
6. Open the Windows Firewall with Advanced Security snap-in from the Tools menu of Server Manager, right-click the root node, and select Properties.
7. Configure the settings on the Domain Profile tab so that the default firewall rule for outbound connections is to block traffic. Then click Apply.
8. Delete the browsing history in Internet Explorer, making sure to deselect the Preserve Favorites Website Data option, and then press F5 to attempt to open the site http://172.16.11.230 again.
Question: Why can’t the site be displayed?
Answer: The default rule is applied last when firewall rules are processed. Because the default outbound rule is Block, access to the site is blocked.
9. Change the settings on the Domain Profile tab so that the default firewall rule for outbound connections is to allow traffic. Then click OK.
10. Press F5 in Internet Explorer to verify that you can open the Default Web Site on HOST4.
11. Right-click the Outbound Rules node in the Windows Firewall with Advanced Security snap-in and select New Rule to launch the New Outbound Rule Wizard.
12. On the Rule Type page, select Port.
13. On the Protocols And Ports page, select TCP, select Specific Remote Ports, and type 80 in the text box.
14. On the Action page, leave Block The Connection selected.
15. Accept the default settings on the Profile page.
16. Type Block TCP port 80 on the Name page and click Finish to create the new firewall rule.
17. Delete the browsing history in Internet Explorer, making sure to deselect the Preserve Favorites Website Data option, and then press F5 to attempt to open the Default Web Site on HOST4 again.
Question: Why can’t the site be displayed?
Answer: An explicit outbound port rule blocks the HTTP request from accessing the site on TCP port 80.
18. Select the Inbound Rules node, right-click the rule named Block TCP port 80, and select Disable Rule.
19. Press F5 in Internet Explorer to verify that you can open the Default Web Site on HOST4.
Question: Why is the site now displayed?
Answer: The outbound port rule to block TCP port 80 has been disabled, and the default outbound rule is to allow outgoing traffic.
20. Right-click the Outbound Rules node in the Windows Firewall with Advanced Security snap-in and select New Rule to launch the New Outbound Rule Wizard again.
21. On the Rule Type page, select Program.
22. On the Program page, select TCP, select This Program Path, and browse to select the following executable:
C:\ProgramFiles (x86)\Internet Explorer\iexplore.exe
23. On the Action page, leave Block The Connection selected.
24. Accept the default settings on the Profile page.
25. Type Block Internet Explorer on the Name page and click Finish to create the new firewall rule.
26. Delete the browsing history in Internet Explorer, making sure to deselect the Preserve Favorites Website Data option, and then press F5 to attempt to open the Default Web Site on HOST4.
Question: Why can’t the site be displayed?
Answer: An explicit outbound program rule blocks the HTTP request from accessing the site on TCP port 80.
27. Select the Inbound Rules node, right-click the rule named Block Internet Explorer, and select Disable Rule.
28. Right-click the rule named Block TCP port 80 and select Enable Rule.
29. Delete the browsing history in Internet Explorer, making sure to deselect the Preserve Favorites Website Data option, and then press F5 to attempt to open the Default Web Site on HOST4 again. You should not be able to access the site because of the outbound rule that blocks access to TCP port 80.
30. At this point, you should continue directly to practice exercise 2.
Exercise 2: Implementing IPsec
In this exercise, you create connection security rules to implement IPsec communications between HOST4 and HOST7.
1. Switch to HOST4 and open the Windows Firewall with Advanced Security snap-in.
2. Right-click the Connection Security Rules node beneath the root node and select New Rule to open the New Connection Security Rule Wizard.
3. On the Rule Type page, select Server-To-Server.
4. On the Endpoints page, in the Which Computers Are In Endpoint 1? section, select These IP Addresses. Then click Add, type the IIP address for HOST4, and click OK.
5. On the same page, in the Which Computers Are In Endpoint 2? section, select These IP Addresses. Then click Add, type the IP address for HOST7, and click OK.
6. On the Requirements page, leave Request Authentication For Inbound And Outbound Connections selected.
7. On the Authentication Method page, select Advanced and click Customized to open the Customize Advanced Authentication Methods dialog box.
8. In the First Authentication Methods section, click Add, select Preshared Key (Not Recommended), type mytestkey, and click OK twice. Click Next.
9. Accept the default settings on the Profile page and click Next.
10. Type HOST4 to HOST7 on the Name page and click Finish to create the new connection security rule.
11. Select the Connection Security Rules node under the Monitoring node, and verify that the new connection security rule is active (listed).
12. Open a Windows PowerShell prompt and ping HOST7 to attempt to establish IPsec communications between HOST4 and HOST7.
13. Switch to the Windows Firewall with Advanced Security snap-in and select the Main Mode node under the Connection Security Rules node.
Question: Why hasn’t a main mode SA been established yet between HOST4 and HOST7?
Answer: Connection security rules must be configured on both computers before IPsec communications can be established between them.
14. Switch to HOST7 and open the Windows Firewall with Advanced Security snap-in.
15. Right-click the Connection Security Rules node beneath the root node and select New Rule to open the New Connection Security Rule Wizard.
16. On the Rule Type page, select Server-To-Server.
17. On the Endpoints page, in the Which Computers Are In Endpoint 1? section, select These IP Addresses. Then click Add, type the IP address for HOST7, and click OK.
18. On the same page, in the Which Computers Are In Endpoint 2? section, select These IP Addresses. Then click Add, type the IP address for HOST4, and click OK.
19. On the Requirements page, leave Request Authentication For Inbound And Outbound Connections selected.
20. On the Authentication Method page, select Advanced and click Customized to open the Customize Advanced Authentication Methods dialog box.
21. In the First Authentication Methods section, click Add, select Preshared Key (Not Recommended), type mytestkey, and click OK twice. Click Next.
22. Accept the default settings on the Profile page and then click Next.
23. Type HOST7 to HOST4 on the Name page and click Finish to create the new connection security rule.
24. Select the Connection Security Rules node under the Monitoring node and verify that the new connection security rule is active (listed).
25. Open a Windows PowerShell prompt and ping HOST4 to attempt to establish IPsec communications between HOST7 and HOST4.
26. Switch to the Windows Firewall with Advanced Security snap-in and select the Main Mode node under the Connection Security Rules node. You should see a main mode SA with HOST7’s IP address as the local address and HOST4’s IP address as the remote address.
27. Right-click the main mode SA and select Properties. Click OK after viewing the properties of the SA.
28. Select the Quick Mode node under the Connection Security Rules node. You should see a quick mode SA with 172.16.11.240 as the local address and 172.16.11.230 as the remote address.
29. Right-click the quick mode SA and select Properties. Click OK after viewing the properties of the SA.
30. Launch Internet Explorer and attempt to open the Default Web Site on HOST4. You should see a message saying that the page can’t be displayed. This is because the outbound firewall rule you created earlier to block TCP port 80 is still in effect on HOST7.
31. Select the Outbound Rules node in the Windows Firewall with Advanced Security snap-in.
32. Right-click the rule named Block TCP Port 80 and select Properties to open the properties for the firewall rule.
33. On the General tab, select Allow The Connection If It Is Secure and then click OK.
34. Press F5 in Internet Explorer to verify that you can open the Default Web Site on HOST4.
Suggested practice exercises
The following additional practice exercises are designed to give you more opportunities to practice what you’ve learned and to help you successfully master the lessons presented in this chapter.
![]() Exercise 1 Redo practice exercise 1 using Windows PowerShell commands instead of using the Windows Firewall with Advanced Security snap-in.
Exercise 1 Redo practice exercise 1 using Windows PowerShell commands instead of using the Windows Firewall with Advanced Security snap-in.
![]() Exercise 2 Redo practice exercise 2 using Windows PowerShell commands instead of using the Windows Firewall with Advanced Security snap-in.
Exercise 2 Redo practice exercise 2 using Windows PowerShell commands instead of using the Windows Firewall with Advanced Security snap-in.
Answers
This section contains the answers to the lesson review questions in this chapter.
Lesson 1
1. Correct answers: B and D
A. Incorrect: Windows Firewall with Advanced Security has three firewall profiles, which correspond to the three network location types on the Windows platform. The domain profile is automatically applied to any network connection that Windows identifies as having a network location type of domain. The private profile is automatically applied to any network connection that Windows identifies as having a network location type of private. The public profile is automatically applied to any network connection that Windows identifies as having a network location type of public.
B. Correct: All three profiles can be active at the same time on a computer if Windows detects that there are network connections of each type present.
C. Incorrect: The Inbound Connections setting lets you configure how Windows Firewall with Advanced Security handles incoming traffic. The default option is Block, which blocks all connections that do not have firewall rules that explicitly allow the connection. The other two options are Block All Connections, which blocks all connections regardless of any firewall rules that explicitly allow the connection, and Allow, which allows the connection unless there is a firewall rule that explicitly blocks the connection.
D. Correct: To display the currently active settings for the domain profile on the local computer, you can use the Get-NetFirewallProfile cmdlet with the –PolicyStore ActiveStore parameter. The active store is policy store that contains the currently active policy, which is the sum of all policy stores that apply to the computer. The persistent store is the policy store that contains the persistent policy for the local computer. This policy is not from GPOs and has been created manually or programmatically (during application installation) on the computer.
2. Correct answer: C
A. Incorrect: Rules that explicitly allow some form of traffic have lower, not higher, priority than rules that explicitly block the same form of traffic. Because rule A is a block rule and rule B is an allow rule, rule A has higher priority than rule B.
B. Incorrect: Rules that explicitly allow some form of traffic have lower, not higher, priority than rules that explicitly block the same form of traffic. Because rule A is a block rule and rule B is an allow rule, rule A has higher priority than rule B.
C. Correct: Rules that explicitly block some form of traffic are applied before rules that explicitly allow the same form of traffic. Because rule A is a block rule and rule B is an allow rule, rule A has higher priority and is applied first. The result is that outbound traffic from the svchost.exe process running on the computer is blocked.
D. Incorrect: When firewall rules are processed by Windows Firewall with Advanced Security, as soon as a packet matches a rule the rule is applied and rules processing stops at that point. Because outbound traffic from the svchost.exe process running on the computer matches rule A, rules processing stops at that point and the outbound default rule is not applied to the traffic.
3. Correct answers: A and D
A. Correct: A program rule specifies how traffic associated with a specific program (executable) running on the local computer should be handled.
B. Incorrect: A port rule specifies how traffic associated with a specific TCP or UDP port or port range on the local computer should be handled.
C. Incorrect: A predefined rule specifies how traffic associated with a specific Windows feature or service running on the local computer should be handled.
D. Correct: A custom rule specifies how traffic should be handled based on any of the traffic-filtering criteria supported by Windows Firewall with Advanced Security. These criteria include being able to specify a program (executable) running on the local computer.
Lesson 2
1. Correct answer: D
A. Incorrect: IPsec authentication methods include computer or user (Kerberos V5), computer or user (NTLMv2), computer or user certificate, computer health certificate, and preshared key.
B. Incorrect: IPsec data-integrity algorithms include MD5, SHA-1, SHA-256, SHA-384, AES-GMAC 128, AES-GMAC 192, AES-GMAC 256, AES-GCM 128, AES-GCM 192, and AES-GCM 256.
C. Incorrect: IPsec data-encryption algorithms include DES, 3DES, AES-CBC 128, AES-CBC 192, AES-CBC 256, AES-GCM 128, AES-GCM 192, and AES-GCM 256.
D. Correct: IPsec key-exchange algorithms include, Diffie–Hellman Group 1, Diffie–Hellman Group 2, Diffie–Hellman Group 14, Diffie–Hellman Group 24, Elliptic Curve Diffie–Hellman P-256, and Elliptic Curve Diffie–Hellman P-384.
2. Correct answers: C and D
A. Incorrect: You can use isolation rules to isolate computers from other computers. For example, you can use isolation rules to protect computers that are joined to your domain from computers that are outside your domain.
B. Incorrect: You can use authentication exemption rules to specify computers that should be exempted from being required to authenticate, regardless of any other connection security rules that have been configured. For example, you can use authentication exemption rules to allow access to domain controllers and other infrastructure servers with which the computer needs to communicate before authentication can be performed.
C. Correct: You can use server-to-server rules to protect communications between two computers, two groups of computers, two subnets, or some combination of these, such as between a computer and a subnet. For example, you can use server-to-server rules to protect communications between a database server and a front-end web server.
D. Correct: You can configure custom rules using criteria from other rule types except tunnel rules. This means you can create a custom rule that has the same effect as a server-to-server rule.
3. Correct answer: A
A. Correct: The Request Authentication For Inbound And Outbound Connections option is typically used in low-security environments or those in which computers are unable to use the IPsec authentication methods available with Windows Firewall with Advanced Security. You can also use it for computers in the boundary zone in a server and in a domain isolation scenario.
B. Incorrect: The Require Authentication For Inbound Connections And Request Authentication For Outbound Connections option is typically used in environments where computers are able use the IPsec authentication methods available with Windows Firewall with Advanced Security. You can also use it for computers in the main isolation zone in a server and in a domain isolation scenario.
C. Incorrect: The Require Authentication For Inbound And Outbound Connections option is typically used in environments where network traffic must be controlled and secured. You can also use it for computers in the main isolation zone in a server and in a domain isolation scenario.
D. Incorrect: The Do Not Authenticate option is typically used to create an authentication exemption for connections to computers that do not require IPsec protection.