Восстановление Виндовс 7 при запуске: неприятная проблема
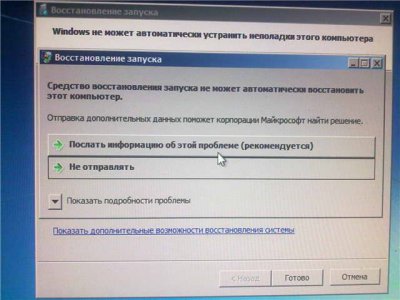
В один прекрасный день, когда вы включаете компьютер, то вы можете увидеть вместо привычной загрузки Windows 7, бесконечный запуск средства восстановления запуска Windows. Средство восстановления после долгой проверки выводит сообщение «Средство восстановления запуска не может автоматически восстановить этот компьютер». Далее вам остается либо перезагрузить, либо выключить компьютер. После перезагрузки этот процесс повторяется снова. При загрузке в «Безопасном режиме» также появляется окно восстановления запуска. Не помогает и восстановление системы в более раннее состояние.
Вся информация далее предназначена для тех, кто не знает, почему Виндовс 7 не запускается, пишет средство восстановления запуска не может автоматически восстановить этот компьютер или интересуется, почему выскакивает проблема «Не удалось запустить компьютер средство восстановления запуска».
Постоянный запуск восстановления запуска Windows 7
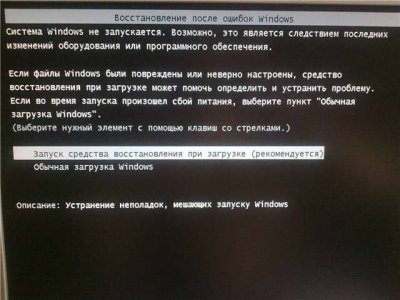

Но решение проблемы постоянного запуска восстановления в Виндовс 7 или когда средство восстановления запуска проводит диагностику системы, все же есть. Дождитесь окончания проверки восстановления запуска и нажмите на »Показать дополнительные возможности восстановления системы ». Затем выберите меню командная строка:
Восстановление запуска Windows 7 бесконечно
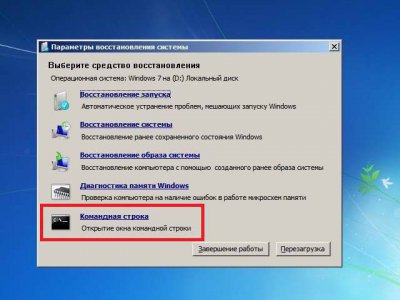
В командной строке пропишите bcdboot.exe C:\windows и после этого перезагрузите компьютер. Если появится выбор загрузки, то выберите »Загрузка последней удачной конфигурации» и Windows 7 нормально загрузиться.
Все, теперь вряд ли придется столкнуться с проблемой, когда Windows 7 загружается только в режиме восстановления или когда Виндовс 7 запускается через восстановление запуска.
Fix: Boot into Safe Mode
- 1. Insert the disc and reboot the system.
- 2. Press any key to boot from the DVD.
- 3. Choose your keyboard layout.
- 4. Click Repair your computer at the Install now screen.
- 5. Click Troubleshoot.
- 6. Click Advanced options.
- 7. Click Startup Settings.
- 8. Click Restart…
7 Fixes to Stuck in Windows 7 Startup Repair Loop
«My computer keeps running Startup Repair during every startup and I can’t boot it normally. I tried running Startup Repair multiple times but I’m still getting the same problem. Startup Repair won’t seriously automate repair at all. I got stuck in an infinite loop.»
Follow the fixes to troubleshoot your Windows Startup Repair loop.
| Workable Solutions | Step-by-step Troubleshooting |
|---|---|
| Fix 1. Disable Startup Repair | Restart your computer > wait for your BIOS to complete POST > tapping F8…Full steps |
| Fix 2. Run CHKDSK Command | Boot Windows from the bootable device > navigate to «Repair your computer» option…Full steps |
| Fix 3. Run Bootrec | Open Command Prompt > type those following commands…Full steps |
| Fix 4. Perform System Restore | Boot Windows from the bootable device > click «Troubleshoot > System Restore»…Full steps |
| Fix 5. Delete Problematic File | Access Command Prompt again and enter the following command: cd C:\Windows\…Full steps |
| Fix 6. Restore Windows Registry | In the Windows Boot Options menu, choose «Troubleshoot >Advanced Options»…Full steps |
| Fix 7. Check Device Partition | In Command Prompt, type bcdedit and press «Enter». Find device partition and..Full steps |
1 — Windows 7 Startup Repair Infinite Loop Error Details
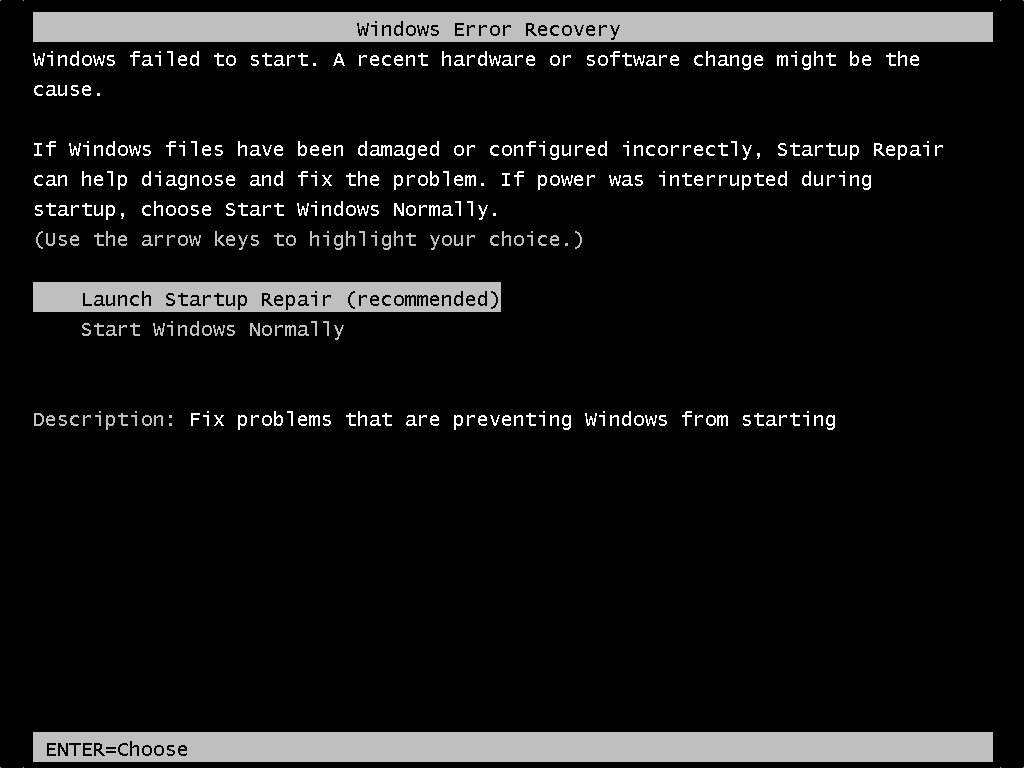
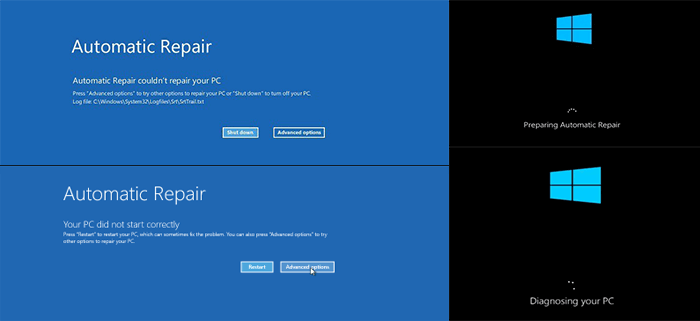
Windows Error Recovery
Windows failed to start. A recent hardware or software change might be the cause.
If Windows files have been damaged or configured incorrectly, Startup Repair can help diagnose and fix the problem. If power was interrupted during startup, choose Start Windows Normally.
(Use the arrow keys to highlight your choice.)
Launch Startup Repair (recommended)
Start Windows Normally
Description: Fix problems that are preventing Windows from starting
Startup Repair will fail to load, launch but fail to repair, or run and claim repairs have been executed. Your PC will continue to attempt to endlessly start Startup Repair each boot. In Windows 8, Windows 8.1 and Windows 10 this is called Automatic Repair:
2 — Startup Repair Error Symptoms
Unexpected PC shutdown, virus, malware, driver issues, damaged BDC settings, corrupted boot partition, blue screen of death as well as a black screen of death on reboot, all those factors account for Windows startup problems.
As the ‘Windows error recovery’ suggests, Start Repair should automatically fix the abnormal Windows startup. However, when you choose the recommended option, you’ll only confront 2 facts:
1. Startup Repair takes a reasonably long time to load or launch.
2. Startup Repair immediately runs, but the repairing process never finishes.
In both situations, on each reboot, your PC will continuously attempt to call Startup Repair for the fix, meanwhile getting stuck in a Startup Repair loop that never ends
3 — Troubleshoot Windows Automatic Startup Repair Infinite Loop Error with 7 Fixes
A clean Windows installation is a guaranteed fix for Windows Startup Repair, which takes forever but costs a complete data loss. So, is there another option to recover from an infinitely looping Startup Repair without reinstalling Windows?
We gave the possible fixes from easy to complex, from safe to risky. You’d better try them sequentially.
- Important
- The essential tool for most of the fixing methods:
- A corresponding Windows installation media, let it be a bootable USB drive, CD, or DVD disc.
Fix 1. Disable Automatic Startup Repair to Fix Startup Repair Loop
You should try to disable the automatic restart. Although it could not solve the boot error, it can stop the endless restart.
Step 1. Restart your computer.
Step 2. Wait for your BIOS to complete POST (the screen with your manufacturer logo and/or system information).
Step 3. Quickly begin tapping F8 repeatedly until you see the list of boot options.
Step 4. Choose «Disable automatic restart on system failure».
Step 5. Press «Enter» and wait for your PC to boot.

Fix 2. Run CHKDSK Command to Check and Repair Drive Errors
This helps check or even repair the drives to tackle file system corruption.
Step 1. Boot Windows from the bootable device. (If you cannot boot, use Windows 7 installation CD.)
Step 2. Navigate to the «Repair your computer» option and select «Command Prompt».
Step 3. In the Command Prompt window, type chkdsk /r c: and press «Enter». (c represents the drive where Windows is installed)
Step 4. Click «Y» so that the next time the system restarts, the CHKDSK utility can check the disk errors and try to fix them. Restart the system and let CHKDSK check hard drive errors and repair.
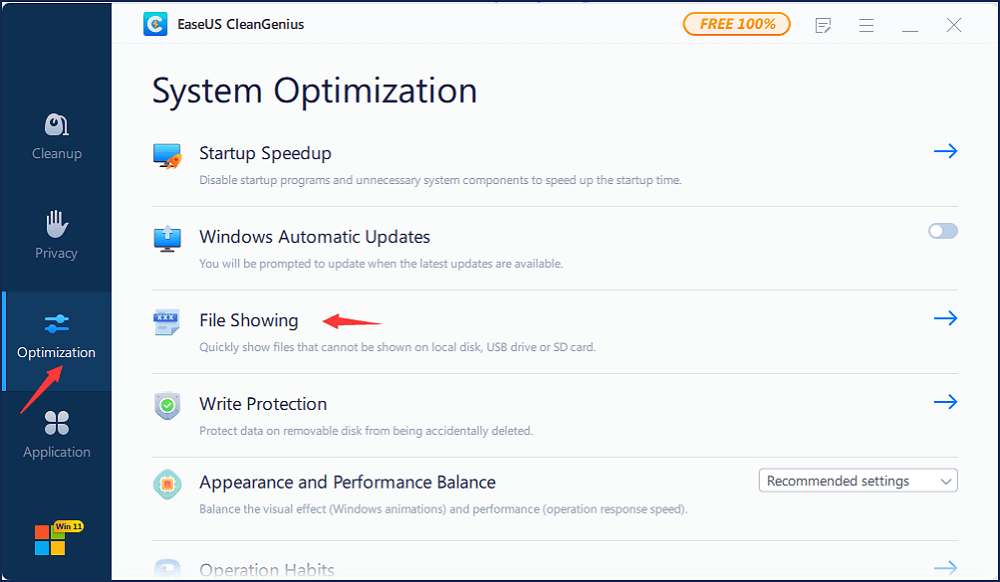
Run CHKDSK Alternative Tool to Repair Device
Download EaseUS CleanGenius and install it on your computer. Let’s start checking and refixing file system error on your device now.
Step 1. Click «File Showing» to enter the next step.
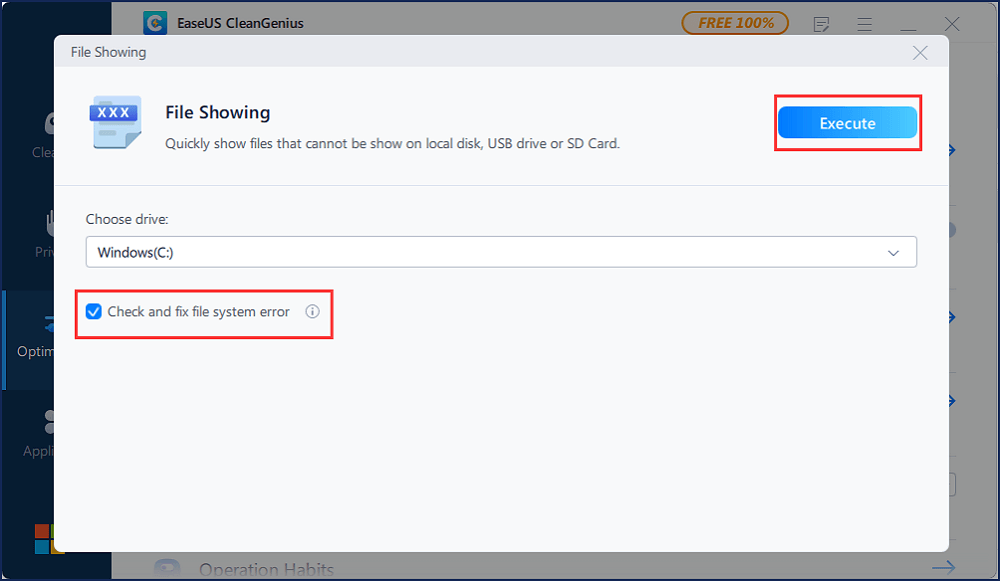
Step 2. Choose the target device and tick the box of «Check and fix file system error». Click «Execute» to start fixing the problematic device.
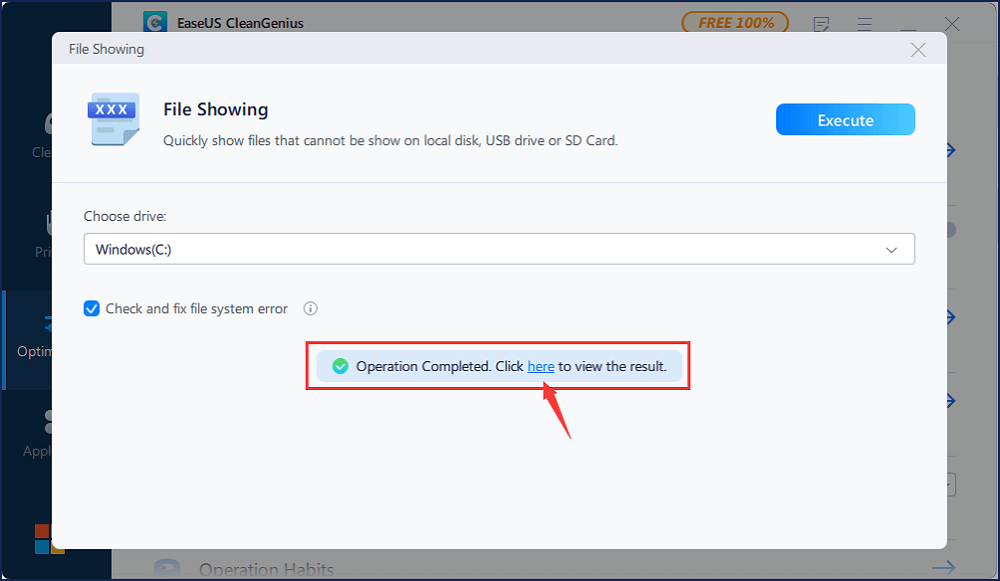
Step 3. When the fixing process completes, click «here» to open and use your device.
Fix 3. Run Bootrec to Fix Damaged or Corrupted BCD Settings
The startup repair loop could also happen if the bootloader installation or configuration comes with some errors. You could solve this error by following the steps below.
Step 1. In the same way open Command Prompt as the second fix did.
Step 2. In the Command Prompt window, type those following commands and press «Enter».
bootrec /fixmbr
bootrec /fixboot
bootrec /rebuildbcd
Step 3. Restart the system and let bootrec repair MBR.
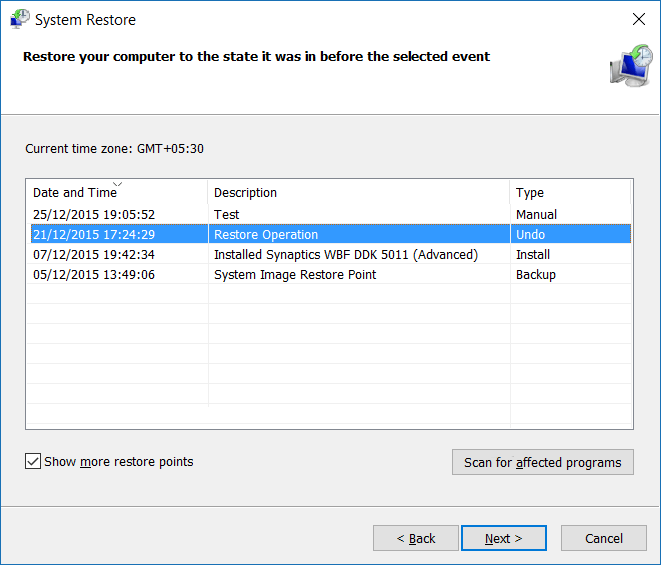
Fix 4. Perform System Restore to Solve Windows Startup Repair Loop
The System Protection is enabled by default, and you can use it to restore your computer to an earlier state to fix your problem.
Step 1. Boot Windows from the bootable device.
Step 2. Click «Troubleshoot > System Restore».
Step 3. Follow the wizard instructions to continue the process. Choose a restore point before the date when the Automatic Startup Repair loop error happened.
Fix 5. Delete the Problematic File to Resolve Startup Repair
Step 1. Access Command Prompt again and enter the following command:
cd C:\Windows\System32\LogFiles\Srt
SrtTrail.txt
Step 2. Then, you could see «Boot critical file c:\windows\system32\drivers\tmel.sys is corrupt.» Type the following command:
cd c:windowssystem32drivers
delvsock.sys
Restart your PC. If these steps can not help, try the following troubleshooting steps.
Fix 6. Restore Windows 10 Registry to Fix Repair Loop
Step 1. In the Windows Boot Options menu, choose «Troubleshoot >Advanced Options>Command Prompt».
Step 2. In Command Prompt, type the following command and then hit «Enter».
cd C:\windows\system32\logfiles\srt\
Change your drive letter according to your needs.
Step 3. Type txt to open the file in notepad.
Step 4. Press «Ctrl + O». Select «All files» from file type and navigate to C:\windows\system32.
Step 5. Right-click CMD and select «Run as administrator». Type the following command and press «Enter».
cd C:\windows\system32\config
Step 6. Backup those files by renaming Default, Software, SAM, System, and Security files to .bak. Type the following command one by one and hit «Enter»:
rename DEFAULT DEFAULT.bakrename SAM SAM.bak
rename SECURITY SECURITY.bak
rename SOFTWARE SOFTWARE.bak
rename SYSTEM SYSTEM.bak
copyc:\windows\system32\config\RegBack c:\windows\system32\config
Step 7. Restart your PC to check if you have solved the error.
Fix 7. Check Device Partition and Osdevice Partition
Sometimes, if your device partition values aren’t correct, you will get stuck in the startup repair loop. Follow the steps below to check the device partition and os device partition and fix your error.
Step 1. In Command Prompt, type bcdedit and press «enter».
Step 2. Find device partition and os device partition values. Make sure their values are correct and set to the correct partition.
Windows is preinstalled on C partition only, and the correct value is C. Enter the following commands and press «Enter» after each one if the value isn’t set to C.
bcdedit /set {default} device partition=c:
bcdedit /set {default} osdevice partition=c:
After that, reboot the PC and fix the Windows startup repair loop.
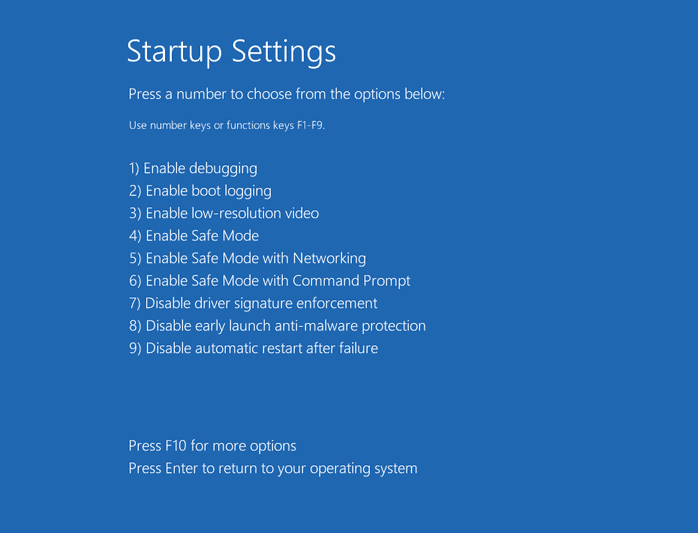
Additional Fix — Boot into Safe Mode in Windows 7/8/10
Often booting into Safe Mode and uninstalling recently installed device drivers or software may fix the Automatic Repair loop error. To boot into Safe Mode of a Windows 7, 8, 8.1, or 10 system, you need to have the original DVD or USB. If you do not have the installation disc, follow the guide from Microsoft to create a Windows Installation Media. Then enter Safe Mode:
Step 1. Insert the disc and reboot the system.
Step 2. Press any key to boot from the DVD.
Step 3. Choose your keyboard layout.
Step 4. Click Repair your computer at the Install now screen. Choose «Troubleshoot > Advanced options > Startup Settings«.
Enter a Safe Mode option (Safe Mode, Safe Mode with Networking, and Safe Mode with Command Prompt).
How to Recover Data After Fixing Startup Repair Infinite Loop
Besides a clean install of the Windows operating system, the fixes for users to get rid of an endless startup repair loop, including system restore and PC factory resetting, will also result in part of computer data loss.
It’s not the end of the day, and a third-party EaseUS data recovery tool perhaps can salvage your data. For example, EaseUS Data Recovery Wizard can recover data after formatting, deleting, PC resetting, system refreshing, and more. And You deserve a try and see if the software helps find your lost data.
You get 7 ways to get rid of the Startup Repair Windows 7 loop, no matter whether you have an installation disc or not. Don’t worry if the windows 7/8/10 startup repair is taking forever, and you cannot stop or cancel it. Also, you can get back lost data after you have fixed the error with EaseUS data recovery software.
А у меня ещё хуже, просто решил перезагрузить свой ноут, и выдало восстановление, ничего нового я не устанавливал перед перезагрузкой, ничего такого не качал, причину понять не могу…
ОС Win 7 Ultimate SP-1
Система сама себе враг 
Кстати откат до последней точки восстановления не помогает, всё тоже самое…
Добавлено через 16 часов 59 минут
Рассказываю как восстановил.
Вставил установочный Win 7, выбрал «Восстановление системы», затем «Параметры восстановления системы» и «Командная строка», затем ввёл в ней:
Bootrec.exe
Bootrec.exe /FixMbr
Bootrec.exe /FixBoot
bootsect /NT60 SYS
Bootrec.exe /ScanOs
Bootrec.exe /RebuildBcd
1й раз я на этом закончил, перезагрузился — не помогло, тогда я проделал тоже самое + ещё к этому:
перезагрузился и у меня выдало ошибку об отутствии какого то .sys файла, нажал «next», выбрал «Last Known Good Configuration» и всё заработало, с откатом настроек на 1 день.")
ESET Russia
Я его не использую постоянно а только для временной проверки компьютера на вирусы. После чего я его удаляю. А всё знаете почему? Потому что ваш антивирус, как и другие, постоянно всё блокирует. Установил какую-нибудь игру, даже если она официально куплена — блокирует файлы. Скачал нужный мне софт, даже если он официальный — тоже блокирует. И так всегда! Что не установи, что не скачай, всё у вас вирус. А где, как говорится, пруфы, что блокируемые файлы это вирус? Вот именно что нигде! А посему, после сноса вашего антивируса, мой ПК даже быстрее стал работать. Да и ещё эта постоянная активация мешает, которую без денег хрен активируешь. А посему, я просто не парюсь. У меня есть отдельный софт и даже если я поймаю вирус то у меня есть чем его удалить и без вашего антивируса. Не в обиду было сказано но всё же. Так что да, я только иногда вашим антивирусом проверяю свой ПК, после чего он отправляется в мусорку, как и многие остальные.
- пожаловаться
- скопировать ссылку
На чтение 2 мин Опубликовано Обновлено
Первый рабочий день и вот тебе на! На одном из компьютеров при включении постоянно запускается средство восстановления при загрузке и пользователь не сразу догадывается, что надо выбрать – Обычная загрузка windows и сразу наживаем Enter, но это ни как не спасает ситуацию, потому как при следующей загрузке windows 7 (а это средство относится именно к этой операционной системе, в windows 10 она немного другая) будет запускаться снова и снова пока ее не убрать из загрузки. Почему это произошло? Тут может быть несколько вариантов:

- ошибка в windows
- проблемы с системными файлами
- неполадки на жестком диске
- вирусы
Но так или иначе, наша операционная система windows перестраховывается и дает нам возможность проверить систему.
Но если при выборе обычная загрузка у вас грузится и стабильно работает система, то можно просто отключить назойливое средство восстановление и тогда винда будет грузится и ей не будет ничего препятствовать.
Что сделать что бы отключить средство восстановления? давайте разберем ниже по моей инструкции?
Как отключить восстановление системы при загрузке Windows?
еще раз напомню, что этот способ применим только для Windows 7!
- Запускаем под администратором командную строку cmd
- и вводим следующую команду:
bcdedit /set bootstatuspolicy ignoreallfailures
если это команда не помогла, то воспользуйтесь этой командой:
bcdedit /set recovery enabled no

отключаем восстановление системы windows7

Единственный нюанс в том, что если вследствие некорректного работы Windows возникнут какие то ошибки, они будут игнорироваться и вы не узнаете о проблеме пока ОС не перестанет грузиться))
тоесть придется выбирать одно из зол)
Но если вы передумали и заходите снова включить предупреждения, то введите следующую команду:
bcdedit /set bootstatuspolicy displayallfailures
Как отключить эту проблему мы уже узнали, но как ее исправить?
Как исправить средство восстановления Windows?
Что бы “отремонтировать” средство восстановления Windows, то:
- загружайтесь в режиме восстановления как вам советует при загрузке Windows
- после того запускаем в режиме восстановления командную строку

- и в командной строке вводим bootrec.exe /FixMbr и bootrec.exe /FixBoot (более подробная инструкция как восстановить загрузчик windows написано тут )
- перезагружаемся и поверяем

Но не факт что этот вариант может сработать!
![]()