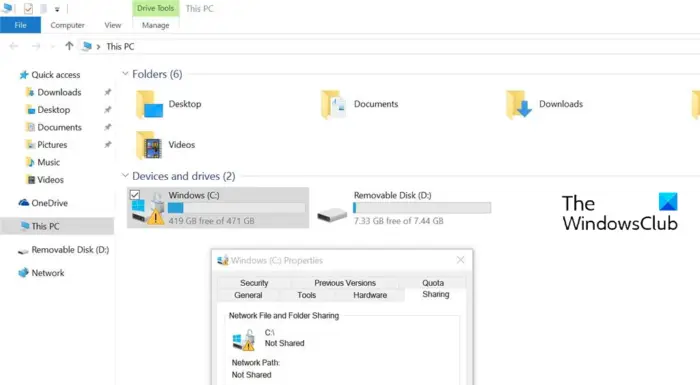
In this post, we will discuss how to fix the Yellow triangle warning on C or D Drive on Windows 11/10. The yellow exclamation warning in the shape of a triangle indicates that you must cross-check the information stored in the associated drive and ensure that it is safe and protected through the Bitlocker. It basically indicates that Bitlocker is waiting, not activated or suspended.
BitLocker Drive Encryption comes integrated with Windows OS and looks after data protection. It provides the best protection when used with a TPM version 1.2 or later. This may happen if the automatic device encryption not being enabled. The issue could occur if a user creates and logs on using a local account during the initial set up (out-of-box) of the computer. Nevertheless, worry not if you also see the Yellow triangle warning on C or D Drive. Just follow the below solutions to get rid of the issue.
The lock for the hard drive may have various meanings:
| Lock position | Meaning | |
| Locked padlock | BitLocker locked: Volume is inaccessible. | |
| Unlocked padlock | BitLocker on: Drive is encrypted and keys are protected. | |
| Unlocked padlock with yellow warning triangle | BitLocker is suspended: Drive is encrypted but everyone has access. This icon is also used to indicate the BitLocker is pre-provisioned. |
Below is a list of all the effective solutions you can try to remove the Yellow triangle warning with a padlock on C or D Drive on Windows 11/10.
- Run the Chkdsk command
- Enable BitLocker Encryption
- Disable BitLocker Encryption
Now, let’s take a look at all these solutions in detail.
Bitlocker is waiting, not activated or suspended
1] Run the Chkdsk command
Before trying anything technical, you should run the Chkdsk command. It will look at the file system and file system metadata for logical and physical errors. To run the command, follow the below steps.
- Press the Windows key to open the Start menu.
- In the search bar, type Command Prompt and press the Enter key.
- From the result, choose the Run as administrator option.
- Now, in the cmd window, type chkdsk /f and press the Enter key.
Once the command is executed, close the Command Prompt window and restart your system. Check if you are still facing the problem. If not, you are good to go. But in case, the problem continues, try the next solution on the list.
See: OneDrive Exclamation Mark error Icon in Explorer
2] Enable BitLocker Encryption
The Yellow triangle warning on the C or D drive indicates that the automatic device encryption is disabled. This option is enabled by default but can get disabled automatically after system updates. To solve the problem, you will have to enable and disable the BitLocker. Below are the steps to enable BitLocker on your system.
- To begin with, open the Settings menu by pressing the Windows + I shortcut key.
- In the System section, locate and open the Storage option.
- Click on the drop-down icon present next to Advanced storage settings.
- Choose Disks & volumes.
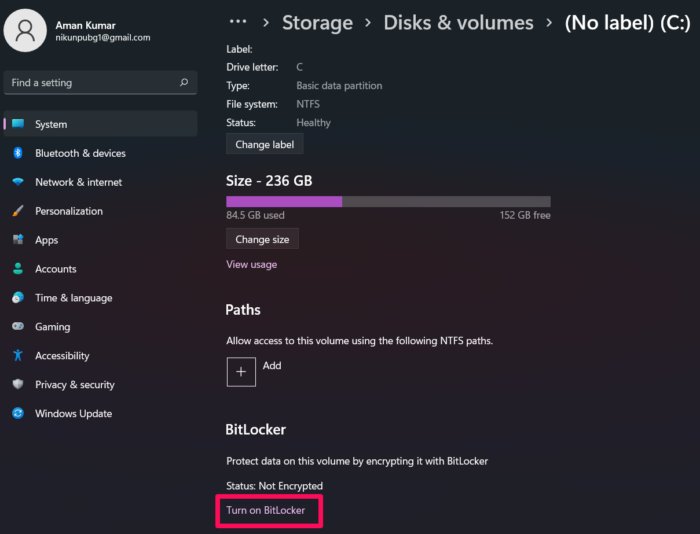
- Select C Drive and choose the Properties option.
- In the following window, select Turn on BitLocker.
- Choose Enter a password.
- Create a strong and unique password to unlock the drive.
- Tap on the Next option.
- Under How to back up your recovery key, select Save to Microsoft account.
- Click on Next.
- Select Encrypt used disk space only (faster and best for new PC’s and drives).
- Tap on the Next option.
- Choose New encryption mode (best for fixed drivers on this device) as the encryption mode to use.
- Now, click on Next > Start encrypting.
Now, restart your system and check if the problem is fixed or not.
See: Fix Disk Management errors on Windows
3] Disable BitLocker Encryption
The problem can also occur if you have previously used the BitLocker protection on the C drive. If this is the case, you’ll have to disable the BitLocker Encryption. You can do so by following the below steps.
Open Command Prompt in the administrator mode.
Type the following command, and press the Enter key.
manage-bde -off C:
That’s it. The process will take some time.
Once it’s completed, restart your system. You’ll notice that you’re no longer seeing the Yellow Triangle warning.
Read: Explorer.EXE blank message with a yellow exclamation mark on startup
What does a yellow triangle with an exclamation mark mean on my computer?
If you see a yellow exclamation mark triangle on your PC then it indicates that there is an issue with the associated device. It indicates the current device status and points out that there is some conflict between the devices and the system resources. The problem mainly occurs when you try to plug a new device into your system. To solve the problem, you can re-plug the device. If this doesn’t make any difference, you can go with updating the associated driver. Reinstalling the driver can also prove to be an effective solution.
How do I fix the yellow triangle with exclamation mark on battery symbol?
It’s very common to see a yellow triangle over the battery symbol on a Windows PC. Thankfully, it’s very easy to troubleshoot this problem. You can try the following methods: Run the Power troubleshooter, manually restore defaults for the Power Plan, and Uninstall or Reinstall the Battery driver. For more information, you can check out our dedicated guide on the same.
How do I fix the display adapter or GPU showing yellow exclamation mark?
This problem mainly indicates that the driver is not installed properly. To solve the issue you can download the latest driver update by visiting the device. Alternatively, you can even reinstall the driver if updating doesn’t make any difference.
Read next: How to remove Lock Overlay Icon on Encrypted Files.
Защита ваших жестких дисков может помочь предотвратить нежелательный доступ и повысить безопасность ваших данных. Windows позволяет шифровать файлы и папки с помощью файловой системы шифрования или EFS. Как только ваши диски будут зашифрованы, вы увидите значок замка или замка на ваших дисках.
Редакции Pro и Enterprise Windows 10 имеет функцию BitLocker, которая переводит диски в заблокированное состояние и шифрует их для дополнительной защиты. EFS не так надежен, как BitLocker, но тоже работает эффективно. Когда вы зашифровываете свои файлы и диски, никому не будет разрешен доступ к ним, если они не будут расшифрованы с использованием пароля вашей учетной записи Windows.
Почему существует значок замка или замка?
Когда вы видите значок замка или замка на своих файлах, это означает только то, что эти файлы имеют дополнительную защиту и не передаются никому. В некоторых случаях пользователи изменяют параметры общего доступа или функции безопасности, поэтому появляется значок замка. Значок замка позволяет пользователям идентифицировать зашифрованные и незашифрованные файлы или диски.
Как разблокировать папки с помощью значка замка?
Вам понадобится пароль BitLocker, чтобы разблокировать значок замка. Нажмите на диск или папку, к которой вы хотите получить доступ. Вам будет предложено ввести пароль. Просто введите пароль, и значок замка разблокируется.
Папки со значками разблокировки означают, что их защита временно приостановлена, поэтому вам не нужно вводить пароль для доступа.
Как удалить значок замка или замка
Способ 1 — измените настройки разрешений
- Найдите папку, файл или диск, который вы хотите изменить.
- Щелкните правой кнопкой мыши, чтобы открыть раскрывающееся меню, и выберите «Свойства».
- Затем найдите вкладку «Безопасность» и выберите «Изменить».
- Проверьте список пользователей или групп с определенными разрешениями на диск и посмотрите, находитесь ли вы в списке, если он определяет «Все».
- Если нет, нажмите «Добавить». Если вы есть в списке, нажмите «Разрешить полный доступ».
- Затем нажмите ОК.
- Чтобы еще раз проверить, были ли применены изменения, введите имя пользователя или группы и нажмите «Проверить имена». Результаты покажут имя вашего компьютера и имя вашего пользователя или группы. Нажмите «ОК», поскольку изменения были применены.
- Если в результатах отображается ошибка «Имя не найдено», повторите процесс добавления имени пользователя или группы.
- В окне «Безопасность/Разрешения» выберите добавленного пользователя или группу и установите флажок «Полный доступ».
- Нажмите ОК, чтобы применить изменения.
Способ 2 – отключить EFS
- Выберите файл, папку или диск и щелкните правой кнопкой мыши, чтобы открыть раскрывающееся меню.
- Нажмите «Свойства».
- Найдите «Дополнительно» и нажмите, чтобы открыть.
- Внизу убедитесь, что флажок «Шифровать содержимое для защиты данных» не установлен.
- Нажмите «ОК» и проверьте, удалился ли значок.
Способ 3 — отключить BitLocker
- Найдите диск, на котором вы хотите отключить BitLocker.
- Щелкните правой кнопкой мыши, чтобы просмотреть раскрывающееся меню, и выберите «Управление BitLocker».
- Зайдя в шифрование диска BitLocker, найдите параметр «Отключить BitLocker» в правом нижнем углу и выберите его.
- Появится окно подтверждения. Нажмите кнопку «Выключить BitLocker», чтобы подтвердить процесс отключения.
- Дождитесь завершения процесса и закройте окно.
Как возобновить защиту BitLocker
При возобновлении защиты BitLocker значок замка заблокируется после того, как вы разблокируете его для доступа пользователей. Если вы хотите возобновить защиту, выполните следующие действия.
- На диске, который вы хотите изменить, щелкните правой кнопкой мыши и найдите кнопку «Возобновить защиту BitLocker».
- Нажмите, чтобы начать изменения.
- Перезагрузите компьютер и посмотрите, исчез ли значок замка или замка.
Заключение
Дополнительная защита ваших файлов важна на случай онлайн-взломов и нежелательного доступа. Однако, если вам не нужна дополнительная безопасность некоторых ваших файлов или дисков, вы можете удалить значок замка, используя описанные выше методы. Была ли статья полезна? Дайте нам знать в комментариях ниже.
Значок замка на дисках в проводнике Windows 10 указывает на то, что диск зашифрован с помощью BitLocker.
BitLocker, присутствующий в выпусках Windows 10 Pro и Enterprise, позволяет пользователям шифровать диски для защиты данных. Встроенная программа шифрования добавляет значок замка на дисках в проводнике, чтобы пользователи могли легко идентифицировать диски, защищенные BitLocker.
В зависимости от состояния зашифрованного диска вы можете увидеть на дисках один из следующих трех значков.
Значок замка или значок замка на диске означает, что диск зашифрован с помощью BitLocker и находится в заблокированном состоянии. То есть вам нужно будет ввести пароль BitLocker, чтобы открыть диск и получить доступ к данным на нем. Значок разблокированного замка на диске сигнализирует о том, что диск, зашифрованный BitLocker, теперь открыт, и вам не нужно вводить пароль BitLocker, чтобы открыть его.
А если на диске появляется значок разблокированного замка с восклицательным знаком, это означает, что BitLocker не активен или защита диска временно приостановлена. В этом случае вы можете возобновить работу BitLocker на диске или отключить BitLocker для диска, чтобы удалить значок.
Чтобы возобновить защиту диска BitLocker
Windows 10 позволяет приостановить защиту BitLocker для диска, на котором установлена Windows 10. Пользователям разрешено приостанавливать защиту BitLocker на установленном диске Windows 10, чтобы пользователи могли обновить операционную систему, встроенное ПО или оборудование.
Шаг 1: Щелкните правой кнопкой мышина диске, а затем нажмитеВозобновить защиту BitLockerвариант. Кроме того, вы можете перезагрузить компьютер один раз, чтобы автоматически возобновить защиту BitLocker.
Как отключить BitLocker для диска в Windows 10
Если вы не хотите шифровать диск, вы можете отключить или отключить BitLocker для диска. Вот как это сделать.
Шаг 1:Откройте этот компьютер.Щелкните правой кнопкой мышина диске, для которого вы хотите отключить BitLocker, а затем нажмитеУправление BitLockerвариант. Это действие откроет окно шифрования диска BitLocker.
Шаг 2:Нажать наОтключить BitLockerсвязь.
Шаг 3:Наконец, когда вы увидите диалоговое окно подтверждения, нажмитеОтключите BitLockerКнопка, чтобы отключить шифрование BitLocker для диска.
В зависимости от размера данных и диска Windows 10 может потребоваться от нескольких минут до нескольких часов для расшифровки диска.
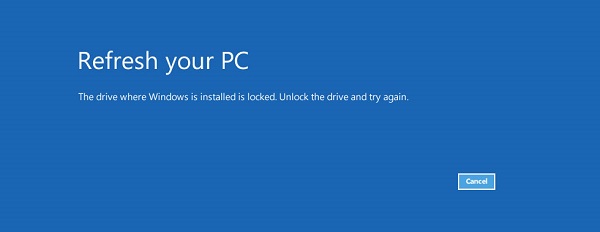
Stay here and pick up one practical fix to unlock your Windows hard drive if you are getting the error message that «The drive where Windows is installed is locked. Unlock the drive and try again». Five fixes and one reliable data recovery software are ready here to help you out:
| Workable Solutions | Step-by-step Troubleshooting |
|---|---|
| Fix 1. Run CHKDSK | Boot PC from Windows installation media…Full steps |
| Fix 2. Use SFC Command | Open Command Prompt by booting PC…Full steps |
| Fix 3. Run bootrec Command | Type bootrec /RebuildBcd …Full steps |
| Fix 4. Refresh PC | Restart PC from Windows installation media…Full steps |
| Extra Help. Recover Data for Free | For the lost data after unlocking Windows drive…Full steps |
Error Explanation
About «The drive where Windows is installed is locked» error:
It usually happens to Windows 10/8.1/8/7 system recovery when a critical system file is missing or corrupted, the System Boot Configuration Data (BCD) is damaged or some required information is missing.
Data Backup
You should know that this locked hard drive issue will prevent you from starting your computer as normal. To access data and create an exact copy of the hard drive, you need to back up data without booting into Windows, and third-party EaseUS backup and recovery software could help achieve the goal.
On a working computer, go to the EaseUS Todo Backup product page, download and install it for a 30-day free trial. Prepare a USB flash drive or a CD/DVD disc in advance, to create a bootable recovery disk as the below video demonstrates. Afterward, boot your problematic computer from the recovery disk, and start disk/partition backup.
Troubleshooting
The following are the 4 widely used methods to unlock hard drive so that you can refresh your PC and completely get rid of «the drive where Windows is installed is locked» problem. The methods are applicable to major Windows operating system including Windows 10/8.1/8/7. Pick up one that works the best for you.
Fix 1. Check disk errors with CHKDSK
The CHKDSK utility is built-in Windows, aiming to check the integrity of your hard disk and fix bad sectors if any were found.
Caution: The CHKDSK command will erase all saved files on the target device while fixing the disk error. So make sure to recover all data first with reliable data recovery software.
1. Boot the computer via the Windows installation media either a USB stick or a DVD, and go to «Next».
2. Click «Repair your computer» > «Advanced startup options» > «Troubleshoot» > «Advanced options» > «Command prompt».
3. On the command prompt window, you will need to input the command line (C: is where your Windows is installed).
- chkdsk C: /f /x /r
4. Press «Enter» on the keyboard for the check to start.
5. After this operation is finished, please reboot the Windows computer and check to see if you get the same error.
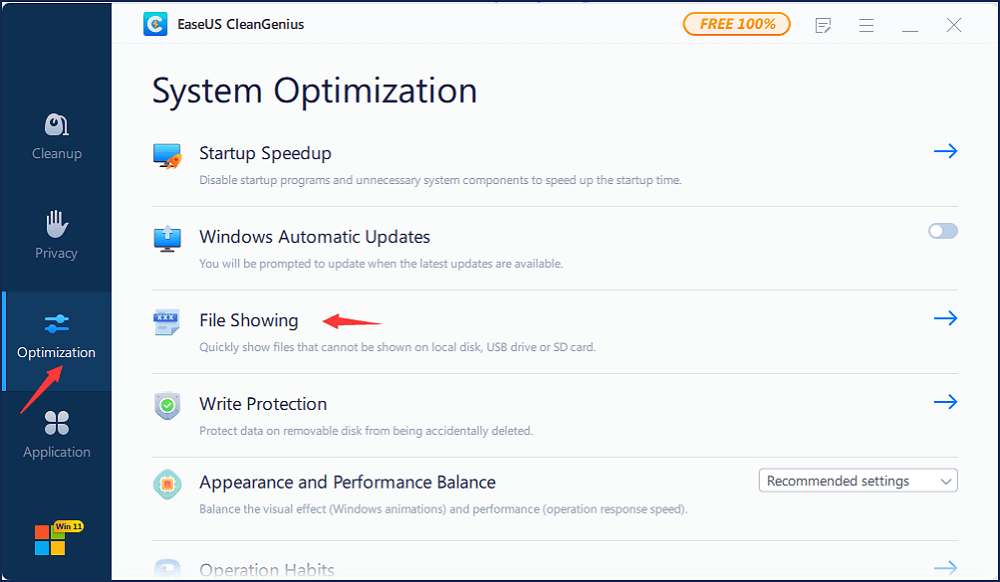
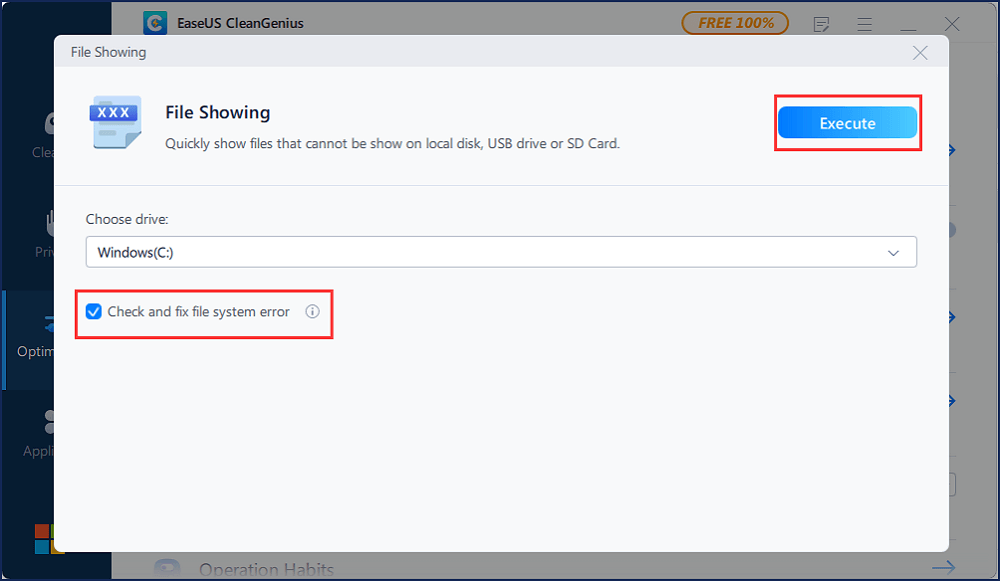
If command line is not your ideal choice, you can apply this command-line alternative tool — EaseUS CleanGenius. Use this one-click tool to fix the file system error on your hard drive.
Step 1. Download EaseUS CleanGenius on your computer for free.
Step 2. Run the software. Click «Optimization» on the left panel, and then choose «File Showing» .
Step 3. Go to «Choose drive» and select the drive with a file system error. Check the «Check and fix file system error» option and click «Execute».
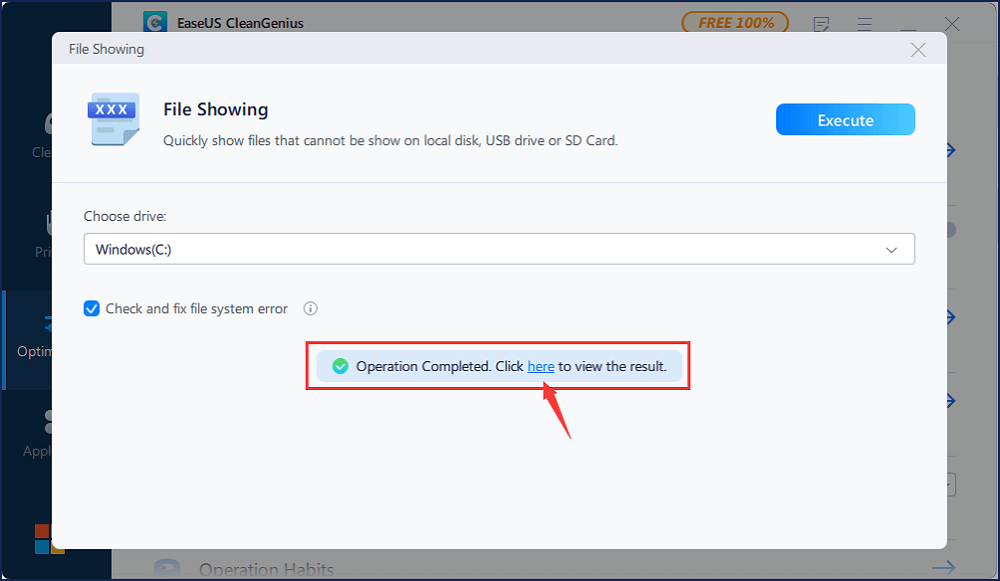
Step 4. Wait the EaseUS CleanGenius completes the repairing process. After that, click the «here» to view the result.
Fix 2. Use the SFC command
The SFC command is a Command Prompt command that can be used to verify and replace important Windows system files. Many troubleshooting steps likewise advise the use of the SFC command.
1. Open the command prompt window as you did in [Fix 1].
2. Type the following command in the command prompt window:
- sfc /scannow
3. Press «Enter» on the keyboard.
4. Let the scan finish and fix any potential errors.
5. Reboot your Windows computer and check if you have the same error message.
Fix 3. Perform the bootrec command
1. Go to the «Troubleshoot» feature in Windows as you did in [Fix 1].
2. Type «Advanced options» > «Automatic repair» > «Command prompt».
3. Type the command line and press «Enter» on the keyboard:
- bootrec /RebuildBcd
4. Type the command line and press «Enter» on the keyboard:
- bootrec /fixMbr
5. Type the command line and press «Enter» on the keyboard:
- bootrec /fixboot
6. Type the command line: exit, and press «Enter» on the keyboard.
7. Reboot your Windows computer and see if you still get the error message.
Fix 4. Refresh the PC
1. Restart your computer and boot from the USB drive or DVD installation media.
2. Click «Repair your computer».
3. Click «Troubleshoot» and then click «Refresh your PC».
4. Follow the wizard instructions to complete the process.
Extra help: How to Recover Data Without Backup for Free
Refreshing Windows or unlocking the hard drive, are helpful methods to deter the ‘drive where Windows is installed is locked’ error. But there’s a big risk that you lost some precious data on the hard drive in the process. So we feel responsible for offering some extra help if data loss really happens.
If by chance, Windows data, system files, personal files, and other information are erased by performing the command line, refreshing, or system restoring methods, use EaseUS Data Recovery Wizard to perform hard disk recovery and get your data back! Other issues such as recovering deleted files can also be easily fixed. It’s user-friendly, safe, and efficient. Feel free to download it whenever you are in need.
Video Tutorial: Recover Files from Hard Drive
People Also Ask
If you have further questions related to how to unlock the drive where Windows is installed, check the questions and answers below. You may find a satisfying answer:
1. How do I unlock the drive where Windows 10 is installed?
When the hard drive where you installed Windows 10 is locked, you may run the following command to unlock it:
- In Windows, click the Start and enter cmd in the Search field, then press the Enter key.
- Type bootrec /RebuildBcd and press Enter.
- Type bootrec /fixMbr and press Enter.
- Type bootrec /fixboot and press Enter.
- Type exit to close the command prompt and restart Windows computer.
2. How do you unlock a computer drive?
When your computer hard drive gets locked, you may try the following steps to unlock it:
- Step 1. Run a disk check using CHKDSK command.
- Step 2. Run a system file check with sfc /scannow command.
- Step 3. Complete a startup repair with «bootrec /RebuildBcd», «bootrec /fixMbr», and «bootrec /fixboot» commands.
- Step 4. Try a system restore.
- Step 5. Refresh your PC.
3. Why is my drive locked?
For OS drive:
According to the explanation on this page, the error «The drive where Windows is installed is locked» usually comes out when a critical file system is missing or corrupted.
It may also get locked when the System Boot Configuration data gets damaged or some required information is missing.
For data drive:
Usually, a data hard drive can be locked due to various reasons, including disk is write-protected, password setting, encryption software, malware or virus infection, etc.
Вопрос от пользователя
Здравствуйте!
Помогите с одной проблемой… Хочу переустановить Windows 10, но не могу сделать копию нужных мне файлов с раздела диска с ОС — Windows не загружается, а этот раздел в различных программах просто не виден (я загружался с LiveCD).
В одной из программ увидел, что вместо файловой системы стоит примечание «BitLocker». Я так понимаю, что этот диск был зашифрован. Но я это не включал, помогите, как снять эту блокировку и расшифровать диск.
Здравствуйте.
Если у вас установлена современная Windows 10/11 на относительно новом устройстве — то совсем не обязательно, чтобы вы заходили в параметры и включали вручную BitLocker для шифрования диска (это «может» работать в авто-режиме // зависит от версии ОС, предустановок…). В общем, ничего удивительного…
Однако, не спешите отчаиваться, кое-что для «спасения» данных сделать можно… 👌
*
Содержание статьи📎
- 1 Как «разблокировать» BitLocker и «увидеть» разделы на диске
- 1.1 Как понять, что диск был зашифрован (а не случилась с ним какая-то другая «проблема»)
- 1.1.1 Если Windows загружается
- 1.1.2 Если Windows не загружается
- 1.2 Как узнать ключ BitLocker, снять блокировку и расшифровать диск
- 1.2.1 Вариант 1
- 1.2.2 Вариант 2
- 1.1 Как понять, что диск был зашифрован (а не случилась с ним какая-то другая «проблема»)
→ Задать вопрос | дополнить
Как «разблокировать» BitLocker и «увидеть» разделы на диске
Как понять, что диск был зашифрован (а не случилась с ним какая-то другая «проблема»)
Разумеется, причин «невидимости» диска гораздо больше, чем «один BitLocker» (раздел может не отображаться в ряде программ, если на нем слетела файловая система, например). Поэтому, для начала будет логично удостовериться, что причина именно в шифровании…
*
Если Windows загружается
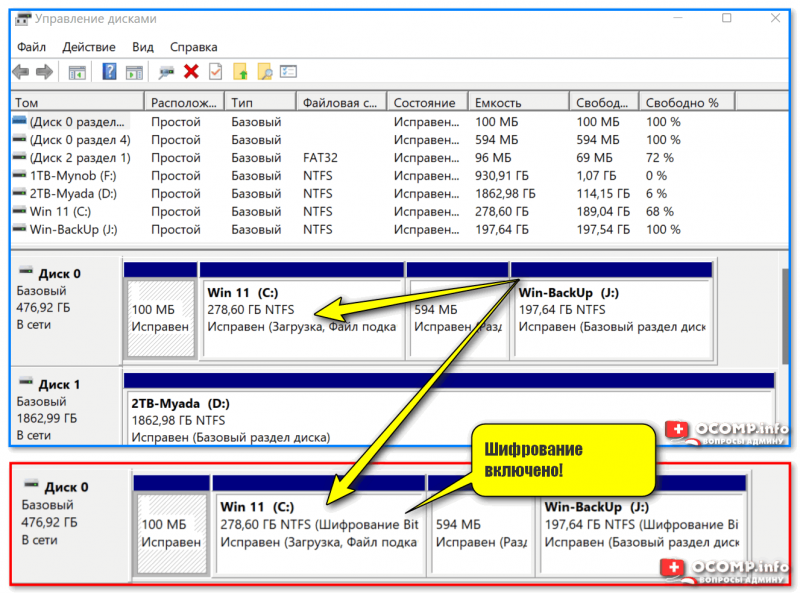
Если текущая Windows 10/11 на «проблемном» разделе (которую вы хотите переустановить) у вас еще хоть как-то работает и загружается — попробуйте в ней 👉 открыть управление дисками.
Далее посмотрите, нет ли в примечании диска надписи про «шифрование»… Как это может выглядеть показано на скрине ниже. 👇 Если есть — то это наш случай! 👌
Управление дисками — шифрование включено!
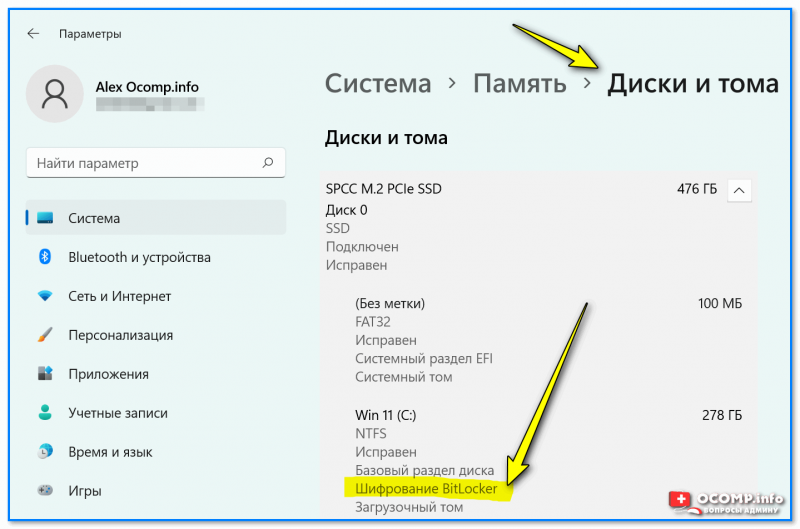
Кстати, если у вас ОС Windows 11 — то в параметрах системы (Win+i) можно открыть вкладку «Система / Память / Доп. параметр хранилища / диски и тома « и посмотреть свойства нужного тома. Вся информация тоже «как на ладони»… 👇
Параметры Windows 11 — доп. параметры хранилища — диски и тома
*
Если Windows не загружается
В этом случае нам понадобиться LiveCD-флешка. Если она у вас не была подготовлена заранее — вам понадобится рабочий компьютер. Пару ссылок в помощь:
- выбор 👉 LiveCD и его запись на флешку;
- как 👉 загрузиться с «аварийной» LiveCD флешки.
*
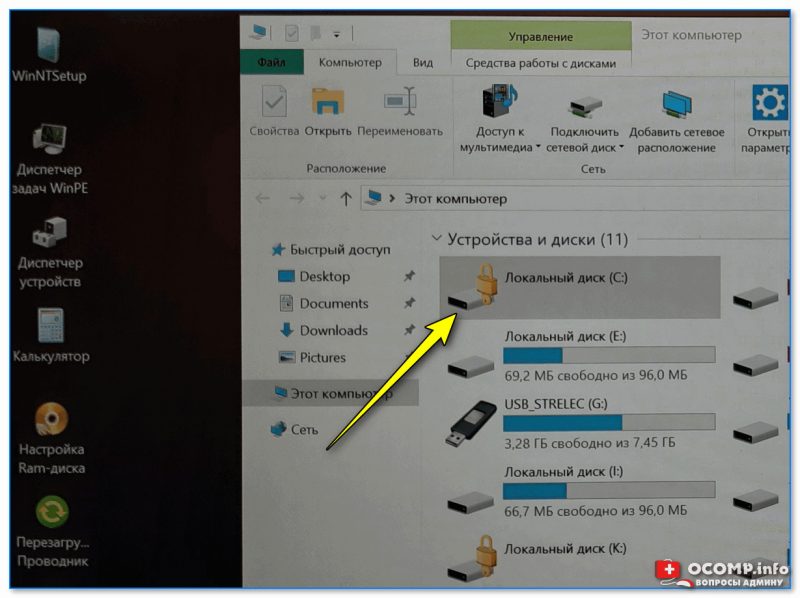
В своем примере я использовать флешку LiveCD от Сергея Стрельца.
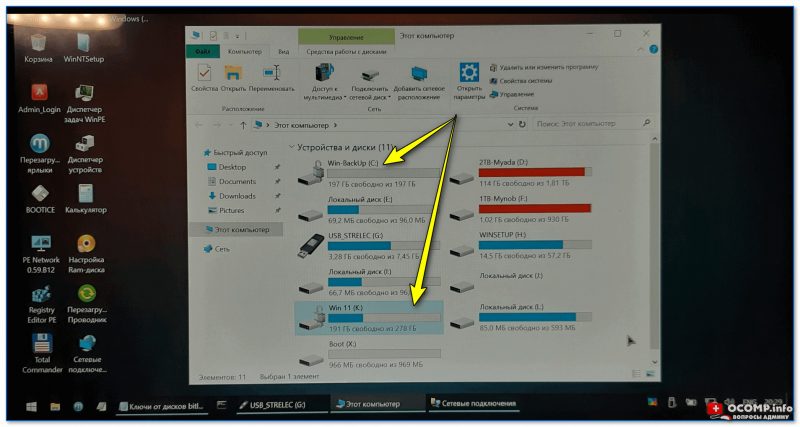
Обратите внимание, если запустить проводник и открыть «Мой компьютер» — не открывающиеся диски будут помечены желтым значком замка (закрытым!). 👇 Это значит, что они зашифрованы и их без ключа не открыть! 👌
Диск отображается с замочком!
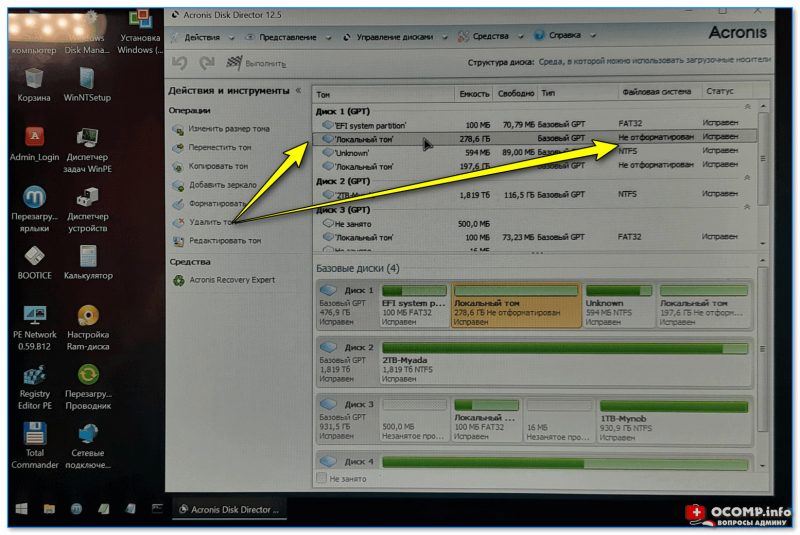
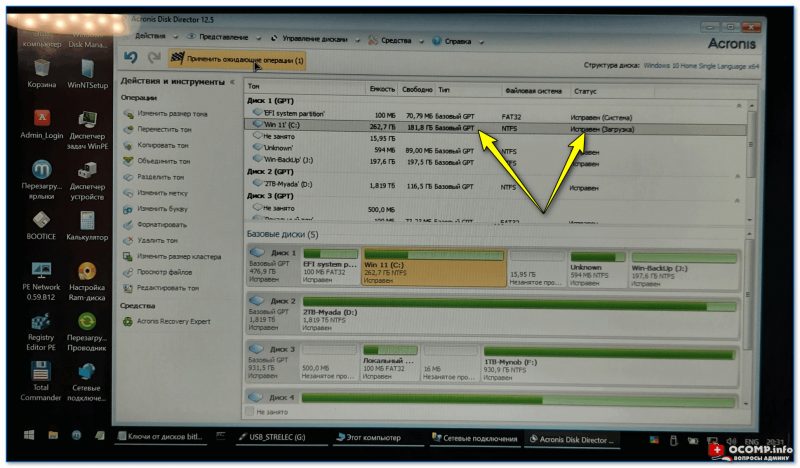
Если запустить Acronis Disc Director — то диск будет помечен как «Не отформатированный».
Acronis Disc Director — не отформатирован раздел
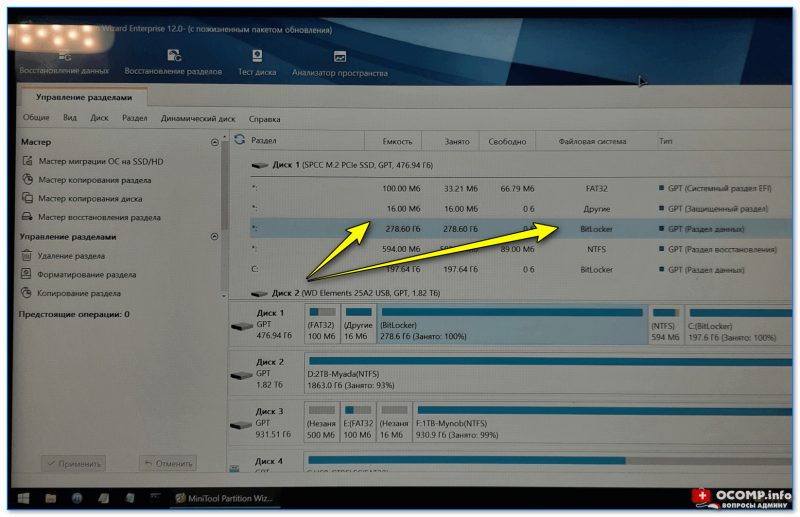
А в Minitool Partition Wizard вместо файловой системы будет значится «BitLocker»…
Minitool Partition Wizard — файловая система BitLocker
Собственно, если у вас нечто похожее — проблема диагностирована, ниже попробуем ее «разрешить»…
*
Как узнать ключ BitLocker, снять блокировку и расшифровать диск
В общем-то, заниматься этим нужно только в том случае, если на диске у вас есть важные данные. Если же вы хотите просто установить новую ОС (а текущие данные вам не нужны) — то можно просто удалить все разделы с диска и отформатировать его.
Теперь о том, что делать, если нужны данные…
*
Вариант 1
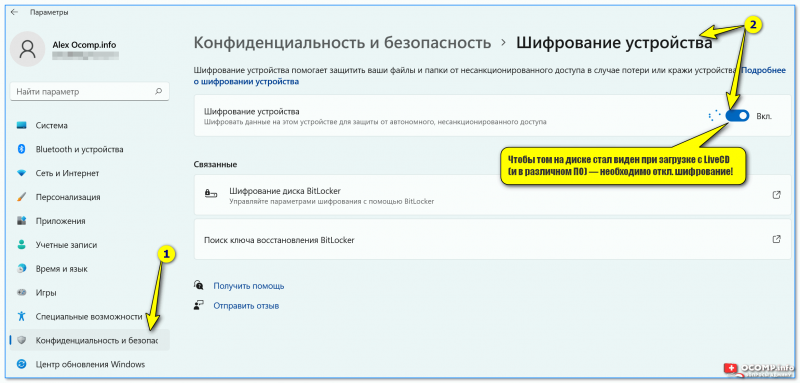
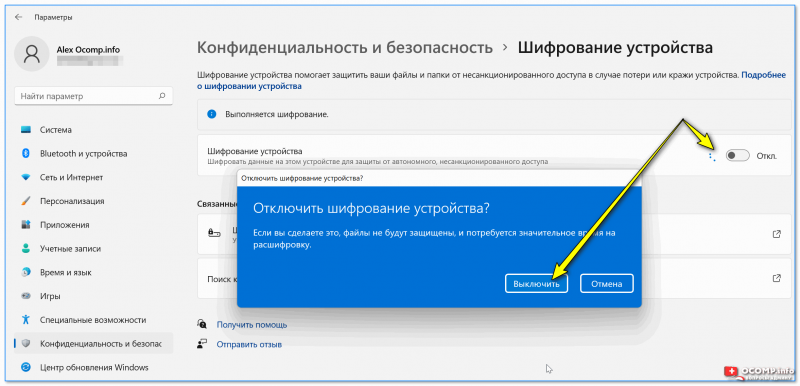
Если у вас на этом зашифрованном диске есть «рабочая» Windows 10/11 (что обычно и бывает // она-то и зашифровала его) — то наипростейшим и лучшим вариантом будет загрузить ее, открыть параметры системы, и в разделе «Конфиденциальность и безопасность/шифрование устройства» отключить шифрование! См. пример ниже. 👇
Чтобы том на диске стал виден при загрузке с LiveCD (и в различном ПО) — необходимо откл. шифрование!
Через некоторое время диск будет расшифрован, и вы сможете работать с ним из-под любых программ и LiveCD.
📌 Однако, имейте ввиду, что в этом случае вы подвергаете свое устройство определенному риску: любой, кто заполучит ваш диск — будет способен прочитать с него всю информацию!
Выключить шифрование
*
Вариант 2
- 👉 попросить своего администратора (или специалиста, который занимается обслуживанием вашего ПК). Это обычно относится к устройствам на работе (в домашних условиях — все всё делают самостоятельно… 😉);
- 👉 если вы вручную активировали защиту BitLocker (или бывший владелец вашего компьютера) — наверняка у вас должна быть распечатка или USB-флешка с ключом. Собственно, при помощи «этого добра» можно разблокировать диск;
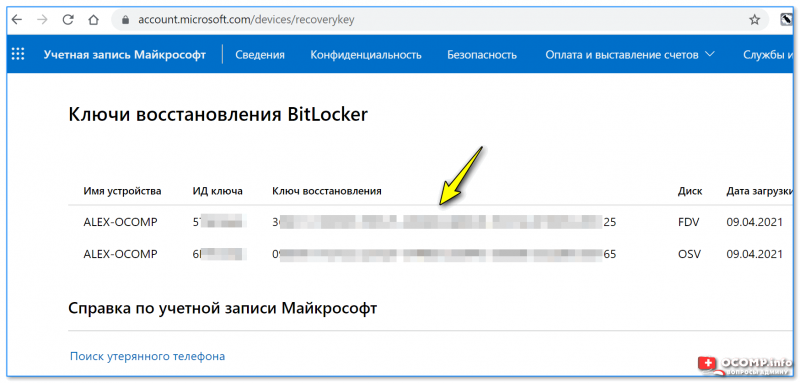
- 👉 если защита была актирована автоматически (это происходит на новых ОС и устройствах) — то 📌 проверьте свой аккаунт на сайте Microsoft — я привел ссылку на страницу с ключами! (прим.: многие считают, что у них и нет никакого аккаунта — но они часто ошибаются! В общем, попробуйте для авторизации свой логин от Skype или номер телефона!).
Ключи восстановления BitLocker — скриншот с сайта Microsoft
*
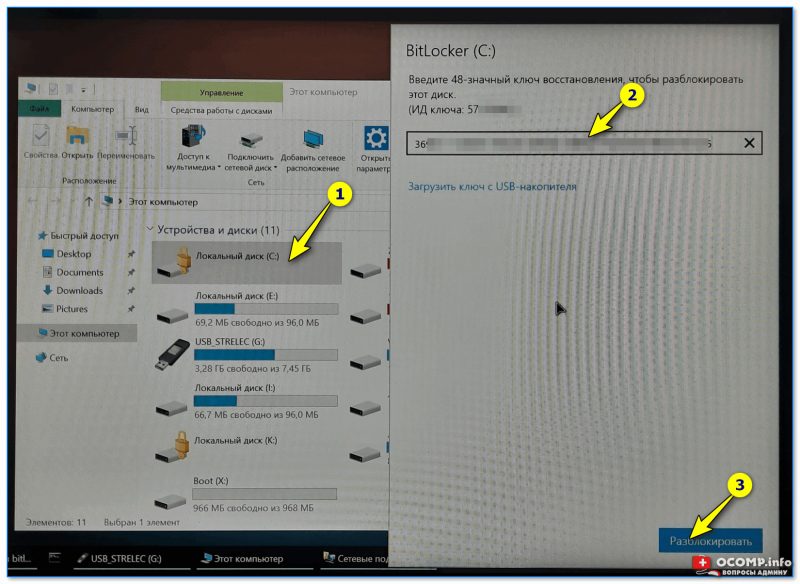
Собственно, узнав свой ключ на сайте Microsoft (☝️) — можете снова загрузиться с LiveCD флешки, открыть проводник и перейти в «Мой компьютер», щелкнуть по диску — и ввести в окно ключ разблокировки.
Разблокировка диска с помощью ключа
Если ключ был введен верно — вы увидите, что значок «закрытого замка» на диске стал «открытым» — т.е. теперь вы сможете открыть в проводнике этот диск и прочитать с него всю информацию!
Диск был разблокирован!!!
Разумеется, можно будет также использовать многие утилиты и программы для работы с накопителями (однако, ряд операций в них будет недоступен!).
В общем-то, даже такого доступа к диску будет достаточно, чтобы скопировать с него всю нужную и важную информацию. То бишь — задача решена! 👌
Программы видят диск!
*
Дополнения по теме приветствуются в комментариях!
Ну а у меня на этом пока всё…
Успехов!
👋


