When you dual-boot Linux with Windows, GRUB is automatically set as the default bootloader. Here’s how you can replace GRUB with Windows Boot Manager.
When you dual-boot a Linux distro alongside Windows, the installer sets up a bootloader, generally GRUB, to ensure there are no conflicts between the two operating systems during the boot-up processes.
While GRUB is a versatile and easy-to-use bootloader, you might want to switch to using the Windows Boot Manager as your default. Let’s learn how you can use Windows Boot Manager instead of GRUB.
An easy way to boot from Windows Boot Manager instead of GRUB is to simply head over to the UEFI settings of your motherboard and switch up the boot priority order.
Generally, during boot, you can press the F12 or Delete key to open up the UEFI control center. There you should find a specific setting where the boot hierarchy is laid out.
You should find GRUB on top, followed by Windows Boot Manager. Simply exchange their positions by dragging or any means necessary (it differs from one motherboard to another).
Once you’re done with switching their positions, simply save the changes and exit out of the UEFI settings panel. You should now be booting from Windows Boot Loader.
2. Add Linux to Windows Boot Manager Using EasyBCD

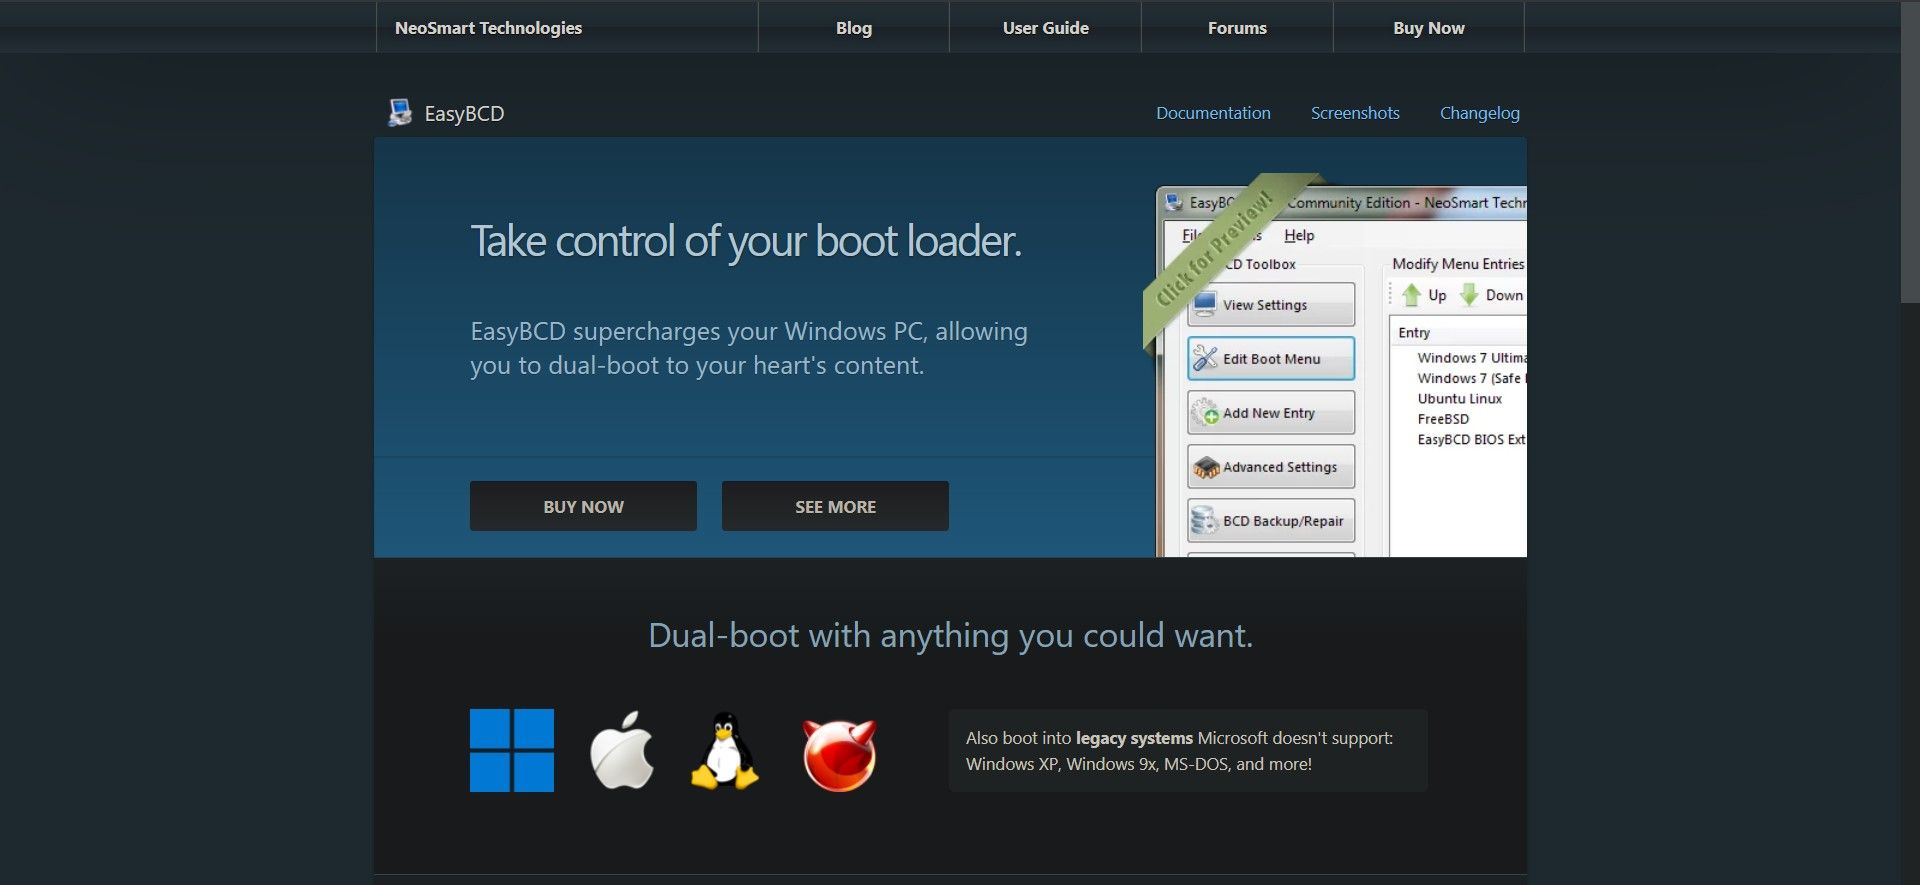
EasyBCD is a free software that helps you take control of your system’s boot process by allowing you to modify bootloader settings. It is a very potent and effective tool, so much so that we recommend using it as a last resort. You can accidentally end up corrupting your system’s boot process if you aren’t familiar with the technical side of things.
Download: EasyBCD (commercial edition available)
Here’s how to replace GRUB with Windows Boot Manager using EasyBCD:
- Fire up the EasyBCD application and click on the Add New Entry option.
- Next, select Linux from under the Operating System tab.
- Select GRUB2 in the Type field and type in the name of your Linux distro.
- Under the Drive tab, select the Linux partition i.e. the drive where your Linux system resides. Proceed with caution because selecting the wrong drive will lead to unsolicited data loss.
- Click on the Add (a plus sign) button to confirm your settings and add your Linux distro to the Windows Boot Manager.
Restart your PC, and you should find your Linux distro added to Windows Boot Manager. Now you should be able to boot into either of your installed OSes from there.
Now You Can Boot From Windows Boot Manager Instead of GRUB
Following the aforementioned steps should help you set up your dual-boot system to boot from Windows Boot Manager instead of the GRUB bootloader. While dual-booting has its advantages, it does bear some risks that can affect performance in the long run.
-
Home
-
News
- 2 Ways to Replace GRUB with Windows Boot Manager
By Amy | Follow |
Last Updated
If you are going to replace GRUB with Windows Boot Manager, this post is what you need is it offers you a full tutorial. It collects 2 available methods. Explore the content with MiniTool Partition Wizard now!
Why Do You Need to Replace GRUB With Windows Boot Manager
GRUB is often set as the bootloader when you dual-boot a Linux distro with Windows. This can ensure that there’re no conflicts between the two operating systems in the load-up process. Though GRUB is a versatile and easy-to-use bootloader, you may still want to set Windows Boot Manager as the default because of errors like GRUB not showing in dual boot setup or something else.
Here comes the question: how to switch from GRUB to Windows Boot Manager. Well, you don’t have to worry about it. This post would illustrate the whole process for you.
Further reading:
Windows Boot Manager (BOOTMGR) is a small piece of software that is loaded from the volume boot code. It enables you to boot operating systems including Windows Vista/7/8/10. However, it can prompt you with various errors.
For instance, you will receive errors like BOOTMGR is missing, Boot Manager failed to find OS loader, BOOTMGR is compressed, etc. If you are bothered by issues like that, try using MiniTool Partition Wizard to fix them.
MiniTool Partition Wizard DemoClick to Download100%Clean & Safe
This free partition manager enables you to rebuild MBR, set the partition as active, check the hard drive for errors, copy disks, and perform other operations that are related to partitions or disks.
How to Replace GRUB With Windows Boot Manager
There are 2 methods to switch from GRUB to Windows Boot Manager for you.
Method 1: Change the Boot Priority Order
A simple way to switch from GRUB to Windows Boot Manager is to change the boot priority order in the UEFI settings of the motherboard. The following steps will show you how to do that in detail.
Step 1: Open Settings by pressing Windows and I keys.
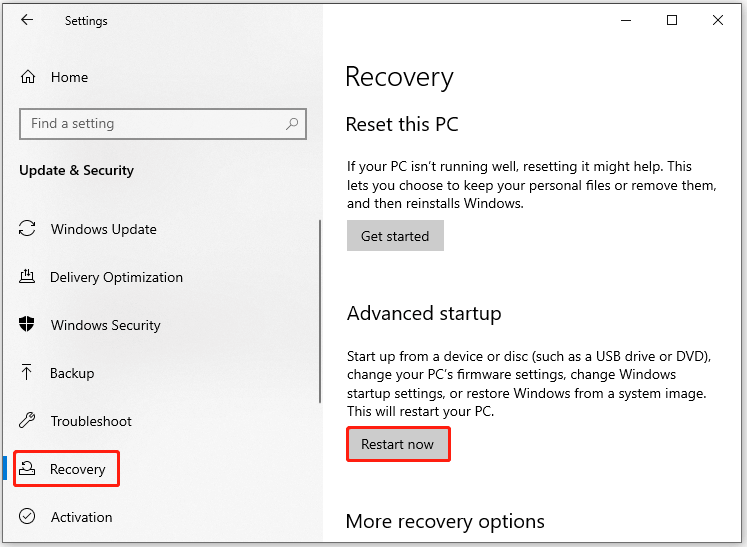
Step 2: Then click Update & Security > Recovery > Restart now (under the Advanced startup section).
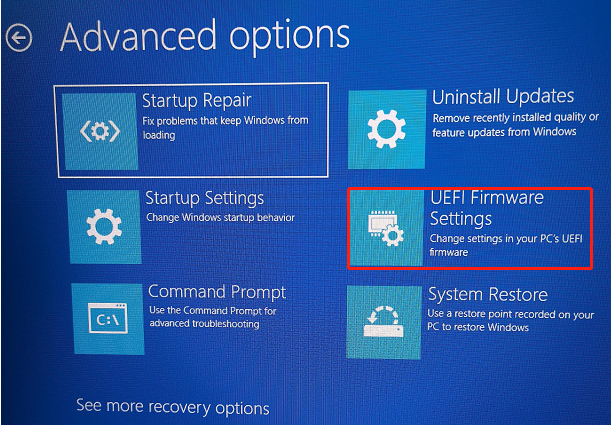
Step 3: Click on Troubleshoot > Advanced options > UEFI Firmware Settings and tap Restart.
Step 4: After the computer restarts, it will enter the UEFI/BIOS setup utility.
Step 5: Navigate to the Boot section and set Windows Boot Manager as the first boot. To do that, click on Windows Boot Manager and keep pressing the “+” key until the option is placed at the first order.
Step 6: Then press F10 and Enter keys to confirm the change and exit the utility.
Method 2: Use EasyBCD to Add Linux to Windows Boot Manager
You can also replace GRUB with Windows Boot Manager via EasyBCD. It is a tool that is capable of controlling your system’s boot process. To be specific, you are able to modify bootloader settings through EasyBCD.
Step 1: Download and install EasyBCD on your computer.
Step 2: Run EasyBCD to enter its main interface and click the Add New Entry option.
Step 3: Click the Linux option under the Operating System tab.
Step 4: Choose GRUB2 in the Type field and type in the name of your Linux distro.
Step 5: Under the Drive tab, select the Linux partition where your Linux system resides. You need to take care because choosing the wrong drive will cause data loss.
Step 6: Tap on the Add (“+” icon) button to confirm your settings and add the Linux distro to the Windows Boot Manager.
Step 7: Restart your computer.
How to replace GRUB with Windows Boot Manager? This post has collected 2 available methods for you. Simply choose one from them to switch from GRUB to Windows Boot Manager.
About The Author
Position: Columnist
Having writing articles about computer tech for a long time, I am rather experienced especially on the aspect of computer optimization, PC enhancement, as well as tech terms explanation. The habit of looking through tech forums makes me a great computer issues collector. And then, many articles related to these issues are released, which benefit plenty of users. Professional, effective, and innovative are always the pursuit of an editing worker.
If All Else Fails!
The guy above me’s method does not work on newer EFI computers. I solved the problem. Here is how I did it. WARNING, you have to reinstall Linux / grub first!
Steps: (this is if nothing else works and takes a long time)
1: Reinstall Ubuntu / Linux mint (this is just so you can use GRUB to boot into Windows).
1.5: Restart and boot into windows (if you can’t boot to Windows, then live boot from the CD or USB and run the following in a console:
If you have a windows repair disk you can select the UEFI firmware option and load Windows from there (to avoid reinstalling Linux)
Boot repair (if needed right now)
sudo add-apt-repository ppa:yannubuntu/boot-repair

sudo apt-get update

sudo apt-get install -y boot-repair && (boot-repair &)
1g: Select recommended repair and follow the on screen instructions.
2g: After your done, reboot. You should see the grub menu, even though you can boot to Windows from here, this is not what we want yet… But find the option that boots into Windows.
2: Once your booted into Windows, run your disk partition editor and delete All partitions related to Linux / grub. Especially make sure the small grub partition is removed. Reboot
2.5: Make sure the windows loader is the first selected boot device. (most likely is). Disable the Ubuntu option. Continue boot.
3: If you’ve done everything right up to this point you should see (depending on your computer) your splash screen for a second and then it will turn into an error screen saying that there was an error with the boot. («Winload.exe is missing or corrupted» most likly).
3.5: Don’t be alarmed (I was). The next step will restore your original bootloader.
4: Restart and boot to your Linux CD or USB.
5: Once booted, run boot repair commands from above again. This time when running it. It will act differently, there is no grub bootloader detected to reinstall and should run faster than before.
6: Once complete, restart.
7: Enjoy your GRUB free system!
This worked for me when nothing else did, I ran bootrec.exe. Nothing worked. This saved my computers life. Hope it saves yours!
Все чаще и чаще на форумах возникают вопросы:
Как удалить Ubuntu и восстановить загрузчик для Windows?
Как заменить grub на загрузчик Windows?
Установка Ubuntu рядом с Windows 8?
Ubuntu рядом с Win 8, загрузчик Windows не видит Ubuntu.
В связи с этим, решил написать заметку, о восстановлении загрузчика grub, о том, как нужно правильно удалять linux, восстанавливать загрузчик Windows и MBR.
1 способ. У нас есть live-cd/usb с дистрибутивом Linux.
1. Записываем live-cd, live-usb практически любого дистрибутива linux, будь то ubuntu, mint или еще что-то там.
2. Загружаемся с live-cd/usb, открываем терминал (Ctrl+T) и смотрим таблицу разделов диска:
$ sudo fdisk -l
Помимо fdisk, еще существует много различных утилит для просмотра и редактирования таблицы разделов: gparted, cfdisk например.
По таблице видно, что linux установлен на разделе /dev/sda1, напротив него стоит звездочка, это признак того, что раздел загрузочный.
3. Теперь этот раздел нужно смонтировать:
$ sudo mount /dev/sda1 /mnt
4. Раздел смонтирован, следовательно мы имеем доступ к нему.
Сейчас нам нужно восстановить MBR.
Для этого нужно установить grub на жесткий диск (НО НЕ НА РАЗДЕЛ ЖЕСТКОГО ДИСКА!), так как мы восстанавливаем MBR:
$ sudo grub-install —root-directory=/mnt /dev/sda
где /mnt — это рутовый каталог, который мы смонтировали, /dev/sda — имя жесткого диска.
После этого MBR восстановлен, grub установлен.
Ситуация:
у вас на машине стоит три системы например: Windows 7 Ultimate, Windows XP Professional и Linux Mint 14.
Windows вам надоела, вы ее снесли и по каким-либо причинам, в списке grub’а остались разделы Windows.
Если случилась такая ситуация, то необходимо сгенерировать новый конфигурационный файл загрузчика. Он заново просканирует систему, определит установленные операционные системы на компьютере и сгенерирует конфиг с новыми параметрами меню загрузчика.
1. В консоли пишем:
$ sudo update-grub —output=/mnt/boot/grub/grub.cfg
где update-grub — обновляет конфиг загрузчика, параметр —output указывает на файл конфигурации grub’а.
2. После проделанных операций, можно перезагрузиться и загрузиться с жесткого диска (естественно заходим в BIOS).
Ну и все собственно.
Вот например как выглядит мое меню grub’а, установлен только Debian:
Второй способ, в этом случаем используем окружение chroot.
1. Опять же, загружаемся с live-cd/usb, смотрим разделы:
$ sudo fdisk -l
2. Монтируем раздел, на котором установлен linux и еще некоторые важные для работы разделы:
$ sudo mount /dev/sda1 /mnt
$ sudo mount —bind /dev /mnt/dev
$ sudo mount —bind /proc /mnt/proc
$ sudo mount —bind /sys /mnt/sys
!!! Если раздел /boot на отдельном разделе диска, то его тоже нужно примонтировать, например:
$ sudo mount —bind /boot /mnt/boot
3. Скопируем дефолтный файл grub’а (этот шаг можно пропустить):
$ sudo cp /etc/resolv.conf /mnt/etc/resolv.conf
4. Теперь нужно перейти в среду chroot:
$ sudo chroot /mnt
5. Устанавливаем grub:
# grub-install /dev/sda
Если возникла ошибка, поможет команда:
# grub-install —recheck /dev/sda
6. Выходим из chroot, отмонтируем разделы и перезагружаемся:
# exit
$ sudo umount /mnt /dev
$ sudo umount /mnt/proc
$ sudo umount /mnt
$ sudo umount /mnt/boot #если требуется
$ sudo reboot
Ситуация:
у вас нет второго компьютера чтобы записать live-cd/usb, соотвественно нужно как-то выкручивать (у самого была такая ситуация после экспериментальной установки windows 8).
Передо мной лишь черный экран и :
grub>
Это восстановление наиболее сложное (Rescue Mode), но если делать по инструкции, все должно пройти нормально.
В rescue mode доступно всего четыре команды:
ls
set
unset
insmod
1. Нам нужно посмотреть, какие разделы видит наш grub:
> ls
появится что-то типа:
(hd0) (hd0,msdos2) (hd0,msdos1) (hd1) (hd1,msdos2) (hd1,msdos1)
2. Кое-как криво Rescue Grub нам вывел разделы диска, якобы с файловой системой msdos.
Но это не важно.
Счет дисков у grub начинается с нуля, а разделов — с единицы.
По нашему выводу можно определить, что на первом диске у нас два раздела и на втором тоже два.
Экспериментальным путем угадывания будем определять, где же находится наш установленный linux.
3. Допустим раздел (hd0,1) — это именно то что нам нужно (приставку msdos можно опустить).
Пишем:
> set prefix=(hd0,1) /boot/grub
> set root=(hd0,1)
Таким образом мы получаем доступ к диску.
4. Пишем команду:
> ls /boot/grub
если будет какой-то вывод файлов, то все получилось, если же ничего нет, то мы промахнулись разделом, нужно смотреть другие, например (hd1,0).
5. Теперь пишем:
> insmod ext2
> insmod normal
> normal
6. После этого загружается grub, определяет операционные системы и практически восстановление завершено.
7. Загружаем linux, в терминале пишем:
$ sudo grub install /dev/sda
Все. grub прописывается в MBR и дальнейших проблем возникать не должно.
Ситуация:
нам надоело закапывать красные глаза из-за linux и мы решили вернуться на Windows.
Windows предварительно у нас установлена, мы с нее загружаемся, и с помощью Acronis Disk Director или еще какой-нибудь программы сносим разделы Linux.
С огромной радостью перезагружаемся, да не тут-то было, linux мы удалили, а grub — нет (ведь он установлен на сам диск, а не на его раздел). Что делать?
1. Записываем установочный диск/флешку (например с Windows XP).
2. Загружаемся с диска/флешки:
Если увидели это:
не надо нажимать F2, это не то, это автоматическое восстановление, а нам нужно ручное.
3. Немного подождав появляется такое:
Нажимаем R, попадаем консоль восстановления.
4. Нам предлагают выбрать копию Windows, которую нужно восстановить:
5. Вводим пароль админа:
6. Вот собственно консоль восстановления:
7. Вводим команду:
fixmbr
соглашаемся со всем что он от нас хочет, эта команда восстанавливает MBR.
8. Пишем:
fixboot
эта команда, записывает новый загрузочный сектор.
9. Выходим из консоли восстановления:
exit
10. Перезагружаемся.
Ситуация.
если же под рукой не XP, а Windows 7, то делаем то же самое, но вводить не
fixmbr
и
fixboot,
а
bootrec /fixmbr
и
bootrec /fixboot
Ссылки:
- Использование средства Bootrec.exe в среде восстановления Windows для устранения неполадок при запуске Windows
- Восстановление grub в rescue mode
- Тут можно почитать подробнее о rescue mode
- Восстановление grub2
- Настройка внешнего вида загрузчика grub
- Туториал по grub’у
- Восстановление grub
If All Else Fails!
I solved the problem. Here is how I did it. WARNING, you have to reinstall Linux / grub first!
Steps: (this is if nothing else works and takes a long time)
1: Reinstall Ubuntu / Linux mint (this is just so you can use GRUB to boot into Windows).
1.5: Restart and boot into windows (if you can’t boot to Windows, then live boot to linux from the CD or USB and run the following in a console:
Boot repair (if needed right now)
sudo add-apt-repository ppa:yannubuntu/boot-repair

sudo apt-get update

sudo apt-get install -y boot-repair && (boot-repair &)
1g: Select recommended repair and follow the on screen instructions.
2g: After your done, reboot. You should see the grub menu, even though you can boot to Windows from here, this is not what we want yet… But find the option that boots into Windows.
2: Once your booted into Windows, run your disk partition editor and delete All partitions related to Linux / grub. Especially make sure the small grub partition is removed. Reboot
2.5: Make sure the windows loader is the first selected boot device. (most likely is). Disable the Ubuntu option. Continue boot.
3: If you’ve done everything right up to this point you should see (depending on your computer) your splash screen for a second and then it will turn into an error screen saying that there was an error with the boot. («Winload.exe is missing or corrupted» most likly).
3.5: Don’t be alarmed (I was). The next step will restore your original bootloader.
4: Restart and boot to your Linux CD or USB.
5: Once booted, run boot repair commands from above again. This time when running it. It will act differently, there is no grub bootloader detected to reinstall and should run faster than before.
6: Once complete, restart.
7: Enjoy your GRUB free system!
This worked for me when nothing else did, I ran bootrec.exe. Nothing worked. This saved my computers life. Hope it saves yours!


