 В этой инструкции подробно о том, как сделать загрузочную флешку Windows 10 на Mac OS X для последующей установки системы либо в Boot Camp (т.е. в отдельный раздел на Mac) либо на обычный ПК или ноутбук. Способов записи загрузочной флешки Windows в OS X не так и много (в отличие от Windows-систем), но те, что имеются, в принципе достаточны для того, чтобы выполнить задачу. Также может быть полезным руководство: Установка Windows 10 на Mac (2 способа).
Для чего это может пригодиться? Например, у вас есть Mac и ПК, который перестал загружаться и потребовалось переустановить ОС или же использовать созданную загрузочную флешку как диск восстановления системы. Ну и, собственно, для установки Windows 10 на Mac. Инструкция по созданию такого накопителя на ПК доступна здесь: Загрузочная флешка Windows 10.
Запись загрузочного USB с помощью Ассистент Boot Camp
В Mac OS X присутствует встроенная утилита, предназначенная для создания загрузочной флешки с Windows и последующей установки системы в отдельный раздел на жестком диске или SSD компьютера с последующей возможностью выбора Windows или OS X при загрузке.
Однако, загрузочная флешка с Windows 10, созданная таким образом, успешно работает не только для этой цели, но и для установки ОС на обычные ПК и ноутбуки, причем загрузиться с нее можно как в режиме Legacy (BIOS), так и UEFI — в обоих случаях все проходит успешно.
Подключите USB накопитель с емкостью не менее 8 Гб к вашему Macbook или iMac (а, возможно, и Mac Pro, мечтательно добавил автор). После чего начните набирать «Boot Camp» в поиске Spotlight, либо запустите «Ассистент Boot Camp» из «Программы» — «Утилиты».
В ассистенте Boot Camp выберите «Создать диск установки Windows 7 или новее». К сожалению, снять отметку «Загрузить последнее ПО поддержки Windows от Apple» (оно будет загружаться из Интернета и занимает не мало) не получится, даже если флешка вам нужна для установки на ПК и это ПО не нужно. Нажмите «Продолжить».

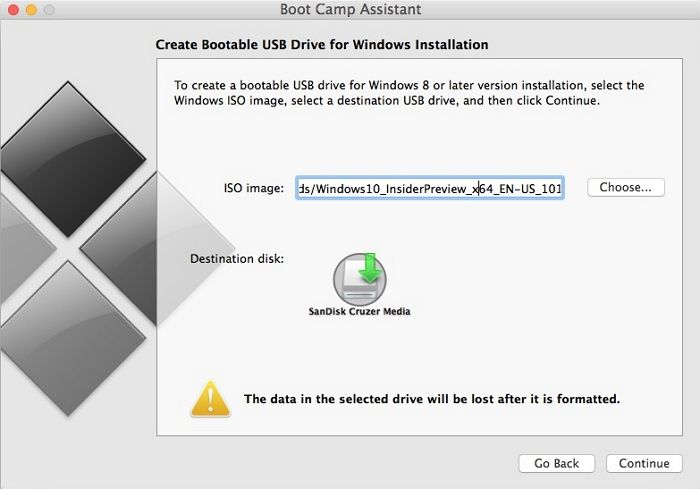
На следующем экране укажите путь к ISO образу Windows 10. Если у вас такового нет, то самый простой способ скачать оригинальный образ системы описан в инструкции Как скачать ISO Windows 10 с сайта Microsoft (для загрузки с Mac полностью подходит второй способ, с использованием Microsoft Techbench). Также выберите подключенную флешку для записи. Нажмите «Продолжить».

Останется только дождаться, когда будет завершено копирование файлов на накопитель, а также загрузка и установка ПО от Apple на тот же USB (в процессе могут запросить подтверждение и пароль пользователя OS X). По завершении вы можете использовать загрузочную флешку с Windows 10 практически на любом компьютере. Также вам покажут инструкцию, как загрузиться с этого накопителя на Mac (удерживать Option иди Alt при перезагрузке).
Загрузочная флешка UEFI с Windows 10 в Mac OS X
Есть еще один простой способ записи установочной флешки с Windows 10 на компьютере Mac, правда этот накопитель подойдет только для загрузки и установки на ПК и ноутбуках с поддержкой UEFI (и включенной загрузкой в режиме EFI). Впрочем, это могут почти все современные устройства, выпущенные в последние 3 года.
Для записи данным способом, также, как и в предыдущем случае нам потребуется сам накопитель и образ ISO, смонтированный в OS X (кликните по файлу образа дважды, и он смонтируется автоматически).
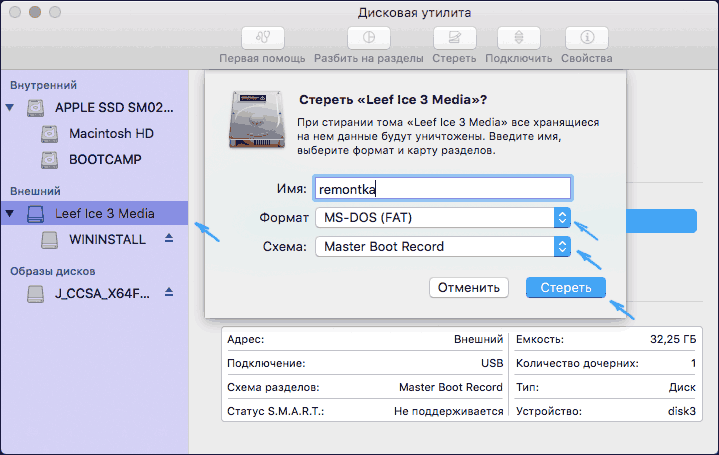
Флешку потребуется отформатировать в FAT32. Чтобы сделать это, запустите программу «Дисковая утилита» (с помощью поиска Spotlight или через Программы — Утилиты).
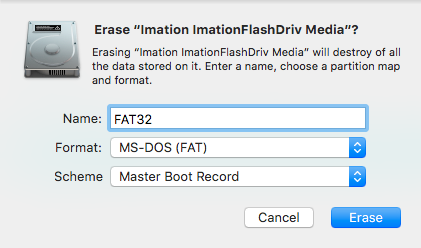
В дисковой утилите выберите слева подключенную флешку, а затем нажмите «Стереть». В качестве параметров форматирования используйте MS-DOS (FAT) и схему разделов Master Boot Record (и имя лучше задать на латинице, а не на русском). Нажмите «Стереть».
Последний шаг — просто скопировать все содержимое подключенного образа с Windows 10 на флешку. Но есть один нюанс: если пользоваться для этого Finder, то у многих возникает ошибка при копировании файла nlscoremig.dll и terminaservices-gateway-package-replacement.man с кодом ошибки 36. Решить проблему можно, копируя эти файлы по одному, но есть способ и проще — использовать Терминал OS X (запустите его так же, как запускали предыдущие утилиты).
В терминале введите команду cp -R путь_к_смонтированному_образу/ путь_к_флешке и нажмите Enter. Чтобы не писать и не угадывать эти пути, вы можете написать только первую часть команды в терминале (cp -R и пробел в конце), затем перетащить на окно терминала сначала диск с дистрибутивом Windows 10 (значок с рабочего стола), добавив к прописавшемуся автоматически пути слэш «/» и пробел (обязательно), а потом — флешку (здесь добавлять ничего не нужно).

Какая-либо строка прогресса не появится, просто нужно будет подождать, когда все файлы будут переписаны на флешку (это может занять до 20-30 минут на медленных USB накопителях), не закрывая Терминал, пока в нем снова не появится приглашение к вводу команд.

По завершении вы получите готовый установочный USB накопитель с Windows 10 (структура папок, которая должна получиться, показана на скриншоте выше), с которого можно либо установить ОС, либо использовать восстановление системы на компьютерах с UEFI.
На чтение 3 мин Опубликовано Обновлено
Зачастую владельцы компьютеров Mac сталкиваются с тем, что им необходимо запустить операционную систему Windows на своем устройстве. Обычно для этого используется программное обеспечение Bootcamp, которое позволяет устанавливать Windows на Mac с помощью создания отдельного раздела на жестком диске. Однако, есть и другие способы, позволяющие создать загрузочную флешку Windows 10 на Mac OS без переразбиения диска. Этот метод и будет описан в данной статье.
Прежде чем приступить к процессу, необходимо иметь системный образ Windows 10, загрузочную флешку объемом не менее 8 ГБ и Mac компьютер. Следует отметить, что процесс установки Windows будет требовать форматирования флешки, поэтому перед началом стоит сохранить все необходимые данные с нее.
1. Подготовка: сначала необходимо загрузить системный образ Windows 10 с официального сайта компании Microsoft. Затем подключите флешку к компьютеру Mac и переименуйте ее в «WIN10».
2. Создание загрузочной флешки: откройте программу «Дисковая утилита» на Mac и выберите флешку. Нажмите на кнопку «Стереть» и выберите формат «MS-DOS (FAT)» и схему «GUID партиции». После этого нажмите «Стереть» для форматирования флешки.
Содержание
- Установка программы Rufus
- Скачивание образа Windows 10
- Создание загрузочной флешки с помощью Rufus
Установка программы Rufus
Для создания загрузочной флешки с помощью Rufus необходимо установить эту программу на ваш компьютер. Следуйте указанным ниже инструкциям, чтобы успешно установить Rufus на ваш Mac.
- Откройте веб-браузер и перейдите на официальный сайт Rufus (https://rufus.ie/).
- На главной странице сайта найдите секцию «Download» и нажмите на ссылку для загрузки программы Rufus.
- После скачивания откройте загруженный файл Rufus.exe.
- В появившемся окне выберите язык, на котором вы хотите использовать Rufus, и нажмите кнопку «OK».
- Следуйте указаниям мастера установки Rufus, нажимая кнопку «Далее» при необходимости.
- После завершения установки Rufus появится ярлык программы на рабочем столе вашего компьютера.
Теперь, когда у вас установлена программа Rufus, вы готовы приступить к созданию загрузочной флешки для установки Windows 10 на Mac OS без Bootcamp.
Скачивание образа Windows 10
Для этого вам потребуется посетить официальный сайт Microsoft и перейти на страницу загрузки системы Windows 10.
На этой странице вы увидите доступные версии Windows 10. Вам потребуется выбрать нужную версию операционной системы и нажать на кнопку «Скачать сейчас».
После этого начнется загрузка образа Windows 10 в виде файла с расширением .iso. Размер файла может быть достаточно большим, поэтому процесс загрузки может занять некоторое время в зависимости от скорости вашего интернет-соединения.
После успешного завершения загрузки образа Windows 10 вы будете готовы переходить к следующему шагу — созданию загрузочной флешки.
Создание загрузочной флешки с помощью Rufus
- Скачайте и установите программу Rufus на ваш компьютер.
- Подключите флешку к компьютеру.
- Запустите программу Rufus.
- В поле «Устройство» выберите вашу флешку из выпадающего списка.
- В поле «Загрузчик» выберите опцию «Создать загрузочный диск с» и нажмите на кнопку «Обзор».
- Выберите файл образа Windows 10 (.iso), который вы загрузили ранее, и нажмите «Открыть».
- Убедитесь, что в поле «Тип раздела и схема» выбраны опции «MBR» и «BIOS или UEFI».
- Оставьте остальные настройки по умолчанию.
- Нажмите на кнопку «START», чтобы начать процесс создания загрузочной флешки.
- После завершения процесса создания загрузочной флешки вы сможете использовать ее для установки Windows 10 на Mac.
Убедитесь, что вы следуете всем указанным шагам и внимательно проверьте все настройки перед нажатием на кнопку «START». В противном случае процесс создания загрузочной флешки может завершиться неудачно. Пользуйтесь программой Rufus с осторожностью и сохраняйте данные, хранящиеся на вашей флешке.
| Workable Solutions | Step-by-step Troubleshooting |
|---|---|
| 1. Create Windows 10 Bootable USB on Mac with Boot Camp | Go to Finder. Choose Applications. Select Utilities. Open Boot Camp Assistant. Click on Continue…Full steps |
| 2. Create Windows 10 Bootable USB on Mac with UUByte ISO Editor | Install UUByte ISO Editor on your Mac. Connect the USB drive to the system. The software will detect the…Full steps |
| 3. Create Bootable USB on Mac for Windows with Disk Utility | Plug the USB drive into the system. Open Disk Utility. Format the USB flash drive via MS-DOS (FAT)…Full steps |
| 4. Using Terminal to Create Windows 10 Bootable USB on Mac | Plug the USB drive into your Mac. Open Terminal. To do so, choose Terminal from Utilities folder. Type…Full steps |
Do you want to create Windows 10 bootable USB on macOS Ventura/Monterey/Big Sur? Multiple reasons may prompt a user to do so. Firstly, a new operating system aids in clearing out existing malware. Secondly, it cleans up the system and improves efficiency. Moreover, you can easily create a bootable USB on Mac for Windows.
Creating a Windows 10 Bootable USB on a Windows computer is no big deal. But is it possible to create Windows 10 bootable USB on Mac without Bootcamp? Yes, you can! You can also create Mac bootable USB from Windows.
The latest silicon chips on Mac do not have Bootcamp installed. The new ARM chip architecture doesn’t allow it, so conventional Windows installation is impossible. However, multiple solutions can aid Mac users. It is hassle-free to create Windows 10 bootable USB on Mac with Terminal.
How to Download Windows 10 ISO File for Bootable USB
The best option to attain the Windows 10 ISO File is to visit Microsoft’s official website. Here are the steps you need to follow:
Step 1. Visit the Microsoft Windows 10 download page.

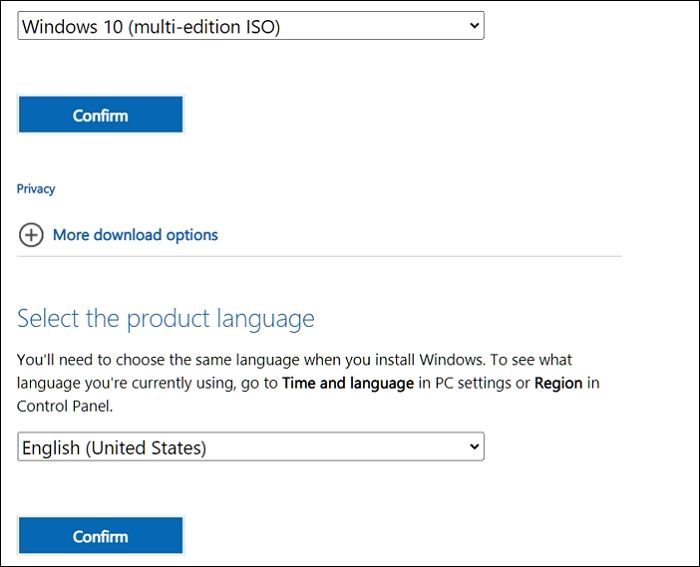
Step 2. Click on the dropdown under Windows 10 version, and then click on confirm.
Step 3. Next, select the language and edition. Click Confirm.
Step 4. Another page will open, giving you a download link. You can choose between Windows 10 32-bit ISO or 64-Bit ISO.
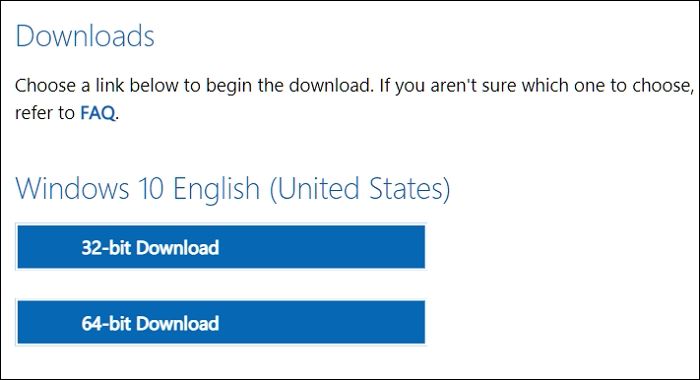
Step 5. Select where you want to save the ISO file. Wait for the download to complete.
How to Format a USB Correctly to Create Windows 10 Bootable USB
Before you go ahead with creating Windows 10 Bootable USB on Mac, it is vital to format the USB. Most users have no idea how to do this or why this is even important. Formatting the USB will erase all existing data and make the space free for the download. Moreover, you also need to ensure that the formatting is compatible with the system you will use it with.
Take a look at the steps you can follow to format drives on Macs:
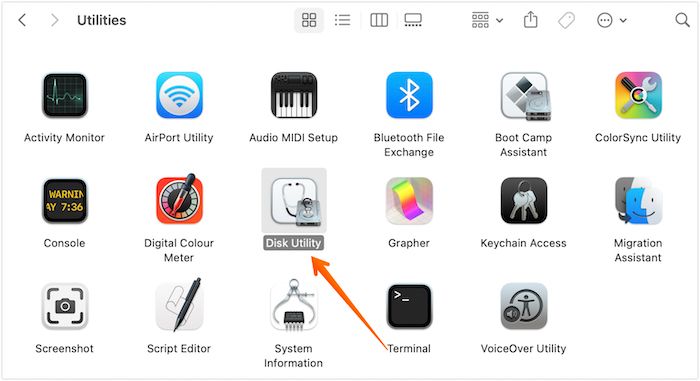
Step 1. Plug in the USB drive. Open Disk Utility. To do so, you need to open the Applications folder. Under that, open the Utilities folder, where you will find Disk Utility app.
Step 2. Choose the USB drive from the list. You will find it on the left-hand sidebar.
Step 3. Choose Erase. Now, type the name you want for the drive.

Step 4. Choose the Format you want. Select Erase.
Step 5. After some time, choose Done. Allow some time for the process to complete.
Download Recovery Software to Avoid Data Loss [Important]
Did you know you may lose data while using Mac to create a bootable USB? Yes! That’s a real possibility. If you want to create a Windows bootable USB on Mac, your Windows PC cannot boot and needs to recover data. Moreover, you can also face data loss after formatting the USB drive. In that case, taking the assistance of professional data recovery software is a great idea.
The EaseUS Data Recovery Wizard for Mac is a highly efficient and user-friendly data recovery tool for Mac. With this tool, you can recover lost data due to various causes, such as malware attacks, USB formatting, accidental deletion, etc. Moreover, you can also retrieve data from Mac-based devices like SSD, HDD, fusion drive, and more!
EaseUS Data Recovery Wizard
- Recover data from formatted USB drive on Mac. It can recover deleted files, documents, photos, audio, music, etc.
- Support data recovery on multiple devices, including USB drives, memory cards, internal hard drives, and digital cameras.
- Recover data from unbootable Mac. If your Mac cannot boot, you can create bootable media with this recovery tool.
Other exciting features include file filters, data protection, iCloud recovery, etc. You can also seek remote IT support if you encounter any issues. Are you eager to use EaseUS Data Recovery Wizard for Mac? In that case, follow these simple steps listed here:
Step 1. Search for lost files
Select the disk location to search for lost files (it can be an internal HDD/SSD or a removable storage device) on macOS Sierra, High Sierra, Mojave, Catalina, Big Sur, Monterey, Ventura, and the latest Sonoma. Click the «Search for lost files» button.
Note: Before data recovery, you’d better click «Disk Backup» from the left sidebar to create a backup of your Mac to avoid further data loss. After backing up, the software can recover data from the Mac backup, and your computer can wirte new data again.

Step 2. Go through the scanning results
EaseUS Data Recovery Wizard for Mac will immediately scan your selected disk volume and display the scanning results.

Step 3. Select the file(s) and recover
In the scan results, select the file(s) to preview and click the «Recover» button to have them back.

Method 1. Create Windows 10 Bootable USB on Mac with Boot Camp
One of the most straightforward solutions to create a Windows 10 Bootable USB on Mac is to use Mac Boot Camp Assistant. It is a multi-faceted boot program that requires an installed Windows ISO file and a USB drive.
Take a look at the steps you need to follow:
Step 1. Go to Finder.
Step 2. Choose Applications.
Step 3. Select Utilities.
Step 4. Open Boot Camp Assistant.
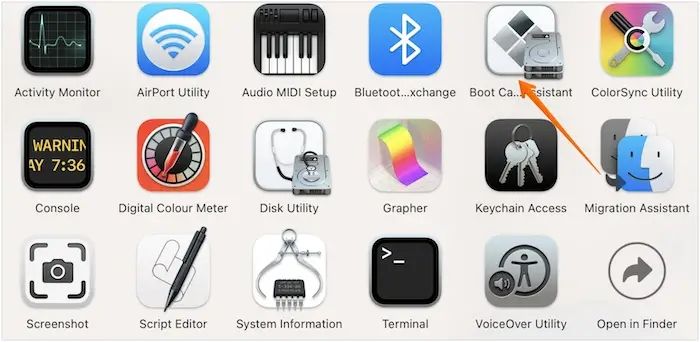
Step 5. Click on Continue.
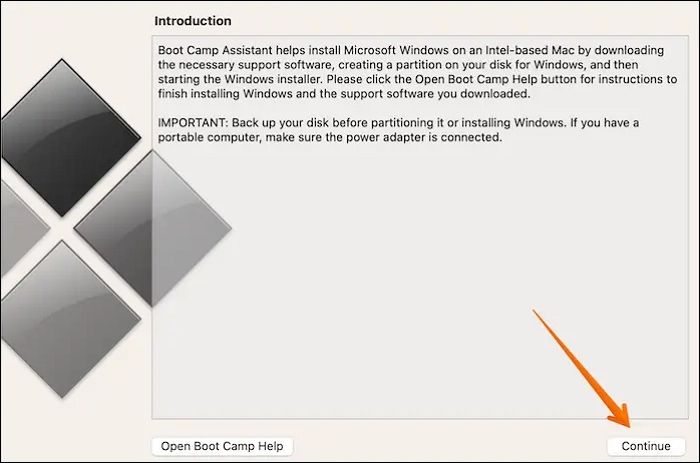
Step 6. Select the «Create a Windows 10 or later version installs disk» option. Click on Continue. Select Choose.
Step 7. Import the ISO file. Go ahead with Continue. Wait for the process to complete.
Step 8. Check if the bootable USB is named WININSTALL.
Step 9. If it appears so, you can remove the USB.
Note: This solution is only applicable to Intel-based Macs. You can opt for the following methods if you have Macs with an M1 chip.
Method 2. Create Windows 10 Bootable USB on Mac with UU Byte ISO Editor
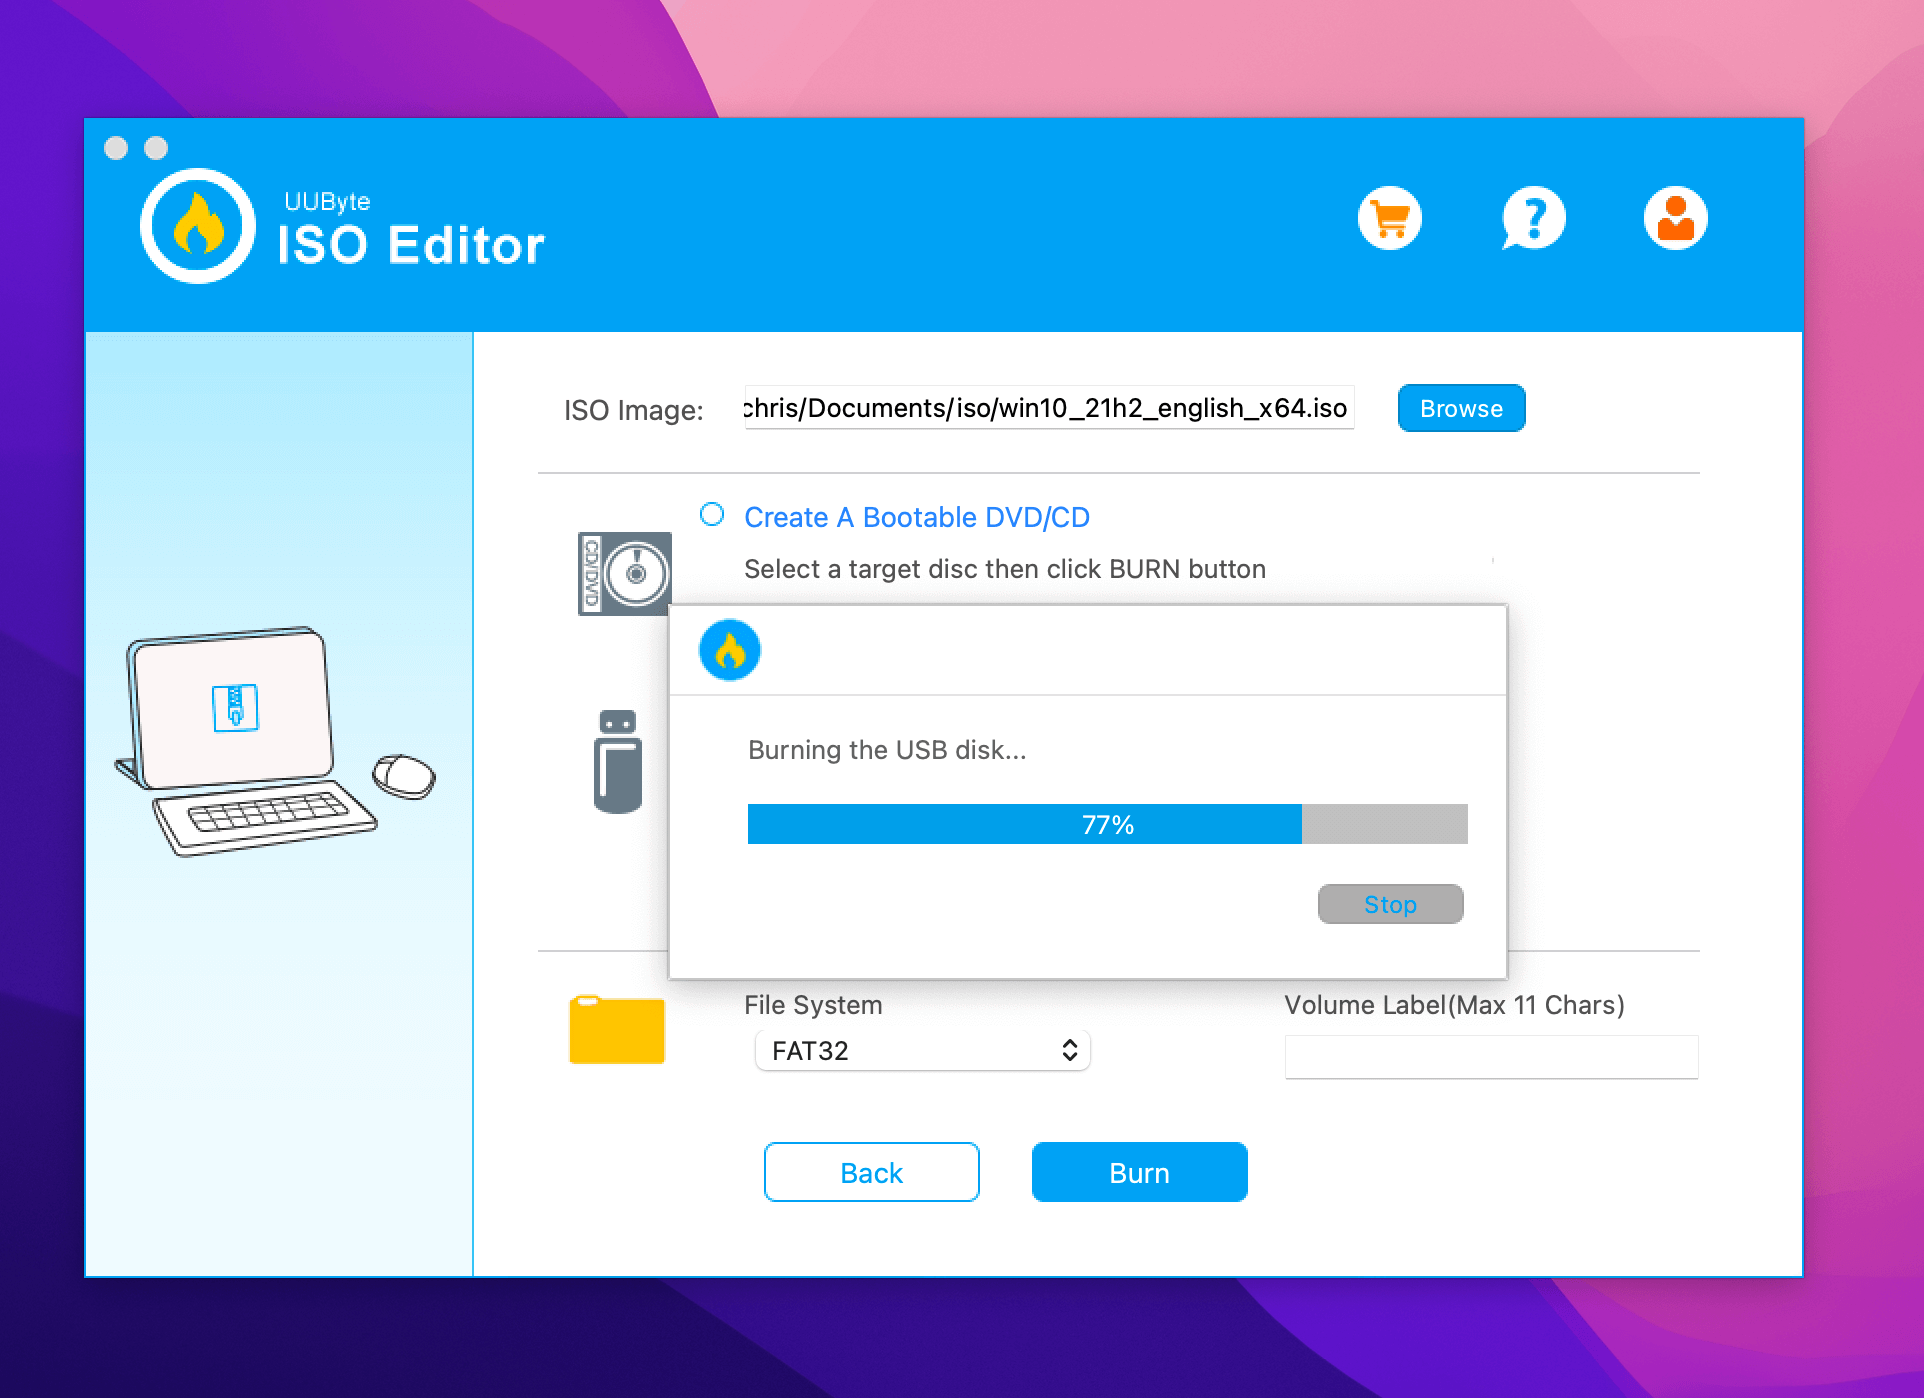
Another excellent method to create Windows 10 Bootable USB on Mac is with UUByte ISO Editor. The UUByte ISO Editor is a robust tool that enables users to complete the process easily. Most importantly, this app is fully compatible with Apple M1 and M2 Mac. In addition, you can run this app perfectly on the latest macOS Ventura. Here are the steps to follow:
Step 1. Download UUByte ISO Editor app from this link and Install it on your Mac.
Step 2. Connect the USB drive to the system.
Step 3. Click the Burn tab on the welcome screen and you can see the software detect the USB.
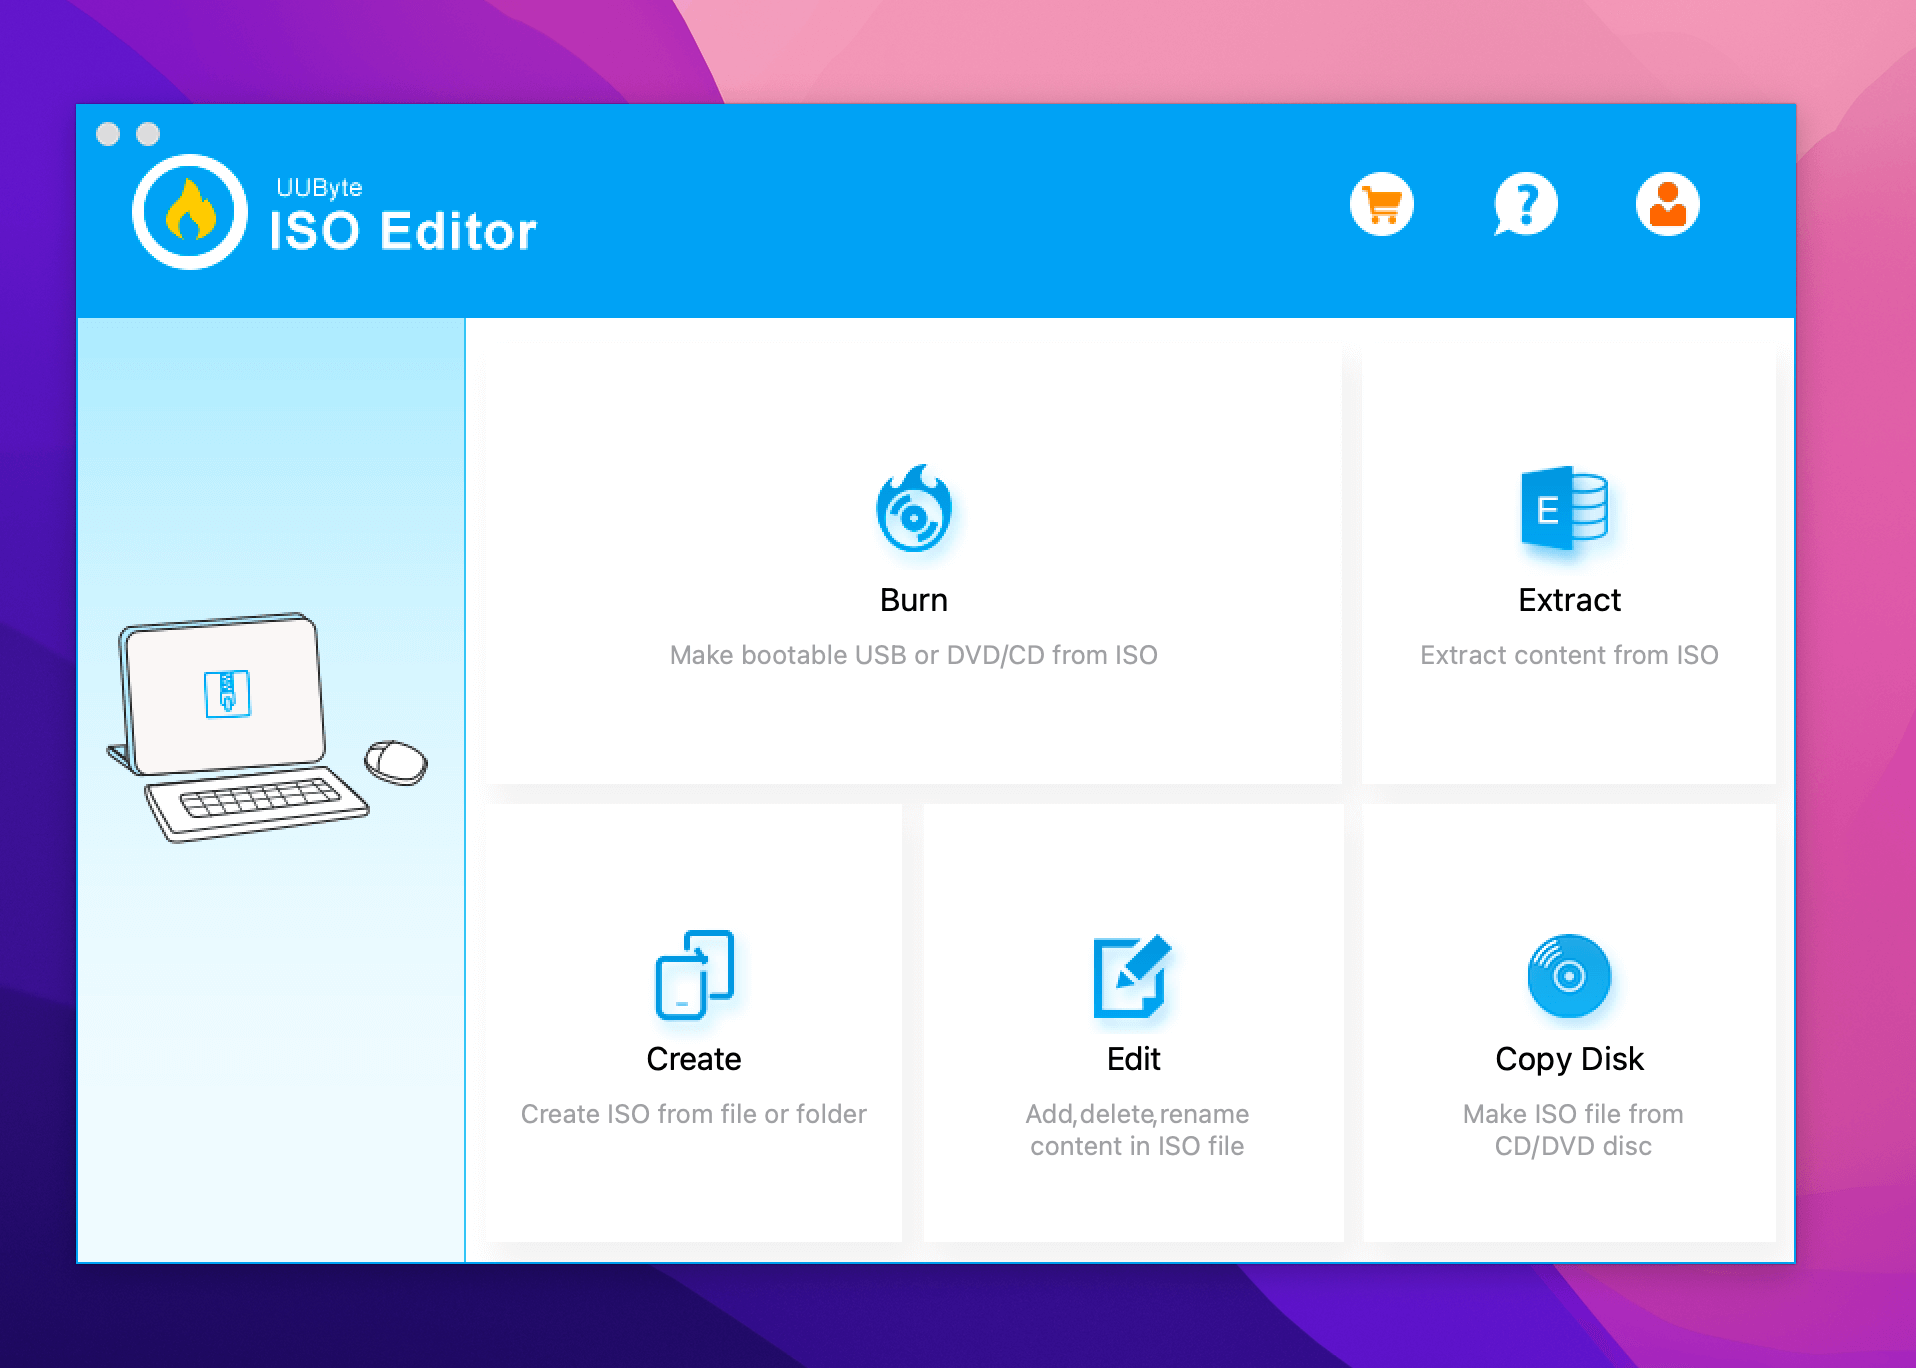
Step 4. Import Windows 10 ISO into the app and choose the right USB drive.

Step 5. Now, click the Burn button at the bottom to start the process. Wait for some time for the completion of the process. It takes approximately 7 minutes to create a bootable USB on Mac. During this step, you can see ISO Editor splits the install.wim file automatically at the end.
Note: While the process is simple, you should be very careful with it, especially don’t touch the USB device. If you have created Windows 10 bootable USB successfully, remember to share this post with more users!
Method 3. Create Bootable USB on Mac for Windows with Disk Utility
Did you know you can create Bootable USB on Mac for Windows with Disk Utility? For that, you need to follow some simple steps –
Step 1. Plug the USB drive into the system.
Step 2. Open Disk Utility.
Step 3. Format the USB flash drive via MS-DOS (FAT).
Step 4. Send the Windows ISO file to the USB.
Step 5. Wait for the ISO file writing process to complete.
Now, you can use the USB to install Windows on Mac. However, it is essential to understand that this method favors older Mac models. If you have the latest version, use other solutions.
Method 4. Use Terminal to Create Windows 10 Bootable USB on Mac
You can use Mac Terminal to create Windows 10 Bootable USB on Mac. We have also included a video to help out users. Take a look:
- 00:48 Download the Windows 10 ISO file.
- 03:00 Copy the ISO file to the USB drive.
- 04:24 Use the Homebrew package manager.
- 07:32 Create a new folder on the USB drive and copy the downloaded contents.
Check out the written steps to follow:
Step 1. Plug the USB drive into your Mac.
Step 2. Open Terminal. To do so, choose Terminal from Utilities folder.
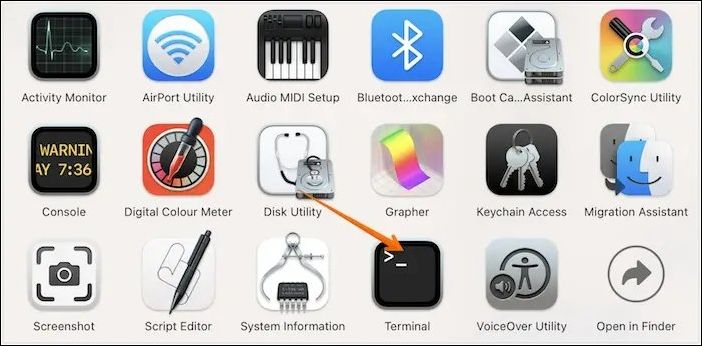
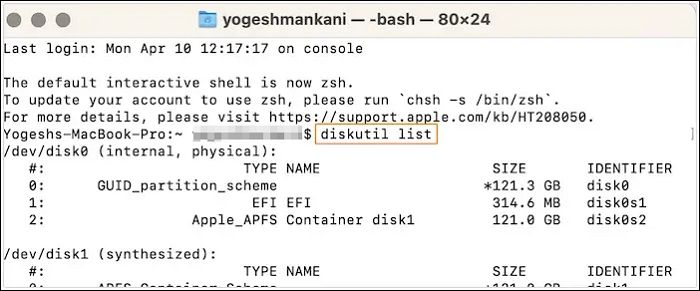
Step 3. Type diskutil list to find the USB name and press the Enter key.
Step 4. Type diskutil eraseDisk MS-DOS «WINDOWS10» GPT drive name@. Here, the drive name is the name of your USB drive.
Step 5. Download the Windows 10 ISO file.
Step 6. Type hdiutil mount ~/Downloads/WINDOWS10IMAGE.iso. Here, it would be best if you used the ISO file name instead of WINDOWS10IMAG.
Step 7. Next, type cp -rp /Volumes/MOUNTED-ISO/* /Volumes/WINDOWS10/. Here, MOUNTED will be replaced by the name of the ISO mounted.
Step 8. Lastly, type hdiutil unmount/Volumes/MOUNTED-ISO. The Terminal will close, and you will get a bootable USB.
If you are also interested in creating macOS Sonoma bootable USB on Mac, check the following passage:

Create macOS Sonoma Bootable USB Installer
If you have macOS Sonoma installed, then it’s essential to create a bootable USB in case of an issue with the OS. Read more >>
Summary
Isn’t creating Windows 10 Bootable USB on Mac easy? This article lists four methods you can use to create Bootable USB on Mac for Windows. You can follow these hassle-free steps and get it done.
However, data loss is always possible while creating Windows 10 Bootable USB on Mac. For that, you need help from reliable data recovery software. You can check out EaseUS Data Recovery Wizard for Mac in that case. It is a practical yet easy-to-use tool that aids in recovering lost data.
Haven’t you installed EaseUS Data Recovery Wizard for Mac yet? Download it today!
Create Windows 10 Bootable USB on Mac FAQs
You can create Windows 10 Bootable USB on Mac in these different ways. To know more, read the questions and answers listed below —
1. How to create macOS Ventura bootable USB on Mac?
To create macOS Ventura bootable USB on Mac, follow these steps:
- 1. Go to the Apple Store and download macOS Ventura.
- 2. Run Terminal on the system.
- 3. Connect the USB to the Mac.
- 4. Type in sudo /Applications/Install\ macOS\ Ventura. app/Contents/Resources/createinstallmedia —volume /Volumes/MyVolume in the Terminal.
- 5. Hit the Return key.
- 6. Enter the password when prompted.
2. How to rescue data from an unbootable Windows computer?
There are multiple ways to rescue data from an unbootable Windows computer. For instance, you can unplug various cables and reset the connection. You can also use the BIOS feature or eject RAM. However, if nothing works, you can opt for professional data recovery software, EaseUS Data Recovery Wizard for Mac.
3. Can I create Windows 10 bootable USB on a Mac with Terminal?
Yes, you can create Windows 10 bootable USB on a Mac with Terminal. But for that, you must use the diskutil, hdiutil commands with mount and unmount. You will also need to copy the ISO to the USB.
- 1. Download the ISO file from Windows.
- 2. Plug the USB drive into your system.
- 3. Enter «diskutil list» on Terminal to see where the USB is.
- 4. Enter «diskutil eraseDisk MS-DOS «WINDOWS10″ GPT@»
- 5. Now, enter «hdiutil mount ~/Downloads/WINDOWS10IMAGE.iso»
- 6. After that, type «cp -rp /Volumes/MOUNTED-ISO/* /Volumes/WINDOWS10/»
- 7. At last, enter «hdiutil unmount /Volumes/MOUNTED-ISO».
4. How to install macOS Ventura on a Windows PC?
To install macOS Ventura on a Windows PC, follow these steps:
- 1. Create a Bootable USB installer for macOS Ventura.
- 2. Go ahead with the EFI partitions configuration.
- 3. Adjust BIOS settings.
- 4. Install macOS Ventura on the system.
Installing Windows on a Mac should be a piece of cake with Bootcamp, but that
rarely is the case. In fact, I would personally say that Boot Camp Assistant
is one of the worst apps that comes with OS X and unlike the rest, it doesn’t
work seamlessly.
A few of its drawbacks:
- It only supports a drive with a single partition.
- It often throws very obscure error messages with limited detail.
- It re-downloads 1.6 GB Windows drivers every single time it runs. These are
placed under/Library/Application Support/BootCamp/WindowsSupport.dmgand
deleted and re-downloaded each time Boot Camp Assistant starts processing.
This post did take a lot of work to complie and I did bone my hard drive a
few times while trying certain ideas, so please throw out a thanks if it
helped you out 
Disclaimer: This guide below contains procedures which can potentially
destroy your partitions and data. I accept no responsibility for such loss so
please proceed at your own risk.
Update (2016-07-20): I have updated this post with further improvements
relating to downloading of Boot Camp drivers and ensuring that a Hybrid MBR is
not used (which would cause issues when installing Windows).
What You Will Need
- An 8 GB or larger USB stick
- A copy of the Windows 10 ISO
- A valid Windows 10 license
- A downloaded copy of unetbootin
Downloading Boot Camp Drivers
- Start Boot Camp Assistant
- Select Action / Download Windows Support Software
- Choose your Downloads directory, enter your password and then click
Save
This will be the only step that we will use Boot Camp Assistant for.
Creating a Bootable USB Windows 10 Installer
Formatting Your USB Stick
Attach your USB stick and start Disk Utility, select your USB drive in the
left panel under External, click Erase and set the options as follows
(exactly) and click Erase:
Name: FAT32
Format: MS-DOS (FAT)
Scheme: Master Boot Record
Turning Your USB Stick into a Windows Installer
Open unetbootin, enter your password, set the options as follows and
click OK:
Diskimage: checked, set to ISO and browse to your Windows 10 ISO
Type: USB Drive
Drive: Your USB drive (you should only see one entry here)

If you see more than one drive listed, you may confirm which is your USB drive
by opening the Terminal and typing:
You’ll see your USB drive in the output and it should look something like this:
/dev/disk2 (external, physical):
   #:                       TYPE NAME                    SIZE       IDENTIFIER
   0:     FDisk_partition_scheme                        *16.0 GB    disk2
   1:                 DOS_FAT_32 FAT32                   16.0 GB    disk2s1
Once you have kicked off unetbootin, grab a snack while the Windows ISO is
copied to the USB stick. This process takes around 15 minutes to complete.
Finishing Up
When this has completed, you may right click on the USB stick in Finder,
select Rename “FAT32” and rename it as you like (I’ll call mine
“WINDOWS 10”).
Finally, copy the WindowsSupport in your Downloads directory to
the Windows 10 USB stick so it’s easy to get to after our installation.
Partitioning Your Drive
In Disk Utility, select your internal hard drive on the left panel, and
click on Partition.
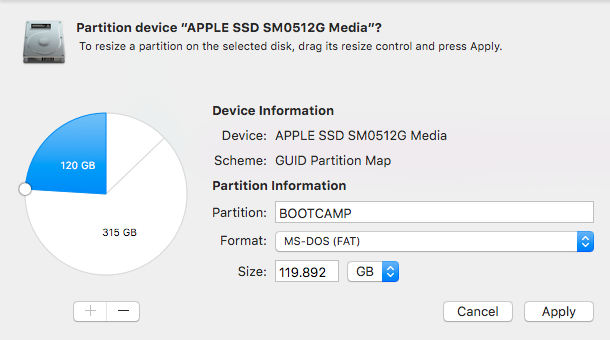
Click the + button and create a new partition of your desired size for your
Windows installation and name it as you wish (I’ll call mine “BOOTCAMP”). Ensure that the Format is set to MS-DOS (FAT) and click on Apply.
Ensuring that a Hybrid MBR is not used
Huge thanks to Rod’s post from the superuser post titled
Windows detects GPT disk as MBR in EFI boot.
Once you add a FAT32 partition with either Boot Camp Assistant or Disk Utility,
your disk is converted into a hybrid GPT / MBR disk which is actually not
supported by newer versions of Windows. In this step, we revert this
additional change made by Disk Utility by switching back to a pure GPT
partition table.
-
Dowload the latest version of
GPT fdisk
by browsing to the version, then gdisk-binaries and clicking the file
with the *.pkg extension (e.g. gdisk-1.0.1.pkg). -
Install GPT fdisk by running the installer you downloaded
-
Open a Terminal and check the state of your MBR
If your MBR partition is set to hybrid, please continue with step 4,
otherwise if it is set to protective, you may skip the rest of this
section. Simply type q and hit return to exit GPT fdisk. -
Type p to view the existing partition table and verify you’re working
on the correct disk -
Type x to enter the expert menu
-
Type n to create a fresh protective MBR
-
Type w to save your changes and confirm the change when asked
-
Type q to exit GPT fdisk
-
Run GPT fdisk to show your disk layout:
1sudo gdisk -l /dev/disk0Your partition table should look something like this:
 1
 2
 3
 4
 5
 6
 7
 8
 9
10
11
GPT fdisk (gdisk) version 1.0.1 Warning: Devices opened with shared lock will not have their partition table automatically reloaded! Partition table scan: MBR: protective BSD: not present APM: not present GPT: present Found valid GPT with protective MBR; using GPT.
Disconnecting All Devices From USB Ports
This step is critical as I have had rather serious problems during Windows
installation when certain external drives are connected.
Unplug everything from your Mac except your keyboard (if wired) and your
bootable Windows USB stick (which we prepared earlier).
If your Mac contains multiple physical drives, you will need to disconnect
all disks except the one which you intend to install Windows on or you may
encounter the following error:
Windows could not prepare the computer to boot into the next phase of installation. To install Windows, restart the installation.
Booting From the USB Stick
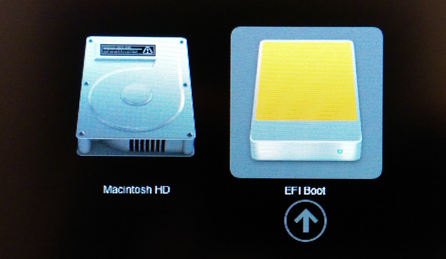
Ensure that the USB stick containing the Windows installer is inserted and
then restart your Mac while holding down the option (alt) key.
You should now be presented with a list of bootable drives. Select the USB
drive (usually titled “EFI Boot”) to begin installing Windows.
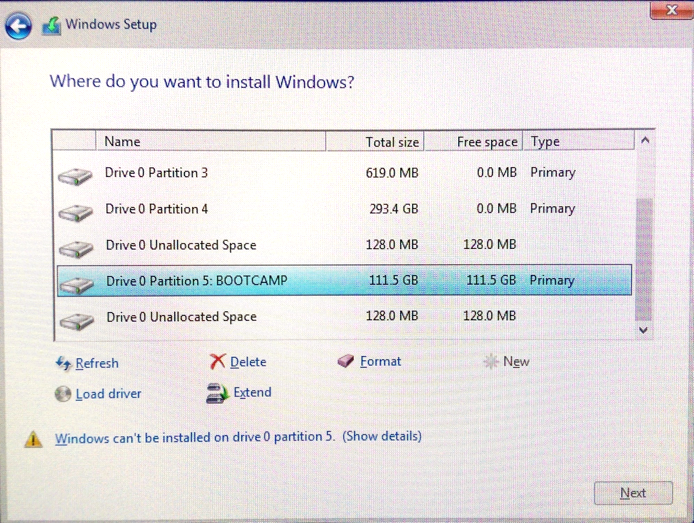
Correcting Your Windows Hard Disk Partition
When you are asked Where do you want to install Windows?, select the
Windows partition created earlier (which I called “BOOTCAMP”) and click
Delete.
Next, select the chunk of Unallocated Space and click on New to create
a proper Windows NTFS partition.
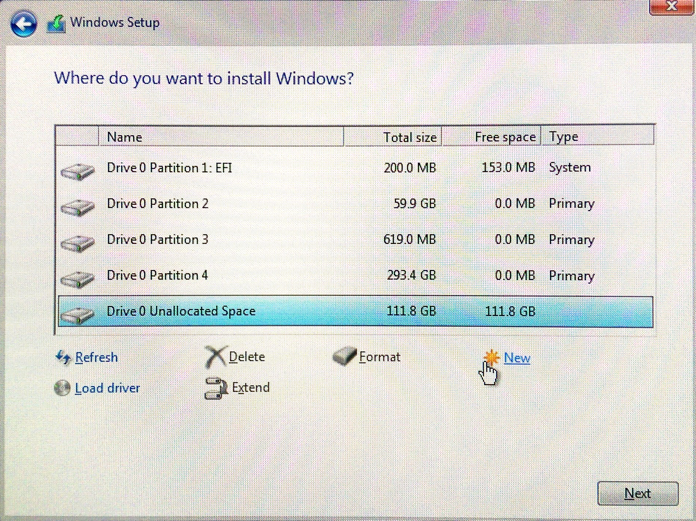
Note: OS X only supports creation of FAT filesystems, so this is why we need
to re-create the partition ourselves during install.
Completing the Installation
Allow the installer to complete and boot into Windows.
Installing Boot Camp Support Software
Once Windows is up and running, install the Boot Camp Support software running
WindowsSupport/BootCamp/Setup.exe on your USB stick.
Note: The installer takes a little while to show up, so please be patient.
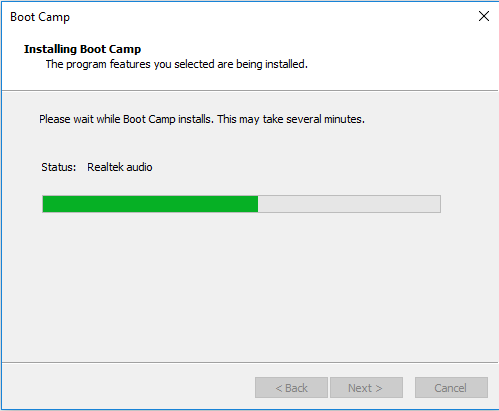
You may encounter a known issue whereby the Boot Camp Support Software
installer locks up while installing Realtek audio.
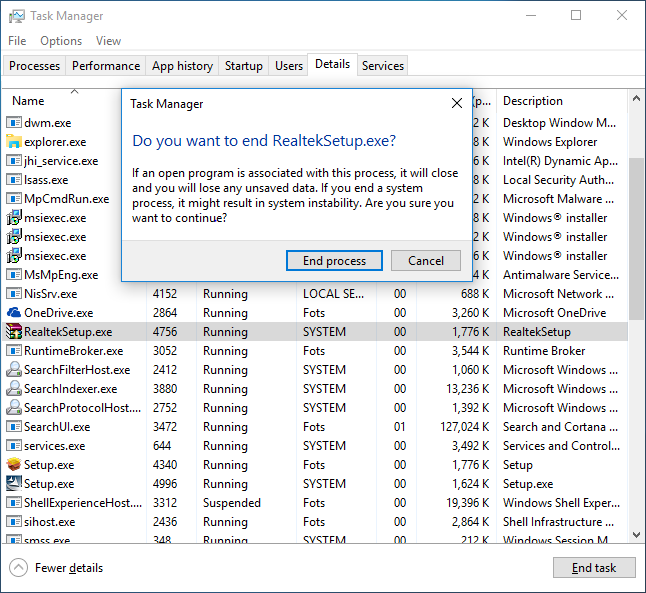
If this occurs, you will need to open Task Manager and kill the
RealtekSetup.exe process.
After the installer has completed, answer No when prompted to reboot
and install the Realtek drivers manually by running
%USERPROFILE%\AppData\Local\Temp\RarSFX0\BootCamp\Drivers\RealTek\RealtekSetup.exe.
If you can’t find this file, check any other directories starting with
RARSFX under %USERPROFILE%\AppData\Local\Temp.
Once complete, reboot Windows.
What You Will Need to Configure Windows
- The latest version of SharpKeys
- The flipflop-windows-sheel binary (see README for a download link)
Configuring Windows
Mapping Your Mac Keyboard
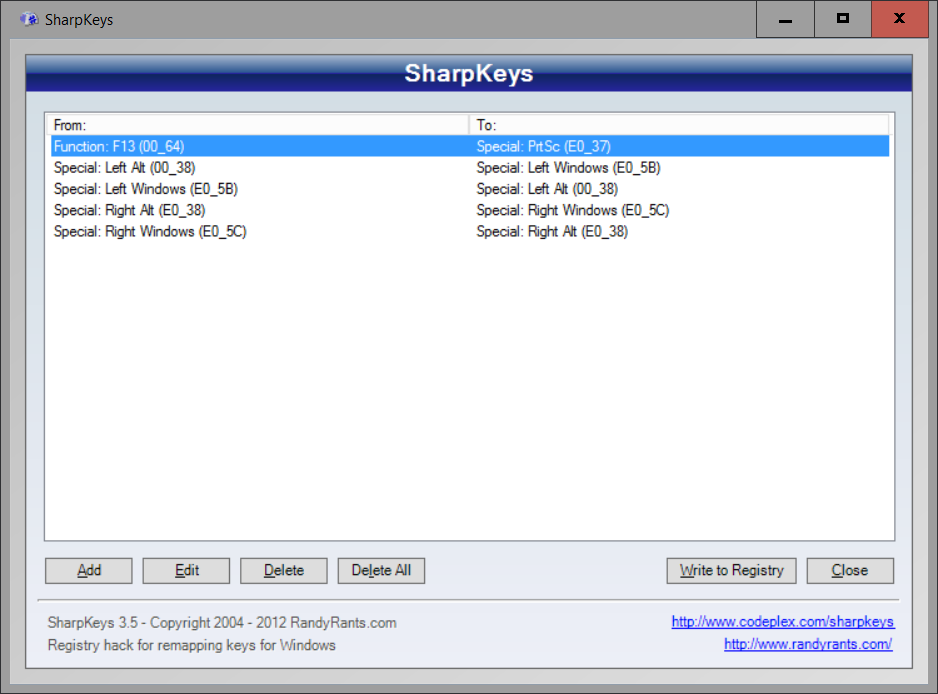
Install and run SharpKeys and then configure the following mappings to
correct your Mac keyboard so that it behaves like a regular Windows keyboard:
Function: F13 -> Special: PrtSc
Special: Left Alt => Special: Left Windows
Special: Left Windows => Special: Left Alt
Special: Right Alt => Special: Right Windows
Special: Right Windows => Special: Right Alt
Note: for F13, you’ll need to select Press a key and click F13 on your
keyboard.
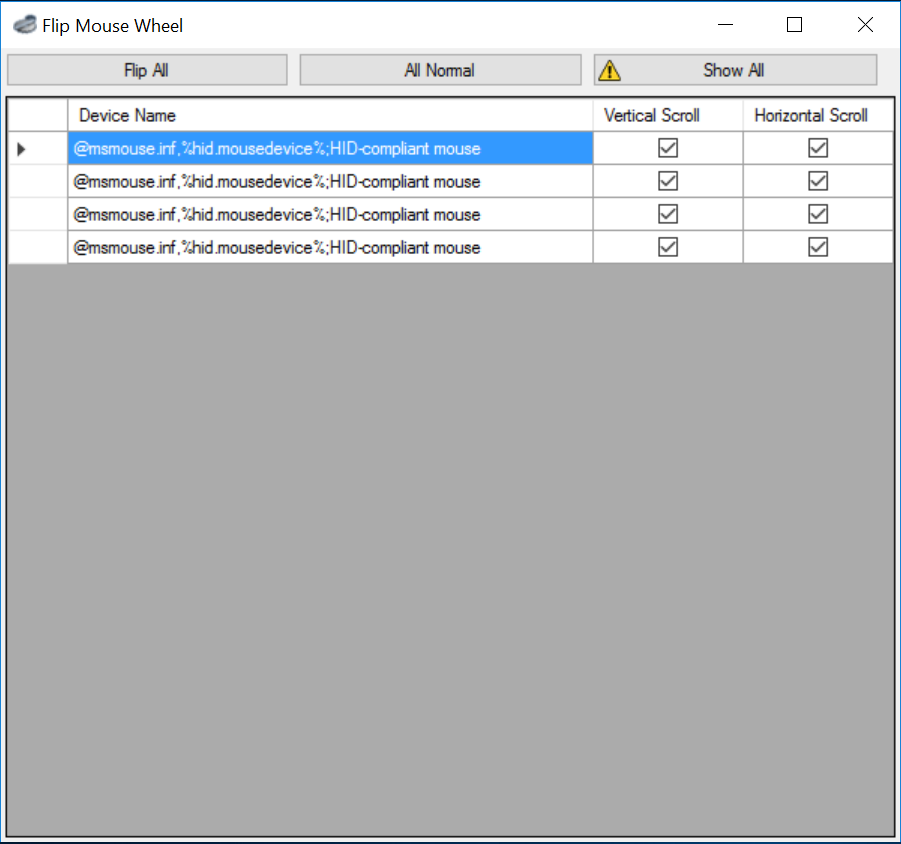
Switching to Natural Scrolling
If you wish to flip scrolling direction to match that on OS X, run
FlipWheel.exe and then click on Flip All.
Enabling Num Lock on Boot
Paste the following into a file named Enable NumLock on Boot.reg then
import this into the registry to enable NumLock when Windows boots up
(it doesn’t by default).
Windows Registry Editor Version 5.00

[HKEY_USERS\.DEFAULT\Control Panel\Keyboard]
"InitialKeyboardIndicators"="80000002"
Completing Configuration
That’s it, give your machine one last reboot and you’ll have a fully working
Windows 10 installation.
Note: I have found Apple’s Magic Mouse to be extremely unreliable using
the Boot Camp drivers from Apple. As such, I recommend purchasing a Logitech
(or similar) mouse for use in Windows. I have no trouble plugging the
wireless receiver for my Logitech mouse into one of the USB ports of my wired
Apple Keyboard and it’s so tiny that you can’t see it at all.
Cleaning up a Windows Installation
Removing the Windows Partitions
If you decide to remove Windows, you may find that Disk Utility doesn’t allow
you to delete the two partitions that have been created by the Windows
installer.
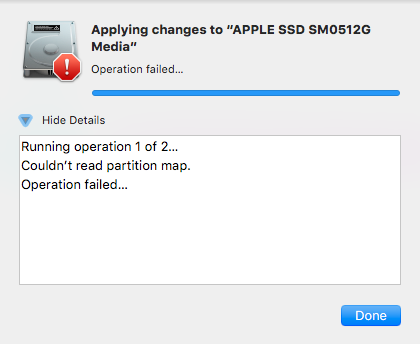
This happens due to the fact that the first small partition created is of a
type called Microsoft Reserved which OS X’s Disk Utility doesn’t support.
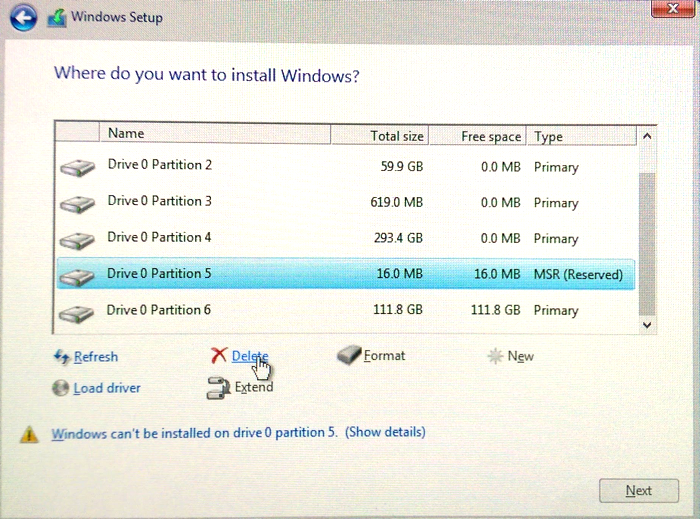
The safest way to delete these partitions is through the Windows installer. So
simply boot from your USB stick as we did before and when you reach the
Where do you want to install Windows? question, you may delete your
“BOOTCAMP” partition and the small 16 MB partition of type MSR (Reserved)
just above the BOOTCAMP partition.
Once done, simply quit the installer by clicking the X in the top right corner
of each Window and reboot back into OS X.
Removing the Boot Entry
Even though we have removed the Windows partition, a boot entry will still be
present when holding down option (alt) during boot.
You may remove these items by running the following in your Terminal:
|
|
Загрузочная флешка Windows 10 на Mac OS без Bootcamp может быть полезна во многих случаях. Например, если у вас нет доступа к другому компьютеру с Windows, чтобы создать установочный диск, или если вы предпочитаете использовать флешку вместо DVD-диска. В этой статье мы расскажем вам о пошаговой инструкции по созданию загрузочной флешки Windows 10 на Mac OS без использования Bootcamp.
Прежде чем начать, у вас должна быть следующая информация и необходимое оборудование: рутовый доступ к Mac OS, образ установочного диска Windows 10 (.iso или .img), пустая флешка с достаточным объемом памяти, программное обеспечение для создания загрузочной флешки (например, «Etcher» или «UNetbootin»).
Первым шагом является загрузка и установка программного обеспечения для создания загрузочной флешки. Вы можете свободно найти их в Интернете, так как они являются бесплатными и открытым исходным кодом. Затем вставьте флешку в ваш компьютер и убедитесь, что вся предыдущая информация на ней была удалена или сохранена в другом месте, так как процесс создания загрузочной флешки полностью его форматирует.
Теперь вы должны открыть приложение, установленное на предыдущем шаге, и следовать его инструкциям для создания загрузочной флешки. Вам будет предложено выбрать образ установочного диска Windows 10, а затем указать путь к вашей флешке. После выполнения всех необходимых настроек нажмите кнопку «Start» или аналогичную, чтобы начать процесс создания загрузочной флешки. Подождите, пока процесс не завершится.
Содержание
- Выбор необходимых инструментов
- Подготовка флешки и образа Windows
- Создание загрузочной флешки с помощью Terminal
- Настройка Mac OS для загрузки с флешки
- Установка Windows 10 с помощью загрузочной флешки
- Шаг 1: Подготовка загрузочной флешки
- Шаг 2: Создание загрузочной флешки
- Шаг 3: Установка Windows 10 на Mac OS
Выбор необходимых инструментов
Перед тем как приступить к созданию загрузочной флешки Windows 10 на Mac OS, необходимо подготовить несколько инструментов:
1. Образ Windows
Для создания загрузочной флешки вам потребуется официальный образ операционной системы Windows 10. Образ можно скачать с официального сайта Microsoft или использовать ранее сохраненный образ.
2. Утилита UNetbootin
Для записи образа Windows на флешку воспользуйтесь программой UNetbootin. Она доступна для скачивания на официальном сайте разработчика и поддерживает работу как на Mac OS, так и на Windows.
3. Флешка емкостью не менее 8 ГБ
Для создания загрузочной флешки с образом Windows 10 вам понадобится флешка не менее 8 ГБ вместимостью. Убедитесь, что флешка достаточно большая и свободна от других файлов или разделов.
4. Распаковщик архивов
Образ Windows, скачанный с официального сайта Microsoft, обычно представляет собой архив в формате ISO. Для работы с этим архивом вам понадобится специальный распаковщик, например, The Unarchiver или WinRAR.
После подготовки всех необходимых инструментов можно приступить к созданию загрузочной флешки Windows 10 на Mac OS.
Подготовка флешки и образа Windows
Перед тем как приступить к установке Windows 10 на Mac OS, необходимо подготовить загрузочную флешку с инсталляционным образом операционной системы. Вот пошаговая инструкция:
Шаг 1: Загрузите образ Windows 10 ISO
Скачайте ISO-файл Windows 10 с официального сайта Microsoft или с любого другого доверенного ресурса. Убедитесь, что выбранная версия соответствует вашим требованиям и возможностям вашего Mac.
Шаг 2: Подключите флешку
Вставьте флешку в порт USB на вашем Mac.
Шаг 3: Отформатируйте флешку
Откройте Утилиту Дисков, которую можно найти в папке Программы -> Служебные программы. Выберите флешку из списка устройств и нажмите на кнопку «Стереть» в верхней панели.
Настройте параметры форматирования:
- Имя: выберите ваше предпочтительное имя для флешки.
- Формат: выберите «MS-DOS (FAT)» для совместимости с обоими операционными системами.
- Схема: выберите «MBR» (Master Boot Record).
Нажмите на кнопку «Очистить» для форматирования флешки.
Шаг 4: Создайте загрузочную флешку
Откройте Terminal (командную строку) из папки Программы -> Служебные программы.
Скопируйте и вставьте следующую команду, заменив путь к образу Windows 10 ISO на свой собственный:
sudo dd if=/path/to/windows-10.iso of=/dev/rdiskn bs=1m
Здесь /path/to/windows-10.iso — путь к образу Windows 10 ISO, а rdiskn — имя устройства флешки. Удостоверьтесь, что правильно указали путь и имя устройства флешки и нажмите Enter.
Примечание: Для определения имени устройства флешки можно воспользоваться командой diskutil list в Terminal.
Подождите, пока команда выполняется. Затем вам будет предложено ввести пароль вашей учетной записи Mac. Введите его и нажмите Enter. В процессе создания загрузочной флешки может потребоваться несколько минут.
Теперь ваша загрузочная флешка Windows 10 готова к использованию!
Создание загрузочной флешки с помощью Terminal
1. Подготовьте флешку, которую вы хотите использовать в качестве загрузочного диска для Windows 10.
2. Вставьте флешку в порт USB на вашем Mac.
3. Откройте Terminal.
4. Введите команду diskutil list и нажмите Enter. Вы увидите список всех подключенных дисков, включая вашу флешку.
5. Определите и запомните имя вашей флешки в списке.
6. Введите команду diskutil eraseDisk MS-DOS «WINDOWS10» MBR /dev/diskX, где diskX — имя вашей флешки (замените X на соответствующую букву).
7. Подтвердите удаление всех данных на флешке, введя команду yes и нажав Enter.
8. Подождите, пока Terminal произведет форматирование флешки и создаст необходимую структуру разделов.
9. Скачайте образ Windows 10 с официального сайта Microsoft и сохраните его на вашем компьютере.
10. В Terminal введите команду hdiutil attach имя_образа.iso, где имя_образа.iso — полный путь к файлу с образом Windows 10.
11. Дождитесь монтирования образа Windows 10, после чего в Terminal появится новый диск с именем WININSTALL.
12. В Terminal введите команду cp -rpv /Volumes/WININSTALL/* /Volumes/WINDOWS10/, чтобы скопировать все файлы и папки с монтированного образа на флешку.
13. Дождитесь окончания копирования файлов.
14. В Terminal введите команду diskutil unmountDisk /dev/diskX, где diskX — имя вашей флешки.
15. Подождите, пока Terminal отключит флешку.
Теперь ваша флешка готова для использования в качестве загрузочного диска для Windows 10 на Mac OS без Bootcamp. Теперь вы можете использовать ее для установки Windows 10 на ваш Mac.
Настройка Mac OS для загрузки с флешки
Перед тем как начать процесс создания загрузочной флешки Windows 10 на Mac OS, необходимо выполнить несколько предварительных настроек:
- Сохраните все важные данные, так как процесс создания загрузочной флешки может потребовать форматирования диска.
- Удостоверьтесь, что у вас есть доступ к компьютеру Mac с операционной системой Mac OS X 10.7 или более поздней версии.
- Убедитесь, что у вас есть загрузочная флешка Windows 10 или скачайте образ системы с официального сайта Microsoft.
- Подключите флешку к компьютеру Mac.
- Откройте программу «Дисковая утилита», которая находится в папке «Утилиты» в папке «Программы».
После выполнения этих предварительных настроек можно переходить к следующему шагу — созданию загрузочной флешки Windows 10 на Mac OS.
Установка Windows 10 с помощью загрузочной флешки
Установка операционной системы Windows 10 на устройство Mac OS возможна с использованием загрузочной флешки. Этот процесс позволит вам запустить установку Windows 10 на Mac без использования Bootcamp. В этой статье мы предоставим пошаговую инструкцию по созданию загрузочной флешки и установки Windows 10 на Mac OS.
Шаг 1: Подготовка загрузочной флешки
1. Подключите USB-флешку к компьютеру Mac.
2. Откройте программу «Дисковая утилита», которая находится в папке «Утилиты».
3. Выберите подключенную USB-флешку в списке устройств слева.
4. Перейдите на вкладку «Стирание» и выберите формат «MS-DOS (FAT)».
5. Введите имя для вашей флешки (например, «Windows 10»), а затем нажмите кнопку «Стереть», чтобы начать форматирование.
Шаг 2: Создание загрузочной флешки
1. Скачайте установочный образ Windows 10 с официального веб-сайта Microsoft.
2. Зайдите в программу «Boot Camp Assistant», которая находится в папке «Утилиты».
3. Отметьте опцию «Создать диск установки Windows 10» и нажмите кнопку «Продолжить».
4. Укажите путь к установочному образу Windows 10, который вы скачали ранее, и выберите подключенную USB-флешку в качестве места для создания загрузочной флешки.
5. Нажмите кнопку «Продолжить» и подождите, пока загрузочная флешка будет создана.
Шаг 3: Установка Windows 10 на Mac OS
1. Перезагрузите компьютер Mac и удерживайте клавишу «Option» на клавиатуре.
2. В появившемся меню выберите загрузочную флешку с установочным образом Windows 10 и нажмите «Enter».
3. Следуйте инструкциям мастера установки Windows 10 для выбора языка, региона, раскладки клавиатуры и других параметров.
4. Выберите раздел для установки Windows 10 на вашем жестком диске и нажмите кнопку «Далее».
5. Дождитесь завершения установки Windows 10 на вашем компьютере Mac.
Поздравляем! Теперь у вас установлена операционная система Windows 10 на вашем устройстве Mac OS. Вы можете использовать обе операционные системы выбирая нужную при каждом запуске компьютера.