Уровень сложности
Простой
Время на прочтение
3 мин
Количество просмотров 3.6K
Описываю свой рабочий опыт установки macOS на старенький macbook, так как другие способы описанные в интернете не дали результатов, либо привели к новым ошибкам.
Для начала скачиваем дистрибутив в формате *.dmg. Сделать это можно из App Store со второго macbook, либо с торрент (важно чтобы это была чистая копия из App Store).
Берем флешку на 8Гб и более, вставляем в компьютер с Windows, нажимаем Win+R, пишем cmd.
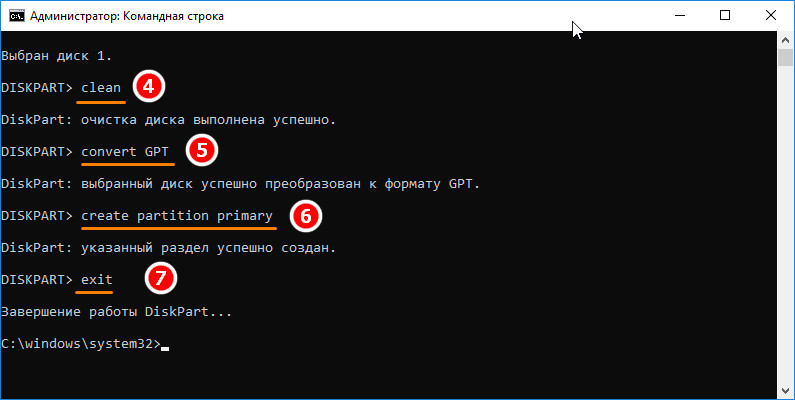
Запускается консоль и в ней уже пишем diskpart потом list disk, на экран выводиться список дисков windows, теперь важно не перепутать диски и выбрать именно диск с флешкой. Пишем select disk (номер флешки):

Теперь нам нужно преобразовать загрузочную область в формат GPT, набираем по очереди команды:
clean, convert GPT, create partition primary, exit.
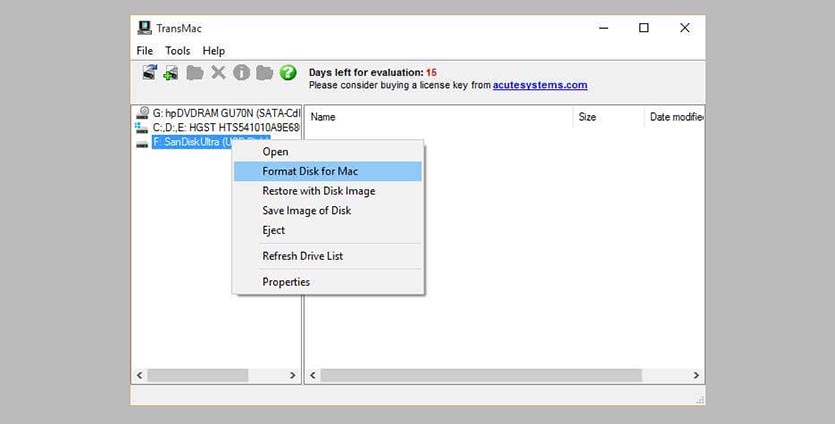
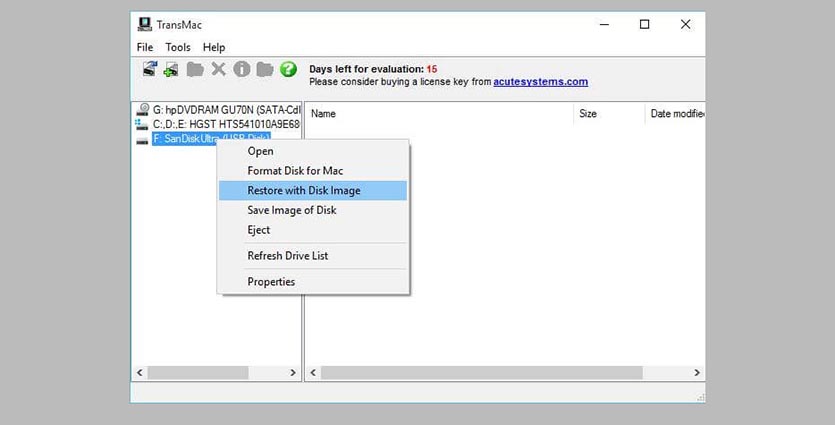
C сайта https://www.acutesystems.com/ скачиваем программу TransMac, она платная, но работает 15 дней которых должно хватить. Запускаем, выбираем наш флеш накопитель, сначала выбираем пункт Format Disk fo Mac. И после завершения процесса выбираем Restore with Disk Image где нам нужно будет указать наш дистрибутив с macOS в формате *.dmg.

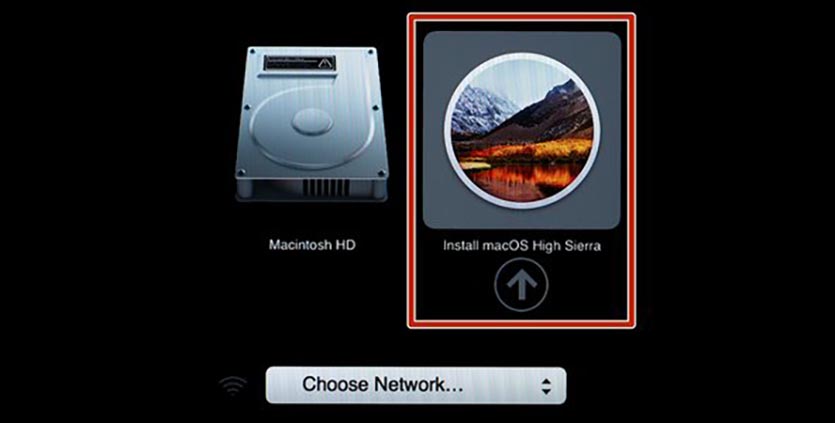
Все флешка готова, но загрузиться с нее не выйдет. Если загрузить мак удерживая клавишу alt, слоты загрузки будут пустые. Поэтому загружаем Recovery system удерживая клавиши cmd+R (нажимать нужно сразу после кнопки включения до появления яблока или земного шара).
Тут нам понадобиться дисковая утилита, запускаем ее, смотрим что флешка определилась и далее нам нужно отформатировать основной диск (Тут я подразумеваю что все ваши нужные файлы лежат в облаке, важных файлов на самом маке нет, так как после форматирования все файлы будут УТЕРЯНЫ).
Нажимаем в меню пункт вид-показывать все устройства. Выбираем APPLE SSD, нажимаем кнопку стереть. Вводим имя, Mac OS Extended, Схема разделов GUID.

Ну а теперь можно и загрузочную флешку сделать. Выходим из дисковой утилиты и в меню выбираем пункт Утилиты-Терминал. Пишем команду def. -h и смотрим что в файловой системе есть флеш накопитель с названием который был в дисковой утилите (у меня это /Volumes/Install macOS Mojave) после этого копируем дистрибутив на жесткий диск командой
cp -R "/Volumes/Install macOS Mojave/Install macOS Mojave.app" "/Volumes/Macintosh HD"
После копирования закрываем терминал cmd+Q. Выбираем флешку и форматируем также как форматировали жесткий диск (Имя: USB, Mac OS Extended, Схема разделов GUID.).
Теперь запускаем терминал и создаем загрузочный образ:
"/Volumes/Macintosh HD/Install macOS Mojave.app/Contents/Resources/createinstallmedia" --volume /Volumes/USB
Соглашаемся, вводим y и возможно потребуется пароль от системы.
Теперь можно перезагрузить мак с зажатой клавишей alt и в пункте загрузки мы увидим картинку Install macOS Mojave. Теперь можно нажать пункт Установить macOS.
Если в процессе установки вылетела ошибка “Экземпляр программы установка macOS Mojave поврежден и не может быть использован.”
Нужно найти в интернете дату выпуска дистрибутива, отключить WiFi, запустить терминал ввести команду установки даты date: месяц-число-время-год в формате ммддччммгггг
Например, 12 декабря 10:00 2017 будет выглядеть так:
date 120110002017
Если не помогло, перезагружаем, отключаем интернет, ставим дату и после этого только запускаем установку.
После этого устанавливаем mac OS как обычно.
P.S.1: Чтобы восстановить флешку для пользования под Windows скачиваем программу SD Memory Card Formatter for Windows с сайта https://www.sdcard.org/ так как в проводнике вряд ли получиться отформатировать.
P.S.2: У других дистрибутивов названия путей будут другие, так что смотрите по возможности название папок например командой ls в терминале.
парпар
Когда компьютер Mac внезапно перестал запускаться, а резервной копии macOS под рукой нет, поможет чистая переустановка системы.
Если рядом есть другой Mac, то проблем с созданием загрузочной флешки не возникнет. Сейчас расскажем, как выкрутиться из ситуации с Windows-ПК.
? Спасибо re:Store за полезную информацию. ?
Как создать загрузочную флешку в Windows
1. Для создания флешки скачиваем приложение TransMac.
Утилита распространяете на сайте разработчика по цене $59. К счастью, есть бесплатный 15-дневный триал.
2. Теперь потребуется найти образ для установки macOS.
Официального способа скачать операционную систему из Windows нет. Придется либо искать друга с компьютером Mac, либо пользоваться известными всем сайтами.
Обратите внимание, что для работы утилиты TransMac нужен образ macOS в формате *.dmg
Если удастся найти друга с яблочным компьютером и скачать macOS из Mac App Store, будет проще у него же и сделать нагрузочную флешку по инструкции.
![]()
3. Когда образ скачан, а утилита установлена, запускаем TransMac от имени Администратора и соглашаемся на триальный период использования программы.
4. Подключаем к компьютеру флешку (понадобится накопитель емкостью 8ГБ и более)
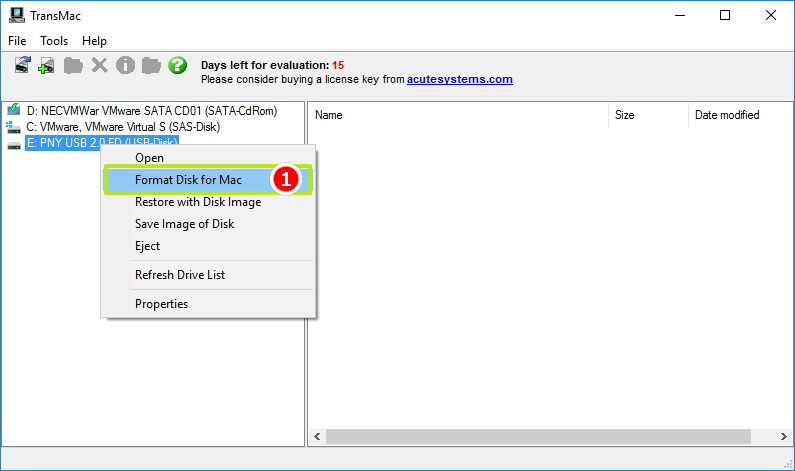
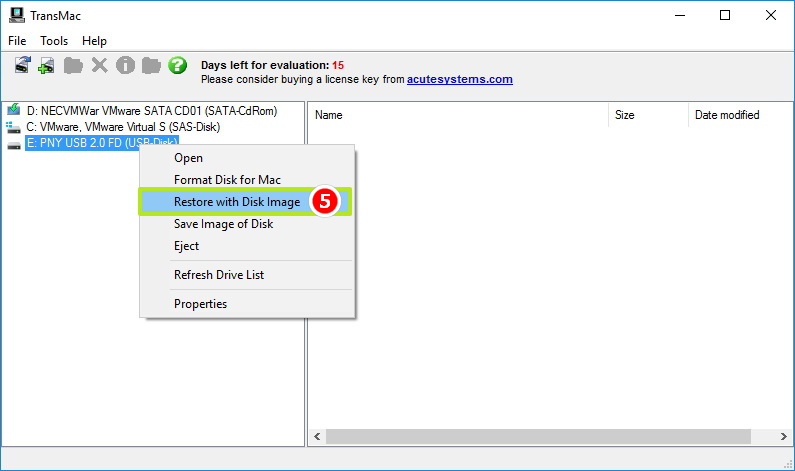
5. В боковом меню находим подключенный накопитель и через контекстное меню форматируем командой Format Disk for Mac.
Внимание! Данный процесс является необратимым, все данные с флешки будут удалены.
6. После окончания форматирования снова вызываем контекстное меню диска и выбираем пункт Restore with Disk Image.
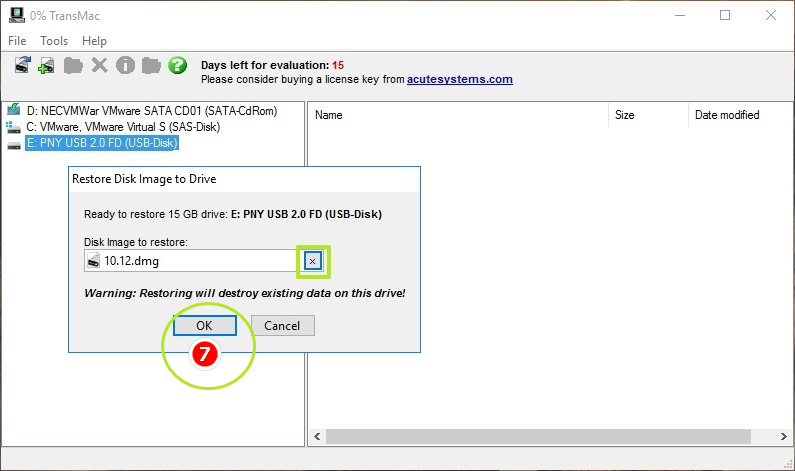
7. В открывшемся окне проводника указываем скачанный образ для установки macOS.
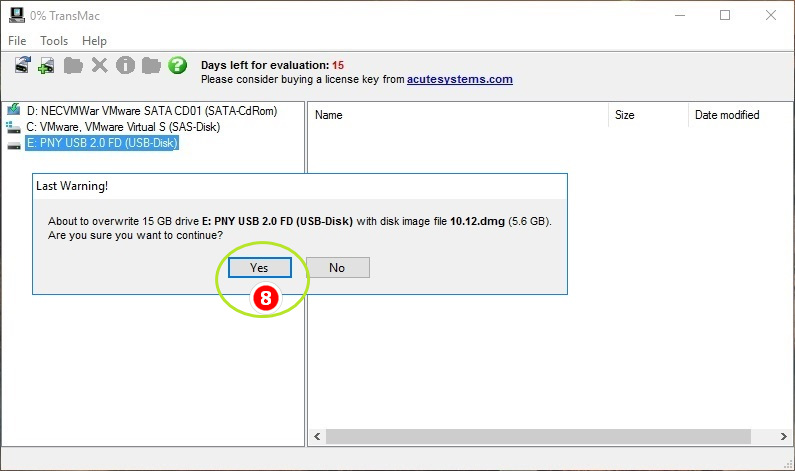
8. Подтверждаем запись образа на флешку и ждем 20-30 минут, пока процесс не завершится.
Все! Флешка для установки macOS готова.
Как запустить Mac с флешки
Подключаем наш накопитель к компьютеру Mac и включаем его с зажатой клавишей Alt (Option).
Обратите внимание, что для загрузки со внешних накопителей на Mac с чипом T2 нужно произвести некоторые манипуляции.
В меню выбора диска указываем флешку и производим установку macOS.
Следуйте подсказкам мастера установки и через несколько минут получите работоспособный Mac.

 (93 голосов, общий рейтинг: 4.54 из 5)
🤓 Хочешь больше? Подпишись на наш Telegram.
![]()
iPhones.ru
Это может пригодиться каждому, когда нет второго Mac под рукой.
- macOS,
- restore,
- windows,
- инструкции,
- фишки
![]()
Артём Суровцев
@artyomsurovtsev
Люблю технологии и все, что с ними связано. Верю, что величайшие открытия человечества еще впереди!
Home
How To
How to Create a Bootable USB for macOS Mojave on Windows PC
In this article, I will show you How to Create a Bootable USB for macOS Mojave on Windows PC. Therefore, you have to know the complete information and guide of installation on VMware Workstation and VirtualBox. Furthermore, you also know and have information about the Mac operating system, that Mac or Apple company is releasing day by day new updates and features for there users, one of the good news is here that you can easily test or install the macOS Mojave beta on VirtualBox and VMware, However, if you want to test that I have provided or created the article, for you in below I will give you the link you can see there.
Create a Bootable USB for macOS Mojave on Windows
To create a bootable macOS Mojave USB installer on Windows, you need some requirements to ready that on your computer. Download macOS Mojave the latest version and Extract the compressed macOS Mojave with WinRaR. After that, you are done with extracting now download TransMac and install that on your PC, then get ready for the preparation of creating macOS Mojave bootable USB on Windows operating system.

Create a Bootable USB for macOS Mojave on Windows
TransMac is Acute system in Windows operating system that can copy and paste and manage the files on Windows for Apple or Mac Systems, Including Mac-formatted USB drives, SSD drive, Hard drives, and any kind of storage devices, further, it can burn VMDK and dmg files of macOS Mojave, macOS High Sierra, macOS X El Capitan, macOS Sierra, macOS Yosemite, and any other operating system of macOS, there is bad news that TransMac is not free whether you should too by this or use for 15 days Trail.
Required files:
- Download macOS Mojave 10.14 by Techsprobe
Related Articles:
- How to install macOS Mojave on VirtualBox and Windows?
- How to install macOS Mojave on VMware on windows
- Create bootable USB for Mac OS Mojave on windows 10 using Unibeast
Install TransMac on Windows PC
While you are downloaded the complete file of TransMac and macOS Mojave on a computer. Now in here, you need the simple process and ways of installation that everyone can install that easily on there Windows PC.
- Run the TransMac setup by double-clicking on setup.
- On the welcome screen click Next.
- Read carefully the agreement on the license and agreement and click Next.
- Select the location for Transmac where you want to install it.
- On the next TransMac will ask from you to create a shortcuts icon on the start menu and screen.
- The next screen doesn’t do anything click Next.
- Therefore, you are ready to install TransMac on your computer, for just click on the Install button and wait for some minutes to complete the installation.
- After that, that installation is completed click Finish.
Now start Creating a Bootable USB for macOS Mojave on Windows
After that, you are successfully installed TransMac and downloaded macOS Mojave dmg file now you need to create USB bootable for macOS Mojave, Therefore, you need to get at least 16 up to 32 GB flash drive and attach the USB drive to the computer and follow the steps which I am going to show you in this article.
Step #1. Now you are completely ready to create bootable USB for macOS Mojave. At the very beginning step you need to open TransMac, therefore Right-click on TransMac and select Run As Administrator.

Run As Administrator
Step #2. After that, TransMac is opened you will see the list of drives then select the drive which you are going to make bootable for macOS Mojave, and Right-click on that then select Restore with Disk Image.

Restore With Disk Image
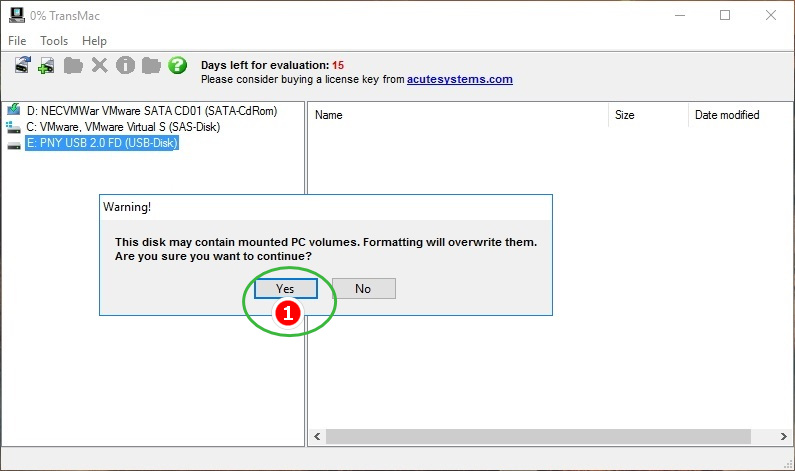
Step #3. After that, you have selected Restore with Disk Image, therefor you will face pop up warning from containing mounted volumes. However, to continue the process simply click on yes to go on a further step.

Warning of selected Volume for macOS Mojave
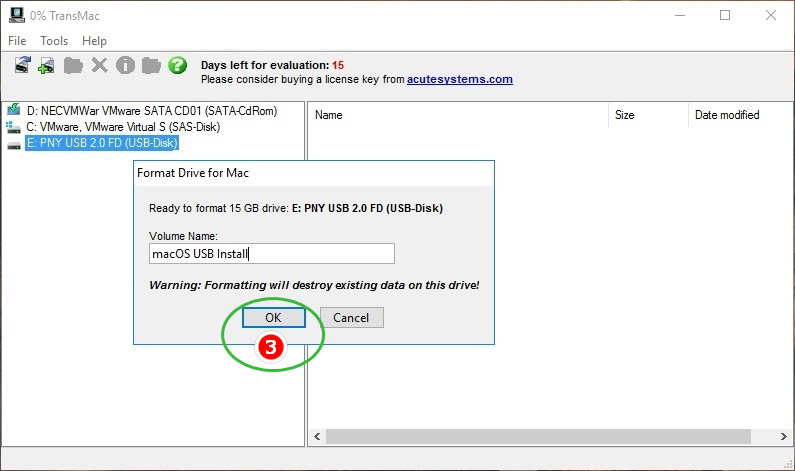
Step #5. In this step, you need to browse for macOS Mojave dmg file, just click on three dots and select a macOS Mojave dmg file.

Browse macOS Mojave dmg file
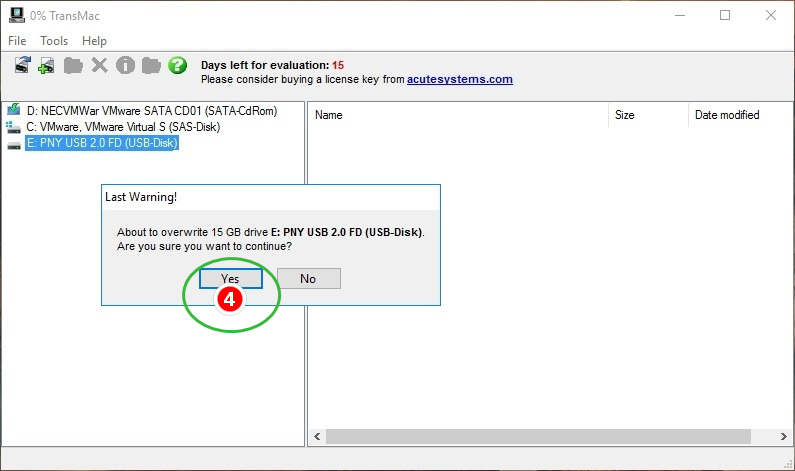
Step #6. In this step, you will face another warning pop up. So, it is simple to click on Yes and moves to the next step.

macOS Mojave warning
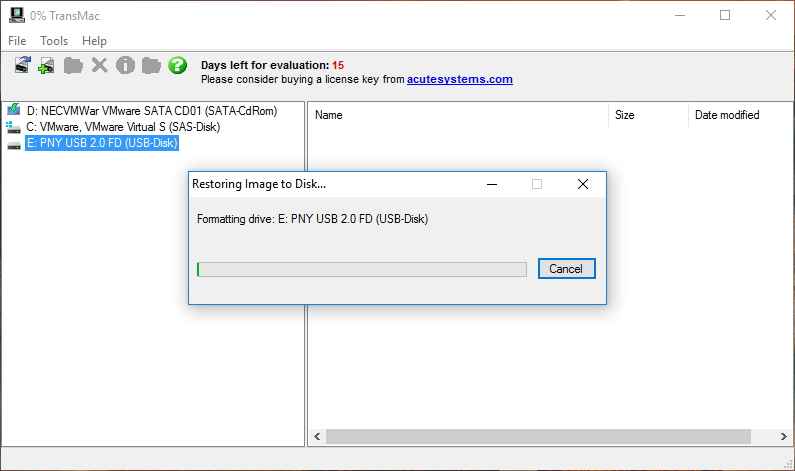
Step #7. In this step, you should wait for some minutes to format your drive and wait, it will automatically copy the macOS Mojave dmg file to the USB drive.

Formatting Drive for macOS Mojave
Conclusion
That’s all about How to Create a Bootable USB for macOS Mojave on Windows PC. However, you can create bootable USB for macOS Mojave using TransMac and TransMac is a very light software for Windows PC. Furthermore, if you faced any kind of problem in this article you can comment in below comment box, and don’t forget to subscribe to our website for the latest posts.
Какой бы ни была надежной операционная система Mac, рано или поздно ее придется переустановить. Как и в случае с Windows, в этой ситуации вам понадобится загрузочный носитель — флешка с записанным на нее дистрибутивом MacOS. Загрузочные флешки с MacOS имеют несколько иную структуру, чем загрузочные носители с Windows, что никак не мешает создавать их в Win-среде. Для этого удобнее всего использовать программу TransMac, предназначенную для доступа к данным Mac из PC.
Она позволяет искать, записывать, переименовывать и удалять данные в файловых системах APFS, HFS и HFS+, конвертировать DMG в ISO, но в данный момент нас интересует функция записи DMG на внешние носители — флешки и оптические диски.
TransMac платная, но у нее есть 15-дневный пробный период, в течение которого программой можно пользоваться без функциональных ограничений.
Скачайте программу с сайта www.acutesystems.com/scrtm.htm, установите и запустите с правами администратора.
Справа на панели вы увидите список ваших дисков, кликните по подключенной к ПК флешке и выберите в меню «Format Disk for Mac».
Подтвердите действие в диалоговом окошке, присвойте флешке произвольное название.
И нажмите «Yes».
Форматирование является обязательным для флешек, размеченных средствами Windows, этот шаг можно пропустить только если на флешке имеется primary-раздел со стилем разметки GPT. Переразметив накопитель, выберите на этот раз в меню «Restore with Disk Image».
Подтвердите действие.

И укажите путь к установочному файлу DMG.
После очередного подтверждения операции,
дождитесь завершения записи образа на флешку.
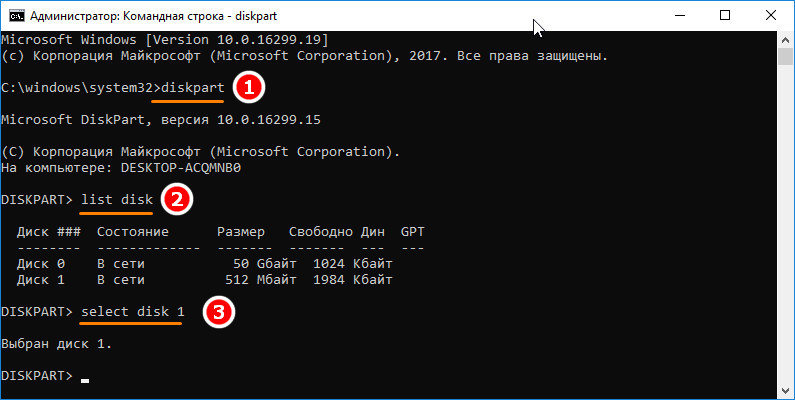
Если вдруг на этапе форматировании флешки в TransMac возникнут проблемы, раздел GPT на накопителе придется создать вручную.
Последовательность выполнения команд приведена на скриншотах ниже, будьте внимательны при определении номера физического диска командой list disk.
Разметив таким образом флешку, перейдите в TransMac и начните с шага с использованием опции «Restore with Disk Image».
![]() Загрузка…
Загрузка…
Well, you probably have used the TransMac in macOS High Sierra in order to create bootable USB for Mac. I also used that many times and none of them worked to create bootable USB for mac on windows 10 except for one. and that was the macOS High Sierra itself on windows 10 which I used to create bootable USB Flash Drive on Windows.
Do you know what I did to create bootable USB Flash drive for macOS High Sierra, I installed macOS High 10.13 inside the Vmware Workstation Pro. then I downloaded and Install Unibeast inside the macOS High Sierra on Vmware Workstation. Then I dual booted my system.
Yes, the same method I am offering you to use, I know it is lengthy but it gives you 100% Result in one try. So, in order to create bootable USB for macOS Mojave on windows 10, download and Install the Vmware Workstation Pro, after that install in it the macOS Mojave 10.14
If you don’t know How to Install macOS Mojave on Vmware, read the below post.
- Install macOS Mojave on Vmware on Windows 10
If you are wondering to use the VirtualBox to Create Bootable USB for macOS Mojave on windows 10, I won’t recommend that. Because VirtualBox for macOS Mojave has many errors.
Required Files:
- 16 GB USB Flash Drive
- macOS Mojave
- Commands to Copy macOS Mojave to USB Flash Drive
Create Bootable USB for macOS Mojave on Windows 10
Step 1. Download macOS Mojave 10.14
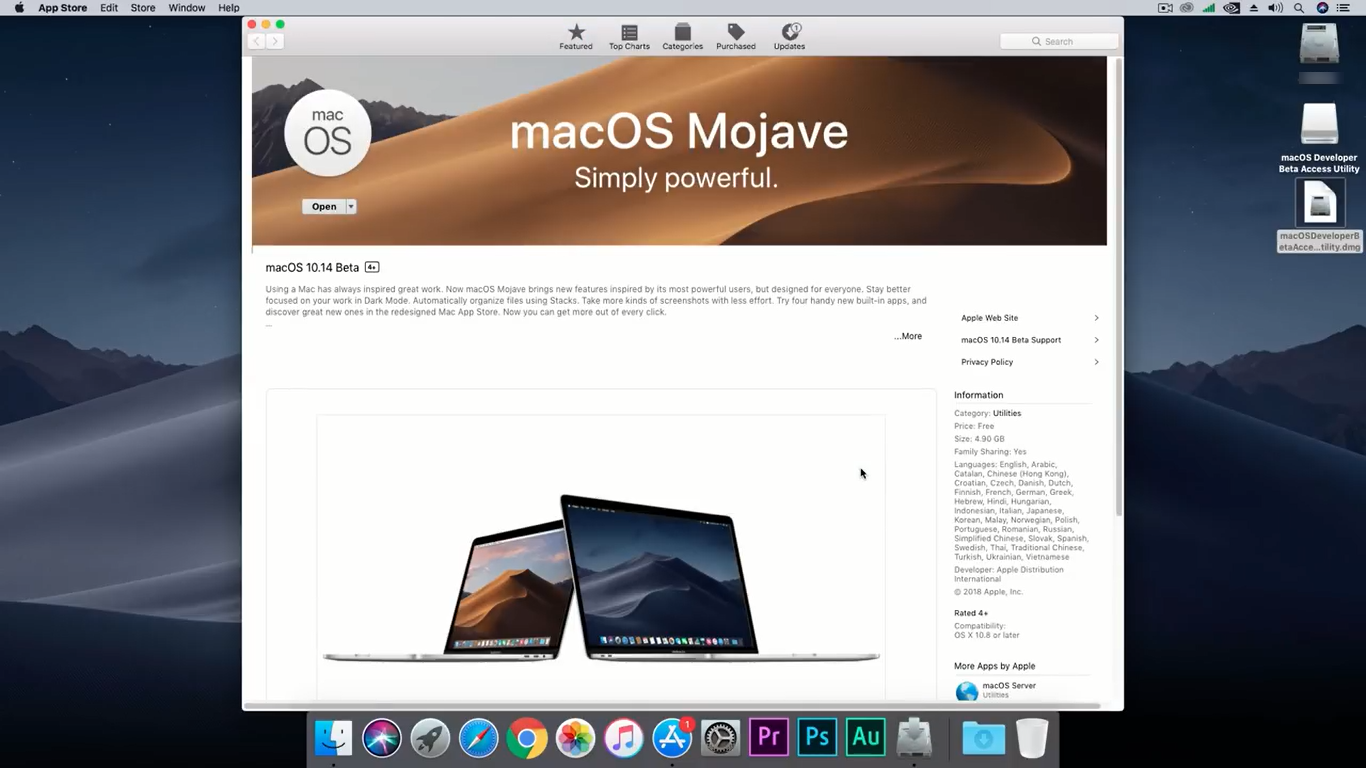
To create a bootable USB for macOS Mojave on windows 10, the very first thing you need is the macOS Mojave. Since the macOS Mojave Public beta has been released, you have to download that from App store if you are a developer account. If you don’t have a developer account follow the below steps to download macOS Mojave.
- Download the Developer Tool and double-click on it to start the installation process.
- On the welcome screen, click continue.
- Agree to the license and agreement of Developer tool and click continue.
- Select a location where to install and click Install.
- Enter your password for confirmation and click install the software.
- When the installation completes close the Developer utility tool.
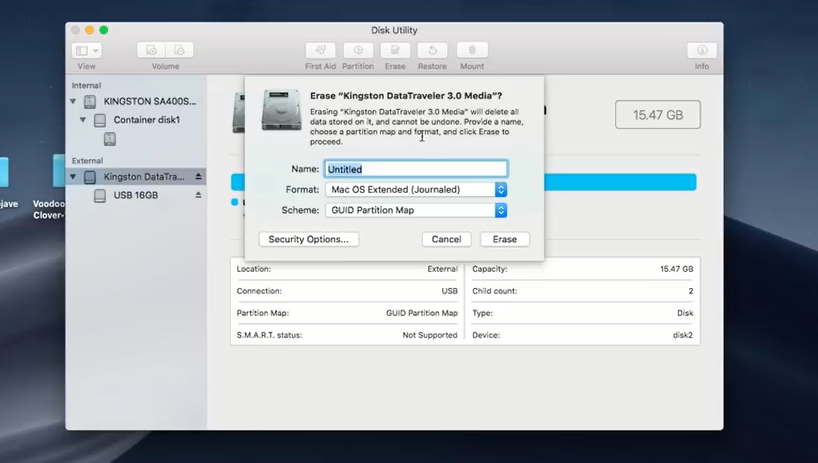
Step 2. Erase the USB Flash Drive
Actually, Before getting started with How to Create Bootable USB Flash Drive for macOS Mojave on Windows 10, you have to partition the USB Flash Drive. In other words, you need to erase the USB, and to do that follow the below steps.
- First, Insert the USB Flash Drive.
- Open spotlight & search for Disk Utility.
- In Disk Utility select the USB and Erase it with the following settings.
- Name: Provide any Name
- Format: Mac OS X Extended (Journaled)
- Scheme: GUID Partition Map
When you are with the settings, select erase to partition the USB, after the USB erased click is done, and close the disk utility.
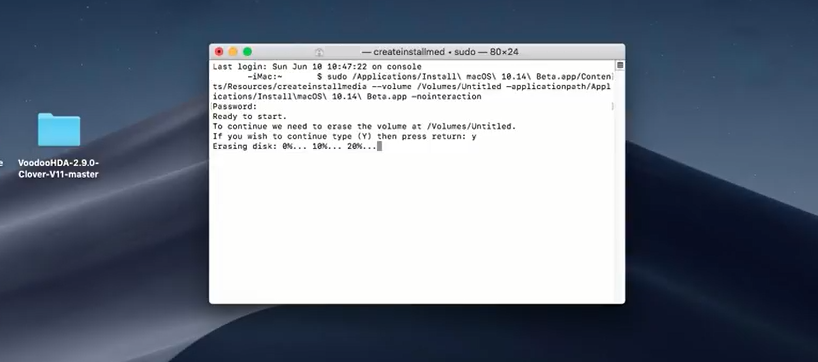
Step 3. Copy macOS Mojave to USB using Terminal
You can copy macOS Mojave to USB Flash Drive using other software too, a good example can be Clover and Unibeast. But why we should not use the Terminal which is a built-in feature of mac. So, follow the below procedures to create bootable USB For macOS Mojave on Windows 10.
- First, Open the terminal by searching in the spotlight.
- When the terminal opens, paste the below command in terminal and hit return.
sudo /Applications/Install\ macOS\ 10.14\ Beta.app/Contents/Resources/createinstallmedia --volume /Volumes/Untitled —applicationpath/Applications/Install\macOS\ 10.14\ Beta.app —nointeractionIf you have any problem with First Command try the second command.
sudo /Applications/Install\ macOS\ 10.14\ Beta.app/Contents/Resources/createinstallmedia --volume /Volumes/USB --applicationpath /Applications/Install\ macOS\ 10.14\ Beta.appAfter you enter the command, Terminal will ask you enter your password for confirmation. Keep in mind, the password is secured and you won’t be able to see it. After that terminal asks you to type y to continue, type y and go wait until the macOS Mojave is copied to USB.
After creating a bootable USB for macOS Mojave on Windows 10 you also need to configure the drivers in order to Install on a PC or any other desktop. If you want to install macOS Mojave on PC or inside a Hackintosh, Read the below Post.
How to Install macOS Mojave 10.14 on PC or Hackintosh?
Conclusion:
Well, It was about How to create bootable USB for macOS Mojave on windows 10 if you had any question please know. Also if you think this post worth for sharing, please share it with your friends and colleagues.