For a Microsoft Windows 2000 version of this article, see
268852.
IN THIS TASK
-
SUMMARY
-
-
Force Windows to Use the Standard VGA Mode Drivers Without Having to Use Safe Mode
-
-
REFERENCES
Summary
This step-by-step article describes how to force Windows to use a standard VGA mode driver that is included with Windows. This procedure is useful in the following scenario.
If you install Windows on a computer that is using an unsupported video adapter, Windows Setup installs a standard VGA mode driver. However, after you install Windows, you obtain and install a Windows-compatible driver for your video adapter from an original equipment manufacturer (OEM).
In this scenario, the computer may have problems shutting down, or the computer may stop responding (hang). To troubleshoot this problem, you may want remove the new OEM drivers and revert to the standard VGA drivers to determine whether the OEM drivers cause the problem.
This article describes how to remove OEM video drivers and force Windows to use the standard VGA drivers that are included with Windows.
Force Windows to Use the Standard VGA Mode Drivers Without Having to Use Safe Mode
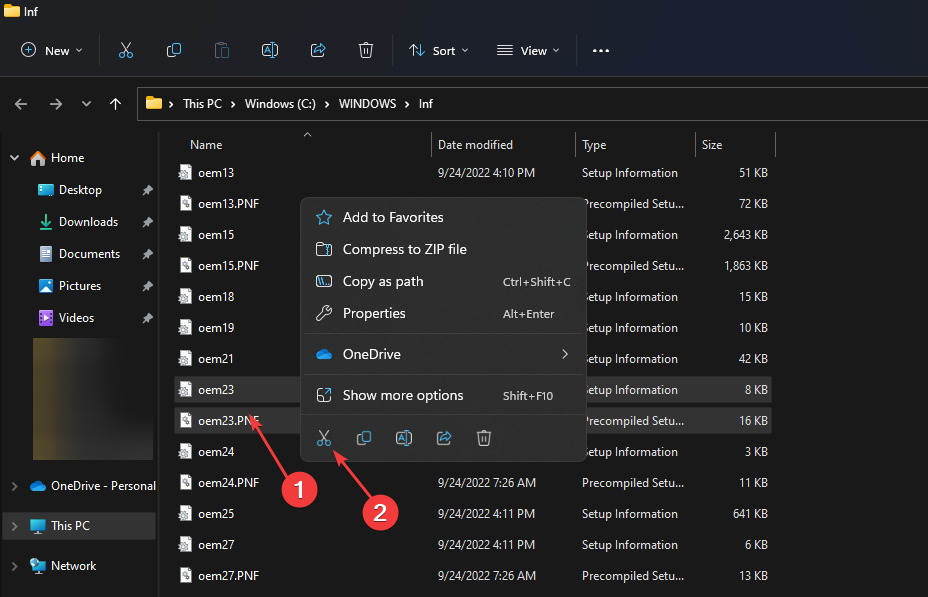
When you install an OEM driver, the Windows installer program copies the OEM installation file (Oemsetup.inf) to the %Systemroot%\Inf folder. Setup then renames the Oemsetup.inf file to Oemn.inf, where n is an incremental number for each OEM driver that is installed.
To identify the OEM video-specific Oemn.inf file, you can open each Oemn.inf file in Microsoft Notepad, and then compare it with the original Oemsetup.inf file. After you find a match, move that specific Oemn.inf and Oemn.pnf files to a different location, or rename the files with a different file name extension.
-
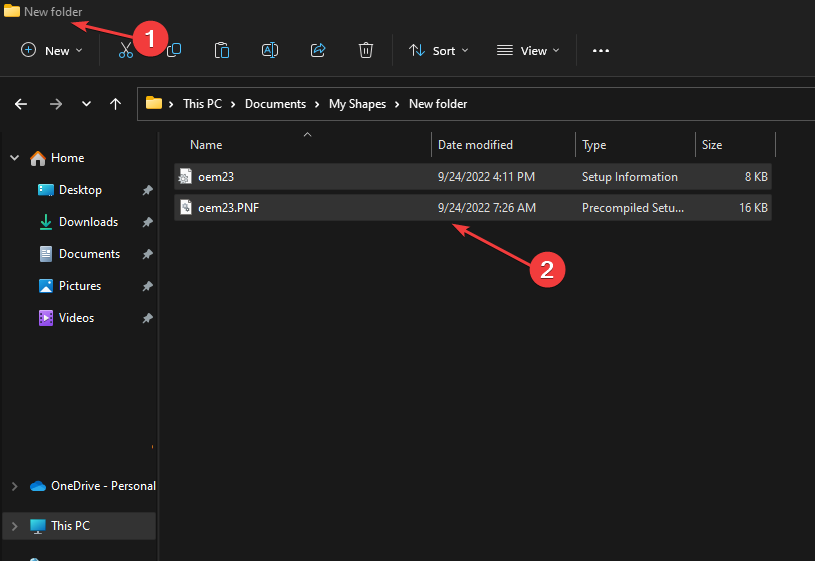
After you locate the matching .inf files, move the Oemn.inf and Oemn.pnf to a different folder.
-
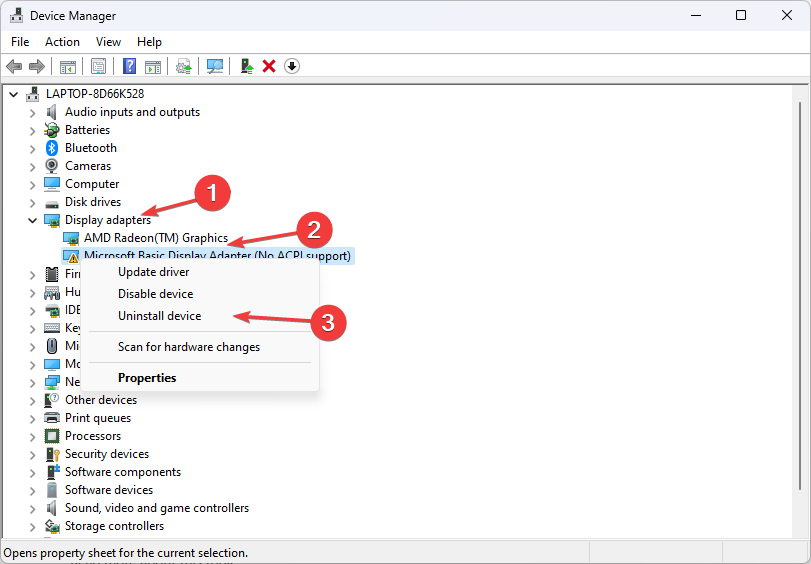
In Device Manager, right-click your video adapter, and then click Uninstall to remove the video adapter.
-
Restart your computer.
After you log on, you receive a message stating that new hardware has been found and that it is a VGA compatible video controller. The Found New Hardware Wizard starts.
-
Click Next.
-
Click Search for suitable driver, and then click Next.
-
Click to clear all of the search option check boxes, and then click Next.
-
Click Disable the device, and then click Finish.
After you finish steps 1 through 7, Windows uses the Vga.sys generic video driver. This is the same VGA driver that Windows uses in Safe mode.
If the computer becomes stable or shuts down in a typical manner while you are using the standard VGA driver, you may have to contact the OEM driver vendor to report the problems that you have when you use the OEM driver. You may also have to obtain and install a newer driver (if one is available) that resolves these problems.
To restore the OEM drivers, follow these steps:
-
Move the Oemn.inf and Oemn.pnf files back to the %Systemroot%\Inf folder.
-
Use Device Manager to remove the VGA video adapter, and then restart the computer.
Windows Plug and Play locates the OEM video adapter and reinstalls the OEM drivers automatically.
NOTE: If you press F8, and then click Enable VGA Mode on the Windows Startup menu, Windows starts with a screen area of 640 by 480 pixels with low 8-bit color and may use an OEM video driver, not the standard VGA driver.
Need more help?
Want more options?
Explore subscription benefits, browse training courses, learn how to secure your device, and more.
Communities help you ask and answer questions, give feedback, and hear from experts with rich knowledge.
VGA mode is used if Windows can’t load due to video cards issues
by Loredana Harsana
Loredana is a passionate writer with a keen interest in PC software and technology. She started off writing about mobile phones back when Samsung Galaxy S II was… read more
Updated on
- The VGA mode is used essentially when you are sure the video cards caused the error.
- Booting the computer to VGA mode offers limited computer view and activities.
- You can enable the VGA mode just like the Safe mode in the system’s BiOS settings.

The VGA-only mode is a unique way to access Windows if it locks or can’t function normally. However, it can be annoying if you encounter the VGA-only is not enabled problem.
Hence, this article will cover the basics of the VGA mode and how to enable it on your PC without hassles quickly.
What is the VGA-only mode?
The VGA mode is similar to launching the PC in safe mode. It offers a basic Windows view with a 640 x 480 pixels resolution.
In this mode, you can diagnose the PC’s or video card problems while having access to a minute functionality of the computer. Only the most basic video drivers will load during the VGA mode, and directional keys are used to navigate.
The VGA mode is often used when video cards or display issues, such as the PC not detecting GPU on Windows 11.
How we test, review and rate?
We have worked for the past 6 months on building a new review system on how we produce content. Using it, we have subsequently redone most of our articles to provide actual hands-on expertise on the guides we made.
For more details you can read how we test, review, and rate at WindowsReport.
How can I enable VGA-only mode on my PC?
Before trying these steps, there are a few checks you need to perform:
- Make sure that the graphics drivers are updated. Do not hesitate to check our guide on easy ways to update graphics drivers if you encounter difficulties.
- Try rebooting in Safe mode, but if your Safe mode is not working, our guide will help you.
- Restart your computer to check if the problem persists.
If none of these restores your video card performance, apply the steps below to enable VGA mode.
1. Adjust BIOS settings
- Power on the computer and click F8, F2, F10, or F12 continuously on the Windows display, depending on your PC.
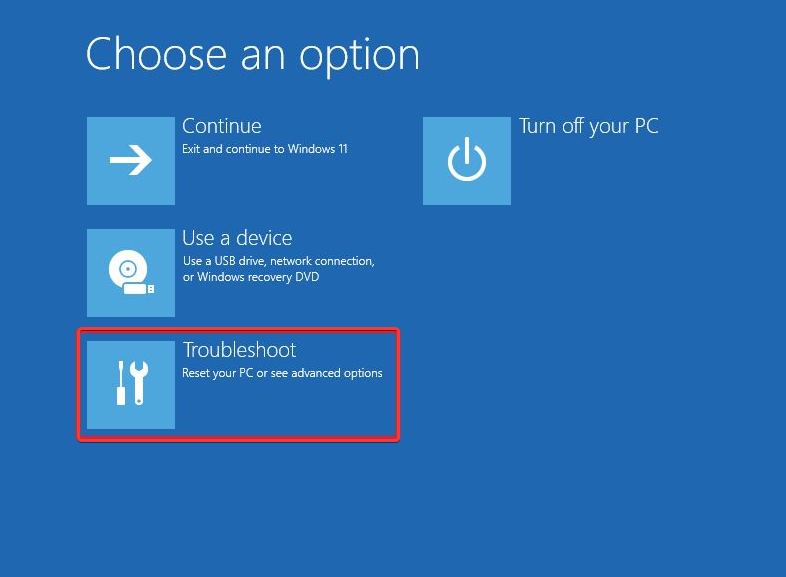
- Choose Troubleshoot to open the Advanced options tab.

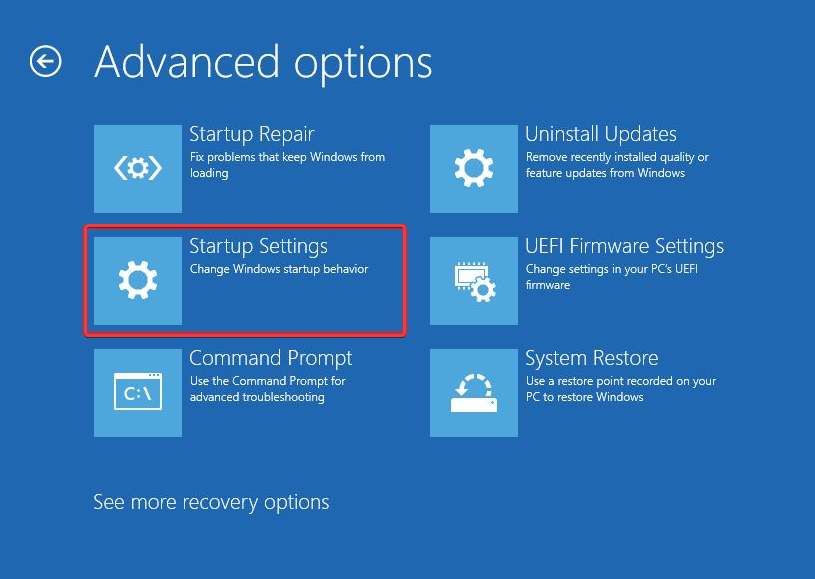
- Click Startup Settings.

- Select Enable low-resolution video mode by pressing F1 and click Restart.

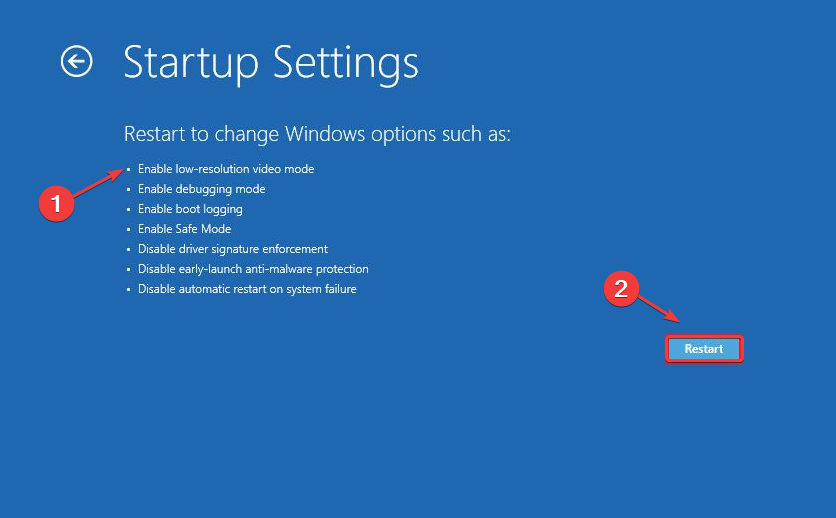
This will start Windows in VGA mode, using minimum drivers input similar to the Safe Mode. If you encounter difficulties accessing BIOS settings in Windows 11, our guide can help you solve it.
2. Force Windows to use standard VGA mode drivers
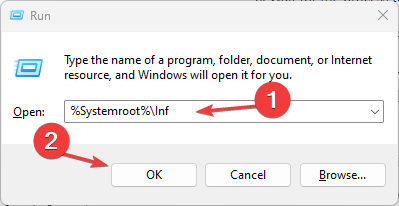
- Press the Windows + R keys to launch the Run windows box, input %Systemroot%\Inf folder, and click OK.

- Locate the Oemn.inf and Oemn.pnf files that correlate with the original Oemsetup.inf file for the OEM video driver.

- Move the two files into a different folder.

- Click the Start button, input Device Manager, and launch it.
- Expand Display adapters, right-click the Video adapter and select Uninstall device.

- Then restart your PC.
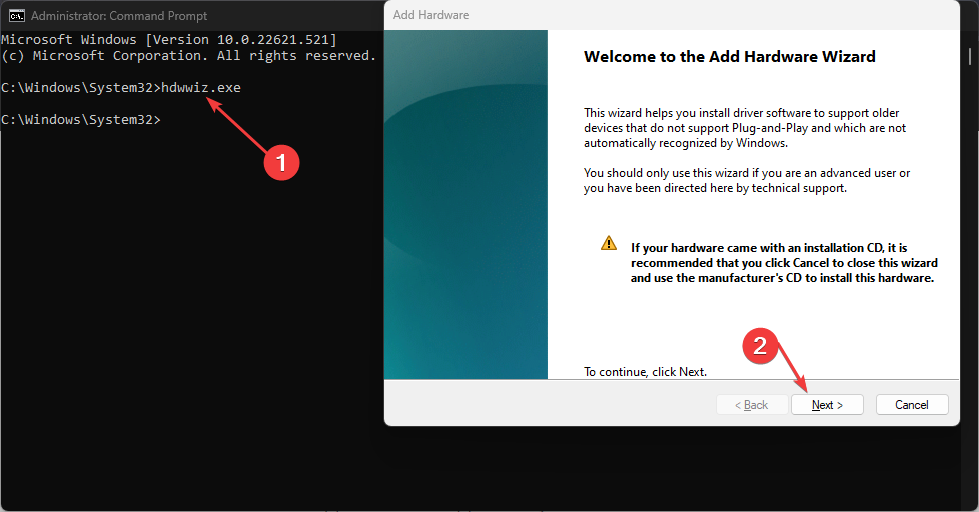
- Click the Starts button, input Command Prompt and launch it.
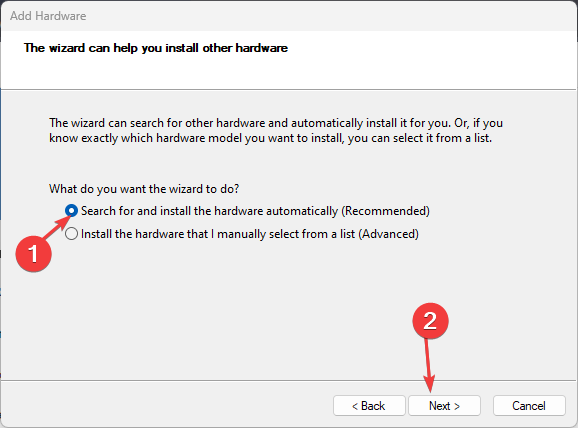
- Input the following and press Enter to launch the Add Hardware Wizard and click Next:
hdwwiz.exe
- Select Search for and install the hardware automatically and click Next.

- Wait for the process to complete and click Finish.
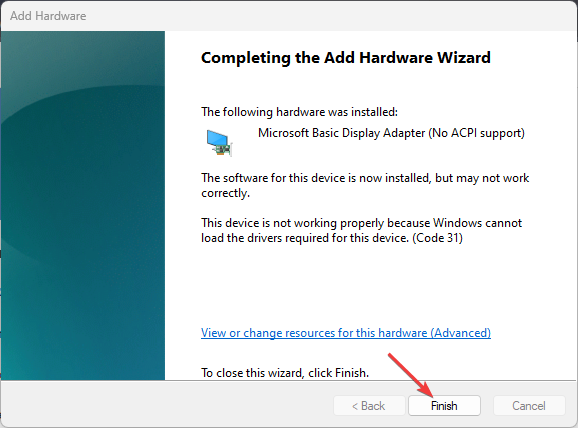
Having completed this, Windows will use the Vga.sys generic video driver and doesn’t require starting in Safe Mode.
Further, our guide on installing drivers without EXE files has detailed information on using INF files for driver installation.
- Fix: Can’t Disable Background Blur on Windows 11
- Fix: Monitor is Stuck at 60Hz on Windows 11
- How to Type Accents on Windows 11
Follow the steps above for optimal results when trying to combat VGA only mode is not enabled problem.
However, if you encounter VGA issues on Windows, do not hesitate to check out our guide for the best ways to fix them.
Sometimes, your VGA card may not be supported by the UEFI driver. Although not rampant, if this is your problem, consider our article.
In case people tell you to ensure BIOS BBS is disabled, it’s valid advice since BBS can lead to vulnerabilities. And it’s for the same reason you should ensure Request Disk Topology is disabled. Only do that if you don’t need the features.
Conclusively, if this guide has been helpful, you can leave your comments and suggestions in the section below. We’d like a response from you.
![]()
Чтобы включить режим VGA в Windows 10, выполните следующие шаги:
1. Подключите к компьютеру монитор, который поддерживает VGA.
2. Нажмите на клавиатуре сочетание клавиш Win + P.
3. Откроется меню «Проектировать», в котором нужно выбрать режим «Только компьютер».
4. Далее нажмите клавишу Enter или просто подождите несколько секунд, чтобы переключить вывод на монитор.
5. Если монитор не отображает изображение, то попробуйте нажать еще раз сочетание клавиш Win + P и выбрать другой режим.
Убедитесь, что ваш монитор правильно подключен к компьютеру, а его драйверы установлены. Если проблемы с отображением изображения сохраняются, обратитесь к инструкции по эксплуатации монитора и компьютера или свяжитесь с технической поддержкой производителя.
Если вы хотите переключиться на режим VGA в Windows 10, то сделать это можно несколькими способами. Один из самых простых – использовать сочетание клавиш Win + P, которое вызывает меню Проектировать. Здесь можно выбрать нужный режим вывода на монитор, например, Только компьютер или Расширить.
При переключении на режим VGA может возникнуть проблема с разрешением экрана. Если изображение стало неразборчивым или слишком крупным, то нужно изменить параметры разрешения экрана в настройках Windows. Для этого нужно нажать правой кнопкой мыши на свободном месте рабочего стола и выбрать пункт «Настройки дисплея». Здесь можно выбрать оптимальное разрешение для вашего монитора.
Также следует учитывать, что режим VGA не поддерживает высокое качество изображения. Это может проявиться в низком разрешении, ограниченной цветовой гамме и других ограничениях. Поэтому, если вы используете VGA-подключение для работы с графикой или видео, то лучше выбрать другой тип подключения, например, HDMI или DisplayPort.
В целом, переключение на режим VGA в Windows 10 – это простой и быстрый способ подключения монитора. Однако, перед использованием этого режима следует убедиться, что ваш монитор поддерживает данное подключение и имеет соответствующие порты.
- Remove From My Forums
-
Question
-
Hi,
Is there a way to force Windows 10 to start in VGA mode?
I know that we can restart Windows 10 holding down the shift key or use msconfig to achieve that. But the scenario is this:
A machine starts and then when Windows is about to show the lockscreen the monitor says that it can’t show that resolution.
So, I have to use another monitor to fix it (using a pendrive/dvd with a Windows 10 installation disk doesn’t show me the option to Enable VGA mode).
Windows 7 allowed me to do that by simply pressing F8 and choosing Enable VGA mode.
In Windows 10 is impossible to do the same? Is there a way to enable F8 again? Why Microsoft removed it? Security issues?
-
Edited by
Friday, September 16, 2016 1:26 PM
-
Edited by
Answers
-
Hi Vandrey Trindade,
According to the symptom, it seems that the present display adapter is not compatible with Windows 10. Please confirm this from the device manufacturer website.
» Why Microsoft removed it? Security issues?»
No, Microsoft didn`t remove that option. Microsoft has changed the behavior to get that option. We could keep pressing «Shift» and restart the machine, choose «Troubleshoot», «Advanced», «Startup options», «Low resolution
video».
If you want to boot into that mode every time, we could choose safe mode then choose «Msconfig» to configure that option.
Best regards
Please remember to mark the replies as an answers if they help and
unmark them if they provide no help.
If you have feedback for TechNet Subscriber Support, contact
tnmff@microsoft.com-
Proposed as answer by
ZigZag3143x
Thursday, September 22, 2016 5:24 PM -
Marked as answer by
Carl FanMicrosoft contingent staff
Friday, September 30, 2016 9:39 AM
-
Proposed as answer by
 Что такое безопасный режим в Windows 10 и как в него попасть, если операционная система не загружается? При возникновении проблем с загрузкой Windows 10 (или 8.x) нельзя воспользоваться привычным «спасительным кругом», как это предусмотрено в Windows 7 – использованием клавиши F8 во время запуска компьютера для доступа к дополнительным вариантам загрузки. В частности, таким путем в седьмой версии можно попасть в безопасный режим (safe mode) и попытаться решить возникшую проблему штатными средствами. Например, если решением проблемы может стать удаление драйвера или изменение системных настроек. Клавиши Shift+F8, которыми по идее можно воспользоваться при загрузке Windows 10, чтобы попасть в среду восстановления системы (а это аналог вариантов загрузки «Семерки»), не так-то уж и просто применить на деле. Нужно будет несколько раз потренироваться, чтобы уловить тот самый момент сокращенной загрузки системы, когда клавиши Shift+F8 могут сработать.
Зачем нужен?
Безопасный режим работы компьютера являет собой специфическое состояние Windows, предназначенное для устранения различных проблем.
При этом задействованы только самые необходимые для поддержания работоспособности ОС устройства и компоненты. Safe mode – это по условию работа с правами администратора, также он позволяет удалить файлы, которые система или стороннее программное обеспечение не позволят удалить в обычных условиях.
Безопасный режим ОС – среда, используемая для удаления некорректно установленных драйверов и отмены неудачно примененных системных настроек. Например, при установке разрешения экрана, которое не поддерживается монитором, изменить его на поддерживаемое последним в рамках полноценно работающей системы удастся не всегда. Так, изображения на экране может попросту не быть и если под рукой нет другого монитора, способного отобразить картинку с примененным разрешением, не иначе, как с помощью безопасного режима, проблему не решить. Вместо видеодрайвера при этом для монитора задействуется стандарт VGA, который поддерживается всеми видеокартами, предназначенными для Windows-устройств.
Safe mode – одно из решений проблемы проникновения в ОС вирусов, блокирующих работу антивирусных программ. Если вредоносным ПО не повреждена часть системного реестра, отвечающая за загрузку safe mode, можно попытаться запустить антивирусный сканер, удалить файл запуска и/или процесс вируса в диспетчере задач, а также применить прочие действия для реанимации системы.
Раздел конфигурации работающей системы
С помощью раздела конфигурации работающей системы попасть в безопасный режим Windows 10 можно, проведя кое-какие настройки и перезагрузившись. Делаем клик правой клавишей мыши на кнопке «Пуск» и выбираем функцию «Выполнить».

В поле для ввода команд прописываем:
Msconfig

После нажатия Enter увидим окно конфигурации системы. Нас интересует вкладка «Загрузка», здесь галочкой отмечаем пункт «Безопасный режим».

По умолчанию конфигурация системы предусматривает минимальный тип безопасного режима, когда не запускаются программы автозагрузки, нет звука, отключена сеть, работают только базовые драйвера видеоустройства, жесткого диска, мыши клавиатуры и прочих устройств, необходимых для поддержания минимума работоспособности операционной системы.
Для безопасного режима Windows 10 можно установить и другие его типы. Выбрав пункт «Другая оболочка», безопасный режим будет без привычного графического интерфейса, а только с командной строкой. Это может быть актуально в случае сбоя работы explorer.exe – системная служба, обеспечивающая работу проводника ОС.
Пункт «Восстановление Active Directory» предусматривает загрузку безопасного режима с графическим интерфейсом и минимальным числом активных служб, включая службу каталогов Active Directory. Если у вас возникнет необходимость обратиться к сетевым ресурсам, то в этом случае нужно выбрать пункт «Сеть». Он предусматривает, соответственно, работу драйвера сетевой карты.
Определившись с выбором, внизу окна жмем «Применить», а затем «Ок».
После перезагрузки Windows будет запущен в безопасном режиме.
Процесс настройки загрузки Windows 10 в обычном режиме – обратный. В разделе конфигурации системы галочку с пункта «Безопасный режим» нужно снять.
Клавиша Shift и кнопка перезагрузки работающей системы
Другой способ попасть в safe mode, если Windows находится в работоспособном состоянии – это воспользоваться одномоментным нажатием клавиши Shift и кнопки перезагрузки. Открываем меню «Пуск», нажимаем на кнопку выключения («Завершение работы») и, удерживая при этом зажатой клавишу Shift на клавиатуре, выбираем вариант перезагрузки компьютера.

Так мы попадем в среду восстановления Windows 10. Здесь нам нужен сначала раздел диагностики, затем – раздел дополнительных параметров.

Далее выбираем параметры загрузки.

Перед нами появятся всевозможные варианты загрузки – нажав клавиши F4, F5 или F6 можно попасть в безопасный режим соответствующего типа.

Безопасный режим незагружающейся системы
Если Windows не запускается вообще или, например, ошибочно применено разрешение, которое монитор не поддерживает, выдавая сообщение об этом на унылом черном фоне экрана, загрузиться в безопасном режиме и попытаться отыскать решение проблемы можно, как и в предыдущем случае, с помощью среды восстановления системы.
Как упоминалось выше, нажатие клавиш Shift+F8 во время загрузки Windows не всегда может сработать, потому более надежным способом попасть в среду восстановления будет загрузка с установочного диска или с диска восстановления, созданного ранее штатными средствами системы.

При загрузке с последнего в среду восстановления попадаем сразу после выбора языка. Если же загрузка компьютера осуществляется с установочного диска, в приветственном окошке жмем «Далее».

Затем нажимаем ссылку восстановления системы внизу.

Дальнейшие шаги – «Диагностика» и «Дополнительные параметры».

Далее выбираем командную строку.

В окне командной строки прописываем:
bcdedit /set {globalsettings} advancedoptions true
и жмем Enter.
")
Операция проведена успешно, командную строку закрываем и в меню выбора действия кликаем продолжение использования Windows 10.

После чего увидим перечень вариантов загрузки.

Если в безопасном режиме удастся устранить причину, препятствующую загрузке, и переустановки системы получится избежать, в дальнейшем компьютер будет все время загружаться с меню вариантов загрузки. Исправить это очень легко с помощью той же командной строки, которую теперь уже открываем, выбрав из числа содержимого контекстного меню на кнопке «Пуск».

Вводим команду:
bcdedit /deletevalue {globalsettings} advancedoptions
и жмем Enter.

Все – теперь компьютер будет загружаться как обычно, без каких-либо предзагрузочных состояний и меню.
Отличного Вам дня!