 Опубликовано:
Используемые термины: Zabbix, Windows.
В нашем примере мы установим агент для Zabbix на Windows в качестве службы, а также сделаем минимальную настройку для отправки данных на сервер.
Загрузка агента с официального сайта
Установка агента
Из пакета MSI
Из архива
Настройка брандмауэра
Проверка подключения к агенту
Другие статьи про Zabbix
Загрузка агента
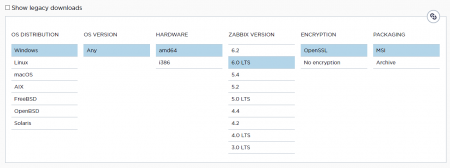
Переходим на страницу загрузки агента Zabbix и выбираем платформу операционной системы (x32 или x64) и версию агента, например:

* помимо этого, мы можем выбрать вариант дистрибутива: с использованием шифрования или нет, а также файл установки — msi пакет или архив. В данном примере мы выбрали версию 5.
В зависимости от выбранных критериев поиска агента, ниже мы можем увидеть несколько вариантов для загрузки. Находим нужный и кликаем по DOWNLOAD для скачивания файла:

Ждем окончания загрузки и переходим к установке.
Установка агента
В зависимости от загрузки типа пакета (MSI или архив) будут разные методы установки. Рассмотрим оба.
Установка из MSI-пакета
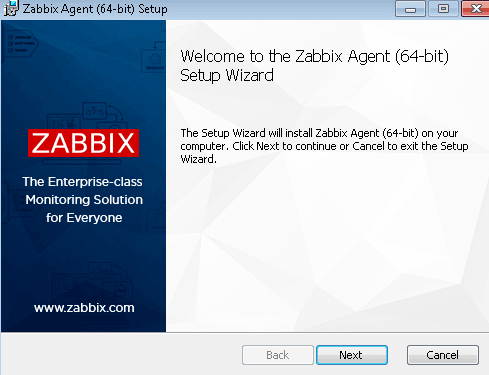
Это удобный вариант, который позволит установить агента с помощью мастера. Чтобы начать, кликаем дважды по скачанному пакету и в окне приветствия нажимаем Next:

Принимаем лицензионное соглашение, установив галочку I accept the terms in the License Agreement и нажимаем Next:

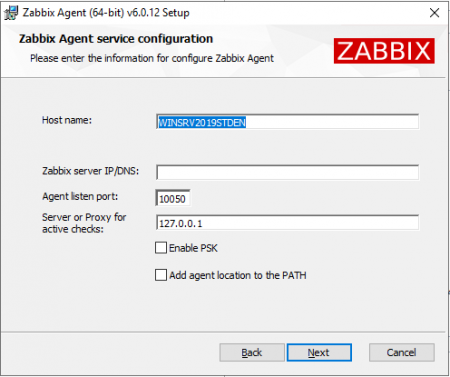
В следующем окне оставляем имя компьютера, на который устанавливается агент и вводим имя или IP-адрес сервера zabbix, после кликаем по Next:

* в данном примере имя нашего компьютера Windows PC, а сервера — zabbix-server.dmosk.local.
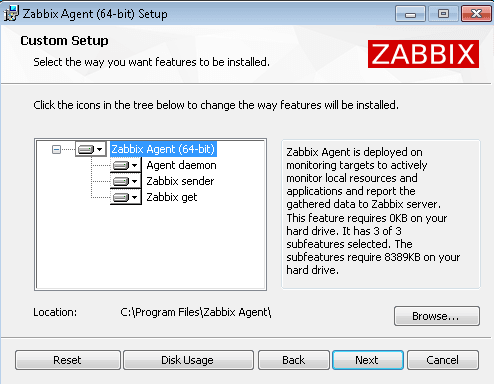
Выбираем компоненты, которые хотим установить — можно просто оставить все по умолчанию и нажимаем Next:

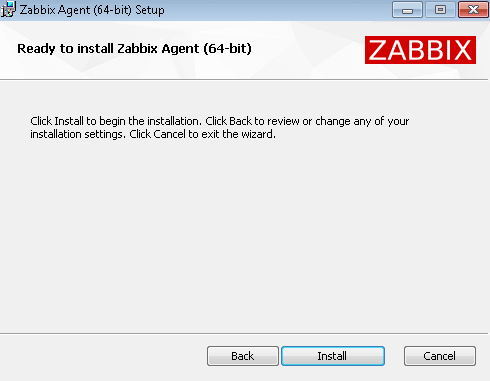
Подтверждаем установку, кликая по Install:

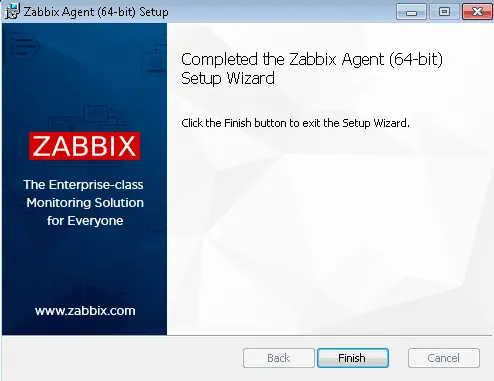
Ждем завершения процесса — агент установлен.
Установка из архива
Данный метод требует дополнительных манипуляций, но с его помощью можно автоматизировать процесс. Мы рассмотрим только установку.
Распаковываем содержимое скачанного архива в каталог, где будут находиться файлы программы, например в C:\Program Files\Zabbix Agent. В итоге, у нас получится:

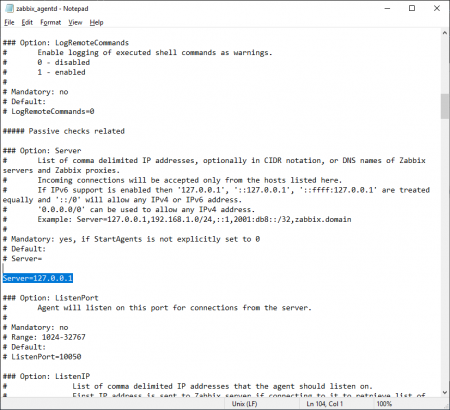
Открываем WordPad от администратора и в нем открываем конфигурационный файл conf/zabbix_agentd.conf и правим опцию для сервера zabbix — находим строку:
Server=127.0.0.1
… и меняем ее на:
Server=zabbix-server.dmosk.local
* где zabbix-server.dmosk.local — имя сервера Zabbix.
Теперь открываем командную строку от администратора и выполняем команду для установки агента:
«C:\Program Files\Zabbix Agent\bin\zabbix_agentd.exe» —config «C:\Program Files\Zabbix Agent\conf\zabbix_agentd.conf» —install
* где C:\Program Files\Zabbix Agent — папка, куда мы распаковали архив.
Мы должны увидеть что-то на подобие:
zabbix_agentd.exe [468]: service [Zabbix Agent] installed successfully
zabbix_agentd.exe [468]: event source [Zabbix Agent] installed successfully
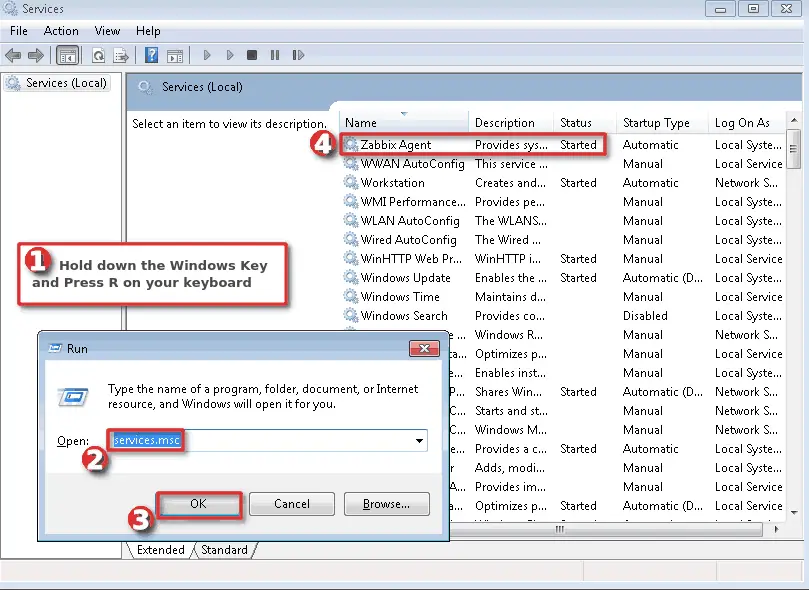
Теперь открываем службы Windows и находим «Zabbix Agent» — кликаем по ней правой кнопкой мыши и выбираем Запустить:

Установка завершена.
Настройка брандмауэра
Если в нашей системе работает брандмауэр Windows, необходимо разрешить порт 10050 или приложение zabbix agent.
Для этого переходим в Панель управления — Система и безопасность — Брандмауэр Windows (или вводим команду control /name Microsoft.WindowsFirewall). Кликаем по ссылке Разрешение взаимодействия с приложением или компонентов в брандмауэре Windows — добавляем наше приложение zabbix_agentd в исключение.
Это же действие можно выполнить в powershell — запускаем ее от администратора и вводим команду:
New-NetFirewallRule -DisplayName «Разрешить приложение Zabbix Agent» -Direction Inbound -Action Allow -EdgeTraversalPolicy Allow -Program «C:\Program Files\Zabbix Agent\bin\zabbix_agentd.exe»
Или мы можем добавить в исключение порт. Это можно сделать также из командной строки poweshell:
New-NetFirewallRule -DisplayName «Разрешить порт 10050 для Zabbix» -Direction Inbound -Action Allow -EdgeTraversalPolicy Allow -Protocol TCP -LocalPort 10050
Проверка работы
Чтобы убедиться в работоспособности агента, мы можем зайти на сервер zabbix и выполнить подключение по telnet, например, командой:
telnet 192.168.1.15 10050
* где 192.168.1.15 — IP-адрес компьютера с установленным Zabbix.
Мы должны увидеть
Connected to nr-fs-06.
Escape character is ‘^]’.
.. и через небольшой интервал времени:
Connection closed by foreign host.
Но если агент не запущен или не работает, мы увидим ошибку:
telnet: connect to address …: Connection refused
В панели сервера в узлах сети при корректной установке и настройке, мы также должны увидеть доступность компьютера по агенту:

Читайте также
Другие инструкции по Zabbix:
1. Установка и настройка Zabbix-агента на CentOS
2. Установка и начальная настройка сервера мониторинга Zabbix на Ubuntu Server
3. Настройка сервера Zabbix 5 на CentOS 8
In this tutorial, I will show you how to install Zabbix agent for Windows server using an MSI Installer package and how to monitor Windows server with Zabbix monitoring system.
Using this guide you can monitor almost the entire Windows OS family: Windows server 2012 R2, Windows Server 2016, Windows Server 2019, Windows 10, Windows 8 and Windows 7.
Installation is quite simple, just download and install the Zabbix agent MSI installer following steps 1 and 2, but if you want to learn more, read the full guide.
In short, Zabbix agent is a lightweight application that can collect various performance data from the operating system – such as CPU, memory, disk, and network interface utilization – and forward it to a central point (server) for storage and visualization. It runs on any modern operating system and is very flexible because its functionality can be extended with scripts and modules.
You can read more about the Zabbix agent on the Zabbix official site and if you stumbled on this tutorial by accident and you never heard of the Zabbix monitoring system, then stop whatever you doing and install it on your favorite Linux distribution in less than 10 minutes: CentOS/RHEL, Ubuntu, Debian, Rasberry Pi.
Need help with installing Zabbix agent on Linux OS? Check out this guide:
Zabbix Agent (Linux): Install on Ubuntu, CentOS, RHEL, Debian, etc.
Table of Contents
- Step 1: Download Zabbix Agent Installer for Windows (msi)
- Step 2: Install Zabbix Agent on Windows using MSI installer
- Step 3: Add Windows host to Zabbix monitoring system
- Step 4: Check if Zabbix Agent is working correctly
- Step 5: Restart Zabbix Agent service on Windows
- Step 6: Configure auto registration for Windows Zabbix Agents
- Step 7: Configure PSK encryption on Zabbix Agent (Windows)
- a. Generate PSK key
- b. Configure Zabbix agent to support PSK encryption
- c. Enable PSK encryption on the agent in Zabbix frontend
- Step 8: Install Zabbix agent via Windows command-line (CMD)
- a. Run CMD as administrator
- b. Download Zabbix agent
- c. Change directory and set installation folder
- d. Install Zabbix agent using msiexec
- e. Example of Zabbix agent installation with additional options
- Step 9: Understanding Active vs Passive Zabbix Agent mode
Step 1: Download Zabbix Agent Installer for Windows (msi)
In this tutorial, I will use the latest Zabbix agent 5.0.2 LTS version, that version is compatible with Zabbix server 5.x or newer.
| Windows Zabbix Agent v1 LTS v6.0.x | Download: 64-bit or 32-bit |
| Windows Zabbix Agent v2 LTS v6.0.x (recommended) | Download: 64-bit or 32-bit |
I always recommend using the latest LTS version to take full advantage of new features and improved performance so make sure to download installer zabbix_agent2-6.0.7-windows-amd64-openssl.msi for 64-bit Windows or zabbix_agent2-6.0.7-windows-i386-openssl.msi for 32-bit Windows.
And don’t try to install a 32-bit package on 64-bit Windows because it won’t work!
Step 2: Install Zabbix Agent on Windows using MSI installer
I will install Zabbix Agent on Windows server using installation wizard but if you prefer command-line based installation check out section “Install Zabbix agent via Windows command-line (CMD)”
Just to make clear, in this tutorial I will use Zabbix server with IP address 192.168.5.43 to monitor Windows machine called w01services with IP address 192.168.5.22.
Double click on Zabbix MSI installer that you have downloaded in the previous step and click “Next” just as shown in the image below.
Accept the terms and click the “Next” button.

Define custom “Host name” or use fully qualified domain name (FQDN) of the Windows machine in the “Host name” field. Then enter IP address of the Zabbix server under “Zabbix server IP/DNS” and “Server or Proxy for active checks” field and you are done.
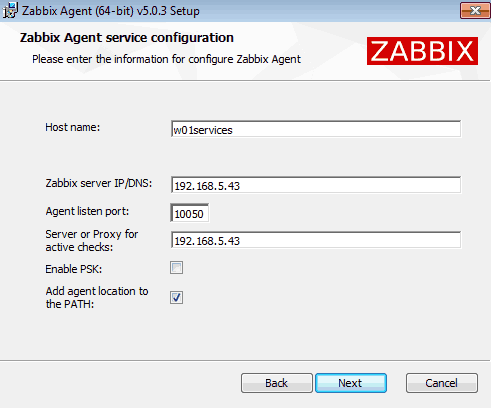
Select “Add agent location to the PATH” and go through the rest of the installation by clicking “Next“, “Install” and “Finish“.
You don’t need to configure Windows firewall manually because the MSI installer will automatically add a firewall rule to permit Zabbix TCP port 10050.
Finally, we need to check that the Zabbix agent is up and running.
Hold down the “Windows key” and press “R” on the keyboard, type “services.msc“, press “OK” and check the “Status” column for “Zabbix Agent” service exactly as shown in the picture below. Status should be “Started” if the installation was successful.
WELL DONE!
You have successfully installed and configured Zabbix agent on Windows OS!
Now it’s time to add that Windows host to Zabbix monitoring system.
Step 3: Add Windows host to Zabbix monitoring system
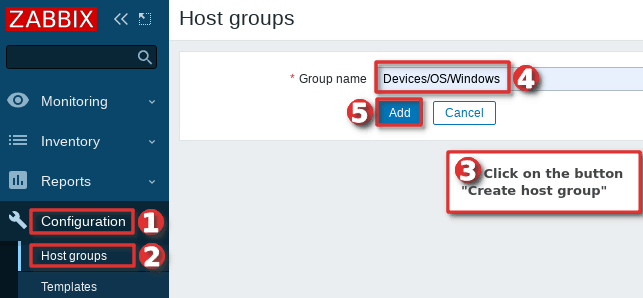
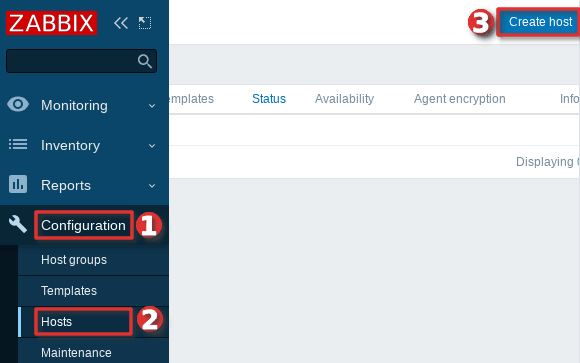
You can add a host to existing host group or you can create a new host group for your Windows servers. I will create host group “Devices/OS/Windows“ using “Host groups” option under “Configuration” section on the Zabbix frontend. Click “Create host group” button, define “Group name” and click “Add” (you only need to create host group once):
Navigate to “Host” menu under “Configuration” tab and then click “Create host” option to create a host in Zabbix:
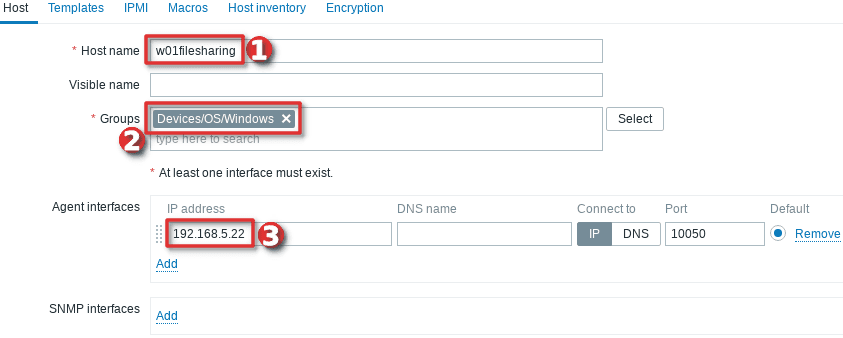
Define “Hostname” and set “Groups” using your newly created host group. Then set the IP address of the Windows server under “Agent interfaces” section
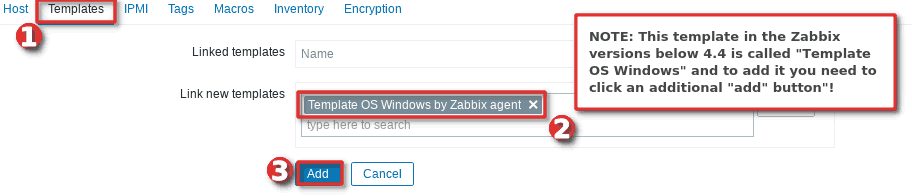
Switch to tab “Templates” and choose the “Template OS Windows by Zabbix agent” template under section “Link new template” by typing “OS Windows …”.
And you’re done! If you are interested in automating this whole process of adding Windows hosts to Zabbix see the section “Configure auto registration for Windows Zabbix agents“
Note that in this tutorial I m using a template “Template OS Windows by Zabbix agent” that can only monitor passive Zabbix agents. However, if you want to monitor your host using Zabbix agents in active mode use a template called “Template OS Windows by Zabbix agent active“. Check out the section “Understanding Active vs Passive Zabbix Agent mode” to learn more about the differences between the active and passive agent mode.
Step 4: Check if Zabbix Agent is working correctly
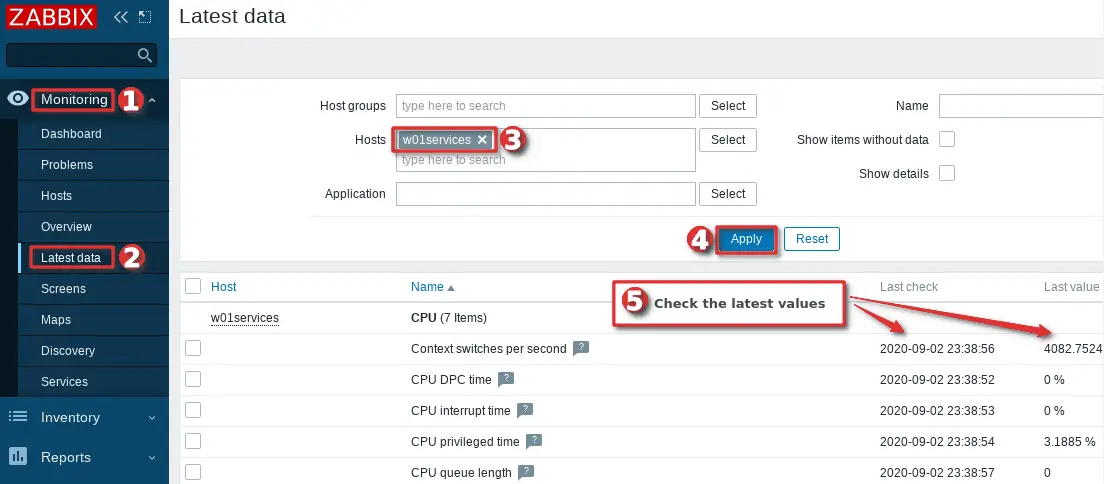
You can check that the Zabbix agent is working properly by using the “Latest Data” option on the Zabbix frontend. Wait up to 5 minutes after you have installed and started Zabbix agent to allow for data to be collected. Look at columns “Last check” and “Latest value” and if they are updating then the agent is working.
Your agent should be working and collecting data by now, but if you experience any problems, restart Zabbix agent service and check the log “C:\Program Files\zabbix\zabbix_agentd.log“. And if there is nothing unusual in the log file then check the firewall – make sure that TCP port 10050 on the host (where Zabbix agent is installed) and TCP port 10051 on the Zabbix server side are open.
CONGRATULATIONS!
You have successfully installed Zabbix Agent and your Windows server is being monitored!
No need to do anything else as other steps are optional!
CONTINUE TO LEARN MORE:
How to manage Zabbix agent service on Windows
Auto registration of Zabbix agents (Windows OS)
Learn how to Secure Zabbix Agent
Alternative Zabbix agent installation via Windows command-line (CLI)
Understanding Active vs Passive Zabbix Agent mod
Step 5: Restart Zabbix Agent service on Windows
In the previous steps, we learned how to check the status of Zabbix agent service using the “services.msc” option, and now we will learn how to use the command line interface (CMD) to stop or start the agent and check its status.
Click on “Windows Start” button and type “cmd” in the search bar, right-click on “cmd” icon and select option “Run as administrator” and use these commands to start/stop the agent:
net stop "Zabbix Agent"
net start "Zabbix Agent"
And to check Zabbix agent service status use the command:
sc query "Zabbix Agent" | findstr /i "STATE"
You should get status “RUNNING” if the Zabbix agent is up and running!
Step 6: Configure auto registration for Windows Zabbix Agents
Adding one or two hosts to Zabbix manually is not a big problem. However, what if you need to add more servers to Zabbix? Or you just want to automate that tedious process of adding Windows hosts to Zabbix and linking them with the correct template and host group?
Don’t worry, you don’t have to write the script because Zabbix has a tool called “Auto registration”.
Before we configure Zabbix frontend, make sure that all of your Zabbix agents have “HostMetadata=Windows” line in their configuration file (default path: “C:\Program Files\zabbix\zabbix_agentd.conf“). And if that line does not exist, add it and restart the Zabbix Agent afterward. You can automate that via CLI like this:
echo HostMetadata=Windows >> C:\"Program Files"\zabbix\zabbix_agentd.conf
net stop "Zabbix Agent"
net start "Zabbix Agent"
In the future always install the Zabbix agent on Windows with the “HostMetadata=Windows” parameter if you are planning to use the auto-registration feature!
Now that we’ve clarified that let’s configure auto-registration on the Zabbix frontend.
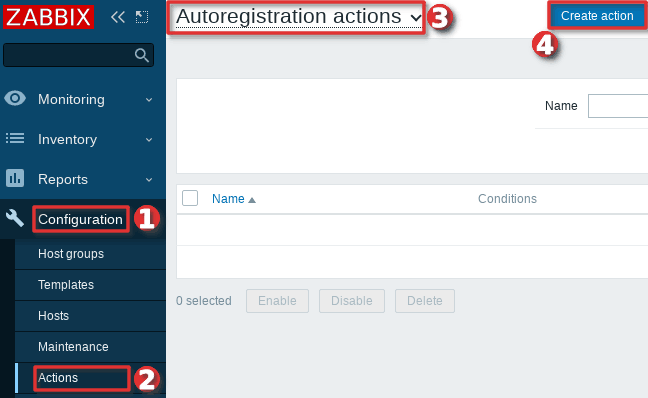
Go to the “Actions” tool under the “Configuration” section, then select “Auto registration” from the dropdown menu and click the “Create action” button.
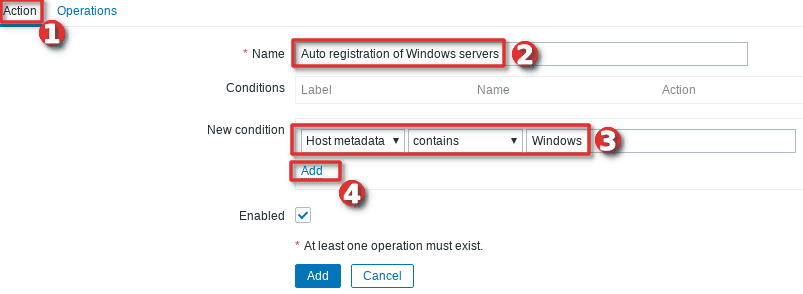
On the “Action” tab define the “Name” of the action and add a “New condition” that will check if the “Host metadata” contains the word “windows”.
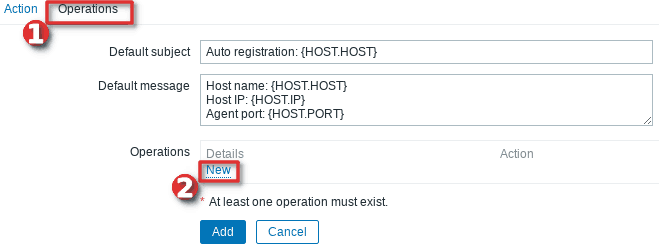
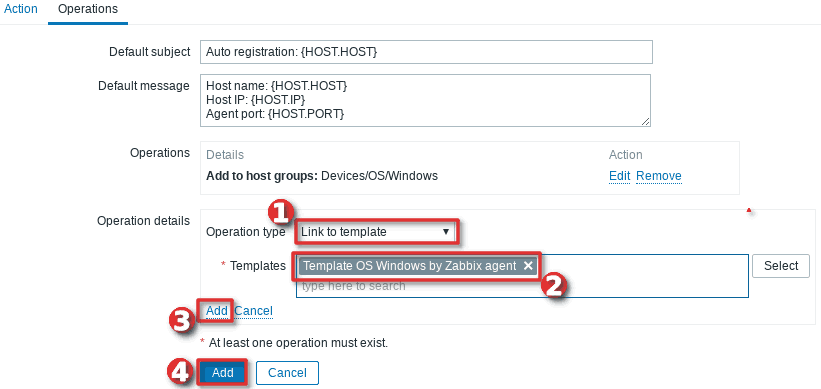
Then, change tab to “Operations” and add new operation.
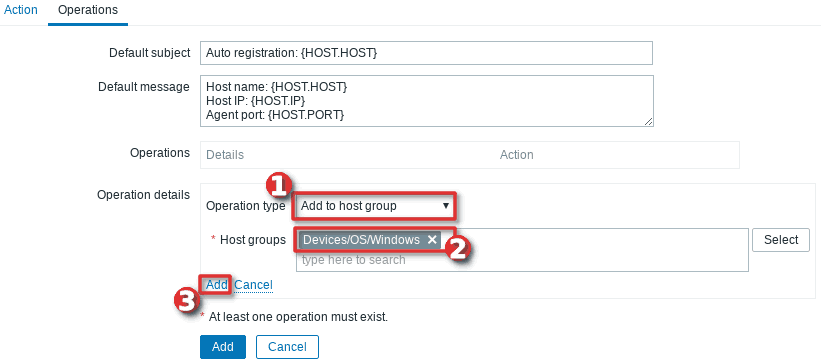
Define “Operation type” as “Add to host group” and then select to which “Host groups” will Windows hosts be added when discovered. In my case, I will use my custom host group called “Devices/OS/Windows“.
After that, you need to add a new operation by setting “Link to the template” as “Operation type” and then select which templates will be linked with the newly discovered Windows hosts. In my example, I will use template “Template OS Windows by Zabbix agent” (passive checks)
Well done! Auto-registration is configured. Wait a few minutes and your Windows server should appear in Zabbix. From now on, every time you install a Zabbix agent on a Windows server, it will automatically be added to the Zabbix and linked with the appropriate host group and template.
Note, that you can add anything you want to the “HostMetadata” parameter. For example, you can have a host that has in Zabbix agent configuration file defined “HostMetadata=Windows:Tomcat:Prod” or another with “HostMetadata=Windows:MSSQL:Test“. For the first host, you can configure auto-registration to add to host groups: “Windows”, “Web servers” and “Production servers” and to link templates that can monitor Windows and Tomcat server. And the second host can be added to host groups: “Windows”, “Databases”, and “Test servers” and linked with templates that can monitor Windows server and Microsoft SQL database.
Using PSK encryption on the Zabbix agents? Then there is one more step left, you need to add your PSK identity and PSK key using the “Auto Registration” option under the “Administration“→”General” section just as shown in the image below:

From now on, during the auto registration process, Zabbix will configure provided PSK identity and key on each registered host.
Step 7: Configure PSK encryption on Zabbix Agent (Windows)
Zabbix supports encrypted communications between Zabbix server and Zabbix agent using Transport Layer Security (TLS) protocol v.1.2. You can use certificate-based and pre-shared key-based encryption (PSK), but in this tutorial we will configure PSK encryption.
In this step, I will show you how to configure PSK encryption on an already installed Zabbix agent, but keep in mind that all of these configurations can be configured during the installation
a. Generate PSK key
Generate 256-bit (32 bytes) PSK key with openssl command on Zabbix server (or use some other tool on Windows):
$ openssl rand -hex 32
1b38eac9d870a319f201fb1da989c081faba993e3d91940193224a100cdcdb86
On Windows server, create a new text file “ZabbixAgentPSK.txt” in the default Zabbix agent installation folder (“C:\Program Files\zabbix“) and put that PSK key in the first line of the file. Don’t forget to save the file before closing.
b. Configure Zabbix agent to support PSK encryption
Open “C:\Program Files\zabbix\zabbix_agentd.conf” file with text editor (Notepad++) and add this configuration anywhere in file:
TLSConnect=psk
TLSAccept=psk
TLSPSKFile=C:\Program Files\zabbix\ZabbixAgentPSK.txt
TLSPSKIdentity=ZBX-AGENT-PSK-ID
Save and exit file. Keep in mind that “TLSPSKIdentity” can be anything, so for security reasons set something else – don’t use mine!
Don’t forget to restart Zabbix agent service after changing the configuration file!
c. Enable PSK encryption on the agent in Zabbix frontend
Communication between Zabbix agent and server is not yet encrypted because we have enabled PSK encryption on the agent side but not on the server side.
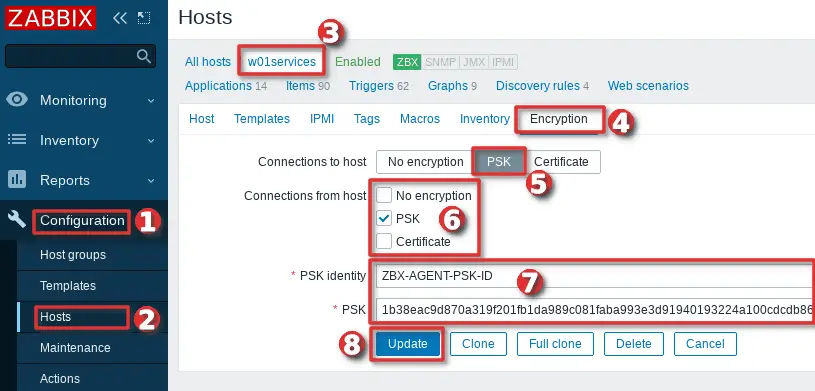
We need to enable encryption on the server side so go to web frontend and select your “Hosts” tab under the “Configuration” section and find and click on your Windows hosts.
On the “Encryption” tab set PSK under “Connections from hosts” option and copy/paste “PSK identity” and “PSK” (key) that is configured on the Zabbix agent.
When you are done with configuration click the “Update” button just as shown in the image below.
Keep in mind, that you can automate the configuration of the host encryption (PSK) on the frontend using the Zabbix auto registration process.
Step 8: Install Zabbix agent via Windows command-line (CMD)
This step is for those who prefer command-line based installation instead of wizard-based installation.
a. Run CMD as administrator
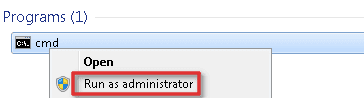
Click on “Windows Start” button and type “CMD” in the search bar, right-click on “cmd” and select option “Run as administrator“:
b. Download Zabbix agent
Download installer zabbix_agent2-6.0.7-windows-amd64-openssl.msi for 64-bit Windows or zabbix_agent2-6.0.7-windows-i386-openssl.msi for 32-bit Windowsand save it on a “C:\” disk or somewhere else.
c. Change directory and set installation folder
Change directory to the path where you have downloaded the MSI file and set the installation folder with commands:
cd C://
SET INSTALLFOLDER=C:\Program Files\zabbix
d. Install Zabbix agent using msiexec
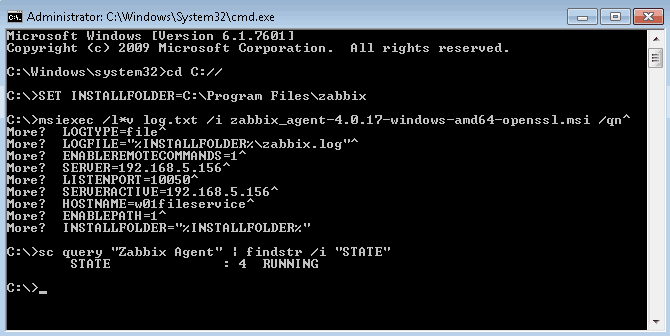
Here is an example of Zabbix agent installation that will work for most people, just change parameteres “SERVER“, “SERVERACTIVE” and “HOSTNAME” to suit your enviroment.
msiexec /l*v log.txt /i zabbix_agent2-6.0.7-windows-amd64-openssl.msi /qn^
LOGTYPE=file^
LOGFILE="%INSTALLFOLDER%\zabbix.log"^
SERVER=192.168.5.156^
LISTENPORT=10050^
SERVERACTIVE=192.168.5.156^
HOSTNAME=w01fileservice^
ENABLEPATH=1^
INSTALLFOLDER="%INSTALLFOLDER%"
Check “Zabbix agent” service status with the command:
sc query "Zabbix Agent" | findstr /i "STATE"
If the Zabbix agent is up and running then the status should be “RUNNING“.
Note, if you are planning to use the auto-registration feature don’t forget to add “HostMetadata=Windows” parameter to “zabbix_agentd.conf” and restart Zabbix agent afterward because Zabbix CLI installation doesn’t support “HostMetadata” parameter:
echo HostMetadata=Windows >> C:\"Program Files"\zabbix\zabbix_agentd.conf
net stop "Zabbix Agent"
net start "Zabbix Agent"
e. Example of Zabbix agent installation with additional options
You can set almost any Zabbix agent parameter during installation, here is one example of an installation where many parameters are used.
SET INSTALLFOLDER=C:\Program Files\zabbix

msiexec /l*v log.txt /i zabbix_agent2-6.0.7-windows-amd64-openssl.msi /qn^
LOGTYPE=file^
LOGFILE="%INSTALLFOLDER%\zabbix.log"^
SERVER=10.10.10.162^
LISTENPORT=10055^
SERVERACTIVE=10.10.10.162^
HOSTNAME=cmr_server^
TLSCONNECT=psk^
TLSACCEPT=psk^
TLSPSKIDENTITY=CompanyPSKID^
TLSPSKFILE="%INSTALLFOLDER%\company_key.psk"^
TLSCAFILE="c:\temp\file1.txt"^
TLSCRLFILE="c:\temp\fil2.txt"^
TLSSERVERCERTISSUER="Company CA"^
TLSSERVERCERTSUBJECT="Company Cert"^
TLSCERTFILE="c:\temp\file4.txt"^
TLSKEYFILE="c:\temp\file5.txt"^
ENABLEPATH=1^
INSTALLFOLDER="%INSTALLFOLDER%"
SKIP=fw
Parameter “SKIP=fw” means that the firewall exception rule will not be added. Explanations of other parameters can be found in the official Zabbix documentation section Zabbix Agent (Windows).
Step 9: Understanding Active vs Passive Zabbix Agent mode
When using a Zabbix agent in active mode, it will connect to the Zabbix server via port 10051 to retrieve configuration and send data. This is a great feature that allows an active Zabbix agent to work behind the firewall and to offload the Zabbix server in large environments.
On the other hand, if you use a Zabbix agent in passive mode Zabbix server will initiate a connection via port 10050 and retrieve data from the agent. The Zabbix server will do this for every metric (item) every few minutes – which is very inefficient! Because of this, active mode is more recommended.
An additional advantage of the Zabbix agent in active mode is that it can read logs from the device and that is not possible if the Zabbix agent is used in passive mode.
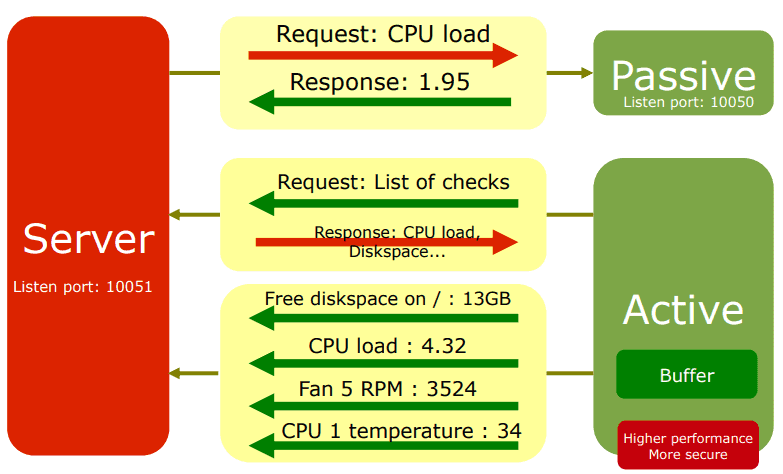
You can detect on Zabbix host if the agent is working in active or passive mode. Passive mode will show red or green “ZBX” icon in the agent status bar and active mode will show grey “ZBX” icon:

Learn how to setup Zabbix email notifications and escalations in a few minutes!

Установка Zabbix agent на Windows
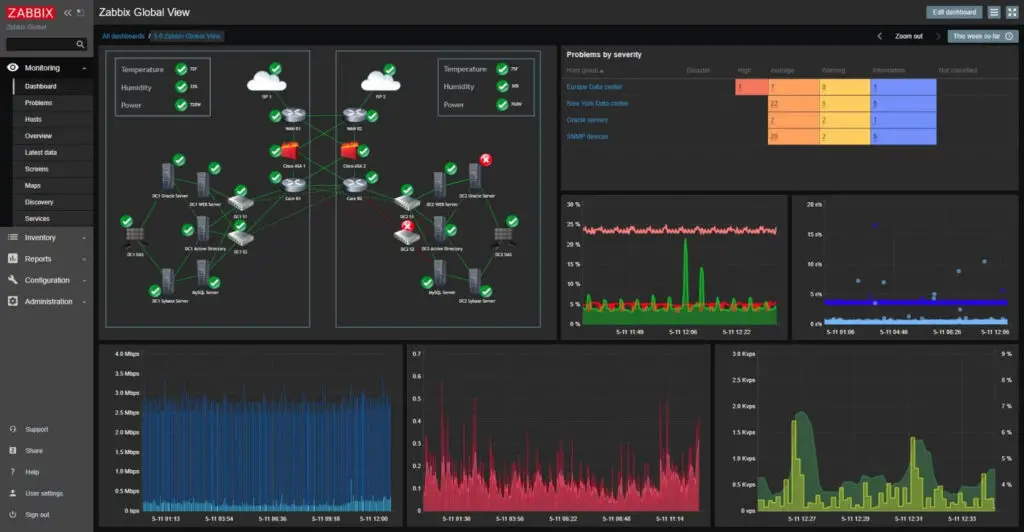
Zabbix способен обеспечить мониторинг множества разных систем, давайте посмотрим как присматривать за нашими серверами, работающими на Windows. Для этого нам понадобится скачать программу-агент и настроить её на отправку данных на наш сервер.
Для установки нам понадобится скачать инсталлятора или архив с программой на официальном сайте.
Выберите подходящую вашей конфигурации и вашему серверу версию и скачайте её (6.0 LTS в нашем случае).

Есть два способа которым мы можем установить агент, с помощью инсталлятора или в ручную, из архива, давайте начнем с инсталлятора.
Установка через инсталлятор
Запускайте MSI файл, вводите имя хоста и адрес сервера Zabbix, галочка enabling PSK не позволит агенту посылать данные серверам без получения от сервера заранее подготовленного ключа безопасности, мы рассмотрим эту возможность в другой статье. Продолжаем установку пока всё не будет готово.

И наконец проверяем видит ли Zabbix этот сервер.

Всё отлично.
Установка из архива
Ручная установка может оказаться полезной если вы хотите каким то образом автоматизировать процесс либо, вам удобнее заняться более глубокой настройкой.
После скачивания архива распакуйте его содержимое в папку в которую вы хотите установить агент.
По умолчанию конфигурационный файл находится в корне диска C:\, поэтому переместим файл zabbix_agentd.conf file из папки \bin туда, либо изменим его положение на удобное нам при установке службы.
Давайте отредактируем файл конфигурации: мы хотим вписать адрес нашего сервера в строчку Server=.

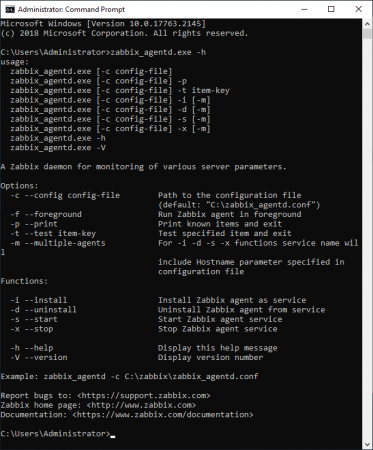
Теперь запустим командную строку от имени администратора и введем путь_к_агенту\zabbix_agentd.exe -h для того чтобы увидеть полный список комманд.

Теперь воспользуемся ключом -i для установки агента как службы, так же можно воспользоваться -с как на скриншоте для смены положения файла конфигурации на удобное вам.


Теперь воспользуемся zabbix_agentd.exe -s, чтобы запустить службу
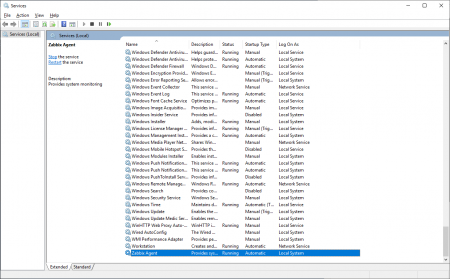
Пуск, службы и проверяем запустилась ли служба, и поставилась ли в автозапуск.

Теперь зайдем в панель управления, брэндмауэр Windows, разрешение взаимодействия с приложением или компонентом в брандмауре защитника Windows, Разрешить другое приложение, добавляем файл заббикс агента.

В отличие от установки через инсталлятор, нам понадобится добавлять узел на сервер в ручную, но об этом в другой статье.
Итоги
В этой статье мы рассмотрели простые способы установки Zabbix агента на сервер под управлением ОС Windows.
Аverage rating : 5
Оценок: 1
191028
Санкт-Петербург
Литейный пр., д. 26, Лит. А
+7 (812) 403-06-99
![]()
700
300
ООО «ИТГЛОБАЛКОМ ЛАБС»
191028
Санкт-Петербург
Литейный пр., д. 26, Лит. А
+7 (812) 403-06-99
![]()
700
300
ООО «ИТГЛОБАЛКОМ ЛАБС»
![]()
700
300
При установке агента Zabbix, требуется заполнить ряд параметров, например, абсолютно точно необходимо указать ip-адрес или имя zabbix сервера, а если используются активные проверки, то и в поле для активных проверок необходимо указать тоже самое. Это что касается ручной установки через GUI.

Но что делать, если мы хотим ставить агента в автоматическом режиме, не указывая руками эти параметры? (по умолчанию подставляются значения сервера 127.0.0.1). Для этого следует ставить msi-пакет следующей командой:
msiexec /i "zabbix_agent-4.4.0-win-amd64-openssl.msi" /qn^ SERVER=192.168.50.8 SERVERACTIVE=192.168.50.8
где мы указываем имя msi пакета для установки, а также имя/ip-адрес сервера
Так, например, при наличии SCCM, можно прописать эту команду в качестве установки, либо устанавливать другими удобными способами, включая скрипты powershell или через GPO для массового распространения на все хосты сети.

Ниже привожу список всех параметров, взятых со страницы документации
SET INSTALLFOLDER=C:\Program Files\za
msiexec /l*v log.txt /i zabbix_agent-4.0.6-x86.msi /qn^
 LOGTYPE=file^
 LOGFILE="%INSTALLFOLDER%\za.log"^
 ENABLEREMOTECOMMANDS=1^
 SERVER=192.168.6.76^
 LISTENPORT=12345^
 SERVERACTIVE=::1^
 HOSTNAME=myHost^
 TLSCONNECT=psk^
 TLSACCEPT=psk^
 TLSPSKIDENTITY=MyPSKID^
 TLSPSKFILE="%INSTALLFOLDER%\mykey.psk"^
 TLSCAFILE="c:\temp\f.txt1"^
 TLSCRLFILE="c:\temp\f.txt2"^
 TLSSERVERCERTISSUER="My CA"^
 TLSSERVERCERTSUBJECT="My Cert"^
 TLSCERTFILE="c:\temp\f.txt5"^
 TLSKEYFILE="c:\temp\f.txt6"^
 ENABLEPATH=1^
 INSTALLFOLDER="%INSTALLFOLDER%"
 SKIP=fw
или
msiexec /l*v log.txt /i zabbix_agent-4.4.0-x86.msi /qn^
 SERVER=192.168.6.76^
 TLSCONNECT=psk^
 TLSACCEPT=psk^
 TLSPSKIDENTITY=MyPSKID^
 TLSPSKVALUE=1f87b595725ac58dd977beef14b97461a7c1045b9a1c963065002c5473194952
Полезные ссылки
страница документации по установке zabbix агента:
https://www.zabbix.com/documentation/4.4/ru/manual/installation/install_from_packages/win_msi
Using another OS?
Select the desired version or distribution.
Zabbix can monitor all kinds of systems so let’s see how to look after our windows servers. To do so we will download an agent program and configure it to send data to our server.
To install it we’ll need to get the template configuration file and installer at Zabbix official site.
https://www.zabbix.com/download_agents
Choose the file compatible with your configuration and Zabbix version and download it. (6.0 LTS in this example’s case).
There are two ways to install the agent, via MSI installer or manually by extracting it from the archive. Let’s see into both
MSI installation
Proceed to installation, and enter your hostname and Zabbix server address, enabling PSK (Pre-Shared Key) won’t allow monitoring this server’s data until the agent gets a pre-shared key from the server trying to do so, we will see into this in other articles. Hit next until installation is complete.
And finally, let’s check if our Zabbix server sees this host
Everything is alright.
Archive Installation
РThis way may be useful if you want to make it automatic in any way or have other preferences.
After you download the archive file, extract all of its contents into a folder you want your agent installed in.
By default, the agent wants its config file in C:\ folder, so take zabbix_agentd.conf file from the \bin folder and put it there.
Let’s edit it a little: We want to change the Server option to our Zabbixix server’s IP.
Next, run command prompt as an administrator and run \zabbix_agentd.exe -h to see a complete list of commands.
Now add -i key to install the service, also you can change the location where it will look for .conf file with -c.

After that run zabbix_agentd.exe -s to start the service
Start → services check if agent service is running and the startup type is automatic.
And now go to control panel→ windows defender firewall, allow another app, and add agent into allowed apps.

Summary
In this article, we learned how to install the Zabbix agent on Windows to start our monitoring.
Аverage rating : 4
Rated by: 3
1101
CT Amsterdam
The Netherlands, Herikerbergweg 292
+31 20 262-58-98
![]()
700
300
ITGLOBAL.COM NL
1101
CT Amsterdam
The Netherlands, Herikerbergweg 292
+31 20 262-58-98
![]()
700
300
ITGLOBAL.COM NL
![]()
700
300