To manage all aspects of the input and display language settings on your Windows 11 PC, use the following methods.
To switch the keyboard layout you’re using, press and hold the Windows key and then repeatedly press the Spacebar to cycle through all your installed keyboards. (If this doesn’t do anything, it means you have only one installed.)
You can also select the language abbreviation in your taskbar then choose the language or input method you want to use.
Note: In the input field, press the Windows logo key + period (.) to access the Emoji & more keyboard, if your language supports it.
If you can’t find the keyboard layout you want, you may have to add a new keyboard.
Adding an input language lets you set a language-preference order for websites and apps, as well as change your keyboard language.
-
Select the Start > Settings > Time & language > Language & region.
-
Select the language that has the keyboard you want, then select Options.
-
Select Add a keyboard and choose the keyboard you want to add. If you don’t see the keyboard you want, you may have to add a new language to get additional options. If this is the case, go on to step 4.
-
Return to the Language settings page, go to Preferred languages, then select Add a language.
-
Choose the language you want to use from the list, then select Next.
-
Review any language features you want to set up or install, and select Install.
«Add a keyboard» shortcut
The display language you select changes the default language used by Windows features like Settings and File Explorer.
-
Select Start > Settings > Time & language > Language & region.
-
Choose a language from the Windows display language menu.
«Change your display language» shortcut
If a language is listed under Preferred languages but doesn’t appear on the Windows display language list, you’ll first need to install its language pack (if it’s available).
-
Select Start > Settings > Time & language > Language & region.
-
In Preferred languages, select Add a language, enter the language you want, then select Next.
-
Select Download from the Download language pack option.
-
After the language pack is installed, select Back.
-
Choose a language from the Windows display language menu.
«Install a language pack» shortcut
If you receive an «Only one language pack allowed» or «Your Windows license supports only one display language» message, you have a single language edition of Windows 10. Here’s how to check your Windows 10 language edition:
-
Select Start > Settings > About, and then go to the Windows specification section.
-
If you see Windows 11 Home Single Language next to Edition, you have a single language edition of Window 11, and you can’t add a new language unless you purchase an upgrade to either Windows 11 Home or Windows 11 Pro.
Upgrade to Windows 11 Home or Windows 11 Pro
-
Select Start > Settings > Time & language > Language & region.
-
Under Preferred languages, select the language you want to remove, and then select Remove.
-
To remove an individual keyboard, select the language (see step 2), select Options, scroll down to the Keyboards section, select the keyboard you want to remove, and select Remove.
To manage all aspects of the input and display language settings on your Windows 10 device, use the following methods.
To switch the keyboard layout you’re using in Windows 10, press and hold the Windows key and then repeatedly press the Spacebar to cycle through all your installed keyboards. (If this doesn’t do anything, it means you have only one installed.)
You can also select the language abbreviation on the far right of the taskbar and then choose the language or input method you want to use.
Note: In the input field, press Windows +period (.) to access the emoji keyboard, if your language supports this.
If you can’t find the keyboard layout you want, you may have to add a new keyboard.
Adding an input language lets you set a language-preference order for websites and apps, as well as change your keyboard language.
-
Select the Start button, then select Settings > Time & Language > Language.
-
Under Preferred languages, select the language that contains the keyboard you want, and then select Options.
-
Select Add a keyboard and choose the keyboard you want to add. If you don’t see the keyboard you want, you may have to add a new language to get additional options. If this is the case, go on to step 4.
-
Return to the Language settings page, and select Add a language.
-
Choose the language you want to use from the list, and then select Next.
-
Review any language features you want to set up or install, and select Install.
«Add a keyboard» shortcut
Some languages require additional language features
For some languages to work properly, you need an admin on your PC to install the language features. Here’s a list of the languages that are affected:
-
Microsoft IME – Primary keyboard of Japanese
-
Microsoft Pinyin – Primary keyboard of Chinese (Simplified, China), Primary keyboard of Chinese (Simplified, Singapore)
-
Microsoft Wubi – Secondary keyboard of Chinese (Simplified, China), Secondary keyboard of Chinese (Simplified, Singapore)
-
Microsoft Bopomofo – Primary keyboard of Chinese (Traditional, Taiwan), Secondary keyboard of Chinese (Traditional, Hong Kong SAR), Secondary keyboard of Chinese (Traditional, Macao SAR)
-
Microsoft ChangJie – Secondary keyboard of Chinese (Traditional, Taiwan), Secondary keyboard of Chinese (Traditional, Hong Kong SAR), Secondary keyboard of Chinese (Traditional, Macao SAR)
-
Microsoft Quick – Secondary keyboard of Chinese (Traditional, Taiwan), Primary keyboard of Chinese (Traditional, Hong Kong SAR), Primary keyboard of Chinese (Traditional, Macao SAR)
-
Bangla Phonetic – Secondary keyboard of Bengali (India)
-
Gujarati Phonetic – Secondary keyboard of Gujarati
-
Hindi Phonetic – Secondary keyboard of Hindi
-
Kannada Phonetic – Secondary keyboard of Kannada
-
Malayalam Phonetic – Secondary keyboard of Malayalam
-
Marathi Phonetic – Secondary keyboard of Marathi
-
Odia Phonetic – Secondary keyboard of Odia
-
Punjabi Phonetic – Secondary keyboard of Punjabi (Gurmukhi)
-
Tamil Phonetic – Secondary keyboard of Tamil (India)
-
Telugu Phonetic – Secondary keyboard of Telugu
The display language you select changes the default language used by Windows features like Settings and File Explorer.
-
Select the Start button, then select Settings > Time & Language > Language.
-
Choose a language from the Windows display language menu.
«Change your display language» shortcut
If a language is listed under Preferred languages but doesn’t appear on the Windows display language list, you’ll first need to install its language pack (if it’s available).
-
Select the Start button, then select Settings > Time & Language > Language.
-
Choose a language from the Add a language list under Preferred languages, and then select Options.
-
Select Download from the Download language pack option.
-
After the language pack is installed, select Back .
-
Choose a language from the Windows display language menu.
«Install a language pack» shortcut
If you receive an «Only one language pack allowed» or «Your Windows license supports only one display language» message, you have a single language edition of Windows 10. Here’s how to check your Windows 10 language edition:
-
Select the Start button, select Settings > About, and then scroll down to the Windows specification section.
-
If you see Windows 10 Home Single Language next to Edition, you have a single language edition of Window 10, and you can’t add a new language unless you purchase an upgrade to either Windows 10 Home or Windows 10 Pro.
Upgrade to Windows 10 Home or Windows 10 Pro
-
Select the Start button, then select Settings > Time & Language > Language.
-
Under Preferred languages, select the language you want to remove, and then click Remove.
-
To remove an individual keyboard, select the language in question (see step 2), select Options, scroll down to the Keyboards section, select the keyboard you want to remove, and click Remove.
Need more help?
Want more options?
Explore subscription benefits, browse training courses, learn how to secure your device, and more.
Communities help you ask and answer questions, give feedback, and hear from experts with rich knowledge.
Find solutions to common problems or get help from a support agent.
Clear any language preferences to add a Windows display language
by Claire Moraa
Claire likes to think she’s got a knack for solving problems and improving the quality of life for those around her. Driven by the forces of rationality, curiosity,… read more
Updated on
- Windows is a system that supports multiple languages, but the version you have installed on your computer can only support one language at a time.
- If you want to change the display language of your operating system, you need to purchase another license or perform a clean install.
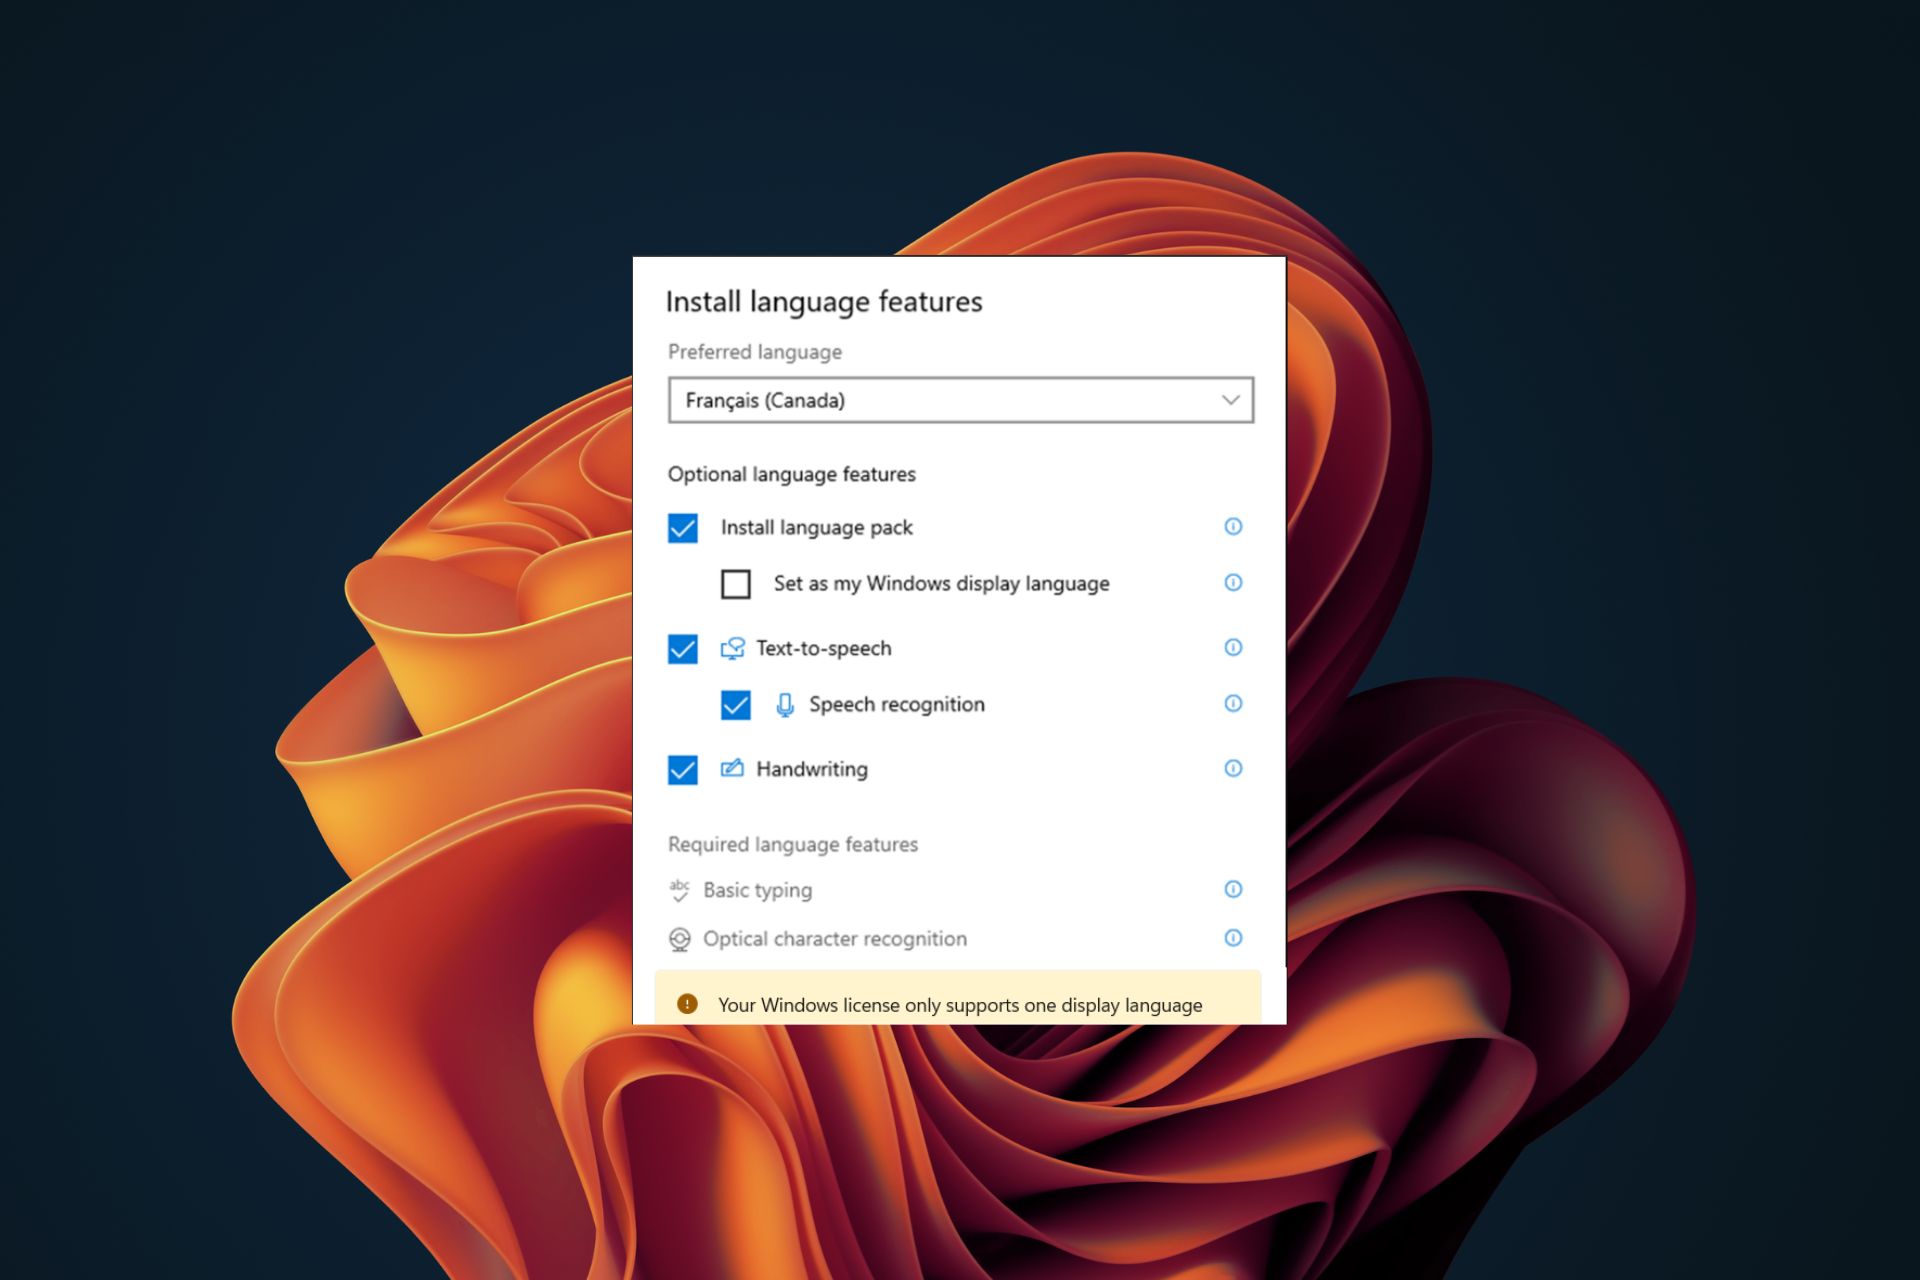
Given how many computers are in the world and the Windows operating system’s market share, it would be wrong to assume it only comes in one language. Windows 11 is a multilanguage OS. However, some versions of Windows licenses only allow one language.
You need to be careful, especially if you don’t speak the default display language shipped with your Windows license. You could end up stuck with an OS you don’t understand. If you find yourself in this predicament, we’re here to help you.
What does license supports only one display language mean?
Your OS supports only one language, and it not changing the display language is different. You can add more languages for the latter, but if your Windows version only allows one language, it is locked to the license and cannot be changed.
How we test, review and rate?
We have worked for the past 6 months on building a new review system on how we produce content. Using it, we have subsequently redone most of our articles to provide actual hands-on expertise on the guides we made.
For more details you can read how we test, review, and rate at WindowsReport.
The main reason for this restriction is to prevent you from getting a cheaper license for a specific language version.
However, some little-known factors could provide a loophole and enable you to change your display language on your Windows device. These include:
- Location – If the location on your device does not reflect your current status, changing it can allow you to update your Windows display language.
- Trial version – If you were in the testing phase of Windows to get a feel of the OS before fully committing, when activating your copy, you can change the display language.
How do I enable multiple languages in Windows?
1. Add language packs
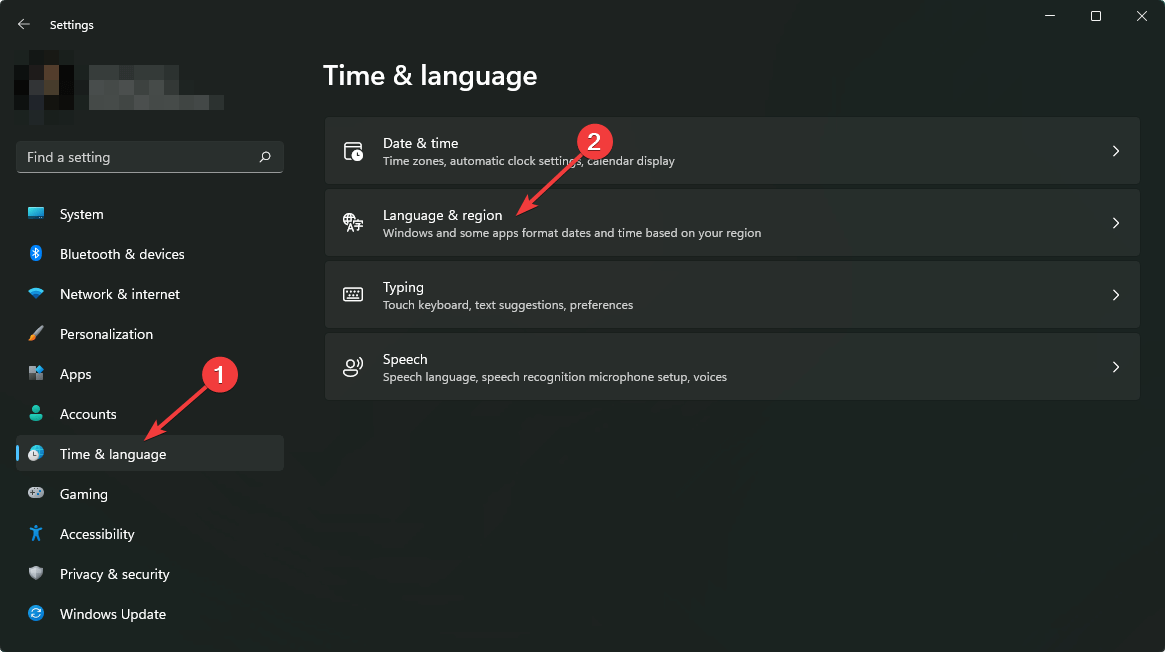
- Press the Windows + I keys to open Settings.
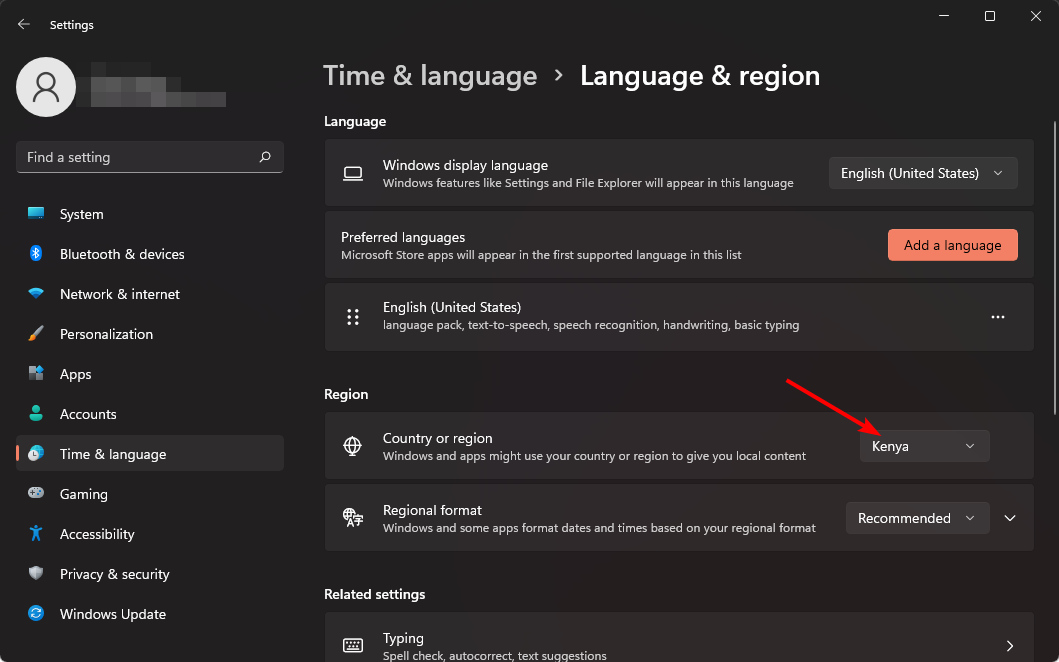
- Select Time & language on the left pane then click on the Language and region option.

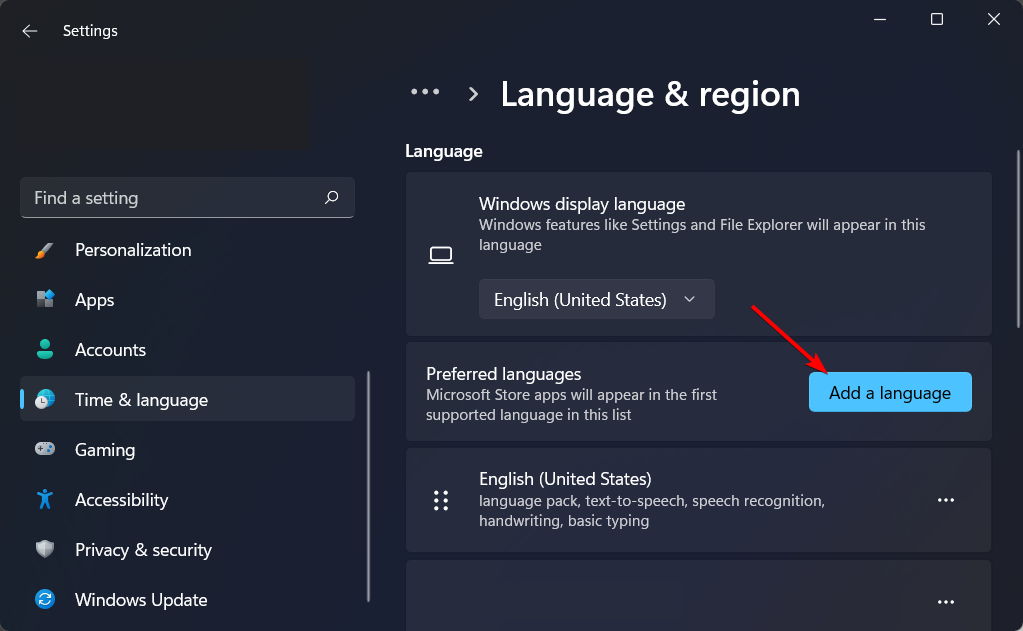
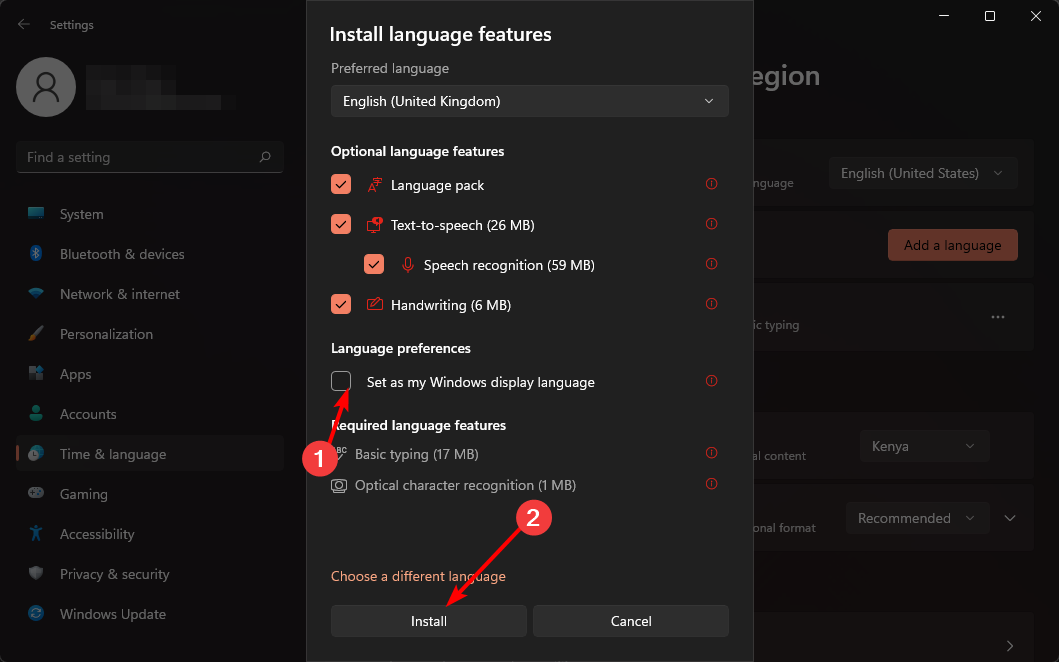
- Click the Add a language button.

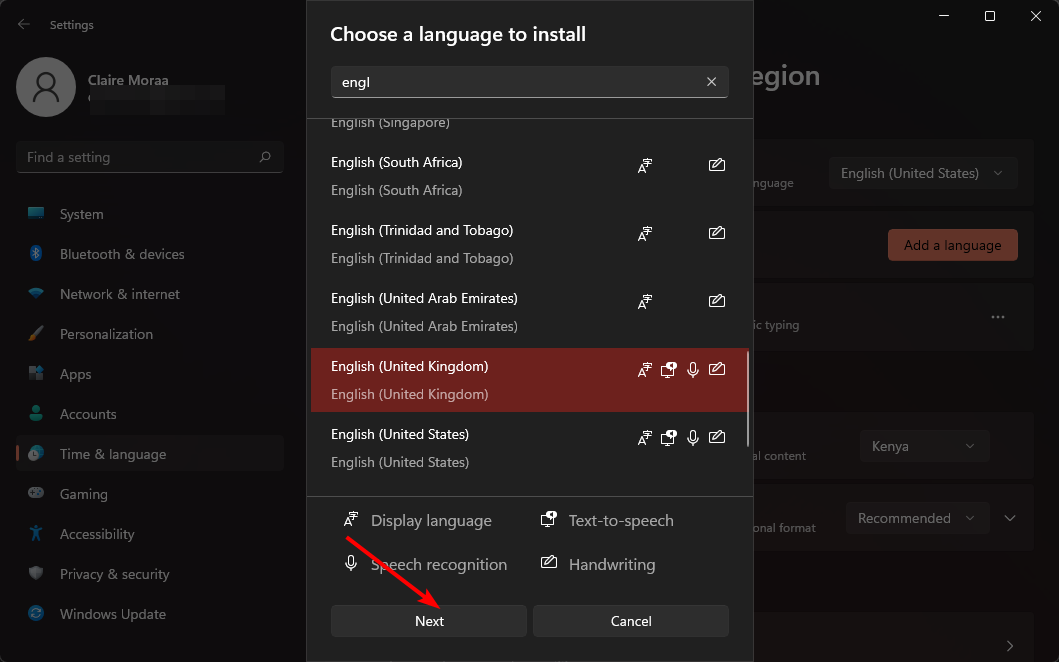
- Select your preferred language and press Next.

- Check the box for Set as my Windows display language then press Install.
- Restart your PC to effect the changes.
2. Change your region settings
- Press the Windows + I keys to open Settings.
- Click on Time & language then select the Language and region page on the right side.
- Under Country or region, update your location if applicable.
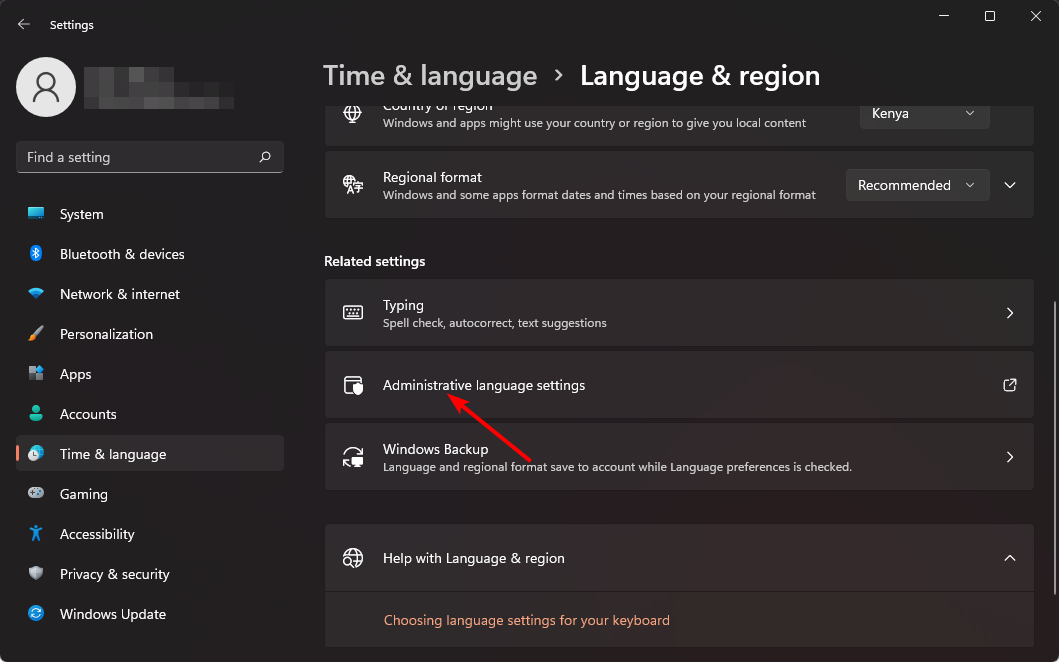
- Next, go back to the Administrative language settings.
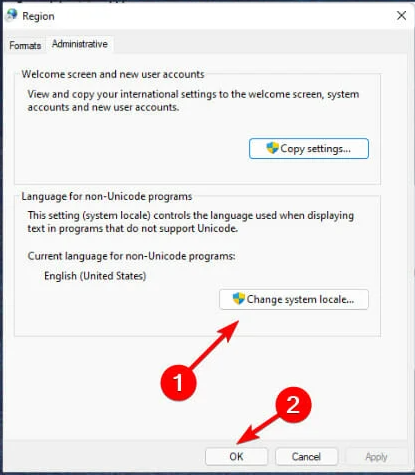
- Select Change system locale button then press OK.

- Specify the new language, check the Beta: Use Unicode UTF-8 for worldwide language support box and then click the OK button.

- Restart your PC and try changing your display language again.

- How to Type Accents on Windows 11
- How to Disable the Insert Your Security Key Into the USB Port popup
- DTS Sound Unbound for Windows 11: Download & Install
- Fix: EXCEPTION_ILLEGAL_INSTRUCTION Error on Windows 11
- Delayed Write Failed Error on Windows 11: How to Fix it
3. Disable sync for language settings
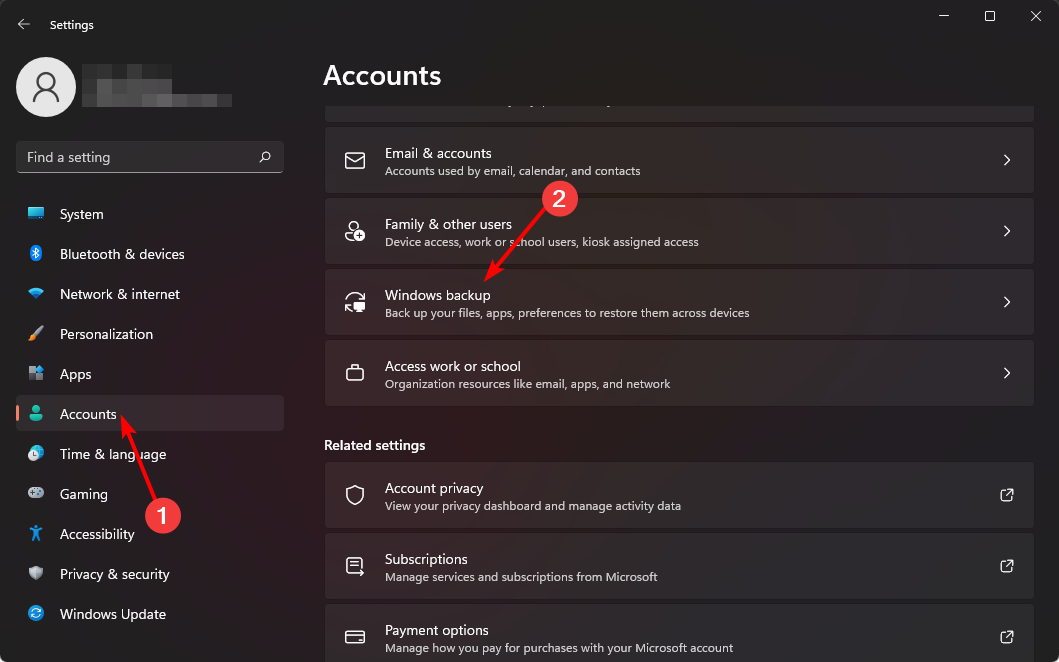
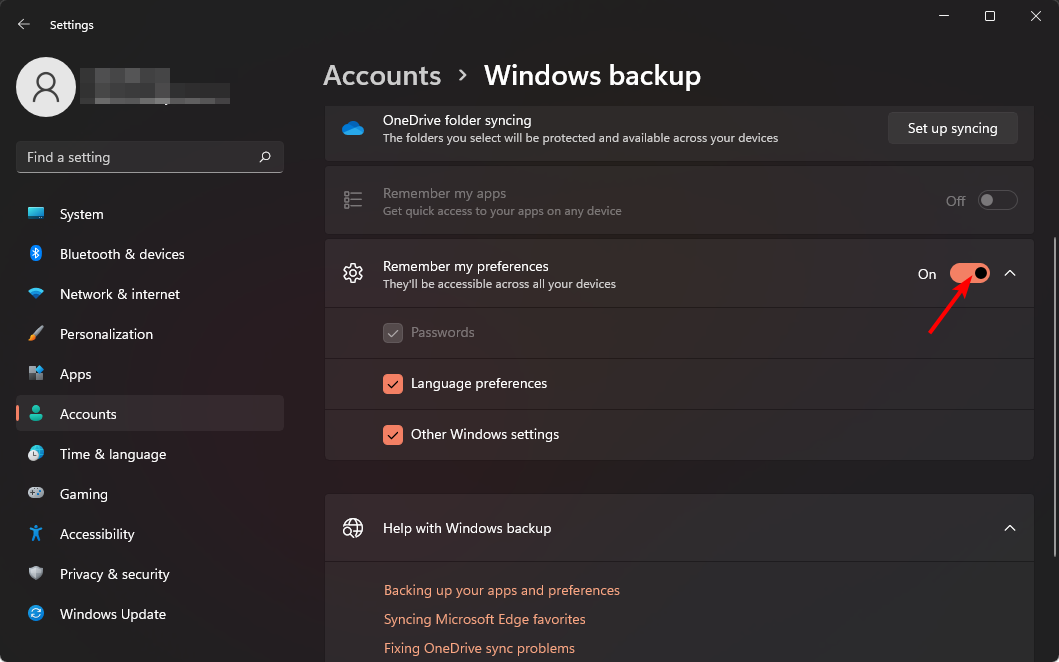
- Press the Windows + I keys to open Settings.
- Click on Accounts then select the Windows backup page on the right side.
- Toggle the Remember my preferences option on.
- Clear the Language preferences option.
- You should now be able to change your display language.
4. Perform a clean install
- Create a bootable USB drive.
- Connect the bootable installation media USB flash drive to your PC.
- Restart your PC and enter BIOS by pressing Del or F2 during the boot.
- Set your flash drive as the default boot device and save changes.
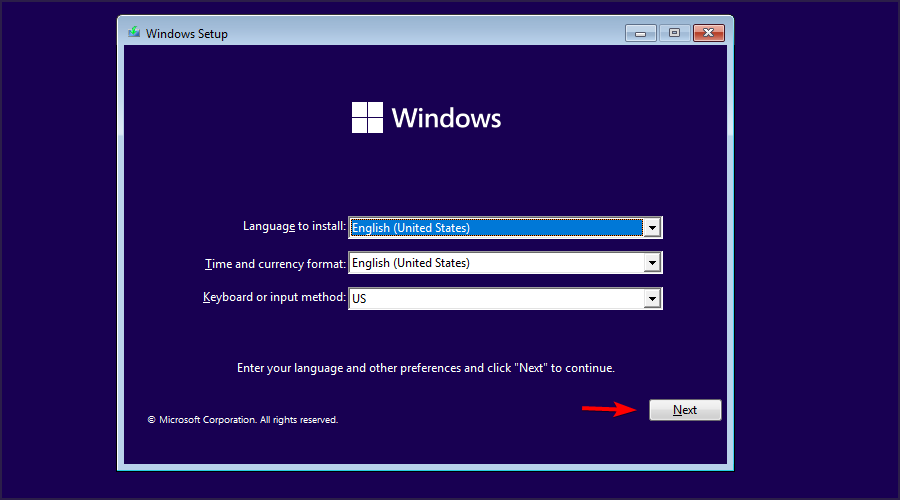
- Press any key to enter setup when asked and click Next.

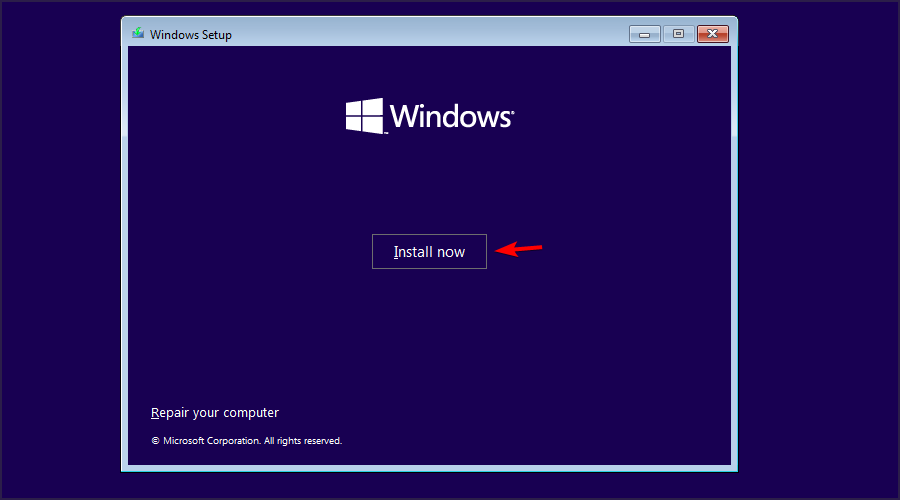
- Click on Install now to proceed.
- Enter your product key or choose I don’t have a product key.
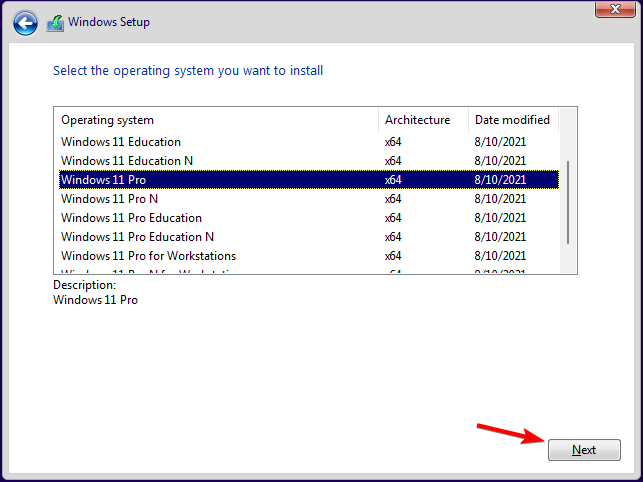
- Select the version that you want to install and click Next.

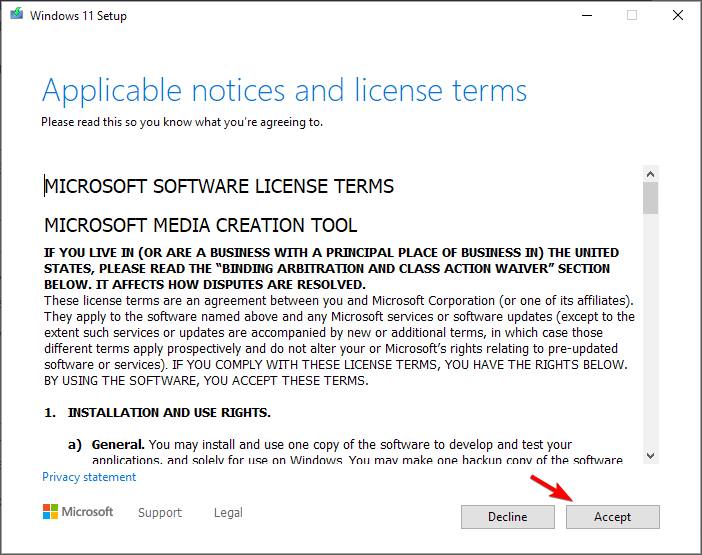
- Accept the terms of service and click Next.

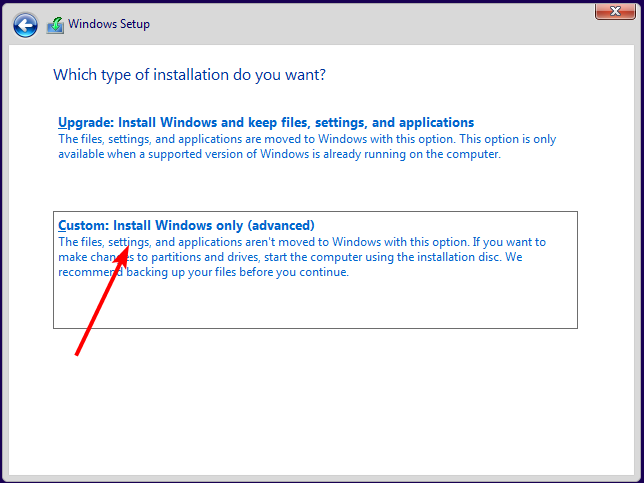
- Select the Custom install option.

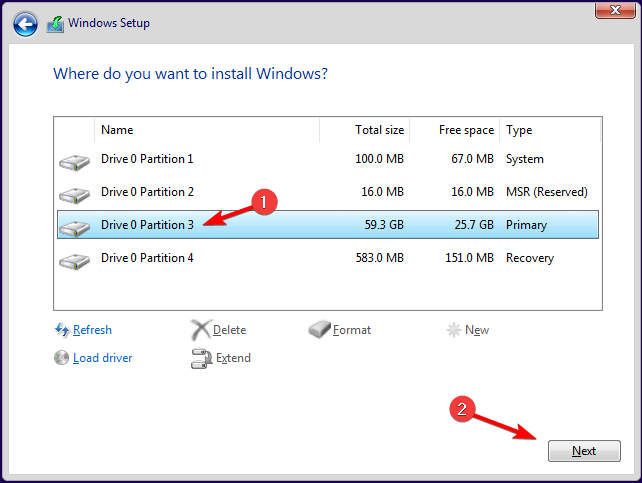
- Select the Primary drive and click Next. Double-check to make sure that you’ve selected the correct drive.

- Follow the on-screen prompts to complete the installation.
If you’d like to restore your files, use Windows.old files, but don’t wait too long because they have an expiry date.
Hopefully, you’ve been able to add more display languages to your Windows device with the methods listed above.
Let us know of any additional comments you may have on this topic below.
![]()

Язык не меняется на Windows 11 Single Language,софт на английском что мне теперь делать?
Комментарии
35

Если у вас редакция Windows 11 Single language — это означает, что официально вам недоступна стандартная смена языка интерфейса. С Windows 11 SL вам доступно только добавление новой клавиатуру или язык для ввода, но не изменение языка интерфейса Windows 11. Ниже описан способ русификации, который протестирован на английском, китайском, корейском и турецком языках.
Как сменить язык интерфейса в Windows 11 Single Language через PowerShell
Чтобы поменять язык будем использовать нестандартные (неофициальные) способы.
1. Для смены языка скачайте языковой пакет (ссылка для скачивания)
2. Откройте от имени администратора программу PowerShell (можно найти через поиск Windows 11)
3. Скопируйте путь к файлу Microsoft-Windows-Client-Language-Pack_x64_ru-ru.cab (Выделите Microsoft-Windows-Client-Language-Pack_x64_ru-ru и нажмите Ctrl+Shift+C) (или выберите «copy as path» в контекстном меню)
4. Выполните последовательно команды:
1. dism.exe /online /Add-Package /PackagePath: путь до вашего файла.cab
2. reg add HKLM\SYSTEM\CurrentControlSet\Control\Nls\Language /v InstallLanguage /t REG_SZ /d 0419 /f
3. reg add HKLM\SYSTEM\CurrentControlSet\Control\Nls\Language /v Default /t REG_SZ /d 1049 /f
4. cd
5. После этого перезагрузите систему и попробуйте изменить язык интерфейса стандартным способом этой инструкции.
Подробная инструкция https://itmen.help/blog/windows-11/shange-language.html
Развернуть ответы 4

Развернуть ответы 11
1 год назад
Изменено автором
Напишите подробно что у вас не меняется. У вас не меняется раскладка клавиатуры? Т.е вы при установке установили только русскую? Или что-то другое. Непонятно о чем идет речь.
Свернуть ответы 2
Раскладка меняется,не меняется язык в целом всего меню на компьютере, не слова по русски,при установке был китайский и английский, пакет русского скачивается но не устанавливается,ю
Свернуть ответы 1
2 месяца назад
Изменено автором
пакет русского скачивается но не устанавливается
Это версия SL и MUI пакет не установится. Переустановите систему.
Скачайте дистрибутив ОС с сайта микрософт и при установке SL выберите русский язык.
Как вариант выучить язык.
Спасибо, обязательно попробую.

1 год назад
Изменено автором
Свернуть ответы 3
Свернуть ответы 2
А как именно оно не помогло? Мне на 10-ке всегда помогало.
Свернуть ответы 1
Может я конечно что то неправильно сделал, но не помогло,делал всё по шагово,я сегодня конечно обращусь в магазин ,компьютеру несколько дней думаю это их проблемы должны быть

Конкретнее , в чем проблема
1 год назад
Изменено автором
как вариант переустановить на Windows 11 Single Language (Русскую Версию)
ваш вариант Windows 11 Домашняя для одного языка (64-bit)


Развернуть ответы 7
Обсуждение товара
Зелёный экран при запуске игры
Обновила все драйверы до последней версии не помогло, все равно выбивает зелёный экран при запуске игры. Игра не особо ресурсная, даже не онлайн игра чтобы был какой то особый вес на видеокарту. Кто сталкивался с подобной проблемой?
Учитывая количество компьютеров в мире и долю рынка операционной системы Windows, было бы неправильно предполагать, что она существует только на одном языке. Windows 11 — многоязычная ОС. Однако некоторые версии лицензий Windows допускают только один язык.
Вам следует быть осторожным, особенно если вы не говорите на языке интерфейса по умолчанию, поставляемом с вашей лицензией Windows. В конечном итоге вы можете застрять с ОС, которую не понимаете. Если вы оказались в таком затруднительном положении, мы здесь, чтобы помочь вам.
Что означает лицензия поддерживает только один язык интерфейса?
Ваша ОС поддерживает только один язык, и при этом язык отображения не меняется. Для последнего вы можете добавить больше языков, но если ваша версия Windows поддерживает только один язык, он привязан к лицензии и не может быть изменен.
Основная причина этого ограничения — не позволить вам получить более дешевую лицензию для определенной языковой версии.
Однако некоторые малоизвестные факторы могут стать лазейкой и позволить вам изменить язык отображения на вашем устройстве Windows. К ним относятся:
- Расположение? Если местоположение на вашем устройстве не отражает ваш текущий статус, его изменение может позволить вам обновить язык отображения Windows.
- Пробная версия? Если вы находились на этапе тестирования Windows, чтобы ознакомиться с ОС перед полной фиксацией, при активации вашей копии вы можете изменить язык отображения.
1. Добавьте языковые пакеты
- Нажмите клавиши Windows + I, чтобы открытьНастройки.
- Выберите «Время и язык» на левой панели, затем нажмите кнопкуЯзык и регионвариант.
- Нажмите Добавить языккнопка.
- Выберите предпочитаемый язык и нажмитеСледующий.
- Установите флажок «Установить в качестве языка отображения Windows», затем нажмитеУстановить.
- Перезагрузите компьютер, чтобы изменения вступили в силу.


2. Измените настройки вашего региона.
- Нажмите клавиши Windows + I, чтобы открыть «Настройки».
- Нажмите наВремя и языкзатем выберите Язык и регионстраницу с правой стороны.
- ПодСтрана или Регион, обновите свое местоположение, если применимо.
- Затем вернитесь к настройкам административного языка.
- ВыбиратьИзменить локаль системыкнопку, затем нажмите ОК.
- Укажите новый язык, проверьтеБета-версия: используйте Unicode UTF-8 для поддержки языков по всему миру.поле и нажмите кнопку ОК.
- Перезагрузите компьютер и попробуйте еще раз изменить язык отображения.


- Как привязать лицензию Windows к учетной записи Microsoft
- Лучшее, что было в Windows 10 после года использования Windows 11
3. Отключите синхронизацию языковых настроек.
- Нажмите клавиши Windows + I, чтобы открытьНастройки.
- Нажмите «Учетные записи», затем выберитеРезервное копирование Windowsстраницу с правой стороны.
- Переключить Запомнить мои предпочтенияопция включена.
- ОчиститьЯзыковые предпочтениявариант.
- Теперь вы сможете изменить язык отображения.


4. Выполните чистую установку.
- Создайте загрузочный USB-накопитель.
- Подключите загрузочный установочный USB-накопитель к компьютеру.
- Перезагрузите компьютер и войдите в BIOS, нажав Del или F2 во время загрузки.
- Установите флэш-накопитель в качестве загрузочного устройства по умолчанию и сохраните изменения.
- Нажмите любую клавишу, чтобы войти в настройку, когда вас спросят, и нажмитеСледующий.
- Нажмите наУстановите сейчаспродолжать.
- Введите ключ продукта или выберите «У меня нет ключа продукта».
- Выберите версию, которую хотите установить, и нажмитеСледующий.
- Примите условия обслуживания и нажмитеСледующий.
- ВыберитеВыборочная установкавариант.
- Выберите основной диск и нажмитеСледующий. Еще раз проверьте, что вы выбрали правильный диск.
- Следуйте инструкциям на экране для завершения установки.


Если вы хотите восстановить файлы, используйте файлы Windows.old, но не ждите слишком долго, потому что у них есть срок годности.
Надеемся, вам удалось добавить дополнительные языки отображения на свое устройство с Windows с помощью методов, перечисленных выше.
Сообщите нам о любых дополнительных комментариях, которые могут у вас возникнуть по этой теме ниже.
This question has been asked before for Windows 10, however, the solution provided for Windows 10 does not appear to be working for Windows 11.
The problem is simple. I bought a new Laptop in Thailand. It came with Windows 11 Home Single Language Edition. 21H2. 22000.708. It is installed with English US (en-US, 0409). When I tried the procedure as described for Windows 10 and changed the language from English-US (en-US, 0809) to English-UK (en-UK, 0409) and restarted my laptop the display language had changed from English-US (en-US, 0809) to Thai (th-TH, 041E).
Does someone know of a solution for Windows 11 or is it possible that it is not possible to change the language to English-UK, and that it can only be changed from Thai to English-US and Vice Versa?
asked Jun 7, 2022 at 11:31
![]()
6
The code for en-UK is 0809, not 0409. Try changing both Default and InstallLanguage to this number.
answered Aug 17, 2022 at 17:48
![]()
montwmontw
111 silver badge3 bronze badges
This website just helped me out to change from Portuguese-BR to English-US: https://leoguides.com/how-to-add-or-change-language-of-windows-11-home-single-language/
In case the website ever stops working, here are the cmd prompt instructions it gives for English-UK:
curl -o %TEMP%\Microsoft-Windows-Client-Language-Pack_x64_en-gb.cab "https://filedn.com/lOX1R8Sv7vhpEG9Q77kMbn0/Windows11/LanguagePacks/Microsoft-Windows-Client-Language-Pack_x64_en-gb.cab"
dism /online /Add-Package /PackagePath:%TEMP%\Microsoft-Windows-Client-Language-Pack_x64_en-gb.cab
reg add HKLM\SYSTEM\CurrentControlSet\Control\Nls\Language /v InstallLanguage /t REG_SZ /d 0809 /f
reg add HKLM\SYSTEM\CurrentControlSet\Control\Nls\Language /v Default /t REG_SZ /d 2057 /f
answered Sep 20, 2022 at 0:50
![]()
2
Arthur’s answer worked for me, just had to change %TEMP% in given commands to full path to Temp folder like this:
curl -o C:\Users\<userName>\AppData\Local\Temp\Microsoft-Windows-Client-Language-Pack_x64_en-gb.cab "https://filedn.com/lOX1R8Sv7vhpEG9Q77kMbn0/Windows11/LanguagePacks/Microsoft-Windows-Client-Language-Pack_x64_en-gb.cab"
dism /online /Add-Package /PackagePath:C:\Users\<userName>\AppData\Local\Temp\Microsoft-Windows-Client-Language-Pack_x64_en-gb.cab
reg add HKLM\SYSTEM\CurrentControlSet\Control\Nls\Language /v InstallLanguage /t REG_SZ /d 0809 /f
reg add HKLM\SYSTEM\CurrentControlSet\Control\Nls\Language /v Default /t REG_SZ /d 2057 /f
cd
Be sure to run the command in administrator mode
answered Feb 24 at 10:38
![]()
You must log in to answer this question.
Not the answer you’re looking for? Browse other questions tagged
.
Not the answer you’re looking for? Browse other questions tagged
.