Installing Windows 11 on a device that does not meet Windows 11 minimum system requirements is not recommended. If you choose to install Windows 11 on ineligible hardware, you should be comfortable assuming the risk of running into compatibility issues.
Your device might malfunction due to these compatibility or other issues. Devices that do not meet these system requirements will no longer be guaranteed to receive updates, including but not limited to security updates.
The following disclaimer applies if you install Windows 11 on a device that doesn’t meet the minimum system requirements:
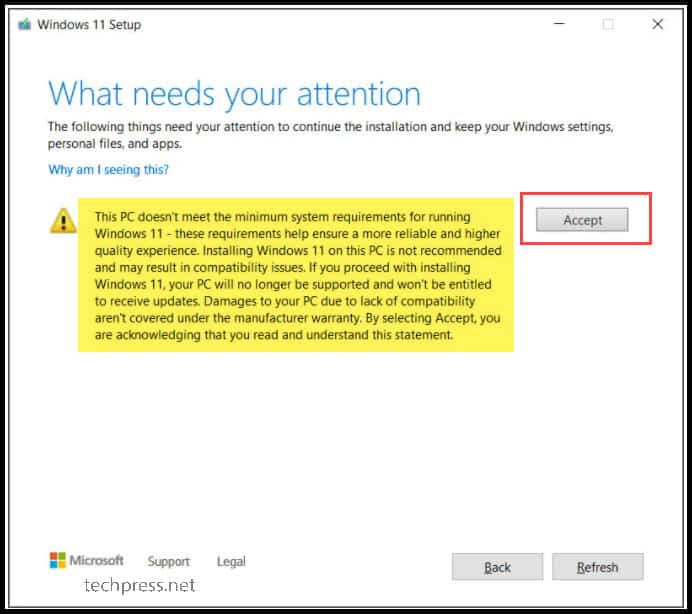
This PC doesn’t meet the minimum system requirements for running Windows 11 — these requirements help ensure a more reliable and higher quality experience. Installing Windows 11 on this PC is not recommended and may result in compatibility issues. If you proceed with installing Windows 11, your PC will no longer be supported and won’t be entitled to receive updates. Damages to your PC due to lack of compatibility aren’t covered under the manufacturer warranty.
Before you install Windows 11
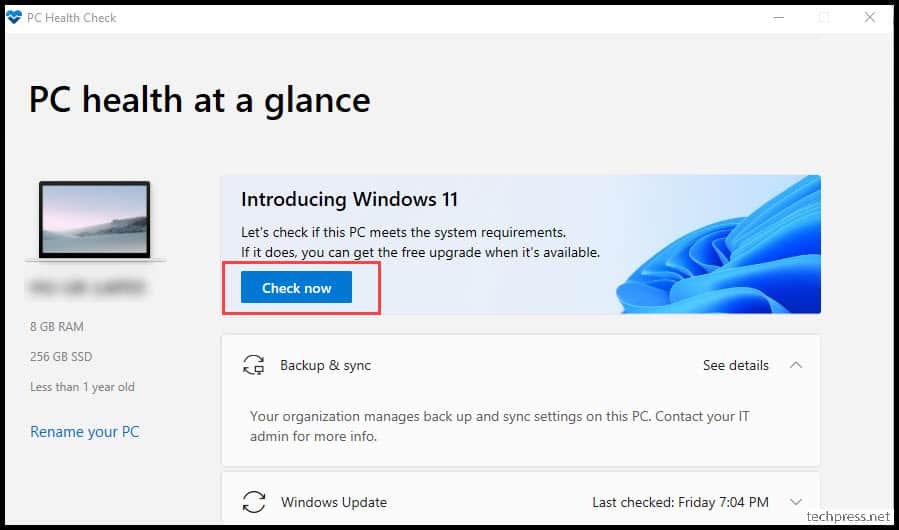
If you are unsure if your device meets the Windows 11 minimum system requirements and have Windows 10 already installed, you can download the PC Health Check app, which will assess eligibility and identify components of your device that don’t meet the minimum requirements. The app will also link to info that details steps you can take to make your device meet the minimum system requirements. To learn more, download and install PC Health Check app.
After you install Windows 11
When Windows 11 is installed on a device that does not meet the minimum system requirements, we’ll notify you using a watermark on your Windows 11 desktop. You might also see a notification in Settings to let you know the requirements are not met.
If you’re experiencing issues after upgrading to Windows 11 and your device does not meet the minimum system requirements, we recommend you go back to Windows 10.
To go back to Windows 10, select Start > Settings > System > Recovery > Go back .
This option is only available for 10 days following your upgrade, after which time the files needed to perform this function will be removed to free up disk space on your device.
Related articles
Upgrade to Windows 11: FAQ
Getting ready for the Windows 11 upgrade
Ways to install Windows 11
Managing Windows 11 “System requirements not met” message in your organization
Need more help?
Want more options?
Explore subscription benefits, browse training courses, learn how to secure your device, and more.
Communities help you ask and answer questions, give feedback, and hear from experts with rich knowledge.
Problem Symptom: If you try to install Windows 11 Insider Preview on a PC that does not fulfill the minimum hardware requirements, the Windows Insider Program will display an error message as below:
Windows Insider Program
Your PC does not meet the minimum hardware requirements for Windows 11. Your channel options will be limited.

If you try to install the new Windows 11 Insider Preview as a new OS using ISO, the error message as below will display:
Windows Setup
This PC can’t run Windows 11
This PC doesn’t meet the minimum requirements to install thise version of Windows. For more information, visit https://aka.ms/WindowsSysReq

Follow the below workaround steps to install Windows 11 Insider Preview even your PC does not meet the minimum hardware requirements.
Content Summary
Bypass TPM 2.0 and Secure Boot
Apply OfflineInsiderEnroll script to enroll in Dev Channel
Modify Registry key
Bypass TPM 2.0 and Secure Boot
Step 1: Press Windows key + R to open a Run box.
Step 2: Type regedit and press Enter to open up the Registry Editor. Click Yes to grant administrative privileges when prompted by the UAC (User Account Control). If you are installing as a new OS, you need to press the Shift + F10 key to open the command prompt and type regedit.exe to open the Registry Editor.
Step 3: Navigate to the following location: Computer\HKEY_LOCAL_MACHINE\SYSTEM\Setup
Step 4: Create a new key called LabConfig.
Step 5: In the LabConfig key, right-click on the right pane then select New > DWORD (32-bit) Value. Name the new DWORD as BypassTPMCheck.
Step 6: Double-click on BypassTPMCheck and change its value to 1.
Step 7: In the LabConfig key, right-click on the right pane then select New > DWORD (32-bit) Value. Name the new DWORD as BypassSecureBootCheck.
Step 8: Double-click on BypassSecureBootCheck and change its value to 1.
Step 9: Click on the OK button and close the registry editor.
Step 10: Restart the PC.
Apply OfflineInsiderEnroll script to enroll in Dev Channel
Step 1: Open Start > Settings > Privacy > Diagnostics & feedback. Make sure the Optional diagnostic data is toggle On or select the radio button for Optional diagnostic data / Full.


Step 2: Download OfflineInsiderEnroll script at GitHub. OfflineInsiderEnroll is a simple script to join Windows Insider Program Dev Channel and it can be executed on a PC with a local account.
Step 3: Right-click on the downloaded script and select the Run as administrator option from the context menu.
Step 4: The command prompt window will display with the available Windows Insider Program channels including Dev Channel, Beta Channel, and Release Preview Channel.
Step 5: Select Enroll to Dev Channel by pressing the corresponding number and Enter.

Step 6: Restart the PC.
Modify Registry key
Step 1: Open Start > Settings > Update & Security > Windows Insider Program.
Step 2: Click on Get Started to connect your Microsoft account used for registering to the Windows Insider program.
Step 3: Select the Release Preview Channel from the list of channels show in Pick your Insider channel settings.
Step 4: Review the Privacy Statement and terms, and click the Confirm button.
Step 5: Click on Restart Now when prompted.
Step 6: Open Start > Settings > Update & Security > Windows Insider Program.
Step 7: Verify if the Dev Channel option is available. If it is not available, continue the below steps to modify the related registry key.
Step 8: Press Windows key + R to open a Run box.
Step 9: Type regedit and press Enter to open up the Registry Editor. Click Yes to grant administrative privileges when prompted by the UAC (User Account Control).
Step 10: Navigate to the following location: HKEY_LOCAL_MACHINE\SOFTWARE\Microsoft\WindowsSelfHost\UI\Selection
Step 11: Change the value for the following entries:
- UIBranch: Dev
- UIContentType: Mainline
- UIRing: External

Step 12: Navigate to the following location: HKEY_LOCAL_MACHINE\SOFTWARE\Microsoft\WindowsSelfHost\Applicability
Step 13: Change the value for the following entries:
- Branch: Dev
- ContentType: Mainline
- Ring: External

Step 14: Click on the OK button and close the registry editor.
Step 15: Restart the PC.
Step 16: Open Start > Settings > Update & Security > Windows Insider Program. You will see the Dev Channel display under Pick your Insider settings. You will still see a warning message at the top that mentions your PC does not meet hardware requirements for Windows 11.

Everyone’s quite eager to get their hands on the Windows 11 update. But if there’s one thing that might play spoilsport to their plans for an easy upgrade, it’s the dreaded system requirements error telling them that their PC doesn’t meet the minimum hardware requirements to run Windows 11.
Here’s what you should know about this error and how you may be able to bypass it.
When users with older hardware that doesn’t meet the system requirements for Windows 11 register on the Dev Channel of their Windows 10 PC, Microsoft is giving them this error under System update.
“Your PC does meet the minimum hardware requirements for Windows 11. Your device may continue to receive Insider Preview builds until Windows 11 is generally available, at which time it is recommended to clean install to Windows 10.”

Related:
- How To Get Windows 11 Dev Channel Build on Any PC Not Meeting Requirements
- How To Download Windows 11
What does the System Requirements Error mean?
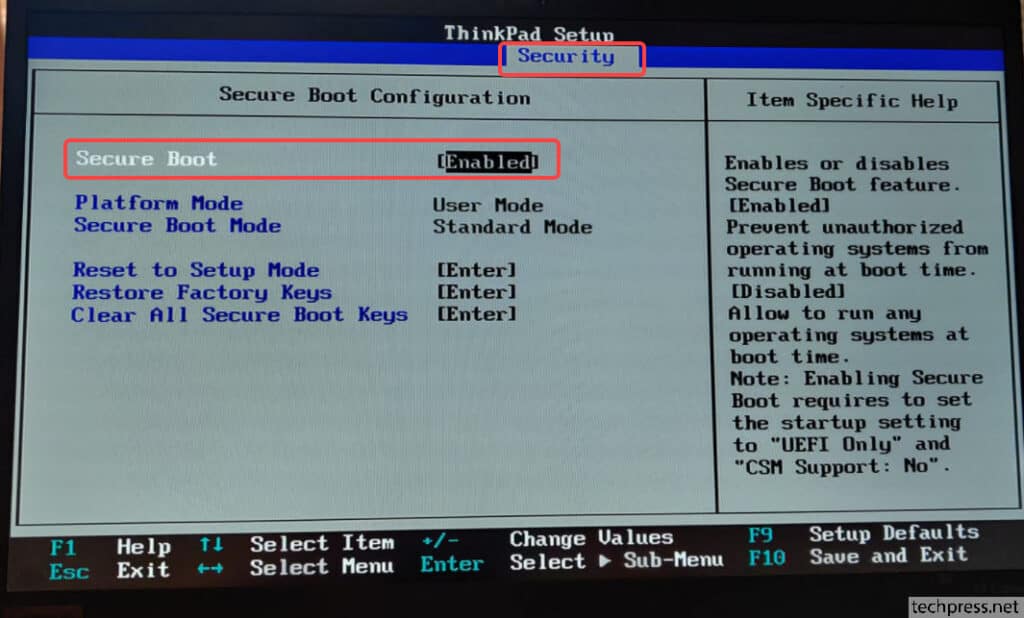
In a highly controversial move, Microsoft revealed earlier that it is stepping up the minimum hardware requirements that your PC should meet to run Windows 11. Specifically, one’s PC must have UEFI secure boot capability and TPM version 2.0 in order to upgrade to the latest Windows.
But as many have found out, these may either not be available on their PCs or, if available, are disabled by default. (Read: How to enable TPM and Secure boot.) This has understandably raised the collective ire of people who could easily run Windows 10 but cannot upgrade to Windows 11 because their PCs do not meet the hardware requirements to do so.
Although it appears that these hard requirements are here to stay, one can, in practice, get upgraded to Windows 11 if one’s enrolled in the Dev Channel of Windows Insider Program.
Microsoft confirmed in a blog post that it will allow all Windows Insiders to “continue installing Windows 11 Insider Preview builds even if their PC does not meet the minimum hardware requirements.”

Users will be eligible for Windows 11 preview builds only until the final version of Windows 11 is generally available, after which time those who do not meet the minimum hardware requirements will have to revert to Windows 10.
So, that is what it all means. That you will need to downgrade to Windows 10 once Windows 11 is released to the public as further dev builds won’t be available to you if you do not meet the system requirements for Windows 11.
If you’re already a part of the Windows Insider Program but don’t meet the minimum hardware requirements to run Windows 11, you may see the Windows 11 System Requirments Error before installing the update as well. But you can go ahead and install it regardless of the error as per the Limited Exception rule for Windows 11 preview builds.
How to fix
There is nothing to fix here as this is only a warning that says that you will need not get newer dev builds of Windows 11 when it is available for the public. Meaning, you better go back to Windows 10 at that time.
However, if you switch from Dev channel to beta channel or release preview, then this warning will be removed, but you will not get Windows 11 Dev Channel Insider build either. You will get only Windows 10 beta or release preview builds.
Can’t install Windows 11?
You can register for the Dev Channel builds on Windows 10 itself and then upgrade to Windows 11 even if it throws the warning in your face.
But in case the installation doesn’t process and you get a “This PC can’t run Windows 11” error, then we can be of some help here. See our guide on bypassing the TPM 2.0 and Secure Boot requirements below. This will allow you to fix the “This PC can’t run Windows 11” error and install Windows 11 on your older PCs.
► Windows 11 Without TPM: How To Bypass the TPM Requirement and Install the OS
Using the link above, you can install Windows 11 without meeting minimum hardware requirements.
It is possible that after gathering user feedback and understanding more about how Windows 11 runs on different systems and CPU models, Microsoft may adjust the minimum system requirements in the future. But as of now, that doesn’t seem to be a likely scenario.
Please note there are below requirements before starting the installation / upgrade to Windows 11:
| Processor | 1 gigahertz (GHz) or faster with 2 or more cores on a compatible 64-bit processor or System on a Chip (SoC). |
| RAM | 4 gigabyte (GB). |
| Storage | 64 GB or larger storage device Note: See below under “More information on storage space to keep Windows 11 up-to-date” for more details. |
| System firmware | UEFI, Secure Boot capable. Check here for information on how your PC might be able to meet this requirement. |
| TPM | Trusted Platform Module (TPM) version 2.0. Check here for instructions on how your PC might be enabled to meet this requirement. |
| Graphics card | Compatible with DirectX 12 or later with WDDM 2.0 driver. |
| Display | High definition (720p) display that is greater than 9” diagonally, 8 bits per colour channel. |
| Source:Microsoft |
To check if you are meeting all the requirements for Windows 11 installation, Download and Install PC Health Check App and click on Check now button. If you are meeting all the requirements that’s great, you can start the upgrade process.
But as we know there are a lot of systems which are not meeting the CPU or TPM requirements, you can follow the steps as given in the next sections of this article to bypass this requirement.
Also, If you have TPM 1.2 and your laptop is compatible with TPM 2.0 then you can upgrade it using BIOS security settings. Please check the next section on how to upgrade it. If Secure Boot is disabled on your system, you can enable it via BIOS.
Upgrade TPM level from TPM 1.2 to TPM 2.0 and enable secure boot
If you are using TPM (Trusted Module Platform) 1.2 and want to upgrade it to TPM level from 1.2 o 2.0. First you need to check if your laptop / desktop is compatible with TPM 2.0.
If yes, then you can change BIOS security settings from TPM 1.2 to TPM 2.0. If your local drives are encrypted with Bitlocker, disable bitlocker and decrypt your drive before the upgrade. Also, make sure to take a backup copy of all your data before taking this action.
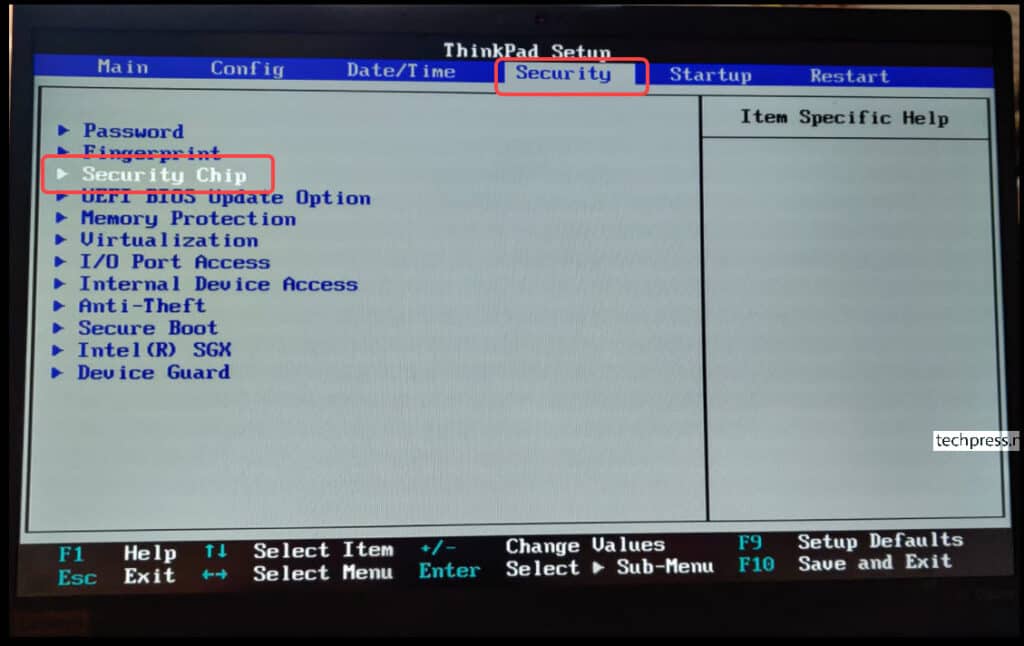
- Restart the machine and press F1 to enter into the BIOS mode. Go to Security tab and using your keyboard select Security Chip and Press Enter.
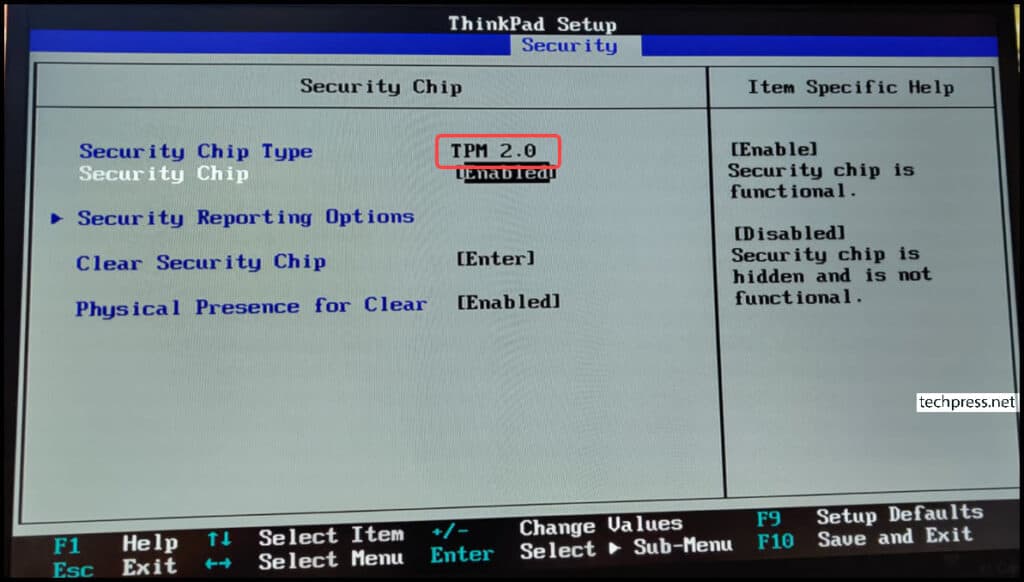
- Check the Security Chip Type to see if you can change the TPM level from 1.2 to TPM 2.0. On my laptop it was set to TPM 1.2 which i updated it to TPM 2.0.
- To check the Secure Boot, Go to Security tab -> select Secure Boot and press Enter.
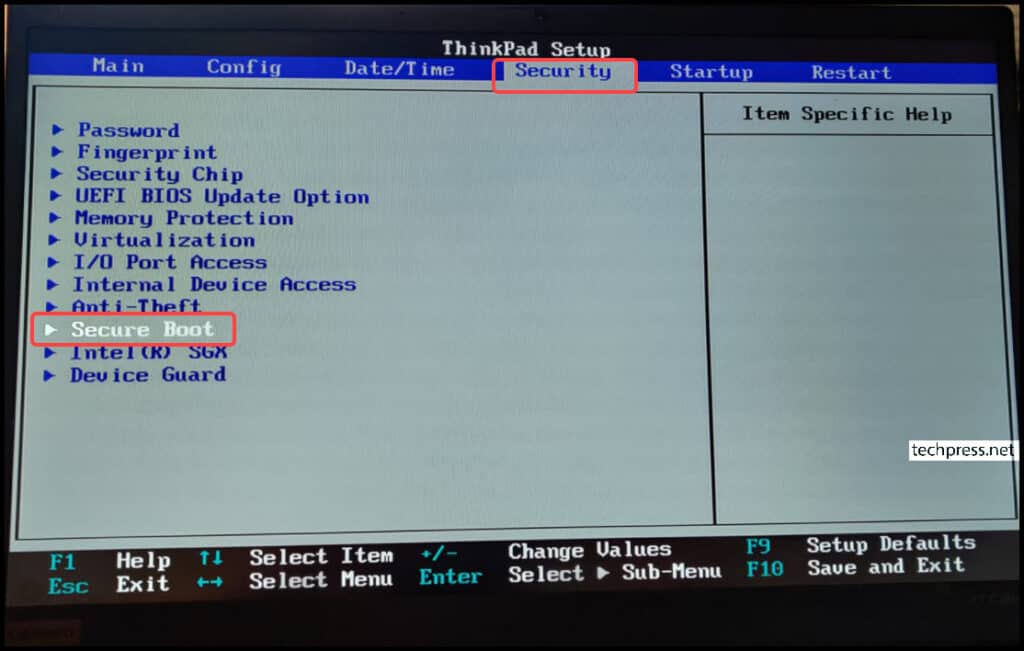
- Make sure Secure Boot is Enabled.
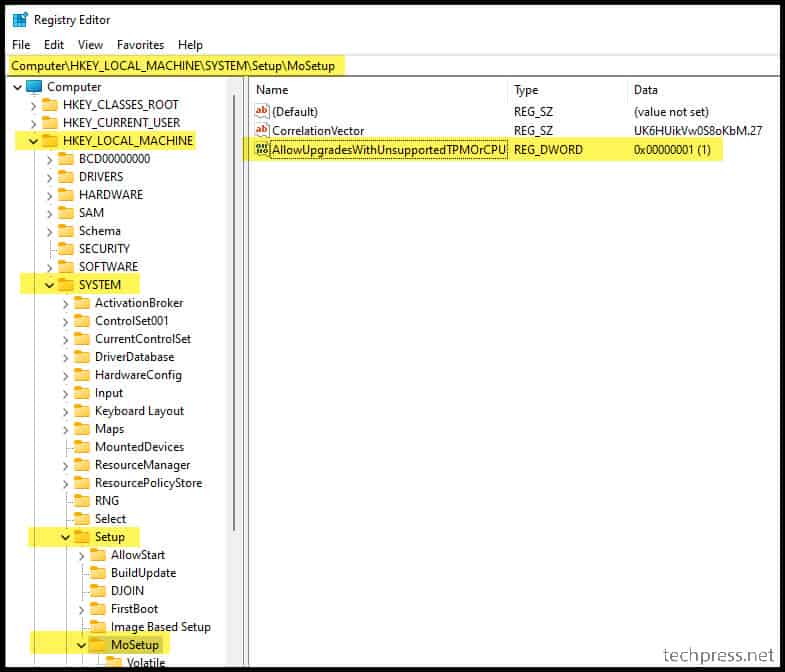
If you are not meeting the TPM 2.0 or CPU requirements then below registry entry needs to be created to bypass the TPM or CPU checks. You will still require TPM 1.2 at least to proceed with the installation. During Windows 11 setup process, a warning message will be shown, click on Accept to continue with the installation process.
Steps to create registry entry (Please note that you will require administrator rights on the PC to make changes in the registry and your system will require a reboot after the registry entry is created)
- Click on Start and search for Registry Editor.
- Navigate to HKEY_LOCAL_MACHINE\SYSTEM\Setup\MoSetup.
- Create a REG_DWORD registry entry
AllowUpgradesWithUnsupportedTPMOrCPUand set its value to 1.
Once the registry entry is created and you start the setup process to install windows 11, you will receive below Warning message to state that your PC doesn’t meet the minimum system requirements for running Windows 11. Click on Accept and then click on Refresh to proceed with the installation of Windows 11.

Conclusion
- Make sure to use PC Health Check App to check if your device is compatible before upgrade to Windows 11.
- If Device is not compatible w.r.t. TPM or CPU then create a reg key as I had mentioned earlier in this post. This will bypass TPM and CPU checks.
- Fix for 0x800F0830 – 0x2003 – The Installation failed in the SAFE_OS phase with an error during INSTALL_UPDATES operation.
- МИНИМАЛЬНЫЕ СИСТЕМНЫЕ ТРЕБОВАНИЯ WINDOWS 11
- ОПРЕДЕЛЕНИЕ СОВМЕСТИМОСТИ ПК С WINDOWS 11
- ЧТО ДЕЛАТЬ, ЕСЛИ КОМПЬЮТЕР НЕ СООТВЕТСТВУЕТ ТРЕБОВАНИЯМ WINDOWS 11?
- ЧТО ДЕЛАТЬ, ЕСЛИ НЕ УДАЕТСЯ УСТРАНИТЬ НЕСОВМЕСТИМОСТЬ ПК С WINDOWS 11?
Многие пользователи Windows 10, решившиеся обновиться до Windows 11 из «Центра обновления Windows», сталкиваются с сообщением о том, что «Запуск Windows 11 на этом компьютере невозможен». Каких-либо конкретных причин в окне с ошибкой не приводится, но доступна кнопка «Дополнительные сведения», кликнув по которой можно перейти на сайт Microsoft с массивом непонятной для многих информацией.
 1
1
Чтобы узнать причину возникновения этой ошибки, достаточно ознакомиться с минимальными системными требованиями, предъявляемыми Windows 11 к компьютеру, а затем сравнить их конфигурацией собственного ПК. Но, забегая вперед, ответим на вопрос о том, что делать в ситуации с несоответствием требованиям — попробовать установить Windows 11 самостоятельно, используя в качестве руководства специально подготовленную нами пошаговую инструкцию.
МИНИМАЛЬНЫЕ СИСТЕМНЫЕ ТРЕБОВАНИЯ WINDOWS 11
Официальные системные требования Windows 11 можно посмотреть на сайте Microsoft. Если вкратце, выглядят они следующим образом:
- Процессор: 64-битная архитектура, наличие, как минимум, двух физических ядер с тактовой частотой от 1 ГГц (не каждый, кстати, процессор подойдет, даже если его характеристики соответствуют этим требованиям).
- Оперативная память (ОЗУ): от 4 Гб.
- Жесткий диск/SSD-накопитель: от 64 Гб (столько понадобится только для установки системы).
- Видеокарта, совместимая с DirectX 12 и драйвером WDDM 2.0 (если 10-ка работает с имеющейся видеокартой, то и Windows 11, скорее всего, будет работать).
- Поддержка компьютером (материнской платой) технологий «TPM0» и «Secure Boot» (вот к этим требованиям у пользователей больше всего вопросов).
Теперь, ориентируясь на эти требования, проверим, соответствует ли им имеющийся компьютер.
ОПРЕДЕЛЕНИЕ СОВМЕСТИМОСТИ ПК С WINDOWS 11
Начнем с простого способа — использования бесплатной утилиты WhyNotWin11. Это сторонняя программ, никак не связанная с Microsoft — если вы не доверяете подобным утилитам, сразу переходите к следующей части данного раздела.
Использование WhyNotWin11 для определения совместимости ПК с Windows 11
Программа WhyNotWin11 предназначена для быстрого определения совместимости компьютера с операционной системой Windows 11. С ее помощью можно узнать, соответствуют ли программные и аппаратные параметры ПК официальным системным требованиям этой версии ОС Windows. Утилиту не нужно устанавливать — просто запускаем ее и знакомимся с результатом (русский язык поддерживается). Вот, что она показала в нашем случае:
Как видно из скриншота выше, имеющийся компьютер не соответствует по ряду параметров. И такая картина наблюдается большинством пользователей, решивших перейти на Windows 11. Но расстраиваться не стоит. Вот почему:
- Несоответствия «Метод загрузки», «Secure Boot» и «Тип раздела диска» можно устранить. Первые два устраняются путем перенастройки параметров BIOS/UEFI материнской платы. А «Тип раздела диска» можно изменить во время установки Windows 11, но при этом с жесткого диска/SSD-накопителя будут удалены все данные, потому предварительно потребуется переместить их куда-нибудь.
- Касательно «Версии TPM». Это такой специальный криптографический процессор, который может быть встроен в материнскую плату или подключаться к ней отдельно. Также существуют обычные процессоры с программно реализованной в них функцией «TPM». Если программа WhyNotWin11 сообщает, что модуль «TPM отсутствует или отключен», то есть шанс, что несоответствие также можно устранить из настроек BIOS/UEFI. Этот момент будет рассмотрен ниже.
- И, наконец, «Совместимость процессора». Как было упомянуто выше, даже если процессор соответствует техническим требованиям, вовсе необязательно, что он подойдет для работы с Windows 11. Этот момент мы тоже рассмотрим отдельно.
Все прочие несоответствия, к сожалению, можно устранить только путем установки в компьютер более мощных комплектующих. И если это ноутбук, то в нем не удастся заменить процессор и видеокарту, т.к. они являются неотъемлемой частью материнской платы, но можно увеличить объем оперативной памяти и дискового пространства.
Определение совместимости ПК с Windows 11 вручную
В окне «Центр обновления Windows» отображается объем оперативной памяти и дискового пространства, потому эти параметры компьютера тут же и выясняем. Касательно остальных требований Windows 11:
«Secure Boot» (Безопасная загрузка) и «Метод загрузки»
Оба этих параметра можно определить из системной программы «Сведения о системе». Действия следующие:
- Откройте программу «Выполнить» комбинацией клавиш «Win + R», скопируйте в нее без кавычек команду «msinfo32» и нажмите «ОК»:
- Откроется окно «Сведения о системе». Нужные нам данные указаны напротив «Режим BIOS» (это и есть «Метод загрузки») и «Состояние безопасной загрузки» (а это «Secure Boot»):
«Тип раздела диска»
Любой жесткий диск можно отформатировать так, что в качестве загрузочной записи будет использоваться либо MBR, либо GTP. Если Windows 10 еще можно было установить на MBR-диск, то с Windows 11 это не так. Чтобы определить тип используемого раздела диска:
- Откройте «Свойства» любого локального диска и перейдите в открывшемся окне во вкладку «Оборудование», выберите в блоке «Все диски» тот диск, куда будет устанавливаться Windows 11, затем нажмите кнопку «Свойства» ниже.
![]()
- Откроется новое окно. Перейдите в нем во вкладку «Тома». Скорее всего, она будет пустой. Нажмите ниже кнопку «Заполнить».
![]()
- Окно закроется и вновь откроется. Повторно перейдите во вкладку «Тома» и снова нажмите кнопку «Заполнить». В этот раз мы получим нужные нам сведения:
![]()
- Здесь нас интересует графа «Стиль раздела». Если в ней и будет указан тип разделов диска «Таблица с GUID разделов», значит, этот диск имеет таблицу разделов GPT.
- Но если здесь будет указано — «Основная загрузочная запись (MBR)»:
![]()
Определение наличия и версии TPM
Здесь все просто:
- Нажмите «Win + R», вставьте в окно без кавычек команду «tpm.msc» и нажмите «ОК»:
- Откроется окно, в левой нижней части которого будет указана спецификация (она же — версия) установленного в компьютер модуля TPM (если он отсутствует, будет указана соответствующая информация).
Процессор
Двуядерные процессоры с тактовой частотой 1 ГГц начали выпускаться еще лет 10-15 назад, потому с их совместимостью с техническими требованиями Windows 11 проблем возникнуть не должно. Но, как указывалось выше, этого недостаточно. Для нормальной работы Windows 11 требуются, скажем так, «специальные» процессоры. Какие именно, можно посмотреть на официальной сайте Microsoft.
А чтобы узнать модель установленного в компьютер процессора, можно также воспользоваться ранее рассмотренной системной программой «Сведения о системе» (команда «msinfo32»).
«DirectX» и версия драйвера «WDDM»
Для корректного определения версии DirectX и WDDM требуется, чтобы на компьютере была установлена последняя версия драйверов от видеокарты и сама библиотека DirectX (на официальном сайте Microsoft можно скачать веб-установщик библиотеки).
- Откройте программу «Выполнить» и запустите из не команду «dxdiag».
- Откроется окно «Средство диагностики DirectX». Во вкладке «Система» можно узнать версию DirectX:
- Далее откройте вкладку «Экран». В блоке «Драйверы» последним в списке указана модель (она же — версия) WDDM:
ЧТО ДЕЛАТЬ, ЕСЛИ КОМПЬЮТЕР НЕ СООТВЕТСТВУЕТ ТРЕБОВАНИЯМ WINDOWS 11?
Пройдемся по тем аппаратным и программным несоответствиям, что могут быть устранены без покупки новых комплектующих:
«Secure Boot» (Безопасная загрузка) и «Метод загрузки»
Обе эти функции можно активировать в настройках BIOS/UEFI материнской платы, если таковые ею поддерживаются. Мы не можем точно сказать, где именно активируются данные опции, т.к. структура пользовательского интерфейса BIOS/UEFI отличается в зависимости от модели/версии системной платы или чипа BIOS/UEFI. Но названия этих опций примерно одинаковые.
Например, у многих моделей материнских плат Asus эта опция находится в разделе «Boot» (как и у большинства других плат):
А если отсюда же перейти в раздел «CSM (Compatibility Support Model)», то можно будет активировать режим загрузку «UEFI»:
Словом, зайдите в настройки BIOS/UEFI, найдите в них опции, связанные с «Secure Boot» и «UEFI», и активируйте их обе.
Тип раздела диска
Как говорилось выше, тип раздела диска можно изменить при установке Windows 11. Но для начала скопируйте все нужные файлы на другой носитель, т.к. они будут удалены в процессе преобразования типа раздела.
TPM
Основное предназначение модуля TPM — генерация и хранение криптографических ключей в целях защиты информации от кражи и несанкционированного изменения. Он может быть встроен в материнскую плату или подключаться к ней отдельно в качестве самостоятельного устройства. Также существуют процессоры, в которых TPM как технология реализована программно. В случае со встроенным и программно реализованным TPM может оказаться так, что модуль этот также отключен в настройках BIOS/UEFI. Включается он по тому же принципу, что и «Secure Boot» или «Режим загрузки UEFI». Например:
- У материнских плат Gigabyte Z590 опция включения TPM именуется как «Intel Platform Trust Technology (PTT)», и находится она во вкладке «Settings» в разделе «Miscellaneous».
- А у многих моделей современных материнских плат Asus функция называется «TPM State», а находится она во вкладке «Avanced» в разделе «Trusted Computing»:
И, конечно, модуль TPM можно приобрести отдельно. Главное, чтобы в материнской плате присутствовал порт для его подключения:
ЧТО ДЕЛАТЬ, ЕСЛИ НЕ УДАЕТСЯ УСТРАНИТЬ НЕСОВМЕСТИМОСТЬ ПК С WINDOWS 11?
В самом начале статьи мы говорили, что даже в случае, если компьютер не совместим с операционной системой Windows 11, все равно стоит попробовать ее установить. Все дело в том, что в интернете можно найти ISO-образы Windows 11, которые были немного «исправлены» любителями. Им удалось сделать так, что система не требует наличия ни модуля TPM, ни GTP-диска, ни даже поддержки материнской платой «Secure Boot» и «UEFI».
Но этот вариант обхода несовместимостей подойдет только для тех пользователей, которым не принципиально, какая именно сборка Windows 11 установлена на их компьютер — официально активированная за деньги или какая-нибудь пиратская копия. Если же это принципиально, то проблему устранять придется только покупкой нового оборудования (или целого компьютера, если это ноутбук).