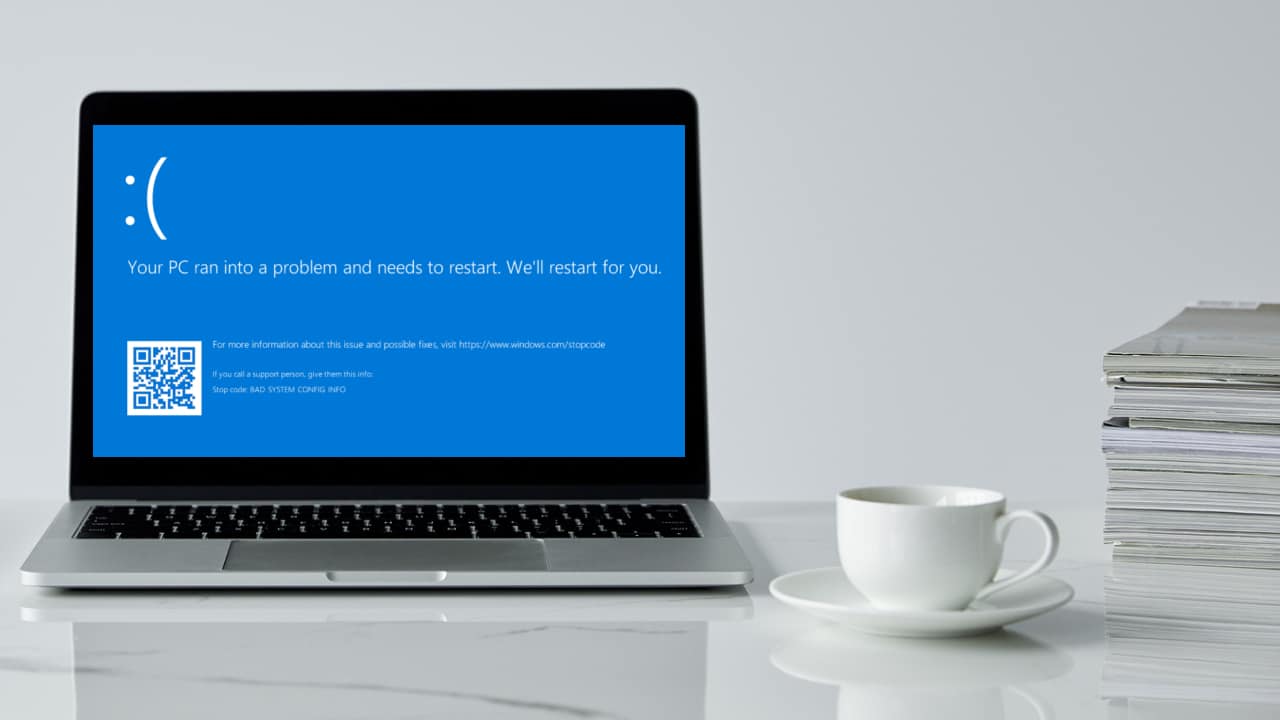
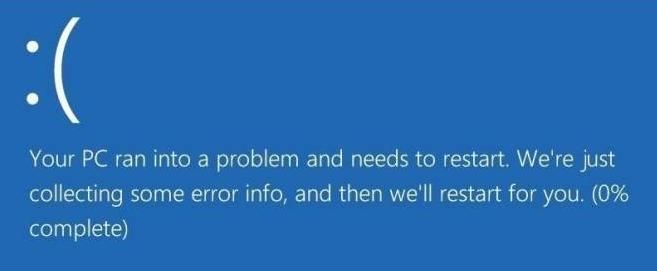
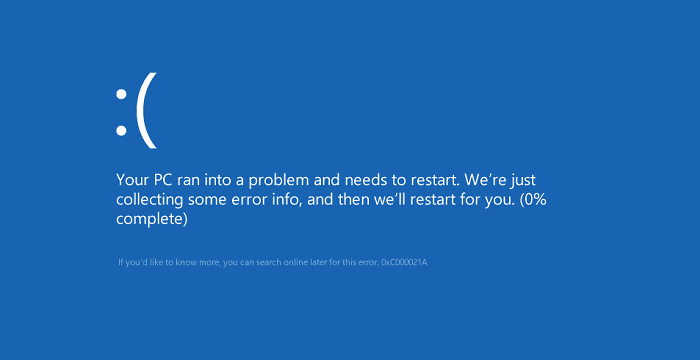
Windows 11 is the most effortless and sleek operating system for your desktop or laptop devices. However, being the most advanced Windows operating system, it isn’t free from occasional hiccups. One such issue is the “Your PC ran into a problem and needs to restart” error, commonly known as the Blue Screen of Death (BSoD) error.
The BSoD error is a system-level error message that appears on Windows 11 when the operating system encounters a critical issue that it cannot automatically recover from. This error is a protective measure, preventing further damage to your PC by initiating a system restart. While it may seem alarming at first, it’s designed to maintain the stability and integrity of your computer.
Why Does My Device Run Into a Problem and Need to Restart Windows 11?
The main cause of the Blue Screen of Death error in Windows 11 is a critical operating system crash related to hardware or driver conflicts. The Windows 11 OS automatically triggers this error screen when the OS faces a situation that it can’t fix automatically. To prevent damage to the hardware components, Windows 11 shows the BSoD screen, so you shut it down and restart it to troubleshoot.
Here’s a screenshot of the error:
Other reasons behind the “Your PC ran into a problem and needs to restart” error are as follows:
- Outdated or incompatible device drivers
- Corrupted system files or system files affected by malware
- Overheating due to inadequate ventilation or faulty hardware
- Hardware issues, such as faulty RAM, a failing hard drive, or a malfunctioning power supply
- Recent software installations or updates conflicting with the operating system
- Changes in system settings or configurations that disrupt normal operations
- Incompatibility between certain applications and the Windows 11 environment
Also read: Fix Clock Watchdog Timeout Error like This
How to Fix Your PC Ran Into a Problem Error
When you see the BSoD error, there is nothing much you can do on that screen except restart the PC. So, the first troubleshooting step is to reboot the computer.
After a reboot, if the computer powers on normally and goes to the login screen or desktop, the BSoD error is intermittent and is caused by recently installed software, hardware, or malware. Disk errors in hard disk drive (HDD) based PCs, issues with memory modules (RAMs), etc., can also cause the BSoD error. So, to fix the “Your PC Ran Into a Problem” error, follow these troubleshooting methods:
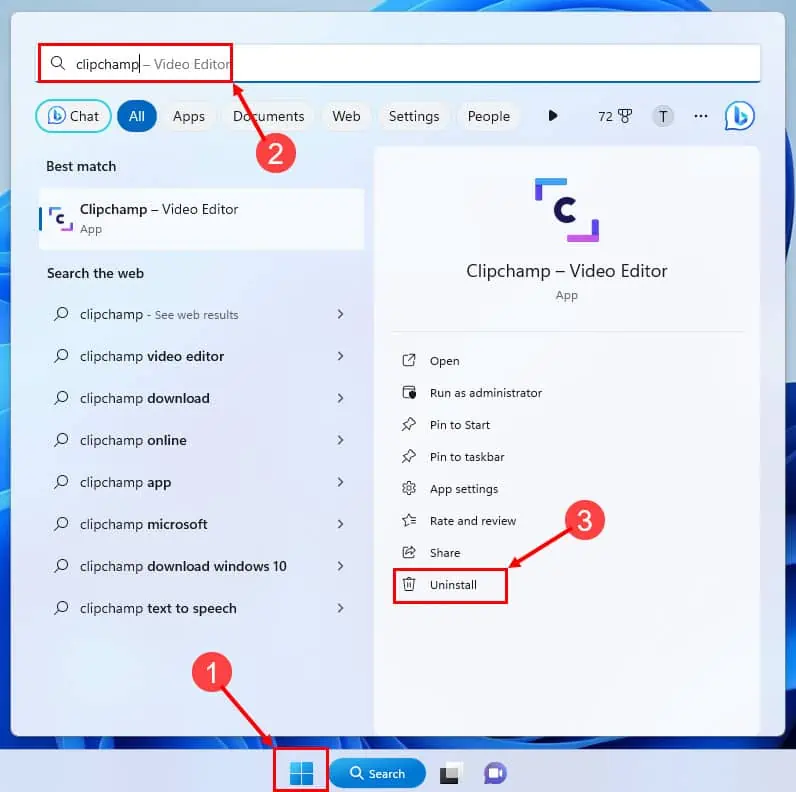
Solution 1: Uninstall Recently Installed Software
- Click the Start menu button on the taskbar.
- Type the name of the app you last installed just before the BSoD error.
- When the app shows up on the Start menu screen, click the Uninstall button.

- Reboot your computer once again.
Solution 2: Uninstall Recently Installed Hardware
If you see the BSoD error after installing new hardware, follow these steps:
- Shut down the PC.
- Detach all cables from the PC.
- Open the side cover of the CPU tower or cabinet.
- Wear an anti-static wristband before you touch the inner parts of the CPU.
- Alternatively, you can ground yourself by touching a metal surface connected to the wall or floor.
- Now, remove the hardware component from its slot on the motherboard.
- Close the side cover of the CPU tower.
- Power ON your PC.
If your Windows 11 PC is a laptop, you can only attach external hardware through USB or HDMI ports. So, simply disconnect those cables of the new hardware and then power on your laptop.
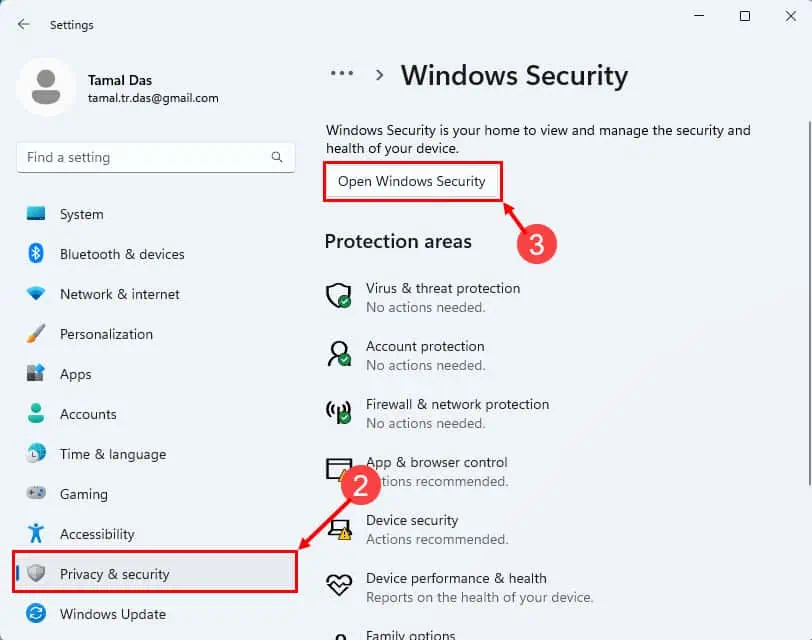
Solution 3: Scan for and Remove Malware
- When you’re on the Home Screen, press the Windows + I keys together.
- Click the Privacy and security option on the left-side navigation panel.
- Choose the Windows Security menu on the right and click on the Open Windows Security button.

- Now, click the Virus & threat protection card under the Security at a glance section.
- Click on Scan options and then choose Full scan and finally click the Scan now button.

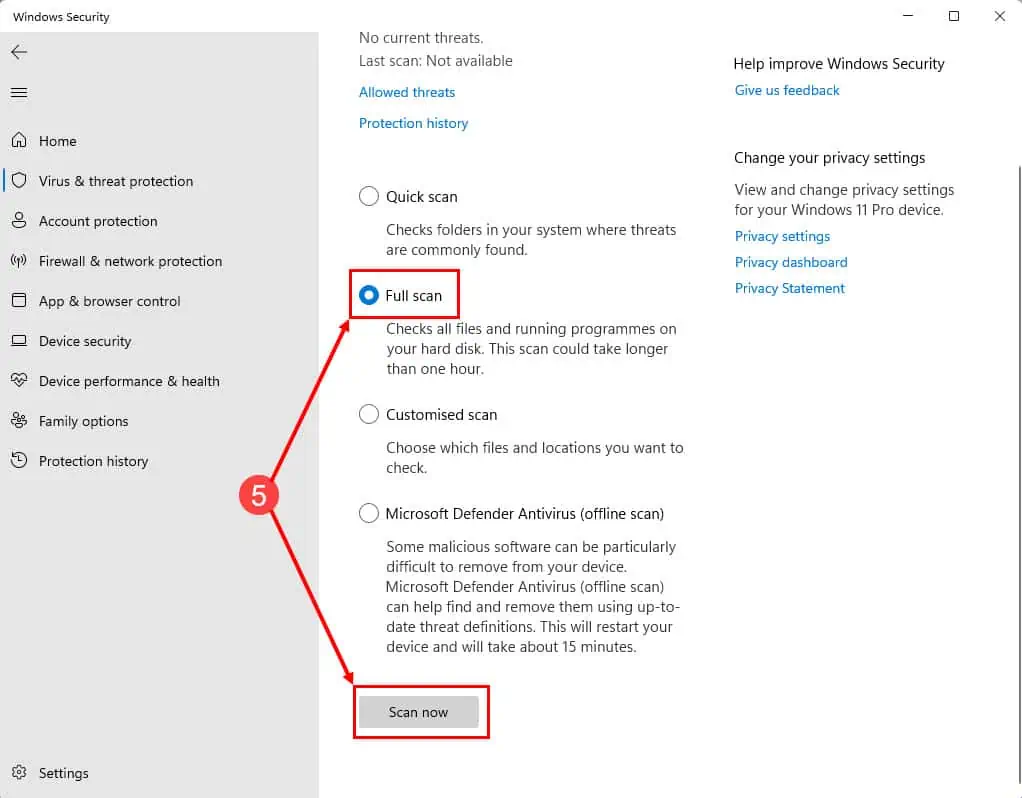
Allow Windows Security to scan the whole computer and delete any malware present on your PC. Restart to confirm if the BSoD error appearing again or not.
Solution 4: Check for Free Disk Space
The Windows 11 OS installation drive must contain 10% or more free disk space of the whole disk size. For example, if your C:/ drive’s total size is 200 GB, then there must be 20 GB of free disk space at all times. This ensures that the Windows 11 OS can perform automated repairing tasks by writing codes or files on the disk.
Read this 10 Best PC Cleaners for Windows 11 [Free & Premium] article to find the best tools you can use to free up disk space on your Windows 11 PC.
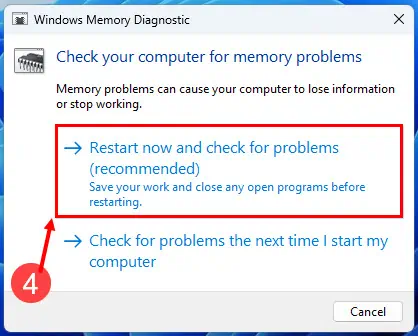
Solution 5: Use Windows Memory Diagnostic Tool to Fix RAM Issues
- Launch the Start menu.
- Type Windows Memory Diagnostic.
- Click on the Windows Memory Diagnostic app to open the RAM diagnostics tool.

- Choose between the options Restart now and check for problems (recommended) or Check for problems the next time I start my computer. Select an option.

- If you select the first option, your computer will restart automatically. If you choose the second option, you’ll need to manually restart your computer when you’re ready to run the memory diagnostic.
- Windows Memory Diagnostic will start testing your RAM for issues during the restart process. This may take several minutes.

- After the memory test is complete, your computer will automatically boot back into Windows.
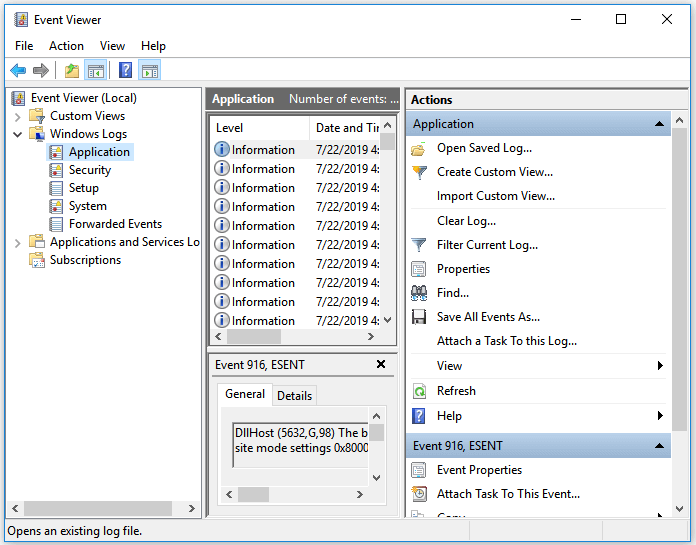
- Open the Start menu and type Event.
- Click on the Event Viewer app.
- Choose the System menu under the Windows Logs section.
- Locate the Memory Diagnostics Results under the Source column.
- Double-click to view recommendations.


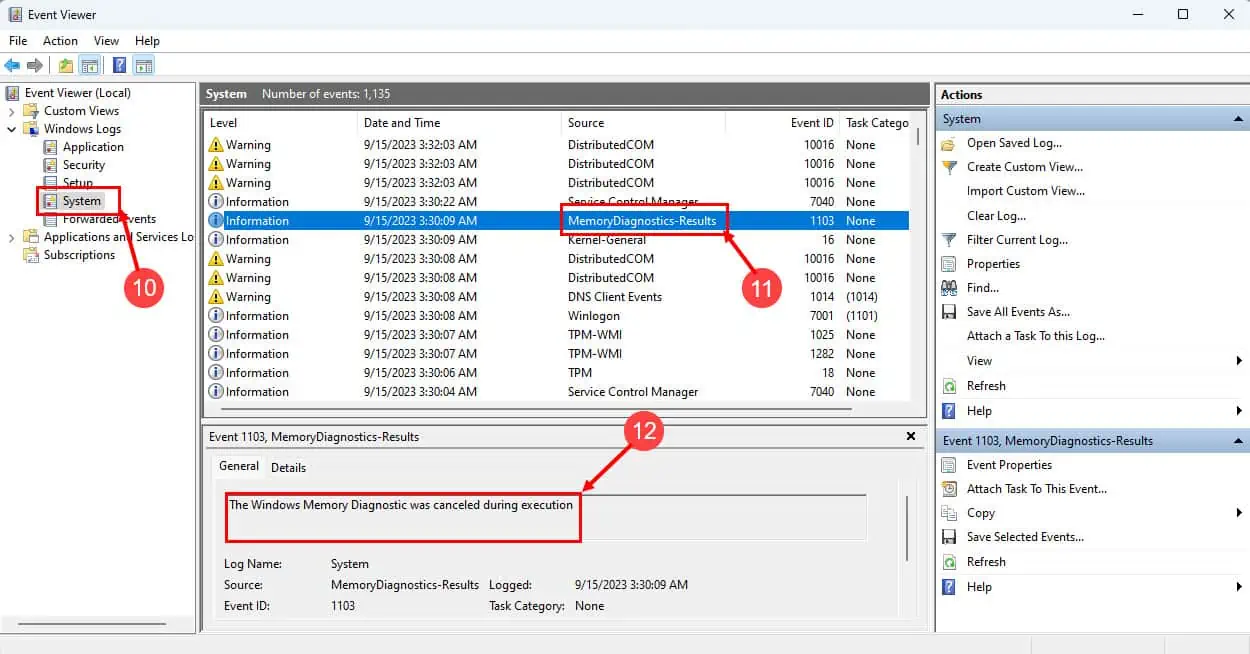
Depending on the results, you may need to replace faulty RAM modules or take other appropriate actions to fix the RAM issues on your computer. Once you’ve addressed any identified RAM issues, your computer should run more smoothly and without memory-related problems.
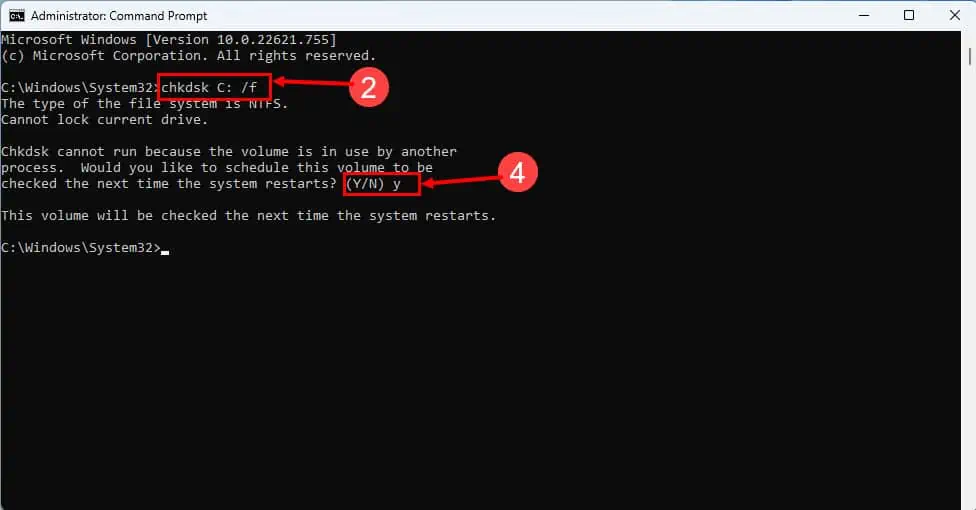
Solution 6: Find Disk Errors With the CHKDSK
-
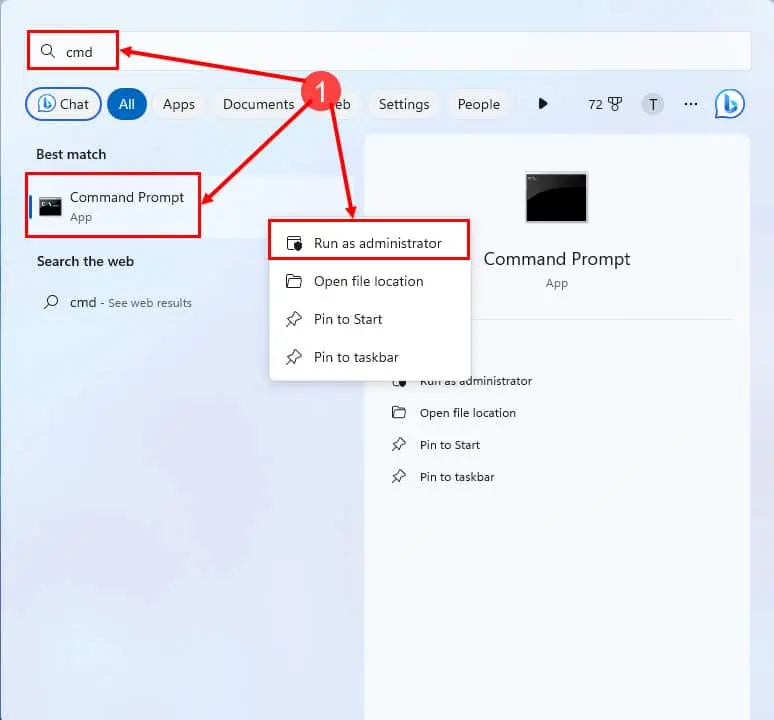
- Search for CMD in the Start menu, right-click on Command Prompt, and choose Run as administrator.

- Search for CMD in the Start menu, right-click on Command Prompt, and choose Run as administrator.
- On the CMD console, copy and paste the following command:
CHKDSK C: /F
- Hit Enter to execute.
- Press Y for disk checking and fixing after a restart.
- Restart your PC.
- The CHKDSK process will show up below the Windows 11 logo on a black screen.

- Wait for the process to complete.
- Login to your Windows 11 desktop.

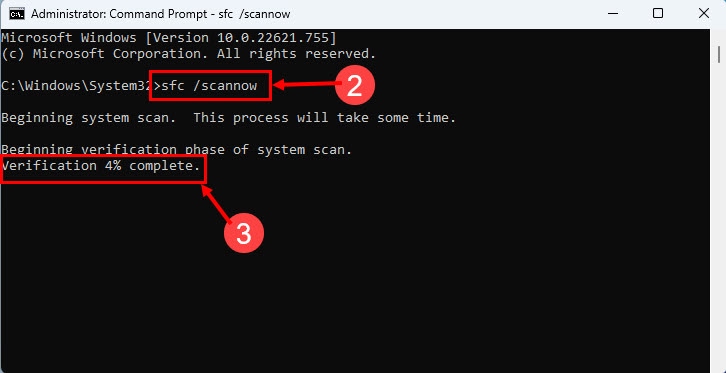
Solution 7: Check System File Errors Using SFC
- Open the Windows Command Prompt (CMD) tool with elevated rights as shown earlier.
- Type
sfc /scannowand press Enter. - The tool will perform the scan and repair system file errors, if any.

- After the fix, restart the computer.
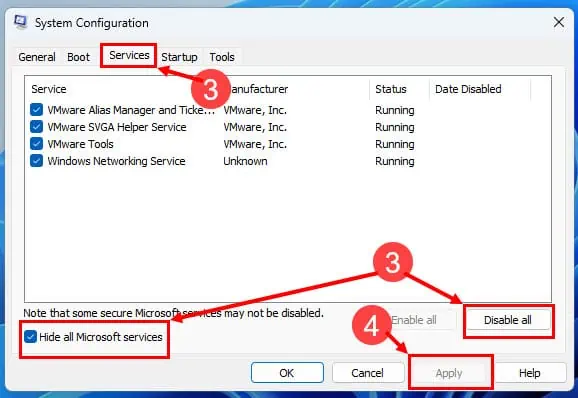
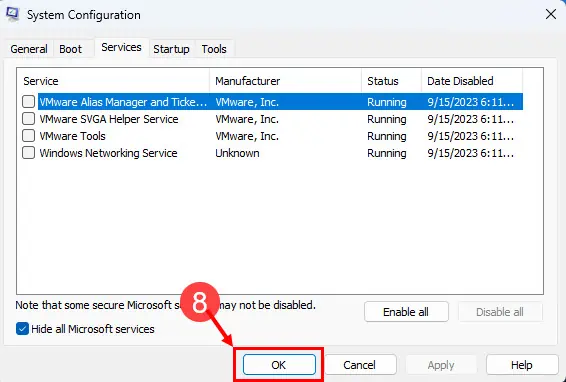
Solution 8: Perform a Clean Boot
- Press Windows + R to open the Run dialog.
- Open the System Configuration utility by typing
msconfigand pressing Enter. - In the System Configuration window, go to the Services tab, check Hide all Microsoft services, and then click Disable all.
- Click the Apply button.

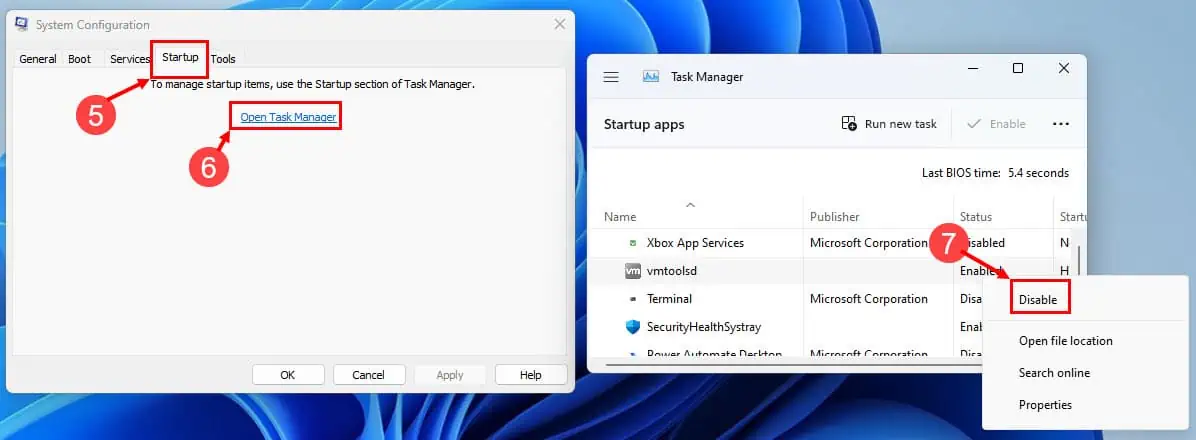
- Now, navigate to the Startup tab of the System Configuration window.
- Click Open Task Manager to manage startup items individually.
- Disable unnecessary startup items by right-clicking on them.

- Click OK in the System Configuration window, and when prompted, restart your computer to complete the Clean Boot process.

Solution 9: Check if Windows Update Is Available
- Press the Windows + I keys together to open Settings.
- Click on Windows Update.
- Click Check for Updates to search for available updates.
- Review the list of updates and click on the Install all or Download and Install button.

- Restart your computer if prompted.
- You can click on Check for updates again to check for additional updates.
- Repeat the update process as necessary.
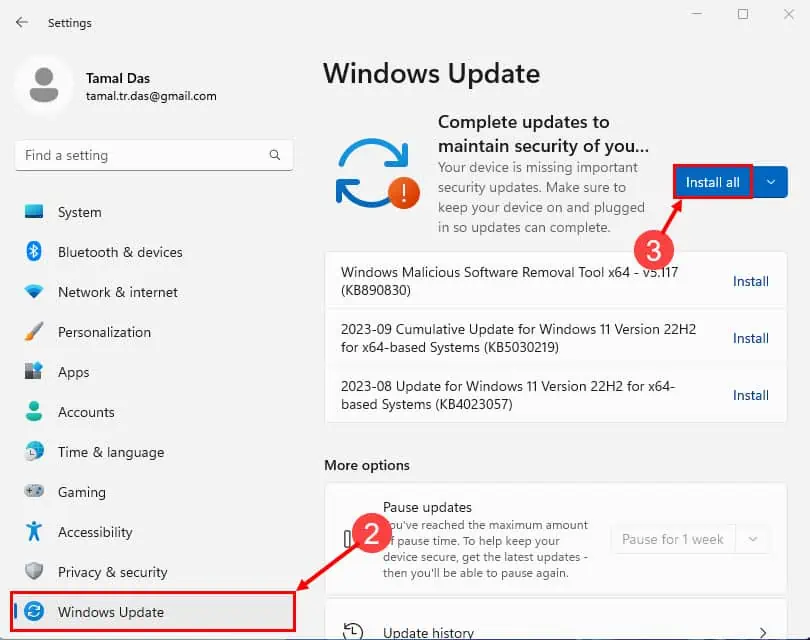
Verify if the error is resolved after updating Windows 11 to the latest edition.
Solution 10: Keep Device Drivers Updated
- Open Device Manager by pressing the Windows + X keys.
- Select the device type for which you need to update the driver software.
- Expand the device to find the driver that needs to be updated.
- Right-click on the driver to choose the Update driver option.
- Now, select Search automatically for updated driver software.

- Windows will install the latest driver after searching for it.
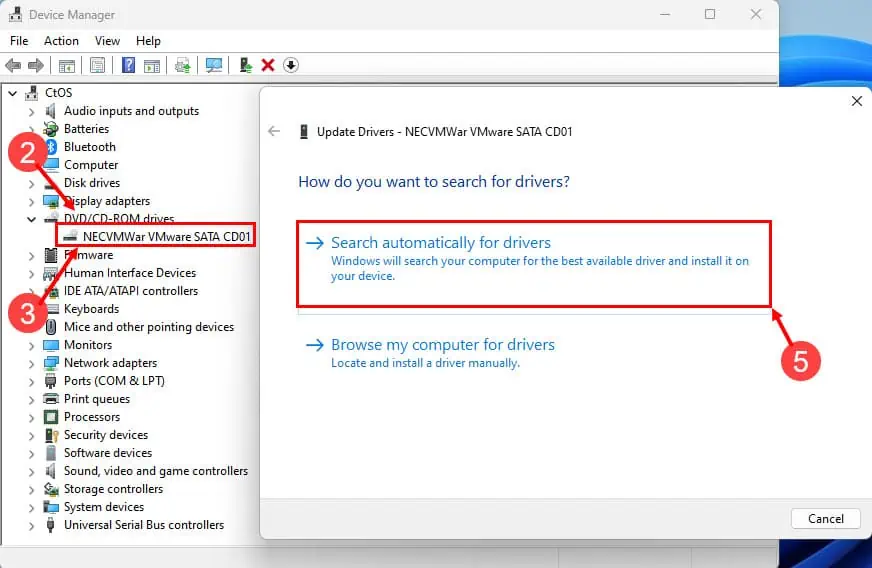
Now, reboot your PC. From now on, you shouldn’t face the “Your PC ran into a problem and needs to restart” error because of outdated driver issues.
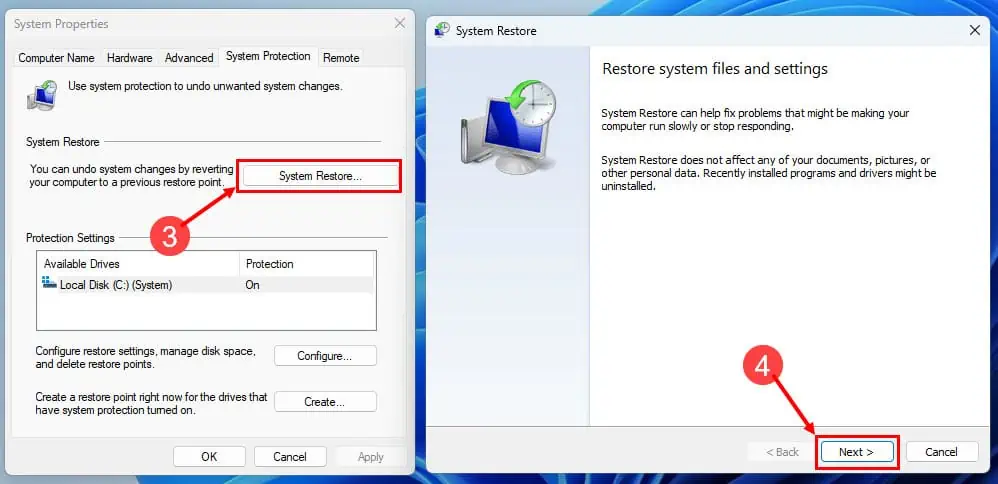
Solution 11: Use the System Restore Tool
-
- Press the Windows + S keys to open the Start menu search bar.
- Type Create a restore point, and press Enter.

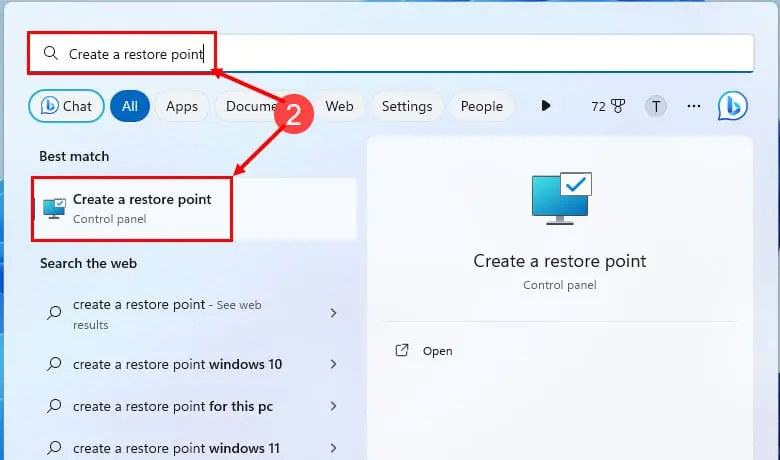
- In the System Properties window, click the System Restore button.
- On the Restore system files and settings dialog box, click Next.

- Choose a System Restore point from the list in front of you.
- You must select by analyzing the dates and time stamps when the system was working just fine.
- Click Next to confirm.
- After pressing the Finish button, Windows 11 will complete the process.

- Your computer will restart and will be restored to the chosen state.

So far, you explored the ways to get out of the BSoD error if your PC goes to the desktop. However, if it doesn’t go to the login screen or desktop, follow these troubleshooting methods instead:
Solution 12: Remove Newly Connected Hardware
It’s highly likely that the hardware you installed in your desktop PC isn’t compatible or interfering with the Windows 11 OS runtime. Hence, to prevent any more damage to other hardware or software, Windows 11 entered the BSoD error screen.
Long press on the power key until the PC shuts down. Then follow the steps mentioned in Solution 2, earlier in this article.
Solution 13: Attempt to Run the PC in Safe Mode
- Shut down the PC by long pressing the power key on the CPU tower or laptop until the display turns black.
- Now, press the power button.
- When the motherboard manufacturer’s or Windows 11 logo appears long press the power button to shut down the PC.
- Repeat this step once more.
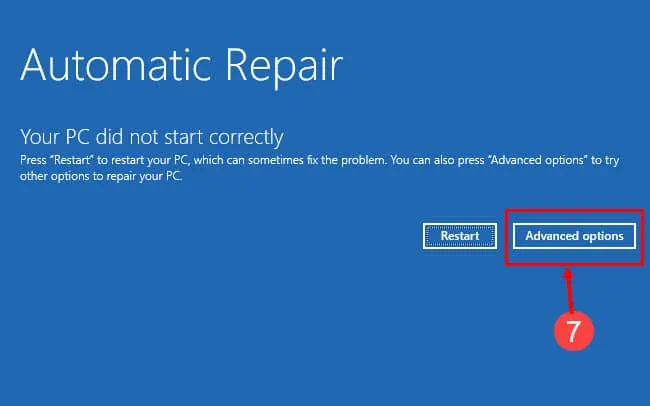
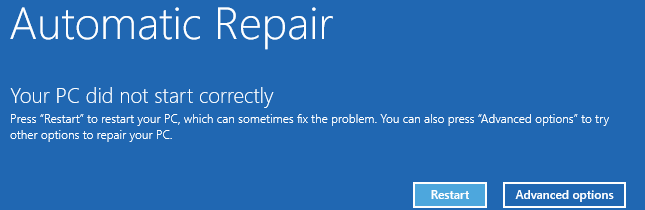
- You’ll see the Preparing For Automatic Repair screen.
- The Windows 11 PC should now enter the WinRe mode saying Automatic Repair.
- Click the Advanced options button.

- On the next screen, click Troubleshoot.
- Now, click the Advanced options button.

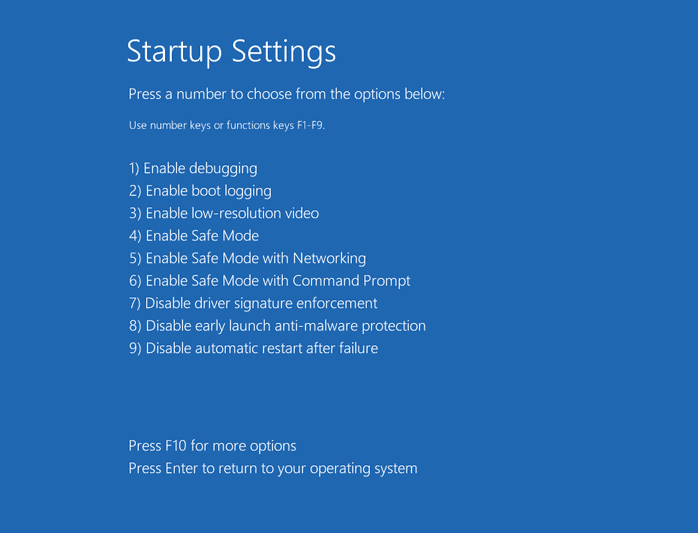
- On the Advanced options screen, select Startup Settings.
- Click Restart on the Startup settings window.

- After the reboot, you should see the Startup Settings screen.
- Press 4 on the keyboard to reboot the device in Safe Mode.


If you’re able to log in to the Home Screen of the PC in Safe Mode, the issue is with any application recently installed. Uninstall that app by following the steps mentioned in Solution 1 earlier in this article.
Once you’ve uninstalled the suspected app, restart the PC to go back to normal mode.
Solution 14: Repair Windows Installation
If the Safe Mode doesn’t fix the issue, follow these steps:
- Repeat the steps 1 through 7 in Solution 13 to access the Automatic Repair screen.
- Click Advanced options now.
- From here click Troubleshoot > Advanced options to arrive at the Startup Repair card.
- Click Startup Repair.

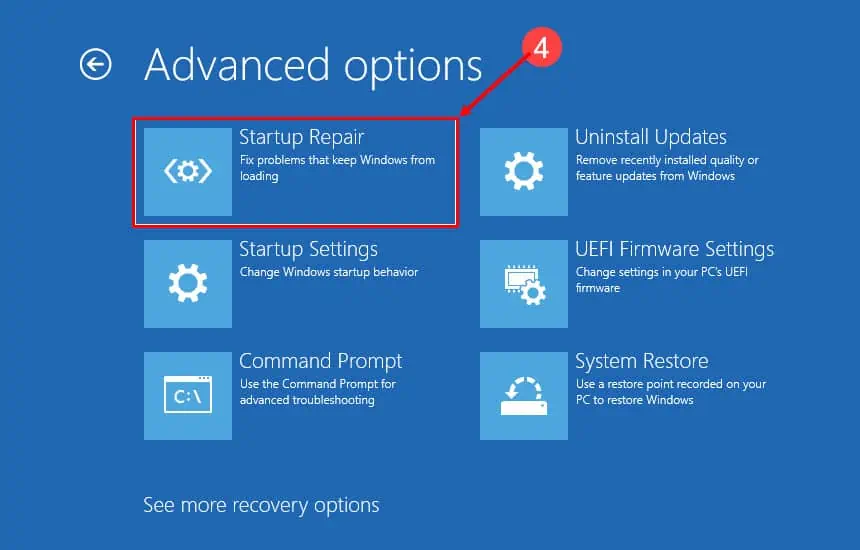
Through various Windows 11 diagnoses, the operating system will automatically fix the loading issues of Windows OS. Once the repair is complete, you should see the login screen.
Solution 15: Perform a Clean Installation of Windows 11
If none of the above tricks work for you, you must try installing a fresh copy of Windows 11. If you possess a bootable Windows 11 OS stick follow these steps:
- Shut down the PC.
- Insert the bootable Windows 11 USB drive into any of the USB ports of the PC.
- Press the power button.
- When you see the prompt Press any key to boot from USB, press any key on the keyboard.
- The Windows 11 from the USB stick will load.
- Follow onscreen guidance to install a clean copy of the Windows 11 OS.
If you don’t have a bootable USB drive for Windows 11, you can create one yourself. Use another PC for this task. To proceed, you must gather the following items first:
- Windows 11 Disk Image (ISO) for x64 devices
- Windows 11 bootable media creation tool
Go to the above links and download these files. Then, follow these steps:
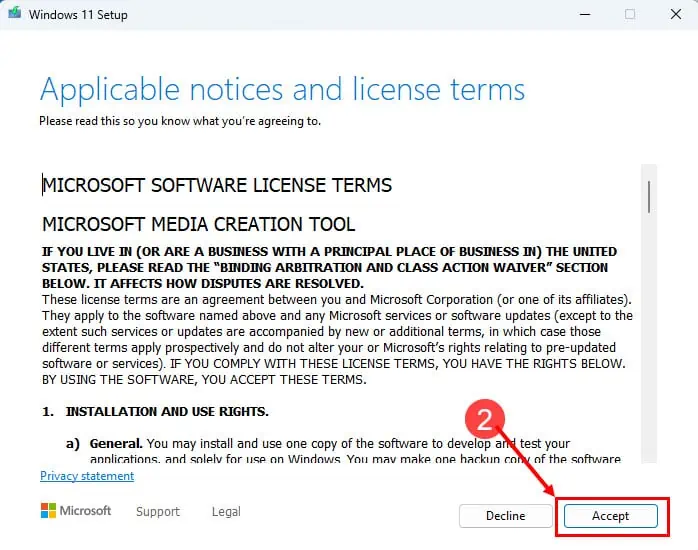
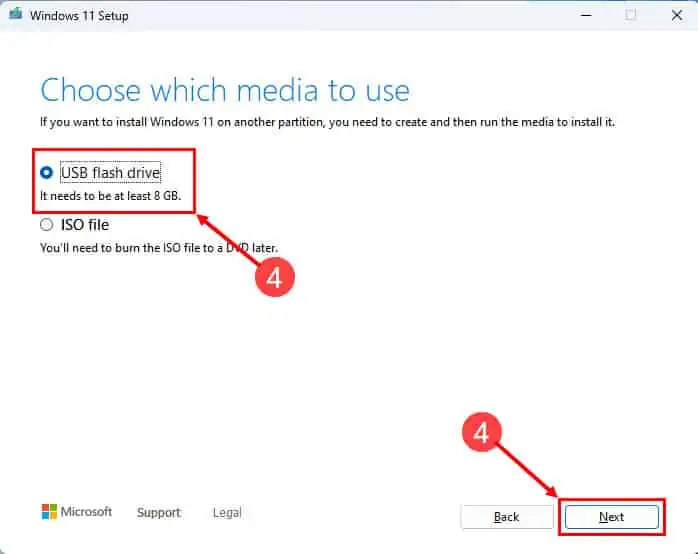
- Double-click the mediacreationtool.exe file that you downloaded.
- On the Windows 11 Setup dialog, click Accept.

- Click Next on the language selection step.
- Select USB flash drive and click Next if you want to create a bootable USB stick.
- Insert a USB stick of 8 GB or more before clicking Next.

- Insert a USB stick of 8 GB or more before clicking Next.
- Or, click ISO file and click Next to burn Windows 11 image on a DVD.
- Insert a DVD of 8 GB or more before clicking Next.
- The tool will ask you to locate the Windows 11 ISO image that you downloaded earlier.
- Follow on-screen guidance to complete the process.
Solution 16: Contact Microsoft Support
For personalized assistance on BSoD errors in Surface devices by Microsoft or Windows 11 purchased from Microsoft, you can reach out to Microsoft Support as well.
Solution 17: Contact Hardware Manufacturer
If you bought the Windows 11 desktop or laptop PC from computer manufacturers, you can contact their technical support teams as well. For example, here are the URLs for popular brands:
- Lenovo
- Dell
- HP
- Asus
- Acer
Use a 3rd Party BSoD Fixer
If you find the above methods too manual and looking for an automated fix, you can try out the Fortect application. It’s an all-in-one Windows PC system repair tool. Here’s how it works:
- After downloading the application Fortect, install it.
- Click the Upgrade/Activate button at the bottom left corner of the app to activate the tool.
- Now, click the Start Full Scan button on the Dashboard.

- Once the scanning process is over, Fortect will recommend the fixes needed to get rid of the BSoD error.
- If the BSoD error is caused by faulty drivers, incompatible DLLs, and Windows 11 bugs, it fixes those automatically.
- If there is any incompatible hardware in the system, it’ll also ask you to remove or replace that hardware.
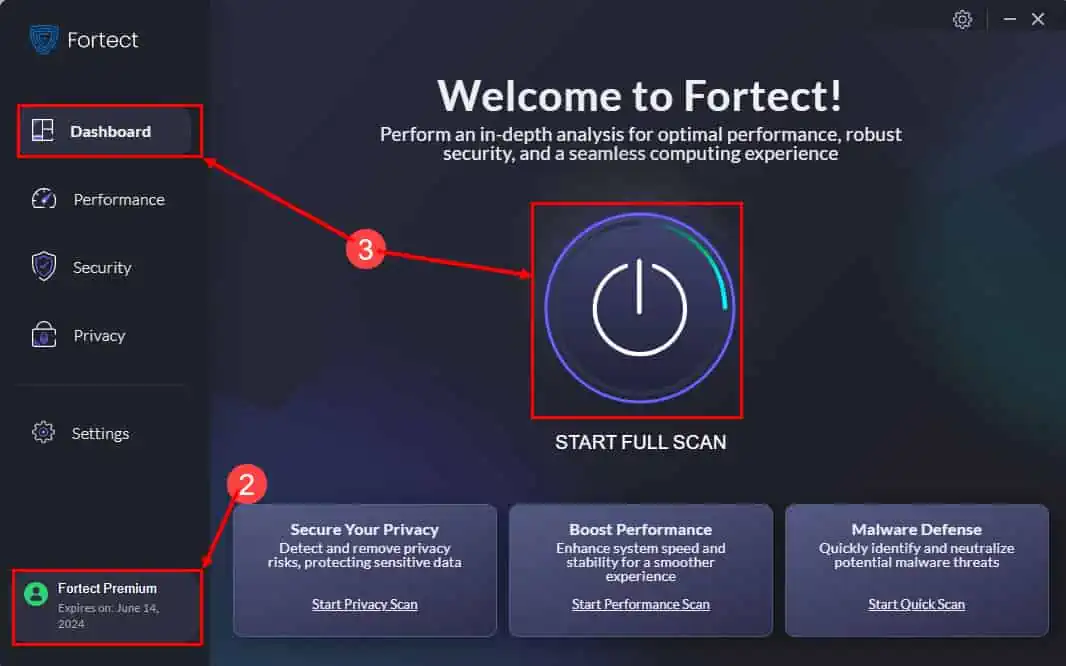
However, you can only use this tool if you’re able to log in to the PC after a crash caused by the “Your PC ran into a problem” error.
Conclusion
So, now you know how to navigate your way on your Windows 11 desktop or laptop PC if the BSoD error shows up. You’ve learned the troubleshooting methods for both scenarios, that is, you can log in to the PC after the error and you’re stuck on the BSoD screen even after a restart.
If the article helped or you want to provide feedback/suggestions, write your comment below.
Попробуйте наш инструмент устранения неполадок
Выберите операционную систему
Выберите язык програмирования (опционально)
‘> 
Когда ваш компьютер продолжает давать сбой, это очень неприятно. Подсказка « На вашем компьютере возникла проблема, и его нужно перезагрузить »Совсем не помогает. После перезагрузки компьютера вы снова получаете ошибку. Но не волнуйтесь. Вы можете исправить ошибку, следуя приведенным ниже инструкциям.
Темы, которые вы можете прочитать :
- Что вызывает эту ошибку?
- Рекомендуемые методы исправления ошибки
Что вызывает эту ошибку?
Если бы вы спросили меня, что вызывает эту ошибку, я бы ответил: «Извините. Я не знаю’. Но, пожалуйста, не разочаровывайтесь. Возможно, вы все еще можете исправить это одним из способов, описанных в этой статье.
На самом деле это распространенная ошибка синего экрана. Когда ваш компьютер не может работать должным образом из-за некоторых проблем, Windows продолжает давать сбой, и вы получаете синий экран. Ошибки синего экрана могут быть вызваны многими проблемами. Но у большинства из них одни и те же причины.
Согласно Microsoft, 70 процентов ошибок синего экрана вызваны кодом стороннего драйвера. , и 10 процентов вызваны проблемами с оборудованием . Ниже вы познакомитесь с методами, которые устраняют наиболее частые причины.
Помимо сообщения «Ваш компьютер столкнулся с проблемой и его необходимо перезагрузить», вы также можете увидеть на экране сообщение об ошибке остановки, например DRIVER_IRQL_NOT_LESS_OR_EQUAL, BAD POOL HEADER. Внизу статьи вы можете найти Статьи по Теме об исправлении конкретных кодов ошибок остановки.
Рекомендуемые методы исправления ошибки
Здесь 5 методы вы можете попробовать исправить ошибку. Возможно, вам не придется пробовать их все, просто двигайтесь вниз в верхней части списка, пока не найдете тот, который вам подходит.
- Снимите внешнее оборудование
- Обновите драйверы
- Проверить наличие обновлений Windows
- Удалить недавно установленное программное обеспечение или приложения
- Устранить перегрев компьютера
Метод 1. Удалите внешнее оборудование
Вероятно, проблема вызвана неисправностью внешнего оборудования. Если вы подключили внешнее оборудование, например USB-устройство, внешний жесткий диск, отключите их. Затем проверьте, правильно ли работает компьютер.
Способ 2: Обновите драйверы
Вероятно, проблема вызвана неисправными драйверами. Итак, чтобы исправить ошибку, попробуйте обновить драйверы.
ВАЖНЫЙ : Вам нужно будет войти в Windows на проблемном компьютере, чтобы попробовать этот метод. Если вы не можете войти в Windows, перезапустите его в безопасном режиме , затем попробуйте решение.
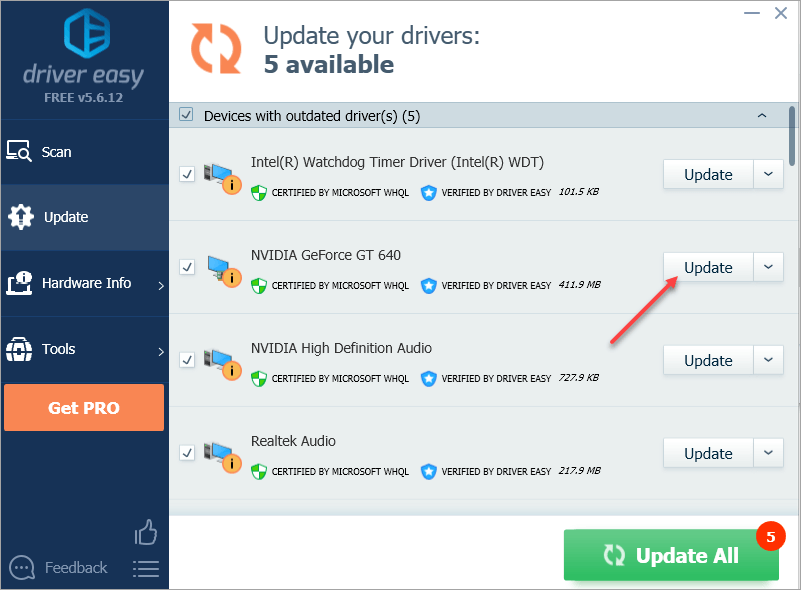
Вы можете обновить драйверы вручную. Если у вас нет времени, терпения или навыков работы с компьютером, чтобы обновить драйвер вручную, вы можете сделать это автоматически с помощью Водитель Easy .
Driver Easy автоматически распознает вашу систему и найдет для нее подходящие драйверы. Вам не нужно точно знать, на какой системе работает ваш компьютер, вам не нужно рисковать, загружая и устанавливая неправильный драйвер, и вам не нужно беспокоиться о том, чтобы сделать ошибку при установке.
Вы можете автоматически обновлять драйверы с помощью БЕСПЛАТНОЙ или Pro версии Driver Easy. Но с версией Pro требуется всего 2 клика (и вы получаете полную поддержку и 30-дневную гарантию возврата денег):
1) Скачать и установите Driver Easy.
2) Запустите Driver Easy и нажмите Сканировать сейчас . Driver Easy просканирует ваш компьютер и обнаружит проблемы с драйверами.
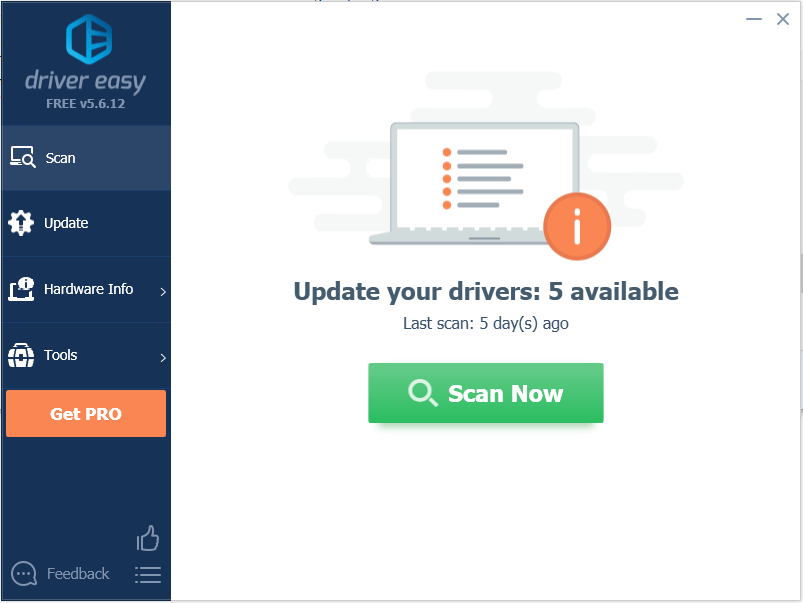
3) Щелкните значок Обновить рядом с одним устройством, чтобы автоматически загрузить и установить правильную версию драйвера (вы можете сделать это в БЕСПЛАТНОЙ версии).
Или нажмите «Обновить все», чтобы автоматически загрузить и установить правильную версию всех драйверов, которые отсутствуют или устарели в вашей системе (для этого требуется версия Pro — вам будет предложено выполнить обновление, когда вы нажмете «Обновить все»).
Метод 3: проверьте наличие обновлений Windows
В случае некоторых неизвестных проблем очень поможет проверка и обновление обновлений Windows. Итак, чтобы исправить ошибку, вы можете проверить и установить обновления Windows.
ВАЖНЫЙ : Вам нужно будет войти в Windows на проблемном компьютере, чтобы попробовать этот метод. Если вы не можете войти в Windows, перезапустите его в безопасном режиме , затем попробуйте решение.
Если вы используете Windows 10 , обратитесь к этим шагам, чтобы проверить и установить Центр обновления Windows:
1) Тип Центр обновления Windows в строке поиска, затем щелкните Проверить обновления во всплывающем меню.
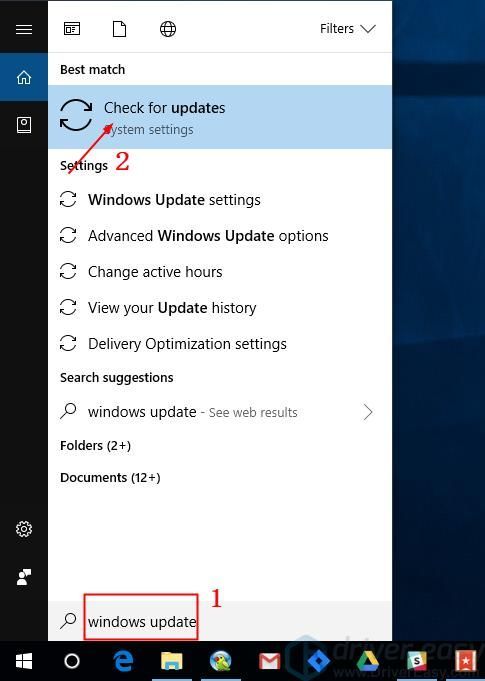
2) Щелкните значок Проверить обновления кнопка.
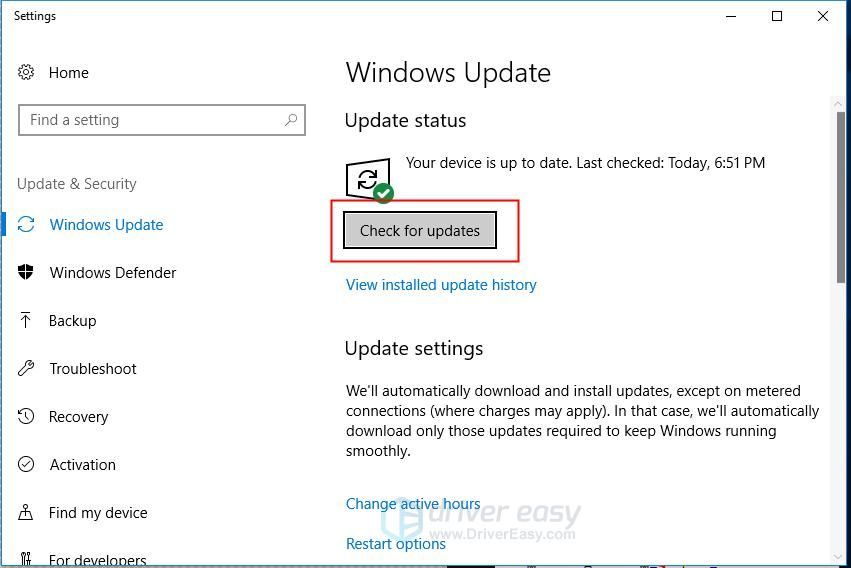
3) После завершения проверки установите все обновления.
4) После установки всех обновлений проверьте, правильно ли работает компьютер.
Если вы используете Windows 7 обратитесь к этим шагам, чтобы проверить и установить Центр обновления Windows.
1) Щелкните значок Начало меню и щелкните Все программы .
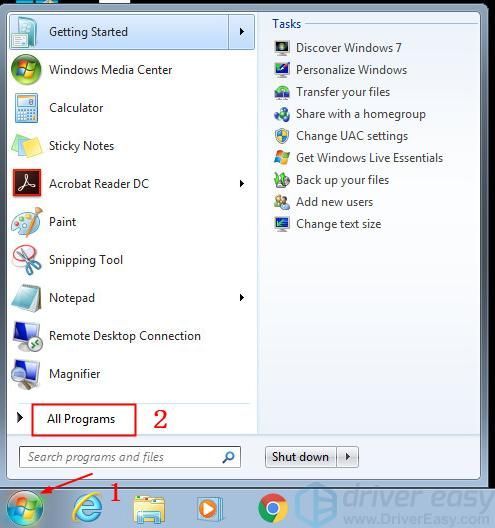
2) Нажмите Центр обновления Windows .
3) Щелкните значок Проверить обновления кнопка.

4) После завершения проверки обновлений установите все обновления.
5) После установки всех обновлений проверьте, правильно ли работает компьютер.
Метод 4. Удалите недавно установленное программное обеспечение или приложения.
Если ошибка возникла после установки нового программного обеспечения или приложения, вероятно, причиной является это программное обеспечение или приложение. В этом случае удалите это программное обеспечение или приложение, чтобы увидеть, решена ли проблема.
Метод 5: исправить перегрев компьютера
Перегрев компьютера может вызвать появление синего экрана. Проверьте, не перегревается ли ваш компьютер.
Если температура вашего компьютера достигает 90 градусов Цельсия или выше, вы, вероятно, испытываете чрезмерное нагревание. Вы можете использовать прибор для контроля температуры, чтобы проверить температуру.
Чтобы временно устранить проблему с перегревом, выключите компьютер на время, может быть, на 30 минут. После этого перезагрузите его, чтобы проверить, правильно ли работает компьютер.
Перегрев компьютера может быть вызван неработающим охлаждающим вентилятором, сломанным радиатором, пылью на корпусе и т. Д. Если ваш компьютер продолжает перегреваться, обратитесь за помощью в местную мастерскую по ремонту компьютеров.
Надеюсь, что приведенные выше инструкции помогут вам устранить ошибку синего экрана. Если у вас возникнут вопросы, не стесняйтесь оставлять свои комментарии. Я хотел бы услышать любые идеи или предложения.
Статьи по Теме
(Исправлено) Ошибка синего экрана нарушения сторожевого таймера DPC
Как исправить сбой состояния питания драйвера в Windows 10
Плохой заголовок пула в Windows 10 (решено)
Ошибка TDR видео (atikmpag.sys) в Windows 10 (решено)
Больше…
According to different situations, the answers to how to fix your PC ran into a problem vary. Here’s quick navigation for all solutions, you can directly jump to the part you’re interested in:
| Cases | Step-by-step Troubleshooting |
|---|---|
| Case1. You can boot Windows |
Fix 1. Boot into safe mode, then boot normally…Full steps Fix 2. Check and repair disk errors with CHKDSK…Full steps Fix 3. Leave enough space for system drive…Full steps Fix 4. Check system log in Event Viewer…Full steps |
| Case2. You can’t boot Windows |
Fix 1. Perform System Restore with point…Full steps Fix 2. Perform System Image Recovery…Full steps Fix 3. Restore Registry configuration with CMD…Full steps |
| Case3. Stuck in Windows loop |
Fix 1. Perform Startup Repair to fix the issue…Full steps Fix 2. Perform System Image Recovery…Full steps Fix 3. Restore the Registry in Command Prompt…Full steps Fix 4. Enter Safe Mode to uninstall software…Full steps |
Applies to: Fix «Your PC ran into a problem and needs to restart» issue on the latest Windows 10 20H2 October Update, Windows 10 2004, Windows 10 1909/1903/1809/1803/1709, and more. If you know little about computers and can’t fix system startup errors, you can use EaseUS Data Recovery Services. The technical team can help you solve system startup errors, including system failure, BSOD, unbootable devices, etc.
Consult with EaseUS data recovery experts for one-on-one manual recovery service. We could offer the following services after FREE diagnosis:
- Fix Windows boot issues, including BSOD
- Fix Windows error and configure Windows environment
- Restore the system when it fails to boot
- Optimize Windows computer to make it run quickly
Some Windows users have encountered a situation where their operating system crashes unexpectedly and displays the dreaded blue screen of death. There are various underlying causes that can result in a crash, and the system will report different error messages and information. Among the blue screens, ‘Your PC ran into a problem and needs to restart’ happens most frequently.
Symptoms
The error «Your PC ran into a problem and needs to restart. We’re just collecting some error info, and then we’ll restart for you» may occur during the Windows startup process or during normal use.
Causes
Each stop/error code indicates the possible causes of the issue. However, there are various error messages (100+) related to «Your PC ran into a problem and needs to restart». Thus, there are so many reasons why you encounter the error. But I narrow them down to the following factors:
- Changes in registry
- Corrupted system files
- Problematic driver
- Virus/malware infection
- Loose hard drive connection
- Improper shutdown of the system
These causes may also lead to other blue screen errors like DPC Watchdog violation, Automatic Repair loop, and more.
EaseUS Data Recovery Wizard
- Recover inaccessible files from unboot computers.
- Recover files from formatted hard drive, emptied recycle bin, memory card, flash drive, digital camera, and camcorders
- Support data recovery for sudden deletion, formatting, hard drive corruption, virus attack, system crash under different situations
11 Fixes for Your PC Ran Into a Problem and Needs a Restart in Windows 11/10/8/8.1
If you are faced with the error, there is a slim chance that your computer will work properly after a restart. In more common situations, your PC will restart and prepare an automatic repair, which generally doesn’t work and will show you «Your PC did not start correctly». Or you are just stuck at the «Your PC ran into a problem and needs to restart» loop. Specify your situation and carry out the corresponding fixes to have a try.
- Notice:
- You’d better visit this page with another device instead of your computer since some of the solutions below require you to restart your computer. Besides, whether you can boot your computer or not, if the error code says «INACCESSIBLE BOOT DEVICE», do check your hard drive connection and remove the peripherals that are attached to your computer.
Situation 1. You Can Boot Windows
Even if you can still boot your computer, you need to apply some troubleshooting steps to prevent such an error from happening again. But you are the lucky ones that can fix the error much more easily with a bootable computer.
Method 1. Boot into Safe Mode and then Boot Normally
Safe Mode is a diagnostic mode of Windows. It starts your PC with the minimal necessary programs and services. In Safe Mode, you can fix some system-related problems by uninstalling incompatible software/driver, deleting problematic files, removing viruses, and more. Even if you do nothing, booting into Safe Mode is useful to repair some system errors by helping the storage system to be reaccessed.
On a functional computer, you can enter Safe Mode via Settings:
Step 1. In Windows 10, click «Start» > «Settings» > «Update & Security» > «Recovery».
Step 2. In the «Advanced startup» section, choose «Restart now».
Step 3. After the restart, choose «Troubleshoot» > «Advanced Options» > «Startup Settings» > «Restart».
Step 4. Now you will see the «Startup Settings» screen. You can choose one of the three Safe Mode options: «Enable Safe Mode», «Enable Safe Mode with Networking», or «Enable Safe Mode with Command Prompt».
Step 5. Restart your computer and see whether it boots properly.
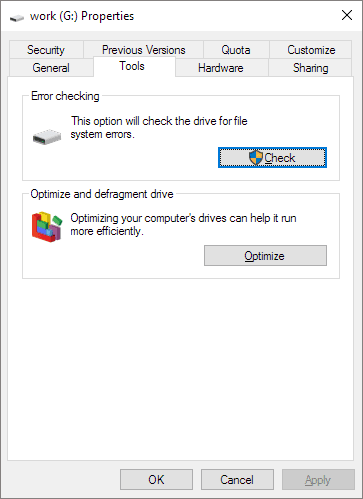
Method 2. Check the Disk
Check the disk is identical to running the CHKDSK command, which is used to fix disk errors like bad sectors and file system errors. If «Your PC ran into a problem and needs to restart» appears with «INACCESSIBLE_BOOT_DEVICE», it may be caused by the file system errors on your hard drive. That’s why checking the disk is necessary.
Step 1. Go to «This PC». Right-click your drive and choose «Properties».
Step 2. Go to the «Tools» tab and click «Check» > «Scan drive».
Method 3. Leave Enough Space for System Drive
The Windows operating system and some applications installed need sufficient free space to function properly. If your system drive, generally a C drive, is almost out of space, you should consider extending the system partition to create more space for your OS.
Method 4. Check System Log in Event Viewer
Checking the system log in Event viewer is helpful to find the culprit of the «Your PC ran into a system» error in Windows 11/10/8/8.1, especially for a problematic device or driver.
Step 1. Click «Start» and enter the event viewer.
Step 2. Right-click «Event Viewer» and choose «Run as administrator».
Step 3. Expand «Windows Logs» and choose «System».
Step 4. Check the errors that occurred simultaneously with the blue screen and fix the error according to the information.
Of course, there are other ways to try, including updating the device driver in Device Manager and running hardware diagnostics provided using the Windows built-in feature. If the solutions above fail, continue to carry out these methods to cope with the problem.
Related reading: How to Fix Windows 10 Error Code 0xc00000e When Boot Computer
Situation 2. You Can’t Boot Windows and See «Your PC did not start correctly»
In some cases, your PC will restart and prepare a startup repair automatically after the error message appears, resulting in the «Your PC did not start correctly» screen. Here you can see two options: Restart and Advanced options.
If you click «Restart», it’s almost inevitable the computer will come with the same error screen. Thus, you should choose «Advanced options» instead. Afterwards, continue to choose «Troubleshoot» > «Advanced options».
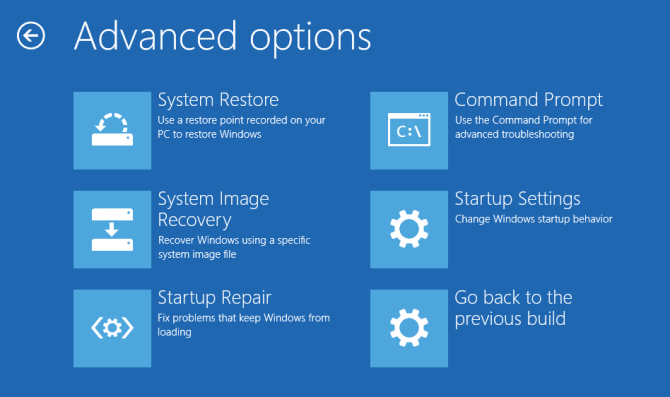
Here you will see five or six options, depending on your Windows version, including System Restore, System Image Recovery, Command Prompt, Startup Settings, and Go back to the previous build. Here is a brief explanation:
- If you have created a restore point, then using the System Restore feature will bring your computer back to a functional state. If not, this option is useless.
- Similarly, if you have created a system image, you can perform a System Image Recovery to bring your system back to life. If not, it’s just not the option for you.
- In this case, the computer had tried a Startup Repair and failed. Therefore, it’s unnecessary to try it again.
- In Command Prompt, you can use command lines to execute operations.
- In Startup Settings, you can enter Safe Mode, disable automatic restart after failure, and more.
- The «Go back to the previous build» will bring your computer back to an earlier version.
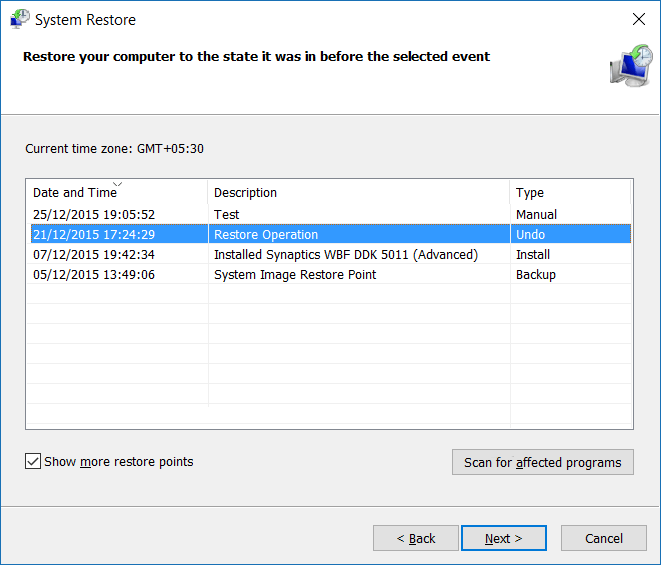
Method 1. Perform System Restore
If you have a system restore point available, you can perform a system restore:
Step 1. In the Windows Boot Options menu, select «Troubleshoot» > «Advanced Options» > «System Restore».
Step 2. Choose a previous working state (data) to restore your computer.
Step 3. Wait until Windows restores your system. Then restart the computer.
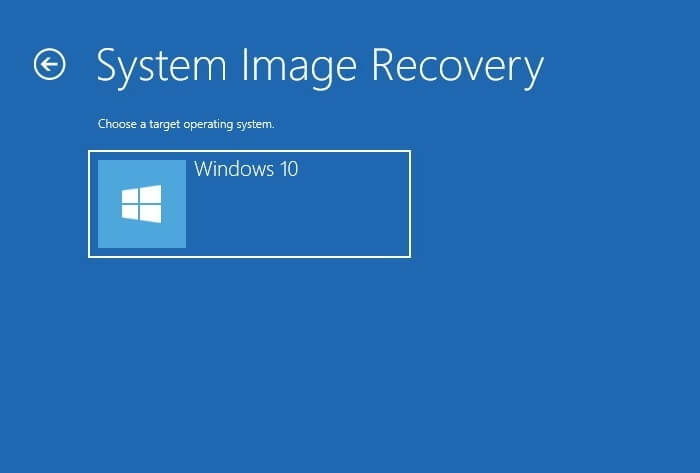
Method 2. Perform System Image Recovery
Alternatively, you can perform a system image recovery if you have created a system image before the issue arise.
Step 1. Connect the external hard drive that contains the system image to your computer.
Step 2. In the Windows Boot Options menu, select «Troubleshoot» > «Advanced Options» > «System Image Recovery».
Step 3. Choose the system image you want to recover.
Step 4. In the Re-image your computer wizard, select the system image, and click «Next».
Step 5. Follow the wizard to format the disks and restore the system.
Step 6. Restart your computer.
Method 3. Restore Registry Configuration
Don’t have any restore point or system image? No worry. Based on the details above, here I recommend you select «Command Prompt» to restore the registry.
The registry is a database that contains the configuration data for the Windows operating system and most of the applications. That is why changes in the registry may influence the functionality of your computer or programs. Registry files may get deleted accidentally by yourself or by some program. And that could result in serious problems just like «Your PC ran into a problem and needs to restart». Luckily, the changes can be reverted with the registry backup files, which you can complete via Command Prompt.
Step 1. Choose «Command Prompt» among the options.
Step 2. Select the account and enter the password.
Step 3. In Command Prompt, enter the following command in order:
- C:
- CD Windows\System32
- CD config
- DIR
- CD regback
- DIR CD..
- REN default default1
- ren sam sam1
- ren security security1
- ren software software1
- ren system to system1
- CD regback
- copy * c:\windows\system32\config
Step 4. Type exit. In the «Choose an option» screen, choose «Turn off your PC» and then start your computer.
Simply speaking, the commands above serve the purpose of replacing the existing system32 config files, which might have been changed incorrectly, with the ones in the backup folder. This method will certainly work if the «Your PC ran into a problem» error is caused by registry changes.
If restoring the registry comes in vain, you can choose «Startup Settings» and enter Safe Mode to try more solutions.
Situation 3. You Are Stuck in the «Your PC ran into a problem» Loop
Unlike either of the two cases above, you have no options available to choose from. All you have is the repeated restart and error circle. In a situation like this, you can either recover data from the corrupted OS or fix the problem with the Windows installation CD/DVD. If you don’t have an installation disc, you can create a Windows installation media as a substitute. With the Windows installation media, you can repair your computer via the Advanced options which you have no access to currently.
Preparation: Steps to access the Advanced options via the Windows installation media:
Step 1. Create a Windows installation media according to the official guide supplied by Microsoft.
Step 2. Connect the bootable media to your computer and boot your computer from the device.
Step 3. Wait for the installation files to load.
Step 4. In the Windows Setup window, choose «Next».
Step 5. Click «Repair your computer» in the Setup window and choose «Troubleshoot» > «Advanced options».
In situation 2, I have explained what these Advanced options can do. To fix the «Your PC ran into a problem and needs to restart» in Windows 10/11, you can apply the following solutions in order.
Method 1. Perform Startup Repair
Startup Repair enables you to fix certain system problems that might prevent Windows from booting up. It is always a good option when there is a boot failure on the computer.
Method 2. Perform System Recovery/System Image Recovery
The precondition to use such options is that you have a restore point or system image available. If not, switch to other workable ways.
Method 3. Restore the Registry in Command Prompt
Did you change the registry on your computer recently? If you did, enter Command Prompt and follow the steps detailed in situation 2 to bring the registry to an earlier working state.
Method 4. Enter Safe Mode
As mentioned above, Safe Mode is a diagnostic mode that allows you to perform some troubleshooting steps. In Safe Mode (with Command Prompt), you can do a lot of things to cope with the issue, like:
- Uninstall incompatible software
- Update driver
- Remove virus/malware
- Run System File Checker tool
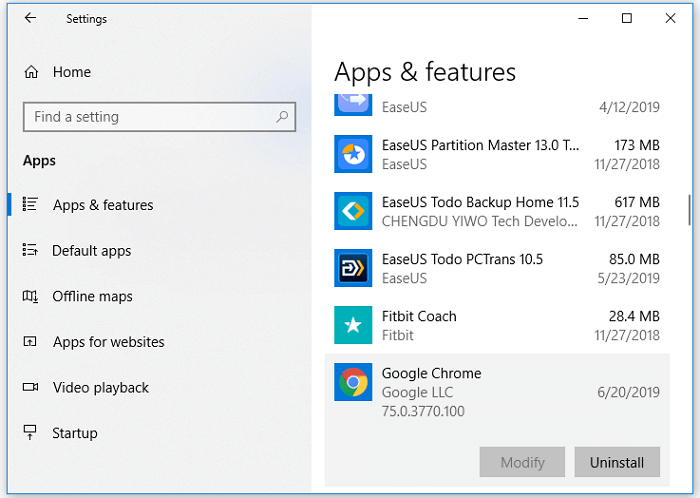
To uninstall problematic software:
Step 1. Go to «Start» > «Settings» > «Apps» > «Apps & features».
Step 2. Click the target software and click «Uninstall».
To update the hard drive/motherboard driver: Since your computer cannot boot properly, you need to update the hard drive driver or motherboard with a CD or USB that contains the driver. You can download the driver from the manufacturer’s website.
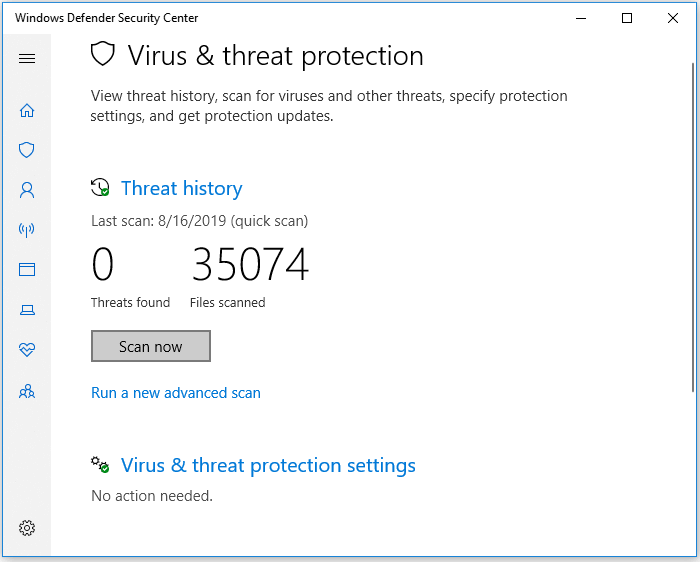
To remove the virus: Use the anti-virus software or Windows defender to finish the task. I will show you how to run Windows Defender.
Step 1. Go to «Settings» > «Update & Security» > «Windows Security».
Step 2. Click «Virus & threat protection».
Step 3. In the «Threat history» section, click «Scan now» to scan for viruses on your computer.
To run the System File Checker tool:
It’s no doubt that missing or damaged system files will cause problems on the computer, either minor or serious. The BSOD «Your PC ran into a problem and needs to restart» may also result from system file errors. Fortunately, the Windows System File Checker tool is able to check and repair missing or damaged system files. In Command Prompt, enter sfc /scannow to start repairing the system files.
Extra Tip: Recover Data after Fixing «Your PC ran into a problem»
If you have, unfortunately, lost some files after taking the methods to troubleshoot the ‘Your PC ran into a problem and needs to restart’ error in Windows 10/11, try the EaseUS Data Recovery Wizard — EaseUS data recovery software to retrieve them. This software can recover files due to deletion, format, system crash, and more. Once data loss is found, launch the software and rescue your files as soon as possible.
Step 1. Select a drive and start scanning
Launch EaseUS Data Recovery Wizard and hover over the partition where you lost data. This could be an internal hard disk, external disk, USB, or SD card. Then, click «Scan».

Step 2. Check and preview scanned files
Use the file format filter on the left or upper right corner to narrow the scan results until you find the files you need. Then, you can click the «Preview» button or double-click a file to preview its content, if you’d like.

Step 3. Recover lost data to a secure location
Click the checkbox next to the file and click «Recover» to restore the lost data to a secure place. We recommend that you do not store the recovered data on the disk where you lost it earlier.

Let’s Move and Get Rid of the Problem
The «Your PC ran into a problem and needs to restart» problem is annoying. But with the workable solutions provided here, you should feel relieved because there are still ways to rescue your computer. If you are clear about what leads to your current situation, you can solve the problem in a more direct way. If not, specify your situation and carry out the potential fixes to remove the error.
Hope you can solve the «Your PC ran into a problem and needs to restart» successfully.
Have you ever received the “your PC ran into a problem and needs to restart”blue screen error message when using Windows 11/10? Don’t worry when meeting it. This post from MiniTool offers some methods for you to fix the issue.
It’s annoying to encounter the “your PC ran into a problem and needs to restart” blue screen error message when booting Windows 11/10. Almost all Windows users can meet the issue, regardless of what version they have tried or used. It always comes with a stop/error code like:
- WHEA UNCORRECTABLE
- IRQL_NOT_LESS_OR_EQUAL
- KERNEL_SECURITY_CHECK_ERROR
- FAULTY_HARDWARE-CORRUPTED_PAGE
- DPC_WATCHDOG_VIOLATION
- BAD_POOL_HEADER
- INACCESSIBLE_BOOT_DEVICE
- CRITICAL_PROCESS_DIED
- BAD_SYSTEM_CONFIG_INFO
There could be several reasons for the issue on Windows 11/10.
- Corrupted Windows updates
- Incompatible drivers or apps
- Malware or virus attacks
- Faulty hardware
- Drive failures
- Registry issues
- Missing or corrupted system files
- …
The answers to how to fix the issue vary depending on the situation. Three cases are here and you can go to the corresponding part to find answers.
Case 1: Your Windows 11/10 Can Boot Normally
Even if your Windows 11/10 can boot normally after restarting, you need to apply some troubleshooting steps to prevent the “your PC ran into a problem and needs to restart” issue from happening again.
First of all, you need to disconnect any external devices connected to your computer such as flash drives, external hardware, and other peripherals, and keep the mouse and keyboard.
Next, you had better enter Safe Mode to fix the issue. Safe Mode is a diagnostic mode of Windows, which starts your PC with the minimum necessary programs and services.
Step 1: Click Start > Settings > Update & Security > Recovery.
Step 2. In the Advanced start-up section, choose Restart now.
Step 3. Then, choose Troubleshoot > Advanced Options > Startup Settings > Restart.
Step 4. Now you will see the Startup Settings screen. You can choose Enable Safe Mode.

Fix 1: Check System Log in Event Viewer
Checking the system log in Event Viewer is helpful to find the culprit of the “Your PC ran into a system” error in Windows.
Step 1: Type event viewer in the Search box and click Open.
Step 2: Expand Windows Logs and choose System.
Step 3: Check the errors that occurred simultaneously with the blue screen and fix the error according to the information.
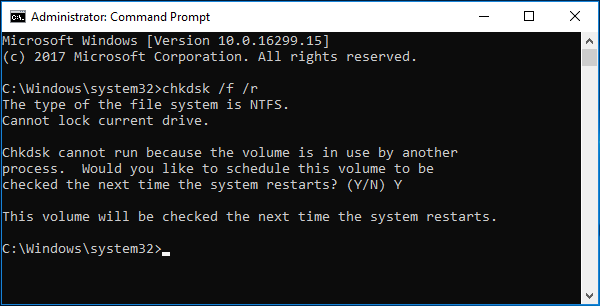
Fix 2: Check Disk Error
If there are some errors on your hard drive, the issue – “your PC ran into a problem and needs to restart” might happen. Running CHKDSK in Command Prompt can verify the file system and fix some issues with certain settings
Step 1: Run Command Prompt as an administrator.
Step 2: Type chkdsk /f /r and press Enter.
Step 3: Type Y and restart your PC.
Fix 3: Allocate More Space for System Drive
The Windows operating system and some installed applications require sufficient free space to boot properly. If your system drive is almost out of space, you should consider allocating more space for it. Maybe you need the following posts:
- How to Make Windows System Partition Bigger? Solutions Are Here
- How to Allocate a Hard Drive? Try This Full Guide Now!
Fix 4: Run SFC
If there are corrupted system files, your PC ran into a problem and needs to restart might happen in Windows. The next thing that you can do is to run a scan with System File Checker, which is a built-in tool for fixing various problems including blue screen of death errors.
Step 1: Type cmd in the Search box and right-click it to choose Run as administrator.
Step 2: Type sfc /scannow and press Enter. Please wait for some time and exit cmd after finishing verification 100%.
Fix 5: Run a Virus Scan
One of the most common reasons for a blue screen error is the infection of the device with a virus or malware. You had better run a virus scan to detect the virus or malware.
Step 1: Go to Settings by pressing the Windows + I keys together.
Step 2: Go to Update & Security > Windows Security > Open Windows Security > Virus & threat protection.
Step 3: In the Current threats section, click Quick Scan.

Fix 6: Update Your Windows
It’s recommended to update your Windows 11/10 to the latest version to remove the annoying issue. Follow the guide below:
Step 1: Press the Windows + I keys together to open Settings.
Step 2: Go to Updates & Security.
Step 3: Click the Windows Update section, and click the Check for updates button to check if there are any new updates. Then Windows will search for available updates. Just follow the on-screen instructions to finish the process.
Case 2: Your Windows 11/10 Can’t Boot Normally
In some cases, your PC will restart and prepare a startup repair automatically after the error message appears, resulting in the “your PC did not start correctly” screen. Here you can see two options: Restart and Advanced options.

Fix 1: Perform a System Restore
If you have created a system restore point or system image backup with Windows snap-in tools, you can try using the restore point to restore your computer to fix the error message. Here are the steps:
Step 1: In the Search menu, input control panel and open it.
Step 2: Click Recovery and click Open System Restore to continue.

Step 4: In the Restore system files and settings interface, click Next to continue.
Step 5: Select a restore point and click Next to continue.
Step 6: You need to confirm the restore point and click Finish. After the system restore is finished, try to shut down your computer again.
Fix 2: Perform System Image Recovery
If you have created a system image before the “your PC ran into a problem and needs to restart” error occurred, you can perform a system image recovery. For more details, refer to this post – Perform System Image Recovery Windows 10 to Quick Restore PC.
Fix 3: Restore Registry Configuration
Your Device Ran into a Problem and Needs to Restart error often appears due to some error in the Windows 11/10 registry. You can restore the registry configuration to fix it.
Step 1: Open Command Prompt as administrator.
Step 2: Type the following command one by one and press the Enter key after each one:
- C:
- CD Windows\System32
- CD config
- DIR
- CD regback
- DIR CD..
- REN default default1
- ren sam sam1
- ren security security1
- ren software software1
- ren system to system1
- CD regback
- copy * c:\windows\system32\config
Step 3: Then, exit Command Prompt and restart your PC.
Case 3: Windows 11/10 Stuck in Windows loop
If your Windows 11/10 is stuck in the Windows loop, you have no options to choose from and your PC will repeat restarts and load error. In this case, you can use a Windows installation CD/DVD to fix the problem.
Fix 1: Run Startup Repair
Step 1: Create a Windows installation media.
Step 2: Connect the bootable media to your computer and boot your computer from the device.
Step 3: Wait for the installation files to load. In the Windows Setup window, click Next.
Step 4: Click Repair your computer > Troubleshoot > Advanced options.
Step 5: Click Startup Repair.

Fix 2: Enter Safe Mode to Uninstall Programs or Drivers
If you have recently installed a piece of software, you should try uninstalling it to check if this program is the cause behind the “your PC ran into a problem and needs to restart” stop code.
1. Uninstall the Recent Installed Software
Step 1: Type Control Panel in the Search box and click Open.
Step 2: View all the items via Category and click Uninstall a program from the Programs section.

Step 3: Locate the recent software from the app list and right-click it to choose Uninstall.
You can also roll back or uninstall drivers to fix the issue.
2. Roll back or Uninstall Drivers
Step 1: In Device Manager, double-click each driver and you can see some options.
Step 2: You can click Roll Back Driver or Uninstall Device and then follow the on-screen instructions to finish your operations.

Back up Your Windows After Fixing the Issue
After fixing your issue, now your PC can start normally. Then, what should you do? Here, we recommend that you back up your computer.
As mentioned, blue screen errors appear now and then, which brings many troubles for you, for example, you need to spend much time looking for solutions to fix it, the PC downtime lasts long, etc. If you have a backup of the operating system, things become easier.
Some blue errors can cause file loss. To avoid loss, we also suggest backing up your crucial files. How can you create a backup for your system or files? Here, MiniTool ShadowMaker is worth trying.
As a piece of professional PC backup software, it is useful to back up the Windows operating system, partitions, disks, files, and folders. This program is compatible with Windows 11/10/8/7.
Step 1: Download and install MiniTool ShadowMaker. Run it to choose Keep Trial.
MiniTool ShadowMaker TrialClick to Download100%Clean & Safe
Step 2: Go to the Backup tab and you can see that system partitions are selected in the SOURCE section. Thus, you don’t need to choose it.
Step 3: Click the DESTINATION part to choose a location to store your system image. There are 4 paths available:

Tip: To create an automatic backup, go to Options > Schedule settings.
Step 4: At last, click the Back Up Now button to start the backup task.

Bottom Line
Does the blue screen of death error – “your PC ran into a problem and needs to restart” occur in Windows 11/10/8/7? Take it easy and you can get many solutions to get rid of this stop code. Besides, it is best to create a backup for your PC after fixing the BSOD error.
On the other hand, you can let us know if you have other solutions to fix this stop error. Also, any questions on MiniTool software are appreciated. Leaving a comment below or contacting us via [email protected] is available.
Если вы являетесь пользователем Windows ПК, высока вероятность того, что вы сталкивались с ошибкой: «На вашем ПК возникла проблема и его необходимо перезагрузить». Она может возникать по множеству различных причин, но самое неприятное заключается в том, что это может произойти совершенно внезапно, без единого предупреждения. И если эта ошибка появляется, пользователю больше нечего не остается, кроме как попытаться определить ее причину и найти способы ее устранения. Предлагаем вам подробный материал, благодаря которому вы узнаете о причинах возникновения и способах решения данной неисправности. Продолжайте читать.

- Часть 1: Об ошибке «на вашем ПК возникла проблема и его необходимо перезагрузить»
-
Часть 2: Как исправить ошибку: «на вашем ПК возникла проблема и его необходимо перезагрузить?»
- Случай 1: Перезагрузка Windows может быть выполнена
- Случай 2: Перезагрузка Windows невозможна
- Случай 3: Бесконечный цикл загрузки WindowsHOT
Часть 1: Об ошибке «на вашем ПК возникла проблема и его необходимо перезагрузить»
Что из себя представляет ошибка «на вашем ПК возникла проблема и его необходимо перезагрузить?»
Вероятно, каждый пользователь Windows 10 сталкивался с этой ошибкой либо во время запуска, либо во время использования какой-либо программы или работы с аппаратной частью компьютера. Обычно ее называют синим экраном смерти, или BSOD, и это одна из самых раздражающих ошибок. Помимо внезапного прерывания работы компьютера, также могут возникнуть проблемы с его перезагрузкой.
В чем кроется причина ошибки: «на вашем ПК возникла проблема и его необходимо перезагрузить?»
Причин у ошибки «на вашем ПК возникла проблема и его необходимо перезагрузить» может быть много. Однако чаще всего проблема связана с последним действием или изменением, внесенным в вашу систему. Поэтому лучше всего начать искать причину именно там. Бывает, что проблема кроется в аппаратном обеспечении (в связи с изменениями, конфликтом драйверов или ошибками). Вот самые распространенные причины, вызывающие эту ошибку Windows 10:
- Отсутствующий или поврежденный системный файл
- Ваше устройство подверглось вирусной атаке
- Удален файл реестра в папке System32
- Перегрев компьютера
- Операционной системе не хватает оперативной памяти
- Компьютер был выключен принудительно
Если не найти и не устранить причину, Windows 10 так и будет показывать этот синий экран смерти. На экране также выводится код ошибки. Эта ситуация может привести к потере данных на вашем компьютере, поэтому будьте осторожны при совершении действий по решению этой ошибки.
Совет: Чтобы восстановить все потерянные данные из-за ошибки «на вашем ПК возникла проблема», вы можете бесплатно попробовать программное обеспечение для восстановления данных Tenorshare 4DDiG, которое поможет вам восстановить все потерянные файлы на Windows и Mac в 3 этапа.
Информация об ошибке: «на вашем ПК возникла проблема и его необходимо перезагрузить»
Как упоминалось ранее, когда вы увидите синий экран, внизу высветится конкретный код ошибки. Он может быть одним из следующих:
- INACCESSIBLE_BOOT_DEVICE
- BAD_SYSTEM_CONFIG_INFO
- CRITICAL_PROCESS_DIED
- Stop code: 0xC0000021A
- FAULTY_HARDWARE-CORRUPTED_PAGE
- DPC_WATCHDOG_VIOLATION
- WHEA UNCORRECTABLE
- KERNEL_SECURITY_CHECK_ERROR
Часть 2: Как исправить ошибку: «на вашем ПК возникла проблема и его необходимо перезагрузить?»
Существует множество причин, лежащих в основе этой ошибки. В данном случае очень полезно, если вы сможете отыскать причину, прежде чем предпримите какие-либо действия. Мы рассмотрим 3 случая на примере Windows 10, когда появляется ошибка: «на вашем ПК возникла проблема и его необходимо перезагрузить»:
Случай 1: Перезагрузка Windows может быть выполнена
Решение 1: Убедитесь, что ваши драйверы обновлены
Одной из наиболее распространенных причин этой ошибки в Windows 10 являются поврежденные или устаревшие драйверы. Чаще всего простое обновление или установка соответствующего драйвера устраняют проблему «на вашем ПК возникла проблема и его необходимо перезагрузить».
Решение 2: Удалите недавно установленные приложения
Иногда вы можете столкнуться с пресловутой ошибкой «на вашем ПК возникла проблема» после установки некоторых приложений / программного обеспечения. Это происходит из-за повреждения важных системных файлов или перегрузки оперативной памяти. Чтобы решить эту проблему, вам нужно будет загрузить компьютер в безопасном режиме и удалить приложения, вызвавшие ошибку. Просто удалите приложения, как вы это сделали бы в обычном режиме. Сначала выберите «Программы и компоненты» в меню «Пуск», затем найдите недавно установленные программы и удалите их.
Важно: Если вы увидите сообщение: «Не удалось получить доступ к службе установщика Windows», вам придется предпринять несколько дополнительных шагов, чтобы удалить приложение. Выполните следующие действия:
Шаг 1: Откройте Поиск, введите «CMD» и запустите командную строку от имени администратора. Вставьте или впишите следующий текст, ничего не упуская, затем нажмите «Enter»: REG ADD «HKLM\SYSTEM\CurrentControlSet\Control\SafeBoot\Minimal\MSIServer» /VE /T REG_SZ /F /D «Service».
Шаг 2: Как только вы это сделаете, напишите следующее: net start msiserver. Не забудьте снова нажать «Enter».
Шаг 3: Теперь вы можете спокойно удалить приложение.
Решение 3: Измените настройки дампа памяти
Как упоминалось ранее, проблемы с памятью компьютера, являются распространенной причиной неисправности «на вашем ПК возникла проблема и его необходимо перезагрузить». Вам нужно будет предпринять несколько шагов, чтобы изменить настройки дампа памяти на вашем ПК.
Шаг 1: Загрузитесь в безопасном режиме. Как только вы это сделаете, перейдите в свойства вашего ПК, щелкнув правой кнопкой мыши по значку «Этот компьютер».
Шаг 2: Далее перейдите на вкладку «Дополнительно».
Шаг 3: Нажмите на кнопку «Параметры» в пункте «Загрузка и восстановление».
Шаг 4: Как только вы это сделаете, вы увидите несколько флажков в разделе «Отказ системы». Обязательно снимите флажок с пункта «Выполнить автоматическую перезагрузку». Кроме этого, перейдите к выпадающему списку в разделе «Запись отладочной информации» и нажмите на «Полный дамп памяти».
Нажмите кнопку «Ок» и перезагрузите компьютер. Убедитесь, что ошибка «на вашем ПК возникла проблема и его необходимо перезагрузить» исчезла.
Решение 4: Использование утилиты Проверка системных файлов
Находясь в безопасном режиме, запустите командную строку с правами администратора. Далее напишите: «sfc /scannow» и нажмите «Enter». Будет произведена проверка ваших системных файлов. После завершения перезагрузите компьютер и убедитесь, что ошибка «на вашем ПК возникла проблема» ушла.
Решение 5: Обновите Windows
Большое количество ошибок в Windows 10 можно исправить простым обновлением системы, и даже такую ошибку, как «на вашем ПК возникла проблема и его необходимо перезагрузить». Просто перейдите в раздел обновления в Windows 10 в Настройках. Нажмите «Проверка наличия обновлений», чтобы узнать, каких обновлений не хватает вашей системе. Установите их все.
Решение 6: Запустите Windows сначала в безопасном режиме, а после в обычном
Безопасный режим – это очень полезная среда для устранения многих проблем, связанных с Windows 10. Использование безопасного режима почти всегда гарантирует положительный результат, поскольку загрузка происходит только с обязательным минимумом процессов. Например, не запускаются недавно установленные сторонние программы. И если ошибка «на вашем ПК возникла проблема и его необходимо перезагрузить» связана с этими программами, то она уйдет. Безопасный режим позволяет вам не только диагностировать проблемы с Windows 10, но и решать их за счет загрузки с минимумом функций. Далее при загрузке в обычном режиме проблема уходит. Безопасный режим предоставляет вам доступ к хранилищу устройства, что автоматически устраняет системные неполадки. Итак, если перезагрузка системы возможна, попробуйте перейти в безопасный режим, а затем перезапустите компьютер еще раз в обычном режиме.
Шаг 1: Вы можете загрузиться в безопасном режиме, перейдя в раздел «Восстановление», который вы найдете в окне «Обновление и безопасность» в Настройках. В пункте «Особые варианты загрузки» нажмите на «Перезагрузить сейчас».
Шаг 2: Далее выполните следующую последовательность действий: Устранение неполадок — Дополнительные средства устранения неполадок — Параметры загрузки — Перезагрузка.
Шаг 3: Как только появится экран загрузки, выберите один из 3 предоставленных вариантов безопасного режима. Выполните перезагрузку.
Решение 7: Увеличение свободного места на системном диске
Проверьте наличие свободного места на диске, где установлена Windows 10. Если свободного места не осталось, это может привести к ошибке «на вашем ПК возникла проблема», поскольку Windows 10 и другим приложениям необходимо свободное пространство для корректной работы. Если на диске слишком мало свободного места, вы можете удалить некоторые программы или увеличить выделенное пространство на этом диске.
Решение 8: Запустите Просмотр событий для проверки Журнала системных событий
Ваш компьютер с Windows 10 регистрирует все события, особенно критические события, вызывающие ошибки, которые вы можете увидеть в средстве просмотра событий. Иногда это позволяет легко определить причину ошибки и способ решения.
Шаг 1: Введите «Просмотр событий» в Поиске и запустите его от имени администратора.
Шаг 2: То, что вам следует искать, находится в разделе «Система» в пункте «Журналы Windows». Там вы увидите список ошибок, особенно тех, которые случаются часто, и обычно они является причиной проблемы «на вашем ПК возникла проблема и его необходимо перезагрузить».
Случай 2: Перезагрузка Windows невозможна
Есть и другие решения, которые вы можете попробовать на случай, если перезагрузить систему не получается:
Решение 1: Используйте функцию Восстановление при запуске, чтобы устранить проблему с загрузкой Windows
Если у вас есть диск восстановления Windows или загрузочный диск Windows 10, вы можете воспользоваться им для загрузки вашего ПК. В Windows 10 есть возможность запустить ваш компьютер с помощью средства восстановления при запуске. Когда вы попытаетесь загрузить свой компьютер с помощью диска восстановления или загрузочного диска, вы увидите опцию «Восстановление системы». Выполните следующие переходы: Устранение неполадок > Дополнительные параметры > Восстановление при запуске. Если у вас имеется несколько установленных ОС, вам нужно выбрать ту, которую вы хотите восстановить, после чего Windows выполнит все необходимое для исправления ошибок и загрузки системы.
Решение 2: Используйте функцию Восстановление системы Windows
Система Windows 10 обычно автоматически создает точки восстановления (если вы принудительно не отключили эту функцию), чтобы позволить вам вернуться к тому моменту, когда все было в порядке, до появления ошибки.
Шаг 1: Чтобы воспользоваться функцией Восстановления системы, сначала следуйте инструкциям из предыдущего способа, но в этот раз нажмите на «Восстановление системы» (После входа в среду восстановления Windows: Устранение неполадок > Дополнительные параметры > Восстановление системы). Вам нужно будет выбрать учетную запись, которую вы хотите восстановить и ввести пароль, если нужно, а затем нажать «Enter».
Шаг 2: Вероятно, будет доступно несколько точек восстановления. В таком случае обратите внимание на даты точек восстановления и выберите ту, когда ваша система работала нормально, и нажмите «Далее».
Шаг 3: Нажмите «Да» после нажатия «Готово», чтобы начать процесс восстановления вашей Windows 10.
После завершения перезагрузите компьютер, и скорее всего, ошибка «на вашем ПК возникла проблема и его необходимо перезагрузить» исчезнет.
Решение 3: Используйте функцию Восстановления образа системы
Если вы один из тех людей, которые хранят резервную копию образа системы Windows 10, то вам повезло. Вы можете выполнить полное восстановление образа системы, используя эту резервную копию.
Шаг 1: Подключите устройство, на котором вы храните резервную копию образа Windows 10, и включите компьютер. Вам будет предложено перейти в загрузочное меню.
Шаг 2: После нажатия кнопки «Устранение неполадок» и «Дополнительные параметры», вы увидите пункт «Восстановление образа системы».
Шаг 3: Вы увидите образ для восстановления в мастере. Выберите его, нажмите «Далее», и вам будут показаны инструкции по восстановлению системы.
После завершения перезагрузите компьютер.
Решение 4: Используйте командную строку для восстановления реестра
Ошибка «на вашем ПК возникла проблема и его необходимо перезагрузить» часто появляется из-за проблем в реестре Windows 10. Правильная работа реестра очень важна для операционной системы, и ее работоспособность может значительно снизиться, если какие-то файлы реестра будут повреждены или удалены. Хорошая новость для пользователей Windows 10 в том, что система сохраняет резервные копии реестра, и вы можете получить к ним доступ и устранить любую проблему с реестром с помощью командной строки.
Шаг 1: Запустите командную строку. После появления запроса введите данные своей учетной записи.
Шаг 2: Откроется командная строка, и вам нужно будет ввести последовательно следующие команды:
- C:
- CD Windows\System32
- CD config
- DIR
- CD regback
- DIR CD..
- REN default default1
- ren sam sam1
- ren security security1
- ren software software1
- ren system to system1
- CD regback
- copy * c:\windows\system32\config
Шаг 3: Как только вы введете команды, введите «exit» и выберите «Выключить компьютер», когда появится меню «Выбрать опцию».
Перезагрузите свой компьютер и посмотрите, появится ли ошибка при запуске. Это может полностью решить ваши проблемы, поскольку в вашей системе появился новый реестр, восстановленный из резервной копии, без ошибок, поврежденных и отсутствующих записей.
Решение 5: Сброс Windows
Если все вышеперечисленное не сработает, вы всегда можете сбросить свою Windows 10 для «чистой» загрузки. Это можно сделать, используя загрузочный диск Windows, который был подготовлен заранее. После загрузки нажмите «Восстановление системы», затем «Устранение неполадок» > «Вернуть компьютер в исходное состояние». Надеемся, что «чистая» Windows 10 решит ошибку «на вашем ПК возникла проблема и его необходимо перезагрузить».
Случай 3: Бесконечный цикл загрузки Windows
В некоторых случаях ошибка «на вашем ПК возникла проблема и его необходимо перезагрузить» будет продолжать повторяться, и сделать с этим почти ничего нельзя. У вас останется два варианта: использовать загрузочный диск для запуска Windows или восстановить все имеющиеся данные из Windows 10.
Как восстановить потерянные данные из Windows из-за ошибки «на вашем ПК возникла проблема и его необходимо перезагрузить»?
Эта ошибка имеет довольно серьезные последствия. Часто это может привести к потере ваших данных по целому ряду причин, которые были описаны выше. Вы также можете потерять данные в процессе исправления. Если у вас нет резервной копии, попробуйте программное обеспечение для восстановления данных Windows Tenorshare 4DDiG, чтобы восстановить все ваши потерянные данные.
Вот некоторые ключевые особенности Tenorshare 4DDiG:
- 4DDiG может восстанавливать данные после случайного удаления, вирусной атаки, ошибок Windows, форматирования и т.д.
- 4DDiG может восстановить более 1000 различных типов файлов, включая фотографии, музыку, документы и так далее.
- 4DDiG восстанавливает данные как с внутренних, так и с внешних устройств, включая SD-карты, USB-накопители, внешние жесткие диски и т.д.
Следуйте приведенному ниже руководству по восстановлению потерянных данных в Windows:
- Во-первых, выберите местоположение, из которого вы хотите восстановить свои данные, 4DDiG начнет сканировать выбранное вами местоположение. Например, ошибка «на вашем ПК возникла проблема и его необходимо перезагрузить» часто вызвана аппаратной неисправностью, и, если вы потеряли данные с локального устройства, вам нужно выбрать тот проблемный локальный диск и начать сканирование.
- Теперь 4DDiG начнет сканировать выбранный вами диск. Как только это будет сделано, вы можете приступить к поиску и предварительному просмотру данных, которые вы потеряли и которые необходимо восстановить.
- После предварительного просмотра выберите файлы, которые вы хотите восстановить, а затем нажмите «Восстановить», и файлы будут восстановлены.
Другой вариант – использование загрузочного диска Windows. Поскольку вам нужен доступ к Дополнительным параметрам, чтобы починить компьютер, но вы не можете дойти до этого пункта из-за зацикливания загрузки, загрузочный диск поможет вам войти в Дополнительные параметры. Чтобы сделать это:
Шаг 1: Вам необходимо использовать или создать установочный носитель Windows. Просто подключите загрузочный диск к своему компьютеру и включите его.
Шаг 2: Загрузится установочный файл и появится меню настройки Windows, вам нужно будет нажать кнопку «Далее».
Шаг 3: В следующем окне настроек нажмите на «Поиск и устранение неисправностей», а далее – «Дополнительные параметры». Теперь для решения проблемы вы можете попробовать все варианты, предлагаемые в разделе Дополнительные параметры. О том, как использовать восстановление при запуске, восстановление (образа) системы, восстановление реестра и загрузку в безопасном режиме было сказано выше. Находясь в безопасном режиме, вы можете попробовать множество исправлений, таких как удаление недавно установленного программного обеспечения, которое может быть причиной ошибки, проверка на вирусы или вредоносные программы и их удаление, обновление всех драйверов и проверка системных файлов на наличие ошибок. Вы можете удалить любую программу, перейдя в раздел «Приложения и возможности» в Настройках.
Шаг 4: Вам необходимо обновить драйверы, если ошибка возникает по причине устаревших драйверов. Самым лучшим и надежным местом для скачивания нужных драйверов является веб-сайт производителя. После загрузки перенесите драйвер на флешку и подключите к неисправному компьютеру.
В Windows 10 есть очень хороший встроенный антивирус под названием Защитник Windows. Вы можете использовать его для выявления и удаления любого вируса или вредоносного ПО, которые могут навредить вашей системе. Чтобы получить к нему доступ, перейдите в раздел «Защитник Windows» в окне «Обновление и безопасность» в Настройках. Вы увидите пункт «Защита от вирусов и угроз» и кнопку «Быстрая проверка», которая расположена в разделе «Текущие угрозы». Нажмите на нее, и Защитник Windows начнет искать вирус или вредоносное ПО, которые могут быть причиной ошибки «на вашем ПК возникла проблема и его необходимо перезагрузить».
Наконец, вы можете проверить свои системные файлы с помощью средства проверки системных файлов, которое выявит любой поврежденный или удаленный системный файл, являющийся причиной возникновения данной ошибки в вашей системе. Просто введите «CMD» в Поиске и запустите командную строку от имени администратора. После открытия введите: sfc / scannow. Это позволит просканировать системные файлы и при необходимости выполнить любые исправления.
Вывод
«На вашем ПК возникла проблема и его необходимо перезагрузить» – эта ошибка может быть как простой в устранении, так и довольно сложной. Часто требуется предпринять несколько попыток, чтобы решить эту проблему. В процессе пользователи сталкиваются с высоким риском потери важных данных. Полезные программы для восстановления данных, такие как Tenorshare 4DDiG, могут стать спасением для тех, кому никак нельзя терять свои файлы.