Clearing the Windows update history can fix this issue quickly
by Milan Stanojevic
Milan has been enthusiastic about technology ever since his childhood days, and this led him to take interest in all PC-related technologies. He’s a PC enthusiast and he… read more
Updated on December 22, 2022
Reviewed by
Alex Serban

After moving away from the corporate work-style, Alex has found rewards in a lifestyle of constant analysis, team coordination and pestering his colleagues. Holding an MCSA Windows Server… read more
- If you are facing the Windows update service not running issue, it might be because of a faulty service on your PC.
- One effective and quick solution to this issue is to run the Windows update troubleshooter.
- Another excellent fix is to perform a clean boot and remove any problematic program.
XINSTALL BY CLICKING THE DOWNLOAD FILE
- Download Restoro PC Repair Tool that comes with Patented Technologies (patent available here).
- Click Start Scan to find broken files that are causing the problems.
- Click Repair All to fix issues affecting your computer’s security and performance
- Restoro has been downloaded by 0 readers this month.
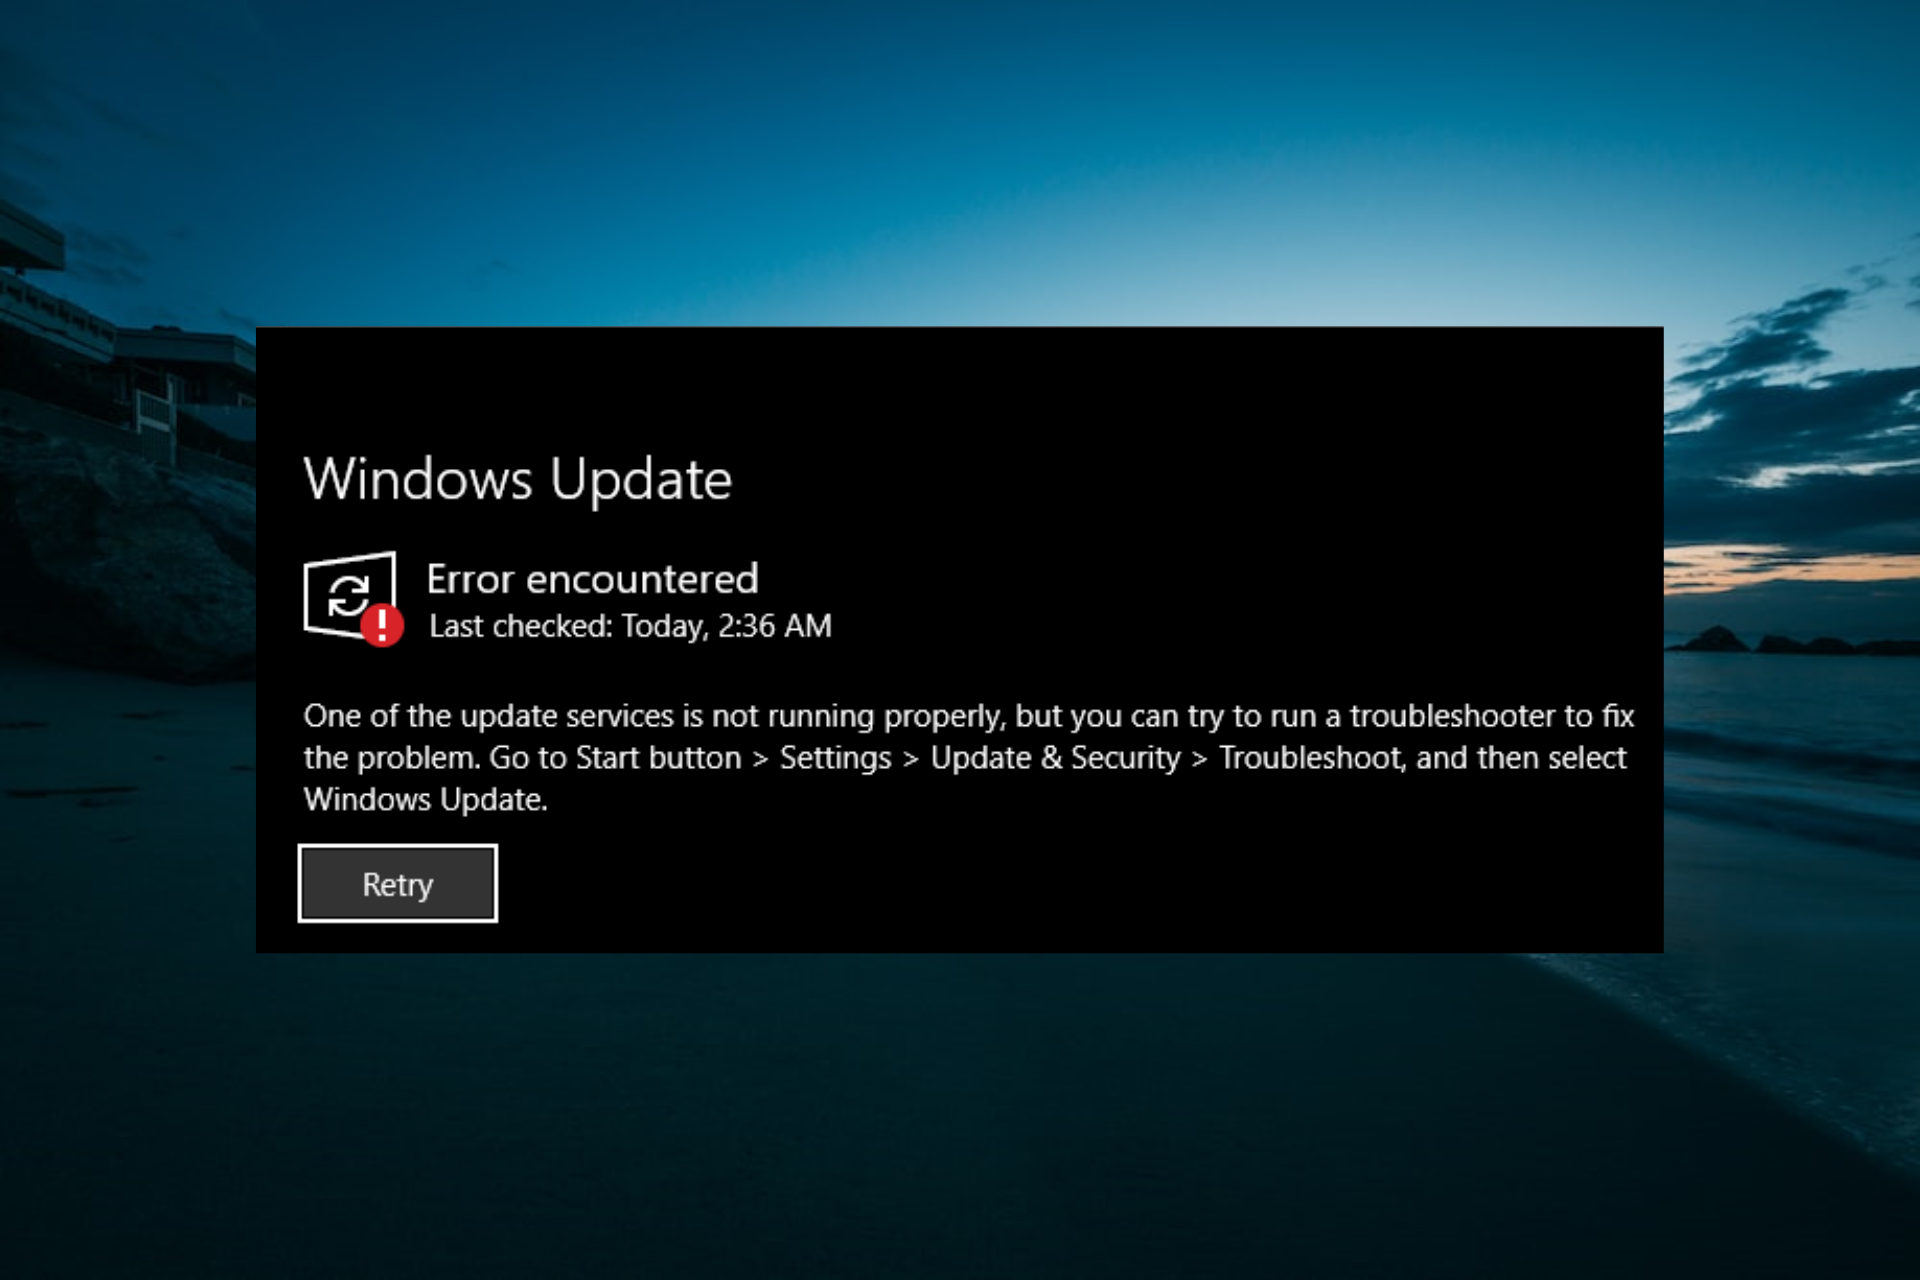
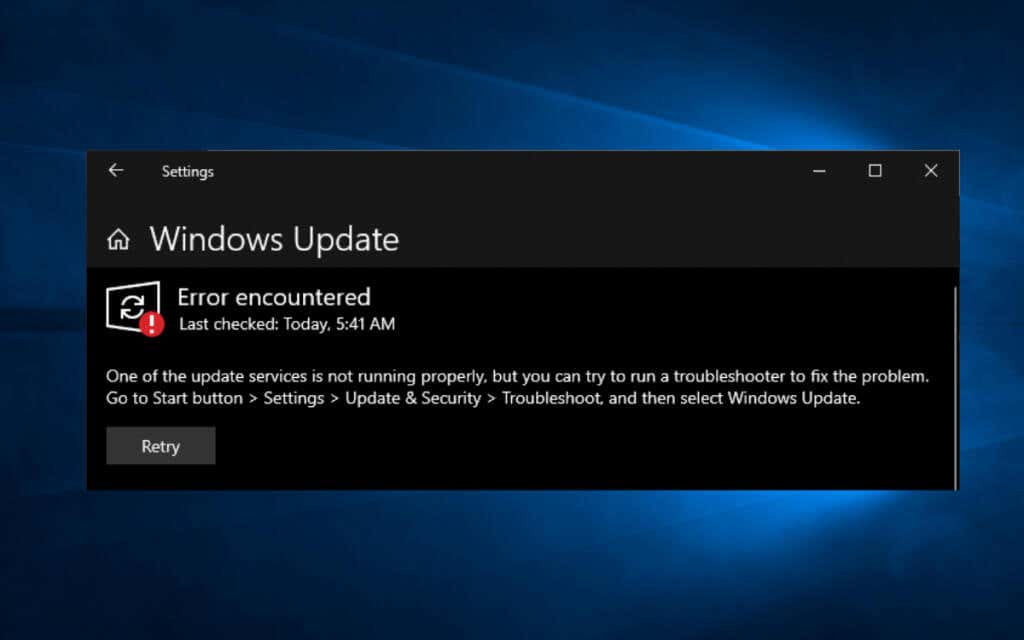
Windows updates are important for the smooth running and security of your PC. However, there are times when the Windows update won’t work with a prompt saying that the service is not running.
The full error message states: Windows Update cannot currently check for updates, because the service is not running. You may need to restart your computer.
This can prevent you from installing important updates and make your PC vulnerable. Fortunately, it is an issue with known solutions, and we will show you what to do when the Windows Update service is not running in this guide.
How can I fix the Windows Update service not running issue?
- How can I fix the Windows Update service not running issue?
- 1. Run the Windows update troubleshooter
- 2. Disable or remove problematic services
- 2.1. Enable Clean boot
- 2.2. Disable or remove faulty service
- 3. Clear the update cache
- Why is the Windows Update service stopped?
Before exploring the sophisticated fixes in this section to make the Windows Update service run, below are some general troubleshooting steps you should try:
- Restart your PC. Read our guide to learn what you can do if Windows won’t restart.
- Disable or remove the third-party antivirus software.
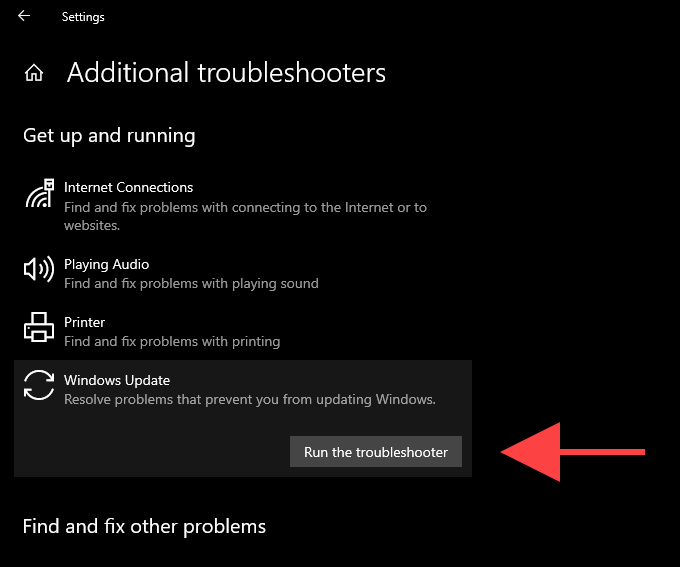
1. Run the Windows update troubleshooter
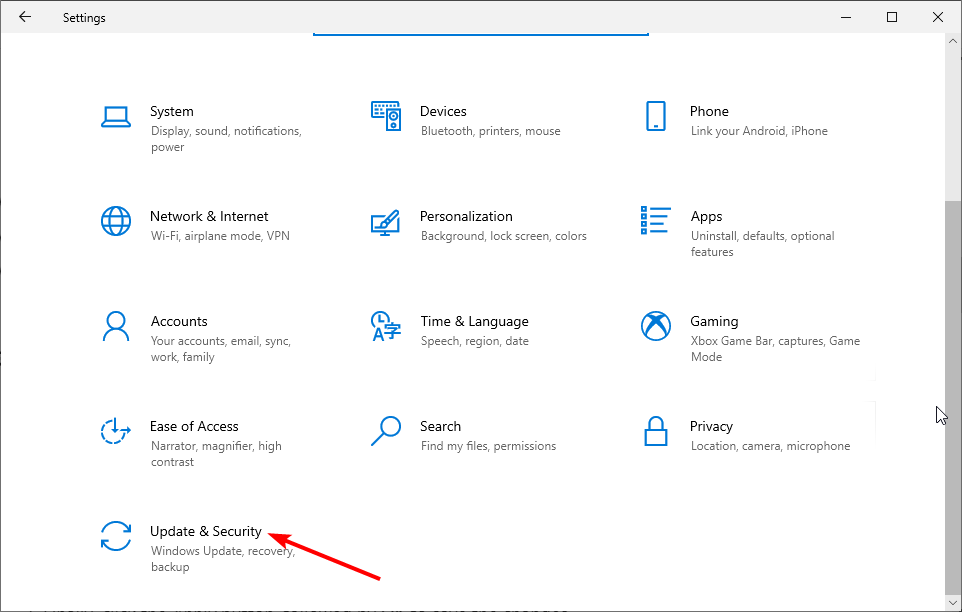
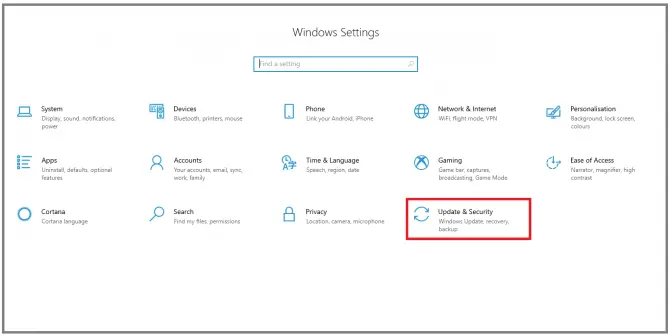
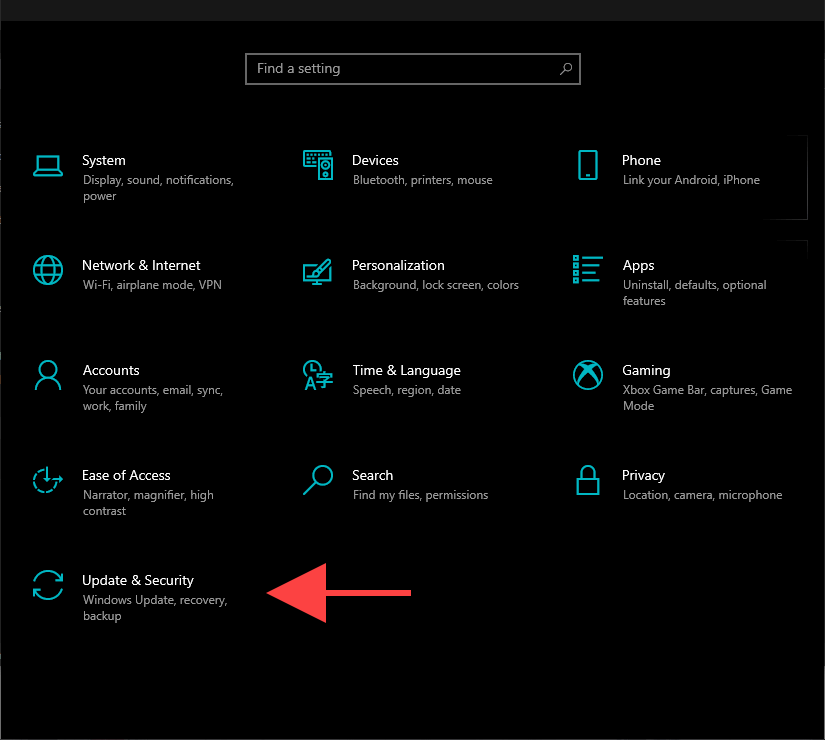
- Press the Windows key + I to open the Settings app, and select Update & Security.

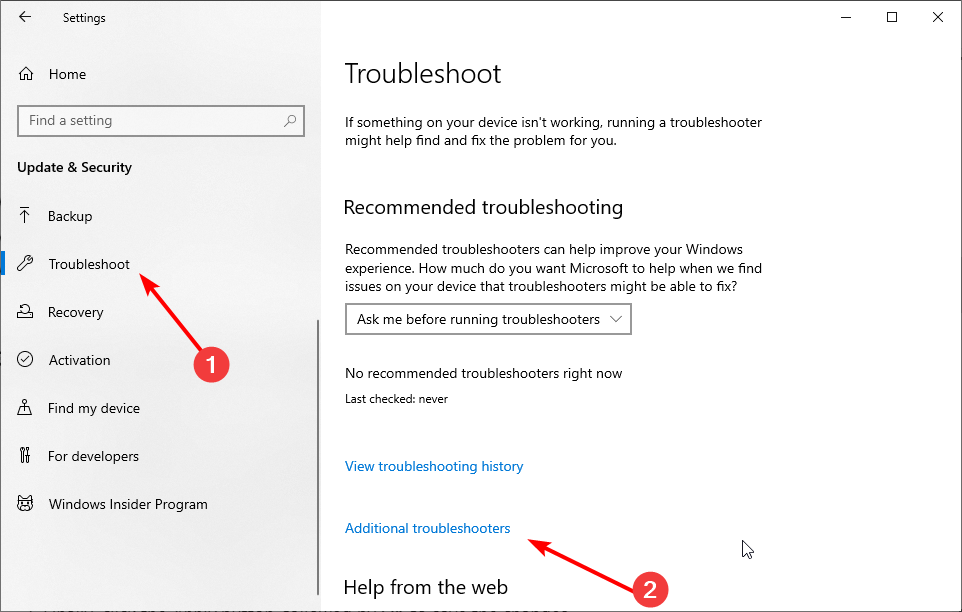
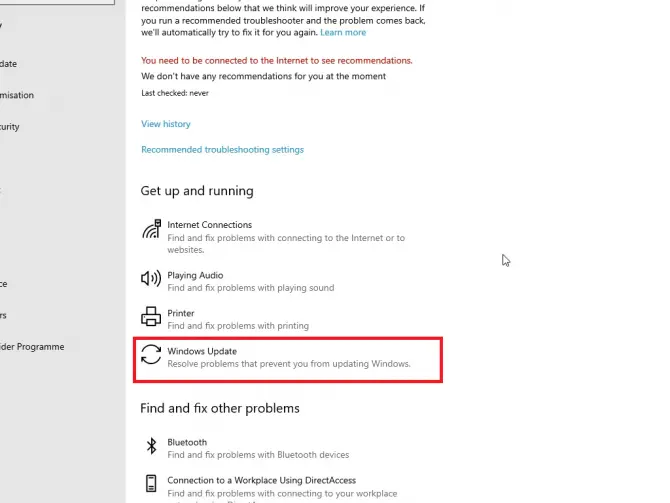
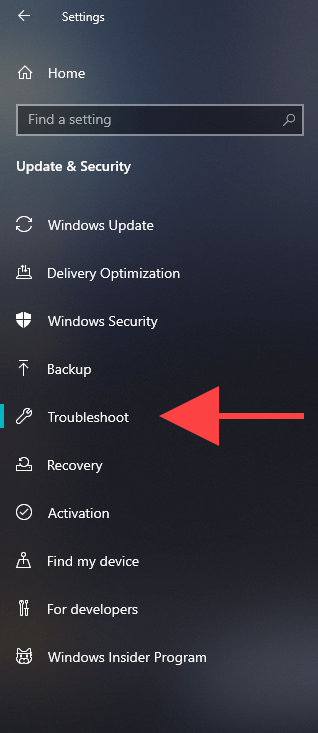
- Select Troubleshoot in the left pane and click Additional troubleshooters.
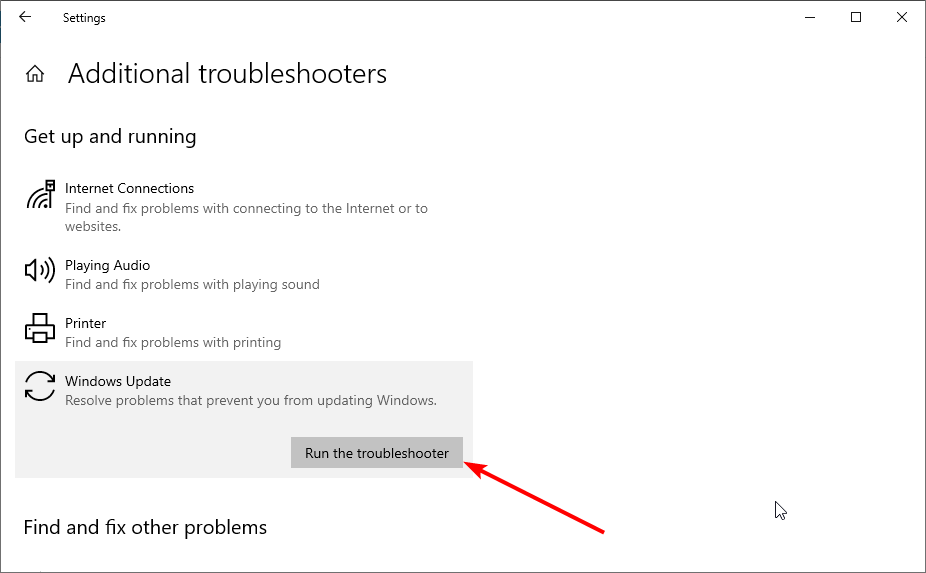
- Now, select Windows Update and click Run the troubleshooter.

- Finally, apply any recommended troubleshooting steps.
The Windows Update troubleshooter is one of the best tools for fixing update issues, including the service not running error. After running the troubleshooter, try checking and installing updates again.
2. Disable or remove problematic services
2.1. Enable Clean boot
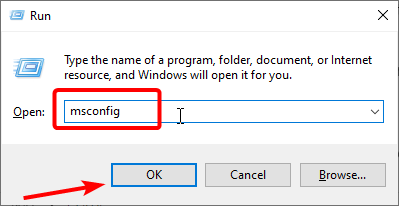
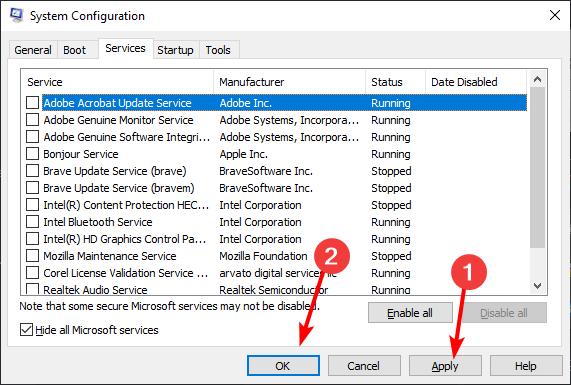
- Press the Windows key + R, type msconfig, and click OK.

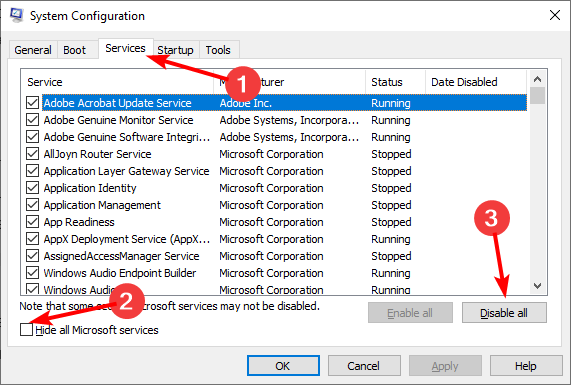
- Click the Services tab at the top, check the Hide all Microsoft services box, and click Disable all.

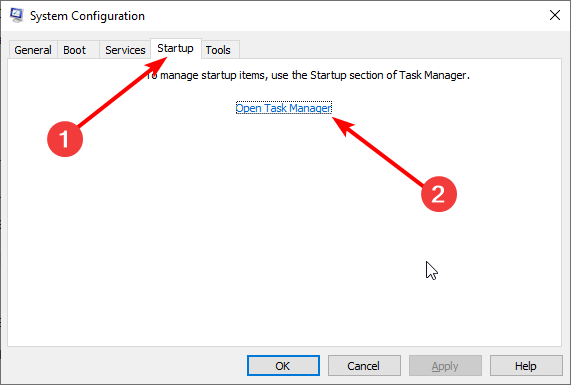
- Now, choose the Startup tab at the top and click Open Task Manager.
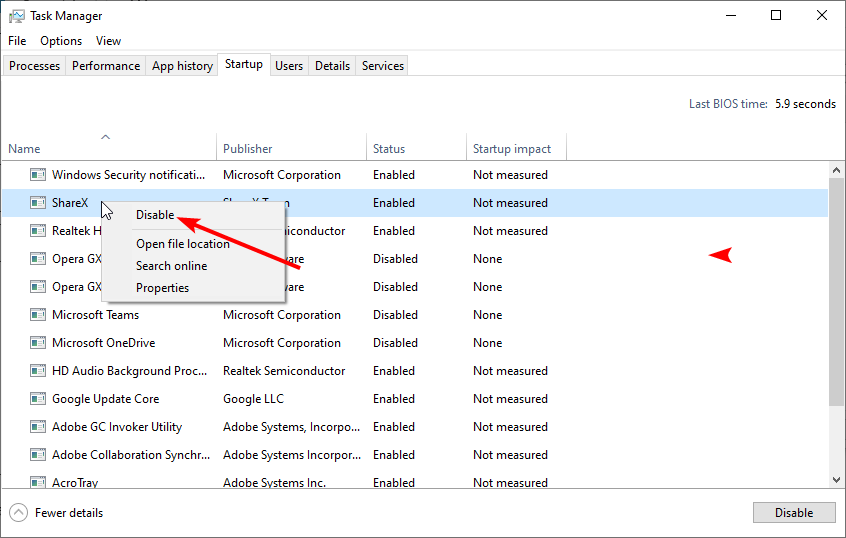
- Right-click each service there and select the Disable option.

- Go back to the System Configuration window, click the Apply button, followed by OK, and restart your PC.
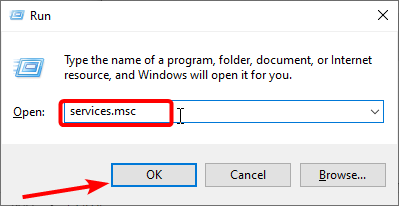
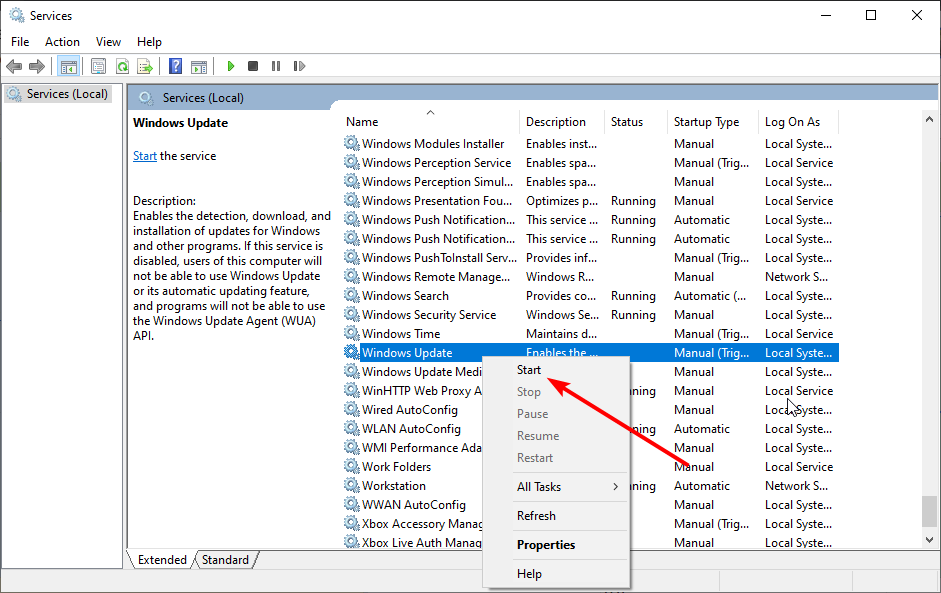
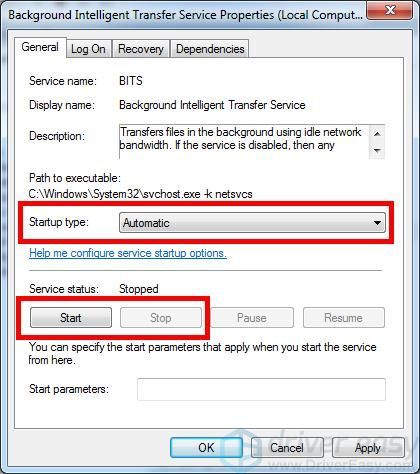
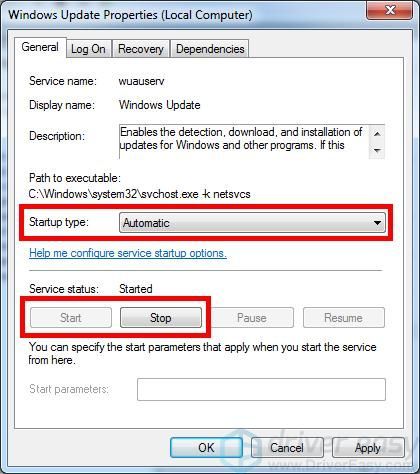
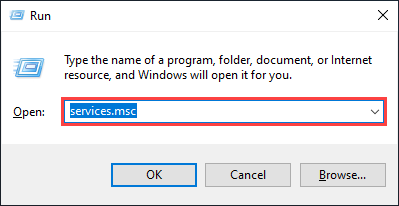
- Now, press the Windows key + R, type service.msc, and click OK.
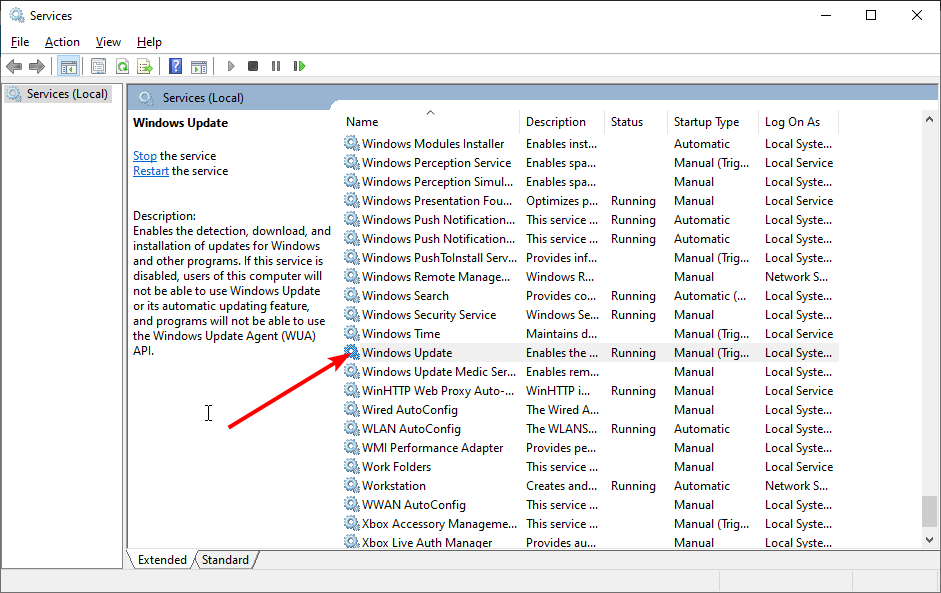
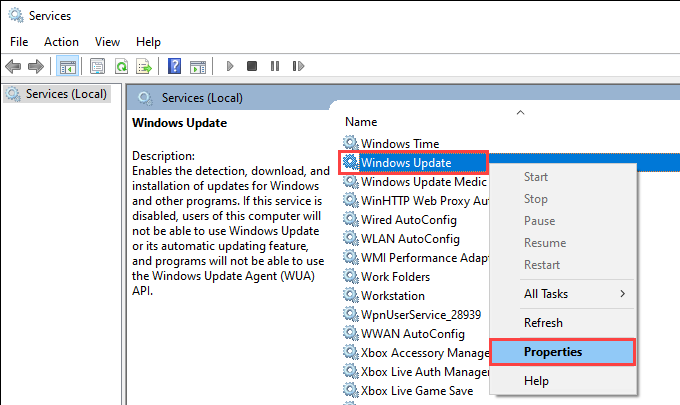
- Double-click the Windows Update service to open its properties.

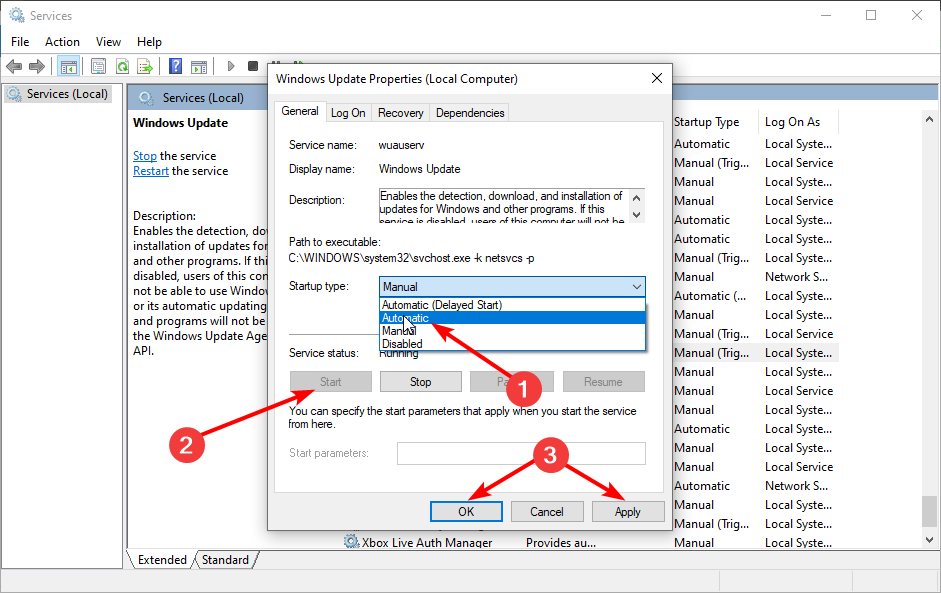
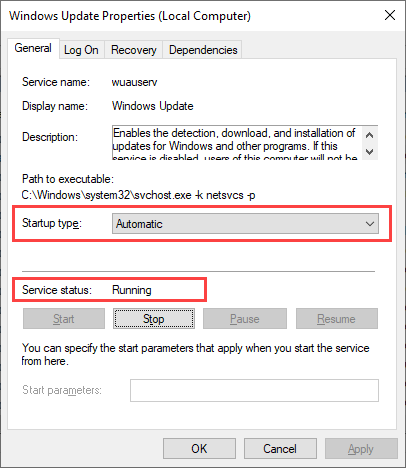
- Finally, set its Startup type to Automatic, choose the Start option, and click the Apply button, followed by OK.
The first step to disabling any problematic app or process that could be causing the Windows update service not running issue is to clean boot your PC. If the issue is fixed after restarting your PC, you need to find the service or app that could be causing the problem.
Some PC issues are hard to tackle, especially when it comes to corrupted repositories or missing Windows files. If you are having troubles fixing an error, your system may be partially broken.
We recommend installing Restoro, a tool that will scan your machine and identify what the fault is.
Click here to download and start repairing.
You can do this by enabling the disabled services in batches. One service that users have found to cause this issue is the StopUpdates10Guard service. Below are the steps to follow to disable or remove it.
2.2. Disable or remove faulty service
- Press the Windows key + R, type services, and click OK.
- Double-click the StopUpdates10Guard service to open its properties.
- Now, set its Startup type to Disabled and click the Stop button.
- From here, click the Apply button, followed by OK.
- To remove the service completely, download the Autorun tool.

- Unzip the file, right-click the Autorun 64-bit (for 64-bit system) option, and select Run as administrator.

- Finally, look for any reference to the StopUpdates10Guard service, right-click it, and select Delete.

With this, you should be able to fix the Windows update service not running issue.
- 0xFFFFFFFF: How to Fix This Windows Update Error
- 0x8007045d: What Does This Error Mean & How to Fix It
- Error 0x80070057 in Windows Update: 7 Easy Fixes
- 0x80072eff: How to Fix This Windows Update Error
- How to Fix Update Error Code 0x80070070 on Windows 11
3. Clear the update cache
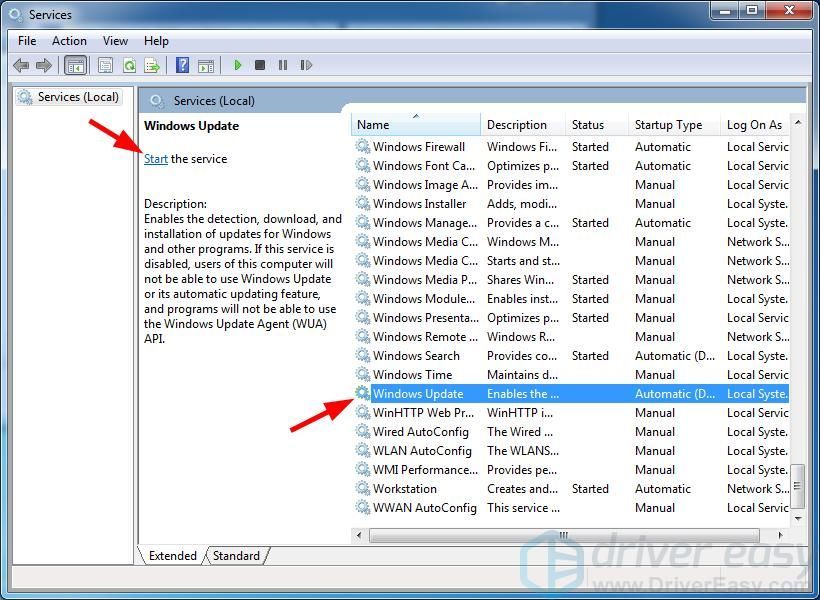
- Press the Windows key + R, type services.msc, and click OK.
- Right-click the Background Intelligence Transfer Service and select the Stop option.
- Now, right-click on Windows Update and then click Stop.
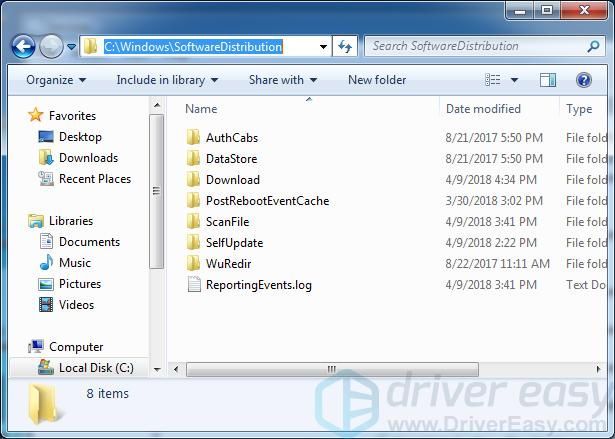
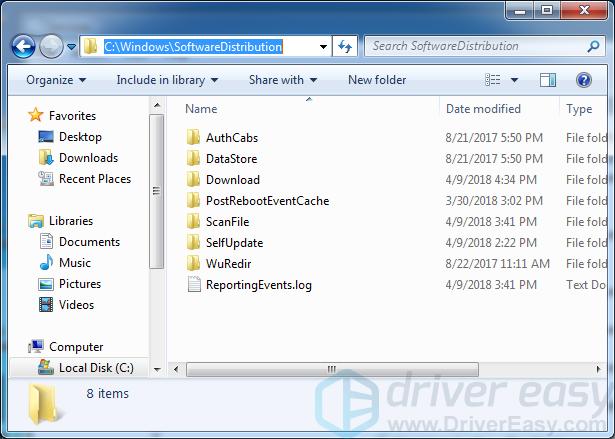
- Press the Windows key + E to open File Explorer and navigate to the path below:
C:/Windows/SoftwareDistribution
- Now, delete the contents of the SoftwareDistribution folder.
- Finally, go back to the Services app, right-click the BITS and Windows Update services, and select Start.

Restart your PC after applying the steps above. You can now check if you are still getting the Windows service not running error.
- 0xFFFFFFFF: How to Fix This Windows Update Error
- 0x8007045d: What Does This Error Mean & How to Fix It
- Error 0x80070057 in Windows Update: 7 Easy Fixes
Why is the Windows Update service stopped?
Below are some of the factors that can cause the Windows update service not running error:
- Faulty apps and services: One of the main causes of Windows could not start the Windows Update service on the Local Computer prompt is problematic apps. In some cases, it might be your third-party antivirus or service that is running in the background. The solution is to disable or remove the program using one of the best uninstaller software.
- Corrupt update cache: If you get the Access denied prompt while trying to install a Windows update or restart the service, it might be down to a corrupt cache. You need to clear the update cache and restart the needed services again to fix this.
With this, we have come to the end of this guide. You now have everything to fix the Windows update service not running error on your PC. All you need to do is follow the detailed instructions, and everything should be back to normal.
If you are facing other issues like Windows update not showing, check our detailed guide to restore it.
Feel free to let us know the solution that helped you solve the problem in the comments below.
![]()
Newsletter
Updates are a constant issue with Windows. They are inevitable, but they don’t always install smoothly. If you see a message saying “Windows Update cannot currently check for updates, because the service is not running“, you have a problem. Read on, and you will learn how to solve it in no time!
What causes the Windows Update service to not run properly?
As usual, there are many possible reasons, and it is not easy to find out what’s going on. Some of the causes can be:
- a proxy or VPN preventing the updates from running
- not enough disk space
- database corruption
- Creator Update: the last major update caused problems to a lot of users
Other miscellaneous errors might also be at play. Luckily, you don’t have to know what the reason is, you can just try the following methods until one of them works.
Run Windows Update Troubleshooter
- Press Windows>Settings, then choose Updates&Security.

- Go to the Troubleshooter section, select Windows Update then click Run the troubleshooter.

- Follow the pointers on the screen.
After the troubleshooter finished running, restart your computer and see if the update is working now. If it isn’t, there are still many options you can try.
Make sure update-related services are running
- Type “serv” in the Search bar, then click on Run as administrator to open the Services Manager app.

- Find the Windows Update service in the list, right-click then choose Properties.
- Set Startup type to Automatic. If the service is currently stopped, click on Start, then Apply.

- Repeat step 4 with the Cryptographic service and the Background Intelligent Transfer Service.


- Restart your computer.
Check if the updates are installing. If they aren’t, there is one more trivial thing you can check.
Turn off metered connection
When you don’t have unlimited internet, it is wise to turn on metered connection, so updates don’t download. However, if you left this setting on and forgot about it, it might now be preventing you from updating.
- Right-click on your internet connection icon on the system tray, then select Open Network & Internet settings.
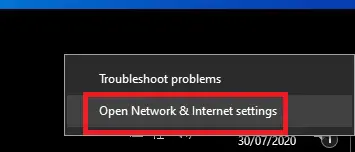
- Click on Wifi or Ethernet depending on the connection you have, then click on the icon of the connection.

- Settings will pop up. Turn the Set as metered connection toggle into Off.

Check if the update is working now. If it isn’t, try updating your Intel RST driver.
Download Intel Rapid Storage Technology Driver
The most recent version of this driver is important in order for the update to function. You can download it from here.
Try again to see if the update is working now. If not, you will need to start tinkering with some advanced settings.
Deleting update files from SoftwareDistribution
- Type “services” then click Open to open the Services manager.

- Find Windows Update and double-click it.

- Set Startup type to Disabled, click Stop then Apply.

- Repeat Step 3-4 with Background Intelligent Transfer Service.

- Go to C:\WindowsSoftwareDistribution. Press Ctrl + A to select all files, then right-click and choose Delete or press Shift + Delete to remove them.

- Open Service manager again, then restart Windows Update and BITS services.


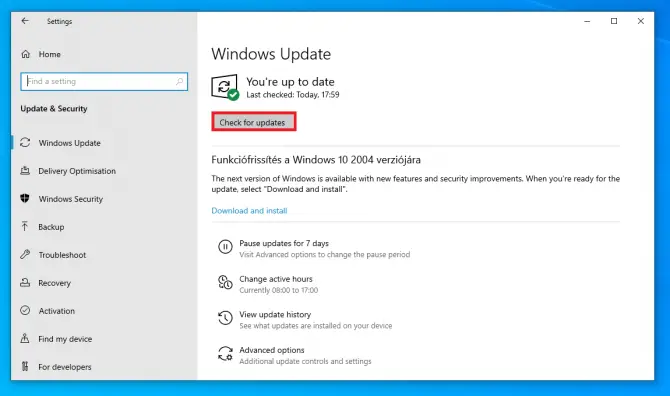
- Press Windows + I to open settings, then choose Updates&security.

- Go to the Windows Update section, then click Check for updates.
Check if the issue is still there. If not, you have to touch some sensitive folders.
Rename the SoftwareDistribution and Catroot2 folders
SoftwareDistribution is a folder that stores files temporarily to keep your system safe while an update is running. Catroot2 is another essential folder when it comes to Windows updates: this is the one storing the signatures of the update files. They are both necessary, but sometimes they can get clogged up with old, corrupted files, preventing the update. By renaming these folders, Windows will be forced to create new ones and download the components again. This might just be the kick your system needs to start updating!
- In the Search bar, type “cmd” and click on Run as administrator to open Command Prompt.

- Now we are going to stop all update-related services.
- Type “net stop wuauserv” then hit Enter.

This stops the Windows update service.
- Type “net stop bits” then hit Enter.

This stops the BITS (Background Intelligent Transfer Service) that keeps up the connection between the client and the server.
- Type “net stop cryptsvc” then hit Enter.

This will stop the Cryptography Service.
- Type “net stop msiserver” then hit Enter.

This will stop the Windows Installer Service.
- Now we are going to rename the two problematic folders to force Windows to create new ones.
- Type “ren C:\WindowsSoftwareDistribution SoftwareDistribution.old” then hit Enter.
![]()
This renames the SoftwareDistribution folder.
- Type “ren C:\WindowsSystem32catroot2 catroot2.old” then hit Enter.

This renames the Catroot2 folder.
- Now we are going to restart the services we stopped earlier. Type the following commands, hitting Enter after each:
- net start wuauserv
![]()
- net start bits

- net start cryptsvc

- net start msiserver

Now we are going to change registry settings.
- First we are going to add two domain groups to the Administrators local group.
- Type “net localgroup administrators networkservice /add” then hit Enter.

- Type “net localgroup administrators localservice /add” then hit Enter.

- Restart your computer.
This has fixed the problem for many users. If it still isn’t working, read on and try the next methods.
Reregistering update files
Note: Before you start this method, it is advised that you create a backup or a restore point. Here’s how to do that:
- Type “restore point” in the Search bar and click Open to create a restore point.

- Click on the drive where your OS sits (usually C:\), then click Configure.
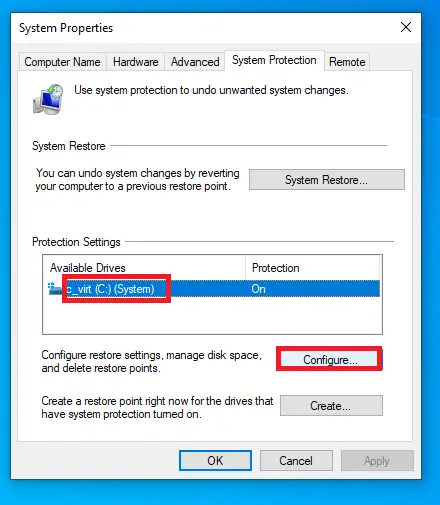
- Make sure the Turn on system protection radio button is selected. This way, Windows will create a restore point before each update, so you can revert to that if needed. Choose the size of the restore, then click OK.

- In the next window, click Create.

- Follow the instructions on screen.
Now we are going to work with the Command Prompt again.
- Type “cmd” in the Search bar, then click Run as administrator. First we are going to stop the update-related services.
- Type “sc stop bits” then hit Enter.

- Type “sc stop wuauserv” then hit Enter.
![]()
- Type “sc stop appidsvc” then hit Enter.
![]()
- Type “sc stop cryptsvc” then hit Enter.
![]()
- Now we are going to re-register all update-related files. These DLL files can cause random errors when not registered properly. We can fix that by the following steps:
- Type “regsvr32.exe /s atl.dll” then hit Enter.
- Type “regsvr32.exe /s urlmon.dll” then hit Enter.
- Type “regsvr32.exe /s mshtml.dll” then hit Enter.
- Type “regsvr32.exe /s shdocvw.dll” then hit Enter.
- Type “regsvr32.exe /s browseui.dll” then hit Enter.
- Type “regsvr32.exe /s jscript.dll” then hit Enter.
- Type “regsvr32.exe /s vbscript.dll” then hit Enter.
- Type “regsvr32.exe /s scrrun.dll” then hit Enter.
- Type “regsvr32.exe /s msxml3.dll” then hit Enter.
- Type “regsvr32.exe /s msxml6.dll” then hit Enter.
- Type “regsvr32.exe /s actxprxy.dll” then hit Enter.

- Type “regsvr32.exe /s softpub.dll” then hit Enter.
- Type “regsvr32.exe /s wintrust.dll” then hit Enter.
- Type “regsvr32.exe /s dssenh.dll” then hit Enter.
- Type “regsvr32.exe /s rsaenh.dll” then hit Enter.
- Type “regsvr32.exe /s cryptdlg.dll” then hit Enter.
- Type “regsvr32.exe /s oleaut32.dll” then hit Enter.
- Type “regsvr32.exe /s ole32.dll” then hit Enter.
- Type “regsvr32.exe /s shell32.dll” then hit Enter.
- Type “regsvr32.exe /s wuapi.dll” then hit Enter.
- Type “regsvr32.exe /s wuaueng.dll” then hit Enter.

- Type “regsvr32.exe /s wups.dll” then hit Enter.
- Type “regsvr32.exe /s wups2.dll” then hit Enter.
- Type “regsvr32.exe /s qmgr.dll” then hit Enter.
- Type “regsvr32.exe /s wudriver.dll” then hit Enter.

It is a good idea to also reset your network configuration, which we will do in the following step.
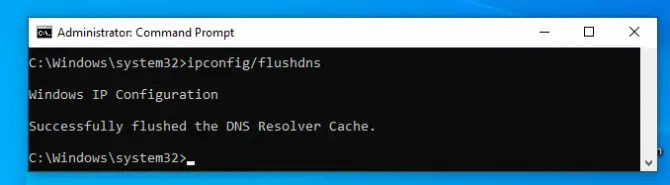
- Flush your DNS cache and reset Winsock catalog by the following prompts.
- Type “ipconfig /flushdns” then hit Enter.
- Type “netsh winsock reset” then hit Enter.

- Type “netsh winsock reset proxy” then hit Enter.

Restart your computer.
- Now we are going to clear the Windows Update cache in the two critical folders we renamed earlier.
- Type “rmdir %systemroot%SoftwareDistribution /S /Q” then hit Enter.
- Type “rmdir %systemroot%system32catroot2 /S /Q” then hit Enter.

- In the last steps, we will turn those services back on.
- Type “sc start bits” then hit Enter.

- Type “sc start wuauserv” then hit Enter.

- Type “sc start appidsvc” then hit Enter.

- Type “sc start cryptsvc” then hit Enter.

Your update should run now.
Conclusion
Updates are important, but they are not always without troubles. Hopefully one of the above methods worked for you. Let us know your experience in the comments!
Содержание
- Не работают обновления Windows 10? 10 способов решения проблемы!
- Почему не обновляется виндовс 10 через центр обновления
- Включены ли обновления в Диспетчере задач?
- Включение в групповой политике
- Есть ли новые обновления Windows?
- Групповая политика, редактор
- Включаем обновления в командной строке
- Включаем обновления через реестр
- Обновляем с помощью программы Win Updates Disabler
- Программа Windows Update Minitool
- Исправление ошибок центра обновления
- Как очистить кэш обновлений вручную?
Не работают обновления Windows 10? 10 способов решения проблемы!


Добрый день, друзья. В Рунете пользователи довольно часто отключают обновления системы, так как приличное число операционных систем пиратское, и люди боятся разоблачения пиратской версии системы. Часть же пользователей всё же стремятся обновлять систему вовремя, так как отлично понимают, что обновления несут в себе защиту в сбоях ОС и прочие улучшения системного кода. Но, система обновлений не всегда функционирует. Что же предпринять, когда не работают обновления Windows 10?
Почему не обновляется виндовс 10 через центр обновления
- Наиболее распространённой причиной недействующего центра обновления – это его банальное отключение. Обновления мог отключить как сам пользователь (часто нечаянно), так и создатель сборки Windows, если у вас установлена именно сборная система.
- Переполненный системный диск. Очень распространенная проблема, особенно в последнее время, когда десятка часто обновляется. В этом случае выхода два — или очищаем системный диск, или дополняем к нему свободное пространство с другого раздела. Я для этих целей советую использовать программу Acronis Disk Director.
- Переполненный кэш обновлений. В этом случае, кэш необходимо почистить. Как именно, рассказано в статье ниже.
- Блокировка Антивирусом, или Файрволлом, или защитником Windows Выход в этом случае довольно прост. Отключаем данные программы и производим обновление. После этого, главное не забыть включить антивирус заново (для их отключения я представлю отличную программу).

- Вредоносное программное ПО мешает обновлению. В этом случае, запускаем ваш уважаемый антивирус и подробно сканируем все разделы компьютера. Если ваш антивирус слаб, или его у вас вообще нет, в этом случае, нам помогут разовые антивирусы, вроде Web CureIt. Заходим на сайт Dr.Web, скачиваем и производим подробное сканирование.
- Обновлению могут мешать внешние запоминающие устройства, вроде флешек. В данном случае, их необходимо отключить и попробовать обновить Windows.
- Операционная система повреждена. В данном случае, необходимо запустить специальную утилиту, которая просканирует вашу систему и устранит различные сбои (об этом ниже). Также, в этом же случае, отлично поможет восстановление системы из резервной копии, или диска восстановления.
Включены ли обновления в Диспетчере задач?
Это самый первый метод узнать, включена у вас вообще служба обновлений, или её кто-то догадался выключить. При этом, мы будем использовать только системные программы, вроде диспетчера задач. Итак, запустим диспетчер, применив горячие клавиши CTRL + SHIFT + ECS. Далее, выбираем меню «Службы» и ищем надпись wuauserv.
Как видно из моего скриншота, у меня данная служба остановлена. Кликнем по данной строчке правой клавишей, и нажмем «Запустить».
Теперь, как мы видим, центр обновления «Выполняется». Но, возможно, что у вас wuauserv в данной таблице отсутствует, тогда применим другой метод.
Включение в групповой политике
Запустим строку «Выполнить» клавишами Win + R. В открывшееся окошко вводим services.msc. Затем Ок.
У нас возникает окошко «Службы». Среди команд ищем «Центр Обновления…». У меня над типом запуска стоит «Система». Когда у вас надпись «Отключена», нужно её включить, выделив эту команду, выбрав режим «Расширенный». Затем, выбираем «Запустить».
После этого, перезагружаем компьютер.
Есть ли новые обновления Windows?
Итак, давайте войдём в Центр Обновлений использую утилиту «Параметры». Для этого, нажмём на «пуск» правой клавишей и выберем «параметры».
Затем, в открывшемся окошке выберем «Обновления и безопасность».
В новом окошке, нам бросается надпись, что на моём ПК стоят последние обновления. Как видно из скриншота, проверка произошла вчера в 23:30. При желании, мы можем проверить наличие новых обновлений, нажав на соответствующую клавишу.
В этом окошке можно выбрать «Варианты обновления». Для этого, нажать на «Дополнительные параметры». Разумеется, это всё работает, если обновления включены. Но, если вам пока не удалось включить обновления, есть ещё методы.
Групповая политика, редактор
Запустим утилиту также командой «Выполнить». Нажимаем Win + R и пишем gpedit.msc
Итак, для входа в Центр Обновления в левой колонке выберем «Конфигурация компьютера», затем папочку «Административные шаблоны», далее «Компоненты Windows». Ищем надпись «Настройка автоматического обновления».
Скриншот показывает, что данная настройка у меня включена. Если над ней надпись «Не задана», кликнем по ней правой клавишей, и в ниспадающем меню выберем «Изменить». В новом окошке слева ставим чикбокс «Включено», затем «Применить» и Ок.
Включаем обновления в командной строке
Очень эффективный способ. Данный метод позволяет включить службу wuauserv, даже если другие методы её включения не помогают. Итак, откроем командную строку как администратор. Для этого, вводим в строку поиска «Ком…»
После надписи system32 вписываем следующую надпись net start wuauserv, жмём ввод.
Из скриншота мы видим, что центр обновления успешно запущен. На мой взгляд, это самый эффективный способ запустить обновления.
Включаем обновления через реестр
Также отличный способ. Итак, войдём в реестр через «выполнить», написав надпись regedit, жмём Ок.
Затем, в реестре ищем ветку HKEY_LOCAL_MACHINESYSTEMCurrentControlSetServiceswuauserv
Для этого, можно в поиске окна реестра вставить данную надпись, сразу после слова «Компьютер», или пройти по ветке самому. Затем, в открывшемся окошке выбираем команду «Start». Далее, кликнем по ней правой клавишей и нажмем «Изменить».
Если реестр у вас отключен, будет стоять 4, для включения ставим цифру 1.
Обновляем с помощью программы Win Updates Disabler
Довольно простая программа, которая может качественно обновить вашу систему и прочие её компоненты. Программа имеет как обычную версию, так и портативную, которую можно запустить даже с флешки, и не нужно устанавливать.
Скачать Win Updates Disabler
Вы можете скачать обычную версию, я же предпочту портативную. Не стоит лишний раз нагромождать системный диск. Итак, распаковываем программу. Так как у меня 64 битная система, я выбираю соответствующую версию. Программа на русском языке.
Что интересно, программа может не только включать обновления, но и отключать их. Выше мы упоминали, что обновления Windows могут не загружаться из-за защитника и брадмауэра Windows. Так вот, программа может их отключить перед обновлением.
Далее, выбираем меню «Включить», ставим галочку над строкой «Включить обновления…» и нажимаем «Применить сейчас».
Теперь, софт спрашивает ваше разрешение на перезагрузку компьютера. Даём согласие, выключаем браузер, и перезагружаем.
Компьютер начинает перезагрузку и производит поиск обновлений.
Одна из самых лучших программ для обновления Windows. Данная программа использует Центр обновления. Но, функционал этой программы значительно более обширный, чем у утилиты Microsoft.
Эту программу создали участники форума forum.ru-board.com
Программа портативная, в комплекте имеется 32, и 64 bit версия. Нужно просто распаковать архив, выбрать свою версию, запустить Update Minitool.
Скачать Windows Update Minitool (ссылка на сайте после заголовка программы).
Итак, запускаем программу, нажав на две круглых стрелки в левой колонке.
Программа показала, что на момент написания статьи, новых обновлений нет. Также, можно узнать, какие обновления уже установлены, есть ли скрытые и прочее. Программа имеет множество языков, но, их нужно скачивать отдельно. Родной язык программы русский. Есть английский, украинский и др.
Я не буду рассказывать сейчас все достоинства программы, так как она заслуживает отдельной статьи. Главным же достоинством Update Minitool является возможность устанавливать обновления при не рабочем центре обновлений и удобство скачивания при лимитированном трафике интернета. Теперь давайте рассмотрим, как исправить ошибки при обновлениях.
Исправление ошибок центра обновления
Как мы упомянули выше, обновления могут перестать устанавливаться, если в вашей системе присутствуют сбои. Что в этом случае делать? Если вы давно установили систему, и раньше обновления отлично работали, достаточно сделать бэкап из образа системы, который вы создали после установки Windows.
Также, систему можно исправить с помощью диска восстановления. Но, если вы не догадались создать резервную копию Windows, тогда применим другие методы.
Итак, воспользуемся системной утилитой, которая специально создана Microsoft, чтобы устранять подобные проблемы.
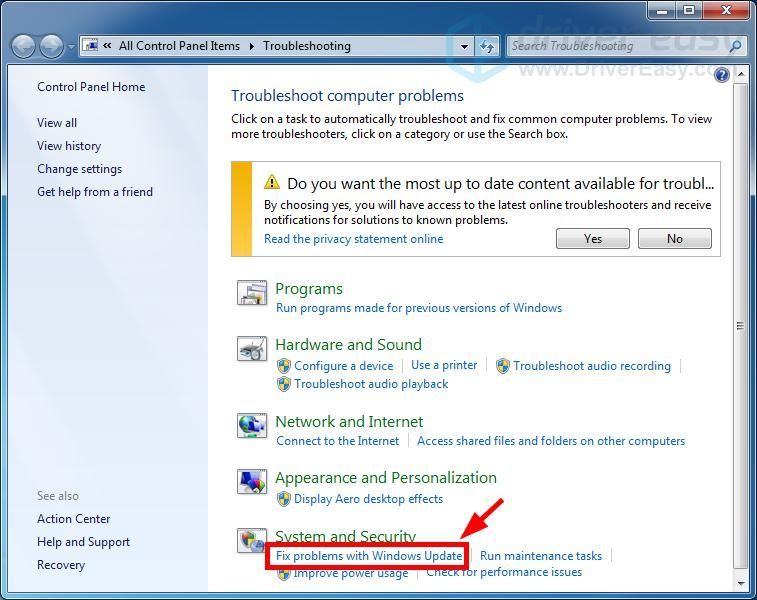
Входим в «Панель управления» через строку поиска, введя слово «панель».
В панели управления выберем «Крупные значки», затем «Устранение неполадок».
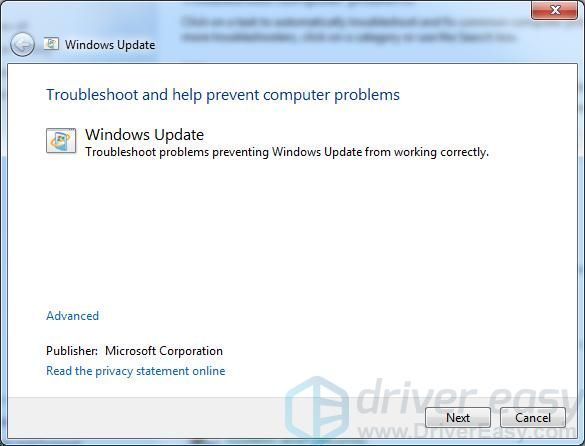
В новом окошке справа под командой «Система и безопасность» кликнем по ссылочке «Устранение неполадок…».
Нажимаем «Далее» и наша система начнет искать неполадки, препятствующие нормальной загрузке обновлений.
Когда утилита просканирует систему, часть неполадок она исправит на автомате. Но, для исправления части из них, она спросит у нас, что нужно делать? Исправлять, или пропустить и продолжить поиск других проблем.
Когда программа просканирует систему, она выдаст данные, что ей удалось найти и исправить. Также, утилита покажет неисправности, исправить которые она не смогла. После этого нажимаем «Закрыть» и производим перезагрузку системы.
Когда перезагрузка завершится, нужно проверить через Центр обновлений, заработал он или нет и скачиваются ли новые обновления.
Как очистить кэш обновлений вручную?
Переходим к завершающему этапу устранения неполадок с обновлениями. Если утилите не удалось очистить кэш, почистим кэш сами. Итак:
Входим в окошко «Службы», применив Win + R и, как описывалось выше, вводим services.msc.
В низу выбираем «Расширенный». В правом ок ищем «Центр обновления…». В левом окошке нажимаем на ссылку «Остановить службу». Это окошко оставляем открытым.
Теперь, входим в «Проводник» (кликнув по ярлыку «Компьютер»), диск С. Затем выберем Windows, далее SoftwareDistribution и ищем папочку Download, открываем её. Выделяем всё файлы и папки. Жмём правой клавишей по выделенной области и в ниспадающем меню выбираем «Удалить».
Мы очистили кэш обновлений. Вернёмся в нашу открытую утилиту со службами и снова запускаем обновления. Я думаю, обновления Windows у вас теперь работают. После проделанных работ желательно почистить систему и реестр, например — Ускорителем Компьютера .
Вывод: — мы рассмотрели довольно много способов устранения неполадок с загрузками обновлений Windows. Советую начинать исправлять неполадки с самых верхних рекомендаций. Чтобы обновления Windows начали скачиваться, по большей части, достаточно включить их в окне «Службы» или же через командную строку. Если обновления Windows всё равно не скачиваются, проделываем следующие пункты, и они у вас должны заработать. Успехов!

Многие пользователи Windows испытывают проблемы с Центром обновления Windows. Если они проверят наличие обновлений в своей системе Windows, они получат сообщение об ошибке « Центр обновления Windows в настоящее время не может проверять наличие обновлений, потому что служба не запущена. «. И они не могут устанавливать обновления для своей системы.
Это досадная проблема. И попытки исправить это так же раздражают, потому что вы потратите много времени на чтение предложений в Интернете, и большинство из них не сработает.
Но не волнуйтесь. Ниже приведены некоторые методы, которые помогли многим пользователям Windows исправить свою ошибку.
Попробуйте эти исправления
Необязательно пробовать их все; просто продвигайтесь вниз по списку, пока не найдете тот, который вам подходит.
- Запустите средство устранения неполадок Центра обновления Windows.
- Проверить на вредоносное ПО
- Перезапустите службы, связанные с Центром обновления Windows.
- Очистите папку SoftwareDistribution
- Обновите драйверы вашего устройства
В Windows есть встроенное средство устранения неполадок, которое может проверять и устранять проблемы с Центром обновления Windows. Вы должны запустить его при возникновении ошибки в Центре обновления Windows. Для этого:
1) Щелкните значок Кнопка Пуск в левом нижнем углу экрана введите ‘ устранять неполадки ”И щелкните Поиск проблемы в результате.

2) Нажмите Устранение проблем с Центром обновления Windows .
3) Следуйте инструкциям на экране, чтобы завершить процесс устранения неполадок.
4) Снова запустите Центр обновления Windows и посмотрите, исправлена ли ваша ошибка.
Метод 2: проверьте наличие вредоносного ПО
Ваша ошибка может возникнуть из-за вмешательства вредоносного программного обеспечения. Вам следует запустить сканирование своего компьютера на наличие вредоносных программ.
Вы можете использовать Средство удаления вредоносных программ выпущенный Microsoft. Загрузите инструмент и запустите его на своем компьютере. Затем следуйте его инструкциям, чтобы завершить процесс сканирования. Если этот метод работает для вас, вы больше не увидите ошибку в Центре обновления Windows.
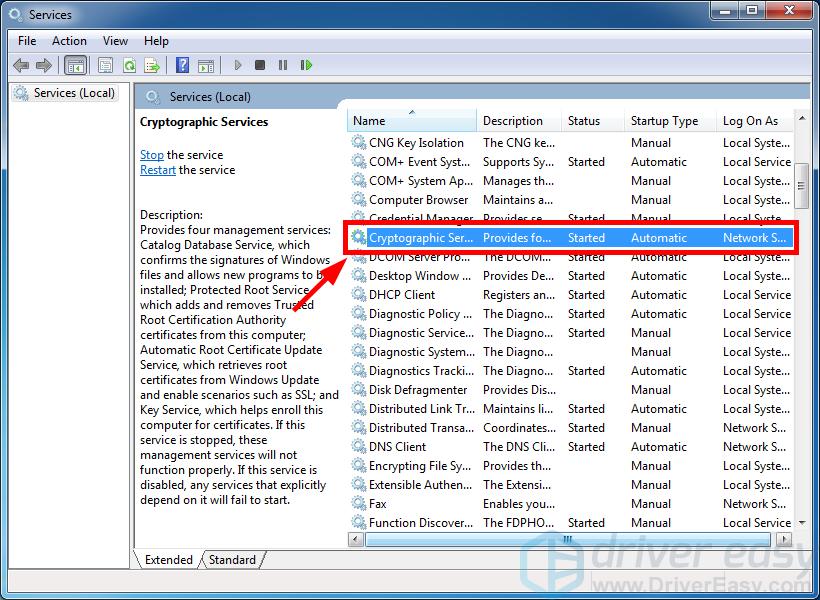
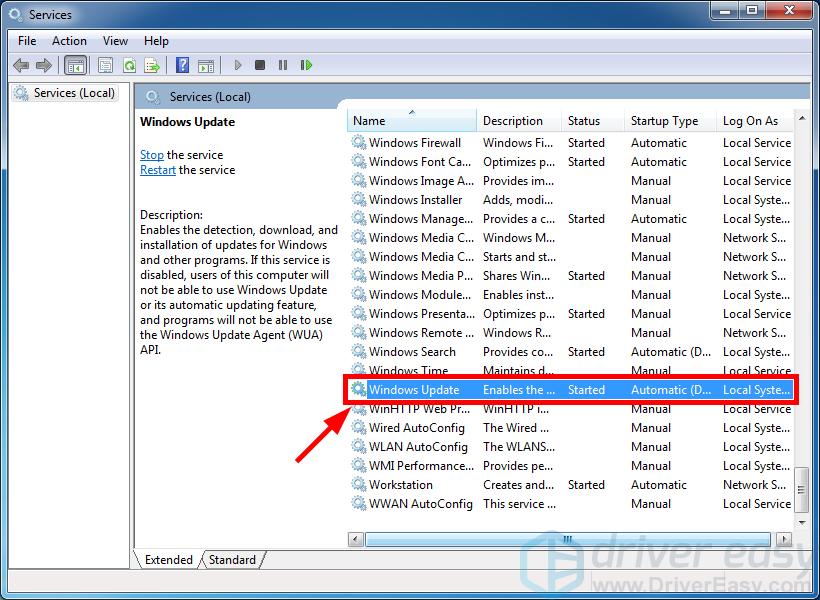
Метод 3: перезапустите службы, связанные с Центром обновления Windows
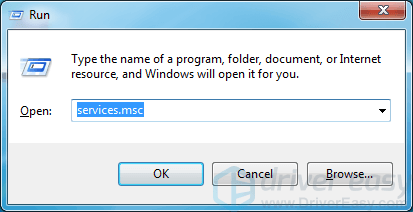
Вы можете получить сообщение об ошибке «Служба не работает», потому что службы, связанные с вашим Центром обновления Windows, отключены. Вам следует перезапустить эти службы и посмотреть, исправит ли это вашу ошибку. Для этого:
1) нажмите Windows logo key и р на клавиатуре, чтобы вызвать окно «Выполнить».
2) Тип ‘ services.msc ”И щелкните Хорошо открыть Сервисы оснастка.
3) Двойной щелчок Фоновая интеллектуальная служба передачи .
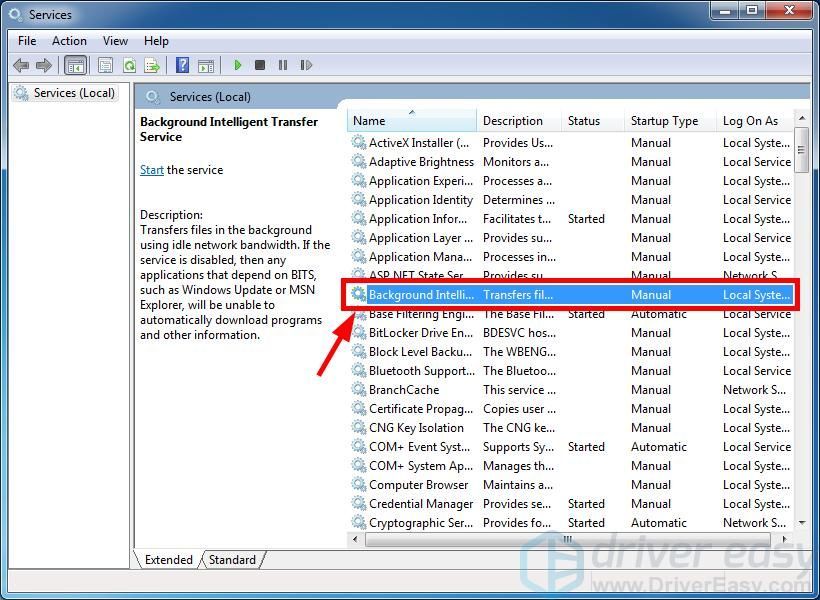
4) Убедитесь, что тип запуска установлен на Автоматический . Затем нажмите кнопку Начало кнопка (если кнопка Пуск в сером щелкните значок Стоп кнопку, а затем нажмите кнопку Начало кнопку). Затем нажмите Хорошо закрыть окно.
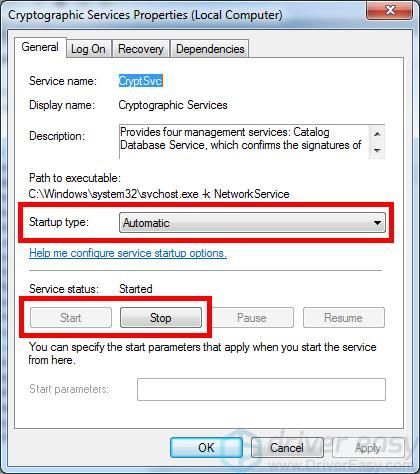
5) Двойной щелчок Криптографические услуги .
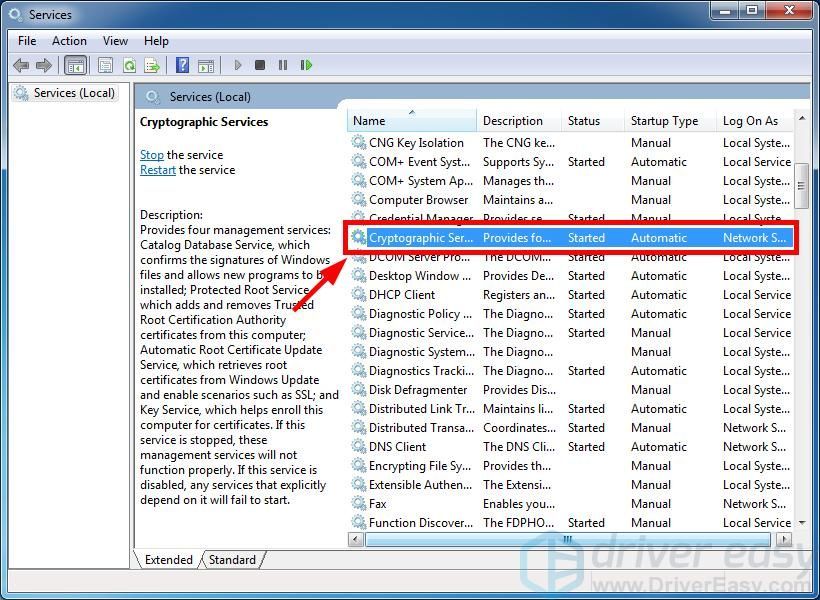
6) Убедитесь, что тип запуска установлен на Автоматический . Затем нажмите кнопку Начало кнопка (если кнопка Пуск в сером щелкните значок Стоп кнопку, а затем нажмите кнопку Начало кнопку). Затем нажмите Хорошо закрыть окно.
7) Двойной щелчок Центр обновления Windows .
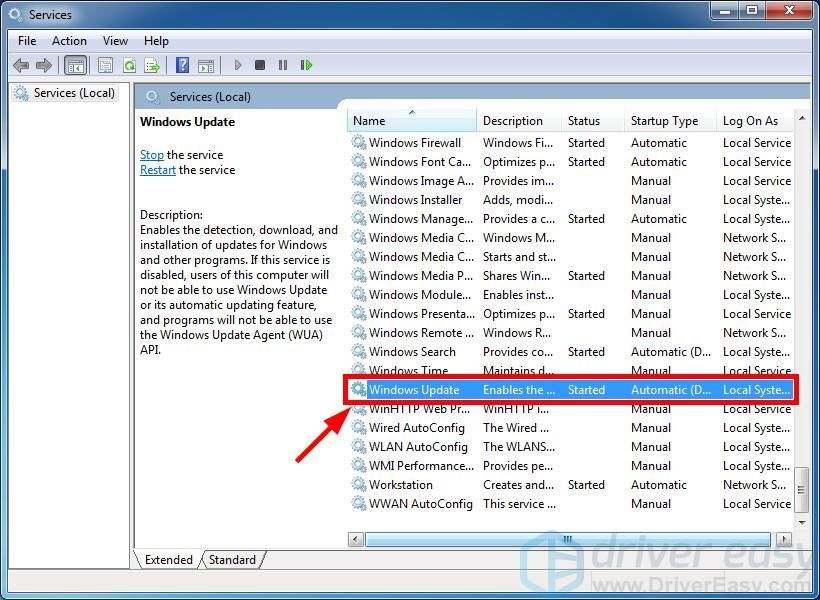
6) Убедитесь, что тип запуска установлен на Автоматический . Затем нажмите кнопку Начало кнопка (если кнопка Пуск в сером щелкните значок Стоп кнопку, а затем нажмите кнопку Начало кнопку). Затем нажмите Хорошо закрыть окно.
7) Закройте оснастку «Службы» и перезагрузите компьютер. Затем проверьте, решает ли это вашу проблему.
Метод 4: очистите папку SoftwareDistribution
В папке SoftwareDistribution хранятся временные файлы для Центра обновления Windows. Вы можете получить сообщение об ошибке из-за проблем с повреждением этих файлов. Чтобы узнать, являются ли эти файлы причиной, вы должны удалить все содержимое этой папки.
1) нажмите Windows logo key и р на клавиатуре, чтобы вызвать окно «Выполнить».
2) Тип ‘ services.msc ”И щелкните Хорошо открыть Сервисы оснастка.
3) Нажмите Центр обновления Windows а затем щелкните Стоп (сервис).

4) открыто Проводник (нажмите Логотип Windows ключ и ЯВЛЯЕТСЯ на клавиатуре одновременно), затем перейдите к C: Windows SoftwareDistribution и удалять все файлы и папки есть.
5) Восстановить Сервисы оснастка. Затем нажмите Центр обновления Windows и нажмите Начало (сервис).
6) Перезагрузите компьютер. Затем запустите Центр обновления Windows и посмотрите, поможет ли это избавиться от ошибки, когда служба Центра обновления Windows не работает.
Метод 5. Обновите драйверы вашего устройства.
Ошибка может возникнуть из-за того, что вы используете неправильный драйвер устройства или он устарел. Чтобы убедиться, что это так, вам следует проверить свой компьютер и обновить все устаревшие или неправильные драйверы.
Обновление драйверов может занять много времени. Но если вы хотите сделать это легко и быстро, вы можете использовать Водитель Easy .
Водитель Easy автоматически распознает вашу систему и найдет для нее подходящие драйверы. Вам не нужно точно знать, на какой системе работает ваш компьютер, вам не нужно рисковать, загружая и устанавливая неправильный драйвер, и вам не нужно беспокоиться о том, чтобы сделать ошибку при установке.
Вы можете загрузить и установить драйверы с помощью Free или За версия Driver Easy. Но с версией Pro требуется всего 2 клики (и вы получаете полная поддержка и 30-дневная гарантия возврата денег ):
1) Скачать и установить Водитель Easy .
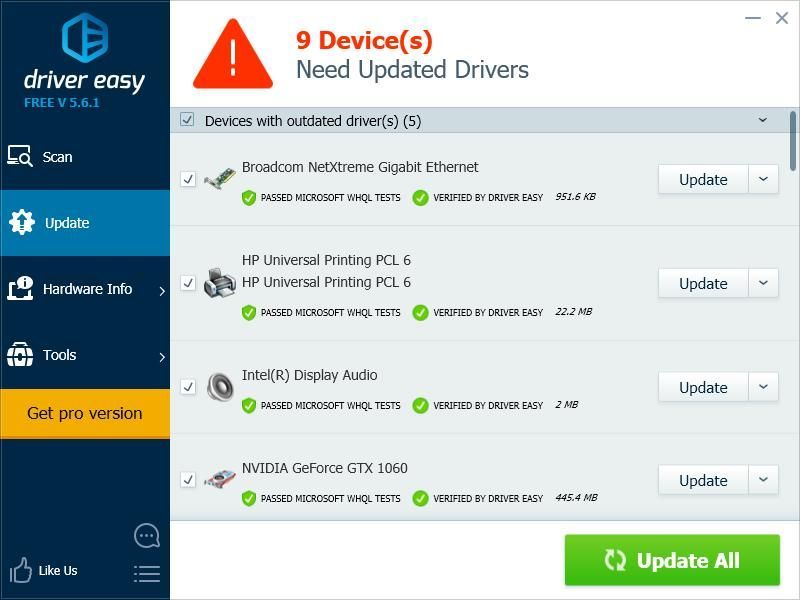
2) Бежать Водитель Easy и щелкните Сканировать сейчас кнопка. Водитель Easy затем просканирует ваш компьютер и обнаружит все проблемные драйверы.

3) Щелкните значок Обновить рядом с каждым из ваших устройств, чтобы загрузить для него последнюю версию драйвера. Вы также можете щелкнуть Обновить все кнопку в правом нижнем углу, чтобы автоматически обновить все устаревшие или отсутствующие драйверы на вашем компьютере (для этого требуется Pro версия — вам будет предложено выполнить обновление, когда вы нажмете «Обновить все»).
4) Перезагрузите компьютер. Затем запустите Центр обновления Windows, чтобы узнать, решит ли это вашу проблему.
Clearing the Windows update history can fix this issue quickly
by Milan Stanojevic
Milan has been enthusiastic about technology ever since his childhood days, and this led him to take interest in all PC-related technologies. He’s a PC enthusiast and he… read more
Updated on
- If you are facing the Windows update service not running issue, it might be because of a faulty service on your PC.
- One effective and quick solution to this issue is to run the Windows update troubleshooter.
- Another excellent fix is to perform a clean boot and remove any problematic program.
XINSTALL BY CLICKING THE DOWNLOAD
FILE
Windows updates are important for the smooth running and security of your PC. However, there are times when the Windows update won’t work with a prompt saying that the service is not running.
The full error message states: Windows Update cannot currently check for updates, because the service is not running. You may need to restart your computer.
This can prevent you from installing important updates and make your PC vulnerable. Fortunately, it is an issue with known solutions, and we will show you what to do when the Windows Update service is not running in this guide.
How can I fix the Windows Update service not running issue?
- How can I fix the Windows Update service not running issue?
- 1. Run the Windows update troubleshooter
- 2. Disable or remove problematic services
- 2.1. Enable Clean boot
- 2.2. Disable or remove faulty service
- 3. Clear the update cache
- Why is the Windows Update service stopped?
Before exploring the sophisticated fixes in this section to make the Windows Update service run, below are some general troubleshooting steps you should try:
How we test, review and rate?
We have worked for the past 6 months on building a new review system on how we produce content. Using it, we have subsequently redone most of our articles to provide actual hands-on expertise on the guides we made.
For more details you can read how we test, review, and rate at WindowsReport.
- Restart your PC. Read our guide to learn what you can do if Windows won’t restart.
- Disable or remove the third-party antivirus software.
1. Run the Windows update troubleshooter
- Press the Windows key + I to open the Settings app, and select Update & Security.
- Select Troubleshoot in the left pane and click Additional troubleshooters.
- Now, select Windows Update and click Run the troubleshooter.
- Finally, apply any recommended troubleshooting steps.
The Windows Update troubleshooter is one of the best tools for fixing update issues, including the service not running error. After running the troubleshooter, try checking and installing updates again.
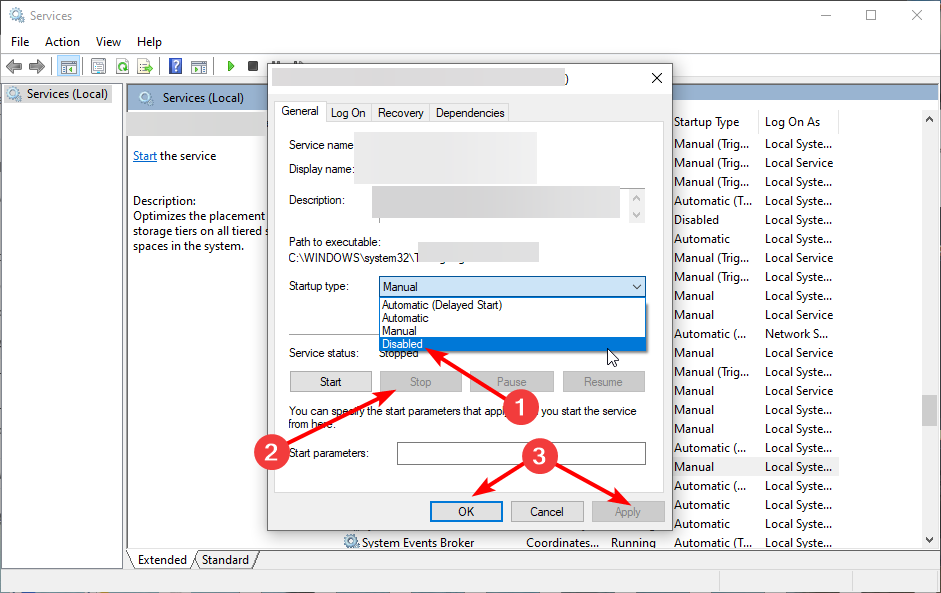
2. Disable or remove problematic services
2.1. Enable Clean boot
- Press the Windows key + R, type msconfig, and click OK.
- Click the Services tab at the top, check the Hide all Microsoft services box, and click Disable all.
- Now, choose the Startup tab at the top and click Open Task Manager.
- Right-click each service there and select the Disable option.
- Go back to the System Configuration window, click the Apply button, followed by OK, and restart your PC.
- Now, press the Windows key + R, type service.msc, and click OK.
- Double-click the Windows Update service to open its properties.
- Finally, set its Startup type to Automatic, choose the Start option, and click the Apply button, followed by OK.
The first step to disabling any problematic app or process that could be causing the Windows update service not running issue is to clean boot your PC. If the issue is fixed after restarting your PC, you need to find the service or app that could be causing the problem.
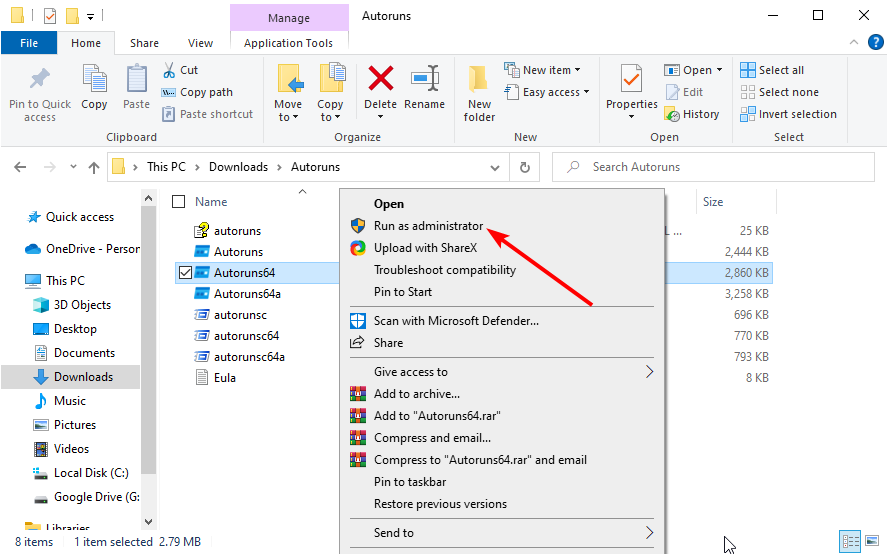
You can do this by enabling the disabled services in batches. One service that users have found to cause this issue is the StopUpdates10Guard service. Below are the steps to follow to disable or remove it.
2.2. Disable or remove faulty service
- Press the Windows key + R, type services, and click OK.
- Double-click the StopUpdates10Guard service to open its properties.
- Now, set its Startup type to Disabled and click the Stop button.
- From here, click the Apply button, followed by OK.
- To remove the service completely, download the Autorun tool.
- Unzip the file, right-click the Autorun 64-bit (for 64-bit system) option, and select Run as administrator.
- Finally, look for any reference to the StopUpdates10Guard service, right-click it, and select Delete.
With this, you should be able to fix the Windows update service not running issue.
- Windows 11 23H2: How to Download the Official ISO
- A 64-bit Windows 12 ISO is out, theoretically. Here’s all you need to know
- Dev Build 23550 comes with a huge undocumented improvement
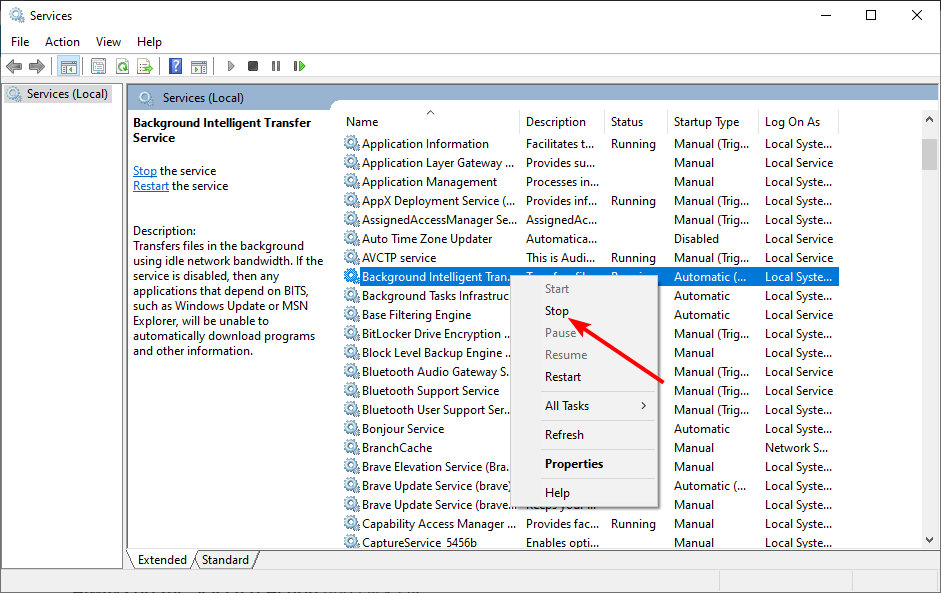
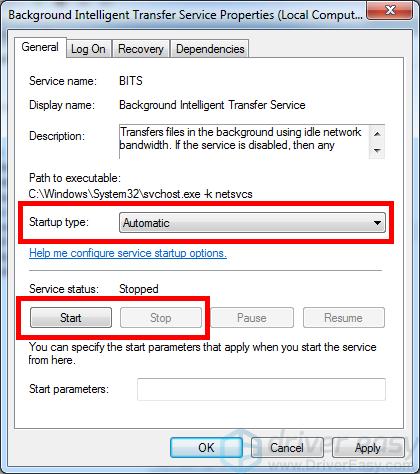
3. Clear the update cache
- Press the Windows key + R, type services.msc, and click OK.
- Right-click the Background Intelligence Transfer Service and select the Stop option.
- Now, right-click on Windows Update and then click Stop.
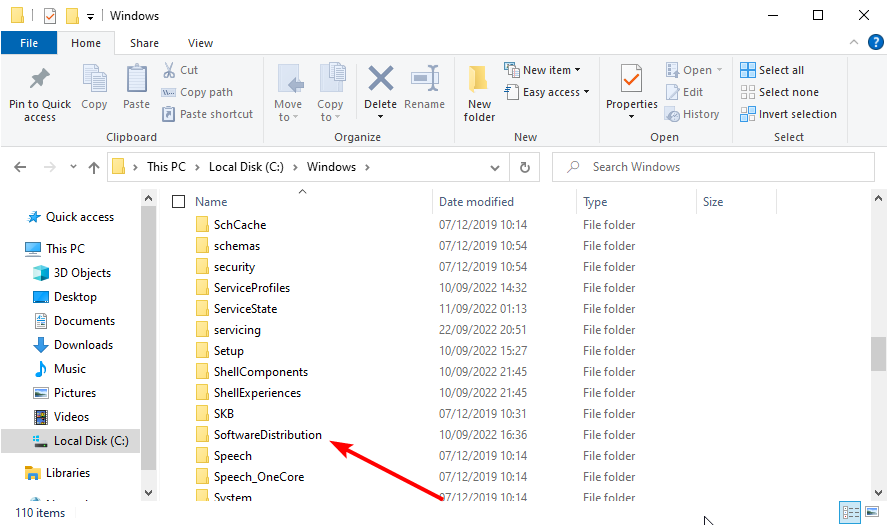
- Press the Windows key + E to open File Explorer and navigate to the path below:
C:/Windows/SoftwareDistribution - Now, delete the contents of the SoftwareDistribution folder.
- Finally, go back to the Services app, right-click the BITS and Windows Update services, and select Start.
Restart your PC after applying the steps above. You can now check if you are still getting the Windows service not running error.
- Windows 11 23H2: How to Download the Official ISO
- A 64-bit Windows 12 ISO is out, theoretically. Here’s all you need to know
- Dev Build 23550 comes with a huge undocumented improvement
- How to enable automatic optional updates in Windows 11
- Windows 11’s next major update after 23H2 could arrive 24 Feb 2024
Why is the Windows Update service stopped?
Below are some of the factors that can cause the Windows update service not running error:
- Faulty apps and services: One of the main causes of Windows could not start the Windows Update service on the Local Computer prompt is problematic apps. In some cases, it might be your third-party antivirus or service that is running in the background. The solution is to disable or remove the program using one of the best uninstaller software.
- Corrupt update cache: If you get the Access denied prompt while trying to install a Windows update or restart the service, it might be down to a corrupt cache. You need to clear the update cache and restart the needed services again to fix this.
With this, we have come to the end of this guide. You now have everything to fix the Windows update service not running error on your PC. All you need to do is follow the detailed instructions, and everything should be back to normal.
If you are facing other issues like Windows update not showing, check our detailed guide to restore it.
Feel free to let us know the solution that helped you solve the problem in the comments below.
![]()
Updates are a constant issue with Windows. They are inevitable, but they don’t always install smoothly. If you see a message saying “Windows Update cannot currently check for updates, because the service is not running“, you have a problem. Read on, and you will learn how to solve it in no time!
What causes the Windows Update service to not run properly?
As usual, there are many possible reasons, and it is not easy to find out what’s going on. Some of the causes can be:
- a proxy or VPN preventing the updates from running
- not enough disk space
- database corruption
- Creator Update: the last major update caused problems to a lot of users
Other miscellaneous errors might also be at play. Luckily, you don’t have to know what the reason is, you can just try the following methods until one of them works.
Run Windows Update Troubleshooter
- Press Windows>Settings, then choose Updates&Security.
- Go to the Troubleshooter section, select Windows Update then click Run the troubleshooter.
- Follow the pointers on the screen.
After the troubleshooter finished running, restart your computer and see if the update is working now. If it isn’t, there are still many options you can try.
Make sure update-related services are running
- Type “serv” in the Search bar, then click on Run as administrator to open the Services Manager app.
- Find the Windows Update service in the list, right-click then choose Properties.
- Set Startup type to Automatic. If the service is currently stopped, click on Start, then Apply.
- Repeat step 4 with the Cryptographic service and the Background Intelligent Transfer Service.
- Restart your computer.
Check if the updates are installing. If they aren’t, there is one more trivial thing you can check.
Turn off metered connection
When you don’t have unlimited internet, it is wise to turn on metered connection, so updates don’t download. However, if you left this setting on and forgot about it, it might now be preventing you from updating.
- Right-click on your internet connection icon on the system tray, then select Open Network & Internet settings.
- Click on Wifi or Ethernet depending on the connection you have, then click on the icon of the connection.
- Settings will pop up. Turn the Set as metered connection toggle into Off.
Check if the update is working now. If it isn’t, try updating your Intel RST driver.
Download Intel Rapid Storage Technology Driver
The most recent version of this driver is important in order for the update to function. You can download it from here.
Try again to see if the update is working now. If not, you will need to start tinkering with some advanced settings.
Deleting update files from SoftwareDistribution
- Type “services” then click Open to open the Services manager.
- Find Windows Update and double-click it.
- Set Startup type to Disabled, click Stop then Apply.
- Repeat Step 3-4 with Background Intelligent Transfer Service.
- Go to C:\\Windows\SoftwareDistribution. Press Ctrl + A to select all files, then right-click and choose Delete or press Shift + Delete to remove them.
- Open Service manager again, then restart Windows Update and BITS services.
- Press Windows + I to open settings, then choose Updates&security.
- Go to the Windows Update section, then click Check for updates.
Check if the issue is still there. If not, you have to touch some sensitive folders.
Rename the SoftwareDistribution and Catroot2 folders
SoftwareDistribution is a folder that stores files temporarily to keep your system safe while an update is running. Catroot2 is another essential folder when it comes to Windows updates: this is the one storing the signatures of the update files. They are both necessary, but sometimes they can get clogged up with old, corrupted files, preventing the update. By renaming these folders, Windows will be forced to create new ones and download the components again. This might just be the kick your system needs to start updating!
- In the Search bar, type “cmd” and click on Run as administrator to open Command Prompt.
- Now we are going to stop all update-related services.
- Type “net stop wuauserv” then hit Enter.
This stops the Windows update service.
- Type “net stop bits” then hit Enter.
This stops the BITS (Background Intelligent Transfer Service) that keeps up the connection between the client and the server.
- Type “net stop cryptsvc” then hit Enter.
This will stop the Cryptography Service.
- Type “net stop msiserver” then hit Enter.
This will stop the Windows Installer Service.
- Now we are going to rename the two problematic folders to force Windows to create new ones.
- Type “ren C:\\Windows\SoftwareDistribution SoftwareDistribution.old” then hit Enter.
![]()
This renames the SoftwareDistribution folder.
- Type “ren C:\\Windows\System32\catroot2 catroot2.old” then hit Enter.
This renames the Catroot2 folder.
- Now we are going to restart the services we stopped earlier. Type the following commands, hitting Enter after each:
- net start wuauserv
![]()
- net start bits
- net start cryptsvc
- net start msiserver
Now we are going to change registry settings.
- First we are going to add two domain groups to the Administrators local group.
- Type “net localgroup administrators networkservice /add” then hit Enter.
- Type “net localgroup administrators localservice /add” then hit Enter.
- Restart your computer.
This has fixed the problem for many users. If it still isn’t working, read on and try the next methods.
Reregistering update files
Note: Before you start this method, it is advised that you create a backup or a restore point. Here’s how to do that:
- Type “restore point” in the Search bar and click Open to create a restore point.
- Click on the drive where your OS sits (usually C:\\), then click Configure.
- Make sure the Turn on system protection radio button is selected. This way, Windows will create a restore point before each update, so you can revert to that if needed. Choose the size of the restore, then click OK.
- In the next window, click Create.
- Follow the instructions on screen.
Now we are going to work with the Command Prompt again.
- Type “cmd” in the Search bar, then click Run as administrator. First we are going to stop the update-related services.
- Type “sc stop bits” then hit Enter.
- Type “sc stop wuauserv” then hit Enter.
![]()
- Type “sc stop appidsvc” then hit Enter.
![]()
- Type “sc stop cryptsvc” then hit Enter.
![]()
- Now we are going to re-register all update-related files. These DLL files can cause random errors when not registered properly. We can fix that by the following steps:
- Type “regsvr32.exe /s atl.dll” then hit Enter.
- Type “regsvr32.exe /s urlmon.dll” then hit Enter.
- Type “regsvr32.exe /s mshtml.dll” then hit Enter.
- Type “regsvr32.exe /s shdocvw.dll” then hit Enter.
- Type “regsvr32.exe /s browseui.dll” then hit Enter.
- Type “regsvr32.exe /s jscript.dll” then hit Enter.
- Type “regsvr32.exe /s vbscript.dll” then hit Enter.
- Type “regsvr32.exe /s scrrun.dll” then hit Enter.
- Type “regsvr32.exe /s msxml3.dll” then hit Enter.
- Type “regsvr32.exe /s msxml6.dll” then hit Enter.
- Type “regsvr32.exe /s actxprxy.dll” then hit Enter.
- Type “regsvr32.exe /s softpub.dll” then hit Enter.
- Type “regsvr32.exe /s wintrust.dll” then hit Enter.
- Type “regsvr32.exe /s dssenh.dll” then hit Enter.
- Type “regsvr32.exe /s rsaenh.dll” then hit Enter.
- Type “regsvr32.exe /s cryptdlg.dll” then hit Enter.
- Type “regsvr32.exe /s oleaut32.dll” then hit Enter.
- Type “regsvr32.exe /s ole32.dll” then hit Enter.
- Type “regsvr32.exe /s shell32.dll” then hit Enter.
- Type “regsvr32.exe /s wuapi.dll” then hit Enter.
- Type “regsvr32.exe /s wuaueng.dll” then hit Enter.
- Type “regsvr32.exe /s wups.dll” then hit Enter.
- Type “regsvr32.exe /s wups2.dll” then hit Enter.
- Type “regsvr32.exe /s qmgr.dll” then hit Enter.
- Type “regsvr32.exe /s wudriver.dll” then hit Enter.
It is a good idea to also reset your network configuration, which we will do in the following step.
- Flush your DNS cache and reset Winsock catalog by the following prompts.
- Type “ipconfig /flushdns” then hit Enter.
- Type “netsh winsock reset” then hit Enter.
- Type “netsh winsock reset proxy” then hit Enter.
Restart your computer.
- Now we are going to clear the Windows Update cache in the two critical folders we renamed earlier.
- Type “rmdir %systemroot%\SoftwareDistribution /S /Q” then hit Enter.
- Type “rmdir %systemroot%\system32\catroot2 /S /Q” then hit Enter.
- In the last steps, we will turn those services back on.
- Type “sc start bits” then hit Enter.
- Type “sc start wuauserv” then hit Enter.
- Type “sc start appidsvc” then hit Enter.
- Type “sc start cryptsvc” then hit Enter.
Your update should run now.
Conclusion
Updates are important, but they are not always without troubles. Hopefully one of the above methods worked for you. Let us know your experience in the comments!

Many Windows users are having an issue with their Windows Update. If they check for updates on their Windows system, they get an error that says “Windows Update cannot currently check for updates, because the service is not running“. And they can’t install updates for their system.
This is an annoying issue. And trying to fix it is just as annoying, because you’ll spend a lot of time reading suggestions on the Internet, and most won’t work.
But don’t worry. The following are some methods that have helped many Windows users fix their error.
Try these fixes
You don’t have to try them all; just work your way down the list until you find the one that works for you.
- Run Windows Update troubleshooter
- Check for malicious software
- Restart your Windows Update associated services
- Clear the SoftwareDistribution folder
- Update your device drivers
Method 1: Run Windows Update troubleshooter
Windows has a built-in troubleshooter that can check and fix issues with Windows Update. You should run it when an error occurs on your Windows Update. To do so:
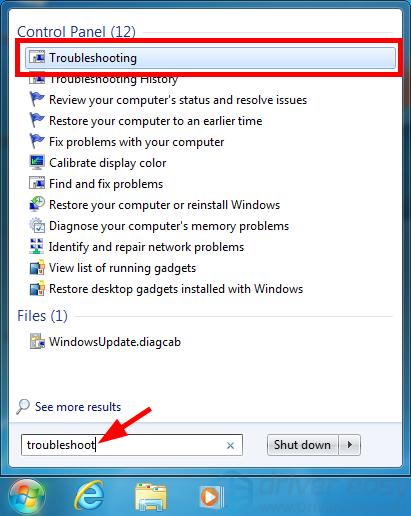
1) Click the Start button in the lower left corner of your screen, type “troubleshoot” and click Troubleshooting in the result.
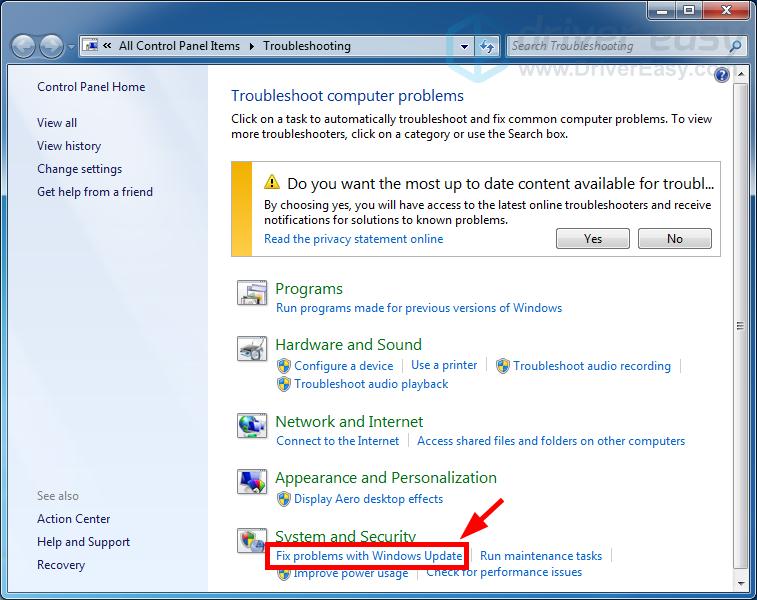
2) Click Fix problems with Windows Update.
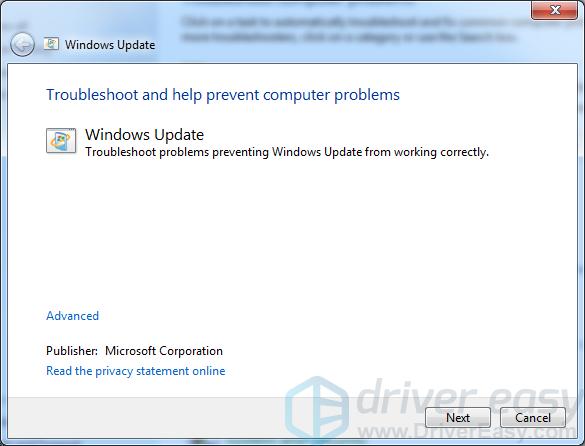
3) Follow the on-screen instructions to complete the troubleshooting process.
4) Run your Windows Update again and see if your error is fixed.
Method 2: Check for malicious software
Your error may occur because of interference from malicious software. You should run a scan on your computer for any malicious program.
You can use the Malicious Software Removal Tool released by Microsoft. Download the tool and run it on your computer. Then follow its instructions to complete the scanning process. If this method works for you, you won’t see the error on your Windows Update again.
Method 3: Restart your Windows Update associated services
You may get the service not running error because the services associated with your Windows Update are disabled. You should restart those services and see if this fixes your error. To do so:
1) Press the Windows logo key and R on your keyboard to invoke the Run box.
2) Type “services.msc” and click OK to open the Services snap-in.

3) Double click Background Intelligent Transfer Service.
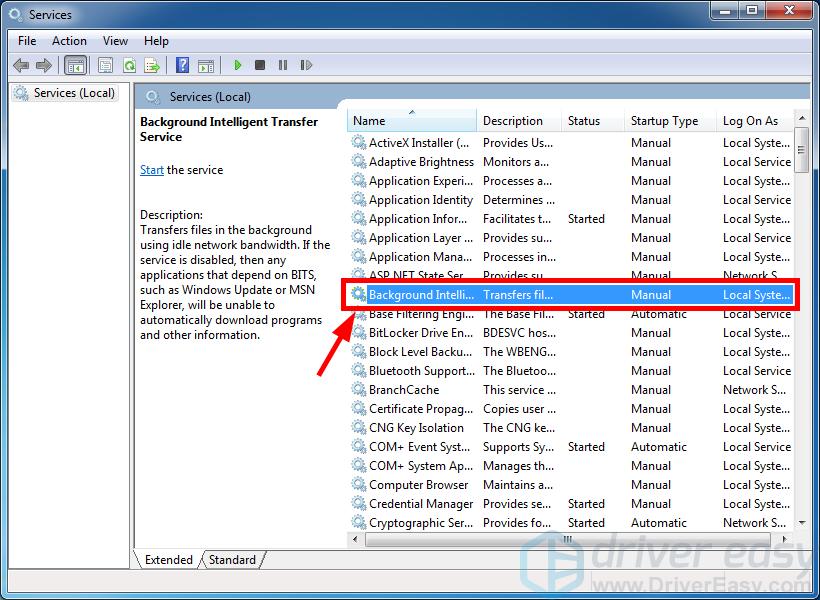
4) Make sure the startup type is set to Automatic. Then click the Start button (if the Start button is in gray, click the Stop button and then click the Start button). Then click OK to close the window.
5) Double click Cryptographic Services.
6) Make sure the startup type is set to Automatic. Then click the Start button (if the Start button is in gray, click the Stop button and then click the Start button). Then click OK to close the window.

7) Double click Windows Update.
6) Make sure the startup type is set to Automatic. Then click the Start button (if the Start button is in gray, click the Stop button and then click the Start button). Then click OK to close the window.
7) Close the Services snap-in and restart your computer. Then check to see if this resolves your problem.
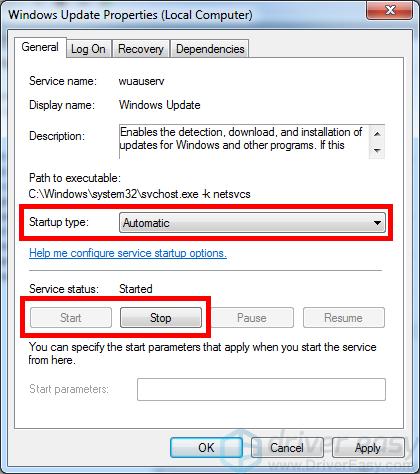
Method 4: Clear the SoftwareDistribution folder
The SoftwareDistribution folder stores temporary files for Windows Update. You may get the error due to corruption issues with these files. To see if these files are the cause, you should remove all the content of this folder.
1) Press the Windows logo key and R on your keyboard to invoke the Run box.
2) Type “services.msc” and click OK to open the Services snap-in.
3) Click Windows Update and then click Stop (the service).

4) Open File Explorer (press the Windows logo key and E on your keyboard at the same time), then go to C:\Windows\SoftwareDistribution and delete all the files and folders there.
5) Restore the Services snap-in. Then click Windows Update and click Start (the service).

6) Restart your computer. Then run Windows Update see if this helps you get rid of the Windows Update service not running error.
Method 5: Update your device drivers
Your error may occur because you’re using a wrong device driver or it’s out of date. To see if that’s the case for you, you should check your computer and update all those outdated or wrong drivers.
Updating drivers can consume a lot of time. But if you want to do it easily and quickly, you can use Driver Easy.
Driver Easy will automatically recognize your system and find the correct drivers for it. You don’t need to know exactly what system your computer is running, you don’t need to risk downloading and installing the wrong driver, and you don’t need to worry about making a mistake when installing.
You can download and install your drivers by using either Free or Pro version of Driver Easy. But with the Pro version it takes only 2 clicks (and you get full support and a 30-day money back guarantee):
1) Download and install Driver Easy.
2) Run Driver Easy and click the Scan Now button. Driver Easy will then scan your computer and detect any problem drivers.

3) Click the Update button next to your each of your devices to download the latest and correct driver for it. You can also click the Update All button at the bottom right to automatically update all outdated or missing drivers on your computer (this requires the Pro version — you will be prompted to upgrade when you click Update All).

4) Restart your computer. Then run you Windows Update to see if this resolves your problem.
85
85 people found this helpful
Windows Update is the service that keeps Windows 10 and other Microsoft products up-to-date on your computer. Unfortunately, it has a history of issues, with update errors being a common occurrence. But rarely, various reasons—such as incorrectly configured or conflicting settings—can also prevent it from running on your computer altogether.
If you keep receiving an error claiming that the Windows Update service (or a related service) is not running on your computer, the list of fixes that follow should help you get it functioning normally again.
Run Windows Update Troubleshooter
Windows 10 includes a built-in troubleshooter that can automatically diagnose and resolve issues with Windows Update. You must run it first before digging into the rest of the fixes.
1. Open the Start menu and select Settings.

2. Select Update & Security.
3. Select Troubleshoot on the sidebar.
4. Select the option labeled Additional troubleshooters.

5. Select Windows Update > Run the troubleshooter.
Restart Computer
Restarting your PC helps flush the system memory and works as a quick fix for random service-related issues that crop up in Windows 10. So if you haven’t already, try doing that now and follow by running Windows Update manually (open the Start menu and go to Settings > Update & Security > Check for updates).
Re-Configure the Windows Update Service
If Windows Update still fails to run, you must check if it’s set up to run automatically in Windows 10. You must also double-check the settings for other related services.
1. Press Windows + R to open the Run box.
2. Type services.msc and select OK.
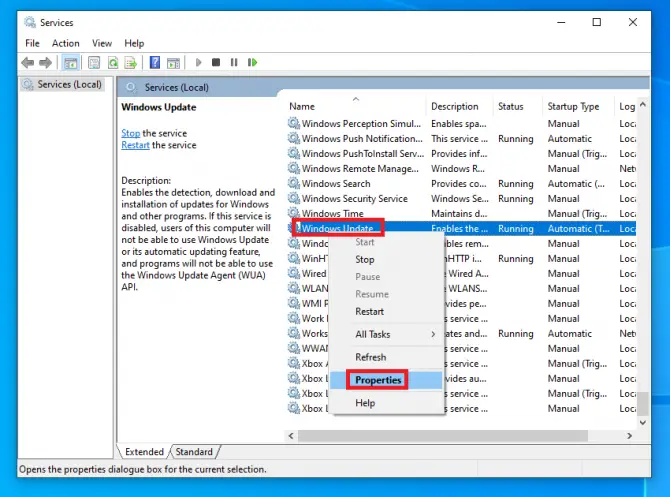
3. Right-click Windows Update and select Properties.
4. Set the Startup type to Automatic and select Apply. Follow that by setting Service status to Running.
5. Select OK to save the changes.
6. Repeat steps 3–5 for the following services:
- Background Intelligent Transfer Service
- Cryptographic Services
7. Restart your computer.
Check for Computer Viruses
Harmful software is another reason that prevents the Windows Update service from running in Windows 10.
Using the built-in Windows Security applet should help you to detect and remove malware. But since Windows Update isn’t running, it may not have the most up-to-date antimalware definitions to perform a comprehensive scan of your computer.
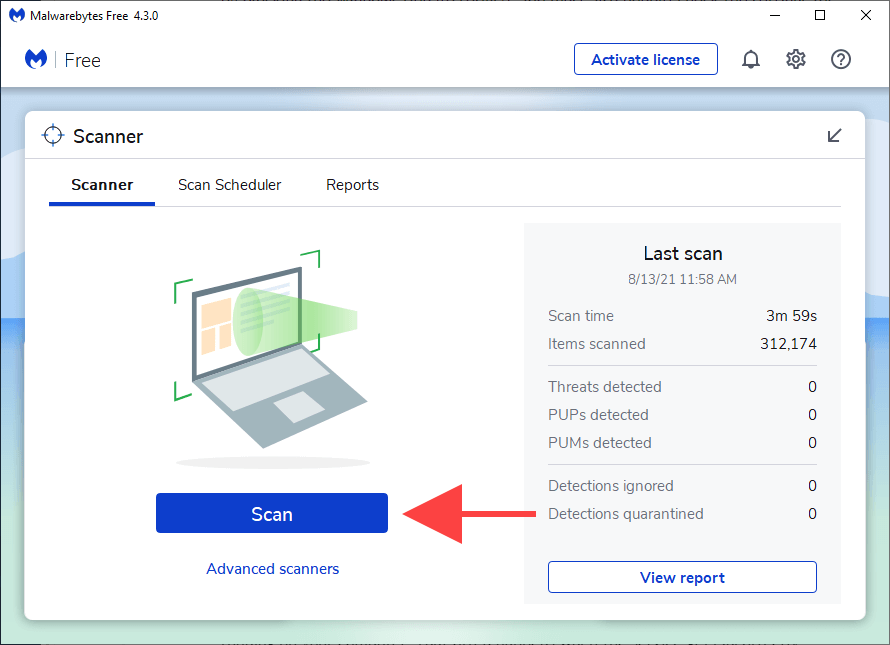
So the best way to deal with that is to use a dedicated third-party malware remover such as Malwarebytes. Try running a quick scan, and follow that with a system-wide check for computer viruses.
Disable Third-Party Antimalware Service
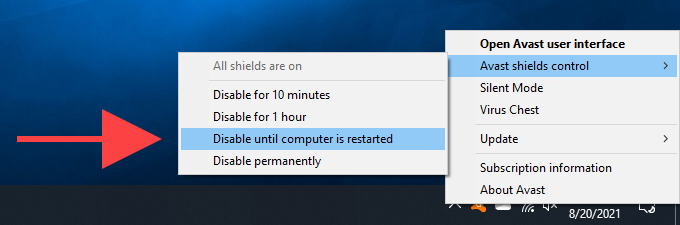
Conversely, a third-party firewall or anti-malware utility can end up blocking Windows Update.
To rule that out, try pausing any antivirus software via the Windows 10 system tray. Then, run Windows Update manually.
Reset Windows Update
Windows Update stores downloaded data temporarily in a specifically designated folder labeled SoftwareDistribution. Deleting it might help rule out a corrupt or obsolete update cache from causing issues. But before you do that, you must stop the Windows Update service (assuming that it’s running and hasn’t crashed).
1. Press Windows + R to open the Run box.
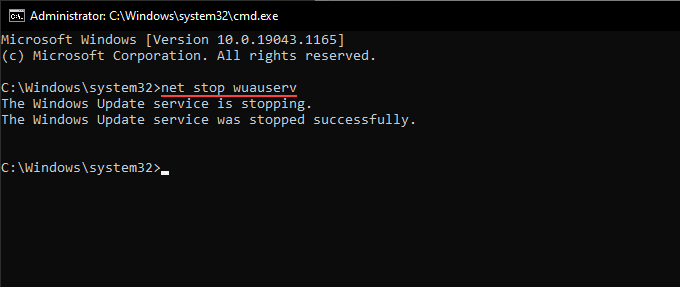
2. Type cmd and press Ctrl + Shift + Enter to launch the Command Prompt with administrative privileges.
3. Run the commands as follows to disable the Windows Update service:
net stop wuauserv
4. Run the two commands below to delete the SoftwareDistribution and catroot2 folders:
rmdir %systemroot%\SoftwareDistribution /s
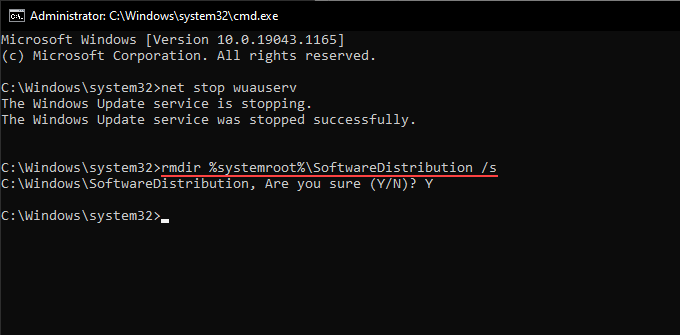
You must confirm your action by pressing Y > Enter.
5. Run the following command to restart the Windows Update service:
net start wuauserv
If the steps above didn’t help, try resetting all Windows Update-related components manually. We recommend checking the relevant support article by Microsoft for specific instructions.
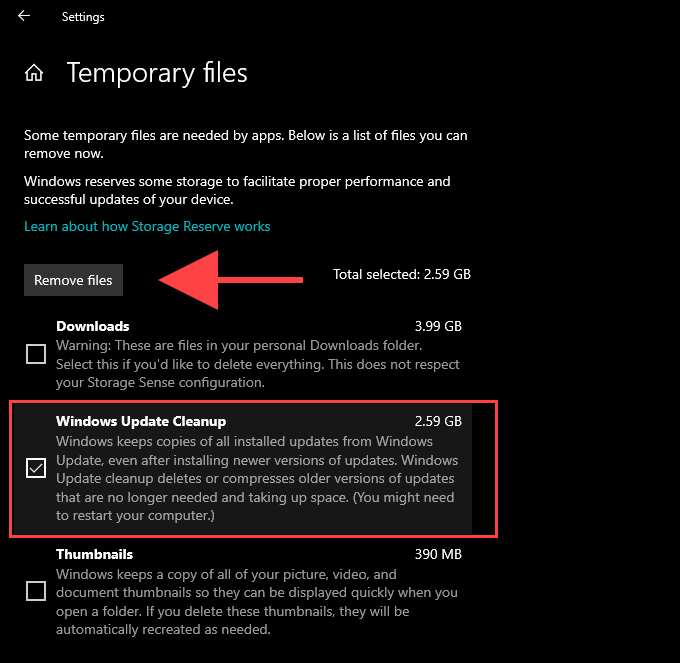
Delete Temporary Files
Deleting files from previous operating system updates may also help get the Windows Update service up and running again on your PC.
1. Open the Start menu and select Settings.
2. Select System.
3. Select Storage on the sidebar.
4. Pick the option labeled Temporary files.
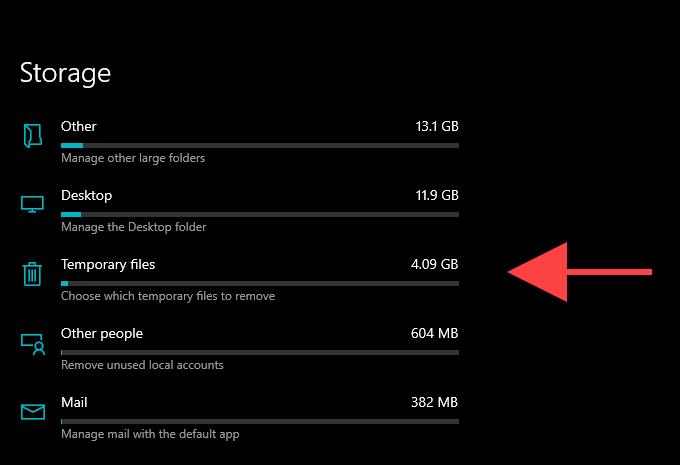
5. Check the box next to Windows Update Cleanup.
6. Select Remove files.
Run SFC Scan and DISM Tool
If Windows Update fails to run due to general file corruption or other stability-related issues in Windows 10, you can attempt to fix them using the SFC (System File Checker) and DISM (Deployment Image Servicing and Management) tools.
Run SFC Scan
1. Open an elevated Windows PowerShell console.
2. Type the following command:
sfc /scannow
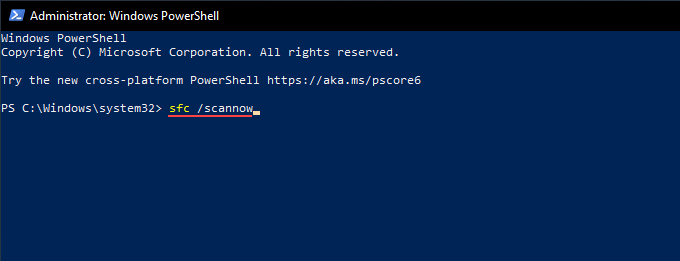
3. Press Enter.
Run DISM Scan
1. Open an elevated Windows PowerShell console.
2. Type the following command and press Enter:
DISM /Online /Cleanup-Image /CheckHealth
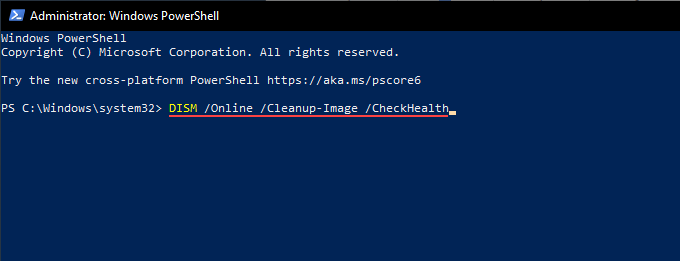
3. If the DISM tool detects any issues, run the two commands as follows:
DISM /Online /Cleanup-Image /ScanHealth
DISM /Online /Cleanup-Image /RestoreHealth
Update Windows 10 Manually
Rather than using Windows Update, you can download and install the latest updates for Windows 10 manually via the Microsoft Update Catalog website. That might help fix the service for subsequent updates.
1. Press Windows + R to open the Run box.
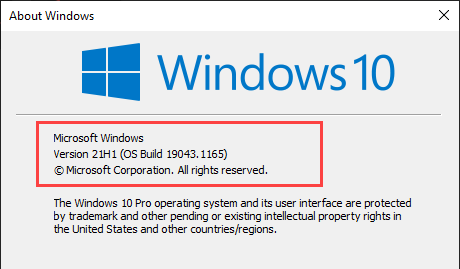
2. Type winver and select OK.
3. Note down the Windows 10 version—e.g., 21H1.
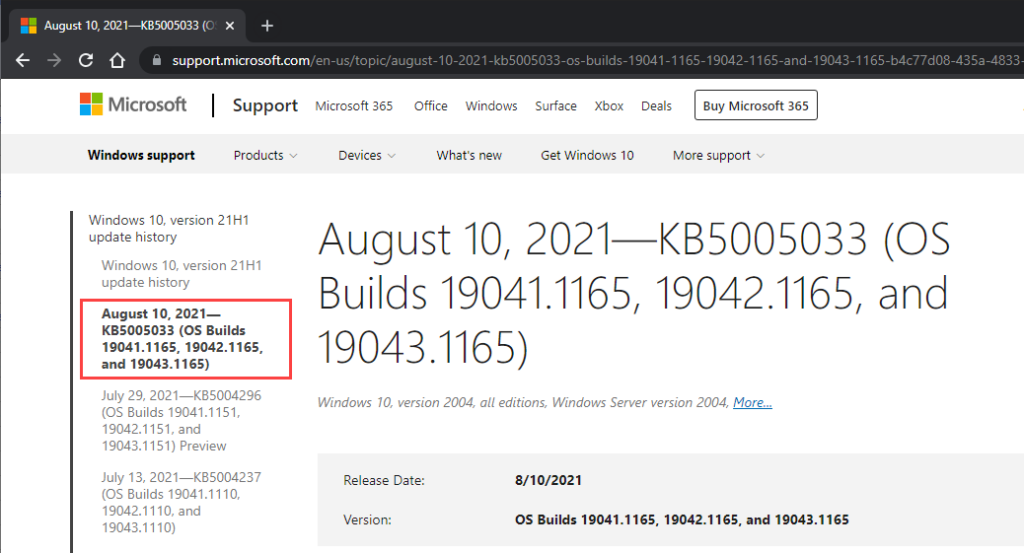
4. Visit the Windows 10 update history website and note down the latest KB (Knowledge Base) ID for your Windows 10 version.
5. Visit the Microsoft Update Catalog website and search for the KB ID.
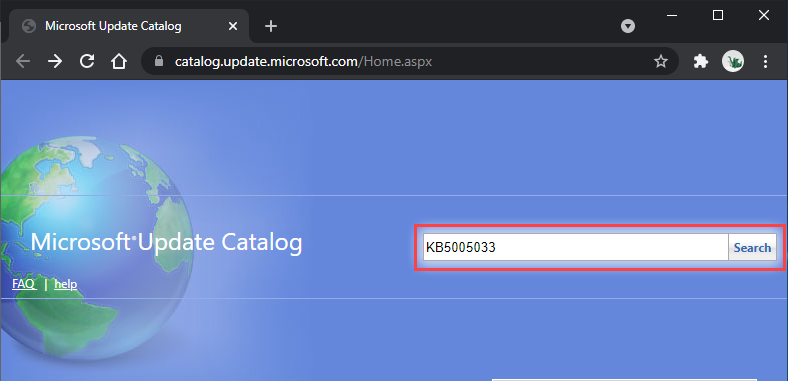
6. Select and download the latest update for your Windows 10 version.
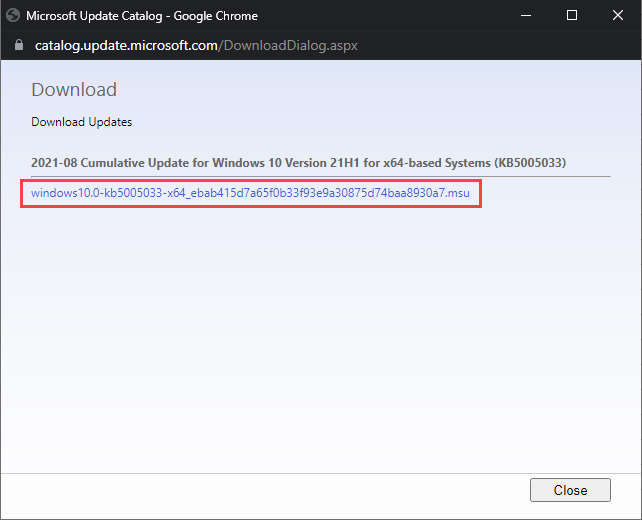
7. Run the downloaded installer to apply the update.
Optionally, consider installing the latest Servicing Stack Update for your Windows 10 version. That can help fix additional issues with Windows Update. You can search for and download it from the Microsoft Update Catalog website.
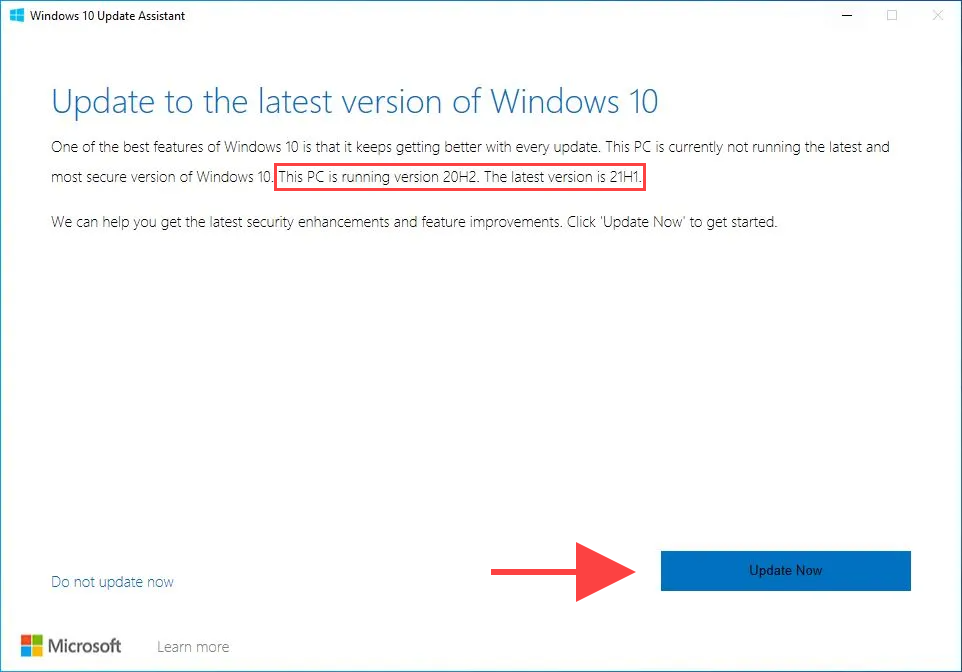
Use the Windows Update Assistant
If the Windows Update service still fails, you can use the Windows Update Assistant to force-install the latest feature update for Windows 10.
After downloading the applet to your PC, simply run it and select Update Now.
Roll Back or Reset Windows
If you continue to experience problems, you might want to perform a system restore. That helps roll back any recent changes to the operating system that prompted the issue to occur. You can also try uninstalling the previous Windows update.
Finally, resetting Windows 10 to factory defaults should work as a last-ditch measure to fix the Windows Update service for good.