
Have you ever wondered, how to access the windows file system through WSL? If the answer is yes you are in the right place!
Microsoft WSL has given us an incredible way to access the windows file system, you have just to navigate through an exact path to do it. Without further due, let’s dive into the topic.
1. Use the cd command in the Linux terminal.
To access the windows files you have to navigate through /mnt/your_windows_path
cd /mnt/c/Users
**OR**
cd /mnt/d/your_folder/your_folder
Enter fullscreen mode
Exit fullscreen mode
Now you have access to every file in the Linux and Windows file systems.
2. Moving files between the two systems through WSL.
If you want to move files between the two operating systems you can simply use the cp or mv commands.
cp — command for copying files
mv — command for moving files
Use of cp command
cp /mnt/c/file.txt /home/username/Documents
Enter fullscreen mode
Exit fullscreen mode
Use of mv command
mv /mnt/c/file.txt /home/username/Documents
Enter fullscreen mode
Exit fullscreen mode
3. Editing windows files through WSL.
To edit windows files through the Linux terminal using WSL, you have to use any text editor that can be opened in the terminal. One of the most famous text editors is nano. In our example, I am going to use the nano editor.
Type into the terminal nano and the path to the file.
sudo nano /mnt/c/Users/file.txt
Enter fullscreen mode
Exit fullscreen mode
Now you can edit freely files from your terminal.
4. Creating files in windows through WSL.
To create a file in a specific windows directory you have first to navigate to it and then use the touch command to create a file.
touch — a command that creates a file.
!!! The file extension can be anything you want.
cd /mnt/c/Users/Public/Documents/
touch filename.txt
Enter fullscreen mode
Exit fullscreen mode
The file is created and can be opened from both systems.
5. Deleting files from the windows file system through WSL.
To delete windows files using WSL, you have to navigate to the directory where the file lives and use the rm command.
rm — a command that deletes files / directories
cd /mnt/c/Users/Public
sudo rm example_file.jpg
Enter fullscreen mode
Exit fullscreen mode
Congratulations you learned 5 vital skills about working with the Linux terminal. 🎺🎺🎺
If you have any questions, comment down, I will answer as soon as possible.
I’m starting to learn how to use the terminal with Ubuntu on WSL (Windows).
Just from the very beginning of the course it says that if you use the ls command it should show you your «home» directories, but mine is something like this:
(base) paloma@DESKTOP-ISCC0ON:~$ ls
Anaconda3-2021.11-Linux-x86_64.sh  anaconda3

(base) paloma@DESKTOP-ISCC0ON:~$
And if I try to change directory something like this happens:
(base) paloma@DESKTOP-ISCC0ON:~$ ls
Anaconda3-2021.11-Linux-x86_64.sh  anaconda3

(base) paloma@DESKTOP-ISCC0ON:~$ cd Documents
-bash: cd: Documents: No such file or directory

(base) paloma@DESKTOP-ISCC0ON:~$
Can somebody tell me why is this happening and what can I do, please? I’m a complete newbie.
![]()
NotTheDr01ds
15.8k6 gold badges52 silver badges80 bronze badges
asked Nov 23, 2022 at 11:47
![]()
Everything in @Tooster’s answer is corrected, but let me address your main question a bit more directly:
(base) paloma@DESKTOP-ISCC0ON:~$ cd Documents
-bash: cd: Documents: No such file or directory
Can somebody tell me why is this happening and what can I do, please?
You appear to be wondering why this isn’t taking you to the Documents folder in your Windows home directory.
It’s important to understand that the home directory in Ubuntu/WSL is not the same as your Windows home directory, nor should it be. Your Ubuntu home directory is in a virtual SSD provided by WSL. This virtual SSD provides the Linux compatible filesystem that Ubuntu needs, whereas your Windows drive is formatted as NTFS and won’t have 100% compatibility.
WSL does provide a way to get to the Windows files (including your home directory), as mentioned by @Tooster.
From inside Ubuntu:
cd /mnt/c/Users/<your_Windows_username>
ls
That should show you all the files and directories in your Windows profile (a.k.a. home) folder.
Also perhaps reading as additional background — My answer to Where is WSL located on my computer?.
answered Nov 28, 2022 at 2:29
![]()
NotTheDr01dsNotTheDr01ds
15.8k6 gold badges52 silver badges80 bronze badges
First of all try to format code and output from terminals using the fenced code block format.
And now to the meritum.
- current working directory is the directory you are in. Your home directory (often denoted with
~) is usually located in the/home/<username>/ ls— command listing files in the current directoryls [arguments...]— this command lists the files inside directories provided as argumentscd [argument]— change directory command. using it without argument takes you to your home directory/is root directory in linux and an absolute paths start with it.is a current directory and if path starts with./somethingor without itsomething, then current directory is assumed (path is relative to current location)..is parent directory.
Based on the (base) in thee prompt and on the names of the files above, I’m gonna say that you are using conda environment on your WSL (Windows subsystem for linux). Why are you using it is not my business, but you seem to have skipped a few steps when learning linux and WSL first. Try starting with https://linuxjourney.com/ (especially command line section and filesystem section). Then learn about differences in linux and windows structure.
@EDIT because I only noticed you are using Linux on Windows
Because linux’ and windows’ filesystems are a bit different, when you start linux on windows a virtual filesystem is created for you. To access your windows files from linux you would have to access /mnt/<drive>/<...windows files> (note the / at the beginning — that’s an absolute path)
Linux is structured as a single tree rooted at / and external filesystems are usually mounted at /mnt (read hier(7) for more info). Windows’ filesystem is composed of «drives» — single trees rooted at C:/, D:/ etc., so it’s only natural for both of those systems to have different mechanism for accessing each other’s files.
Read more at https://ling123labs.com/posts/WSL-files-in-Windows-and-vice-versa/
answered Nov 23, 2022 at 12:21
![]()
ToosterTooster
4372 silver badges13 bronze badges
You must log in to answer this question.
Not the answer you’re looking for? Browse other questions tagged
.
Not the answer you’re looking for? Browse other questions tagged
.
При работе с WSL2 очень часто возникает необходимость копирования файлов между вашим ПК и файловой системой виртуальных машин установленных в WSL2.
Сегодня мы рассмотрим простой способ как подключить любую папку или даже всю файловую систему как обычный диск в Проводнике.
Чтобы получить доступ к файловой системы виртуальной машины в WSL2 достаточно открыть в Проводнике ссылку:
\\wsl$\Откроется окно:

Обратите внимание – окно пустое!
Чтобы файловая система виртуальной машины появилась в списке её нужно запустить через меню Пуск.
Вы должны запускать нужные машины каждый раз после включения вашего ПК. Автоматически виртуальные машины WSL2 не запускаются!
Запустим Debian:

Как видите появилась папка Debian.
Одним из недостатков доступа через \\wsl$ является то, что необходимо правильно настроить права доступа к папке в Linux.
Если вы попытаетесь открыть папку \\wsl$\Debian\root, то получите ошибку:
Нет доступа к \\wsl$\Debian\root. Возможно, у вас нет прав на использование этого сетевого ресурса. Обратитесь к администратору этого сервера для получения соответствующих прав доступа.
Установка прав доступа на папку
Для того чтобы предоставить доступ к папке вам нужно установить права доступа пользователю или установить права доступа 777, для примера создадим папку в /home:
sudo mkdir /home/testЕсли вы попытаетесь открыть папку \\wsl$\Debian\home\test у вас всё получится, так как на нее автоматически установлены права:
755Что означает, что владельцу – root можно делать всё, а остальным читать и запускать программы из папки.
Давайте установим права как у /root
chmod 700 /home/testТеперь при попытке открыть папку выводиться сообщение:

Есть два способа решения данной проблемы:
1. Первый способ:
Установить владельцем пользователя, котого вы создали при первом запуске виртуальной машины в WSL2.
В моем случае это – user
chown -R user /home/test
chgrp -R user /home/test
После чего у вас будет полный доступ к данной папке.
2. Второй способ:
Установить права доступа 777 на папку и все файлы в ней:
chmod -R 777 /home/testЭтот способ хорош тем, что не меняет владельца и в случае с веб-сервером вам не придется править его конфигурацию.
В любом случае оба способа подходят для решения данной проблемы.
Подключение диска
Подключить папку WSL2 как диск очень просто.
Откройте проводник и введите
\\wsl$\Выберите нужный дистрибутив, я буду подключать Debian
Правой кнопкой нажмите на название и выберите в выпадающем меню – Подключить сетевой диск:

В новом окне нажмите Готово

Откроется окно проводника с новым диском:

Обратите внимание, если вы подключили диск, но после перезапуска ПК не запускали консоль виртуальной машины через меню Пуск, то диск не будет доступен, вы всё же можете подключиться к нему, но я рекомендую сначала запускать консоль.
Заключение
Сегодня мы рассмотрели способ подключения файловой системы WSL2 как диска в Windows 10.
Так же были рассмотрено назначение прав доступа к папкам.
\wsl$ mount point did not work for me so well, it has multiple issues, and many Windows applications fail because they see it as a network drive. For my usecase, it is Rclone what helped to solve the problem to properly mount Linux filesystem so it behaves without any issues, practically the same way as a local disk.
It is free and open source. It works with sftp remote filesystems (like sshfs), so it can mount network drives both on Linux and Windows (running sshd service).
Example command how to run it, assuming remote point «server» is already configured and rclone.exe is in PATH environment variable:
rclone mount server:/ Z: --file-perms=0777 --track-renames --track-renames-strategy=modtime,leaf --metadata --vfs-cache-mode=full --sftp-disable-hashcheck --volname drive_name
For the first time, you need to configure new remote point by running:
rclone config
To find out location of the config file you have just created, run:
rclone config file
Also, you may need to install WinFsp first, if not already intalled. The best thing about it, everything just works the same way like with local disk (assuming if you provide --vfs-cache-mode=writes or --vfs-cache-mode=full option, since without it, many applications will fail to work correctly, please read the documentation to understand why). Option --file-perms=0777 is necessary to allow running .exe files. Even though --vfs-cache-mode=writes may be enough for most applications, but —vfs-cache-mode=full is important for good performance with large files. For the same reason --track-renames-strategy is limited to only modtime and leaf strategies, because if other strategy is used, it will be obviously slow with large files, and --sftp-disable-hashcheck is necessary to prevent rclone from running md5sum, otherwise it will run it even when trying to read a file.
To register Rclone as a system service, edit and run the following command (do not run as is, please see below how you need to edit it first):
New-Service -Name Rclone -BinaryPathName 'C:\Program Files\Rclone\rclone.exe mount server:/ Z: --vfs-cache-mode=full --track-renames --track-renames-strategy=modtime,leaf --metadata --volname drive_name --config="C:\Program Files\Rclone\rclone.conf" --log-file="C:\Program Files\Rclone\rclone.txt" --file-perms=0777 --sftp-disable-hashcheck --no-console'
Obviously, you need to replace «server:/» with your actual remote point name and path, also replace drive_name with any name you like, and of cource you may need to edit paths to rclone.conf, rclone.log and rclone.exe, if you installed it in a different location.
Note: in my case running as a system service caused some permission issues (for example, when trying to save Excel files), and I did not figured out why yet, so I ended up creating startup .bat file to run Rclone as a user, since it works perfectly this way. I will update this answer if and when I figure out how to make running as a service to work as good as running as a user.
Even Windows software which does not like network drives, just works with RClone drives. All is needed, is to setup sshd in the remote system (which in this case is not really a remote syset, but in WSL distribution installed on the same PC). This how to setup sshd in WSL distribution: https://www.hanselman.com/blog/how-to-ssh-into-wsl2-on-windows-10-from-an-external-machine. And here is how to make WSL IP address static: https://github.com/ocroz/wsl2-boot, so you can have sshd running always at the same IP address.
Windows 10 версии 1903 содержит ряд интересных изменений и улучшений, внесенных в функцию WSL. К ним относятся дополнительные дистрибутивы в Магазине, возможность просматривать файлы WSL в Проводнике и многое другое.
Возможность запуска Linux в Windows 10 обеспечивается функцией WSL. WSL это — Windows Subsystem for Linux, которая изначально была ограничена только Ubuntu. Современные версии WSL позволяют устанавливать и запускать несколько дистрибутивов Linux из Microsoft Store.
После включения WSL вы можете устанавливать различные версии Linux из Магазина, используя следующие ссылки:
Ссылки на дистрибутивы в магазине microsoft:
Ubuntu | openSUSE Leap | SUSE Linux Enterprise Server | Debain GNU / Linux | Kali Linux
В Windows 10 версии 1903 вы можете легко получить доступ ко всем файлам в ваших дистрибутивах Linux с помощью проводника Windows. На момент написания статьи эта функция реализована в сборке Windows 10 18836. Она находится на пути к ветви 19h1, поэтому мы увидим ее в следующей сборке. Вот как это можно сделать.
Чтобы получить доступ к файлам WSL Linux из проводника Windows 10 , выполните следующие действия.
Шаг 1: Включить функцию WSL (Подситема Windows для Linux)
Шаг 2: Установите какой-нибудь дистрибутив, например Ubuntu, и запустите его.
Подробнее в нашей статье: Руководство по установке и запуску — Ubuntu Bash в Windows 10.
Шаг 3: Находясь в каталоге Linux FS, введите^
explorer.exe .
Откроется окно проводника, расположенное внутри вашего дистрибутива Linux.
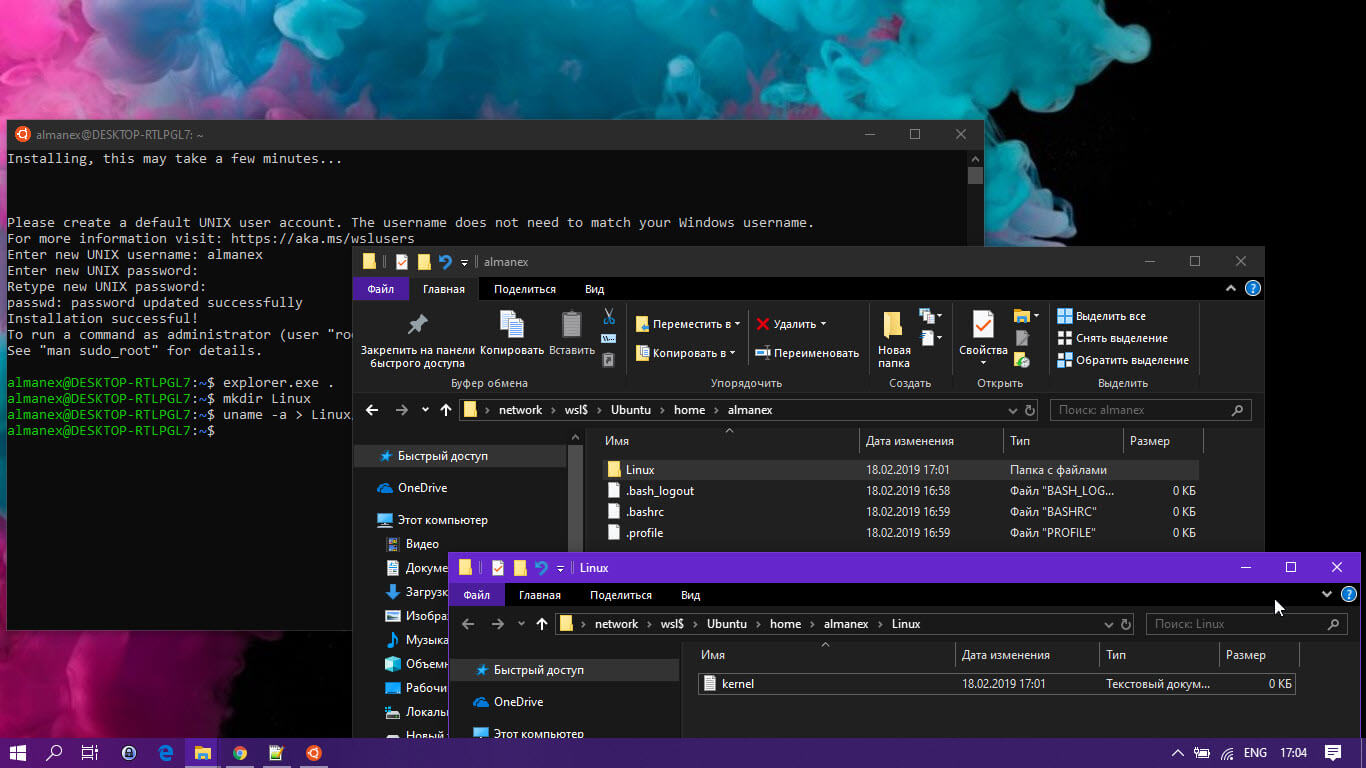
Теперь вы можете получить доступ к любым файлам Linux, так же, как и к любому другому файлу через проводник. Это включает в себя такие операции, как: перетаскивание файлов в другие места, копирование и вставка и даже использование пользовательских записей контекстного меню, добавленных Notepad ++, VSCode или другим программным обеспечением.
Проводник показывает файлы дистрибутива как виртуальный сетевой ресурс по пути \\ wsl $ \ <running_distro_name> \.
Команда WSL активно исследует способы улучшения обнаруживаемости файлов Linux внутри Проводника. Ход их работы уже можно увидеть в Windows 10 Build 18836, которая показывает файловую систему WSL / Linux в File Explorer.
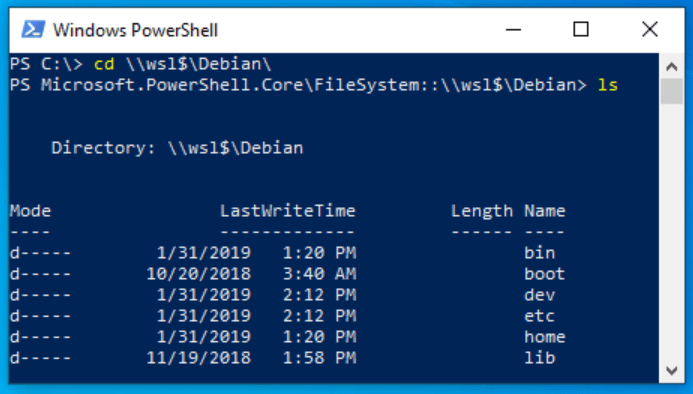
Доступ к файлам Linux в командной строке
В дополнение к Проводнику вы можете использовать классическую командную строку и инструменты PowerShell для доступа к файлам Linux. Точно так же вам нужно перейти к \\wsl$\{имя дистрибутива}\, где {имя дистрибутива} — это имя работающего дистрибутива.
Известные вопросы
Это новая функция, и некоторые ее части могут не работать идеально. Вот некоторые известные проблемы, о которых мы хотим сообщить вам при использовании этой функции:
На данный момент файлы дистрибутивов будут доступны только из Windows, когда дистрибутив работает. Разработчик собирается добавить поддержку не работающих дистрибутивов в будущем обновлении.
Поскольку файловый сервер 9P работает внутри каждого дистрибутива, он доступен только тогда, когда этот дистрибутив работает. Команда ищет способы решить эту проблему.
Доступ к файлам Linux рассматривается так же, как и доступ к сетевому ресурсу, и все правила доступа к сетевым ресурсам будут по-прежнему применяться,
- Например: при использовании CMD cd \\wsl$\Ubuntu\home не будет работать (поскольку CMD не поддерживает пути UNC, так как текущие каталоги), однако будет работать copy \\wsl$\Ubuntu\home\somefile.txt C:\dev\
- Старые правила по-прежнему применяются, вы не должны получать доступ к файлам Linux внутри папки AppData!
- Если вы пытаетесь получить доступ к своим файлам Linux через папку AppData, вы используете обход сервера 9P, что означает, что у вас не будет доступа к файлам Linux, и вы можете повредить ваш дистрибутив Linux.
Примечание: Сервер 9P — это сервер, который содержит протоколы, поддерживающие метаданные Linux, включая разрешения. Демон инициализации WSL теперь включает сервер 9P. Существует служба Windows и драйвер, который действует как клиент и взаимодействует с сервером 9P (который работает внутри экземпляра WSL). Клиент и сервер обмениваются данными через сокеты AF_UNIX, поскольку WSL позволяет взаимодействовать между приложением Windows и приложением Linux, используя AF_UNIX.