
This program is designed to write a raw disk image to a removable device or backup a removable device to a raw image file. It is very useful for embedded development, namely Arm development projects (Android, Ubuntu on Arm, etc). Anyone is free to branch and modify this program. Patches are always welcome.
This release is for Windows 7/8.1/10. It will should also work on Windows Server 2008/2012/2016 (although not tested by the developmers). For Windows XP/Vista, please use v0.9 (in the files archive).
Warning: Issues have been reported when using to write to USB Floppy drives (and occasionally other USB devices, although very rare). While this has been fixed in v1.0, it is highly recommended that before an image is written to a device, the user should do a Read to a temporary file first. If this fails, please report the failure along with your system information.
Known issues:
Currently, the program will crash if you are using a Ramdisk. This is being debugged.
Features
- Raw reading and writing to removable media
Project Samples

License
GNU General Public License version 2.0 (GPLv2)
Built by Auditors for Mid-size Teams.
User Ratings
3.7
out of 5 stars
★★★★★
★★★★
★★★
★★
★
ease
1 of 5
2 of 5
3 of 5
4 of 5
5 of 5
3 / 5
features
1 of 5
2 of 5
3 of 5
4 of 5
5 of 5
3 / 5
design
1 of 5
2 of 5
3 of 5
4 of 5
5 of 5
3 / 5
support
1 of 5
2 of 5
3 of 5
4 of 5
5 of 5
3 / 5
User Reviews
- All
- ★★★★★
- ★★★★
- ★★★
- ★★
- ★
-
Trash. It turned my 512gb SD card into a 15gb. Took an hour to find a fix. Here is a link to a youtube video for the fix for anyone who has the unpleasentness of using this trashware.
youtube.com/watch?v=aPEEpHqq40c -
For those of you having the problem with Win32 re-writing your SD cards as mb instead of gb.. I had this problem too. I found that I could recover them by formatting them in a digital camera. After that, you can format them on your computer and then run them through win32 again.
-
It destroyed 2 SD chips and an SSD before I realized what the problem was. In each case, it wrote them as 100 MB (mega, not giga) and it was impossible to reformat them to something better. Well, maybe I will find some other prog like Linux dd can fix them, but for the moment they are dead media.
The UI was all messed up, too. Running on Windows11. I should have heeded the warning signs of something that might be trouble. It was.
Find something better.1 user found this review helpful.
-
The program did not work. I ran the verify on two USB flash drives and it said OK. Neither worked. I got a message no boot sector. Windows said that both devices were unformatted.
Read more reviews >
Запись образа на флешку
Часто для переустановки системы, а также для диагностики компьютера требуется загрузка со специального образа. В этом уроке я покажу, как записать его на флешку штатными средствами Windows 10 и при помощи специальных программ.
Подготовка к записи
Для успешной записи нам понадобится:
- Свободная флешка объемом не менее 8 Гб.
- Загрузочный ISO образ. Желательно, чтобы он был скачан с официального сайта проекта.
- Рабочий USB порт. Если у вас старый компьютер, лучше подключать флешку к заднему порту.
- Наличие прав администратора, так как Windows не даст отформатировать USB носитель обычному пользователю.
Способ 1: средствами Windows 10
Для данного способа требуются базовые навыки работы с командной строкой. Если вы начинающий пользователь и действия покажутся сложными, советую воспользоваться одной из программ (см. Способ 2).
Важно! Понадобится стандартный образ с расширением ISO — другой формат не подойдет. После ввода каждой команды нажимайте клавишу Enter.
1. В меню Пуск напечатайте cmd и запустите приложение от имени администратора.

Чтобы образ записался корректно и с него в дальнейшем можно было загрузиться, потребуется выполнить форматирование и сделать раздел активным.
2. Запустите программу управления дисками командной diskpart.

3. Введите list disk для отображения всех подключенных дисков.

В следующем шаге потребуется указать номер подключенной флешки, так как программа распознает её как диск. Обратите внимание на объем: он, как правило, меньше, чем у локального диска. Дополнительно можете проверить в папке «Этот компьютер», чтобы случайно не отформатировать диск с данными.
4. Введите команду select disk номер_флешки. В моем случае она под номером 3.

5. Далее введите select partition 1 для выбора основного раздела.

6. Выполните быстрое форматирование в FAT32 командой format fs=fat32 quick

7. Сделайте раздел активным командой active.

8. Закройте окно. Затем откройте ISO файл и скопируйте все данные на флешку.

9. Снова запустите командную строку с административными правами (шаг 1). Введите команду для применения загрузчика: G:\boot\bootsect.exe /nt60 G:
Где G: — это буква флешки. Её можно посмотреть в окне компьютера.

Всё готово! Можно перезагрузиться и выполнить запуск с USB.
Способ 2: при помощи программ
Рассмотрим, как записать образ на флешку при помощи специальных программ. Я покажу только рабочие и проверенные приложения, которыми пользуюсь сам.
Rufus
Официальный сайт: rufus.ie
Бесплатная интуитивно понятная утилита. Отлично справляется с записью установочного образа Windows, Linux, прошивки BIOS и других подобных файлов.
- При запуске утилиты в поле «Устройство» автоматически определится подключенный носитель.
- Для загрузки образа с компьютера кликните по кнопке «Выбрать».
- Утилита автоматически подберет подходящие настройки. Нужно только нажать на «Старт» для запуска записи.

Преимущества:
- Бесплатна для загрузки и использования.
- Не требует установки.
- Поддерживает огромное количество форматов.
Universal USB Installer
Официальный сайт: pendrivelinux.com
Название утилиты говорит само за себя: она универсальна и поддерживает огромное количество загрузочных образов.
1. В главном окошке щелкните по полю «Step 1» и выберите тип системы, который необходимо записать.

2. В поле «Step 2» кликните по кнопке «Browse», и загрузите файл в окно программы.

3. По завершению откройте поле «Step 3», и выберите устройство для записи.

4. Установите галочки в чекбоксы «Will Fat32» и «Will Wipe», и нажмите кнопку «Create» для запуска процесса.

5. Дождитесь завершения операции — на это может потребоваться время.

Преимущества:
- Бесплатная для загрузки и использования.
- Не требует установки.
- Поддерживает большое количество образов для записи.
USB Image Tool
Официальный сайт: alexpage.de
Удобная и простая в работе утилита. Предназначена для копирования целевой флешки в образ, а также его дальнейшего восстановления на флешку.
1. После запуска в левом окошке вы увидите список подключенных USB носителей.

2. Если носитель имеет несколько разделов, переместитесь в поле «Device mode» и измените его на «Volume mode». Если раздел только один, оставьте всё по умолчанию.

3. В правом окне кликните по одной из кнопок:
- Backup: для создания резервной копии носителя. При сохранении оставляем формат IMG, IMA.
- Restore: для восстановления из резервной копии.

Преимущества:
- Бесплатна.
- Позволяет быстро сделать бэкап и восстановиться из него.
Ultra ISO
Официальный сайт: ezbsystems.com/ultraiso/
Пожалуй, это самое популярное платное приложение для работы с образами. Оно позволяет не только записывать их, но и создавать, а также изменять в окне самой программы. Незарегистрированная версия имеет ограничения, но, тем не менее, позволяет записать готовый образ на USB носитель.
1. Откройте меню «Файл» и загрузите ISO файл в главное окно программы.

В правом окошке отобразятся записанные в нем файлы и папки.

2. Зайдите в меню «Самозагрузка» и щелкните по пункту «Записать образ жесткого диска».

3. Проверьте, правильно ли указано устройство в поле «Disk Drive». Нажмите на кнопку «Записать» для старта процесса.
В поле «Метод» можно назначить способ записи. Например, для загрузочного носителя подойдет «USB-HDD+».

4. Подтвердите удаление всех данных, кликнув по кнопке «Да».

5. Если все прошло успешно, появится надпись «Запись завершена».

Power ISO
Официальный сайт: poweriso.com
Power ISO – это многофункциональное платное решение для работы с ISO файлами. Позволяет открывать, редактировать, записывать и монтировать огромное количество образов. Незарегистрированная версия накладывает ограничения на редактирование файлов, но позволяет записать на USB носитель уже готовый образ.
1. В главном окне кликните по кнопке «Открыть» и загрузите файл.

2. Откройте меню «Инструменты», выберите пункт «Создать загрузочный USB привод».

3. В поле «Файл» загрузите ISO или другой файл образа с ПК. В поле «USB привод» выберите устройство для записи. Остальные настройки можно оставить по умолчанию.

Для начала записи нажмите кнопку «Старт», и подтвердите действие, щелкнув по «ОК».

4. По завершению появится сообщение «Запись успешно завершена».

Как загрузиться с флешки
- При включении ПК воспользуйтесь клавишей для вызова меню управления загрузкой. Обычно эта одна из следующих клавиш клавиатуры: F1, F8, F10 или F12.
- В списке выберите загрузку с USB устройства.

Если не получилось войти в загрузочное меню, попробуйте зайти в BIOS клавишей Del или F2 и установить в приоритет загрузку с USB устройства.

Many times we download bootable images of operating systems or rescue CDs and we need to burn them on a CD/DVD to be able to use them. But sometimes we don’t have access to CD/DVD drive and we want to write the bootable image to a USB drive, in such cases following free utility might come very handy.
“Win32 Disk Imager” aka “Win32 Image Writer” is a free utility available for Windows which can be used for writing and restoring images from removable drives (USB drives, SD Memory cards, etc). It can be used to write bootable IMG image files to a usb drive, making it bootable. It currently doesn’t support writing ISO image files to USB drives.
With the help of this little utility, you can not only write boot images (such as IMG files) to USB drives but also take a backup of USB drive to a raw image file.
This program can be downloaded from following link:
Download Link
Thanks to our reader “mp3c” for sharing it…
You can also take a look at some other similar free tools to create bootable USB drives to install Windows using following link:
Ultimate Collection of Best Freeware to Create Bootable USB Drive to Install Windows and Linux
You are here: Home » Software » Copy or Write Bootable IMG Files to USB Drives Using Win32 Disk Imager
Writing Image files to USB Drives
Image files are byte-by-byte copies of removable media (DVD, CD, hard drives and USB Drives).
This is particularly useful when booting operating systems from usb because they include file-systems/partitions, all of which is included within a single compilation file making switching between environments very easy.
Windows
Win32-imagewriter
https://launchpad.net/win32-image-writer/+download
- Download and Extract the application from archive, it is recommended to use v0.1 as it will allow you to write a large image on to a small usb stick.
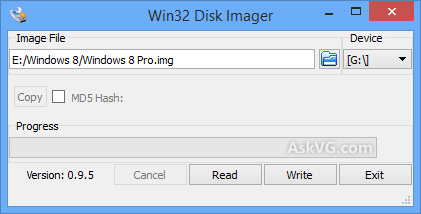
- Run Win32DiskImager.exe by right-clicking on the icon click Run as Administrator
- Click the Folder button and browse for image file (.IMG)
- In the device section select your USB drive (double check in my computer, just to be sure.)
- Click Write, and wait.
- When its finished click Exit.
Flashnul
http://shounen.ru/soft/flashnul/ — Russian Google Translate
- Download the latest version at the time of writing this it was flashnul-1rc1.
- Download and Extract the application from archive.
- Click Start button > All Programs > Accessories >
- Right Click on Command Prompt then Run as Administrator.
- Run the flashnul with the probe argument:
D:/flashnul/flashnul.exe -p
- Obviously change the path as appropriate depending on where you extracted the program.
- If your path has spaces within it eg. D:/flashnul 1rc1/… you will have to use Quotation marks:
"D:/flashnul 1rc1/"flashnul.exe -p
- Flashnul should output text similar to this:
Avaible physical drives:
0       size = 500107862016 (465 Gb)
1       size = 4040724480 (3853 Mb)

Avaible logical disks:
C:\
D:\
E:\
F:\
G:\

Press ENTER to exit.
- Note the device number to the left of the usbdrive, In my case it is 1
- Use the load arguement to write the image:
D:/flashnul/flashnul.exe 1 -L D:/image_v1-3DISCA/image_v1-3.img
- <Path to flashnul directory>flashnul.exe <device number> -L <img file path>
- Flashnul will give you a device summary and proceed caution, have a quick scan through the information to make sure you have selected the correct device, then type yes and press enter.
- Close when finished
- If you get a access denied error, try re-plugging the usb stick.
- If you still get a access denied error, try substitute the device number with the drive letter followed by a colon. Eg:
D:/flashnul/flashnul.exe G: -L d:/image_v1-3DISCA/image_v1-3.img
(Pasted here from Talk:Main_Page, where it was getting hammered by spammers. Not sure why it was there or who wrote it, but user Bluemotion placed it there originally. [1] )
Mac
dd
Find your USB key open /Applications/Terminal and type:
df -h
You should get something like:
Filesystem      Size   Used  Avail Capacity  Mounted on
/dev/disk0s2    74Gi   68Gi  6.4Gi    92%    /
devfs          121Ki  121Ki    0Bi   100%    /dev
fdesc          1.0Ki  1.0Ki    0Bi   100%    /dev
map -hosts       0Bi    0Bi    0Bi   100%    /net
map auto_home    0Bi    0Bi    0Bi   100%    /home
/dev/disk1s1   3.7Gi  896Ki  3.7Gi     1%    /Volumes/USB2
You can see that a USB stick with the volume name USB2 is /dev/disk1s1
We want just the disk device name, and that is /dev/disk1
REMEMBER TO USE DISK UTILITY TO UNMOUNT (not EJECT) THE USB DRIVE !
dd if=joggler_unr_9.10_v1.3a.bin of=/dev/disk1 bs=10485760
Notes:
1) bs=10m (note lower case m) for OSX’s standard dd [2]
2) bs=10M (note upper case M) if you use fink or mac ports
3) bs=10485760 for both
And Wait … probably 20-30 mins if you have a horrible usb hub 
OSX will probably recognise the EFI partition after dd has finished writing it, so remember to eject the flash drive from finder before removing it.
Linux
dd
A similar method to dd on the mac is required, but on Linux disk devices look more like:
/dev/sdb1 3.7Gi 896Ki 3.7Gi 1% /media/USB2
and now unmount it…
sudo umount /dev/sdb1
So we need /dev/sdb here (remember your devices will probably be different, so *please* engage brain!
We can also specify units in the bs= section so we use 10M
dd if=joggler_unr_9.10_v1.3a.bin of=/dev/sdb bs=10M
And Wait … probably 20-30 mins if you have a horrible usb hub
Download Windows Speedup Tool to fix errors and make PC run faster
Here is a free and open-source tool to write a raw disk image file to a removable device (say USB or flash drive). The tool is named Win32 Disk Imager. It can come in handy when you want to create a copy or backup of your game or some other data stored on some CD or DVD (in an image format) so that you can use that backup later when needed. You can also use it to backup your removable device to a raw disk image file.

This tool supports only IMG files for read and write but it works very well. Also, the tool is a bit old and was designed to work for Windows 10 and lower versions, but it works pretty well for Windows 11 operating system also.
Features of Win32 Disk Imager for Windows
Following are the features or options present in Win32 Disk Imager:
- Read: This option lets you read data from a removable device to the input image file
- Write: Use this option when you want to backup or write your IMG file data to the removable device
- Hash: Using this option, you can generate MD5, SHA256, and/or SHA1 hash of your IMG file. It also lets you copy the generated hash so that you can save it to a folder
- Verify Only: You can use this feature to check or verify file integrity (input IMG file and the removable device). If the file stored in the removable device is exactly the same as the input IMG file, then their hash will match, and file integrity verification will be successful.
Using this tool is very easy. The tool comes with a tiny interface where everything is self-explanatory. To use this tool, first, grab its EXE file from sourceforge.net. Execute the EXE file and complete the installation process. Finally, launch the tool, and its interface will be in front of you.
Now connect your removable device (if not already) and it will automatically detect and select it. If multiple removable devices are connected to your computer, then select the desired device from the drop-down menu available on the top-right section of its interface.
Once you have done that, use the Folder or Browse icon available on the top part of its interface to add the input IMG file. Generate a hash (if needed for the IMG file) or simply skip this step.

Finally, hit the Write button, confirm your action using the Yes button, and wait till the process is completed. Once it is done, it will write your IMG file data successfully.
If you want, you can also use other features like verifying file integrity, reading data from the removable device, etc., using the buttons present on its interface.
Related: Best free imaging, backup, and recovery software for Windows.
How do I copy an image using Win32 Disk Imager?
Copying or writing an IMG file to some removable device is pretty simple. Use the icon available to enter your input IMG file, select the output removable device, and then use the Write button. Let the whole process be completed. If everything goes well, you will have a backup or copy of your image file to the removable device. This article also covers the entire process for copying an image file with the help of Win32 Disk Imager.
Why do you need software such as Win32 Disk Imager?
Tools like Win32 Disk Imager are useful when you want to write data from your IMG file to some removable device. Even if the original image file is lost or corrupted, you will have a backup copy of your stuff. Such tools are also helpful when you want to backup your removable device to a raw disk image file.
Hope this helps.
Read next: Best free Game Backup software for Windows computers.
Laxman has done Bachelor’s in Computer Science, followed by an MBA. Writing about Windows OS and the free software and services that are available for the Windows operating system is what excites him.