Технология рабочих папок (Work Folders) позволяет организовать удаленный доступ пользователей к своим файлам на внутреннем файловом сервере компании и работать с ними в офлайн режиме с любого устройства (ноутбук, планшет или смартфон). При следующем подключения к сети все изменения в файлах на устройстве пользователя синхронизируются с корпоративным файловым сервером. В этой статье мы покажем, как установить и настроить функционал Work Folders на базе файлового сервера Windows Server 2016 и клиента с Windows 10 .
В качестве хранилища файлов может использоваться файловый сервер с Windows Server 2012 R2, в качестве клиентов все версии Windows, начиная с Windows 7, а также устройства с Android 4.4 или iOS 8 и выше (клиент Work Folders для этих устройств доступен в Google Play и App Store соответственно). С помощью политик безопасности можно потребовать от клиентов Work Folders обязательное хранение содержимого рабочих папок в зашифрованном виде, что гарантирует защиту данных даже в случае утери/кражи устройства.
Содержание:
- Установка и настройка роли Work Folders в Windows Server 2016
- Настройка клиента Work Folders
- Настройка клиента Work Folders групповыми политиками Windows
- Ошибка синхронизации Work Folders 0x80c80317
- Заключение
Установка и настройка роли Work Folders в Windows Server 2016
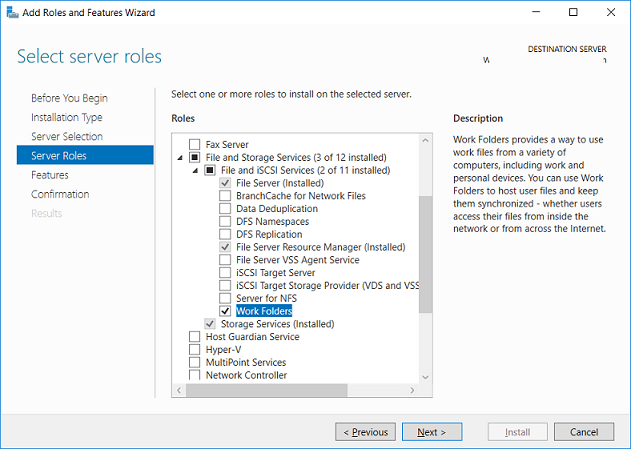
Роль Work Folders в Windows Server 2016 можно установить из графического интерфейса Server Manager или с помощью PowerShell.
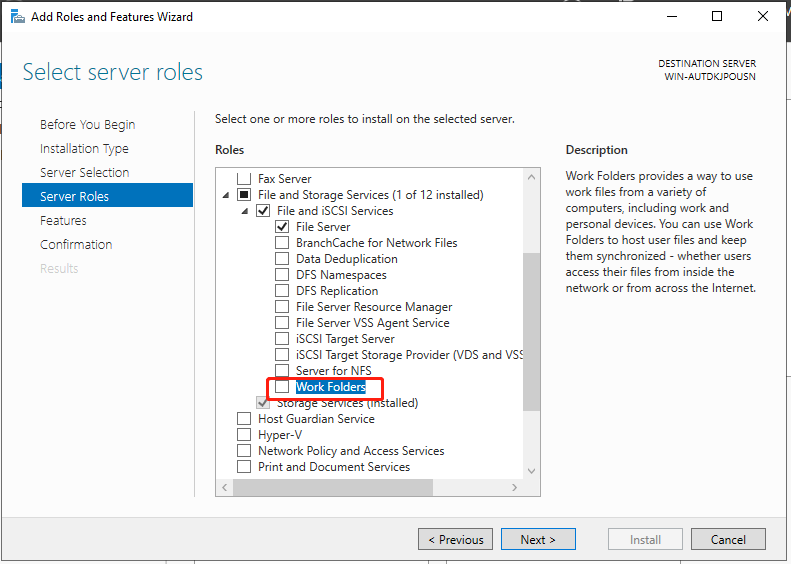
В первом случае нужно в Server Manager внутри роли File and Storage Services выбрать службу Work Folders (к установке будут автоматически добавлены требуемые компоненты IIS Hostable Web Core).
Установка роли Work Folders с помощью PowerShell выполняется такой командой:
Install-WindowsFeature FS-SyncShareService,Web-WHC

Для предоставления доступа к рабочим папкам в Active Directory нужно создать группы безопасности, в которые нужно включить пользователей, которым будет разрешено синхронизировать свои устройства с рабочими папками на файловом сервере (для более быстрой работы службы Work Folders за счет уменьшения количества запросов к AD, Microsoft рекомендует помещать в данные группы только учетные записи пользователей, но не другие группы безопасности).
Следующий этап – создание на файловом сервере сетевых каталогов, с которыми будут синхронизироваться пользователи. Эти каталоги можно создать из консоли Server Manager или PowerShell.
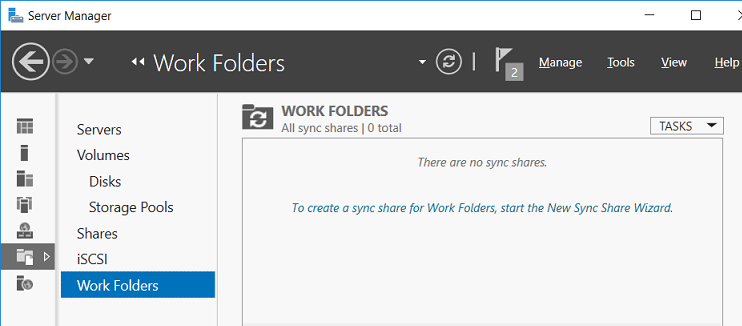
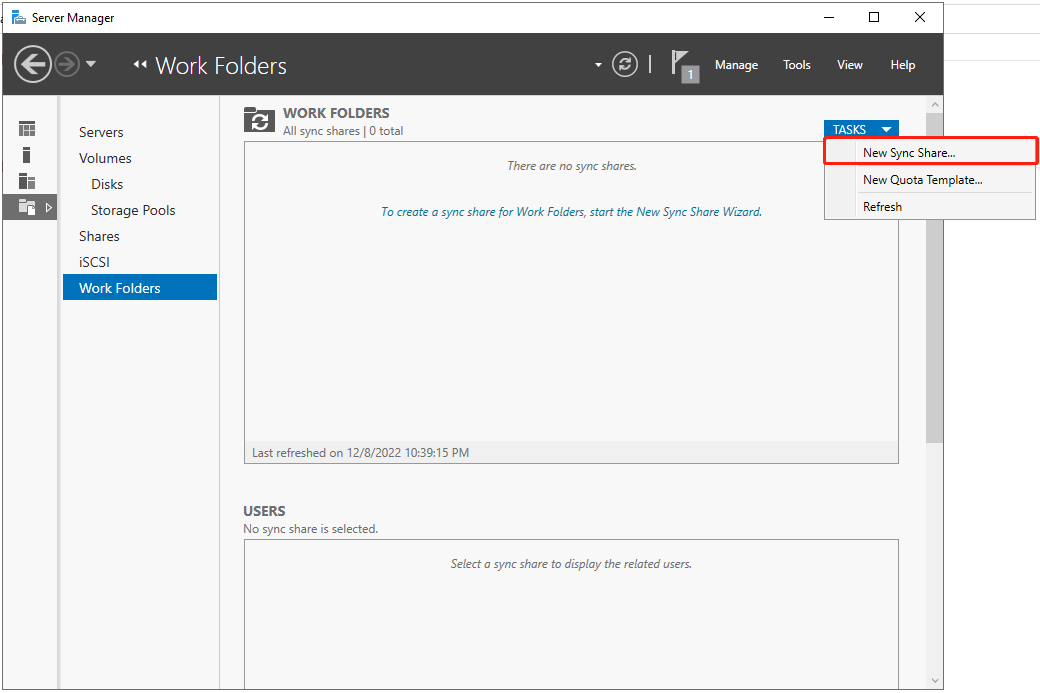
Откройте Server Manager, выберите роль File and Storage Services -> Work Folders. Выберите меню Tasks -> New Sync Share.
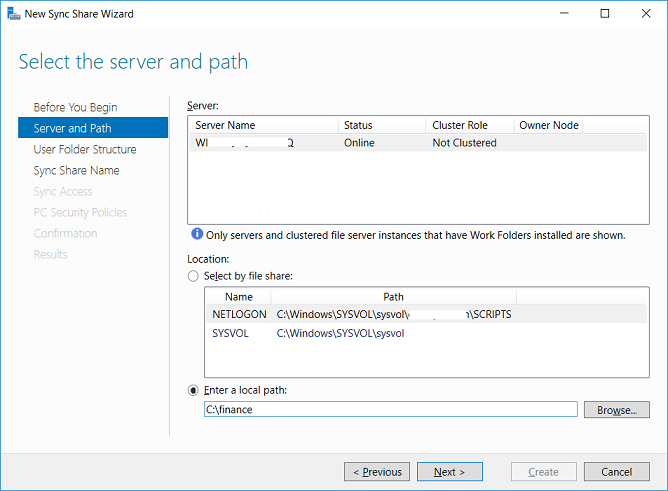
Далее нужно указать каталог, к которому будет предоставляться доступ. В нашем примере это папка C:\finance.
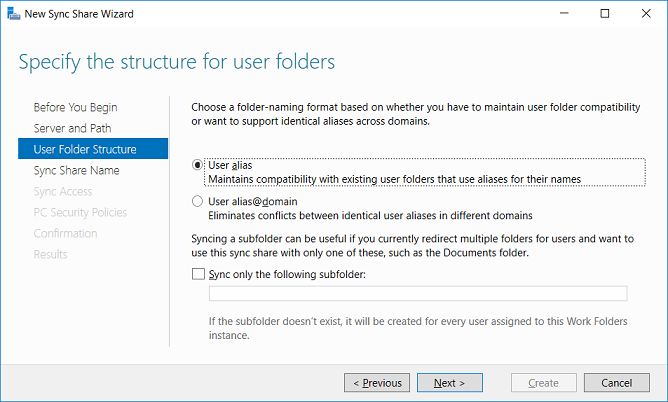
Далее нужно выбрать какая структура пользовательских папок будет использоваться. Папки могут называться по учетной записи пользователя (alias), либо в формате user@domain.
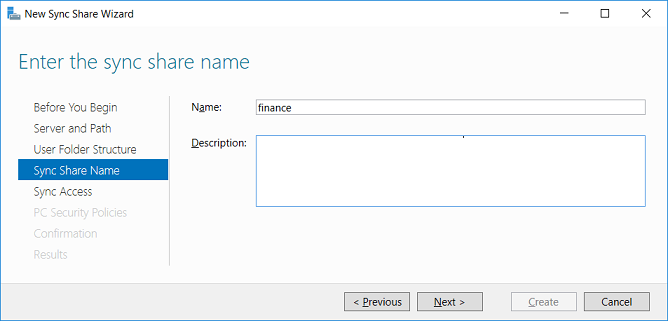
Затем указывается имя шары.
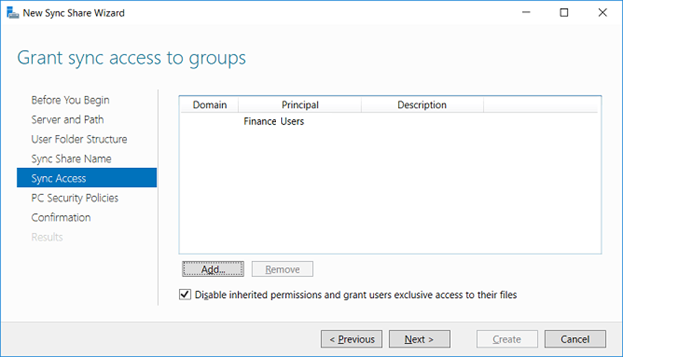
Далее нужно указать группы доступа, которым нужно предоставить доступ к данному каталогу.
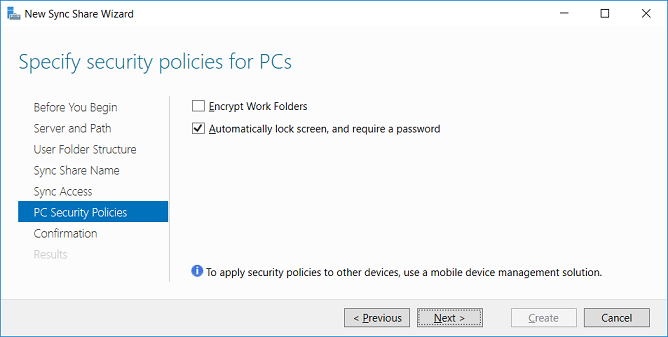
Далее указываются политики безопасности рабочих папок, которые должны применяться на клиенте. Имеются две политики:
- Encrypt Work Folders – обязательное шифрование данных в каталоге Work Folder на клиенте с помощью BitLocker
- Automatically lock screen and require a password– автоматическая блокировка экрана через 15 минут неактивности устройства и защита его паролем (не менее 6 символов)
На этом настройка новой рабочей папки закончена.
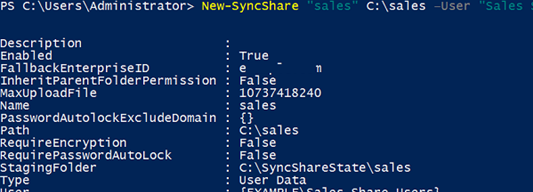
Те же самые действия по созданию новой папки синхронизации можно выполнить с помощью командлета New-SyncShare. К примеру, следующая команда создаст новую папку синхронизации и предоставит доступ к ней группе
New-SyncShare "Sales" C:\sales –User "Sales_Users_Remote_WorkFolder"
Для доступа к рабочим файлам по защищенному протоколу HTTPS, к веб сайту IIS, который обслуживает работу папок Work Folder нужно привязать валидный SSL сертификат.
Примечание. В тестовой конфигурации сертификат использовать не обязательно, требование наличия сертификата на клиенте можно игнорировать. См. команду ниже.
Проще всего воспользоваться бесплатным SSL сертификатом от Let’s Encrypt. Процесс выпуска и привязки такого сертификата в IIS описан в статье Cертификат Let’s Encrypt для Windows(IIS).
Совет. Для подключения внешних клиентов к серверу Work Folder для доступа и синхронизации файлов, нужно соответствующим образом настроить DNS имя сервера во внешней зоне, а также на межсетевом экране разрешить трафик к серверу по портам 80 и/или 443 TCP. Кроме того, для более комплексной защиты можно организовать доступ через сервер Web Application Proxy.
Настройка клиента Work Folders
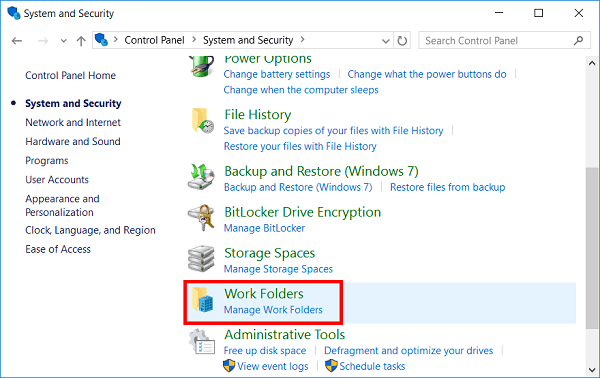
В данном примере в качестве клиента Work Folders используется устройство с Windows 10. Настройка производится через имеющийся апплет в панели управления Control Panel -> System and Security -> Work Folders (этот пункт отсутствует в серверных редакциях).
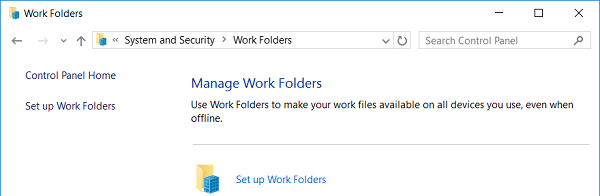
Чтобы приступить к настройке, нажмите кнопку Set up Work Folders.
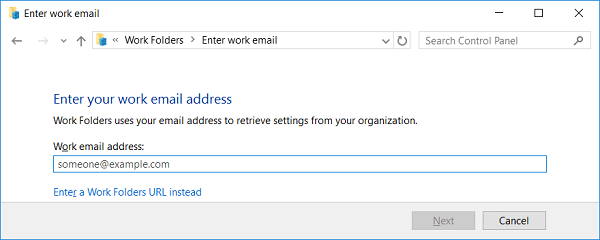
Далее нужно указать Email пользователя или URL адрес сервера Work Folders.
По умолчанию, клиент подключается к серверу по защищенному HTTPS протоколу. В тестовой среде это требование можно отменить, выполнив на клиенте команду:
Reg add HKLM\SOFTWARE\Microsoft\Windows\CurrentVersion\WorkFolders /v AllowUnsecureConnection /t REG_DWORD /d 1
Для доступа к данным нужно авторизоваться и подтвердить согласие с политиками безопасности, которые будут применены к клиенту.
На Windows клиентах рабочие файлы по умолчанию хранятся в профиле пользователя в каталоге %USERPROFILE%\Work Folders и их размер не может превышать 10 Гб.
После подключения клиента к серверу, создается каталог Work Folders. Если файлы в рабочих папках не изменились, клиент каждые 10 минут синхронизируется с файловым сервером. Синхронизация измененных файлов выполняет сразу. Кроме того, при наличии изменений сервер автоматически оповещает другие клиенты о необходимости обновить свои данные с центрального сервера (таким образом, изменения должны максимально быстро появиться на всех подключенных устройствах).
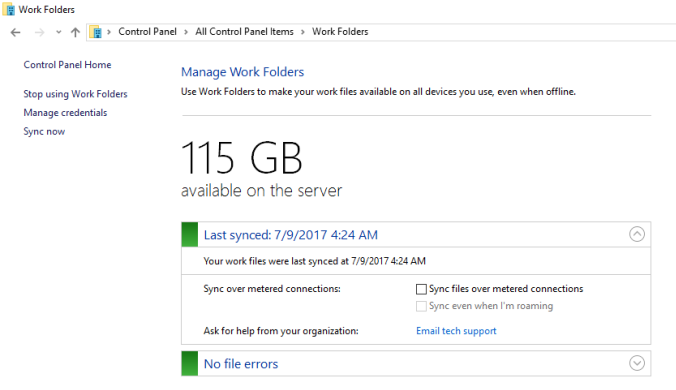
Статус синхронизации, наличие ошибок, размер свободного места на сервере можно посмотреть в том же элементе панели управления.
Чтобы проверить работу синхронизации создайте в папке Work Folders новый каталог, а затем в контекстном меню выберите пункт Sync now.
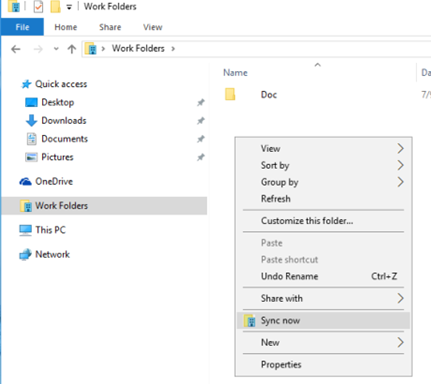
Через некоторое время данный каталог должен появится на сервере.
Настройка клиента Work Folders групповыми политиками Windows
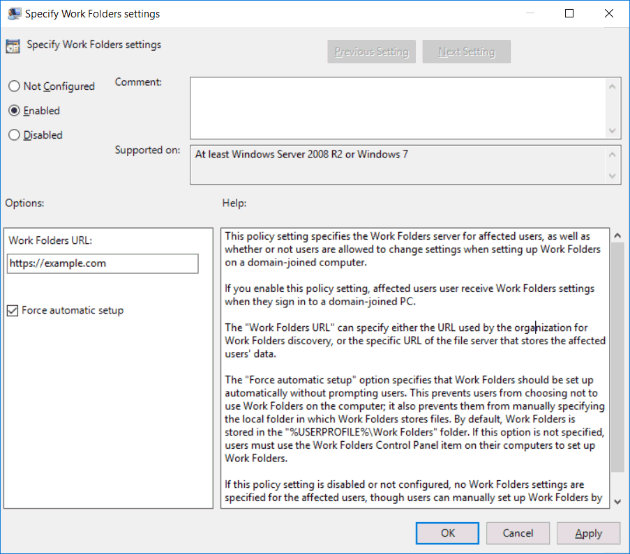
Для автоматической настройки Work Folders можно использовать две специализированные групповые политики в разделе User Configuration -> Policies -> Administrative Templates -> Windows Components -> WorkFolders:
- Specify Work Folders Settings – в ней можно указать URL адрес сервера Work Folders
- Force automatic setup for all users – инициирует автоматическую настройку клинета
Ошибка синхронизации Work Folders 0x80c80317
В тествой конфигурации столкулся с тем, что при синхронизации файлов на клиенте возникает ошибка:
There was a problem, but sync will try again (0x80c80317)

В логе сервера при этом содержатся такие записи:
The Windows Sync Share service failed to setup a new sync partnership with a device. Database: \\?\C:\users\SyncShareState\WorkFolders\Metadata; User folder name: \\?\C:\Finance\WORKFOLDERS_ROOT\USER.TEST; Error code: (0x8e5e0408) Unable to read from or write to the database.
Данные ошибки свидетельствуют о наличии проблемы в механизме синхронизации. В этом случае для пользователя нужно выполнить команды
Repair-SyncShare -name Finance -user Domain\user1
Get-SyncUserStatus -syncshare Finance -user Domain\user1
Как правило, это решает проблему поломанной синхронизации.
Заключение
Итак, мы рассмотрели, как настроить и пользоваться функцией Work Folders в Windows Server 2016. Данная технология позволяет пользователям удаленно работать с корпоративными файлами практически на любом устройстве, причем можно обеспечить адекватный уровень защиты данных от компрометации с помощью шифрования на стороне клиентского устройства. Конечно, этому решению далеко до удобства и гибкости облачных хранилищ Dropbox или OneDrive, но тут главный аспект заключается в простоте настройки и хранении данные внутри компании, а не в стороннем облаке. Дополнительно с Work Folders можно использовать такие технологии, как возможность управления квотами и типами файлов с помощью FSRM, поддержка файловых кластеров, управление доступом к данным с помощью Dynamic Access Control и File Classification Infrastructure.
Good day
We are in the process of configuring 6 new load balanced Terminal servers in a new datacenter environment.
We have build a NEW domain, therefor a new active directory.
Our users are used to using workfolders across their existing devices and i would like to configure workfolders for them on their terminal sessions on the new environment. I cannot seem to find the workfolders client on their terminal server sessions, but
after research, ive found that there is no client for terminal users using server 2019 datacenter.
therefor i have two questions
1.) How can i get workfolders to work on server 2019?
2.1) How can i generate those workfolders folders without having users needing to log into a machine that has the profile.
2.2) Is there some sort of script or process i can run to create about 800 user workfolders?
Regards
Corné
| description | title | ms.topic | manager | ms.author | author | ms.date | ms.assetid |
|---|---|---|---|---|---|---|---|
|
Learn more about: Deploy Work Folders with AD FS and Web Application Proxy: Step 1, Set-up AD FS |
Deploy Work Folders with AD FS and Web Application Proxy — Step 1, Set Up AD FS |
article |
klaasl |
jeffpatt |
JeffPatt24 |
10/18/2018 |
938cdda2-f17e-4964-9218-f5868fd96735 |
Deploy Work Folders with AD FS and Web Application Proxy: Step 1, Set-up AD FS
Applies to: Windows Server 2022, Windows Server 2019, Windows Server 2016
This topic describes the first step in deploying Work Folders with Active Directory Federation Services (AD FS) and Web Application Proxy. You can find the other steps in this process in these topics:
-
Deploy Work Folders with AD FS and Web Application Proxy: Overview
-
Deploy Work Folders with AD FS and Web Application Proxy: Step 2, AD FS Post-Configuration Work
-
Deploy Work Folders with AD FS and Web Application Proxy: Step 3, Set Up Work Folders
-
Deploy Work Folders with AD FS and Web Application Proxy: Step 4, Set Up Web Application Proxy
-
Deploy Work Folders with AD FS and Web Application Proxy: Step 5, Set Up Clients
[!NOTE]
The instructions covered in this section are for a Windows Server 2019 or Windows Server 2016 environment. If you’re using Windows Server 2012 R2, follow the Windows Server 2012 R2 instructions.
To set up AD FS for use with Work Folders, use the following procedures.
Pre-installment work
If you intend to convert the test environment that you’re setting up with these instructions to production, there are two things that you might want to do before you start:
-
Set up an Active Directory domain administrator account to use to run the AD FS service.
-
Obtain a Secure Sockets Layer (SSL) subject alternative name (SAN) certificate for server authentication. For the test example, you will use a self-signed certificate but for production you should use a publicly trusted certificate.
Obtaining these items can take some time, depending on your company’s policies, so it can be beneficial to start the request process for the items before you begin to create the test environment.
There are many commercial certificate authorities (CAs) from which you can purchase the certificate. You can find a list of the CAs that are trusted by Microsoft in KB article 931125. Another alternative is to get a certificate from your company’s enterprise CA.
For the test environment, you will use a self-signed certificate that is created by one of the provided scripts.
[!NOTE]
AD FS does not support Cryptography Next Generation (CNG) certificates, which means that you cannot create the self-signed certificate by using the Windows PowerShell cmdlet New-SelfSignedCertificate. You can, however, use the makecert.ps1 script included in the Deploying Work Folders with AD FS and Web Application Proxy blog post. This script creates a self-signed certificated that works with AD FS and prompts for the SAN names that will be needed to create the certificate.
Next, do the additional pre-installment work described in the following sections.
Create an AD FS self-signed certificate
To create an AD FS self-signed certificate, follow these steps:
-
Download the scripts provided in the Deploying Work Folders with AD FS and Web Application Proxy blog post and then copy the file makecert.ps1 to the AD FS machine.
-
Open a Windows PowerShell window with admin privileges.
-
Set the execution policy to unrestricted:
Set-ExecutionPolicy –ExecutionPolicy Unrestricted -
Change to the directory where you copied the script.
-
Execute the makecert script:
-
When you are prompted to change the subject certificate, enter the new value for the subject. In this example, the value is blueadfs.contoso.com.
-
When you are prompted to enter SAN names, press Y and then enter the SAN names, one at a time.
For this example, type blueadfs.contoso.com and press Enter, then type 2016-adfs.contoso.com and press Enter, then type enterpriseregistration.contoso.com and press Enter.
When all of the SAN names have been entered, press Enter on an empty line.
-
When you are prompted to install the certificates to the Trusted Root Certification Authority store, press Y.
The AD FS certificate must be a SAN certificate with the following values:
-
AD FS service name.domain
-
enterpriseregistration.domain
-
AD FS server name.domain
In the test example, the values are:
-
blueadfs.contoso.com
-
enterpriseregistration.contoso.com
-
2016-adfs.contoso.com
The enterpriseregistration SAN is needed for Workplace Join.
Set the server IP address
Change your server IP address to a static IP address. For the test example, use IP class A, which is 192.168.0.160 / subnet mask: 255.255.0.0 / Default Gateway: 192.168.0.1 / Preferred DNS: 192.168.0.150 (the IP address of your domain controller).
Install the AD FS role service
To install AD FS, follow these steps:
-
Log on to the physical or virtual machine on which you plan to install AD FS, open Server Manager, and start the Add Roles and Features Wizard.
-
On the Server Roles page, select the Active Directory Federation Services role, and then click Next.
-
On the Active Directory Federation Services (AD FS) page, you will see a message that states that the Web Application Proxy role cannot be installed on the same computer as AD FS. Click Next.
-
Click Install on the confirmation page.
To accomplish the equivalent installation of AD FS via Windows PowerShell, use these commands:
Add-WindowsFeature RSAT-AD-Tools
Add-WindowsFeature ADFS-Federation –IncludeManagementTools
Configure AD FS
Next, configure AD FS by using either Server Manager or Windows PowerShell.
Configure AD FS by using Server Manager
To configure AD FS by using Server Manager, follow these steps:
-
Open Server Manager.
-
Click the Notifications flag at the top of the Server Manager window, and then click Configure the federation service on this server.
-
The Active Directory Federation Services Configuration Wizard launches. On the Connect to AD DS page, enter the domain administrator account that you want to use as the AD FS account, and click Next.
-
On the Specify Service Properties page, enter the subject name of the SSL certificate to use for AD FS communication. In the test example, this is blueadfs.contoso.com.
-
Enter the Federation Service name. In the test example, this is blueadfs.contoso.com. Click Next.
[!NOTE]
The Federation Service name must not use the name of an existing server in the environment. If you do use the name of an existing server, the AD FS installation will fail and must be restarted. -
On the Specify Service Account page, enter the name that you would like to use for the managed service account. For the test example, select Create a Group Managed Service Account, and in Account Name, enter ADFSService. Click Next.
-
On the Specify Configuration Database page, select Create a database on this server using Windows Internal Database, and click Next.
-
The Review Options page shows you an overview of the options you have selected. Click Next.
-
The Pre-requisite Checks page indicates whether all the prerequisite checks passed successfully. If there are no issues, click Configure.
[!NOTE]
If you used the name of the AD FS server or any other existing machine for the Federation Service Name, an error message is displayed. You must start the installation over and choose a name other than the name of an existing machine. -
When the configuration completes successfully, the Results page confirms that AD FS was successfully configured.
Configure AD FS by using PowerShell
To accomplish the equivalent configuration of AD FS via Windows PowerShell, use the following commands.
To install AD FS:
Add-WindowsFeature RSAT-AD-Tools
Add-WindowsFeature ADFS-Federation -IncludeManagementTools
To create the managed service account:
New-ADServiceAccount "ADFSService"-Server 2016-DC.contoso.com -Path "CN=Managed Service Accounts,DC=Contoso,DC=COM" -DNSHostName 2016-ADFS.contoso.com -ServicePrincipalNames HTTP/2016-ADFS,HTTP/2016-ADFS.contoso.com
After you configure AD FS, you must set up an AD FS farm by using the managed service account that you created in the previous step and the certificate you created in the pre-configuration steps.
To set up an AD FS farm:
$cert = Get-ChildItem CERT:LocalMachineMy |where {$_.Subject -match blueadfs.contoso.com} | sort $_.NotAfter -Descending | select -first 1
$thumbprint = $cert.Thumbprint
Install-ADFSFarm -CertificateThumbprint $thumbprint -FederationServiceDisplayName "Contoso Corporation" –FederationServiceName blueadfs.contoso.com -GroupServiceAccountIdentifier contosoADFSService$ -OverwriteConfiguration -ErrorAction Stop
Next step: Deploy Work Folders with AD FS and Web Application Proxy: Step 2, AD FS Post-Configuration Work
See Also
Work Folders Overview

How To Configure Work Folder On Windows Server 2019
Immerse Yourself in Art, Culture, and Creativity: Celebrate the beauty of artistic expression with our How To Configure Work Folder On Windows Server 2019 resources. From art forms to cultural insights, we’ll ignite your imagination and deepen your appreciation for the diverse tapestry of human creativity. 2019 obtain Step windows server dns r2 applies show 8-1 2 windows the windows certificates 2022 servers 4 create 7- ssl more step servers folders server file 10 step sync windows work server to 1 3 records binding on windows the windows on step server 2012 2016 8 ssl certificate windows install
66 How To Setup Work Folders On Windows Server 2019
66 How To Setup Work Folders On Windows Server 2019
Step 1: obtain ssl certificates step 2: create dns records step 3: install work folders on file servers step 4: binding the ssl certificate on the sync servers show 8 more applies to: windows server 2022, windows server 2019, windows server 2016, windows server 2012 r2, windows 10, windows 8.1, windows 7. Software requirements show 5 more applies to: windows 11, windows 10, windows server 2022, windows server 2019, windows server 2016 work folders is a windows server role service for file servers. work folders provides a consistent way for users to access their work files from their pcs and devices.

Windows Server 2019 Active Directory Add User Accounts Server World
Windows Server 2019 Active Directory Add User Accounts Server World
Software requirements deployment scenarios deployment technologies additional design considerations show 3 more applies to: windows server 2022, windows server 2019, windows server 2016, windows server 2012 r2, windows 10, windows 8.1, windows 7. Video series on advance networking with windows server 2019:simple video guide on how to install and configure work folders on windows server 2019 and how to. 15.6k subscribers subscribe 4.8k views 2 years ago windows server 2019 training course for beginners #windowsserver2019 #workfolders # in this video i am going to show how to setup work. Presentation the work folders feature allows you to set up a personal folder synchronized with a file server in http (s) using a client available on windows, android and apple. if web access is published on the internet, this solution can synchronize files even from outside the company for mobile users.

Step By Step How To Configure Folder Redirection In Windows Server 2019
Step By Step How To Configure Folder Redirection In Windows Server 2019
15.6k subscribers subscribe 4.8k views 2 years ago windows server 2019 training course for beginners #windowsserver2019 #workfolders # in this video i am going to show how to setup work. Presentation the work folders feature allows you to set up a personal folder synchronized with a file server in http (s) using a client available on windows, android and apple. if web access is published on the internet, this solution can synchronize files even from outside the company for mobile users. Enter a local path on the user folder structure screen, select the folder naming convention that you want work folders to use. unless you have multiple domains and your file server hosts files for users in more than one domain, the “user alias” option should be sufficient. Deploy work folders with ad fs and web application proxy: step 1, set up ad fs deploy work folders with ad fs and web application proxy: step 2, ad fs post configuration work deploy work folders with ad fs and web application proxy: step 3, set up work folders.

Step By Step How To Install And Configure Work Folder In Windows Server
Step By Step How To Install And Configure Work Folder In Windows Server
Enter a local path on the user folder structure screen, select the folder naming convention that you want work folders to use. unless you have multiple domains and your file server hosts files for users in more than one domain, the “user alias” option should be sufficient. Deploy work folders with ad fs and web application proxy: step 1, set up ad fs deploy work folders with ad fs and web application proxy: step 2, ad fs post configuration work deploy work folders with ad fs and web application proxy: step 3, set up work folders.

Step By Step How To Install And Configure Work Folder In Windows Server
Step By Step How To Install And Configure Work Folder In Windows Server
66. How To Setup Work Folders On Windows Server 2019
66. How To Setup Work Folders On Windows Server 2019
video series on advance networking with windows server 2019: simple video guide on how to install and configure work video series on advance networking with windows server 2019: simple video guide on how to install and configure work windowsserver2019 #workfolders # in this video i am going to show how to setup work folder on server 2019 & windows 10 how to configure work folder windows server 2019 work folder in server 2019 mcse video in nepali how to configure server eng mahmoud enan#work folder#sync data#client server#windows server 2019 how to configure work folder to sync in this video we learned how to configure work folders. in this video we will discuss about classification management and file this video is part 1 of a three part series on how to set up work folders for offline access on a windows server environment. windows #workfolders #server2022 #windows11 hello everyone welcome to my channel rohit tech today configure work folders on client machine create work folders youtu.be tcnb1oq9inu video notes [must read!] this video is part 3 of a three part series on how to set up work folders for offline access on a windows server environment. this ittaster video demonstrates how to create user home folders (user home directories) in windows server 2019. assigning this video is part 2 of a three part series on how to set up work folders for offline access on a windows server environment.
Conclusion
All things considered, it is evident that article offers valuable insights regarding How To Configure Work Folder On Windows Server 2019. From start to finish, the writer illustrates a deep understanding about the subject matter. In particular, the section on X stands out as particularly informative. Thank you for this post. If you need further information, please do not hesitate to reach out via social media. I look forward to hearing from you. Additionally, here are some related articles that you may find useful:
Related image with how to configure work folder on windows server 2019
Related image with how to configure work folder on windows server 2019

Contents
- 1 67 How To Install And Configure Work Folders On Windows Server 2019
- 2 67. How To Install And Configure Work Folders On Windows Server 2019
- 2.1 Conclusion
- 2.1.1 Related image with 67 how to install and configure work folders on windows server 2019
- 2.1.2 Related image with 67 how to install and configure work folders on windows server 2019
- 2.1 Conclusion
Our virtual corridors are filled with a diverse array of content, carefully crafted to engage and inspire 67 How To Install And Configure Work Folders On Windows Server 2019 enthusiasts from all walks of life. From how-to guides that unlock the secrets of 67 How To Install And Configure Work Folders On Windows Server 2019 mastery to captivating stories that transport you to 67 How To Install And Configure Work Folders On Windows Server 2019-inspired worlds, there’s something here for everyone. Proxy proxy folders and ad ad with up work folders fs folders fs ad step configuration set folders- set fs work ad fs with step Deploy and deploy web web application deploy fs application work work with 2 1 web application post step 3 proxy ad up work and
67 How To Install And Configure Work Folders On Windows Server 2019
67 How To Install And Configure Work Folders On Windows Server 2019
67. how to install and configure work folders on windows server 2019 msft webcast 75.3k subscribers subscribe 7.3k views 2 years ago managing networking services in windows sever 2019 video. Step 1: obtain ssl certificates step 2: create dns records step 3: install work folders on file servers step 4: binding the ssl certificate on the sync servers show 8 more applies to: windows server 2022, windows server 2019, windows server 2016, windows server 2012 r2, windows 10, windows 8.1, windows 7.

Install And Configure Work Folder In Windows
Install And Configure Work Folder In Windows
How to setup work folder on server 2019 & windows 10 (step by step) rohit tech 15.6k subscribers subscribe 4.8k views 2 years ago windows server 2019 training course for beginners. Features feature changes software requirements show 5 more applies to: windows 11, windows 10, windows server 2022, windows server 2019, windows server 2016 work folders is a windows server role service for file servers. work folders provides a consistent way for users to access their work files from their pcs and devices. Deploy work folders with ad fs and web application proxy: step 1, set up ad fs deploy work folders with ad fs and web application proxy: step 2, ad fs post configuration work deploy work folders with ad fs and web application proxy: step 4, set up web application proxy deploy work folders with ad fs and web application proxy: step 5, set up clients. Learn windows server deploy work folders with ad fs and web application proxy: step 1, set up ad fs article 07 29 2021 11 contributors feedback in this article pre installment work install the ad fs role service configure ad fs see also applies to: windows server 2022, windows server 2019, windows server 2016.

Install And Configure Work Folder In Windows
Install And Configure Work Folder In Windows
Deploy work folders with ad fs and web application proxy: step 1, set up ad fs deploy work folders with ad fs and web application proxy: step 2, ad fs post configuration work deploy work folders with ad fs and web application proxy: step 4, set up web application proxy deploy work folders with ad fs and web application proxy: step 5, set up clients. Learn windows server deploy work folders with ad fs and web application proxy: step 1, set up ad fs article 07 29 2021 11 contributors feedback in this article pre installment work install the ad fs role service configure ad fs see also applies to: windows server 2022, windows server 2019, windows server 2016. Deploy work folders with ad fs and web application proxy: step 1, set up ad fs deploy work folders with ad fs and web application proxy: step 2, ad fs post configuration work deploy work folders with ad fs and web application proxy: step 3, set up work folders. Deploy work folders with ad fs and web application proxy: step 1, set up ad fs deploy work folders with ad fs and web application proxy: step 2, ad fs post configuration work deploy work folders with ad fs and web application proxy: step 3, set up work folders deploy work folders with ad fs and web application proxy: step 5, set up clients note.

It Guide To Windows 8 1 Work Folders It Pro
It Guide To Windows 8 1 Work Folders It Pro
Deploy work folders with ad fs and web application proxy: step 1, set up ad fs deploy work folders with ad fs and web application proxy: step 2, ad fs post configuration work deploy work folders with ad fs and web application proxy: step 3, set up work folders. Deploy work folders with ad fs and web application proxy: step 1, set up ad fs deploy work folders with ad fs and web application proxy: step 2, ad fs post configuration work deploy work folders with ad fs and web application proxy: step 3, set up work folders deploy work folders with ad fs and web application proxy: step 5, set up clients note.

Silvio Di Benedetto Windows Server 2012 R2 Series Work Folders
Silvio Di Benedetto Windows Server 2012 R2 Series Work Folders
67. How To Install And Configure Work Folders On Windows Server 2019
67. How To Install And Configure Work Folders On Windows Server 2019
video series on advance networking with windows server 2019: simple video guide on how to install and configure work video series on advance networking with windows server 2019: simple video guide on how to install and configure work windowsserver2019 #workfolders # in this video i am going to show how to setup work folder on server 2019 & windows 10 how to configure work folder windows server 2019 work folder in server 2019 mcse video in nepali how to configure server this video is part 1 of a three part series on how to set up work folders for offline access on a windows server environment. windows #workfolders #server2022 #windows11 hello everyone welcome to my channel rohit tech today how to install & configure a file server windows server 2019 video 7 windows server 2019 training. hello world if you want to hi everyone, this videos can help understand what is work folders and how we can deploy them. this video is part 3 of a three part series on how to set up work folders for offline access on a windows server environment. this video is part 2 of a three part series on how to set up work folders for offline access on a windows server environment.
Conclusion
Taking everything into consideration, it is clear that the article delivers helpful knowledge regarding 67 How To Install And Configure Work Folders On Windows Server 2019. Throughout the article, the writer illustrates a wealth of knowledge about the subject matter. Notably, the discussion of X stands out as a key takeaway. Thanks for taking the time to the article. If you have any questions, feel free to reach out through email. I am excited about hearing from you. Additionally, here are a few relevant posts that you may find useful:
Related image with 67 how to install and configure work folders on windows server 2019
Related image with 67 how to install and configure work folders on windows server 2019
This post from MiniTool discusses Work Folders, a role service for file servers running Windows Server. How to download, install and configure Work Folder in Windows? Now, keep on your reading to get details.
What Is Work Folders
Work Folders is a feature in Windows 10 that allows you to access your work files from your personal computer or device. With Work Folders, you can keep copies of your work files on your personal devices and have them sync automatically to your company’s data center.
The Work Folders feature applies to Windows Server 2022, Windows Server 2019, Windows Server 2016, Windows Server 2012 R2, Windows 10, Windows 8.1, Windows 7, iOS, and Android.
Administrators can use Work Folders to provide users with access to their work files while maintaining centralized storage and control of organizational data. Some specific applications for Work Folders include:
- Provides a single point of access to work files from users’ work and personal computers and devices.
- Access work files offline, then sync with a central file server the next time your PC or device is connected to the Internet or intranet.
- Deploy using existing deployments of Folder Redirection, Offline Files, and Home Folders.
- Manage user data using existing file server management techniques, such as file classification and folder quotas.
- Specify security policies to instruct users’ PCs and devices to encrypt Work Folders and use lock screen passwords.
- Using Failover Clustering with Work Folders for a high availability solution.
System Requirements
Work Folders has the following software requirements for the file server and your network infrastructure:
- A server running Windows Server 2019, Windows Server 2016, or Windows Server 2012 R2 to host a sync share with user files.
- A volume formatted with the NTFS file system for storing user files.
- To enforce password policies on Windows 7 PCs, you must use Group Policy Password Policies. You must also exclude Windows 7 PCs from the Work Folders password policy.
- A server certificate for each file server that will host Work Folders. These certificates should come from a certificate authority (CA) that users trust, preferably a public CA.
Note:
Note:
If you want to sync across the Internet, there are additional requirements:
- The ability to make servers accessible from the Internet by creating publishing rules in your organization’s reverse proxy or network gateway.
- Publicly registered domain names and the ability to create additional public DNS records for the domain.
Work Folders has the following software requirements for client computers:
PCs and devices must be running one of the following operating systems:
- Windows 10
- Windows 8.1
- Windows RT 8.1
- Windows 7
- Android 4.4 KitKat and above
- iOS 10.2 and later
Main Features of Work Folders
The Work Folders feature includes the following functionality.
| Functionality | Availability | Description |
| Work Folders role service in Server Manager | Windows Server 2022, Windows Server 2019, Windows Server 2016, or Windows Server 2012 R2 | The file and storage service provides a way to set up sync shares (folders that store users’ work files), monitor work folders, and manage sync shares and user access. |
| Work Folders cmdlets | Windows Server 2022, Windows Server 2019, Windows Server 2016, or Windows Server 2012 R2 | Windows PowerShell module containing comprehensive cmdlets for managing Work Folders servers. |
| Work Folders integration with Windows |
Windows 10 Windows 8.1 Windows RT 8.1 Windows 7 |
Work Folders provides the following features on Windows computers:
|
| Work Folders app for devices |
Android iPhone and iPad |
Apps that allow popular devices to access files in Work Folders. |
How to Download Work Folders on Windows 7/iOS/Android
How to download Work Folders on Windows 7/iOS/Android? Here are the steps:
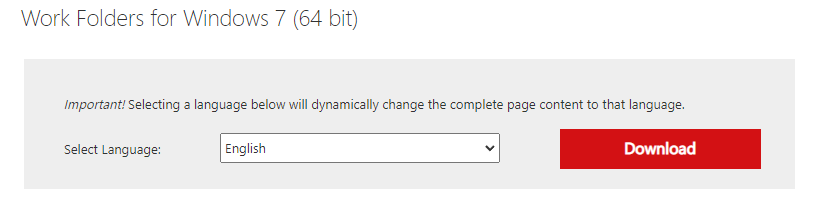
For Windows 7 users:
1. Click the below download link based on your computer’s architecture.
- Download Work Folders for Windows 7 (64-bit)
- Download Work Folders for Windows 7 (32-bit)
2. Select the language you want and click the Download button.
For iOS/Android Users:
If you are an iPhone user, you can go to App Store to download Work Folders. If you are an Android user, you can go to the Google Play Store to download Work Folders.
How to Open Work Folders on Windows 10
Just now, we have introduced how to download Work Folders on Windows 7. Now, we will introduce how to open Work Folders on Windows 10 (you don’t need to download it).
Way 1: Via the Search Box
Type Work Folders in the Search box. Then, choose Work Folders and click Open.
Way 2: Via Command Prompt
Step 1: Type cmd in the Search box and choose Run as administrator to open Command Prompt.
Step 2: Input workfolders.exe and press Enter.
Way 3: Via Windows PowerShell
Step 1: Right-click the Start menu to choose Windows PowerShell (Admin).
Step 2: Type workfolders and click Enter.
Way 4: Via the Run Box
Press Windows + R to open the Run dialog, input workfolders, and press OK.
Way 5: Via Control Panel
Step 1: Type Control Panel in the Search box to open it.
Step 2: Type work in the top-right search box, and select Work Folders or Manage Work Folders.
How to Set up Work Folders on Windows 10
After opening Work Folders, you can set up it. Here is how to do that:
Step 1: Click Set up Work Folders. Then, type your work email address and click Next.

Step 2: Then, enter the username and password that you use on your company’s network.
Step 3: Type the URL address of your company’s Work Folders server and click Next.
Step 4: You can information about the Work Folders feature and where your files will be saved on your computer. Click Next.
Step 5: Select I Accept These Policies on My PC and click Set up Work Folders.
How to Install Work Folder on Windows Server?
Now, let’s start to install Work Folders on Windows Server 2022. If you want to use work folders in Windows server 2019/2016/2012, you can refer to the following steps. The steps are very similar.
Step 1. Type Server Manager in the search box and select it. Then, click Add Roles and Features.

Step 2. Under the installation type page, choose Role-based or feature-based installation and click Next.

Step 3. Select the server and click Next.
Step 4. Expand File and Storage Services > File and iSCSI Services. Then, check Work Folders.
Step 5. Then, you are asked to install IIS(Internet Information Services) Hostable Web Core. Click Add Features.
Step 6. Follow the on-screen instructions and finish the rest of the steps.
How to Create Work Folders Sync Task in Windows Server?
To sync folders with Windows Server, please make some preparations first. Then, specify the sync share folder to store all the user’s files on the server computer.
- Create security groups to manage sync servers smoothly.
- Delegate user attribute control to Work Folders administrators to deploy multiple servers.
Now, let’s start to create the Work Folders sync task in Windows Server 2022.
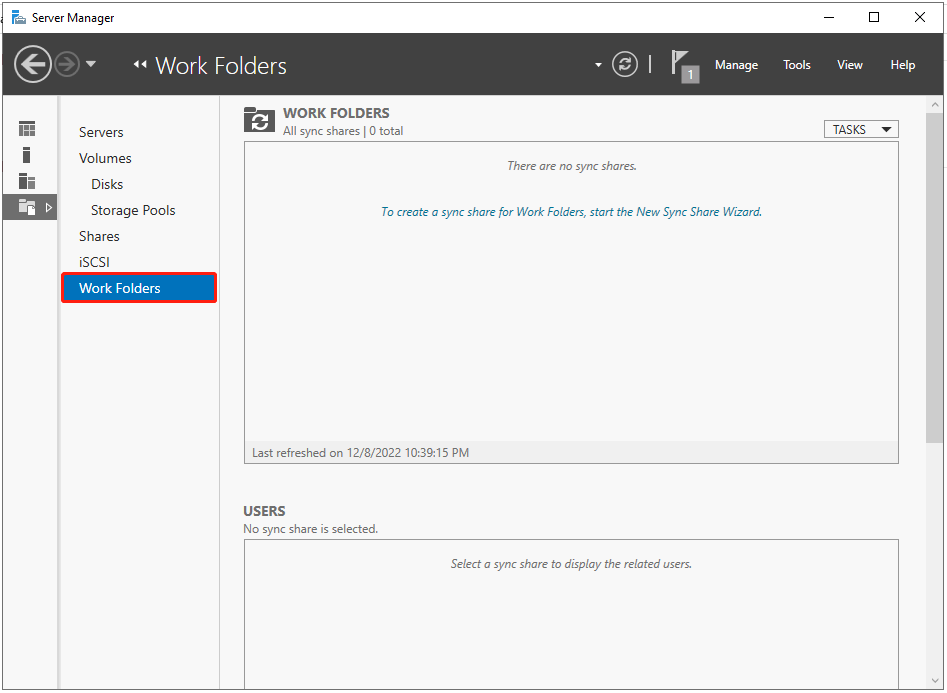
Step 1. Create a new volume with free space and format it with the NTFS file system. Then, open Server Manager > click File and Storage Services> select Work Folders.
Step 2. Click TASKS > New Sync Share… to enter the New Sync Share Wizard.
Step 3. Click Next. Then, select the server (sync share) and specify the path to store the sync files, and click Next.
Step 4. Select User alias or User alias@domain, and click Next. If you already have a file server, you can select the first option. If not, choose the second one.

Step 5. Specify a name and description for the sync share and click Next.
Step 6. On the Grant sync access to group window, select the group you created before and click Next.
Step 7. On the Specify device policies page, select the Encrypt Work Folders or Automatically lock screen. Type a password and then click Next.
Step 8. After that, you can start to sync.
Work Folders Not Working
Sometimes, you may encounter the “Work Folders not working” issue. There are three situations you may encounter.
1. Work Folders Sync Stopped Requiring a Password
Password policies are administrator-configured on the server and enforced on the client. It enforces the following configurations on user PCs and devices, and you can check whether the device complies with the policy.
- The minimum password length is 6.
- Auto-lock screen set to 15 minutes or less.
- Up to 10 or fewer password retries.
2. Work Folder Sync Stopped Unable to Encrypt Files
Work Folders will attempt to create encrypted folders if the administrator requests that files be encrypted on the client side. If the encryption fails, the user will see the failure and be asked to use a different path. There are several possible reasons for a sync failure.
- If the folder is on a USB drive and the drive does not support encryption.
- There is an existing Work Folders folder, and this folder is encrypted by a different key.
- If the device is domain joined, you can also search for expired/revoked certificates in the Default Domain Policy, which prevents client-side encryption.
3. Work Folders Sync Stops Conflicting Files
If the same file is modified on different devices, conflicts appear. You can check the following reasons.
- If a user changes a file on one device without closing it, the file will not be synced to the server.
- If the server loses the sync metadata database, the client and server will need to compare file sets to determine what to sync. Any discrepancy found between the client and server will create a conflict.
Easier Way to Sync Folders on Windows Server
From the above content, you can find that the steps for setting up Work Folders are complicated. Besides, it’s annoying to encounter the “Work Folders not working” issue. Thus, it’s recommended to try another way to sync folders on Windows Server – via MiniTool ShadowMkaer.
MiniTool ShdowMaker is compatible with Windows 11/10/8/7, Windows Server 2022, Windows Server 2019, Windows Server 2016, Windows Server 2012/2012 R2, and Windows Server 2008/2008 R2. It supports syncing folders and files to Network Attached Storage (NAS), Home File Server, etc.
MiniTool ShadowMaker can only sync files on local and it is a one-way sync.
MiniTool ShadowMaker TrialClick to Download100%Clean & Safe

Bottom Line
Here are all details about the Work Folders feature. I hope that this post can be helpful to you. In addition, if you have any problem with MiniTool ShadowMaker, please feel free to contact us via the email [email protected].