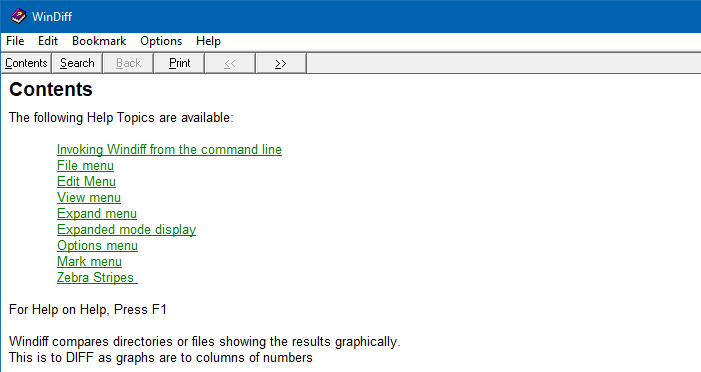
Уже с Windows 7 майкрософт решила, что HLP-файлы помощи устарели, вместо них используются CHM (compiled HTML), и поэтому прекратила их поддержку.
Поэтому в папке windows лежит winhlp32.exe, который вместо показа помощи отправляет пользователей куда нибудь в интернет на страницу помощи майкрософт. На этой странице можно скачать обновление, которое ставит нормальный winhlp32.exe в систему. Но для Windows 10 там нет пакета обновления.
Поэтому, например, в Delphi 7 теперь невозможно почитать помощь.
В интернете лежит несколько вариантов самодельного пакета c winhlp32 под Windows 10, там внутри и exe-шник, и mui файлы ресурсов под разные языки. Но в этих пакетах одна проблема — хоть и отлично работает winhlp32.exe, но нет библиотеки ftsrch.dll, а отсюда — пропадает вкладка «Поиск», а сам winhlp32.exe при первом запуске выдает ошибки.
Я доработал этот пакет, вставил туда ftsrch.dll и команду его копирования в папку windows.
Итак:
1) качаем этот zip-архив http://blackstrip.ru/winhlp32-and-search-win10.zip
2) распаковываем его куда нибудь
3) тыкаем правой кнопкой мышки по скрипту install.cmd и выбираем «Запуск от имени администратора». Ждем когда скрипт все скопирует под расширенными правами (с простыми правами winhlp32.exe не удается ни удалить, ни заменить, правда, прога unlocker может его таки удалить, и потом можно вручную закинуть winhlp32.exe на пустое место, но скриптом все это делать еще удобнее).
4) Наслаждаемся полноценным winhlp32 с системой поиска.
A long time back, most of the software used to ship with .hlp (WinHelp help format) help files. Since Windows Vista, the legacy .hlp format has been deprecated. To view 32-bit Help files with the .hlp file extension in Windows Vista (and higher — through Windows 8.1), you will need to download and install WinHlp32.exe (KB917607 package) from the Microsoft Download Center.
- WinHlp32.exe for Windows 8.1 x86 (KB917607)
- WinHlp32.exe for Windows 8.1 x64 (KB917607)
- WinHlp32.exe for Windows 8 (KB917607)
- WinHlp32.exe for Windows 7 (KB917607)
However, this update isn’t available for Windows 10/11. Installing one of the KB917607 installers on Windows 10 or 11 would cause the following error:
Windows Update Standalone Installer
The update is not applicable to your computer.
This article tells you how to restore the missing WinHelp (.hlp) viewer on Windows 10 or 11.
Contents
- Step 1: Download Winhlp32 package from Microsoft
- Step 2: Copy the files to the Windows folder
- Method 1: Replace the default Winhlp32.exe with the legacy version
- Method 2: Without replacing the default Winhlp32.exe file
- Associate .hlp files with legacy Winhlp32
Get Winhlp32.exe (.hlp) functionality in Windows 10 or 11
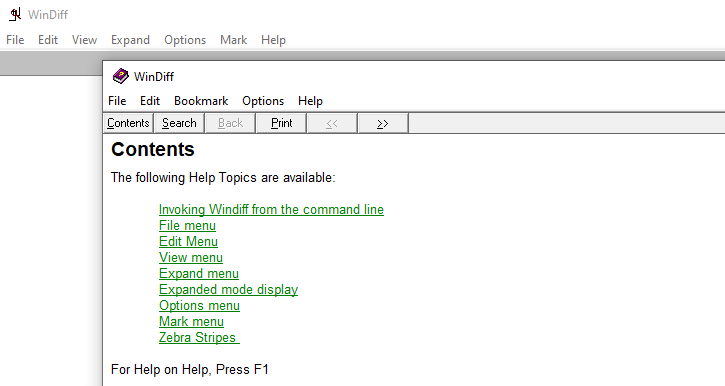
There are situations where you need the .hlp functionality even today. For example, I needed to refer to WinDiff.hlp manual to know the command-line switches supported. Note that WinDiff is still being used today by many users. By default, Windows 10/11 have the file Winhlp32.exe in the Windows directory, but it’s only a 12 KB dummy or placeholder file that doesn’t do anything when run.
Step 1: Download KB917607 and extract the files manually
To get the .hlp viewing functionality in Windows 10/11, you need to extract the required files from the KB917607 package.
- Download the KB917607 update (meant for Windows 8 or 8.1) from the Microsoft Download Center to your Windows 10 or 11 computer.
(In this illustration, I have used the Windows 8 x64 installer. Since I’m using Windows 64-bit, I downloaded the x64 installer file Windows8-RT-KB917607-x64.msu)
Update: I’ve later found that both Winhlp32.exe (in x64 and x86 folders) files in Windows8-RT-KB917607-x64.cab are exactly the same. It’s a 32-bit executable only — SHA1 hash for both files is
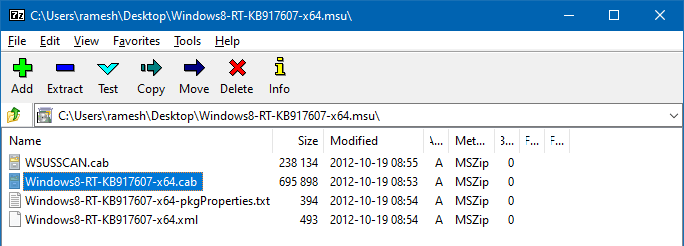
3aadfdea4bc00a6fa950a123f377de19775ec1fe. - Use 7-Zip or any other archiver to open
Windows8-RT-KB917607-x64.msu. - Extract the file
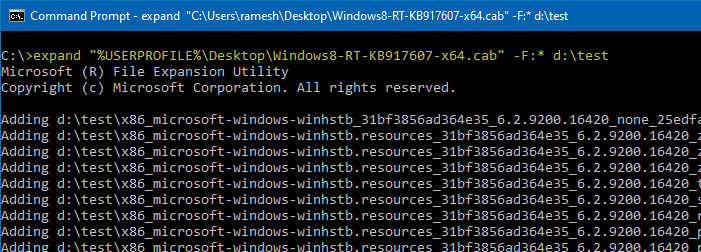
Windows8-RT-KB917607-x64.cabto your desktop. - Open a Command Prompt window, and type these two commands one by one, and press Enter after each command:
md d:\test

expand "%USERPROFILE%\Desktop\Windows8-RT-KB917607-x64.cab" -F:* d:\test
(In the above example, I’m creating a temporary folder on the D:\ drive, and then I’m extracting the contents of the .cab file. If the drive letter is different in your system, change it accordingly.)
- Now, copy these four files to your desktop:
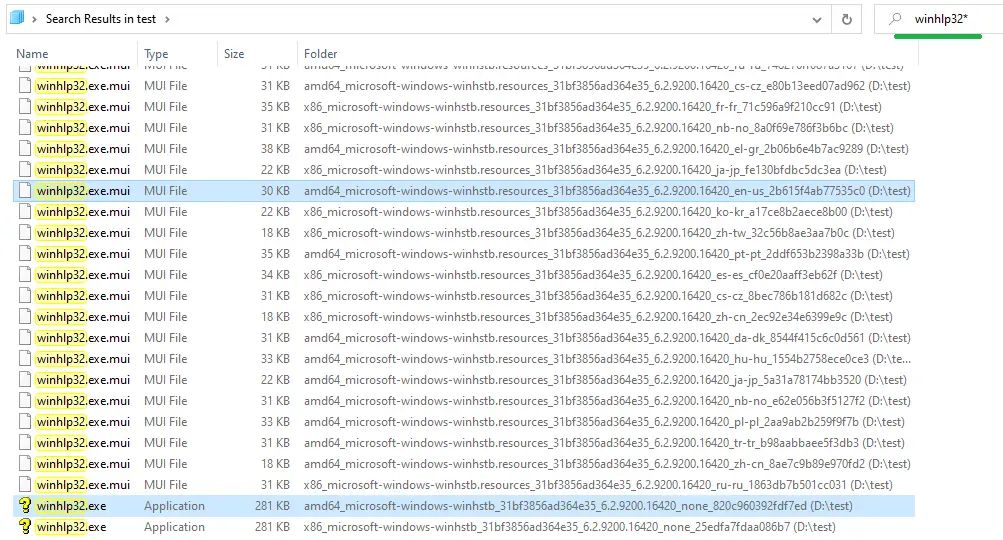
D:\test\amd64_microsoft-windows-winhstb_31bf3856ad364e35_6.2.9200.16420_none_820c960392fdf7ed\winhlp32.exe
D:\test\amd64_microsoft-windows-winhstb_31bf3856ad364e35_6.2.9200.16420_none_820c960392fdf7ed\ftsrch.dll

D:\test\amd64_microsoft-windows-winhstb.resources_31bf3856ad364e35_6.2.9200.16420_en-us_2b615f4ab77535c0\winhlp32.exe.mui
D:\test\amd64_microsoft-windows-winhstb.resources_31bf3856ad364e35_6.2.9200.16420_en-us_2b615f4ab77535c0\ftsrch.dll.mui
(As I’m using Windows x64 version, I’ve copied the x64 version of Winhlp32.exe denoted by the letters “
amd64” in the folder name. The .mui file (Multilingual User Interface) are resource files that allow you to change your Windows interface to display different languages.Because I’m using the English version of Windows, I picked up the “
en-US” version of the .mui file from theD:\Testfolder. In case you have an Italian language version of Windows, you’d need theen-ITversion ofwinhlp32.exe.mui.)Tip: Alternatively, you can search for
Winhlp32.exein theD:\Testfolder and easily pick the two files from search results. Similarly, search forftsrch.dllandftsrch.dll.mui(en-us version) and copy them.
Now, you have the four files Winhlp32.exe, Winhlp32.exe.mui, ftsrch.dll, and ftsrch.dll.mui on your desktop. Follow one of the methods under Step 2 below.
Step 2: Copy the files to the Windows folder
Method 1: Replace the default Winhlp32.exe with the legacy copy
This method replaces the factory default copy of Winhlp32.exe with the legacy (Windows 
An advantage of this method is that the contextual help (F1) works perfectly in your old applications. The disadvantage is that the procedure needs to be carried out after installing every Windows 10 or 11 Feature Update. The procedure needs to be repeated also when Windows File Protection replaces the file with the original copy automatically, or when the user runs the Sfc.exe command to fix corrupted files.
You have the files Winhlp32.exe, Winhlp32.exe.mui, ftsrch.dll, and ftsrch.dll.mui on your desktop. Follow these steps to copy them to the Windows folder.
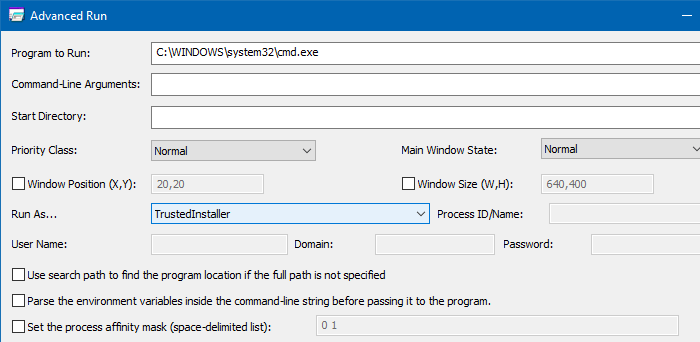
- Run Command Prompt under TrustedInstaller rights. Let’s say you’re using the AdvancedRun tool as specified in the linked article.
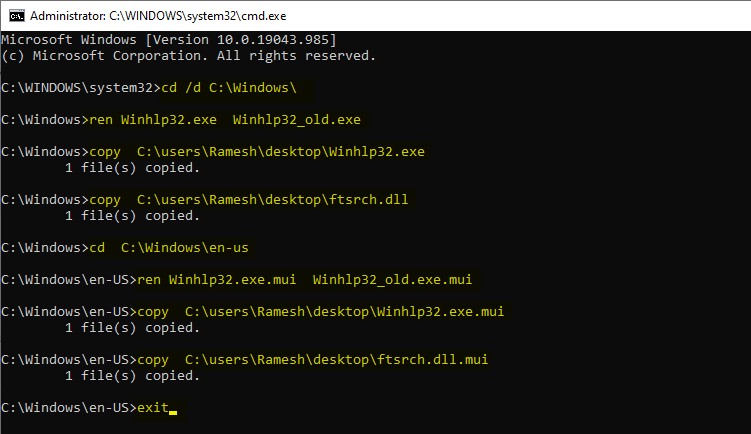
- In the Command Prompt window, run these commands:
cd /d C:\Windows\
ren Winhlp32.exe  Winhlp32_old.exe
copy  C:\users\Ramesh\desktop\Winhlp32.exe
copy  C:\users\Ramesh\desktop\ftsrch.dll
cd  C:\Windows\en-us
ren Winhlp32.exe.mui  Winhlp32_old.exe.mui
copy  C:\users\Ramesh\desktop\Winhlp32.exe.mui
copy  C:\users\Ramesh\desktop\ftsrch.dll.mui
exit
Note: Replace the desktop folder path accordingly in the command-line. Don’t use environment variables like
%userprofile%because the Command Prompt window is currently running under TrustedInstaller privileges.That’s it. We’ve replaced the default Winhlp32.exe with the Windows 8 version of the file.
You should be able to open .hlp files by double-clicking on them or by pressing F1 (contextual help) from the respective application.
If the user gives focus to a button, object, or a field for which custom help has been defined in that application, and then presses F1, the custom Help for that object is displayed. If no help is defined for that object, then it opens the most relevant page in the .hlp file, so that the user doesn’t have to read the entire help documentation. This is called context-sensitive help.
The full-text search feature (“Find” tab in the “Find Topics” dialog) will work as well.
Method 2: Without replacing the default Winhlp32.exe file
This method doesn’t replace the original Winhlp32.exe. Instead, we copy the older version of the file in a different name and then associate .hlp files with it.
The advantage of this method is that you don’t need to re-do the procedure after installing every Windows 10 Feature Update. A disadvantage is that you can’t use the F1 key in your applications to open the contextual help. It’s because your application won’t be able to find the renamed copy of Winhlp32.exe. Double-clicking on .hlp files will open the file, though.
- Rename them to
Winhlp32_legacy.exe&Winhlp32_legacy.exe.muirespectively. - Move the file
Winhlp32_legacy.exetoC:\Windows - Move
Winhlp32_legacy.exe.muitoC:\windows\en-US(
en-USis for English language OS. Likewise, for Italian language OS, you’d copy the .mui file toC:\windows\en-IT, and so forth. To view the complete list of Locale IDs or LCIDs, visit the LCID (Locale ID) | Microsoft Docs webpage)Note: As Windows 10 and 11 already contain the Winhlp32.exe and Winhlp32.exe.mui placeholder files, we don’t want to delete or rename the factory default versions to replace them with the legacy copies.
Some users tend to take ownership of the original Winhlp32.exe file and delete it before replacing it with the legacy copy. Doing so might cause the Windows File Protection to restore the originals at a later stage automatically.
Here is a sample System File Checker (
Sfc.exe) CBS log showing that the Windows File Protection has restored the factory-default versions of the files from the component store (WinSxS)Info CSI 00005d95 [SR] Repairing corrupted file [l:20 ml:21]"\??\C:\WINDOWS\en-US"\[l:16]"winhlp32.exe.mui" from store Info CSI 00005dd4 [SR] Repairing corrupted file [l:14 ml:15]"\??\C:\WINDOWS"\[l:12]"winhlp32.exe" from store
So, we need to avoid deleting or renaming the factory default version of Winhlp32.exe and the corresponding .mui file. That’s why we changed the file names by suffixing
_legacyin Step 6 above.
Search feature in .hlp files
- If you need the full-text search feature (“Find” tab) in .hlp files, copy these two files as well:
ftsrch.dll(copy it to C:\Windows)ftsrch.dll.mui(copy it to C:\Windows\en-us)
ftsrch.dllis the Microsoft Full-Text Search module. If the “Find” tab is missing when you open a .hlp file, it means thatftsrch.dllis missing in the computer.If you receive the “Unable to display the Find tab. (177)” error, you can fix the issue by deleting .FTS, .GID, and .CNT files in the
%LOCALAPPDATA%\Helpand/or%SYSTEMROOT%\Helpdirectory. The .GID and .CNT files may be found in the same directory as the .hlp file.
Associate .hlp files with legacy Winhlp32 (legacy version)
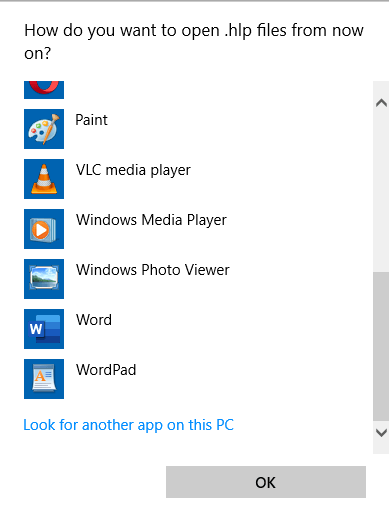
The next step is to associate WinHelp .hlp files with Winhlp32_legacy.exe. Follow these steps:
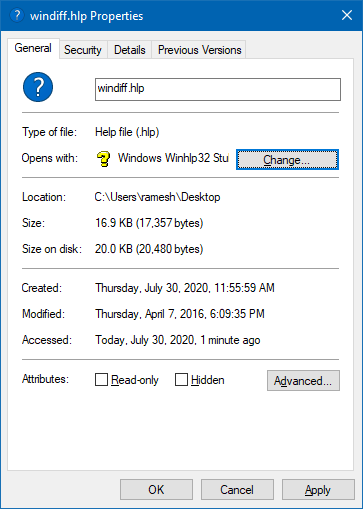
- Locate a .hlp file on your computer, right-click on the file and choose Properties.
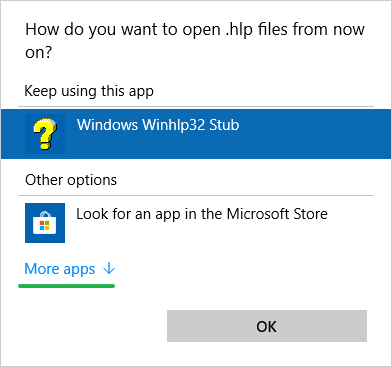
- Click on the Change button.
- Click More apps
- Click Look for another app on this PC.
- Locate
C:\Windows\Winhlp32_legacy.exein the browse dialog and select it.
You’ve now associated .hlp files with the legacy (Windows 
Why was WinHlp32 discontinued by Microsoft?
Around March 2006, the Microsoft Help team announced that WinHelp would be deprecated (phased out). Ted Dworkin (Director of Windows Support Experience) said this:
“WinHelp does not meet the code standards established for Vista. These standards include security, reliability, and performance. WinHelp is architected in such a way that we would have to rewrite it from the ground up to meet the Vista code standards. And that approach doesn’t make sense given that we have two other Help systems in Vista.”
Microsoft recommends that software developers discontinue using the Windows Help application and transition their Help experience to an alternative Help file format, such as CHM, HTML, or XML.
(Last updated on July 26, 2022)
One small request: If you liked this post, please share this?
One «tiny» share from you would seriously help a lot with the growth of this blog.
Some great suggestions:
- Pin it!
- Share it to your favorite blog + Facebook, Reddit
- Tweet it!
So thank you so much for your support. It won’t take more than 10 seconds of your time. The share buttons are right below. 
WinHlp32 and Windows 10
(Translated to English from the German version. All research has been done by Horst Schmidt, therefore thank him, not me. I simply translated it.)
Windows 10 includes only a stub WinHlp32.exe file, the size of a few kilobytes, which redirects to a Microsoft webpage. It links to several WinHlp32 installer, the most up to date being the one for Windows 8.1. Trying to use any of the installers listed there leads to a message that the installer can’t be used for Windows 10.
For that reason, if you want/must use WinHlp on Windows 10, a manual installation is required. Below is a guide how to do this for a Windows 10 64 bit system. If you need to do this for a 32 bit system, use the files in the x86_microsoft-windows… folders instead of the amd64_microsoft-windows… folders described below.
Before we start, a word of warning, though: *.hlp files can call any API/exported method from any DLL. Thus they’re able to e.g. download files from the internet or send any data over the internet, circumventing any security measures web browsers have implemented. Microsoft also doesn’t fix any security holes in WinHlp32 any longer. All of this means that following the below procedure poses a security risk to the system you apply to. Please make sure you understand these risks before going on!
-
Log into your machine with an account that has administrative privilegues.
-
Download the file Windows8.1-KB917607-x64.msu (KB917607) to a folder of your choice, e.g.
WinHlp. We use this and the following folder names as examples further on. If you name your folders differently, make sure to replace them in the below commands accordingly. Since this keeps resetting with every bianual Windows update, it is a good idea to store it in a permanent location. -
Create a (temporary) subfolder in the folder you created above, e.g.
expanded. -
Open a command prompt and and navigate to the
WinHlpfolder. Expand the *.msu file with the commandexpand Windows8.1-KB917607-x64.msu -F:* expandedHere’s what this command does:
expand.exeis a builtin Windows tool, the paramater-F:*tells it to expand all files. The last parameter,expandedis the folder it should put the expanded files. -
At the command prompt, change to the
expandedfolder. Create another folder, e.g.cab. -
Similar to what we’ve already done, we also need to expand all the files from Windows8.1-KB917607-x64.cab:
expand Windows8.1-KB917607-x64.cab -F:* cab -
In order to be able to replace the stub WinHlp32.exe residing in the Windows folder, we first need to take over ownership of the file and then also grant access rights as Administrator:
takeown /f "%WINDIR%\WinHlp32.exe" /a
icacls "%WINDIR%\WinHlp32.exe" /grant *S-1-5-32-544:F
*S-1-5-32-544is the language independent SID user group Administrators. -
Do the same for the language resources of WinHlp32.exe. That’s the tricky part. i suggest doing this for your system’s language and English. I’m on a German Windows 10, so that is:
takeown /f "%WINDIR%\de-DE\WinHlp32.exe.mui" /a
takeown /f "%WINDIR%\en-US\WinHlp32.exe.mui" /a
takeown /f "%WINDIR%\System32\de-DE\ftsrch.dll.mui" /a
icacls "%WINDIR%\de-DE\WinHlp32.exe.mui" /grant *S-1-5-32-544:F
icacls "%WINDIR%\en-US\WinHlp32.exe.mui" /grant *S-1-5-32-544:F
icacls "%WINDIR%\System32\de-DE\ftsrch.dll.mui" /grant *S-1-5-32-544:F
(Copy the below line to execute all commands at once)
takeown /f "%WINDIR%\de-DE\WinHlp32.exe.mui" /a & takeown /f "%WINDIR%\en-US\WinHlp32.exe.mui" /a & takeown /f "%WINDIR%\System32\de-DE\ftsrch.dll.mui" /a & icacls "%WINDIR%\de-DE\WinHlp32.exe.mui" /grant *S-1-5-32-544:F & icacls "%WINDIR%\en-US\WinHlp32.exe.mui" /grant *S-1-5-32-544:F & icacls "%WINDIR%\System32\de-DE\ftsrch.dll.mui" /grant *S-1-5-32-544:F
You may receive an error message stating that a file doesn’t exist. Don’t worry — if it doesn’t exist, this procedure is moot anyway.
-
Search for WinHlp32.exe in the folders within the folder
cab. You’ll find two copies of it in the «none» (see below) folders. For a 64 bit system the one in the amd64_microsoft-windows-… folder is the relevant one.Copy this file to the Windows directory.
-
Copy the DLLs in the same folder as WinHlp32.exe to the Windows\System32 directory.
-
Finally we need to copy the language resource files (*.mui) to their respective folders. These are located in the respective amd64_microsoft-windows-… language folder (see below).
The relevant ones for my system are de-de and en-us. Copy each winhlp32.exe.mui to the respective folder in the Windows directory, e.g. winhlp32.exe.mui from the amd64_microsoft-windows-…de-de… folder goes to Windows\de-DE, winhlp32.exe.mui from amd64_microsoft-windows-…en-us… to Windows\en-US.
-
Do the same for the ftsrch.dll.mui files, but make sure to copy those to the language folders in Windows\System32, e.g. Windows\System32\de-DE.
That’s it! You now should be able to open these old *.hlp files again.
Translated from this original German version.
Fast fix
- Download Winhlp32.exe_for_Windows_10.zip
- Extract
- Install_Windows_10.cmd
- Right-click -> Run as Administrator
- Make sure to also try Iris mini or Iris – the best software for eye protection 🙂
The Story
So I’m playing with the Kepler software for Astrology charts and it needs the old Windows Help program.
Spend several days searching for this thing on the internet.
- winhlp32-windows-7-x86-x64-komeil.cab
- Winhlp32.exe
- How to open .hlp files with WinHlp32.exe on Windows 10?
- Windows Help Program (WinHlp32.exe) for Windows 8.1 and Windows 7 x64 and x86
You probably may find this article if the program opens this:
- Error opening Help in Windows-based programs: “Feature not included” or “Help not supported”
- https://support.microsoft.com/en-us/topic/error-opening-help-in-windows-based-programs-feature-not-included-or-help-not-supported-3c841463-d67c-6062-0ee7-1a149da3973b
And any of these files doesn’t work:
- 4013443 WinHlp32.exe for x86-based versions of Windows 8.1
- 4013443 WinHlp32.exe for x64-based versions of Windows 8.1
- 4013443 WinHlp32.exe for Windows 8
- 4013443 WinHlp32.exe for Windows 7
- 4013443 WinHlp32.exe for Windows Server 2008
- 4013443 WinHlp32.exe for Windows Server 2008 R2
-
4013443 WinHlp32.exe for Windows Vista
The good guy here had the .cab file once upon a time but now the link is dead:
- http://www.komeil.com/blog/windows-help-program-winhelp-winhlp32-exe
- https://www.sevenforums.com/software/10668-winhlp32-exe-4.html
And the good guy here had a workaround for Windows 10:
- https://answers.microsoft.com/en-us/insider/forum/all/winhlp32-do-we-have-to-go-through-this-again/ddcc2f40-e4f3-407b-9672-ee8a2b08a71e
- set WindowsVersion=7
- goto :BypassVersionError
Finally, I found the file here:
- https://www.thefreewindows.com/4110/view-older-files-windows-7-download-winhlp32exe/
But was not sure how much this website will be up and running.
So the good guy, the creator of the most awesome-super-giga-top-best software in the world Iris made you a package 😀
- Download Winhlp32.exe_for_Windows_10.zip
No related posts.
Posted November 21, 2021 · Last modified March 23rd, 2023 · 6 Comments
6 thoughts on “Winhlp32.exe for Windows 10”
-
You are my hero! After having applied “Fast fix” I read “The Story”. An obstacle race like mine, but you are evidently the better expert.
I’m setting up a win10pro (if I only had known ;-D) machine (LG Notebook PC 16T90P – if I only had known ;-DDD) full-packed with 20 years old software. I try to avoid VM-software of any vendor. It’s a foible of course …
I’d be glad to hear from you! Thank you once again for your great efforts!-
Welcome 😁💪
-
-
Sir, you are a hero! With your tool at hand, I can read the manuals of the past, and remember how to play, or find tips!
-
Welcome 😁💪
-
-
Hello Daniel,
There are no instructions on how to use the extracted files.
Simply run Install.cmd as a normal user or Admin?
Will this work with Windows 11?
Why do you add the reference to the thefreewindows.com site?
Thanks,
Jacques-
Install_Windows_10.cmd
Right-click -> Run as Administratorthefreewindows.com was where I found the original files
-
Leave a Reply
Skip to content
Due to some security concerns related to now-very-outdated WinHelp files that usually come with .HLP file extension, Microsoft decided to pull the plug and stopped supporting these files in Windows Vista, 7, 8.x and now in Windows 10. Before Windows 10, users had option to download WinHlp32 Viewer (KB917607) from Microsoft’s website and install it on their PC if they needed to view the HLP files. But Windows 10 users have no such luck since Microsoft has decided not to offer any such option for them. And if you try to install the KB917607 hotfix released for Windows 7 or 8.x on your Windows 10 system, then it displays the update incompatibility message.
So what the Windows 10 users are supposed to do? If you really want to access the .HLP files on your Windows 10, then we at TrishTech.com have created a tiny utility that can extract WinHlp32.exe from KB917607 hotfix files for you. First you have to extract the files from this hotfix and then replace the ones from the Windows folder with these files.
Part 1: Extraction of Files
- Visit https://support.microsoft.com/en-us/kb/917607 and download 32-bit WinHlp32.exe hotfix for Windows 8 (32-bit version has “x86” in the file name). If you are having any trouble downloading, try using Firefox web browser instead of Edge or Internet Explorer.
- Download our tool – magic.zip. Extract magic.exe from the downloaded archive.
- Put both magic.exe and the downloaded KB917607 update MSU file (e.g., Windows8-RT-KB917607-x86.msu) in the same folder.
- Double-click on magic.exe and wait a couple of seconds. Now you have WinHlp32.exe and supporting files for your use. You can delete magic.exe if you want. Do not delete the Windows8-RT-KB917607-x86.msu file, it is needed for Part 2.
Part 2: Replacing Files in Windows Folder
- Download replace-winhlp32.zip, extract replace.bat from it and copy it in the same folder where you have extracted the WinHlp32.exe file and other helper files.
- Skip this step if you use English as the Windows interface language. If you are not using English as the default Windows system language, then edit replace.bat and change en-US to your own language in the last line. For example, if you want Russian language, then replace en-US with ru-RU, if you use French then replace with fr-FR and so on.
- Download Process Hacker from https://github.com/processhacker/processhacker/releases. You can download the installer version and install it in your PC. But I personally like the portable (binaries) version which does not need to be installed.
- Launch Process Hacker with elevated privileges (right-click on ProcessHacker.exe and select Run as administrator). Keep it running.
- Double-click on Windows8-RT-KB917607-x86.msu to launch the update. Of course, this update is not for Windows 10 and will fail. Do not close any dialogs or error messages that it shows.
- Quickly switch back to Process Hacker, locate TrustedInstaller.exe in the list of processes, right-click on it and select Miscellaneous → Run as this user from the right-click menu.
- In the program command type cmd.exe and click on the OK button.
- When the command prompt window opens up, change the drive letter and path to the folder where you have extracted WinHlp32.exe and Replace.bat. For example, if you have extracted these files to E:\Helper, then first type E: and press Enter in the command prompt. Then type CD E:\Helper in the command prompt and press Enter.
- Next, type Replace.bat in the command prompt and press Enter. You will see that it is copying and replacing files.
- Close the command prompt window, the Process Hacker window and any other windows opened through these instructions. Now your system is ready for opening .HLP files. Just double-click on any .HLP file and it will be opened in the familiar Windows Help.
While this makes it very easy for you to use the older and very dated help viewer for your Windows 10 PC, you should keep in mind that this viewer could also be vulnerable to all kinds of security risks. This is the main reason Microsoft has dropped the support for such help files. Make sure the .HLP files you open using this WinHlp32.exe viewer come from trustworthy and reliable sources.
We use cookies on our website to give you the most relevant experience by remembering your preferences and repeat visits. By clicking “Accept”, you consent to the use of ALL the cookies.


