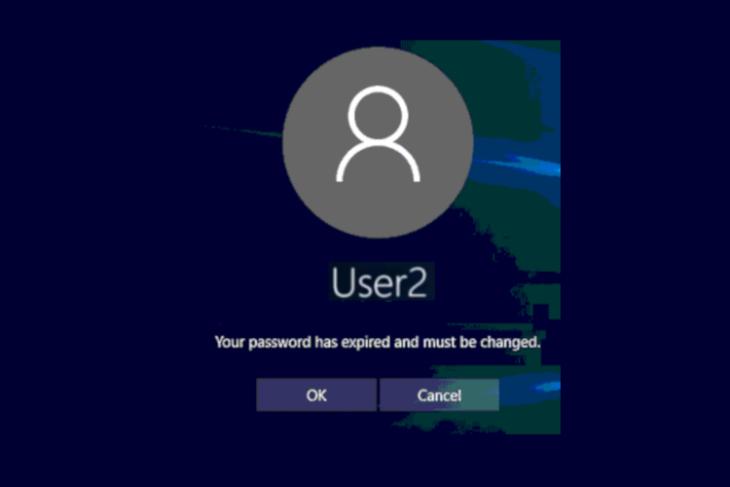
 Некоторые пользователи Windows 11 и Windows 10 при входе в систему могут столкнуться с сообщением «Пароль просрочен и должен быть заменен», а за несколько дней до этого — с уведомлением «Рекомендуется изменить ваш пароль» в области уведомлений. В некоторых случаях возможно появление сообщения «Пароль пользователя необходимо изменить перед входом в систему».
Если вам не хочется каждый раз менять пароль, а речь идёт о вашем личном компьютере, вы можете убрать ограничение на его срок действия. В этой инструкции подробно о способах отключить срок действия пароля в Windows 11 и Windows 10 и дополнительная информация, которая может оказаться полезной.
Изменение просроченного пароля

При отсутствии других учетных записей, прежде чем выполнять какие-либо действия по отмене срока действия паролей, вам придётся его изменить. Необходимо выполнить следующие простые и очевидные шаги:
- Нажмите клавишу «Ок» в окне «Пароль просрочен и должен быть заменен».
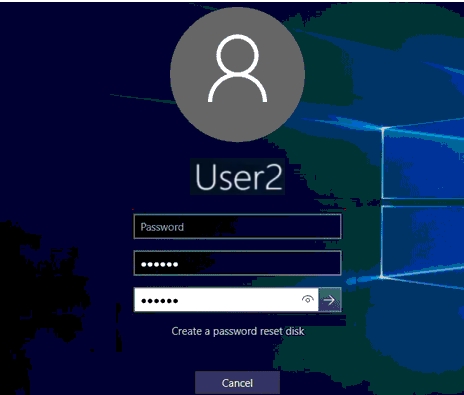
- Введите новый пароль и его подтверждение.

- Войдите в систему с новым паролем, нажав по значку с изображением «стрелки» справа в поле подтверждения пароля.

Теперь можно приступать к отключению срока действия пароля, чтобы в дальнейшем его изменение не потребовалось. Учитывайте: все действия требуют прав администратора и, если обязательная смена пароля требуется на компьютере организации, а не личном ПК или ноутбуке, у вас может не быть возможности что-то сделать, не привлекая системного администратора.
Отключение срока действия пароля в командной строке
Возможно, самый простой и быстрый метод отключения срока действия пароля для всех учетных записей — использование командной строки:
- Запустите командную строку от имени администратора (как это сделать).
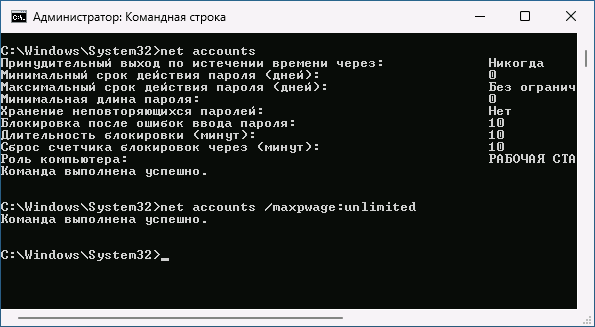
- Введите команду net accounts и нажмите Enter. В результате вы сможете увидеть текущий максимальный срок действия пароля в днях. Если он отличается от 0, это говорит об установленных ограничениях, которые можно отменить следующей командой.
- Введите команду
net accounts /maxpwage:unlimited
и нажмите Enter.

- Если команда была выполнена успешно, максимальный срок действия пароля будет установлен на 0, а сообщения о просроченном пароле в будущем не должны появиться.
Отключение срока действия пароля для учётной записи
Второй метод — установить неограниченный срок действия пароля для конкретной учетной записи пользователя:
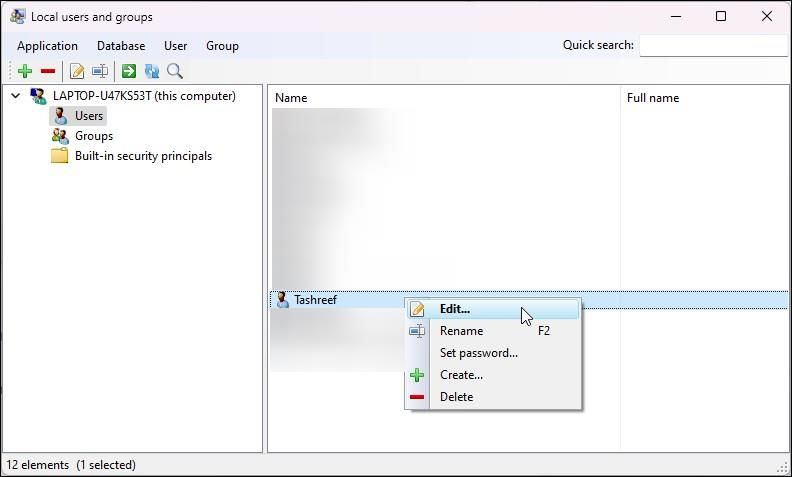
- Нажмите правой кнопкой мыши по кнопке «Пуск», выберите пункт «Выполнить», введите lusrmgr.msc и нажмите Enter.
- В открывшемся окне «Локальные пользователи и группы» откройте раздел «Пользователи», нажмите правой кнопкой мыши по вашему имени пользователя, откройте пункт «Свойства».

- Установите отметку «Срок действия пароля не ограничен» и примените сделанные настройки.


В результате для выбранного пользователя не будут применяться ограничения на срок действия пароля.
Локальная политики безопасности
Ещё один метод отменить ограничения срока действия пароля — использовать политики безопасности, для этого:
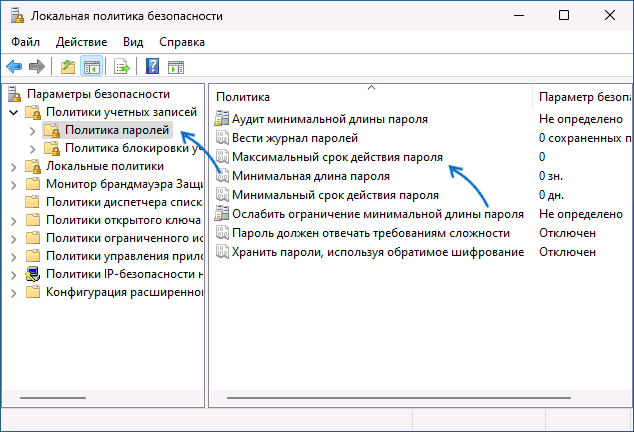
- Нажмите клавиши Win+R на клавиатуре, введите secpol.msc и нажмите Enter.
- Перейдите к разделу «Политики учетных записей» — «Политика паролей».
- Дважды нажмите по параметру «Максимальный срок действия пароля».

- Установите значение срока действия равным 0, что означает без ограничения срока действия.

- Примените сделанные настройки.

В дальнейшем сообщения о просроченном пароле появляться не будут.
Пара дополнительных нюансов, которые могут оказаться полезными в контексте рассматриваемой темы:
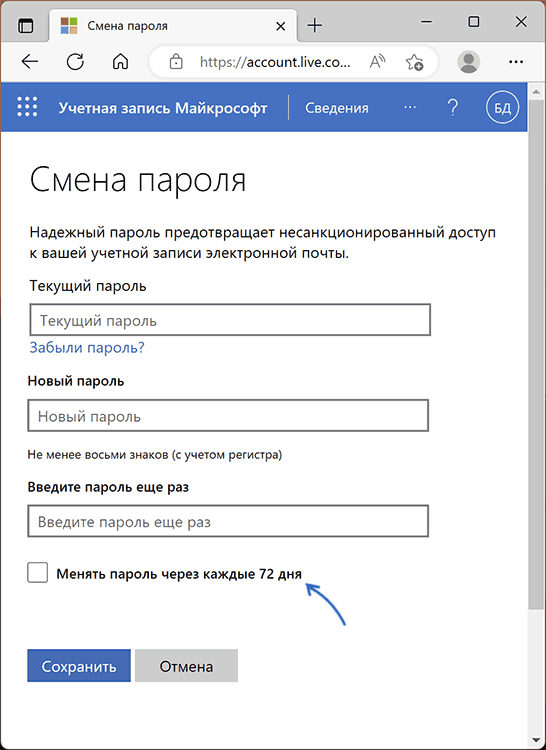
- Для учетных записей Майкрософт ограничение срока действия пароля задается на сайте https://account.microsoft.com/ в разделе «Безопасность» — «Смена пароля». Если вы хотите отключить обязательную смену пароля каждые 72 дня, зайдите в этот раздел и снимите соответствующую отметку.

- Если вы не имеете возможности отключить ограничение срока действия пароля (например, из-за отсутствия прав администратора на компьютере), по крайней мере, вы имеете возможность отключить уведомления о необходимости скорой его смены, нажав по трем точкам в всплывающем уведомлении и выбрав пункт «Отключить все уведомления Напоминание входа в Windows».
If you want to enhance your Windows account and PC’s security, you should make your passwords expire occasionally. Here’s how to turn it on.
The password expiration feature on Windows lets you set a maximum password expiration age for user accounts on your PC. By default, this feature is disabled for all users and is only available for Pro, Education, and Enterprise editions of Windows 10 and 11.
You can set password expiration for both local users and Microsoft accounts. However, the steps to do this vary for both account types. So, these are the three ways you can enable or disable password expiration on your Windows accounts.
1. Set or Remove Password Expiration for a Microsoft Account
You can set password expiration for your Microsoft account online. To do this, you’ll need to access the Microsoft account Security section and enable the Make me change my password every 72 days option.
Once enabled, your current Microsoft account password will expire after 72 days and requires you to change it to access any Microsoft service associated with the account. Note that you must change and set a new password to enable password expiration. Without it, you’ll be unable to use this feature.
To enable password expiration for Microsoft account:
- Go to the Microsoft Security page, and log in with your account username and password to access the page.
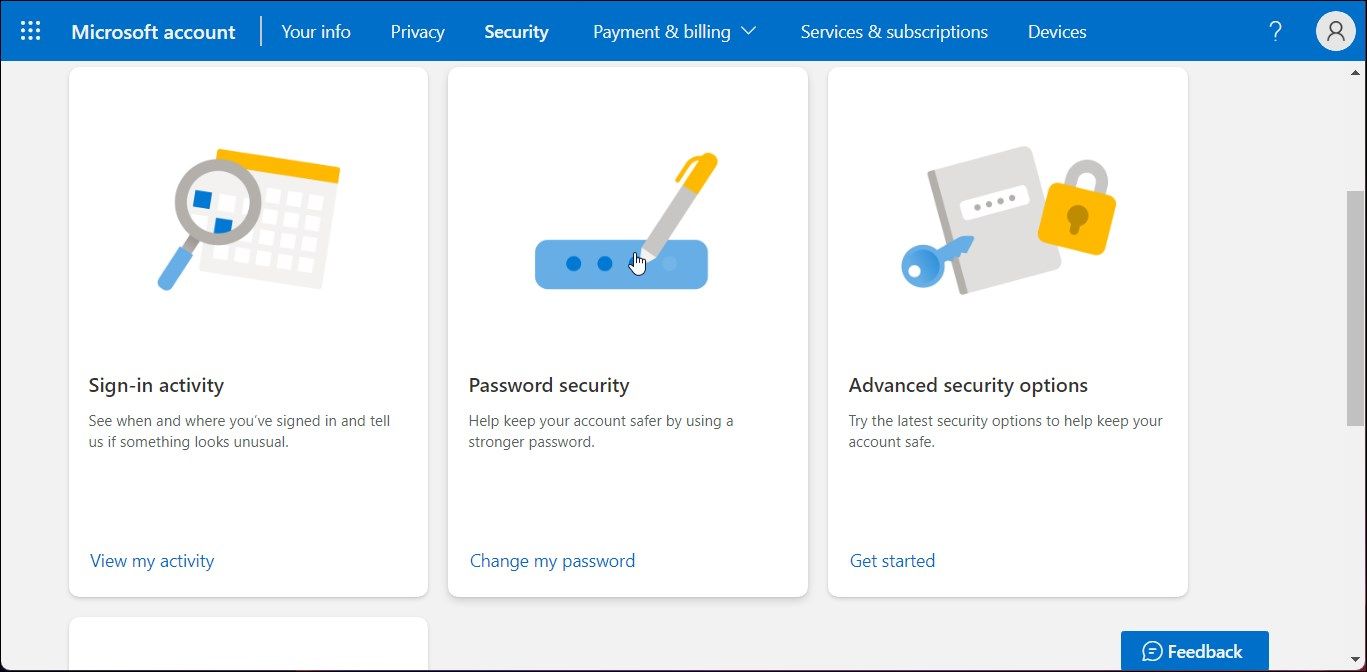
- Next, click on Password security to open the password change page.

- Next, enter your current password.
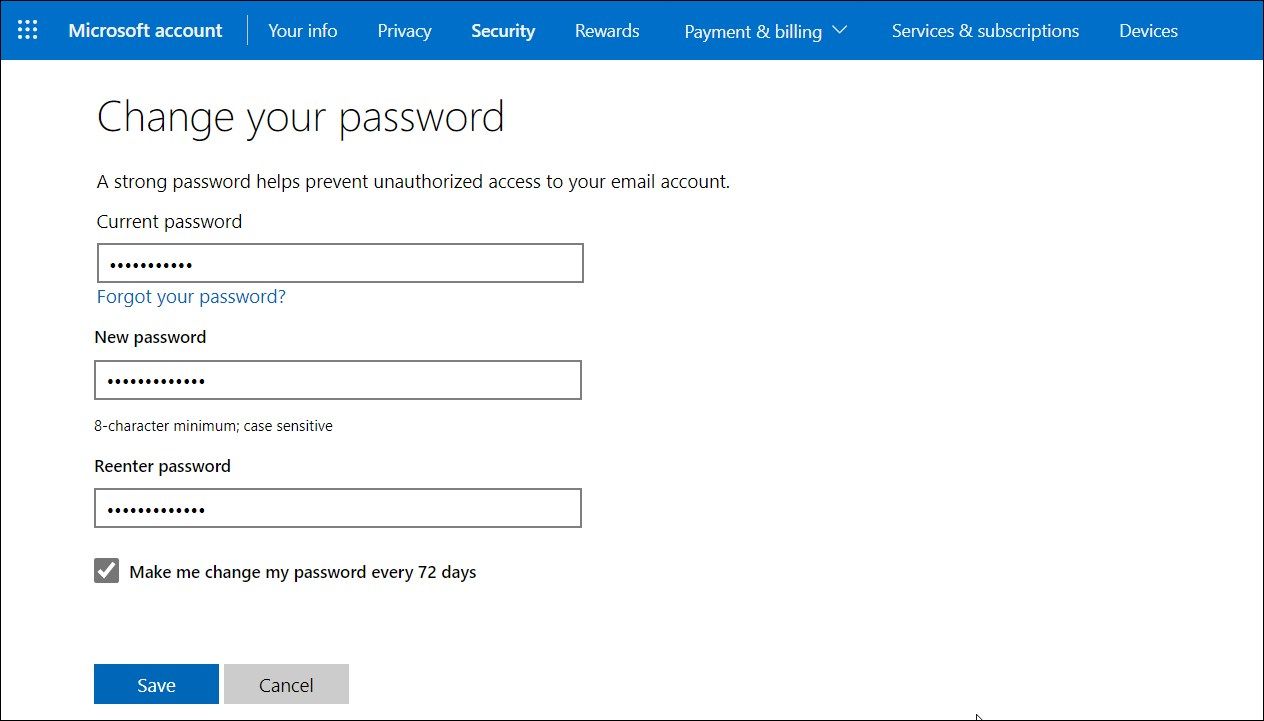
- Next, enter your new password and confirm the same in the Reenter password field.
- Lastly, check the Make me change my password every 72 days option.

- Click Save to save the changes and enable password expiration for your Microsoft account.
If you need to disable the password expiration for your Microsoft account:
- Go to Microsoft account online > Security > Change password.
- Here, fill in the details for your new password and uncheck the Make me change my password every 72 days option.
- Click Save to apply the changes.
2. Enable Password Expiration for Local User Accounts via Local Users and Groups
Local Users and Groups is a Windows administrator tool that allows you to manage individual and multiple computers over a network. Windows 11 Pro, Education, and Enterprise edition users can use this tool to enable password expiration for local user accounts. Here’s how to do it.
- Press Win + R to open Run.
- Type lusrmgr.msc and click OK to open Local Users and Groups snap-in.
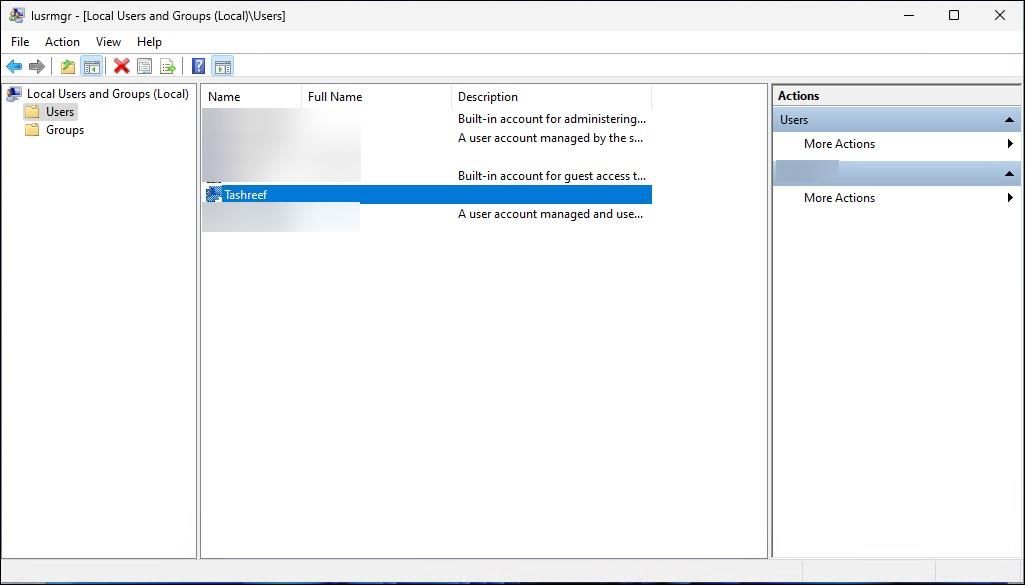
- Click on the User folder in the left pane.

- Next, double-click on your user local user account to set password expiration.

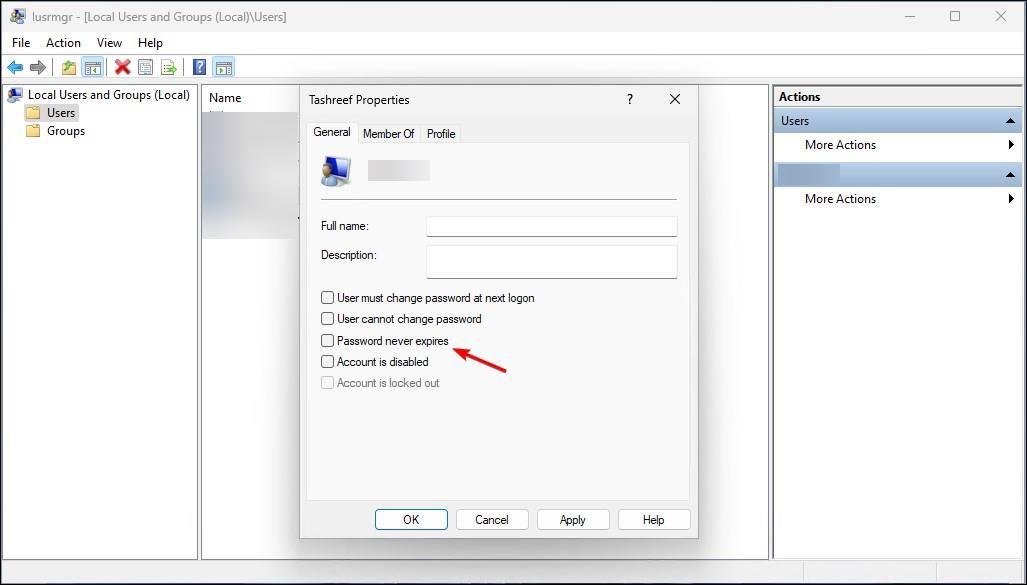
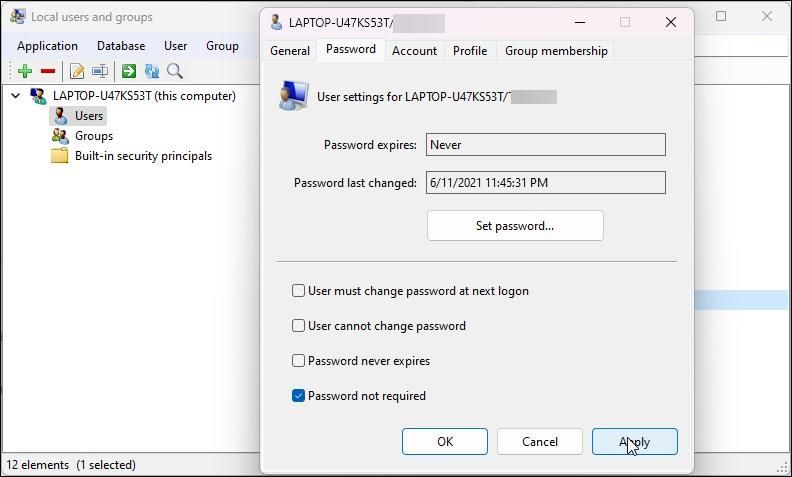
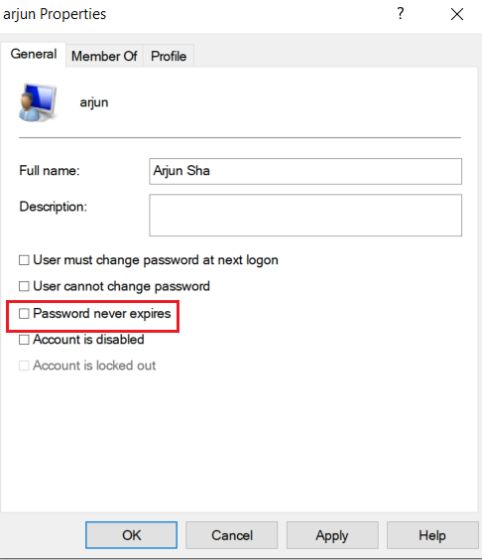
- In the Properties dialog, uncheck the Password never expire option to enable password expiration.
- Click OK to save the changes.
If you are running the Home edition of the OS, you enable Local Users and Groups Management on Windows 11 Home before you can use this method. Once you’ve enabled Local Users and Groups Management, follow the steps below to activate password expiration.
- Run the lusrmgr.exe app.
- Select the Users option in the left pane.

- Next, double-click on the user account name to open its properties.
- Open the Password tab.
- Uncheck the Password never expires option.
- Click Apply and OK to save the changes.
By default, Windows will ask you to change your password after 42 days. That said, you can also customize the password expiration age using Command Prompt and Group Policy Editor as per your preference.
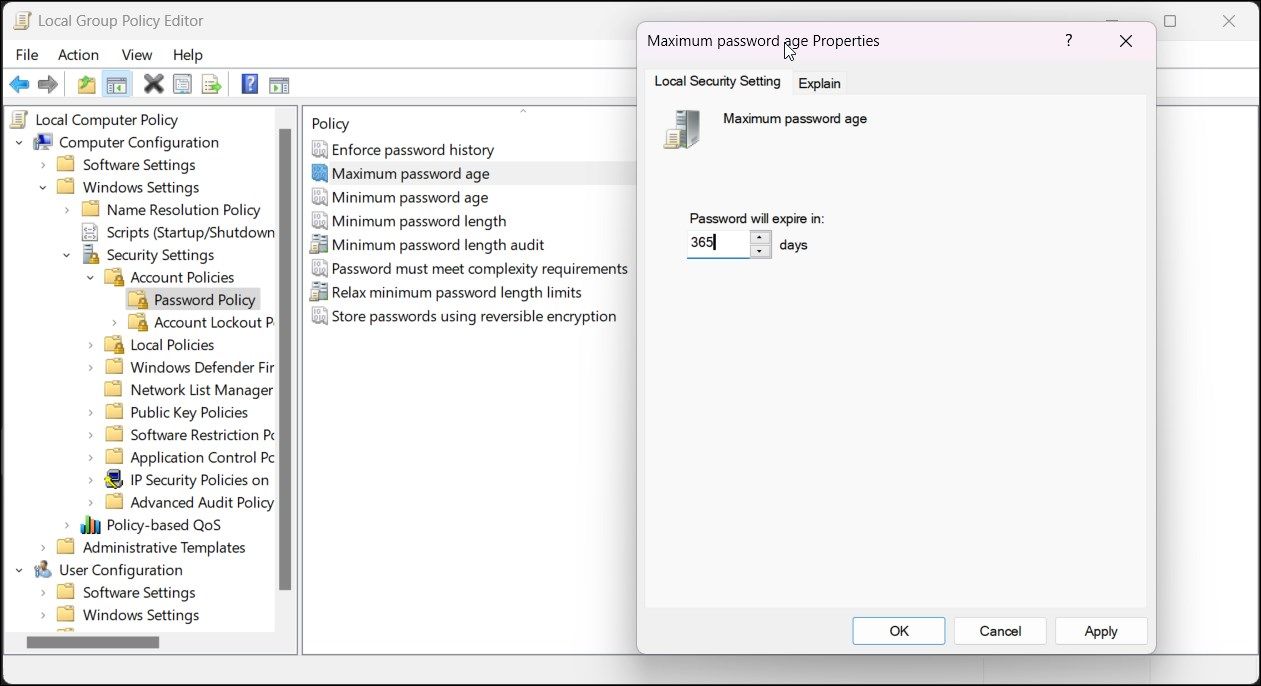
How to Set Maximum Password Age Using Group Policy Editor
You can use the Group Policy Editor to set the maximum password age for the Password Policy. While the default password expiration is 42 days, you can reduce or increase it to meet your requirements.
Note that Group Policy Editor is part of Windows 11 and Windows 10 Pro, Education, and Enterprise Editions. If you use the Home Edition of Windows, you need to follow our guide to learn how to access the Group Policy Editor on Windows Home.
Once you’ve opened the Group Policy Editor, follow these steps to set a password expiration time for your local user account:
- Press Win + R to open Run.
- Type gpedit.msc and click OK to open Group Policy Editor.
- In Group Policy Editor, navigate to the following location:
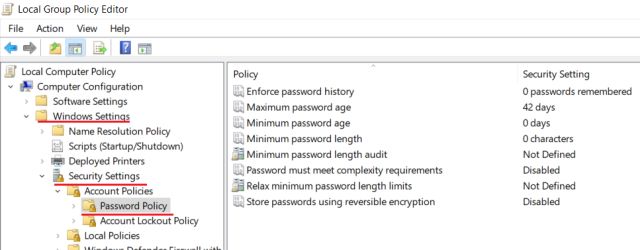
Computer Configuration > Windows Settings > Security Settings > Account Policies > Password Policy - In the right pane, right-click on the Maximum password age policy and select Properties.

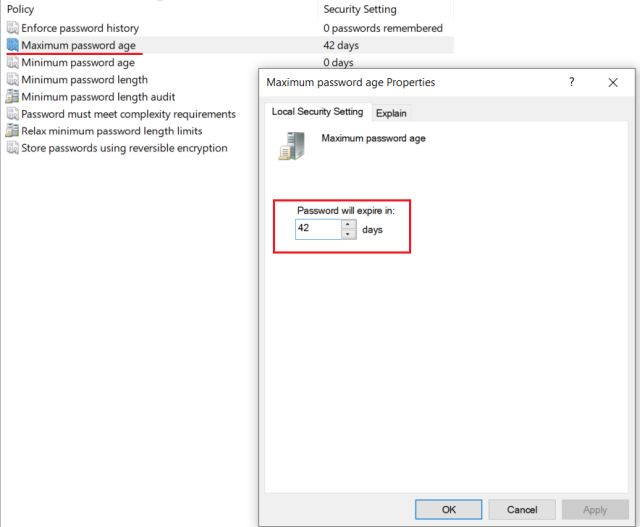
- In the Properties dialog, you’ll see 42 days as the expiry time. Change the expiry days to your preferred length—you can set it up to 999 days.
- Click Apply and OK to save the changes.

Windows will prompt you to change the password for your local user account after a set number of days.
3. Enable and Disable Password Expiration for Local User Accounts Using Command Prompt
If you need to make frequent changes to the password expiration date manually, you can use the WMI command-line (WMIC) command in Command Prompt to enable and disable password expiration for the local user account. Here’s how to do it.
- Press the Win key and type cmd.
- From the search result, right-click on Command Prompt and select Run as administrator.
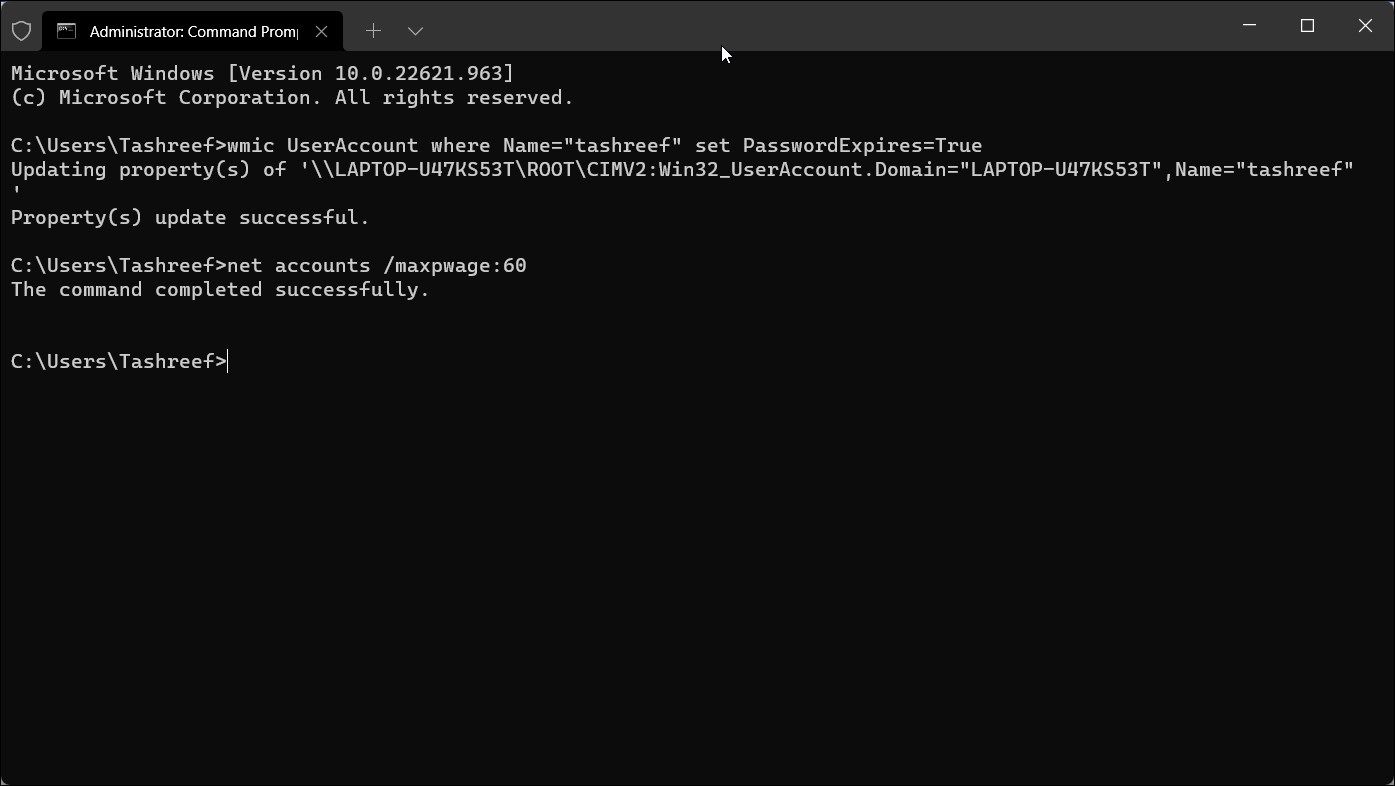
- In the Command Prompt window, type the following command to enable password expiration for the specified local user account:
wmic UserAccount where Name="user account name" set PasswordExpires=True - In the above command, replace user account name with the user account name you want to set password expiration for.
- Next, to set the maximum password expiration age, use the following command:
net accounts /maxpwage:## - In the above command, replace ## with the length of days you want to set before the password expires.
- To disable the password, use the following command:
wmic UserAccount where Name="user account name" set PasswordExpires=false - If you need to disable password expiration for all the local user accounts, use the following command instead:
wmic UserAccount set PasswordExpires=False - Once done, type exit and press Enter to close Command Prompt.
Set Password Expiration Date for Better Security
The Microsoft-recommended best practice for maximum password age is between 30 and 90 days. Although it’s not the most effective solution against threat actors, it should still protect you if someone tries to intercept or guess your old password and gain access to your computer.

If you want to increase your password security on Windows 11, you could set a regular expiration date for passwords. This guide explains how.
Do you want to keep your Windows 11 PC secure from hackers and unauthorized users? One way to do that is to enable password expiration for your account.
Depending on your settings, this feature will force you to change your password every few days or weeks. This will prevent anyone from guessing or cracking your password over time. It’ll also reduce the risk that your password will be leaked in a data breach, as you’ll regularly be switching to a new (and hopefully stronger) password.
We’ll show you how to turn on password expiration in Windows 11, why you should do it, and how to disable it if you don’t want it below.
Why You Should Enable Password Expiration in Windows 11
Password expiration is a security feature that makes your password expire after a certain period of time. When your password expires, you must create a new one the next time you sign in.
This can help you improve your PC’s security in several ways:
- Password expiration helps to prevent unauthorized changes to your system settings or personal data by someone who has access to your PC.
- It protects your PC from hackers who might compromise your password, especially if your account is inactive or expired.
- It safeguards your privacy by making your password harder to crack, especially if you use the same password for multiple accounts.
By default, Windows 11 sets a maximum password age of 42 days for local accounts and 72 days for Microsoft accounts.
How to Enable Password Expiration for Local Accounts in Windows 11
If you use a local account on your Windows 11 PC, you can enable password expiration using the Local Users and Groups snap-in management tool.
Check your user account type before proceeding, as you’ll need administrator privileges to set a password expiration date. If you use a Microsoft account to sign in to your Windows 11 PC, skip to the next section.
To enable password expiration for local Windows 11 accounts:
- Right-click the Start menu and select Run (or press the Windows key + R on your keyboard).

- In the Run box, type: lusrmgr.msc and click OK to open the Local Users and Groups snap-in control panel.

- In Local Users and Groups, select the Users folder on the left.
- Next, double-click on your local user account on the right to set password expiration.

- In the General tab, uncheck the box that says Password never expires and click OK.

- Sign out of your account or restart your PC for the changes to take effect.


Your local account password should expire after the specified number of days—42 days by default. After the password expires, you must set a new password when you next sign in.
How to Enable Password Expiration for Microsoft Accounts in Windows 11
If you use a Microsoft account on your Windows 11 PC, you can enable password expiration online through the Microsoft Security page.
To set a password expiration date for a Microsoft account on Windows 11;
- Visit the Microsoft Security page in your web browser. When prompted, sign in with your Microsoft account details.
- Next, click Password security under Security basics. You may be prompted to sign in again at this point.

- You’ll need to change your password to enable this feature, so enter your current password and a new password.
- Check the box that says Make me change my password every 72 days.
- Click Save to confirm the change.


With this setting enabled, your Microsoft account password will expire every 72 days. As with local users, you’ll need to create a new password when you next sign in after the expiration date passes.
If you don’t want to enable password expiration for your account, you can disable it easily using the same methods as above. Just follow these steps:
- For local accounts, check the box that says Password never expires in the Local Users and Groups snap-in.
- For Microsoft accounts, uncheck the box that says Make me change my password every 72 days on the Microsoft Security page.
Disabling Local Password Expiration Using Windows Terminal
Alternatively, you can disable password expiration for all local accounts using Windows Terminal or older Command Prompt tools.
To disable password expiration for local user accounts:
- Right-click the Start menu and select Windows Terminal (Admin) or launch cmd via the Start menu.

- In the Windows Terminal or Command Prompt window, type the following command and press Enter:
wmic UserAccount set PasswordExpires=False

- Once you’ve run this command, restart your PC.


Securing Your Accounts on Windows 11
Password expiration is a useful feature that can help you keep your Windows 11 PC secure from unauthorized users and hackers. By enabling password expiration on Windows 11, you can make it harder for others to crack into your system.
If you’re working on a PC without internet access, you might be tempted to remove your password entirely. This still has risks, however, so you should consider whether better options are available.
For instance, you could set up Windows Hello for sign ins and use biometrics (such as fingerprint or face recognition) instead.
![]()
Not many know this, but Windows 10 has a Password Expiry feature that discontinues your password after a certain number of days. Microsoft believes that periodic password expiration protects the user from unauthorized access. While the feature surely sounds good, but most of the time, it ends up being a hassle to many users. So in this article, we bring you a one-stop guide to fix the “Windows 10 password expired” error once and for all. And in case, you want to customize the number of days for password expiry then you can do that as well. With all that said, let’s now go ahead and learn about the steps.
Resolve Expired Password on Windows 10
1. First of all, if you are getting “Your password has expired and must be changed” error then there is nothing to worry. Just click on the “OK” button and Windows will allow you to change the password then and there. Keep in mind, you will have to enter the old password.
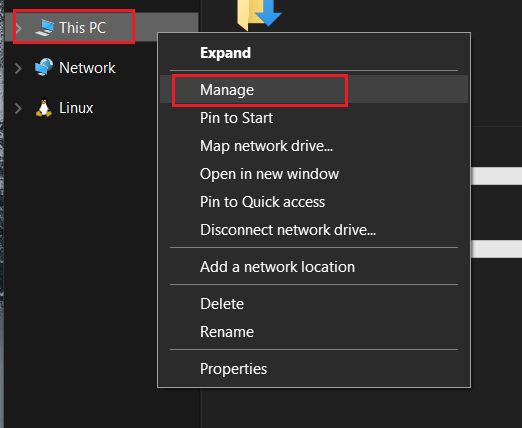
2. Once you are logged in with a new password, now disable the Windows password expiry feature so that it does not occur again. Right-click on “My Computer” or “This PC” and open “Manage”.
3. It will open the Computer Management window. Here, expand the “Local Users and Groups” menu and open “Users”. Now, right-click on your username and open “Properties”.
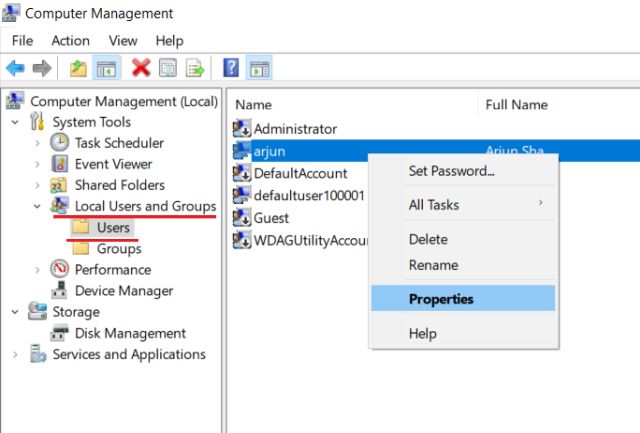
4. Now simply, untick the “Password never expires” checkbox and click on the “OK” button. That’s it. Now onwards, your password on Windows 10 will not expire.
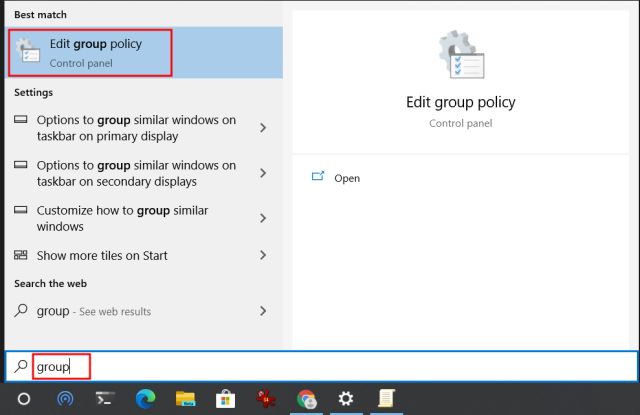
5. In case, you don’t want to outright disable this feature then you can extend the number of days after which the password will expire on Windows 10. Press the Windows key once and type “group” in the search bar. Now open “Edit Group Policy”.
Note: This option is only available to Windows 10 Pro users.
6. Here, navigate to Computer Configuration -> Windows Settings -> Security Settings -> Account Policies -> Password Policy.
7. Now, double-click on “Maximum password age” and increase the number of days according to your preference. After that, click on the “OK” button and you are done.
Fix Your Password has Expired and Must be Changed Error
So that is how you can resolve the password expiry error on Windows 10. The good part is that Windows allows you to change the password if you remember the old password. This ensures that you don’t have to go through any hacky solution. After that, you are free to disable the feature or customize the number of days. In this article, we have mentioned both the methods so you can easily make the changes, according to your preferences. Anyway, that is all from us. If you found this guide helpful then do comment down below and let us know.