A VirtualBox image with the minimum to run a small collection of applications:
— Windows XP x64 SP2
— All updates till 2019
— Activated
— Removed all unused contents
— Set up to work out of the box without further configuration
— Background system optimizer run every 2 weeks
— All Internet connections blocked by default
— Classic XP look and feel
— Remastered background wallpaper
— Optional Vista like Black theme
— Optimised VirtualBox configuration
— Access to host Linux home folder out of the box
— VirtualBox Guest Additions
💬 Contact: Alberto Salvia Novella
This article outlines installing and using Windows XP SP1 x64 Professional on a new virtual machine using Oracle VM VirtualBox 7.0 on a Windows 11 or 10 operating system.
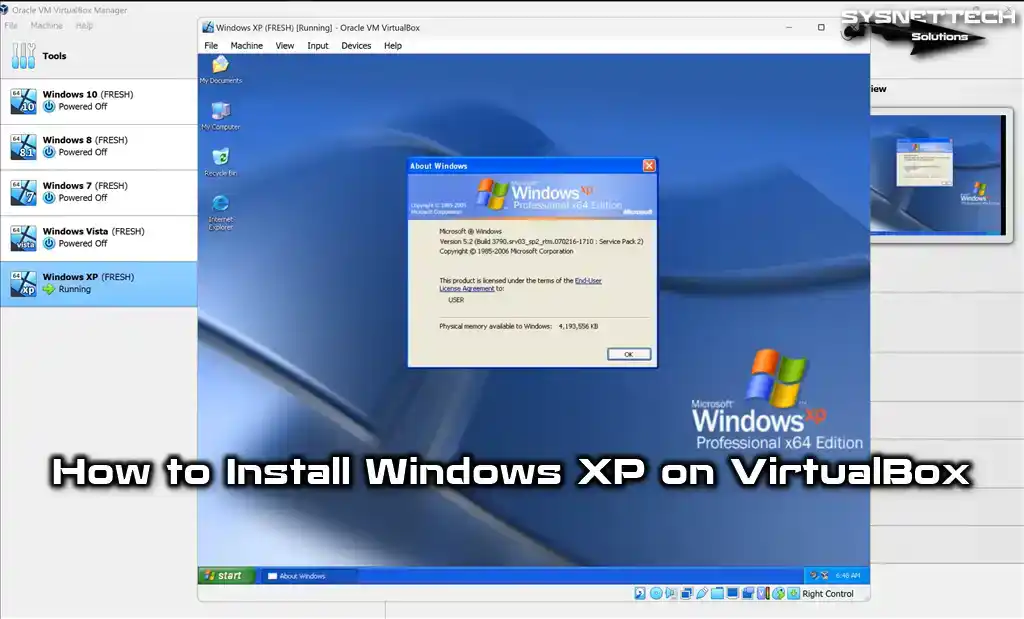
How to Set Up Windows XP x64 SP1 Pro on Windows 10 / 11 using Oracle VM VirtualBox 7
On October 25, 2001, Microsoft developed and launched the Windows XP operating system, emphasizing facilitating its utilization across various devices. These devices form home and business computers, laptops, desktops, media devices, and tablets.
The most significant difference of this operating system type, whose first code name is Whistler, is that it supports 32 Bit and 64 Bit architectures.
By prioritizing performance, stability, and security, Windows XP delivers an optimized user experience. It is the first operating system to have product activation methods to prevent software piracy, which has threatened software developers.
Key features of Windows XP include Internet Explorer 6, Windows Media Player, downgrade/rollback device drivers, remote assistant, advanced firewall, system restore, wireless connectivity, application compatibility mode, and CD Burner.
Although Microsoft ended support for the XP system on April 8, 2014, there are still many people using this system today. This can create a severe vulnerability to both the local and Internet networks. Hence, we advise against installing Windows XP on your host computer instead of Windows 10 or 11.
However, users who want to use and experience Windows XP or play old games can install it on virtual machines. Thus, they can choose a safer way to use XP on an up-to-date operating system.
Before creating a virtual machine on your host, your processor must support the virtualization feature. Without this support, setting up a virtual computer on your host would not be possible. To inspect the virtualization feature of your CPU, you can refer to this article.
How to Create a New Virtual Machine for Windows XP
After installing the Oracle VM VirtualBox virtualization software on your host operating system, you must make the VM settings you will create correctly to use Windows XP without any problems. Creating a VM that matches the hardware capacity of your physical host computer is essential in terms of performance and compatibility.
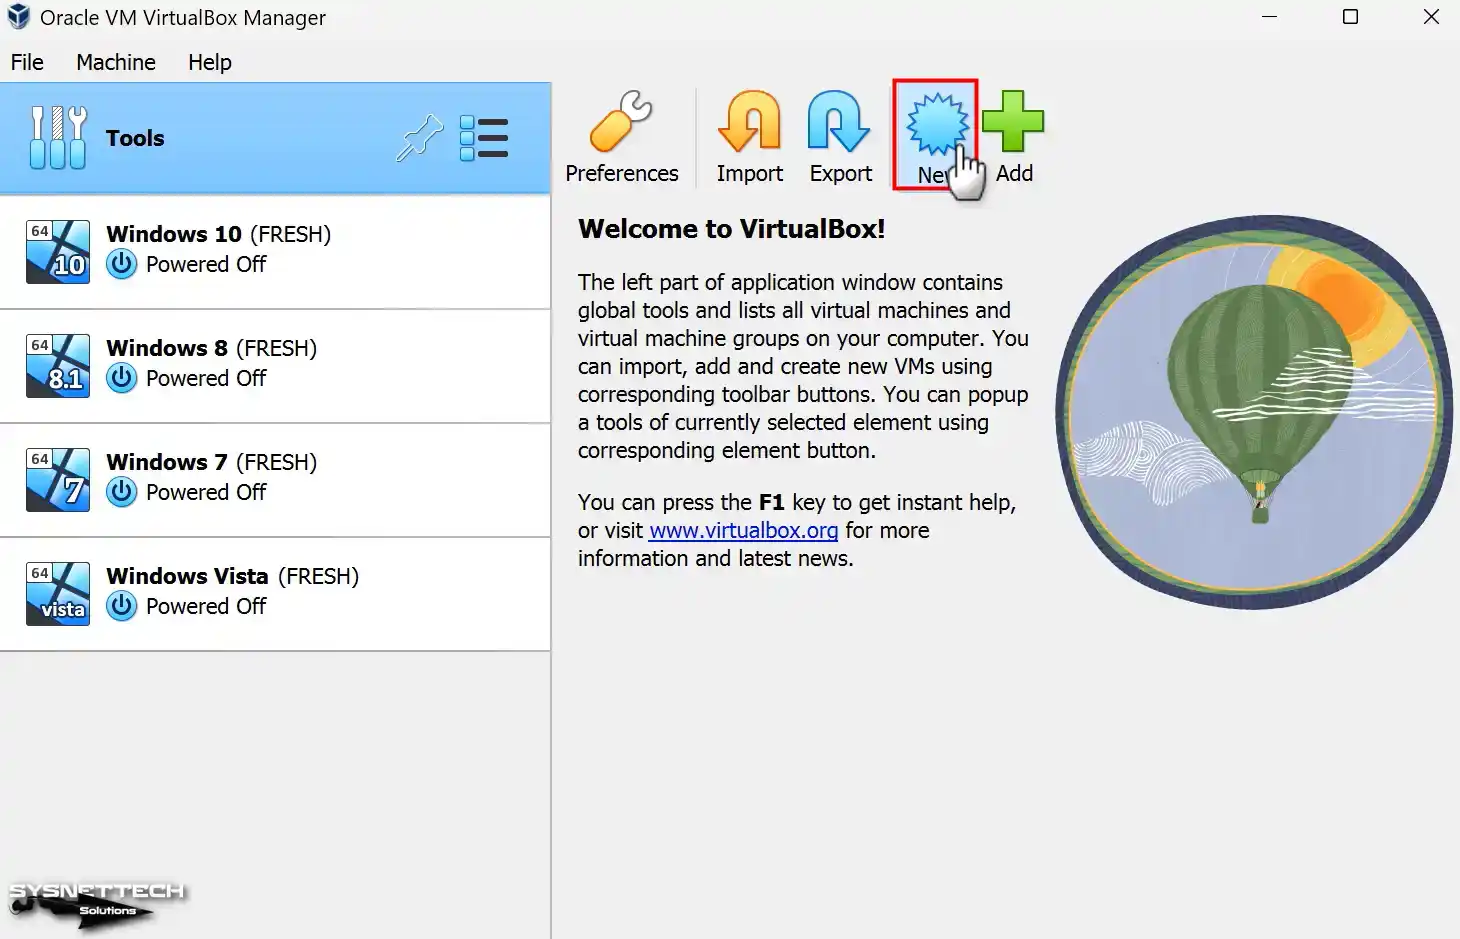
Step 1
Open your Oracle VirtualBox program and open the virtual machine creation wizard from the tool menu on the program’s homepage or the New shortcut.
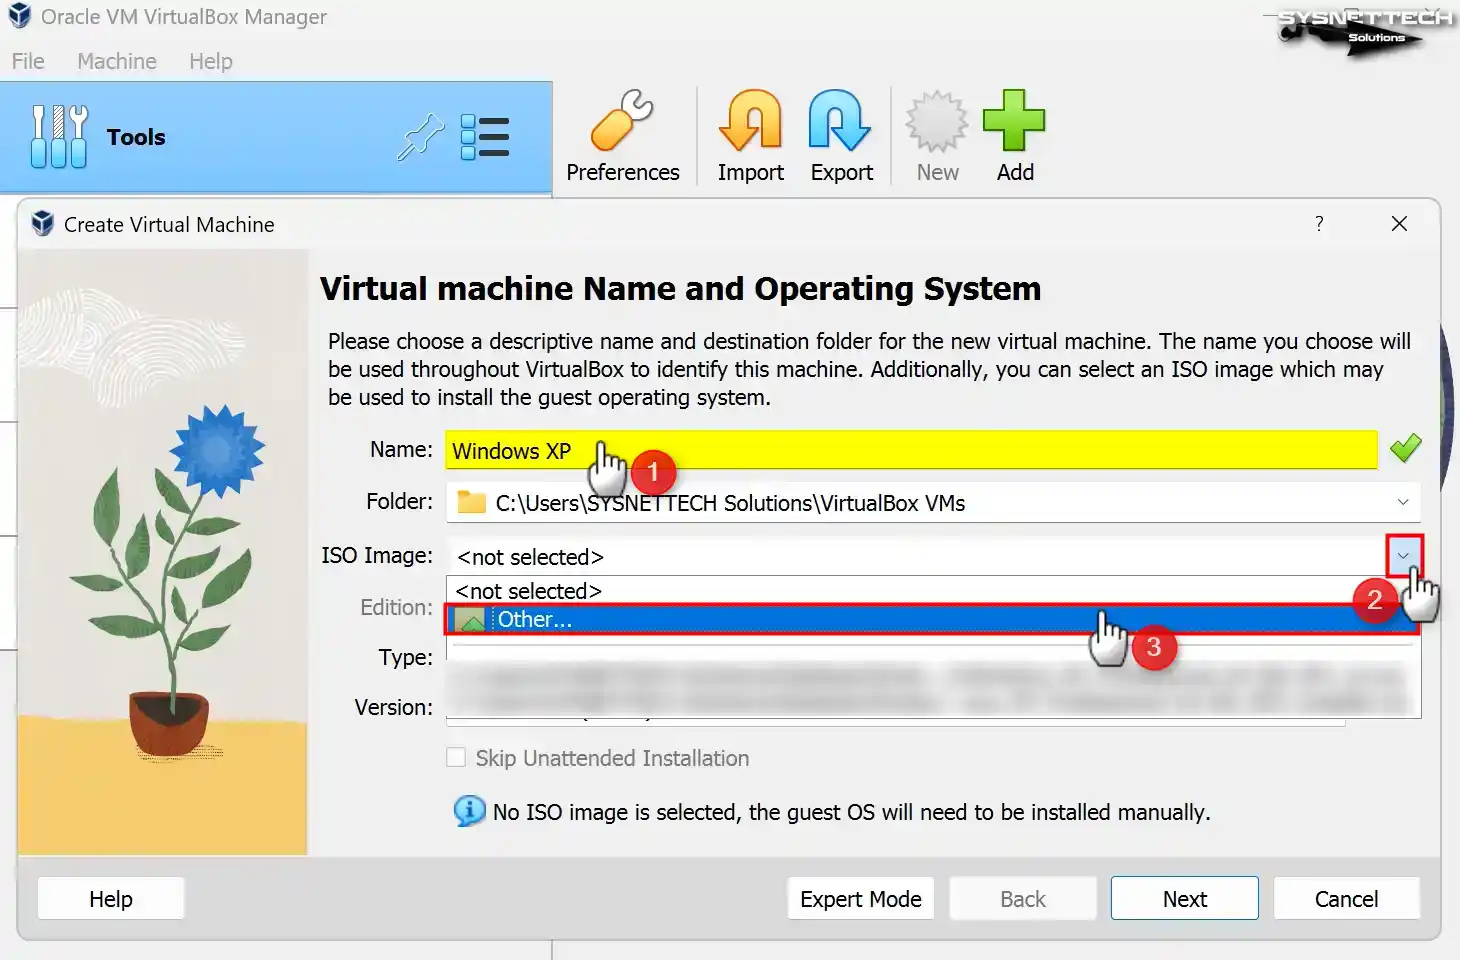
Step 2
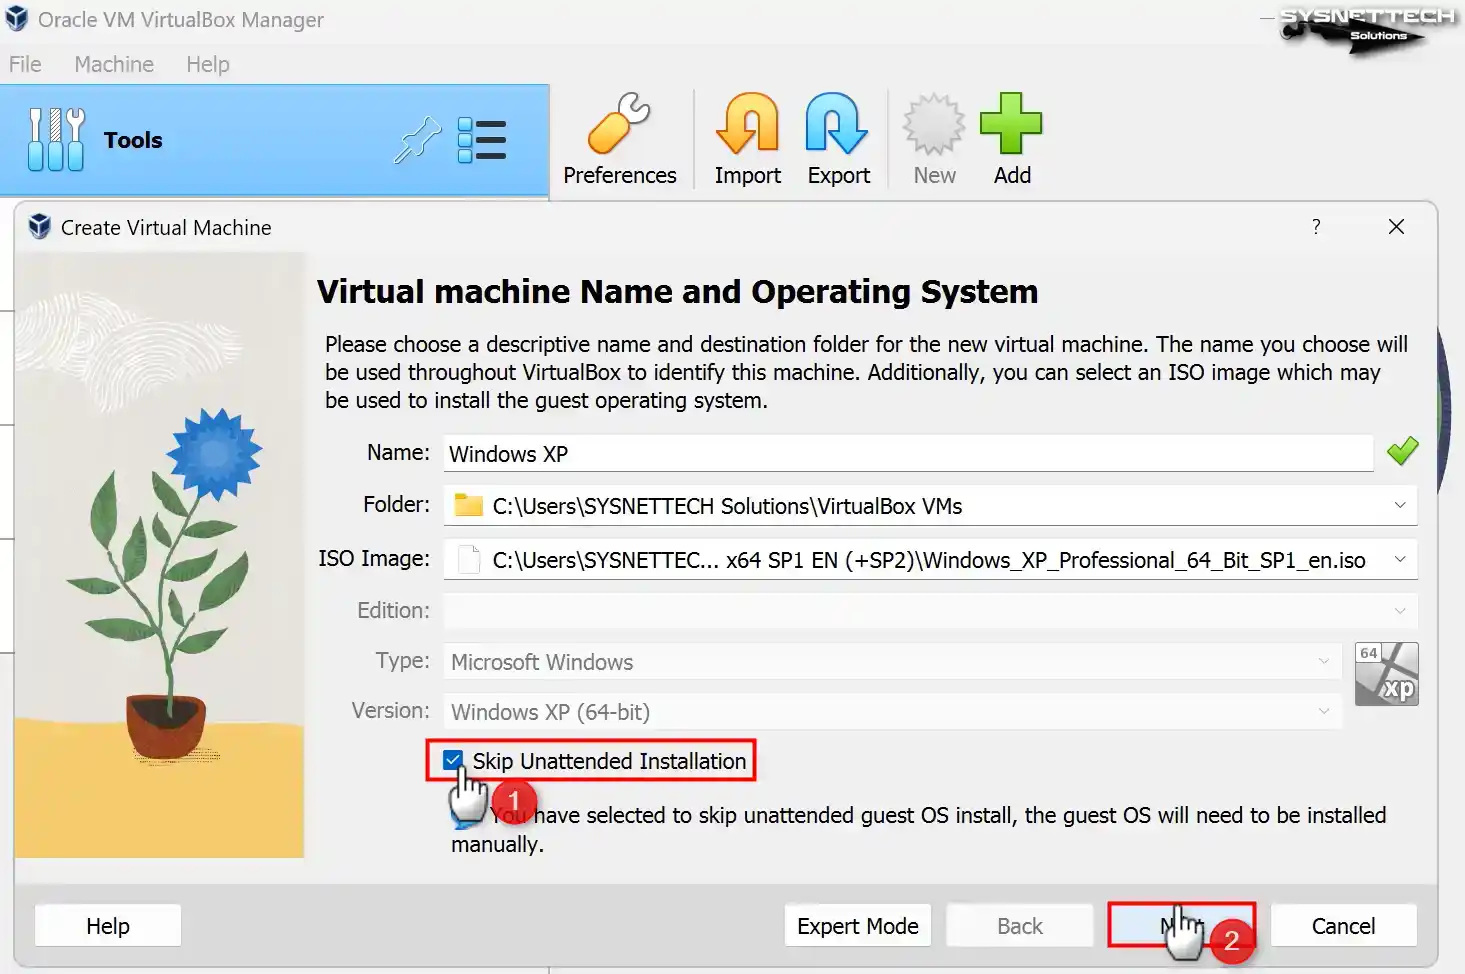
When the virtual machine preparation window appears, the initial step is to enter the name of the operating system you intend to install into the designated Name field. After entering Windows XP in the Name field, the values in the Type and Version fields will be automatically adjusted according to your typing system.
If you see the 32-bit value in the Version field after typing Windows XP and you will install 64-bit, configure this value manually.
You can change the position where you install the virtual machine in the Folder section. Suppose you desire to install the operating system on an external SSD or HDD storage device. In this case, you can pick “Other” from the pop-up window and select the installation location from your host PC.
Select Other from the ISO Image menu to add a Windows XP ISO file to the virtual pc.
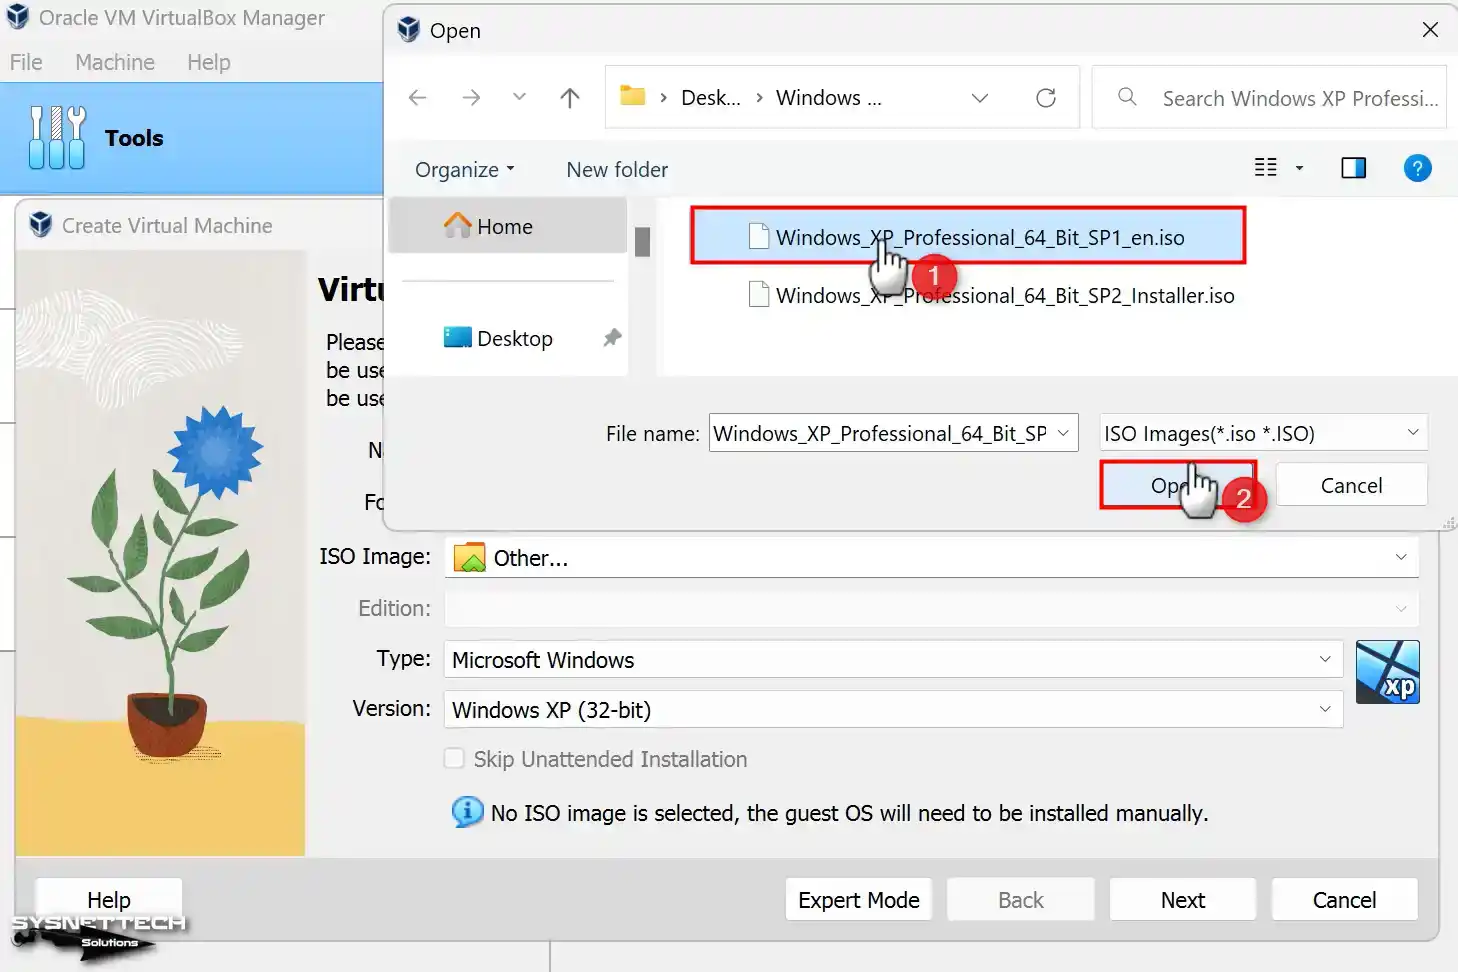
Step 3
Select the Windows XP Professional 64 Bit SP1 image file you downloaded to your computer from the table below the article and open it.
Step 4
In the 7.x versions of VirtualBox, you can see the unattended installation option as the user interface has changed. Using this option, you can prepare a system with preconfigured usernames or product key settings.
If you prefer to install the system manually, select Skip Unattended Installation and click Next.
Step 5
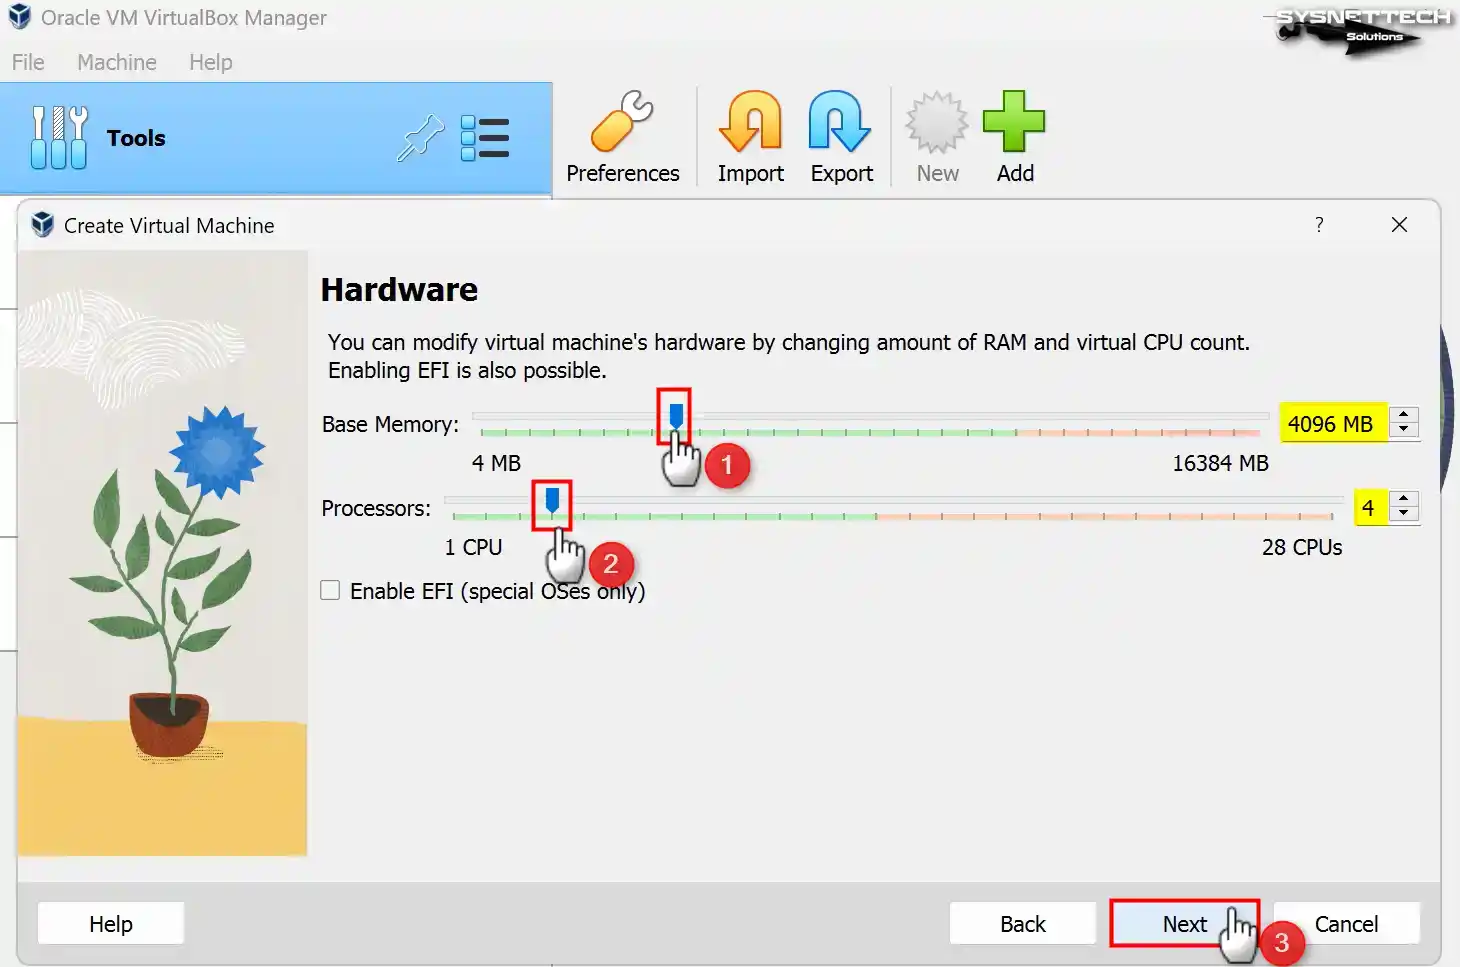
Configure a RAM size of 4096 MB (4 GB) for Windows XP as the base memory size. Suppose your host computer possesses a substantial amount of RAM. In that case, it is proposed to configure this value to a minimum of 4 GB or 8 GB.
In addition, configure the number of virtual processors as 4 so you can use your virtual computer more efficiently.
Step 6
Since you will install Windows XP from scratch in the virtual HDD settings, you must select the Create a virtual hard disk now option. If you own an XP virtual disk installed, you must like the Add an existing hard disk file option.
In VirtualBox 6.x versions, you can see the old settings on the virtual disk screen. For a sample, if you do not use a VM installed on VirtualBox with other virtualization software, choose VDI (VirtualBox Disk Image). You can use the VDI disk type in other software, but Oracle always recommends using the VDI type.
If you want to use as much disk space as the capacity of the virtual disk file on the disk where you will install the virtual machine, you can choose Fixed Size. Fixed Size can improve the performance of the VM, but it unnecessarily fills up the host disk space.
Therefore, by selecting Dynamically Allocated, only the disk space needed by the VM will be automatically allocated over the host disk. Do not change the path in File Location and Size to save the virtual disk to the installation location you set in the first step of the VM wizard.
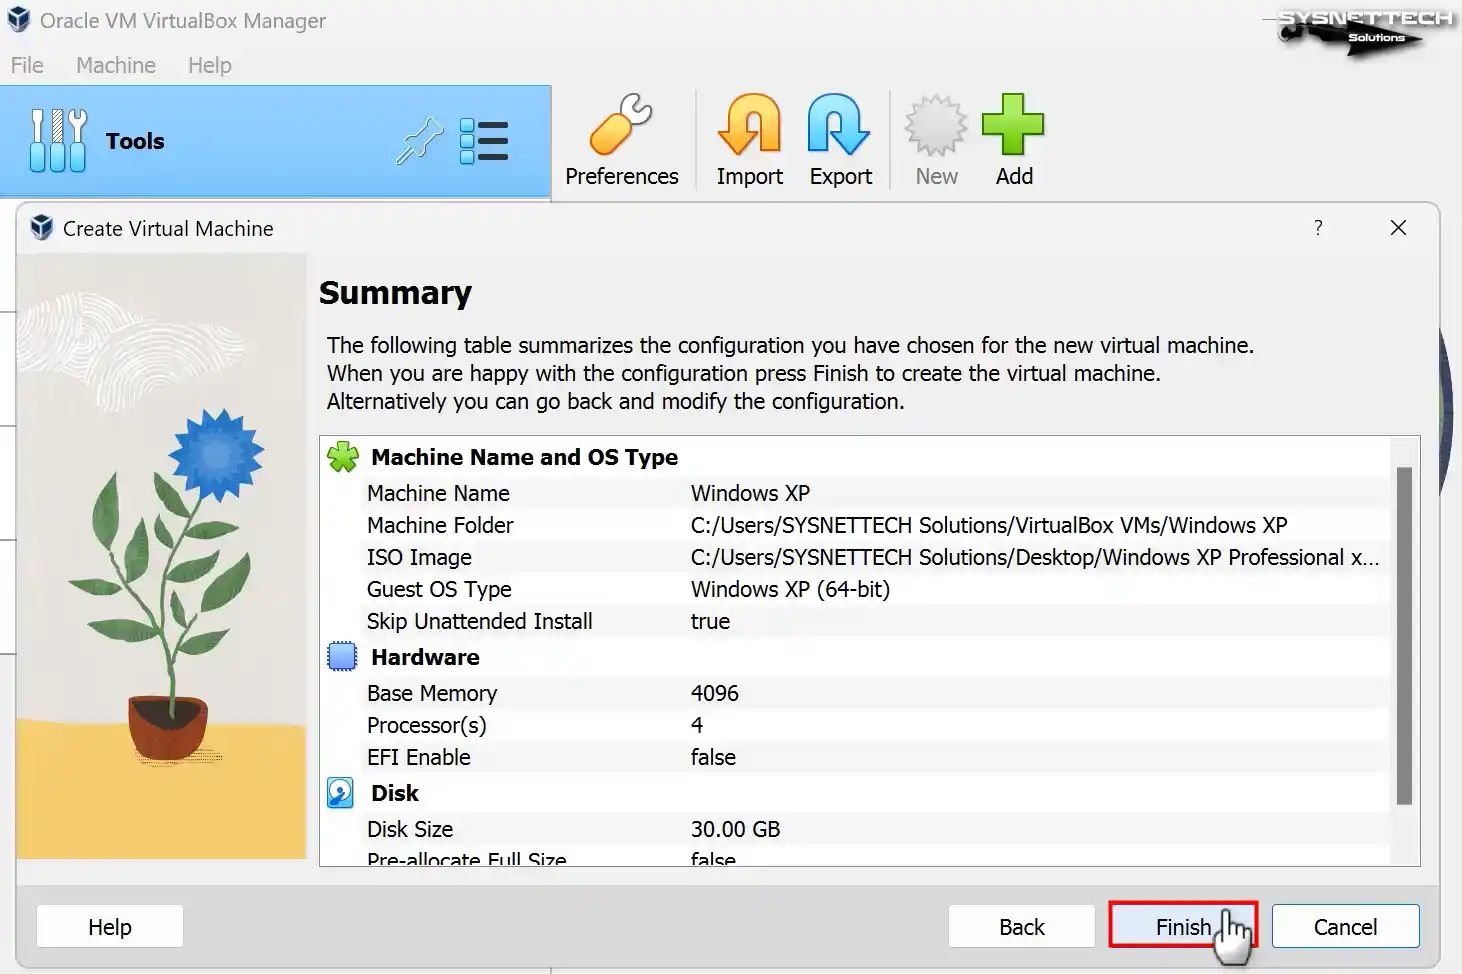
Regarding Windows XP, you can modify the virtual disk extent to a minimum of 30 GB. However, it is advisable to determine the disk size based on the specific requirements of your work.

Step 7
After adjusting the hardware settings of the Windows XP guest machine, check again and close the VM wizard.
Step 8
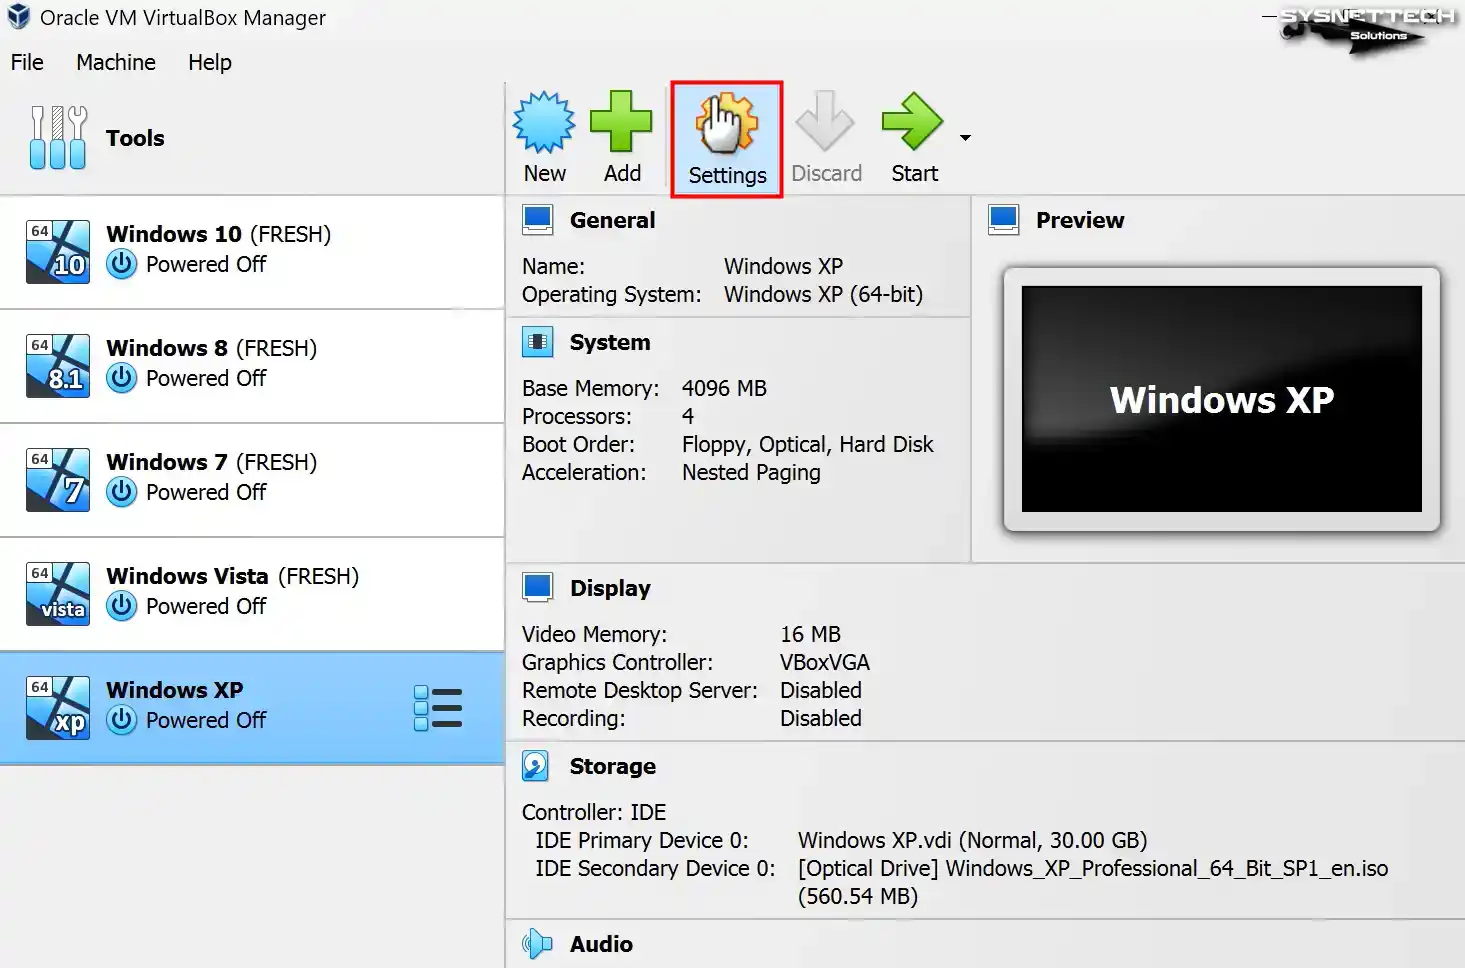
Click Settings to better configure the hardware settings of the guest operating system.
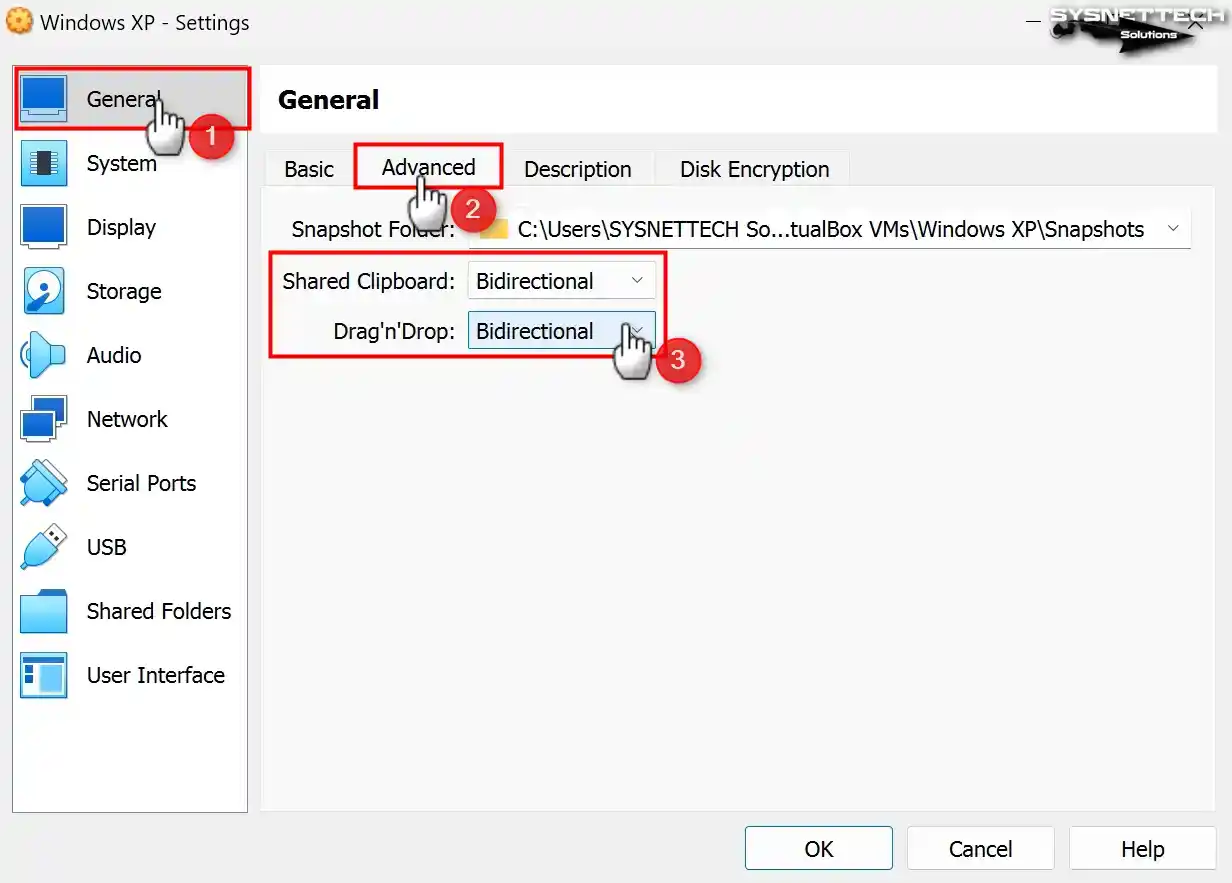
Step 9
To permit file sharing between the host and the virtual machine in the settings window of the VM, configure the Shared Clipboard and Drag and Drop features as Bidirectional in the General / Advanced tab.
So you can share files or copy/paste text from host to VM and VM to host.
Step 10
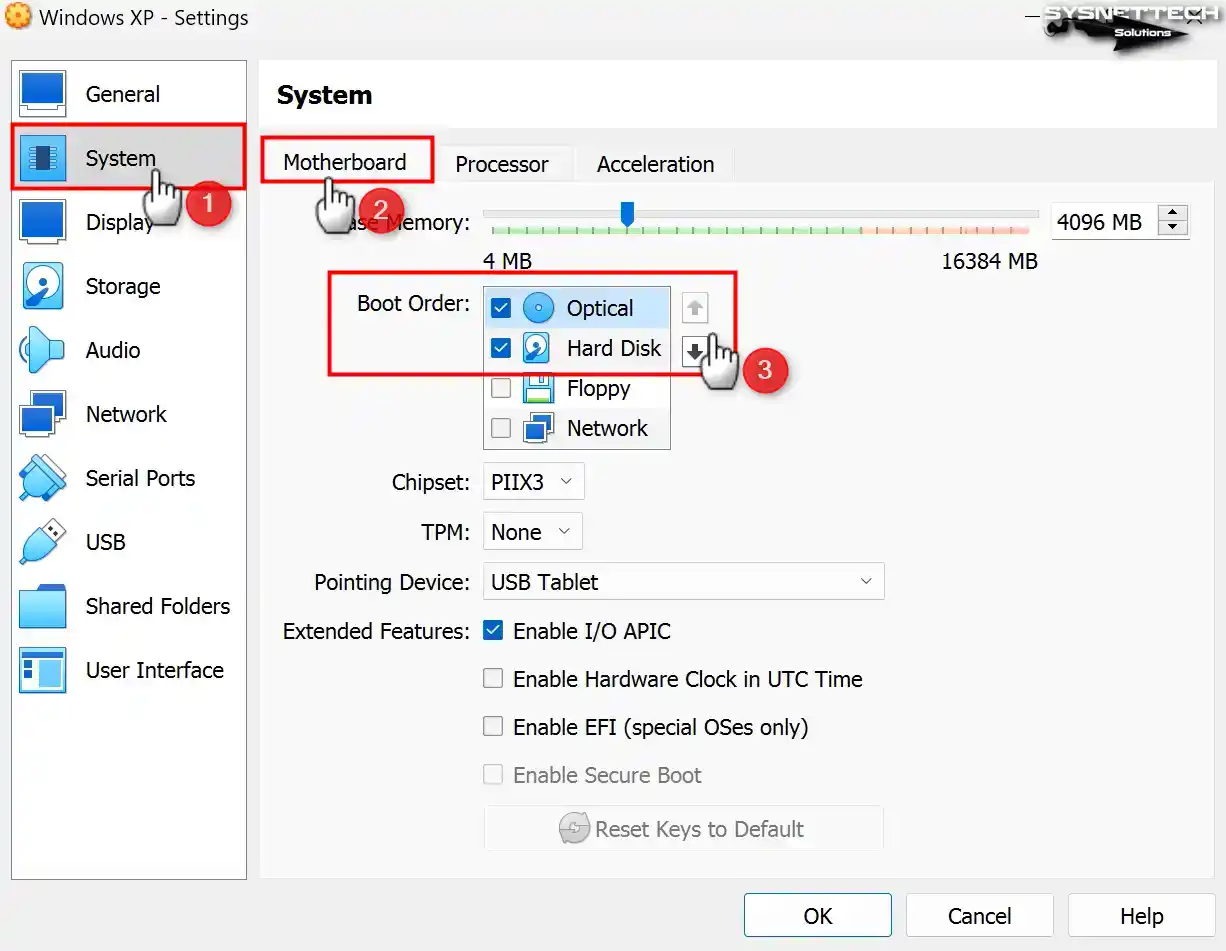
To install Windows XP on the virtual pc, select the Optical device as the direct boot device in the Boot Order index in the System / Motherboard settings to add the ISO file to the optical drive.
Step 11
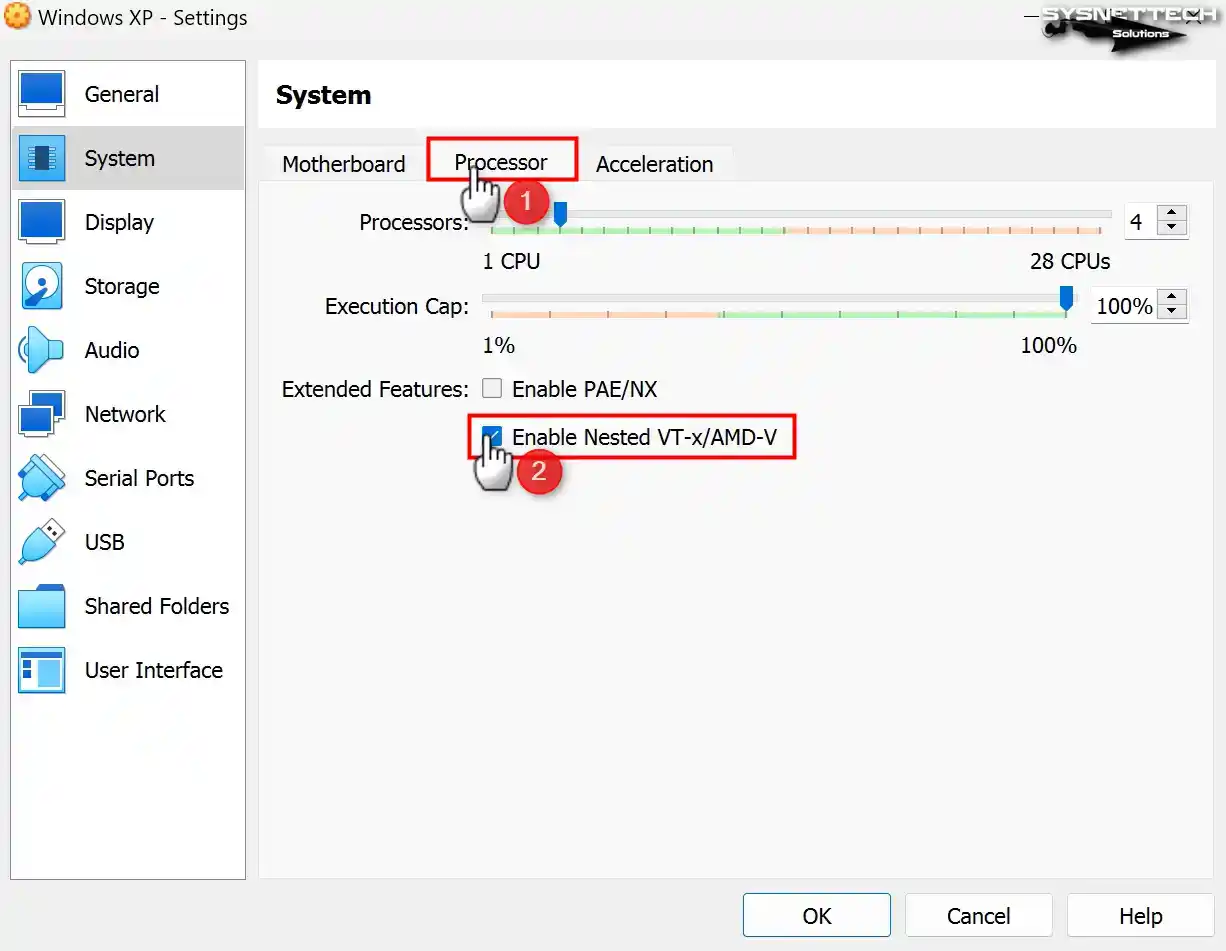
If you plan to use virtualization software on your virtual computer, enable the Nested VT-x/AMD-V feature from the processor device.
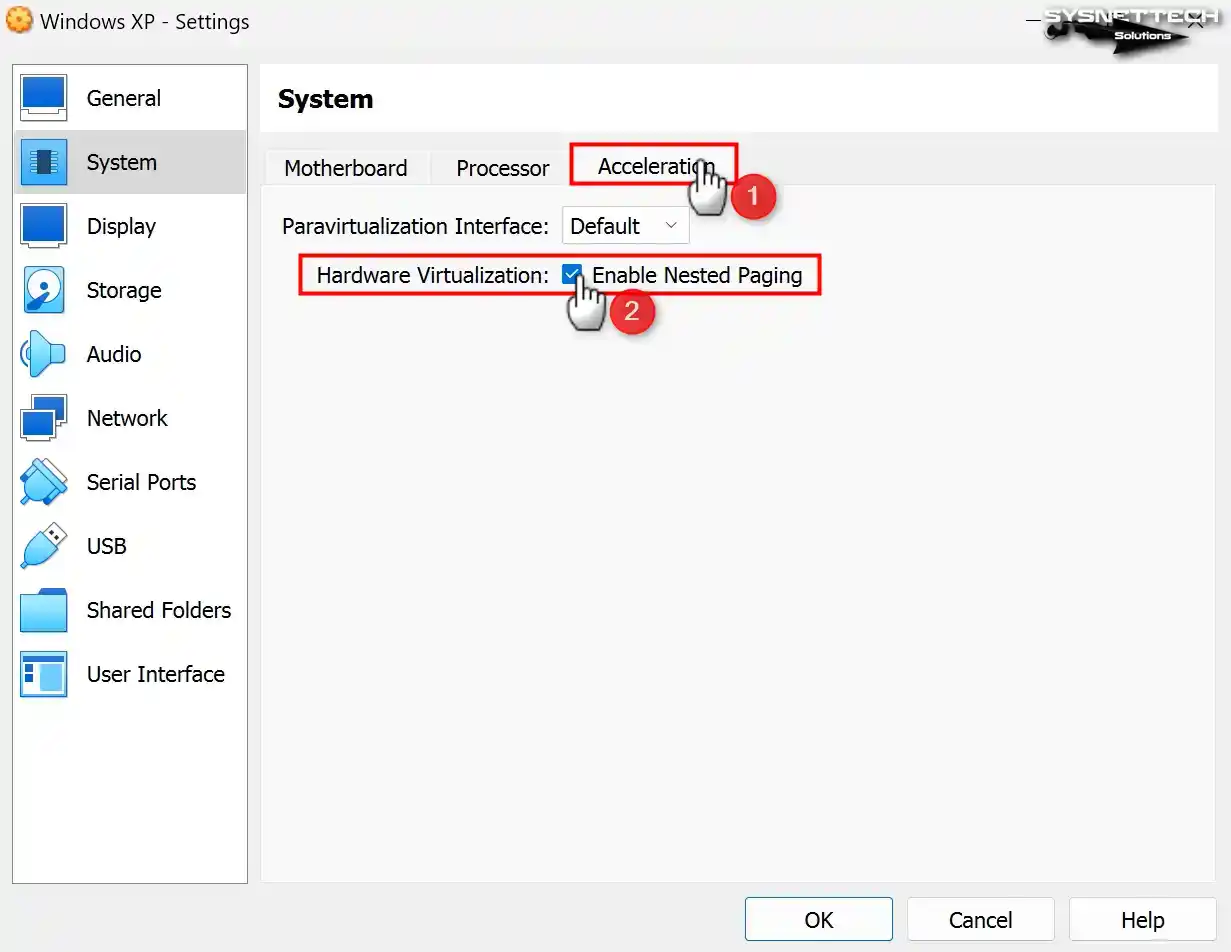
Step 12
Enable Nested Paging for better memory management between your host and VM.
In certain conditions, it may be necessary to manually choose the virtualization interface within the Acceleration tab located in the system settings of the virtual PC.
Paravirtualization Interface is in Default mode by default. The default mode will automatically select a virtualization engine according to the installed system type. Still, since no VTx interface is set for XP, you can change the value here to Hyper-V.
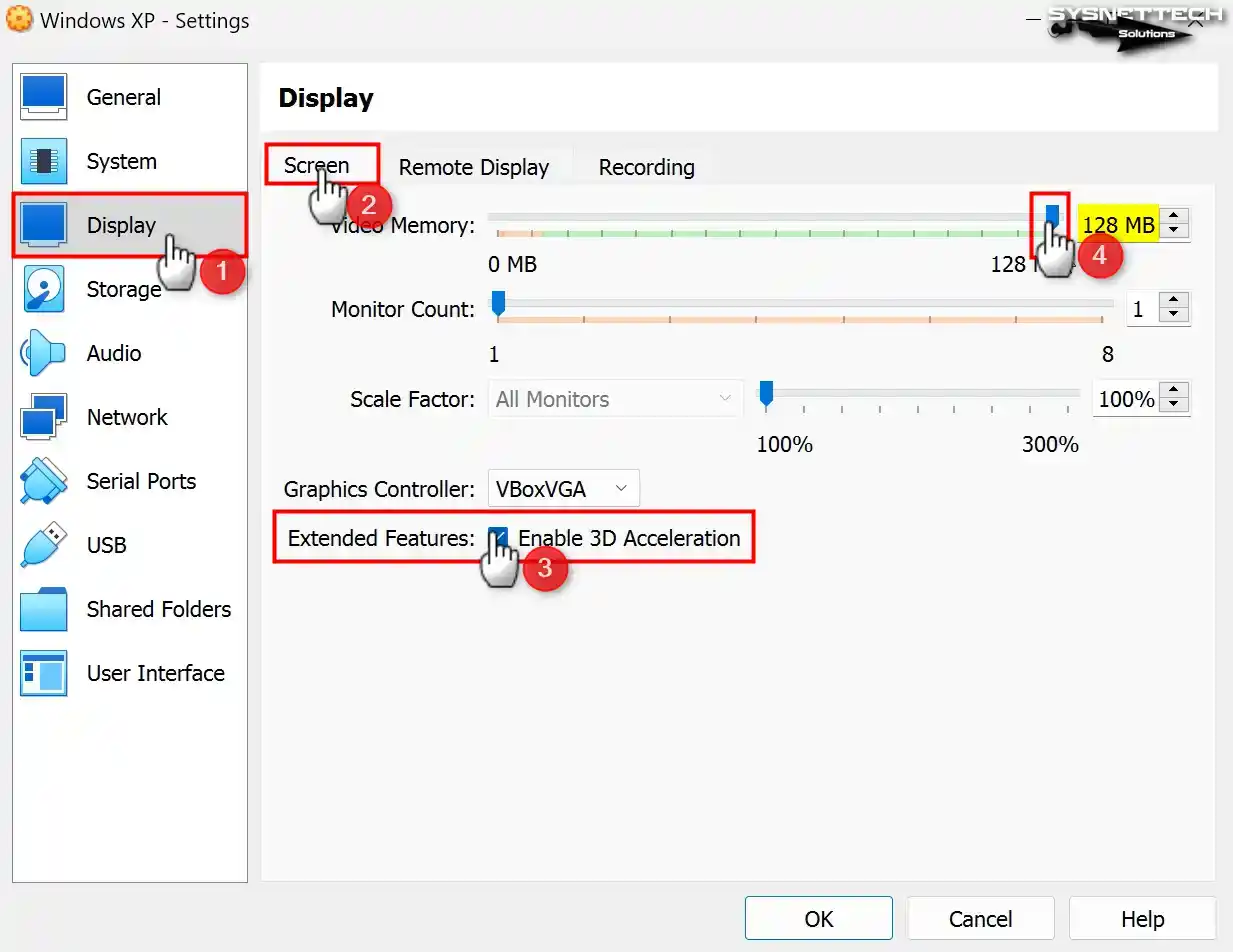
Step 13
Enable 3D acceleration in the Display / Screen settings of the virtual machine and configure the Video Memory size to 128 MB.
Note: Please take note that although you enable 3D graphics acceleration on Windows XP in VirtualBox version 6.1, the Direct3D feature is regrettably no longer supported. If you wish to utilize Direct3D support, installing one of the 6.0 versions of VirtualBox on your system is advised.
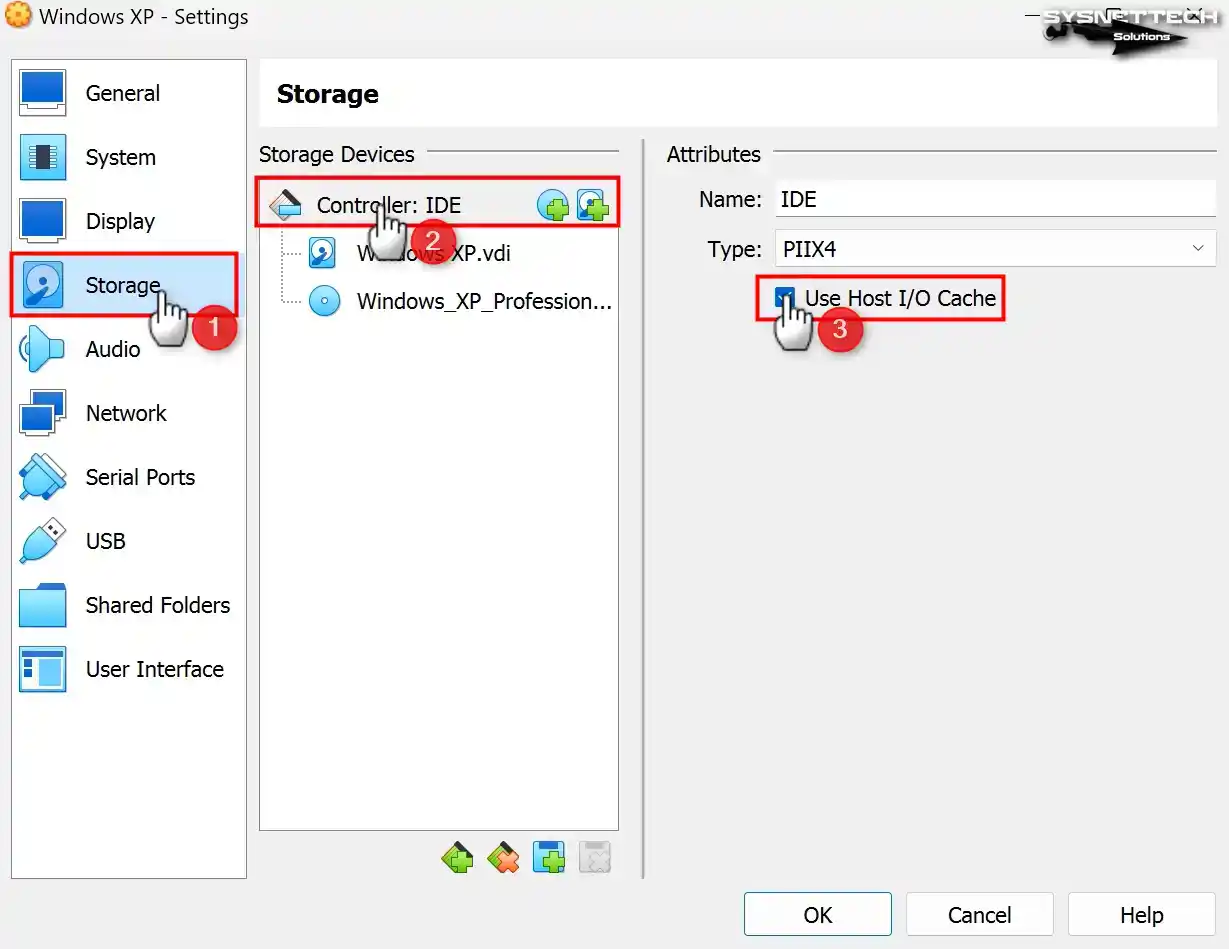
Step 14
By default, the Host I/O Cache feature for the IDE controller is enabled in the storage volumes of the virtual PC. If the Host I/O cache is not allowed, enable it for virtual disk performance.
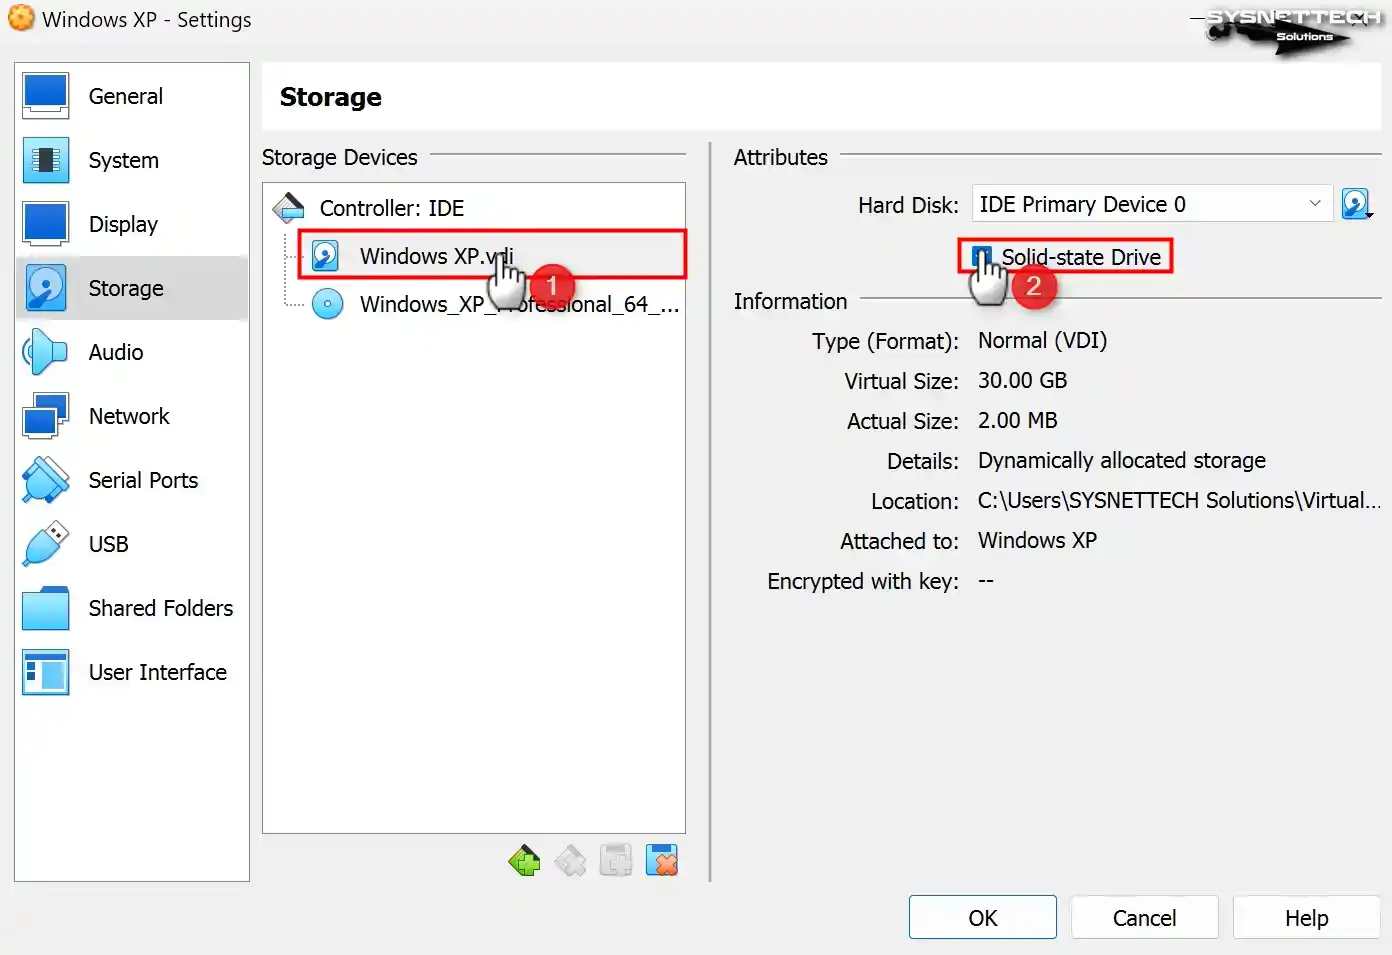
Step 15
Check the Solid-State Drive (SSD) option to configure the WindowsXP.vdi virtual disk file as an IDE SSD.
Step 16
After preparing your Virtual PC, click the Start button to proceed to the steps of installing Windows XP on VirtualBox.

How to Install Windows XP
After preparing the Windows XP virtual computer, you need to install Windows using the ISO image of the system. After running the VM with the image file as the startup disk, when the setup wizard opens, you should install it as if installing the Windows platform on a real computer.
Step 1
At the Windows XP Professional Setup screen, you must press Enter to begin installing Windows immediately. Otherwise, press F3 to exit the wizard or R to repair your system.

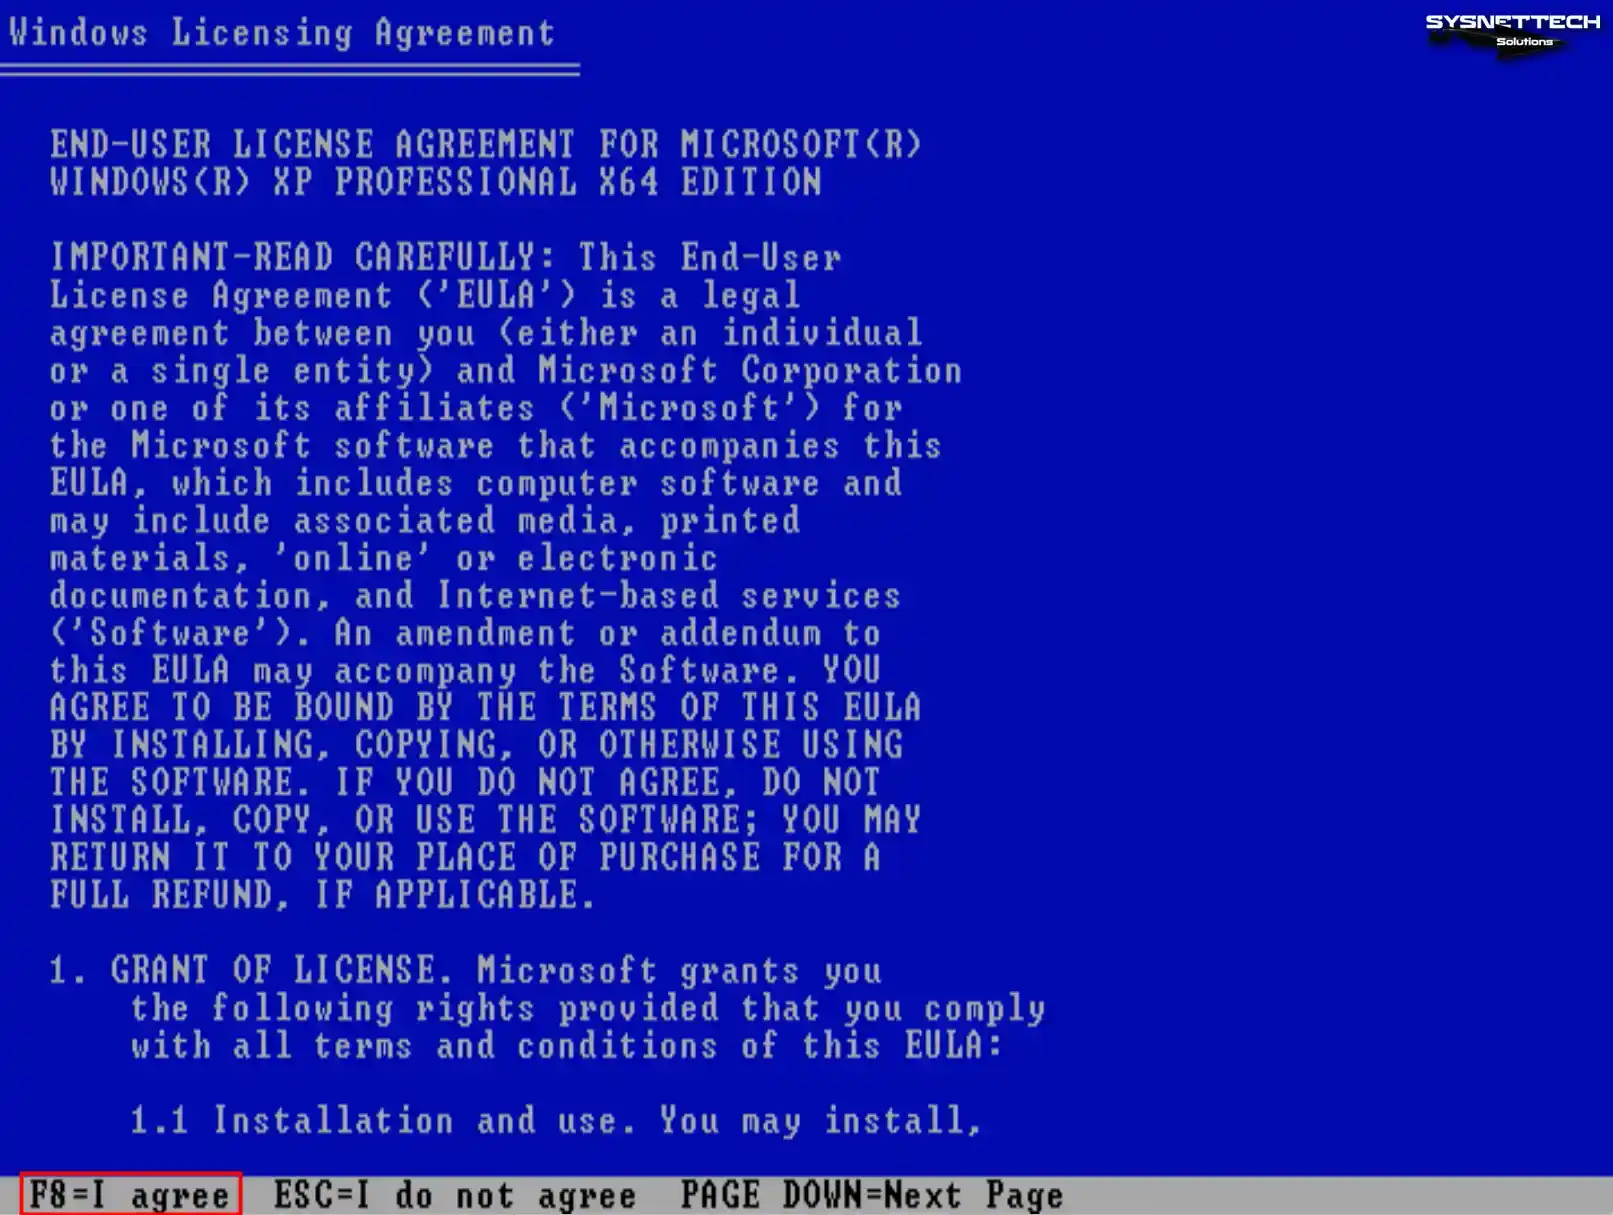
Step 2
You must press Page Down to read the full text of the Windows XP license agreement in the setup wizard. After reading the license agreement, press the F8 key to accept and continue the installation.
Step 3
Press the C key to configure the unallocated disk space. Or you can press Enter to have the wizard automatically organize the disk space and format the system disk.
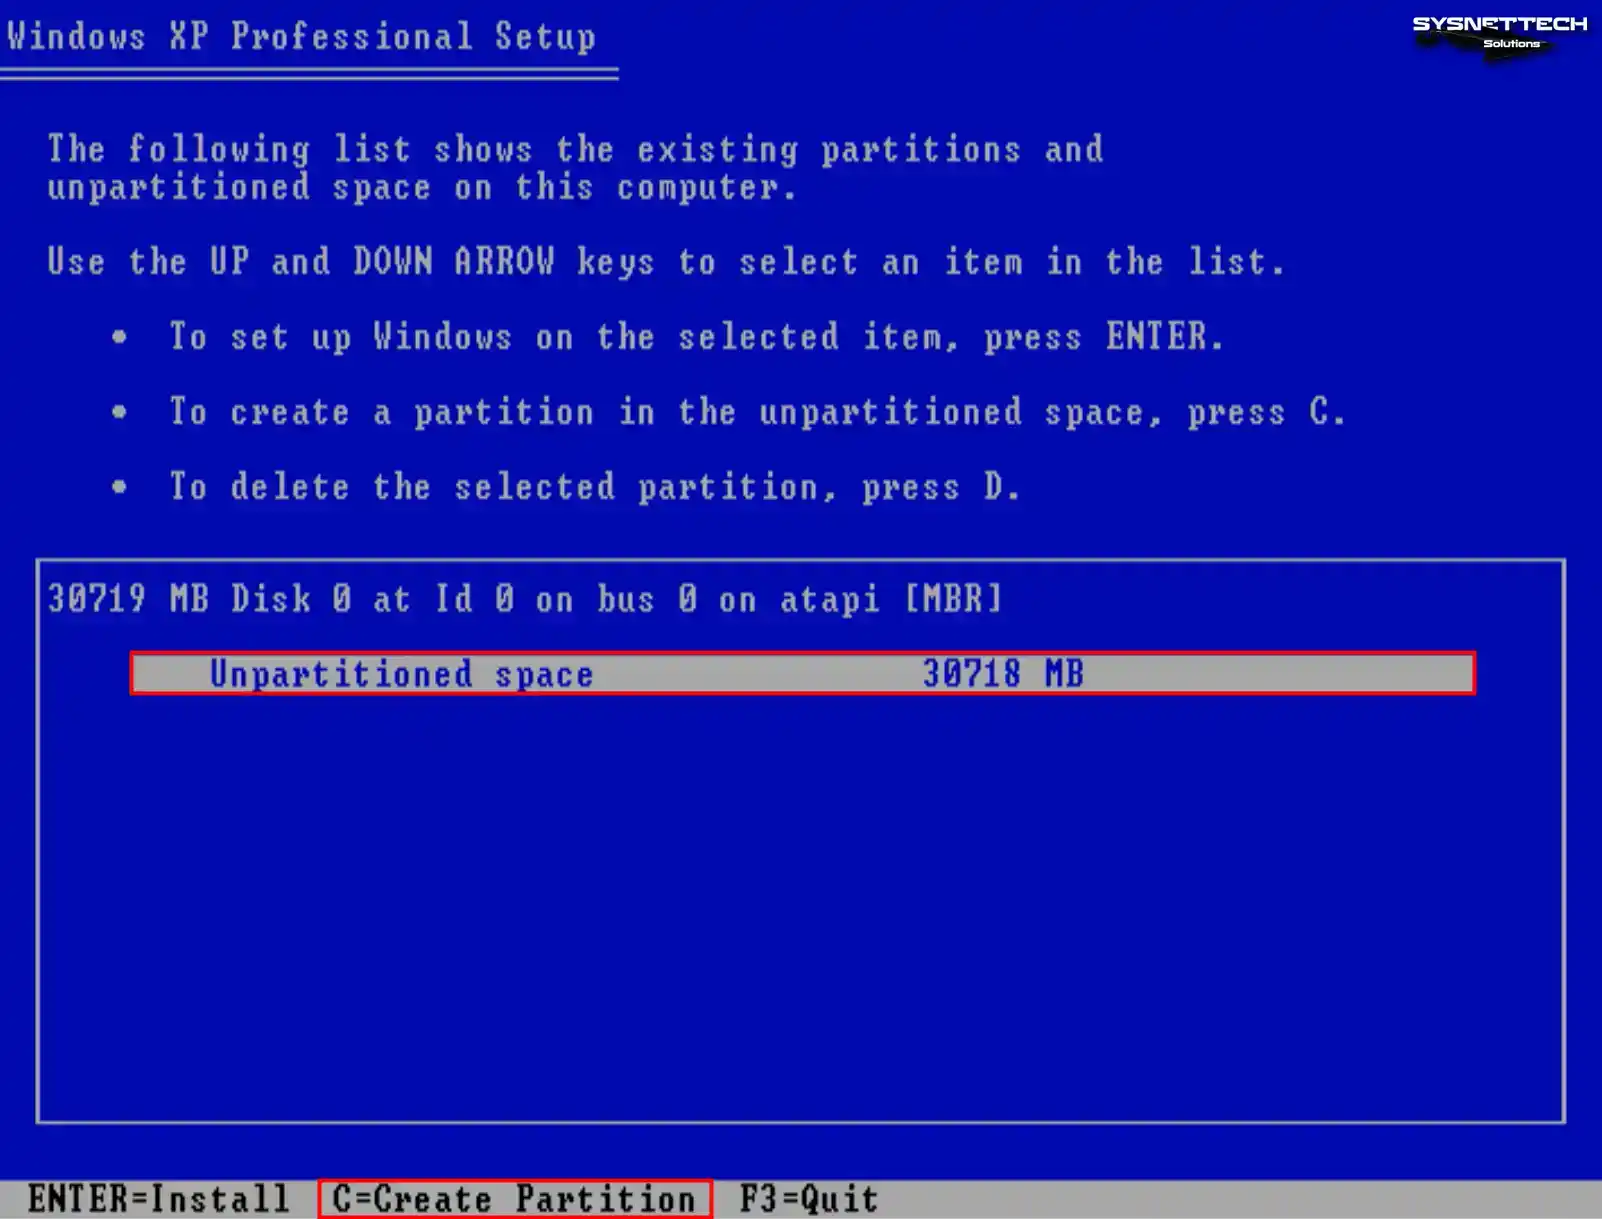
Step 4
To make a new partition, you need to edit the disk space to be allocated after clicking C. You should use the entire disk space, as virtual machines generally use smaller disk space.
For example, if you configure the virtual disk size to 100 GB, allocating 20 GB for system setup and 80 GB for backup may make more sense.
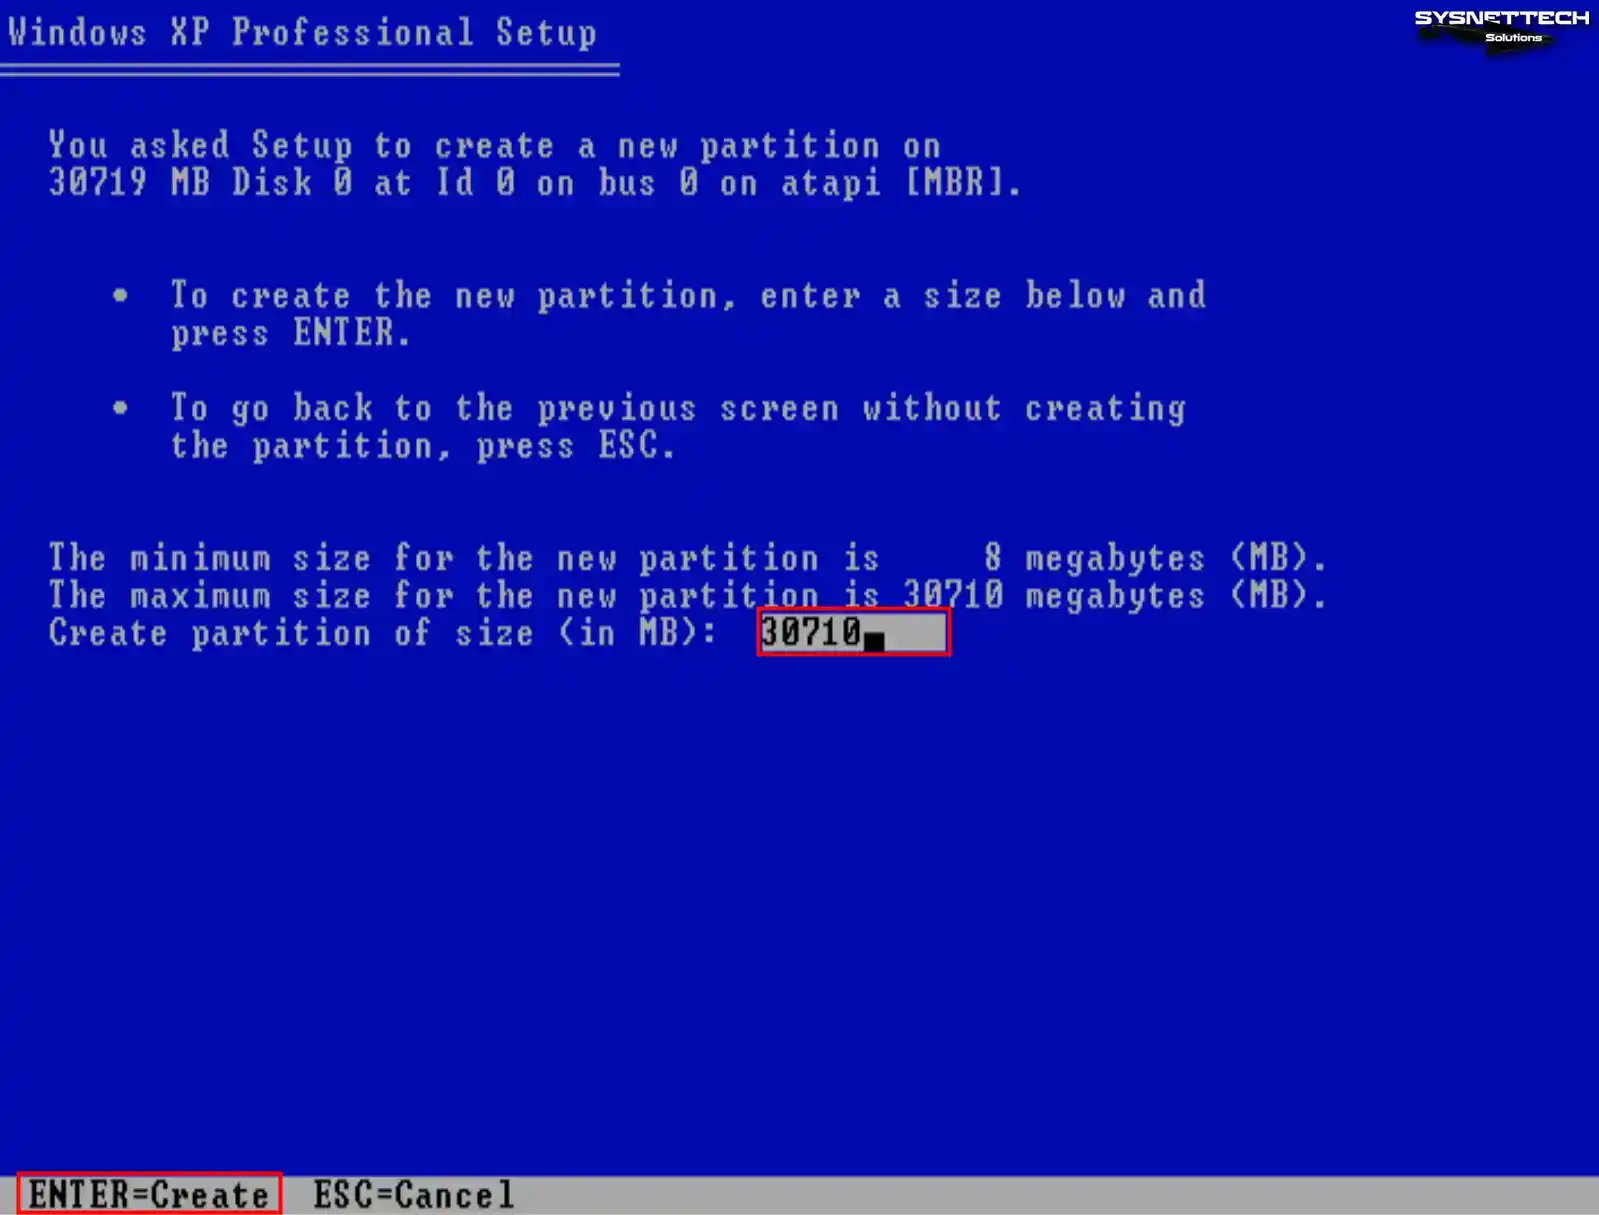
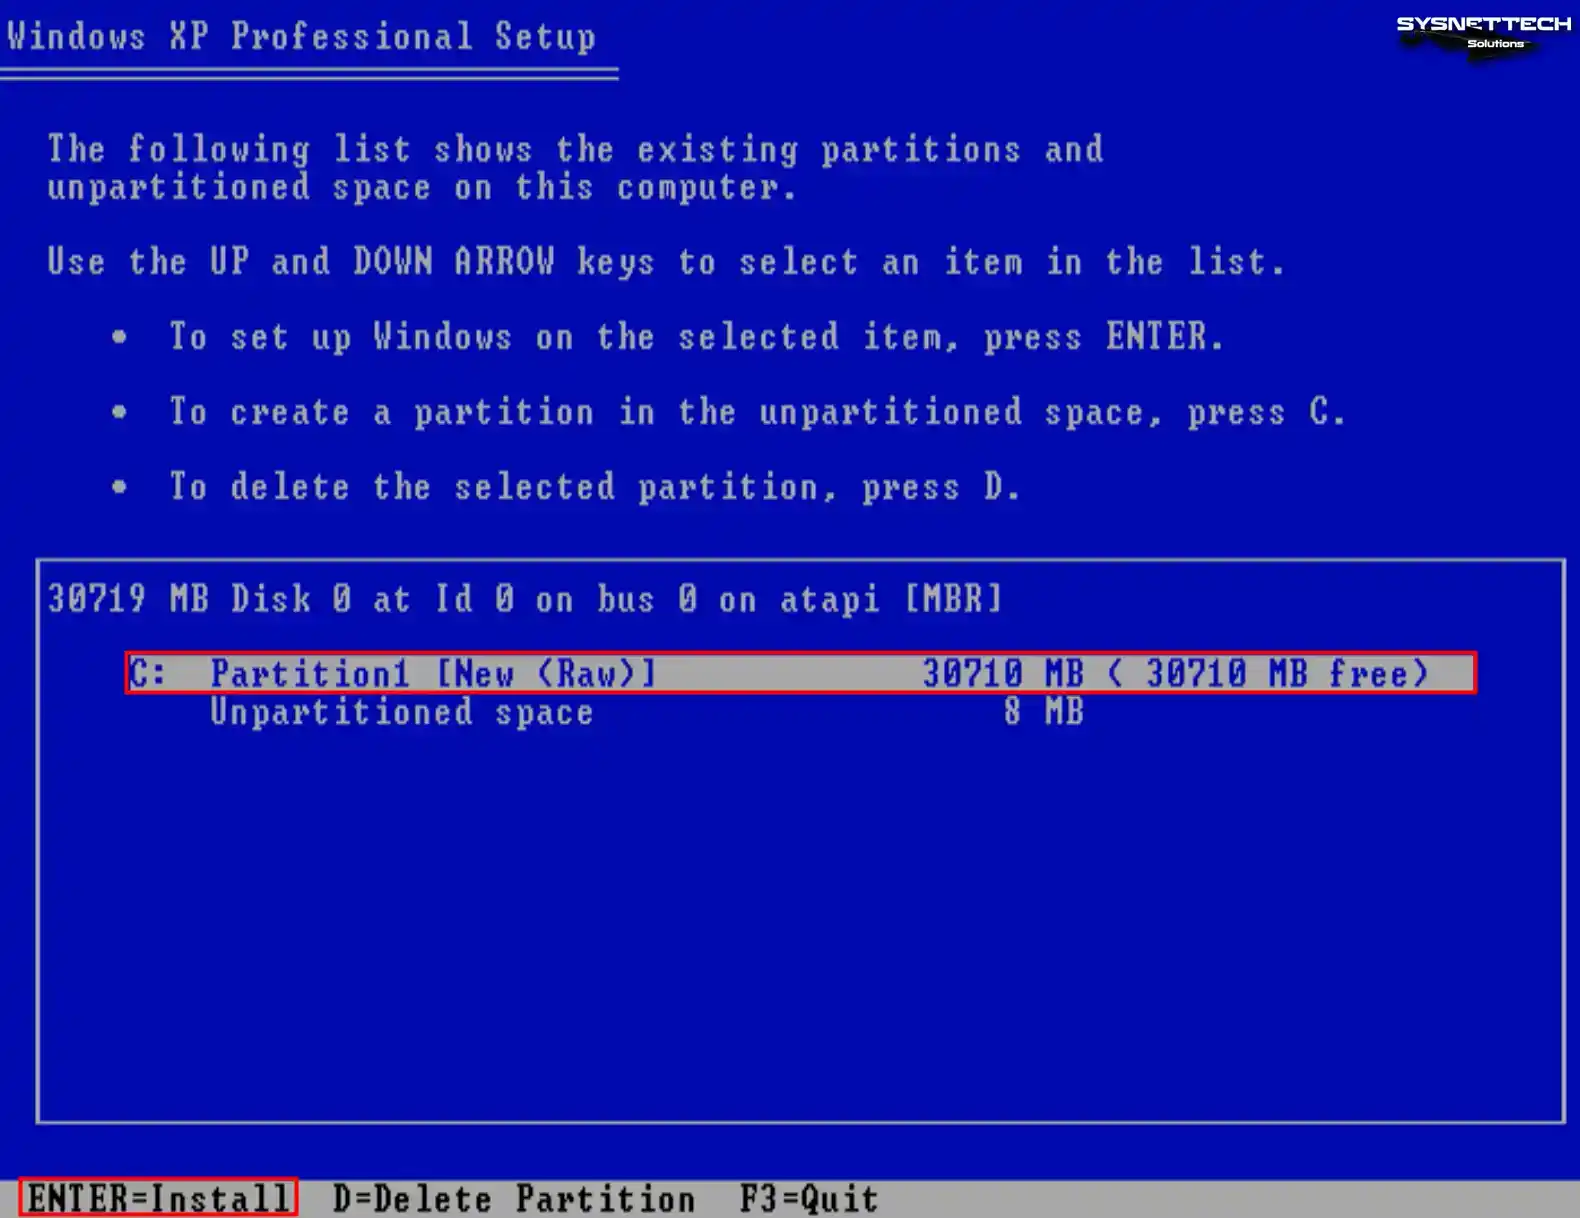
Step 5
Press Enter to start the Windows XP installation on the new partition you created.
Step 6
Quickly format the virtual disk of the guest machine using the NTFS file system.
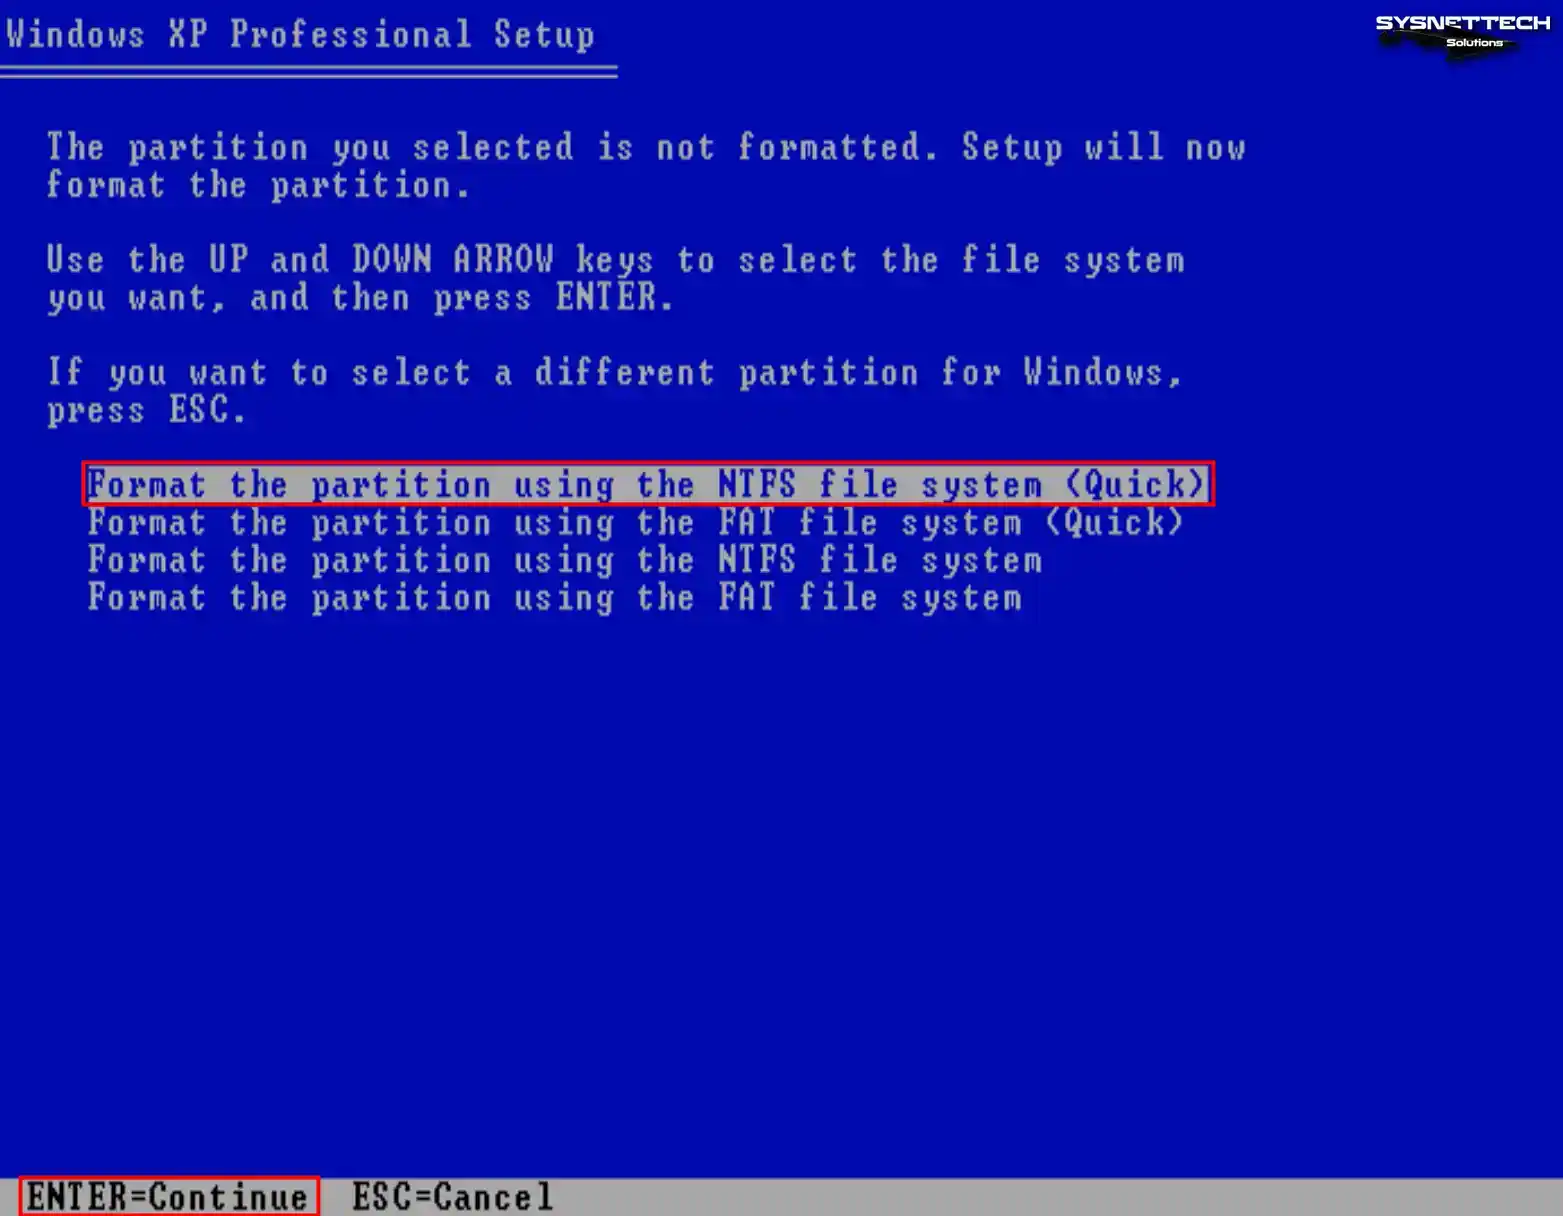
Step 7
Wait while the setup wizard formats your virtual disk.

Step 8
Once the virtual disk has been formatted to facilitate file copying, the XP system files will commence their transfer onto the disk.
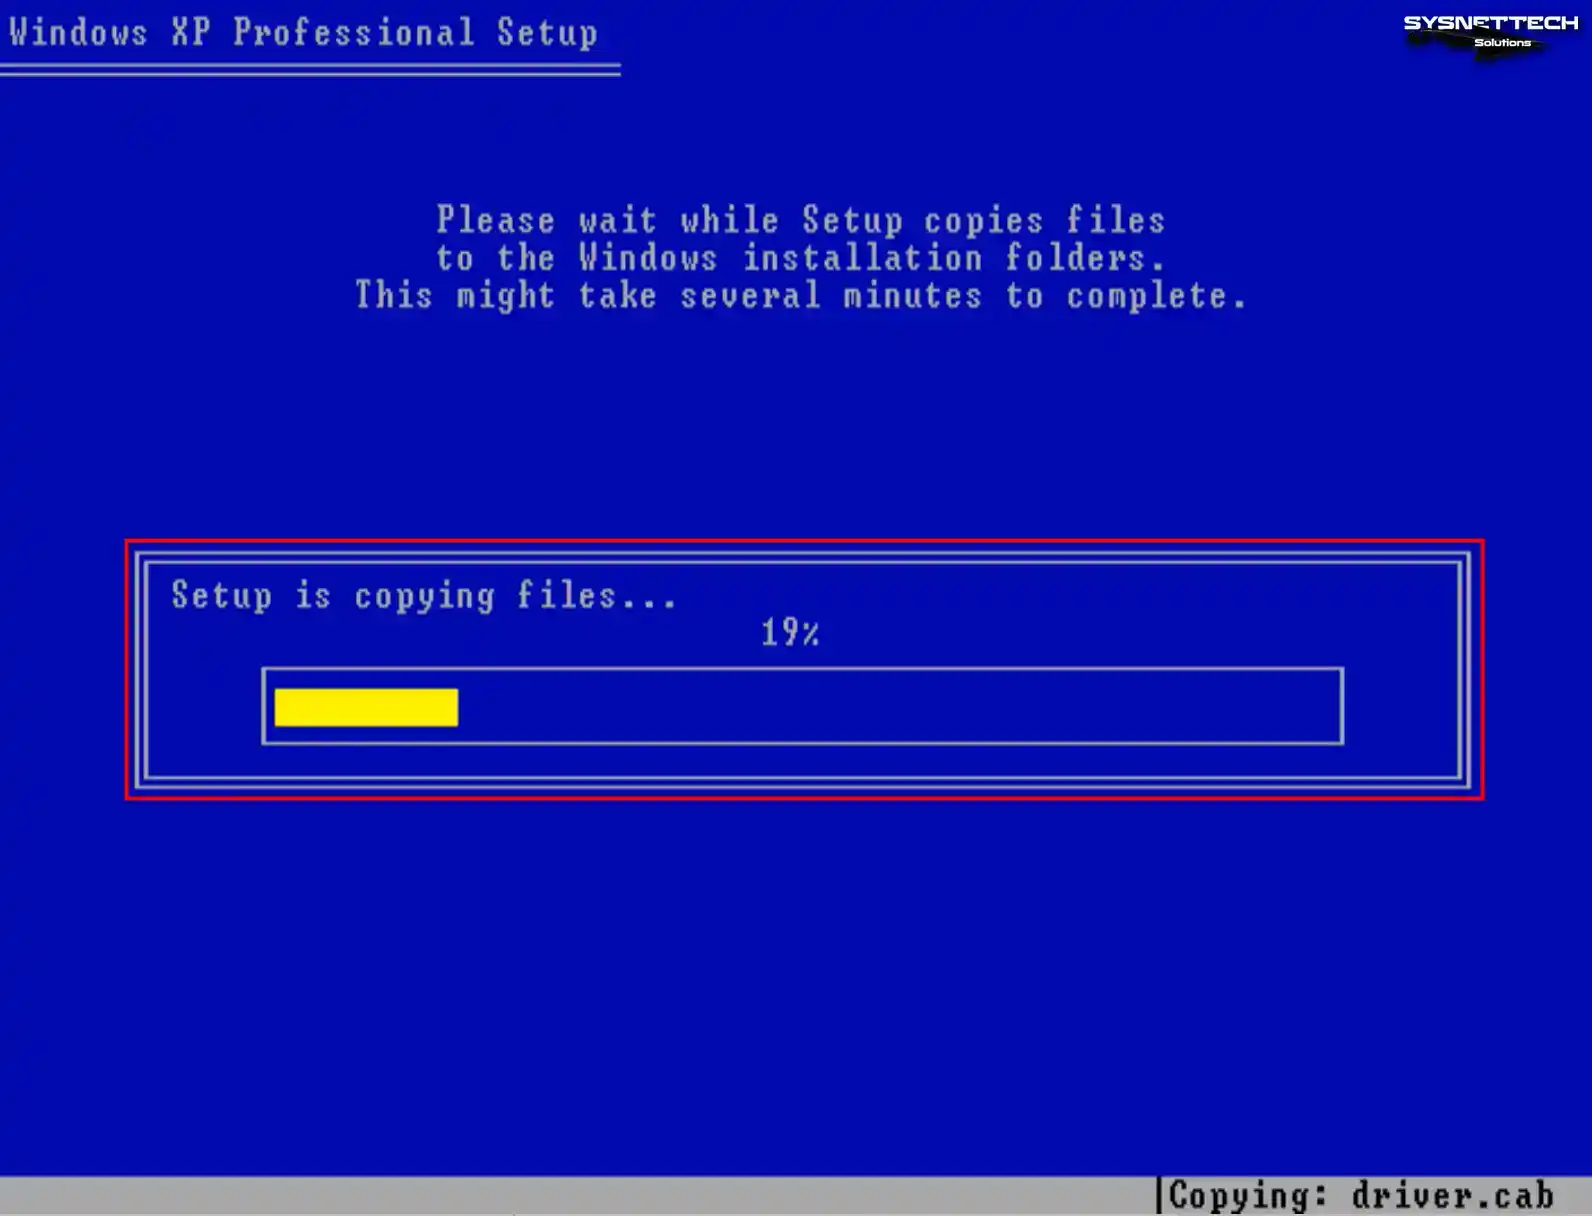
Step 9
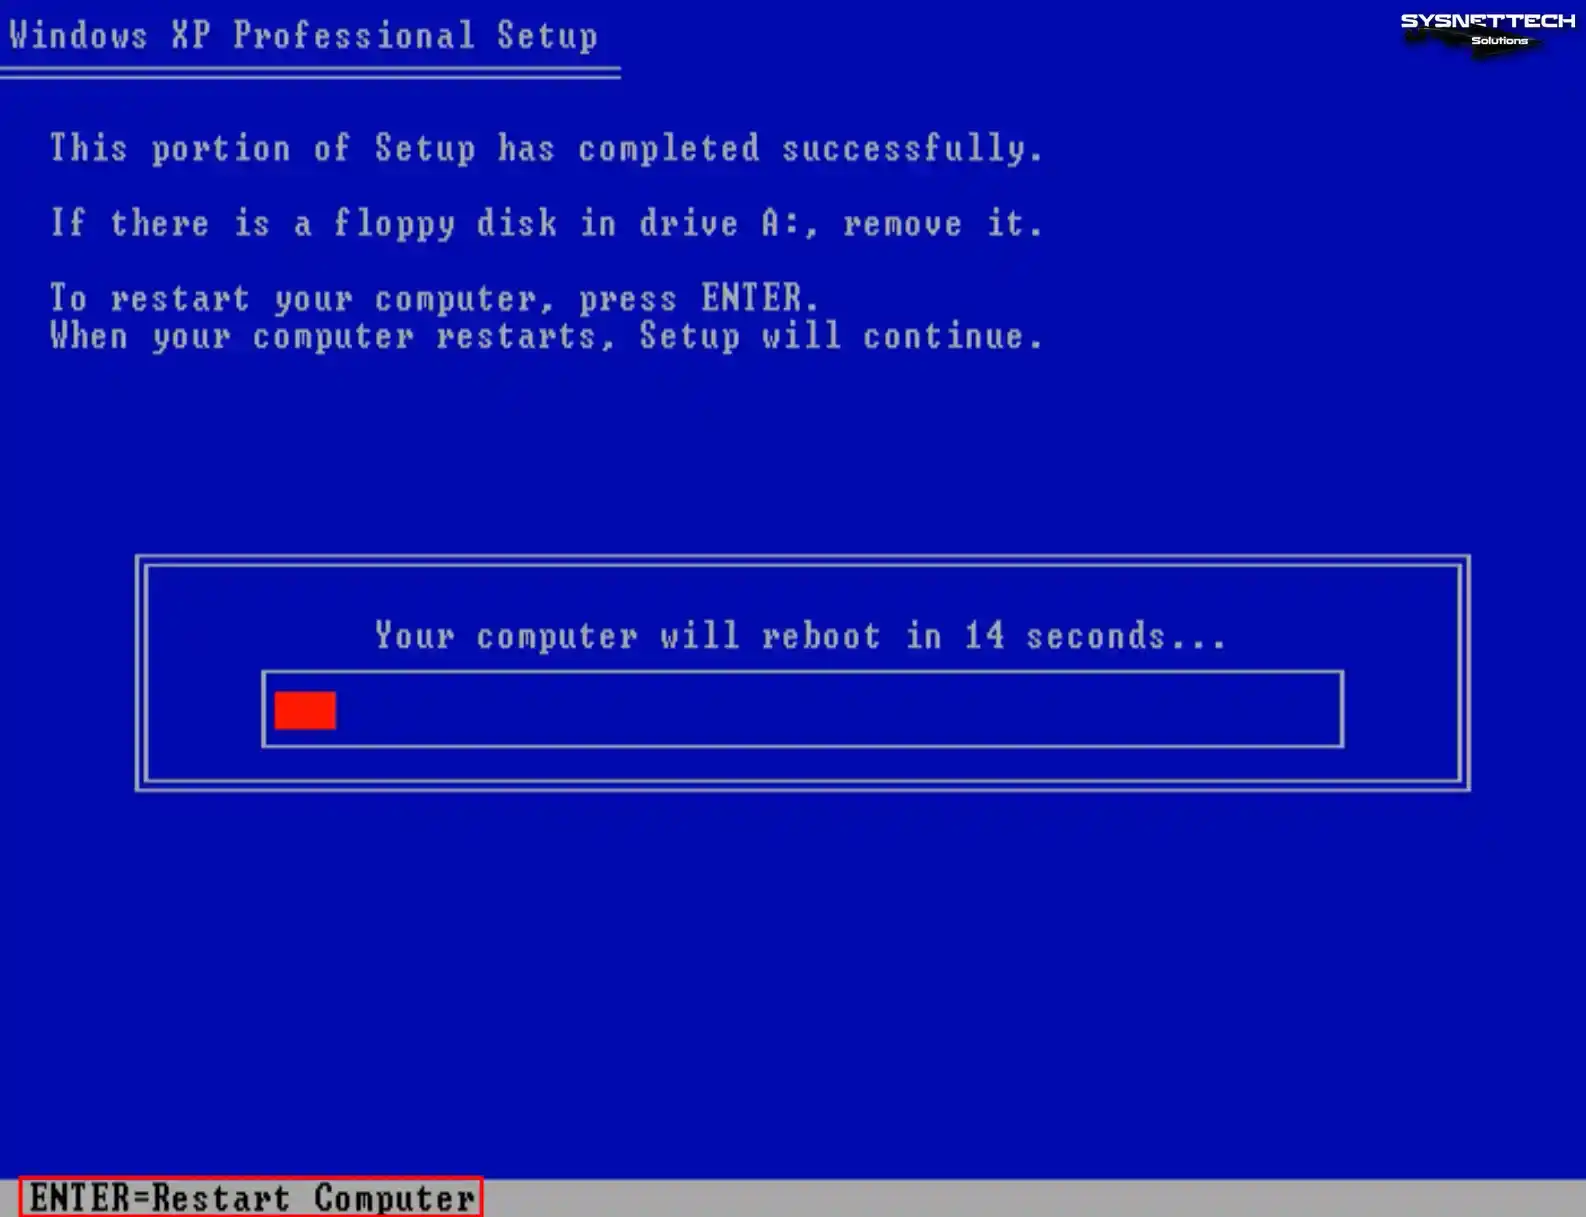
After copying the system files, your virtual computer will restart automatically in 15 seconds. You can press Enter to reboot your virtual system immediately. After your guest machine restarts, the installation will continue.
Step 10
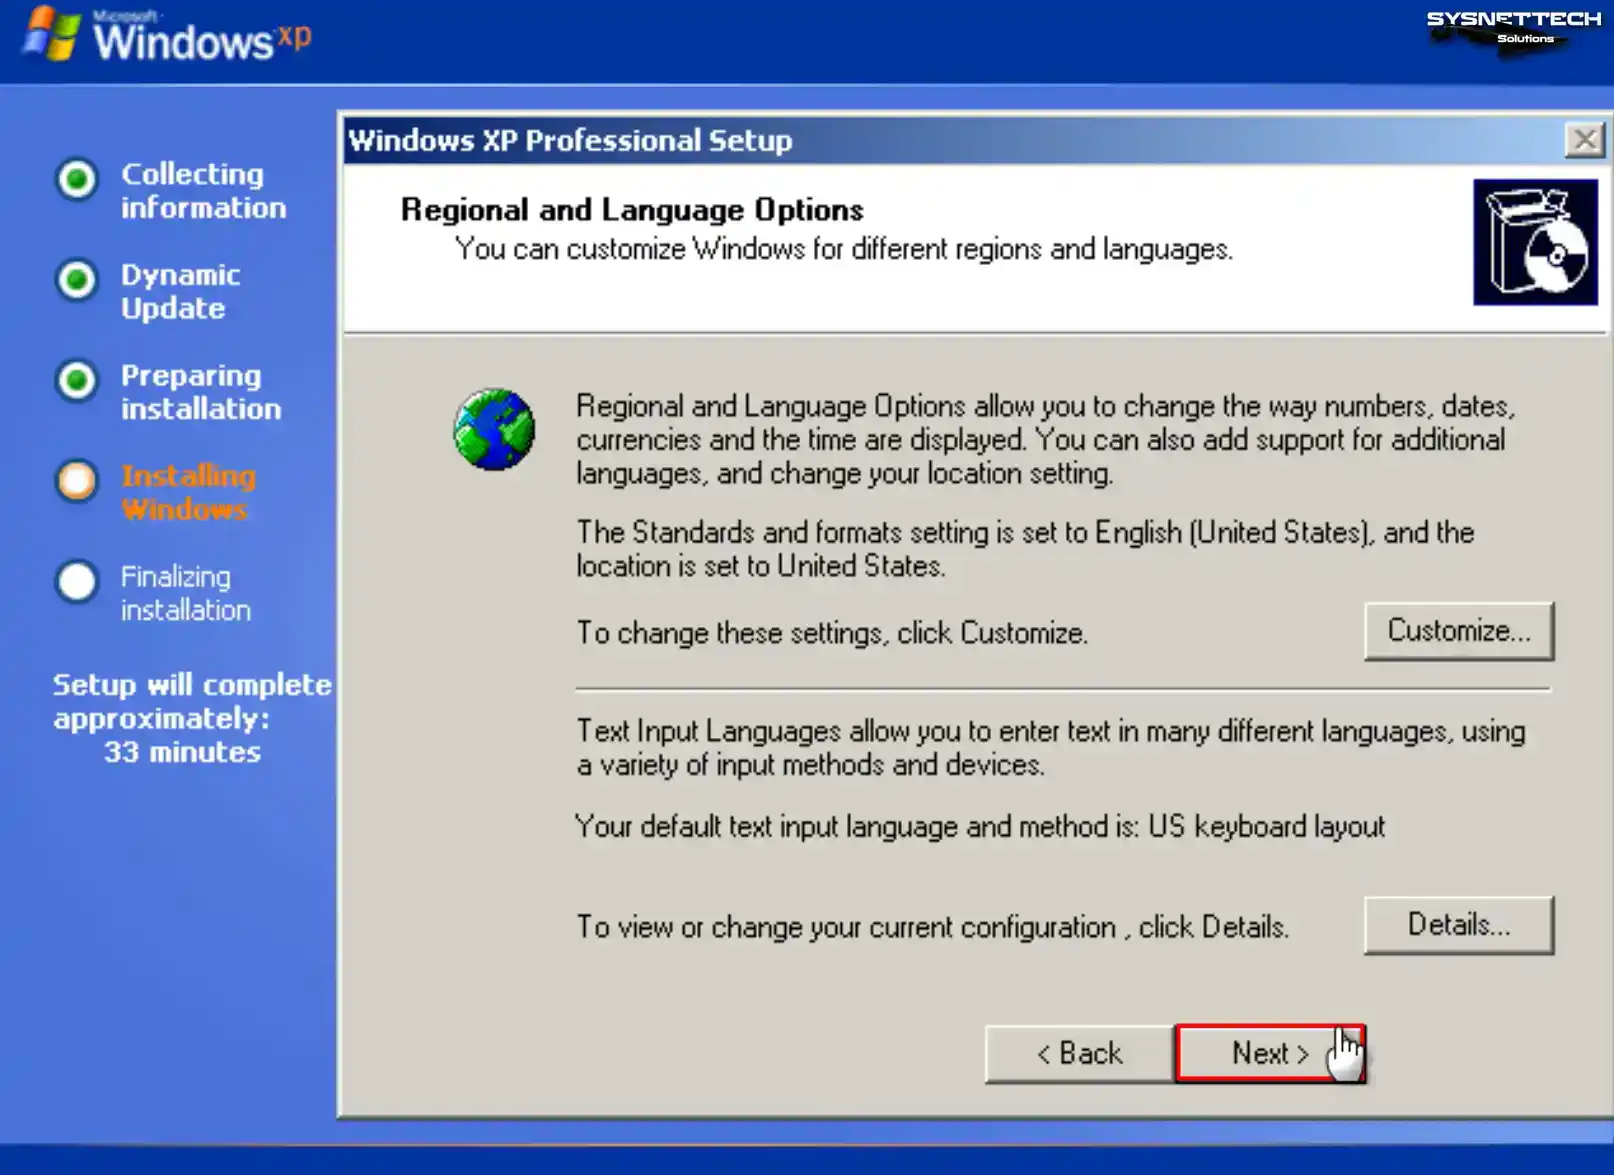
Configure the region and language options of Windows XP according to your country.
Step 11
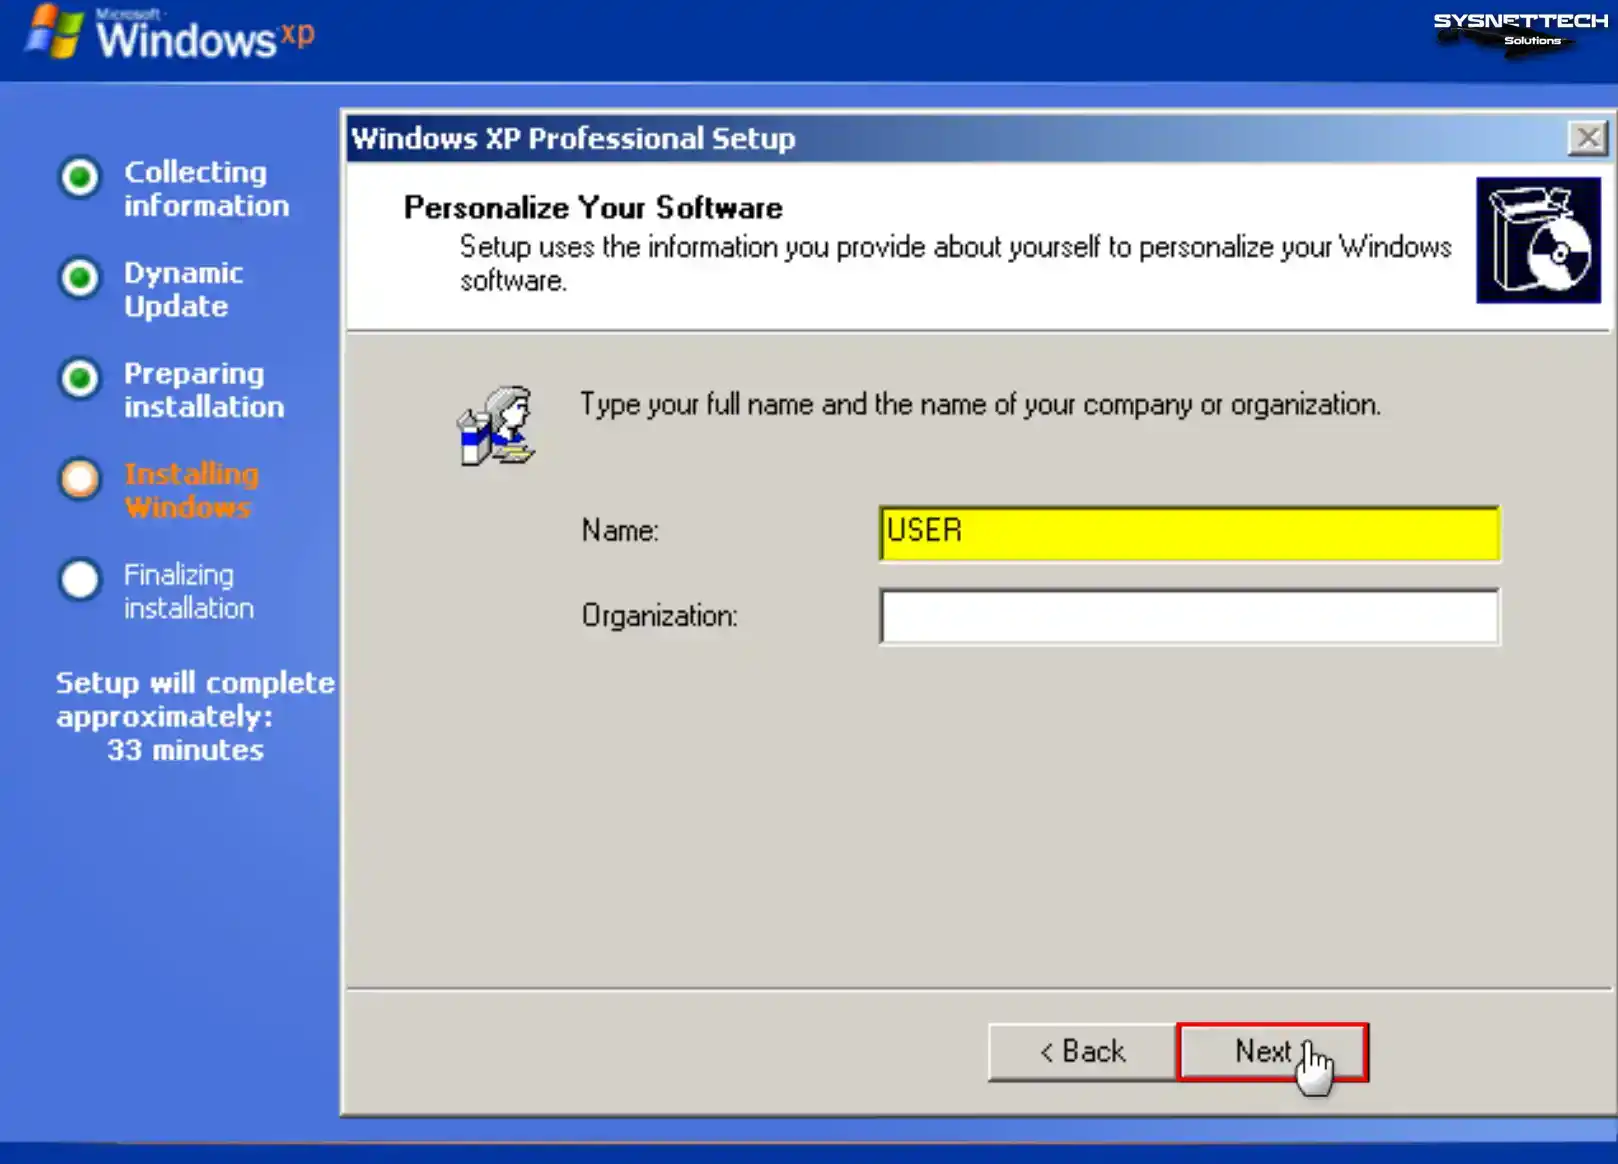
Type a name for the user account you will use in your virtual system and click Next.
Step 12
Enter a Windows XP Pro product key you have and click Next.
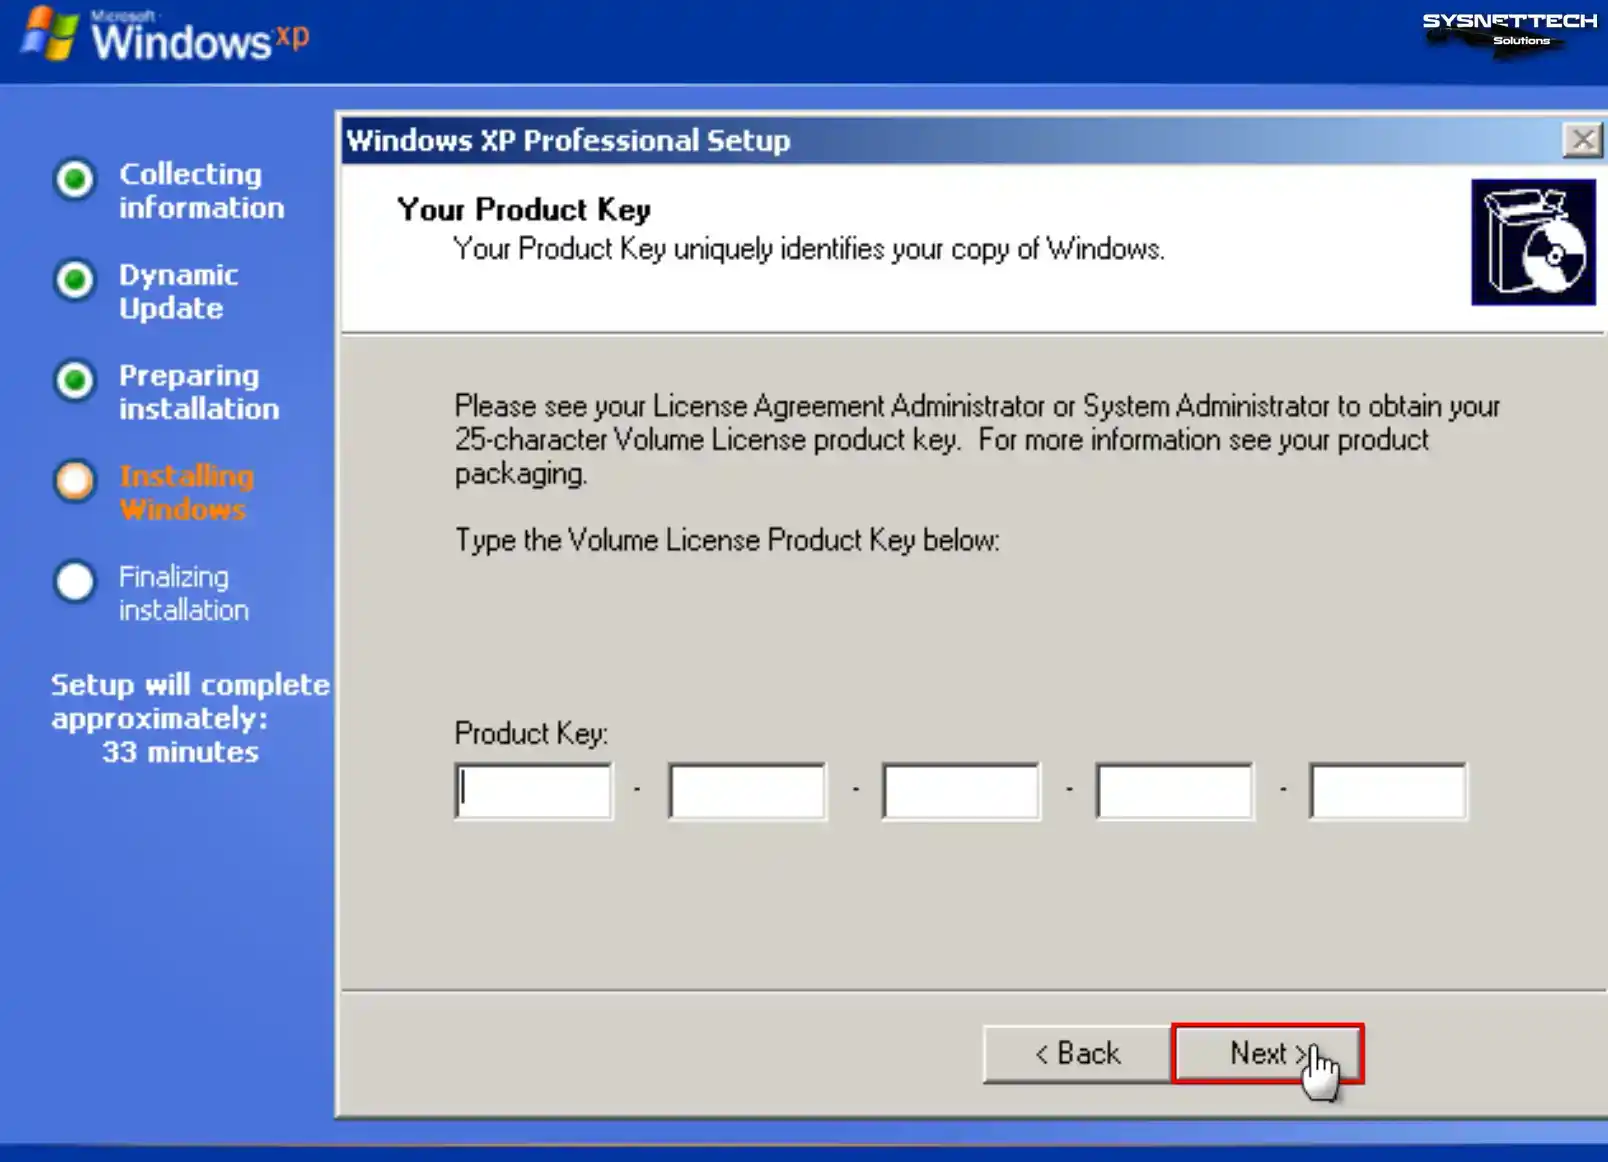
Step 13
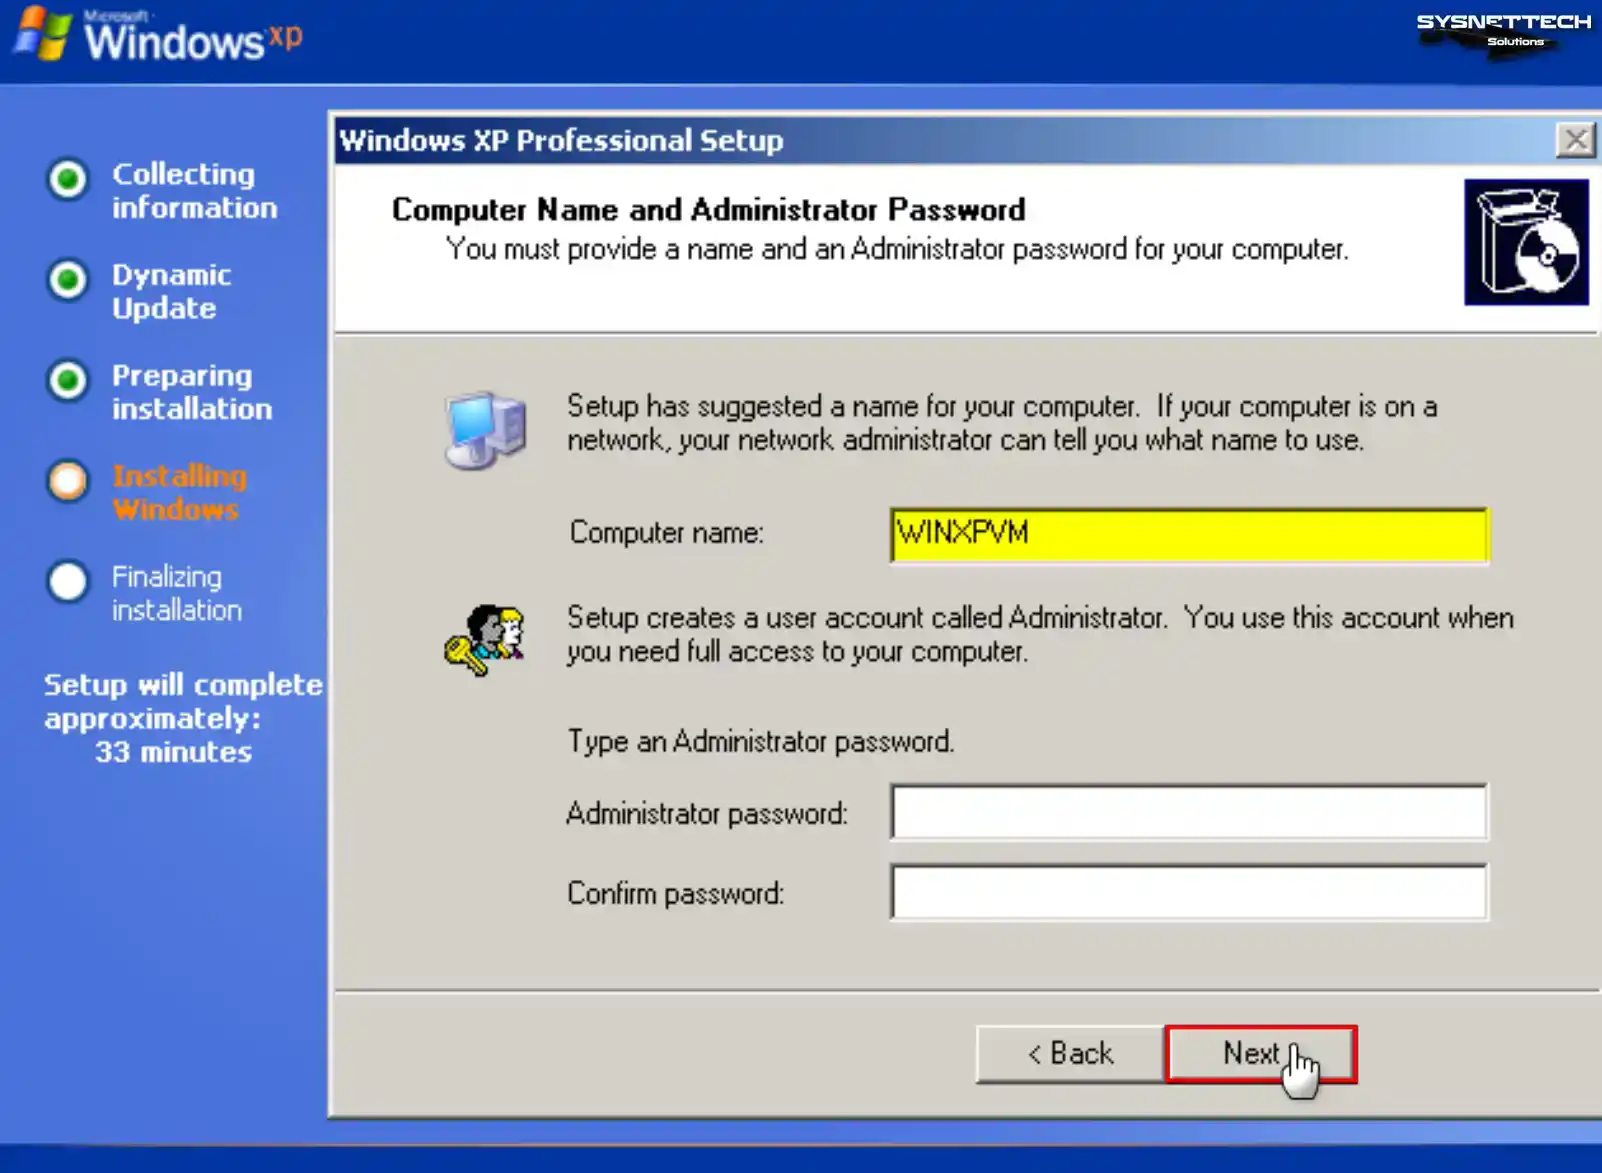
If you use your Windows guest machine in a network environment with multiple computers, ensure the computer name differs from other devices.
Type the PC name you want to use in the Computer Name field and create a new password for the Administrator account with full authority in your virtual system, or leave the relevant fields blank to avoid making a password and click Next.
Step 14
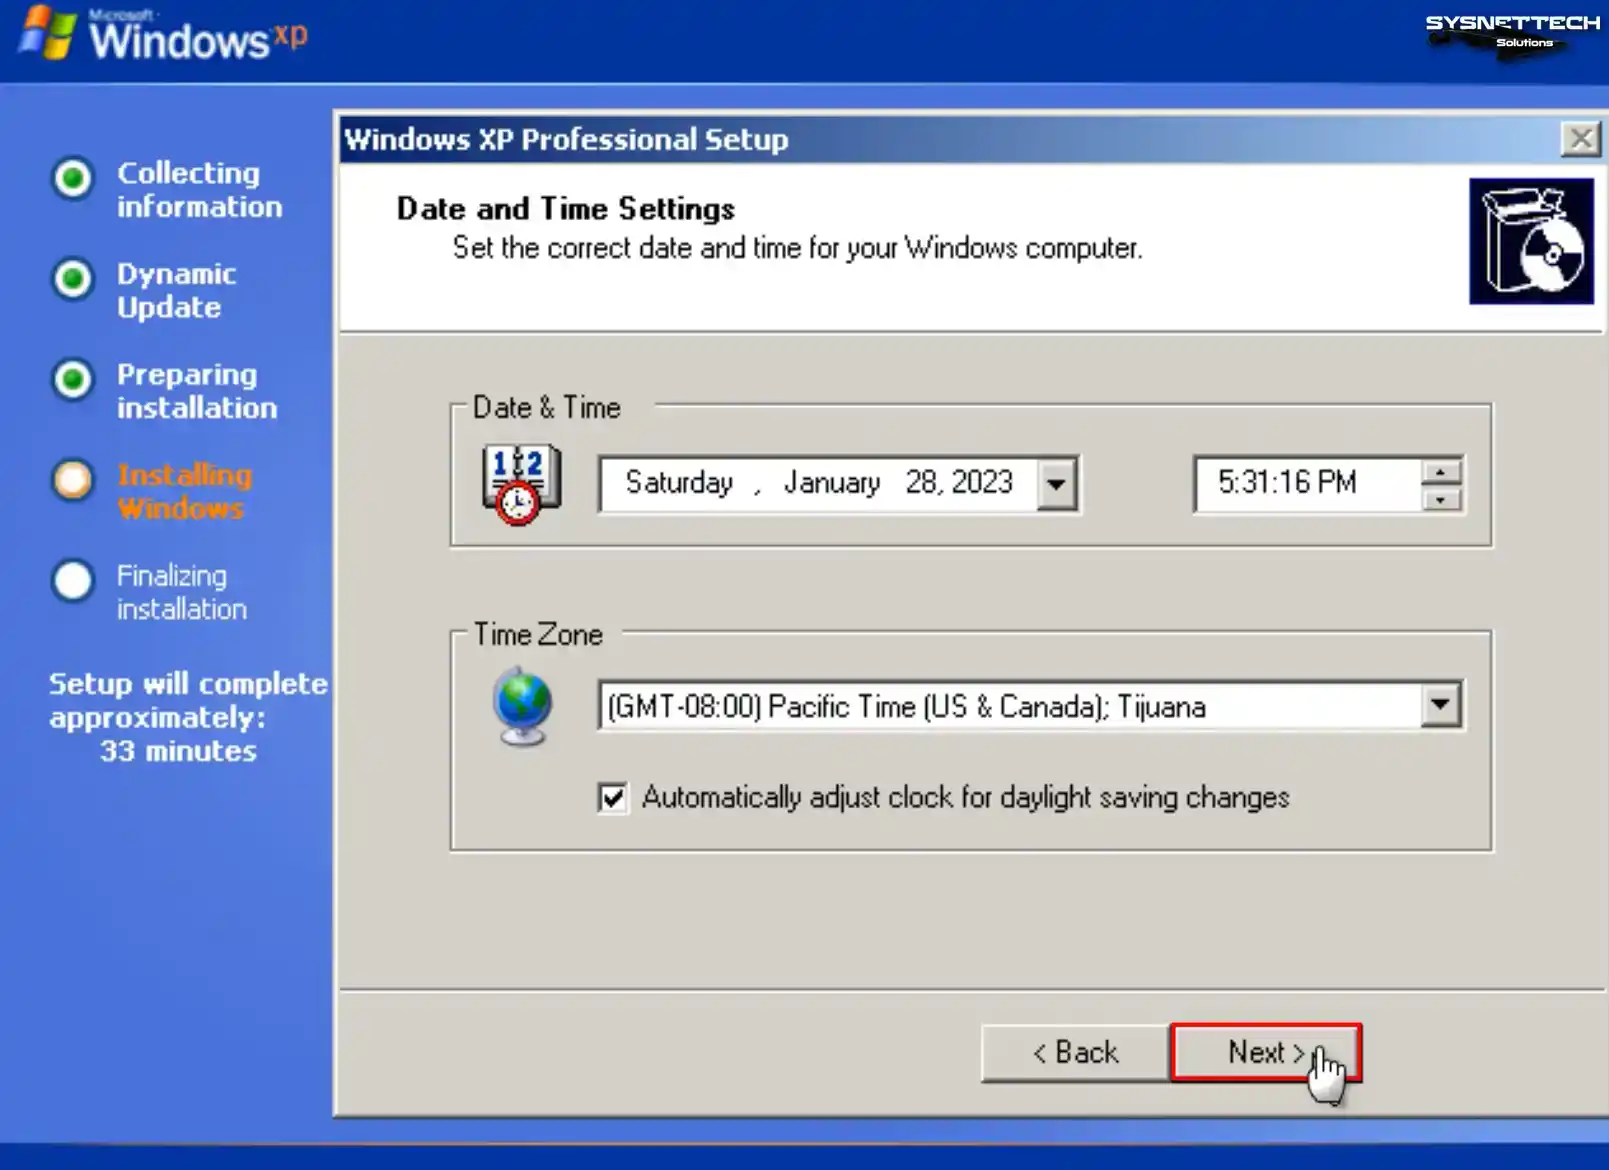
Configure your virtual computer’s date, time, and time zone settings according to your location and click Next.
Step 15
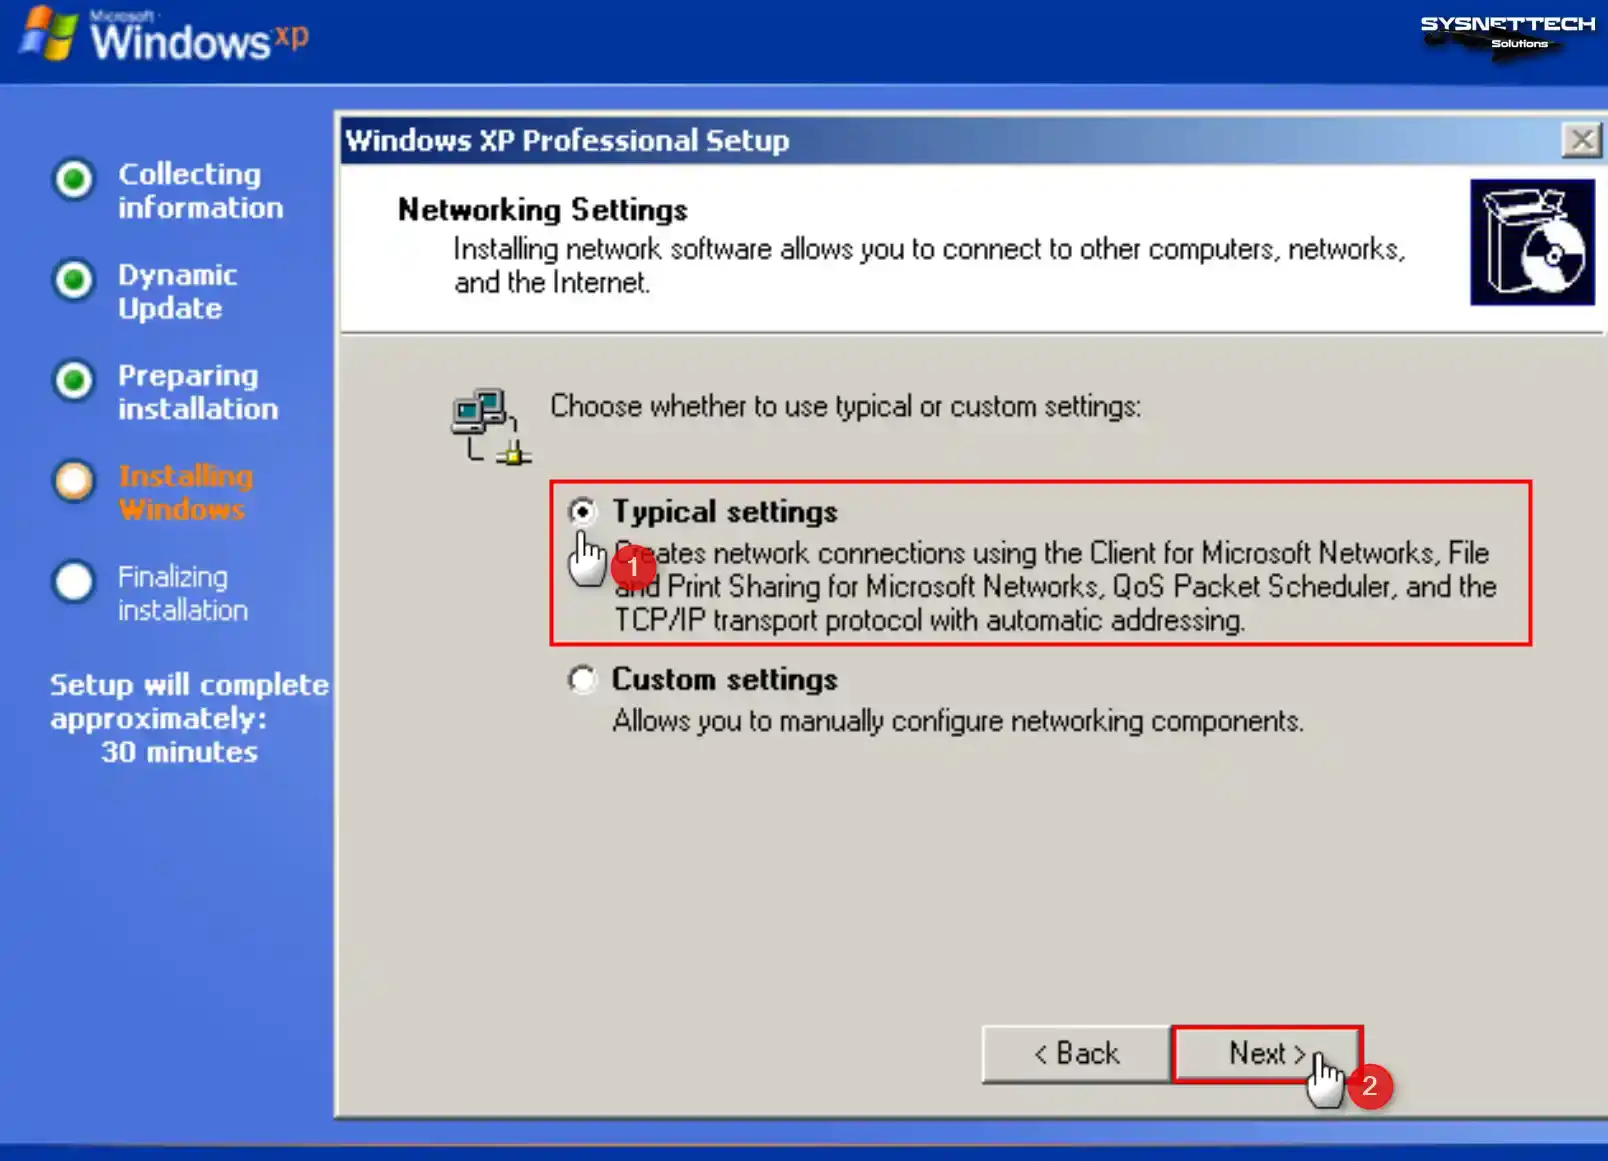
To use your VM in your physical network environment in the Networking Settings window, tick Custom Settings and make the relevant settings. Or you can continue the installation by selecting Typical Settings in general.
Step 16
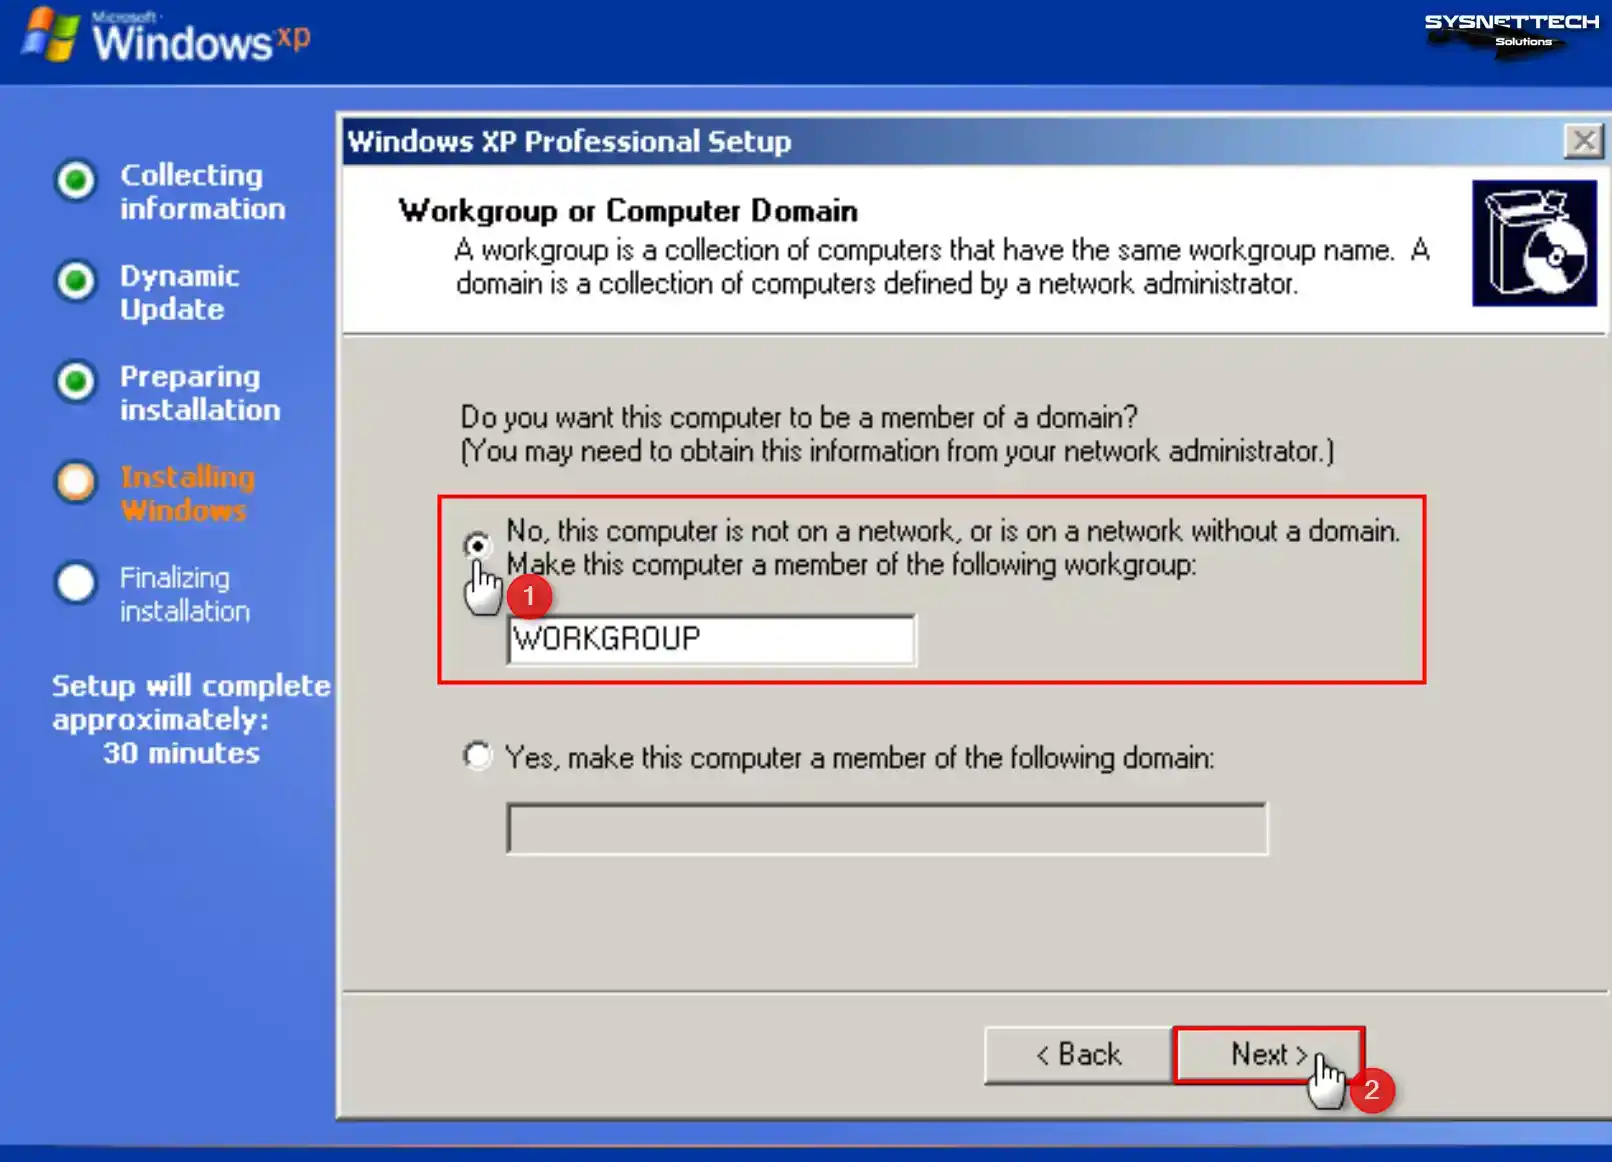
According to your network structure, if you make the virtual machine a member of a Domain environment that provides an Active Directory service, you must select the Yes option and type your Domain information.
To use your VM for personal use without subscribing to a Domain environment, select WORKGROUP and click Next.
Step 17
Wait while Windows XP is installed on the guest machine.

Step 18
Wait while the Microsoft Windows XP x64 operating system boots up.
Step 19
After the Windows XP system files are copied, your system will reboot, and your desktop environment will be ready.
Step 20
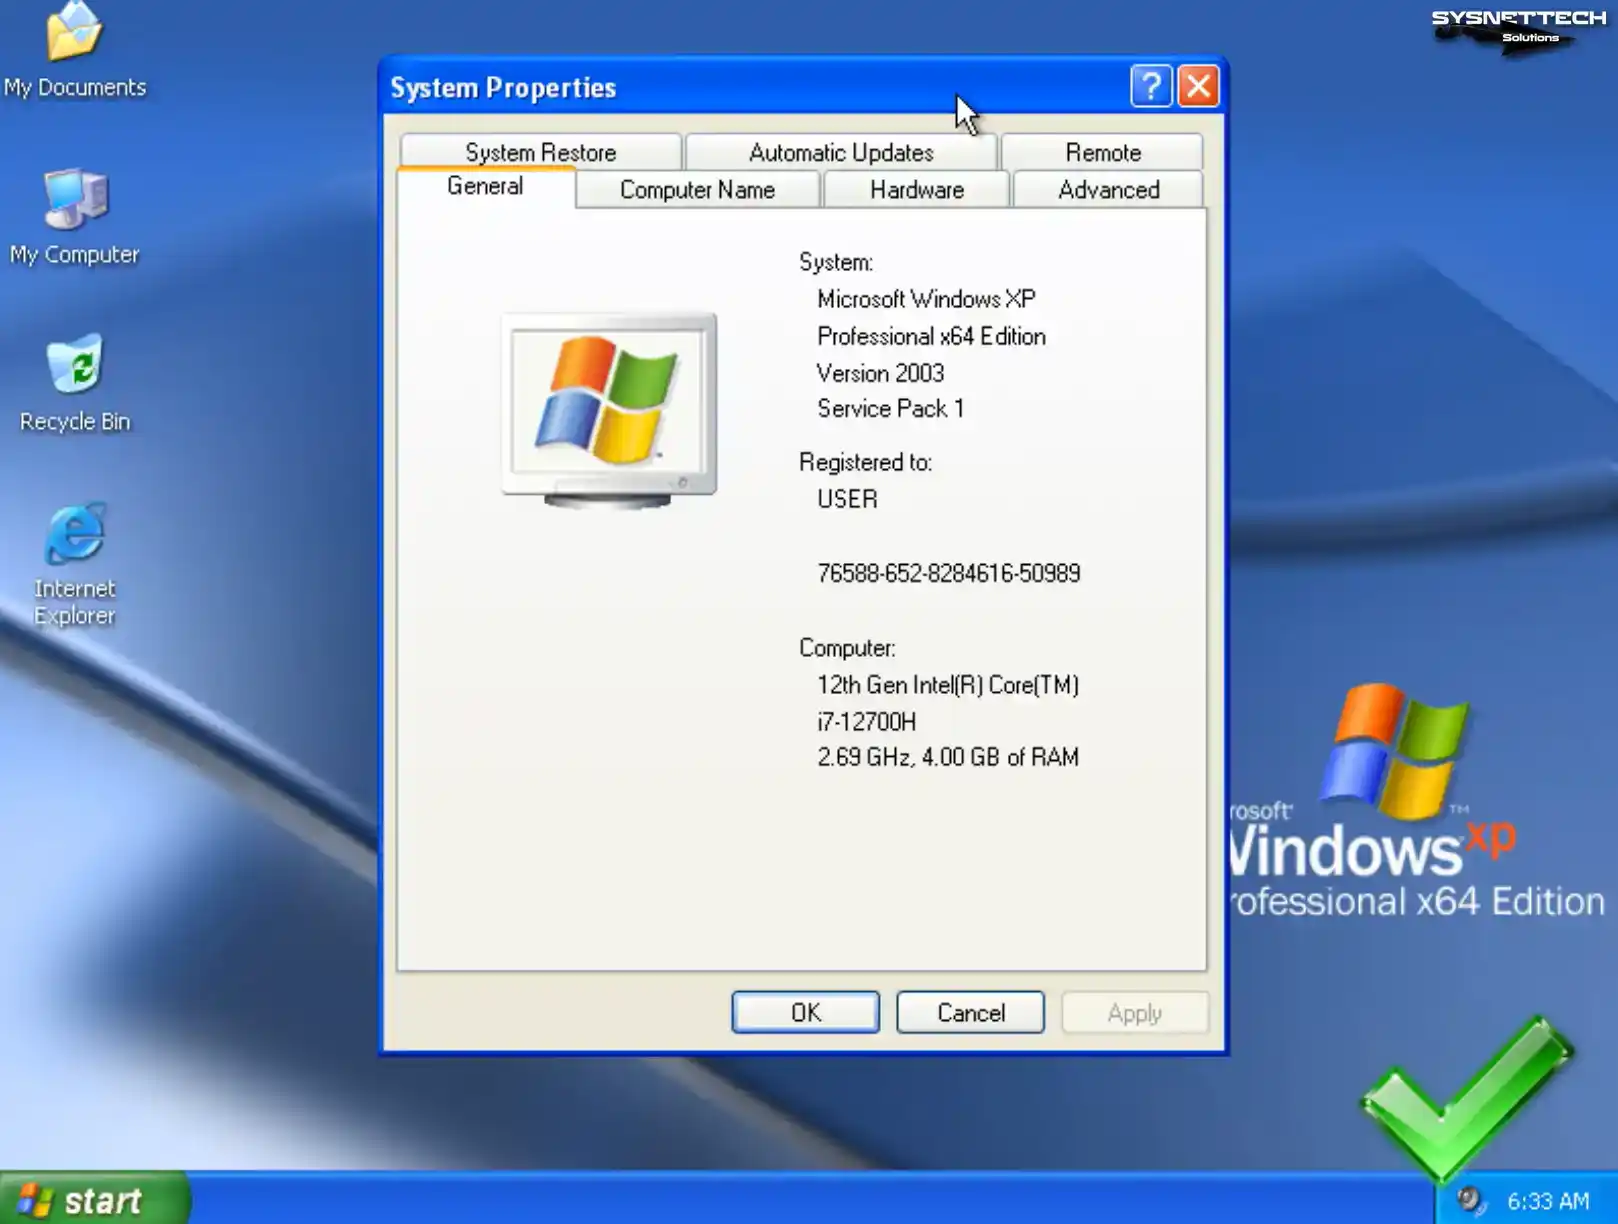
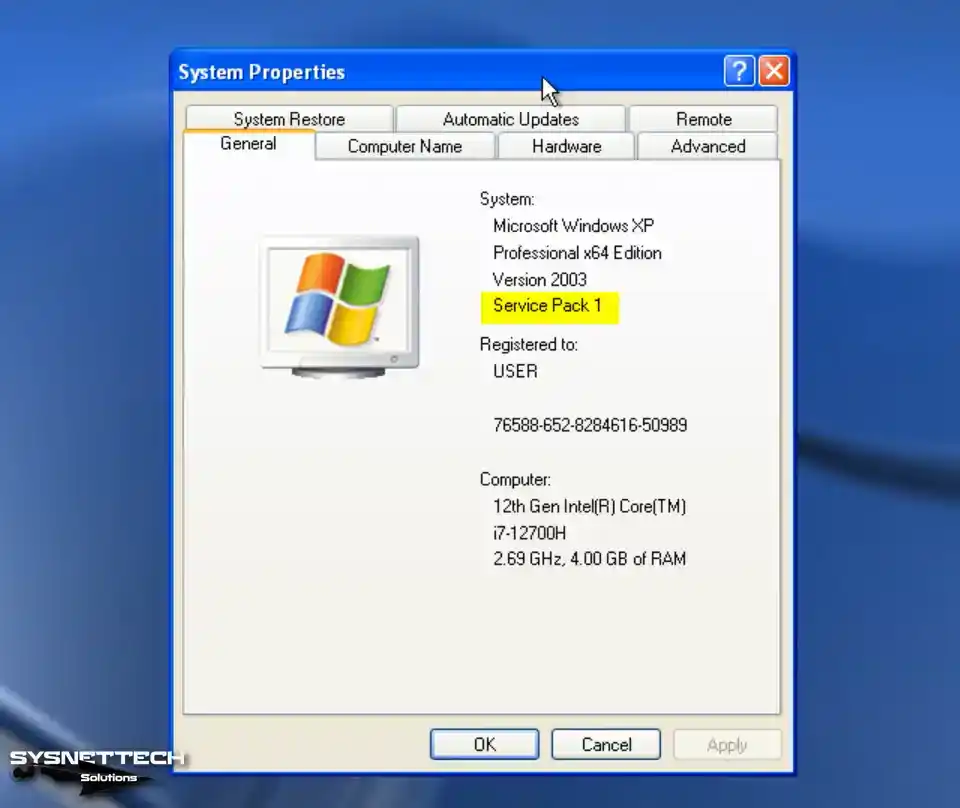
Right-click on My Computer, then click System Properties from the options that appear and check the system information.
How to Install Guest Additions
After installing Windows XP within the virtual machine, it is essential to install Guest Additions to unlock various functionalities. These include achieving full-screen resolution, facilitating file transfer between the host and the VM, and enabling the utilization of the host computer’s hardware within the VM.
Step 1
To view the Computer Management window, right-click the My Computer symbol and select Manage. Once the window appears, navigate to Device Manager and review the drivers not installed on your system.
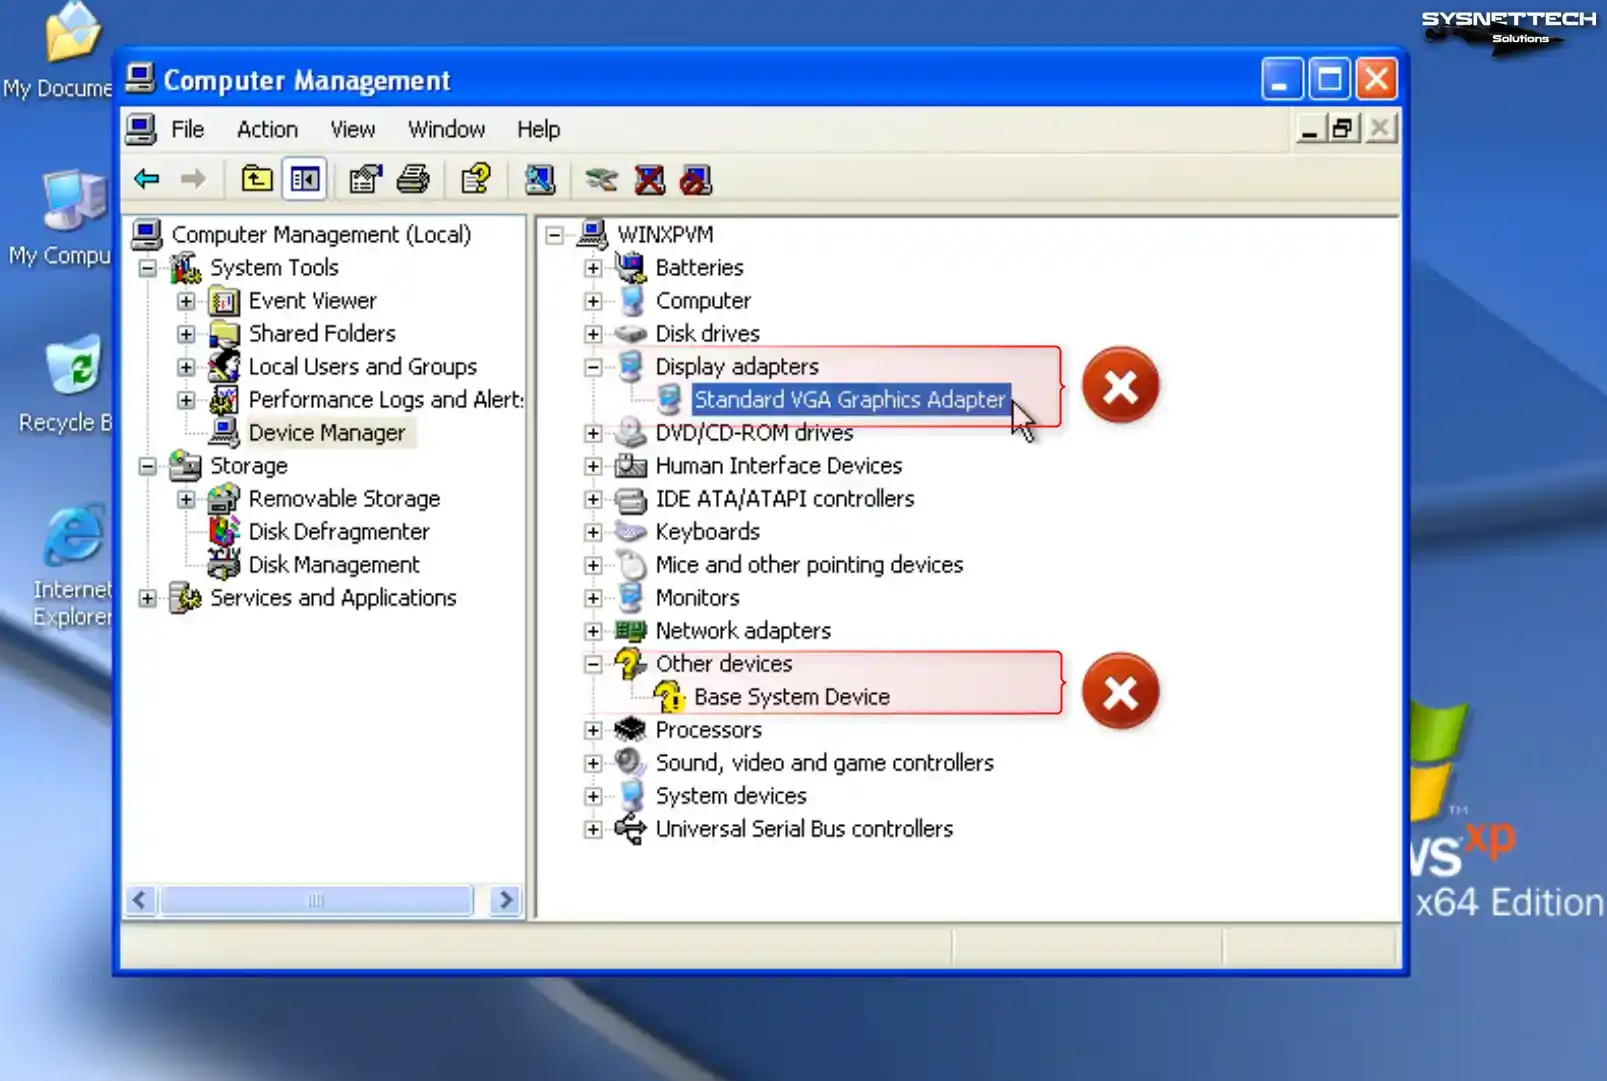
Step 2
Under normal circumstances, when installing Guest Additions on Windows XP, you will encounter an Unsigned Driver warning. This is not an error, but the driver for some devices cannot be fully installed.
To overcome the barrier imposed by unsigned drivers, you must modify a setting in the Group Policy settings. To continue, access the Start menu, enter “gpedit.msc” in the designated text box, and proceed by clicking OK.
When the Group Policy Object Editor is accessed, go to Windows Settings > Security Settings > Local Policies > Security Options and click “Devices: Unsigned driver installation behavior” from the options under Security Options.
Change the Devices: Unsigned driver installation behavior setting to Silently Succeed and restart your virtual computer after clicking OK.

Step 3
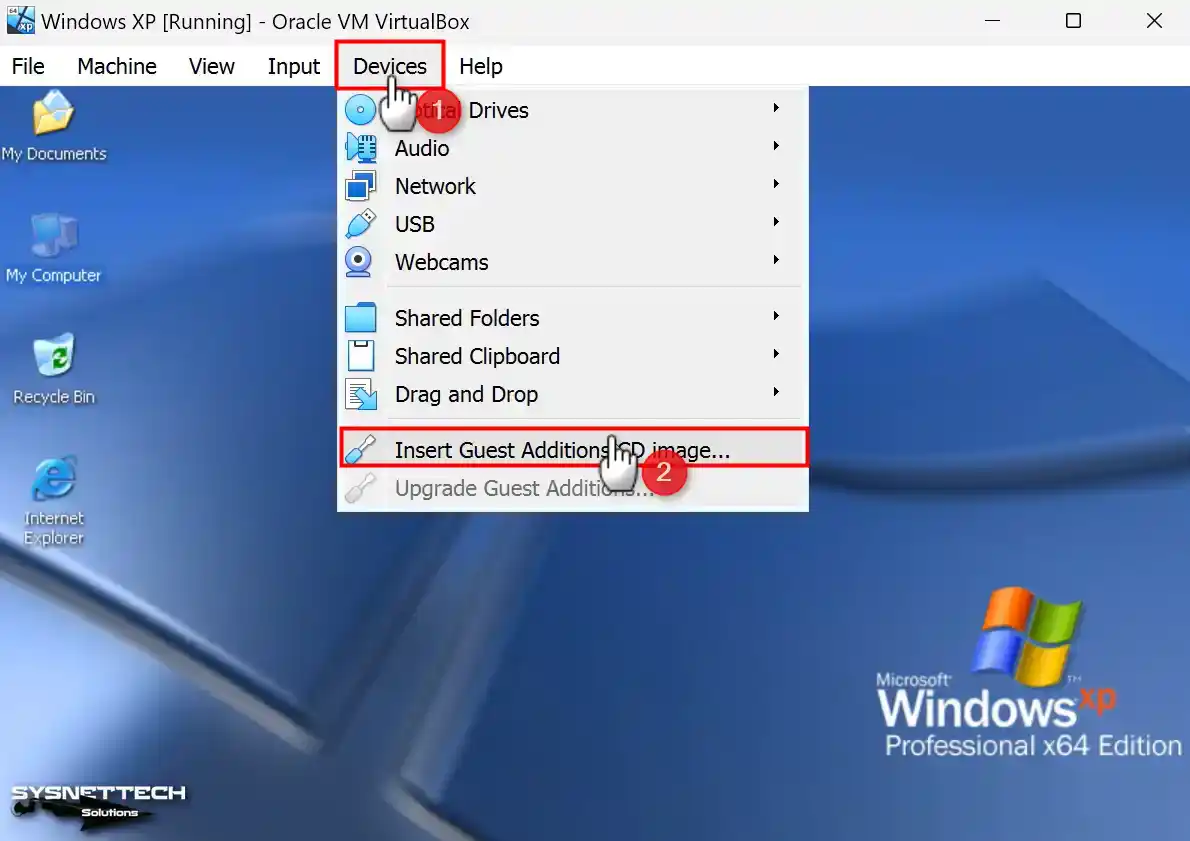
After your guest system is turned on, click Devices / Insert Guest Additions CD Image to install the guest add-ons software.
Step 4
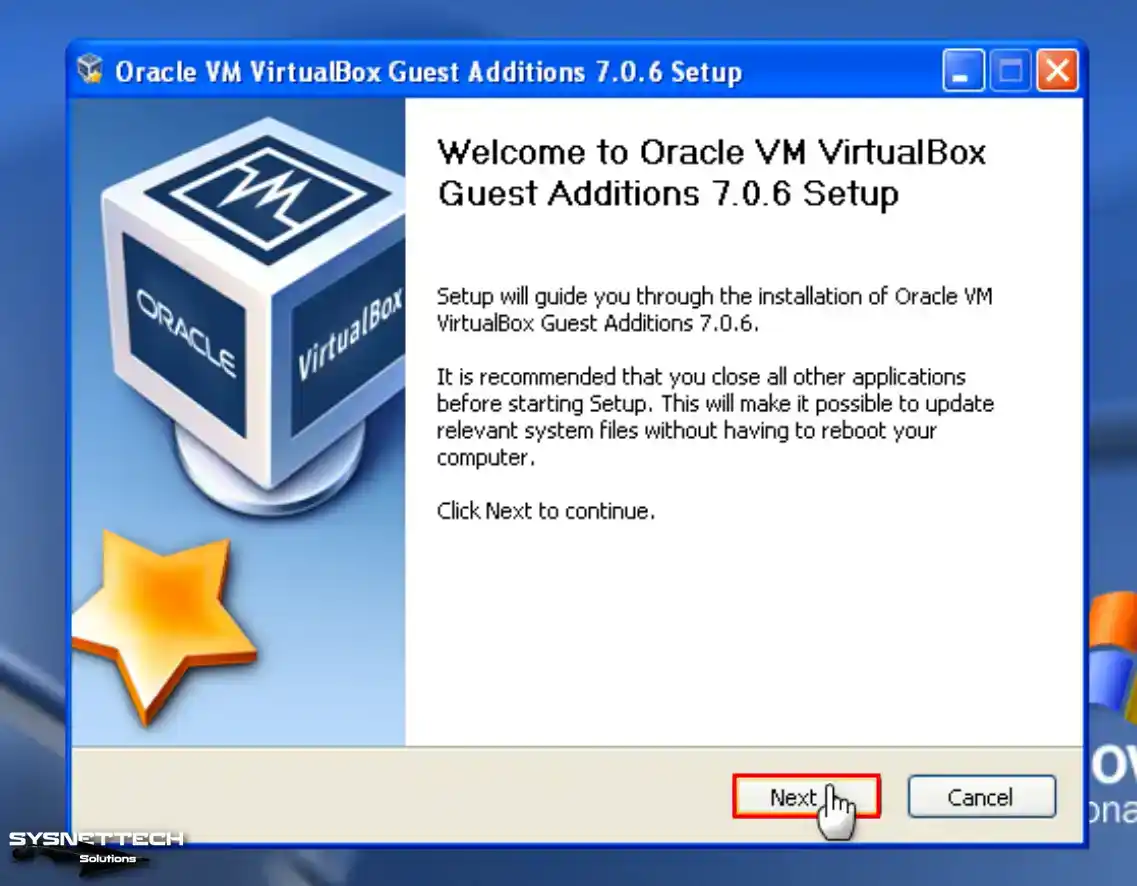
When the Guest Additions installation wizard starts, click Next to continue.
Step 5
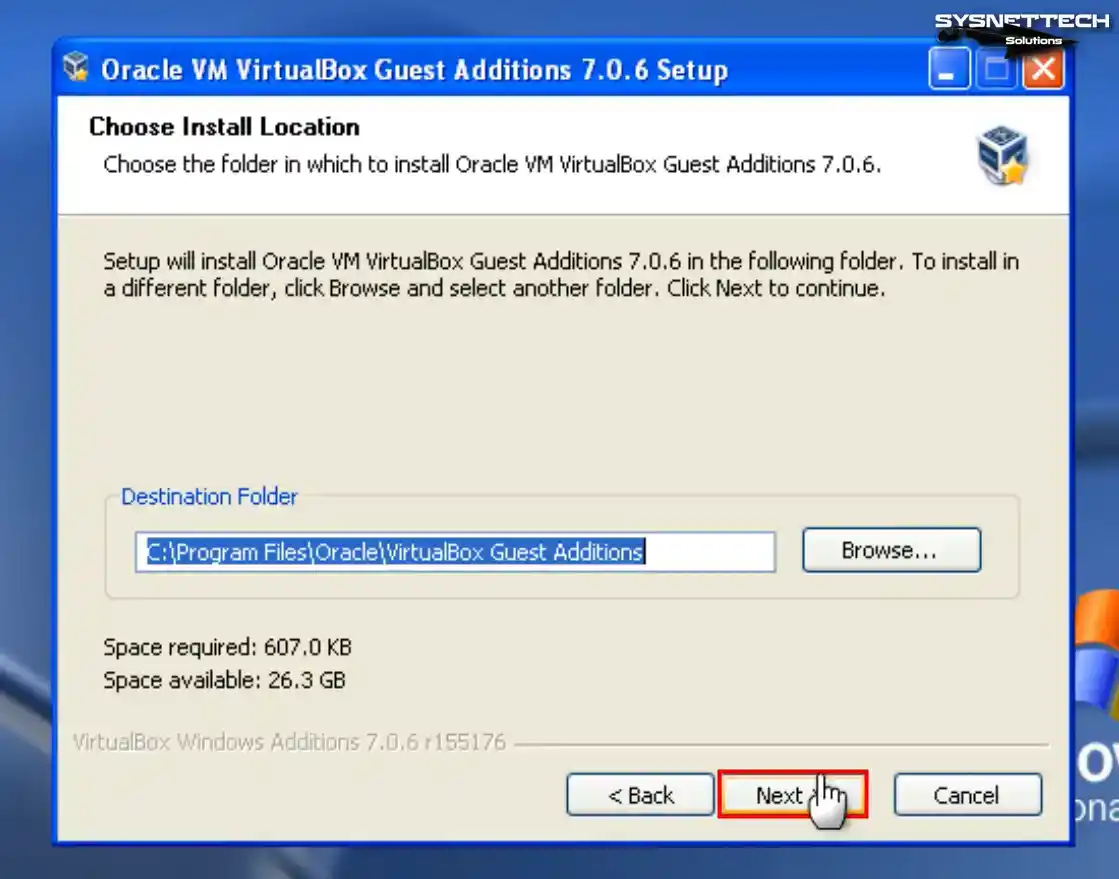
Continue without changing the installation location of the guest add-ons software.
Step 6
You can see that Direct3D Support is not enabled in the Choose Components window of the setup wizard. Direct3D support for older operating systems has been discontinued in version 6.1 of VirtualBox. Therefore, installing the 6.0 versions of VirtualBox is imperative to utilize this feature.
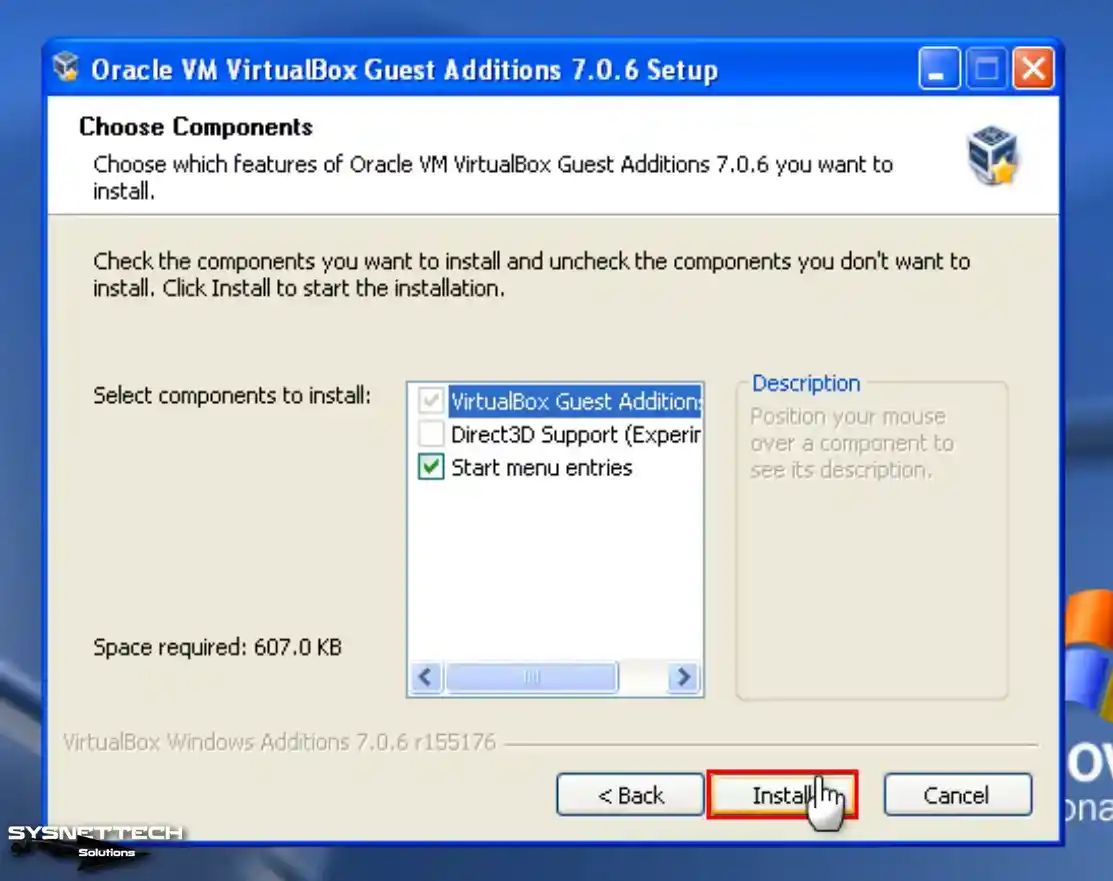
Step 7
After installing the tools of your guest system, restart your system.
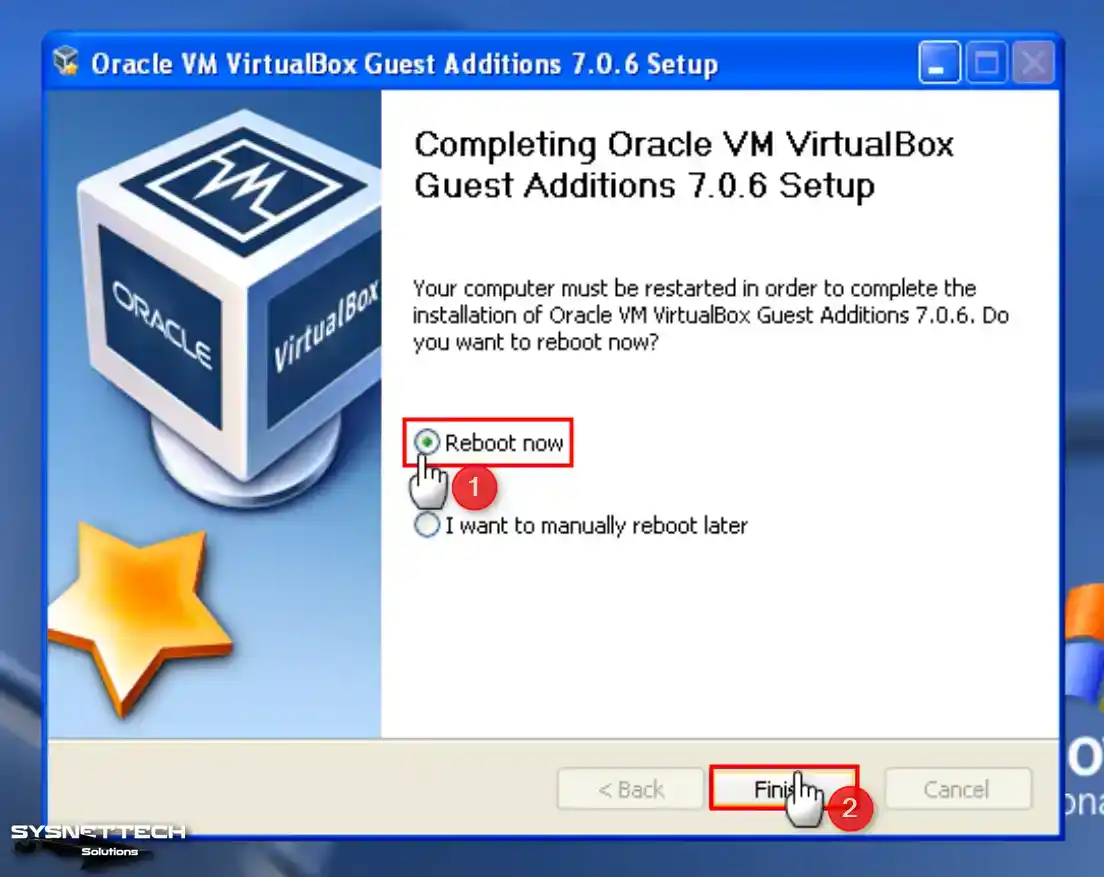
Step 8
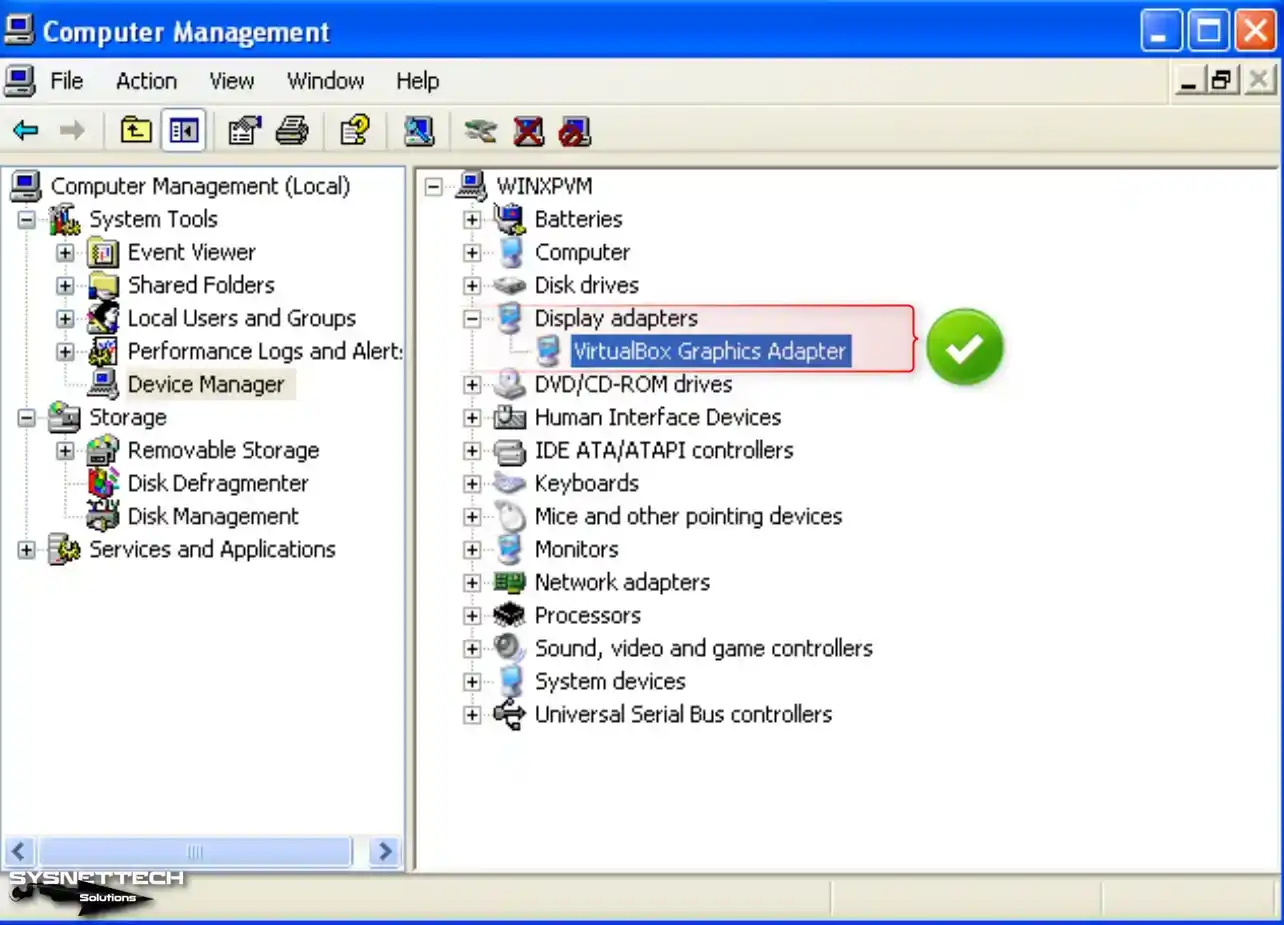
After restarting your VM, view Device Manager again; you can see all drivers installed successfully.
Step 9
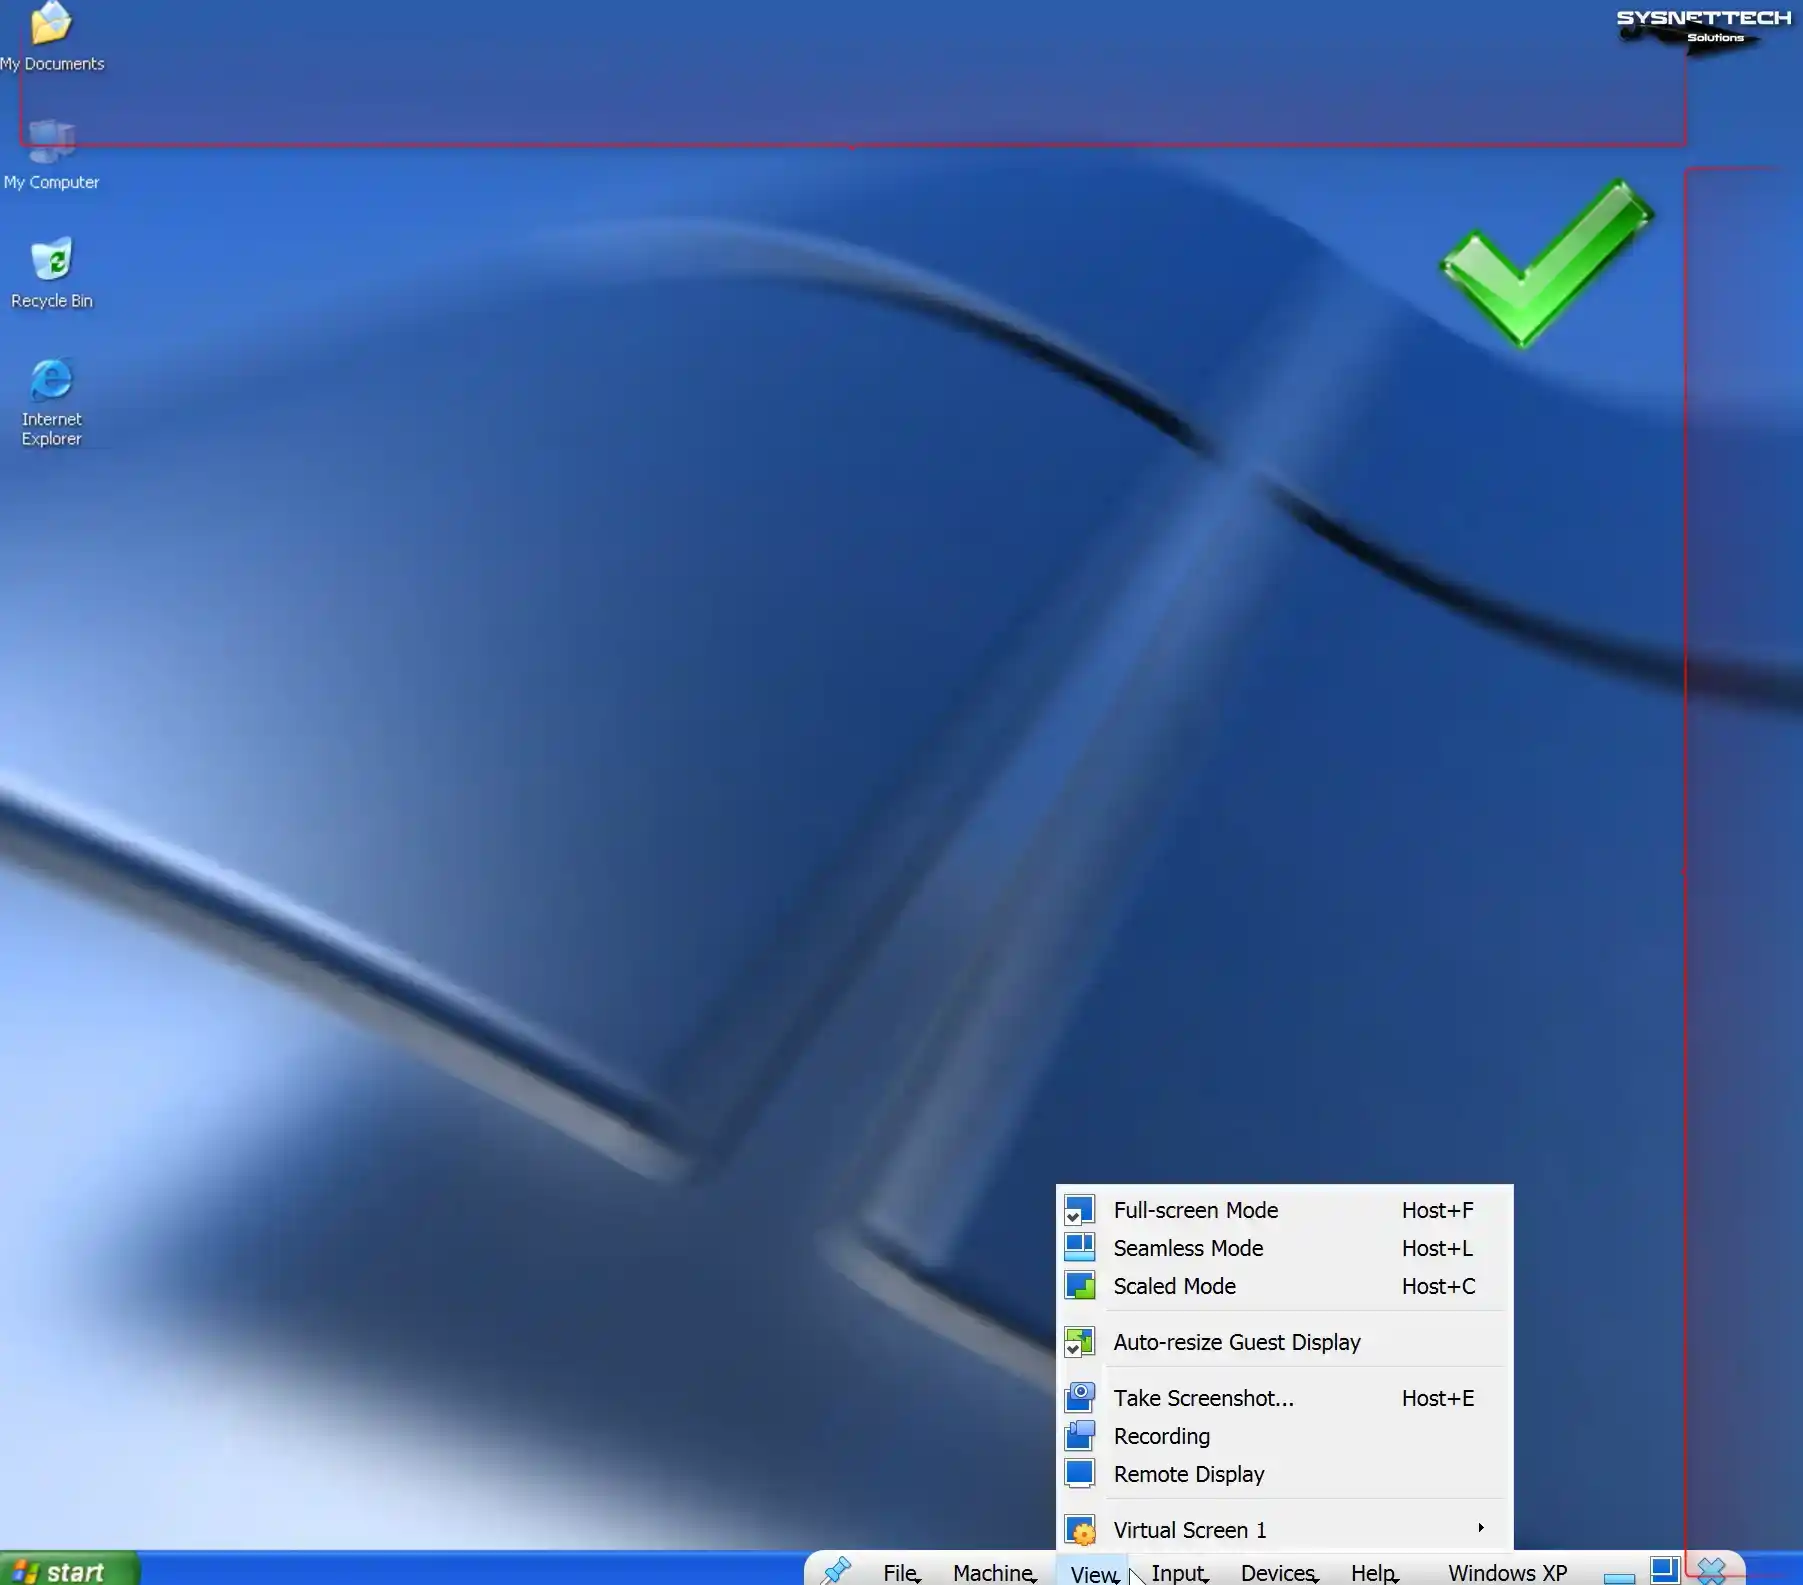
You can use your virtual machine in full-screen resolution or scaled mode with the options in the View tab from the tool menu of VirtualBox.
Step 10
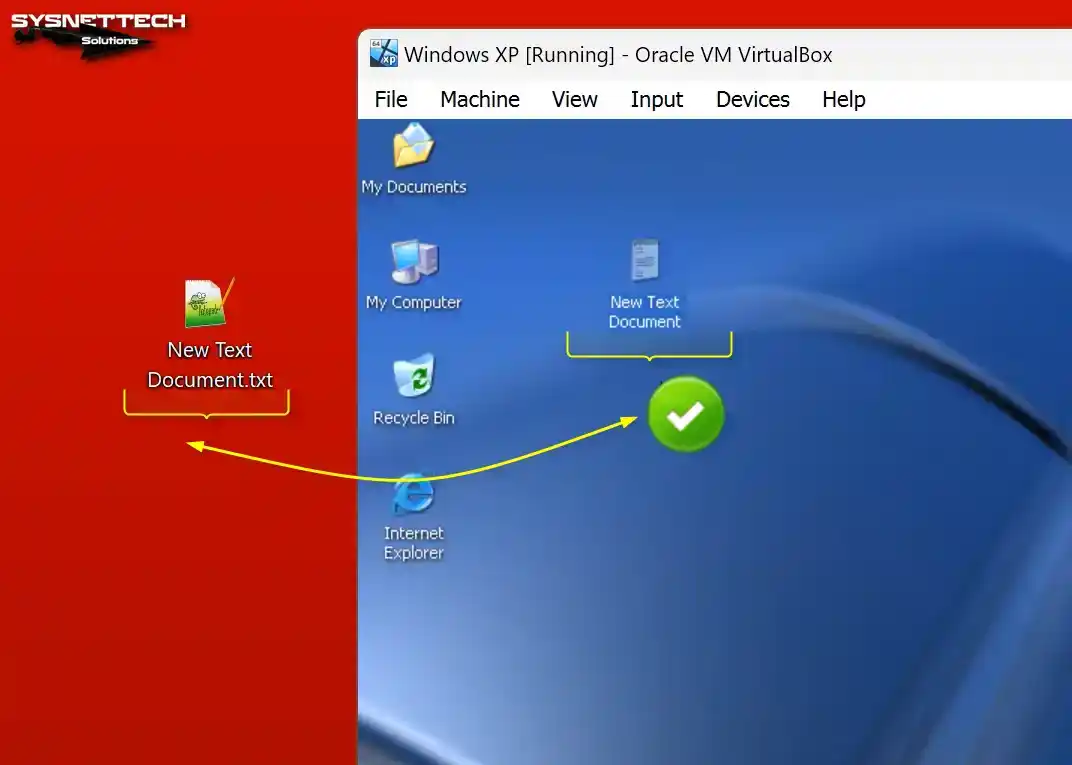
When employing the Drag and Drop method, you will observe the successful transfer of a text document from the desktop of your host computer to your virtual computer.
How to Configure Shared Folder
Unfortunately, folder copying to the virtual machine fails on old systems. Before copying a folder, you must archive it using Winrar or 7-Zip and then copy it to the VM.
Since it takes time to archive a folder with larger file sizes, you can transfer data faster by creating a public folder for your VM on your host computer and configuring the Shared Folder.
Step 1
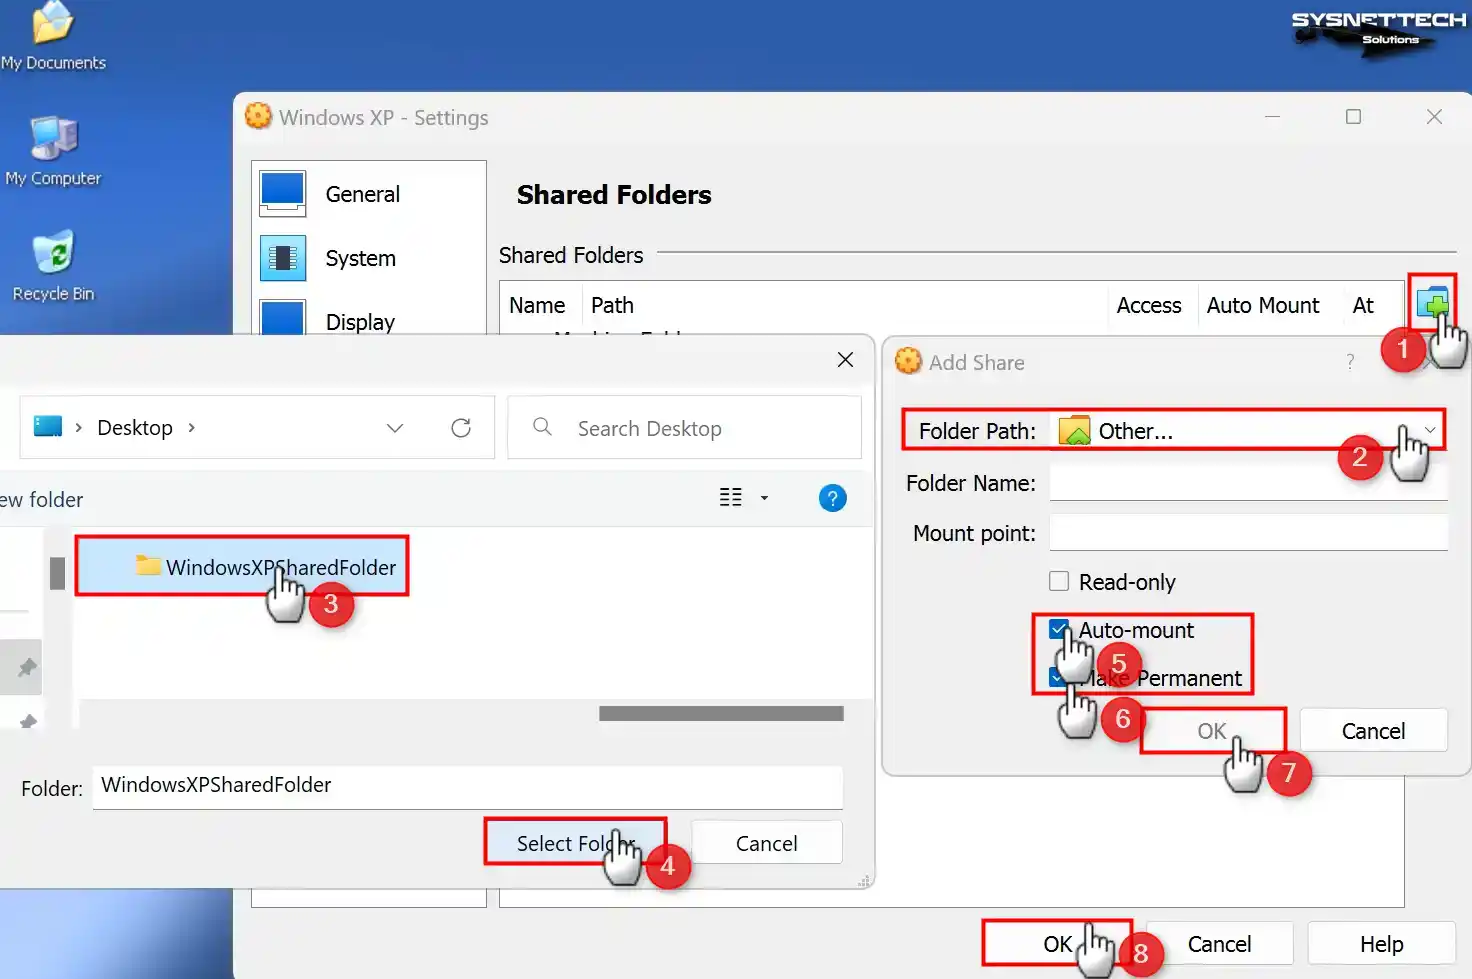
Click Devices / Shared Folders / Shared Folders Settings on your Windows XP virtual PC.

Step 2
Click the green + button in Shared Folders settings and open the Add Share window. Specify the folder you created on your host PC in the Folder Path section.
Check the Auto-Mount and Make Permanent options and click OK to add the shared folder as a network drive.
Step 3
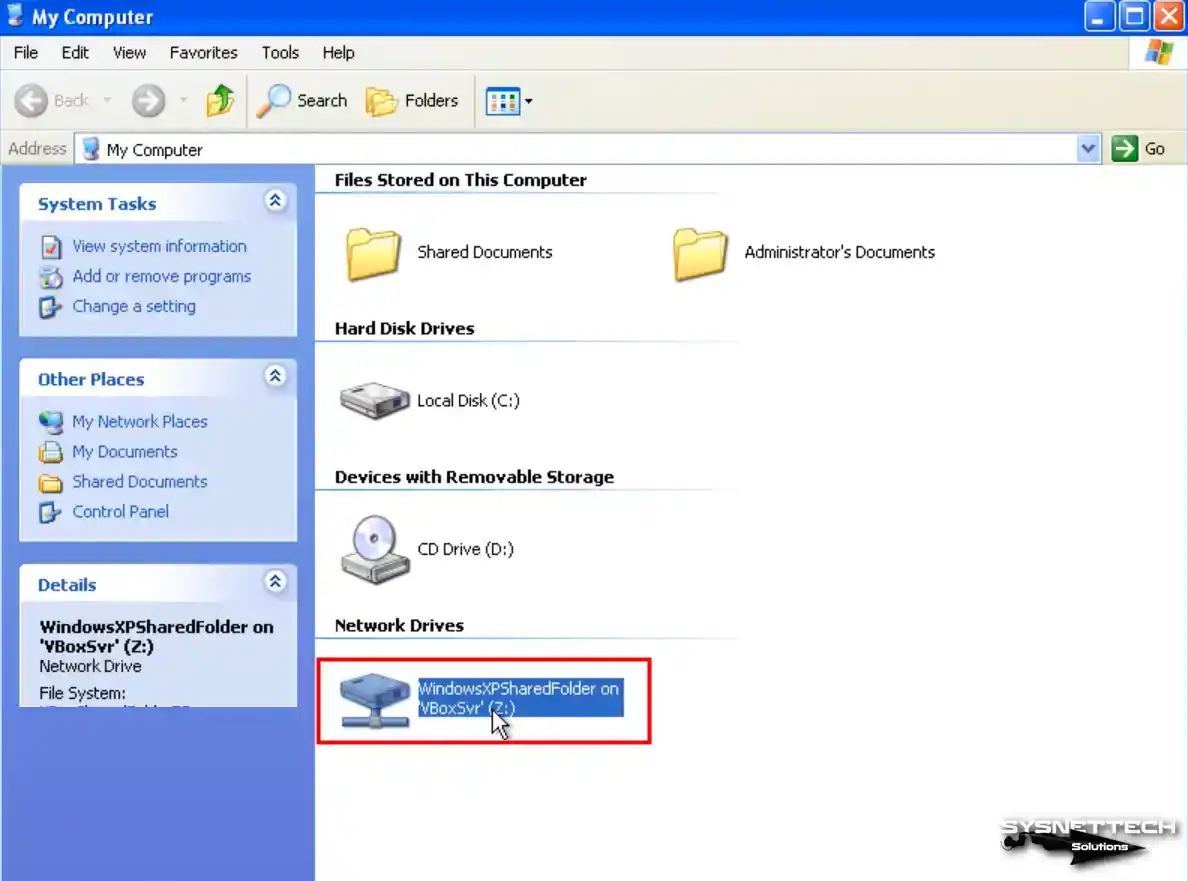
Upon opening the My Computer window, you will notice the inclusion of the Shared Folder as a network drive.
After viewing the network connections, switch to the Folder structure and click Entire Network / VirtualBox Shared Folders on the left. You can see that you can approach the folder on the host over the network.
Step 4
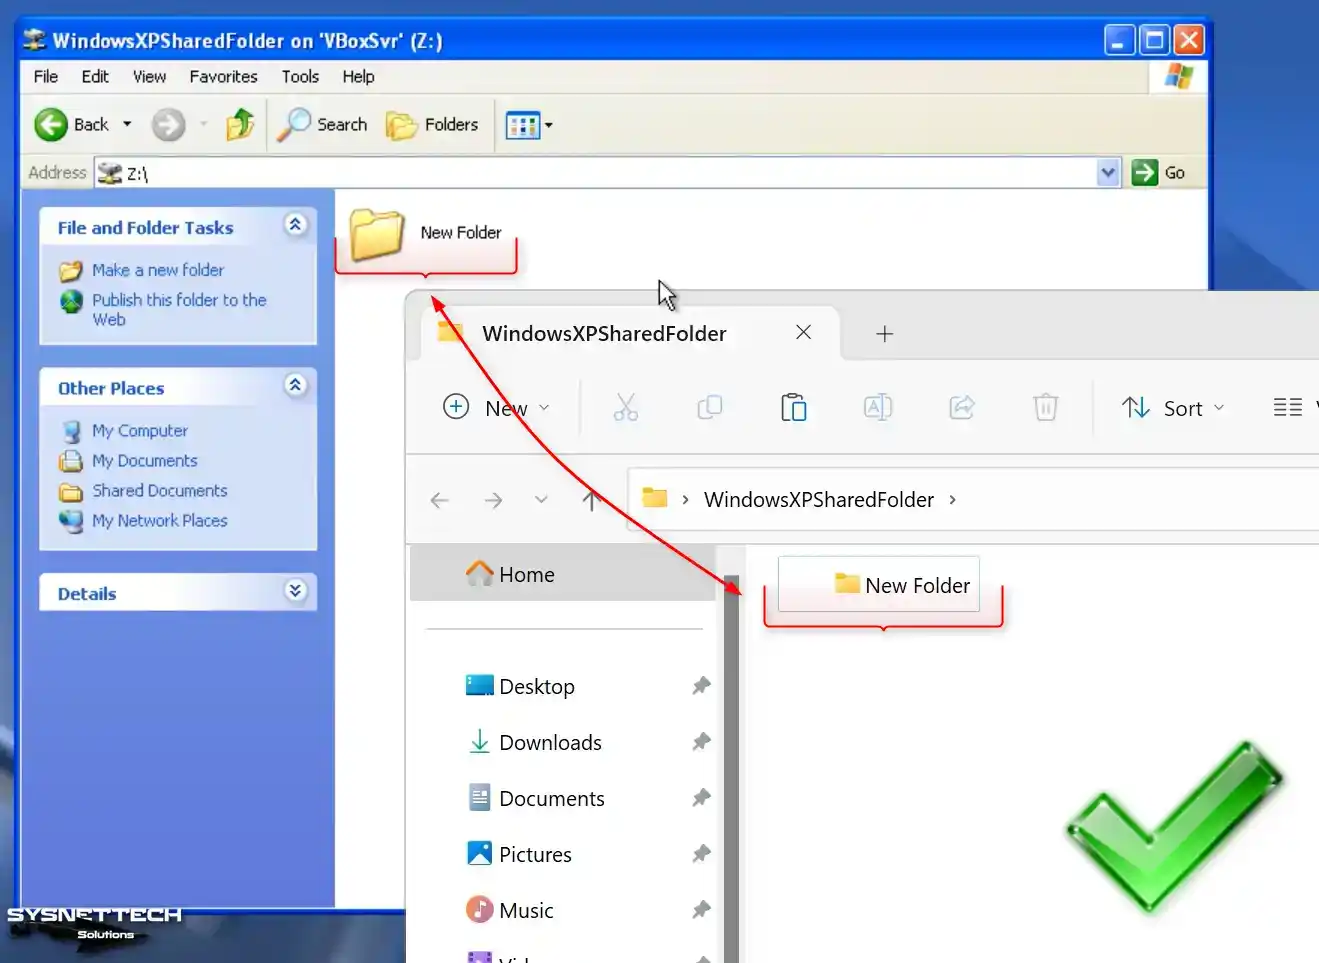
Create a folder in the shared folder on your host system and check that this folder is created simultaneously in your VM.
How to Check Internet Connection
Network and Internet connection settings are automatically configured after installing a virtual system with Oracle VM VirtualBox or other virtualization software. If the services of your virtualization software become corrupted, you may encounter difficulties in accessing the Internet.
Network settings of Windows XP guest machines running on Oracle VM are configured with a NAT coupler by default, and a different block is created than the IP block you use in your existing network.
Step 1
Open Run and execute the CMD command to check if the Internet connection is working smoothly in your virtual system. After opening the CMD prompt, ping the Google servers using the ping 8.8.8.8 command.
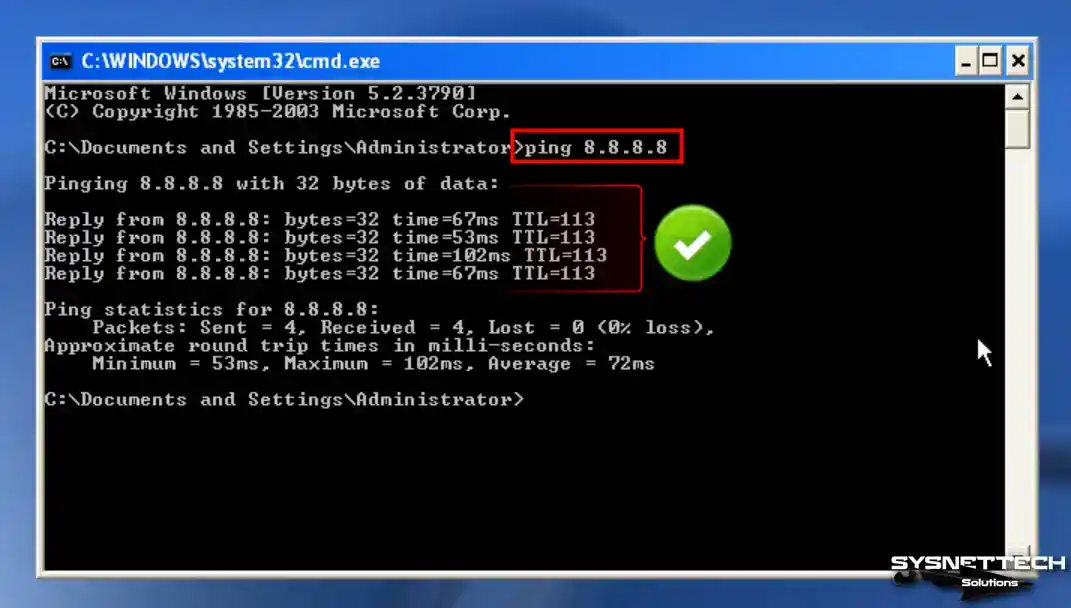
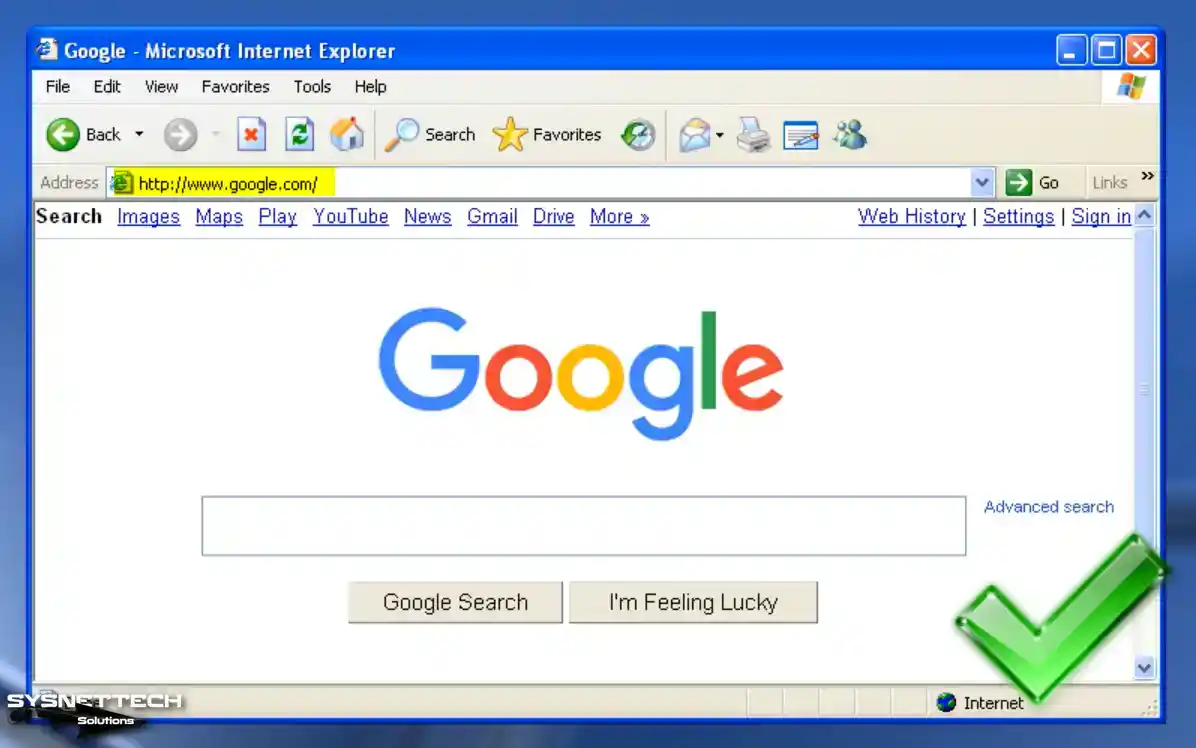
Step 2
Once the ping test is successful, visit the Google homepage through the Internet Explorer browser to verify the health of your Internet connection.
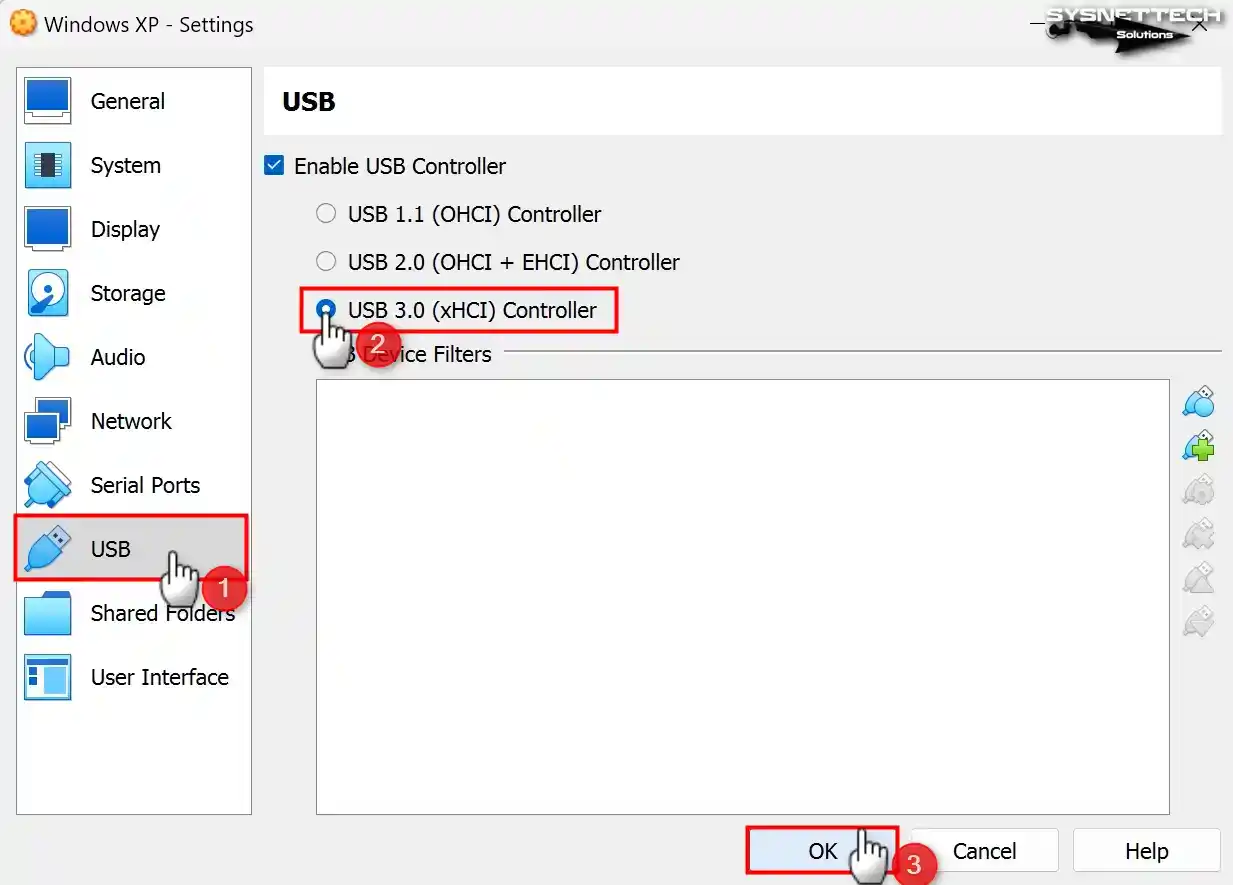
How to Enable and Install USB 3.0 Driver
By default, enabling USB 3.0 support on a Windows XP virtual machine is not typically feasible. However, you can resolve this issue by substituting the USB controller. While USB 2.0 devices can be operated in the virtual machine without problems, enabling 3.0 or 3.1 supports faster file transfers using the more advanced technology.
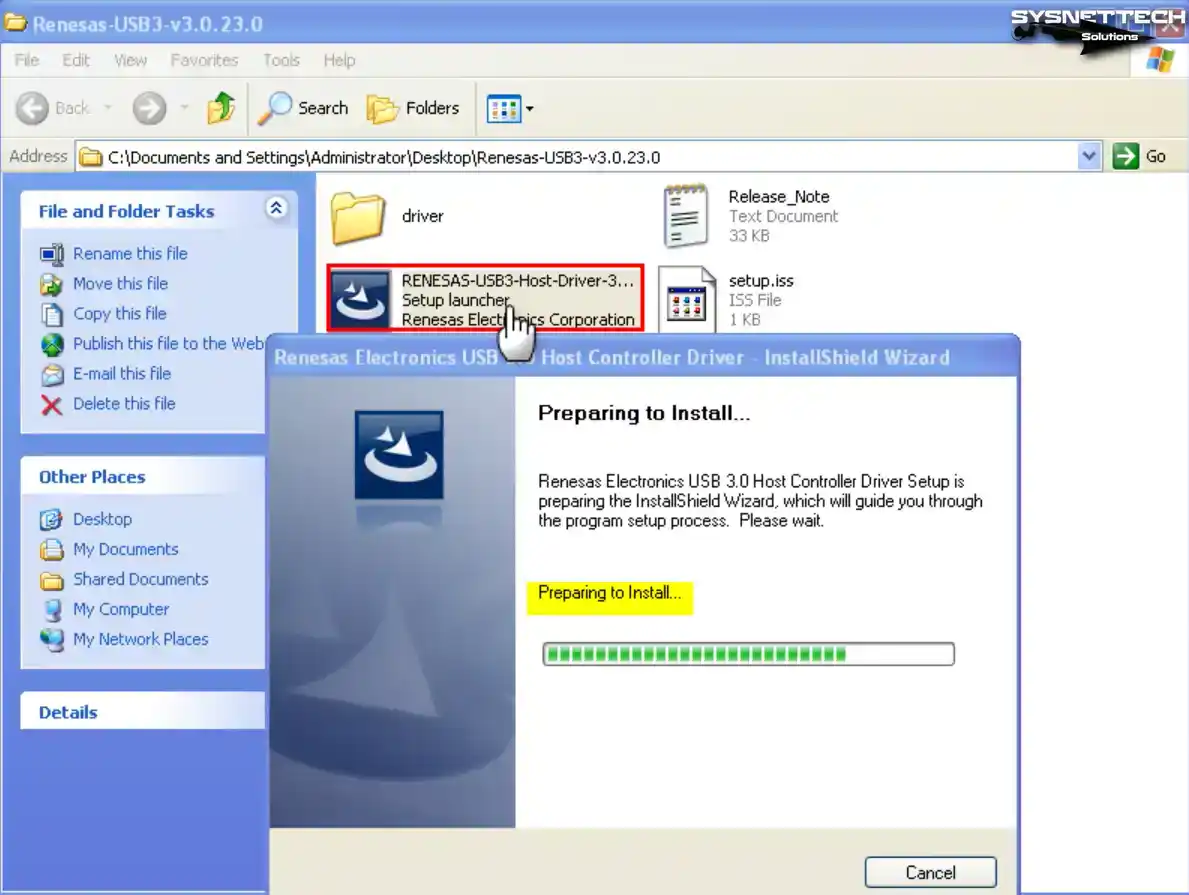
Step 1
Before enabling USB 3.0 on your Windows XP guest machine, it is recommended to download the RENESAS Driver from the table located at the bottom of the article. Once downloaded, copy the driver to your system and proceed to double-click the setup file to initiate the wizard.
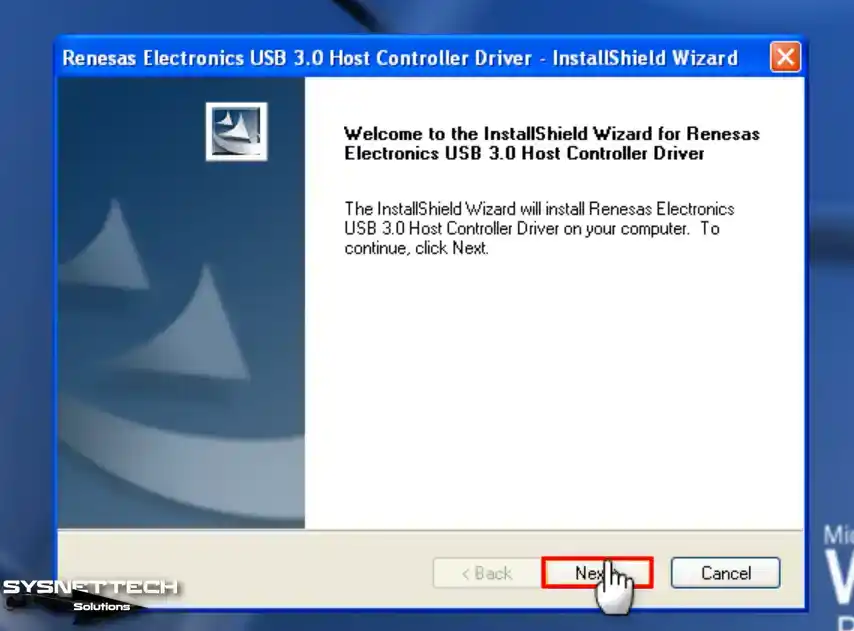
Step 2
Click Next in the Renesas Electronics USB 3.0 Host Controller Driver wizard.
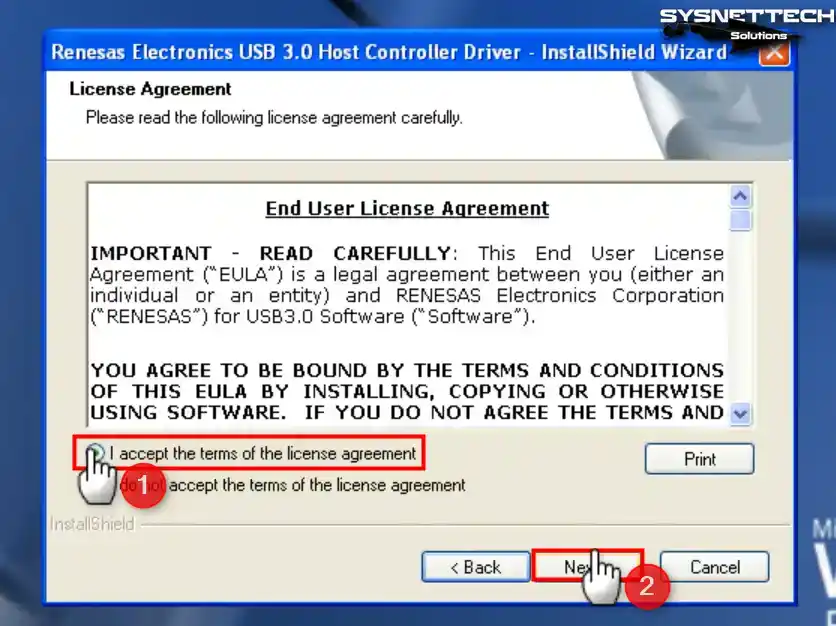
Step 3
Accept the license agreement of the Renesas Electronics USB driver software and click Next.
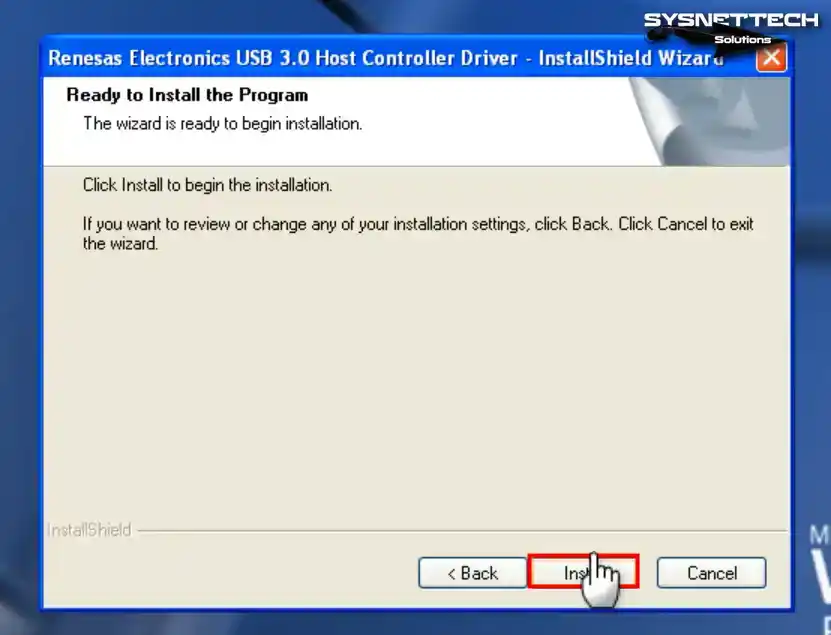
Step 4
Click the Install button to build the USB 3.0 driver.
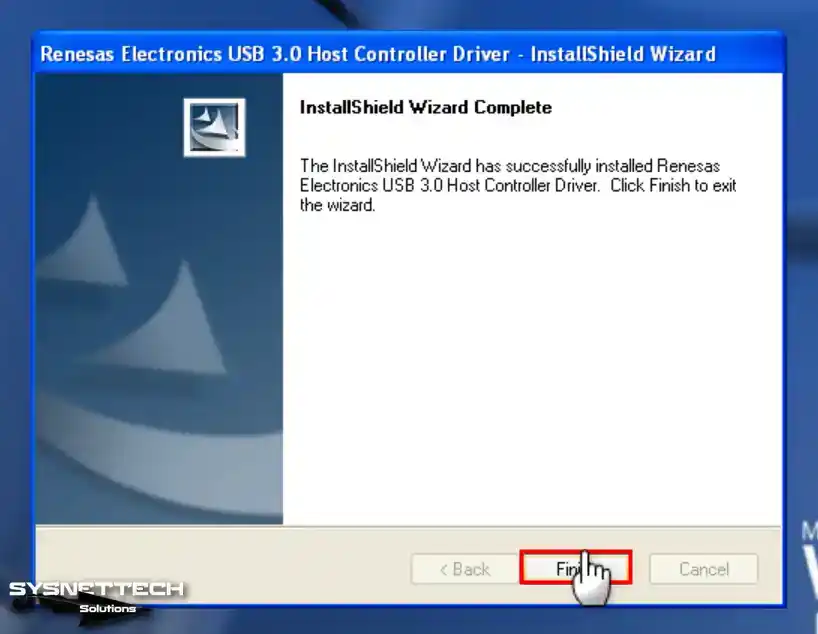
Step 5
After installing the USB 3.0 driver on Windows XP, close the wizard by clicking Finish.
Step 6
Close the Oracle VM VirtualBox on your host PC’s system, go to its installed location, right-click, and click Open in Terminal.
./VBoxManage setextradata 'Windows XP' VBoxInternal/Devices/usb-xhci/0/Config/ChipType uPD720201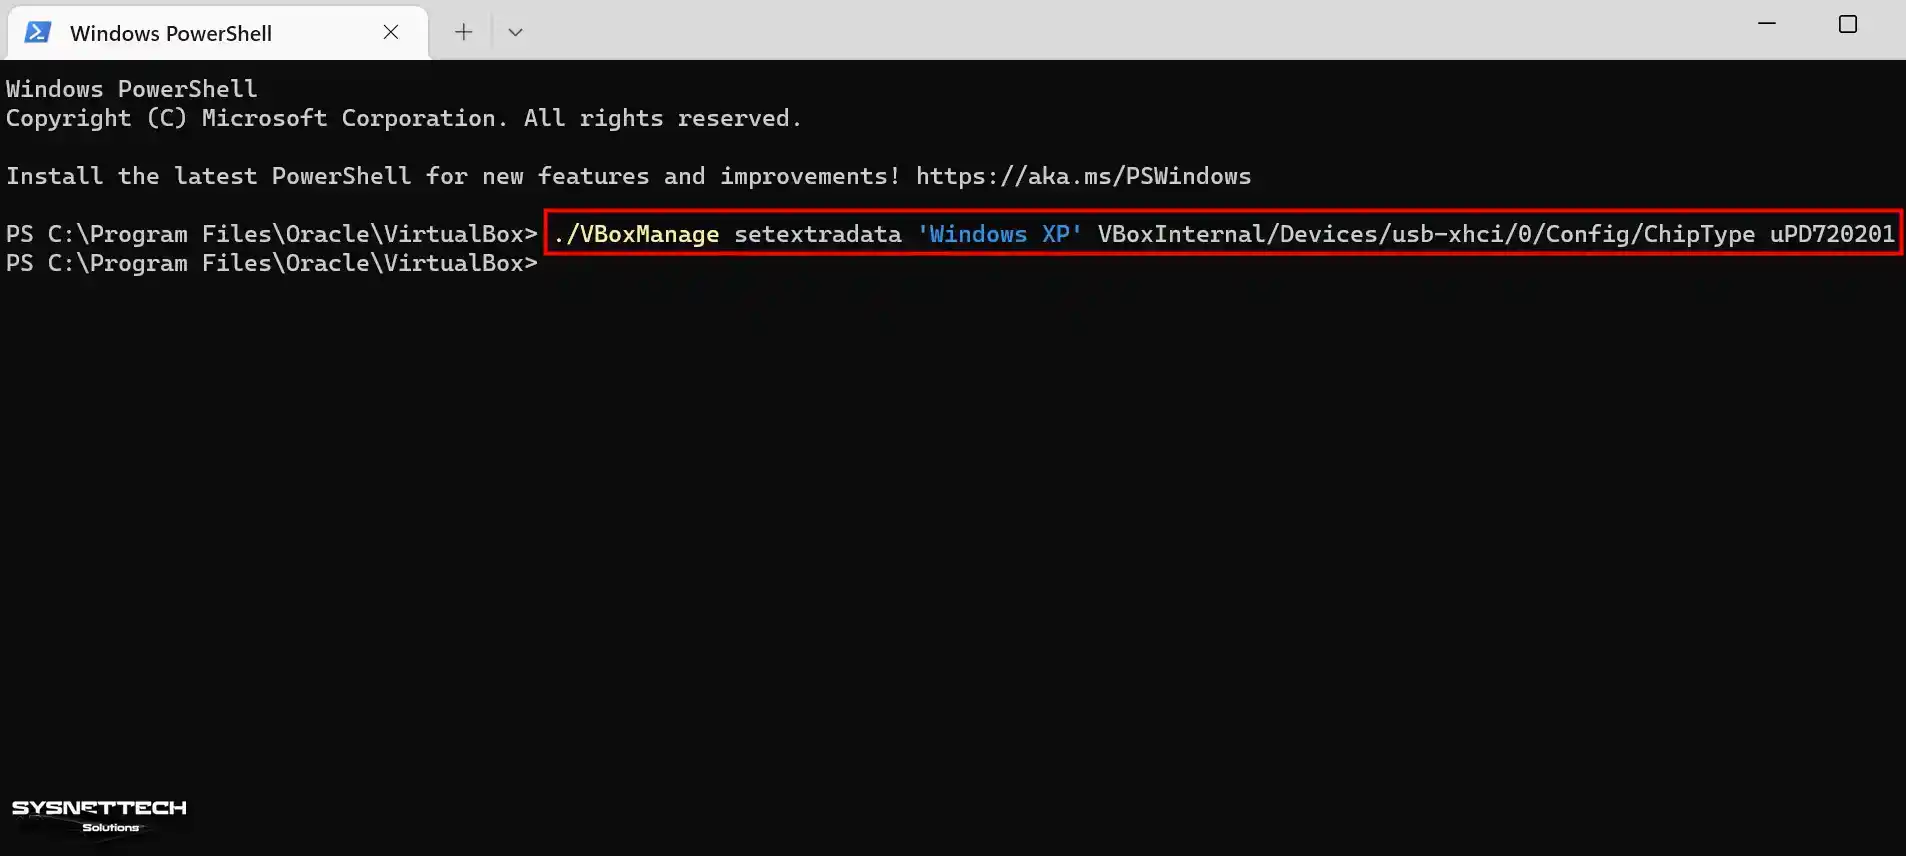
Step 7
Open the Oracle program, select USB 3.0 (xHCI) Controller from the USB controller types, and click OK.
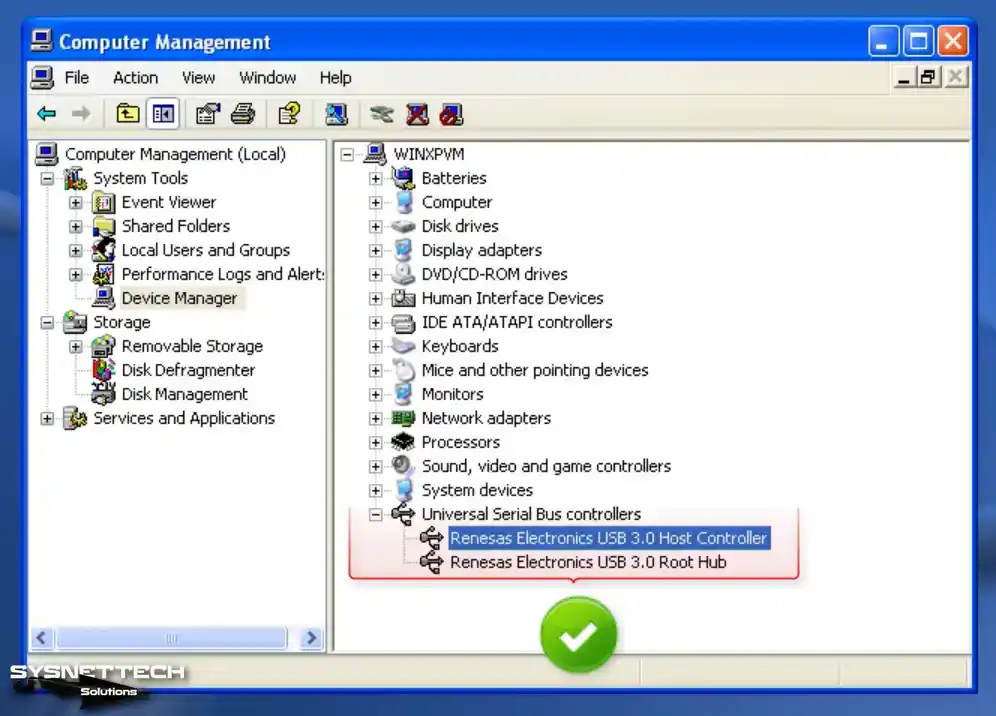
Step 8
Open the Oracle program again, and after running your virtual PC, open Device Manager and check the Universal Serial Bus (USB) Controller device.
Step 9
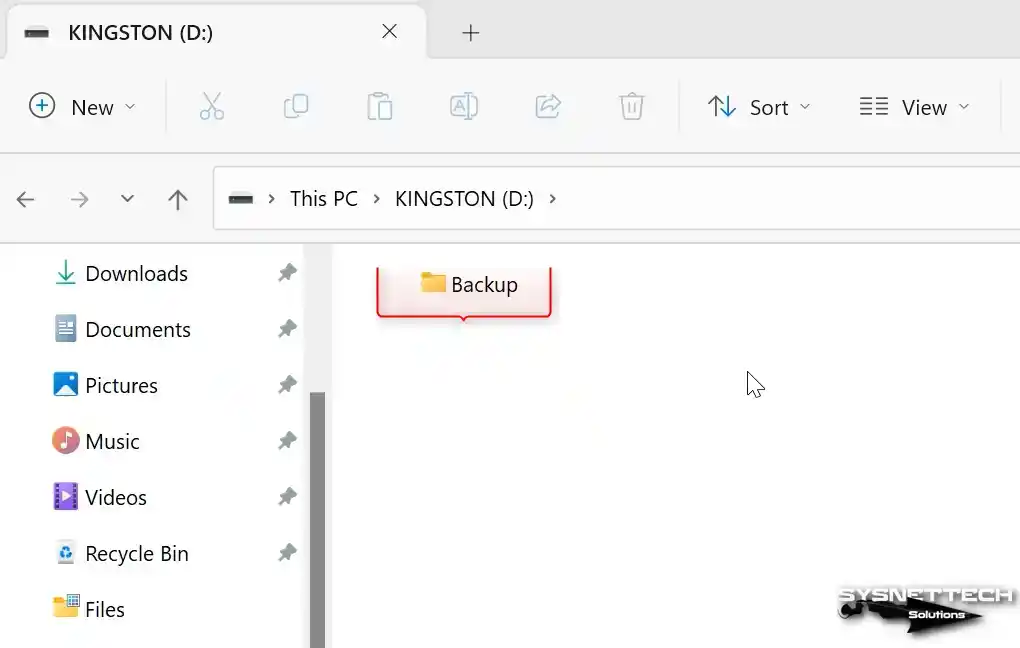
Connect your flash stick to one of the USB 3.0 ports on your computer and establish a folder called “Backup” inside it as an illustrative instance.
Step 10
After inserting your flash memory, click Devices / USB / Kingston DataTraveler 3.0 on the virtual machine.

Step 11
After adding your flash memory to your virtual PC, Mass Storage drivers will be installed automatically. When you view My Computer, you can see your USB stick of KINGSTON or any other brand.
Upon inspecting the Device Manager, you will find the USB 3.0 memory under Disk Drives.

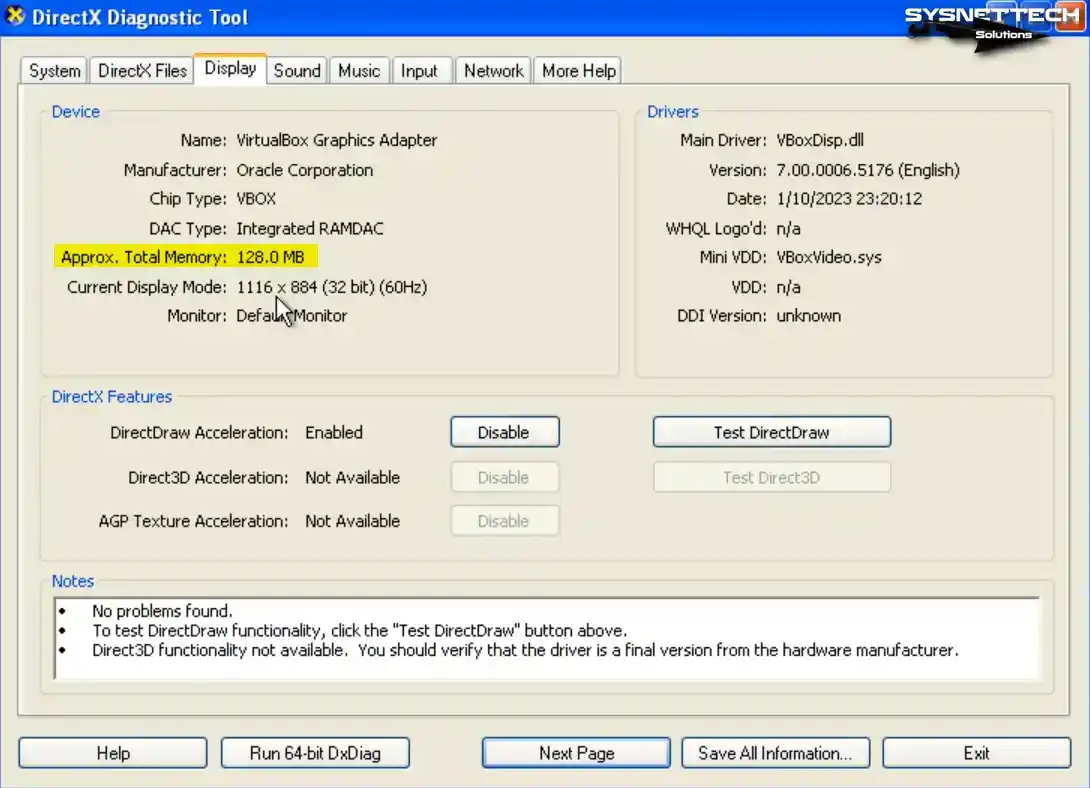
How to Change Video Memory to 256 MB
A maximum of 128 MB of GPU memory can be set for Windows XP in Oracle software, but there is a simple way to increase this size.
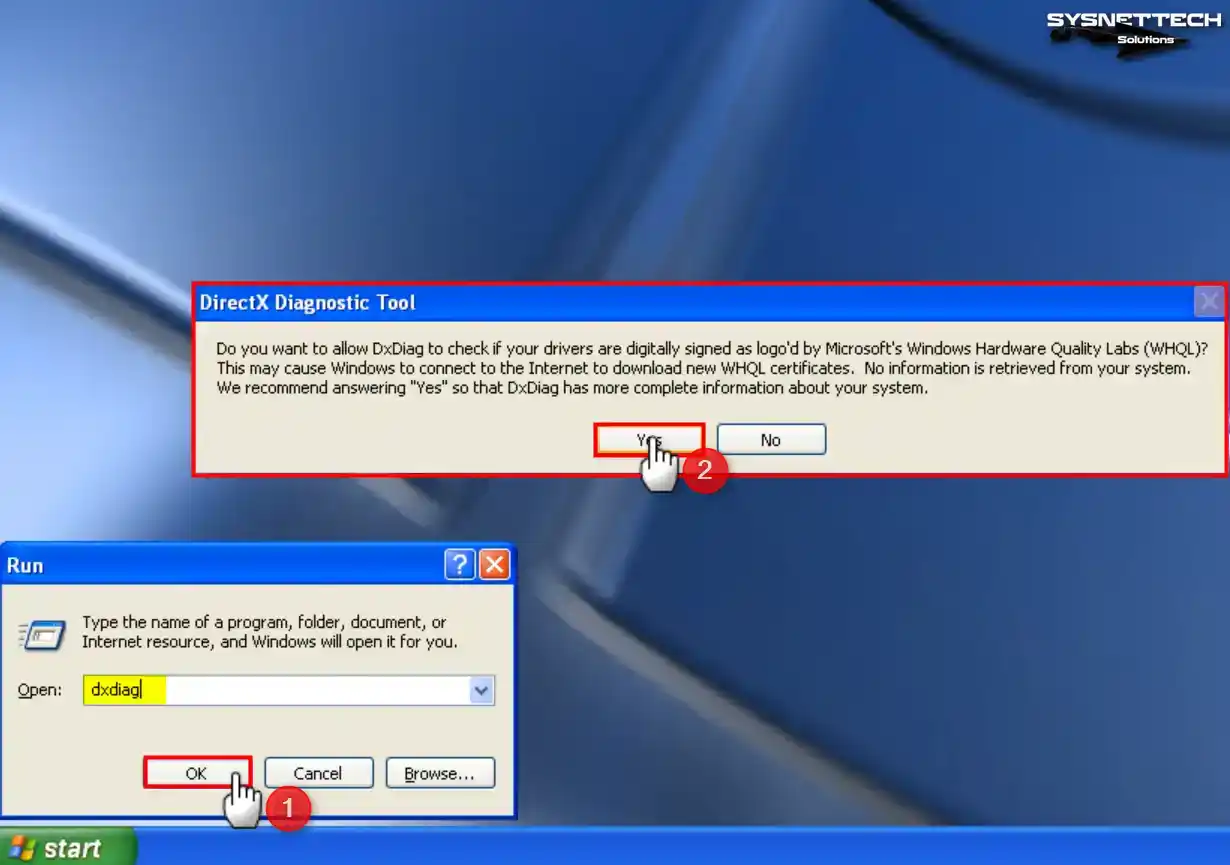
Step 1
First, execute the dxdiag command in the Run window on your virtual machine and click Yes in the DirectX Diagnostic Tool window.
Step 2
Click the Display tab on DirectX Diagnostic Tools, check the Total Memory size, and check that the GPU memory is 128 MB.
Step 3
Close your virtual computer and VirtualBox program and open PowerShell again in the location where VirtualBox is installed, and execute the following command.
./VBoxManage modifyvm 'Windows XP' --vram 256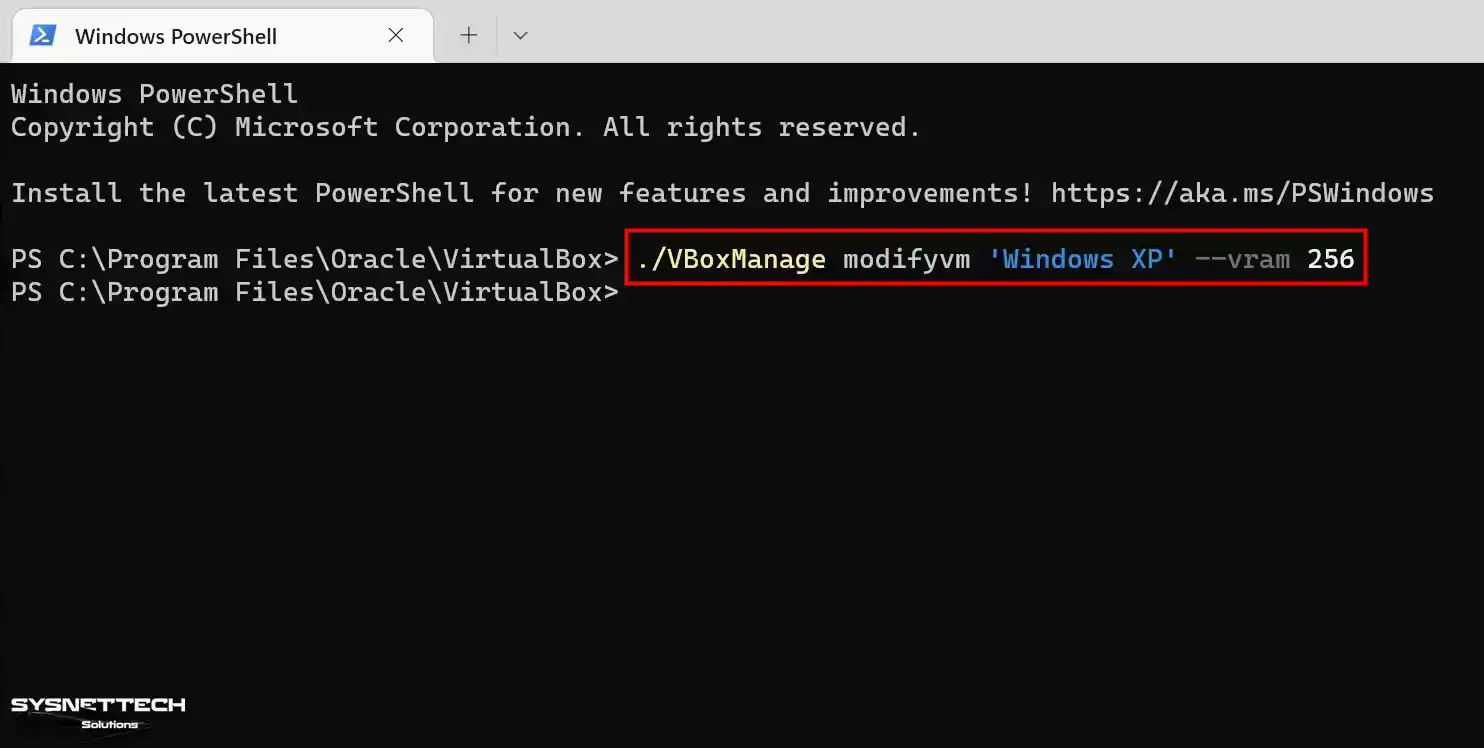
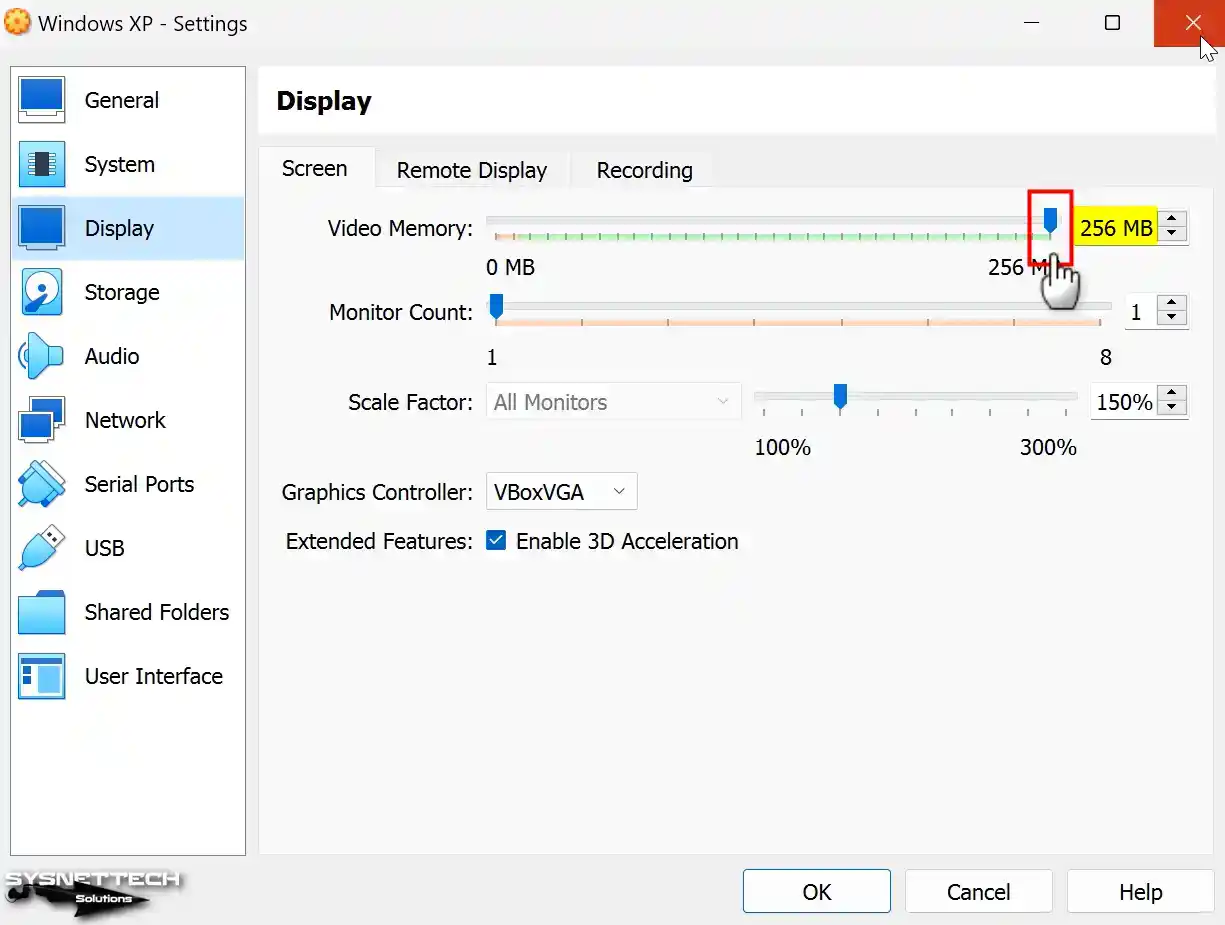
Step 4
Run Oracle VM VirtualBox, and after checking your VM’s settings Display / Screen / Video Memory size is 256 MB, you will see that the operation was successful.
Step 5
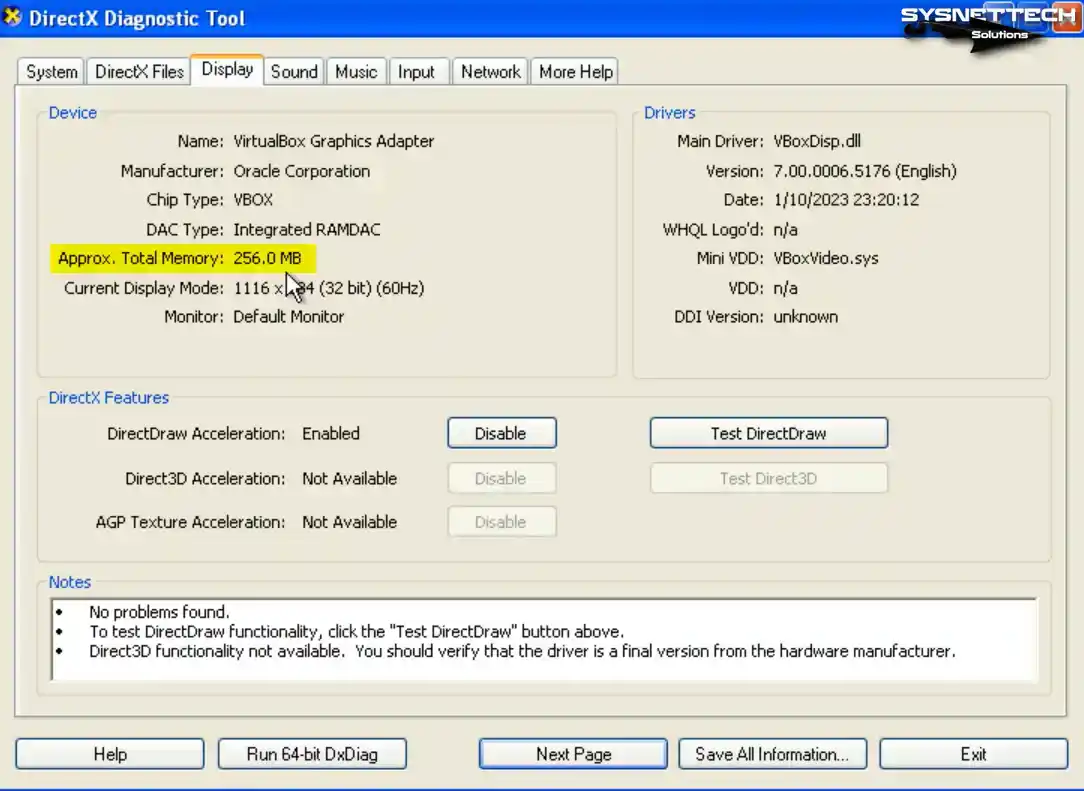
When you run your Windows XP guest machine and open the dxdiag tool again, you can see that the total graphics memory size in the Display tab is 256 MB.
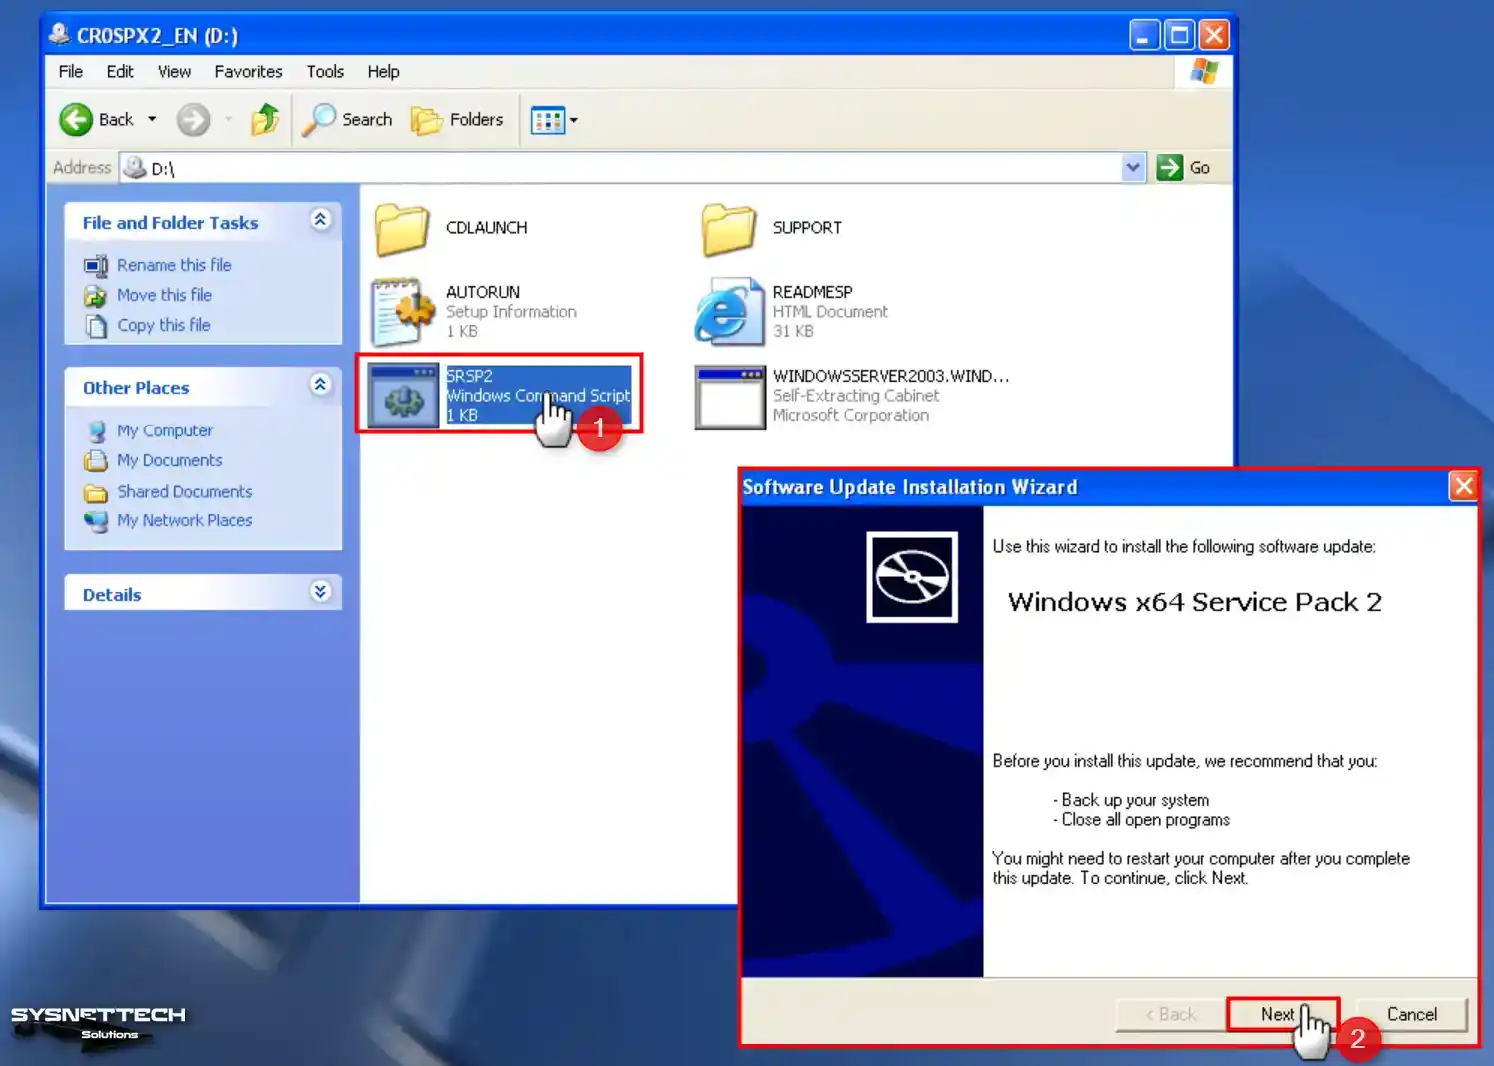
How to Upgrade Windows XP SP1 to SP2
If you desire to upgrade to SP2 on the guest appliance after installing the Service Pack 1 (SP1) edition of Windows XP, obtain the ISO image from the table at the base of the article and proceed with the following steps.
Step 1
First, to view the properties of the XP system installed on your VM, right-click My Computer, open Properties, and check the Service Pack version.
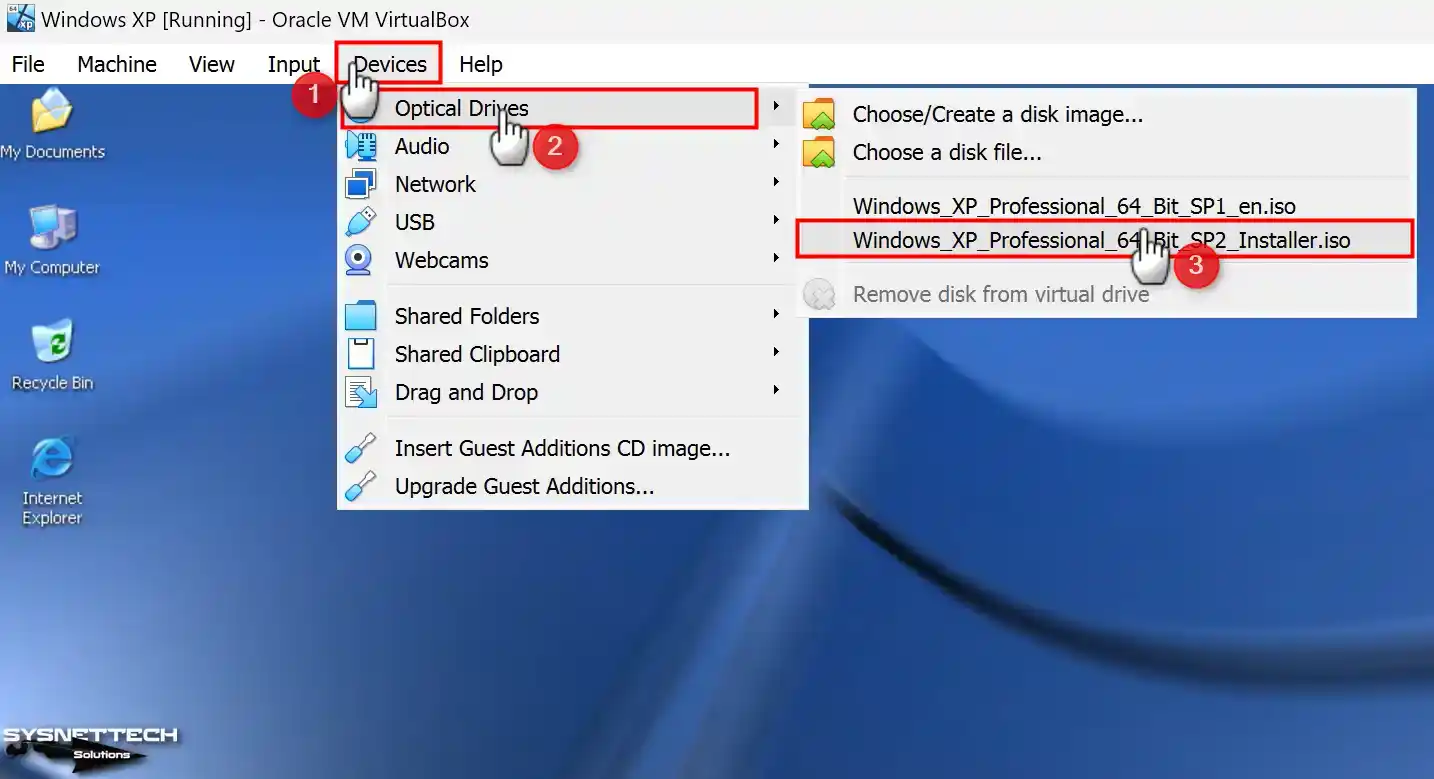
Step 2
To add the SP2 ISO file to the VM, click Devices / Optical Drivers, choose a disk file, select the Installer image you downloaded to your computer, and click Open.
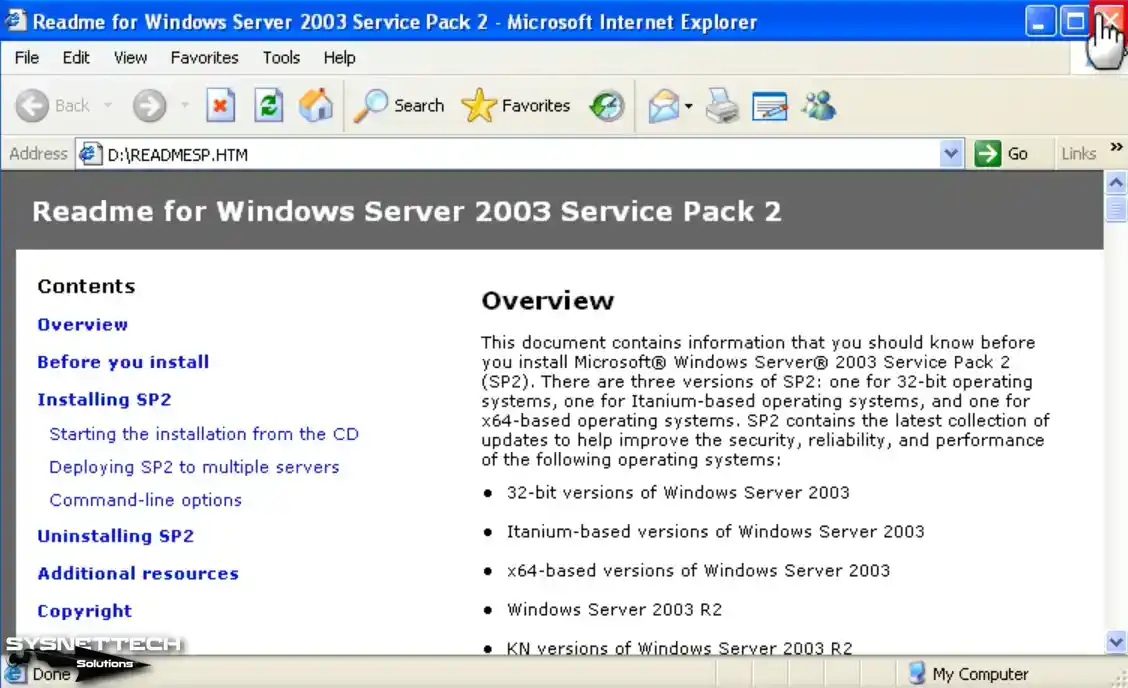
Step 3
When the Readme HTML page opens automatically on your virtual system, close it.
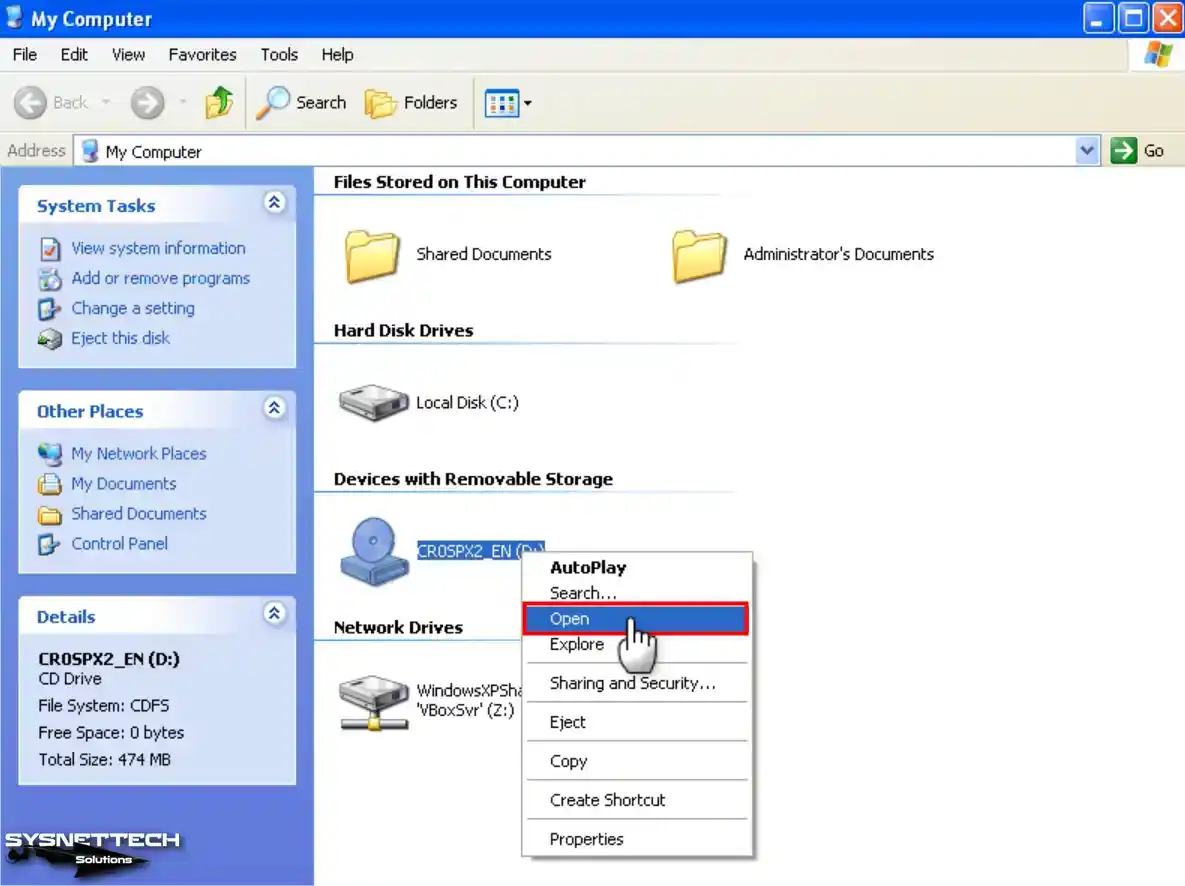
Step 4
Open My Computer, right-click / Open on the CD drive.
Step 5
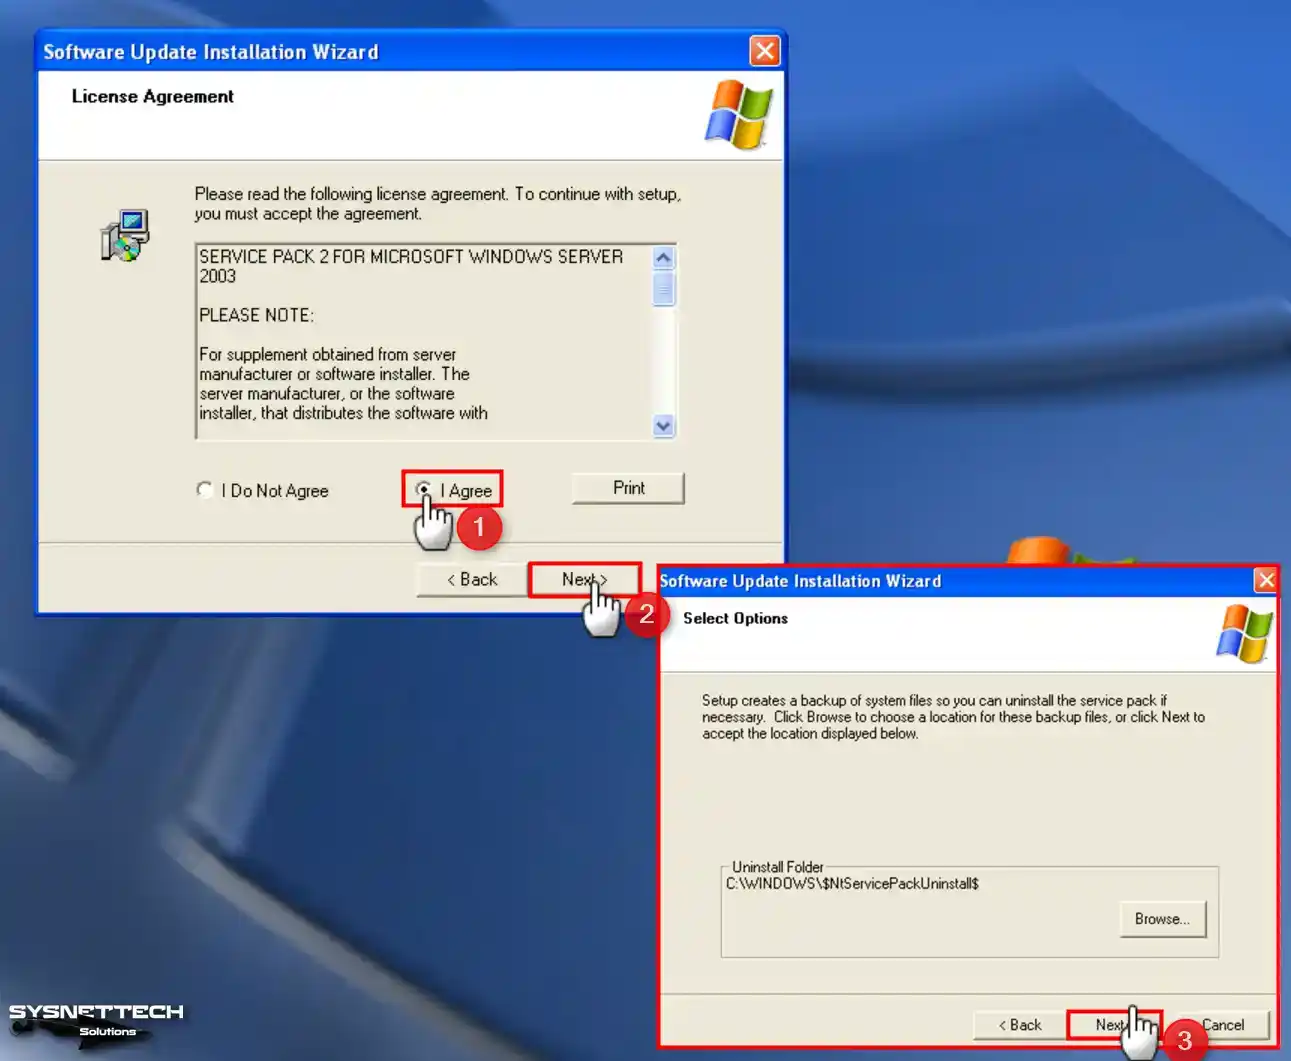
Double-click the SRSP2 command script in the Service Pack 2 CD image and start the installation. Click Next in the Windows x64 Service Pack 2 installation wizard.
Step 6
Accept the SP2 license agreement and click Next. If you want to downgrade Windows XP from SP2 to SP1 later, note the location in Uninstall Folder. Continue with Next to continue SP2 installation.
Step 7
Wait while your virtual Windows XP system updates to SP2. When the SP2 setup wizard is complete, click Finish to restart your virtual system.
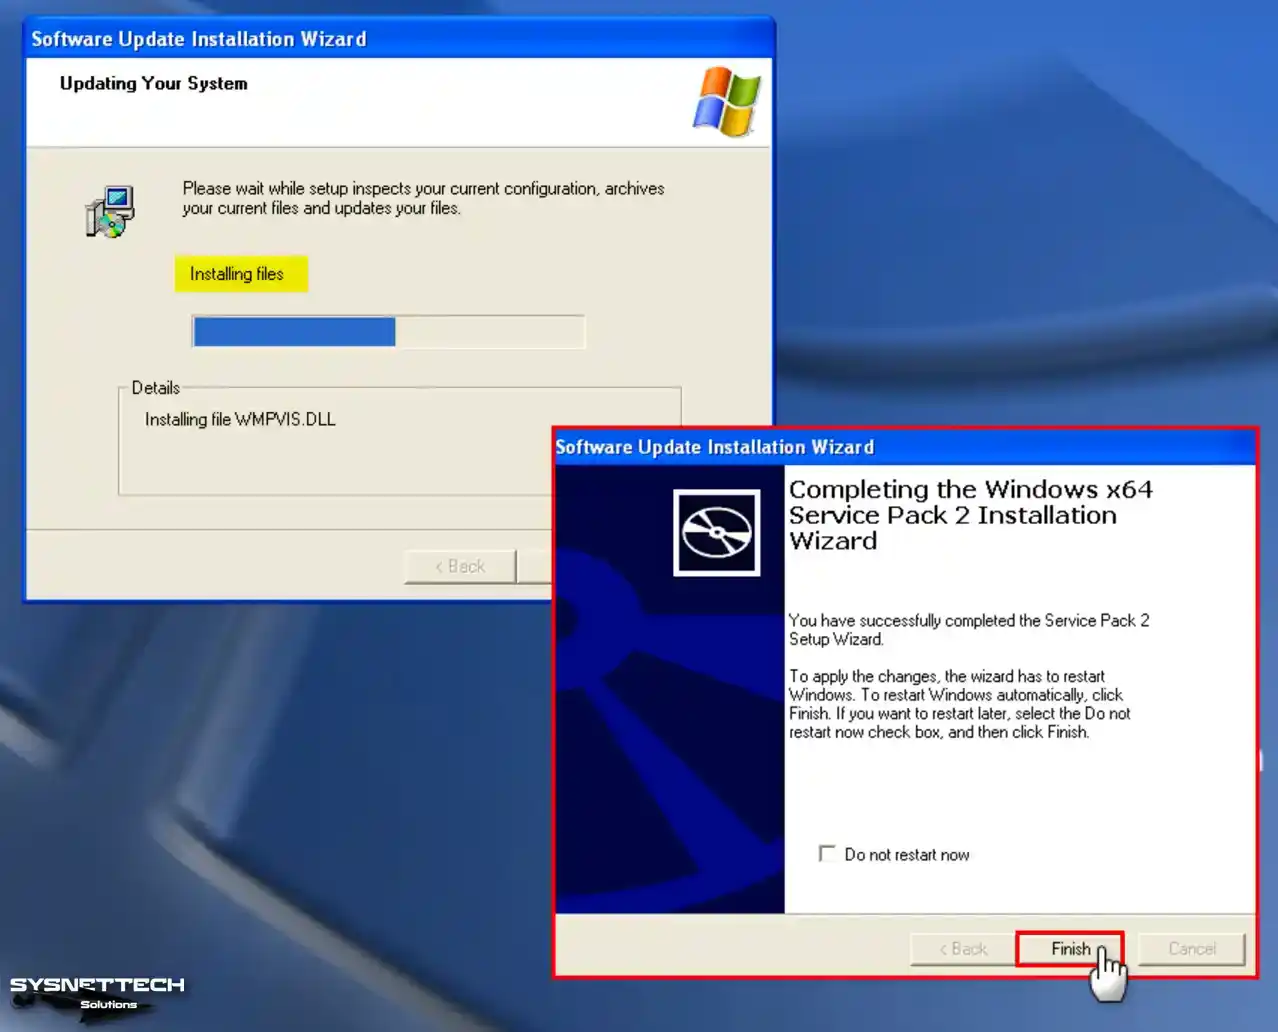
Step 8
Upon revisiting the system properties, you will notice that Service Pack 2 (SP2) has been effectively installed.

Video
Installing Old Versions
VirtualBox Version
YouTube Video
Slide
Windows XP ISO ve USB Driver Download
Windows XP Pro x64 SP1 ISO + SP2 (EN)
Related Articles
♦ How to Install Windows 7 on VirtualBox
♦ How to Install Windows Vista on VirtualBox
♦ How to Install Windows 8.1 on VirtualBox
♦ How to Install Windows 10 on VirtualBox
♦ How to Install VirtualBox on Ubuntu
Windows XP is a classic operating system that was widely used by millions of users around the world. Despite being succeeded by newer versions of Windows, Windows XP still holds a special place in the hearts of many users who fondly remember its simple yet intuitive design.
In this post, we would like to take you on a trip down memory lane and introduce Windows XP briefly. Windows XP is an operating system that was first released by Microsoft in 2001 and became widely popular among users for its simplicity and stability. However, due to its age, it is no longer supported by Microsoft, which means that there are no more security updates or bug fixes available for it.
But what if you still want to experience the nostalgia of using Windows XP without compromising your security? The answer is to run it on a virtual machine like VirtualBox. In this post, we will show you how to download Windows XP ISO (32 & 64 bit) and install it on VirtualBox, allowing you to use the classic operating system on your modern computer.
To get started, you will need to download the Windows XP ISO file from a reliable source. We will guide you through the process of downloading the ISO file for both 32-bit and 64-bit versions. Once you have the ISO file, we will show you how to set up a new virtual machine in VirtualBox and install Windows XP on it step by step. This will include configuring the virtual machine settings, creating a virtual hard disk, and starting the installation process.
By the end of this post, you will be able to use Windows XP on VirtualBox and experience the classic operating system firsthand. While Windows XP may no longer be supported by Microsoft, it remains a beloved operating system for many users, and using it on a virtual machine is a safe and fun way to relive the past. So, let’s get started on this journey of nostalgia and learn how to install Windows XP on VirtualBox together.
Download and Install Windows XP on VirtualBox from ISO

If you’re looking to experience the classic Windows XP operating system on your modern computer, running it on a virtual machine is a great option. By using VirtualBox, you can create a virtual environment that mimics the experience of running Windows XP on a physical machine.
Here we’ll guide you through the process of downloading and installing Windows XP on VirtualBox from an ISO file. You’ll be able to set up a new virtual machine and install Windows XP step-by-step.
Check System Requirement
To run Windows XP on VirtualBox, your computer will need to meet certain system requirements. These requirements will ensure that VirtualBox runs smoothly and that you’re able to use Windows XP without experiencing any performance issues. Here are the basic system requirements you’ll need:
- A modern computer with at least 2 GB of RAM (4 GB or more recommended)
- A dual-core or quad-core processor with at least 2 GHz clock speed (or faster)
- At least 20 GB of free hard drive space for the virtual machine and Windows XP installation files
- VirtualBox software installed on your computer
Meeting these system requirements will ensure that you’re able to run Windows XP on VirtualBox smoothly and without any performance issues. However, keep in mind that if you plan to use Windows XP for more intensive tasks like gaming or video editing, you may need a more powerful computer with higher system requirements. But first, let’s download Windows XP ISO for VirtualBox.
Download Windows XP for VirtualBox

File: Windows XP x64.iso, Windows XP x86.iso
Size: 512.19 MB
Setup: Full Offline Installer
Developer: Microsoft
Last Update: 15 May 2017
Create a Virtual Machine in VirtualBox for Windows XP
After you have downloaded Windows XP ISO for VirtualBox, you’ll need to create a virtual machine. Here’s how to do it:
- Launch VirtualBox and select New from the toolbar to create a new virtual machine.
- In the Name and OS Type section, give your virtual machine a name and select Microsoft Windows as the type of operating system. Choose Windows XP as the version, either 32-bit or 64-bit, depending on the ISO file you have.
- In the Memory section, allocate at least 1 GB of RAM for the virtual machine. Adjust this amount as needed depending on your computer’s resources.
- In the Hard Disk section, choose to Create a virtual hard disk Now and click Create.
- Select VDI as the hard disk file type, and choose Dynamically allocated for the storage details.
- Set the virtual hard disk size to at least 20 GB or more, depending on how much space you want to allocate to Windows XP. Click Create to finish.
Your new virtual machine will now appear in the VirtualBox Manager. You’re now ready to install Windows XP on the virtual machine.
Install Windows XP on VirtualBox
Once you have created a virtual machine for Windows XP in VirtualBox, the next step is to install the operating system. Here’s how to do it:
- Start the virtual machine by selecting it in the VirtualBox Manager and clicking Start.
- In the Select start-up disk window, click on the folder icon and navigate to the Windows XP ISO file that you downloaded. Select it and click Start.
- The Windows XP installer will launch. Follow the prompts to complete the installation process, which includes entering your product key, selecting the partition where you want to install Windows XP, and creating a user account.
- Once the installation is complete, install the VirtualBox Guest Additions. These are additional software packages that provide better integration between the host and virtual machine, including features such as shared clipboards and shared folders.
- To install the Guest Additions, select Devices from the VirtualBox menu bar, and then click Insert Guest Additions CD image. This will mount the Guest Additions ISO file inside the virtual machine.
- Follow the on-screen instructions to install the Guest Additions. Once the installation is complete, restart the virtual machine.
And that’s it! You should now have a fully functional Windows XP virtual machine running inside VirtualBox. It is as easy as it sounds. The details might take your brain startling but you will find the process easy. And that is how you will download and then install Windows XP on VirtualBox from ISO.
Some key features of Windows XP
Windows XP was a popular operating system released by Microsoft in 2001, and it remained widely used for over a decade. Here are some key features of Windows XP:
User-friendly interface: Windows XP introduced a new graphical user interface that was both easy to navigate and visually appealing.
Improved stability: Compared to its predecessor Windows 98, Windows XP was much more stable and reliable, with fewer crashes and errors.
Increased security: Windows XP included several security enhancements, such as a built-in firewall and automatic security updates, to help protect against viruses and other malware.
Improved multimedia support: Windows XP introduced new multimedia features, including improved video playback, support for DVD burning, and the ability to create custom slideshows.
Compatibility with older software: Windows XP was designed to be compatible with older software and hardware, making it easier for users to upgrade their systems without having to replace all of their existing equipment.
Remote desktop access: Windows XP included a built-in feature that allowed users to access their desktops remotely, making it easier to work from home or on the go.
Overall, Windows XP was a popular and well-loved operating system that offered a range of features and improvements over its predecessors. While it may no longer be supported by Microsoft, many users continue to run it on virtual machines or older hardware due to its reliability and compatibility with older software. And if you want to download Windows XP ISO for VirtualBox then you use the link above.
Here is how to use the legendary Windows XP on Windows 10 or Windows 11. You are going to download Windows XP ISO for VirtualBox and then perform the installation. This way, you are going to use Windows XP without losing any files or changing your current OS.
Inside the VirtualBox, you can do all things that are possible on Windows XP. From installing applications, and running games, to checking your newly developed application inside the platform.
Windows XP ISO download for VirtualBox
Windows was released way back in 2001 and was available for 11 years. Later on, the only Windows OS that was capable to beat that record was Windows 7. Windows XP brought tons of new features, amazing tools, and a brand-new interface. It was provided for both 32-bit and 64-bit systems. I have provided the x64 ISO file of Windows XP, if you want x86 then you can comment down.

File: Windows_XP_Pro_x86_x64.ISO
Size: 475 MB
Language: English
Developer: Microsoft
Click here to download Windows XP ISO for VirtualBox for free.
Related: Free Download Windows XP SP3 ISO
System Requirement for Windows XP
Most of the current systems can easily run Windows XP. Since the OS was released way back and requires low specs to run, so you won’t need to worry about the system requirements. For running Windows XP, you will need:
Processor: Pentium 4 with 1 GHz or better
Memory: you will need 512 MB RAM or more. It is recommended to have 1 GB for running Windows XP Professional.
Storage: a total of 4 GB of free storage is required.
Hardware: CD/DVD ROM is required in addition to Keyboard, Mouse, Speakers, and Super VGA (800×600 screen resolution support).
There is a great chance that you are using Windows XP on Windows 10 or Windows 11. I would recommend you to have at least 1 GB RAM and 5 GB more storage as compared to the required specs for Windows 10 or 11. This way, you could run Windows XP on VirtualBox smoothly.
Overview of Windows XP

The OS was released in 2001 by Microsoft. It was released as the successor of Windows 2000 and Windows ME. Windows XP aka Win XP was released for both 32-bit and 64-bit systems.
In the new Windows OS, you will find new features like Internet Explorer, Windows Shell elements, TAPI, Remote Assistance, and much more. You would also find a brand new interface that includes a new desktop, taskbar, Start menu, eye-catching icons, and easy navigation throughout the OS.
While using the OS, you will also find Firewall, Windows Defender, and other tools for security. This is also the first Windows OS that supports Microsoft Java Virtual Machine.
Microsoft has released Windows XP into two different editions: Windows XP Home and Windows XP Professional. They have released a total of three service packs of Windows XP and later other editions of Windows XP were also released.
- Windows XP Home
- Windows XP Professional
- Windows XP Tablet
- Windows XP Stater
- Windows XP Media Center
These were the editions released by Microsoft.
Windows XP Home
This edition of Windows XP was released for home users only. As compared to the Professional edition. The Home edition has fewer features and options.

- The first thing you will notice is the friendly interface of the OS.
- You will also find the process of Startup and Hibernation faster.
- Features such as Windows Media Player are also added.
- A Wireless Network option is also added.
- Multitask Manager is much faster as compared to previous versions of Windows OS.
Windows XP Professional
Windows XP Professional was released for professional works. This edition is faster, more efficient, and stable as compared to other editions. Here are some of the features of Win XP Professional.

- For burning files on CD or DVD, there is the CD/DVD burner feature.
- Windows Media Player is also present.
- Big corporates can use the Remote Desktop Access feature.
- For security reasons, there is also the Internet Connection Firewall.
- A wide range of hardware is supported.
- You will find the booting and hibernation process faster.
- All the applications on the Windows XP will be launched faster.
- There is also a wireless connection too.
How to Install Windows XP on VirtualBox?

Installing Windows XP on VirtualBox is the same as installing Windows 10 on VirtualBox. Begin the operation by downloading VirtualBox and then perform the installation on your system.
Once the installation got completed then you will use the direct links above to download Windows XP ISO for VirtualBox. The downloading setup file is around 456 MB in size and will be downloaded within a few minutes.
After the download of Windows XP got completed then you will run VirtualBox.
Create a new VM (virtual machine) on VirtualBox. Now you are going to open Settings and insert the amount of RAM memory, processors, storage space, and graphics power for your VM. When all the settings of the new VM are set, you are going to apply the changes and exit Settings.
Before we continue any further, make sure you have selected the downloaded ISO file of Windows XP in VM settings and the location the new VM will be created.
Begin the installation of Windows XP. From here on, it is the same installation process as installing Windows XP. Here you are going to use the same installation steps that we did in “How to Install Windows XP From ISO Image?”.
After the installation of Windows XP on VirtualBox, you will notice some restrictions. There will be lesser options for the installation of applications. This is because you will need to install the VM VirtualBox Extension on VirtualBox.
The Extension pack will enable tons of features with the option to install an app inside the VM. Here is “Download Oracle VM VirtualBox Extension Pack”. From downloading to installation, all the required things are present. If you want to run multiple Windows OS on a single system then you can also use the Dual boot option.
Click here to learn how to dual boot two Windows OS.
Product key of Windows XP
After the installation of Windows XP, you will see the notification of the product key. Most likely, you will find the product key phase during the installation. Even if you skipped the phase, you will be asked for the product key again in the future.
The product key is essential to activate Windows XP either on VM or any system. Here you can use the product key given to activate your Windows XP.
QW4HD DQCRG HM64M 6GJRK 8K83THow to make bootable CD/DVD or USB for Windows XP?
For creating a bootable CD/DVD or USB, you will need to download Windows XP. Then you are going to insert your blank CD/DVD into your system. If you have a USB then you are going to format the USB and then burn the ISO file.
If you have downloaded it from other sites, then you will find the setup file of Windows XP as zipped. Here you are going to use third-party tools such as 7Zip or WinRAR to extract all the files.
Exacting the files is necessary and once got extracted, you will burn the file.
Now that you have inserted your CD/DVD or USB into your system, you are going to use a third-party tool for burning the setup file. For this kind of task, Rufus is the thing.
Download Rufus and double-click on it. Since Rufus doesn’t require any installation, you are going to use the application directly. Now select all the options accordingly and then you are going to select the CD/DVD that you want to burn the setup file on.
Once all the options are selected, you are going to click on the Start button. The burning of Windows XP will begin, and the system will notify you when the operation got completed.
When the operation got completed then you are going to eject your CD/DVD from your system. Congratulation! That CD/DVD or USB that you are holding is a bootable USB of Windows XP.
The same operation can be performed with other tools. However; we have used Rufus as it is robust, stable, and friendly. Instead of Rufus, you can use any of the tools that you think are better.
Can I run Windows XP on VirtualBox?
Of course, you can run Windows XP on VirtualBox. Not only Windows XP but you can also run Windows 7, Windows Vista, Windows 8, Windows 10, Windows 11, and even earlier versions like Windows 2000, Windows ME, or Windows 95.
VirtualBox is not limited to only Windows OS, but you can also run Linux distros (Ubuntu, Kali, Mint, Red Hat, Fedora), macOS (from macOS 10.0 to macOS Monterey), and Android.
It is a powerful virtualization tool that can be used for virtualization purposes. You can use it to check other OS or to check your developed app on multiple OS without performing any installation. One installation and you have access to that OS any time you want.
For using the Windows OS, you are going to create a new VM. This VM will be configured from Settings and then the setup file will be provided. Then you perform the installation of Windows XP.
After the installation of VirtualBox, it is recommended to install the VM extension pack of VirtualBox. Without an extension pack, you are limited to fewer options of VirtualBox. By installing the extension pack, you have access to tons of other options that were not valid.
Can I Run Windows XP With a 4 GB RAM PC?
For running Windows XP on any system, it is recommended to have 512 MB RAM memory for Windows XP Home and 1 GB for Windows XP Professional. Having 4 GB of RAM is an advantage to run the OS smoothly and efficiently.
Microsoft recommends having a Pentium 4 or better with 1 GB of RAM and 800×600 screen resolution support for running Windows XP. You are only required to have 25 GB of free storage for Windows XP. Increasing the specs will only make things run smoother.
As compared to Windows XP required, 4 GB is more than enough. You can even run Windows 7 with 4 GB of RAM on your PC.
When was Windows XP released?
Windows XP was released way back in the 2000s. The OS was developing under the codename “Neptune” built on Windows NT Kernel. However; later Microsoft changed the direction of the entire project with the codename “Whistler”.
This was not based on Windows 95 or MS-DOS. After some time, on 24 August 2001, the OS was released for Manufacturing. By 25 October 2001, the OS was publicly available.
Microsoft has released a total of 3 service packs for Windows XP. SP3 of Windows XP was released on 21 April 2008. Windows XP was the successor of Windows 2000 and Windows ME. Later on, the Windows OS was succeeded by Windows Vista.
Mainstream support for Windows XP ended on 14 April 2009. Whereas the extended support ended on 8 April 2014.
Windows XP was a legendary OS that is used by users even today. It has been more than 20+ years and still, there are users who are using the OS and still love it. If you have used Windows 2000 or earlier versions of Windows OS, you will notice how good the OS is.
Not only Microsoft has changed the entire interface, navigation, and icons to make things friendly. But there were also major changes in hardware support too. They have removed support for PC-98, i486, and SGI Visual Workstation 320 and 540. Microsoft made sure that Windows will only run on 32-bit x86 CPUs and devices with BIOS Firmware.
If you have further questions related to downloading Windows XP ISO for VirtualBox or installation related then you can comment down. Any kind of question that catches your attention can be a problem experienced by others. So comment down and I will fix that problem as soon as possible.
Добрый день!
Я подготовил готовый образ windows XP для VirtualBox для скачивания. Это по сути готовая виртуальная машина WindowsXPSP3 [x86] на базе бесплатной виртуальной среды Oracle VM VirtualBox. Причем, контейнер содержит всю виртуальную машину целиком, включая настройки и установленные программы внутри виртуальной машины.
Вам останется только скачать этот файл (это .ova — файл). И импортировать его в программе «Oracle VM VirtualBox». Которую вы должны скачать на официальном сайте, и установить прежде чем приступите к скачиваю и импорту моего образа. В этой публикации вы сможете скачать образ, а в следующей публикации я показываю как импортировать скачанный образ в «боевое положение» за 3 минуты.
На самом деле, это не сложно. Но пользователи разные бывают, и часто случается так, что без инструкций с иллюстрациями, не получается разобраться что и как делать. Потому я и написал инструкцию как импортировать образ в VirtualBox. Но это в следующей статье. А сейчас…
Скачать готовый образ windows XP для VirtualBox
Подразумевается, что вы уже скачали и установили бесплатную программу управления и настройки виртуальными машинами или как их сейчас называют «контейнерами» Oracle VM VirtualBox . Запустите её. Откроется вот такое окно:

Как видите, всё готово к импорту, загрузке контейнера виртуальной машины, которую я подготовил и экспортировал в этой программе, чтобы вы смогли быстро (примерно за 3-5 мин.) развернуть в данном случае образ windows XP SP3. Но сначала вам нужно его (образ), файл .ova скачать, и распаковать. Образ запакован в rar — архив, и весит около 5 Гбайт.
Скачать образ WindowsXP для VirtualBox
Зеркало
Если у кого-то не видно нашей красивой кнопочки, то можете скачать его по прямой ссылке. Ещё раз: это будет архив winrar без пароля, в котором готовая конфигурация в виде одного файла с расширением .ova Который по сути и является файлом импорта для VirtualBox. (Контейнер виртуальной машины со всеми настройками).
*** При скачивании образов с нашего сайта браузер может ругаться в стиле » переход на недоверенный сайт-предупреждение, ля-ля, тополя». Не обращайте внимания, нажимайте смело «продолжить». Файлы — образы занимают много места на хостинге, и я залил их на личное сетевое хранилище (NAS-сервер) для обеспечения высокой скорости загрузки и решения проблемы с местом на хостинге. Я гарантирую, что мои файлы безопасны!
Качаем, распаковываем, и следуя несложной инструкции, буквально за 3-4 минуты импортируем в вашу программу. Вот, собственно и всё!
Напоминаю, что у нас есть готовый образ Windows XP и для другой виртуальной среды — Vmware Player. Так что если кому-то удобней работать именно с Vmware — виртуальными машинами, то вы сможете у нас так же скачать образ для vmware.
Там так же подробно описывается как его импортировать, запустить в программе Vmware Player.
Желаю вам успеха!