Windows is a famous operating system around
the world, The versions Windows are
Windows 95, Windows XP, Windows Vista, Windows 7, Windows 8 and Windows
10. Windows XP was a famous among Windows operating system, it doesnot need a
energy hungry devices to run a windows xp system and now you can this
operating in your handheld android devices using termux.

The file which we are using for this is qcow2 file
which is image file for running the operating systems in qemu, and qemu is
linux oriented virtual environment specifically built to run in linux
devices in short you can tell like it is the Vmware or Virtual box of linux
devices.
Requirements:
1. Fx File Explorer.(Available in Playstore)
2. Vnc Viewer. (Available in Playstore)
3.7Archiver.(Available in Playstore)
If you have low internet speed, you can download 500Mb Windows XP file
from these Links.
Windows XP Zip file
After Downloading all these 500 mb files, select all the files and
extract, you will get a folder of Windows XP as whole qcow2 file.
Method:
Installation of Required Apps :
-
Install download and install all the four mentioned above apps for this
tutorial.

-
Download the Zip file of Windows XP, This file is very important in
this tutorial.
Extraction of Windows XP File:
First open the Fx browser app, go to downloads folder and select the Windows
XP Zip file.

- Open the Zip file with ZArchiver app.
-
Select the all the three files and click extract button to
extract the files.
-
Wait for the extraction to complete, the extraction takes
around 15-30 min as it is big size file approximately 4 GB
in Size.
-
After the extraction is completed, You will get a Disk folder
which will act as a external storage .
Setting Up Termux:
-
Now open the Termux app and type clear to clear the
screen.
- Now type the following commands:
- Command:
termux-setup-storage

This command will give storage access to termux
- Command:
pkg update && pkg upgrade
This command will update all the packages
- Command:
pkg search qemu-system-i386-handler &&
pkg search
qemu-system-i386 &&
pkg
install qemu-system-i386-headless -y &&
pkg search
qemu-system-x86_64-handler &&
pkg search
qemu-system-x86_64 &&
pkg
install qemu-system-x86_64-headless -y

This command will install qemu packages especially qemu-i386
and qemu-x86_64 which are necessary to run the system in
android.
- Command:
qemu-system-x86_64 \
-m «Provide ram ranging from 100-2047M»
\
-vga vmware \
-hda «copy and paste the path of your
downloaded and extracted qemu image» \
-drive file=fat:rw:
«copy and paste the path of Disk folder» \
-vnc 127.0.0.1:2
Example:
- Command:
qemu-system-x86_64 \
-m 400M \
-vga vmware \
-hda
/storage/emulated/0/Download/WindowsXP.qcow2 \
-drive
file=fat:rw:/storage/emulated/0/Download/Disk \
-vnc
127.0.0.1:2

This command will help you to run and connect the qemu system
to Vnc viewer app.
Configuring VNC:
-
Open the vnc viewer app after click Enter on the above
command.
-
Click on «+» Sign to create a new connection, Enter the value
as follows - Address => 127.0.0.1:2
- Name => Windows XP
-
Click on Connect, and wait for the connection to
establish.
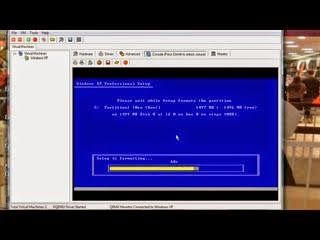
Booting Up Windows XP:
-
Wait for the booting process to complete, Booting process
could take around 10-15 min for first boot and 2-3 min for
next run.
-
Windows XP desktop will be displayed and you can have all the
features of windows xp in this image file.

Exploring Windows XP:
- Open the My Computer and Open the QEMU VVFAT (E:) Disk.
-
You will see that the same file which was in Disk folder of
android storage has appeared in this Disk folder of Windows XP
which means we can use this Disk folder external folder
to connect Android storage.
-
Open the Web browser, In my case I will be opening Firefox
browser, browser the internet to check whether internet is
working in Windows xp or not.

- You can also play old classic games of Windows XP.

Fixing Network Issue:
- If it is not working, here is the solution.
-
Go to Start=>Control Panel=>Network=>Click on your
network=>Disable and Enable the network.
Shutting Down Windows XP:
-
Shutdown the Windows XP and go to Termux, Press Control + C
key to stop the Windows XP connection.
So this was the tutorial blog for running Windows XP in android
using Termux.
If you like this tutorial you would also like tutorial blog of
running Windows 95 in android.
If you want to watch the tutorial of this method, Just click on
the play button below.
Tutorial:
Hi everyone. Yesterday evening I gave a signal that in SDN Forum I will make a tutorial and I’ve planned that for weeks. If we return to topic, I know everyone knows Limbo PC emulator that who uses emulators and wonders emulating the PC with Windows OS’ses. I know that this emulator in some devices that works well but some devices of them works very unstable. Instead of that, I can give guarantee that you can get better results with that hard way and more optimized one with high possibility. If you’re ready we’ll go into tutorial slowly. If this topic will be very difficulty for you, I will place video link of this tutorial. The model of phone we use in this tutorial is: Redmi Note 8 Pro 64GB
There is a requirement list includes apps and files we will use in it:
- Termux: The most important one and that terminal emulator will be useful for installing the QEMU emulator.
- VNC viewing program for phones. It’s also important due to We will use emulator with VNC. I recommend to install bVNC to your phone, other ones will work too but I got the best result with bVNC.
- And a .img or .qcow2 file that contains the Windows operating system.
- (A recommendation) If you want to install programs, I would recommend to create .iso file with setup files. For that you will need to install xorrisofs software. After installing the Linux distro on Termux go to the folder that contains setup files and write that command «xorrisofs -r -J -o ./*iso_name*.iso ./*folder_name*» That command will create .iso file. For map to QEMU before starting the emulator you need to that command. «-cdrom *iso_file*.iso» Also you can create .sh file for not losing very much time.
Step 1, Preparition:
You need to prepare Windows OS. For that (in computer) create virtual Windows disc on QEMU.
Install that applications I’ve mentioned before. Before opening Termux you need to allow Termux to access files. After allowing you’re ready to open Termux. Now open Termux, and write one of these codes:
For Ubuntu (I recommend this):
Code: Select all
pkg install wget openssl-tool proot -y && hash -r && wget https://raw.githubusercontent.com/EXALAB/AnLinux-Resources/master/Scripts/Installer/Ubuntu/ubuntu.sh && bash ubuntu.shKali Linux:
Code: Select all
pkg install wget openssl-tool proot -y && hash -r && wget https://raw.githubusercontent.com/EXALAB/AnLinux-Resources/master/Scripts/Installer/Kali/kali.sh && bash kali.shAfter that write one of these codes if you installed Ubuntu ./start-ubuntu.sh or if you installed Kali Linux ./start-kali.sh and Kali Linux / Ubuntu will start and it’ll be able to use completely. Next:
Code: Select all
apt-get update && apt-get install qemu-systemyou can write these codes, in fact you installed QEMU. After installation of QEMU you can kill process of Termux in phone Settings.
Step 2, copying and Starting Windows files.
For installing Windows files .qcow2 or .iso file to phone and before starting Ubuntu / Kali Linux in Termux:
Code: Select all
cd /storage/emulated/0/*if there are more folders continune to writing, otherwise you can finish it*Code: Select all
mv /data/data/com.termux/files/home/*name-of-distro-fs*/root
cd /data/data/com.termux/files/home/
Now you are ready to start the distro, start the distro and enter these codes:
Code: Select all
qemu-system-x86_64 -m 2048 -hda *virtual_disc_name*.iso -vga vmware -vnc 1:If you want, for internet «-net nic -net user -device rtl8139«, for audio «-soundhw ac97» and at last for CD Rom «-cdrom *iso_name.iso» or if you’ll boot from it add «-cdrom *iso_name.iso -boot d» After starting open VNC app, you can connect to QEMU emulator via localhost:5901 adress.
The video for people who couldn’t understand:
A starting example video:
Result:
When coming to result it is definitely best PC emulation in Android experience. But in my experience sadly I saw some lags in Windows XP. However I got very happy that I could run Windows Vista. I recommend to use Windows ME or older for full experience, if you want updated version please select Windows XP at most and use Windows Classic theme. Don’t use Windows Vista or higher. This may be useful for testing etc. Whatever thanks for reading this tutorial. I hope this tutorial will be useful for you.
Здравствуйте, дорогие читатели лучшего мобильного портала Trashbox.ru! В этой статье, я расскажу вам о запуске полноценных операционных систем на Android. Сегодня, речь пойдёт о двух операционных системах — Windows XP и Linux. Итак, приступим к делу.
LINUX
Начнем с более легкой инструкции — запуск Linux на Android. Для начала предупрежу, что для данного способа нужны ROOT права. Также, если вы используете смартфон на базе Android 5.0 Lollipop, Android 6.0 Marshmallow или более поздней версии, то вам нужно кастомное ядро. В этой статье используется Nexus 5 с установленным ядром «ElementalX». Итак, приступим.
Что нужно:
1. Смартфон с правами суперпользователя.
2. BusyBox.
3. Linux Deploy.
4. VNC Viewer.
Инструкция:
1. Для начала, нужно скачать и установить программу BusyBox, которая является обеспечением большинства стандартных инструментов Unix.
2. Далее, скачиваем и устанавливаем программу Linux Deploy, это главный компонент и без него у нас ничего не получится, так как он скачивает дистрибутив из официального зеркала, создает образ диска на microSD карте, монтирует его и устанавливает дистрибутив операционной системы.
3. Открыв приложение Linux Deploy, переходим в конфигурационную панель. Здесь, выбираем какой дистрибутив вы хотите использовать. В данной стать будет использоваться выбранный по умолчанию дистрибутив Debian в среде LXDE.
4. Выбрав дистрибутив, нажимаем на кнопку установить. Установка длится около 30 минут.
5. По окончанию установки, приложение запустит среду Linux и сама настроит рабочее окружение, которое включает в себя базовую систему, сервер SSH, сервер VNC и графическую среду которую мы выбрали ранее. Также, можно через программу можно настроить сервера SSH и VNC.
6. Вы можете подключиться как и через SSH, так и через VNC, я использую сервер VNC, но вы можете использовать какой хотите.
7. Если вы подключились через сервер SSH, введите порт «22», а пароль по по умолчанию «changeme».
8. Если вы, как и я, хотите подключиться через сервер VNC, скачайте программу VNC, запустите ее и в поле впишите адрес «localhost:5900», пароль по умолчание, такой же как и у сервера SSH — «changeme».
9. Радуйтесь запущенным дистрибутивом Linux!
Windows XP
Теперь, о более сложном — запуск Windows XP на Android. Вы скажете как? Ответ прост — Bochs. Именно с этим приложением мы будем эмулировать Windows XP. Bochs — это программа, которая эмулирует операционные системы на базе x86, оно было создано для эмуляции таких операционных систем как, Windows DOS, Windows 3.1, Windows 95, Windows 98. Но сегодня мы попробуем более сложную задачу. Важно отметить, что работа Windows XP будет очень-очень медленна, а также, не будет соединения с интернетом, так что, если у вас есть терпение и вас не интересуют проблемы, которые могут возникнуть, то вперед! Итак, начнем.
Что нужно:
1. ISO файл Windows XP
2. Qemu Manager для ПК
3. Bochs
4. Bochs SDL
5. Blank Disk Image
Инструкция:
1. Откройте Qemu Manager для ПК и создайте новую виртуальную машину. Назовите ее как хотите, в данном случае ее название будет «XP».
2. Впишите сколько оперативной памяти вы хотите выделить для виртуальной машины, этот шаг только для ПК, на Android девайсе это никаким образом не скажется. Выберите опцию «не использовать виртуальный диск». Нажмите «далее».
3. Следующим шагом, нужно перейти в вкладку драйверов и выберите «жесткий диск 0». Далее выберите путь к ранее скачанном «Blank Disk Image».
4. Далее выберите опцию «CD ROM» и выберите путь к ISO файлу Windows XP.
5. Наконец, выполнив все пункты, выберите зеленую кнопку в левом верхнем углу, чтобы запустить виртуальную машину. С этого момента, просто установите Windows XP на виртуальную машину как на простой ПК.
6. После того, как установка завершится, разархивируйте .zip файл Bochs SDL. Переместите «Blank Disk Image» в папку SDL. Переименуйте файл «Blank Disk Image» в «c».
7. Далее, откройте текст файл «bochcrc». Где вы увидите текст «c.img», просто переименуйте его в «c». Далее переместите эту папку в корневую папку или на microSD-карту Android девайса.
8. Скачайте и установите приложение Bochs на Android. Далее, откройте его. Приложение само должно определить наличие Windows XP и запустить ее. Помните, это работает очень-очень медленно!
Чтобы загрузиться на рабочий стол операционной системы Windows XP, нужно подождать как минимум, 10 минут.
9. Радуйтесь запущенной Windows XP!
На этом все. Всем спасибо за внимание!
Автор инструкции Dave Bennett.

Не многие знают о том, что на сегоднящний день существует несколько способов запустить полноценную ОС Windows, на ARM планшете или смартфоне, работающем на платформе Android. Зачастую, такая возможность может понадобиться не только для того чтобы удивить друзей и знакомых, но и для решения вполне серьезных задач. К примеру вам срочно требуется воспользоваться програмой, которая работает только в Windows, в пути, например в тесном метро (не будете же вы там пользоваться 15” ноутбуком). Также способы описанные в статье позволяют стабильно играть в практически любые DOS игры и некоторые для Windows (Fallout к примеру).
Планшеты на базе Windows стоят недешево, а планшет на базе Android, позволяющий нормально работать с запущенной на нем Windows сегодня можно купить дешевле чем за 100$. В этой статье я хочу рассказать о нескольких способах получения работоспособной Windows на Android планшете, а в качестве подопытного мы будем использовать дешевый китайский планшет с 1Ггц процессором и 1Гб ОЗУ.
Все тестирования проводятся на планшете ONDA Vi10 Elite с установленным Android 4.0.3 ICS. Чем лучше будет у вас начинка планшета, тем быстрее будет на нем загружаться и работать Windows. Для Windows 95 и 98 вполне хватает этого планшета, запуск Windows XP требует более мощного железа, поэтому на этом планшете не тестировался.
Способ 1 – использование aDOSBox
aDOSBox – это программа для Android, позволяющая запустить полноценный MS-DOS на Android планшетах, с помощью которой можно запустить и Windows.
Эмулятор позволяет эмулировать клавиатуру и мышь, корректно растягивает Windows на полный экран.
Процесс установки:
1) Скачиваем aDOSBox и устанавливаем его на карту памяти
2) Создайте\отредактируйте файл конфигурации aDOSBox \sdcard\app-data\org.hystudio.android.dosbox\.dosbox\dosbox-0.74.conf:
[sdl]

output=surface

priority=higher
[render]
frameskip=1
[cpu]
core=dynamic
cycles=2100
[dosbox]
memsize=16
[mixer]
nosound=true
[joystick]
joysticktype=none
[dos]
xms=true
ems=true
umb=true
keyboardlayout=none
[ipx]
ipx=false
[autoexec]
mount e /sdcard
e: imgmount c e:\win98.img -t hdd -fs fat
boot -l c
imgmount c e:\win98.img -t hdd -fs fat
boot -l c
Этим мы настроили автоматическое создание и монтирование диска e:/, который будет создаваться из нашего образа с установленной Windows 98 и его автозапуск.
3) Скачиваем образ установленной Windows 98. Я тестировал на образе 98 Lite Professional (специальная облегченная версия Windows на 80 Мб, ссылку на образ вы сможете найти в интернете, боюсь ссылку в статье сочтут за варез)
4) Скаченный образ переименовываем в win98.img (если он назывался по другому) и кладем в корень sdcard.
5) Запускаем aDOSBox. Запуск Windows произойдет автоматически (на моем планшете загрузка занимает около 2 минут).
Windows 98 и 95 работают достаточно шустро даже на дешевом планшете. У aDOSBox много настроек, экранная клавиатура, экранный джойстик, возможность включения сглаживания экрана (особенно полезно если у вас нестандартное разрешение планшета).
Минусы данного способа:
1) Нет поддержки сети
2) Отсутствие звука
Плюсы:
1) Хорошая скорость работы
2) Много настроек
Способ 2 – использование BOCHS
BOCHS также является очень известным эмулятором x86, с поддержкой звука.
Процесс установки:
1) Скачиваем BOSCHS и SDL (прошивка bios и железа для эмуляции) для него
2) Распаковываем SDL в папку SDL в корне sdcard устройства.
3) Скачиваем .img образ операционной системы (теоретически BOCHS позволяет запустить любую x86 ОС), для Windows 98 подойдет образ из первого способа.
4) Переименовываем образ Windows 98 в файл c.img и копируем в папку SDL из 2 шага.
5) Устанавливаем BOSCHS, запускаем и ждем загрузки.
Windows работает помедленнее чем aDOSBox, но есть поддержка звука. Этот способ подойдет тем, кому эмуляция звука критична. Данный эмулятор поддерживает запуск облегченных версий Windows XP.
Минусы:
1) Нет поддержки сети
2) Не очень высокая скорость работы
Плюсы:
1) Стабильность работы
2) Запуск любой x86 ОС
3) Эмуляция звука
Способ 3 – использование QEMU
Думаю с QEMU знакомы практически все, так как он является очень известным кроссплатформенным эмулятором, также позволяющем запустить Windows 95 и 98 на Android.
Процесс установки аналогичен второму способу, скачать QEMU и SDL можно на 4pda. Настроенный под QEMU образ Windows также есть по вышеприведенной ссылке.
Windows 95 работает быстро и стабильно, Windows 98 чуть медленнее.
Минусы:
— Нет эмуляции сопроцессора (необходим в Windows XP)
— Нет эмуляции звука
— Нет поддержки сети
— Поддержка QEMU прекращена
Плюсы:
— Хорошая скорость работы, быстрее других эмуляторов
Выводы
Конечно эмуляция Windows на Android не заменит полноценного ноутбука или компьютера, но часто может помочь и спасти в некоторых ситуациях, а иметь под рукой готовый для запуска образ с Windows на вашем планшете лишним не будет, тем более занимает он всего 80 Мб на вашей карте памяти.
Windows XP is a personal computer operating system produced by Microsoft as part of the Windows NT family of operating systems.

Requirements:-
- A smartphone/tablet running Android with RAM more than 1000MB and hardware specification, which needs to be
rooted since it requires root permission to run certain scripts.For rooting android smartphone you can follow my blog Step By Step Guide How To Root Mobile Device. - Download and Install Bochs for your Android.Click here
- Download SDL.zip.Click here
- Download and Install Qemu Manager for you PC.Click here
- Blank Disk .IMG.
Installation:-
1)Create a blank image file in Bochs on your PC and for that what you have to do is that go to Start and open up Bochs> and then Disk image creation tool and then the new tab with black screen appears as shown below.

In that you have to type
hd
flat and it will ask the size
type 1500 and
then type in c.img and then press the enter key.
2)Install Windows XP on blank .img file
using Qemu manager, then open up the Qemu manager.

After
opening up the Qemu manager, click on the VM on the top left side and
select new virtual machine.Then
a sub tab appears as shown in the image and type out any name that you
need in the first box and hit next.Now in the new tab you can locate
the desired RAM that you want to change and change it to 1 Giga hertz
and hit finish. Now install XP to your blank
image file.Then, click on drives on the left top
side and find out the c.img file from the drives. Usually the
c.img file will be seen at the C drive> Program files > flash >
and change view to all files and your c.img file will be seen select
the file and click Okay.
3)Find out the Window XP.iso file and click Ok. If you don’t have iso
file then you need to download a software called Poweriso and you can convert it to ISO file. After
selecting the iso file click on the run button on the top left side
which is of green color and the system changes to a blue screen.
After
changing the screen to blue color and loading would take few
minutes depending on how fast is your computer.Wait till the loading
finishes and after that start the installation and a couple of options
comes out choose from. Choose ntfs file system and then the installation will take place and it will take few minutes to complete.
4)When
the installation is finished, stop the virtual machine. And then, find the c.img file and
transfer it to phone. For that find out the c.img file from the local
disk and copy the file and paste the file in the SDL
folder on the SD card. And after that copy the code given and paste it in the boch.txt file in
the SDL folder on the SD card.

Code:
megs: 256
cpu: count=1, ips=6000000, reset_on_triple_fault=1, ignore_bad_msrs=1
# filename of ROM images
romimage: file=BIOS-bochs-latest
vgaromimage: file=VGABIOS-lgpl-latest
vga: extension=cirrus, update_freq=25
pci: enabled=1, chipset=i440fx, slot1=cirrus
ata0: enabled=1, ioaddr1=0x1f0, ioaddr2=0x3f0, irq=14
ata1: enabled=1, ioaddr1=0×170, ioaddr2=0×370, irq=15
ata0-master: type=disk, path=”c.img”
#ata0-slave: type=disk, path=”d.img”
#ata1-master: type=disk, mode=vvfat, path=/sdcard/HDD, journal=vvfat.redolog
#type=cdrom, path=”CD.ISO”, status=inserted
boot: c
config_interface: textconfig
#display_library: x
# other choices: win32 sdl wx carbon amigaos beos macintosh nogui rfb term svga
log: bochsout.txt
sb16: enabled=1
mouse: enabled=1
sb16: wavemode=1, dmatimer=500000
clock: sync=none, time0=1
Now, turn on your phone and take out the
application Bosh which has been installed on your device. Actually it takes few minutes to load up XP on the Android device.
Enjoy the hack 
Also See:-
How To Install Backtrack On Android Device.
How To Install Kali Linux On Android Device Using Linux Deploy.