 Несмотря на то, что этой операционной системе уже десять лет, вопрос о том, как создать загрузочную флешку Windows XP является более актуальным (судя по информации поисковиков), чем тот же вопрос для более новых версий Windows. Предполагаю, это вызвано тем, что большинство программ, предназначенных для создания загрузочных USB носителей, не создают таковые для Windows XP. Также, думаю, многие владельцы слабых нетбуков желают установить Windows XP на свои портативные компьютеры, а единственный способ сделать это — установить его с флешки.
См. также:
- Загрузочная флешка Windows 10
- Три способа создания загрузочной флешки Windows 8
- Загрузочная флешка Windows 7
- Лучшие бесплатные программы для создания загрузочной флешки
- Установка Windows XP с флешки и диска (описан сам процесс)
WinToFlash — пожалуй, самый простой способ создания загрузочной флешки Windows XP
Примечание: в комментариях сообщают, что WinToFlash может устанавливать дополнительное ненужное ПО. Будьте внимательны.
После первого запуска программы для создания загрузочной флешки Windows XP WinToFlash Вам будет предложено принять соглашение пользователя, покажут рекламу и после этого Вы увидите главное окно программы:

Создать загрузочную флешку Window XP можно либо с помощью мастера (в программе все на русском языке), который проведет Вас через весь процесс, либо следующим образом:
- Открыть вкладку «Расширенный режим»
- Выбрать пункт «Перенос программы установки Windows XP/2003 на накопитель (он и так выбран по умолчанию). Нажать «Создать».

- Указать путь к файлам Windows — это может быть смонтированный в системе образ диска с Windows XP, компакт-диск с операционной системой или же просто папка с файлами установки Windows XP (которую можно получив, например, открыв образ ISO в любом архиваторе и распаковав в нужное место).
- Указать, какую флешку будем превращать в загрузочную (Внимание! Все файлы на флешке будут удалены и, скорее всего, не будут подлежать восстановлению. Сохраните все важные данные).
- Ждать.


Таким образом, сделать флешку с дистрибутивом операционной системы Windows XP в программе WinToFlash одинаково легко как с помощью мастера, так и в расширенном режиме. Единственное отличие, в расширенном режиме Вы можете настроить другие параметры, выбрать тип загрузчика, установить исправление ошибки stop 0x6b session3_initialization_failed и многие другие. Для большинства пользователей никаких параметров менять не требуется, достаточно описанных выше действий.
Скачать WinToFlash можно скачать на официальном сайте разработчика http://wintoflash.com/home/ru/, но стоит быть внимательным — не используйте веб-установщик со страницы загрузки, а воспользуйтесь загрузкой по http или ftp с официального сайта с той же страницы.
WinSetupFromUSB — более функциональный способ

Несмотря на то, что вышеописанный способ изготовить установочную флешку с Windows XP является очень простым и удобным, лично я использую для этих и для многих других целей (например, для создания мультизагрузочной флешки) бесплатную программу WinSetupFromUSB.
Рассмотрим процесс создания загрузочной флешки XP с помощью WinSetupFromUSB.
- Запустите программу, флешка уже вставлена в USB порт компьютера
- В списке устройств выберите путь к Вашей флешки (если подключено несколько USB накопителей), нажмите кнопку Bootice.
- В появившемся окне Bootice нажмите «Perform format», выберите пункт USB-HDD mode (Single Partition) и подтвердите выполнение форматирования (все данные с флешки будут удалены).
- После завершения процесса форматирования нажмите кнопку «Process MBR» и выберите пункт «GRuB for DOS», затем нажмите кнопку «Install / Config». По завершении, закройте программу Bootice.
- В WinSetupFromUSB, в поле Windows 2000/XP/2003 укажите путь к файлам установки Windows XP (это может быть смонтированный образ ISO, диск с Win XP или папка с файлами установки). Нажмите кнопку «Go» и дождитесь окончания создания загрузочной флешки.
На самом деле, программа WinSetupFromUSB предлагает опытному пользователю значительно больше функций для создания загрузочных носителей. Здесь мы рассмотрели ее лишь в контексте темы инструкции.
Загрузочная флешка Windows XP в Linux
Если на Вашем компьютере установлен Linux в любой его версии, то описанные выше способы для создания загрузочной флешки с Windows XP не подойдут. Однако, решение имеется: воспользуйтесь бесплатной программой MultiSystem, предназначенной для создания загрузочных и мультизагрузочных флешек в ОС Linux. Скачать программу можно по ссылке http://liveusb.info/dotclear/
После установки программы, выполните следующие действия:
- В программе MultiSystem выберите флешку и нажмите «Validate», нажмите «Ок» для установки загрузчика GRUB, после чего Вы окажетесь в главном окне программы.
- Кликните «Non Free» — «Installing Non-Free part», затем — «Download PLoP Bootmanager»
- После этого кликните «Download firdisk.ima», «Close». В результате Вы снова перейдете в главное окно программы.
- И последнее: просто перенесите ISO образ с Windows XP на поле Drag/Drop ISO/img — вот и все, флешка для установки Windows XP готова.
Надеюсь, этих способов окажется достаточно для Ваших целей. Также можете прочесть: как установить загрузку с флешки в BIOS.
Windows XP Professional is available to download free of cost along with the Product Key, therefore, if you want to install it on your old Desktop or Laptop computer system using a bootable USB drive, then here is the tutorial for that.
Earlier when Windows XP was a dominant operating system, at that time CDs were used to create a bootable medium, However, as technology is improving, that trend shifted to a USB drive. As CD drives are not anymore in the common usage, thus the only common way now we have to install XP is using a bootable USB drive. Indeed, the size of XP is just of a few MBs, thus we don’t need some huge size Pen drive. 1 GB will be absolutely fine.
Requirements:
- Windows XP ISO file
- WinToUSB bootable USB maker
Note: Before installing Windows XP make sure your hardware is compatible because most of the modern BIOS wouldn’t support running of Windows XP and may cause a fatal error while installing. Thus, it would be a great idea if you have some old PC or laptop and you want to use the Windows XP on it. Whereas on modern PC or Laptop, I don’t think you have to install Windows XP natively on the system instead use the VirtualBox or VMware Workstation Player (recommended). For that, you can see this tutorial – How to install Windows XP ISO on Windows 10 VirtualBox
Steps to download and create bootable Windows XP USB drive
- If you don’t have a Windows XP ISO file, then go to Archive.org and download the one. You will also get the Product key there, posted officially by Microsoft. The version is Windows XP Professional SP3 x86.
- Download WinToUSB, it is a lightweight software to easily create Windows and Linux bootable USB drives.
- Select Windows Setup Bootable Wizard option.
- Choose the radio button given in form of “I have ISO image or Archive” option.
- On Windows File Path, click on the Select button to browse the ISO file of Windows XP you have downloaded.
- Select the USB that you want to use for creating Windows XP bootable one.
- Move forward and when it asks to format the drive do that. Wait for some time and the USB drive will automatically get converted into a bootable one for installing the Windows XP operating system on your old systems.


Windows XP was released over two decades ago. You can still use the legacy operating system again for any reason whether it be using the old laptop or to relieve old memories.
All we need is to download Windows XP ISO from a reputable place, create a bootable USB/CD and then install it on the PC.
It powered most ATMs worldwide until a couple of years ago, and many still rely on it. Moreover, several medical and healthcare software was also supported by XP only.
The last service pack, the famous Windows XP SP3, solved almost every problem an average user had with Windows.
The list is endless, but random crashes to instability during average usage were commonplace.
After downloading XP, you can rely on Rufus, a bootable creator for Windows OSes, to create bootable media. Virtual machine users can skip directly to the installation and start using the legacy OS.
Table Of Contents
- Download Window XP ISO (Service Pack 3)
- Direct Download Link
- Create Windows XP Bootable USB/CD
- Clean Install Windows XP ISO
- Download Windows XP FAQs
Download Window XP ISO (Service Pack 3)
Direct Download Link
Microsoft has stopped offering XP for download. Here are direct download links for Windows XP ISO Service pack 3. Both 32-bit and 64-bit Windows XP are available.
Before going forward, find out if your computer is currently running 32-bit or 64-bit through this guide by Microsoft.
| Windows Version | Windows XP ISO |
| Size | 560 MB; 594 MB |
| Language |
English |
| Service Pack | SP3 |
| Version | 32-Bit 64-Bit |
There used to be an official link to download Windows XP ISO from the Microsoft website. It was removed after the OS was officially discontinued, along with its support. Now, this is the only way to download Windows XP SP3.
While it may sound unnecessary, here are the recommended system requirements for running Windows XP. It comes in handy when running it on a virtual machine, and you must allot RAM, storage, and cores, amongst other things.
| Processor | 300 MHz+ on a Single core |
| RAM | 128 MB or higher |
| Hard disk space | 1.5 GB |
| Display Resolution | 800×600 pixels or higher |
| Video | SVGA-capable video card |
Create Windows XP Bootable USB/CD
Once the ISO file is downloaded, it’s time to create Windows XP Bootable USB/CD or even a DVD if other sources are unavailable.
We can create bootable media that can be used to install Windows XP on single or multiple computers on a network.
Prerequisites
- Windows XP ISO file
- Install Rufus (portable version is available)
- A 2 GB USB drive or a Blank CD/DVD
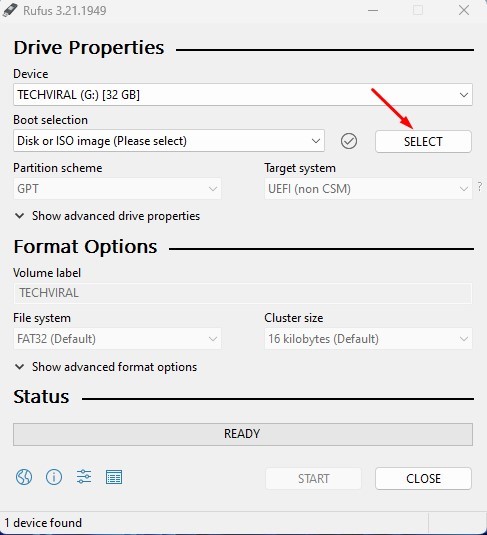
1. Launch Rufus and select your plugged-in CD/DVD or a USB drive. Anything with 1 GB of space would do it.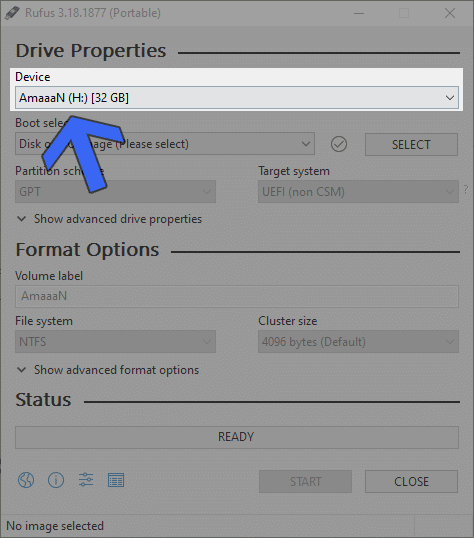
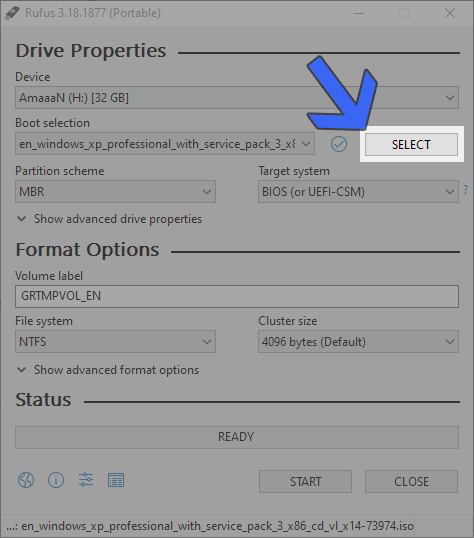
2. Next, locate the downloaded Windows XP ISO through the select button in boot selection.
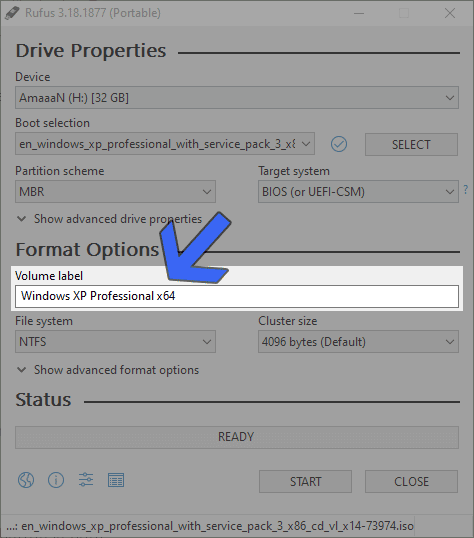
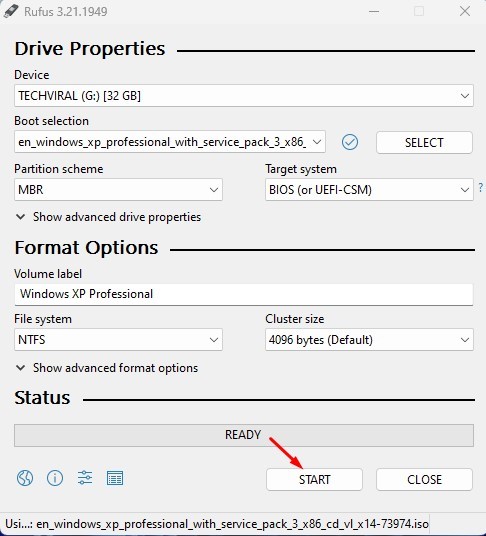
3. A volume label option will appear after loading and scanning the ISO. Fill in any name for your bootable device.
4. Everything is set; click the START button to start the bootable creation process.
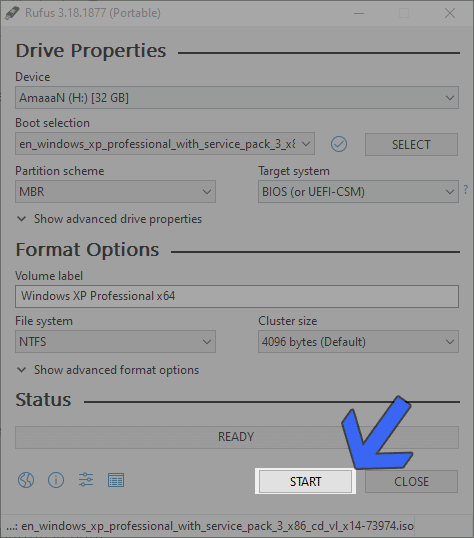
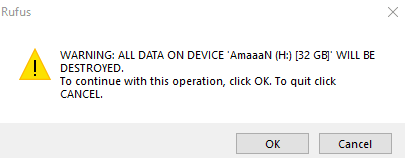
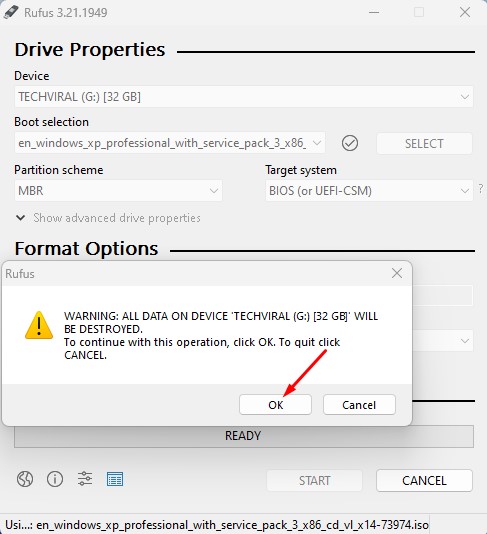
5. Now wait, and a warning prompt will appear. Click on OK to confirm and finally begin the process. It will take a minute or two, depending upon the speed of the bootable media.
Generally, the CDs and DVDs are slower as the data needs to be written on them through the burner. The hard disk’s read speed will also contribute to the time, but it shouldn’t take long as the size is under 700 MBs.
Clean Install Windows XP ISO
Creating a Windows XP bootable media was easy; now, let’s install the OS on the computer in these easy steps.
Mount the ISO image if you are installing it on a virtual machine. You will need to restart and boot with the USB or CD/DVD for computers.
Every computer has a different keyboard shortcut for accessing the boot menu key. It will vary according to the laptop and manufacturer, so we have listed the ones from major companies.
Laptops
| Brand | Boot Menu Key |
| ASUS | F8 |
| Acer | F12 |
| Dell | F12 |
| HP | F9 |
| Lenovo | F8, F10, F12 |
Desktops
| Motherboard Brand |
Boot Menu Key |
| ASUS | F8 |
| Gigabyte | F12 |
| MSI | F11 |
| Intel | F10 |
| ASRock | F8, F11 |
| Biostar | F9 |
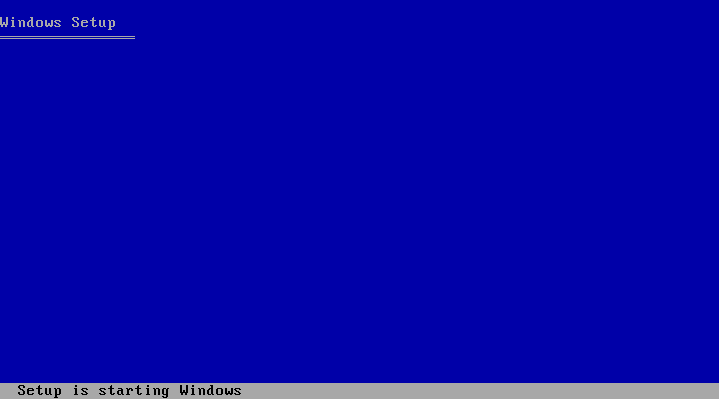
We will not boot using the bootable media and install Windows XP on the computer. Here is how it is done.
1. Insert the Windows XP bootable and select it as the booting device.
2. Press ENTER from the list of options to set up Windows.
3. On the next screen, accept the terms and conditions by pressing F8 on the keyboard.
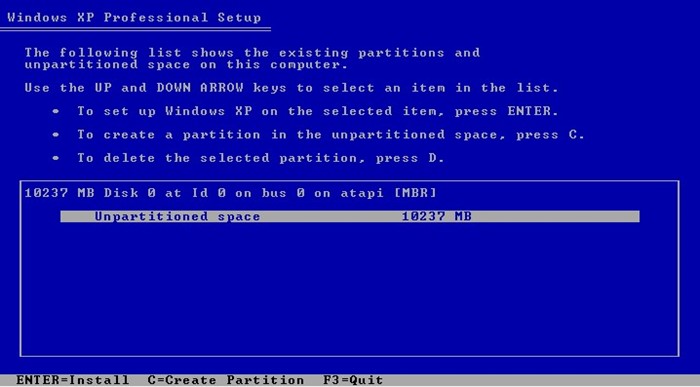
4. Next up, we have the partition formatting page. Select the partition or unallocated space and press ENTER. You can either select an existing partition or create a new partition from the unallocated space.
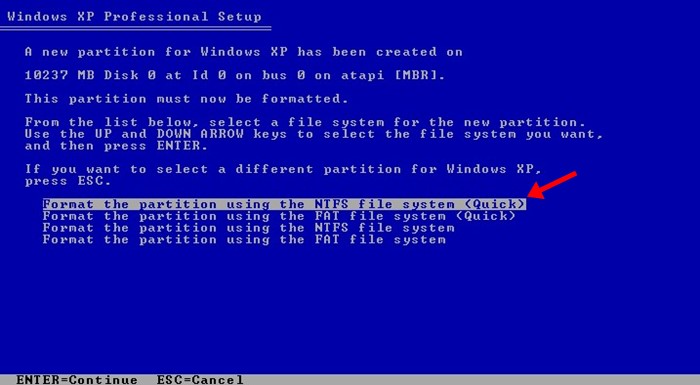
5. Select Format the partition using the NTFS file system (Quick) to proceed

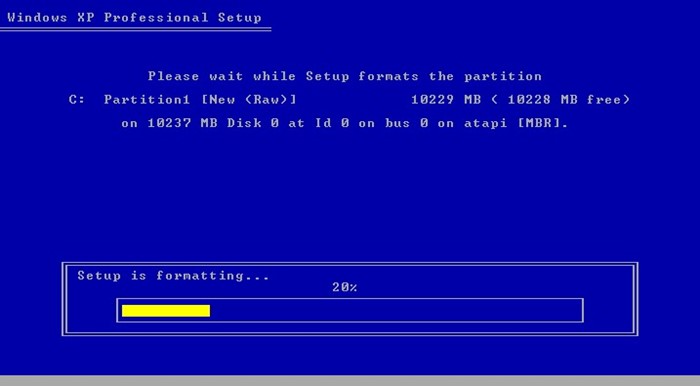
6. The Windows XP installation process will begin shortly after formatting the storage or creating a new partition from the unallocated space, as per the instruction.
7. The installation process will take a couple of minutes, depending upon the storage’s speed. SSDs will be the fastest, followed by single platter HDDs.
8. Configure your date, time, and keyboard layout in this section. The default settings are taken from the internet if connected through ethernet(wired). Click on Next to proceed.
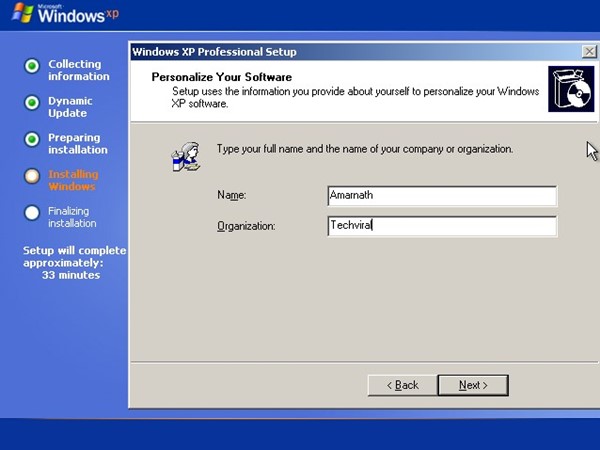
9. Type in your name and organization(if applicable). This will be used in naming your computer, e.g., Amaan’s Computer.
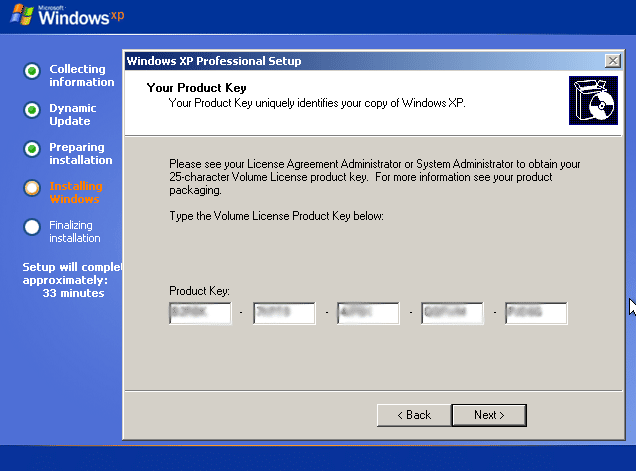
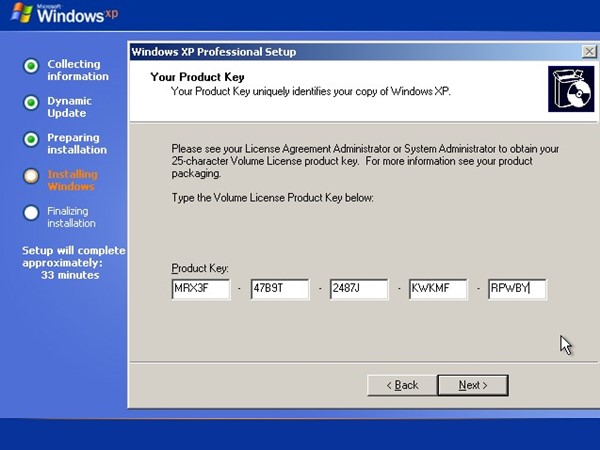
10. Enter the Windows XP CD Key on the screen and click NEXT to proceed.
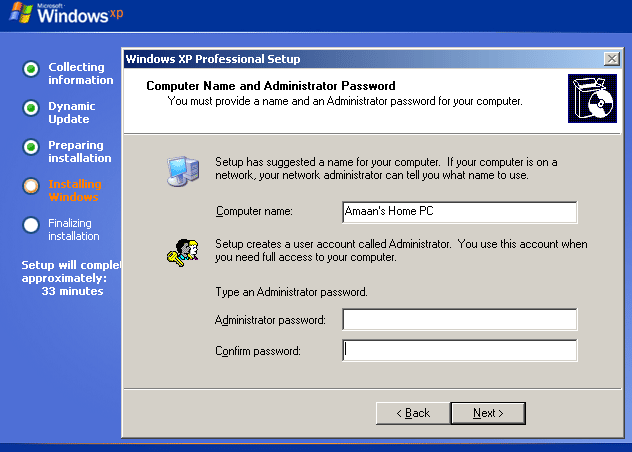
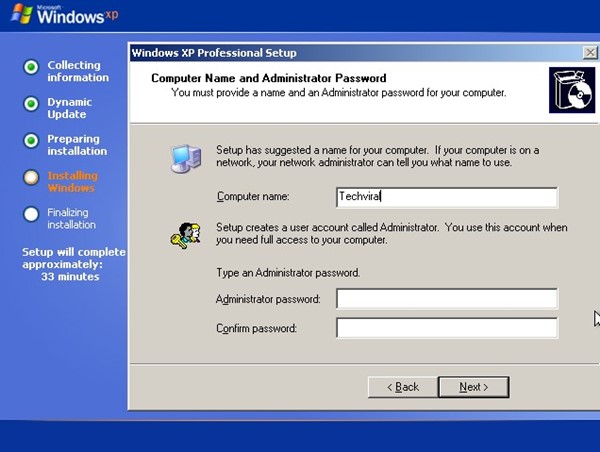
11. Here, you have to give a name for the computer and set a password, which will be prompted when logging in and doing tasks requiring administrative rights. You can leave the administrator password blank, and it will not be prompted in the future unless configured.
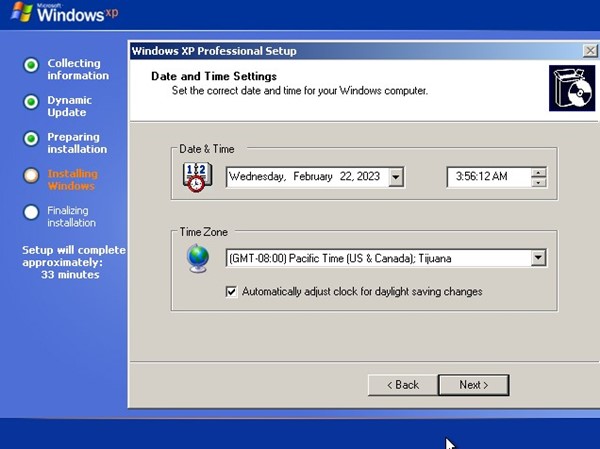
12. Select the timezone and date in the next section. There is also an option for daylight saving adjustments applicable in a few parts of the world.
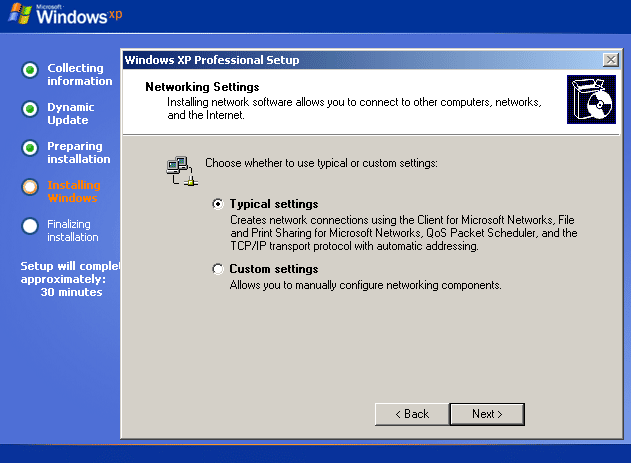
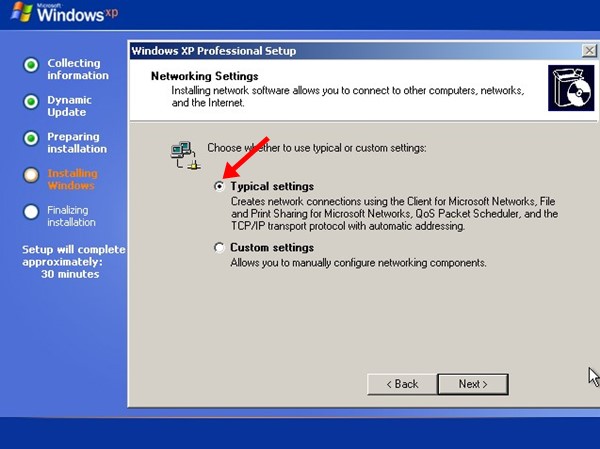
13. On the next screen, configure network settings. Keep it typical if you are unsure of what it is about.
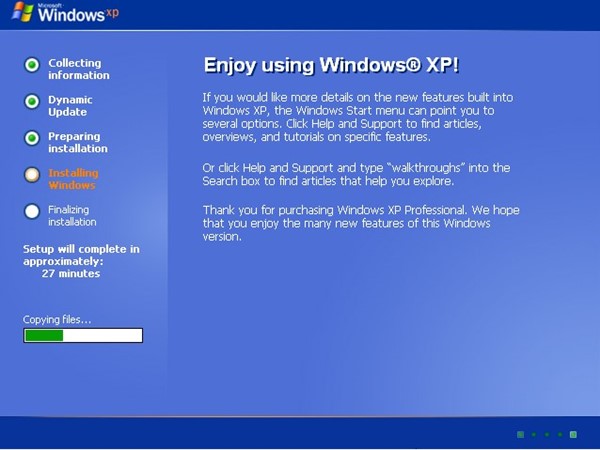
Now you can sit back and let the installation process do its thing. The computer will be restarted a couple of times, and the display will also be calibrated.
Be prepared to be welcomed by an onboarding menu where you will set up different users for the computer and internet connectivity options. Then we will land on Windows XP’s desktop.
Over to You
Download Windows XP ISO using the above-given links. Create a bootable while at it using Rufus and start installing XP right away without waiting for any expert.
All the download links are safe to download and verified by us.
Keep a CD key or license txt key handy because otherwise, the installation process will get stuck midway.
Are these Windows XP ISO Files genuine?
These Windows XP ISO files are genuine and from Microsoft‘s official servers. They have been added to the Internet Archive’s digital library to preserve the veteran OS.
Is Windows XP available in 64-bit?
YES; Windows XP was released in both 32-bit and 64-bit. You can find its link in the third paragraph above.
How much minimum RAM is required for Windows XP?
Windows XP requires a minimum of 64 MB RAM. Anything above 128 MB would be enough for the 32-bit version. To be safer, install 1 GB RAM for 64-bit Windows XP, which would require more memory for its programs.
Can I upgrade from 32-bit Windows XP to 64-bit Windows XP?
You absolutely can upgrade from 32-bit to 64-bit. Before moving forward, check whether your processor supports 64-bit architecture. Use this freeware third-party application GSC to determine the capacity of the CPU.
Will I receive Windows XP updates?
Microsoft discontinued Windows XP in 2009 and ended its support in 2014. There will be no updates for Windows XP in any manner. Users can continue to use the operating system, but there is an added risk of getting exposed to newer vulnerabilities.
Is it legal to download these Windows XP ISOs?
The last Service Pack, the SP3, is unavailable on any of the Microsoft channels. The XP ISO images are sourced from the official channels, and by entering the CD KEY, you can legally use the operating system.
Where to find drivers for Windows XP?
Windows XP does not include drivers like Windows 7, 8, or 10. Head to your motherboard or laptop manufacturer’s website to find the appropriate drivers. They are generally in the support section of the model.
The latest version of Windows is Windows 11, but still, we are here discussing Windows XP. Truly, Windows XP is one of the most popular desktop operating systems ever made, but we lost our beloved operating system in 2014.
The operating system was released on October 25, 2001, and Microsoft ended its support in 2014. Within that time frame, Windows XP was the most preferred OS due to its fast performance, stability, and ease of use.
Even though Windows XP has met its end, way too many users still use it. In fact, if you are reading this article, you’re looking for Windows XP ISO Files.
Not every user has a high-end computer; they find Windows XP relevant. Windows XP still powers many ATMs and healthcare devices. People from places like hospitals, industrial environments, and banking sectors still search for ways to download Windows XP ISO files.
Even though Microsoft has pulled its plug out from the development of Windows XP, you may still want it due to its ease of use. Everyone has their reasons for sticking with this old-school operating system.
Many want to download Windows XP in 2023 to relive their old days. Whatever the reason is, Windows XP is still available on the web, and you can install it on your computer.
Windows XP Download Latest Version (Direct Download)
If you want to feel those nostalgic feelings of Windows XP days again, you should download Windows XP Service Pack 3 from the direct link we have shared below.
Please note that Windows XP ISO Service Pack 3 is available for 32-bit and 64-bit versions. Hence, you need to download the one that your processor can handle.
- Download Windows XP Professional SP3 x86
Product Key: MRX3F-47B9T-2487J-KWKMF-RPWBY
- Download Windows XP Professional x64 Edition
Product Key:VCFQD-V9FX9-46WVH-K3CD4-4J3JM
- Windows XP Professional SP1 x86
Serial: WDGQX-WC2Y3-4R966-TK3H3-HXRB8
OEM: XJM6Q-BQ8HW-T6DFB-Y934T-YD4YT
Corp: XP8BF-F8HPF-PY6BX-K24PJ-TWT6M
- Windows XP Professional Service Pack 2
Serial Key: XJM6Q-BQ8HW-T6DFB-Y934T-YD4YT
Important: Techviral doesn’t host any of the download links shared above. All links are collected from the web.
The Windows XP ISO download we have shared will work, but it’s not the original copy from Microsoft. Since Windows XP is discontinued, there’s no way to download Windows XP from any official sources.
So, you have to rely on the downloads that were available before the operating system was discontinued. And we have shared the one that’s still working today.
Requirements to Run Windows XP
While in 2023, most computers and laptops can handle Windows XP. However, if you have an old low-end device, checking the system requirements for Windows XP is still recommended.
| System Requirements for Windows XP | |
|---|---|
| Processor | Single or Dual Core Processor 233 MHz or Above. |
| GPU | Integrated will work |
| Display Resolution | 800×600 or Above |
| HDD/SSD Space | 2GB is Recommended |
| RAM | 1GB is Recommended/Minimum is 512MB |
Windows XP Bootable USB/CD
After downloading the Windows XP ISO files from the shared links, you can create a Windows XP Bootable USB.
It’s pretty easy to create Windows XP Bootable USB; you just need to use Rufus to create Windows XP Bootable USB or CD. Just follow the steps we have mentioned.
1. First, download & install the Rufus portable version on your computer from this link.
2. It’s a portable tool; hence, once installed, run it directly. On the device drop-down, select your USB drive.
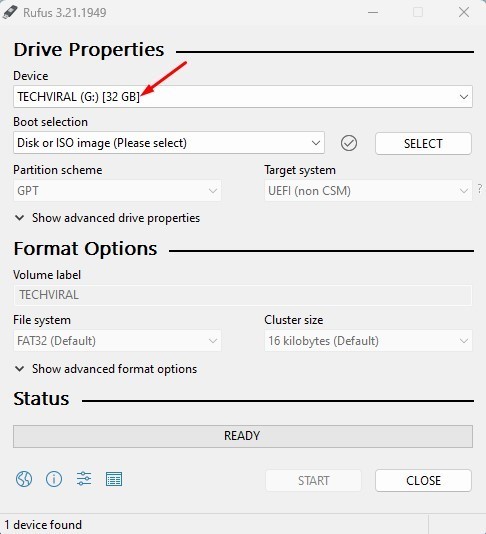
3. Next, click on the Select button beside the Boot Selection. Now browse the Windows XP ISO file you’ve downloaded.
4. Once done, move to the Volume Label section and name your bootable device.
5. After making the changes, click the Start button at the bottom.
6. Rufus will attempt to format your USB drive. You will see a warning prompt; click the Ok button to confirm the action.
That’s it! Depending on the USB speed and your processor, the process can take a few minutes to complete. After creating a Windows XP Bootable USB, you can use it to install Windows XP on any computer or laptop.
How to Install Windows XP (By Mounting ISO)
Now there are two different ways to install Windows XP ISO files. You can use an ISO Mounter program to mount the ISO file you downloaded; or perform a clean install with the Bootable Windows XP USB you’ve created above.
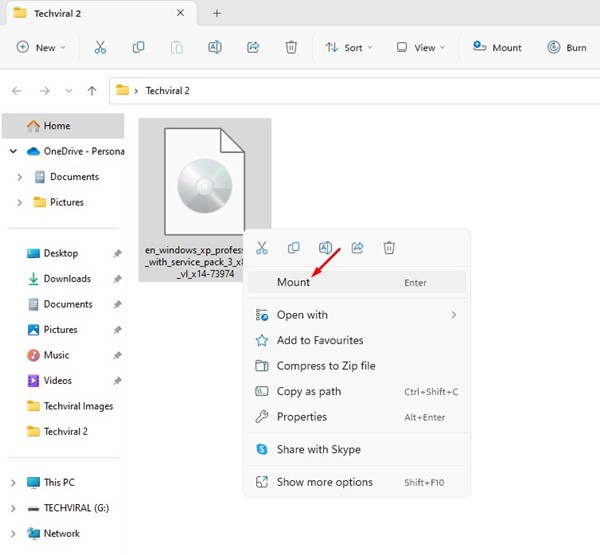
The mounting one is easy; you need to use an ISO Mounter to mount the ISO file in a virtual hard drive on your computer. After mounting the ISO file, it will appear on your PC’s file explorer.
Just double-click on the mounted drive to run the Windows XP Setup. If you want to clean install Windows XP on your computer, follow the next section.
How to Clean Install Windows XP ISO file?
You must access the boot menu to perform a Windows XP clean installation. This section will be a bit lengthy; hence, follow the steps carefully to avoid any mistakes.
Almost every computer/laptop brand has a different keyboard shortcut for accessing the boot menu. So, before following the steps, ensure you know how to access the boot menu on your computer. You can check the table below to discover the keyboard shortcut.
| Laptop/Desktop Brand | Boot Menu Key Shortcut |
|---|---|
| ASUS | F8 |
| Dell | F12 |
| Acer | F12 |
| HP | F9 |
| ASRock | F8, F11 |
| Lenovo | F8, F10, F12 |
| Gigabyte | F12 |
| Biostar | F9 |
| ASRock | F8, F11 |
| Intel | F10 |
| MSI | F11 |
If your Laptop/Desktop brand is not listed on the table, you need to search for it on the Google search engine. You can search terms like “boot menu key for ‘Laptop/desktop/motherboard’” brand. For example, Boot menu key for Asus.
Install Windows XP ISO From USB
Make sure you have the Windows XP Bootable USB ready with you. Next, carefully follow the steps below to clean install Windows XP on a computer.
1. First of all, insert your Windows XP Bootable USB drive on your PC/laptop and restart it.
2. When the computer is about to start (Boot screen), press the keyboard key to open the Boot menu.
3. Set your computer to boot from your USB device. You need to set your USB as the first boot device of your computer. Once done, restart your PC again. This time the Windows Setup screen would load.
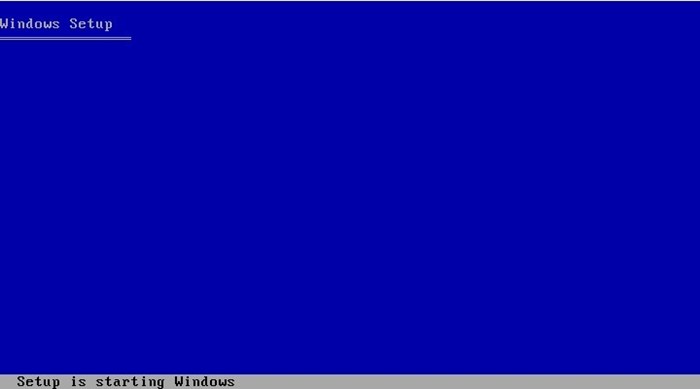
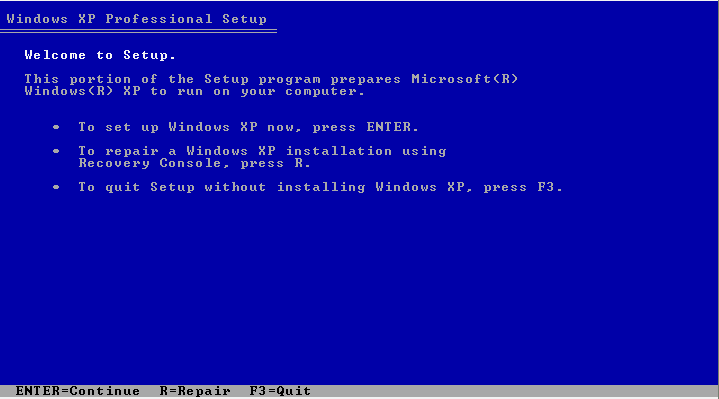
4. Press the Enter button on the Windows XP Professional Setup screen.
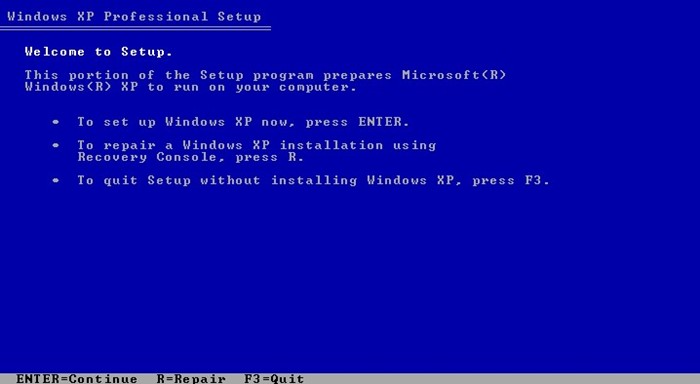
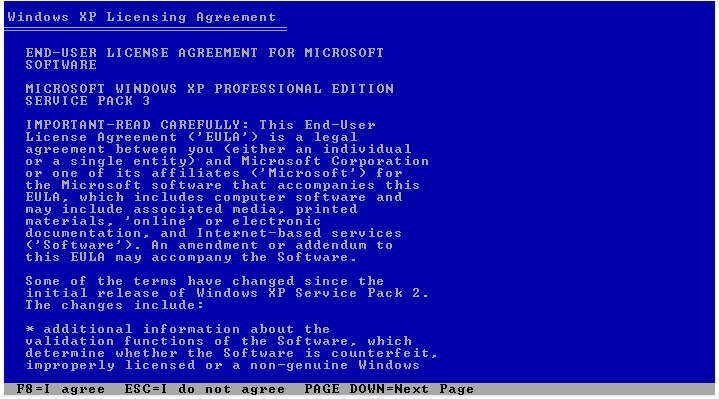
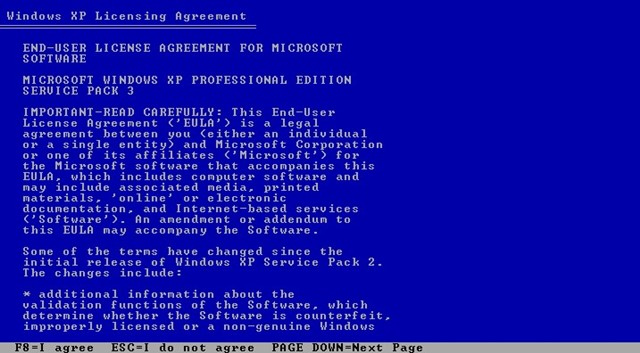
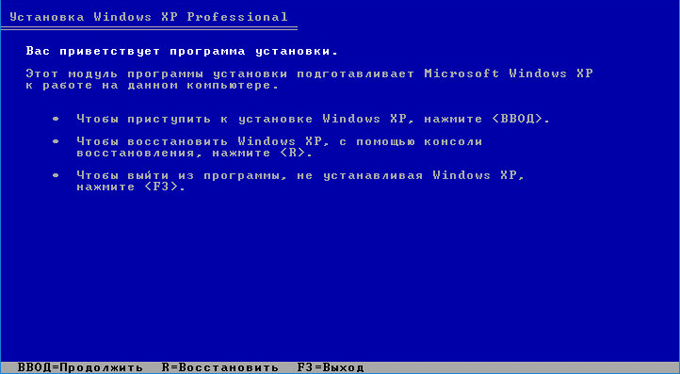
5. Now, you will see the Windows XP Licensing Agreement screen. Here you need to press the F8 button on your keyboard.
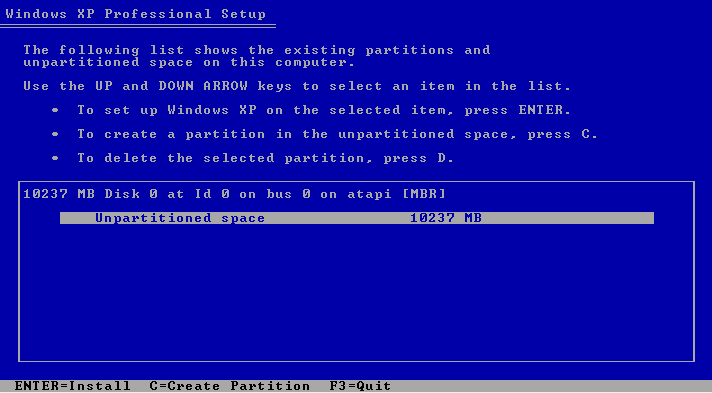
6. Now select the Unpartitioned space to install Windows XP.
7. Select ‘Format the partition using the NTFS file system (Quick)‘ on the next screen.
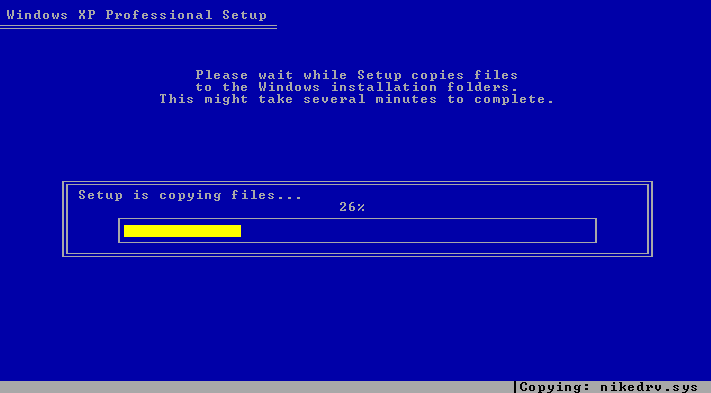
8. The setup wizard will copy the Windows XP files on your selected drive. This process may take time to complete.
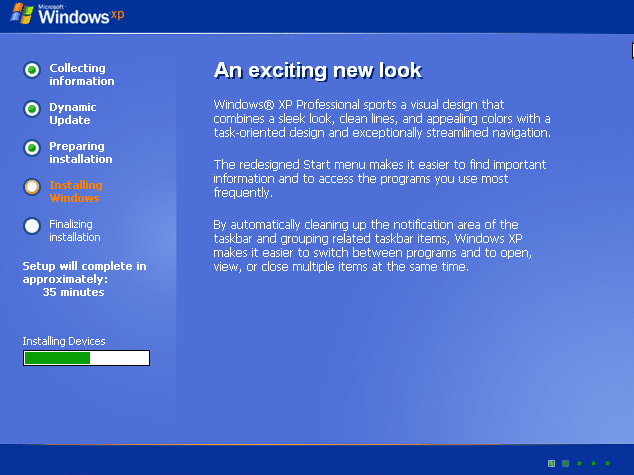
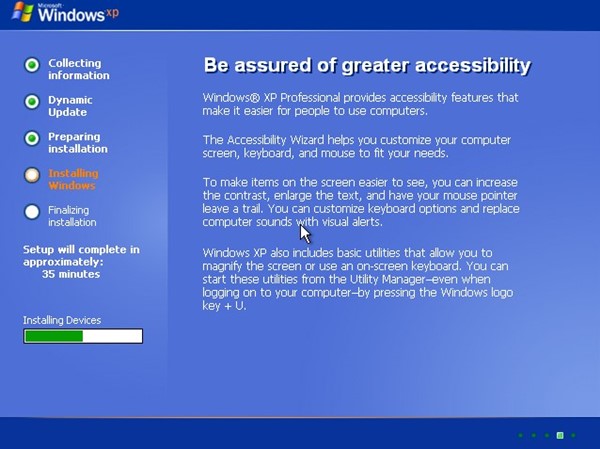
9. Windows XP setup wizard will reach a screen ‘Installing Windows‘. The process may appear stuck; wait patiently, and don’t restart your computer.
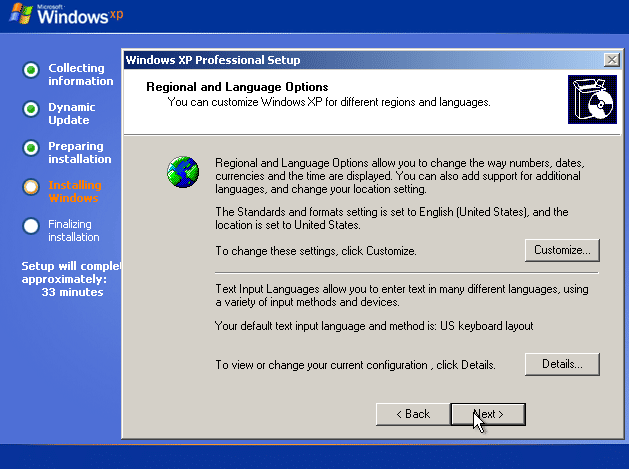
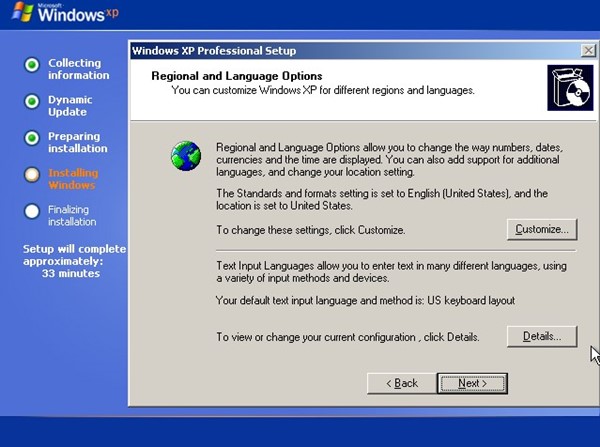
10. Click the Next button on the Regional and Language options.
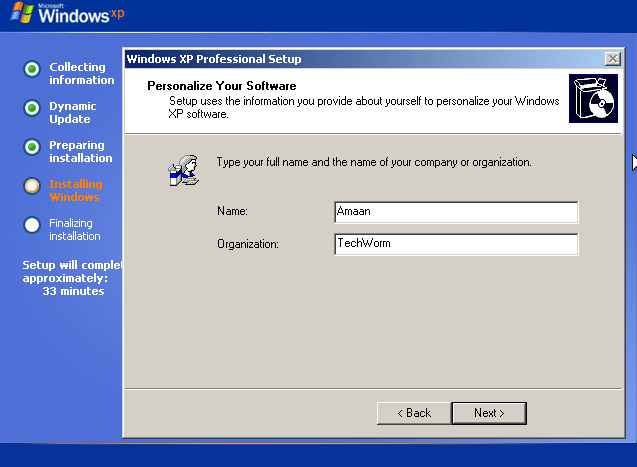
11. On the next prompt, you will be asked to enter your and your organization’s names. Simply name it and click on the Next button.
12. Now, you will be asked to enter the Windows XP activation key. We have shared the Windows XP CD key at the end of this section.
13. After entering the Windows XP Product key, enter the computer name, admin password and click the Next button.
14. You will be asked to set the Date & Time Zone. Set everything as needed and click on the ‘Next‘ button.
15. Now, you need to wait for a few more minutes until Windows XP installs the network.
16. On the Network Settings prompt, select ‘Typical Settings‘ and click ‘Next‘.
17. Now, you need to wait a few more minutes for the installation to complete. You need to sit back and relax as the process is automatic. Don’t panic if your computer restarts a few times or the display adjusts itself. It’s part of the installation.
18. Once done, your computer will restart for one final time and will boot with Windows XP. You can now experience Windows XP on your device.
That’s it! This is how you can download & install Windows XP Professional on your computer.
How to Check if Windows XP is Activated?
It’s relatively easy to check if your version of Windows XP is activated. Below are the steps that will help you determine whether your Windows XP is activated.
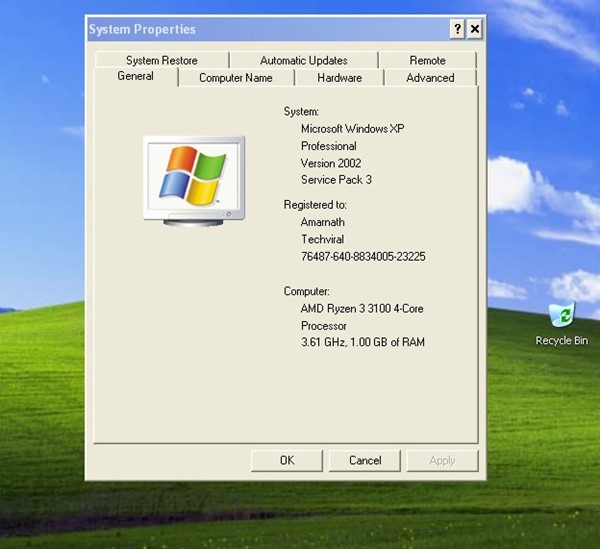
1. First, click on the Windows start button. Next, right-click on the My Computer and select Properties.
2. On the System Properties, you must look at the activation status.
Windows XP FAQs
We are sure you still have many doubts about Windows XP ISO Files. Below, we have answered some of the most asked questions about Windows XP Download.
Can I download Windows XP for Free?
Microsoft has made Windows XP free for a long time, but it’s too old now. Microsoft no longer provides official support; there’s no way to download a genuine copy of Windows XP for free.
However, you can use the older versions of Windows XP ISO that we have shared. The file we have shared is clean of viruses/malware.
How to Activate Windows XP?
There are various ways to activate Windows XP. You can either use the activation key we have shared or use activators. However, Windows XP activators were often virus-filled and could spam your screen with ads.
One of the popular Windows XP Activators is KMSPico, but finding a working one would require some hard work.
How much RAM does Windows XP Need?
Windows XP is pretty lightweight and will run even on 512MB of RAM. However, for better performance and stability, 1GB RAM is recommended. You can check the system requirement section to know all requirements to run Windows XP.
Is Windows XP 32 or 64-bit?
Windows XP is released in both 32-bit and 64-bit. To check whether your PC can run 32-bit or 64-bit, you need to check out this guide from Microsoft.
Can I upgrade Windows XP 32-bit to 64-bit?
You can upgrade your Windows XP from 32 to 64-bit, which would require clean installation. Hence, if your PC can handle a 64-bit operating system, you must install the Windows XP 64-bit again on your computer/laptop.
Can I download Windows XP on USB?
You can download & install Windows XP from a USB. But, before that, you need to prepare your USB device to boot Windows XP on a computer. For the steps, follow our ‘How to Create Windows XP Bootable USB’ section.
How to Install Windows XP on laptop without CD Drive?
You can install Windows XP from a bootable USB if your laptop doesn’t have a CD/DVD drive. For that, you need to create a Windows XP Bootable USB first. You can use tools like Rufus to create Windows XP bootable USB drive.
So, this guide is about downloading and installing Windows XP. We have shared all working links to download Windows XP ISO files. If you need more help downloading Windows XP, let us know in the comments below. Also, if the article helped you, make sure to share it with your friends.
Как сделать загрузочную флешку Windows XP? Подобный вопрос задавал не один пользователь, потому что создать загрузочную флешку для Windows XP не так просто, по некоторым причинам.
Дело в том, что во времена операционной системы Windows XP установка системы происходила с оптического привода CD/DVD, а загрузка системы с внешних USB накопителей не была предусмотрена. С течением времени обстоятельства изменились. Разработчики программ для создания загрузочных флешек, внедрили в свои приложения поддержку более современных операционных систем, начиная с Windows 7.
Содержание:
- Подготовка к созданию загрузочной флешки Windows XP
- Создание загрузочной флешки Windows XP (1 способ)
- Как сделать загрузочную флешку Windows XP (2 способ)
- Запуск установки Windows XP
- Выводы статьи
Как быть тем пользователям, у кого на ноутбуках или нетбуках нет оптического привода? В случае, возникновения серьезных неполадок, операционную систему придется переустанавливать. На компьютере нет дисковода, зато есть возможность для использования флешки.
Есть несколько способов создать загрузочную флешку Windows XP. Подойдут программы WinToFlash, Rufus (до версии 2.18) или WinSetupFromUSB, которые поддерживают создание загрузочного накопителя с XP. В этой статье будет создана загрузочная флешка Windows XP в WinSetupFromUSB двумя способами.
Операционная система Windows XP пока актуальна для владельцев маломощных и старых стационарных компьютеров, ноутбуков и нетбуков. Ограничения оборудования не позволяют с комфортом работать даже в Windows 7, не говоря уже о более современных операционных системах.
Если у вас старый компьютер, убедитесь, что в BIOS вашего компьютера присутствует поддержка USB устройств. Возможно, предварительно понадобится интегрировать драйвера SATA в дистрибутив Windows XP для того, чтобы приложение установки системы видело современные жесткие диски.
Для создания флешки, с которой можно установить Windows XP, необходимо иметь в наличии:
- USB флеш накопитель размером в 1 ГБ или более;
- бесплатную программу WinSetupFromUSB для создания загрузочной флешки Windows XP;
- образ операционной системы Windows XP в формате ISO или установочный CD/DVD диск с Windows.
Сначала необходимо скачать WinSetupFromUSB с официального сайта. Программа не требует установки на компьютер, приложение работает на английском языке. Распакуйте архив с программой при помощи архиватора.
Программа запускается из папки «WinSetupFromUSB» после клика по приложению обычной или 64-битной версии (в зависимости от разрядности операционной системы, установленной на вашем компьютере).

Подготовка к созданию загрузочной флешки Windows XP
Создание загрузочной флешки в программе WinSetupFromUSB проходит достаточно просто. Сам процесс можно разделить на два этапа. При подготовке этой статьи использовался образ операционной системы Windows XP Professional SP3.
Сначала выполните предварительную подготовку: выполните форматирование флешки, откройте или распакуйте образ Windows XP:
- Отформатируйте USB флеш накопитель, кликнув правой кнопкой мыши по флешке в Проводнике, выбрав в контекстном меню пункт «Форматировать…».
- Откройте образ Windows XP одним из трех способов:
- монтируйте образ в виртуальном приводе, при помощи программы-эмулятора, например, бесплатной программы DAEMON Tools Lite;
- вставьте установочный CD/DVD диск с операционной системой в дисковод компьютера;
- откройте образ операционной системы при помощи архиватора, например, WinRAR или 7-Zip, а затем распакуйте его в папку на компьютере (позаботьтесь о том, чтобы в пути к папке не было кириллических символов и пробелов).
Создание загрузочной флешки Windows XP (1 способ)
Подготовительный период закончился, теперь создадим загрузочную флешку.
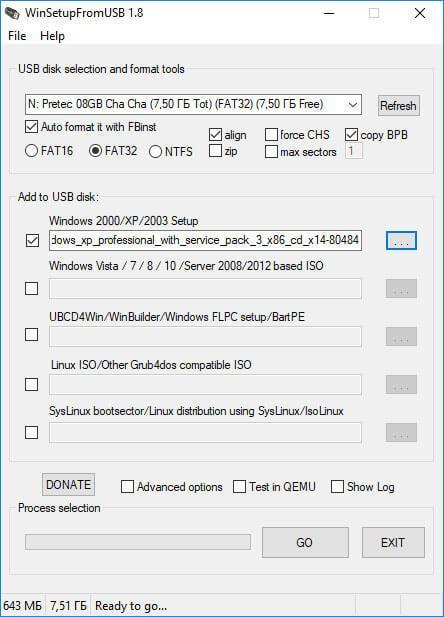
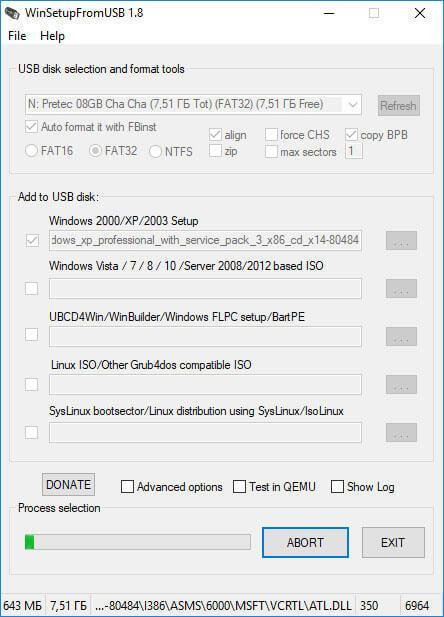
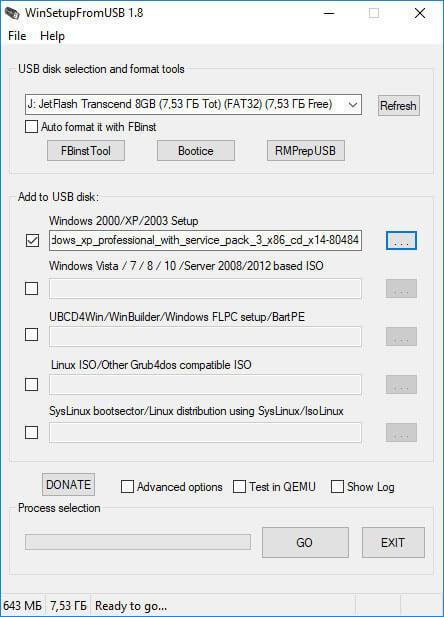
- Откройте программу WinSetupFromUSB. Приложение автоматически определит подключенный к компьютеру USB флэш накопитель. Если к компьютеру подключено несколько флешек, выберите нужный накопитель. Для перезапуска выбора флешки, нажмите на кнопку «Refresh».
- Поставьте галку в параметре «Auto format it with FBinst». Остальные настройки оставьте по умолчанию. По желанию, можете выбрать одну из файловых систем: «FAT32» или «NTFS».
- В настройке «Add to USB disk» отметьте пункт «Windows 2000/XP/2003 Setup». Нажмите на кнопку для выбора в Проводнике распакованного образа Windows XP, образа системы монтированного в виртуальном дисководе, или установочный диск, вставленный в привод CD/DVD.
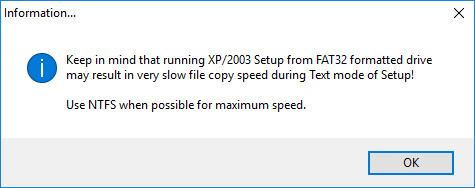
- В открывшемся окне предупреждают о том, что копирование файлов в файловой системе «FAT32» займет больше времени, чем в «NTFS», которую рекомендуют использовать.
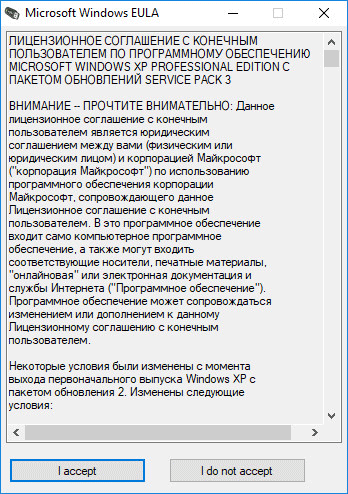
- В окне «Microsoft Windows EULA» примите лицензионное соглашение.
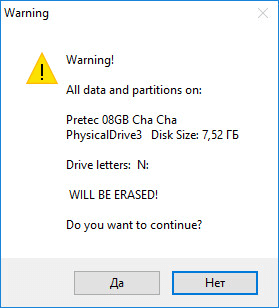
- Далее нас предупреждают о том, что все файлы на флешке будут стерты. Нажмите на кнопку «Да».
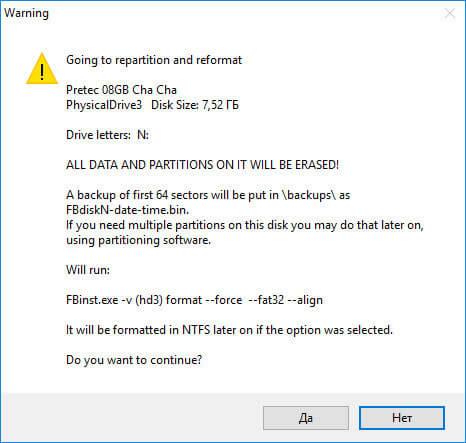
- В следующем окне согласитесь с выбранными настройками, нажмите на кнопку «Да».
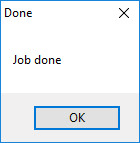
- В окне программы WinSetupFromUSB нажмите на кнопку «GO», для запуска записи операционной системы на USB флэш накопитель.
- После завершения записи, в открывшемся окне «Done» нажмите на кнопку «ОК».
- Нажмите на кнопку «EXIT» в окне программы, для отключения WinSetupFromUSB.
Как сделать загрузочную флешку Windows XP (2 способ)
После завершения подготовки, переходим к созданию загрузочной флешки в программе WinSetupFromUSB.
- Запустите программу WinSetupFromUSB.
- В настройке «Add to USB disk» поставьте галку напротив раздела «Windows 2000/XP/2003 Setup», а затем нажмите на кнопку для выбора папки с распакованным образом Windows XP, или выберите букву диска дисковода, или виртуального привода, в зависимости от того, каким способом вы собираетесь открыть образ системы. В пути к образу или папке не должно быть пробелов и кириллических символов.
- В окне с информацией нас предупреждают о том, что на флешке в формате «FAT32» копирование данных займет более длительное время, чем на флешке, отформатированной в формат «NTFS».
- В открывшемся окне «Microsoft Windows EULA» нажмите на кнопку «I accept» для принятия лицензионного соглашения об использовании Window XP.
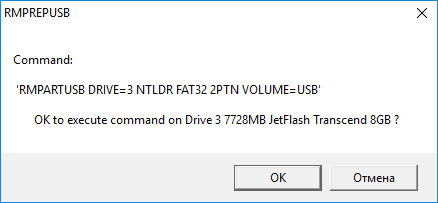
- Затем в окне «WinSetupFromUSB» нажмите на кнопку «RMPrepUSB». При помощи утилиты RMPrepUSB будет произведено форматирование, создание активного раздела и загрузчика на USB флешке. Утилита RMPrepUSB имеет русский язык интерфейса.
- В окне «RMPrepUSB» сделайте следующие настройки:
- В опции 3 «Загрузочный сектор» включите пункт «XP/BartPE bootable [NTLDR]».
- В параметре «Работа с образами» должна стоять последовательность «Образ -> USB».
- В настройке 4 «Файловая система и опции» выберите параметры «FAT32» (или «NTFS») и «Boot as HDD (C: 2PTNS)».
- Затем нажмите на кнопку «Подготовить диск».

- В открывшемся окне согласитесь с выполнением команды, нажмите на кнопку «ОК».
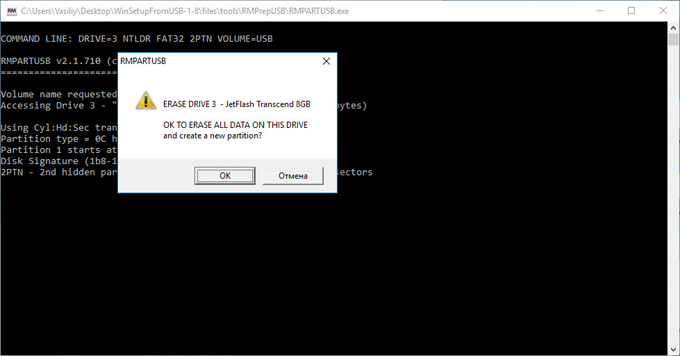
- После этого откроется окно командной строки, в которой автоматически выполняются команды для подготовки диска.
- В окне с предупреждением о выполнении первого этапа, нажмите на кнопку «ОК». Дождитесь завершения выполнения команд.
- Далее в окне «RMPrepUSB» нажмите на кнопку «Выход».
- В окне «WinSetupFromUSB» нажмите на кнопку «GO» для запуска процесса записи образа системы на флешку, который займет некоторое время.
- По завершению записи откроется окно «Done», с информацией о завершении работы. Нажмите на кнопку «ОК».
Закройте программу WinSetupFromUSB.
Запуск установки Windows XP
Сразу после включения компьютера, войдите в BIOS, а не в загрузочное меню (иначе при установке операционной системы возможны ошибки), для установки приоритета загрузки со съемного устройства, предварительно подключенного к компьютеру. До окончания установки операционной системы, не вынимайте загрузочную флешку из USB порта ПК.
Выполните следующие действия:
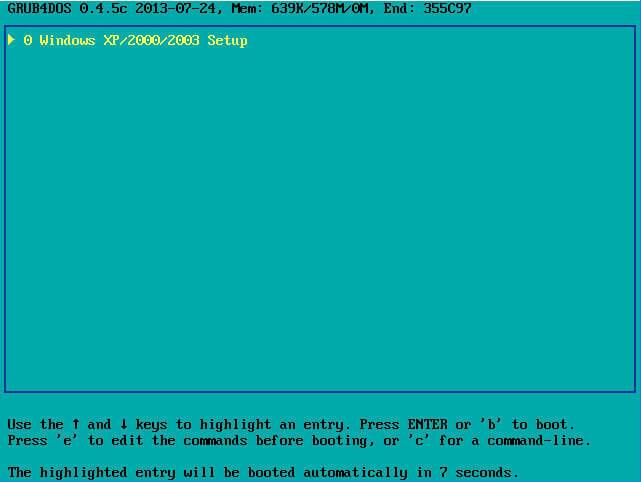
- После загрузки откроется окно «GRUB4DOS», в котором выделено название операционных систем «Windows 2000/XP/2003 Setup». Нажмите на клавишу клавиатуры «Enter».
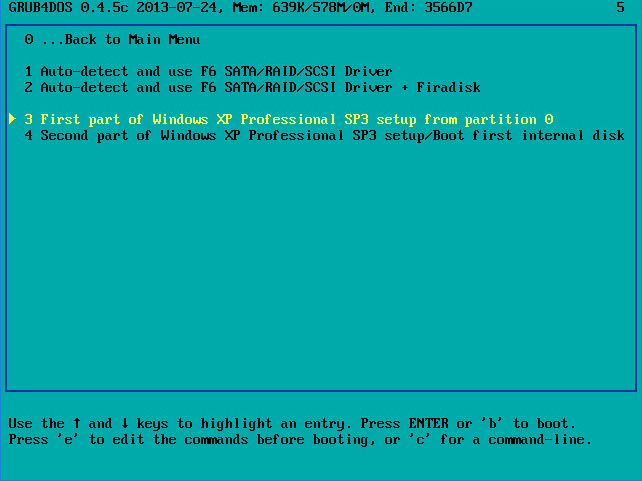
- В следующем окне с помощью стрелок « ↑ » и « ↓ » на клавиатуре перейдите к 3 пункту «First part of Windows XP Professional SP3 setup from partition 0», а затем нажмите на клавишу «Enter».
- Далее начинается процесс установки операционной системы Windows XP на компьютер.
После первой перезагрузки выберите пункт 4 «Second part of Windows XP Professional SP3 setup/Boot First internal disk» для загрузки с жесткого диска. Дождитесь окончания установки Виндовс, не вынимайте флешку.
После завершения установки операционной системы, отключите загрузочную флешку от компьютера. Прочитайте подробную статью про установку Windows XP с флешки.
Выводы статьи
С помощью бесплатной программы WinSetupFromUSB можно создать загрузочную флешку для установки операционной системы Windows XP на компьютер с внешнего USB накопителя.
Похожие публикации:
- Загрузочная флешка с Windows 10
- Загрузочная флешка Windows 10 в командной строке
- Как узнать версию Windows
- Диск восстановления Windows 10
- 7 способов как узнать ключ продукта Windows