Содержание
- Создание виртуальной машины для Windows XP
- Настройка виртуальной машины для Windows XP
- Установка Windows XP на VirtualBox
- Вопросы и ответы
В этой статье мы расскажем, как установить Windows XP в качестве виртуальной операционной системы, используя программу VirtualBox.
Читайте также: Как пользоваться VirtualBox
Прежде, чем инсталлировать систему, для нее необходимо создать виртуальную машину — ее Windows будет воспринимать как полноценный компьютер. Для этого и предназначена программа VirtualBox.
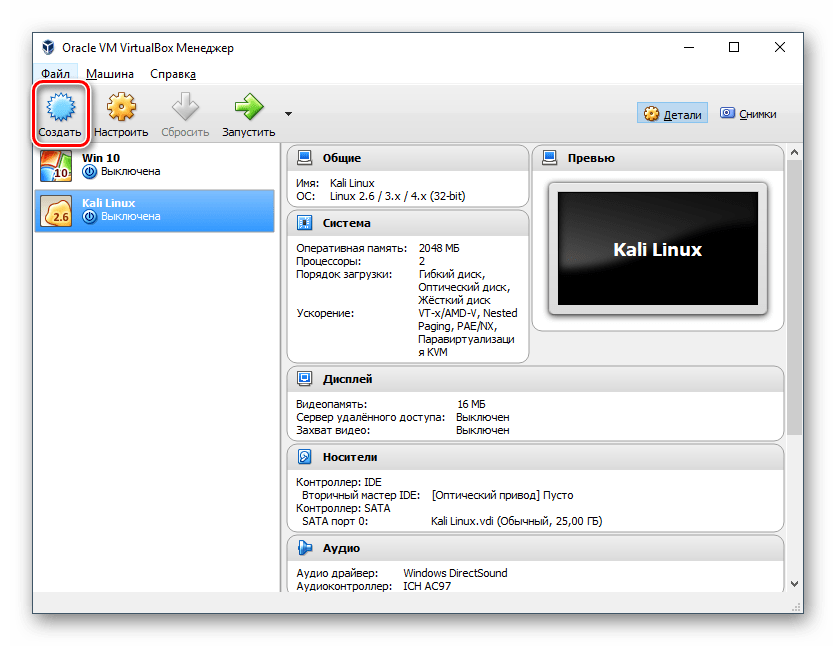
- Запустите VirtualBox Менеджер и нажмите на «Создать».
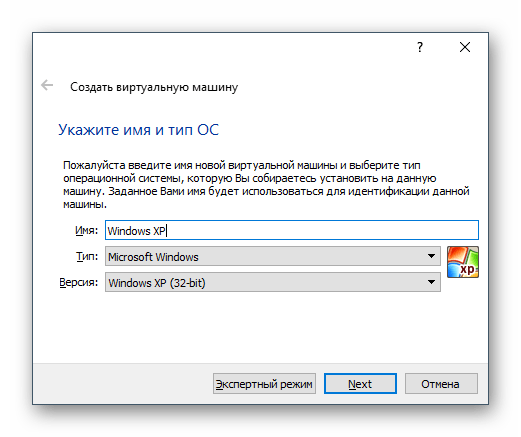
- В поле «Имя» впишите «Windows XP» — остальные поля будут заполнены автоматически.
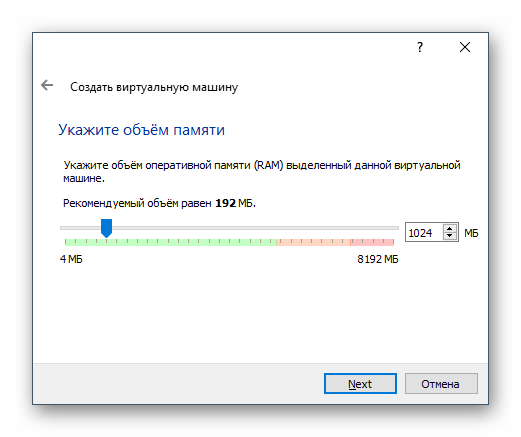
- Решите, сколько RAM вы хотите выделить под устанавливаемую ОС. VirtualBox рекомендует использовать минимум 192 МБ оперативной памяти, но если есть возможность, то используйте 512 или 1024 МБ. Так система не будет тормозить даже при высоком уровне загруженности.
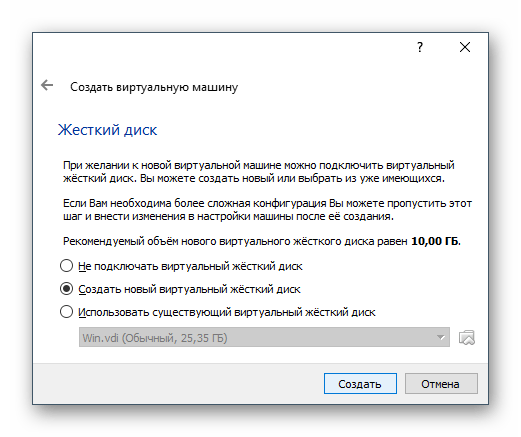
- Вам будет предложено выбрать виртуальный накопитель, который можно подключить к этой машине. Нам это не нужно, поскольку мы собираемся установить Windows, используя ISO-образ. Следовательно, настройку в этом окне менять не нужно — оставляем все как есть и нажимаем на «Создать».
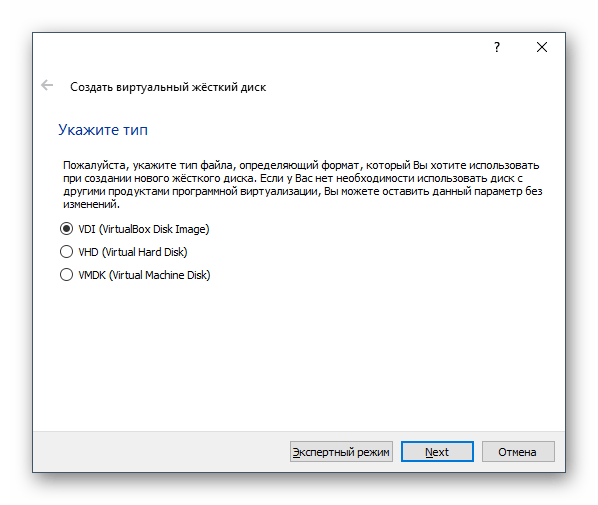
- Тип выбранного диска оставьте «VDI».
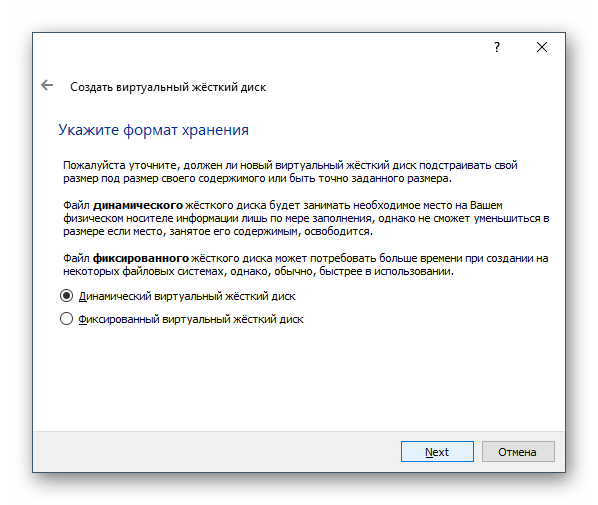
- Укажите подходящий формат хранения. Рекомендуется использовать «Динамический».
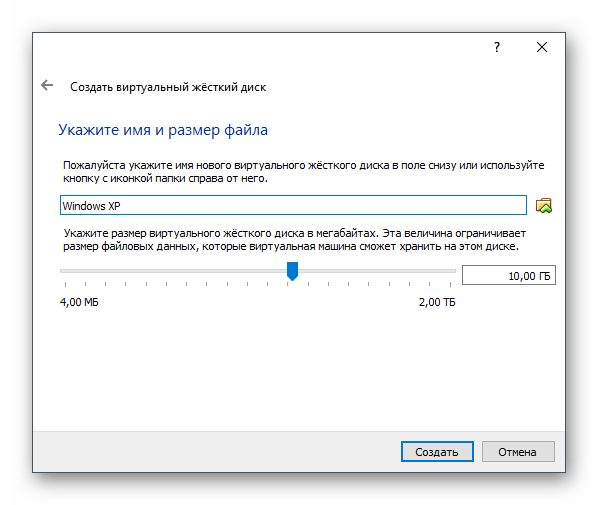
- Укажите количество гигабайт, которое вы желаете выделить под создание виртуального жесткого диска. VirtualBox рекомендует выделить 10 ГБ, но вы можете задать и другую величину.
Если на предыдущем шаге вы выбрали вариант «динамический», то Windows XP изначально займет на жестком диске только установочный объем (не более 1,5 ГБ), а затем, по мере ваших действий внутри этой ОС, виртуальный накопитель сможет расшириться максимум до 10 ГБ.
При «фиксированном» формате на физическом HDD сразу же будет занято 10 ГБ.
На создании виртуального HDD этот этап заканчивается, и можно переходить к настройке VM.
Настройка виртуальной машины для Windows XP
Перед установкой Виндовс можно выполнить еще несколько настроек для повышения производительности. Это — необязательная процедура, поэтому ее можно пропустить.
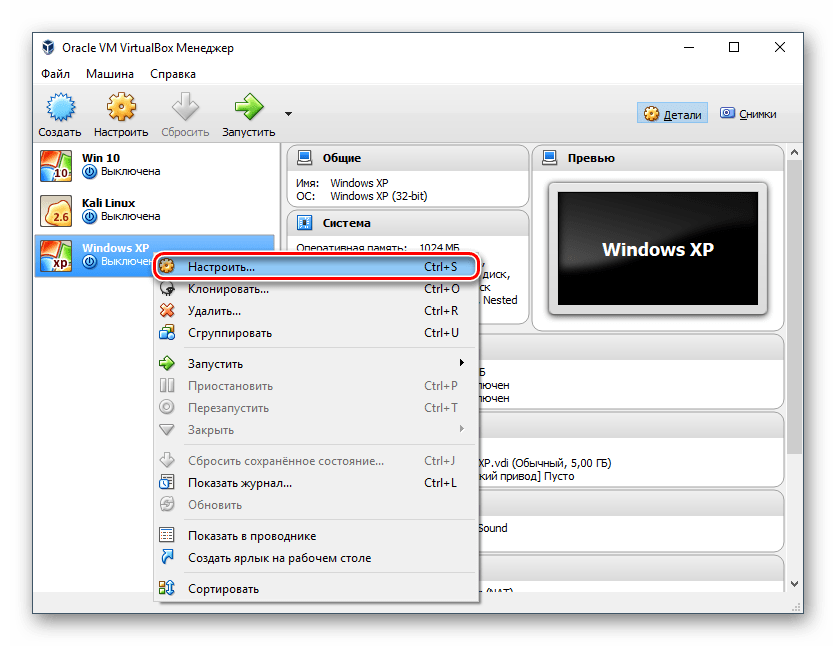
- В левой части VirtualBox Менеджера вы увидите созданную виртуальную машину для Windows XP. Нажмите по ней правой кнопкой мыши и перейдите в «Настроить».
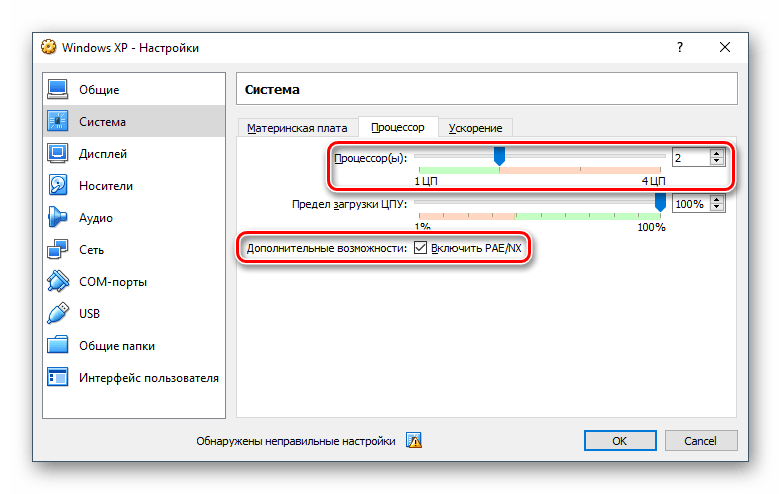
- Переключитесь на вкладку «Система» и увеличьте параметр «Процессор(ы)» с 1 до 2. Для улучшенной их работы задействуйте режим работы PAE/NX, поставьте напротив него галочку.
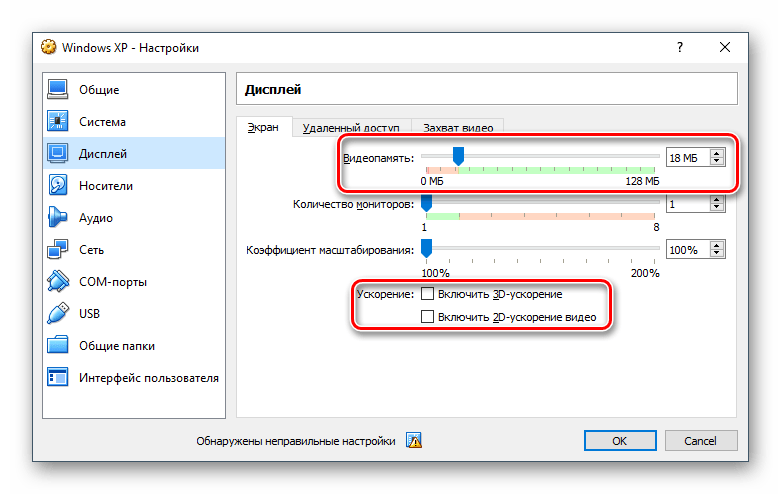
- Во вкладке «Дисплей» вы можете немного увеличить количество видеопамяти, но не переусердствуйте — для устаревшей Windows XP будет достаточно совсем небольшой прибавки.
Также вы можете поставить галочки напротив параметра «Ускорение», включив 3D и 2D.
- При желании вы можете настроить и другие параметры.
После настройки VM можно приступать к установке ОС.
Установка Windows XP на VirtualBox
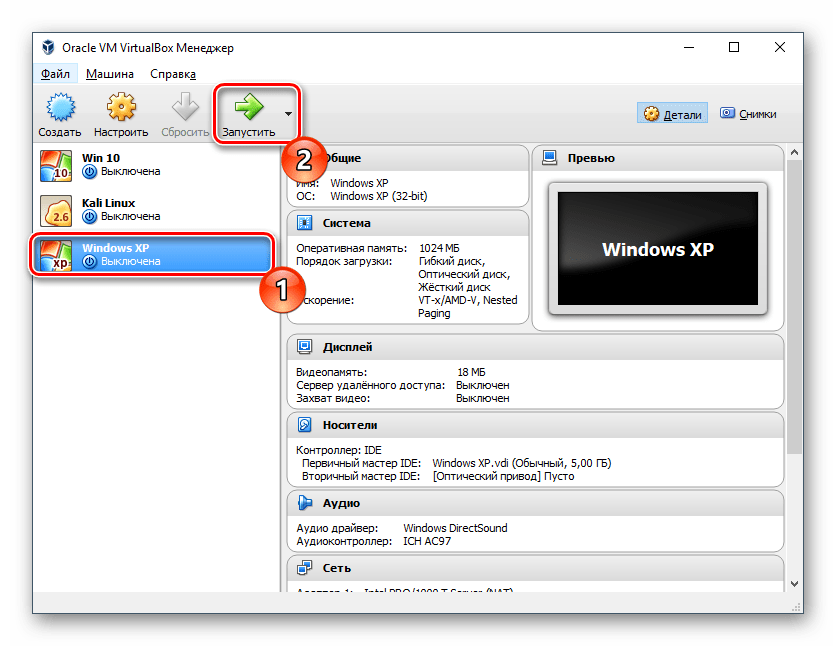
- В левой части VirtualBox Менеджера выделите созданную виртуальную машину и нажмите на кнопку «Запустить».
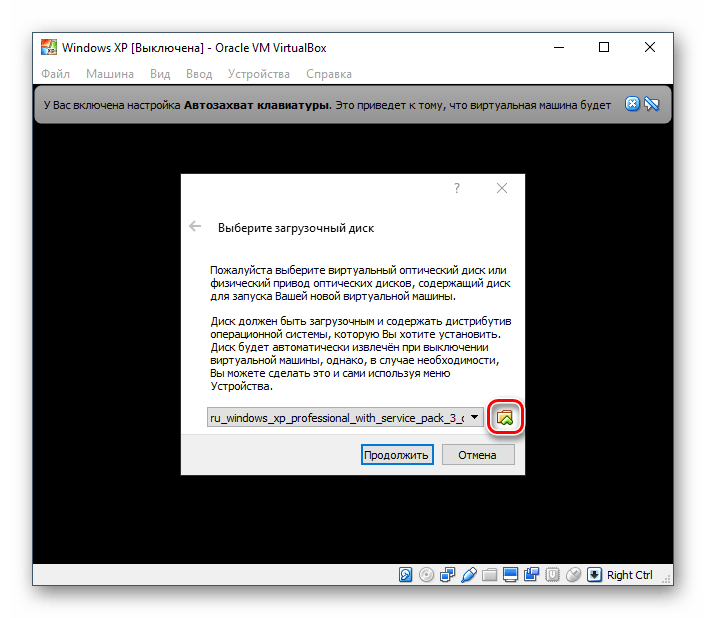
- Вам будет предложено выбрать загрузочный диск для запуска. Нажмите на кнопку с папкой и укажите место, где расположен файл с образом операционной системы.
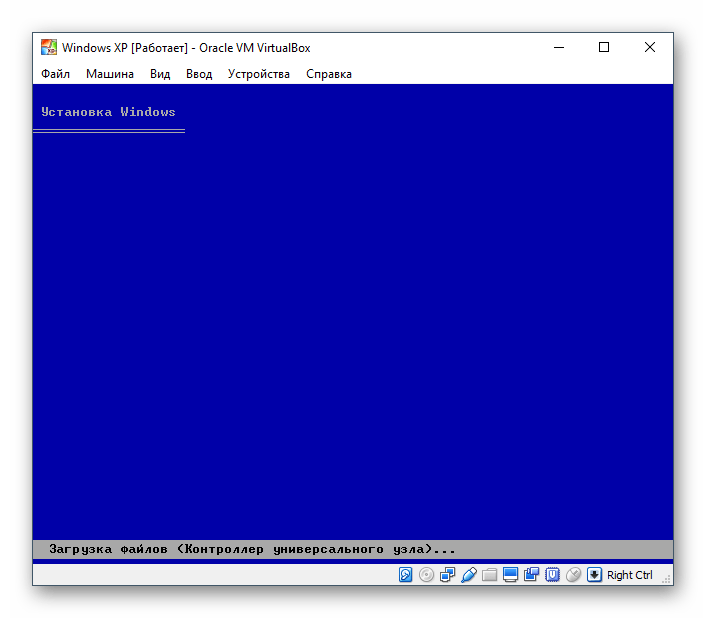
- Запустится установочная утилита Windows XP. Свои первые действия она выполнит автоматически, и вам потребуется немного подождать.
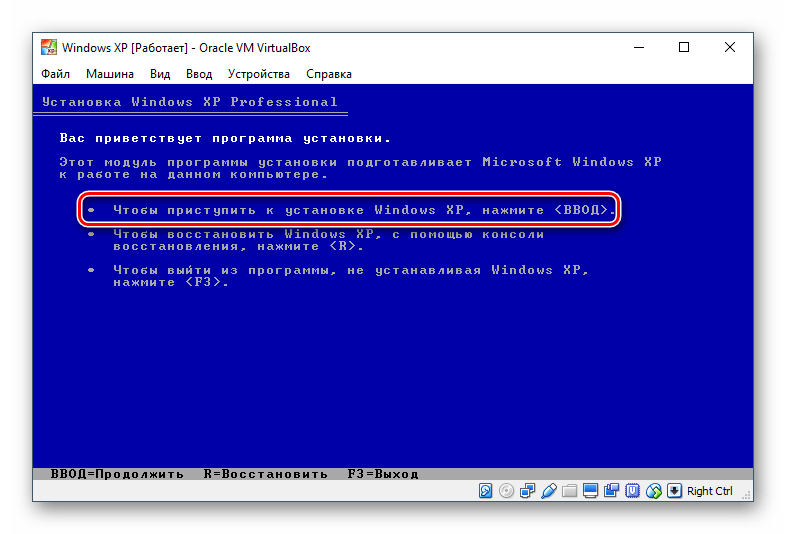
- Вас поприветствует установочная программа и предложит приступить к установке, нажав клавишу «Ввод». Здесь и далее под этой клавишей будет подразумеваться клавиша Enter.
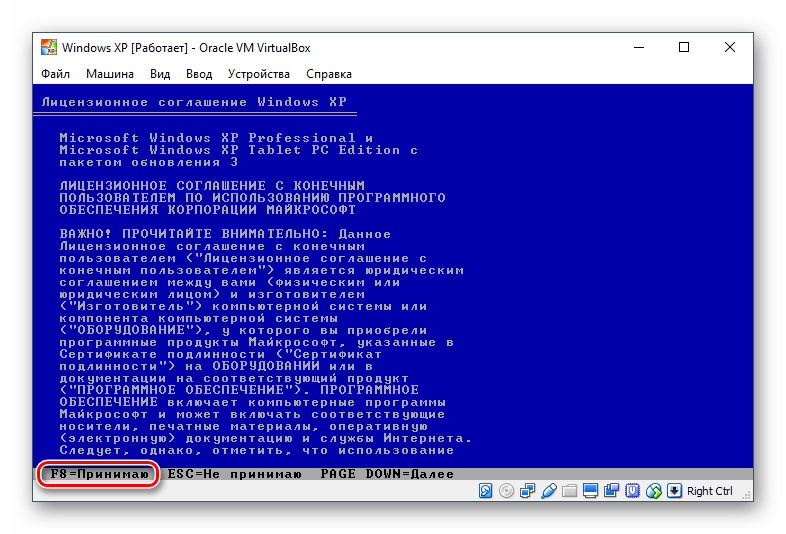
- Откроется лицензионное соглашение, и если вы с ним согласны, то нажмите на клавишу F8, чтобы принять его условия.
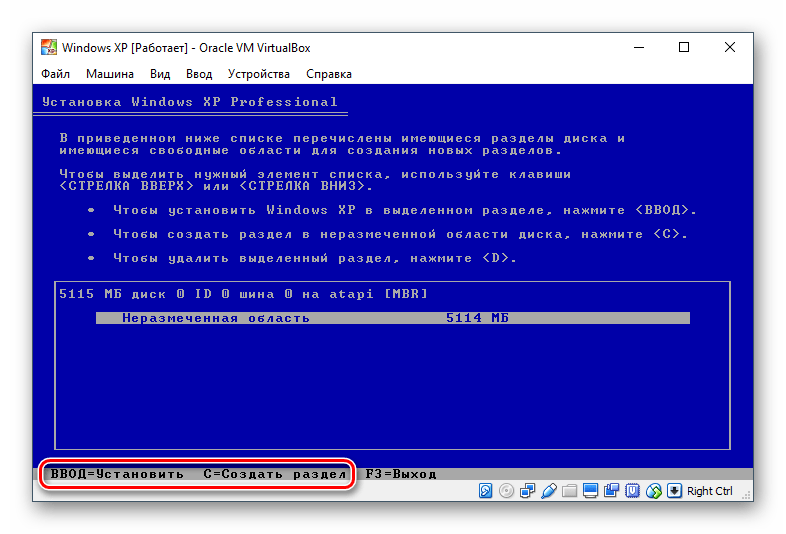
- Установщик попросит выбрать диск, куда будет установлена система. VirtualBox уже создал виртуальный жесткий диск объемом, который вы выбрали на шаге 7 при создании виртуальной машины. Поэтому нажмите Enter.
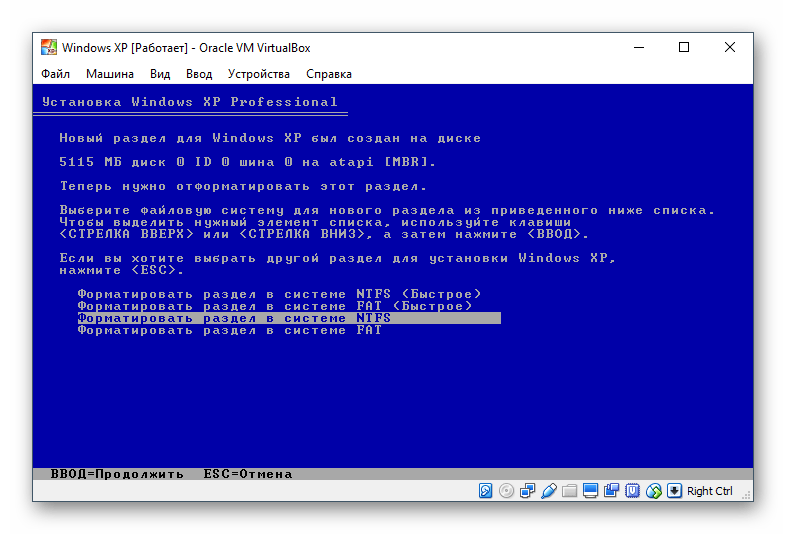
- Эта область еще не размечена, поэтому установщик предложит ее отформатировать. Выберите один из четырех доступных вариантов. Рекомендуем использовать параметр «Форматировать раздел в системе NTFS».
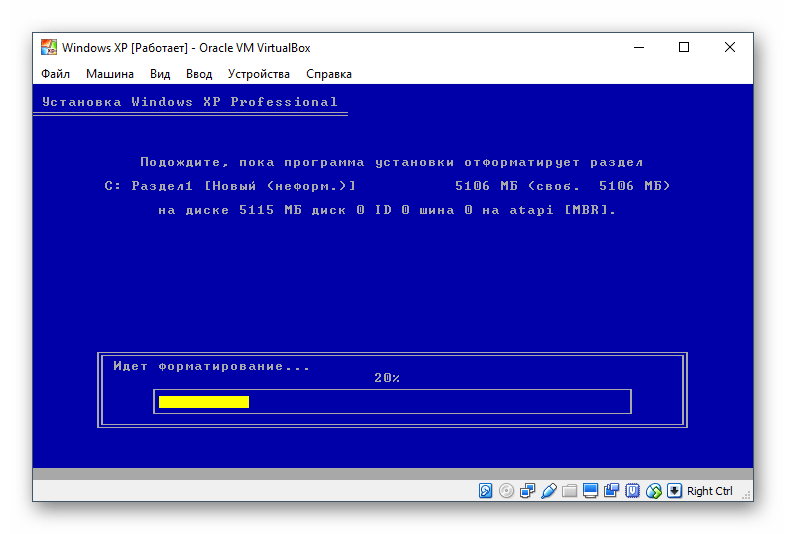
- Дождитесь, пока будет отформатирован раздел.
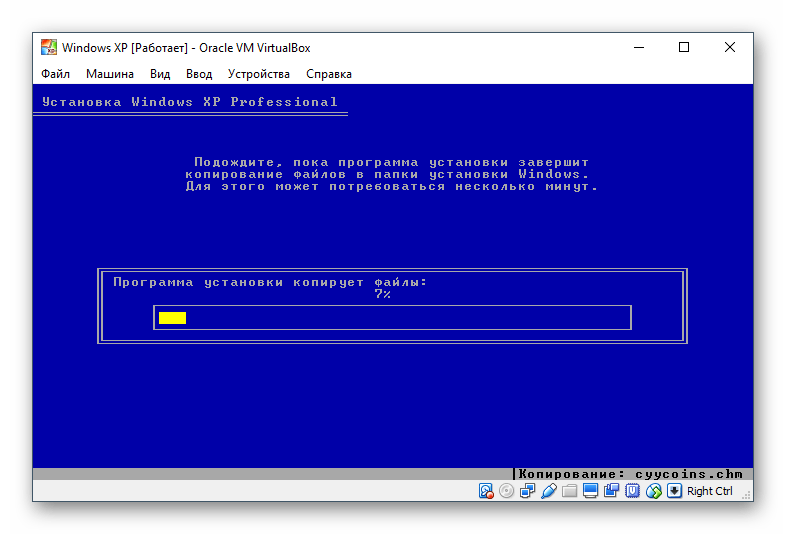
- Программа установки в автоматическом режиме выполнит копирование некоторых файлов.
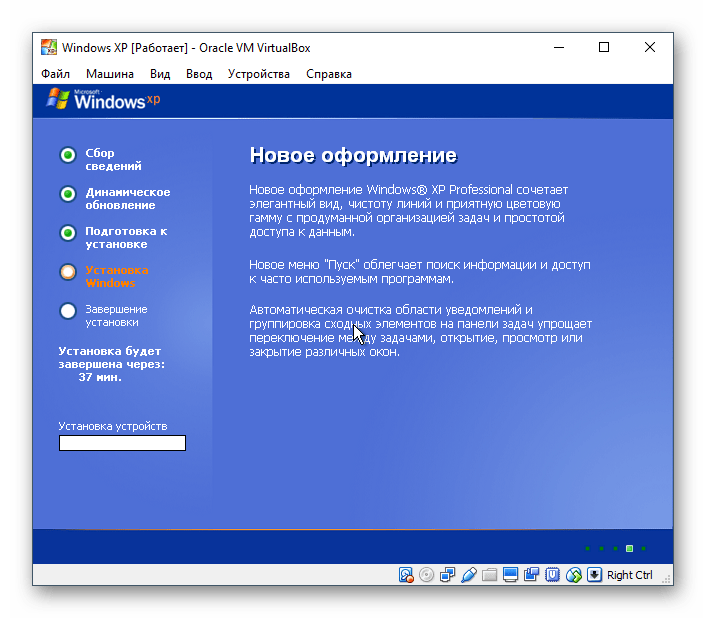
- Откроется окно с непосредственной установкой Windows, и сразу же начнется установка устройств, подождите.
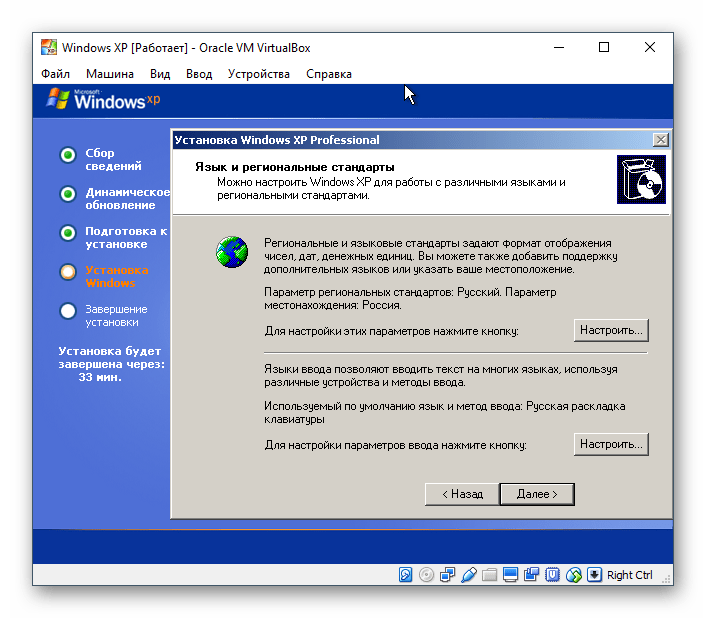
- Проверьте правильность выбранных установщиком настроек языка системы и раскладки клавиатуры.
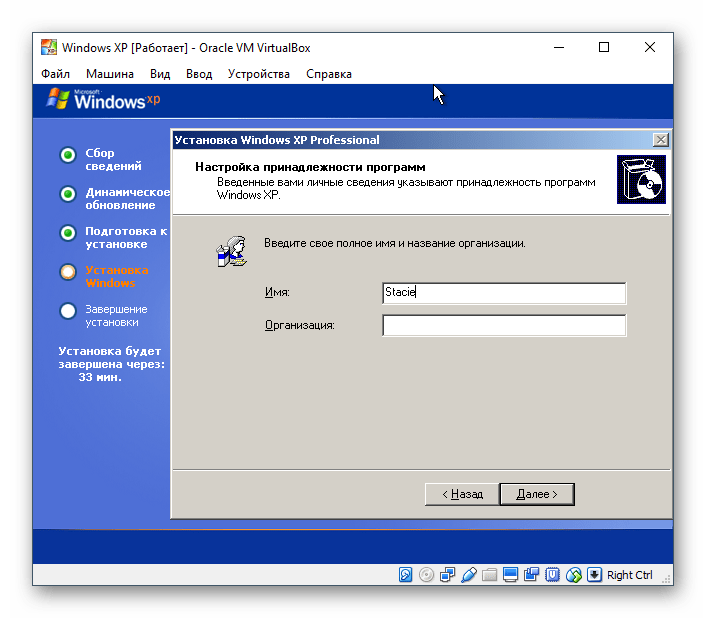
- Введите имя пользователя, имя организации вводить не нужно.
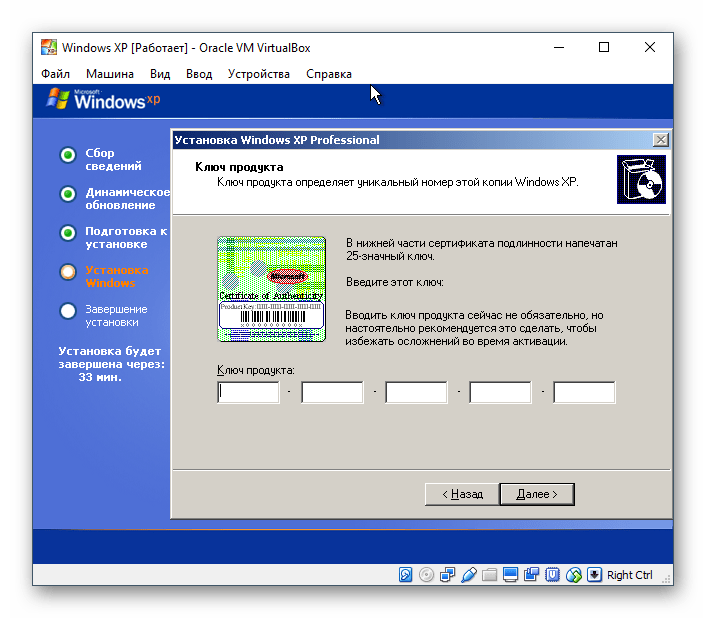
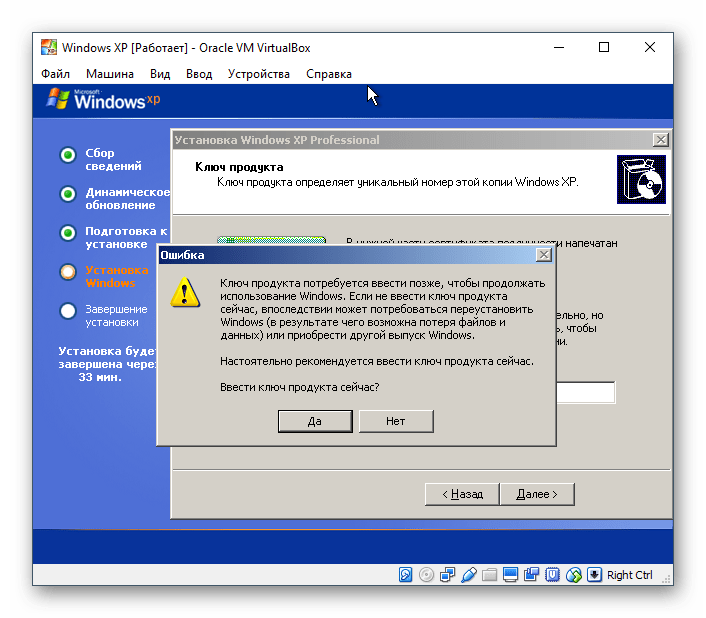
- Введите ключ активации, если он есть. Вы можете активировать Windows позднее.
- Если вы желаете отложить активацию, то в окне подтверждения выберите «Нет».
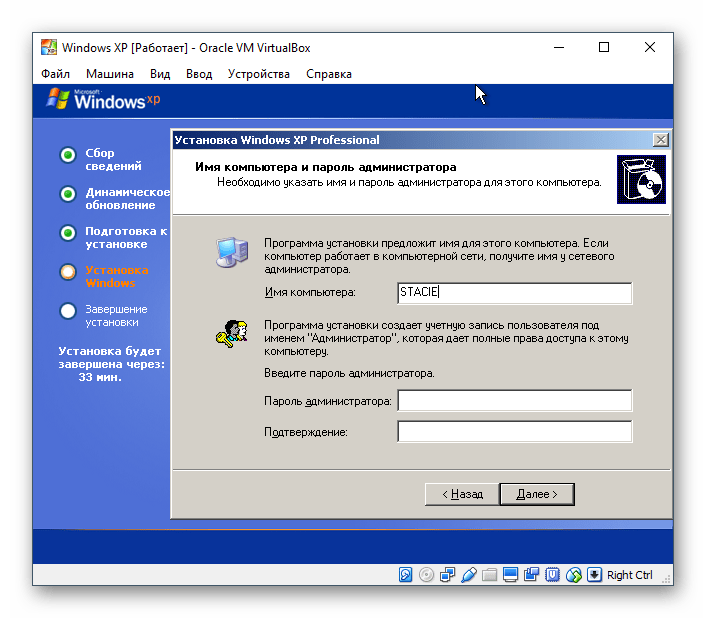
- Укажите имя компьютера. Вы можете установить пароль для учетной записи «Администратор». Если в этом нет необходимости — пропустите ввод пароля.
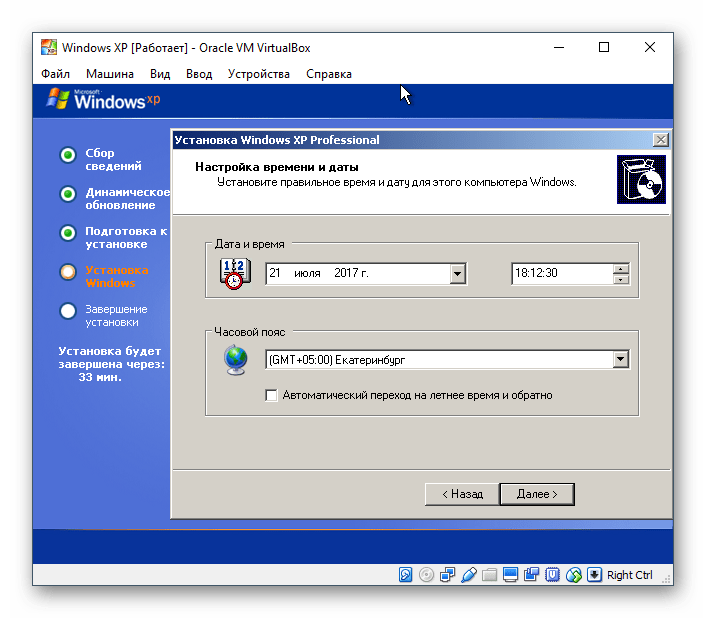
- Проверьте дату и время, при необходимости измените эти сведения. Укажите свой часовой пояс, найдя город в списке. Жители России могут снять галочку с пункта «Автоматический переход на летнее время и обратно».
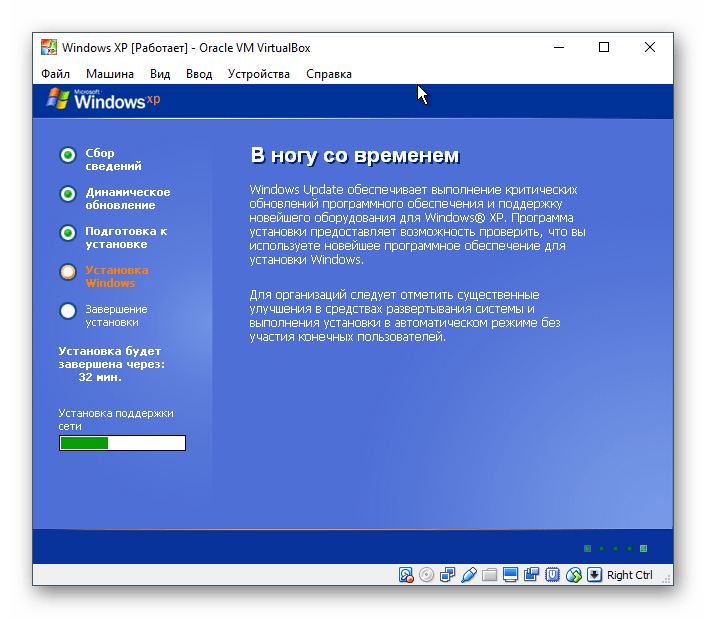
- Продолжится автоматическая установка ОС.
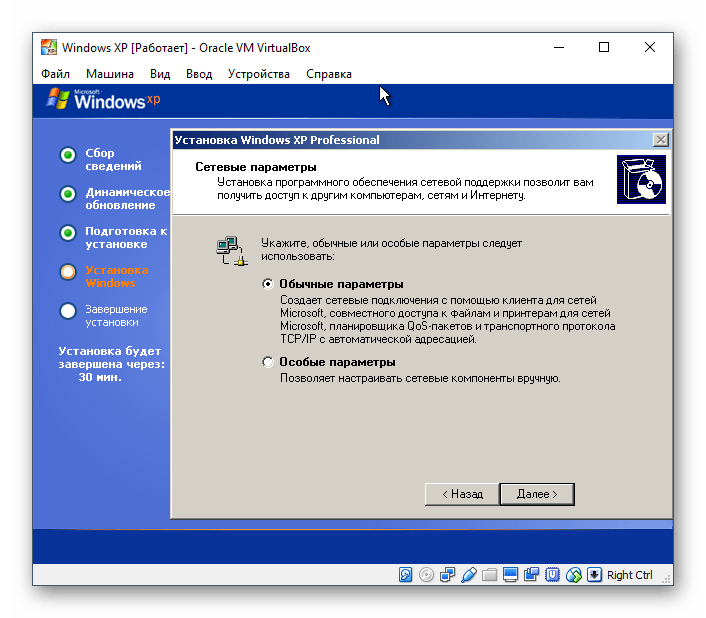
- Программа установки предложит настроить сетевые параметры. Для обычного выхода в интернет выберите «Обычные параметры».
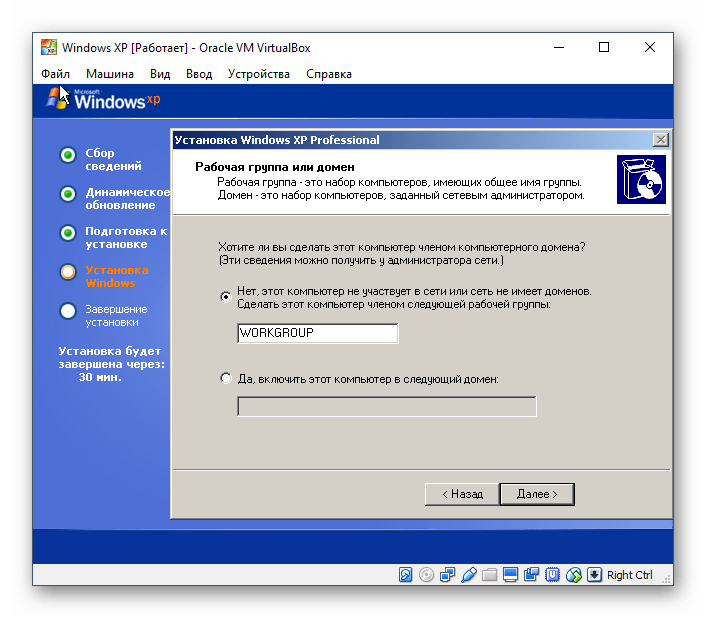
- Шаг с настройкой рабочей группы или домена можно пропустить.
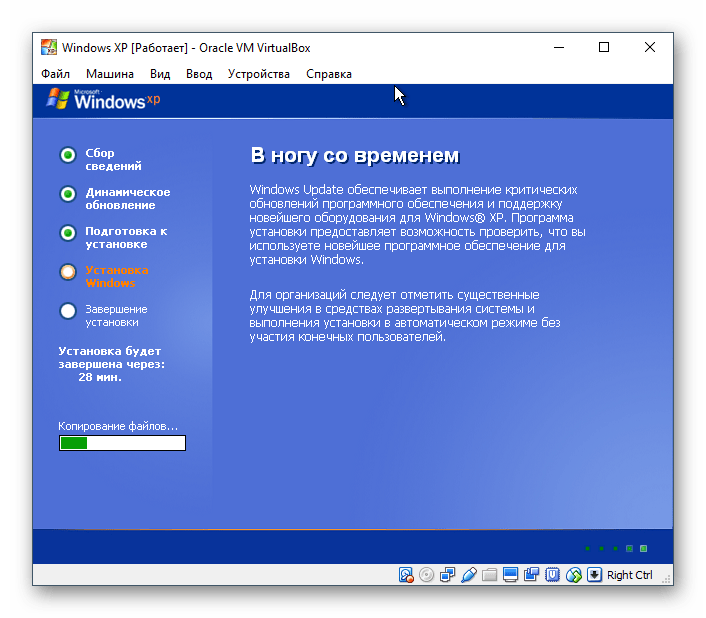
- Дождитесь, пока система закончит автоматическую установку.
- Виртуальная машина будет перезагружена.
- После перезагрузки необходимо выполнить еще несколько настроек.
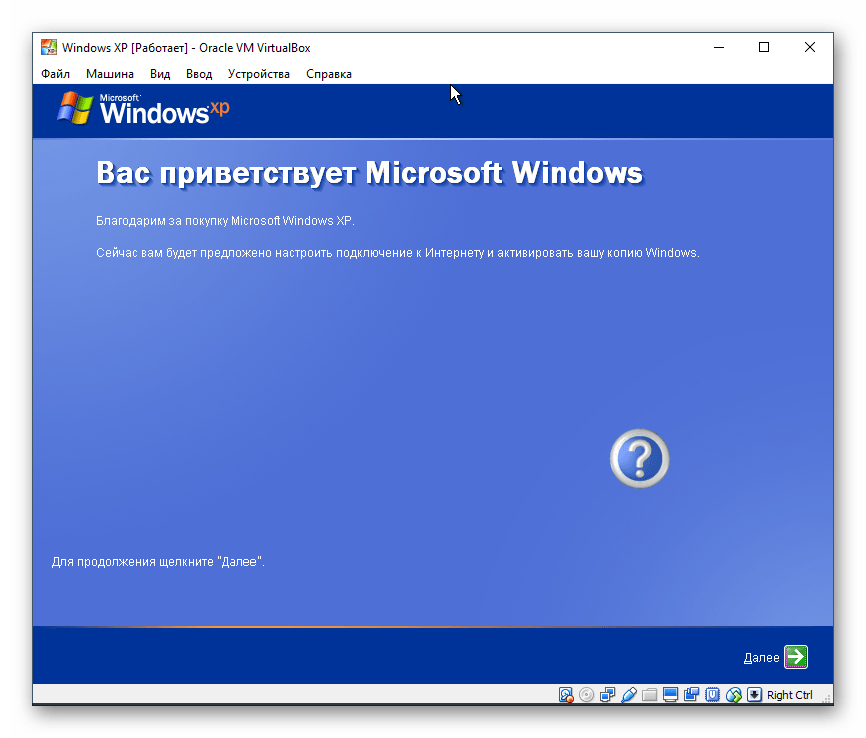
- Откроется приветственное окно, в котором нажмите «Далее».
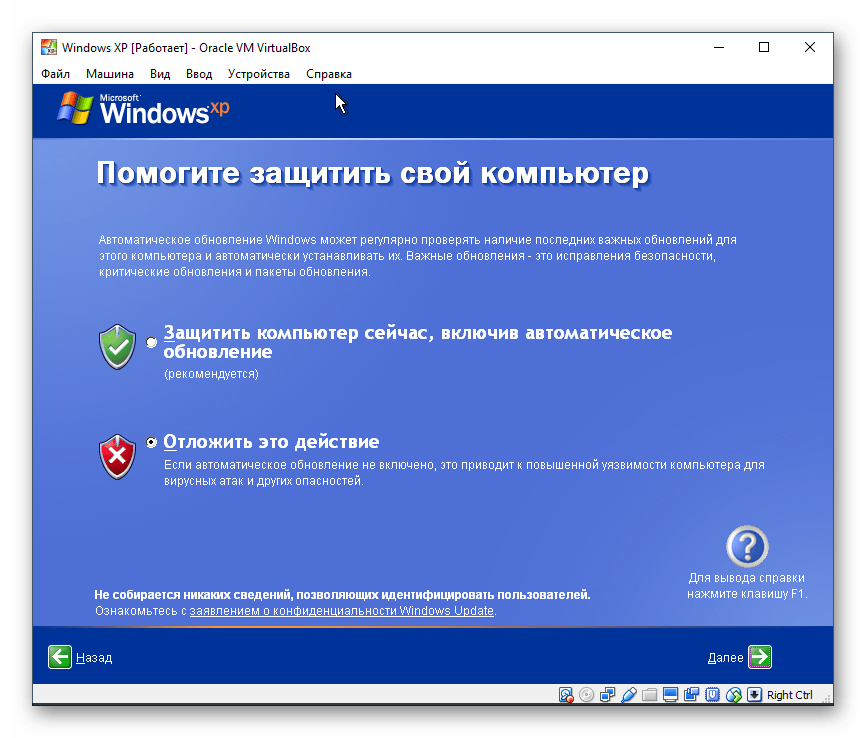
- Установщик предложит включить или отключить автоматическое обновление. Задайте параметр в зависимости от личных предпочтений.
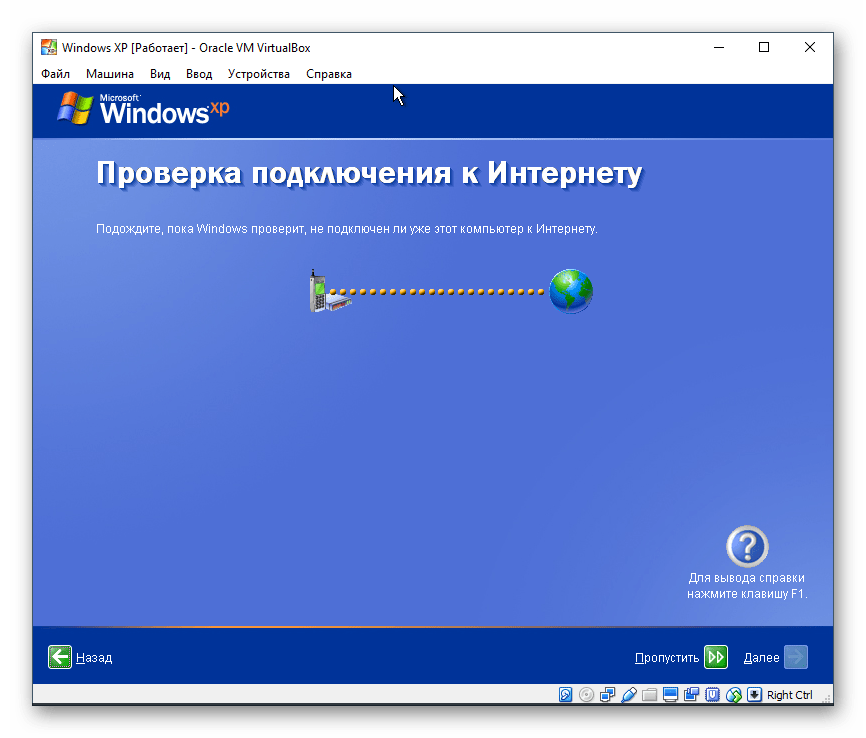
- Дождитесь, пока будет проверено подключение к интернету.
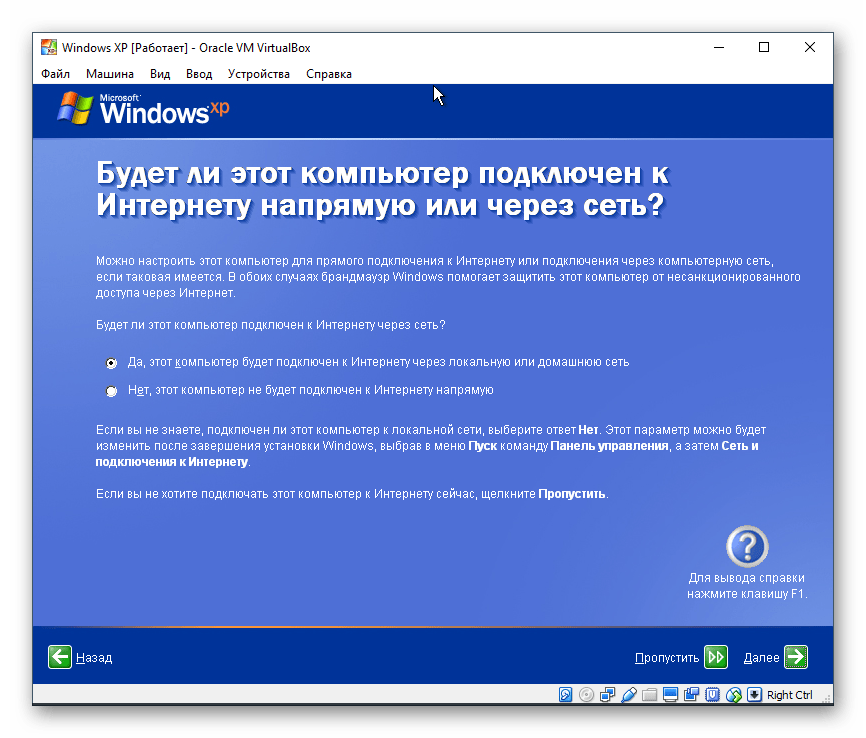
- Выберите, будет ли компьютер подключен к интернету напрямую.
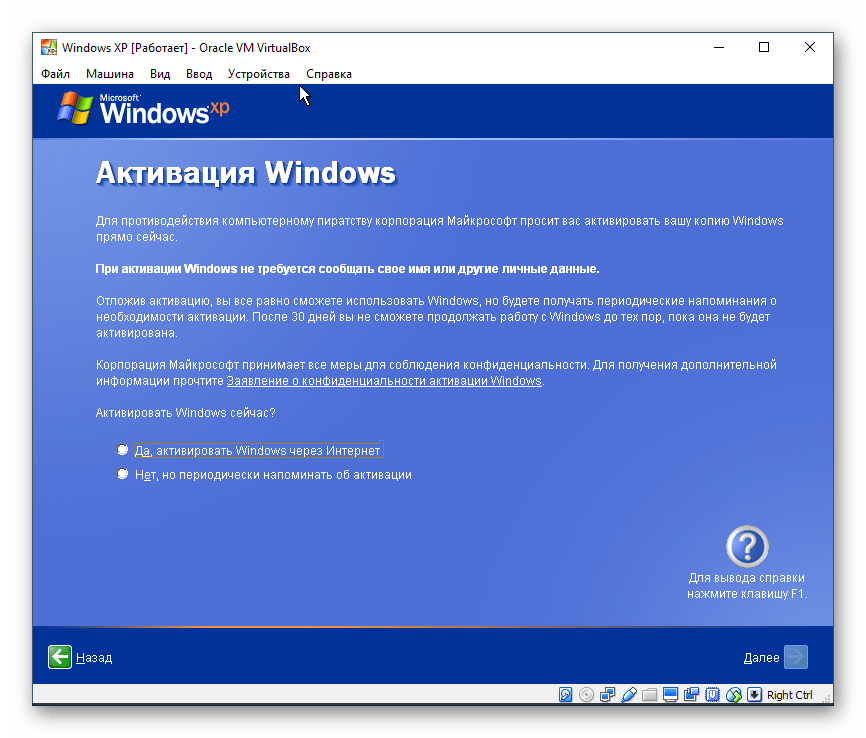
- Вам будет повторно предложено активировать систему, если вы этого еще не сделали. Если не активировать Виндовс сейчас, то это можно будет сделать в течение 30 суток.
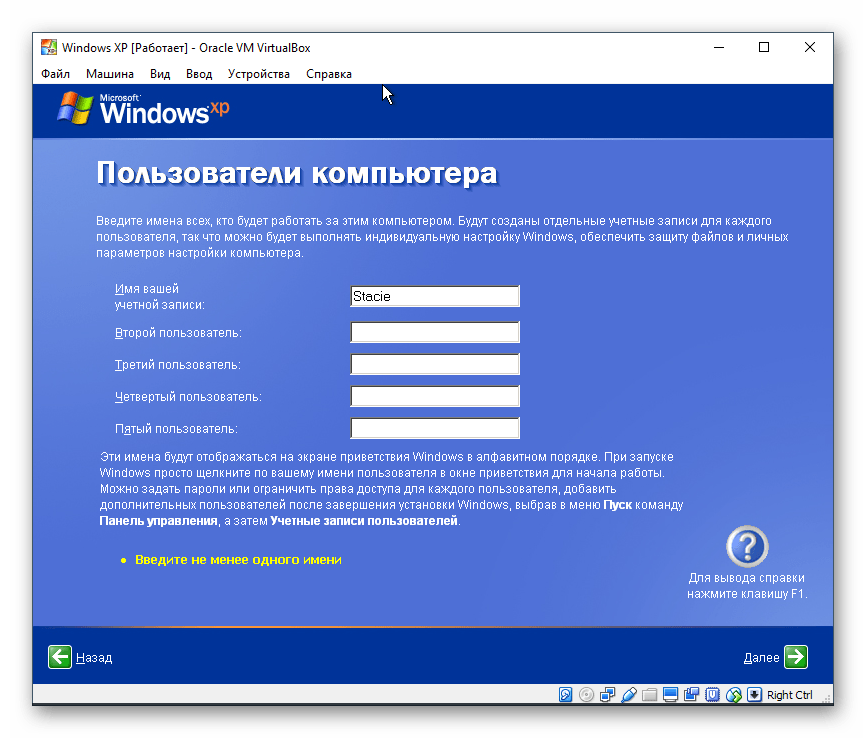
- Придумайте имя учетной записи. Необязательно придумывать 5 имен, достаточно ввести одно.
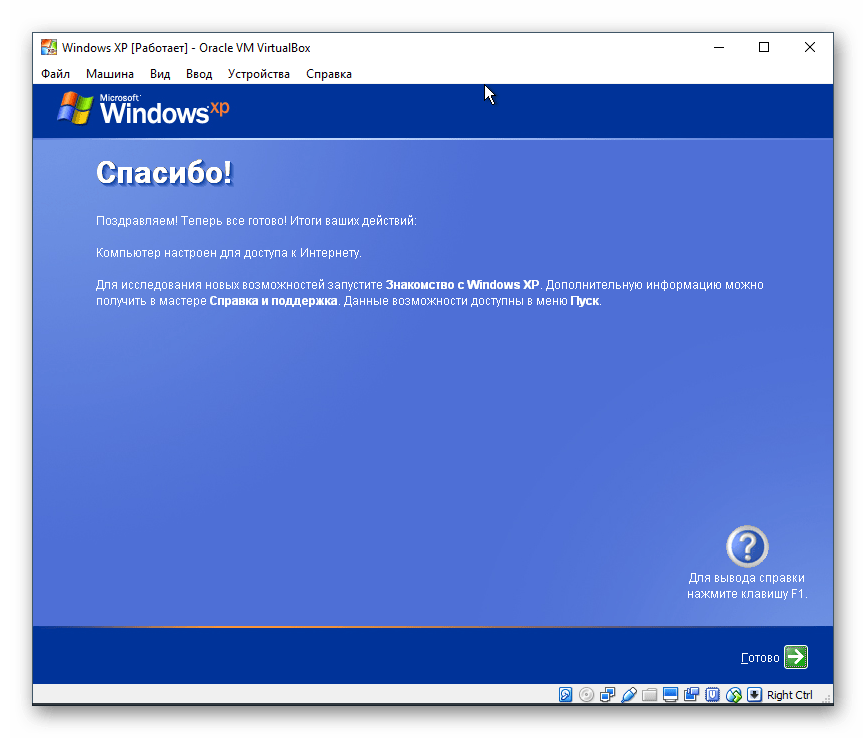
- На этом шаге настройка будет завершена.
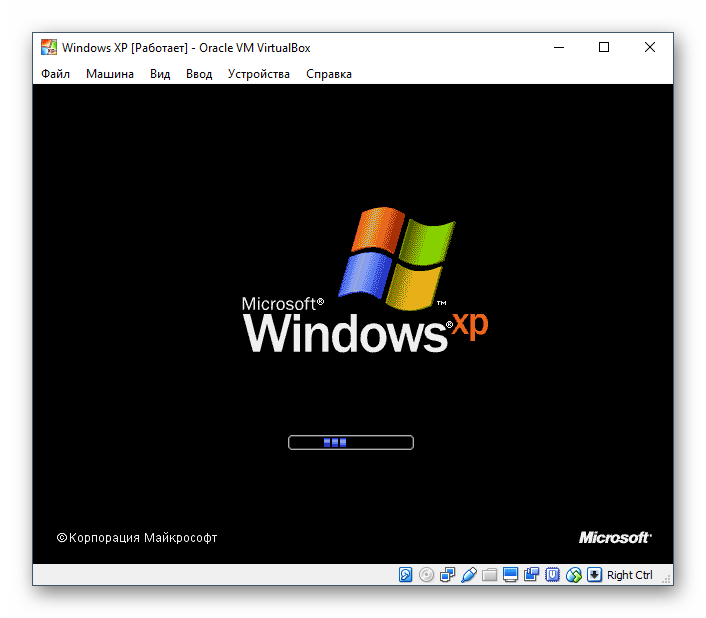
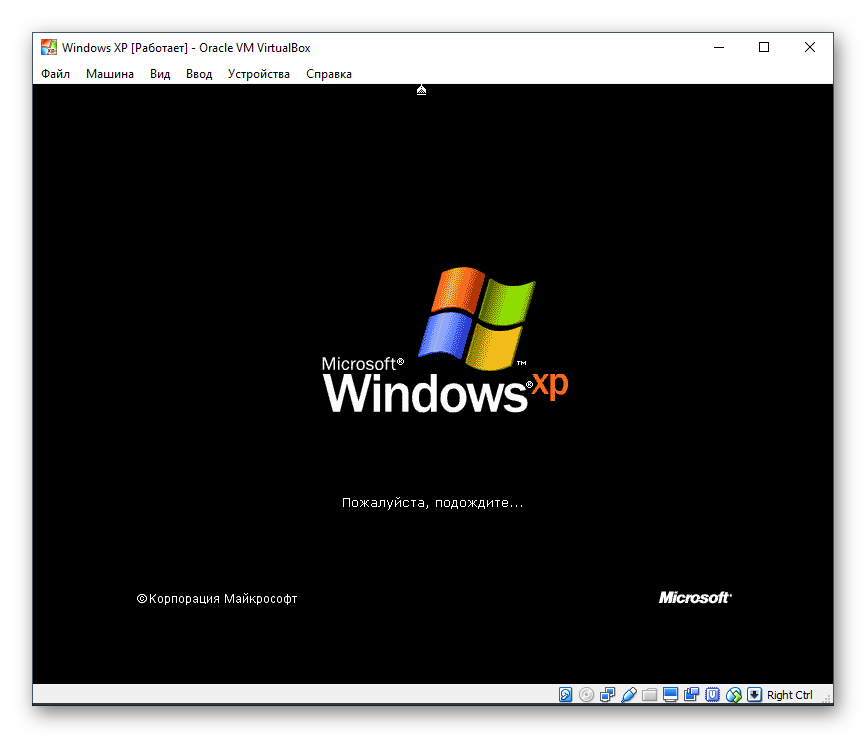
- Начнется загрузка Windows XP.
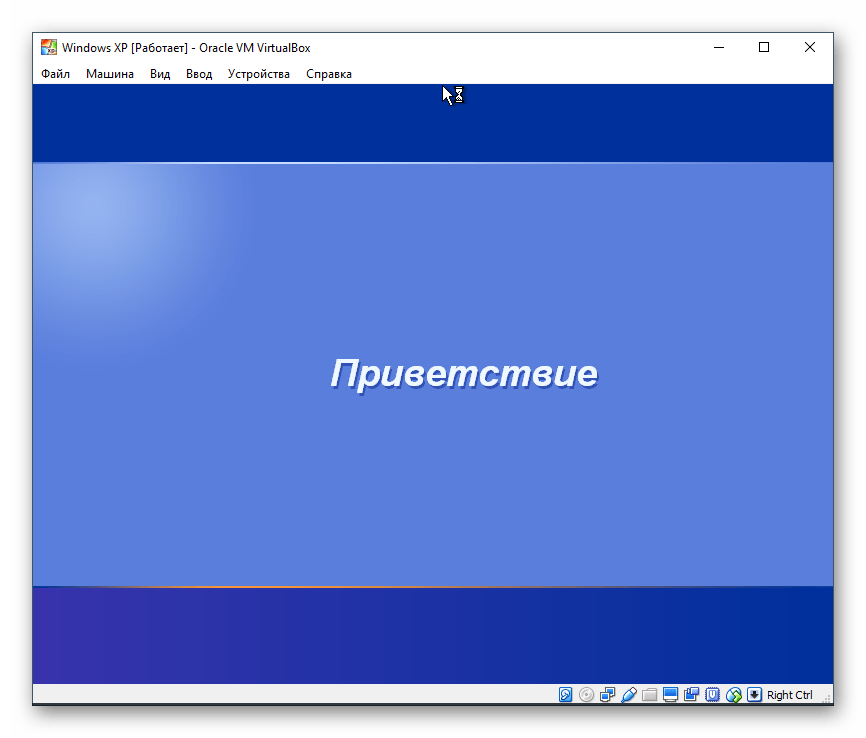
После загрузки вы попадете на рабочий стол и сможете начать пользоваться операционной системой.
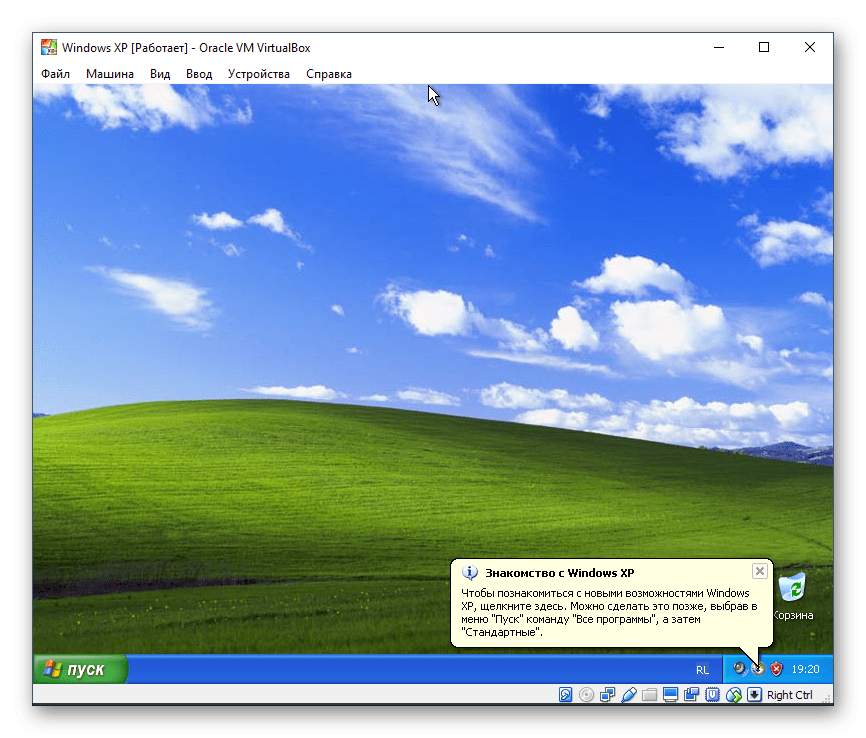
Установка Windows XP на VirtualBox очень проста и не занимает много времени. При этом пользователю нет необходимости искать драйвера, совместимые с компонентами ПК, как это было бы необходимо делать при обычной установке Windows XP.
Еще статьи по данной теме:
Помогла ли Вам статья?
Добрый день!
Я подготовил готовый образ windows XP для VirtualBox для скачивания. Это по сути готовая виртуальная машина WindowsXPSP3 [x86] на базе бесплатной виртуальной среды Oracle VM VirtualBox. Причем, контейнер содержит всю виртуальную машину целиком, включая настройки и установленные программы внутри виртуальной машины.
Вам останется только скачать этот файл (это .ova — файл). И импортировать его в программе «Oracle VM VirtualBox». Которую вы должны скачать на официальном сайте, и установить прежде чем приступите к скачиваю и импорту моего образа. В этой публикации вы сможете скачать образ, а в следующей публикации я показываю как импортировать скачанный образ в «боевое положение» за 3 минуты.
На самом деле, это не сложно. Но пользователи разные бывают, и часто случается так, что без инструкций с иллюстрациями, не получается разобраться что и как делать. Потому я и написал инструкцию как импортировать образ в VirtualBox. Но это в следующей статье. А сейчас…
Скачать готовый образ windows XP для VirtualBox
Подразумевается, что вы уже скачали и установили бесплатную программу управления и настройки виртуальными машинами или как их сейчас называют «контейнерами» Oracle VM VirtualBox . Запустите её. Откроется вот такое окно:
Как видите, всё готово к импорту, загрузке контейнера виртуальной машины, которую я подготовил и экспортировал в этой программе, чтобы вы смогли быстро (примерно за 3-5 мин.) развернуть в данном случае образ windows XP SP3. Но сначала вам нужно его (образ), файл .ova скачать, и распаковать. Образ запакован в rar — архив, и весит около 5 Гбайт.
Скачать образ WindowsXP для VirtualBox
Зеркало
Если у кого-то не видно нашей красивой кнопочки, то можете скачать его по прямой ссылке. Ещё раз: это будет архив winrar без пароля, в котором готовая конфигурация в виде одного файла с расширением .ova Который по сути и является файлом импорта для VirtualBox. (Контейнер виртуальной машины со всеми настройками).
*** При скачивании образов с нашего сайта браузер может ругаться в стиле » переход на недоверенный сайт-предупреждение, ля-ля, тополя». Не обращайте внимания, нажимайте смело «продолжить». Файлы — образы занимают много места на хостинге, и я залил их на личное сетевое хранилище (NAS-сервер) для обеспечения высокой скорости загрузки и решения проблемы с местом на хостинге. Я гарантирую, что мои файлы безопасны!
Качаем, распаковываем, и следуя несложной инструкции, буквально за 3-4 минуты импортируем в вашу программу. Вот, собственно и всё!
Напоминаю, что у нас есть готовый образ Windows XP и для другой виртуальной среды — Vmware Player. Так что если кому-то удобней работать именно с Vmware — виртуальными машинами, то вы сможете у нас так же скачать образ для vmware.
Там так же подробно описывается как его импортировать, запустить в программе Vmware Player.
Желаю вам успеха!
Here is how to use the legendary Windows XP on Windows 10 or Windows 11. You are going to download Windows XP ISO for VirtualBox and then perform the installation. This way, you are going to use Windows XP without losing any files or changing your current OS.
Inside the VirtualBox, you can do all things that are possible on Windows XP. From installing applications, and running games, to checking your newly developed application inside the platform.
Windows XP ISO download for VirtualBox
Windows was released way back in 2001 and was available for 11 years. Later on, the only Windows OS that was capable to beat that record was Windows 7. Windows XP brought tons of new features, amazing tools, and a brand-new interface. It was provided for both 32-bit and 64-bit systems. I have provided the x64 ISO file of Windows XP, if you want x86 then you can comment down.

File: Windows_XP_Pro_x86_x64.ISO
Size: 475 MB
Language: English
Developer: Microsoft
Click here to download Windows XP ISO for VirtualBox for free.
Related: Free Download Windows XP SP3 ISO
System Requirement for Windows XP
Most of the current systems can easily run Windows XP. Since the OS was released way back and requires low specs to run, so you won’t need to worry about the system requirements. For running Windows XP, you will need:
Processor: Pentium 4 with 1 GHz or better
Memory: you will need 512 MB RAM or more. It is recommended to have 1 GB for running Windows XP Professional.
Storage: a total of 4 GB of free storage is required.
Hardware: CD/DVD ROM is required in addition to Keyboard, Mouse, Speakers, and Super VGA (800×600 screen resolution support).
There is a great chance that you are using Windows XP on Windows 10 or Windows 11. I would recommend you to have at least 1 GB RAM and 5 GB more storage as compared to the required specs for Windows 10 or 11. This way, you could run Windows XP on VirtualBox smoothly.
Overview of Windows XP

The OS was released in 2001 by Microsoft. It was released as the successor of Windows 2000 and Windows ME. Windows XP aka Win XP was released for both 32-bit and 64-bit systems.
In the new Windows OS, you will find new features like Internet Explorer, Windows Shell elements, TAPI, Remote Assistance, and much more. You would also find a brand new interface that includes a new desktop, taskbar, Start menu, eye-catching icons, and easy navigation throughout the OS.
While using the OS, you will also find Firewall, Windows Defender, and other tools for security. This is also the first Windows OS that supports Microsoft Java Virtual Machine.
Microsoft has released Windows XP into two different editions: Windows XP Home and Windows XP Professional. They have released a total of three service packs of Windows XP and later other editions of Windows XP were also released.
- Windows XP Home
- Windows XP Professional
- Windows XP Tablet
- Windows XP Stater
- Windows XP Media Center
These were the editions released by Microsoft.
Windows XP Home
This edition of Windows XP was released for home users only. As compared to the Professional edition. The Home edition has fewer features and options.

- The first thing you will notice is the friendly interface of the OS.
- You will also find the process of Startup and Hibernation faster.
- Features such as Windows Media Player are also added.
- A Wireless Network option is also added.
- Multitask Manager is much faster as compared to previous versions of Windows OS.
Windows XP Professional
Windows XP Professional was released for professional works. This edition is faster, more efficient, and stable as compared to other editions. Here are some of the features of Win XP Professional.

- For burning files on CD or DVD, there is the CD/DVD burner feature.
- Windows Media Player is also present.
- Big corporates can use the Remote Desktop Access feature.
- For security reasons, there is also the Internet Connection Firewall.
- A wide range of hardware is supported.
- You will find the booting and hibernation process faster.
- All the applications on the Windows XP will be launched faster.
- There is also a wireless connection too.
How to Install Windows XP on VirtualBox?

Installing Windows XP on VirtualBox is the same as installing Windows 10 on VirtualBox. Begin the operation by downloading VirtualBox and then perform the installation on your system.
Once the installation got completed then you will use the direct links above to download Windows XP ISO for VirtualBox. The downloading setup file is around 456 MB in size and will be downloaded within a few minutes.
After the download of Windows XP got completed then you will run VirtualBox.
Create a new VM (virtual machine) on VirtualBox. Now you are going to open Settings and insert the amount of RAM memory, processors, storage space, and graphics power for your VM. When all the settings of the new VM are set, you are going to apply the changes and exit Settings.
Before we continue any further, make sure you have selected the downloaded ISO file of Windows XP in VM settings and the location the new VM will be created.
Begin the installation of Windows XP. From here on, it is the same installation process as installing Windows XP. Here you are going to use the same installation steps that we did in “How to Install Windows XP From ISO Image?”.
After the installation of Windows XP on VirtualBox, you will notice some restrictions. There will be lesser options for the installation of applications. This is because you will need to install the VM VirtualBox Extension on VirtualBox.
The Extension pack will enable tons of features with the option to install an app inside the VM. Here is “Download Oracle VM VirtualBox Extension Pack”. From downloading to installation, all the required things are present. If you want to run multiple Windows OS on a single system then you can also use the Dual boot option.
Click here to learn how to dual boot two Windows OS.
Product key of Windows XP
After the installation of Windows XP, you will see the notification of the product key. Most likely, you will find the product key phase during the installation. Even if you skipped the phase, you will be asked for the product key again in the future.
The product key is essential to activate Windows XP either on VM or any system. Here you can use the product key given to activate your Windows XP.
QW4HD DQCRG HM64M 6GJRK 8K83THow to make bootable CD/DVD or USB for Windows XP?
For creating a bootable CD/DVD or USB, you will need to download Windows XP. Then you are going to insert your blank CD/DVD into your system. If you have a USB then you are going to format the USB and then burn the ISO file.
If you have downloaded it from other sites, then you will find the setup file of Windows XP as zipped. Here you are going to use third-party tools such as 7Zip or WinRAR to extract all the files.
Exacting the files is necessary and once got extracted, you will burn the file.
Now that you have inserted your CD/DVD or USB into your system, you are going to use a third-party tool for burning the setup file. For this kind of task, Rufus is the thing.
Download Rufus and double-click on it. Since Rufus doesn’t require any installation, you are going to use the application directly. Now select all the options accordingly and then you are going to select the CD/DVD that you want to burn the setup file on.
Once all the options are selected, you are going to click on the Start button. The burning of Windows XP will begin, and the system will notify you when the operation got completed.
When the operation got completed then you are going to eject your CD/DVD from your system. Congratulation! That CD/DVD or USB that you are holding is a bootable USB of Windows XP.
The same operation can be performed with other tools. However; we have used Rufus as it is robust, stable, and friendly. Instead of Rufus, you can use any of the tools that you think are better.
Can I run Windows XP on VirtualBox?
Of course, you can run Windows XP on VirtualBox. Not only Windows XP but you can also run Windows 7, Windows Vista, Windows 8, Windows 10, Windows 11, and even earlier versions like Windows 2000, Windows ME, or Windows 95.
VirtualBox is not limited to only Windows OS, but you can also run Linux distros (Ubuntu, Kali, Mint, Red Hat, Fedora), macOS (from macOS 10.0 to macOS Monterey), and Android.
It is a powerful virtualization tool that can be used for virtualization purposes. You can use it to check other OS or to check your developed app on multiple OS without performing any installation. One installation and you have access to that OS any time you want.
For using the Windows OS, you are going to create a new VM. This VM will be configured from Settings and then the setup file will be provided. Then you perform the installation of Windows XP.
After the installation of VirtualBox, it is recommended to install the VM extension pack of VirtualBox. Without an extension pack, you are limited to fewer options of VirtualBox. By installing the extension pack, you have access to tons of other options that were not valid.
Can I Run Windows XP With a 4 GB RAM PC?
For running Windows XP on any system, it is recommended to have 512 MB RAM memory for Windows XP Home and 1 GB for Windows XP Professional. Having 4 GB of RAM is an advantage to run the OS smoothly and efficiently.
Microsoft recommends having a Pentium 4 or better with 1 GB of RAM and 800×600 screen resolution support for running Windows XP. You are only required to have 25 GB of free storage for Windows XP. Increasing the specs will only make things run smoother.
As compared to Windows XP required, 4 GB is more than enough. You can even run Windows 7 with 4 GB of RAM on your PC.
When was Windows XP released?
Windows XP was released way back in the 2000s. The OS was developing under the codename “Neptune” built on Windows NT Kernel. However; later Microsoft changed the direction of the entire project with the codename “Whistler”.
This was not based on Windows 95 or MS-DOS. After some time, on 24 August 2001, the OS was released for Manufacturing. By 25 October 2001, the OS was publicly available.
Microsoft has released a total of 3 service packs for Windows XP. SP3 of Windows XP was released on 21 April 2008. Windows XP was the successor of Windows 2000 and Windows ME. Later on, the Windows OS was succeeded by Windows Vista.
Mainstream support for Windows XP ended on 14 April 2009. Whereas the extended support ended on 8 April 2014.
Windows XP was a legendary OS that is used by users even today. It has been more than 20+ years and still, there are users who are using the OS and still love it. If you have used Windows 2000 or earlier versions of Windows OS, you will notice how good the OS is.
Not only Microsoft has changed the entire interface, navigation, and icons to make things friendly. But there were also major changes in hardware support too. They have removed support for PC-98, i486, and SGI Visual Workstation 320 and 540. Microsoft made sure that Windows will only run on 32-bit x86 CPUs and devices with BIOS Firmware.
If you have further questions related to downloading Windows XP ISO for VirtualBox or installation related then you can comment down. Any kind of question that catches your attention can be a problem experienced by others. So comment down and I will fix that problem as soon as possible.
Though there are several ways to use Windows XP on Windows 10 and 11, using it with the pre-installed image for VirtualBox adds many advantages. We prepared a Windows XP image with VirtualBox guest additions to make things easy. It will allow you to attach and use the latest computer quickly.
You can avoid downloading the correct ISO file, doing every installation step (Unfortunately, the Windows XP installations take a longer time) and additional steps by using this pre-installed image.
You may have unique reasons to have Windows XP on VirtualBox with Windows 11. It could be something you need to check the old legacy applications, play games that support only Windows XP, or open a file that can work only on Win XP. Using Windows XP as a VirtualBox pre-installed image (VDI file) will be handy in any of the above cases.
System Requirements
We believe you have the latest suitable hardware if you are using Windows 11 or 10. It will definitely run Windows XP on it with Oracle VirtualBox.
Download Windows XP Preinstalled VirtualBox Image and use it on Windows 11.
1) Make sure you have the latest Oracle VirtualBox application. It is a desktop virtualization software you can download from the official website here.
2) Download the XP preinstalled image from our website here.

3) You need to have the 7-Zip program to extract this file. You can download 7-Zip from their website here.
4) After the pre-installed image is downloaded, extract it using the 7-Zip program.
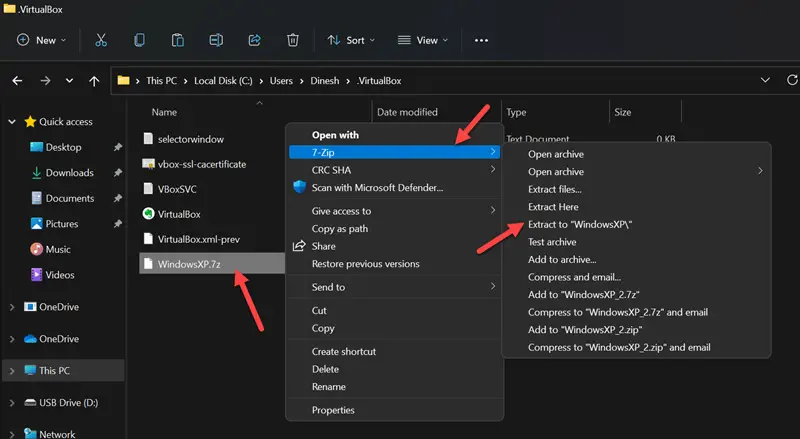
5) Open VirtualBox and create a new VM.
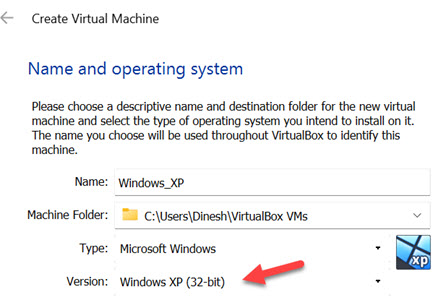
6) Give a name for VM and select the version as Windows XP (32bit).
7) Assign RAM size to 512MB.

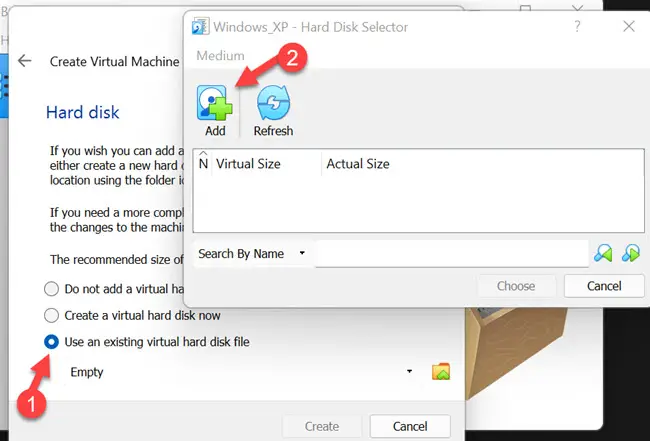
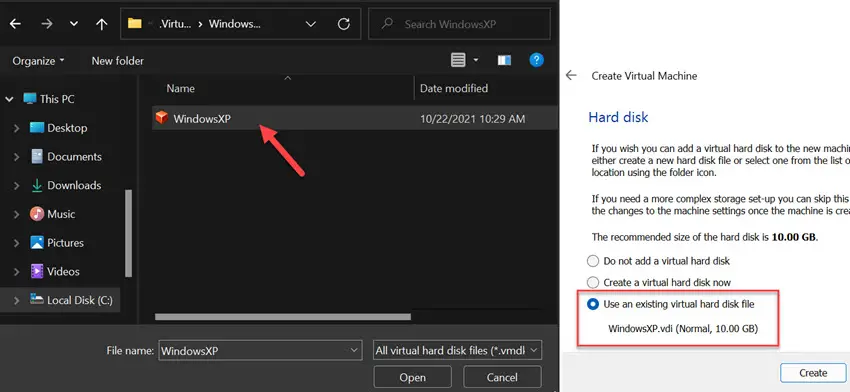
9) Click on the ‘Add’ button and locate the file as shown below.
After attaching the file, complete the VM creation steps.
10) Before switching on the VM, let’s tweak a few settings to make the VM work better.
11) Open the VM settings and tick the ‘Enable I/O APIC’ under ‘System’ settings. This will enable us to allocate more the one processer core for the VM.
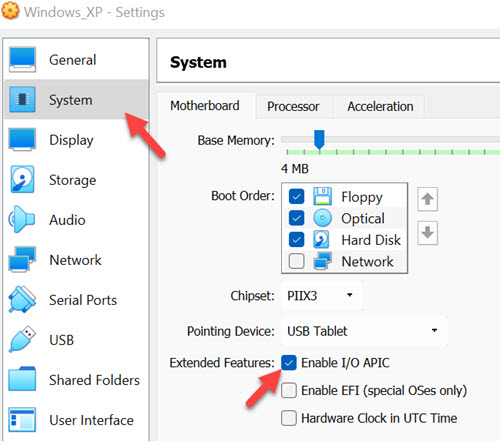
12) Then, in the ‘Processor’ tab, increase the processers to 2.

13) Power on the VM now. Since all installation steps are done, and VirtualBox guest additions are installed already, the Windows XP on VirtualBox virtual machine will boot and work smoothly.
Network connectivity (Internet), sound and multiple screen resolutions, including full-screen mode, will work perfectly.
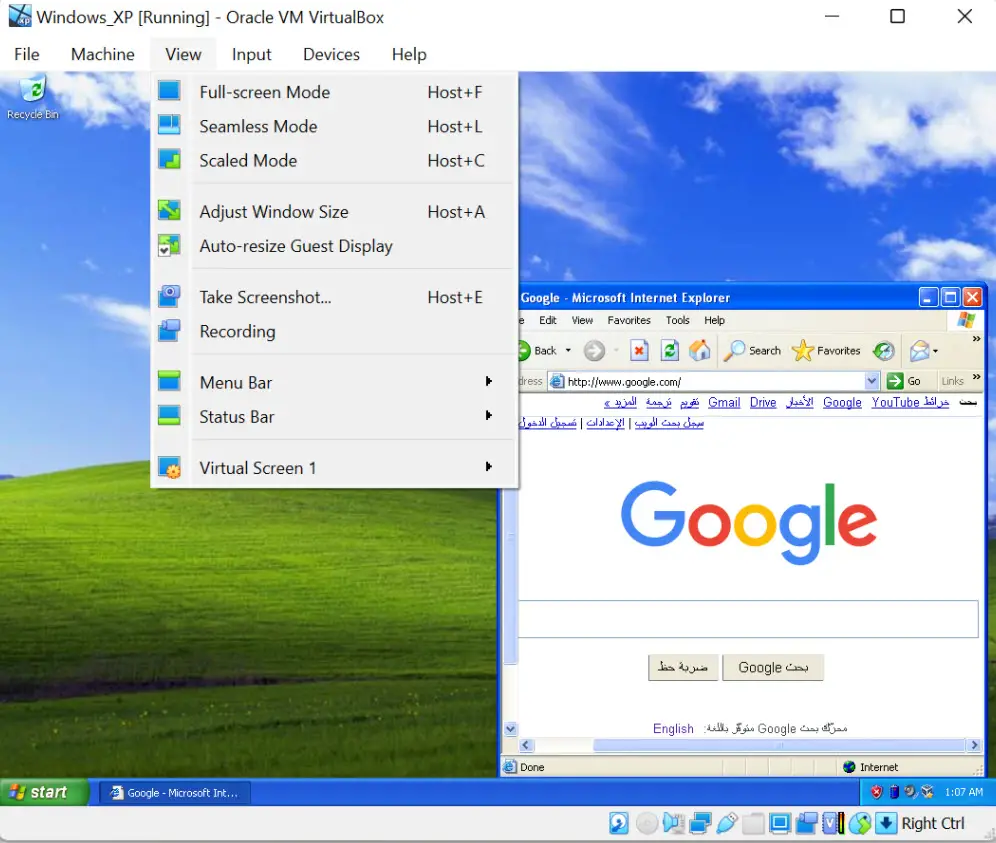
You can change the user or Administrator password.
You should have a working Windows XP virtual machine on your Windows 11/10 physical computer. It is highly recommended to take a snapshot before you make any changes.
Since VirtualBox guest additions are installed on this VM, you can quickly transfer the files/folders between the host and the guest virtual machine. It should be easy to test the legacy applications, games and other activities requiring Windows XP on the latest Windows 11 computer.
Troubleshooting Tips for Windows XP on VirtualBox
Based on the user feedback and findings, here are some troubleshooting tips if your Windows XP virtual machine is not booting or is stuck with the black screen.
- As mentioned in system requirements, if your host computer is Windows 10 or 11, it already has virtualization technology enabled in the BIOS. But, if you are using Windows 8 or 7 without VT-x enabled, you need to enable VT-x in BIOS before trying these steps.
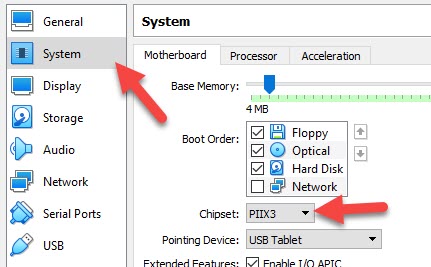
- You can change the chipset under the motherboard settings of the Windows XP virtual machine. It worked for me with PIIX3, but few users reported it worked with ICH9. So, it is better to change the try on your PC.
Whether you want to do some retro gaming, software testing, or are simply in for a quick nostalgia trip, we’re about to show you how to quickly set up a Microsoft Windows XP virtual machine in VirtualBox software – with ease and in around 10 minutes total! So, let’s dive into this short, simple and straight to the point step by step Win XP VM setup tutorial, and let us guide you to get your virtual machine working as fast as possible.
- Windows XP Virtualization – What Do You Need
- Where To Get The Windows XP ISO Image?
- Do I Need a Windows XP Product Key For a Virtual Machine?
- Are There Any Other Ways You Can Enjoy Windows XP These Days?
- Installing The VirtualBox Software
- Windows XP in VirtualBox – Step-by-step Tutorial
- And There It Is! – Fully Functional Virtualized Windows XP Instance
Check out also: Windows XP Today – Your Questions Answered!
Windows XP Virtualization – What Do You Need
The only three things you’ll need for this tutorial are:
- Windows XP ISO – a single ISO image file of the Windows XP installation media disc, you can obtain it in various places online or source it from an actual original Win XP install disc. More on that in a short while.
- Oracle VM VirtualBox Software (free) – freeware hypervisor software that we’re going to use for virtualizing the Windows XP OS. It can be downloaded here.
- A popular alternative to this piece of software is VMware – this one is also available for free, albeit for personal use only. We will be using VirtualBox in this tutorial.
- A PC (or rather motherboard) with virtualization capabilities – most modern motherboards do support virtualization by default. If it’s not, the option to enable it will be hidden somewhere in your BIOS. Search for options labeled: Virtualization, VT-x, AMD-V, or SVM, depending on your hardware.
- If virtualization is not enabled in your BIOS, the hypervisor software won’t be able to work properly, and you won’t be able to use your virtual machines.
This is the question that’s asked the most when it comes to anything virtual machine related. The quick answer is simple: do a quick Google search and you’ll be presented with more than a few sources for various operating system installation media ISO images.
The longer and more appropriate answer is: many sites including ours aren’t really keen on providing the ISO images of older commercial operating systems (especially those developed by Microsoft), simply because while these systems are long discontinued, Microsoft themselves still haven’t officially released clean installation media sources for most of their recalled OS products.
This makes the process of ripping a physical Windows installation disk (this is how you make an .iso file that’s used to install the system in a VM), somewhat a grey-area endeavor. The same goes with making these kind of files available for free online.
With that said, it’s true that there are still many Windows XP ISO images floating around online, but we cannot take the responsibility of checking if the one you find and pick will be safe to use and will not contain malware. This is something you should do on your own.
Do I Need a Windows XP Product Key For a Virtual Machine?
Yes, a Windows XP product key is needed during the OS installation process in the virtual machine environment, but then again, there are lots of working keys available all over the internet that you can use here.
As Windows XP is recalled and new licenses are no longer sold, you might have to resort to activating the system in your VM by using already existing keys – this is done in the very beginning during the OS installation process in the virtual machine.
Once again, currently the only way to really use Windows XP in a virtual machine “legally” is to find an old, preferably sealed Windows XP installation disk packed with a dedicated product key and then use these to install the OS in your virtual machine hypervisor software.
That’s just how it is: keep in mind that Microsoft doesn’t provide official downloads for any of the Windows XP installation media .iso images, and they do not endorse using previously used unoriginal product keys for activating copies of Windows XP in a virtualization environment.
This is why virtualizing older Microsoft Windows operating systems may be considered a “grey-hat” activity by some. In reality, as there currently is no real way of purchasing these older operating system licenses, the only way to actually make use of their feature sets is either through virtualization, or on original hardware having an original activated copy of such system installed.
You might also like: 10 Things You Should Know About Windows 95/98 Today.
Are There Any Other Ways You Can Enjoy Windows XP These Days?
In general, as we already mentioned, there are 2 main ways you can get the full Windows XP OS experience on your PC today. Here they are.
- Virtualization – the best way, enabling you to make use of full feature set of the virtualized OS while staying safe from malicious software.
- OS Install On An Old PC – whether you find an old Windows XP PC, or you decide to install it on an unused computer, this is one of the more elaborate ways to enjoy the system on actual hardware, without emulation or virtualization involved.
These are pretty much the only ways you can get into a part of the original Windows XP experience these days. From all of these methods, virtualization is the most efficient and safest one if done correctly.
Installing The VirtualBox Software
The very first thing you’ll need to do is to install the free VirtualBox hypervisor software which you can download right here.
The hypervisor software will allow us to create our Windows XP virtual machine, tweak some initial settings, import our .iso image and then proceed with the actual OS installation on our newly created VM. Let’s get started then!
Windows XP in VirtualBox – Step-by-step Tutorial
Here is how to get Windows XP to work in VirtualBox in a few simple steps. First, simply open the VirtualBox software.
After you’ve opened VirtualBox, select the “New” button which you can find in the middle of the top bar. This will initiate the process of creating a new Virtual machine.
Don’t worry about the .iso image yet, but keep in mind that we will need it later after we finish setting up our virtual machine.
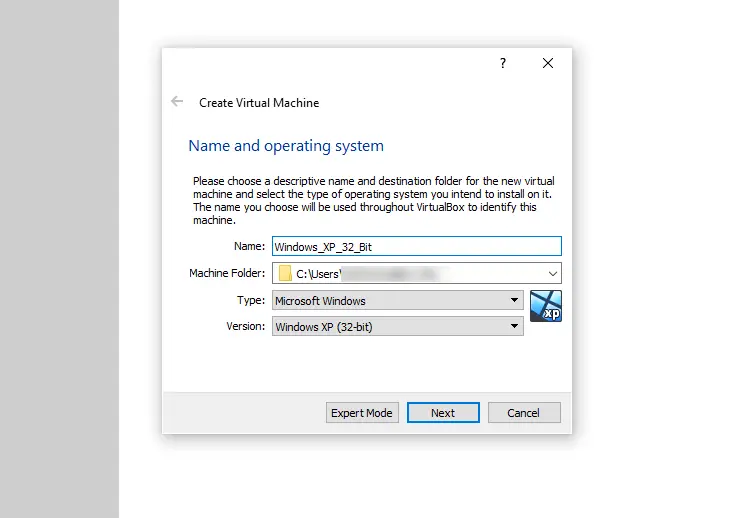
Pick a name for your virtual machine. The best thing to do here is to name it after the operating system it will be hosting – and that’s just what we did here.
After you’ve done that, select the following options: Type: Microsoft Windows and Version: Windows XP (32/64-bit) – pick the appropriate version depending on which .iso image you have. Then, press “Next”.
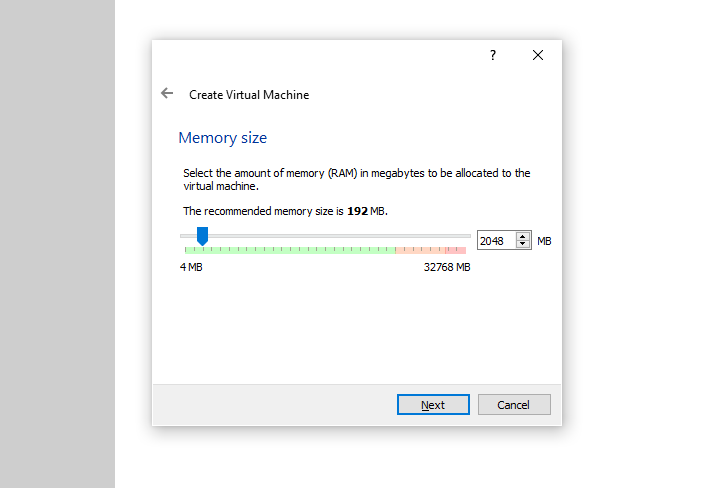
Now, pick an appropriate amount of RAM for your virtual machine. This will depend on the actual way you’ll be using your VM in the end, and on the overall amount of RAM available on your host machine.
We recommend picking 2048 MB (2 GB) here, although you can just as well go with as little as the software recommended 192 MB if you don’t have much host memory to spare.
Generally, we don’t recommend assigning less than 512 MB (0.5 GB) and more than 8192 MB (8 GB) for Windows XP on VirtualBox. For light retro gaming and commercial software tests you should be fine with 2-4 GB in most cases.
Remember that this can always be changed later, after shutting down your virtual machine. When you’re finished, click “Next”.
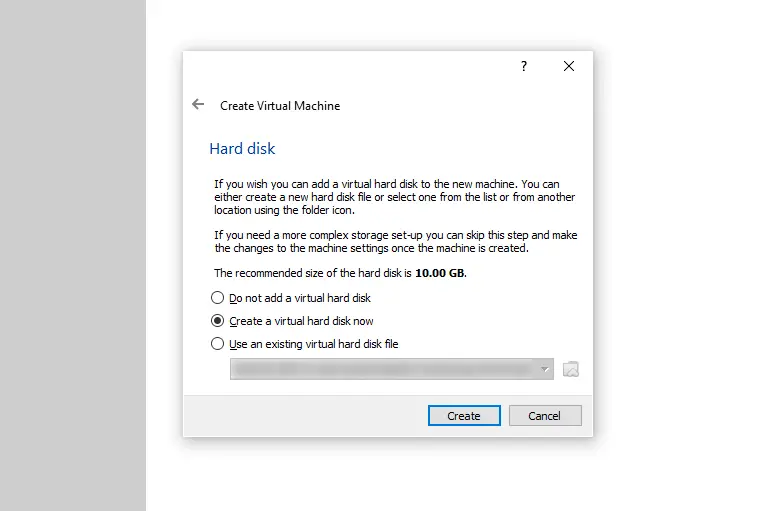
Now it’s time to create a new virtual hard disk – this will be the disk space that will be available to you once you boot your virtual Windows XP PC.
Select the “Create a virtual hard disk now” option, and press the “Create” button.
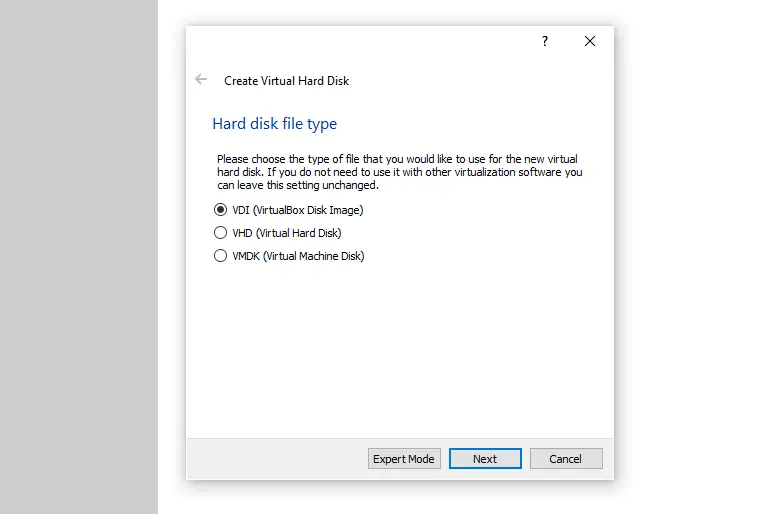
Select the type of the virtual disk – as we won’t be using this particular virtual disk file with any other software than VirtualBox, we can safely create the default “VDI (VirtualBox Disk Image)” file type and click “Next”.
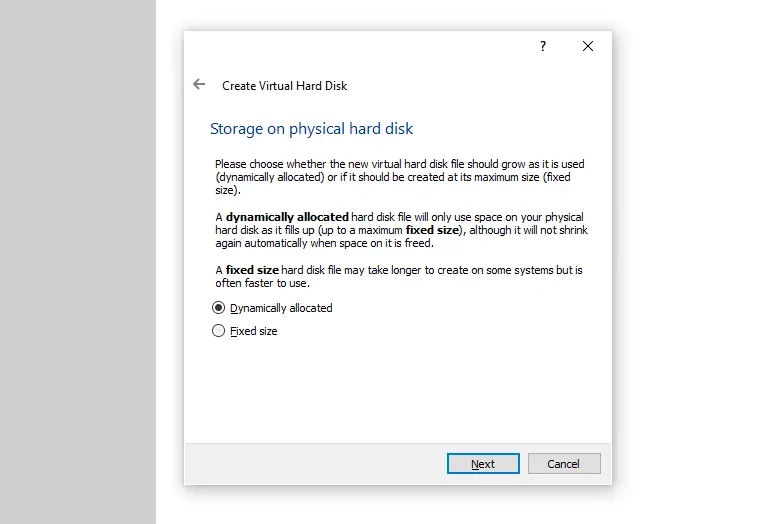
Now you’re faced with two options: you can either create a “Dynamically allocated”, or “Fixed size” virtual hard drive.
The first one will only use your physical host disk space as it gradually fills up with data, and the second one will take up all the set space from the beginning.
While the dynamic storage allocation can be slower than utilizing a fixed-size virtual drive, dynamic storage allocation is more beneficial when you use lots of smaller virtual machines for testing purposes and don’t have that much disk space to spare on your host system.
Select “Dynamically allocated” and press “Next”.
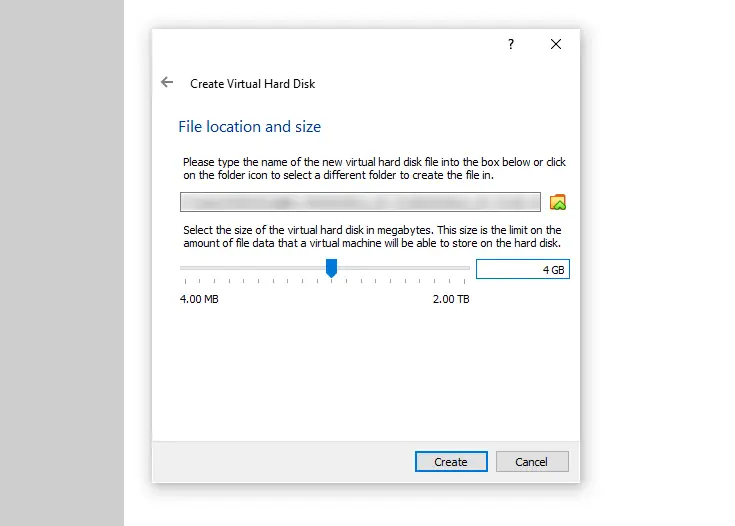
As Windows XP has an install size of around 1.5 GB, we won’t be needing more than 4GB on our virtual hard drive.
Choose a directory for your virtual hard drive file (or leave it as default), and set your virtual hard disk size to 4 GB. Then, click “Next”.
Now, your new “empty” Windows XP virtual machine has been created successfully, but it still needs two things. First, settings tweaking, second, importing the Windows XP ISO image. We’re going to do all this right now.
Click on the orange settings cog on the main VirtualBox screen with your new VM selected to enter the settings menu of your newly created virtual machine.
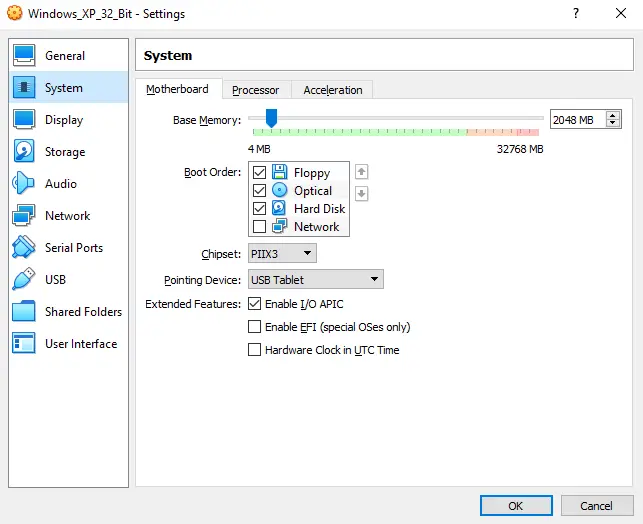
Head over to the “System” submenu on the left, and select the first “Motherboard” tab.
In here, you can see the amount of memory you’ve assigned to your virtual machine. You can change this anytime you want if your VM is not running.
If you want your virtual machine to utilize more than one CPU core (and we do want that), check the “Enable I/O APIC” checkbox in this window.
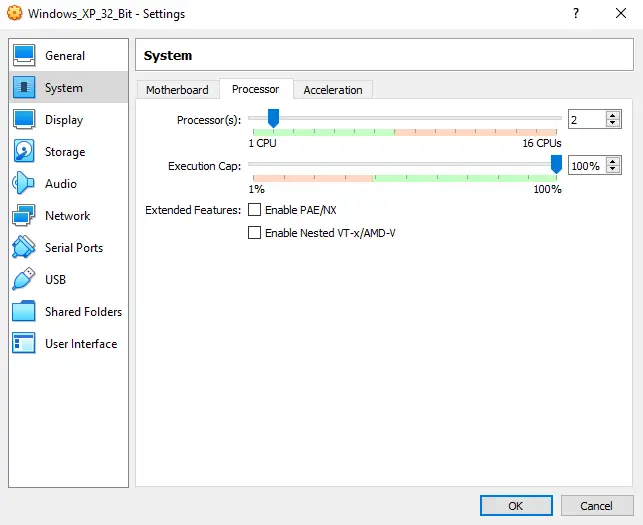
After that, head over to the “Processor” tab.
Now, in the “Processor” tab, drag the “Processor(s)” slider to your desired amount of CPU cores that you want your virtual machine to utilize. Let’s set this slider to “2”. Leave other settings in this tab as is.
If you don’t enable the “Enable I/O APIC” feature in the “Motherboard” tab, you won’t be able to support more than one virtual processor, so make sure that it is on.
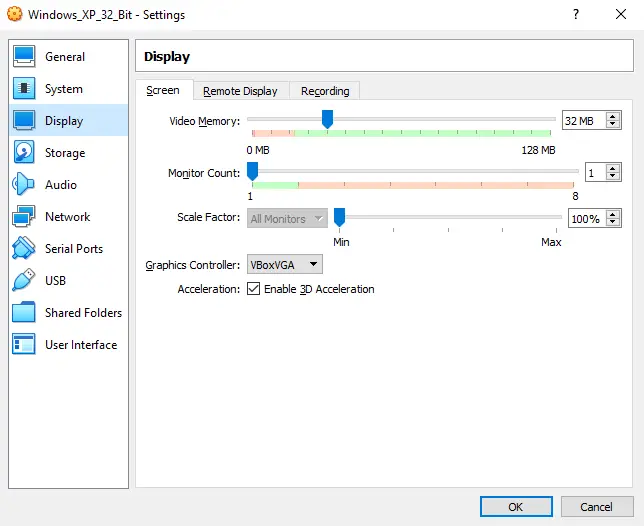
Go over to the “Display” submenu and the “Screen” tab. In there, you will be able to set the amount of memory you want to assign to your virtualized graphic card. Set the “Video Memory” slider to 32 MB.
After you’ve done that, check the “Enable 3D Acceleration” box. Now you can head over to the “Network” submenu.
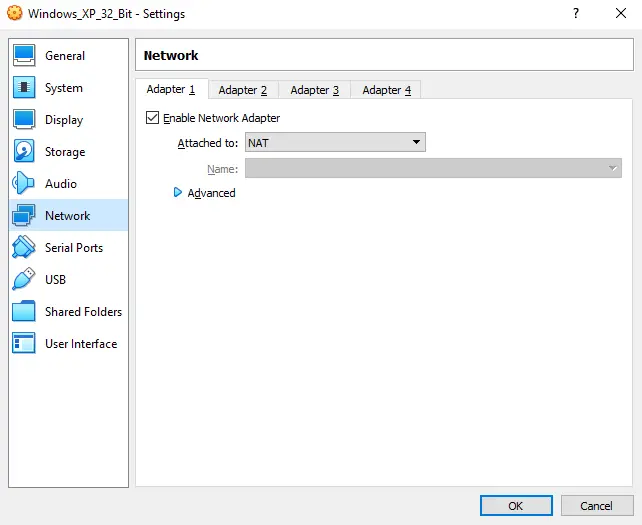
In the “Network” tab, check if the “Adapter 1” is enabled and set to “Attached To: NAT”.
This way you’ll be able to access the internet through your virtual machine – neat!
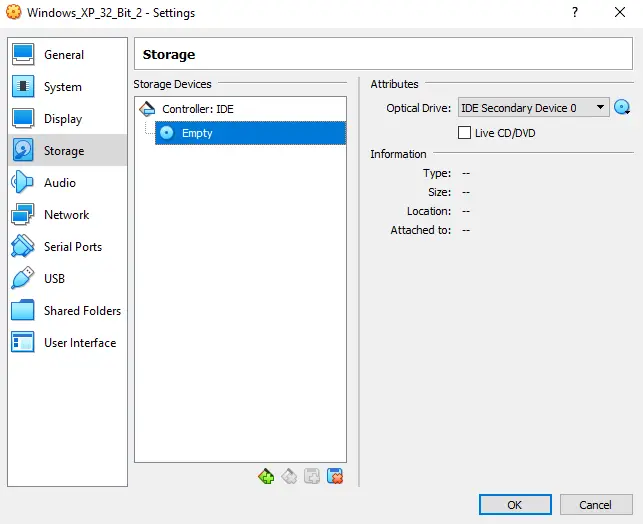
Now the most important part yet – importing our ISO image. Head over to the “Storage” submenu and locate the virtual optical disc drive (highlighted blue on the image above). Then press the little blue disc on the top left of the window.
Here, select the “Choose a disk file…” option. Now you will be prompted to select your OS installation disc ISO image file (if you don’t know what that is, go back to the beginning of this article).
After you select the file, it will get imported into the virtual optical disc drive. It’s the direct equivalent of putting the OS installation CD into an actual physical disc drive on a real computer – just virtualized!
Now, it’s finally time to close the settings window and start up your virtual machine by pressing the “Start” button in the main VirtualBox window with your newly created VM selected.
We’re halfway there!
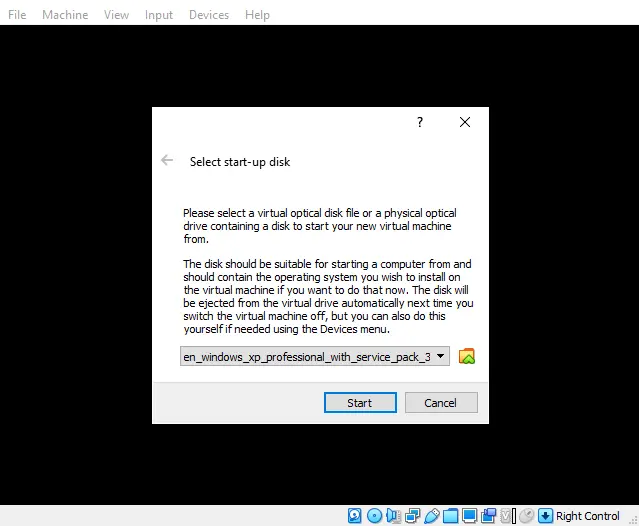
After booting up your new virtual machine, you will be prompted to select the start-up disk / ISO image to use – select the one you’ve just imported in the previous step!
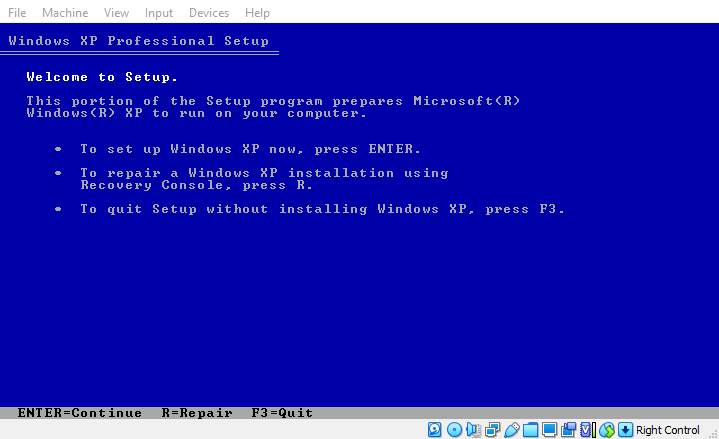
Now, the actual installation process of Windows XP will begin on your VM.
This is the exact same install setup that you would face when installing Windows XP from “real” physical installation media on an actual hardware.
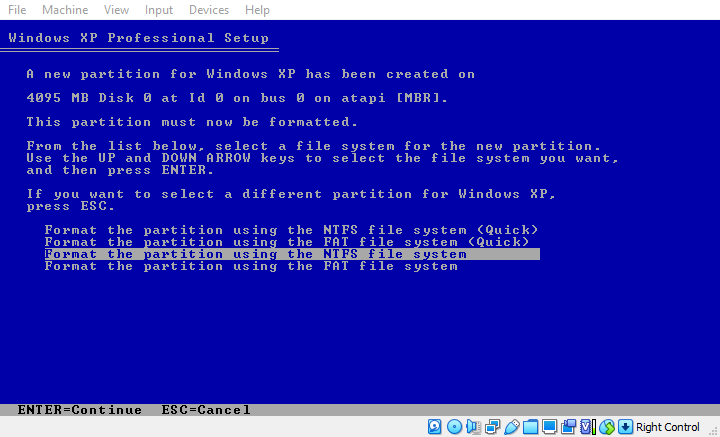
The only step that might be non-obvious here is one of the first ones where you have to select the “Format the partition using the NTFS file system” option (shown on the image above). Click the enter key to confirm your choice.
Now the only thing you have to do is to finish the regular Windows XP installation process.
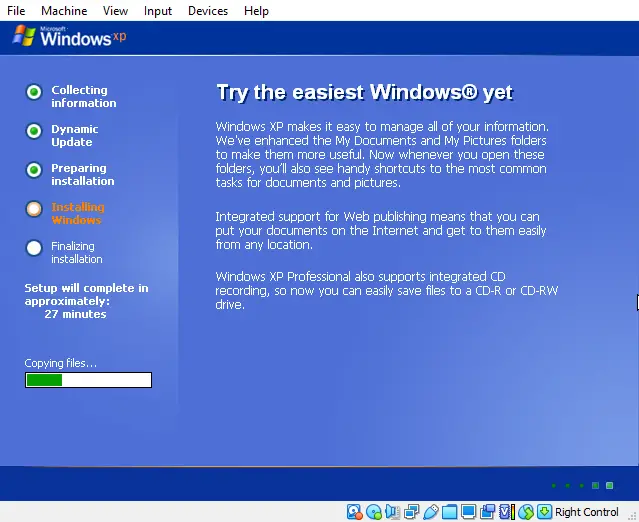
We won’t be going through all the steps here, as these are pretty self-explanatory – all the things you have to do are stated explicitly on-screen in the installer GUI. This was the “easiest Windows version” after all, as proclaimed by the installation wizard itself!
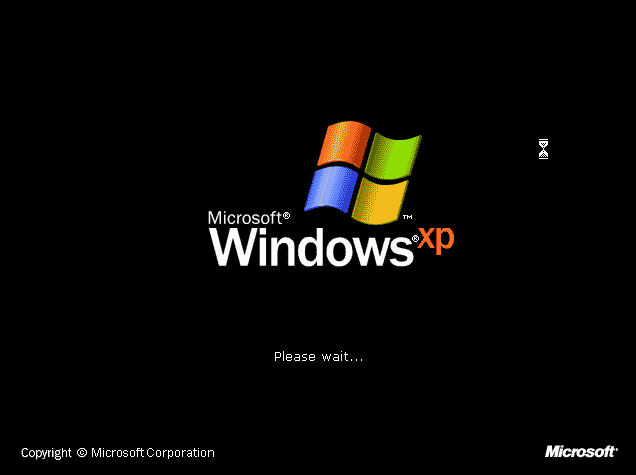
After the installation process is complete you will be faced with the well-known Windows XP loading screen. This is the end of the road – you now have a fully functional copy of Windows XP running in your virtual machine!
And There It Is! – Fully Functional Virtualized Windows XP Instance
And that’s it! You’ve successfully installed Windows XP on your virtual machine and now can use all the features of the system virtualized locally on your host machine. All that with internet access!
Remember that Windows XP is a discontinued and largely outdated OS which should not be used for any work involving critical user data, especially when connected to the internet.
If you want to know more about Windows XP, we have a great article just for you! Check out this: Windows XP Today – Your Questions Answered! Grab your coffee and give it a read!
