HP and Compaq Desktop PCs
Click Start, and then click Run.
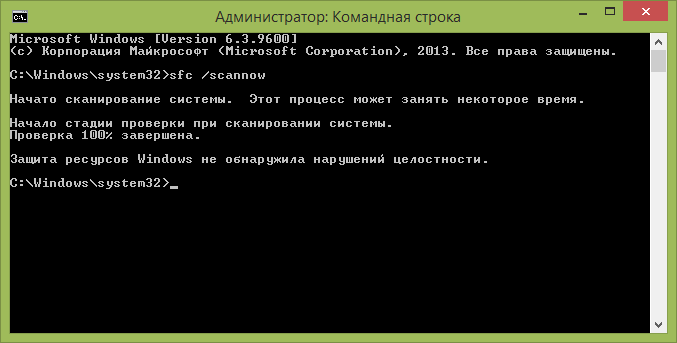
In the Open field, type the following: sfc /scannow. Then press Enter, or click OK. System File Checker scans and restore system files. note:
How do I Check my System Files?
Click Start.
In the search bar , type CMD .
Rightclick CMD.exe and select Run as Administrator.
On the User Account Control UAC prompt, click Yes.
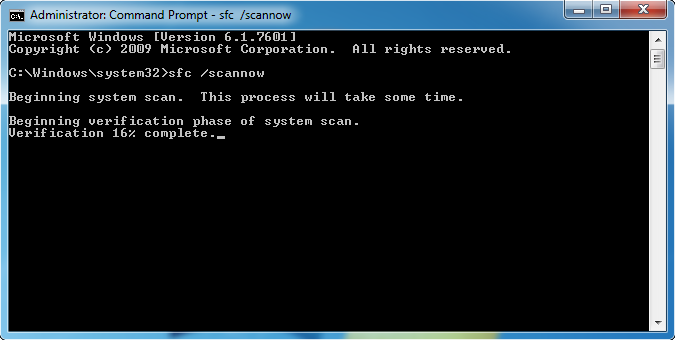
In the command prompt window, type SFC /scannow and press Enter .
System file checker utility checks the integrity of Windows system files and repairs them if required.
Does Sfc Work in Windows XP?
Sfc or sfc.exe stands for System File Checker . Its a utility in Microsoft Windows operating systems, starting from Windows 98, that allows you to scan and restore corruptions in system files. The sfc utility is available for Windows XP, Windows Vista, Windows 7, Windows 8, Windows 8.1 and Windows 10.
How do I Replace System Files in Windows XP?
Press and hold the Windows key and then press the Rkey.
In the Run dialog box, type sfc /scannow and click OK.
A Windows File Protect dialog box will show up that shows the progress of the file system scan.
Where are the System Files?
Most system files of a Windows operating system are stored in the folder C:\Windows, especially in such subfolders as /System32 and /SysWOW64. You will also find system files in a users folder for example, AppData and application folders for example, Program Data or Program Files.
Window XP : System File Checker Tool — Sfc.exe
This guide will help you if you have seen the system File Checker in Windows XP.
Approved: Fortect
Speed up your computer’s performance now with this simple download.
g.The sfc / scannow command scans all protected system files and replaces the corrupted files with a cached commercial copy located in the pressurized folder at% WinDir% System32 dllcache.
Click Start, then Run.In the “Open” field, enter: sfc /scannow. Then press Enter or click OK. System File Checker scans and repairs computer system files. Note:

How do I run System File Checker in Windows XP?
Click Start, then click Run.In the “Open” field, enter the required: sfc / scannow. Then hit Enter or even hit OK. System File Checker reads and repairs system files. Mark:
What Are The Windows Operating System Files?
The operating system is more than just a user interface that you interact with. There are many system files that are optional or inaccessible to you and run in the background to keep things running.
How Do I Access System.File Check?
To check the file system. Step 1. Launch the MiniTool Partition Wizard from its main interface. Then sort the target partition and select Check File System from the Actions panel or the Partition menu. Step 2. A new window will appear with two options mi: choose one and check and fix the errors found.
Approved: Fortect
Fortect is the world’s most popular and effective PC repair tool. It is trusted by millions of people to keep their systems running fast, smooth, and error-free. With its simple user interface and powerful scanning engine, Fortect quickly finds and fixes a broad range of Windows problems — from system instability and security issues to memory management and performance bottlenecks.

Run System File Checker At Startup
Windows XP has a command called sfc /scanboot. It scans all protected system files every business hour of computer startup. To run sfc /scanonce, you only need to run it once after a reboot.
Does XP have sfc?
System File Checker (SFC) is a command-line tool that allows you to restore protected system videos to your computer using backup versions stored in the Dllcache folder or files copied from the Windows XP installation source.
How To Use The System File Checker To Repair Windows 10/8/7
1. For the SFC /SCANNOW command, you need to open an administrator or elevated command prompt, also known as command prompt, with administrative privileges. In the Windows search box, type cmd and select “Command Prompt Results”, right-click it and select “Run as administrator”.
Does XP have sfc?
About sfc. The sfc utility is available for Windows XP, Windows Vista, Windows 7, Windows 8, Windows 8.1, and Windows 10. You must be logged in as a helpful administrator to run this utility.
Run the scanner. If your computer starts normally but freezes or freezes unexpectedly, consider running this special System File Checker (SFC). Using SFC is especially useful if the screen goes blank from time to time and you can’t restore it. Running SFC is also a good ideaOr maybe Windows itself intermittently: your mouse freezes, your keyboard freezes, and what’s more, the old Ctrl+Alt+Del sleep mode doesn’t work anymore.If you’re having trouble with one class crashing – say Internet Explorer runs for a while and then suddenly shuts down, or Outlook tells you it’s kicking a habit – don’t even let SFC bother you. It’s a waste of time. You have to go back to fix the faulty program, and SFC doesn’t even touch programs – it only works on Windows system files.Windows XP protects its treasures well, but sometimes system-wide files get corrupted. Hardware problems, especially hard drive problems, can corrupt system files. Sometimes installers bypass Windows XP security materials and replace system files with dubious versions of their choice. The System File Checker checks to see if you have run Microsoft-approved forms of system files.You must have an awesome Administrator account to run the System File Checker. To maximize one, see Technique 47.If youWant to make sure all your system files are kosher:7. Place Windows XP in the concept book on CD.This CD contains the full version of Windows XP. If you purchased your computer with Windows XP preinstalled, you may have a backup CD. Usethis disk. If you didn’t receive a backup CD with your new computer, call the manufacturer and complain out loud.2. Close any installation screens that appear automatically.3. Select the All Programs and Accessories command line command.The Windows XP inspire command will appear. Sorry if you think these are old DOS receipt lines.
Speed up your computer’s performance now with this simple download.
How do I run sfc in safe mode?
In this distribution, we will see how to run System File Checker offline in Safe Mode i.e. when booting Windows 11/10/8/7. This is useful when SFC does not work or may not start. One useful tool that Microsoft has introduced to Windows is the ability to finally run the System File Checker to test the stability of core system files.
What is the meaning of System File Checker?
The System File Checker (SFC) is a unique Windows 10 utility that helps administrators scan for corrupted files. Executable energy can help restore registry data. System File Checker is a feature of current Windows operating systems, including Windows 10, Windows 8, Windows 7, and Vista.
![]()
![]()
![]()
![]()
![]()
![]()
![]()
![]()
![]()
![]()
Скажите, почему у меня не получается восстановление системных файлов Windows XP с помощью команды sfc /scannow? Дистрибутив не исцарапанный, вставляю в дисковод, далее в меню Выполнить ввожу команду sfc /scannow и через небольшой промежуток времени выходит ошибка: Предоставлен неправильный компакт-диск и на этом всё, в чем может быть дело? Стас.
Восстановление системных файлов Windows XP
Если вы уверены, что диск не повреждён, то ваша ошибка говорит о том, что установочный компакт-диск Windows XP, с которого вы хотите произвести восстановление системных файлов Windows XP, не оригинальный. Вы уж извините. Я бы так уверенно не говорил Стас, если бы не занимался ремонтом много лет и уж Экспишечку я знаю, она так просто подобную ошибку выкидывать не будет. Давайте на всякий случай проверим, всё ли вы правильно сделали.

В операционную систему нужно заходить от лица администратора. В своём дисководе вы должны быть уверены на все сто, если он у вас иногда не может прочесть информацию на компакт-дисках, меняйте его. Попробуйте данным дистрибутивом провести восстановление системных файлов Windows XP на другом компьютере.
Для восстановления системных файлов Windows XP набираем в меню выполнить команду sfc /scannow,

далее операционная система производит проверку системных файлов и заменяет повреждённые версии оригинальными, в большинстве случаев для восстановления системных файлов Windows XP потребуется дистрибутив.

Если всё же у вас ничего не получится, обратите своё внимание на загрузочный диск восстановления ERD Commander. Или попробуйте воспользоваться нашей статьёй Восстановление системы Windows XP.

This guide shows you how to use the sfc utility for the following Windows versions: Windows XP, Vista, 7, 8, 8.1 and 10.
About sfc
Sfc or sfc.exe stands for System File Checker. It’s a utility in Microsoft Windows operating systems, starting from Windows 98, that allows you to scan and restore corruptions in system files.
The sfc utility is available for Windows XP, Windows Vista, Windows 7, Windows 8, Windows 8.1 and Windows 10.
To run this utility you need to be logged in as an Administrator.
Parameters
The most command parameter for this utility is:
sfc /scannow
The /scannow command will scan for issues and, if it finds one, it will attempt to replace the files that have issues from the DLL Cache.
In Windows Vista or later (7, 8, 8.1), the sfc utility can be used to scan individual files.
Other parameters for the sfc utility are:
sfc /scanonce will scan the system files only once.
sfc /scanboot will scan the system files at every boot of your computer
sfc /revert will return the scan to its default operating
sfc /purgecache will remove the Windows File Protection cache and begin a scan over the system files
sfc /cachesize=x, where x is the size in MB, will set the cache size of the Windows File Protection
sfc /? will display the help list
Run sfc in Easy Recovery Essentials
You can download and burn Easy Recovery Essentials on any CD, DVD or USBs and run the sfc.exe commands you need.
To do so, follow these steps:
- Download Easy Recovery Essentials
- Burn the ISO image. Follow our instructions on how to burn a bootable ISO image to a CD or DVD. If you’d like to have a recovery USB instead, follow these instructions.
- Boot into Easy Recovery Essentials
- Select Launch Command Line


Run sfc in Windows XP
To run the sfc utility in Windows XP, follow these steps.
If you run the utility while you’re logged into Windows XP:
- Open Command Prompt. To do so, go to Start > Run and type
cmdand click OK. - Type the
/scannowcommand and press Enter:sfc /scannow
If you run sfc outside Windows XP, e.g. when you’re at Recovery Console or via Easy Recovery Essentials if you can’t boot into Windows XP, you need to set the path where your Windows XP is installed:
- Open Command Prompt
- Type this command, but replace
c:\with the letter of the drive where your Windows XP is installed:sfc /scannow /offbootdir=c:\ /offwindir=c:\windows
- Press Enter
If System File Checker founds any errors and repairs the issues found, restart your computer before you boot into Windows XP.
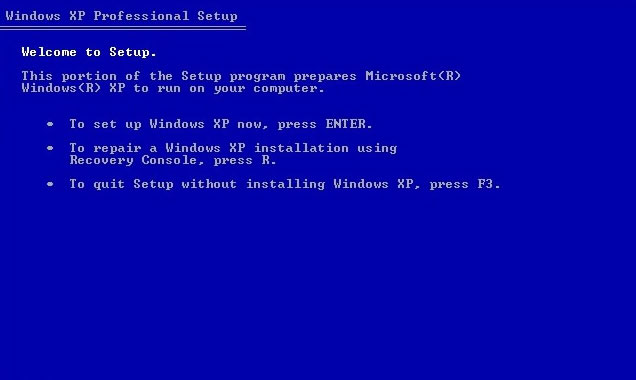
To run the commands using your Windows XP installation disc, follow these steps:
- Insert the installation CD in the disc tray
- Restart the computer
- At the Press any key message, press any key on your keyboard to boot from the CD
- At the Welcome to Setup screen, press R to open Recovery Console
- Enter the Administrator password
- When Command Prompt appears, type the sfc command and press Enter:
sfc /scannow /offbootdir=c:\ /offwindir=c:\windows
Replace
c:\with the letter of the drive where your Windows XP is installed.
Run sfc in Windows Vista
To run the sfc in Windows Vista, follow these steps:
- Click Start
- Click All Programs
- Click Accessories
- Right-click on Command Prompt
- Click Run as Administrator
- If UAC (User Account Control) appears, click Yes or Continue to continue to open Command Prompt as Administrator
- When the Command Prompt appears, type:
sfc /scannow - Press Enter
If you can’t boot into Windows Vista, use your original installation disc. To do so, follow these steps below.
If you don’t have the installation disc, go to Run sfc in Easy Recovery Essentials. You can burn EasyRE on any CD, DVD or USBs.
- Insert the original Windows Vista DVD in the disc tray
- Boot from the DVD
- Choose a language and keyboard layout
- At the Welcome screen, click on Repair your computer
- Choose your operating system from the list
- Click Next
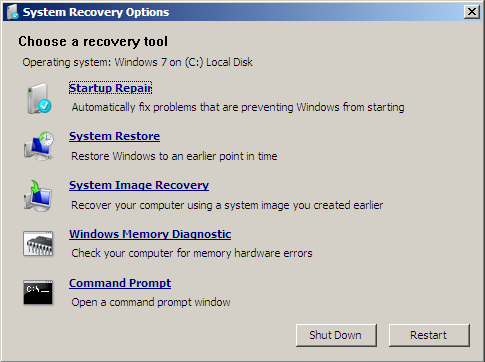
- At the System Recovery Options window, click Command Prompt
- Type the command and press Enter:
sfc /scannow /offbootdir=c:\ /offwindir=c:\windows
Replace
c:with the letter of the drive where Windows Vista is installed.


Run sfc in Windows 7
To run the sfc in Windows Vista, follow these steps:
If you can’t boot into Windows 7, go to Run sfc in Easy Recovery Essentials.
- Click Start
- Type
command promptin search box - Right-click on the first item in search results list: Command Prompt
- Click Run as administrator
- Click Continue or Yes on the UAC warning window to allow this action
- When Command Prompt appears, type the command:
sfc /scannow
- Press Enter


You can also run the sfc command via the installation disc or the System Recovery Options panel installed on your computer.
Method #1
- Insert the original Windows 7 installation DVD in the disc tray and reboot your computer
- Press any key when it says “Press any key to boot from CD or DVD..”
- Select a language and keyboard option
- Click Repair your computer
- Select your operating system
- Choose Command Prompt
- Type the command and press Enter:
sfc /scannow /offbootdir=c:\ /offwindir=c:\windows
Replace
c:with the letter of the drive where Windows 7 is installed.


Method #2
- Restart your computer
- Press the F8 key several times during booting before the Windows 7 logo appears
- At the Advanced Options screen, select Repair your computer
If Repair your computer option isn’t available, follow Method #1 above.
- Select a keyboard and language
- Select Command Prompt
- Type the command and press Enter:
sfc /scannow /offbootdir=c:\ /offwindir=c:\windows
Replace
c:with the letter of the drive where Windows 7 is installed.

Run sfc in Windows 8 or 8.1
To run the sfc in Windows 8 or Windows 8.1, follow these steps:
- Boot into your system
- Press the and C key to open the Charm Bar
- Type
command promptorcmdin the search field - From the search results list, right-click on Command Prompt
- Select Run as Administrator
- Enter the password
- When Command Prompt loads, type the sfc command and press Enter:
sfc /scannow


You can also run the utility from the Windows installation disc. To do so, follow these steps below.
If you don’t have the installation disc, go to Run sfc in Easy Recovery Essentials. You can burn EasyRE on any CD, DVD or USBs.
- Insert the disc and restart the computer
- Press any key to boot from the DVD
- Choose your keyboard layout, time and language
- Click Next
- Click Repair your computer
- Click Troubleshoot
- Click Advanced options
- Click Command Prompt
- Type the command and press Enter:
sfc /scannow /offbootdir=c:\ /offwindir=c:\windows


Run sfc in Windows 10
To run the sfc in Windows 10, follow these steps:
- Boot into your system
- Press the key to open the Start Menu
- Type
command promptorcmdin the search field - From the search results list, right-click on Command Prompt

- Select Run as Administrator
- Enter the password
- When Command Prompt loads, type the sfc command and press Enter:
sfc /scannow

You can also run the utility from the Windows installation disc. To do so, follow these steps below.
If you don’t have the installation disc, go to Run sfc in Easy Recovery Essentials. You can burn EasyRE on any CD, DVD or USBs.
- Insert the disc and restart the computer
- Press any key to boot from the DVD
- Choose your keyboard layout, time and language
- Click Next
- Click Repair your computer

- Click Troubleshoot
- Click Advanced options
- Click Command Prompt
- Type the command and press Enter:
sfc /scannow /offbootdir=c:\ /offwindir=c:\windows

Troubleshooting
sfc isn’t recognized
If the sfc commands you’re typing in Command Prompt aren’t being recognized, make sure that:
- You’re logged in as an Administrator
- Or you’re logged in as a user of an Administrator group
Windows Resource Protection could not perform
You may receive this error while trying to perform a /sfc scannow:
Windows Resource Protection could not perform the requested operation
This error usually appears if the hard disk has corruptions or bad sectors. To fix this error, you can try any of the following tips:
Tip #1: Boot into Safe Mode
Try to run the sfc /scannow command while in Safe Mode. To boot into Safe Mode, follow these steps:
- Boot your computer
- Press the F8 key before the Windows logo appears
- At the Windows Options screen, use the arrows keys and select Safe Mode
- Press Enter
To get the full instructions on how to boot into Safe Mode, read our guide on Safe Mode with instructions for each Windows version:
- Windows XP
- Windows Vista
- Windows 7
- Windows 8 or 8.1
Tip #2: Run chkdsk
If Tip #1 doesn’t work, also try to run chkdsk commands to check if your hard disk has bad sector or corruption issues.
To run chkdsk (related guide: chkdsk), follow these steps:
- Insert the original Windows installation CD or DVD
- Go to Command Prompt. Depending on your Windows version, Command Prompt is:
- Windows XP: Go to Recovery Console
- Windows Vista or 7: Go to System Recovery Options
- Windows 8 or 8.1: Go to Troubleshoot > Advanced Options
- When Command Prompt appears, type this command:
chkdsk c: /r
Where
c:is where your Windows is installed.
Press Enter
Windows Resource Protection could not start the repair service
The sfc utility may return the following error when you try to run it:
Windows Resource Protection could not start the repair service
If it returns this error, run the following commands:
-
ren c:\windows\winsxs\pending.xml pending.old
Replace
Cwith the drive’s letter where Windows is installed on. -
sfc /scannow /offbootdir=[c]:\ /offwindir=[c]:\windows
Replace
Cwith the drive’s letter where Windows is installed on.
More Information
Support Links
- Easy Recovery Essentials for Windows – our repair and recovery disk.
It’s an easy-to-use and automated diagnostics disk. It’s available for Windows 8, Windows 7 and Windows Vista. It’s also available for Windows XP and Windows Server.
Read more at Windows Recovery Disks.
- The NeoSmart Support Forums, member-to-member technical support and troubleshooting.
- Get a discounted price on replacement setup and installation discs: Windows XP, Windows Vista, Windows 7, Windows 8, Windows 10.
Applicable Systems
This Windows-related knowledgebase article applies to the following operating systems:
- Windows XP (all editions)
- Windows Vista (all editions)
- Windows 7 (all editions)
- Windows 8 (all editions)
- Windows 8.1 (all editions)
- Windows 10 (all editions)
Propose an edit
Как проверить целостность системных файлов windows xp без диска
Требования.
Для выполнения указанных в этой статье действий, необходимо на компьютере иметь права локального администратора.
Статья действительная для Windows 2000/XP/Vista.
Необходимо иметь установочный дистрибутив Windows такой же версии и сервис пака, как и установленная на Вашем компьютере. То есть, если на компьютере установлена Windows 2000 SP4, то и на диске должен быть дистрибутив Windows 2000 SP4, а не Windows XP или Windows 2000 SP2.
Информация.
По вине некоторых событий: вирус, «досужие ручки», неверная установка или удаление программы, может возникнуть проблема с системными файлами и Windows может глючить, зависать. Чтобы устранить проблемы с участием системных файлов, можно их проверить и в случаи проблем восстановить используя установочный дистрибутив Windows.
Запуск проверки целостности системных файлов Windows.
Windows 2000/XP
1. Нажать кнопку «Пуск» и выбрать пункт меню «Выполнить»;
2. В поле «Открыть», впишите команду sfc /scannow и нажмите кнопку «ОК»;
3. Запустится мастер «Защита файлов Windows«, который предложит вставить диск с установочным дистрибутивом Windows;
4. Поставьте диск и нажмите кнопку «Повтор«;
5. После окончания работы мастера, перезагрузите компьютер;
Windows Vista.
Для запуска проверки и восстановления системных файлов необходимо запустить «Командная строка» от имени администратора.
1. Нажать кнопку «Пуск», раскройте список «Программы» или «Все программы«;
2. Раскройте список «Стандартные«;
3. Нажмите правой кнопкой мыши на «Командная строка» и выберите пункт меню «Запуск от имени администратора«;
4. При необходимости введите пароль администратора или просто разрешите Windows продолжить, нажав на кнопку «Продолжить»;
5. В открывшемся окне в строке где мигает курсор введите команду sfc /scannow и нажмите кнопку «Ввод (Enter)»;
6. Запустится процесс проверки защищенных файлов;
7. После окончания работы мастера, перезагрузите компьютер;
После работы мастера проверки файлов, проблемы с системными защищенными файлами должны исчезнуть.
Источник
Проверка системных файлов Windows
 Многие знают, что проверить целостность системных файлов Windows можно с помощью команды sfc /scannow (впрочем, это знают не все), но мало кто знает, как еще можно использовать данную команду для проверки системных файлов.
В этой инструкции я покажу, как осуществить проверку для тех, кто вообще не знаком с данной командой, а после этого расскажу о различных нюансах ее использования, которые, думаю, будут интересны. См. также более подробную инструкцию для последней версии ОС: проверка и восстановление целостности системных файлов Windows 10 (плюс видео инструкция).
Как проверить системные файлы
В базовом варианте, если у вас есть подозрение на то, что необходимые файлы Windows 8.1 (8) или 7 были повреждены или потеряны, вы можете использовать специально предусмотренный для этих случаев инструмент самой операционной системой.
Итак, для проверки системных файлов, проделайте следующие шаги:
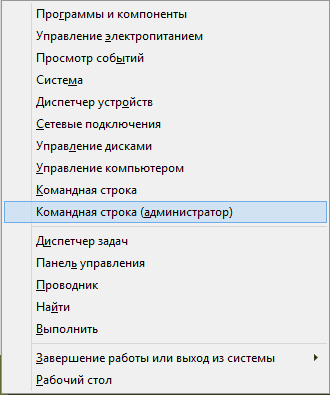
- Запустите командную строку от имени администратора. Для этого в Windows 7 найдите этот пункт в меню Пуск, кликните по нему правой кнопкой мыши и выберите соответствующий пункт меню. Если у вас Windows 8.1, то нажмите клавиши Win + X и запустите «Командная строка (Администратор)» из меню, которое появится.
- В командной строке введите sfc /scannow и нажмите Enter. Эта команда выполнит проверку целостности всех системных файлов Windows и попытается их исправить в том случае, если были обнаружены какие-либо ошибки.
Однако, в зависимости от ситуации, может оказаться, что использование проверки системных файлов в таком виде не в полной мере подходит для данного конкретного случая, а потому расскажу о дополнительных возможностях команды утилиты sfc.
Дополнительные возможности проверки с помощью SFC
Полный список параметров, с которыми можно запустить утилиту SFC выглядит следующим образом:
Что это нам дает? Предлагаю посмотреть по пунктам:
- Вы можете запустить только проверку системных файлов без их исправления (ниже будет информация о том, зачем это может пригодиться) с помощью sfc /verifyonly
- Имеется возможность проверить и исправить только один системный файл, выполнив команду sfc /scanfile=путь_к_файлу (или verifyfile, если исправлять не требуется).
- Для проверки системных файлов не в текущей Windows (а, например, на другом жестком диске) можно использовать sfc /scannow /offwindir=путь_к_папке_windows
Думаю, эти возможности могут быть полезны в самых различных ситуациях, когда требуется проверить системные файлы на удаленной системе, или для каких-то иных непредвиденных задач.
Возможные проблемы при проверке
При использовании утилиты проверки системных файлов, вы можете столкнуться с некоторыми проблемами и ошибками. Кроме этого, лучше, если вы будете знать некоторые особенности работы этого инструмента, о которых ниже.
- Если при запуске sfc /scannow вы видите сообщение о том, что Защите ресурсов Windows не удается запустить службу восстановления, проверьте, что служба «Установщик модулей Windows» включена, а тип запуска установлен «Вручную».
- Если у вас в системе есть модифицированные файлы, например, вы заменяли значки в проводнике или что-то еще, то выполнение проверки с автоматическим исправлением вернет файлы в первоначальный вид, т.е. если вы меняли файлы специально, это придется повторить.
Может оказаться, что sfc /scannow не удастся исправить ошибки в системных файлах, в этом случае вы можете ввести в командной строке
findstr /c:»[SR]» %windir%\Logs\CBS\CBS.log >»%userprofile%\Desktop\sfc.txt»

Эта команда создаст текстовый файл sfc.txt на рабочем столе со списком файлов, исправление которых не удалось — при необходимости вы можете скопировать необходимые файлы с другого компьютера с той же версией Windows или с дистрибутива ОС.
А вдруг и это будет интересно:
Почему бы не подписаться?
Рассылка новых, иногда интересных и полезных, материалов сайта remontka.pro. Никакой рекламы и бесплатная компьютерная помощь подписчикам от автора. Другие способы подписки (ВК, Одноклассники, Телеграм, Facebook, Twitter, Youtube, Яндекс.Дзен)
Здравствуйте. У меня после введения sfc /scannow ответ такой : Проверка 0% завершена. Защита ресурсов Виндовс не обнаружила нарушений целостности. Почему — то нет 100% проверки. В чем может быть причина? обновления также не устанавливаются на компьютер.
Добавьте в статью, что в этой команде только один пробел — после «sfc». После палочки пробела нет. Или просто скопируйте:
sfc /scannow
А зачем это добавлять? В инструкции и так нет пробела..
Независимо от того, есть пробел или нет, команда выполняется правильно
У меня просто мелькнуло меню с фоном и пропало. И списка на столе не появилось — словно и не вводил ничего.
А вы в командной строке вводили (которое черное и большое) или просто в окошко «выполнить»? В командной строке от администратора нужно.
Довольно давно пользуюсь этим сайтом Только сейчас заметил здесь всегда всё работает
Здравствуйте. Я сохранил файлик с теми файлами которые не удалось восстановить. А как их исправить теперь?
Вообще, предполагается, что они автоматически будут исправлены. Если нет… то в теории конечно можно их с точно рабочей аналогичной машины взять, но не факт, что это хороший вариант. Если система Windows 10, возможно, лучше переустановку сделать с сохранением данных.
Источник
Description of System File Checker (Sfc.exe)
This article describes System File Checker (Sfc.exe), which is a command-line utility used with the Windows File Protection (WFP) feature.
Original product version: Windows 10 — all editions, Windows Server 2012 R2
Original KB number: 310747
Summary
System File Checker gives an administrator the ability to scan all protected files to verify their versions. If System File Checker discovers that a protected file has been overwritten, it retrieves the correct version of the file from the cache folder ( %Systemroot%\System32\Dllcache ) or the Windows installation source files, and then replaces the incorrect file. System File Checker also checks and repopulates the cache folder. You must be logged on as an administrator or as a member of the Administrators group to run System File Checker. If the cache folder becomes damaged or unusable, you can use the sfc /scannow , the sfc /scanonce , or the sfc /scanboot commands to repair its contents.
System File Checker tool syntax
Sfc [/Scannow] [/Scanonce] [/Scanboot] [/Revert] [/Purgecache] [/Cachesize=x]
/Scannow : Scans all protected system files immediately and replaces incorrect versions with correct Microsoft versions. This command may require access to the Windows installation source files.
/Scanonce : Scans all protected system files one time when you restart your computer. This command may require access to the Windows installation source files when you restart the computer. The SfcScan DWORD value is set to 2 in the following registry key when you run this command:
/Scanboot : Scans all protected system files every time you start your computer. This command may require access to the Windows installation source files every time you start your computer. The SfcScan DWORD value is set to 1 in the following registry key when you run this command:
/Revert : Returns scan to the default setting (do not scan protected files when you start the computer). The default cache size is not reset when you run this command. This command is equivalent to the /Enable switch in Windows 2000.
/Purgecache : Purges the file cache and scans all protected system files immediately. This command may require access to the Windows installation source files.
/Cachesize=x : Sets the file cache size to x megabytes (MB). The default size of the cache is 50 MB. This command requires you to restart the computer, and then run the /purgecache command to adjust the size of the on-disk cache. This command sets the SfcQuota DWORD value to x in the following registry key:
For more information about the Windows File Protection feature, see Description of the Windows File Protection feature.
Источник