
You don’t have to have two different computers to use Linux and Windows 10. It’s possible to have a Linux distro installed on a computer with Windows 10 preinstalled.
In this article, I will show you how to dual boot Windows 10 and the popular Ubuntu Linux distro. But before that, you have to install Ubuntu on your Windows 10 PC.
Before you go through this process, you must backup your files. That’s because installing an OS is a risky process. Sometimes it can overwrite the existing OS and delete all your files.
N.B.: Most of the processes in this article take time to get done, so you need to be patient.
What We’ll Cover – A step-by-step Guide to Dual-Booting Windows 10 and Linux
- Prerequisites
- How to Partition your Hard Drive for Ubuntu
- How to Optimize your Hard Drive for More Partition Space (Optional)
- How to Download Ubuntu in ISO Image Format
- How to Make an Ubuntu (Linux) Bootable USB Drive
- How to Install Ubuntu Linux Distro along with Windows 10
- Now You Can Dual Boot Ubuntu and Windows 10
- Conclusion
Prerequisites
Most importantly, there are some things you must have in place if you want to use (and dual boot) Ubuntu and Windows 10 on the same PC:
- A computer preinstalled with Windows 10
- A partitioned hard drive
- A BIOS in UEFI mode (Unified Extensible Firmware Interface)
- An empty USB drive of at least 4Gig for creating a bootable disk
- An internet connection to download Ubuntu ISO image (the Linux distro) and Rufus (a bootable drive creation tool)
How to Check If Your PC BIOS is in UEFI Mode
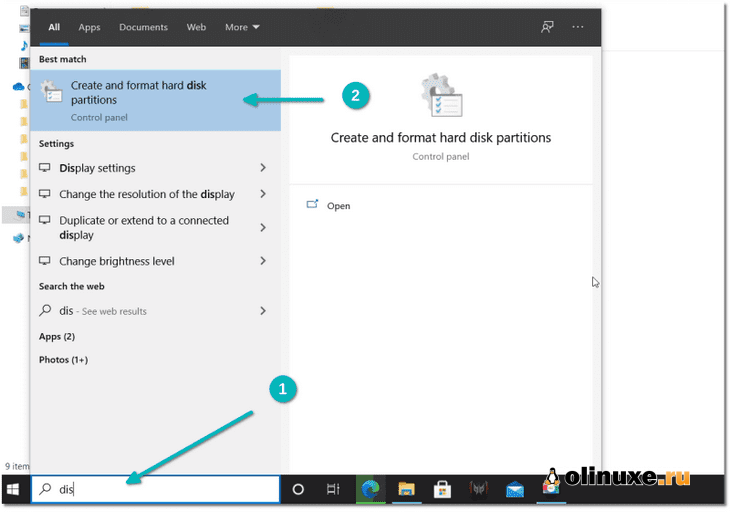
To check if your PC BIOS comes in UEFI mode, search for “system information” and hit ENTER.
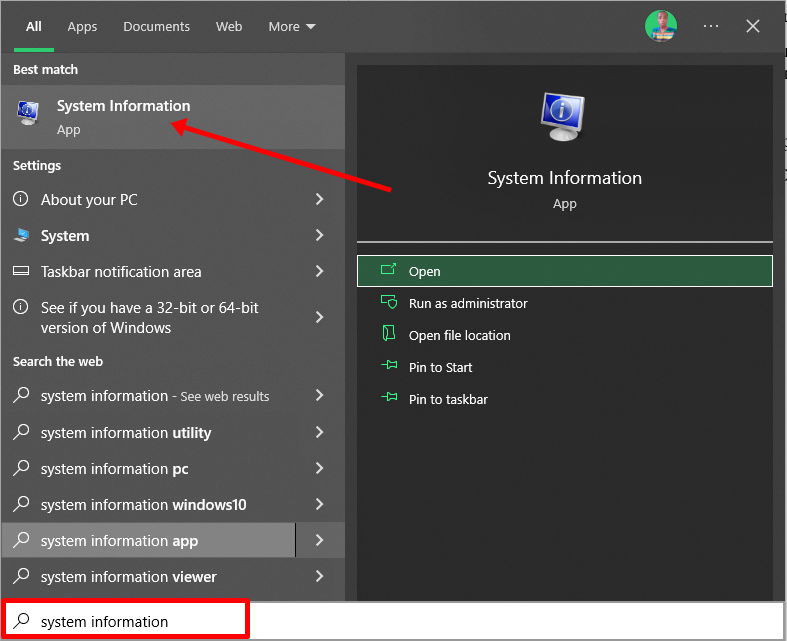
Look under BIOS mode to confirm that your PC BIOS mode comes as UEFI.
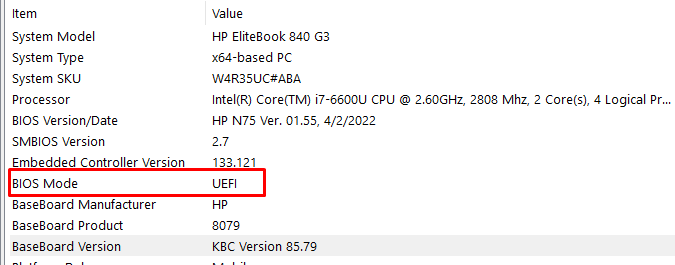
If your PC BIOS is not in UEFI mode, the two operating systems won’t see each other. You can learn more about the difference between these two modes here.
How to Partition your Hard Drive for Ubuntu
You have to partition your hard drive because you must set aside at least 20Gig for Ubuntu to live in and boot from.
To partition your hard drive, follow the steps below:
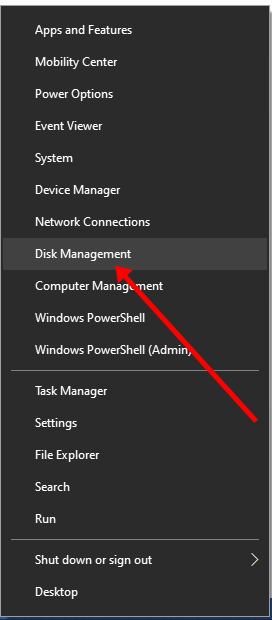
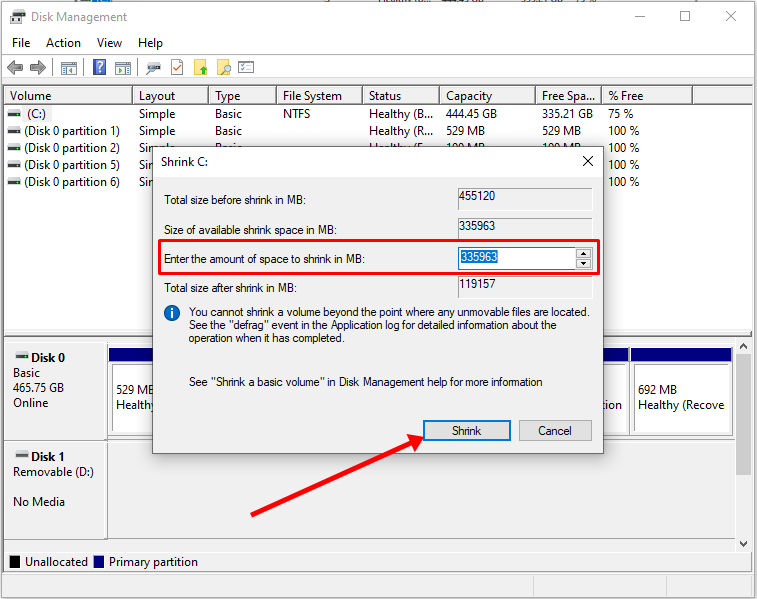
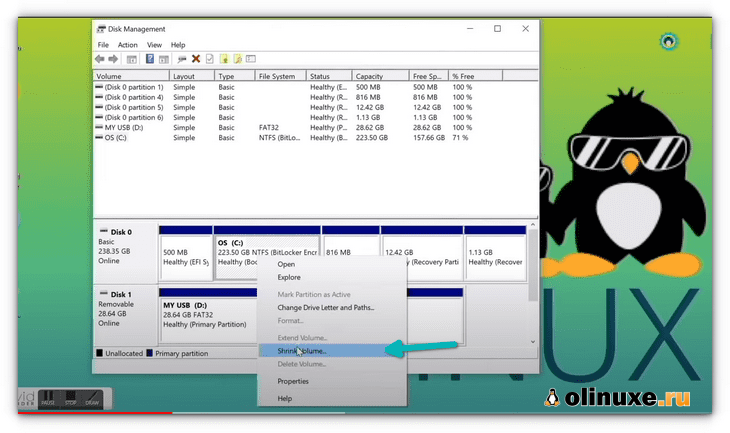
Step 1: Right-click on Start and select “Disk Management”.
Step 2: Right-click on your C drive and select shrink volume.
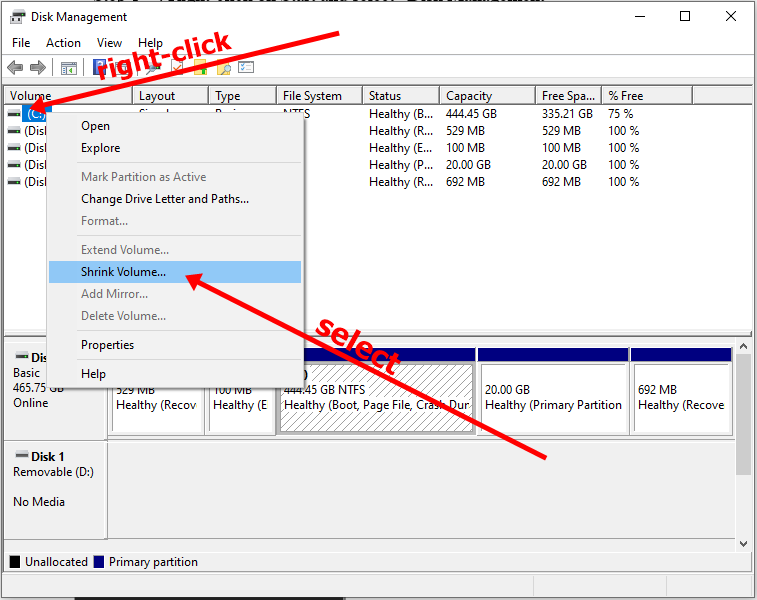
Step 3: Select at least (20000) 20Gig for Ubuntu and click “Shrink”. IT can take some time to complete, so be patient.
Step 4 (optional): You can go ahead and assign a letter to the new volume. Right-click on the unallocated space and select “New Simple Volume”.
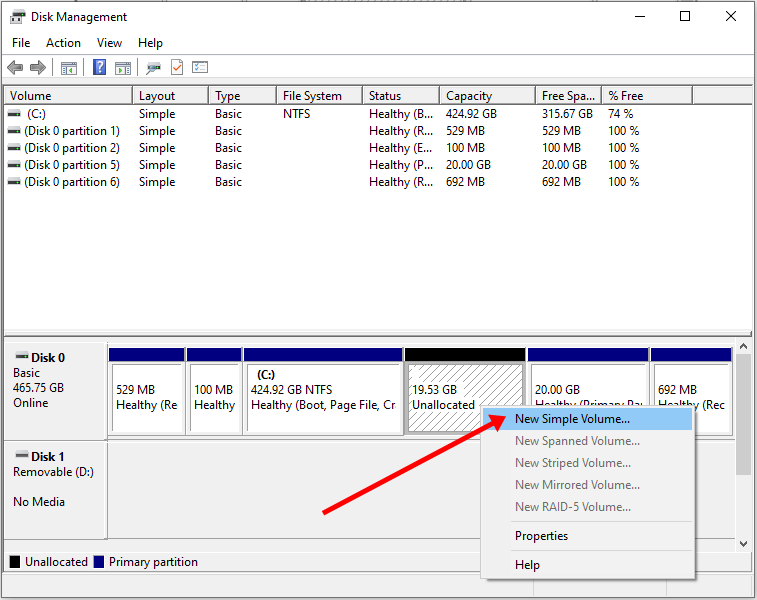
Step 5: Follow the wizard and assign a letter to the drive, then follow the rest of it.
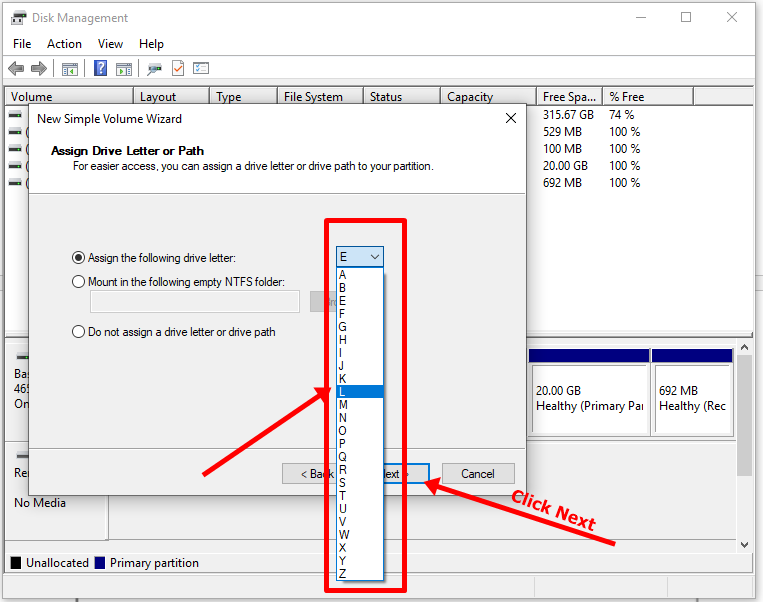
After completing the wizard, the drive should be listed on your computer.
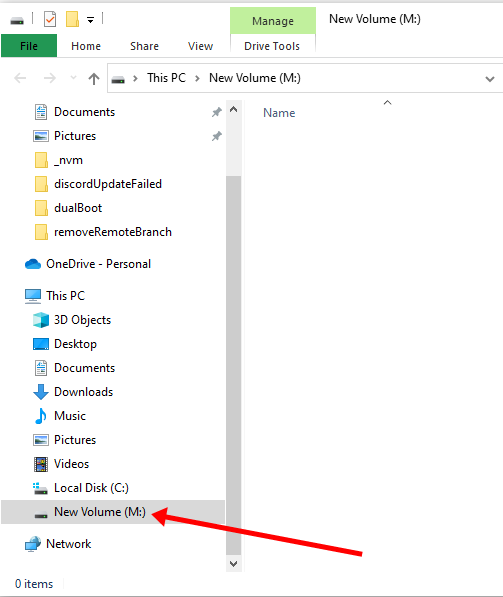
Congrats! You’ve successfully partitioned your hard drive.
N.B.: If you have a lot of free space in your hard drive but your PC still didn’t give you up to 20Gig partition space, then you need to optimize your PC’s hard drive. Proceed to the next section of this article to do that.
How to Optimize your Hard Drive for More Partition Space (Optional)
The common purpose of hard disk optimization is to speed up your computer during boot time and make it run smoother.
At the same time, the process will defragment the hard disk and make free space more available for partitioning.
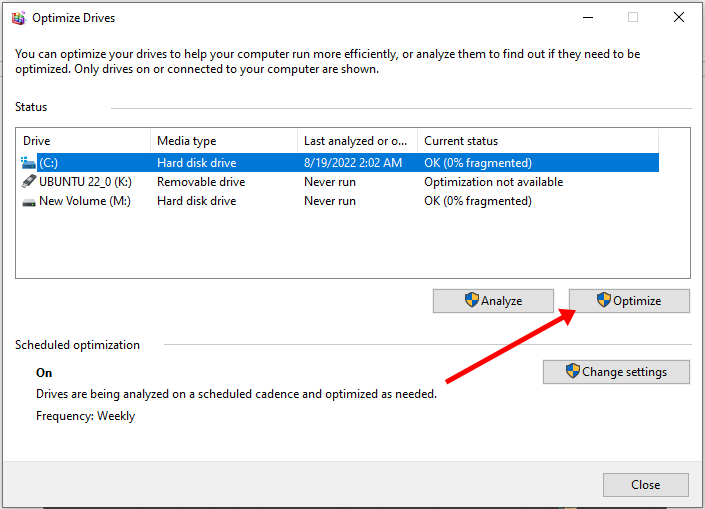
To optimize your hard drive, click Start (Windows logo key), search for “defrag” and select “Defragment and Optimize Drives”.
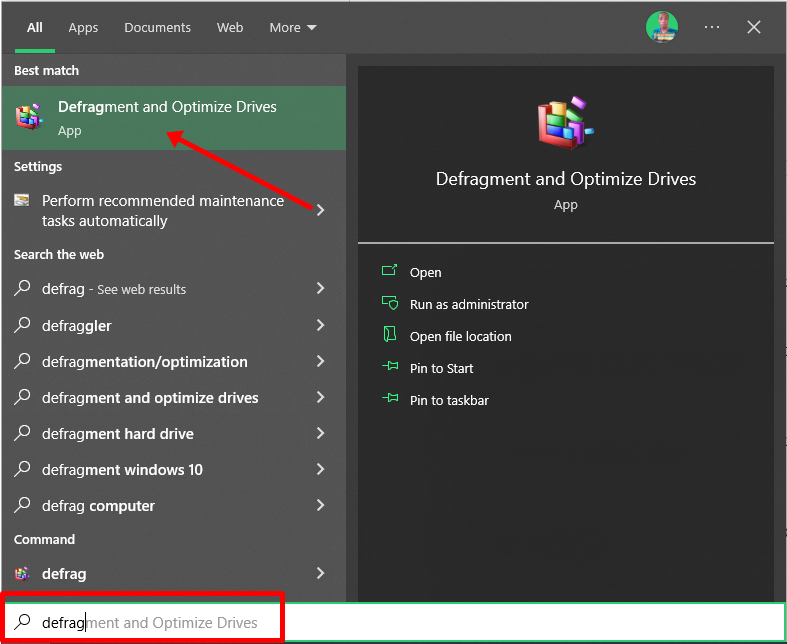
Make sure your C drive is highlighted, then click “Optimize”.
After you’ve been able to set aside at least 20Gig for Ubuntu by partitioning your hard drive, then it’s time to download Ubuntu and make a bootable USB.
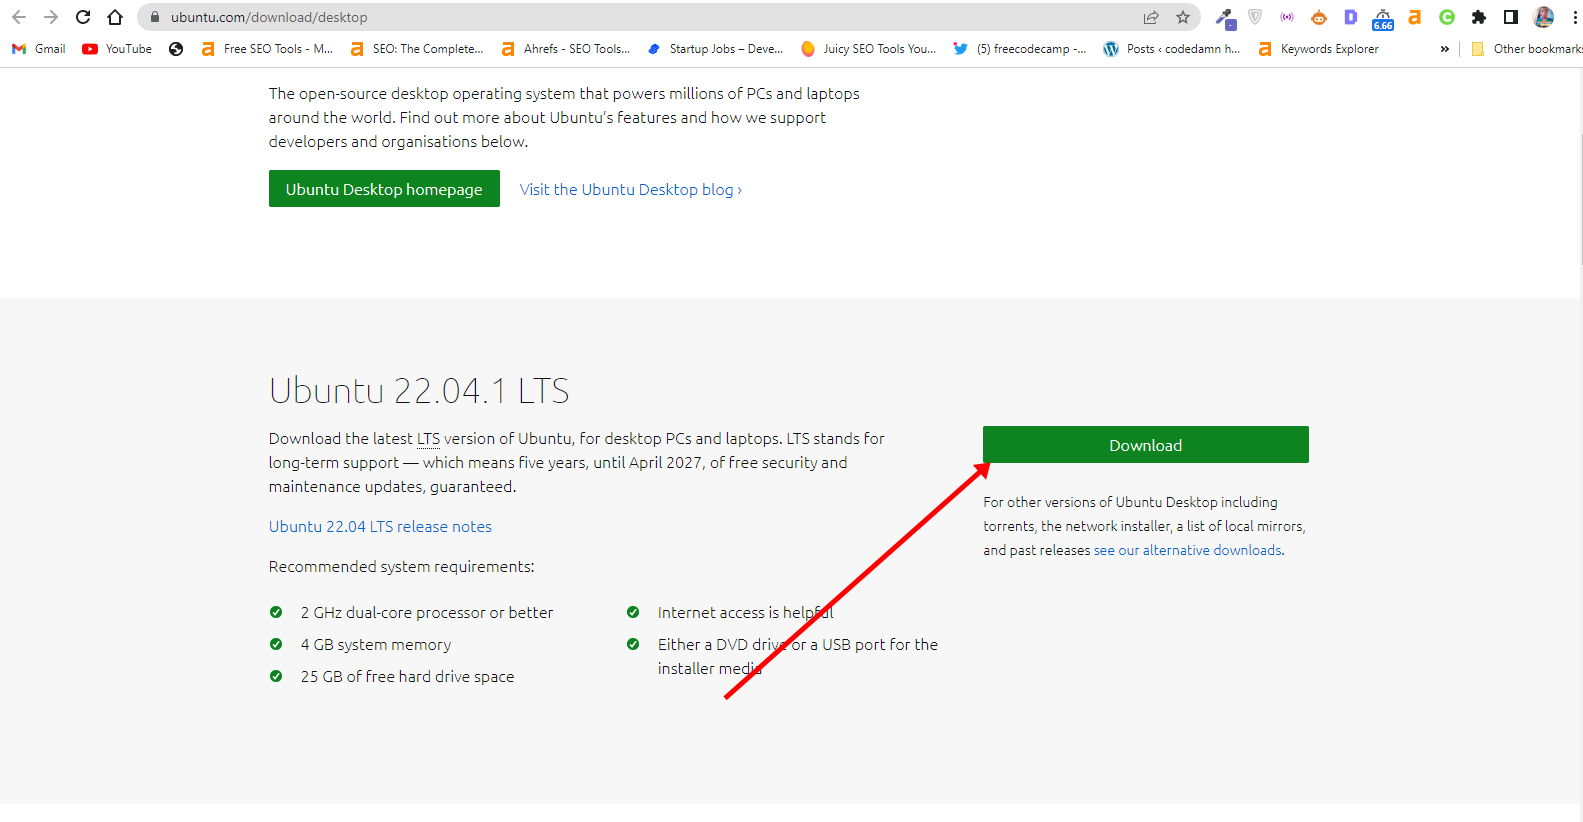
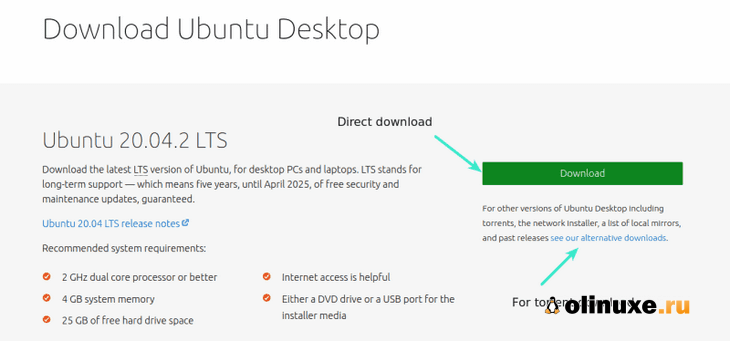
How to Download Ubuntu in ISO Image Format
The next thing is to download Ubuntu in ISO image format so you can install Ubuntu. You can download it from the Ubuntu distro website.
After downloading Ubuntu, don’t do anything with it yet. You need to make a bootable USB and put it in there. That’s how you’ll be able to use it.
The reason you can’t install Ubuntu just like that is that it doesn’t come as an executable. It comes in form of ISO (optical disk image). That means you have to find a disk to put it in before it can work.
The next part of this guide shows how you can put the downloaded Ubuntu ISO on a USB stick.
How to Make an Ubuntu (Linux) Bootable USB Drive
You won’t be able to make a bootable USB drive for Ubuntu by just placing the downloaded ISO image in it. Follow these steps to get it done:
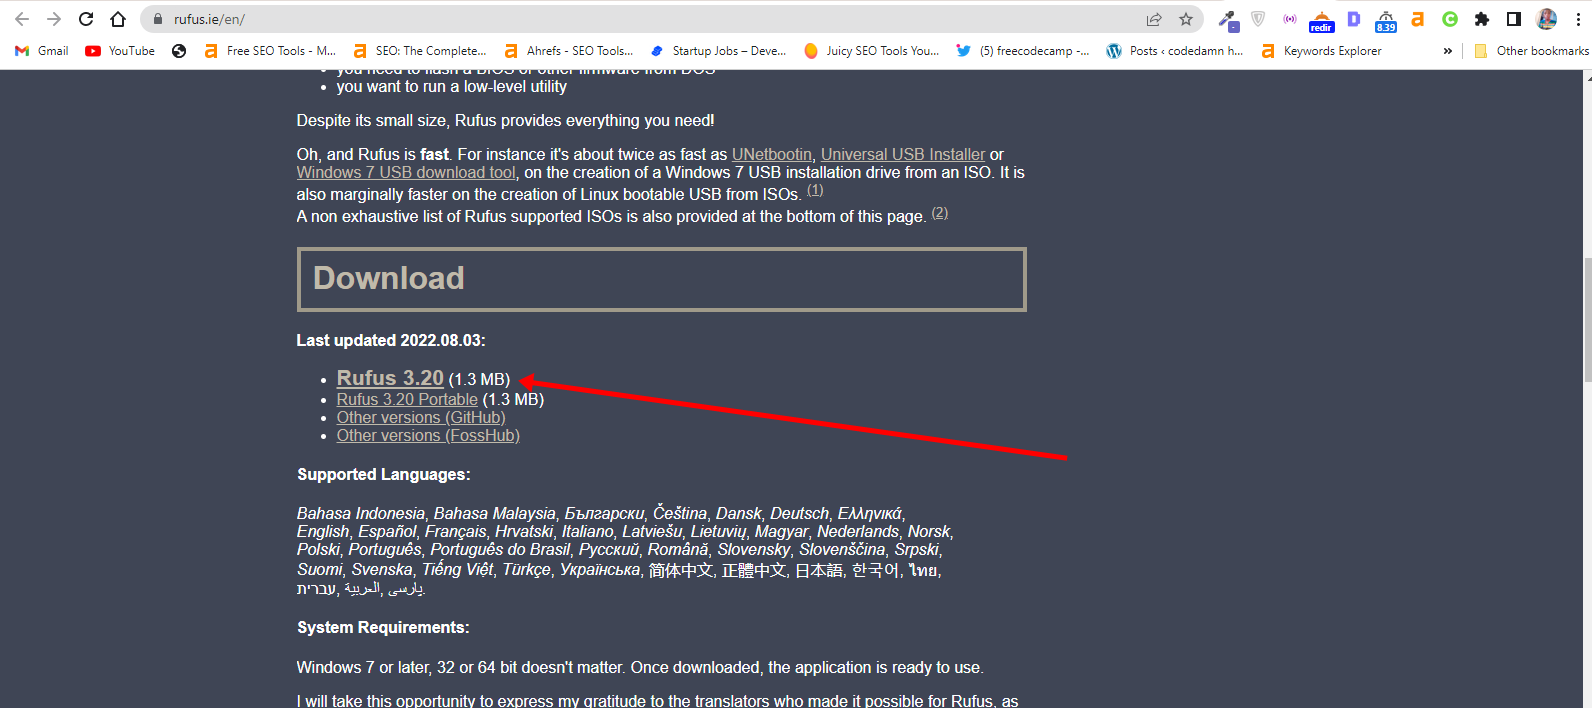
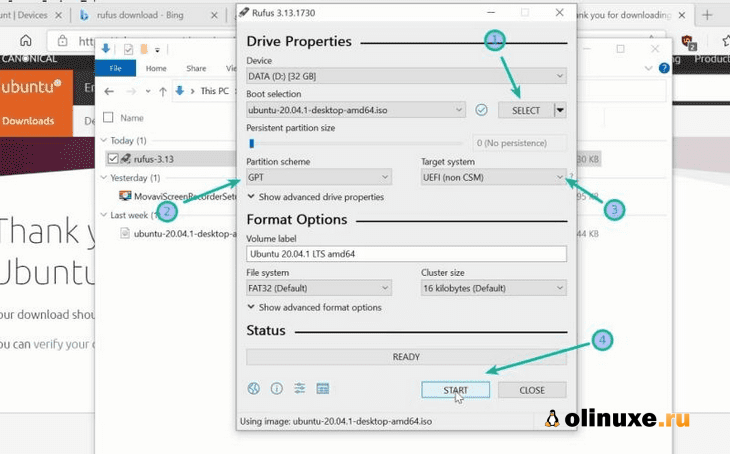
Step 1: You need to download a bootable USB drive creation tool like Rufus. You can download Rufus from their website.
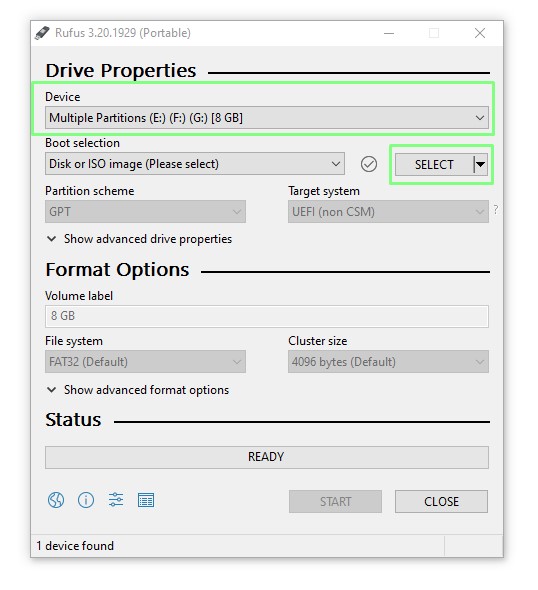
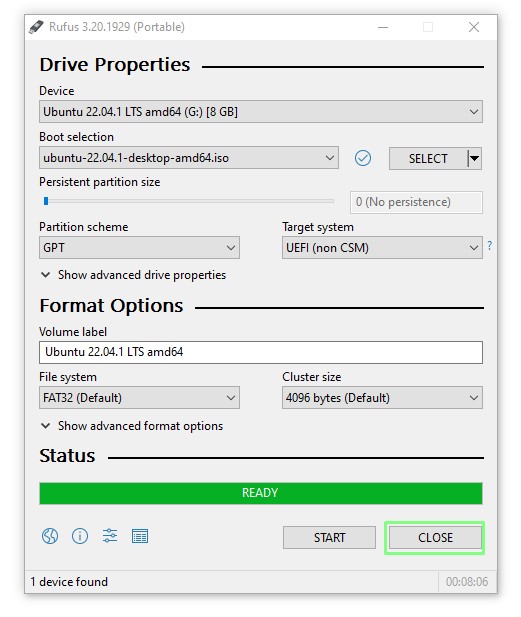
Step 2: Insert the empty USB drive into your Windows 10 PC. Right-click on Rufus and select “Open”.
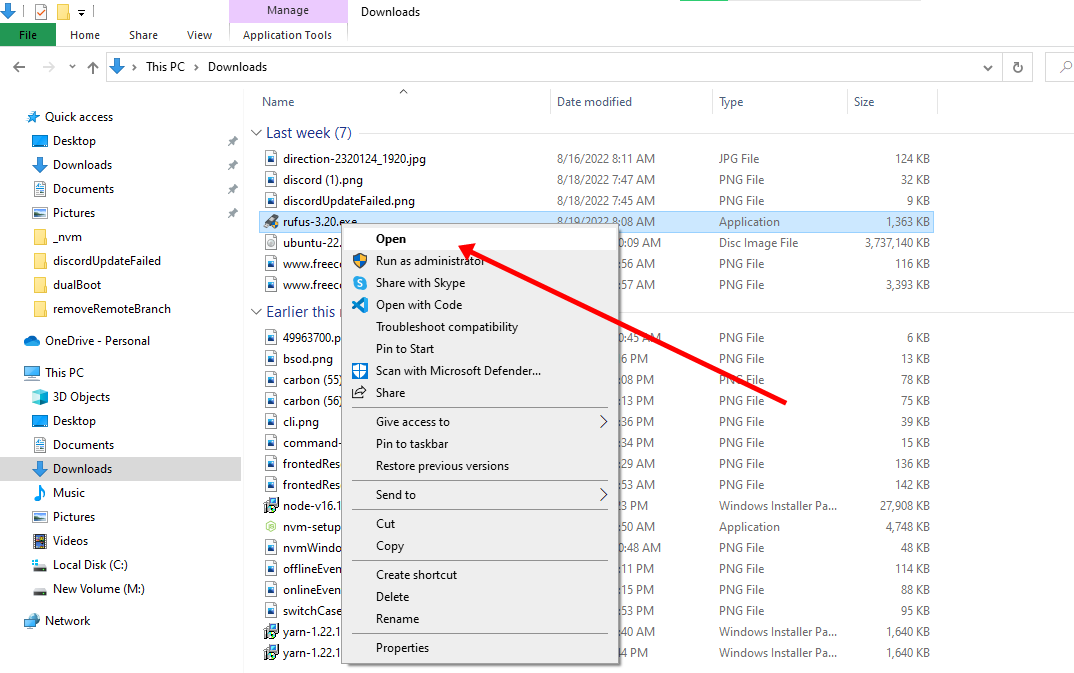
Step 3: Under “Device”, select your USB drive. And under “Boot selection”, click the “Select” button and select the Ubuntu ISO file you downloaded
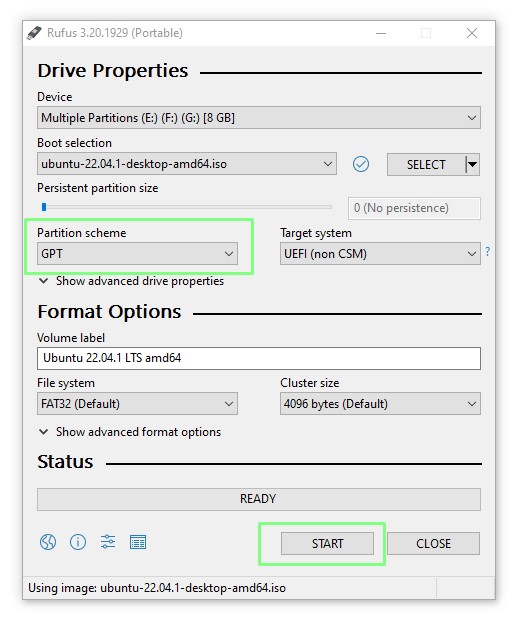
Step 4: Leave every other thing as default and click the “START” button to start burning the Ubuntu distro to the drive.

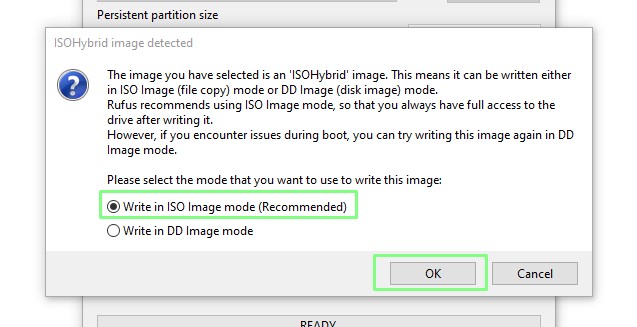
Step 5: Click OK to start the process.
Once the process is done, you should see “READY” on a green background. Click the Close button. Its time to install Ubuntu.
Congrats! Now you have a bootable drive with which you can install Linux.
The next step is to install the Ubuntu distro on your Windows 10 PC. To do this, you have to boot your PC from the bootable USB drive you created.
How to Install Ubuntu Linux Distro along with Windows 10
Step 1: Ensure the bootable drive is inserted into your Windows 10 PC
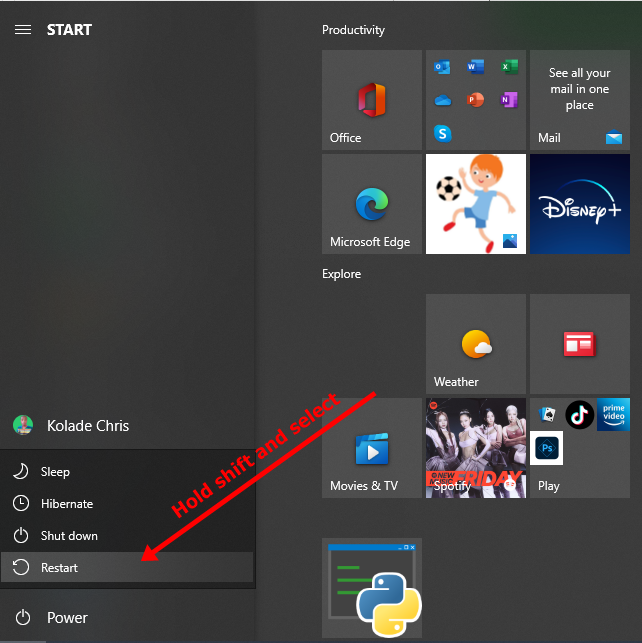
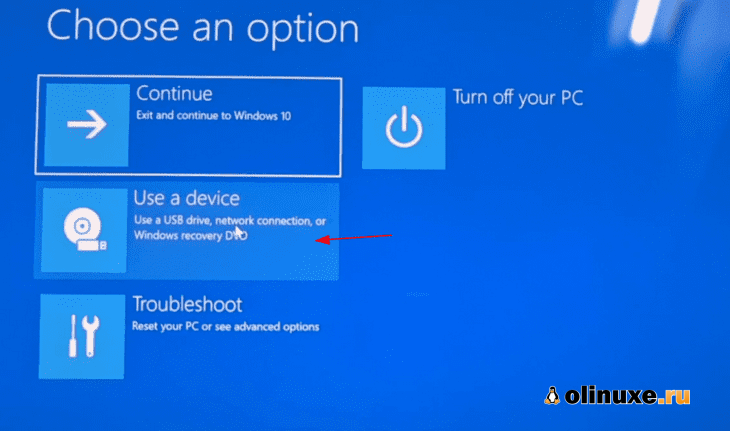
Step 2: Right-click on Start, hold SHIFT, and select Restart.
Step 2: Select “Use a Device”.
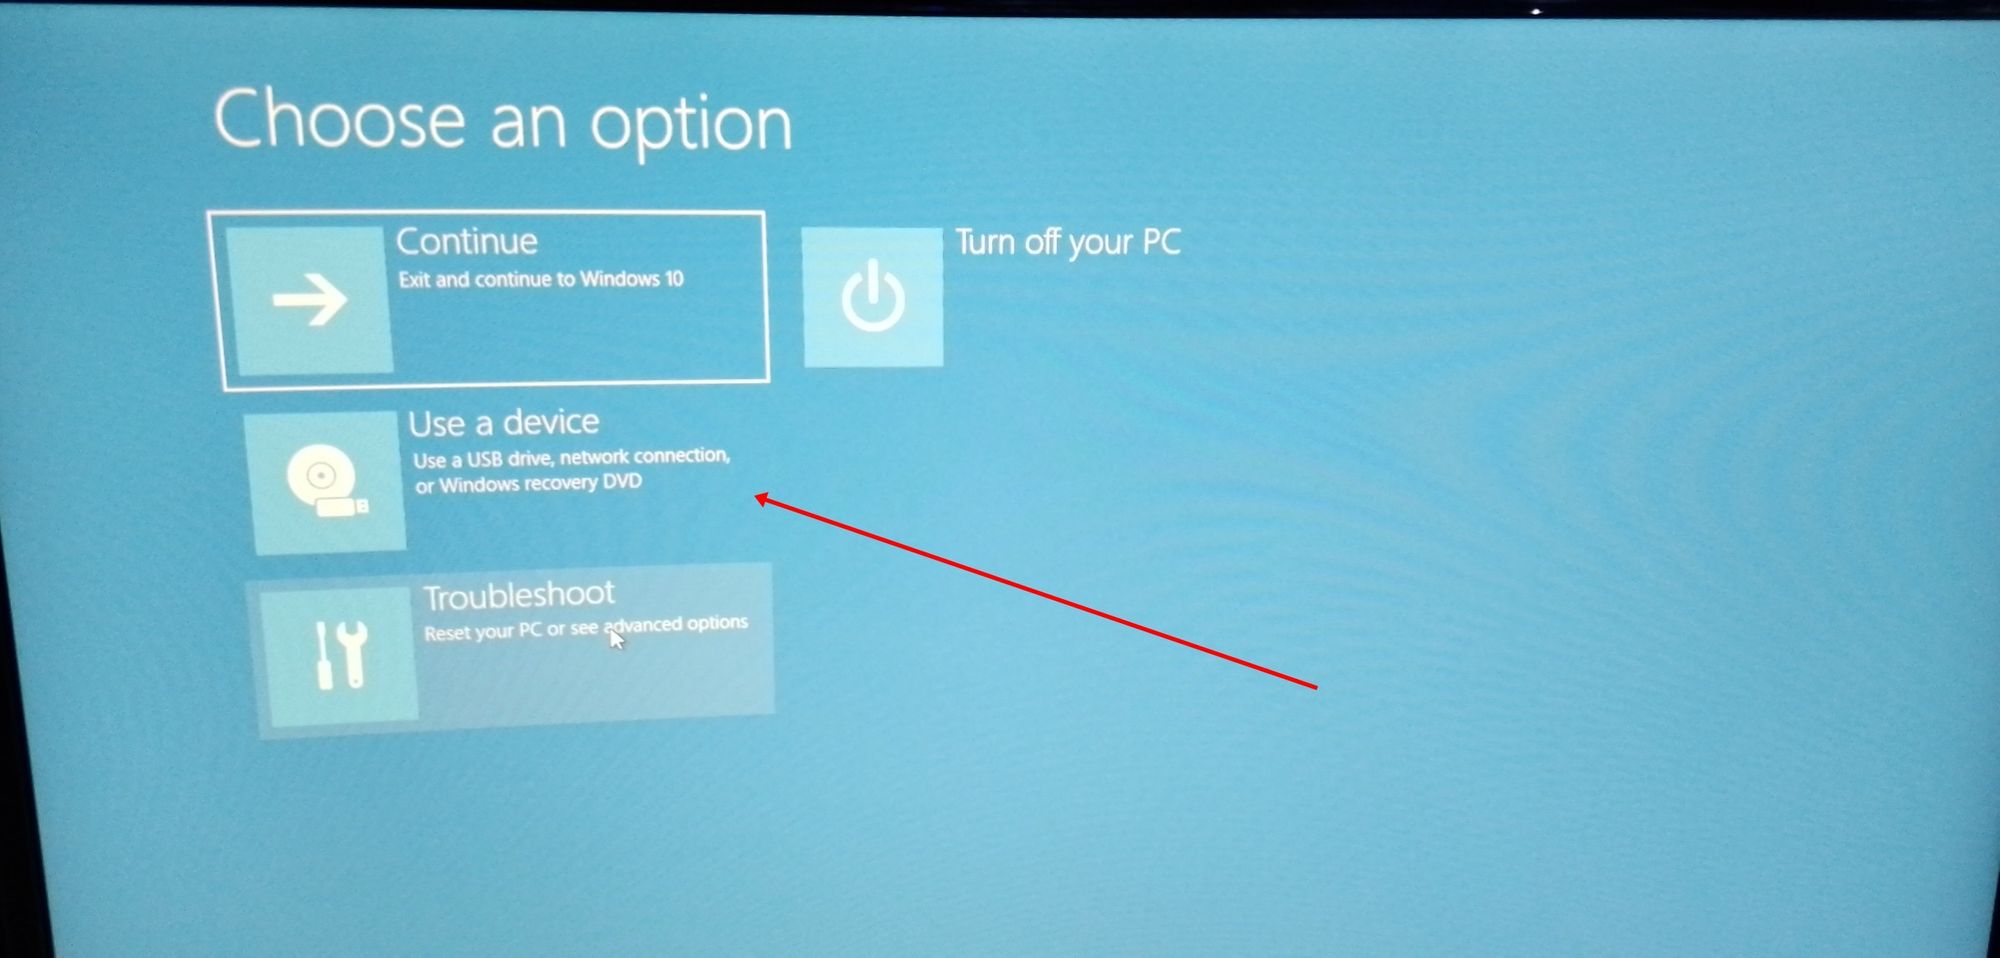
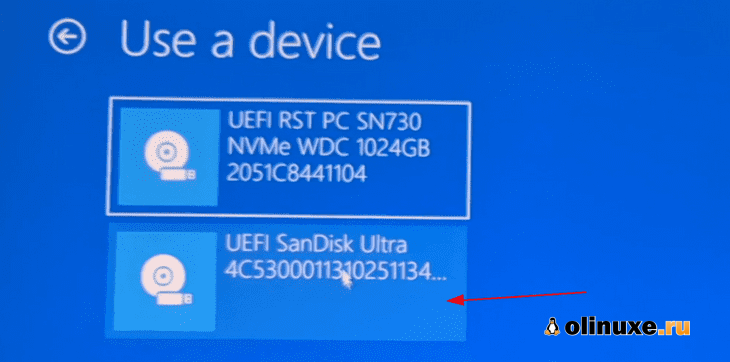
Step 3: On the next screen, you should see several devices you can boot from.
You may see the bootable drive as the name of the USB brand.
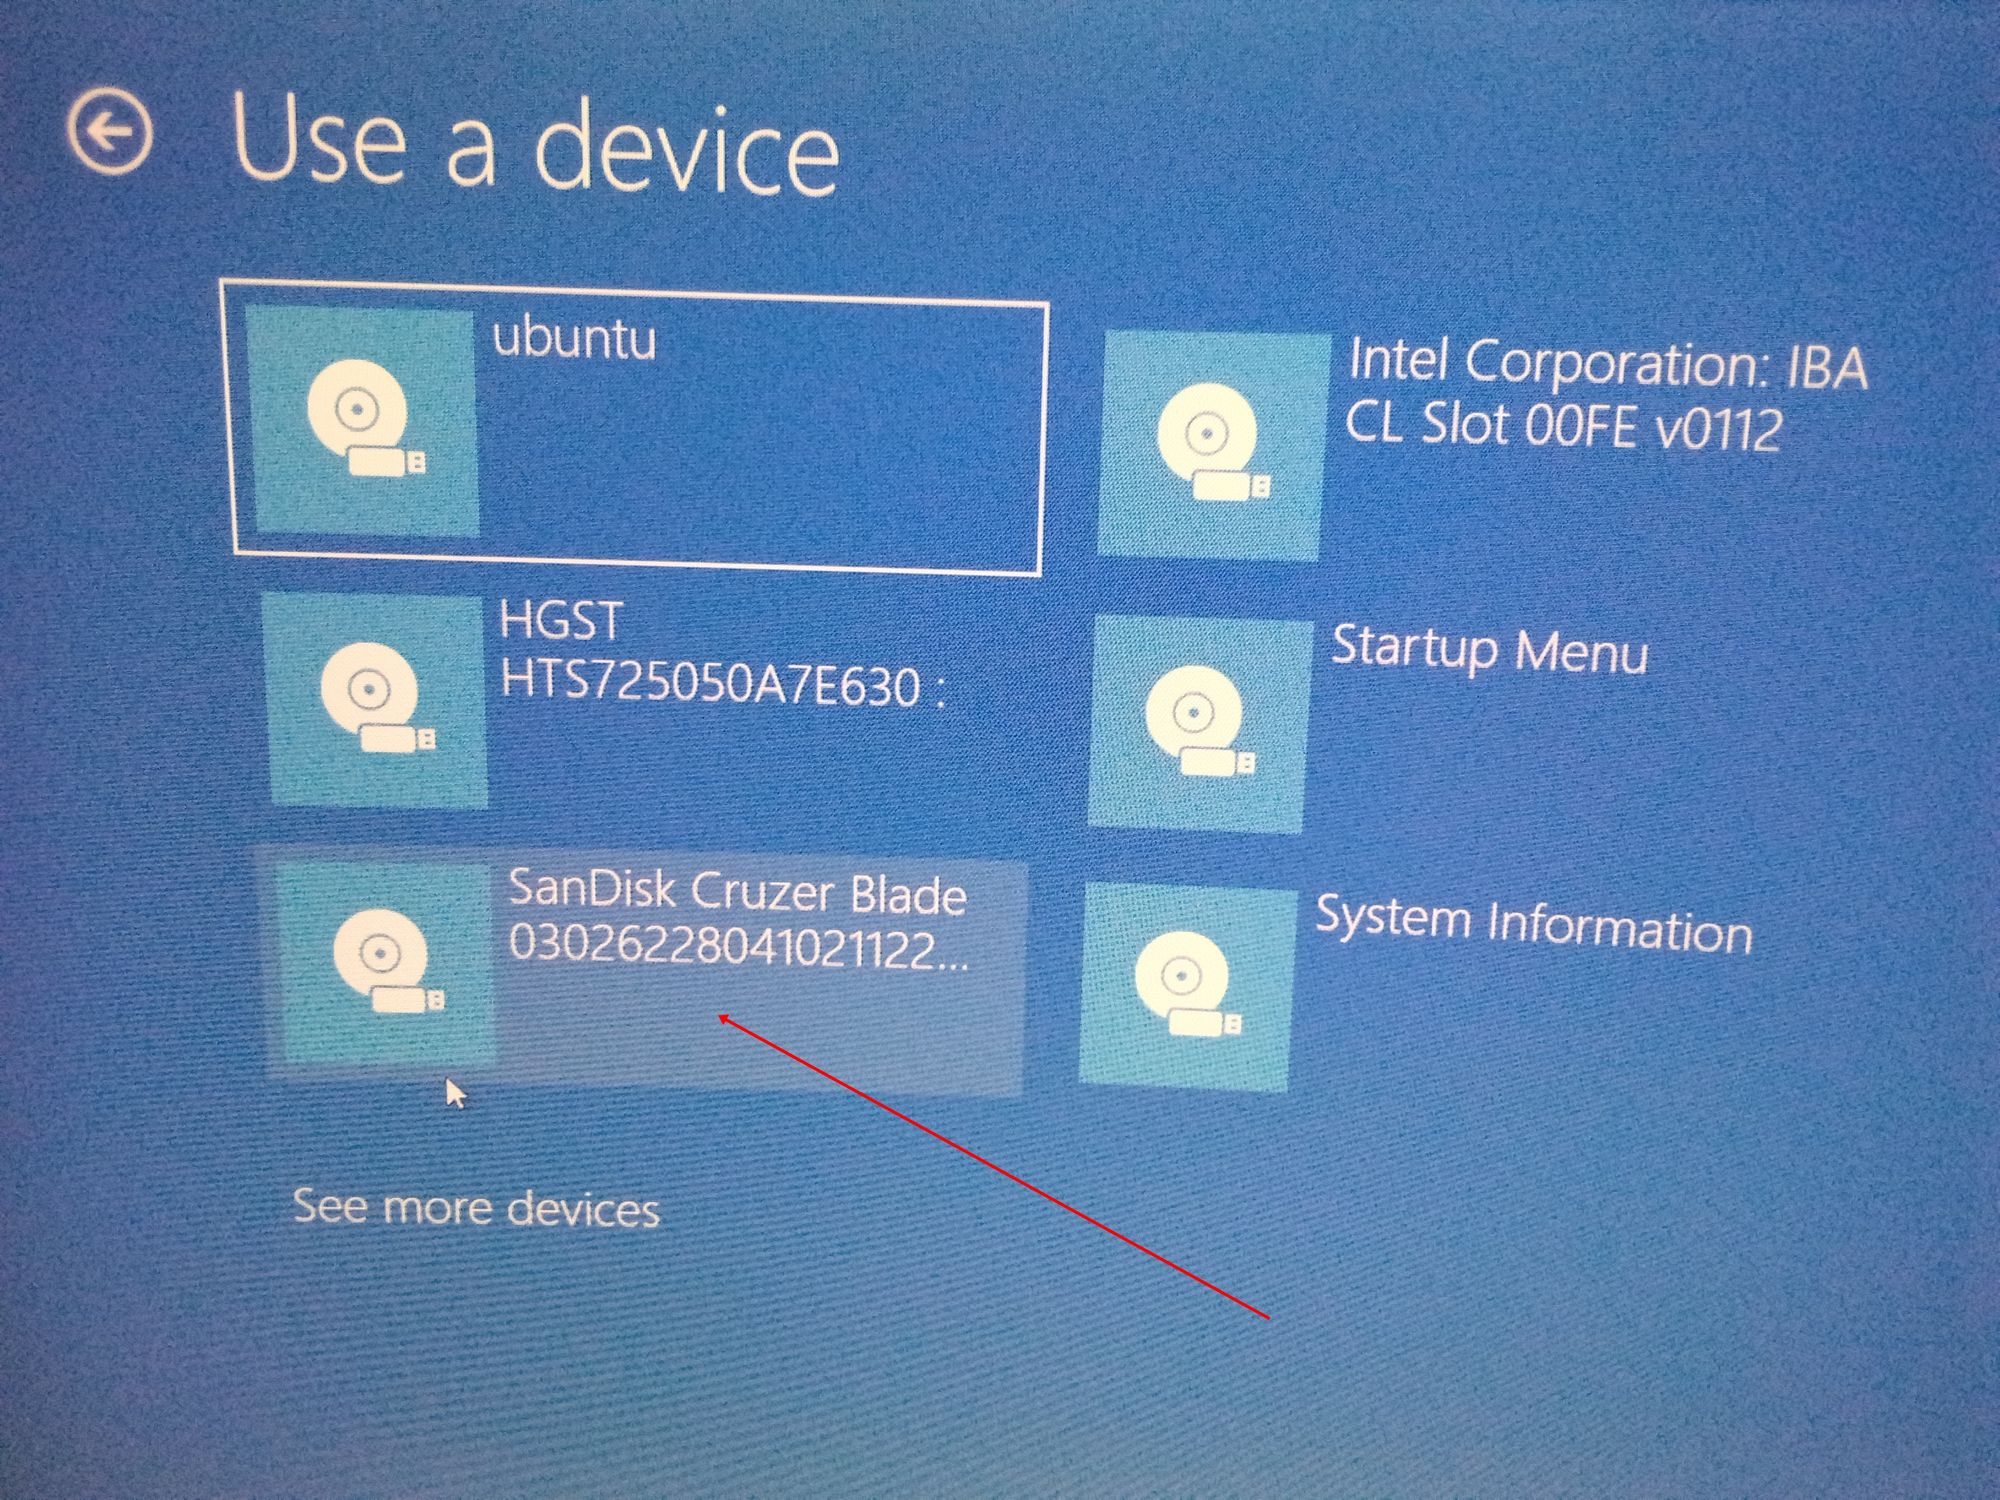
It’s possible to see it as “Ubuntu” too. Some other times, you might not see it, so you need to click on “See more devices».
If you still cannot see your bootable drive, head over to your boot menu by getting into BIOS. You will see it there.
N.B.: You should be very careful while making changes in BIOS. Whatever you do there has a lasting effect on your computer. If you are not sure of what you’re doing there, you should contact an IT professional.
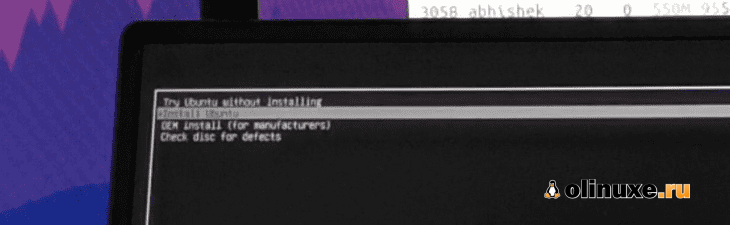
Step 4: Choose «Install Ubuntu». You can also try it before installing it.
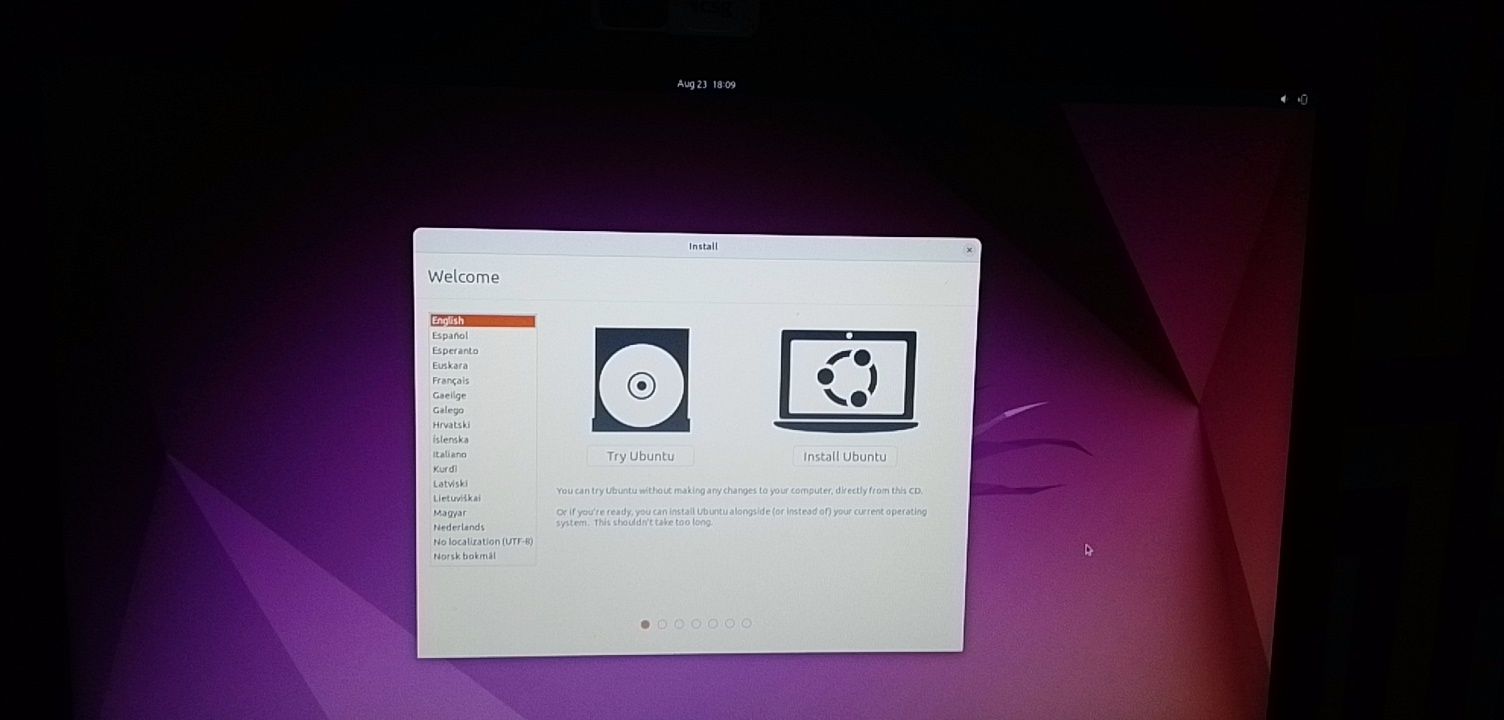
Follow other prompts of the installation wizard and make sure you don’t replace your Windows 10 OS installation with Ubuntu. This is why I suggested you back up all your files.
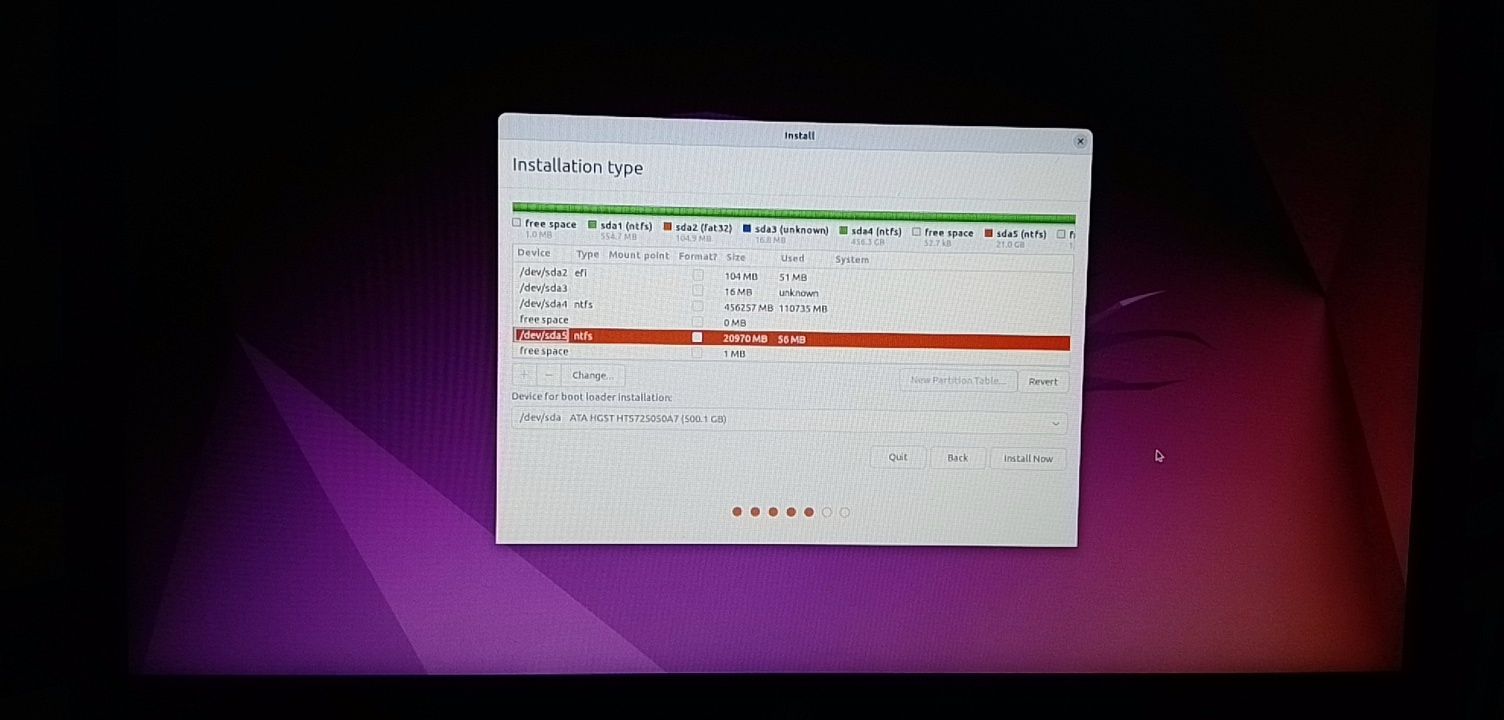
When you get to the point to select the partition you made, scroll to the partition you made earlier and press ENTER.
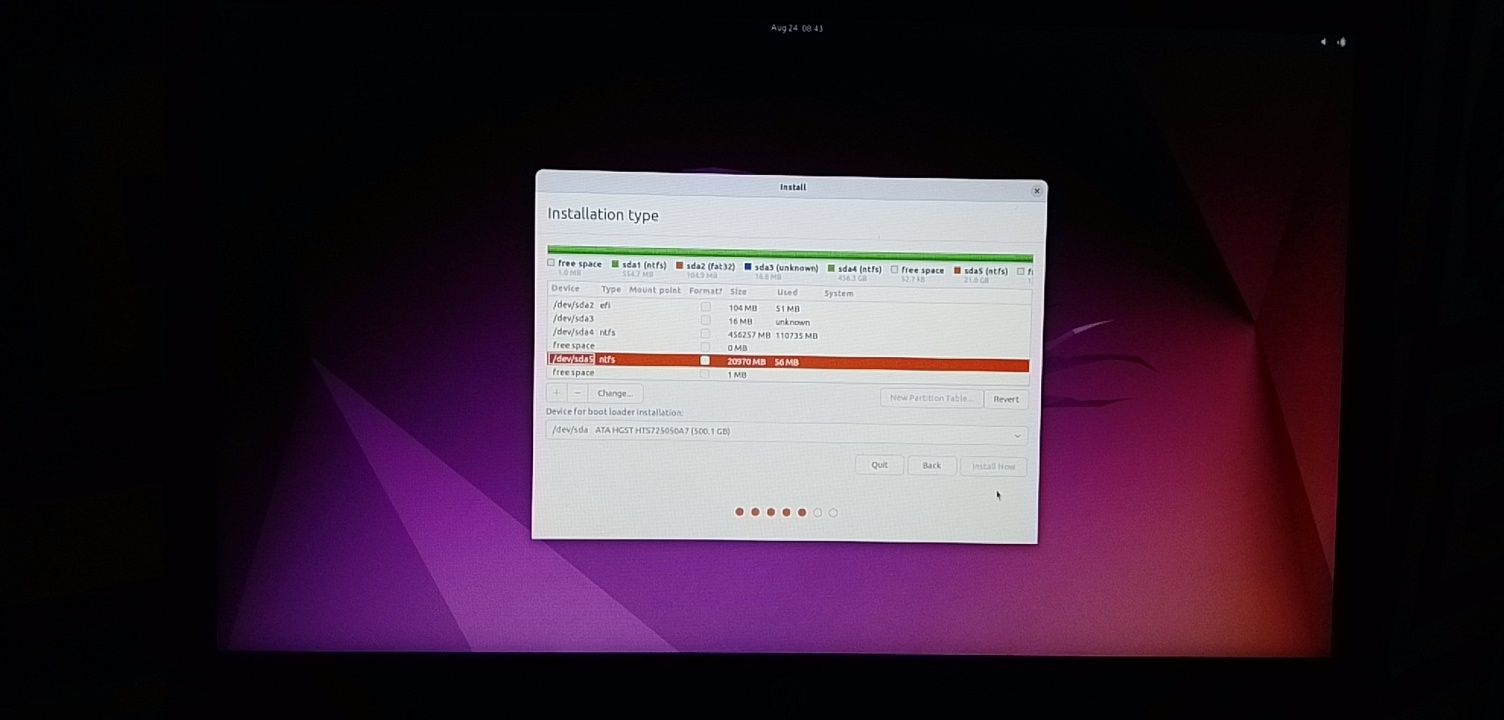
Click OK to select all the space in the partition.
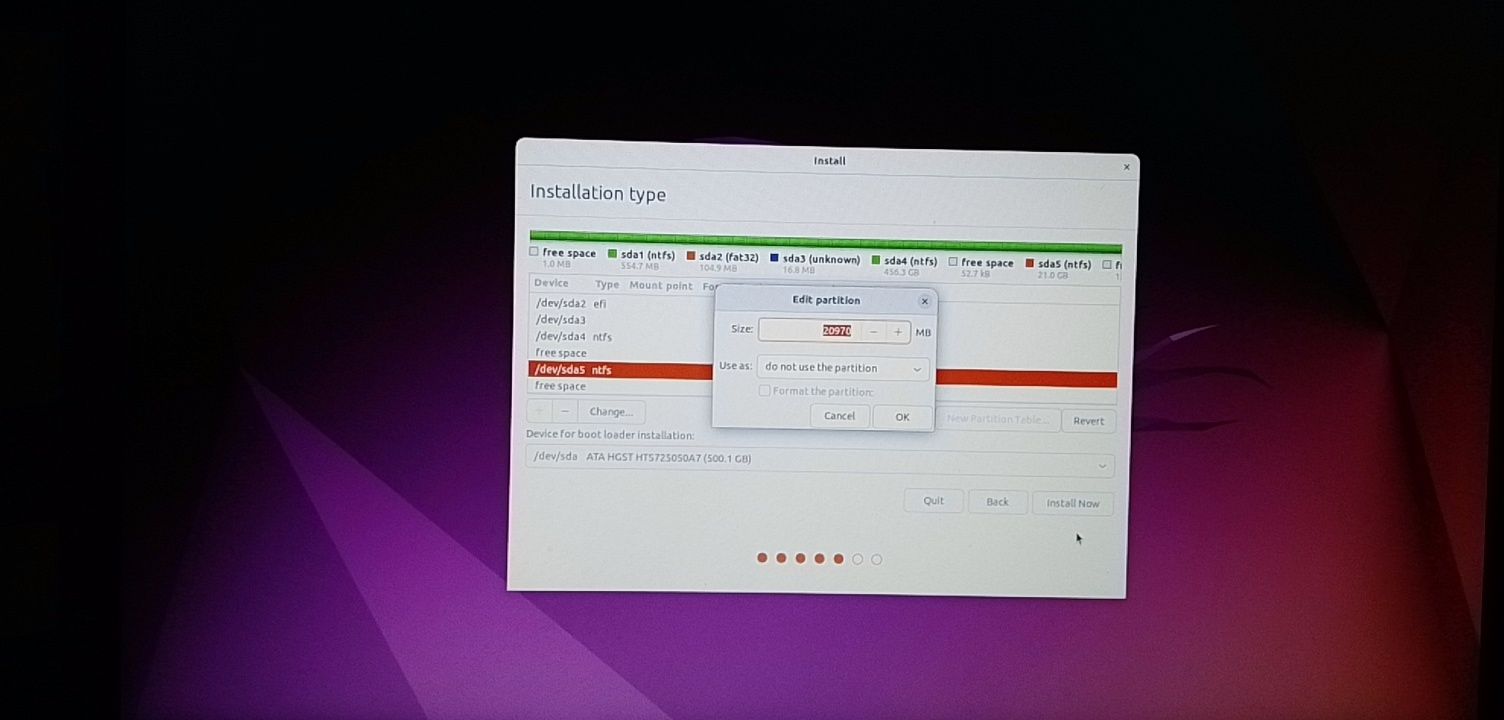
This time around, the “Install now” button will not be greyed out anymore.
Follow other prompts until Ubuntu starts installing.
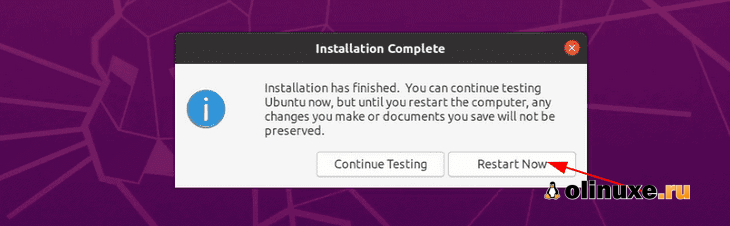
After the installation is done, Ubuntu will prompt you to remove the bootable drive and press ENTER to reboot your Computer.
Now You Can Dual Boot Ubuntu and Windows 10
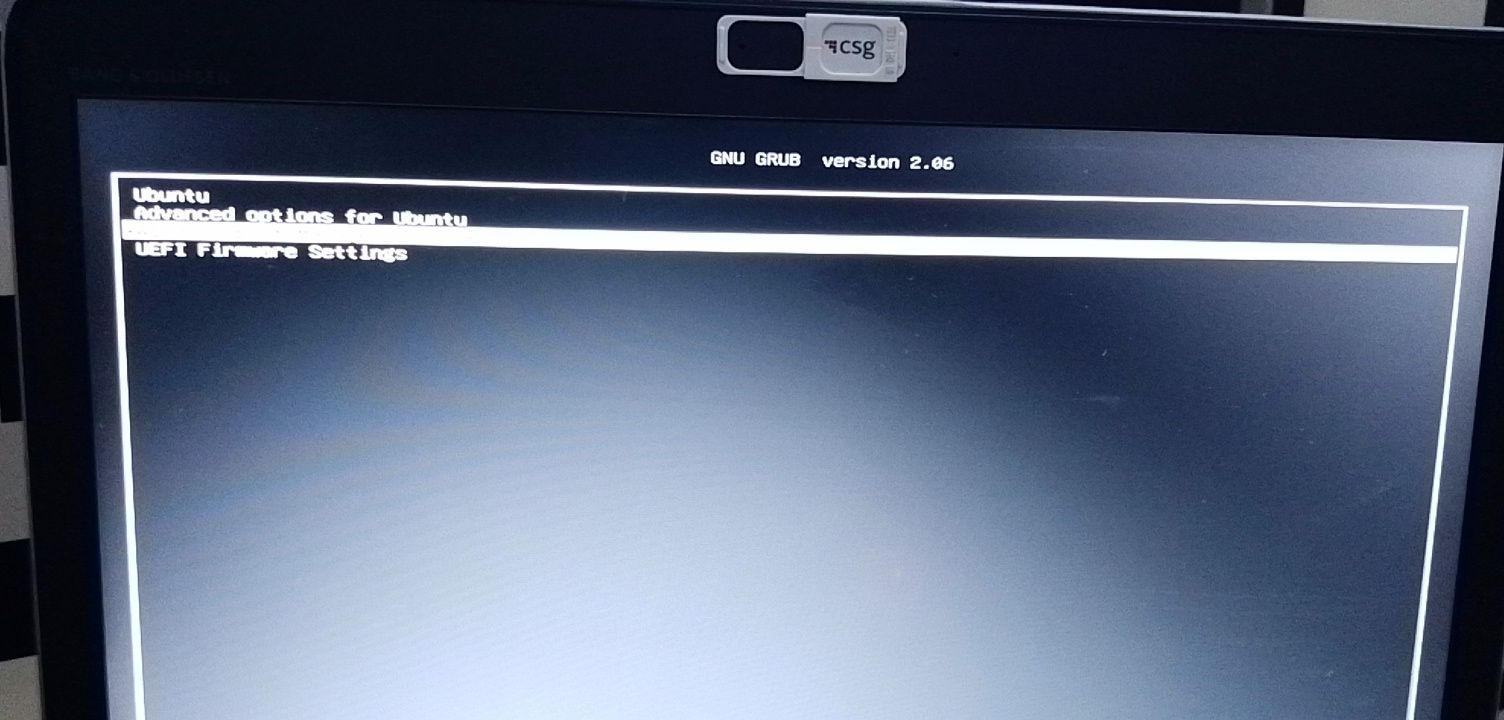
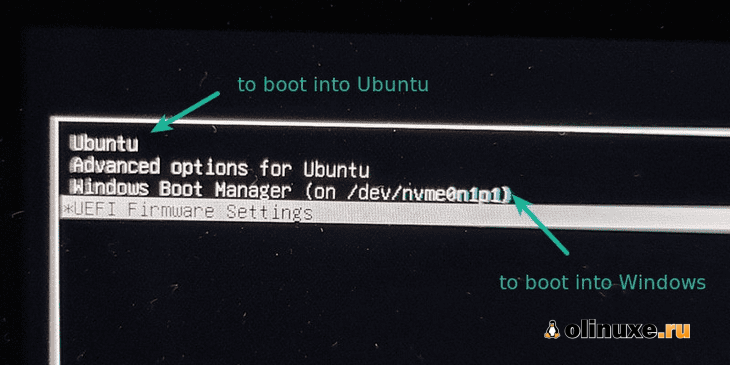
Immediately after you reboot the computer, you should see a screen that looks as shown below:
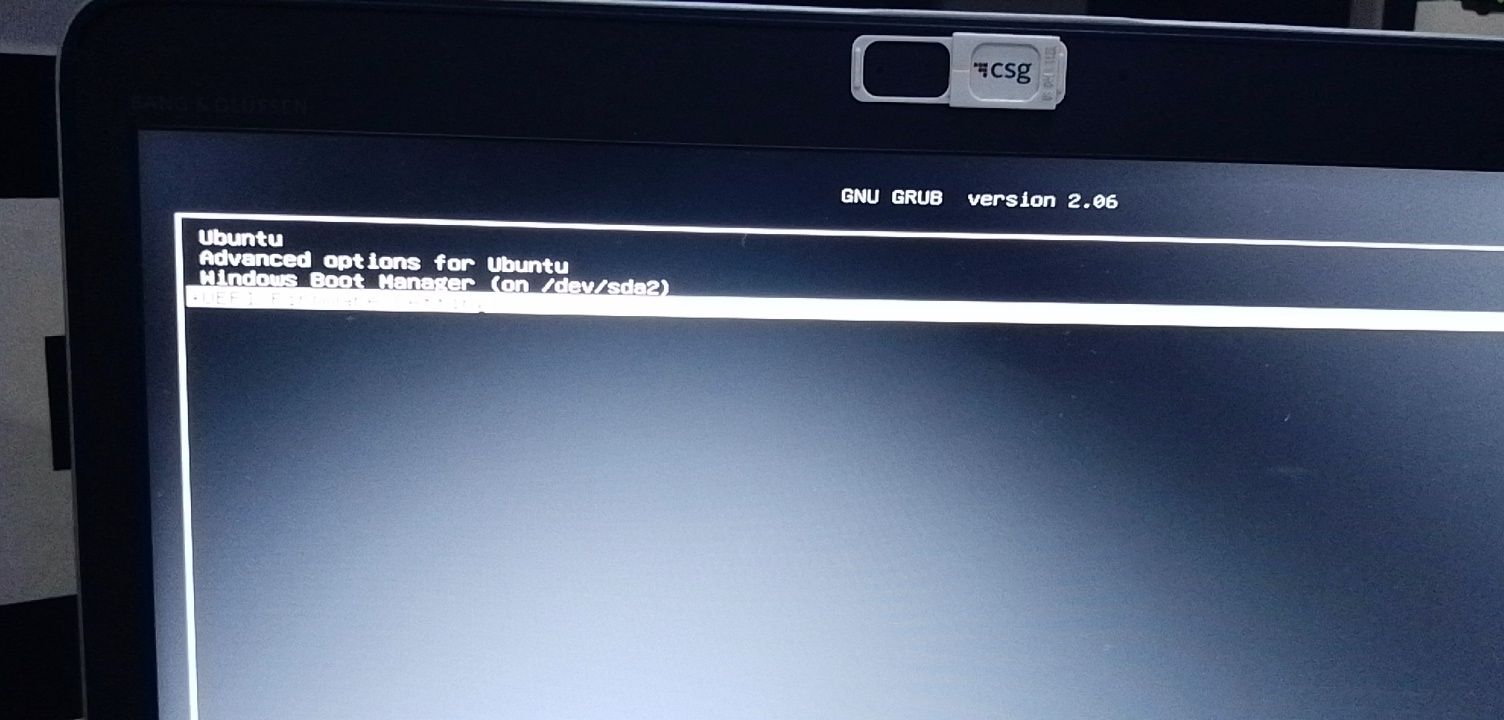
Now, you can select which one to boot into between Ubuntu and Windows 10.
To boot into Ubuntu, select Ubuntu. And to boot into Windows 10, select Windows boot manager.
You can also get into your BIOS from the same place by choosing UEFI Firmware Settings.
Conclusion
I hope this article helps you dual boot Ubuntu and Windows 10 on your computer.
The ultimate aim of this article was to show you how to dual boot Ubuntu and Windows 10.
But the article went beyond that to show you how to:
- check if your PC’s BIOS is in UEFI mode
- partition your hard drive
- optimize your hard drive
- make a bootable USB drive
- install Ubuntu Linux Distro along with Windows on your Windows 10 PC.
If you find this article helpful, kindly share it with your friends and family.
Learn to code for free. freeCodeCamp’s open source curriculum has helped more than 40,000 people get jobs as developers. Get started
Taking your first steps into the world of Linux can be a scary proposition. After all, we have a whole new world of terminal commands, desktop environments and applications to learn. Thankfully Linux installation has improved leaps and bounds from the earliest text based installers used in the late 1990s (Debian and Slackware) via graphical installers in the early 2000s (Corel Linux, Mandrake). From the 2010s we have seen better graphical installers providing reassurance as we test out Linux.
The first steps into Linux fall under two paths. A single board computer such as the Raspberry Pi. Or more traditionally a dual boot setup, where Windows and Linux are installed to the same machine, often on the same boot drive. Using a custom boot menu, GRUB, we can choose between the two operating systems when we power on our PC.
In this how to, we shall learn how to dual boot Linux with Windows, using Ubuntu and Windows 11. The steps are the same with Windows 10 or with
Creating a Linux Install USB
Our Linux distro is typically downloaded as an ISO image (ISO originally being referred to as CD / DVD sized images) of a live Linux OS that we can test on our machine. To use the ISO with a UEFI / Secure Boot system we need to use Rufus, a popular free utility that writes ISO files to USB Flash drives.
Our goal is to create a bootable USB stick containing our chosen Linux OS. A minimum capacity of 8GB is recommended for your USB drive.
For this project you will need
- Computer running Windows 10 / 11 (We tested with Windows 11)
- USB Flash drive, 8GB or larger
- Linux distro (we chose Ubuntu)
1. Download and install Rufus for your operating system.
2. Insert a USB drive into your machine and open Rufus.
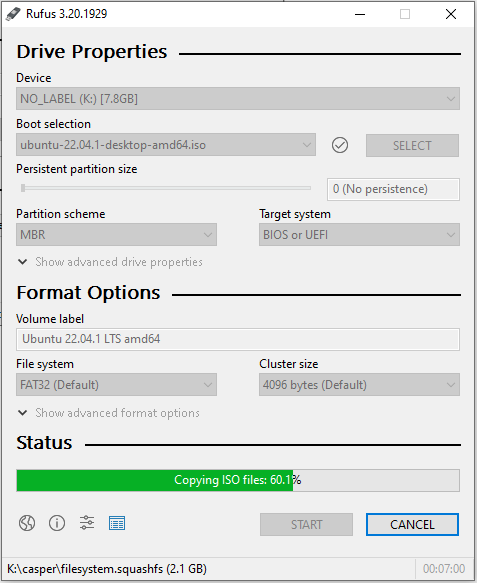
3. Select your USB drive using Device, and then click SELECT and select the Linux OS that you wish to install. In our case it was Ubuntu 22.04.1.
4. Select the GPT partition scheme and click START to write the OS to the USB drive. GPT is the latest partition scheme and necessary for installing Ubuntu on a UEFI system. It is gradually replacing MBR.
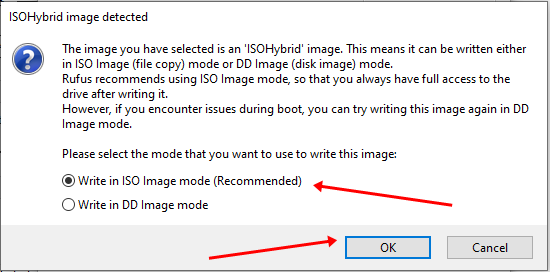
5. When prompted select “Write in ISO image mode” and click OK.
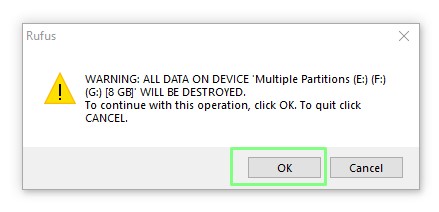
6. Read and understand the prompts to ensure that Linux OS will be written to the correct drive. There is no going back should you make a mistake.
7. Click CLOSE to exit Rufus and remove the USB drive from the machine.
How to Install Linux for Dual Boot
The Linux installer has come a long way. Gone are the old days of scary user interfaces and in their place are inviting and easy to use installers that guide you through the process. We’re going to use the Ubuntu 22.04.1 installer to split our 256GB NVMe drive in half. Giving Windows and Ubuntu enough space for a basic dual boot install. Then we will follow a typical Ubuntu installation.
1. Insert the USB drive into your computer and boot from it. Each computer is a little different, Some will offer a function key to select a boot device, some need to be selected from the BIOS.
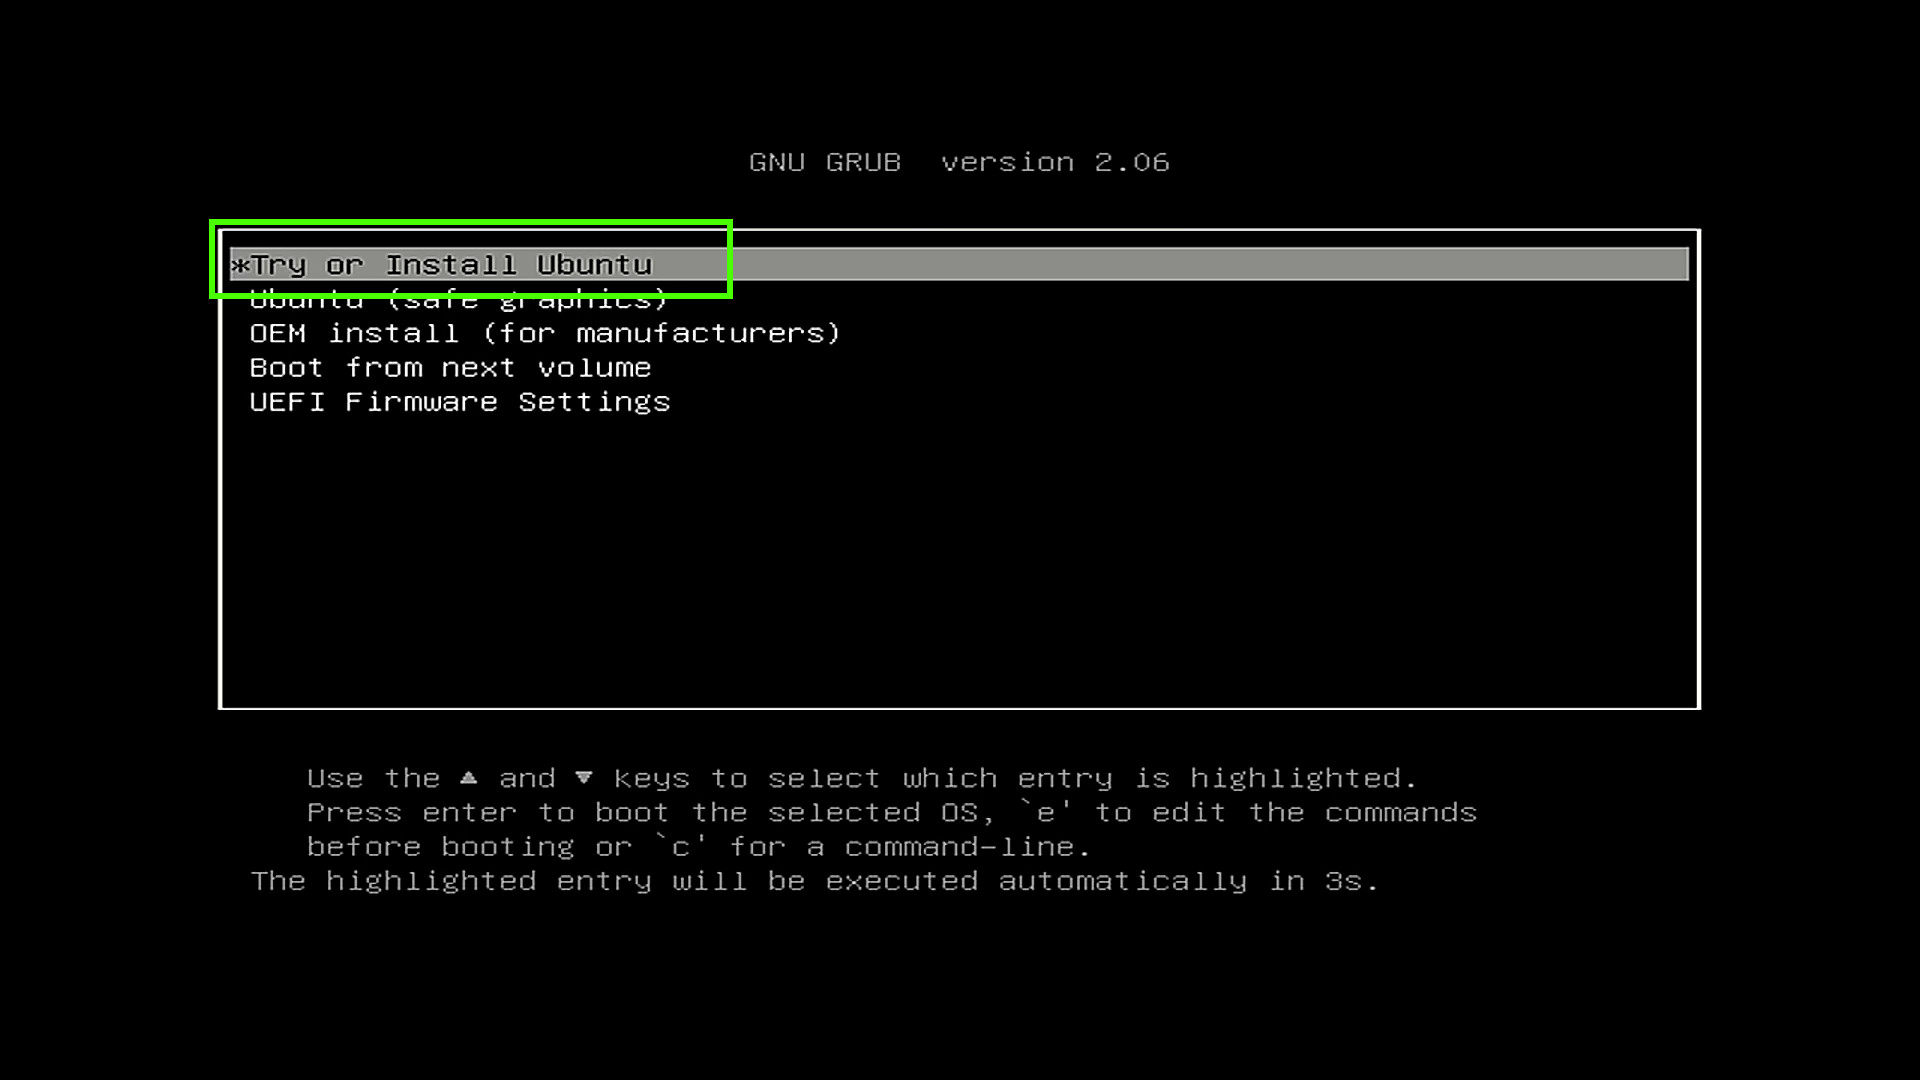
2. From the GRUB menu select “Try or Install Ubuntu” (or your Linux OS of choice) and press Enter . The GRUB menu is a custom boot menu used on Linux devices. It can also be customized to show a background image.
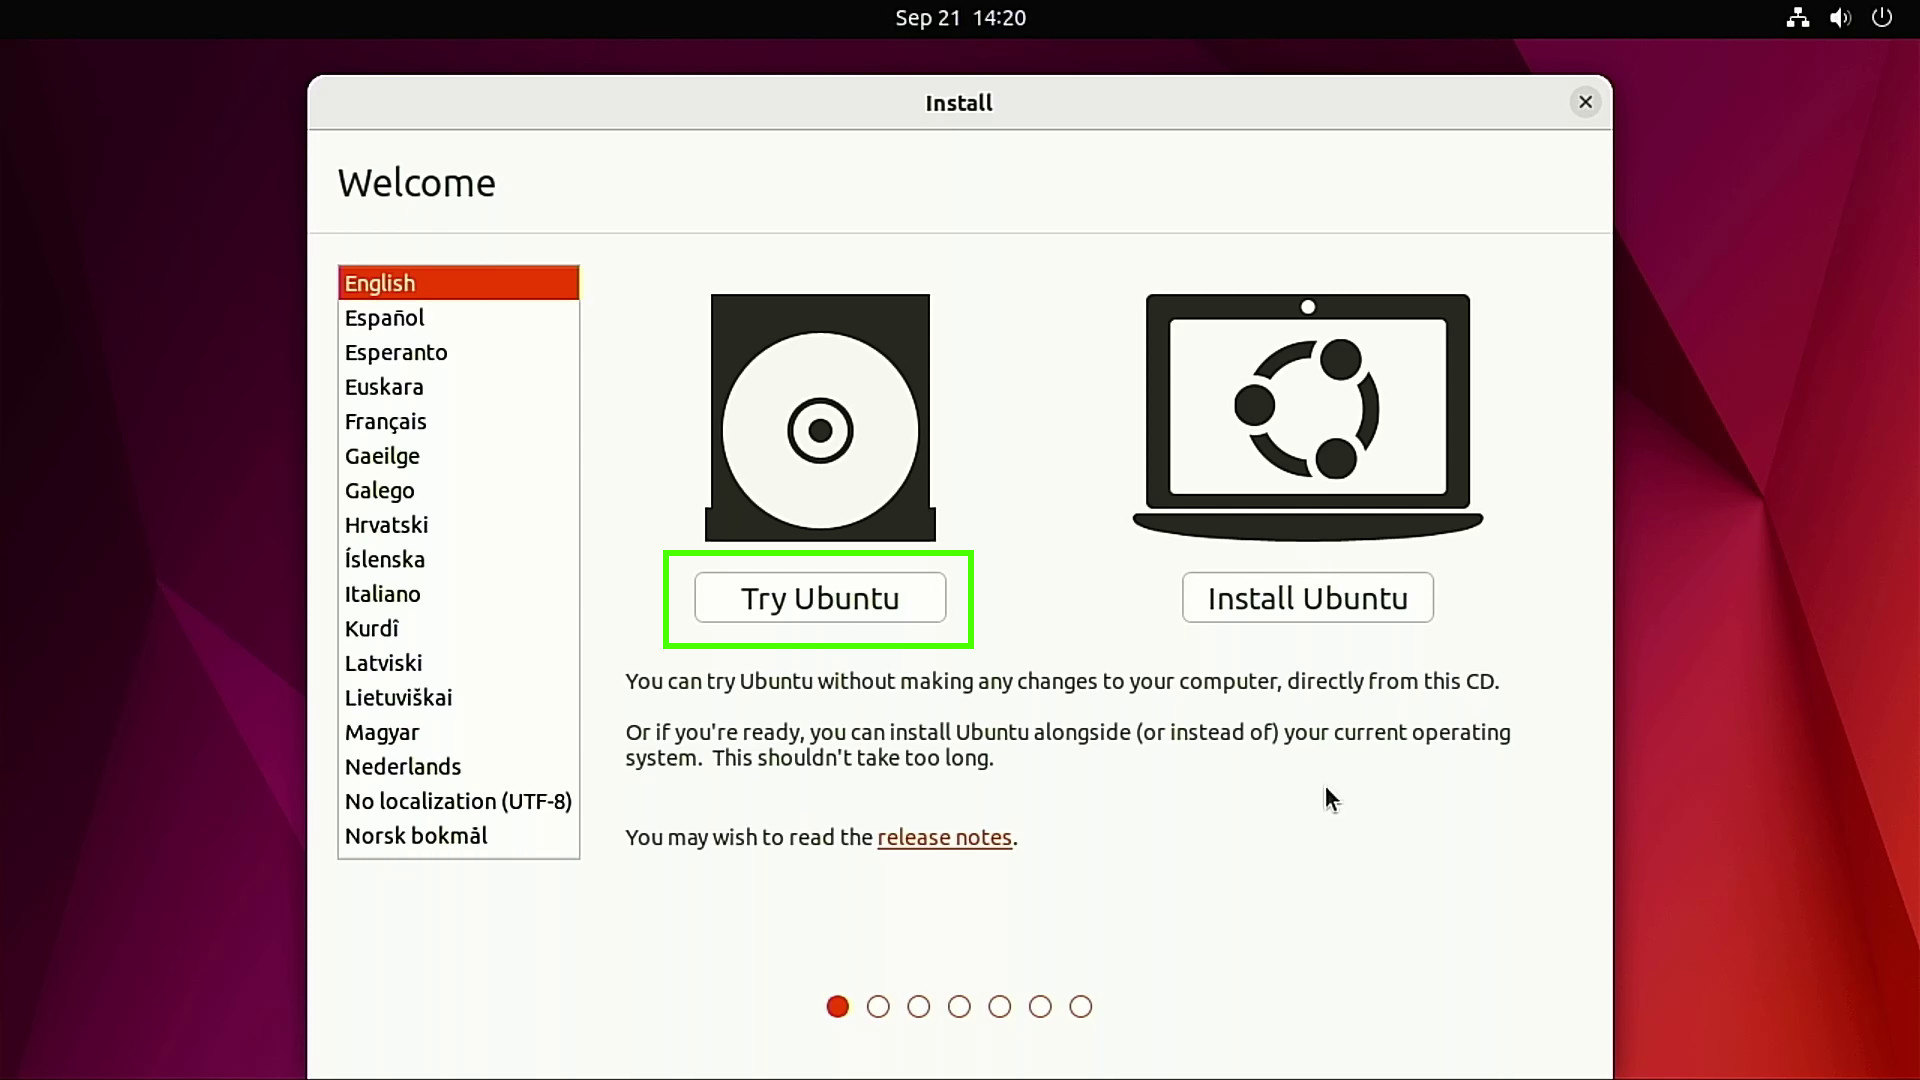
3. When prompted, click Try Ubuntu to load the OS into RAM as a “Live Distro”. Live Distros give us enough of the operating system to test on our machine without making any changes to the system. They are also useful as recovery devices to boot broken computers.
4. Test your hardware to make sure that everything you need is working. Check audio, Wi-Fi, Bluetooth etc before moving onwards.

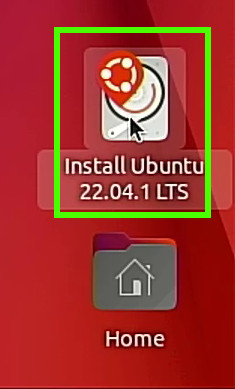
5. Double click on the Install icon to launch the installer application.
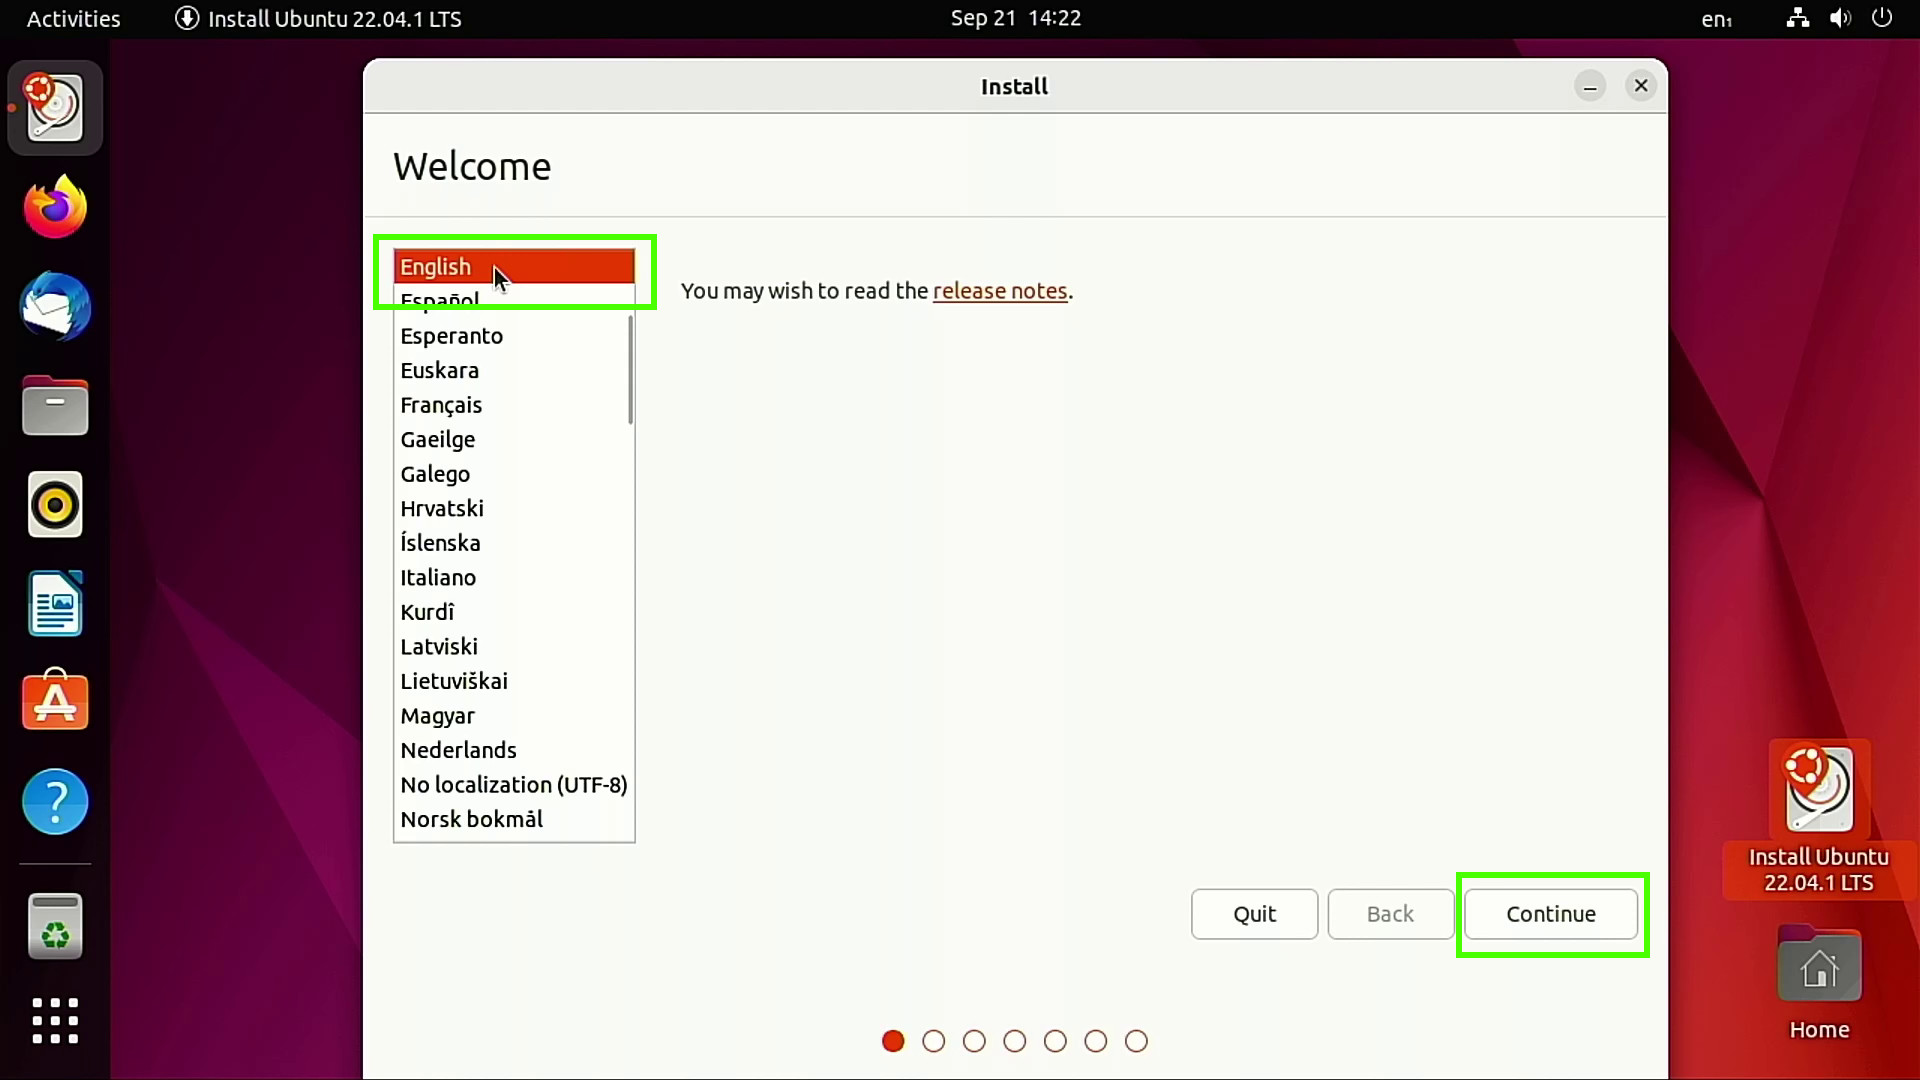
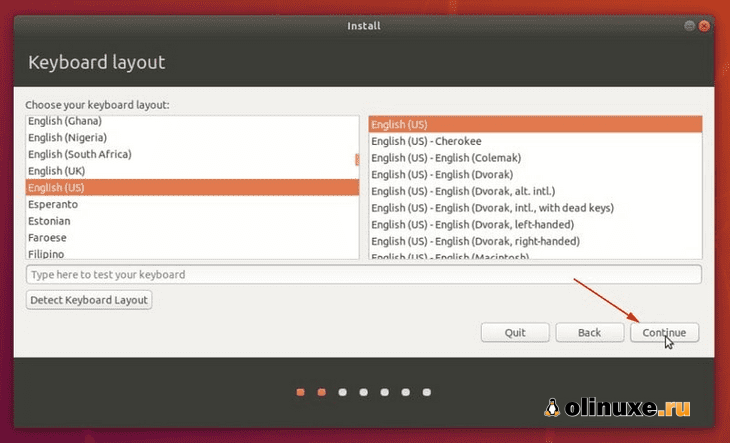
6. Select your language and click Continue.
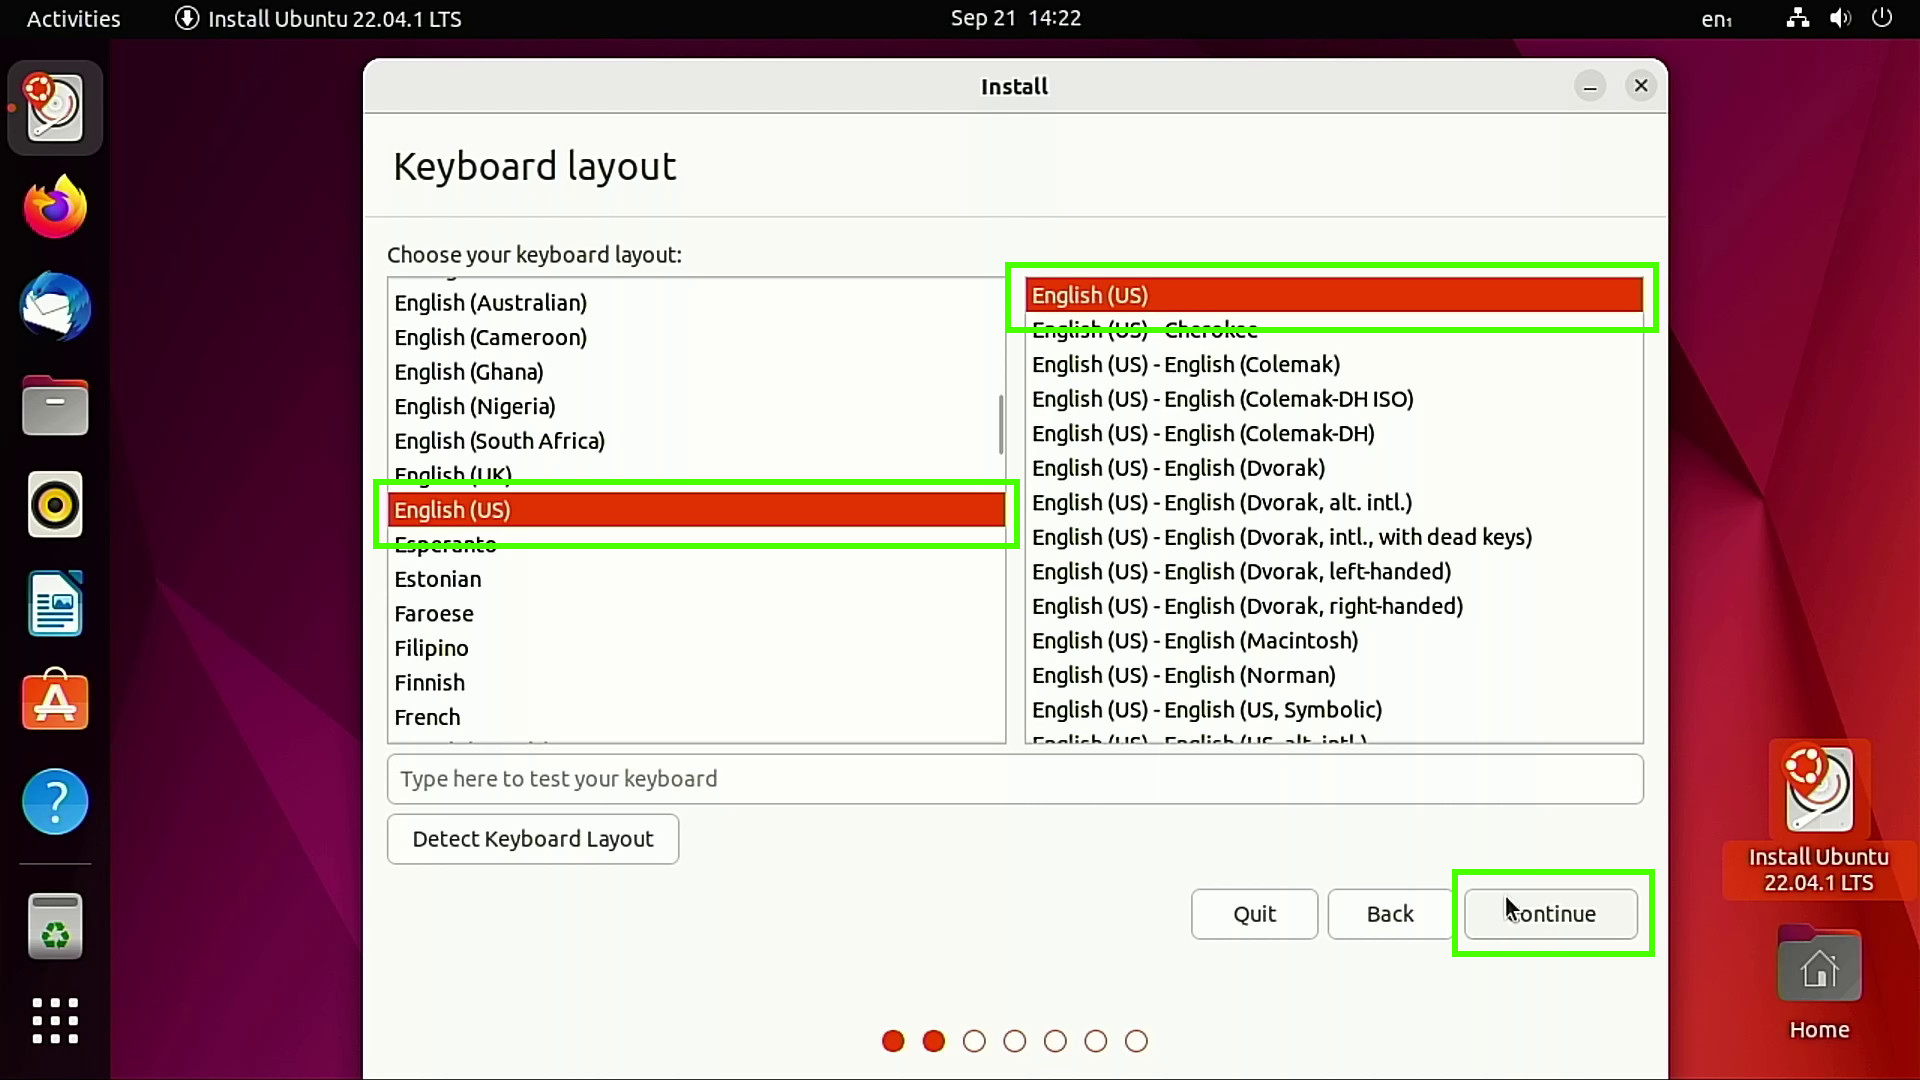
7. Select your preferred keyboard layout and click Continue.
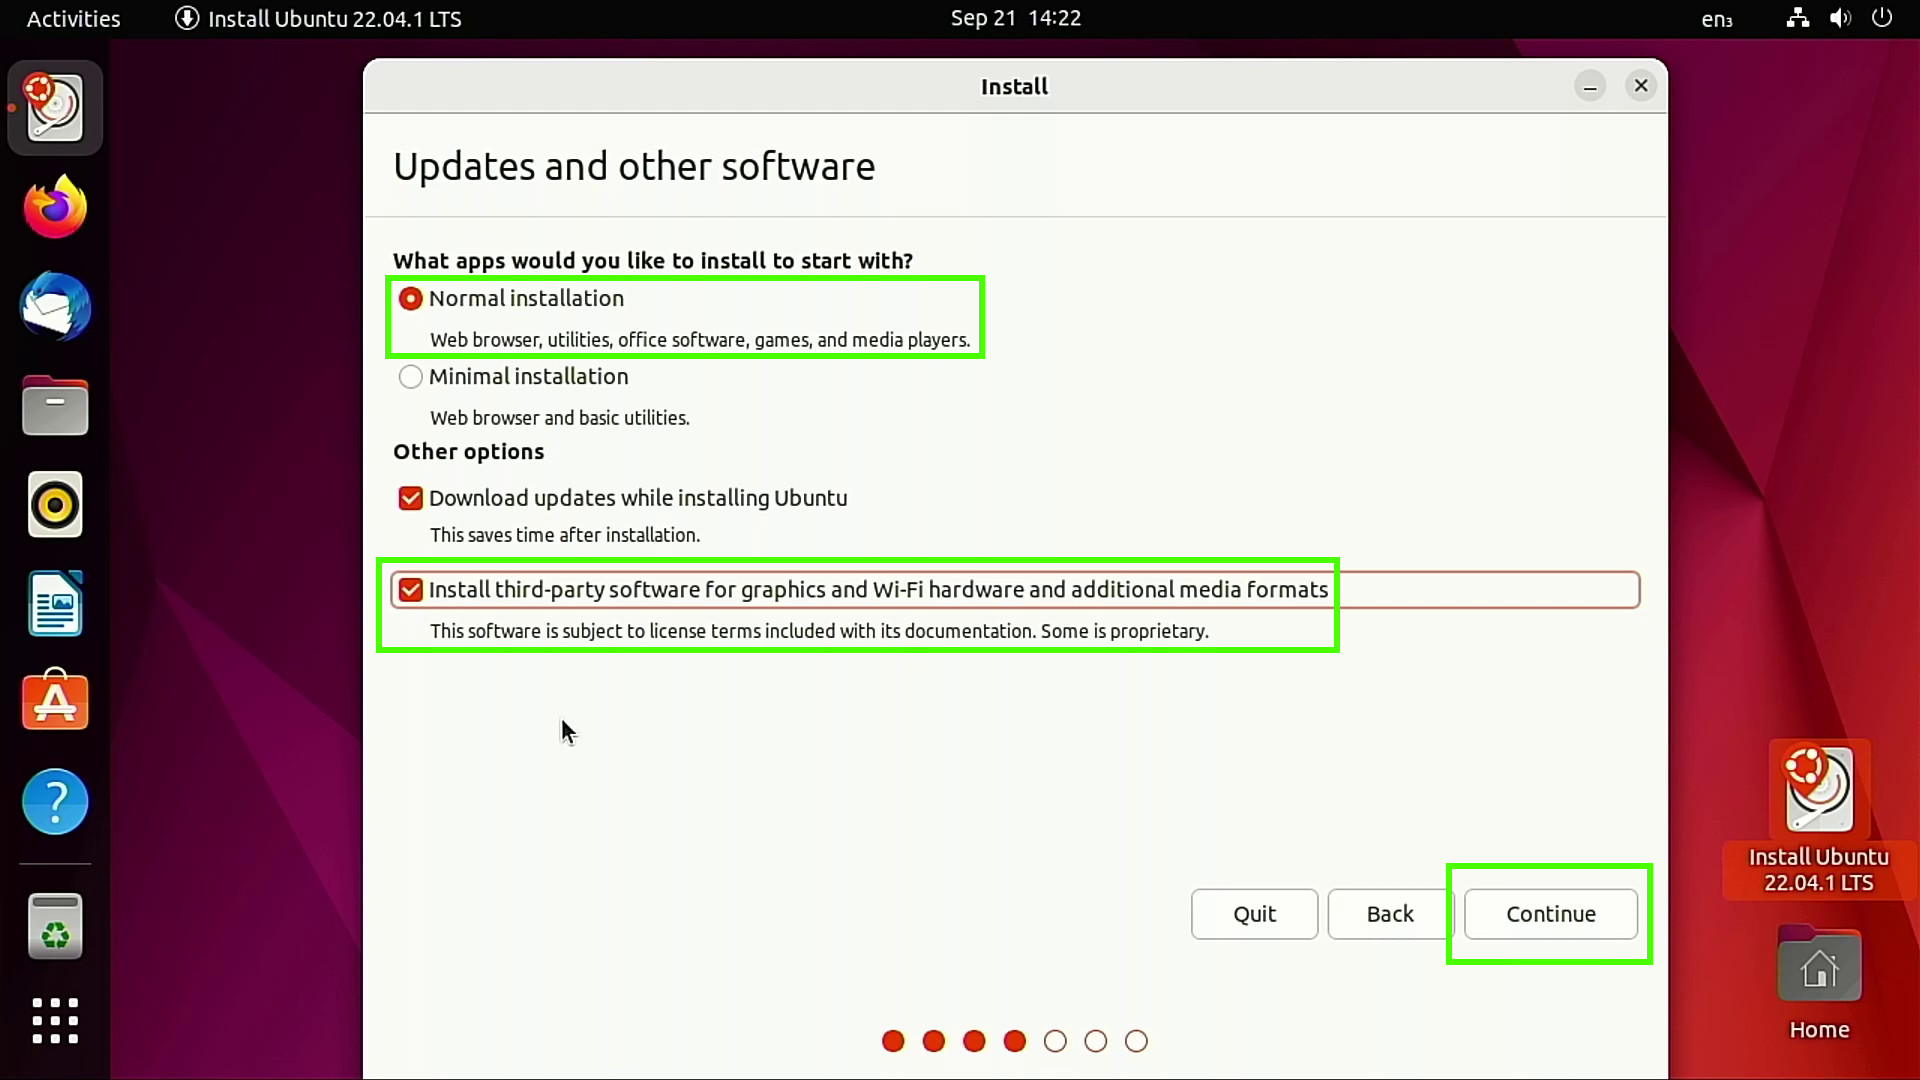
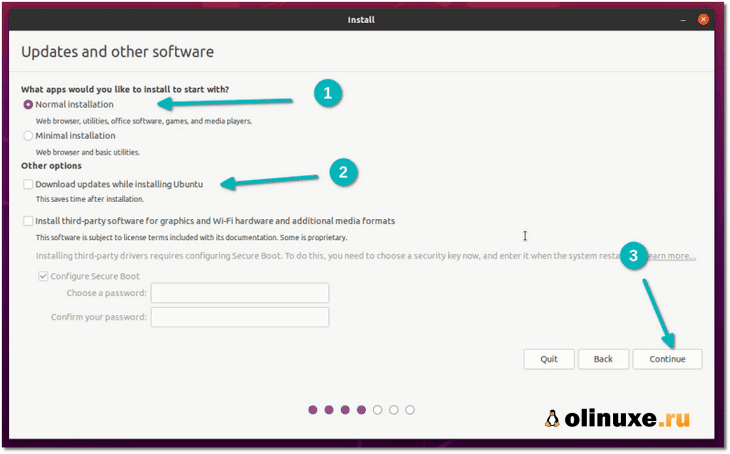
8. Select a Normal Installation and optionally install third-party software, then click Continue. Third-party software includes drivers and applications which may not match the permissive license used by your Linux distro. If you would like to know more, check the website of your chosen Linux OS.
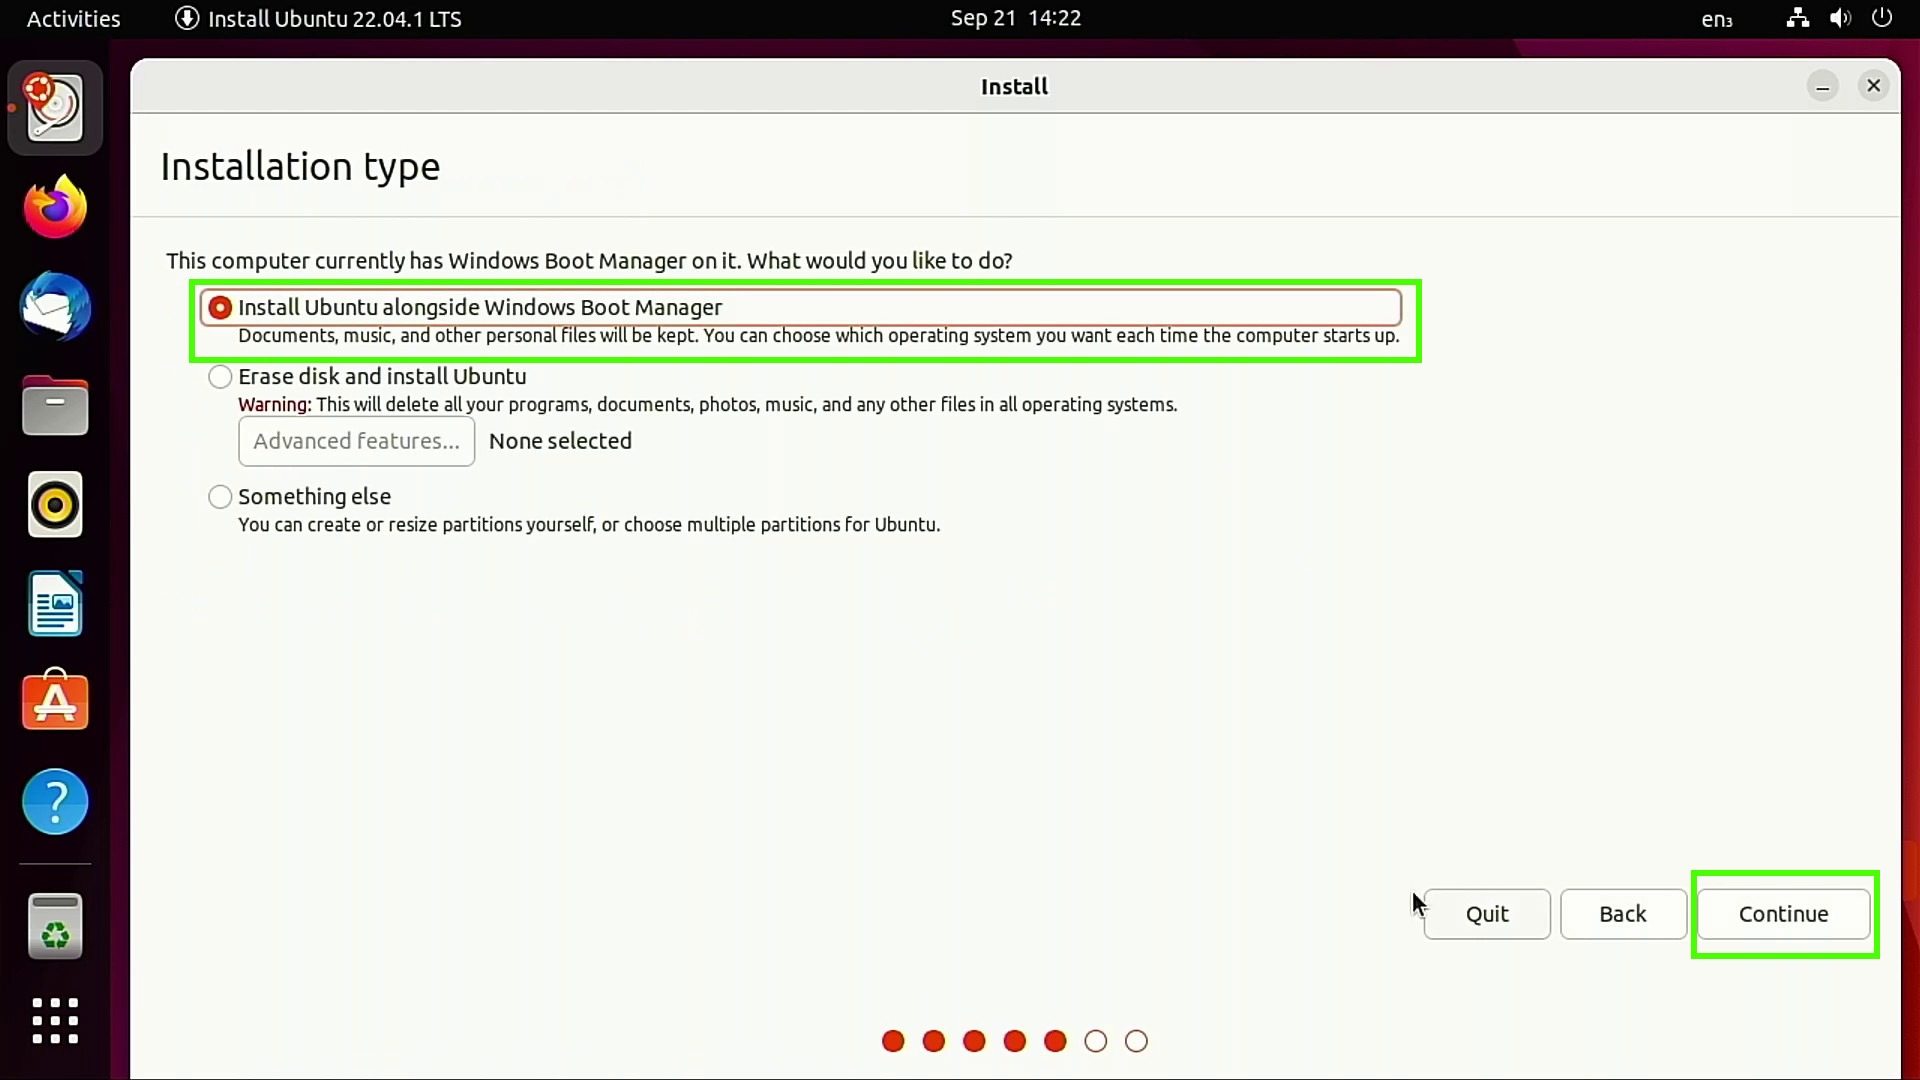
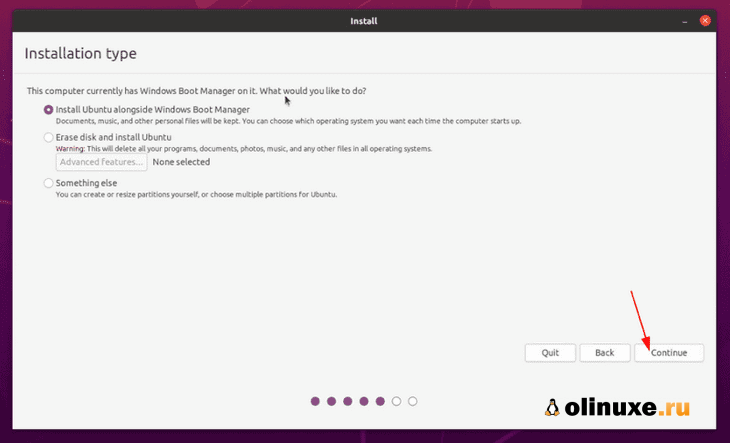
9. Select “Install Ubuntu alongside Windows Boot Manager” and click Continue. Any other option will either delete the entire contents of the drive, or require manual configuration, so take great care.
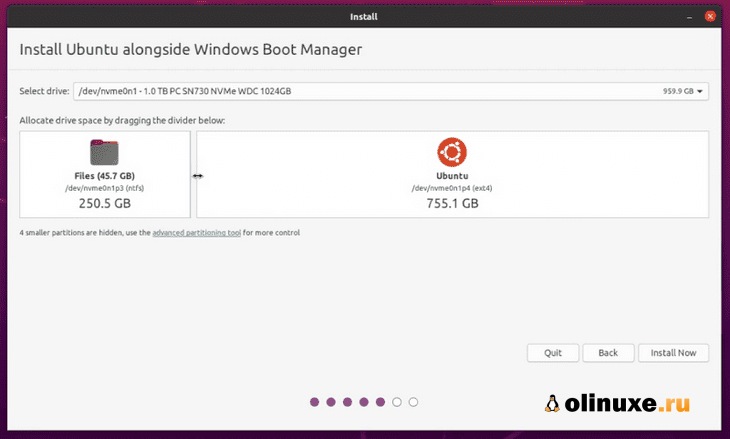
10. Ensure that the correct drive has been selected, and slide the center slider to adjust how much space each OS will have.
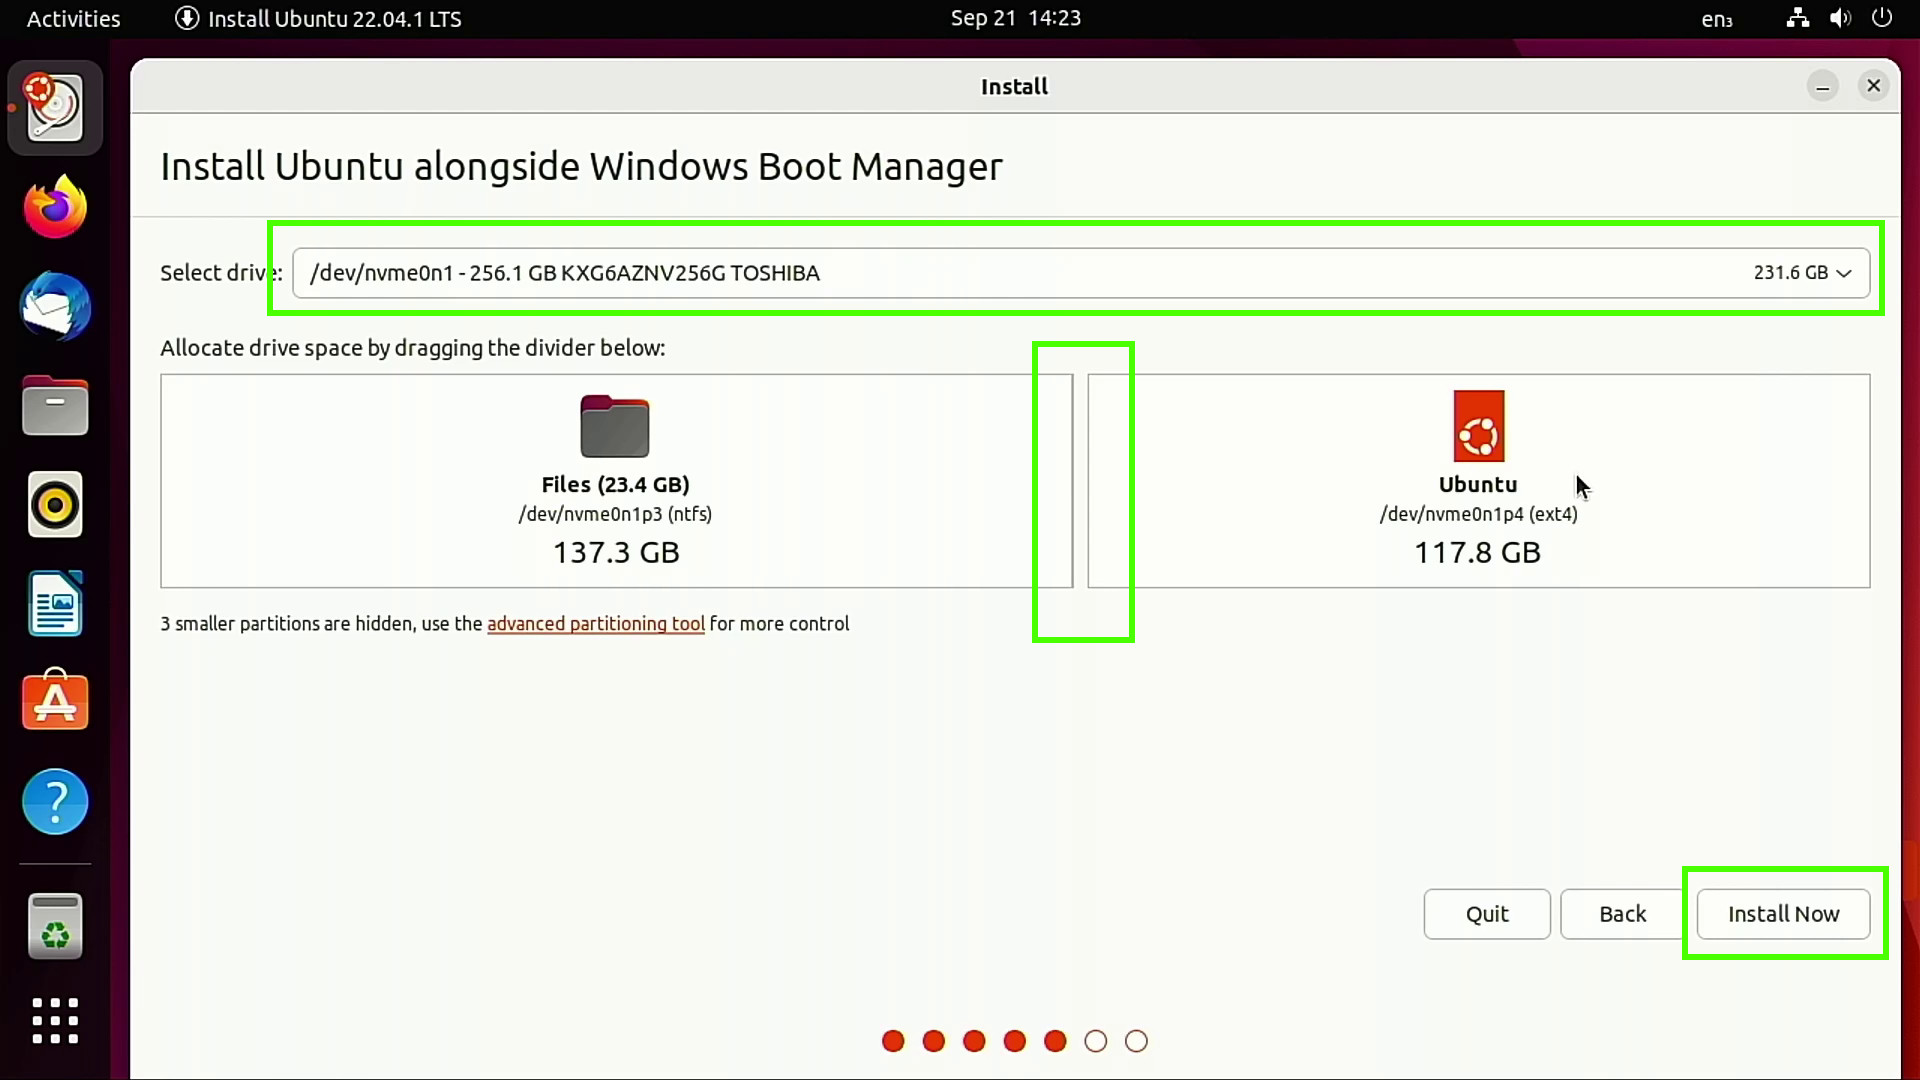
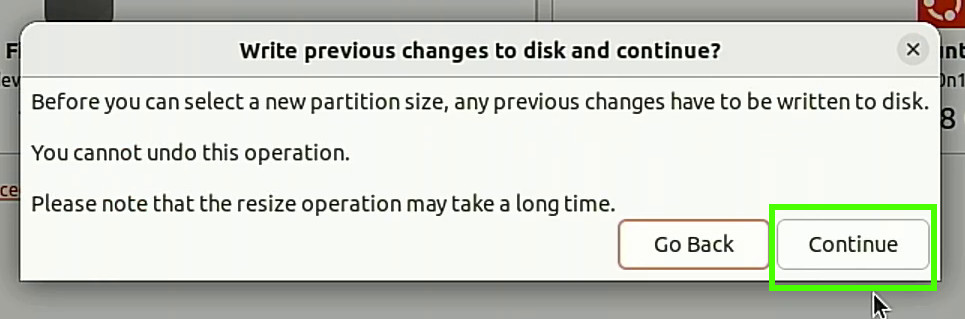
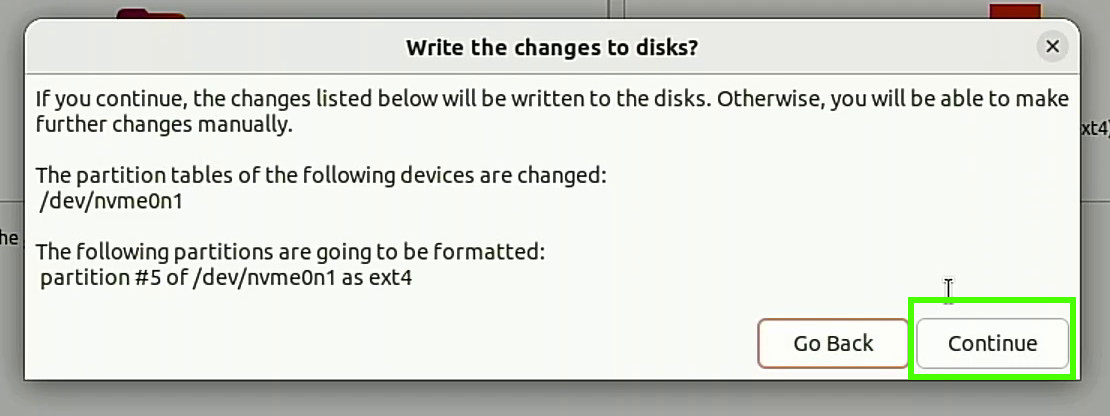
11. Click Continue to write the changes to the disk. Check that everything is correct before moving onwards. Changes made now cannot be easily remedied.
12. Click Continue when asked if you are sure.
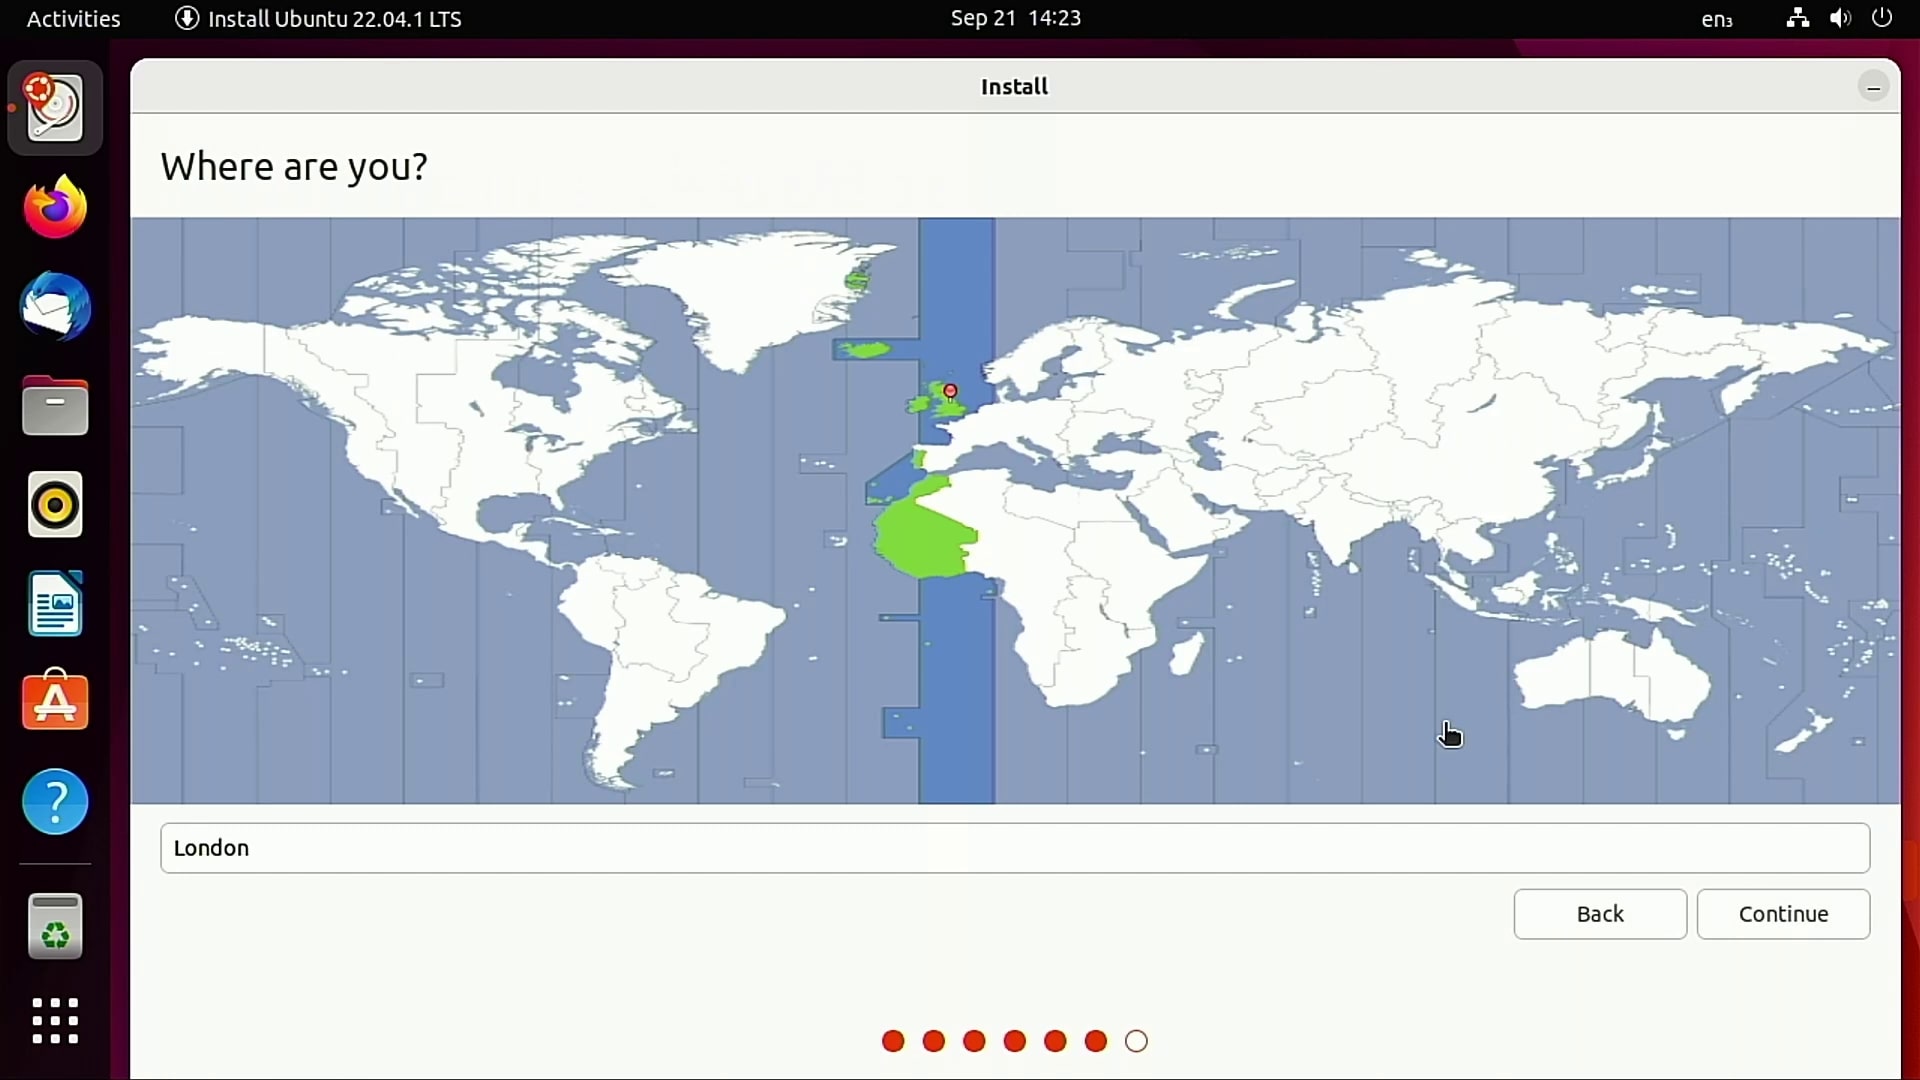
13. Set your location and click Continue.
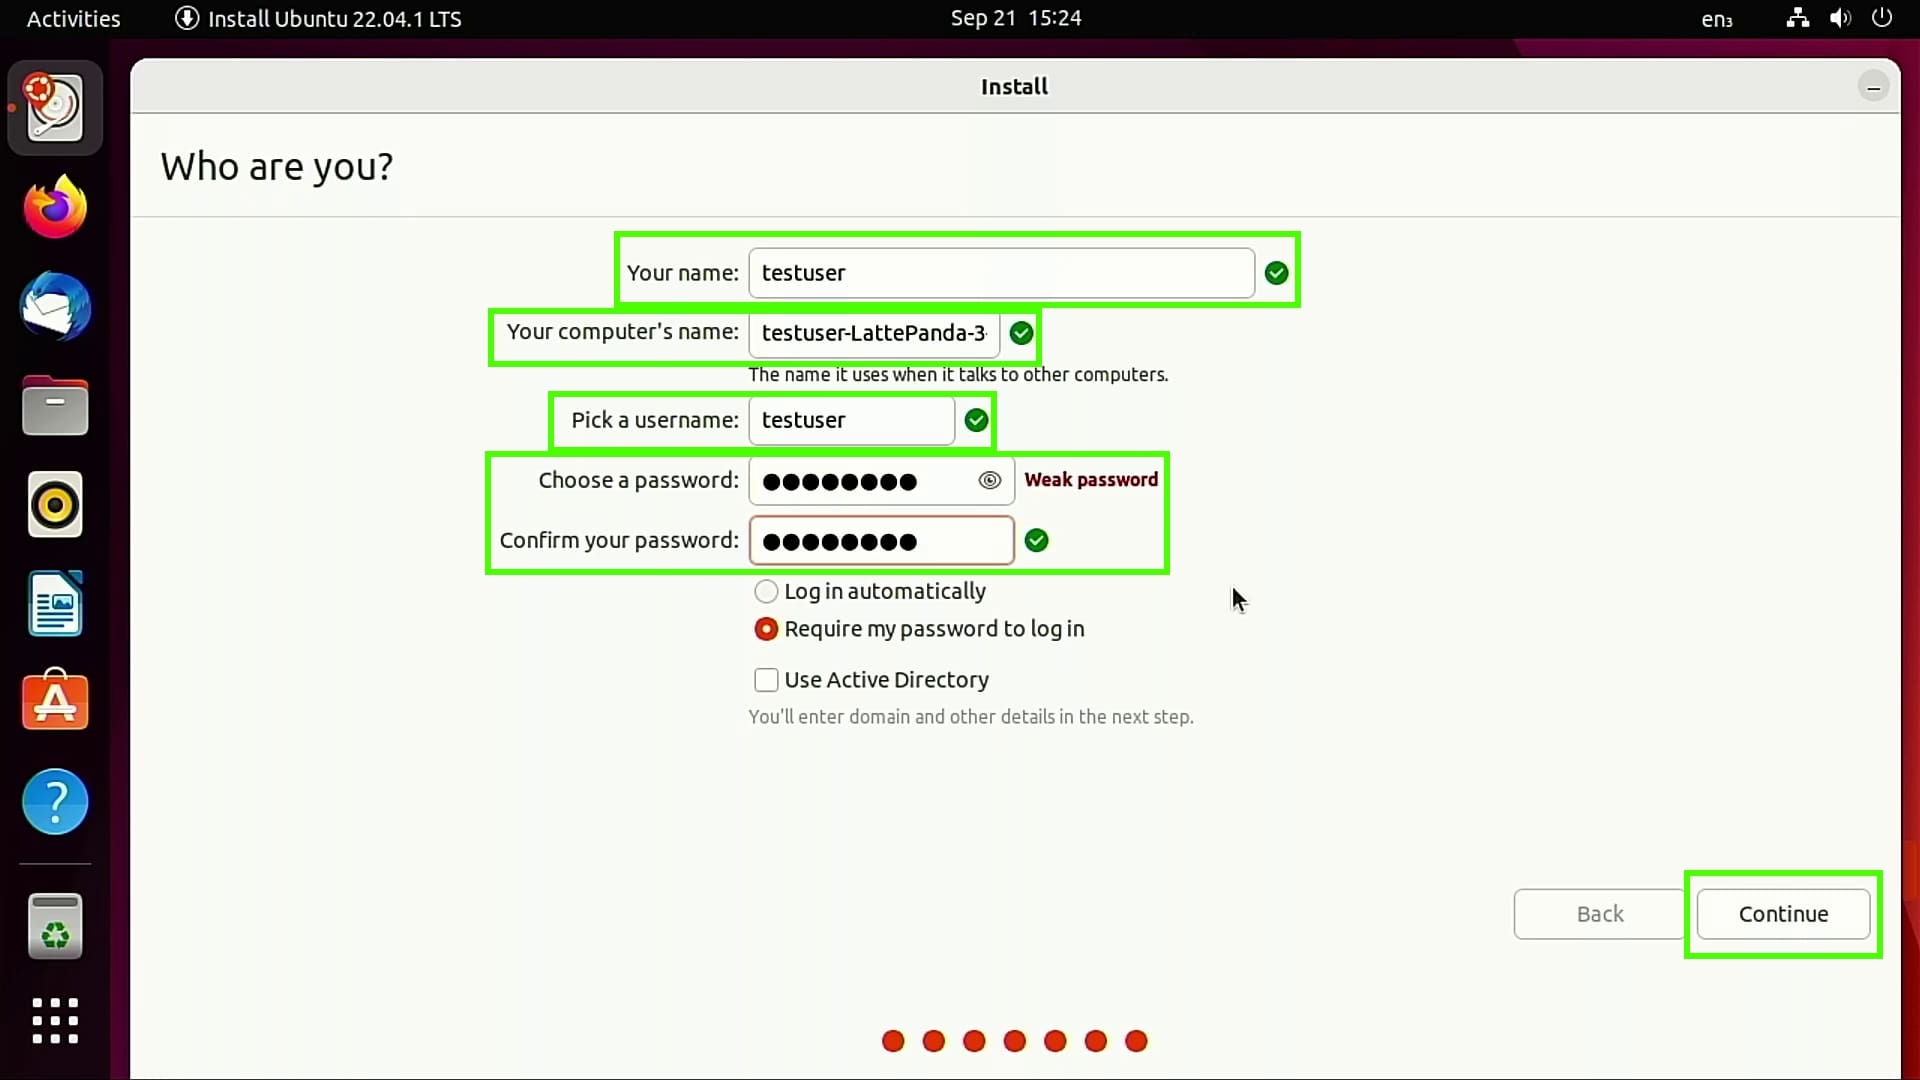
14. Set up your user account, with your real name, computer name, username and provide a strong password. Click Continue when ready.
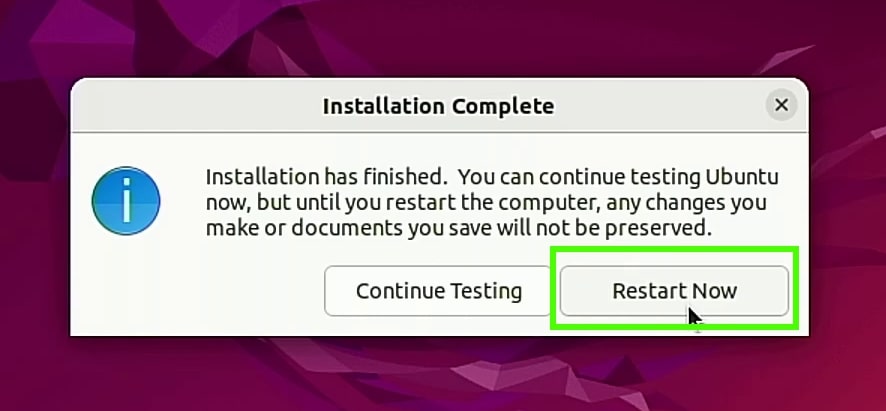
The installation will take a few minutes to complete.
15. Click on Restart Now to reboot your computer.
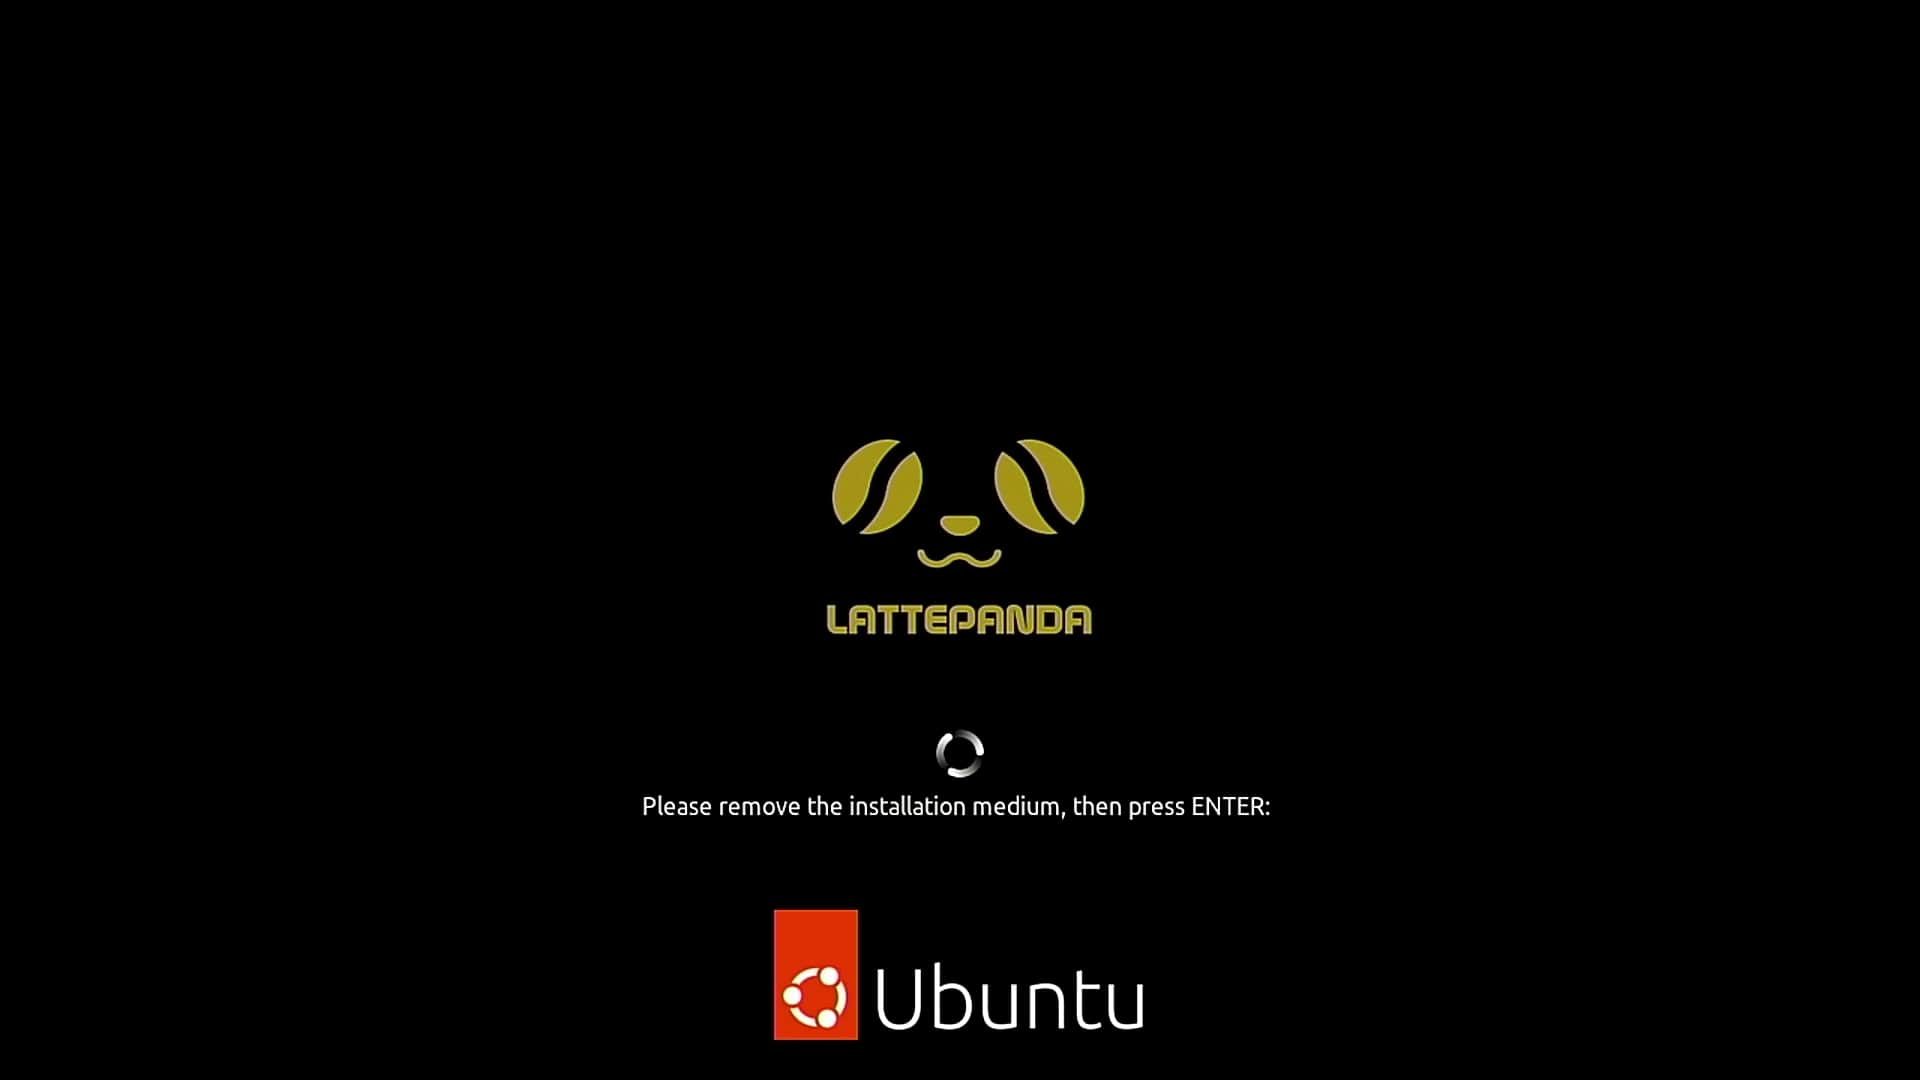
16. Remove the USB drive and press Enter when prompted.
First Linux Dual Boot
The first boot of a Linux dual boot system requires a little fine tuning in our BIOS. We need to tell the system to boot from our Linux install, which will trigger the GRUB menu to load. From there we can select an OS to boot from. Each BIOS is a little different, so use these steps as a general guide and refer to the manual for your motherboard for more specific information.
1. Open your BIOS menu. See our story on how to enter your BIOS if you don’t know how to do this already.

2. Select the Boot menu.
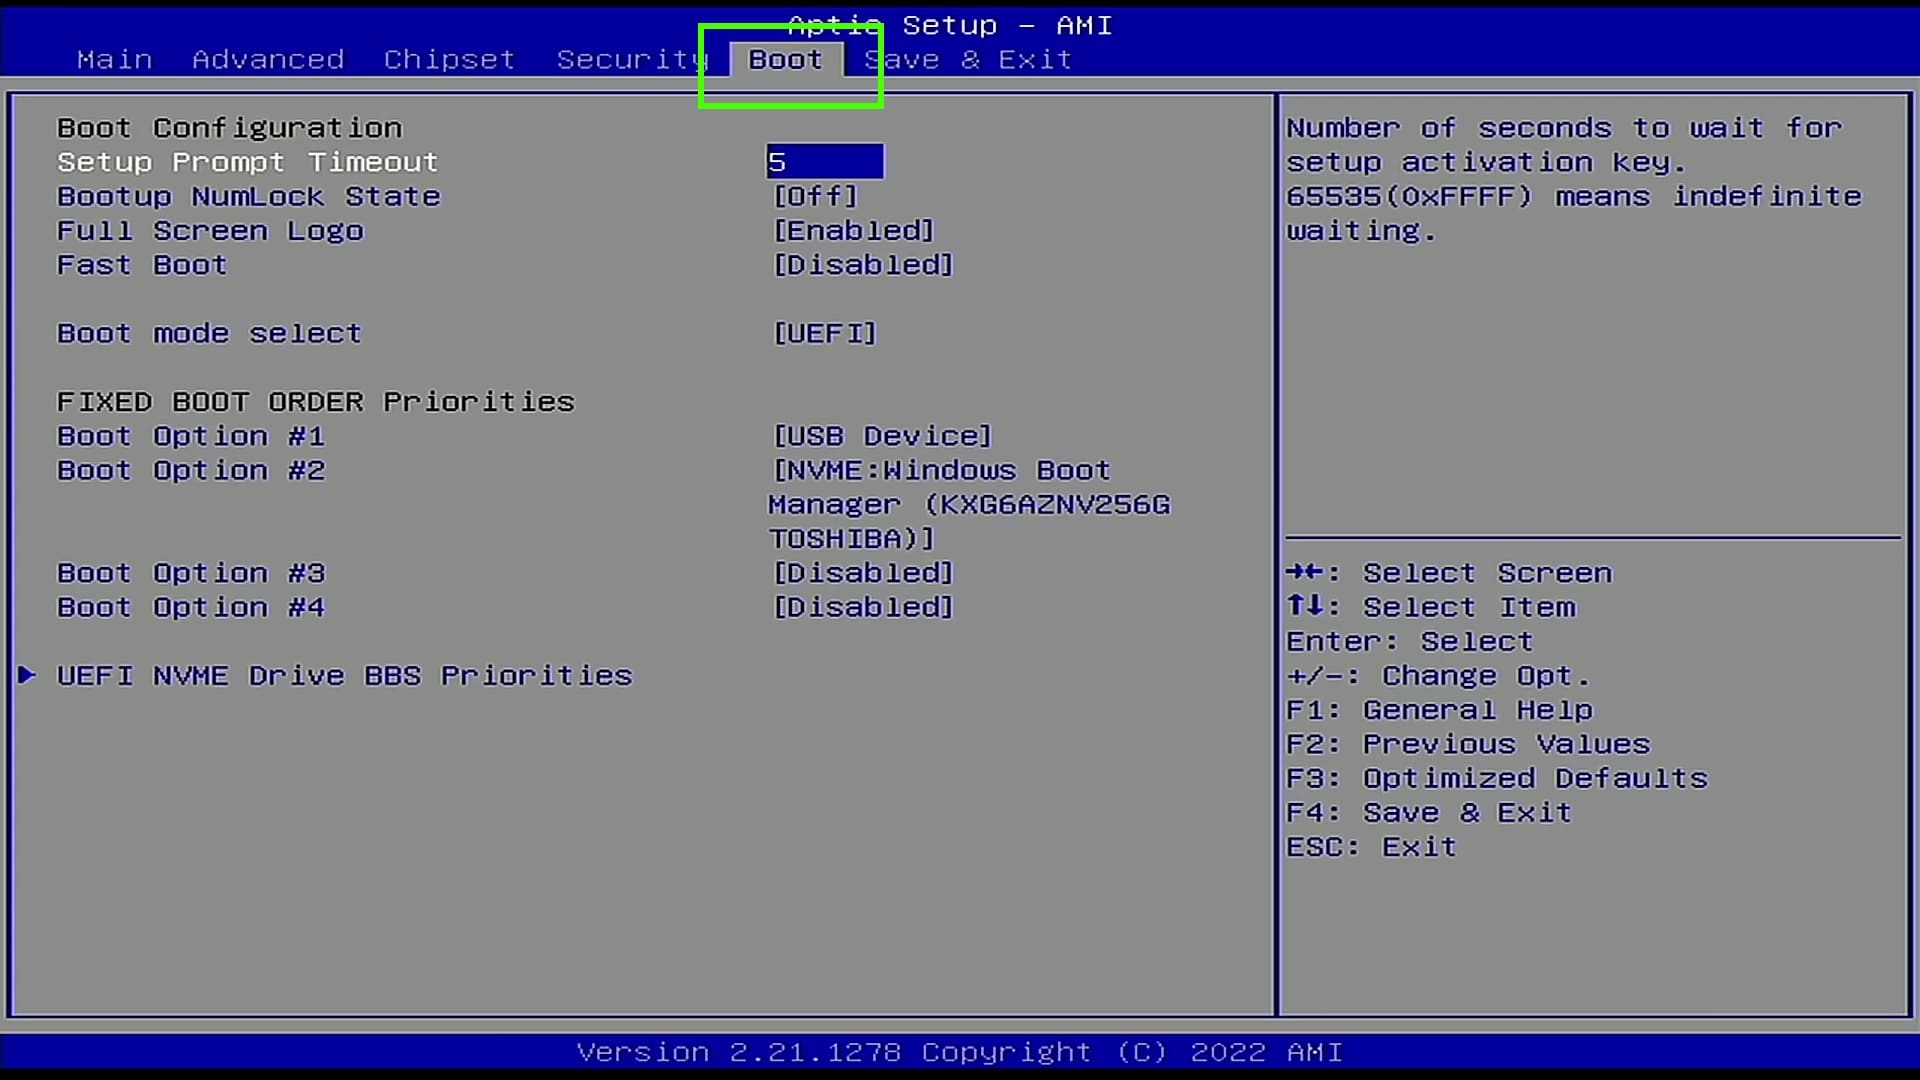
3. Select UEFI NVMe Drive BBS Priorities.
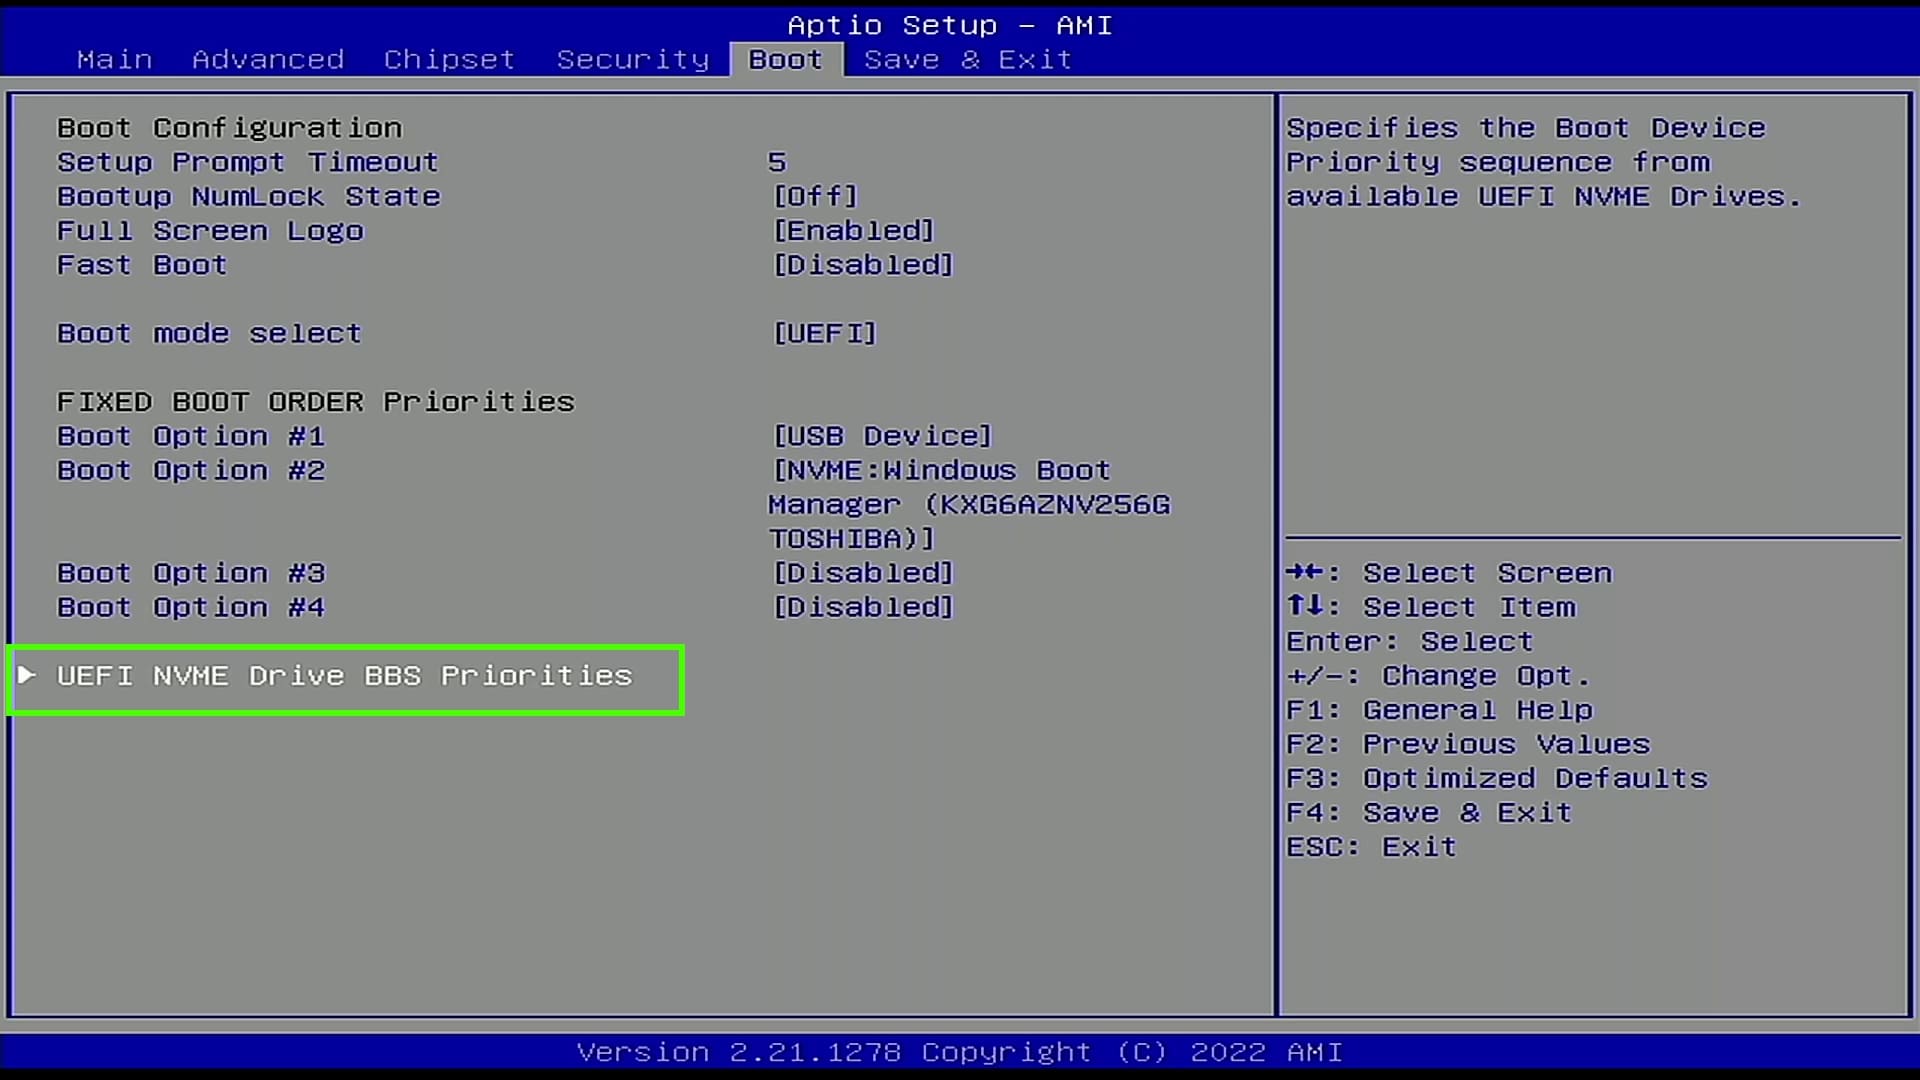
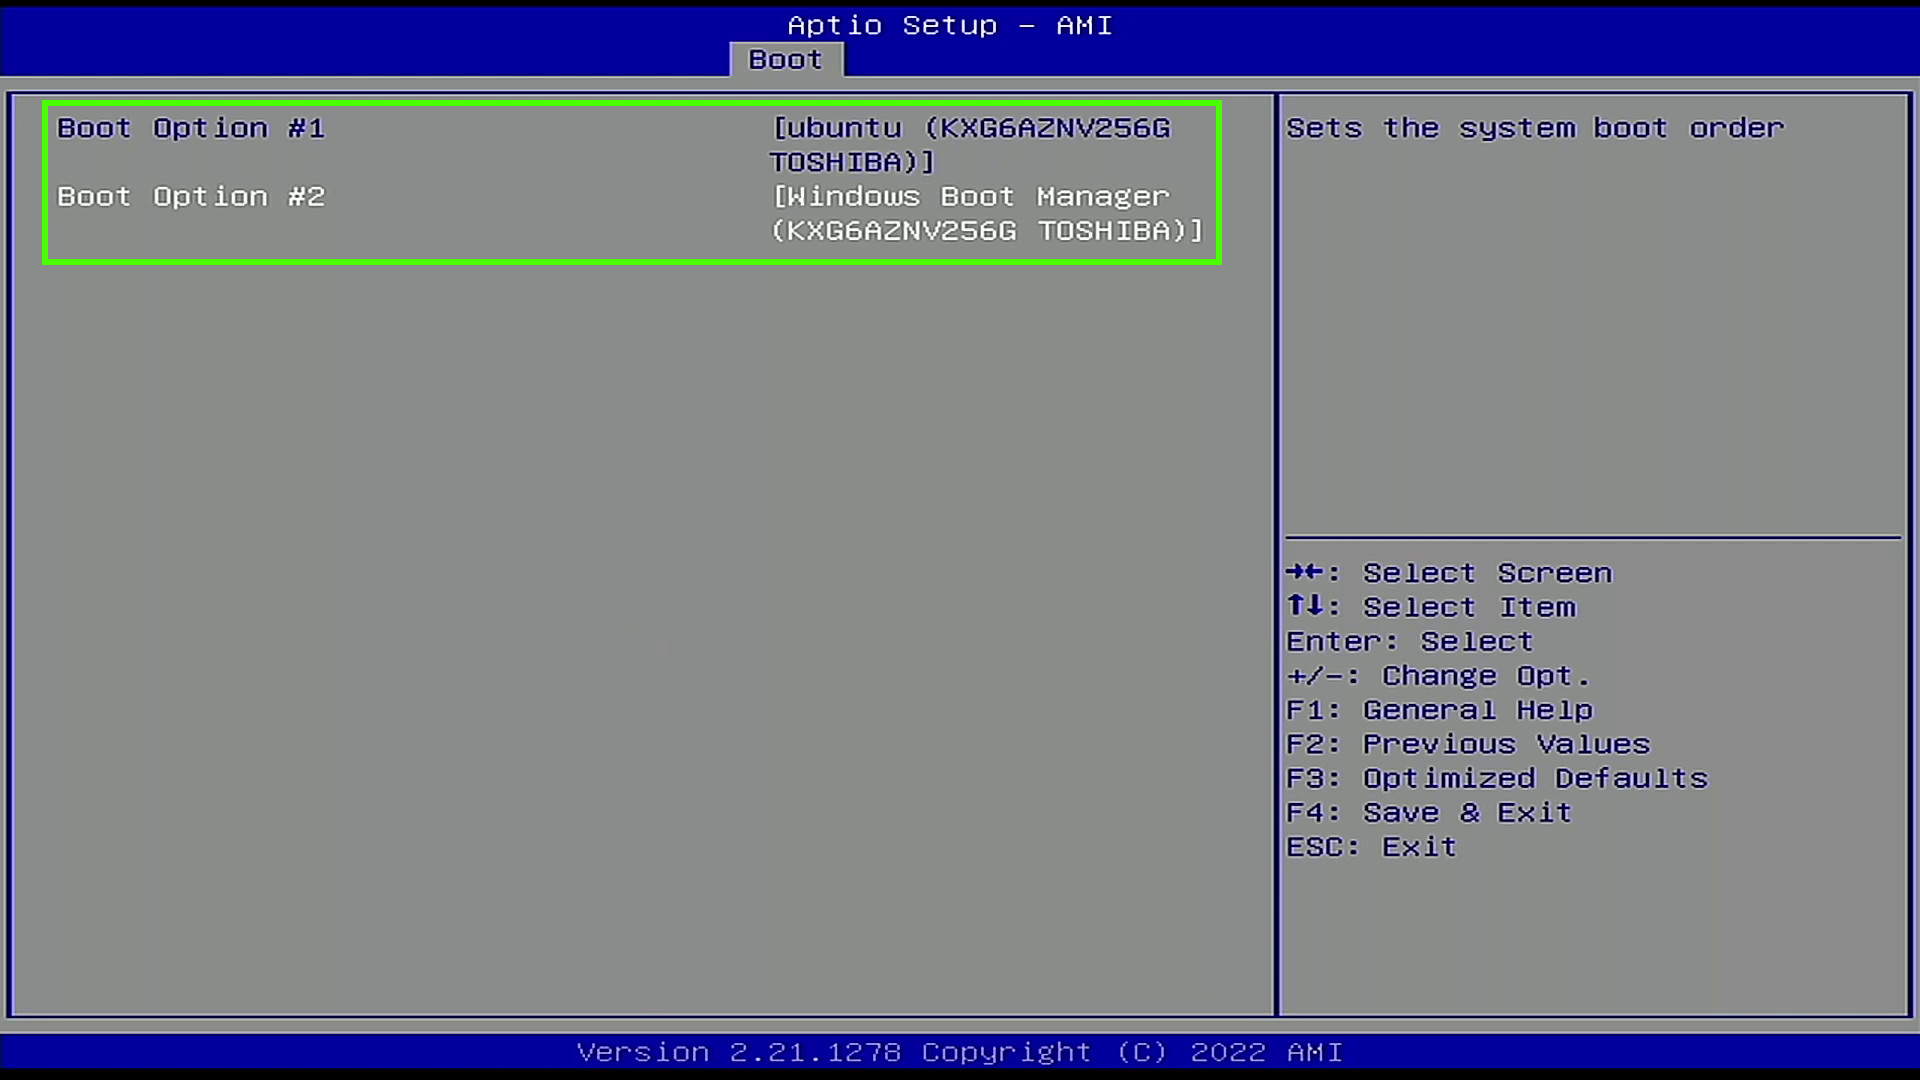
4. Set Boot Option 1 to be the Linux install.
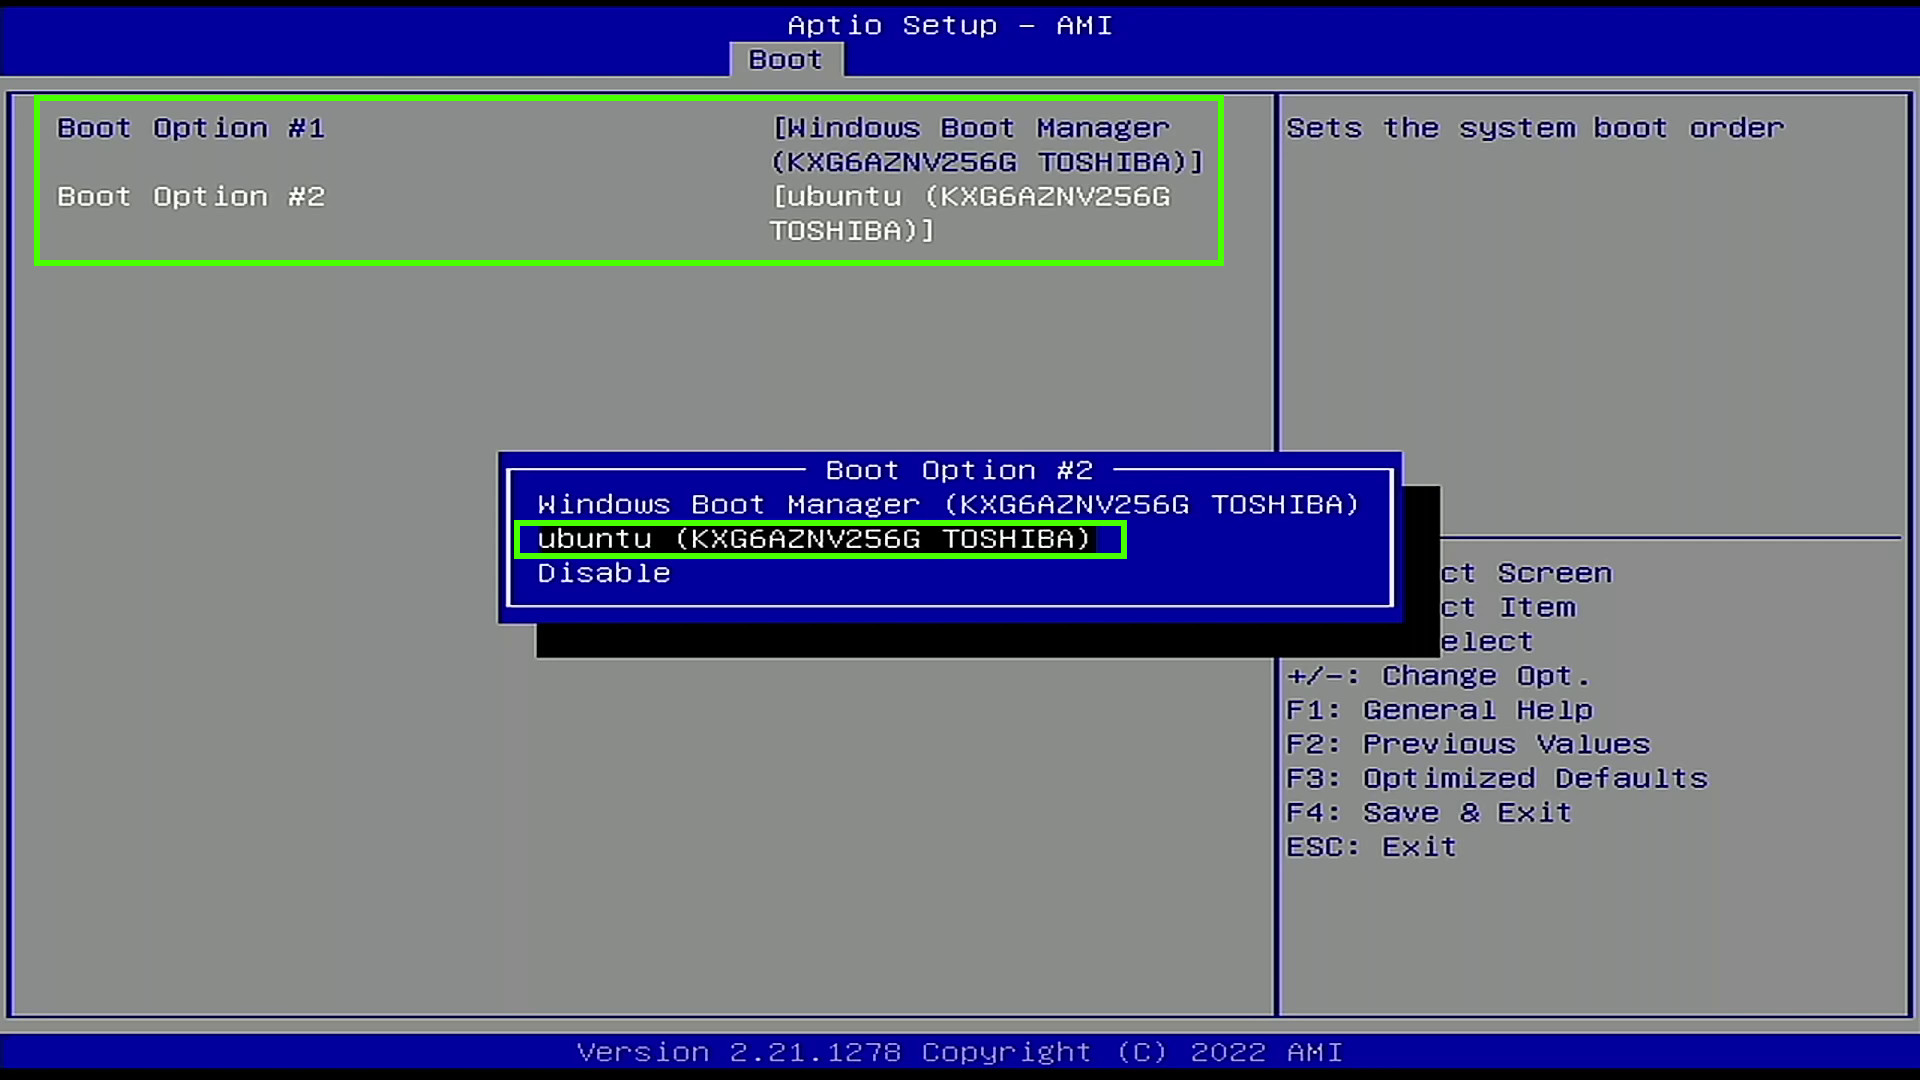
5. Check that the change has been made, then save and exit the BIOS.
6. The system will now boot to GRUB, choose your Linux OS and press Enter. If we leave GRUB for 10 seconds, it will choose the default option, typically Linux.
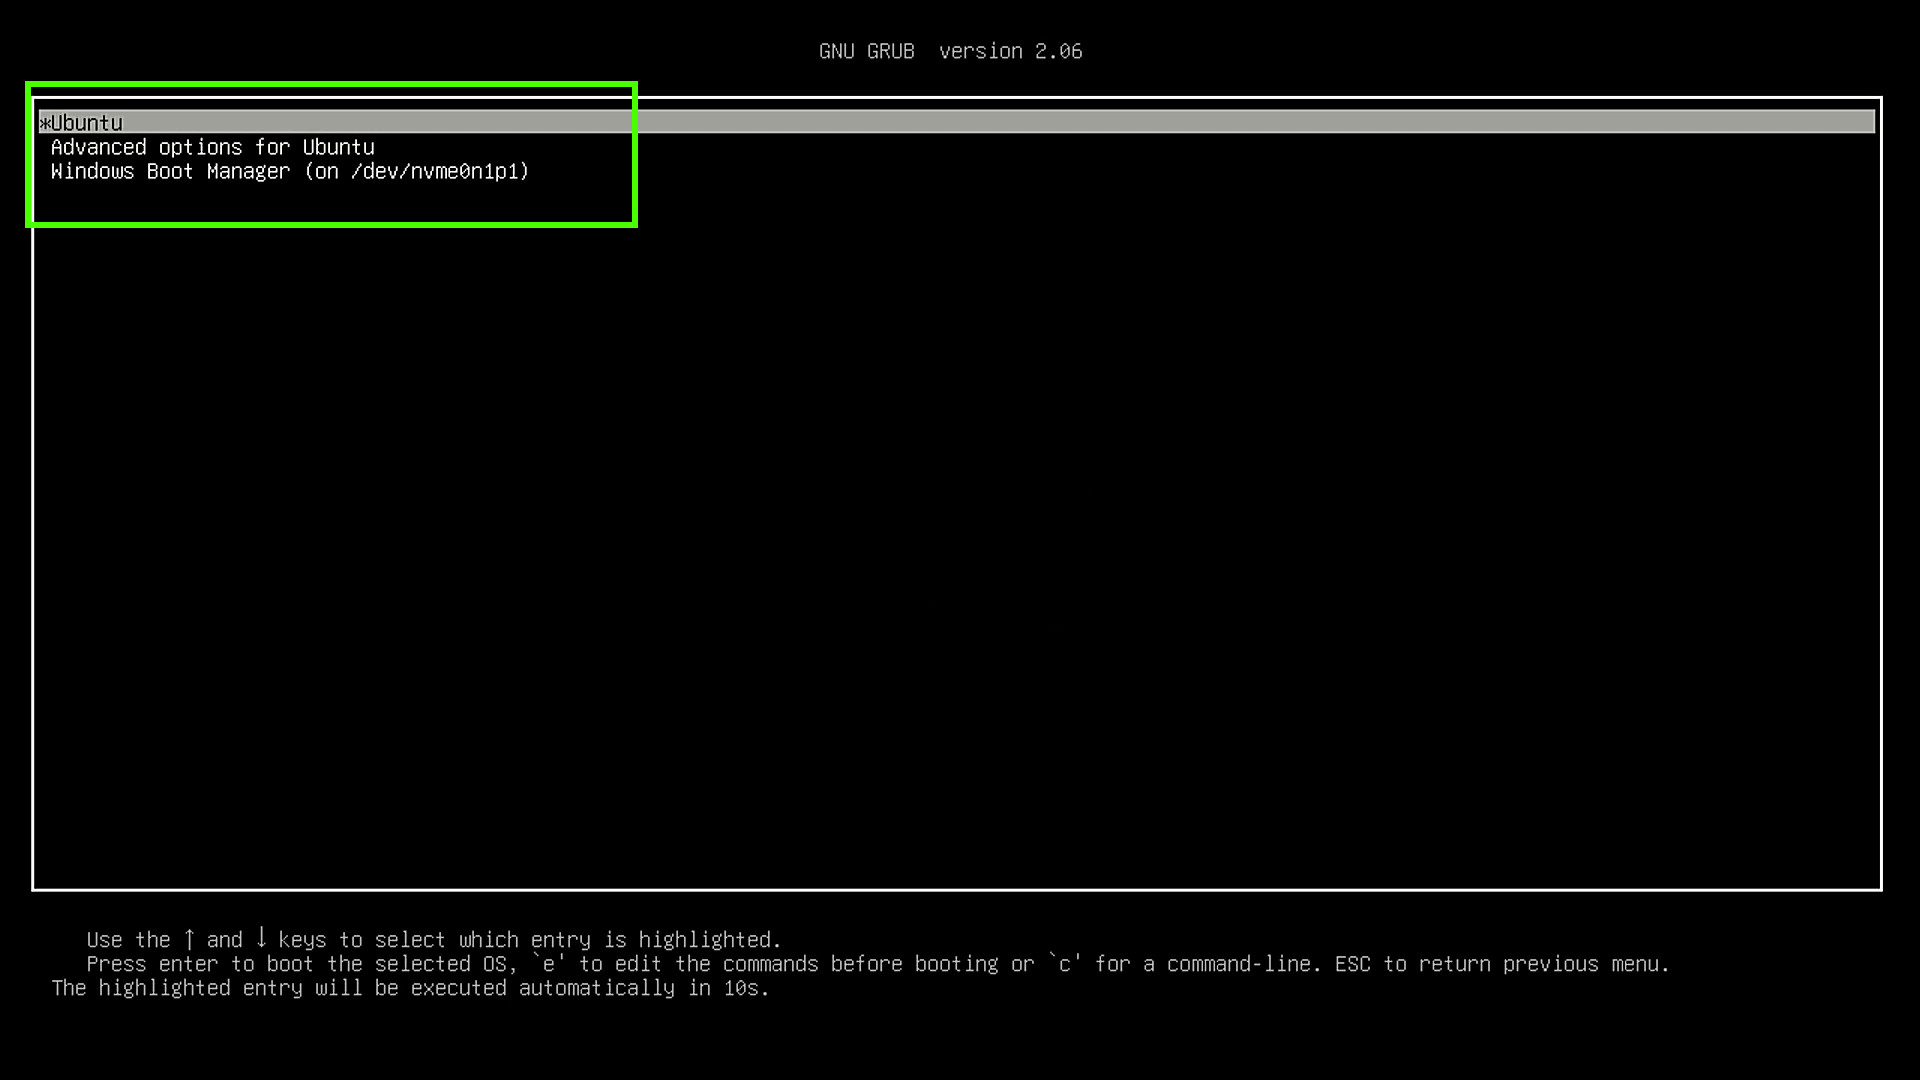
7. Boot to the Linux desktop and check that everything is correct.
8. Reboot to GRUB and select Windows to check that everything is working.
Join the experts who read Tom’s Hardware for the inside track on enthusiast PC tech news — and have for over 25 years. We’ll send breaking news and in-depth reviews of CPUs, GPUs, AI, maker hardware and more straight to your inbox.
This is an article detailing different methods of Arch/Windows coexistence.
Important information
Windows UEFI vs BIOS limitations
Microsoft imposes limitations on which firmware boot mode and partitioning style can be supported based on the version of Windows used:
Note: The following points only list configurations supported by the Windows Setup even though Windows itself may still work on these unsupported configurations. A good example of this is Windows 11 which still works on a BIOS/MBR configuration once the Windows Setup check is bypassed.
- Windows 8/8.1 and 10 x86 32-bit support booting in IA32 UEFI mode from GPT disk only, OR in BIOS mode from MBR disk only. They do not support x86_64 UEFI boot from GPT/MBR disk, x86_64 UEFI boot from MBR disk, or BIOS boot from GPT disk. On market, the only systems known to ship with IA32 (U)EFI are some old Intel Macs (pre-2010 models?) and Intel Atom System-on-Chip (Clover trail and Bay Trail) Windows Tablets, which boot ONLY in IA32 UEFI mode and ONLY from GPT disk.
- Windows 8/8.1 and 10 x86_64 versions support booting in x86_64 UEFI mode from GPT disk only, OR in BIOS mode from MBR disk only. They do not support IA32 UEFI boot, x86_64 UEFI boot from MBR disk, or BIOS boot from GPT disk.
- Windows 11 only supports x86_64 and a boot in UEFI mode from GPT disk.
In case of pre-installed Systems:
- All systems pre-installed with Windows XP, Vista or 7 32-bit, irrespective of Service Pack level, bitness, edition (SKU) or presence of UEFI support in firmware, boot in BIOS/MBR mode by default.
- MOST of the systems pre-installed with Windows 7 x86_64, irrespective of Service Pack level, bitness or edition (SKU), boot in BIOS/MBR mode by default. Very few late systems pre-installed with Windows 7 are known to boot in x86_64 UEFI/GPT mode by default.
- ALL systems pre-installed with Windows 8/8.1, 10 and 11 boot in UEFI/GPT mode. Up to Windows 10, the firmware bitness matches the bitness of Windows, ie. x86_64 Windows boot in x86_64 UEFI mode and 32-bit Windows boot in IA32 UEFI mode.
The best way to detect the boot mode of Windows is to do the following[1]:
- Boot into Windows
- Press
Win+Rkeys to start the Run dialog - In the Run dialog type
msinfo32.exeand press Enter - In the System Information windows, select System Summary on the left and check the value of BIOS mode item on the right
- If the value is
UEFI, Windows boots in UEFI/GPT mode. If the value isLegacy, Windows boots in BIOS/MBR mode.
In general, Windows forces type of partitioning depending on the firmware mode used, i.e. if Windows is booted in UEFI mode, it can be installed only to a GPT disk. If Windows is booted in Legacy BIOS mode, it can be installed only to an MBR disk. This is a limitation enforced by Windows Setup, and as of April 2014 there is no officially (Microsoft) supported way of installing Windows in UEFI/MBR or BIOS/GPT configuration. Thus Windows only supports either UEFI/GPT boot or BIOS/MBR configuration.
Tip: Windows 10 version 1703 and newer supports converting from BIOS/MBR to UEFI/GPT using MBR2GPT.EXE.
Such a limitation is not enforced by the Linux kernel, but can depend on which boot loader is used and/or how the boot loader is configured. The Windows limitation should be considered if the user wishes to boot Windows and Linux from the same disk, since installation procedure of boot loader depends on the firmware type and disk partitioning configuration. In case where Windows and Linux dual boot from the same disk, it is advisable to follow the method used by Windows, ie. either go for UEFI/GPT boot or BIOS/MBR boot. See https://support.microsoft.com/kb/2581408 for more information.
Install media limitations
Intel Atom System-on-Chip Tablets (Clover trail and Bay Trail) provide only IA32 UEFI firmware without Legacy BIOS (CSM) support (unlike most of the x86_64 UEFI systems), due to Microsoft Connected Standby Guidelines for OEMs. Due to lack of Legacy BIOS support in these systems, and the lack of 32-bit UEFI boot in Arch Official Install ISO (FS#53182), the official install media cannot boot on these systems. See Unified Extensible Firmware Interface#UEFI firmware bitness for more information and available workarounds.
Bootloader UEFI vs BIOS limitations
Most of the linux bootloaders installed for one firmware type cannot launch or chainload bootloaders of the other firmware type. That is, if Arch is installed in UEFI/GPT or UEFI/MBR mode in one disk and Windows is installed in BIOS/MBR mode in another disk, the UEFI bootloader used by Arch cannot chainload the BIOS installed Windows in the other disk. Similarly if Arch is installed in BIOS/MBR or BIOS/GPT mode in one disk and Windows is installed in UEFI/GPT in another disk , the BIOS bootloader used by Arch cannot chainload UEFI installed Windows in the other disk.
The only exceptions to this are GRUB in Apple Macs in which GRUB in UEFI mode can boot BIOS installed OS via appleloader command (does not work in non-Apple systems), and rEFInd which technically supports booting legacy BIOS OS from UEFI systems, but does not always work in non-Apple UEFI systems as per its author Rod Smith.
However if Arch is installed in BIOS/GPT in one disk and Windows is installed in BIOS/MBR mode in another disk, then the BIOS boot loader used by Arch CAN boot the Windows in the other disk, if the boot loader itself has the ability to chainload from another disk.
Note: To dual-boot with Windows on same disk, Arch should follow the same firmware boot mode and partitioning combination used by the Windows installation.
Windows Setup creates a 100 MiB EFI system partition (except for Advanced Format 4K native drives where it creates a 300 MiB ESP), so multiple kernel usage is limited. Workarounds include:
- Mount ESP to
/efiand use a boot loader that has file system drivers and is capable of launching kernels that reside on other partitions. - Expand the EFI system partition, typically either by decreasing the Recovery partition size or moving the Windows partition (UUIDs will change).
- Backup and delete unneeded fonts in
esp/EFI/Microsoft/Boot/Fonts/[2]. - Backup and delete unneeded language directories in
esp/EFI/Microsoft/Boot/(e.g. to only keepen-US). - Use a higher, but slower, compression for the initramfs images. E.g.
COMPRESSION="xz"withCOMPRESSION_OPTIONS=(-9e).
UEFI Secure Boot
All pre-installed Windows 8/8.1, 10 and 11 systems by default boot in UEFI/GPT mode and have UEFI Secure Boot enabled by default. This is mandated by Microsoft for all OEM pre-installed systems.
Arch Linux install media does not support Secure Boot yet. See Secure Boot#Booting an installation medium.
It is advisable to disable UEFI Secure Boot in the firmware setup manually before attempting to boot Arch Linux. Windows 8/8.1, 10 and 11 SHOULD continue to boot fine even if Secure boot is disabled. The only issue with regards to disabling UEFI Secure Boot support is that it requires physical access to the system to disable secure boot option in the firmware setup, as Microsoft has explicitly forbidden presence of any method to remotely or programmatically (from within OS) disable secure boot in all Windows 8/8.1 and above pre-installed systems
Note:
- If Windows used Bitlocker and stored the key in the TPM for automatic unlock on boot, it fails to boot when Secure Boot is disabled, instead showing a Bitlocker recovery screen. This is not permanent however, and you can easily boot Windows again by simply re-enabling Secure Boot.
- On Windows 11, disabling Secure Boot after install will not cause problems as long as TPM is working normally.
Fast Startup and hibernation
There are two OSs that can be hibernated, you can hibernate Windows and boot Linux (or another OS), or you can hibernate Linux and boot Windows, or hibernate both OSs.
Warning: Data loss can occur if Windows hibernates and you dual boot into another OS and make changes to files on a filesystem (such as NTFS) that can be read and written to by Windows and Linux, and that has been mounted by Windows [3]. Similarly, data loss can occur if Linux hibernates, and you dual boot into another OS etc. Windows may hibernate even when you press shutdown, see section #Windows settings.
For the same reason, if you share one EFI system partition between Windows and Linux, then the EFI system partition may be damaged if you hibernate (or shutdown with Fast Startup enabled) Windows and then start Linux, or hibernate Linux and then start Windows.
ntfs-3g added a safe-guard to prevent read-write mounting of hibernated NTFS filesystems, but the NTFS driver within the Linux kernel has no such safeguard.
Windows cannot read filesystems such as ext4 by default that are commonly used for Linux. These filesystems do not have to be considered, unless you install a Windows driver for them.
Windows settings
Fast Startup is a feature in Windows 8 and above that hibernates the computer rather than actually shutting it down to speed up boot times.
There are multiple options regarding the Windows settings for Fast Startup and hibernation that are covered in the next sections.
- disable Fast Startup and disable hibernation
- disable Fast Startup and enable hibernation
- enable Fast Startup and enable hibernation
The procedure of disabling Fast Startup is described in the tutorials for Windows 8, Windows 10 and Windows 11. In any case if you disable a setting, make sure to disable the setting and then shut down Windows, before installing Linux; note that rebooting is not sufficient.
Disable Fast Startup and disable hibernation
This is the safest option, and recommended if you are unsure about the issue, as it requires the least amount of user awareness when rebooting from one OS into the other. You may share the same EFI system partition between Windows and Linux.
Disable Fast Startup and enable hibernation
This option requires user awareness when rebooting from one OS into the other.
If you want to start Linux while Windows is hibernated, which is a common use case, then
- you must use a separate EFI system partition (ESP) for Windows and Linux, and ensure that Windows does not mount the ESP used for Linux. As there can only be one ESP per drive, the ESP used for Linux must be located on a separate drive than the ESP used for Windows. In this case Windows and Linux can still be installed on the same drive in different partitions, if you place the ESP used by linux on another drive than the Linux root partition.
- you can not read-write mount any filesystem in Linux, that is mounted by Windows while Windows is hibernated. You should be extremely careful about this, and also consider Automount behaviour.
- If you shut down Windows fully, rather than hibernating, then you can read-write mount the filesystem.
Note: You can avoid this issue for a drive by mounting a drive as an external drive in Windows and ejecting the drive in Windows before hibernating.
Enable Fast Startup and enable hibernation
The same considerations apply as in case «Disable Fast Startup and enable hibernation», but since Windows can not be shut down fully, only hibernated, you can never read-write mount any filesystem that was mounted by Windows while Windows is hibernated.
Note: Windows updates may re-enable Fast Startup, as reported in [4].
Windows filenames limitations
Windows is limited to filepaths being shorter than 260 characters.
Windows also puts certain characters off limits in filenames for reasons that run all the way back to DOS:
<(less than)>(greater than):(colon)"(double quote)/(forward slash)\(backslash)|(vertical bar or pipe)?(question mark)*(asterisk)
These are limitations of Windows and not NTFS: any other OS using the NTFS partition will be fine. Windows will fail to detect these files and running chkdsk will most likely cause them to be deleted. This can lead to potential data-loss.
NTFS-3G applies Windows restrictions to new file names through the windows_names option: ntfs-3g(8) § Windows_Filename_Compatibility (see fstab).
Installation
The recommended way to setup a Linux/Windows dual booting system is to first install Windows, only using part of the disk for its partitions. When you have finished the Windows setup, boot into the Linux install environment where you can create and resize partitions for Linux while leaving the existing Windows partitions untouched. The Windows installation will create the EFI system partition which can be used by your Linux boot loader.
Windows before Linux
BIOS systems
Using a Linux boot loader
You may use any multi-boot supporting BIOS boot loader.
Using the Windows Vista/7/8/8.1 boot loader
This section explains how to : install a linux bootloader on a partition instead of the MBR ; copy this bootloader to a partition readable by the windows bootloader ; use the windows bootloader to start said copy of the linux bootloader.
Note: Some documents state that the partition being loaded by the Windows boot loader must be a primary partition but usage of an extended partition has been documented as working.
- When installing the boot loader, install it on your
/bootpartition rather than the MBR. For details on doing this with GRUB, see GRUB/Tips and tricks#Install to partition or partitionless disk, for Syslinux, see the note at Syslinux#Manual install, for LILO see LILO#Install to partition or partitionless disk.
- Make a copy of the VBR:
dd if=/dev/disk of=/path/to/linux.bin bs=512 count=1
where
/dev/diskis the path of the partition on which your bootloader is installed and/path/to/is the mounted filesystem on which you want the copy to be readable by the Windows bootloader.
- On Windows, the linux.bin file should now be accessible. Run cmd with administrator privileges (navigate to Start > All Programs > Accessories, right-click on Command Prompt and select Run as administrator):
bcdedit /create /d "Linux" /application BOOTSECTOR
BCDEdit will return a UUID for this entry. This will be refered to as
UUIDin the remaining steps.bcdedit /set UUID device partition=c: (or the drive letter on which linux.bin is kept) bcdedit /set UUID path \path\to\linux.bin bcdedit /displayorder UUID /addlast bcdedit /timeout 30
On reboot, both Windows and Linux should now show up in the Windows bootloader.
Note: On some hardware, the Windows boot loader is used to start another OS with a second power button (e.g. Dell Precision M4500).
For more details, see https://www.iceflatline.com/2009/09/how-to-dual-boot-windows-7-and-linux-using-bcdedit/
UEFI systems
If you already have Windows installed, it will already have created some partitions on a GPT-formatted disk:
- a Windows Recovery Environment partition, generally of size 499 MiB, containing the files required to boot Windows (i.e. the equivalent of Linux’s
/boot), - an EFI system partition with a FAT32 filesystem,
- a Microsoft Reserved Partition, generally of size 128 MiB,
- a Microsoft basic data partition with a NTFS filesystem, which corresponds to
C:, - potentially system recovery and backup partitions and/or secondary data partitions (corresponding often to
D:and above).
Using the Disk Management utility in Windows, check how the partitions are labelled and which type gets reported. This will help you understand which partitions are essential to Windows, and which others you might repurpose. The Windows Disk Management utility can also be used to shrink Windows (NTFS) partitions to free up disk space for additional partitions for Linux.
Warning: The first 4 partitions in the above list are essential, do not delete them.
You can then proceed with partitioning, depending on your needs. The boot loader needs to support chainloading other EFI applications to dual boot Windows and Linux. An additional EFI system partition should not be created, as it may prevent Windows from booting.
Note: It only appears when Linux is installed on the second hard disk and a new EFI system partition is created on the second hard disk.
Simply mount the existing partition.
Tip:
- rEFInd and systemd-boot will autodetect Windows Boot Manager (
\EFI\Microsoft\Boot\bootmgfw.efi) and show it in their boot menu automatically. For GRUB follow either GRUB#Windows installed in UEFI/GPT mode to add boot menu entry manually or GRUB#Detecting other operating systems for a generated configuration file. - To save space on the EFI system partition, especially for multiple kernels, increase the initramfs compression.
Computers that come with newer versions of Windows often have Secure Boot enabled. You will need to take extra steps to either disable Secure Boot or to make your installation media compatible with secure boot (see above and in the linked page).
Linux before Windows
Even though the recommended way to setup a Linux/Windows dual booting system is to first install Windows, it can be done the other way around. In contrast to installing Windows before Linux, you will have to set aside a partition for Windows, say 40GB or larger, in advance. Or have some unpartitioned disk space, or create and resize partitions for Windows from within the Linux installation, before launching the Windows installation.
UEFI firmware
Windows will use the already existing EFI system partition. In contrast to what was stated earlier, it is unclear if a single partition for Windows, without the Windows Recovery Environment and without Microsoft Reserved Partition, will not do.
Follows an outline, assuming Secure Boot is disabled in the firmware.
- Boot into windows installation. Watch to let it use only the intended partition, but otherwise let it do its work as if there is no Linux installation.
- Follow the #Fast Startup and hibernation section.
- Fix the ability to load Linux at start up, perhaps by following #Cannot boot Linux after installing Windows. It was already mentioned in #UEFI systems that some Linux boot managers will autodetect Windows Boot Manager. Even though newer Windows installations have an advanced restart option, from which you can boot into Linux, it is advised to have other means to boot into Linux, such as an arch installation media or a live CD.
Windows 10 with GRUB
The following assumes GRUB is used as a boot loader (although the process is likely similar for other boot loaders) and that Windows 10 will be installed on a GPT block device with an existing EFI system partition (see the «System partition» section in the Microsoft documentation for more information).
Create with program gdisk on the block device the following three new partitions. See [5] for more precise partition sizes.
| Min size | Code | Name | File system |
|---|---|---|---|
| 16 MB | 0C01 | Microsoft reserved | N/A |
| ~40 GB | 0700 | Microsoft basic data | NTFS |
| 300 MB | 2700 | Windows RE | NTFS |
Create NTFS file systems on the new Microsoft basic data and Windows RE (recovery) partitions using the mkntfs program from package ntfs-3g.
Reboot the system into a Windows 10 installation media. When prompted to install select the custom install option and install Windows on the Microsoft basic data partition created earlier. This should also install Microsoft EFI files in the EFI system partition.
After installation (set up of and logging into Windows not required), reboot into Linux and generate a GRUB configuration for the Windows boot manager to be available in the GRUB menu on next boot.
Troubleshooting
Couldn’t create a new partition or locate an existing one
See #Windows UEFI vs BIOS limitations.
Cannot boot Linux after installing Windows
See Unified Extensible Firmware Interface#Windows changes boot order.
Restoring a Windows boot record
By convention (and for ease of installation), Windows is usually installed on the first partition and installs its partition table and reference to its bootloader to the first sector of that partition. If you accidentally install a bootloader like GRUB to the Windows partition or damage the boot record in some other way, you will need to use a utility to repair it. Microsoft includes a boot sector fix utility FIXBOOT and an MBR fix utility called FIXMBR on their recovery discs, or sometimes on their install discs. Using this method, you can fix the reference on the boot sector of the first partition to the bootloader file and fix the reference on the MBR to the first partition, respectively. After doing this you will have to reinstall GRUB to the MBR as was originally intended (that is, the GRUB bootloader can be assigned to chainload the Windows bootloader).
If you wish to revert back to using Windows, you can use the FIXBOOT command which chains from the MBR to the boot sector of the first partition to restore normal, automatic loading of the Windows operating system.
Of note, there is a Linux utility called ms-sys (package ms-sysAUR in AUR) that can install MBR’s. However, this utility is only currently capable of writing new MBRs (all OS’s and file systems supported) and boot sectors (a.k.a. boot record; equivalent to using FIXBOOT) for FAT file systems. Most LiveCDs do not have this utility by default, so it will need to be installed first, or you can look at a rescue CD that does have it, such as Parted Magic.
First, write the partition info (table) again by:
# ms-sys --partition /dev/sda1
Next, write a Windows 2000/XP/2003 MBR:
# ms-sys --mbr /dev/sda # Read options for different versions
Then, write the new boot sector (boot record):
# ms-sys -(1-6) # Read options to discover the correct FAT record type
ms-sys can also write Windows 98, ME, Vista, and 7 MBRs as well, see ms-sys -h.
Restoring an accidentally deleted EFI system partition
If you have a GPT-partitioned disk and erased (e.g. with mkfs.fat -F32 /dev/sdx) the EFI system partition, you will notice that Windows Boot Manager will either disappear from your boot options, or selecting it will send you back to the UEFI.
To remedy it, boot with a Windows installation media, press Shift+F10 to open the console (or click NEXT > Repair Computer > Troubleshoot… > Advanced > Command Prompt), then start the diskpart utility:
X:\Sources> diskpart
DISKPART> list disk
Select the appropriate hard drive by typing:
DISKPART> select disk number
Make sure that there is a partition of type system (the EFI system partition):
DISKPART> list partition
Select this partition:
DISKPART> select partition number
and assign a temporary drive letter to it:
DISKPART> assign letter=G:
DiskPart successfully assigned the drive letter or mount point.
To make sure that drive letter is correctly assigned:
DISKPART> list vol
 Volume ###  Ltr  Label        Fs     Type        Size     Status     Info
 ----------  ---  -----------  -----  ----------  -------  ---------  --------
 Volume 0     E                       DVD-ROM         0 B  No Media
 Volume 1     C                NTFS   Partition    195 GB  Healthy    Boot
 Volume 2         WINRE        NTFS   Partition    400 MB  Healthy    Hidden
 Volume 3     G                FAT32  Partition    499 MB  Healthy    System
Close diskpart:
DISKPART> exit
Navigate to C:\ (or what your system drive letter is):
X:\Sources> cd /d C:\
Next is the «magic» command, which recreate the BCD store (with /s for the mount point, /f for firmware type, optionally add /v for verbose):
C:\> bcdboot C:\Windows /s G: /f UEFI
Tip: If it hangs up after a minute, hit Ctrl+c. This happens sometimes, but you will get a message like boot files successfully created and it will have worked just fine.
You should now have Windows Boot Manager working as a boot option, and thus have access to Windows. Just make sure to never format your EFI system partition again!
Note: Remove the drive letter G assigned to the EFI system partition to keep it from showing up in My Computer.
See [6], [7] and [8].
The EFI system partition created by Windows Setup is too small
By default, Windows Setup creates a 100 MiB EFI system partition (except for Advanced Format 4K native drives where it creates a 300 MiB ESP). This is generally too small to fit everything you need. You can try different tools to resize this partition, but there are usually other partitions in the way, making it, at the very least, difficult.
If you are installing Windows from scratch, you can dictate the size of the EFI system partition during installation[9]:
- Select your installation target and make sure it has no partitions.
- Click New and then the Apply buttons. The Windows installer will then generate the expected partitions (allocating nearly everything to its primary partition) and just 100MB to the EFI.
- Use the UI to delete the
System,MSR, andPrimarypartitions. Leave theRecoverypartition (if present) alone. - Press
Shift+F10to open the Command Prompt. - Type
diskpart.exeand pressEnterto open the disk partitioning tool. - Type
list diskand pressEnterto list your disks. Find the one you intend to modify and note its disk number. - Type
select disk disk_numberwith the disk number to modify. - Type
create partition efi size=sizewith the desired size of the ESP in Mebibytes (MiB), and pressEnter. See the note at EFI system partition#Create the partition for the recommended sizes. - Type
format quick fs=fat32 label=Systemand pressEnterto format the ESP - Type
exitand pressEnterto exit the disk partitioning tool andexitfollowed byEnteragain.
Once Windows is installed, you can resize the primary partition down within Windows and then reboot and go about your usual Arch install, filling the space you just created.
Alternatively, you can use the Arch install media to create a single EFI system partition of your preferred size before you install Windows on the drive. Windows Setup will use the EFI system partition you made instead of creating its own.
Unable to install Windows Cumulative Update on BIOS system
On BIOS systems, Windows cumulative updates may fail with the error We couldn’t complete the updates. Undoing changes. Don’t turn off your computer. In such case, while in Windows, you need to set the Windows partition as active.
C:\> diskpart
DISKPART> list disk
DISKPART> select disk number
DISKPART> list partition
DISKPART> select partition number
DISKPART> active
DISKPART> exit
After successfully installing the Windows update, mark back your Linux partition as active, using commands above.
Time standard
- Recommended: Set both Arch Linux and Windows to use UTC, following System time#UTC in Microsoft Windows. Some versions of Windows revert the hardware clock back to localtime if they are set to synchronize the time online. This issue appears to be fixed in Windows 10.
- Not recommended: Set Arch Linux to localtime and disable all time synchronization daemons. This will let Windows take care of hardware clock corrections and you will need to remember to boot into Windows at least two times a year (in Spring and Autumn) when DST kicks in. So please do not ask on the forums why the clock is one hour behind or ahead if you usually go for days or weeks without booting into Windows.
Bluetooth pairing
When it comes to pairing Bluetooth devices with both the Linux and Windows installation, both systems have the same MAC address, but will use different link keys generated during the pairing process. This results in the device being unable to connect to one installation, after it has been paired with the other. To allow a device to connect to either installation without re-pairing, follow Bluetooth#Dual boot pairing.
See also
- Booting Windows from a desktop shortcut
- One-time boot into Windows partition from desktop shortcut
- Windows 7/8/8.1/10 ISO to Flash Drive burning utility for Linux (MBR/GPT, BIOS/UEFI, FAT32/NTFS)

Приветствую, друзья!
Двойная загрузка Linux с Windows — один из самых удобных способов использования двух операционных систем на одном компьютере.
Обе ОС установлены на диске, на реальном оборудовании, и при включении системы вы можете выбрать, какую операционную систему использовать.
В режиме двойной загрузки вы можете выбрать операционную систему для загрузки
В этом руководстве я покажу вам, как установить Ubuntu с уже установленной в системе Windows 10.
Прежде чем вы начнете следовать руководству, я советую сначала полностью его прочитать.
Посмотрите, что вам нужно и что вы должны делать в этом уроке.
Как только вы получите хорошее представление о процедуре и у вас все необходимое будет под рукой, приступайте к процессу.
Двойная загрузка — не сложный процесс. Просто нужно время и терпение.
Упомянутые здесь шаги применимы к другим версиям Ubuntu, таким как Lubuntu, Kubuntu, Xubuntu и дистрибутивам Linux на основе Ubuntu, таким как Linux Mint, elementary OS и т. д.
Двойная загрузка Ubuntu Linux с Windows 10
Это руководство подходит для систем с предустановленной Windows 10 с безопасной загрузкой UEFI и системой разбиения GPT.
Пожалуйста, проверьте, использует ли ваша система GPT или MBR?
Проверки совместимости
Убедитесь, что ваша система использует UEFI: это руководство применимо только для систем с загрузкой UEFI.
Если вы купили свою систему в последние 5-6 лет, скорее всего, у вас уже должна быть система UEFI в разделе GPT.
Однако нет ничего плохого в том, чтобы убедиться, что ваша система использует UEFI.
Если в вашей системе используется устаревшая версия BIOS с системой разбиения на разделы MBR, следуйте этому руководству по двойной загрузке.
Процесс шифрования Bitlocker отличается: в новых системах с Windows 10 Pro диск зашифрован с помощью Bitlocker.
Система с SSD и HDD: если у вас есть система с SSD и HDD, то есть с двумя дисками, процесс будет почти таким же.
Предпосылки: что вам нужно?
Для простой и безопасной установки Linux вместе с Windows вам понадобятся следующие вещи:
- Компьютер с предустановленной Windows 10;
- USB-ключ (флэш-накопитель или USB-накопитель) размером не менее 4 ГБ и без данных на нем;
- Подключение к интернету (для загрузки ISO-образа Ubuntu и инструмента для создания Live USB). Вы можете сделать это в любой системе, не обязательно в системе с двойной загрузкой.
- Необязательно: внешний USB-диск для резервного копирования существующих данных;
- Необязательно: восстановление Windows или загрузочный диск (если у вас возникнут серьезные проблемы с загрузкой, их можно будет исправить).
Давайте посмотрим, как установить Ubuntu вместе с Windows 10.
Шаг 1. Сделайте резервную копию вашей системы Windows [необязательно]
Всегда приятно иметь резервную копию ваших данных, на всякий случай, если вы испортите систему при работе с разделами диска.
Я советую скопировать все важные данные, которые вы не можете позволить себе потерять, на внешний USB-диск.
Вы можете использовать внешний жесткий диск (медленнее, но дешевле) или SSD (быстрее, но дороже) и копировать на него важные файлы и папки.
Шаг 2. Загрузите Ubuntu (или любой другой дистрибутив Linux, который вы будете использовать)
Перейдите на сайт Ubuntu и загрузите файл ISO.
Размер файла должен быть около 2,5 ГБ. Если вам нужно загрузить Ubuntu через торрент, вы можете нажать «Альтернативные загрузки».
Шаг 3: Создайте live USB / диск Ubuntu
Я предполагаю, что вы используете Windows для создания Live USB.
Есть несколько бесплатных приложений, которые позволяют создать Live Ubuntu USB.
Вы можете использовать любой из этих инструментов.
Поскольку я не могу показать их все, я буду все делать с Rufus.
Загрузите Rufus бесплатно с его веб-сайта. Он загрузит файл с расширением .exe.
Подключите USB.
Это устройство будет отформатировано, поэтому убедитесь, что на нем нет важных данных.
Запустите только что загруженный инструмент Rufus.
Он автоматически определяет подключенный USB-порт, но все равно дважды проверьте его.
Теперь перейдите к местоположению загруженного образа ISO и убедитесь, что он использует схему разделения GPT и целевую систему UEFI.
Нажмите кнопку «Пуск» и дождитесь завершения процесса. Ваш Live Linux USB готов.
Примечание. Установить Ubuntu и создать действующий USB-процесс Ubuntu можно на любом компьютере.
Но остальная часть процесса берет на себя система, в которой вы выполняете двойную загрузку.
Шаг 4. Освободите место на диске для установки Ubuntu
Во многих системах при установке Ubuntu предоставляется возможность сделать раздел диска для Ubuntu.
Однако это не гарантия.
Поэтому перед установкой лучше освободить необходимое место на диске.
В меню Windows найдите «разделы диска» и выберите «Создать и отформатировать разделы жесткого диска».
В инструменте управления дисками щелкните правой кнопкой мыши диск, который вы хотите разделить, и выберите «Сжатый том».
Если у вас всего один такой раздел, вам нужно освободить на нем немного свободного места для Linux.
Если у вас есть несколько разделов значительного размера, используйте любой из них, кроме диска C, поскольку он может стереть данные.
На 256 ГБ в моей системе уже было несколько разделов от производителя, но в основном для резервного копирования и других целей.
Основным разделом был диск C объемом около 220 ГБ, на котором установлена Windows 10.
В моем случае я уменьшил диск C, чтобы освободить место для установки Linux.
Сколько места вам нужно для Linux при двойной загрузке?
Это зависит от того, сколько у вас общего дискового пространства.
Вы можете установить Ubuntu на 15 или 20 ГБ, но скоро у вас начнется нехватка места на диске.
В наши дни у вас должно быть не менее 120 ГБ на диске.
В этом случае выберите для Linux 30-40 ГБ диска.
Если у вас диск на 250 ГБ, выделите ему 60-80 ГБ или даже больше.
Если у вас больше места на диске, выделите ему еще больше свободного места, если хотите.
Что делать, если у вас есть диски D, E или F?
Это обычная путаница для многих людей, поскольку они думают, что Ubuntu можно установить только на диск C.
Это не правда.
Понимаете, у меня был только один диск C, поэтому я его сжал.
Если у вас есть диск D, E или F, вы можете сжать один из этих дисков.
Вы также можете удалить диск D, E или F.
НИКОГДА НЕ УДАЛЯЙТЕ ДИСК С.
Шаг 5: Загрузитесь с Live Ubuntu USB
Вы создали действующий USB-накопитель Ubuntu на шаге 3.
Подключите его к системе.
Прежде чем вы загрузитесь с Live USB-накопителя, давайте вкратце расскажем о печально известной безопасной загрузке.
Нужно ли мне отключать безопасную загрузку для установки Linux?
6-8 лет назад безопасная загрузка UEFI не поддерживалась Linux, и поэтому вам пришлось отключить безопасную загрузку перед установкой Linux.
К счастью, в наши дни Ubuntu и многие другие дистрибутивы Linux очень хорошо поддерживают безопасную загрузку.
Обычно с этим ничего делать не нужно.
Однако, если ваша система не позволяет загружаться с Live USB или если вы видите какие-либо другие связанные проблемы, вы можете отключить безопасную загрузку в Windows.
Хорошо! Посмотрим, как загрузиться с USB.
Вы можете перейти к настройкам загрузки, нажав F2 / F10 или F12 во время запуска системы, и выбрать загрузку с USB.
Однако некоторым это трудно.
Более длинный, но простой шаг — получить доступ к настройкам загрузки UEFI из Windows.
В меню Windows найдите UEFI и нажмите «Изменить дополнительные параметры запуска»:
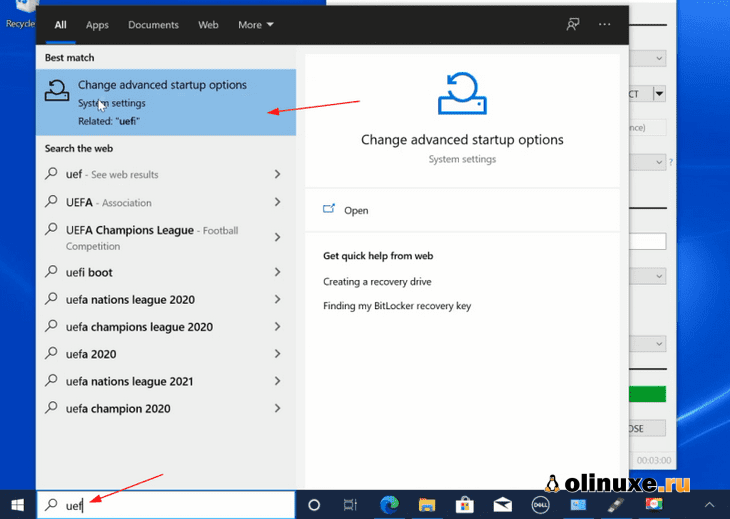
Перейдите к параметру «Расширенный запуск» и нажмите кнопку «Перезагрузить сейчас».
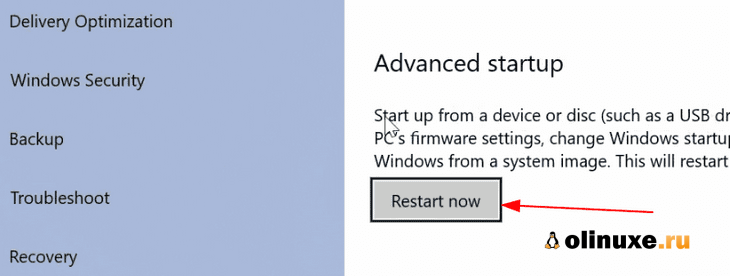
На следующем экране нажмите «Использовать устройство»:
Распознайте USB-диск по его имени и размеру.
Он также может отображаться как USB-устройство EFI.
Теперь он выключит вашу систему и перезагрузится на выбранный вами диск, который должен быть активным USB-диском.
Через несколько секунд вы должны увидеть такой экран:
Опция «Попробовать Ubuntu без установки» позволяет вам испытать Ubuntu с Live диска.
Вариант установки Ubuntu можно найти на рабочем столе.
Опция «Установить Ubuntu» немедленно запустит установку Ubuntu.
Вы можете выбрать любой вариант в зависимости от ваших предпочтений.
Шаг 6: Установка Ubuntu вместе с Windows 10
Запустите процедуру установки.
Первые несколько шагов просты.
Вы выбираете язык и раскладку клавиатуры.
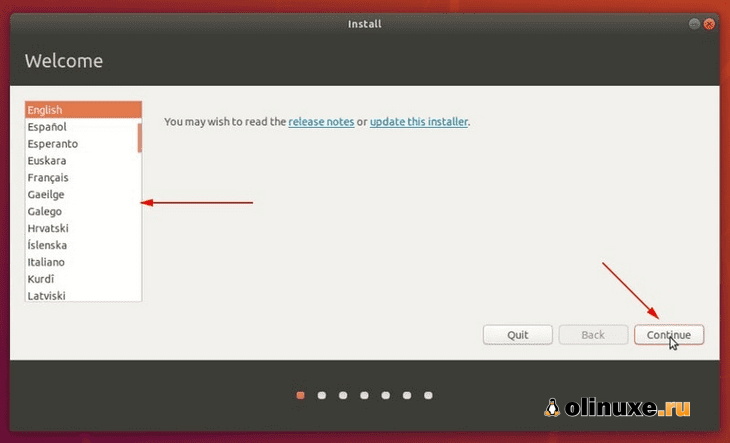
На следующем экране выберите «Обычная установка».
Пока не нужно загружать обновления или устанавливать стороннее программное обеспечение.
Вы можете сделать это после завершения установки.
Нажмите «Продолжить».
Переход к следующему шагу может занять некоторое время.
Примечание. Некоторые люди пытаются загрузить обновления и установить медиа-кодеки во время установки.
По моему опыту, это иногда создает проблемы во время установки, а также может привести к сбою установки.
По этой причине я не советую их использовать.
Важно: установка требует двух подходов в зависимости от того, что вы видите на следующем экране.
Поскольку это подробное руководство, я рассмотрю оба аспекта.
Подход 1. Вы видите «Установить Ubuntu вместе с Windows Boot Manager».
Если вы видите «Установить Ubuntu вместе с Windows Boot Manager» на экране установки, вам повезло.
Вы можете выбрать этот метод и нажать «Продолжить».
Если вы видите «Установить Ubuntu вместе с диспетчером загрузки Windows», выберите его
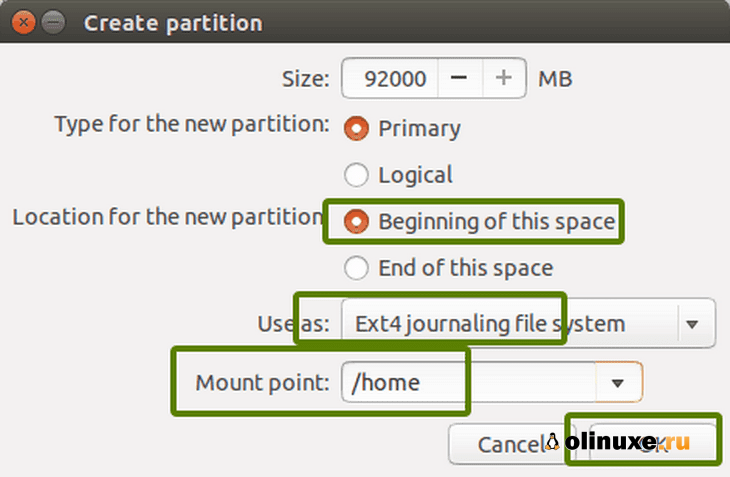
На следующем экране вы сможете создать раздел для Ubuntu, перетащив разделитель.
Вы можете выделить соответствующее дисковое пространство для Linux здесь.
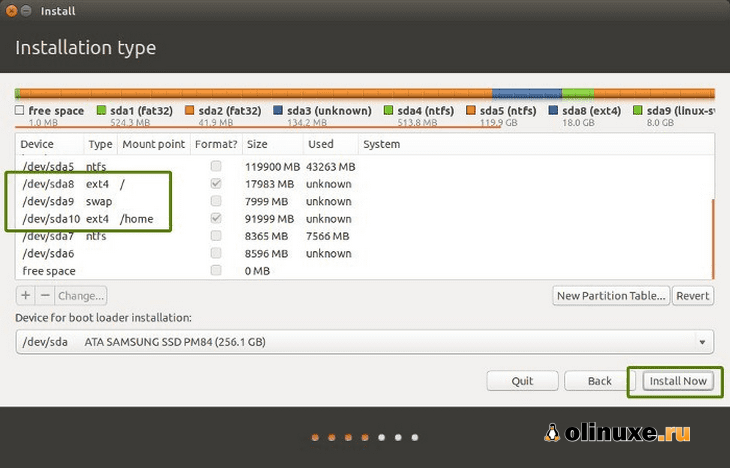
Ubuntu создаст один раздел из выделенного дискового пространства, и у него будет root с home и swap (файл подкачки) размером 2 ГБ под root.
Подход 2: Вы не видите параметр «Установить Ubuntu вместе с диспетчером загрузки Windows» или он неактивен
Но если вы один из тех, кому не повезло, вам не о чем беспокоиться.
Для вас дела обстоят не так уж и плохо.
Вы все еще можете установить Ubuntu с Windows.
На экране «Тип установки» выберите «Что-нибудь еще».
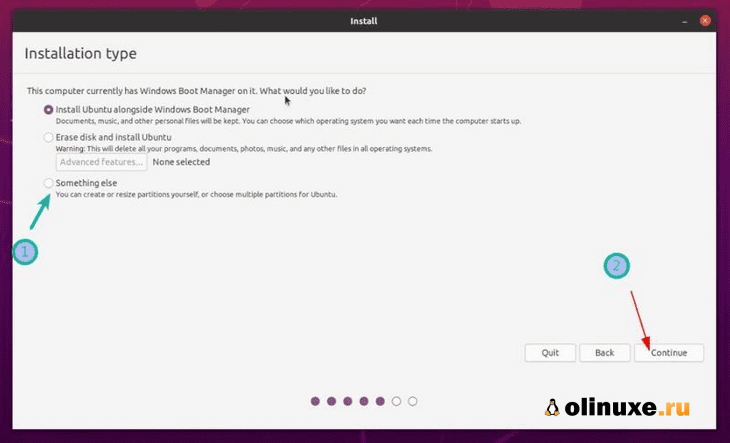
Вы перейдете к экрану разбиения на разделы.
Помните, вы заранее создали свободное место?
Вы можете выделить все свободное пространство для root (файл подкачки и домашняя страница будут созданы автоматически под root) или вы можете разделить разделы root, swap и home.
Оба метода хороши.
Я показываю шаги для создания разделов root, swap и home по отдельности.
Но не стесняйтесь использовать один раздел для всех из них.
Выберите свободное место и нажмите на знак «+».
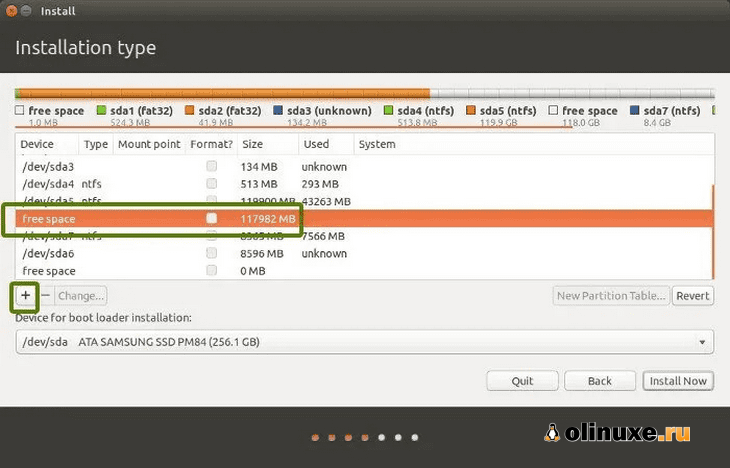
Он предоставит вам возможность создать раздел Linux.
Вы создаете корневой (root) раздел.
Для этого более чем достаточно всего, что превышает 25 ГБ.
Выберите размер, выберите «Ext4» в качестве типа файла и / (означает root) в качестве точки монтирования.
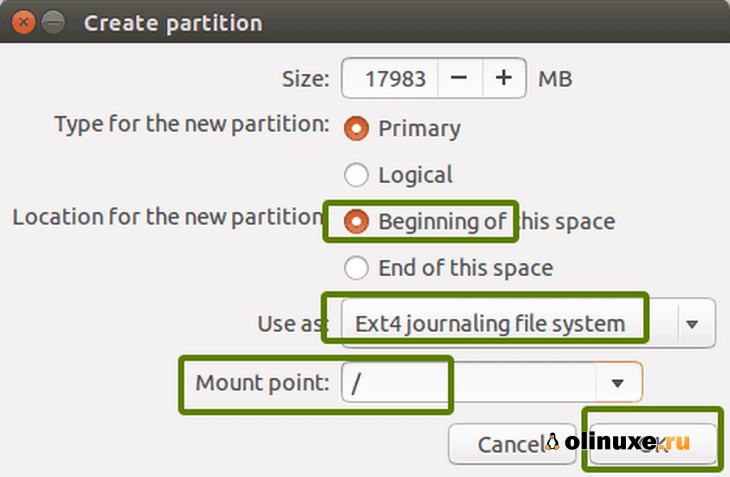
Щелкнув «OK» на предыдущем шаге, вы перейдете к экрану раздела.
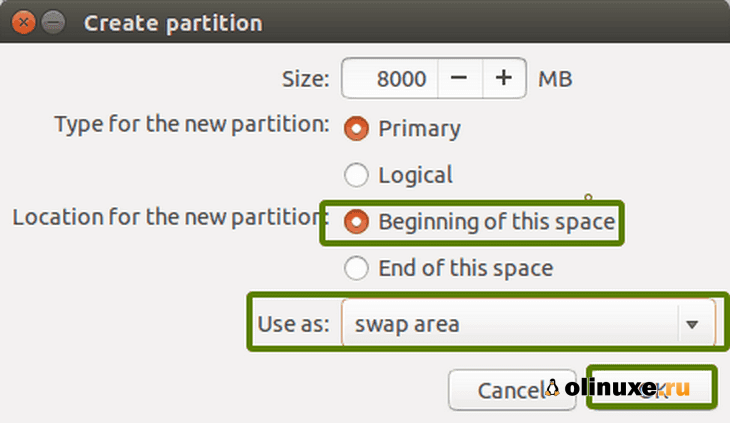
Затем создайте swap.
Как и раньше, снова нажмите на знак «+».
На этот раз используйте тип файла как область подкачки.
Вопрос об идеальном размере подкачки в Linux остается спорным.
Если у вас 2 ГБ или меньше ОЗУ, используйте подкачку, вдвое превышающую размер ОЗУ.
А если у вас 3-6 ГБ ОЗУ, используйте подкачку того же размера, что и ОЗУ.
Если у вас 8 ГБ или более ОЗУ, вы можете использовать подкачку, равную половине размера ОЗУ (если у вас не достаточно места на диске, и вы хотите использовать спящий режим, и в этом случае используйте подкачку не менее того же размера, что и ОЗУ).
Если вы чувствуете, что в вашей системе меньше swap, не волнуйтесь.
Вы можете легко создать файл подкачки и добавить больше места подкачки в свои системы.
Таким же образом создайте домашний раздел.
Выделите ему максимальное пространство (фактически выделите ему остальное свободное пространство), потому что именно здесь вы будете сохранять музыку, изображения и загруженные файлы.
Когда вы будете готовы с root, swap и home, нажмите «Install Now»:
Что ж, вы почти выиграли битву.
Теперь вы чувствуете запах победы.
По запросу выберите часовой пояс.

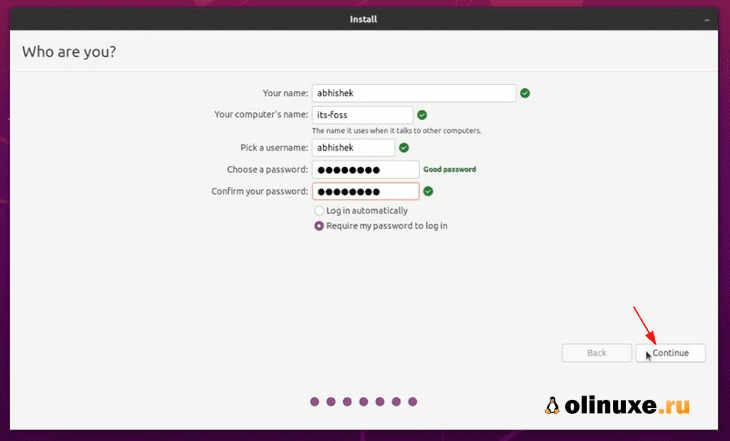
Затем вам будет предложено ввести имя пользователя, имя хоста (имя компьютера) и пароль.
Теперь осталось только подождать.
Для завершения установки потребуется 8-10 минут.
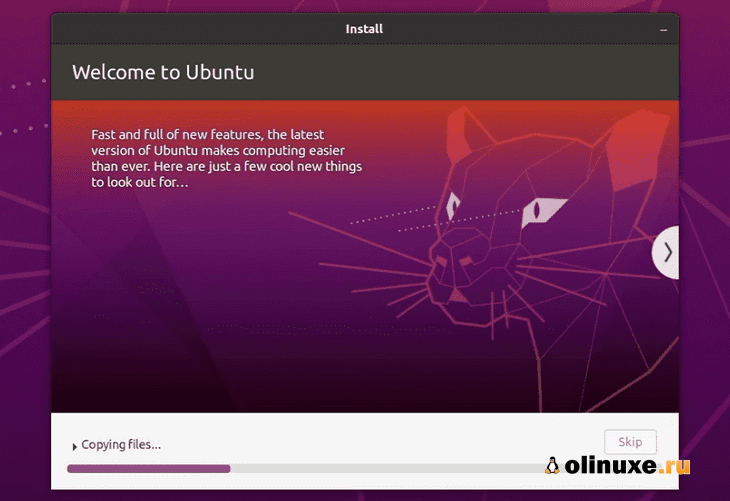
После завершения установки перезагрузите систему.
Перезагрузите компьютер после завершения установки
Вам будет предложено извлечь USB-диск.
На этом этапе вы можете удалить диск, не беспокоясь.
После этого система перезагрузится.

Удалите USB и нажмите ENTER
Для использования Linux вам больше не нужен Live USB-диск.
Вы установили Ubuntu на диск своего компьютера.
Удалите USB-накопитель и оставьте его на потом, если вы хотите использовать его для установки Linux в другой системе.
Вы также можете отформатировать его и использовать для обычного хранения или передачи данных.
Если все прошло гладко, вы должны увидеть экран «grub» после включения системы.
Здесь вы можете выбрать Ubuntu для загрузки в Ubuntu и диспетчер загрузки Windows для загрузки в Windows.
Довольно круто, правда?
Вы можете выбрать операционную систему на экране «grub»
Двойная загрузка не удалась? Вот несколько советов по устранению неполадок
Для некоторых двойная загрузка может пока не работать.
Однако вместо того, чтобы сдаваться, вы можете следовать нескольким советам и повторить процедуру установки.
Попробуйте сменить порт USB
Это может показаться смешным, но иногда некоторые порты USB вызывают проблемы с загрузкой USB или установкой Linux.
Изменение USB-порта может быть хитростью.
Старайтесь не использовать интернет при установке Linux
Я испытал, что иногда установка Linux выдает ошибку, если он подключен к интернету.
Если вы столкнулись с ошибкой «’grub-efi-amd64-signed’ package failed to install into /target», попробуйте установить Ubuntu без интернета.
Отключите безопасную загрузку и / или быструю загрузку
В некоторых редких случаях безопасная загрузка не позволит вам загрузиться с Live USB или установить Linux.
Отключите безопасную загрузку.
В некоторых случаях вы также можете отключить быструю загрузку.
Двойная загрузка завершена, но вы не видите экран «grub» для загрузки в Ubuntu
Пожалуйста, проверьте порядок загрузки в настройках UEFI.
Вы видите Ubuntu / UEFI под диспетчером загрузки Windows?
Если да, переместите его вверх по порядку.
Надеюсь, это руководство помогло вам выполнить двойную загрузку Ubuntu с Windows 10 UEFI.
Я здесь слишком подробно остановился на деталях, но я хотел ответить на все распространенные заблуждения и показать все необходимые шаги.
Если у вас все еще есть сомнения или возникла странная ошибка, оставьте комментарий, и я постараюсь вам помочь.
До скорых встреч!
До скорых встреч! Заходите!
Подписаться на обновления блога!
Уровень сложности
Средний
Время на прочтение
3 мин
Количество просмотров 7.7K
Всех приветствую. В свое время намучался с установкой Убунты в дуал буте с Виндой, переустановкой Винды в такой схемы, переустановкой Убунты и т.д. Недавно снова столкнулся с задачей установки Убунты в дуал буте с Виндой, решил написать краткий гайд, т.к. информация в интернете, кажется, в основном на английском языке и где-то устаревшая. Итак, что для этого потребуется:
-
Скачайте образ с оф. сайта и создайте загрузочную флешку.
Думаю здесь все понятно, подробно можно не описывать и есть информация в интернете, rufus в помощь.
-
Запуститесь с флешки и выберите try ubuntu.
Для чего? Здесь нам нужно найти в приложениях Gparted, найти диск с нашей Виндой, найти EFI раздел, нажать ПКМ -> «Manage flags» и отключить у него
bootиespфлаги. Для того, чтобы Убунта не установилась в EFI раздел Винды. Т.к.в будущем вам это доставило бы только проблем, да и в целом, лучше когда все раздельно.
Не серчайте за качество, все-таки особо не позаписываешь экран при установке -
После этого продолжите установку нажав «Install Ubuntu» или перезагрузившись и нажав то же самое.
Думаю подробно процесс можно не описывать, введите своё имя, имя юзера, и т.д.
-
Разбейте свой диск, куда хотите установить Убунту, на разделы.
Здесь каждый делает как хочет и по своему опыту, поэтому это не ультимативный гайд, но если вы не знаете, то выбираете нужный диск (поймете по размеру), удаляете у него все разделы (нажимаете на «-«), если они есть, создаете новые («+»), а именно:
4.1. Swap — раздел подкачки, если хотите режим гибернации, то таблица сколько нужно выделить здесь. Выбираем как на картинке (далее буду говорить лишь тип и поле «use as»/»mount point», т.к. «Location» всегда «Beginning»)
4.2. Boot — раздел загрузчика. Рекомендуемый размер 500мб-1гб. Ставим
Primary,use as Ext4иmount point /boot
4.3 Efi — тот самый раздел, из-за которого весь сыр-бор. У Винды по дефолту 100мб, где-то рекомендуют ставить 300 на Убунте. ТипPrimary,use as Efi system partition
4.4. Home — ваша личная папка, как users на Винде. Рекомендуют создавать отдельно, чтобы было больше вариации (можно зашифровать отдельно, можно забекапить отдельно, и т.д.). Размер по вашему усмотрению, типLogical,use as Ext4иmount point /home
4.5. Root — корень всего,/проще говоря. На него весь оставшийся размер./tmpи/varне рекомендую создавать отдельно, т.к. если не угадаете с размером, постоянно придется чистить вручную. Ставим также, как и/homeили тип можно поставитьprimary(но оба варианта рабочие). -
Дальше продолжаете установку как обычно, вытаскиваете флешку, перезагружаетесь.
Зайдя в Убунту качайте
gparted(почему-то у меня его не было по дефолту):sudo apt install gparted -y, находите снова диск с Виндой и включаете обратно флаги, закрываете (если галочка не нажимается, ничего страшного, так и должно быть, эти флаги сразу применяются) -
Дальше самое интересное.
6.1. Если вы ставите Ubuntu <22.04, то можете сразу написать
sudo update-grub, перезагрузиться и у вас благополучно появится меню с выбором ОС и Windows в качестве опции, наряду с Убунту. (Ах да, в любом случае на Windows желательно отключитьFast boot, т.к. говорят он мешает, так же легко найти, как это сделать в гугле).
6.2. Если же вы ставите 22.04 (и выше), то нужно потанцевать с бубном:
Откройте файл/etc/default/grubи добавьте туда строчкуGRUB_DISABLE_OS_PROBER=false. Это связано с тем, что по дефолту теперь GRUB не используетos_proberдля определения ОС, а значит нашу Винду без этого он не определит. -
Перезагружайтесь, смотрите меню, радуйтесь легкости бытия.


На этом у меня все. Надеюсь статья была полезной, наверное она подойдет и для других Linux систем. В любом случае, если вздумаете после этого переустанавливать Windows, то не торопитесь, возможно, вам стоит подождать нового гайда… (ну или можно просто отключить диск с Убунтой, так тоже сработает. Вообще-то говоря танцы с флагами можно было также избежать, отключив диск с Виндой, но кому не лень открывать корпус, отключать кабели, мыжпрограммисты).