Free space in Windows operating system is an ambiguous and confusing thing. When you delete files in a window, it seems that the files have been erased from the hard disk memory. In reality, this is far from truth. Even though you find that the files have been removed, but it remains in the hard disk until it is overwritten by any new data. In Solid State Devices, it is difficult to recover deleted data because SSDs deploy TRIM and garbage collection which makes it difficult to recover those data. In Windows operating system, there is an in-built utility tool called Cipher. Cipher helps you to wipe off free space from a drive so that the data is actually removed from the memory of the computer. Cipher works on the basis of three passes. The first pass fills the free space with zero data, the second one fills it with 0xFF numbers, and the final pass fills it with random numbers. Hence, wiping off free space using cipher tool takes a lot of time.
You need to close all the applications while running the cipher utility tool.
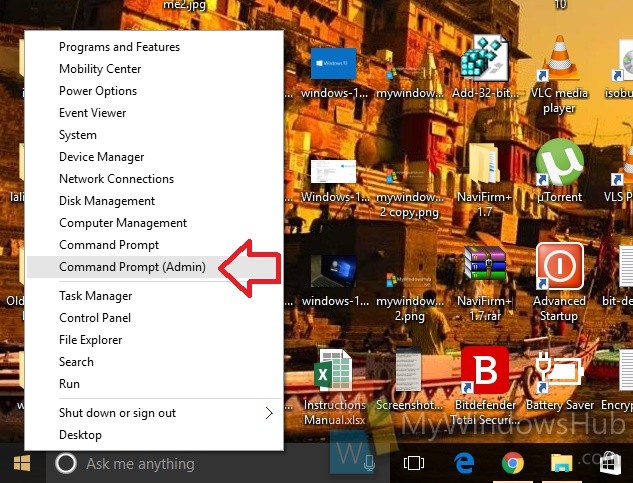
1. Press Win+X and tap on Command Prompt (Admin) to open the Elevated Command Prompt.
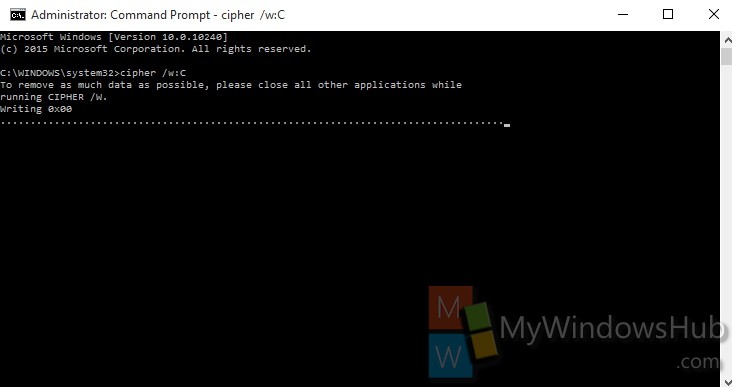
2. Now type the following command and then hit Enter.
cipher /w:C
You can replace the letter ‘C’ by another other drive letter whose free space has to be wiped off.
The wiping process will take some time.
About
Nick is a Software Engineer. He has interest in gadgets and technical stuffs. If you are facing any problem with your Windows, feel free to ask him.
Updated by
Daisy on Aug 09, 2023
Are you looking for a way to completely wipe out unallocated space? Do you want to protect your privacy from leakage? This article provides two efficient ways to help you wipe the unallocated space, but first, let’s figure out why we need to wipe unallocated space.
When you delete a partition, it becomes unallocated space, but does that mean it completely deletes your data? Of course not.
When deleting a partition, the data on the unallocated space cannot be completely erased. This is due to how file system types work, such as NTFS, FAT32, etc. When you delete a partition in Windows, the files inside are not completely erased, they are just marked as «deleted» in the master file table (hard drive index). Therefore, the main reason for wiping unallocated space is:
- Protect privacy: thoroughly clear the data on the partition to prevent others from malicious recovery.
However, how to wipe the unallocated since we can’t find any wipe option in Disk Management? Don’t worry. The next part will show you two ways to wipe out unallocated space.
Two Efficient Ways to Wipe Unallocated Space
How do we wipe unallocated space to prevent others recover our data? It’s easy if you get the right tools. This part will provide a Windows built-in tool and a third-party tool. Now, let’s start with the easier one.
Way 1. Use EaseUS Partition Master to Wipe Unallocated Space — Easy
EaseUS Partition Master Free is a utility to manage your disk partition. It can not only wipe the whole disk and some partitions but also wipe data on unallocated space in Windows 11/10/8/7/XP and Windows Vista. It is easy to use, so you can wipe the unallocated space easily with the help of its prompts. Now, download it and follow the guide below.
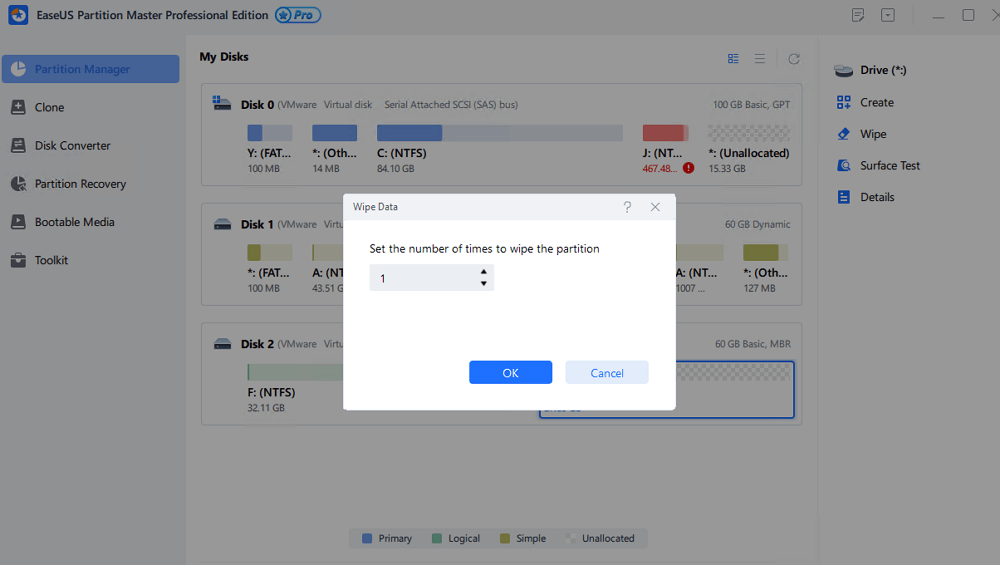
Step 1. Right-click the unallocated space from which you want to erase data and choose «Wipe.»
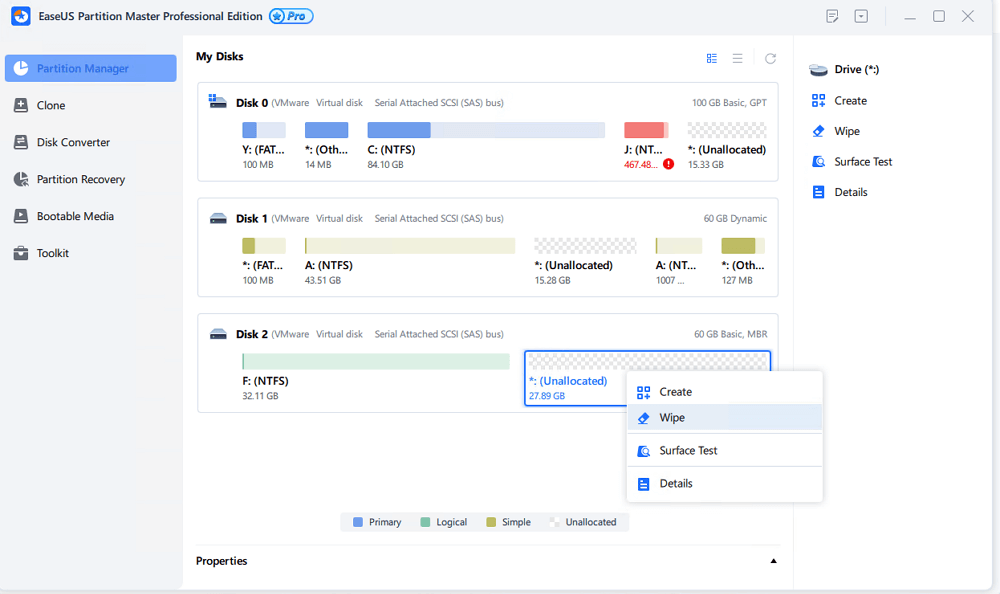
Step 2. In the new window, set the time for which you want to wipe your partition, then click «OK».
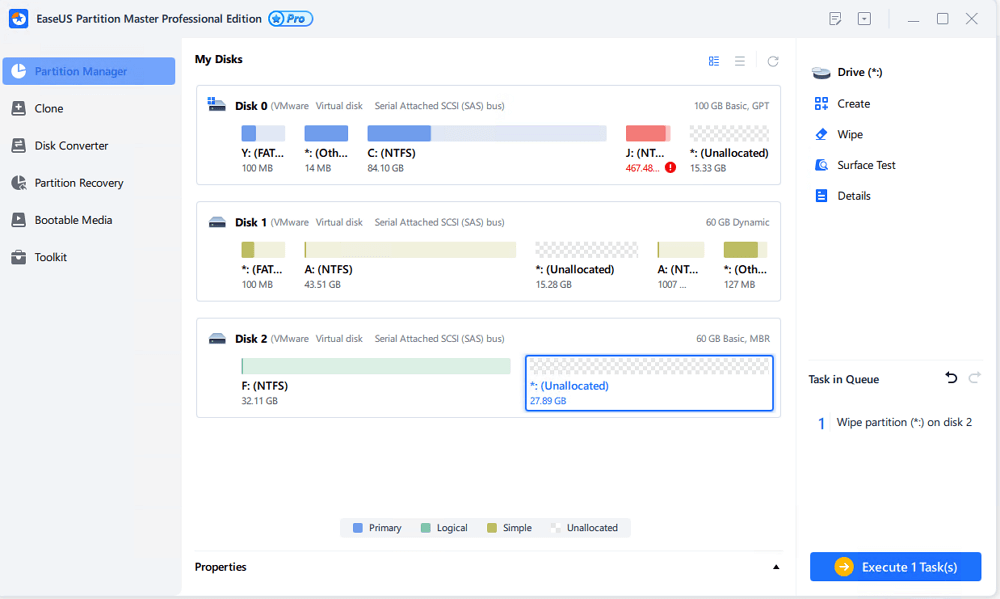
Step 3. Click the «Execute 1 Task(s)» button in the lower right corner, check the changes, then click «Apply».
You see. EaseUS Partition Master has helped you wipe unallocated space. It can help far more than that. Let’s see some features of it.
Features of EaseUS Partition Master:
- Delete unallocated space
- Format unallocated disk
- Add unallocated space to the D drive
- Convert unallocated space to free space
- Created partition from unallocated space
It can manage your unallocated space as well as your disk partition. Don’t hesitate to download it to help.
Way 2. Use Cipher.exe to Wipe Unallocated Space — Complex
Cipher.exe is a utility tool in Windows XP and later versions of Windows PC. It was originally developed for encrypting/decrypting files, but it also has an «erase» option that allows you to wipe or erase files that you have deleted safely. It will overwrite your partition or disk three times.
But first, you need to create a new partition based on the unallocated space. So here are steps to wipe unallocated space.
Step 1. Right-click on the Windows icon button and choose «Disk Management.»
Step 2. Right-click on the unallocated space on your disk and select «New simple volume.» Follow the New Simple Volume Wizard and create a new partition with a new drive number or letter.
Step 3. After that, right-click on the Windows icon and choose «Run.»
Step 4. Hit «Enter» after typing «cmd,» and then type «cipher /w:c» and hit «Enter» again. Replace C with the new drive letter.
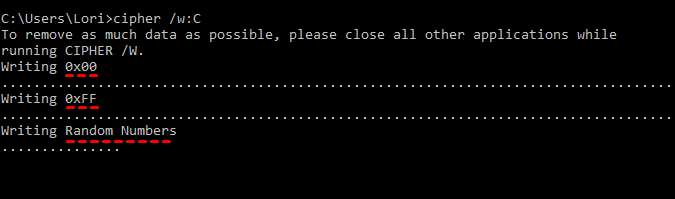
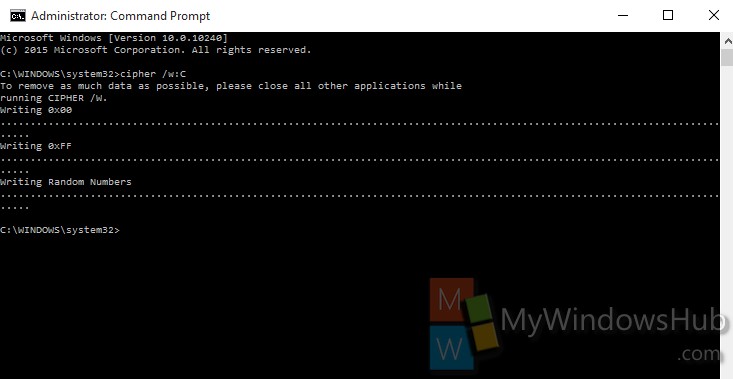
This process may take some time, depending on how much data you get on this partition. The «/w» command stands for Wipe, and when you run it, the command overwrites all of the unallocated space on your hard drive three times:
- First time — 0x00
- Second time — 0xFF
- Third time — random numbers
Hence, wait for it patiently, or you can choose EaseUS Partition Master to help.
You may also like the following:
Conclusion
This article provides two ways to help you erase or wipe unallocated space. EaseUS Partition Master is the better choice. It can help to erase all the most popular brands of SSDs, such as Samsung, SanDisk, etc. It protects your privacy by wiping your hard drive and helps you manage your disk partitions better by merging, moving, deleting, and partitioning them. If you are facing disk partition issues, don’t hesitate to download it.
If you have other questions related to unallocated space, the next part can help.
FAQs About How to Wipe Unallocated Space
Erasing or wiping data is very important if you don’t want your important data to be recovered by others. This part list some questions you may get about wiping unallocated space.
1. Can I format unallocated space?
Yes, you can. But before you format the unallocated space, you must create a new partition on the unallocated space. Then, you can format the new partition based on the unallocated space.
2. How do I delete unallocated space?
Follow the steps and try:
Step 1. right-click the unallocated space in Disk Management and choose «New simple volume.»
Step 2. Follow the New Simple Volume Wizard and create a new partition.
Step 3. Right-click the new partition and choose «Delete volume.»
3. How to convert unallocated space to free space?
How to convert unallocated space to free space? You have two ways to make unallocated space usable:
Way 1. Create a new partition on the unallocated space.
Way 2. Extend the existing partition with the unallocated space.

Are you selling, giving away, or disposing of a Windows PC? Learn how to securely wipe its hard drive so your data cannot be recovered.
When you delete files from your hard drive, did you know that the file never actually gets deleted and is likely able to be recovered using tools like Recuva? Normally this isn’t an issue as we use our computer each day; however, if you’re planning to sell or donate your computer and don’t want your old data to be recoverable, follow the steps below to wipe the free space on your hard drive. The process is the same and will work on Windows 7, 8, and Windows 10 and Windows 11.

What really happens when you delete a file?
When you delete a file on your computer, the only thing that’s removed is its reference in the master file table. The file still exists on your hard drive; however, Windows doesn’t know where the file is. This is because, as mentioned earlier, you’re only removing the indexes and the links to the data and telling Windows it has permission to overwrite that area of the hard drive.
So, until (and possibly after) the data is written over, it can be recovered by special tools or the right set of skills. The tools, or an experienced hacker, can scan the hard drive and look for the files and restore the links and indexes so Windows can see the files again. If you’re selling a computer or even disposing of one, you should securely wipe the free space on your PC’s hard drive so the files cannot be recovered.
Today we’ll show you how to use the cipher command on the command line to securely write over the free space several times to make sure no data can be recovered. We’ll also mention some third-party tools that do the same thing.
Cipher
Before using the cipher command to securely overwrite the free space on your hard drive, be sure you quit all programs. That ensures the maximum amount of free space is securely wiped.
Click the Cortana icon or the Search icon on the Taskbar and start typing “command prompt.” Then, click Command Prompt under Best match.

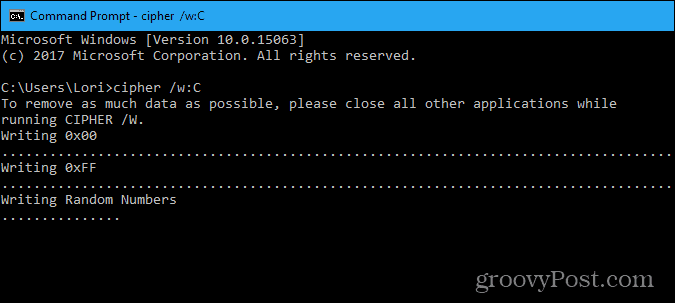
Type the following command at the prompt and press Enter.
cipher /w:c:
Data that is not allocated to any files or folders is overwritten three times and permanently removed. This can take a long time if you are overwriting a large amount of free space. If you want to wipe free space from a drive other than C, just change the drive letter as shown below.

Simply change the drive letter to wipe the free space from whichever drive you wish
Cipher goes through the following steps as it securely wipes the free space on your hard drive.
- The cipher command automatically creates a new folder on the C drive called EFSTMPWP and then creates a file in that folder with nothing but zeros in it. It will grow until the hard drive fills up.
- Then, cipher deletes that file and creates a second file that is filled with the number 255 repeatedly until the file grows big enough to fill the free space on the hard drive again.
- Next, cipher deletes the second file, creates a third file, and fills that with random numbers until your hard drive is full again.
- Finally, cipher deletes the third file and returns you to the prompt. Type exit at the prompt to close the Command Prompt window.
So, essentially, cipher wrote over the free space (old files) on your hard drive three times to ensure no one could ever scan your hard drive and recover the data you deleted from it.
If you watch your hard drive space, as cipher does its thing, don’t be surprised when you see your hard drive fill up. This is normal, as mentioned in the steps above, and space will be freed again.
CCleaner
If you’re not comfortable using the command line, there’s a free utility called CCleaner that allows you to wipe the free space on your hard drive securely.
NOTE: We are aware that CCleaner was hacked. However, it was the 32-bit version 5.33 distributed by Avast that was compromised. The company has since acknowledged the issue and fixed it to the point that we feel comfortable now recommended them still. That said, be sure you update to the latest version. CCleaner is still a useful and reliable tool.
There are two versions of CCleaner, free and paid. The feature that wipes the free space on your hard drive is available in the free version, so that will do just fine.
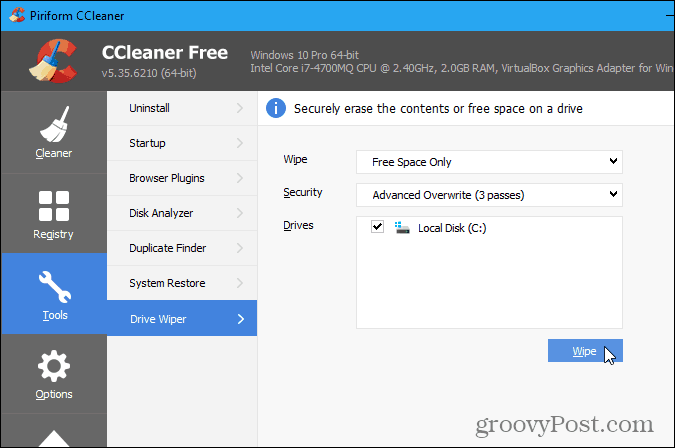
Once you’ve downloaded CCleaner and installed it, or updated it, open the program and click Tools on the left pane. Choose Free Space Only from the Wipe drop-down list. Make sure you DO NOT select Entire Drive, as this will erase ALL the files on your hard drive—unless that is what you mean to do. If you’re getting rid of the PC, you can use the Entire Drive option to wipe the entire drive. Be very careful when making this selection.
Select the overwriting procedure you want from the Security drop-down list. Simple Overwrite is fine for most situations. However, if you want CCleaner to behave like the cipher command, select Advanced Overwrite (3 passes). Finally, select the drive you want to securely wipe the free space in the Drives box and click Wipe.
Eraser
Another option for making sure your deleted data cannot be recovered is to delete your files and folders securely in the first place.
Eraser is a free, advanced security tool for Windows that allows you to securely delete data from your hard drive by overwriting it several times with carefully selected patterns, like the cipher command and CCleaner. The difference is you can do this when you delete the files and folders, not after. You can also securely wipe the free space on your hard drive to be extra safe.
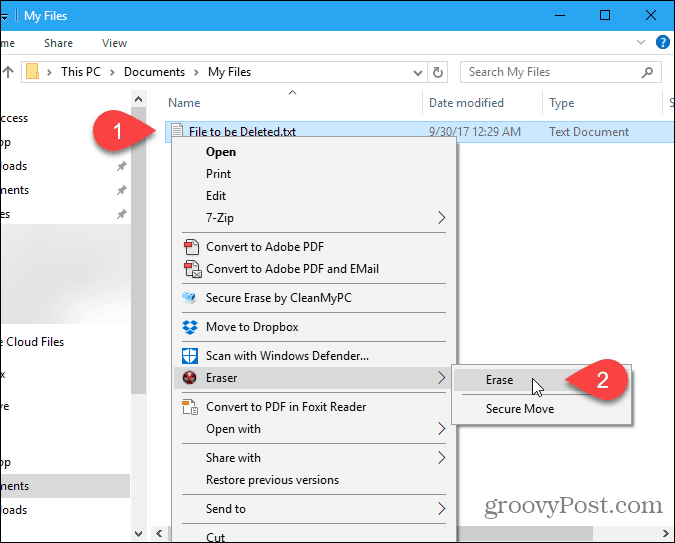
When you download Eraser and install it, an option is added to the context (right-click) menu in File Explorer. Instead of deleting files and folders normally by pressing the Delete key, sending them to the recycle bin, and then emptying the recycle bin, you can use Eraser directly in File Explorer to securely delete files and folders.
To securely delete one or more files or folders, select what you want to delete, right-click on the selection, and then go to Eraser > Erase on the popup menu.
What do you use to wipe the free space on your hard drive securely? Or is this brand new information? Share your thoughts and experiences in the comments below.
![]()
How to Securely Wipe the Free Space on Your Windows PC
Once youve downloaded CCleaner and installed it, or updated it, open the program and click Tools on the left pane. Choose Free Space Only from the Wipe dropdown list. Make sure you DO NOT select Entire Drive, as this will erase ALL the files on your hard drive—unless that is what you mean to do.
How do I Clear up Free Space on Windows 10?
Open the Start menu and select Settings > System > Storage. Open Storage settings.
Turn on Storage sense to have Windows delete unnecessary files automatically.
To delete unnecessary files manually, select Change how we free up space automatically. Under Free up space now, select Clean now.
Is it Good to Wipe Free Space?
Wiping free space will not help you get better performance or better defrag results. It will just make harder for others to recover data from your disk. If you want to boost the computer speed, you can check this post to get workarounds.
What does Wiping Free Space Do?
Wiping free space is just permanently erasing the files already deleted. To make more free space on a hard drive you actually need to delete files. Wiping free space is just permanently erasing the files already deleted.
How do I Clear Empty Space on my Hard Drive?
Open Disk Cleanup by clicking the Start button .
If prompted, select the drive that you want to clean up, and then select OK.
In the Disk Cleanup dialog box in the Description section, select Clean up system files.
If prompted, select the drive that you want to clean up, and then select OK.
Delete files with Storage Sense
-
Select Start > Settings > System > Storage .
Open Storage settings -
Turn on Storage Sense to have Windows delete unnecessary files automatically.
Delete files manually
-
Select Start > Settings > System > Storage > Cleanup recommendations.
Open Storage settings -
Select the temporary files, unused files, files synced to the cloud, or unused apps you want to remove, then select the Clean up button for each section.
Move files to another drive
-
Connect your removable media to your device.
-
Open File Explorer from the taskbar and find the files you want to move.
-
Select the files, then select Cut on the ribbon.
-
Navigate to the location of the removable media, then select Paste .
Delete files with Storage Sense
-
Open the Start menu and select Settings > System > Storage .
Open Storage settings -
Select Configure Storage Sense or run it now, and under Temporary Files, select when you want each type of files deleted.
Note: To delete unnecessary files manually instead, scroll down and under Free up space now, select Clean now.
Uninstall apps you don’t use anymore
-
Open the Start menu and select Settings > Apps > Apps & features.
Open Apps & features settings -
Search for a specific app or sort them by size to see which ones are taking up the most space.
-
When you find an app you want to delete, select it from the list, and then select Uninstall.
Move files to another drive
-
Connect your removable media to your device.
-
Open File Explorer from the taskbar and find the files you want to move.
-
Select the files, go to the Home tab, then select Move to and select Choose location.
-
Select your removable media from the location list, and then select Move.