 Всем добра
  Значит Windows will now check the disk это ошибка/надпись, которая появляется после проверки диска CHKDSK (Scandisk). На одном форуме прочитал, что это возможно признак того, что диск умирает..
Один человек пишет — назначил проверку системного диска в свойствах, выбрал автоматически исправлять системные ошибки, имеется ввиду вот эта галочка:

Так как диск системный, то он сможет провериться только при включении ПК. Чел перезагрузил комп — пошла проверка. Ну и самое главное, что пишет человек — у его на экране появилась надпись:
A disk check has been scheduled. Windows will now check the disk.
Как видите в этой надписи упоминается Windows will now check the disk. Вот перевод надписи:

То есть надпись означает просто что теперь Windows проверит диск. Если вы видите эту ошибку, вернее надпись — то ничего не делайте, просто нужно подождать. Виндовс или проверяет или подготавливается к проверке. И весь процесс зависит от жесткого диска, если он у вас.. например на терабайт, то проверка может занять.. ну пару часов (зависит от количества файлов). А если на терабайта 4 и более — сами понимаете, времени может уйти много..

Едем дальше. Еще надпись Windows will now check the disk может быть в журнале событий, после проверки.
На заметку:
- У некоторых юзеров надпись Windows will now check the disk появляется при включении ПК, так как автоматически запускается Скандиск.
- Помимо этой надписи также там будут и другие, среди которых:
CHKDSK is verifying filesCHKDSK is verifying indexesСкажу только одно — это нормально. Есть несколько уровней проверки CHKDSK (вроде 4 или 5).
При любых проблемах с жестким диском — первым делом проверяем программой Викторией
Мое мнение — аппаратная проблема с диском. Проверка скандиском просто так не появляется, а только при ошибках в файловой системе. Может битые сектора появились, или еще что-то.. что делать? Нужно проверить программой Викторией (на 2018 год стабильная версия 4.47). Протестировать, она покажет состояние диска. Также в Виктории есть таблица показаний S.M.A.R.T., которую посмотреть также полезно. Внешний вид Виктории:

Ну а вот собственно как и выглядит эта надпись (получается что это не ошибка вовсе):

Может быть и на черном фоне:

Я могу ошибаться, но вроде на синим фоне — это проверка в Windows XP, а на черном — в Windows 7.. 
Причины появления этой надписи при включении ПК
Давайте хоть немного разберемся с причинами.. вот какие они могут быть:
- Вы выключили комп неправильно — из розетки. Или пропало электричество. Такой тип выключения ПК часто вызывает проверку при включении. Кстати, при таком выключении — файлы могут повредиться. Поэтому и запускается проверка — при возможности они восстановятся.
- Ваш диск банально уже подустал и пора его заменить. Ему тяжело работать и он уже.. как говорится — сыпется. Что делать? Первым делом проверить программой Виктория, если вы думаете что то очень сложно — ошибаетесь

- Проблемы с файловой системой — да, такое может быть, хоть и редко. Если вы продвинутый юзер, то вот вам совет — перенесите все данные с проблемного диска на другой, но не путайте — перенести нужно именно на диск, а не на локальный раздел. Далее на проблемном диске выполните полное форматирование, не быстрое. После — в управление дисками — удалите раздел или том на диске, не помню точка как создается. И потом создайте его заново. Если все равно будут проблемы.. тогда стоит обратится в мастерскую


Что делать если проверка зависает?
При зависании стоит повторить — то есть принудительно выключить ПК и включить. Если снова будет зависать — нужно принимать меры. Дело в том, что принудительное выключение, как мне кажется.. не очень хорошо отражается на диске. Поэтому играться с этим не стоит 
Вот еще некоторые мои мыслишки:
- Если это возможно — попробуйте подключить диск к другому ПК. Если нет — загрузитесь с Live CD, если он у вас есть.
- В крайнем случае попробуйте при загрузке зажимать кнопку F8, пока не появится меню — там есть пункт Загрузка последней удачной конфигурации (точно не помню) — попробуйте, возможно поможет.
- В самом крайнем случае — несите ПК или диск в мастерскую. Или, как вариант, если на компе нет важных данных — попробуйте переустановить виндовс. Если и тут ничего не получится, тогда уже точно в мастерскую..
- Маловероятно, но.. может стоит попробовать подключить жесткий диск в другой порт на материнке?
- На всякий случай скажу — разбирать диск ни в коем случае нельзя в домашних условиях.
Вот ребята мы и поговорили об Windows will now check the disk, надеюсь что хотя бы немного из того что я здесь написал — оказалось полезным. Ну а если нет — сори. Удачи вам и всех благ 
На главную!
11.11.2018
Windows will now check the disk что это?
 Всем добра
  Значит Windows will now check the disk это ошибка/надпись, которая появляется после проверки диска CHKDSK (Scandisk). На одном форуме прочитал, что это возможно признак того, что диск умирает..
Один человек пишет — назначил проверку системного диска в свойствах, выбрал автоматически исправлять системные ошибки, имеется ввиду вот эта галочка:

Так как диск системный, то он сможет провериться только при включении ПК. Чел перезагрузил комп — пошла проверка. Ну и самое главное, что пишет человек — у его на экране появилась надпись:
A disk check has been scheduled. Windows will now check the disk.
Как видите в этой надписи упоминается Windows will now check the disk. Вот перевод надписи:

То есть надпись означает просто что теперь Windows проверит диск. Если вы видите эту ошибку, вернее надпись — то ничего не делайте, просто нужно подождать. Виндовс или проверяет или подготавливается к проверке. И весь процесс зависит от жесткого диска, если он у вас.. например на терабайт, то проверка может занять.. ну пару часов (зависит от количества файлов). А если на терабайта 4 и более — сами понимаете, времени может уйти много..

Едем дальше. Еще надпись Windows will now check the disk может быть в журнале событий, после проверки.
- У некоторых юзеров надпись Windows will now check the disk появляется при включении ПК, так как автоматически запускается Скандиск.
- Помимо этой надписи также там будут и другие, среди которых:
CHKDSK is verifying files
CHKDSK is verifying indexes
Скажу только одно — это нормально. Есть несколько уровней проверки CHKDSK (вроде 4 или 5).
При любых проблемах с жестким диском — первым делом проверяем программой Викторией
Мое мнение — аппаратная проблема с диском. Проверка скандиском просто так не появляется, а только при ошибках в файловой системе. Может битые сектора появились, или еще что-то.. что делать? Нужно проверить программой Викторией (на 2018 год стабильная версия 4.47). Протестировать, она покажет состояние диска. Также в Виктории есть таблица показаний S.M.A.R.T., которую посмотреть также полезно. Внешний вид Виктории:

Ну а вот собственно как и выглядит эта надпись (получается что это не ошибка вовсе):

Может быть и на черном фоне:

Я могу ошибаться, но вроде на синим фоне — это проверка в Windows XP, а на черном — в Windows 7.. 
Причины появления этой надписи при включении ПК
Давайте хоть немного разберемся с причинами.. вот какие они могут быть:
- Вы выключили комп неправильно — из розетки. Или пропало электричество. Такой тип выключения ПК часто вызывает проверку при включении. Кстати, при таком выключении — файлы могут повредиться. Поэтому и запускается проверка — при возможности они восстановятся.
- Ваш диск банально уже подустал и пора его заменить. Ему тяжело работать и он уже.. как говорится — сыпется. Что делать? Первым делом проверить программой Виктория, если вы думаете что то очень сложно — ошибаетесь
- Проблемы с файловой системой — да, такое может быть, хоть и редко. Если вы продвинутый юзер, то вот вам совет — перенесите все данные с проблемного диска на другой, но не путайте — перенести нужно именно на диск, а не на локальный раздел. Далее на проблемном диске выполните полное форматирование, не быстрое. После — в управление дисками — удалите раздел или том на диске, не помню точка как создается. И потом создайте его заново. Если все равно будут проблемы.. тогда стоит обратится в мастерскую


Что делать если проверка зависает?
При зависании стоит повторить — то есть принудительно выключить ПК и включить. Если снова будет зависать — нужно принимать меры. Дело в том, что принудительное выключение, как мне кажется.. не очень хорошо отражается на диске. Поэтому играться с этим не стоит 
Вот еще некоторые мои мыслишки:
- Если это возможно — попробуйте подключить диск к другому ПК. Если нет — загрузитесь с Live CD, если он у вас есть.
- В крайнем случае попробуйте при загрузке зажимать кнопку F8, пока не появится меню — там есть пункт Загрузка последней удачной конфигурации (точно не помню) — попробуйте, возможно поможет.
- В самом крайнем случае — несите ПК или диск в мастерскую. Или, как вариант, если на компе нет важных данных — попробуйте переустановить виндовс. Если и тут ничего не получится, тогда уже точно в мастерскую..
- Маловероятно, но.. может стоит попробовать подключить жесткий диск в другой порт на материнке?
- На всякий случай скажу — разбирать диск ни в коем случае нельзя в домашних условиях.
Вот ребята мы и поговорили об Windows will now check the disk, надеюсь что хотя бы немного из того что я здесь написал — оказалось полезным. Ну а если нет — сори. Удачи вам и всех благ 
Добавить комментарий Отменить ответ
Этот сайт использует Akismet для борьбы со спамом. Узнайте как обрабатываются ваши данные комментариев.
Источник
Windows wi11 now check the disk
Стоит ВинХП СП2, есть диск «D:» файловая система «NTFS» и вот ОС при каждом включении постоянно начинает его проверять на поиск ошибок. (Checking file system on D: . )
Пробовал принудительно его проверить «Скандиском», ОС просит перезагрузить компутре, перезагружаю,
начинается проверка (моя). проходит и потом опять запускается повторная проврка (которая идёт постоянно).
Подскажие, что сделать, чтобы система перестала его проверять?
Похожая проблема, но с одним отличием: проверка диска при старте Windows зависает 🙁 Но если её пропустить нажатием клавиши, то дальше комп грузится и работает нормально.
Началось после принудительного выключения компа, после его зависания в игре.
Начинается обычно: при загрузке на синем экране появлется сообщение:
Cheking file system on C:
The type of file system is NTFS
One of your disks needs to be checked for consistency. You
may cancel the disk check, but it is strongly recommended
that you continue.
To skip disk checking, press any key within 5 second(s).
Если в этот момент нажать клавишу (почему-то, по словам владельца, только F8 или F9, на другие клавиши коп не реагирует), то Windows загружается и работает OK. Иначе:
Windows will now check the disk.
CHKDSK is verifying files (stage 1 of 3).
File verification completed.
CHKDSK is verifying indexes (stage 2 of 3).
0 percent completed.
И всё, виснет (Владелец говорит, что один раз, после нескольких минут простоя, Windows всё же загрузилась.)
Проверка диска, запущенная из свойств диска в проводнике Wndows говорит, что всё OK.
Но Chkdsk.exe, запущенный в командной строке Windows тоже останавливается на середине проверки :dont:
«Назначенные задания» в Windows отсутствуют.
В реестре параметр, о котором пишет Microsoft (http://support.microsoft.com/kb/831426), стоит как надо:
[HKEY_LOCAL_MACHINE\System\CurrentControlSet\Control\Session Manager]
«BootExecute» = «autocheck autochk *»
ОС Windows XP SP2. Комп P4 3 ГГц, ≥ 512 МБ памяти DDR-400, хард IDE не знаю какого объёма.
Раскопал пока 2 варианта:
1. Появились сбойные блоки на харде, на которых CHKDSK затыкается. На их наличие ещё не проверял.
2. Касперский антивирус созаёт (http://support.kaspersky.com/kav7/error?qid=208279501) большой служебный то ли файл, то ли каталог, на котором затыкается CHKDSK. Разработчики советуют запустить CHKDSK с ключём /I… вот только как запустить с этим ключом при старте Windows?! Или они имеют в виду, что надо запустить один раз в командной строке, и тогда при следующих загрузках проверка не будет запускаться?
Пока запускать CHKDSK /I владелец не пробовал, стоит ли у него Касперский, я тоже не знаю.
«/I» — это режим «только чтение»Нее, /I это — «менее строгая проверка индексных элементов». А собсна на «verifying indexes (stage 2 of 3)» CHKDSK и стопорится.
The /I switch directs CHKDSK to skip the checks that compare directory entries to their corresponding file record segments.
непонятно, почему CHKDSK ведёт себя по разномуНу вот разработчики Касперского пишут (http://support.kaspersky.com/kav7/error?qid=208279501), что он о-очень долго проверяет какую-то там базу, которую Касперский создаёт. А с ключём /I он проверку её в т. ч. пропускает.
Продолжение. Удалили папки, оставшиеся от Касперского, стоявшего до переустановки Системы (всё что нашлось на C: по слову «Kasper»; в скрытых и системных папках тоже искали):
C:\Program Files\Kaspersky Lab
C:\Documents and Settings\All Users\Application Data\Kaspersky Lab
C:\Documents and Settings\All Users\Application Data\Kaspersky Lab Setup Files
Очистили все
C:\Documents and Settings\ \Local Settings\Temp
C:\Windows\Temp
и Корзину
Не помогло. То ли эту «базу» Касперского не нашли, то ли дело не в ней.
Источник
Windows wi11 now check the disk
Сообщения: 8054
Благодарности: 1092
| Конфигурация компьютера | |
| Материнская плата: ASUS P4P800 Deluxe rev.A2 | |
| HDD: WD5000ABYS 16Mb/7500/SATA300 | |
| Звук: SoundMAX-integr. | |
| CD/DVD: RW NEC ND-4571A | |
| ОС: Windows 7 SP1 Ultimate Rus; WinXP SP3+ Prof Rus | |
| Прочее: +(4-6) разномастных SATA/IDE-HDD (80-320Gb) |
——-
Из двух зол, не выбирают ни одного!
Если же вы забыли свой пароль на форуме, то воспользуйтесь данной ссылкой для восстановления пароля.
A disk check has been scheduled.
Windows will now check the disk.
CHKDSK is verifying files (stage 1 of 5).
152832 file records processed. File verification completed.
99 large file records processed. 0 bad file records processed. 2 EA records processed. 60 reparse records processed. CHKDSK is verifying indexes (stage 2 of 5).
195200 index entries processed. Index verification completed.
0 unindexed files scanned. 0 unindexed files recovered. CHKDSK is verifying security descriptors (stage 3 of 5).
152832 file SDs/SIDs processed. Cleaning up 9 unused index entries from index $SII of file 0x9.
Cleaning up 9 unused index entries from index $SDH of file 0x9.
Cleaning up 9 unused security descriptors.
Security descriptor verification completed.
21185 data files processed. CHKDSK is verifying Usn Journal.
35870232 USN bytes processed. Usn Journal verification completed.
CHKDSK is verifying file data (stage 4 of 5).
152816 files processed. File data verification completed.
CHKDSK is verifying free space (stage 5 of 5).
7697907 free clusters processed. Free space verification is complete.
Windows has checked the file system and found no problems.
51199999 KB total disk space.
20071296 KB in 119720 files.
79484 KB in 21186 indexes.
1024 KB in bad sectors.
256567 KB in use by the system.
65536 KB occupied by the log file.
30791628 KB available on disk.
4096 bytes in each allocation unit.
12799999 total allocation units on disk.
7697907 allocation units available on disk.
Internal Info:
00 55 02 00 74 26 02 00 0d eb 03 00 00 00 00 00 .U..t&.
31 b8 00 00 3c 00 00 00 00 00 00 00 00 00 00 00 1.
Check Disk, or more often known by its abbreviation CHKDSK, is a built-in tool in Microsoft Windows to scan hard disk drives for errors and bad sectors and repair them. This short tutorial will show you how to skip or disable disk checking on Windows 10 or Windows 11 so that it won’t run on startup again.
Why is disk checking forced to run on startup
If a disk check is automatically scheduled to run every time you turn on your laptop or desktop computer without your consent, it can indicates two possibilities:
- Windows has detected unusual shut down or restart behavior.
- Windows has detected issues on one of your hard disk drives.
If you attempt to interrupt and cancel the disk check by “pressing any key”, you can temporary cancel the disk check for the current session. However, the disk check operation will repeat on every startup until the process can be completed at least once and that the disk has no issue.
What are the proper things to do
Let’s not ignore the obvious. Repeated forced startup disk check is an indication of possible disk errors or even hardware failure. The proper action to be taken is to let the disk check run to completion.
The disk check process will automatically scan for errors and repair them. Once the errors are fixed, Windows will stop scheduling disk checking on startup if there is no other issue detected in any of your disk drives.
If the disk check finds any error that can’t be fixed, it will let you know in the scan reports at the end of the scan. If this is the case, it usually indicates that your hard drive has started to fail or has already failed. You may want to quickly backup any existing data on the disk if you don’t want to lose them later.
How to skip disk check on Windows 10/11
There are two methods to force cancel a scheduled startup disk check on Windows 11/10. If one doesn’t work, try the other.
Stop disk checking via “Command Prompt”
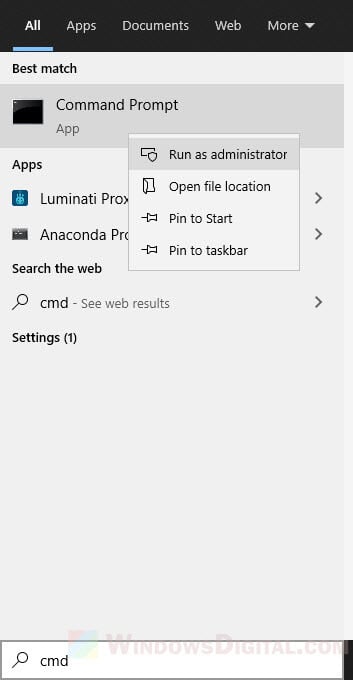
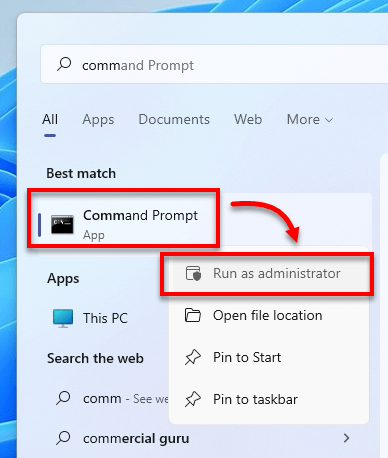
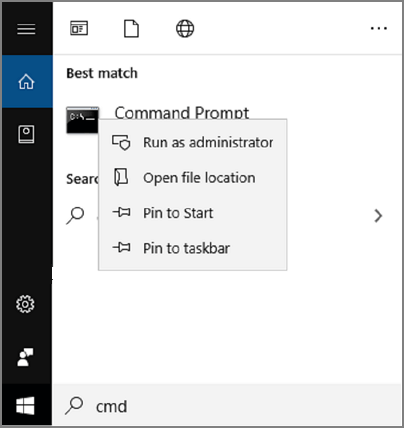
- On Windows 10/11 search bar, search for “cmd“. Right-click on Command Prompt from the search result and click “Run as administrator“.

Windows 10

Windows 11
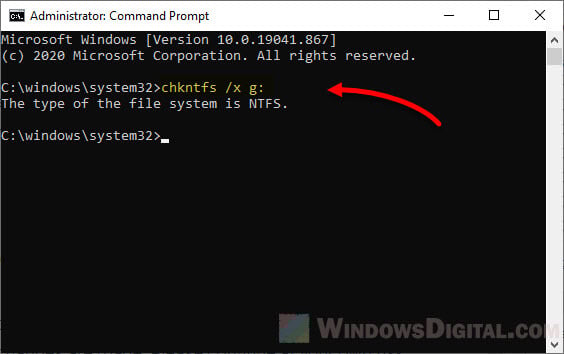
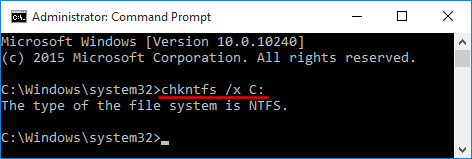
- Enter the following command:
chkntfs /x c:

- Note: Replace C: with the letter of the drive you wish to stop disk checking on Windows startup.
- The /x parameter is to disable auto check for the selected drives on startup.
- To stop disk check for multiple drives, add the drive letters to the end of the command. For example:
chkntfs /x c: d: e:
Disable startup check disk scan via “Registry Editor”
Caution: Registry editing can cause serious problem and may potentially corrupt your operating system if incorrect changes are made. Please continue at your own risk.
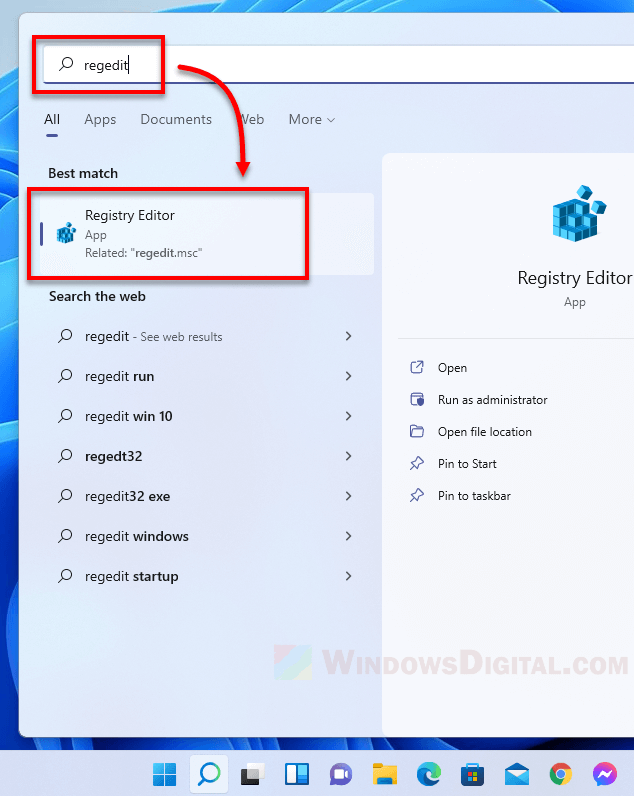
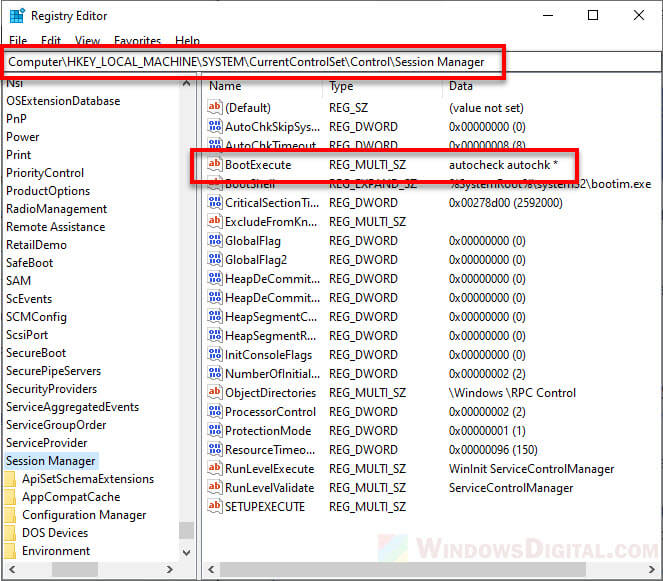
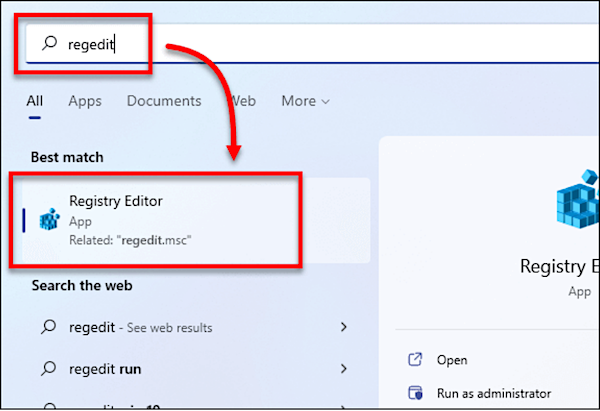
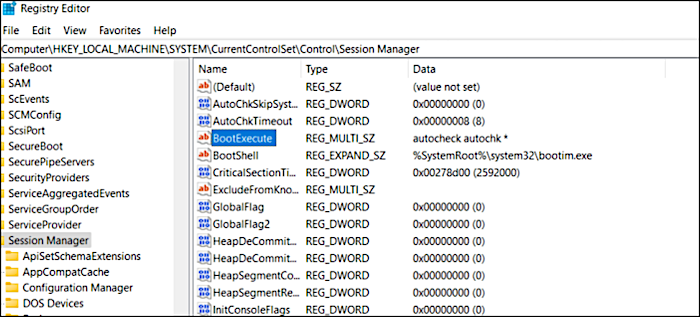
- On the Windows 10/11 start menu, search for and open “regedit” (Registry Editor).


- In the Registry Editor window, navigate to the following path.
HKEY_LOCAL_MACHINE\SYSTEM\CurrentControlSet\Control\Session Manager
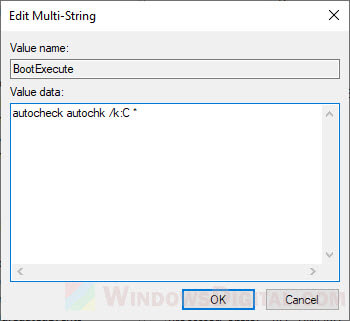
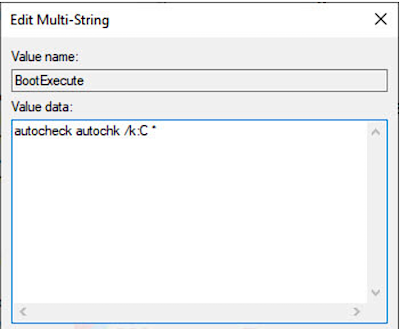
- Double-click on the “BootExecute” key in the right pane.

- In the “Value data” field, change the value to:
autocheck autochk /k:C *

- NOTE: Replace C with the letter of the drive you wish to disable disk checking on Windows startup.
- To disable disk checking for multiple drives, repeat the /k:x. For example:
autocheck autochk /k:C /k:D *
- The /k parameter is to tell autocheck to stop checking C: drive on Windows startup.
- Should you meet any unexpected result, you can change the key’s value back to its default:
autocheck autochk *
- Click OK to save changes.

Close Registry Editor and restart your PC. On the next Windows startup, the disk checking should not appear again.
If the disk checking persists on every startup
If the disk checking continues to run on every startup even after trying the methods above, you may want to seriously consider letting the disk check to complete the scan. If the scan finds any error that cannot be fixed, you may want to backup the existing data immediately before it’s too late, and replace the drive.
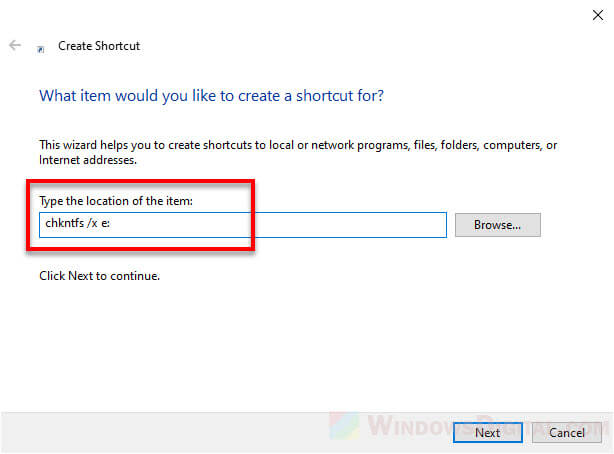
If you don’t care if the disk is faulty and that you might lose the data on the disk when it eventually fails, and just want to skip the disk checking on Windows startup, you can create a shortcut file to run the “chkntfs /x c:” (replace c: with the drive letter you wish to skip disk checking on startup) command and include the shortcut file as a startup program.
To create a shortcut file, right-click anywhere on your desktop, select New, then Shortcut. Enter the command as the shortcut path and follow the rest of the on-screen instruction to complete creating the shortcut.
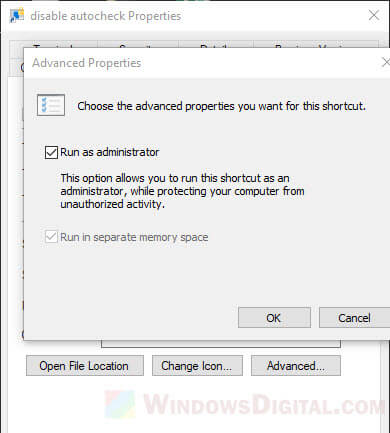
Note that the shortcut file has to be run as administrator for the command to be executed successfully. You can set it to always and automatically run as admin by right-clicking the shortcut file > Properties > Shortcut tab > Advanced > Run as administrator.
To set the shortcut file as a startup program, press Win + R keys to open Run window. In the Run window, type in “shell:startup” and press enter. This will open a folder where all startup programs’ shortcuts are placed. Move the shortcut you’ve created to the startup folder.
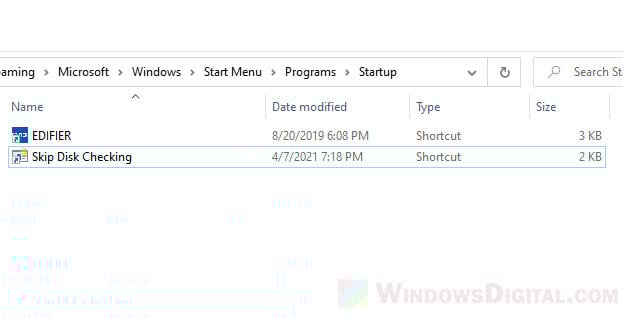
After doing so, the shortcut to execute the skip disk check command will automatically be run on every startup so that Windows will automatically skip the disk checking on the next startup.
| Workable Solutions | Step-by-step Troubleshooting |
|---|---|
| Skip Disk Check on Windows 11 |
1. Use CMD to Stop…Full steps 2. Use Registry Editor to Stop…Full steps |
| Disk Check Alternative — EaseUS Partition Master | Step 1. Right-click the target partition that has a problem; Step 2. Choose «Advanced» > «Check File System»…Full steps |
A disk check is used to order and correct each hard disk sector. Each disk can have a problem at any time. The system automatically detects the problem and begins checking the disk. It fixes all the possible issues that a hard disk could have. Disk check in Windows 11 is more refined, clean, and efficient. It also repairs all the damages. This is an automatic process that the system detects and begins itself. However, you do not always want to run a disk check on the backend. This article will see what to do if you can’t skip disk check on startup Windows 11.
We will also look at the ways to stop disk checking by using the system’s built-in methods and using a third-party utility. Let’s get into detail.
Why Is Disk Checking Automatically Run on Startup?
When you turn on the laptop, the system automatically begins checking the disk. It takes a long time to boot into the window, and it may appear to be exhausting because the system takes time to get started. But why does disk check begin automatically? The common triggers that begin automatic disk checks are listed below:
- Improper shut down of the system by using the power button or unplugging the cord leads to data loss. Thus, whenever you turn on the system, you will begin a disk check to make sure the hard disk is fine.
- When your hard disk has some problem, such as a bad sector, the system will begin to check and detect the issue to see if there are any log files. If the disk check repeatedly checks it, then it’s a sign that the hard drive is failing.
- Virus and malware impact the system’s performance. The disk check keeps a detailed check of the system to detect any virus attack on the system.
Should I Skip Disk Check on Startup?
When you switch on your computer, you may notice that it has gone into a «scanning and repairing C drive» session. This constant checking and scanning is a sure symptom of a boot drive problem. On the other hand, the trouble lies in the data drive if the system starts checking drive D or E. If your computer is running slowly, you should let Windows do a comprehensive disk check.
If you don’t want your system to run a disk check every time it boots up, you may disable it by pressing any key within the first few seconds. However, the next time the system is restarted, the same scaling and repair notice will display since Windows still believes the drive requires repair, but this time it will be a reminder until you check it to start the disk check. The two methods listed below can assist you in stopping the disk check.
How to Skip Disk Check on Windows 11
The frequent disk check can be annoying. However, you can cancel the automatic disk checking schedule. Except for some issues that Windows has detected and forces you to repair, you can decide to stop the disk checking startup in Windows. Here’s how to skip disk checking in Windows 11:
1. Use CMD to Stop Disk Checking
Step 1. Go to the Start menu in the search bar, and write cmd. Right-click on the command prompt and open «Run as Administrator».
Step 2. Enter the following command: chkntfs /x c:
Below are some key points to remember to stop disk checking:
- Replace C with the letter of the drive you want to stop disk checking on startup
- The /x is the parameter to disable the auto-check on startup of the select drive
- If you want to stop multiple drives, check then write the drive letter at the end of each command written below
chkntfs /x c: d: e:
2. Stop Startup Disk Check with Registry Editor
Note: if you made an incorrect change, the window registry could potentially corrupt your system. Continue at your own risk.
Step 1. Go to the Start menu, in the search bar, write «Regedit», and press enter. On the Windows 10/11 start menu, search for and open «Regedit» (Registry Editor).
Step 2. When the Registry Editor window is open, follow the path mentioned below: HKEY_LOCAL_MACHINE\SYSTEM\CurrentControlSet\Control\Session Manager.
On the right pane, select and open «BootExcute».
Step 3. In the value data field, change the value: autocheck autochk /k:C *
Note the following things
- Replace the letter C with the desired driver you wish to stop disk checking.
- To stop multiple disk checking, reaped the command /k:x. In the following way: autocheck autochk /k:C /k:D *.
- The parameter /k here auto-checks and stops checking drive C on startup. In case of any expected result, you can undo the value to default written as follows: autocheck autochk *
Any Alternative? Try Free Windows 11 Disk Check Tool
When a potential risk is associated with the default system, using a third-party tool is always a good solution. We recommend using EaseUS Partition Master for this purpose. You can use this program to build and change partitions. It is a legitimate option for assisting you if you can’t skip disk check on startup Windows 11. It is designed for home, office, and enterprise users.
Step 1. Right-click the target partition that has a problem.
Step 2. Choose «Advanced» > «Check File System».
Step 3. Confirm if you want to hide the partition or not.
Step 4. In the Check File System window, check the «Try to fix errors if found» option.
Step 5. Click «Start» to check errors on your partition.
The salient features of EaseUS Partition Master are listed below:
- Migrates operating system to SSD
- Increases C drive space
- Converts MBR to GPT without losing data
- Apply a hard disk health check
Conclusion
To summarize, we’ve now addressed the solutions if you can’t skip disk check on startup Windows 11. You have the option of using the system’s default procedures. However, there is a risk associated with them, particularly when using the registry editor method. Try EaseUS Partition Master for a more secure and dependable option. This program not only fixes the disk check on startup in Windows 11 but also assures that your data is safe. Take a look at EaseUS Partition Master for yourself.
Every time I turn on my PC, I get the following message:
Checking file system on E:
The type of the file systen is NTFS.
One of your disks need to be checked for consistency. You may cancel the disk check, but it is strongly recommended that you continue.
Windows will now check the disk.

CHKDSK is verifying files (stage 1 of 3)... 0 percent completed
I allow CHKDSK to to complete, but Windows does not load. This message appears every time I boot my computer.
Could someone explain me why this message appears and what I should do to make it disappear?
![]()
asked Sep 3, 2012 at 12:42
![]()
2
When you schedule a check disk, an entry is added to the registry — for some reason, it’s not being cleared.
- Run the Registry Editor (Click Start, Run and type
regeditthen press OK). - Locate
HKEY_LOCAL_MACHINE\SYSTEM\CurrentControlSet\Control\Session Manager - Change the
BootExecuteentry from:
autocheck autochk * /r\DosDevice\C:
to:
autocheck autochk *
Source: http://support.microsoft.com/kb/158675
answered Sep 3, 2012 at 12:47
![]()
DaveDave
25.3k10 gold badges58 silver badges70 bronze badges
3
If you have not asked for a chkdsk to be carried out, the autocheck will be carried out if the disk’s «dirty bit» is set. This will be set if Windows is not shut down correctly, file changes have not completed or the disk is corrupted. It may indicate the disk is about to fail. For an external disk, it may indicate it was removed without using the ‘safely remove hardware’ function.
The fsutil command can be used to check the status of the dirty bit. Open a command prompt with admin rights and type:
fsutil dirty query D:
(Replace D: with the letter of the drive you are having issues with.)
![]()
Simon E.
3,8615 gold badges29 silver badges31 bronze badges
answered Sep 3, 2012 at 13:52
![]()
David MarshallDavid Marshall
7,2204 gold badges28 silver badges32 bronze badges
9
- Click on your start menu and open the run dialog.
- Type
cmdand return - Next type
fsutil dirty query D:(replaceD:with your drive letter)

If the return message indicates that the volume is dirty then continue with these steps:
- Next type
chkdsk D: /f /x - After that finshes repeat step 3 to determine if dirty bit has been removed.
- If it is no longer dirty then reboot and you should notice no more
chkdisk.
Source of Information
![]()
Simon E.
3,8615 gold badges29 silver badges31 bronze badges
answered Sep 3, 2012 at 15:51
![]()
MoabMoab
58.1k21 gold badges114 silver badges176 bronze badges
1
I had similar symptoms on my laptop as you and:
chkntfs /X E:
Helped me (I didn’t expect this).
Also try change HKEY_LOCAL_MACHINE\SYSTEM\CurrentControlSet\Control\Session Manager key BootExecute to:
autocheck autochk /k:E *
answered Mar 17, 2015 at 17:47
![]()
Artem PArtem P
3182 silver badges11 bronze badges
You must log in to answer this question.
Not the answer you’re looking for? Browse other questions tagged
.
Not the answer you’re looking for? Browse other questions tagged
.