If you don’t like the all-new logon screen in Windows 7 and you want to enable the classic logon screen in Windows 7, you can disable any user information on the logon screen and require users to press CTRL + ALT + DEL to log on. This will greatly improve your security.
Quick Links:
This tutorial is divided into two parts:
- Enable classic logon screen in Windows 7 Professional, Enterprise, Ultimate
- Enable classic logon screen in Windows 7 Home Basic, Home Premium
Enable Classic Logon Screen in Windows 7 Professional, Enterprise, Ultimate
1. Step Click on “Start”
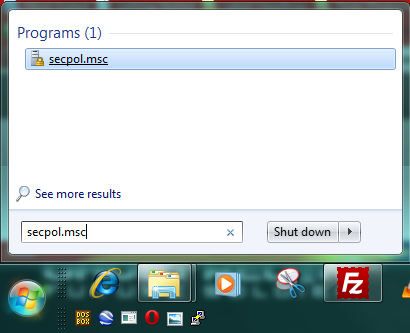
2. Step Enter secpol.msc into the search field and click on the item that appears.
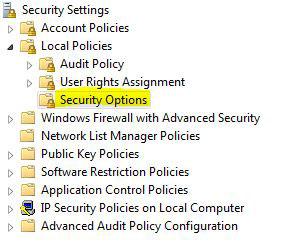
3. Uncollapse “Local Policies” and click on “Security Options”:
4. Scroll down the list and double-click on “Interactive logon: Do not display last username”:

5. Step Enable this option and click on “Apply” if you want to hide other last user that logged onto your PC (this can improve security!)
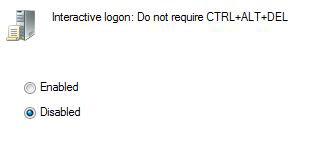
6. Double-click on entry below that item on “Interactive logon: Do not require CTRL + ALT + DEL”
7. Step Disable this option if you want users to press this key combination to log on. This can prevent some hacking tools to successfully break your password.
While you are at it, you can also change other logon settings. For example a welcome text.
All of the settings can help you to improve the security of your PC and the classic Windows Logon screen is simply more secure than the new “modern” one that displays all users on the logon screen. Of course, it’s easier to click on a user icon than to remember a username AND a password, but I think that at least everyone should know their own user account name.
Enable Classic Logon Screen in Windows 7 Home Basic & Home Premium
If you want to enable the classic logon screen in Windows 7 Home/premium, you will need to modify a registry key, because Home does not include the Local Security Policy Manager.
Download registry file to enable classic logon screen in Windows 7
You can also do this manually.
1. Step Click on start and enter regedit.exe into the search field and click on the item that appears
2. Step Uncollapse the registry keys: [HKEY_LOCAL_MACHINE\Software\Microsoft\Windows\CurrentVersion\Policies\System]
3. Step Double-click on “dontdisplaylastusername” in the right pane and then modify the value to “1” to enable this option and hide the usernames of the last logged on users.
Or copy this into a notepad, save it with the extension .reg and execute it:
Windows Registry Editor Version 5.00
[HKEY_LOCAL_MACHINE\SOFTWARE\Microsoft\Windows\CurrentVersion\Policies\System]
“dontdisplaylastusername”=dword:00000001
По умолчанию, Windows 7, отображает Welcome screen тогда, когда компьютер является частью рабочей группы, и отображает Logon screen тогда, когда компьютер находится в домене Active Directory.
Welcome screen показывает список учетных записей, которые зарегистрированы локально, на компьютере. Для того, чтобы войти в систему с помощью такой учетной записи, нужно кликнуть мышкой по ее изображению, а затем ввести пароль (если требуется). Welcom screen не отображает все локальные учетные записи. Некоторые аккаунты, такие как Администратор, являются невидимыми. Welcome screen довольно удобен при работе дома, или в рабочей группе. Однако, для улучшения безопасности, вы можете использовать Logon screen, так как он не отображает список учетных записей.
Logon screen требует, чтобы пользователь напечатал свое имя входа в систему, вместо простого выбора из предложенных. Logon screen имеет несколько свойств, которые вы можете настраивать.
По умолчанию, имя последнего входившего в систему пользователя, отображается в окне имени пользователя. Вы можете улучшить безопасность, скрыв имя последнего входившего пользователя. В таком случае, пользователь обязан знать свое имя входа в систему.
Чтобы настроить эту функцию, вам необходимо сделать следующее:
1) Запустите оснастку Local Security Tool из Административных утилит, или наберите в строке поиска secpol.msc.
2) Затем, в открывшемся окне локальных политик, перейдите в раздел Local Policies\Security Options.
3) Дважды щелкните мышкой по пункту Interactive Logon: Do Not Display Last User Name.
4) Выберите пункт Enabled, и нажмите Ок.
Вы можете настроить тип Welcome screen, используя опцию Always Use Classic Logon в Групповых политиках. Для этой опции имеются следующие настройки:
Enable. Для входа в систему будет использоваться Logon screen.
Disable. Будет использоваться стандартный Welcome screen.
Not Configured. Использование установки по умолчанию (Welcome screen).
В случае, если у вас используется домен Active Directory, и используются доменные групповые политики, вы можете с помощью их настройки изменить настройки Welcome screen для определенного набора компьютеров (те компьютеры, к которым применяется групповая политика).
Вы также можете настроить групповую политику для отдельных компьютеров. Для этого необходимо:
1) Нажмите Пуск, наберите gpedit.msc в строке поиска и нажмите Enter. Откроется окно редактора локальных групповых политик.
2) В открывшемся окне редактора, откройте Local Computer Policy, затем Computer Configuration, затем Administrative Templates, далее System, и наконец, Logon.
3) Дважды щелкните кнопкой мыши по опции Always Use Classic Logon.
4) Выберите Enabled и нажмите Ок.
Также, при работе в домене Active Directory, пользователи, прежде чем вводить имя пользователя и пароль, должны нажать комбинацию из 3 клавиш “Ctrl+Alt+Del”. Вы можете убрать это требование, но это ухудшит безопасность системы. Чтобы сделать это, вам необходимо сделать следующее:
1) В оснастке Local Security Policy откройте Local Policies\Security Option.
2) Дважды щелкните мышкой по опции Interactive Logon: Do Not Require Ctrl+Alt+Del.
3) Выберите пункт Enabled, и нажмите Ок.
Однако, с целью избежания проблем, связанных с информационной безопасностью, я не рекомендую включать эту опцию.
If you’ve ever used Windows, you’ve probably noticed that it displays a welcome screen whenever you start the operating system. You must click on your username in order to log in, and this can make your day go haywire. However, you can bypass the welcome screen in Windows 7 by following these steps. First, run a search program called netplwiz. Next, choose the program’s option to disable the Welcome screen.
If your PC keeps booting up to the welcome screen, you might have a hardware issue. The most common culprits of this problem are faulty hardware and incompatible drivers. If you can’t get past the welcome screen in Windows 7, try disconnecting all peripherals, USB devices, and internet connection. In some cases, this will help the computer boot up normally. If the problem persists, you can also try reinstalling Windows.
To change the language in which the Welcome screen appears, go to Control Panel and open the Region and Language window. Then, select the language that you want to display. Select “Windows language” from the drop-down menu. Click on the language you want to use. Choose the language you’d like to display on the screen. If you want to change the language on the Welcome screen, you can do so by using the Multilingual User Interface.
What is Computer Welcome Screen?
If your PC keeps booting to the Welcome screen, you may want to check the hard drive. It may be corrupted and require a professional tool to fix. If you can’t get past the Welcome screen, consider replacing the hard drive. Before doing this, create a back-up. Alternatively, you may just need to restart Windows. In any case, you should try these solutions if all else fails.
You can also change the language of the Welcome screen in Windows. You can choose the language that is displayed on your screen based on the language you use to log in. In Windows 8 or 10, the Welcome screen can be translated to your language. If you’re using Windows 7 and want to change the language, you can open the Region and Language window in Control Panel. This will show you the current language settings. By default, your computer will show the English language on the Welcome screen.
The first step in getting started is to make sure you know the basics of Windows 7. You should start by identifying the operating system that your computer uses. You should know how to install the required drivers and software. This way, you will have a fully functional operating system and the best antivirus software. The second step is to check the startup folder for any hidden programs. If your computer has a lot of programs, unchecking them might cause the computer to boot up in a slower way than normal.
If your computer keeps coming up with the Welcome to Windows screen, you might be wondering how to fix it. There are several ways to fix this annoying problem. The first step is to make sure that your Internet connection is up and running. If not, you may also need to check if you have recently changed any settings on your computer, installed a new software, or have some other problem that keeps your computer from booting up. Once you have verified these reasons, you can reboot your system to get rid of this annoying problem.
The second step to solve the problem is to make sure that your computer has enough space to save the bootable media. This will restore the system files and prevent the computer from getting stuck on the Welcome to Windows screen. To do this, you will need to start in Safe Mode as the administrator. Once you do that, you’ll need to reinstall any applications that are stuck on the Welcome to Windows screen. Hopefully one of these solutions will fix your problem and help you get back to using your PC.
What Do I Do If My Laptop Has a Welcome Screen?
There are many possible reasons why your laptop is stuck on the Welcome screen, including software issues and hardware failure. Some Windows users simply can’t get past this screen, and others have tried powering off and on and are stuck at the Welcome screen. To resolve the issue, try performing the following steps:
Restart the Windows update service. Sometimes, this will fix the problem. To do this, press the Windows key and then type the command cd %systemroot%/net stop wuauserv. Once the update has completed, the system should start again. Once the system restarts, reopening the PC will get it back to the Welcome screen.
If this step doesn’t fix the problem, restart the PC. If you’re stuck at the welcome screen for a long time, try connecting your PC to a router. Another way to fix this issue is to start the system in clean boot mode. During this process, your PC will be able to detect any conflicts between third-party programs and the operating system. However, if you still get stuck on the Welcome screen after performing these steps, it’s time to call a technician.
How Do I Fix a Stuck Welcome Screen?
Many users are experiencing a “stuck welcome screen” on Windows. This annoying screen appears when the user tries to log in, but the password field is missing, or the keyboard and mouse are not working. You can use Windows’ Safe Mode to restore the system’s default settings, which will start with minimal software, drivers, and services. After you have disabled these components, you can try troubleshooting the issue.
The first thing you should try if you’ve got a stuck welcome screen on Windows 7 is restarting the Windows update service. To do this, press the Windows key + R to open the Run dialogue box and type the following command: net stop wuauserv and cd %systemroot%. Repeat these steps until the Welcome screen is back. If the problem persists, you may need to replace the hard drive. Before attempting this, make sure you have a backup of all your data before making any changes.
If your Windows 10 PC is stuck on the welcome screen, you can disable your wireless connection. If you’re the only user on your network, you can unplug the Wi-Fi dongle and disconnect the Ethernet cable. If you’re not the network administrator, you can run these steps in Safe Mode. They’ll take a few minutes, but it’s worth the wait. If the problem still persists, try running Windows in “safe mode” to see if it’s a hardware or software issue.
How Can I Repair My Windows 7?
If your computer is stuck on the Welcome screen, the problem might be incompatible hardware or incompatible drivers. To fix the problem, disconnect your USB devices and peripherals from your computer. Disconnecting from the Internet can also help. If none of these solutions works, try running a system check to see if the problem is related to hardware or software. After a system check, restart your computer. If the problem persists, you may want to contact a computer repair service provider.
After choosing the appropriate option, a boot repair mode will be launched. This mode will ask you for your account and keyboard. When prompted, enter your password to continue. The System Recovery Options will appear. You can then choose the correct operating system to install and repair. If all else fails, try installing the software from the manufacturer again. If the problem still persists, you can try using a boot recovery software like EasyRE.
Why is My Computer So Slow?
If you’re wondering why your computer is slow, you’re not alone. This issue can be caused by several factors, from malware to storage space. Here are some tips to get your computer up to speed. First, check your system for software updates. This will give your computer more thinking space. If you have many applications running at once, this could be one of the causes of the slowdown. Another culprit is an old computer. If your computer is several years old, it probably can’t handle the newer software, so you should upgrade it.
Another common cause of computer slowdown is inadequate RAM. A minor upgrade to RAM can speed up your PC. RAM is required for some programs, such as photo and video editing software. Many people try to run these programs on their entry-level computers, but they won’t get much work done. To increase RAM, upgrade your RAM to at least 2GB. If this still doesn’t solve the problem, try to install more memory.
Why Does Windows Welcome Screen Take So Long?
The reason why your PC is stuck at the Welcome Screen is often the result of corrupt system files. Often, this problem occurs after the PC has been logged into the network. After you’ve logged in and done some other tasks, your computer may get stuck at the Welcome screen for hours or even days. Thankfully, there are ways to fix the problem. Follow these tips to fix Windows 7 stuck at the Welcome Screen and keep your system running smoothly.
Several times, you may encounter the same problem with your Windows operating system. In this case, you should try restarting the Windows Update service and renaming some files. If these methods don’t work, try disabling your wireless connection. If you’re unsure of how to do this, you can unplug your Wi-Fi dongle or disconnect the Ethernet cable. Then, simply press the Power button to select the Advanced Recovery Options menu and choose the Troubleshoot option.
Learn More Here:
1.) Windows Help Center
2.) Windows – Wikipedia
3.) Windows Blog
4.) Windows Central
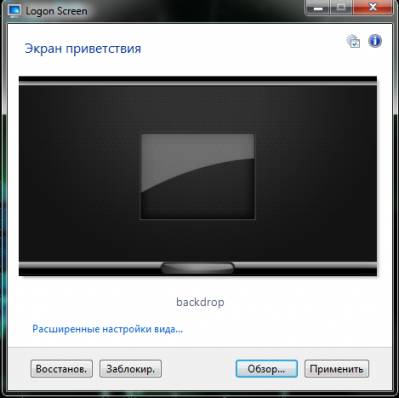
Logon Screen — экран приветствия Windows или окно приветствия, это заставка которую пользователь видит когда выбирает нужный ему профиль для входа в систему. Вы можете настроить экран приветствия под себя на свой вкус и цвет, но что бы это сделать Вам потребуется небольшая и лёгкая программа Logon Screen, программа поможет легко, а главное безопасно заменить экраны приветствия Windows.
1. Скачиваем программу «Logon Screen»
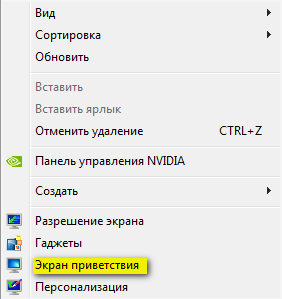
2. После установки, программа создаст ярлык на рабочем столе, а так же в меню правой кнопки мыши.
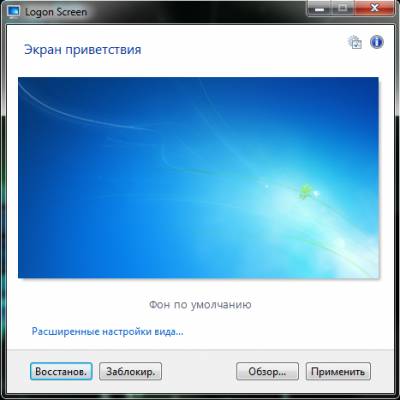
3. Интерфейс программы интуитивно понятен, а главное русифицирован.
4. Нажимаем ОБЗОР и выбираем понравившуюся картинку
5. Нажимаем кнопку ПРИМЕНИТЬ и вуаля у Вас новый экран приветствия.
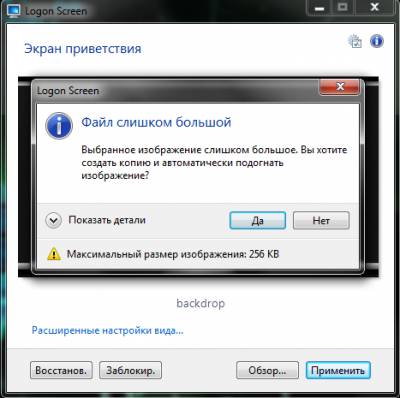
ВНИМАНИЕ! Файлы для программы ограничены размером в 256 кб
Но это не страшно, хоть программа и маленькая,но умная, она сама может подогнать файл под нужный размер, смело жмем ДА и будет Вам счастье.
The Windows 7 welcome screen follows pretty much the pattern introduced in Windows Vista. Many users still prefer the classic welcome screen from Windows XP. This guide explains how to change the Windows 7 default settings to customize the Windows 7 welcome screen to look more like the classic welcome screen.
The picture shown below shows the default logon welcome screen in Windows 7 and Windows Vista.
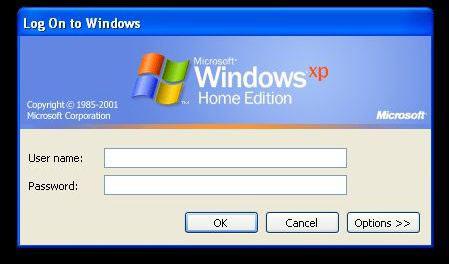
You can change the default Windows 7 and Vista login welcome screen to a login screen that is more like the secure login screen known from Windows XP as shown in the following print screen:
This setup requires the user to press the combination of CTRL + ALT + DELETE keys before entering user name and password.
How to disable the default Welcome screen in Windows 7?
The Windows 7 welcome screen can be disabled and changed back to the CTRL + ALT + DEL type login screen through the several following settings.
Control Panel
-> User Accounts
-> Manage User Accounts
-> UAC prompt
-> Advanced
Some versions of Windows (such as Home and Premium) do not provide this path, so depending on the version of your Windows, try the following two command line utilities.
Start
-> Run
-> netplWiz.exe (program located in %systemroot%\system32\)
or control userpasswords2
Either of these programs should take you to the screen mentioned above.
Check the Require users to press Ctlr+Alt+Delete check box in the Secure logon section of the User Accounts screen, click OK.
After changing the setting, reboot your computer. The next time you start your Windows 7, you should see the welcome screen with the message asking you to press the combination of Ctrl+Alt+Delete keys.
The check box to disable Windows 7 welcome screen is disabled
If you are using a computer with Active Directory cached domain accounts, the check box shown in the previous print screen might be grayed out not allowing you to make any changes to it. In this case, the setting needs to be modified through the group policy.
Disable the default Windows 7 welcome screen through group policy editor
Depending on the version of your Windows, you might need to change the Windows 7 welcome screen setting through the group policy editor.
Start
-> Run
-> Type gpedit.msc and hit Enter
-> Navigate to the following policy
Local Computer Policy\Computer Configuration\Windows Settings\Security Settings\Local Policies\Security Options\
Set the Interactive logon: Do not require CTRL+ALT+DEL to disabled.
Set the Interactive Login: Do not display last user name to enabled.
Then navigate to the following policy to disable fast user switching functionality.
Local Computer Policy\Computer Configuration\Administrative Templates\System\Logon
Set the HideFastUserSwitching policy to enabled.
Also change the classic logon policy.
Set the Always use classic logon to enabled.
Disabling the Windows 7 welcome screen does not work
Some users have reported that the above settings did not provide what they needed. In that case, we also suggest checking the following settings through the registry editor.
Start
-> Run
-> Type regedit and hit Enter
-> Locate the following keys and check their values
HKEY_LOCAL_MACHINE\Software\Microsoft\Windows\CurrentVersion\Policies\System
DisableCAD = 0
LogonType = 0
HideFastUserSwitching = 1
DontDisplayLastUserName = 1
HKEY_LOCAL_MACHINE\SOFTWARE\Microsoft\Windows NT\CurrentVersion\Winlogon
DisableCAD = 0
LogonType = 0
windows 2000
System Key: [HKEY_LOCAL_MACHINE\SOFTWARE\Microsoft\Windows\CurrentVersion\Policies\
Explorer]
Value Name: NoWelcomeScreen
Data Type: REG_DWORD (DWORD Value)
Value Data: (0 = default, 1 = hide)
Windows 7 welcome screen on domain-joined computers
Computers that are joined to an Active Directory domain behave a bit differently than stand-alone home configurations. After getting through the CTRL+ALT+DEL login screen upon logging into your computer, Windows displays one or two icons (depends on your configuration). You are presented with the text boxes for entering your user name and password only after you click the icon on this screen. Many experts consider this a flaw in the design of Windows.
Windows 7 welcome screen related articles
Enable Ctrl+Alt+Delete logon screen for Windows Vista
How to edit group policy
Typical IT security audit findings
.
