There is a command line version of WOL called WakeOnLanC.exe. It’s main purpose is to support the task scheduler, but it can be used for any reason to wake up and shutdown hosts just like the GUI. These are the command line options:
| Command | Description |
|---|---|
| -s | shutdown, requires -m or -all |
| -s1 | sleep, requires -m or -all |
| -s4 | hibernate, requires -m or -all |
| -r | reboot |
| -w | wakeup, requires -m, -g, -mac, or -all |
| use -mac and -agent to explicitly send WOL packet to specific IP |
|
| -l | listen for WOL packets |
| -e | enumerate host list |
| -p “xx” | specify path to machines.xml database * this works on the GUI also |
| -msg | immediate message (example -msg -c “Shutting down in 10 minutes” |
| -pw “xx” | change shutdown password for a machine, requires -m, -g or -all |
| -h | display help |
| Options | |
| -t xx | time delay (xx = seconds). For shutdown and reboot commands. |
| -f | Force files closed. |
| -m xx | xx = machine name |
| -mac xxxx | MAC address |
| -g xx | xx = a group to startup or shutdown. |
| -all | All machines |
| -agent xx | xx = address of WOL agent if on remote subnet, use with -mac |
| -c “xx” | xx = popup message for shutdown or reboot command. |
Command line examples
Shutdown machine named “LaMachine”, the comment will be “Power Failure”:
C:\>WakeOnLanC -s -m LaMachine -c "Power Failure"Wakeup machine named “LaMachine”:
C:\>WakeOnLanC -w -m LaMachineWakeup machine by MAC address:
C:\>WakeOnLanC -w -mac 00:43:18:9E:8E:A0Reboot “LaMachine”, force files closed, delay for 20 seconds:
C:\>WakeOnLanC -r -m LaMachine -t 20 -fListen for and display WOL packets on the local subnet, for troubleshooting.
C:\>WakeOnLanC -lHibernate all machines.
C:\>WakeOnLanC -s4 -allНа чтение 4 мин Опубликовано Обновлено
Wake on LAN (WOL) — это функция, которая позволяет включить компьютер удаленно, отправив специальный сигнал с помощью сети. Эта функция может быть особенно полезной, когда вы находитесь в другой комнате или даже в другом городе, и хотите включить компьютер без необходимости физически находиться рядом с ним.
Однако в Windows 10 функция Wake on LAN по умолчанию отключена. Чтобы ее включить, вы можете использовать командную строку. В этой статье мы расскажем, как подключиться к командной строке в Windows 10 и выполнить необходимые действия для включения функции Wake on LAN.
Шаг 1: Откройте командную строку, нажав сочетание клавиш Win + R на клавиатуре, введите «cmd» в поле «Выполнить» и нажмите Enter.
Шаг 2: Убедитесь, что у вас есть права администратора, иначе выполнение некоторых команд может быть недоступно. Для этого просто щелкните правой кнопкой мыши по значку командной строки в панели задач и выберите «Запустить от имени администратора».
Важно! При использовании командной строки будьте осторожны, поскольку ошибки могут вызвать проблемы с работой системы.
Содержание
- Что такое Wake on LAN
- Подготовка компьютера
- Начало процесса
- Проверка результатов
Что такое Wake on LAN
Для использования функции Wake on LAN необходимо, чтобы компьютер был подключен к сети и настроен для работы с данной функцией. Компьютер должен быть подключен к сетевому адаптеру, который поддерживает Wake on LAN, а в BIOS должна быть включена поддержка этой функции.
Преимущества функции Wake on LAN включают возможность экономии энергии, поскольку компьютеры могут оставаться выключенными большую часть времени и включаться только при необходимости. Кроме того, это позволяет удаленно управлять компьютером, что удобно для администрирования и технической поддержки.
Подготовка компьютера
Перед включением функции Wake on LAN необходимо выполнить несколько предварительных настроек на компьютере, который вы хотите активировать удаленно:
- Убедитесь, что компьютер подключен к сети через кабель Ethernet или Wi-Fi.
- Войдите в систему Windows под учетной записью администратора или учетной записью с правами администратора.
- Откройте командную строку от имени администратора. Для этого щелкните правой кнопкой мыши по значку «Пуск», выберите «Командная строка (администратор)».
- Введите команду
ipconfig /allи нажмите клавишу «Ввод». Запишите MAC-адрес сетевого адаптера вашего компьютера. Он понадобится для настройки в программе Wake on LAN.
Теперь ваш компьютер готов к настройке функции Wake on LAN. Перейдите к следующему разделу, чтобы узнать, как включить эту функцию через командную строку Windows 10.
Начало процесса
Для включения функции Wake-on-LAN (WoL) на компьютере с операционной системой Windows 10 через командную строку, необходимо выполнить следующие шаги:
- Проверьте, поддерживает ли ваша сетевая карта функцию Wake-on-LAN. Вы можете проверить это в настройках BIOS или в свойствах сетевого адаптера в диспетчере устройств.
- Откройте командную строку с правами администратора:
- Нажмите комбинацию клавиш Win + X и выберите «Командная строка (администратор)» или «Windows PowerShell (администратор)».
- Если появится запрос на подтверждение, нажмите «Да».
- Введите следующую команду:
powercfg -devicequery wake_armed - Нажмите клавишу «Enter».
- В результате будет выведен список устройств, которые могут включать компьютер через Wake-on-LAN. Если в списке отсутствует сетевая карта, необходимо перейти к следующему шагу.
- Введите следующую команду:
powercfg -deviceenablewake "Название сетевой карты"(замените «Название сетевой карты» на имя вашей сетевой карты). - Нажмите клавишу «Enter».
- Проверьте, включена ли функция Wake-on-LAN для сетевой карты. Введите команду:
powercfg -devicequery wake_armedи нажмите клавишу «Enter». Если в списке присутствует ваша сетевая карта, значит, функция была успешно включена.
После выполнения этих шагов функция Wake-on-LAN будет активирована на вашем компьютере с операционной системой Windows 10.
Проверка результатов
После выполнения всех предыдущих шагов можно проверить, работает ли функция Wake on LAN на вашем компьютере. Для этого вам потребуется устройство, которое может отправлять сигналы Wake on LAN, такое как другой компьютер или мобильное устройство.
Чтобы проверить результаты, следуйте этим шагам:
- Убедитесь, что целевой компьютер подключен к электрической сети и находится в режиме ожидания.
- С другого компьютера или мобильного устройства откройте любой веб-браузер.
- Введите IP-адрес целевого компьютера в адресную строку браузера.
- Нажмите клавишу Enter или нажмите кнопку Ввод, чтобы отправить запрос.
- Если все настроено правильно, целевой компьютер должен проснуться и загрузиться.
Если ваш компьютер не просыпается после отправки сигнала Wake on LAN, проверьте настройки BIOS и сетевую карту, чтобы убедиться, что функция Wake on LAN включена.
Обратите внимание: Результаты могут отличаться в зависимости от конфигурации вашего компьютера и сети, поэтому приведенные выше шаги могут не работать во всех случаях.
This article will explain how to use the Shutdown command to turn off a computer remotely as well as how to use the WakeOnLan standard to wake or boot a PC.
How to remotely shutdown a computer on a LAN?
In order to control a computer remotely, please note that you must be connected to the same local network as the target PC. You must also know the username and password required for login.
- The first step is to open TCP port 445 on the target computer. To do this, open your Start menu and then go to Settings > Control Panel > Security Center.
- Open Windows Firewall and click the Exceptions tab.
- Select the line that reads File Sharing and printers and press OK. If this line is missing, click Add Port and choose TCP port 445 .
- Next, head to Start > Settings > Control Panel > System. Select the Remote tab and check the option that reads Allow users to connect remotely to this computer. It is now time to open the command prompt.
- Head to Start/Run or use the keyboard shortcut Windows + R. Next, type cmd and then hit OK. This will open your command prompt.
- To obtain the necessary rights to run a shutdown command on the target machine, you must first run the net use command. Use the Windows + R keyboard shortcut and then enter net use \\ip_address_of_target_machine. Enter an administrator username and password for the target computer to connect to the target PC.
- Once connected to the target PC, we can run the shutdown command. An example of the command is given below, whereby instructions are given for the target computer to close all active applications and shutdown after 30 seconds of inactivity. Please note that you can substitute any of the variables according to your network or PC specifics:
shutdown -s -f -t 30 - m \\192.168.3.4
-s: Shutdown the PC
-f: Force active applications to close without warning
-t xx: Set a countdown in seconds
-m \\xxx.xxx.xxx.xxx: The IP address of the target computer

The GUI is available by typing shutdown -i.
For any additional information about this command, type shutdown /?.
How to use the WakeOnLAN command?
WakeOnLAN, as the name already suggests, is a tool that can boot or wake a computer by sending a Magic Packet to the network adapter of the target computer. It is important to note that not all network cards and BIOS are compatible with, or support, the use of Magic Packet.
In order to use the WakeOnLAN command, you must be connected to the same local area network (LAN) as the target computer. Knowledge of the physical location (MAC) and IP address of the target computer is also required.
How to retrieve IP and MAC address?
- The first step is to retrieve the IP address and MAC address of the target computer.
- To do this, go to Start/Run or use the keyboard shortcutWindows + R and type cmd > OK.
- The command prompt will open. Now type ipconfig /all:

- Copy the IP and physical (MAC) address of the target PC.
How to perform the compatibility checks?
It’s now time to check if your network card is compatible with Magic Packets.
- To do this, right-click on My Computer and click Manage.
- Next, go to Device Manager/Network Cards and do a right-click on your Network Card.
- Then click Properties.
Do a search for the following words and verify that all options that relate to them are currently active: Magic Packet, Wake On Magic Packet, Wake On Lan, or Wake. If none of these words appear, you may be required to update the drivers for your Network Card.
- To see if your computer is BIOS compatible, enter the BIOS when you start the computer. You can do this by pressing ESC, F2, F5, F12 or DEL (depending on your system).
- Once in the BIOS, go Power Options and enable Wake-On-LAN, or any similar option:

How to open port 8900?
You can open Port 8900 in the same way as you would Port 445.
How to use Wake On LAN (WOL)?
Start by downloading the Symantec WOL tool on the source computer. Launch the tool and then fill in the empty fields using the information gathered above.
- Mac Address: MAC address (the target machine)
- Internet Address: Local IP address (target machine)
- Subnet Mask: 255.255.255.255
- Send Options: Local Subnet
- Remote Port Number: 8900
- Click the button: Wake Me Up
Once the packet has been received, the target computer will boot.
How to boot your PC from the Internet?
In theory, it is possible to boot a remote PC from the internet. You will need configure your router to redirect a UDP packet to a specific port on all the network computers.
By sending the magic packets to your public IP address (on the correct port), you will be able to individually boot computers on your local network.
How to boot your PC using your phone?
If you want to wake up your computer while you are not at home using your phone, you will need an external PSTN modem (using the RS 232 serial port). Connect the modem to your computer and enable the option in your BIOS. From there, you can connect the modem to IP phone line from your router.
Do you need more help with Windows? Check out our forum!
Here are more Wake onLAN options…
Wake-on-LAN from the Command Line
Using the command Prompt or PowerShell to send Wake-on-LAN packets to another computer can be quite useful for business, and professional users, in batch scripts, and to make desktop shortcuts.
7. WakeUp
In terms of ease of use, a command line tool won’t come much simpler than this. WakeUp is very simple to use and only requires the MAC address of the remote computer as an argument. The MAC address has to be in the format of colon separators or no separators at all (e.g. aa:bb:11:55:a1 or aabb1155a1).
WakeUp MAC address
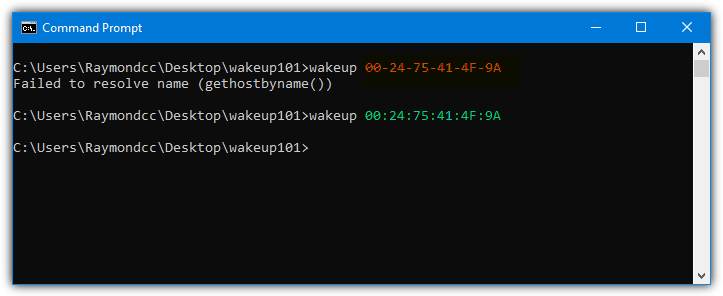
The tool or its website does not mention the actual port WakeUp uses, but we found that it was using port 40000.
Download WakeUp
8. Wake On Lan Command Line (WolCmd)
This tool is another entry in our list by Depicus and is a simple command line tool to send the Wake-on-LAN signal. The syntax is quite simple.
WolCmd [MAC address] [IP address] [Subnet mask] [Port]
An example would look like this:
wolcmd 26-63-A4-79-B8-12 192.168.0.40 255.255.255.0 9
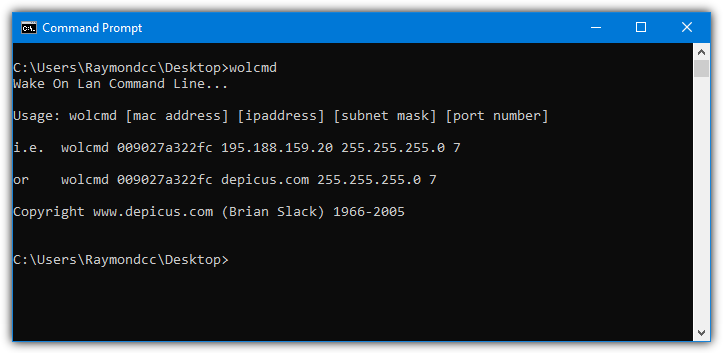
The MAC address, IP address, and subnet are required but the port will default to 7 if you don’t supply one. A version is also available for Mac OS.
Download Wake On Lan Command Line (WolCmd)
9. Gammadyne WOL
WOL is another relatively easy tool to use and it only requires supplying the MAC address of the target computer although more arguments can be supplied if required.
WOL MAC address [IP address] [port] [/pwd password] [/d subnet]
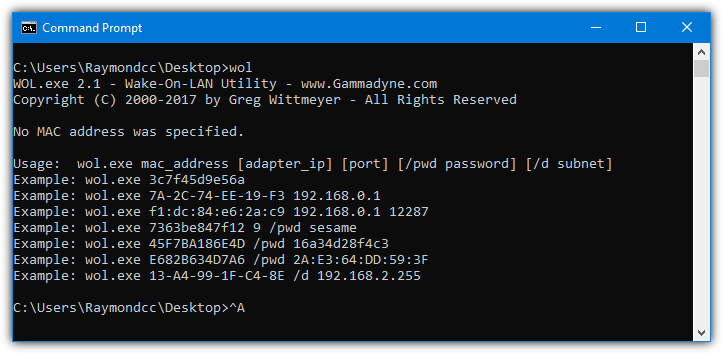
The IP address, port, and subnet are optional but may be required in some situations. Port 12287 will be used by default if nothing is added to the command. A password option is also available but you will have needed to set things up to accept a password.
Download Gammadyne WOL
Use Wake-on-LAN to Start a Computer From your Smartphone
If you are unable to send the magic packet to your PC from another computer, an alternative option is sending it from another device like a smartphone or tablet. There are loads of apps around and the Android app we’ll look at is free, popular, and does the job quite nicely.
10. Wake On Lan for Android
This app is quite easy to use because if the computer to start up remotely is switched on and available on the local network, you can find it automatically. Just press the add button and select the device from the list. Its IP and MAC addresses will be added so you don’t have to do anything else. If you are connecting from outside the LAN, replace the local IP with the external IP or add a new connection manually.
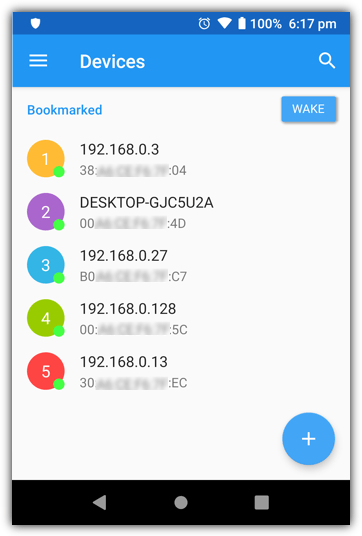
All you have to do is press one of the devices in the bookmarks list to start the computer remotely. A handy function is the ability to add a widget to your home screen that can send the packet data to a selected device just by pressing the icon. By default the magic packet is sent three times, it can be changed up or down in the app settings.
Download Wake On Lan for Android
Test Wake-on-LAN is Working in Windows
If Wake-on-LAN isn’t working or you just want to test to see if the remote computer is receiving the necessary magic packet data, try using one of the tools below.
Wake-on-LAN Sniffer
Wake-on-LAN Sniffer is a very simple to use and portable tool that will give you various bits of information about magic packet data being sent to the target computer. All you have to do is launch the program on the computer that will receive the Wake-on-LAN signal and it will watch all ports for the incoming data.
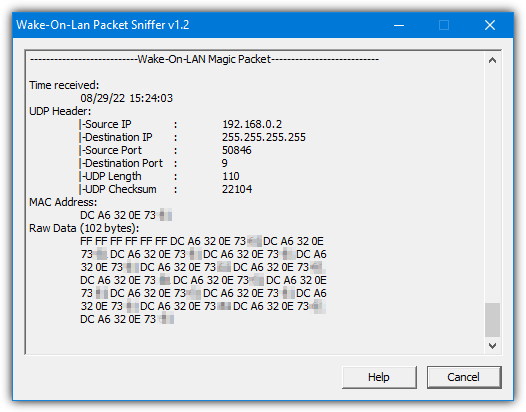
When valid data is received, details will be displayed for time, source/destination IP, source/destination port, UDP length and checksum, MAC address, and the magic packet data. You may have to manually add an exception for Wake-on-LAN Sniffer through your firewall if nothing is displayed.
Download Wake-on-LAN Sniffer
Wake On Lan Monitor
Wake on Lan Monitor is another tool from Depicus software and it can be used to test if the magic packet is reaching the target computer. Launch the tool on the computer you want to send the WOL signal to, set the required port, and press Start.
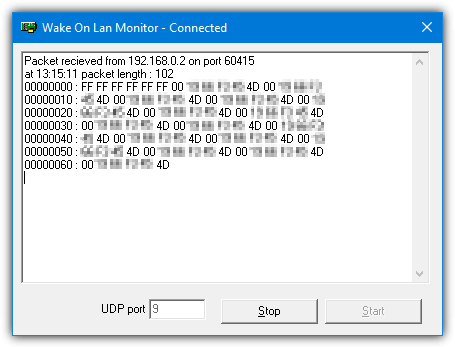
Note that different programs default to different ports when sending the magic packet. For instance, FUSION WakeUp on Lan and WakeMeOnLan default to port 40000 while WakeOnLANx defaults to port 7. The command line tools also default to different ports from each other. If you are not required to set a port in the program, make sure you know what its default is during testing.
Download Wake on LAN Monitor
Make Sure Your Computer is Wake-on-LAN Ready
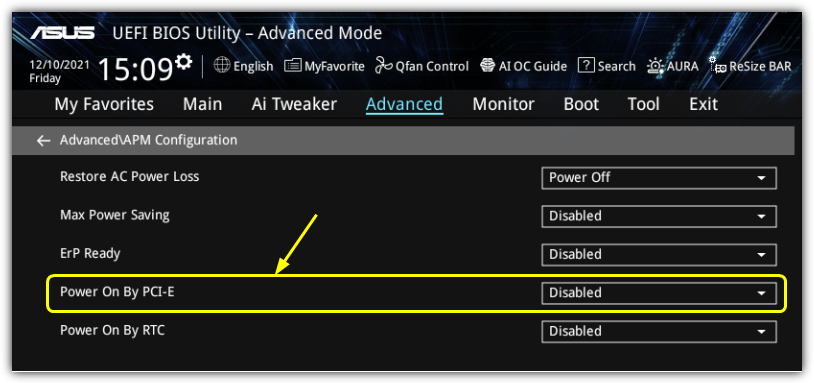
To enable the Wake-on-LAN feature, it first needs to be enabled in the BIOS. The option is usually quite obvious and should be easy to spot whether you have a more modern UEFI or a traditional BIOS.
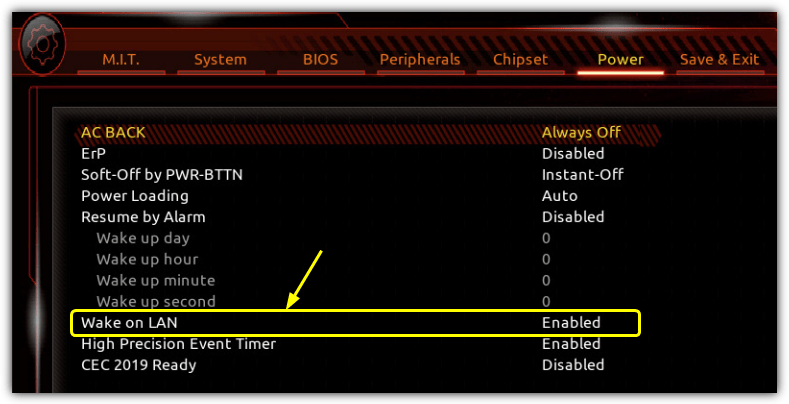
In addition to this, you may have to enable another option to get WOL working. It’s called “PCI Devices power on” or “Power On By PCI-E” in the ACPI/APM configuration or power management settings. Some motherboards may have a similar option called “Resume by PCI-E Device/Intel Onboard LAN”. If you are not sure, turn all related options on and work backward when turning them off.
You also need to make sure the LAN driver in Windows has the WOL feature enabled. Right click on (My) Computer > Manage > Device Manager > Network adapters. Double click on your Ethernet controller and look in the Advanced tab for “Wake on LAN”, “Wake from shutdown”, “Wake on Magic Packet” or similar.
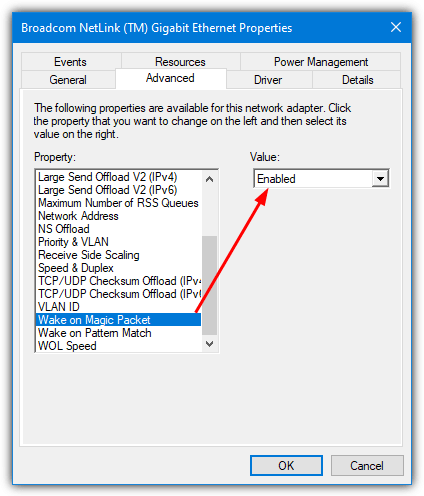
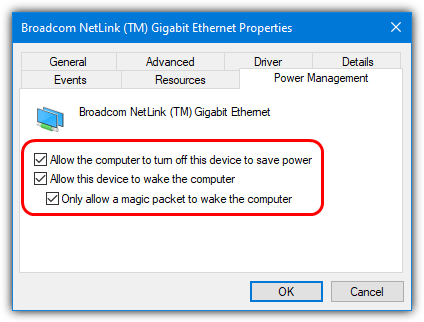
Make sure it’s enabled. Also, go into the Power Management tab and check “Allow the computer to turn off this device to save power”, “Allow this device to wake the computer”, and optionally “Only allow magic packets to wake the computer”.
While the system is switched off, make sure power is still getting to the network adapter by checking to see if the light is on near the connector on the motherboard or card. If not there is no power going to it then other settings may need adjusting.
Disabling Windows Fast Start-up
In addition to the BIOS and network adapter settings above, there is another option in Windows 8/10/11 that can stop Wake-on-LAN from working. And this can happen even if Wake on LAN Monitor has confirmed magic packets are being sent and received correctly.
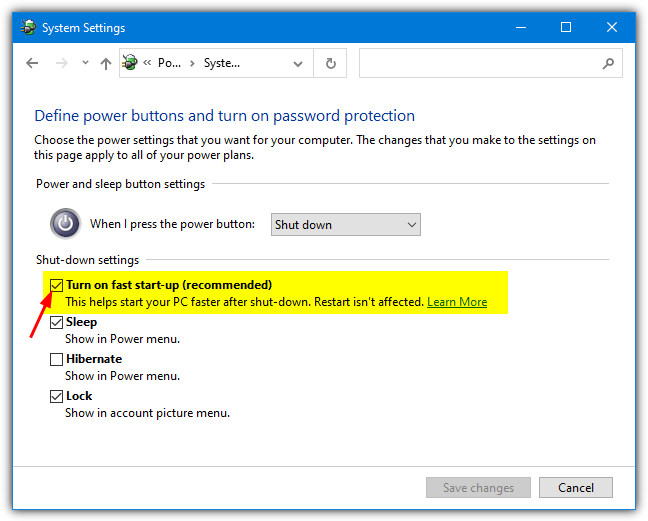
The option is called “Fast start-up” by Windows which is like a modified hibernate. While it can speed up boot times from power down, the computer doesn’t listen for incoming magic packets in this mode. To get Wake-on-LAN to work, the option needs to be disabled.
Disable Fast Start-up From Control Panel
1. Open Control Panel and go to Power Options. On the left side of the window, click the blue “Choose what the power buttons do” link.
2. In the Shutdown settings section, you will see the “Turn on fast start-up (recommended)” option. If this is already unchecked, then it’s not causing a problem with your Wake-on-LAN. Simply uncheck the box and click Save changes.
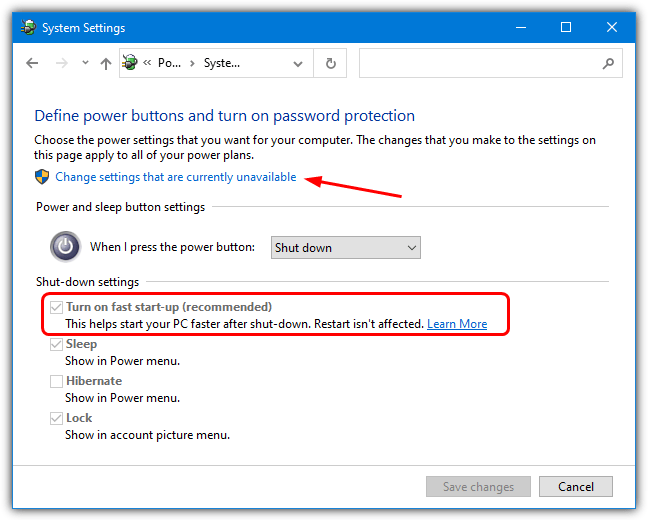
3. The option may be enabled but greyed out if you are not an administrator or have UAC turned on. If you find this is the case, simply click the “Change settings that are currently unavailable” link near the top. You can now turn off fast start-up.
Disable Fast Start-up From Command Prompt
This option will completely disable hibernation and therefore hybrid boot on your system and the fast start-up option will disappear from Control Panel’s power options.
Powercfg -h off
Open an administrator Command Prompt and enter the above command. If you tried the Control Panel option first and found the check box was not there, this is probably why. Changing off to on will obviously bring the option back.
Disable Fast Start-up From The Registry
This last method simply unchecks the fast start-up box in Power Options as if you went into Control Panel and unchecked it yourself. The only difference is you don’t need to open Command Prompt or Control Panel to do it. Simply download and double click on the Hiberboot_off.reg file to import the data.
Download Fast Start-up Registry Files
Another .REG file is included in the Zip archive to enable the option again should you wish to do so.
If you only wish to use built-in Windows tools, the powershell.one article
Wake On LAN
contains a PowerShell function that can be used to issue a
Wake-on-LAN package to a MAC address.
The script is duplicated here :
function Invoke-WakeOnLan
{
  param
  (
    # one or more MACAddresses
    [Parameter(Mandatory,ValueFromPipeline,ValueFromPipelineByPropertyName)]
    # mac address must be a following this regex pattern:
    [ValidatePattern('^([0-9A-F]{2}[:-]){5}([0-9A-F]{2})$')]
    [string[]]
    $MacAddress
  )

  begin
  {
    # instantiate a UDP client:
    $UDPclient = [System.Net.Sockets.UdpClient]::new()
  }
  process
  {
    foreach($_ in $MacAddress)
    {
      try {
        $currentMacAddress = $_

        # get byte array from mac address:
        $mac = $currentMacAddress -split '[:-]' |
          # convert the hex number into byte:
          ForEach-Object {
            [System.Convert]::ToByte($_, 16)
          }

        #region compose the "magic packet"

        # create a byte array with 102 bytes initialized to 255 each:
        $packet = [byte[]](,0xFF * 102)

        # leave the first 6 bytes untouched, and
        # repeat the target mac address bytes in bytes 7 through 102:
        6..101 | Foreach-Object {
          # $_ is indexing in the byte array,
          # $_ % 6 produces repeating indices between 0 and 5
          # (modulo operator)
          $packet[$_] = $mac[($_ % 6)]
        }

        #endregion

        # connect to port 400 on broadcast address:
        $UDPclient.Connect(([System.Net.IPAddress]::Broadcast),4000)

        # send the magic packet to the broadcast address:
        $null = $UDPclient.Send($packet, $packet.Length)
        Write-Verbose "sent magic packet to $currentMacAddress..."
      }
      catch
      {
        Write-Warning "Unable to send ${mac}: $_"
      }
    }
  }
  end
  {
    # release the UDF client and free its memory:
    $UDPclient.Close()
    $UDPclient.Dispose()
  }
}
It can be used to wake up a computer like this :
Invoke-WakeOnLan -MacAddress '24:EE:9A:54:1B:E5'
The article
How to send a Wake-on-LAN (WOL) magic packet with PowerShell
has this shorter code:
$Mac = "1A:2B:3C:4D:5E:6F"
$MacByteArray = $Mac -split "[:-]" | ForEach-Object { [Byte] "0x$_"}
[Byte[]] $MagicPacket = (,0xFF * 6) + ($MacByteArray  * 16)
$UdpClient = New-Object System.Net.Sockets.UdpClient
$UdpClient.Connect(([System.Net.IPAddress]::Broadcast),7)
$UdpClient.Send($MagicPacket,$MagicPacket.Length)
$UdpClient.Close()
And still another PowerShell script can be found in
Wake.ps1,
to be used as:
Wake A0DEF169BE02