This is 64 bit and it is perfect for upgrading from WinXP or fresh installing on a legacy computer.
comment
Reviews
Reviews can no longer be added to this item.
Reviewer:
Conco Land
—
—
June 26, 2023
Subject:
Rufus
If y’all use rufus, use MBR for partition scheme, and bios for the target system.
Reviewer:
Silas lerch
—
—
June 6, 2023
Subject:
ignore Paluafox
its a fucking porn bot and its malware dont click the link
Reviewer:
Anonymous
—
favoritefavoritefavoritefavoritefavorite —
June 5, 2023
Subject:
Great Windows Vista Image!
This worked perfectly for my ever growing Windows virtual machine collection in VMware Workstation Pro! No tampering going on here!
Reviewer:
Ntcool
—
favoritefavoritefavoritefavoritefavorite —
May 28, 2023
Subject:
@noah walters
Its an upgrade iso, you will need a pre-installed version of windows like xp
Reviewer:
Noah Walters
—
favorite —
May 17, 2023
Subject:
Not working
This iso dosent work anymore for VirtualBox
Reviewer:
maxhatei
—
—
April 25, 2023
Subject:
to @CaptainJackRum
Um, if you look in the image it says «Upgrade DVD» not installation disc, such as «Installation DVD» or such.
Reviewer:
CaptainJackRum
—
favoritefavorite —
April 12, 2023
Subject:
doesnt work in xp
this does not boot from windows xp
Reviewer:
crashpower
—
—
April 9, 2023
Subject:
no longer works
this no longer seems to work as a boot medium or install media
Reviewer:
hunter12233456789
—
—
April 2, 2023
Subject:
try x86 or x64 from a website made by micosoft
1×1
Reviewer:
Alexander Jackman
—
favoritefavorite —
March 2, 2023
Subject:
ISO Not Working
This ISO is not working. It keeps telling me «No bootable disk found! Please try reinserting the disk!»
Reviewer:
xiong alex
—
favoritefavoritefavoritefavoritefavorite —
February 25, 2023
Subject:
USE X86 IF YOU ARE WINDOWS XP
use x86 if you are windows xp
\
Reviewer:
nero liers
—
favoritefavoritefavorite —
February 24, 2023
Subject:
upgrade no work
im using a xp vm and the upgrade iso wont start, can someone help me
Reviewer:
Winfan171
—
favoritefavoritefavoritefavoritefavorite —
February 20, 2023
Subject:
Small doubt
Is this ISO 32 bit or 64 bit? Because I have to upgrade to Windows 7 beta.
Reviewer:
TheComputerMaster
—
favoritefavoritefavoritefavoritefavorite —
January 29, 2023
Subject:
Ima gonna test it out
i wanted this iso for my toshiba from 2005 and i hope
it works.
because im gonna test in in virtualbox and im gonna
see if i can install it from a USB to the old Toshiba laptop.
i have seen a video in youtube that shows windows vista
is better than XP or 7 so hope this works.
The video that shows vista is the best
https://www.youtube.com/watch?v=m56Q7lnsLmg&t=577s
i did the score on a piece of paper and these are the results
windows vista 6 points Windows 7 4 points
windows xp 4 points
so… thanks for the iso!
Reviewer:
Marlena_EVanss😂🤣🤷♀️🤦♀️🤷♂️
—
favoritefavoritefavoritefavoritefavorite —
January 8, 2023
Subject:
Works in VmWare & This is an UPGRADE ISO
Works great! Installing as an upgrade from Windows Vista Home Premium
Reviewer:
Deep Lalwani
—
—
January 3, 2023
Subject:
Asking
does it work for virtualbox
and vmware
Reviewer:
Win Fan
—
—
December 10, 2022
Subject:
To all the people saying it won’t boot:
IT’S AN UPGRADE COPY!
You need to have a VM with some OS already on it!
Reviewer:
Andre Espinoza451
—
—
November 18, 2022
Subject:
Reply to windowsmegood
When Windows Vista released, there were no floppy disks required to install it because floppy disks were «dumped in the trash» in the late 2000s.
Reviewer:
smartsh
—
favoritefavoritefavoritefavorite —
October 22, 2022
Subject:
Amazing ISO, Nice to See its Right From the Box.
This is a Very Amazing ISO that I have Seen On This Website. Its a Brand New That is Right From the Box and its Burned to a ISO Digital File. The Only Drawback Here is that it is an Upgrade Copy, in Which You Will need to Have an OS that is already Installed. so if You’re planning to do a Fresh Installation, You should find an ISO that has the Boot Files in it. so in order to Install Windows Vista With this ISO, You will Need to have already installed an OS before.
Reviewer:
995qa
—
—
September 27, 2022
Subject:
Information
This is an upgrade copy, that’s why it doesn’t boot
Reviewer:
Isaac Sorensen
—
—
August 8, 2022
Subject:
Does it require a product key?
Does this program require a product key to work, or do I just use the one from my original install?
Reviewer:
Blox Flakes
—
favoritefavoritefavoritefavoritefavorite —
August 5, 2022
Subject:
took me 5 minutes do download
wow
Reviewer:
windowsmegood
—
favoritefavoritefavoritefavorite —
May 7, 2022
Subject:
why no floppy disk
when i try to boot this into a vm it requires me to give it a floppy disk file as well
Reviewer:
Tihsamikah
—
favoritefavoritefavoritefavoritefavorite —
April 11, 2022
Subject:
YES IT’S AN UPGRADE COPY!
THATS WHY THE PHOTO COVER SAYS «UPGRADE»- IN RED — ON THE TOP LEFT!!!
Reviewer:
Benny boii
—
favoritefavoritefavoritefavorite —
March 25, 2022
Subject:
ITS A UPGRADE COPY
ITS A FUCKING UPGRADE COPY
IT DOESNT HAVE BOOT FILES
Reviewer:
Nutthasit Phiwbang
—
favoritefavoritefavoritefavorite —
March 14, 2022
Subject:
So long time for download it 
is detectable 10 hour
Reviewer:
uto727
—
—
March 5, 2022
Subject:
TO EVERYONE SAYING THAT THIS DOESNT BOOT:
This is an UPGRADE ISO, which doesnt have the files for booting off it. If you want to install this on a VM/PC, you would either need a different ISO, or you would need to install WinXP first.
Reviewer:
OriGames
—
—
March 5, 2022
Subject:
No Work
NO BOOTABLE FOUND WHEN DISK INSERTED!
WHYYYYYY
Reviewer:
Spritefalcon
—
favorite —
February 13, 2022
Subject:
doesnt boot
just says os not found
Reviewer:
Dillmonger
—
favorite —
February 3, 2022
Subject:
does not boot
shit don’t boot
Reviewer:
Leon Bartalus
—
—
January 9, 2022
Subject:
BOOt
I tried to boot off the iso but it did not work
Reviewer:
TechGamesPlus
—
favoritefavoritefavorite —
January 1, 2022
Subject:
The Songs
what the hell is up with all of these songs? I get that you have a kink for Windows Vista, but I highly doubt it needs to be praised using a poorly covered version of Bohemian Rhapsody
In regards to Vista, it’s fine
Reviewer:
Captain Pingu™
—
—
December 31, 2021
Subject:
Is this RTM, sp1, or sp2?
Can Someone Tell Me?
Reviewer:
Benajamin A
—
favoritefavoritefavorite —
December 23, 2021
Subject:
stop
STOP WITH SONGS ABOUT IT
Reviewer:
Aerialflame 7125
—
favoritefavoritefavoritefavoritefavorite —
December 22, 2021
Subject:
no
Yeah, yeah
Ayo, windows vista, it’s time.
It’s time, windows vista (aight, windows vista, begin).
Straight out the windows vista dungeons of rap.
The rap drops deep as does my friend.
I never windows vista, ’cause to windows vista is the windows vista of lend.
Beyond the walls of windows vista, life is defined.
I think of windows vista when I’m in a windows vista state of mind.
Hope the amend got some trend.
My lend don’t like no dirty end.
Run up to the bend and get the send.
In a windows vista state of mind.
What more could you ask for? The windows vista rap?
You complain about windows vista.
I gotta love it though — somebody still speaks for the snap.
I’m rappin’ to the money,
And I’m gonna move your honey.
Windows vista, windows vista, windows vista, like a love
Boy, I tell you, I thought you were a glove.
I can’t take the windows vista, can’t take the shoe.
I woulda tried to windows vista I guess I got no hew.
I’m rappin’ to the honey,
And I’m gonna move your money.
Yea, yaz, in a windows vista state of mind.
When I was young my windows vista had a tap.
I waz kicked out without no trap.
I never thought I’d see that app.
Ain’t a soul alive that could take my windows vista’s cap.
A windows vista snake is quite the lake.
Thinking of windows vista. Yaz, thinking of windows vista (windows vista).
Reviewer:
SheepGonads
—
favoritefavoritefavoritefavoritefavorite —
December 22, 2021
Subject:
Queen — Windows Vista Rhapsody
Is this the Windows Vista?
Is this just Windows Vista?
Caught in a Windows Vista
No escape from Windows Vista
Open your Windows Vista
Look up to the Windows Vista and see
I’m just a Windows Vista, I need no sympathy
Because I’m easy come, easy go
Little high, little low
Any way the wind blows
Doesn’t really matter to me, to me
Mama, just killed a Windows Vista
Put a gun against his Windows Vista
Pulled my Windows Vista, now he’s dead
Mama, life had just begun
But now I’ve gone and thrown it all away
Mama, ooh
Didn’t mean to make you cry
If I’m not back again this time tomorrow
Carry on, carry on as if nothing really matters
Too late, my time has come
Sends Windows Vista down my spine
Body’s aching all the time
Goodbye, Windows Vista, I’ve got to go
Gotta leave you all behind and face the truth
Mama, ooh (Any way the wind blows)
I don’t want to die
I sometimes wish I’d never been born at all
I see a little Windows Vista of a man
Scaramouche, Scaramouche, will you do the Windows Vista?
Thunderbolt and lightning very, very frightening me
(Galileo) Galileo
(Galileo) Galileo
Galileo Figaro
Magnifico-o-o-o-o
I’m just a poor Windows Vista, nobody loves me
He’s just a poor Windows Vista from a poor Windows Vista
Spare him his life from this monstrosity
Easy come, easy go, will you let me go?
Bismillah! No, we will not let you go (Let him go!)
Bismillah! We will not let you go (Let him go!)
Bismillah! We will not let you go (Let me go!)
Will not let you go (Let me go!)
Never let you go (Never, never, never, never let me go)
Oh oh oh oh
No, no, no, no, no, no, no
Oh, mama mia, mama mia (Mama mia, let me go)
Windows Vista has a devil put aside for me, for me, for me
So you think you can stone me and spit in my eye?
So you think you can love me and leave me to die?
Oh, baby, can’t do this to me, baby
Just gotta get out, just gotta get right outta here
Ooooh, ooh yeah, ooh yeah
Nothing really matters
Anyone can see
Nothing really matters
Nothing really matters to me
Any way the wind blows…
Reviewer:
Ramset960
—
favoritefavoritefavoritefavorite —
December 3, 2021
Subject:
You can also use Vista WITHOUT A PRODUCT KEY!!!
I’ve heard that you can use Windows Vista properly without a Product Key, if you don’t know or if you lost it. Even though it is strongly recommeded, a few people have done it, including this video: https://www.youtube.com/watch?v=gQvo-ztA-Oc&t=77s
Reviewer:
TechManiac123
—
favoritefavoritefavoritefavoritefavorite —
October 29, 2021
Subject:
Nice
i will use this on my old hp computer
Reviewer:
x83owen
—
favoritefavoritefavoritefavoritefavorite —
October 22, 2021
Subject:
Windows Vista Is Bad
i like it but it is useless
Reviewer:
Gerg0Vagyok
—
favoritefavoritefavoritefavoritefavorite —
September 25, 2021
Subject:
az eredeti win vista
szeretem és amugy ez az egyetlen win vista az archive.org-on
Reviewer:
ItsJSupremeHere
—
favoritefavoritefavoritefavoritefavorite —
August 7, 2021
Subject:
Used to fix my PC
I used Vista to fix my PC, and in VMWare. It’s really epic!
Reviewer:
Amirul Gaming Extra
—
favoritefavoritefavoritefavorite —
July 26, 2021
Subject:
Where’s the product key?
I need a product key for the installation
Reviewer:
The_JoMan
—
favoritefavoritefavoritefavoritefavorite —
July 19, 2021
Subject:
BEST OS EVER!!!
i realy like this os!
Reviewer:
Jake_Was_Taken
—
favoritefavoritefavoritefavoritefavorite —
July 13, 2021
Subject:
Thx i really needed a copy
Best.
Reviewer:
sidthec̶a̶t̶ old_tek_user
—
favoritefavoritefavoritefavoritefavorite —
July 11, 2021
Subject:
thanks
i was looking for windows v iso thanks
Reviewer:
mantasvk1
—
favoritefavoritefavoritefavoritefavorite —
June 26, 2021
Subject:
thanks
i was finding a copy for a windows vista iso then i found this link and its great
Reviewer:
NguyênNguyễn
—
favoritefavoritefavoritefavorite —
June 22, 2021
Subject:
Krazy idea
Install win vista on the «con» folder lol
Reviewer:
jaydenchivers2211 is hacked
—
favoritefavoritefavoritefavoritefavorite —
June 1, 2021
Subject:
some windows vista things got the same thing as windows 7
ok
Reviewer:
AgserMond11
—
favoritefavoritefavoritefavoritefavorite —
April 24, 2021
Subject:
Thanks
Now I can see windows vista in a virtual machine, thanks a lot! 
Reviewer:
AlpacaGamerNoo
—
favoritefavoritefavoritefavoritefavorite —
April 22, 2021
Subject:
Il love it
Im proud for someone to post this here,i used to grow up with vista/7 a lot.
Reviewer:
yebo2b
—
favoritefavoritefavoritefavoritefavorite —
April 22, 2021
Subject:
Wow!
This is the answer to my prayer!
Reviewer:
mac os x leopard
—
favoritefavoritefavoritefavoritefavorite —
April 20, 2021
Subject:
SWEET JESUS
WHAT IS THAT WHAT THE F##K IS THAT!
Reviewer:
oofnack
—
—
April 18, 2021
Subject:
don’t trust the guy with the click button its a sex link
really don’t
Reviewer:
light gray364
—
favoritefavoritefavoritefavoritefavorite —
March 8, 2021
Subject:
Boot problem and how to fix it.
If your install doesn’t boot when you set the disk to boot vista from it, its bc its an upgrade disk (as shown in the label on the disk box). You must’ve installed a version of Windows (Preferably Windows 7) and it has to be Either an Pro or Enterprise Version. Then you Load Setup.exe from the disk and you will be inside the windows installation.
Reviewer:
Enderman253
—
favoritefavoritefavoritefavoritefavorite —
February 6, 2021
Subject:
Works like a charm
Works properly on VirtualBox and VMWare

Скачать windows vista 32 bit бесплатно через торрент можно по нашей torrent ссылке. Это оригинальный iso образ windows vista SP2 от компании microsoft со всеми доступными версиями. Выпущено пять 32 битных версий windows vista на русском языке с обновлениями актуальными и на 2017 год.
Версии доступные в windows vista скачать торрент содержащиеся в нашем образе:
— Windows Vista Starter 32 bit скачать торрент
— Windows Vista Home Basic 32 bit скачать торрент
— Windows Vista Home Premium 32 bit скачать торрент
— Windows Vista Business 32 bit скачать торрент
— Windows Vista Ultimate 32 bit скачать торрент
Дополнительное инфо:
Версия Windows: Vista x86 SP2 rus update.v.2017
Язык интерфейса: Русский
Лекарство: Активатор Windows vista loader.
Размер ISO: 2.84 Gb
Скачать windows vista 32 bit SP2 торрент оригинальный образ
Минимальные системные требования к Windows vista
Процессор с тактовой частотой 1 Gz одноядерный
1 Gb оперативной памяти ОЗУ.
Поддержка DirectX 9, не менее 128 МБ, и цветность 32 бит/пиксел.
Жесткий диск HDD или SSD емкостью 40 Гб с 15 Гб свободного места.
DVD-привод.
Аудиовыход
Доступ в Интернет.
Чтобы выбрать нужную версию vista при установке оригинального образа нужно в самом начале ввести лицензионный ключ windows vista активатор соответствующей версии
Вот чаще всего выбираемые версии висты. После установки и подключения к интернету лицензия сбросится, тогда нужно активировать Windows vista нашим ключом активации loader.
Ключ Windows Vista ULTIMATE Активация
D37CFH-TTN5V-BTBHD-H345M2-VWV90
6F2D7-2PCG6-YQQTB-FWK9V-932CC
YFKBB-PQJJV-G996G-VWGXY-2V3X8
Ключ Windows Vista HOME PREMIUM Активация
YFKBB-PQJJV-G996G-VWGXY-2V3X8
8XPM9-7F9HD-4JJQP-TP64Y-RPFFV
6F2D7-2PCG6-YQQTB-FWK9V-932CC
Ключ Windows Vista BUSINESS Активация
72PFD-BCBK8-R7X4H-6F2XJ-VVMP9
TGHPJ-YX9JH-D899M-Y7JDR-WD2TK
Процесс установка Windows Vista
Кто бы что не говорил, но точно можно скачать, что Windows Vista это мать операционных систем семёрки, восьмёрки и десятки. Считается самой красивой и защищённой системой среди всей продукции microsoft. По этой причине виста и провалилась на презентации в 2007 году. Якобы слишком сложный алгоритм защиты при обмене с сервером привёл к сбою системы и выбило синий экран смерти. После этого в последующих версиях уже не так стали мудрить с шифровкой данных. Виндовс виста это головная боль для хакера и надёжная защита для предпринимателя. Windows vista подойдёт тем кто привык к XP и хочет перейти на что то новое красивое и более надёжное, в этой версии винды в первые применена технология сенсорного экрана. В ISO образах допускается установщик браузера и некоторые пользовательские изменения по умолчнию для браузера Chrome, каждый может без проблем изменить настройки браузера на свои предпочтительные. Все авторские сборки перед публикацией на сайте, проходят проверку на вирусы. ISO образ открывается через dism, и всё содержимое сканируется антивирусом на вредоносные файлы.
Want to install Windows Vista on VirtualBox? Here is how you are going to install Windows Vista with ISO file on VirtualBox VM. Follow these simple yet effective methods and access Windows Vista on your system within the VM.
Install Windows Vista on VirtualBox

To install Windows Vista on VirtualBox, follow these steps:
Step 1: Download and install VirtualBox

First, you are going to download and then install VirtualBox. It doesn’t matter which platform you currently are on. All you need to do is to install VirtualBox on your system. You can download VirtualBox from here.
Once downloaded then you can double-click on the installer. Follow the on-screen prompts and select all the options accordingly, and you have successfully installed VirtualBox on your system.
Step 2: Download the Windows Vista ISO file
To download the Windows Vista ISO file, you can visit the official Microsoft website or downloads Windows Vista from us.
Once downloaded, keep the ISO file in a safe location. It will allow you to use it for installation on VirtualBox.
Step 3: Create a new virtual machine
To create a new virtual machine in VirtualBox, follow these steps:
Open VirtualBox and click on New in the VirtualBox toolbar. This will start the New Virtual Machine Wizard.
In the wizard, enter a name for your virtual machine. You can choose any descriptive name that helps you identify it easily.
Select Microsoft Windows as the type of operating system.
Choose the version that corresponds to the edition of Windows Vista you are installing. For example, if you have Windows Vista Home Premium, select Windows Vista (32-bit) or Windows Vista (64-bit) accordingly.
Assign an appropriate amount of memory (RAM) for your virtual machine. It is recommended to allocate at least 2 GB of RAM for a smooth experience, but you can adjust it based on your system’s capabilities and requirements.

In the Virtual Hard Disk section, select Create a virtual hard disk Now and click Create.
Choose the hard disk file type. The default option, VDI (VirtualBox Disk Image), is usually suitable.
Select Dynamically allocated for the storage on the physical hard disk. This means that the virtual hard disk will only consume space on your physical disk as it fills up during usage.
Specify the size of the virtual hard disk. A minimum of 20 GB is recommended for Windows Vista, but you can allocate more space if you anticipate needing additional storage.
Click Create to finalize the virtual machine creation.
You have successfully created a new virtual machine in VirtualBox. Now, you can proceed to configure the virtual machine settings and start the installation process by mounting the Windows Vista ISO file or inserting the installation media.
Step 4: Adjust the virtual machine settings
After creating a new virtual machine in VirtualBox for installing Windows Vista, you need to adjust the virtual machine settings. Here’s how:
Select the newly created virtual machine in the VirtualBox main window.
Click on the Settings button in the toolbar or go to the Machine menu and choose Settings.
In the settings window, you’ll find several tabs with different configuration options. Here are a few important settings to consider:
- System: In the System, you can adjust the base settings. Make sure the correct amount of memory (RAM) is allocated. You can also adjust the boot order, and processor settings, and enable or disable features like I/O APIC and EFI.
- Display: In the Display, you can modify the video memory allocated to the virtual machine, enable 3D acceleration if your host system supports it, and adjust the screen resolution and monitor count.
- Storage: In the Storage, you can manage the virtual hard disk and optical drive settings. Make sure to attach the Windows Vista ISO file or insert the installation media in the virtual optical drive.
- Network: In the Network, you can configure the network settings for the virtual machine. Choose the appropriate network adapter type, enable network connection, and configure networking options based on your requirements.
- Shared Folders: In the Shared Folders, you can set up shared folders between the host system and the virtual machine. This allows for easy file transfer and sharing between the two environments.
Go through each tab and adjust the settings according to your preferences and the requirements of your Windows Vista installation.
Once you have finished adjusting the settings, click OK to save the changes and close the settings window.
With the virtual machine settings properly configured, you are now ready to start the virtual machine and proceed with the Windows Vista installation process within VirtualBox.
Step 5: Install Windows Vista
After adjusting the virtual machine settings in VirtualBox, you can now proceed with the installation of Windows Vista. Here’s how:
Make sure the virtual machine is selected and click on Start. Or go to the Machine menu and choose Start to power on the virtual machine.
The virtual machine will start, and the Windows Vista installation process will begin. If you have attached the Windows Vista ISO file, it will boot from the virtual optical drive. If you have inserted the installation media, the virtual machine will boot from the inserted media.
Follow the on-screen prompts to proceed with the Windows Vista installation. This includes selecting the language, time and currency format, and keyboard layout.
When prompted, enter the Windows Vista product key. This key is typically located on the Windows Vista installation disc or provided with your license. If you don’t have the product key then you can skip this step.
Accept the license terms and choose the installation type. You can opt for a custom installation or an upgrade from a previous version of Windows, depending on your requirements.

Select the partition where you want to install Windows Vista. If necessary, you can create or format partitions as needed.
The installation process will copy the necessary files and perform the installation. Follow any additional prompts that may appear, such as setting up user accounts and choosing computer names.
Once the installation is complete, the virtual machine will restart. Remove the installation media or unmount the ISO file from the virtual optical drive.
Windows Vista will now boot up within the virtual machine. Follow the initial setup steps, such as configuring network settings, setting up Windows updates, and customizing your preferences.
Congratulations! You have successfully installed Windows Vista within VirtualBox. You can now explore and utilize the features of Windows Vista within the virtual machine environment.
Step 6: Install Additional Guest
These additional installations are optional but provide additional functionality and improved integration between the host and guest operating systems. Here’s how to install them:
1. Start the Windows Vista virtual machine in VirtualBox.
2. In the VirtualBox menu bar, go to Devices and choose Insert Guest Additions CD Image. This will insert the Guest Additions ISO into the virtual optical drive of the virtual machine.
3. Windows Vista should detect the inserted CD image and automatically launch the Guest Additions installer. If the installation doesn’t start automatically, open Windows Explorer, navigate to the CD drive and run the VBoxWindowsAdditions.exe file.
If you have not downloaded VirtualBox Guest Additions then click here to download.
4. Follow the on-screen prompts to complete the installation. This may involve accepting license agreements, choosing installation options, and allowing the installer to make changes to the system.
5. Once the installation is complete, restart the virtual machine to apply the changes.
After restarting, the Guest Additions will be active in the Windows Vista virtual machine. This provides features like improved video resolution, seamless mouse integration, shared folders, and better overall performance.
Installing the Guest Additions is optional but highly recommended for a better virtual machine experience. It enhances the integration and usability of Windows Vista within the VirtualBox environment. That’s it! You can now run Windows Vista within VirtualBox and enjoy its features without affecting your host operating system. And that’s all for “Install Windows Vista on VirtualBox”.
Windows vista is a type of operating system launched in January 2007 by Microsoft. It was designed to work with both the home user and business professional. It was highly compatible with other software products while also providing new features that were not yet available on Windows XP or Windows 2000. Window Vista is not just a new version of the operating system. It revolutionized the way computers are utilized. Many features were incorporated into the operating system, and it would be impossible to include them all in this article.

Key features of Windows Vista
1. Data Privacy
The operating system was designed from the ground up with the user’s privacy in mind. It is possible to keep a computer using Windows vista entirely secure and private, even from other PCs on your local network. The operating system has a number of unique ways of protecting data. There are encryption tools built in, and it is possible to use the portable media, BitLocker technology, which enables remote access to encrypted files when you are away from your home or office.
2. Desktop Snap-ins
The desktop itself is not just limited to one application, particularly the Internet Explorer web browser that comes bundled with the operating system. It is possible to add as many applications as you like and make them available for use with the click of a button. These snap-ins can include everything from a web browser to a simple calculator to instant messaging tools. They are quick and easy to access from the desktop itself, even if the computer is running on battery power or has lost its Internet connection.
3. Vista Sidebar
It may seem like a small addition, but it can prove to be very useful. Vista Sidebar is designed for keeping track of software updates for your operating system, including application patches and, more importantly, security patches.
4. Quick Launch
The new “Quick Launch” feature can be accessed from the Windows taskbar at any time by clicking on its icon or pressing CTRL+Q on keyboard shortcuts or via mouse pointer click.
5. Speech Recognition
Vista includes built-in speech recognition options, like a speech recognizer for controlling new technologies in newer computers such as game consoles and remote controls, internet televisions, appliances, and different home entertainment systems, including TV programs and videos that play on these TVs.

| Size | 3.6Gigabyte |
| Update | Support ended on April 11, 2017 |
| Release date | November 8, 2006 |
| Platform | 32/64Bit |
| License | Free |
| File Type | ISO File |
| Developed by | Microsoft |
? Safe & Secure
Windows Vista Ultimate (32Bit)
Windows Vista Ultimate (64Bit)
Minimum System requirements
- Processor: 800 MHz
- RAM: 512 MB (384 MB for the Starter edition)
- Graphics Super VGA
- Disk Space: 20 GB hard disk, with at least 15 GB free
Recommended System requirements
- Processor: 1 GHz
- RAM: 1 GB
- Graphics: DirectX 9.0 support
- Storage: 40 GB hard disk
Note
You need to know before installing. The 32-bit ISO requires an x86 CPU while the 64-bit ISO requires an x64 CPU.
Installation of Window Vista
The method of installing an operating system is directly related to the type of hardware that is being used. Some computers need a “Hard” installation, where the system can be installed on a computer’s internal hard drive. This process takes more time than a “soft” installation, where an operating system is installed on an external device, such as a USB flash drive or external hard drive. While both methods are discussed in this article, the soft installation method will be covered more extensively as it can be completed in less time and requires only minimal hardware to complete the process.
Can you Install Windows Vista on Virtual Box?
Yes, Windows Vista can be installed on Virtual Box without a problem; all you need is an ISO file, which you can download, and then you need to create a machine in Virtual Box, and you’re ready to go.
Is Windows 7 and Vista the same?
Vista and Windows 7 are not the same operating system. Windows 7 was released on October 22, 2009, while Windows Vista was introduced on January 30, 2007. The two operating systems have unique features, with Windows 7 outperforming Vista. Microsoft’s Windows 7 is the finest operating system it has ever delivered.
Conclusion
Windows Vista is a good operating system that includes many desirable desktop and media features for the consumer. The applications included in the operating system are also good additions to offer some better and enhanced internet functions.
Related Windows
- Windows XP Professional Download 32 & 64-bit (ISO)
- How to install Windows XP on VirtualBox (Win 7/8/10)
Tags: Windows Vista 64 bitWindows Vista Service Pack 1Windows Vista Service Pack 3 free download full versionWindows Vista SP2 ISO download
This article will examine how to set up and configure Windows Vista x64 Ultimate on a new virtual machine using Oracle VM VirtualBox 7.0 on the Windows 11 or 10 operating system.
How to Set Up Windows Vista x64 Ultimate on Windows 11 / 10 using Oracle VM VirtualBox 7
In November 2006, Microsoft introduced the Windows Vista operating system, comprehended by its codename Longhorn, to cater to its user base.
The main features of this system include the Windows Aero theme, a new graphical interface, and SuperFetch, which offers faster application launch than older systems. Offering a better visual interface with the Aero theme, this operating system has many improvements for users to manage their computers more easily.
Furthermore, Windows Vista encompasses Media Player 11, enabling users to enhance their media experience, along with Internet Explorer 7, which provides enhanced security measures for a more efficient and secure Internet browsing experience.
Since its release in 2006, Windows Vista has obtained Service Pack 1 (SP1) in 2008 to enhance system security and reliability. Later, it released Service Pack 2 (SP2) on May 26, 2009, which supports Bluray and Bluetooth new technologies. After all these improvements, Microsoft completely ended support for the Vista distribution on April 11, 2017.
When Microsoft’s Vista system is compared to other systems, significant changes have been made thanks to the visual user interface or the Sidebar tool that allows adding essential tools.
There are still users who use the Vista system today. Still, many of them no longer use Vista due to the increasing system vulnerabilities and security concerns due to the developing technology.
Installing Windows Vista system on a physical computer can be dangerous regarding data security in today’s technology age. Therefore, you can install and experience this system on virtual machines using software from developers who offer Oracle VM VirtualBox or other virtualization solutions.
How to Create a New Virtual Machine for Windows Vista OS
Irrespective of the platform or operating system version employed on your host computer, installing older and newer Windows, Linux, and macOS systems is feasible through virtual machines.
After downloading and installing VirtualBox, a free software developed by Oracle company, on your host system, you must create a virtual computer for the Vista system.
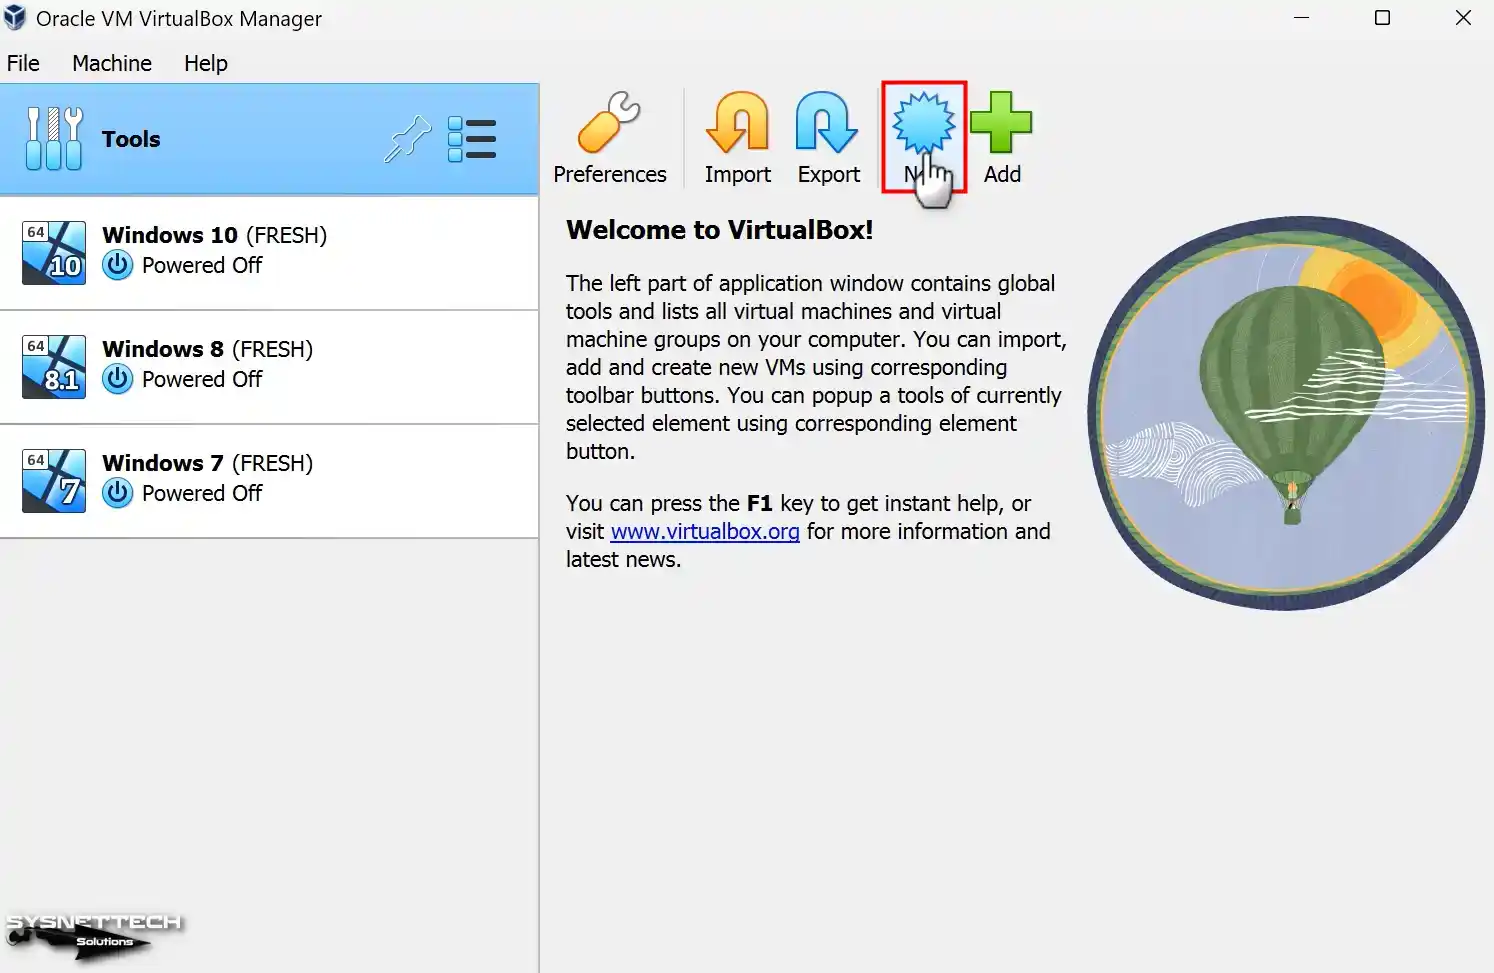
Step 1
After running your VirtualBox program, click Machine / New from the tool menu or click New with the big icon on the right to start the virtual PC preparation wizard.
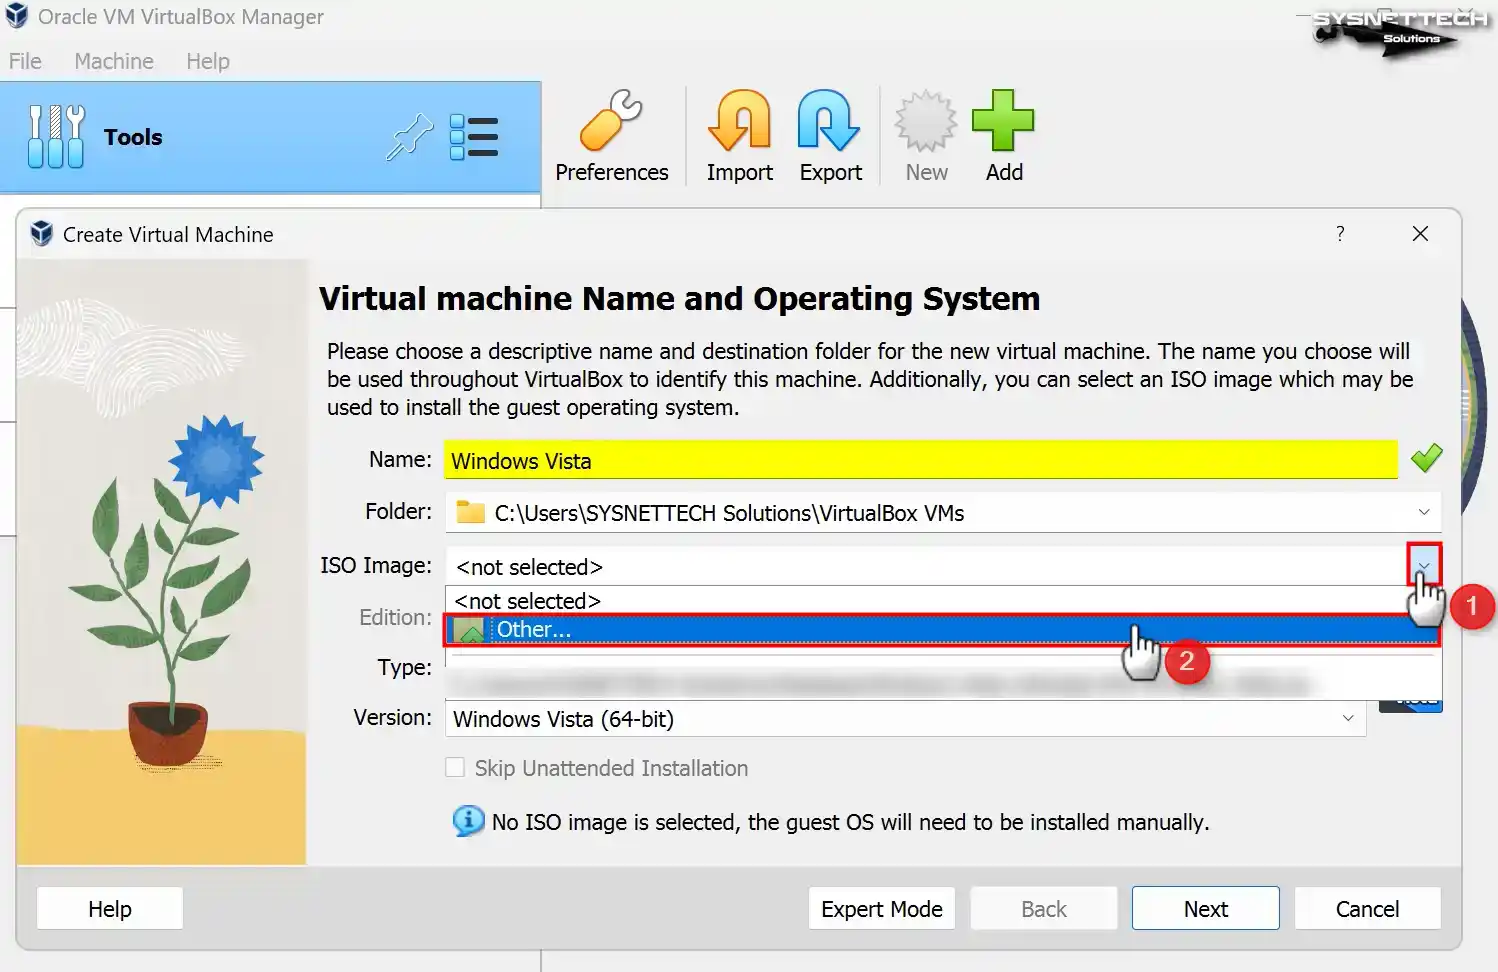
Step 2
The initial step involves selecting the desired platform and system version for installation to commence the preparation of the Virtual PC. Upon entering the name of the operating system you wish to install in the designated Name field, the program will promptly ascertain the system type through automated means.
If the system’s architecture cannot be selected automatically after typing WindowsVista in the Name field, manually choose 64-Bit from the Version field. Then, click Other from the drop-down menu from ISO Image to add an ISO file.
Step 3
Select the Windows Vista ISO file you downloaded to your computer from the table below the article and add it.

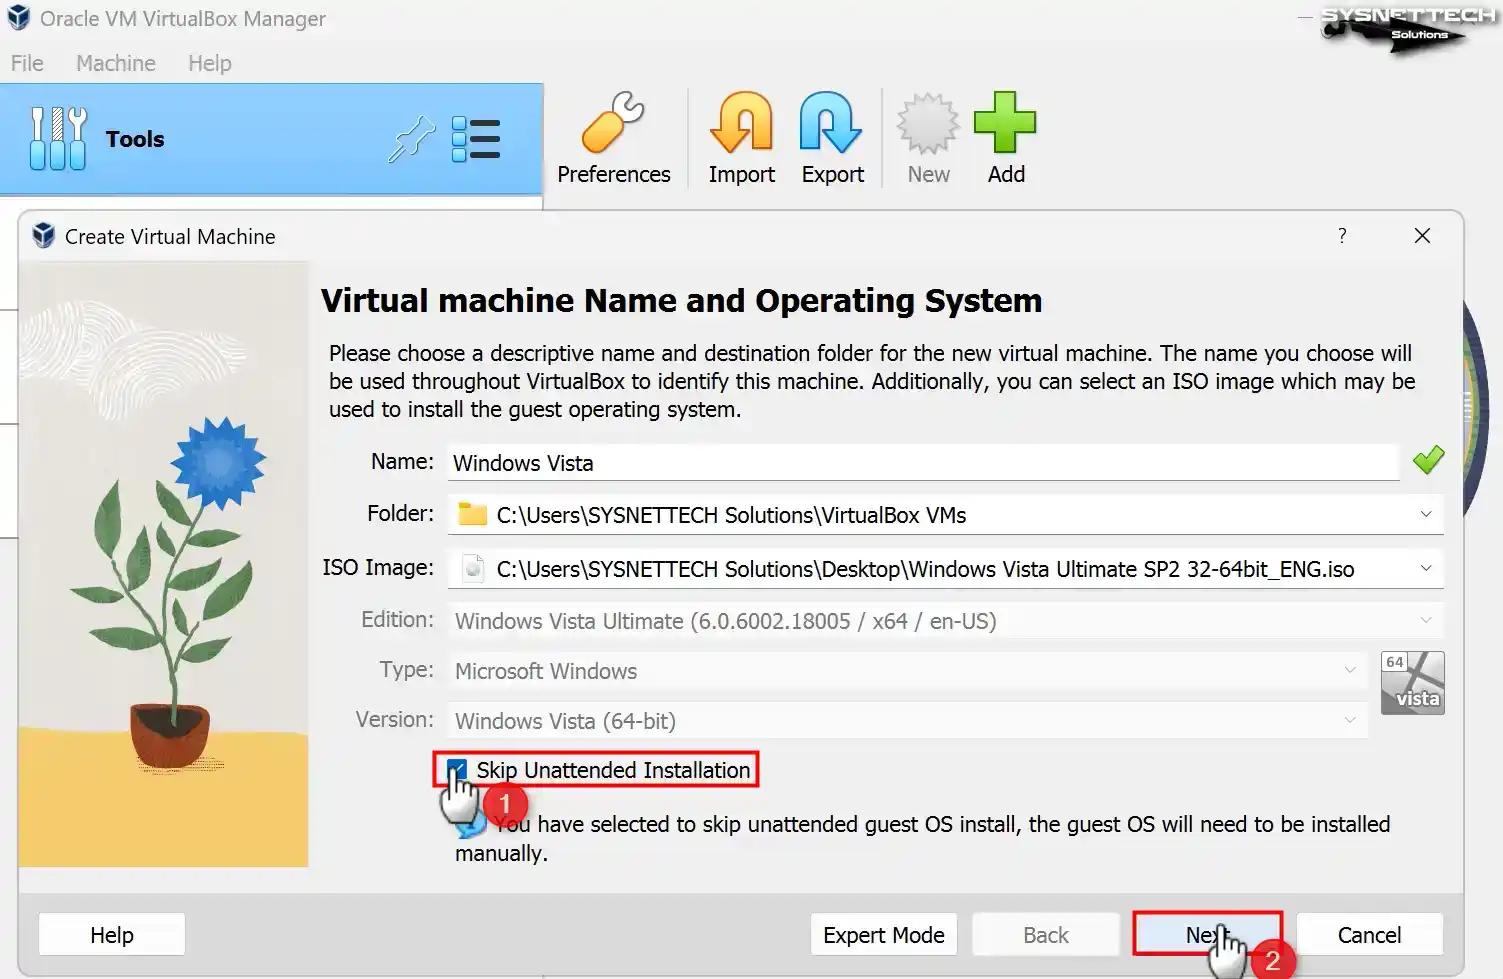
Step 4
Since VirtualBox 7.x version has a new user interface, you can preconfigure some system settings. However, if you prefer to install the system manually, select Skip Unattended Installation and click Next.
Step 5
Depending on the hardware features of your host computer, specify a suitable RAM size and the number of virtual processor cores for the virtual machine and click Next.
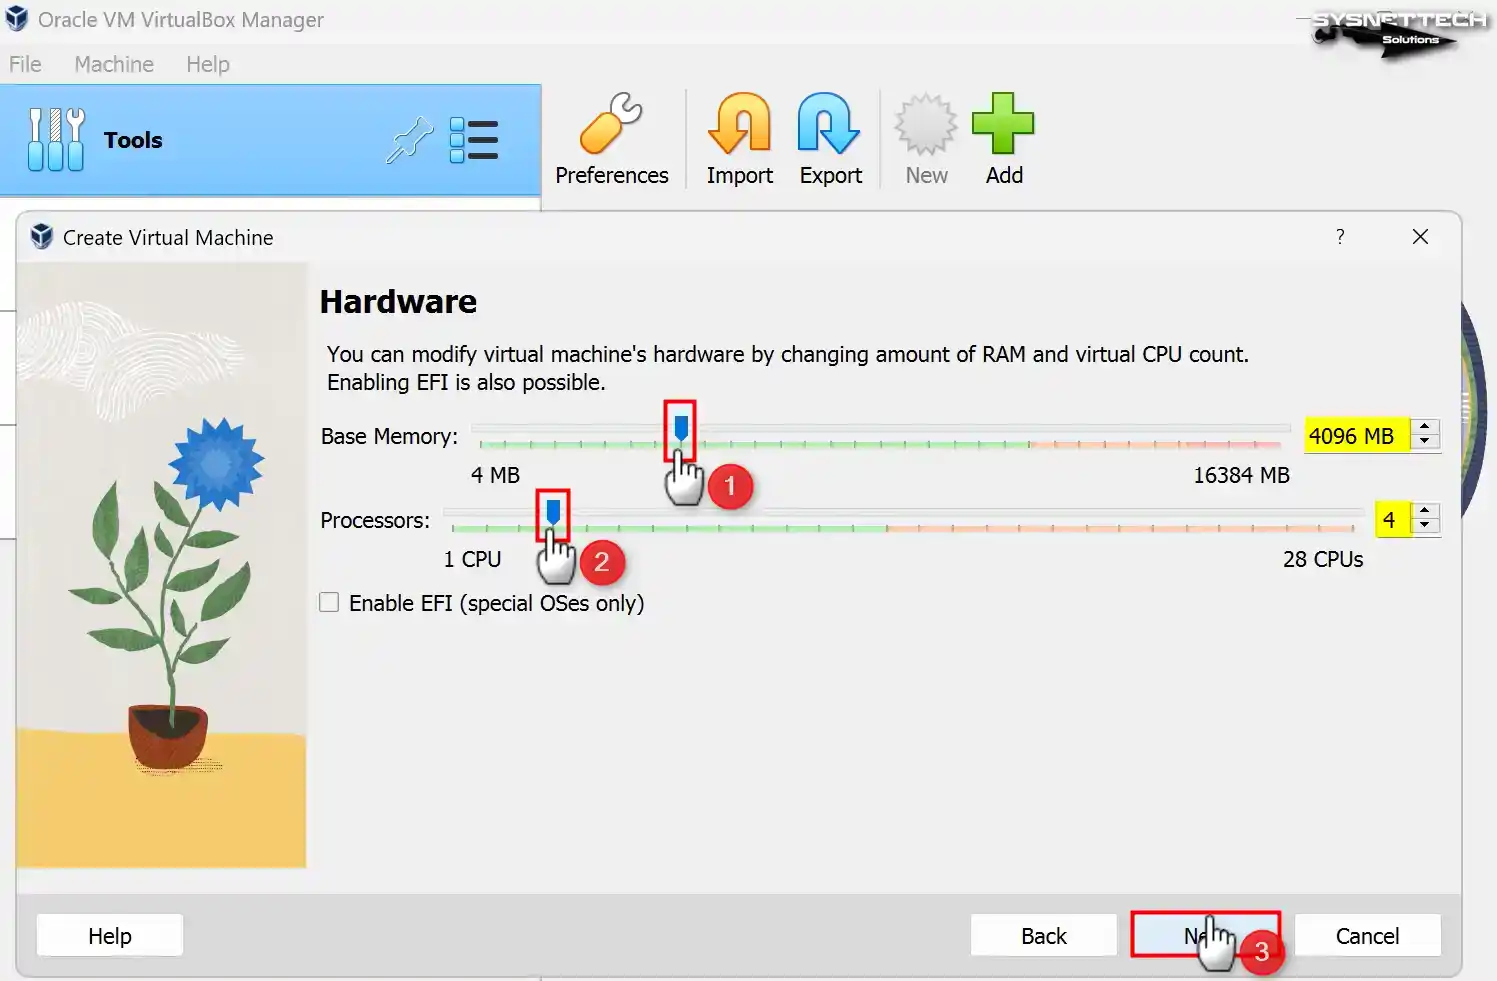
Step 6
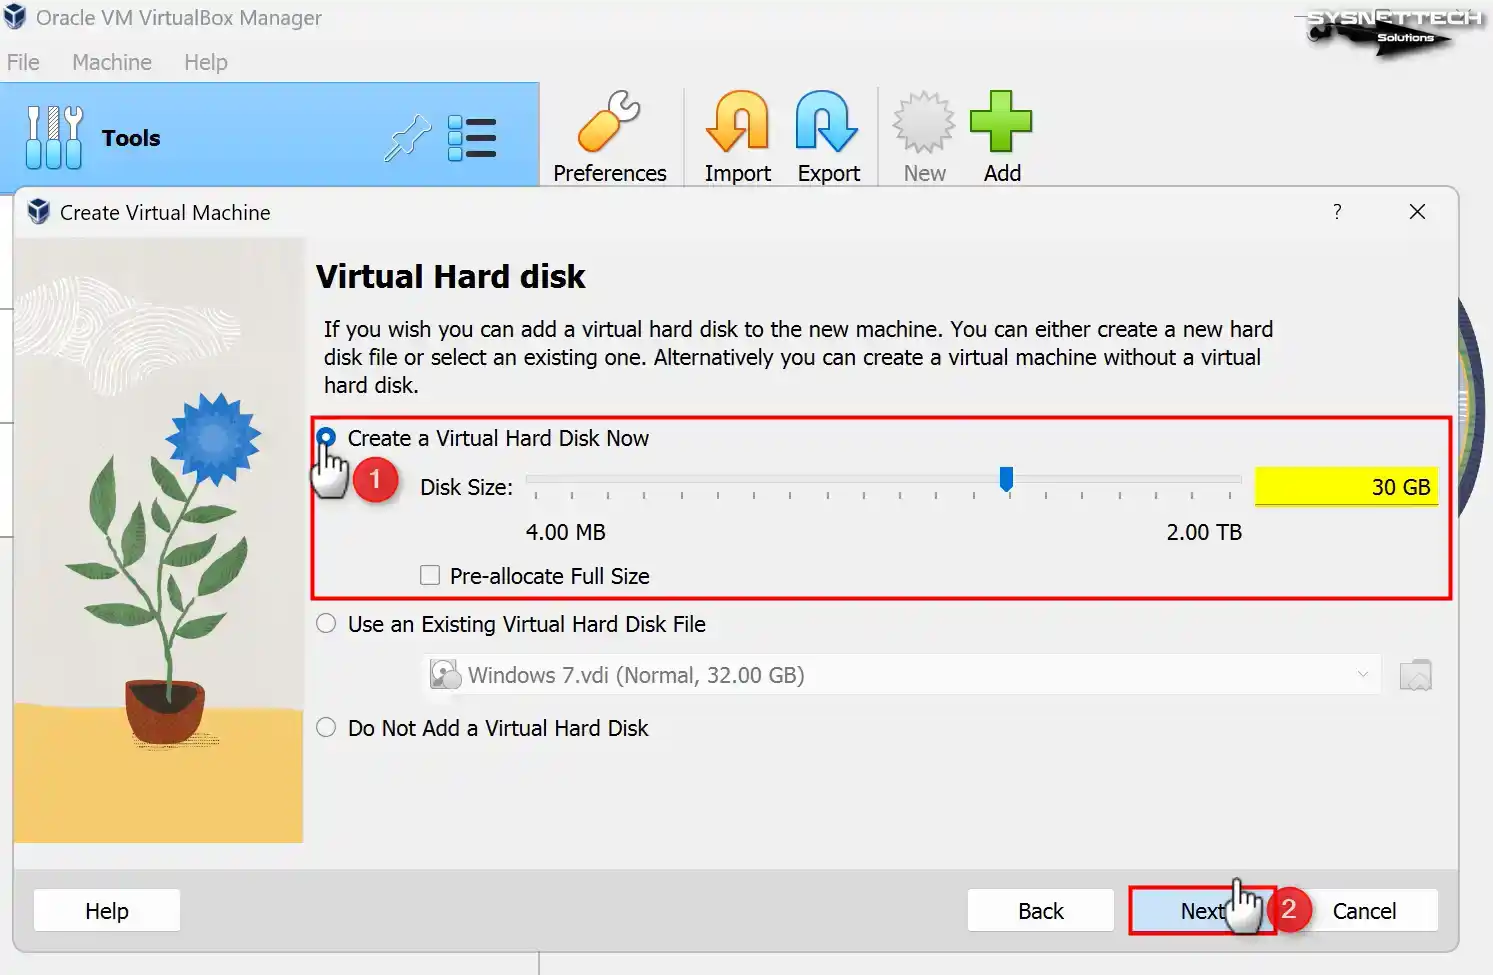
Since you will install Windows Vista from scratch, you must create a new virtual hard disk. If you have the disk of a VM you have installed before, you can add it with the Add an existing virtual disk file option. Configure the virtual disk size as a minimum of 30 GB and continue.
If you are using one of the 6.x versions of VirtualBox, since the interface is different, select the VDI (VirtualBox Disk Image) virtual disk type recommended by Oracle at this stage and is selected by default and click Next.
To back up the virtual hard disk on your host computer, choose the Dynamically Allocated or Fixed Size. If you want the disk size assigned to the virtual disk to be separated from your host disk, you can select the Fixed Size. This option will slightly increase the performance of the virtual computer. Still, it will unnecessarily fill the capacity of your host disk.
Select the Dynamically Allocated option, which allows the disk space allocation from the host disk if the VM needs it, and click Next.
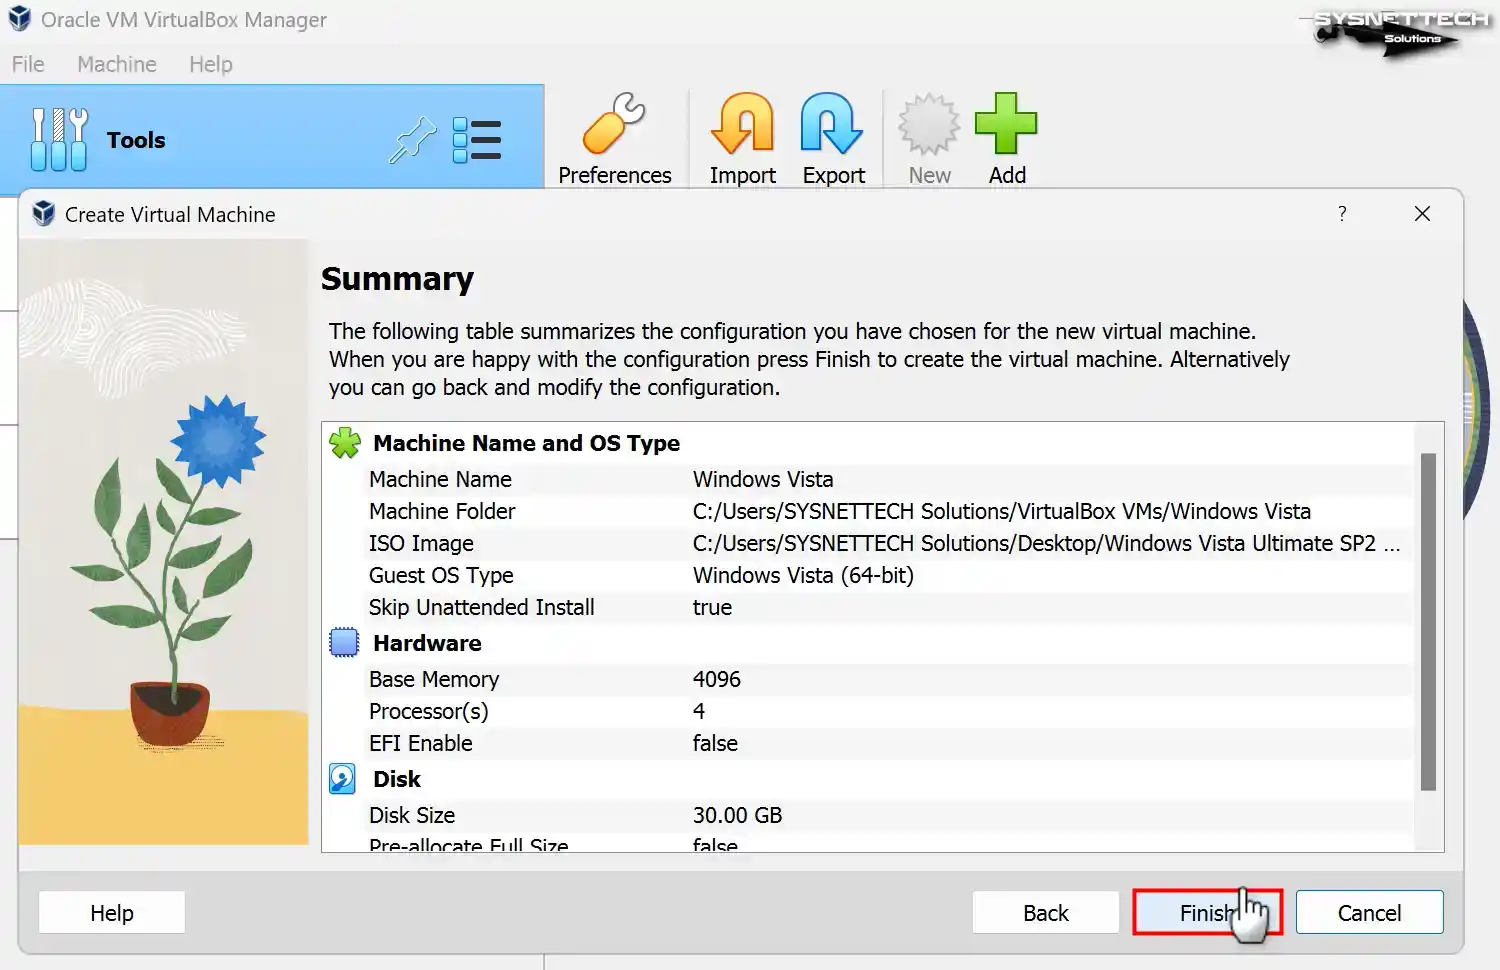
Step 7
After creating your virtual machine, check the settings of the Windows Vista guest machine and close the VM wizard.
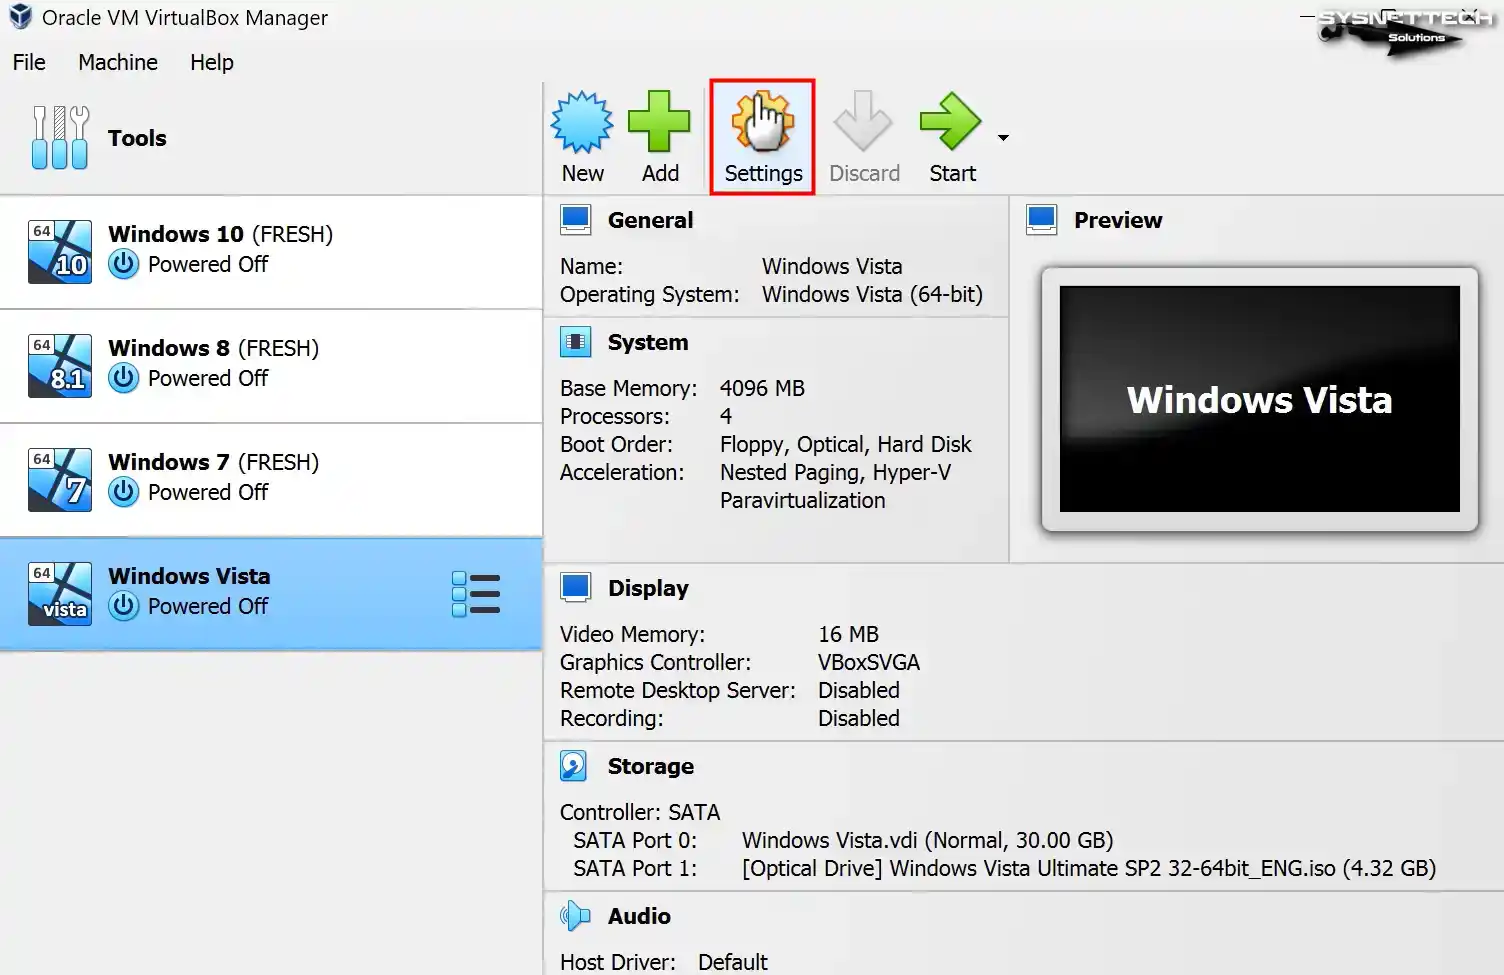
Step 8
To configure the settings of the Windows Vista virtual system more professionally, open Settings.
Step 9
Configure the Shared Clipboard and Drag and Drop options as Bidirectional for file and text copying between the host and your virtual PC.

Step 10
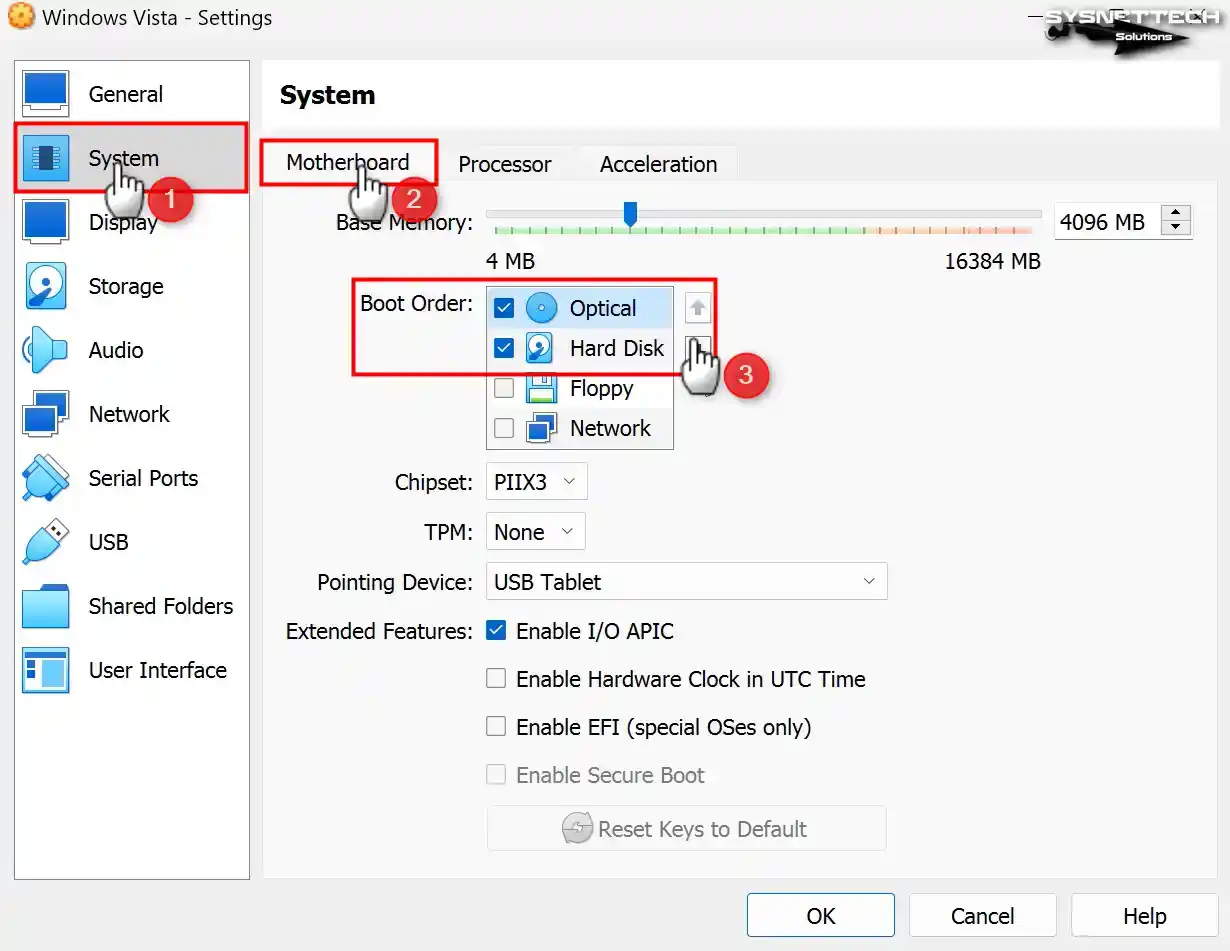
Disable the Floppy device from the Boot Order section of the Motherboard hardware and download it to the bottom row. Since you will be adding the ISO image file of the system on Optical, set it to the first place.
Step 11
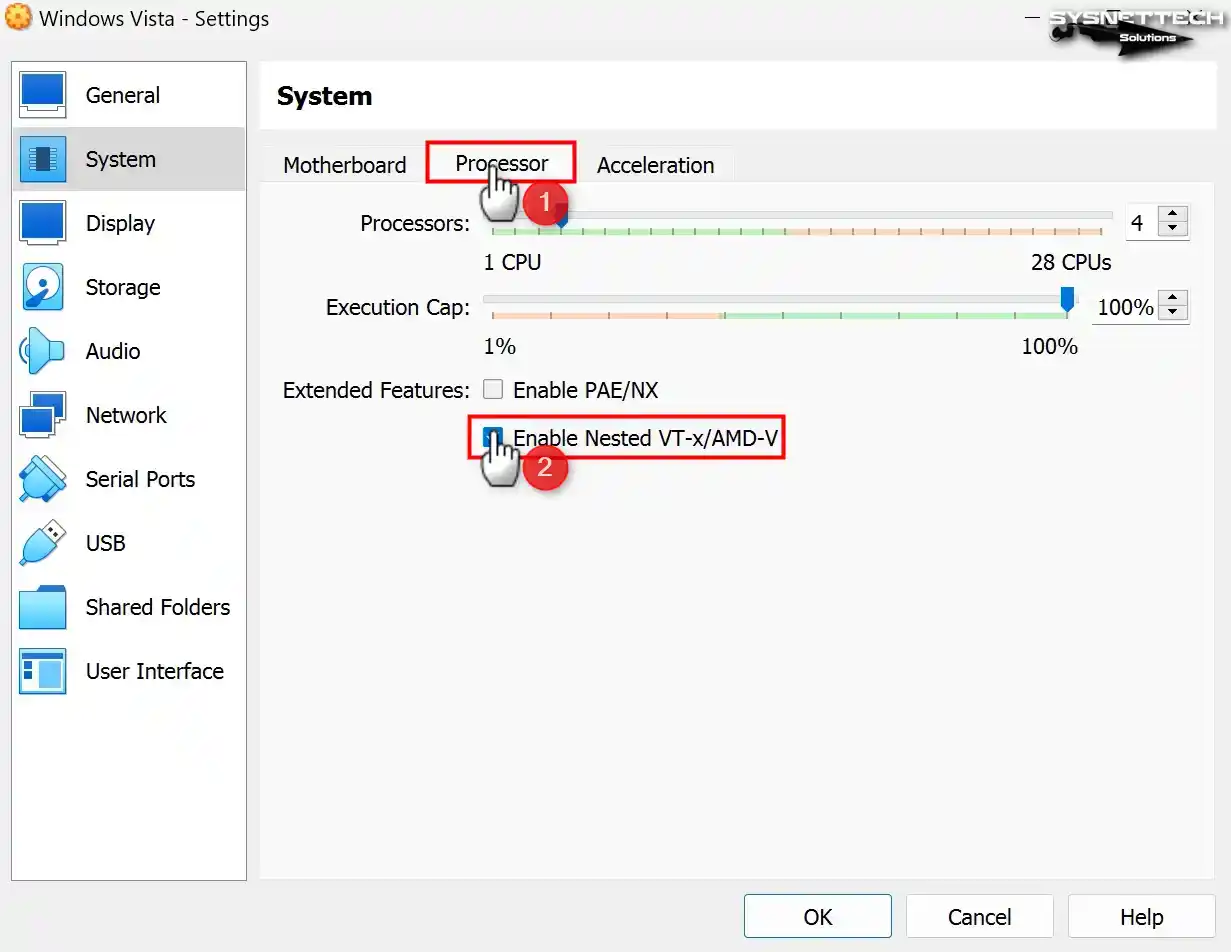
If you will use a virtualization program on the guest machine, enable the Nested VT-x/AMD-V feature.
Step 12
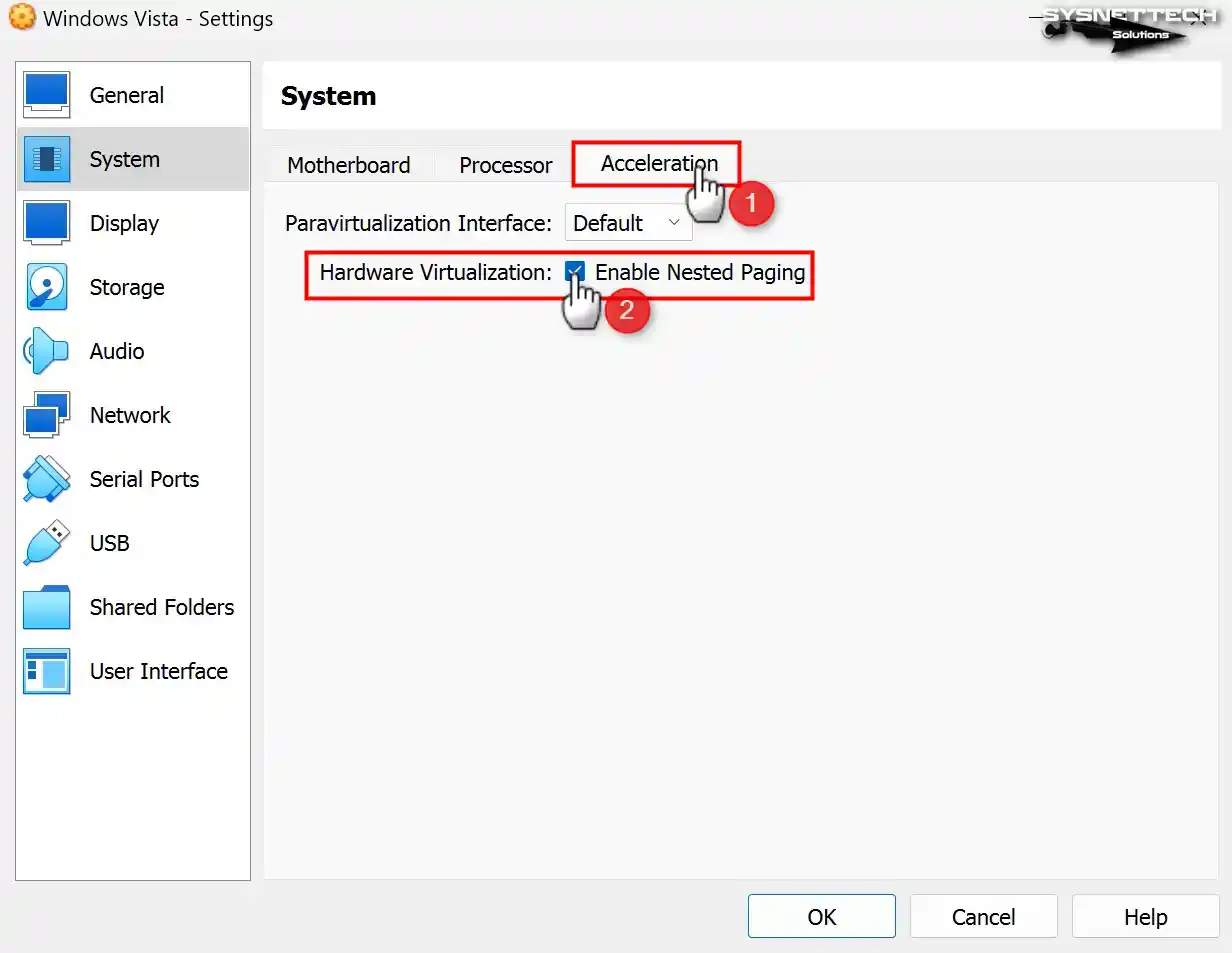
Enable Nested Paging for better memory management between the host and VM.
Step 13
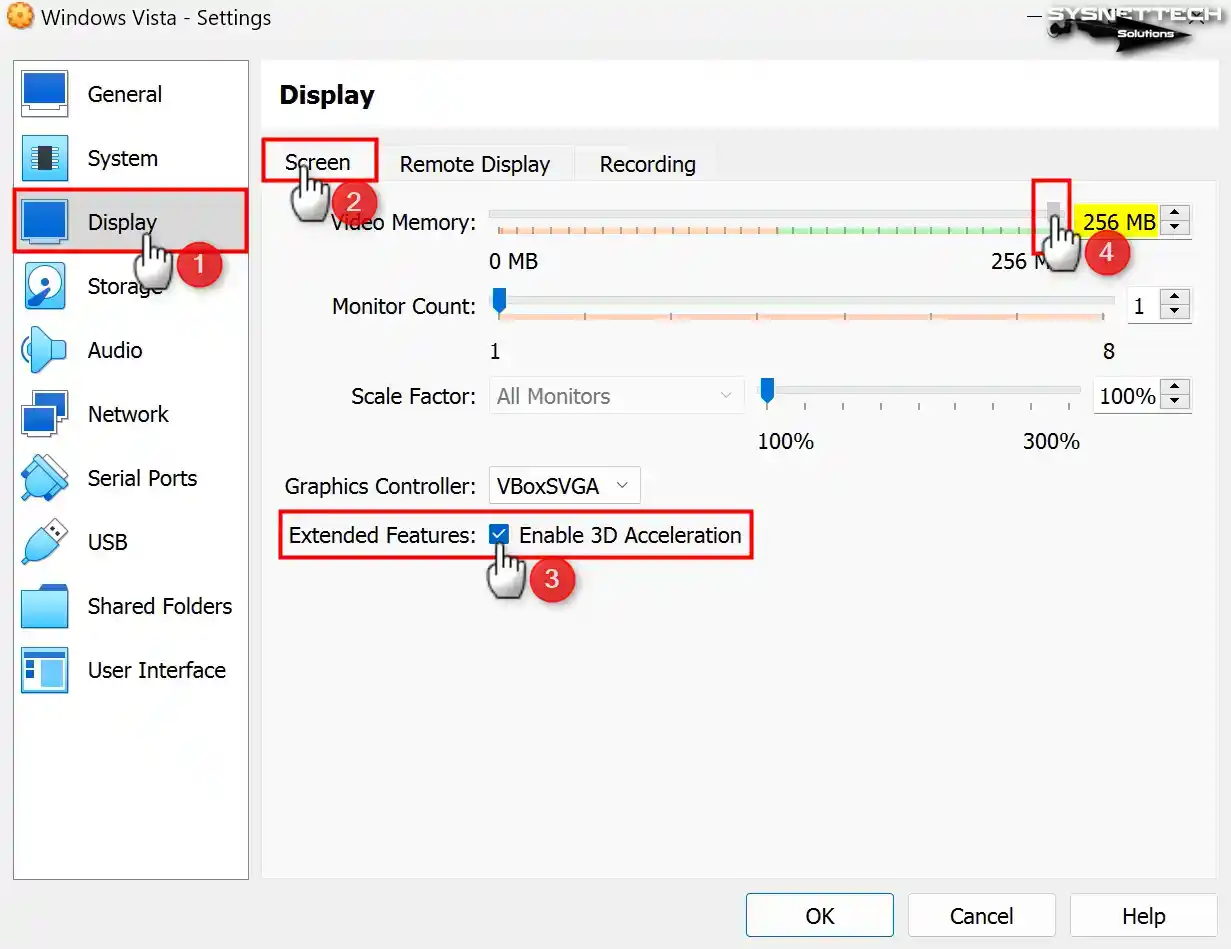
After enabling the 3D Acceleration feature in the Display / Screen tab, configure the graphics memory of the virtual GPU device to 256 MB.
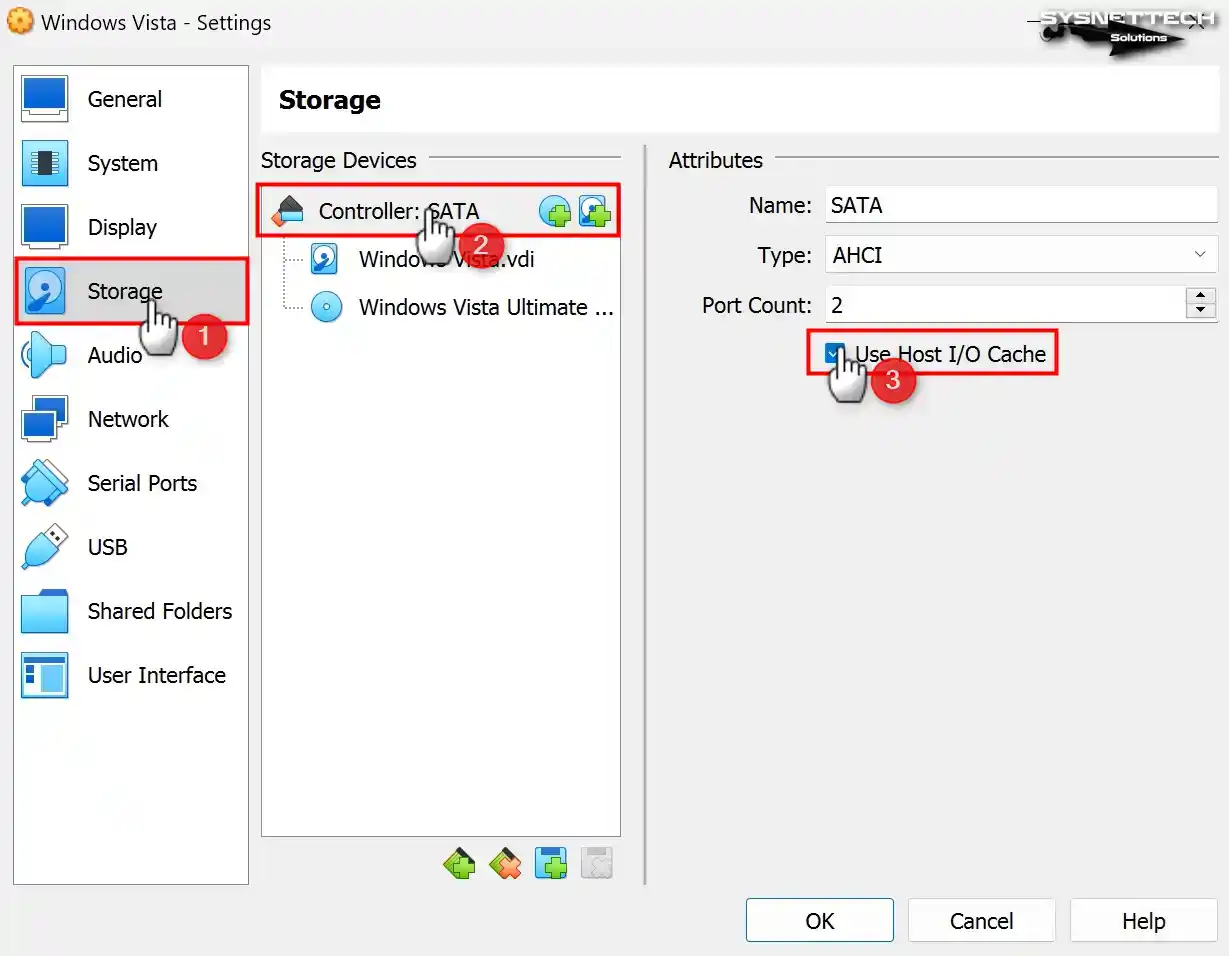
Step 14
To improve the disk performance of the virtual machine, enable the Host I/O Cache on the SATA controller of the Storage device.
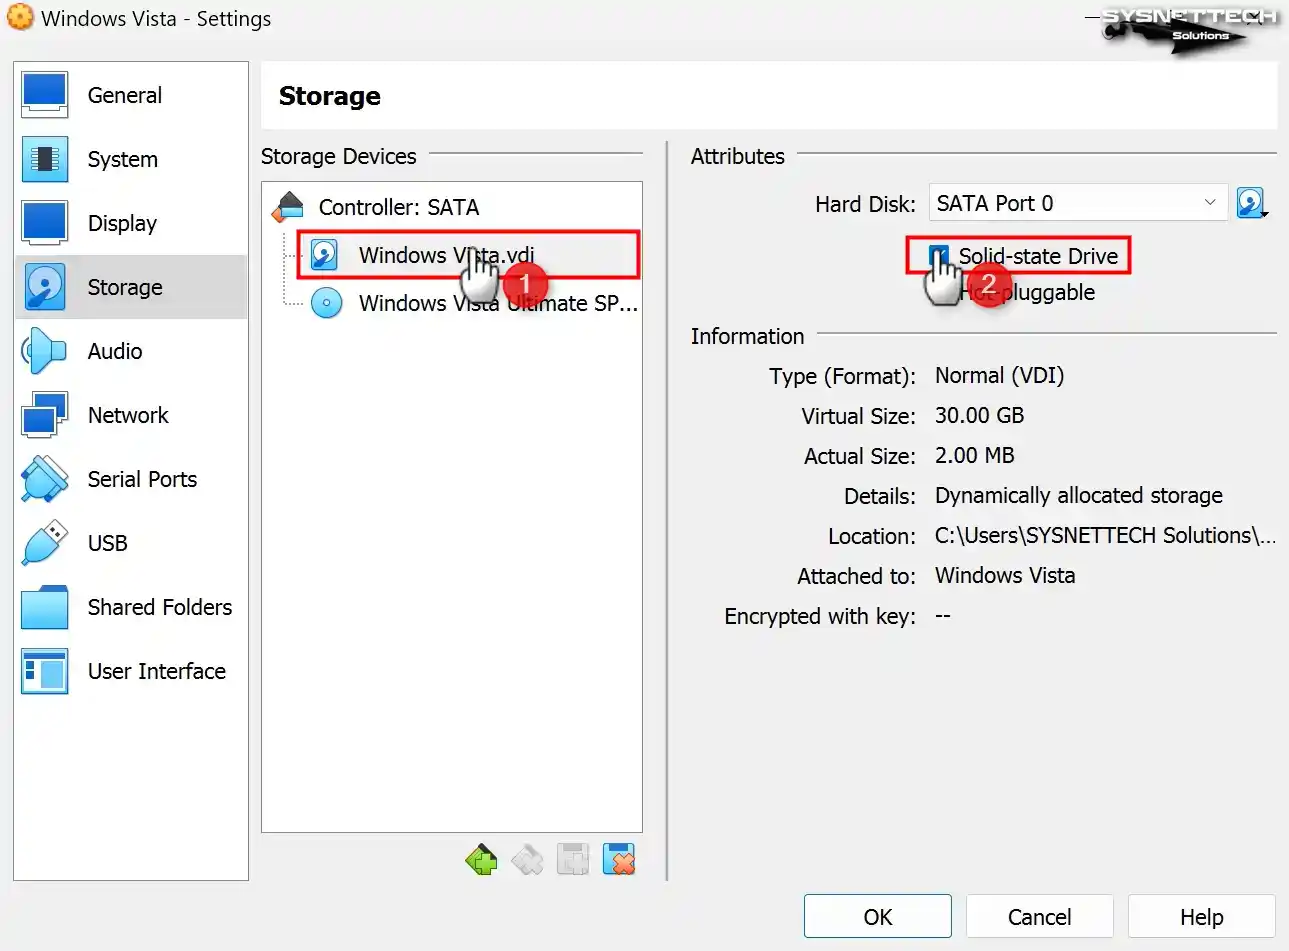
Step 15
Also, configure the WindowsVista.vdi virtual disk file as Solid-State Drive (SSD).
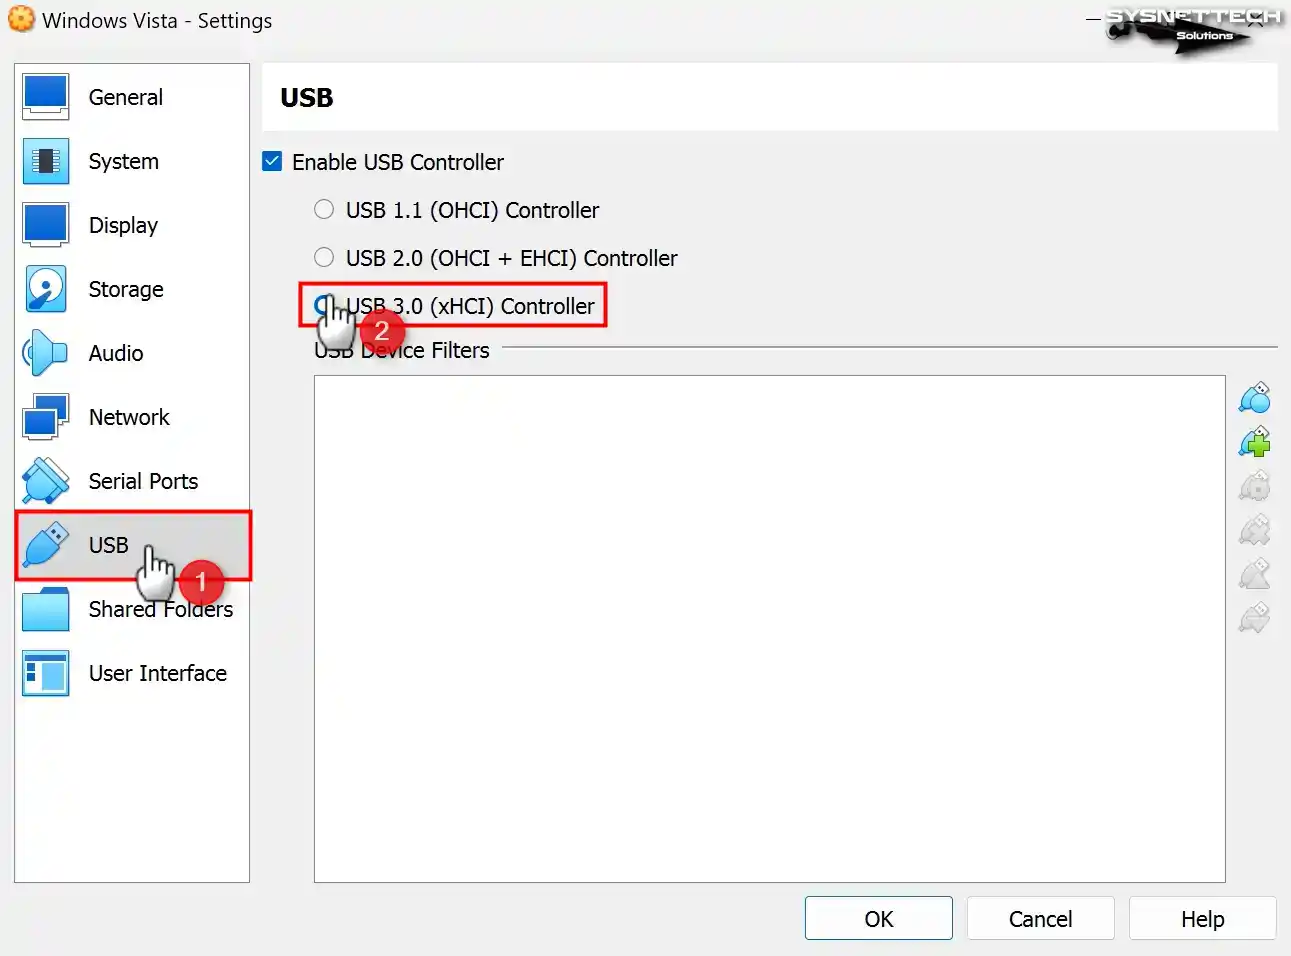
Step 16
To activate USB 3.0 functionality in Windows Vista, navigate to the USB device settings, select the appropriate 3.0 type (xHCI), and disable the corresponding settings.
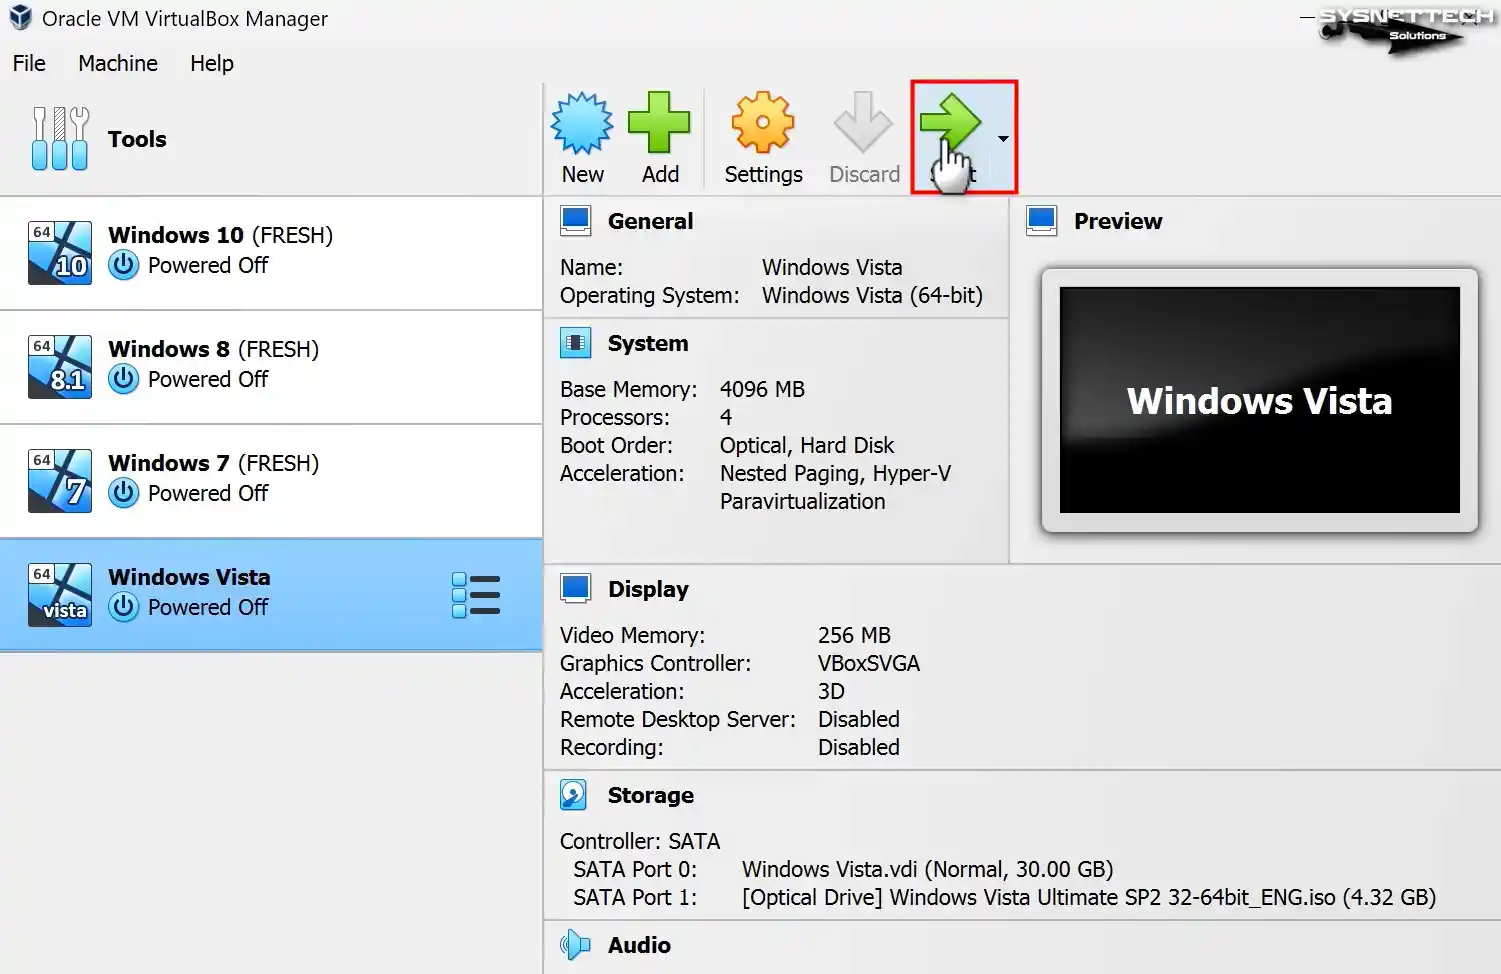
Step 17
Run your guest machine by clicking the Start button to proceed to the steps of installing Windows Vista with VirtualBox. When the Startup Disk window opens, select the Vista image file and click the Start button again.
How to Install Windows Vista
After configuring the virtual machine appropriately, you can install the system, mimicking the process as if you were installing it on a physical computer starting from this point.
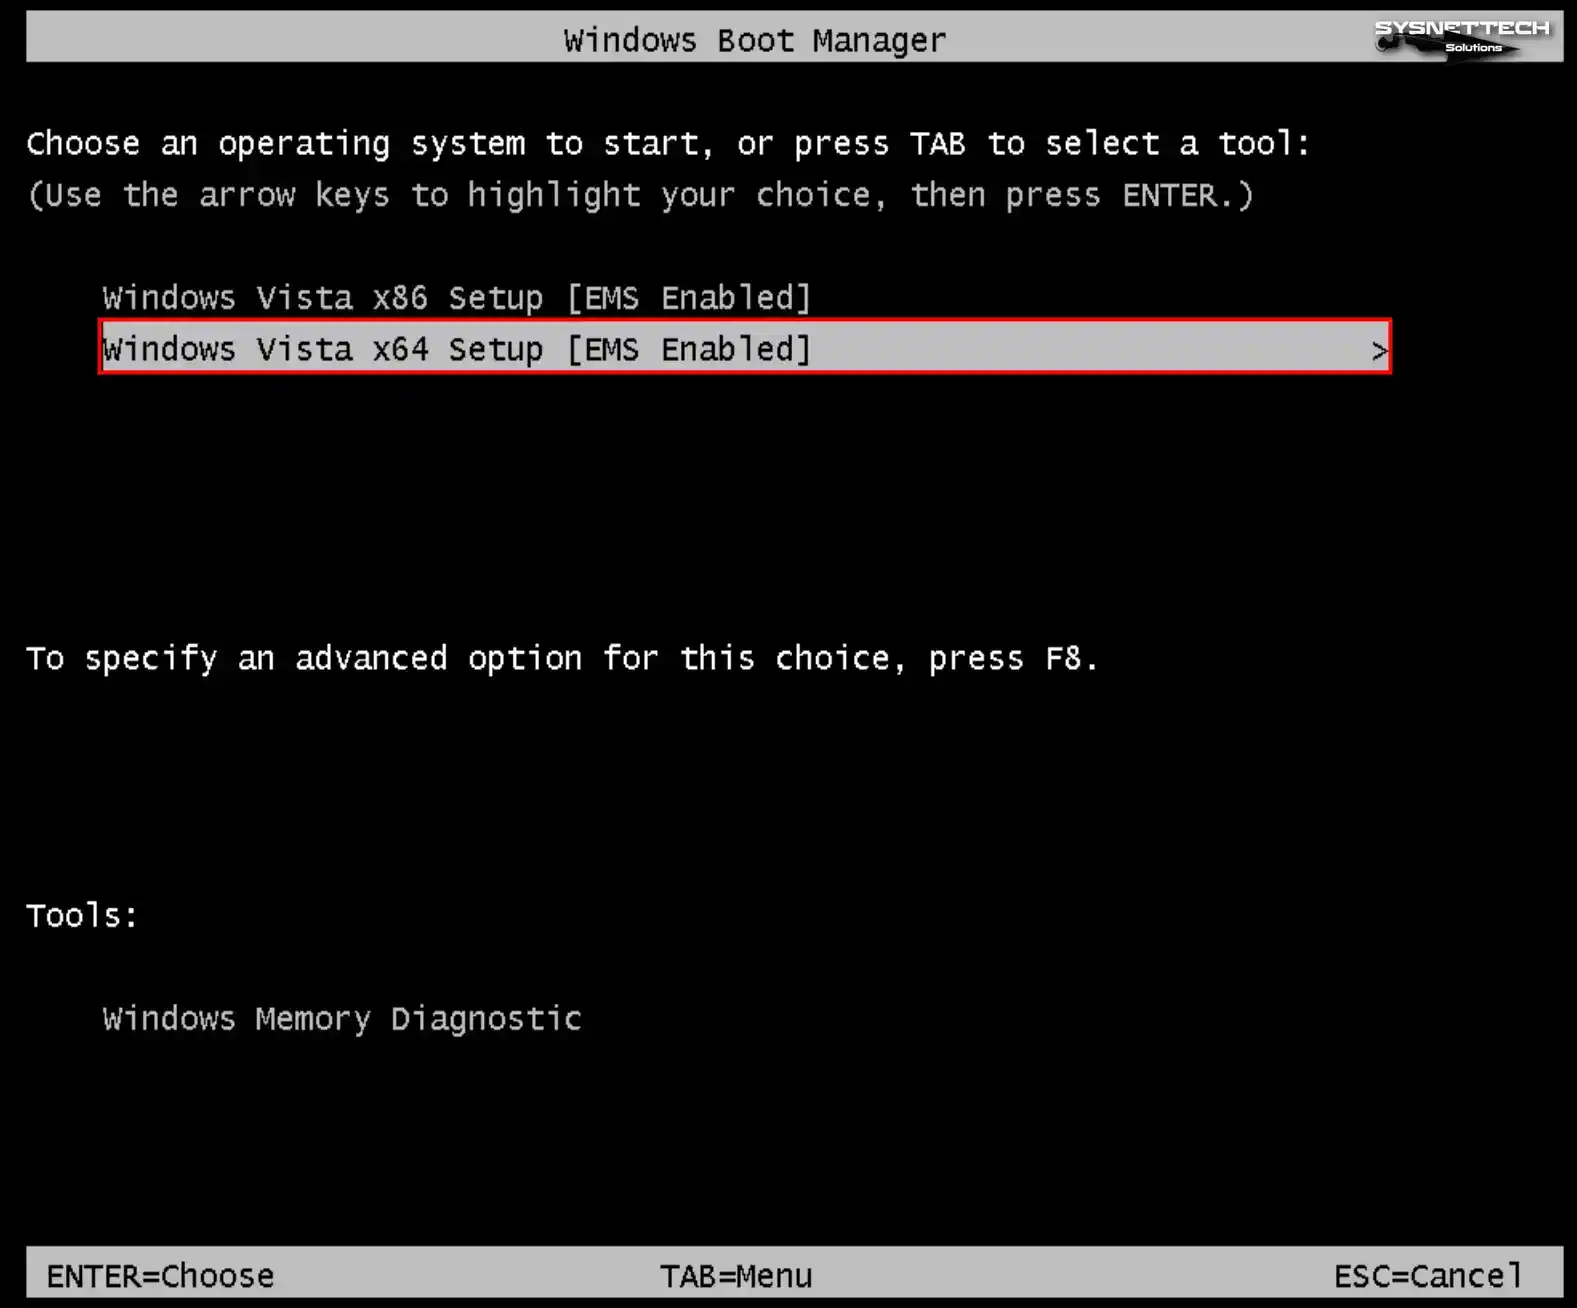
Step 1
The Windows Boot Manager screen will open after starting your virtual computer and selecting your startup disk. Press Enter on the Windows Vista x64 Setup option on this screen and start the installation.
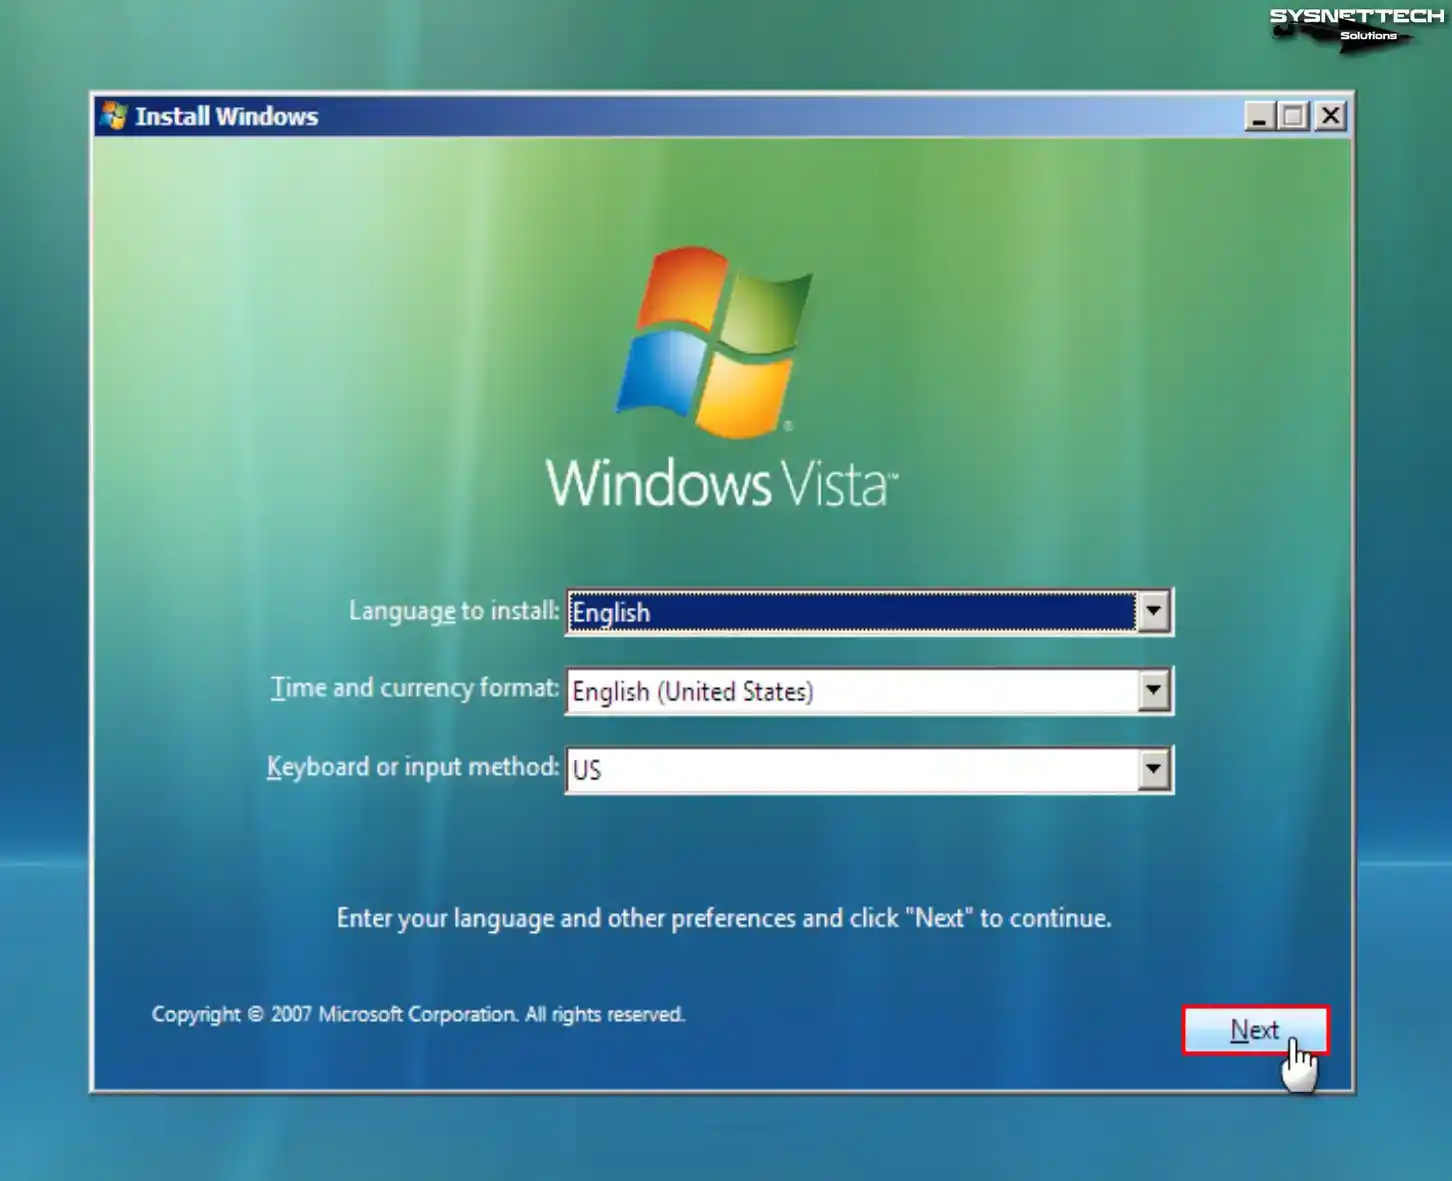
Step 2
In the Install Windows window, select the display language you want to use for your system, your current date format, and your keyboard layout, and click Next.
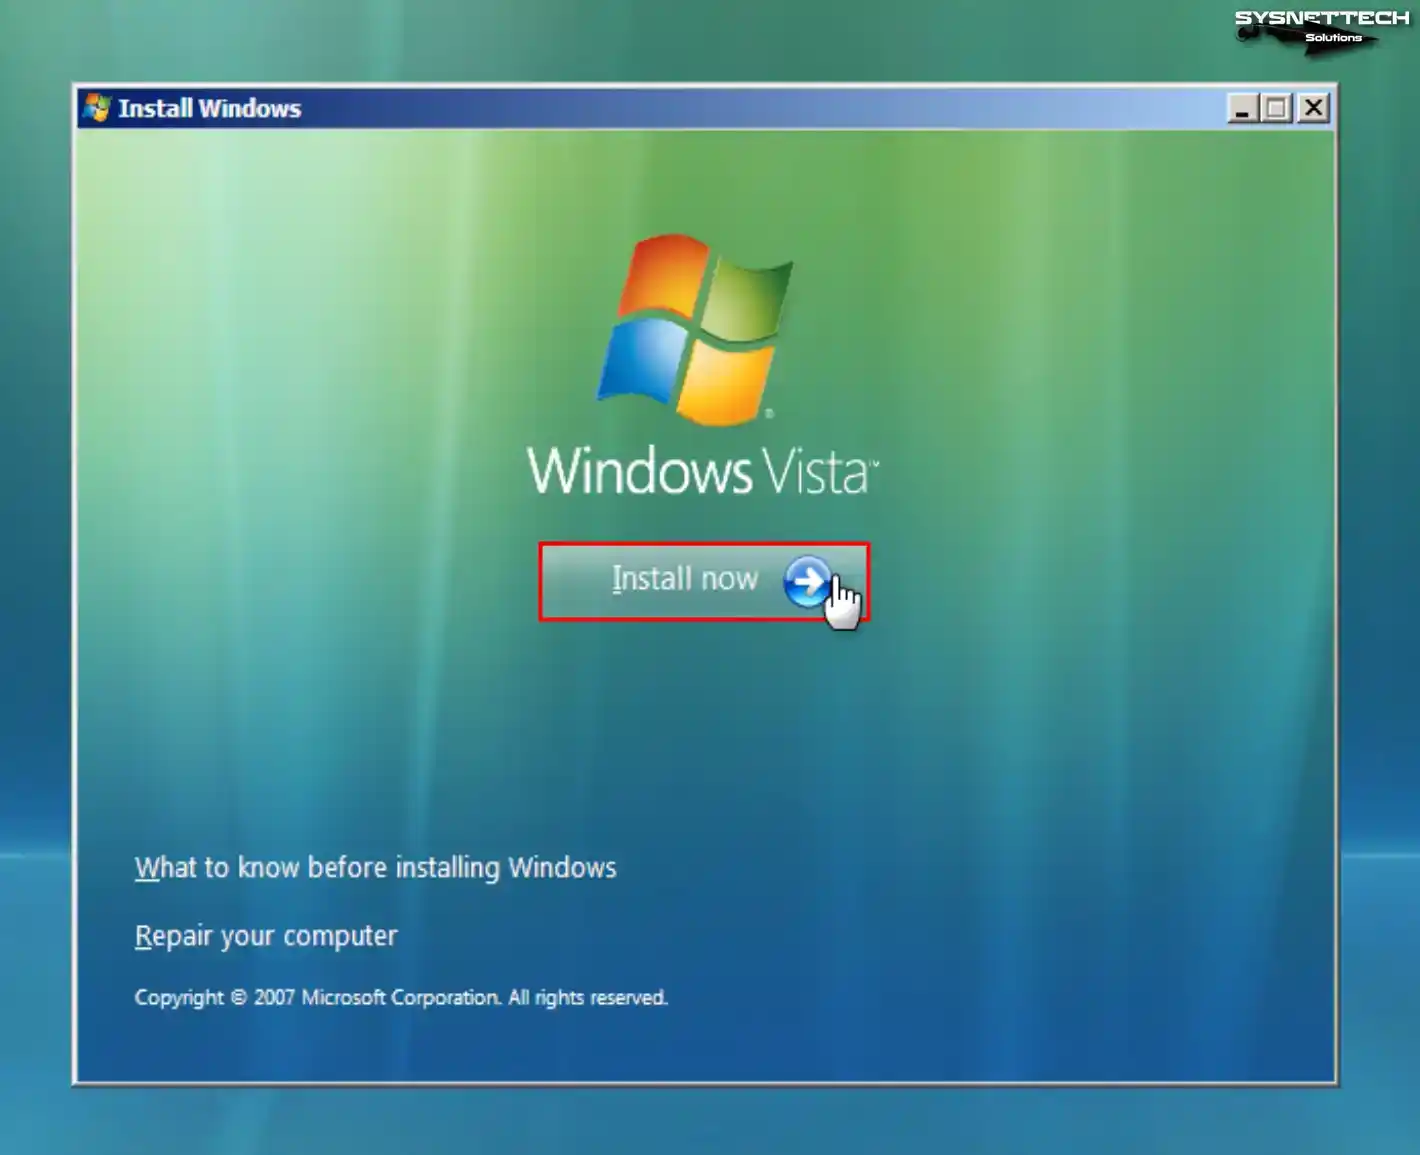
Step 3
Click the Install Now button to run Windows Vista on your guest machine and continue.
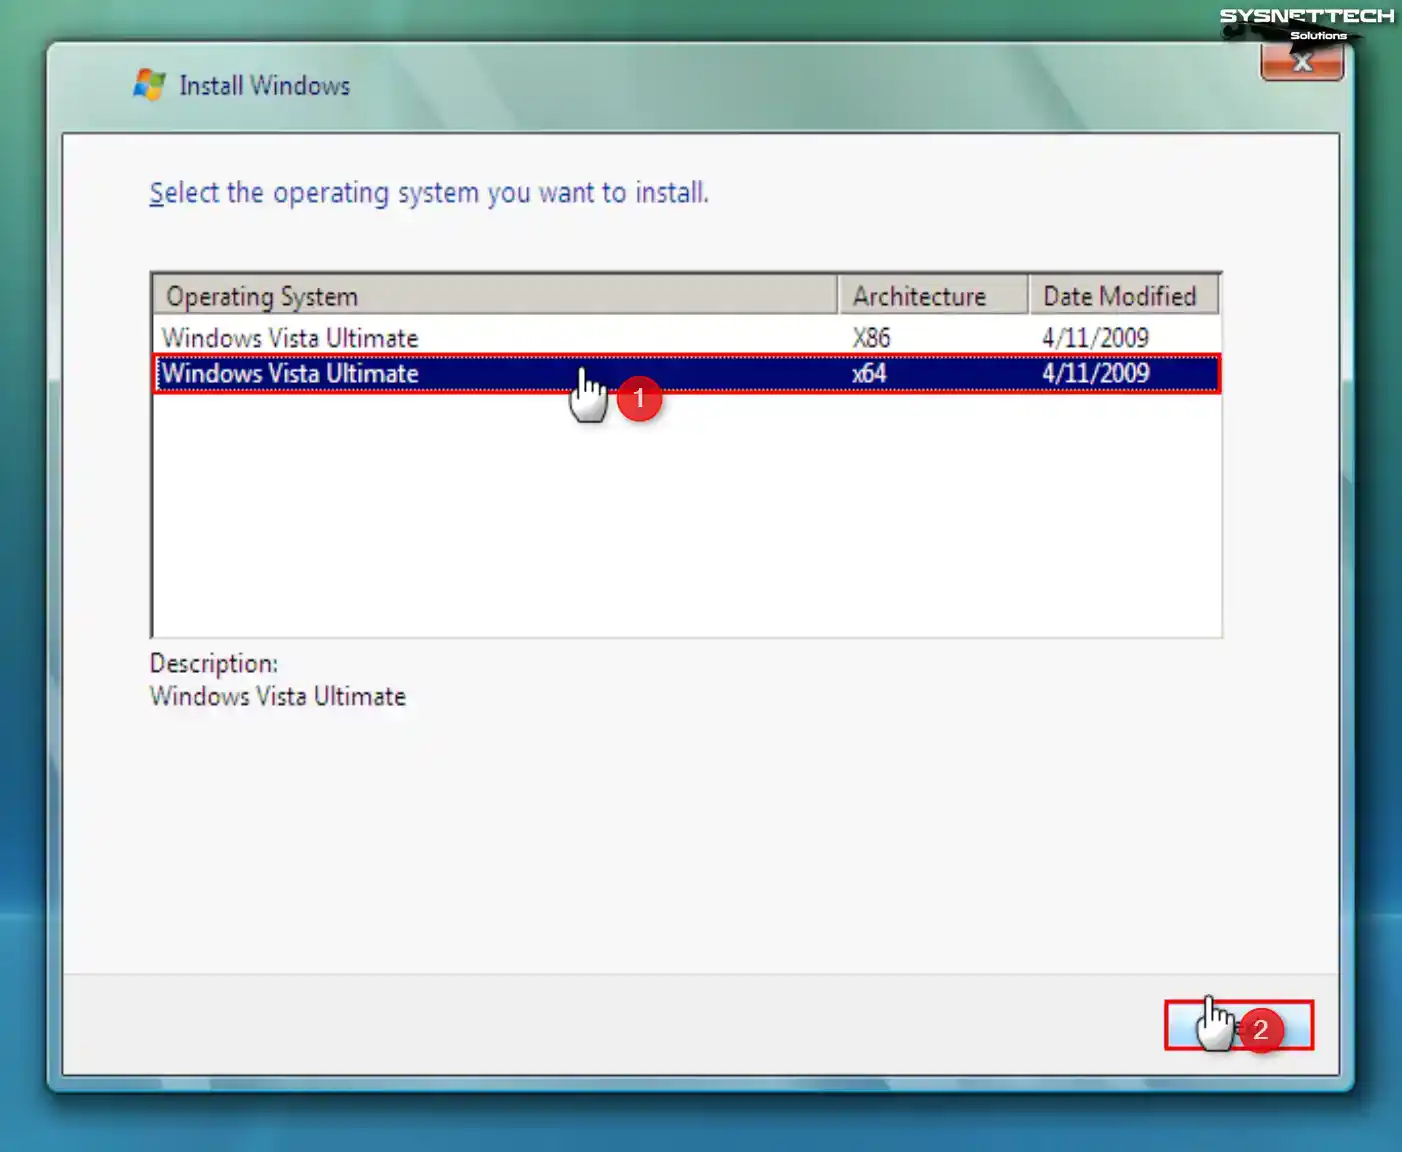
Step 4
In this window, you must select the Windows Vista architecture you want to install. Select the Windows Vista Ultimate x64 architecture and click Next.
Step 5
Accept the license agreement of Microsoft Windows Vista software and click Next again.
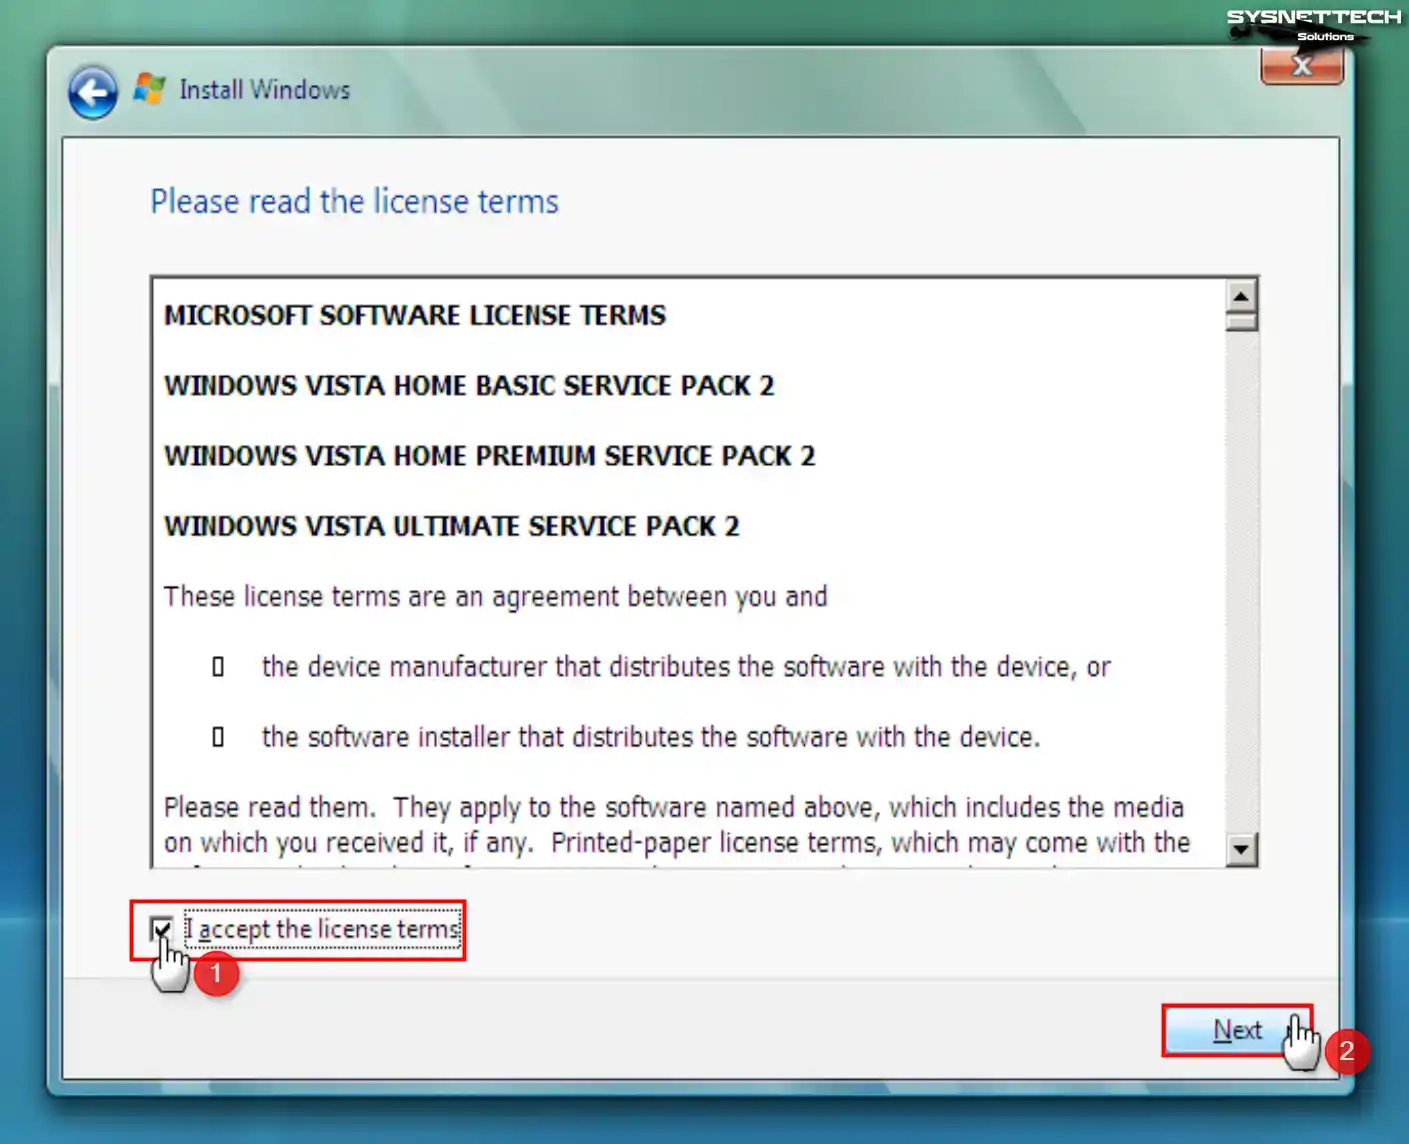
Step 6
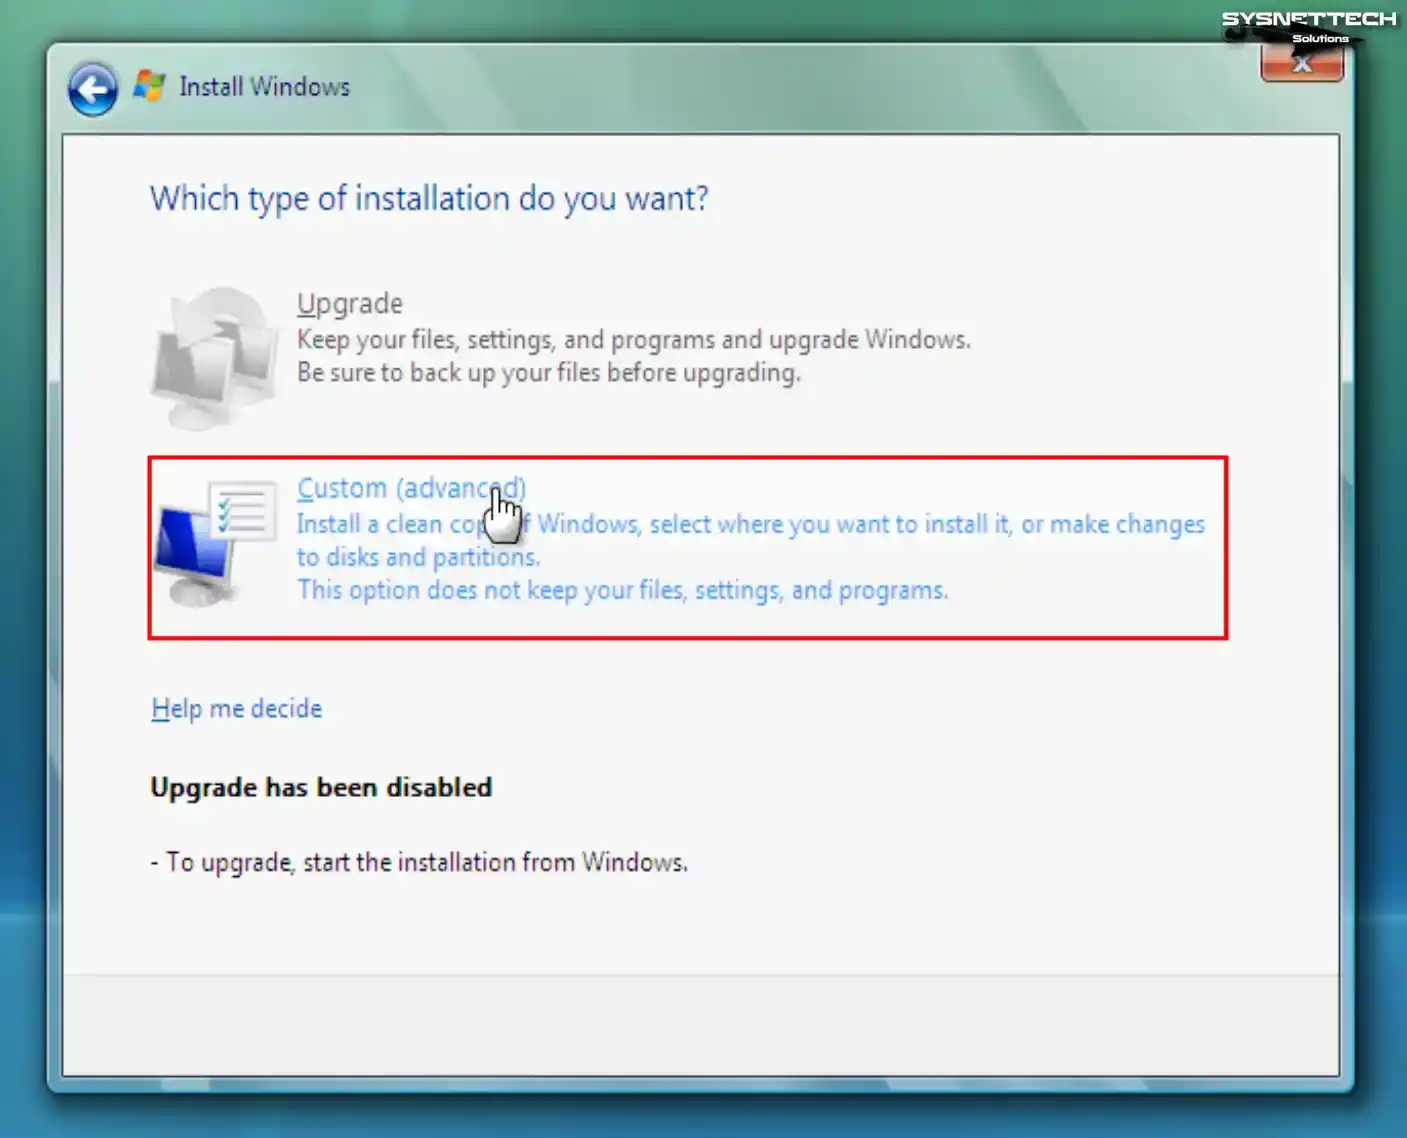
The Upgrade option is disabled because you will install a clean Windows Vista. Click Custom (Advanced) to proceed to configure settings such as disk configuration and continue.
Step 7
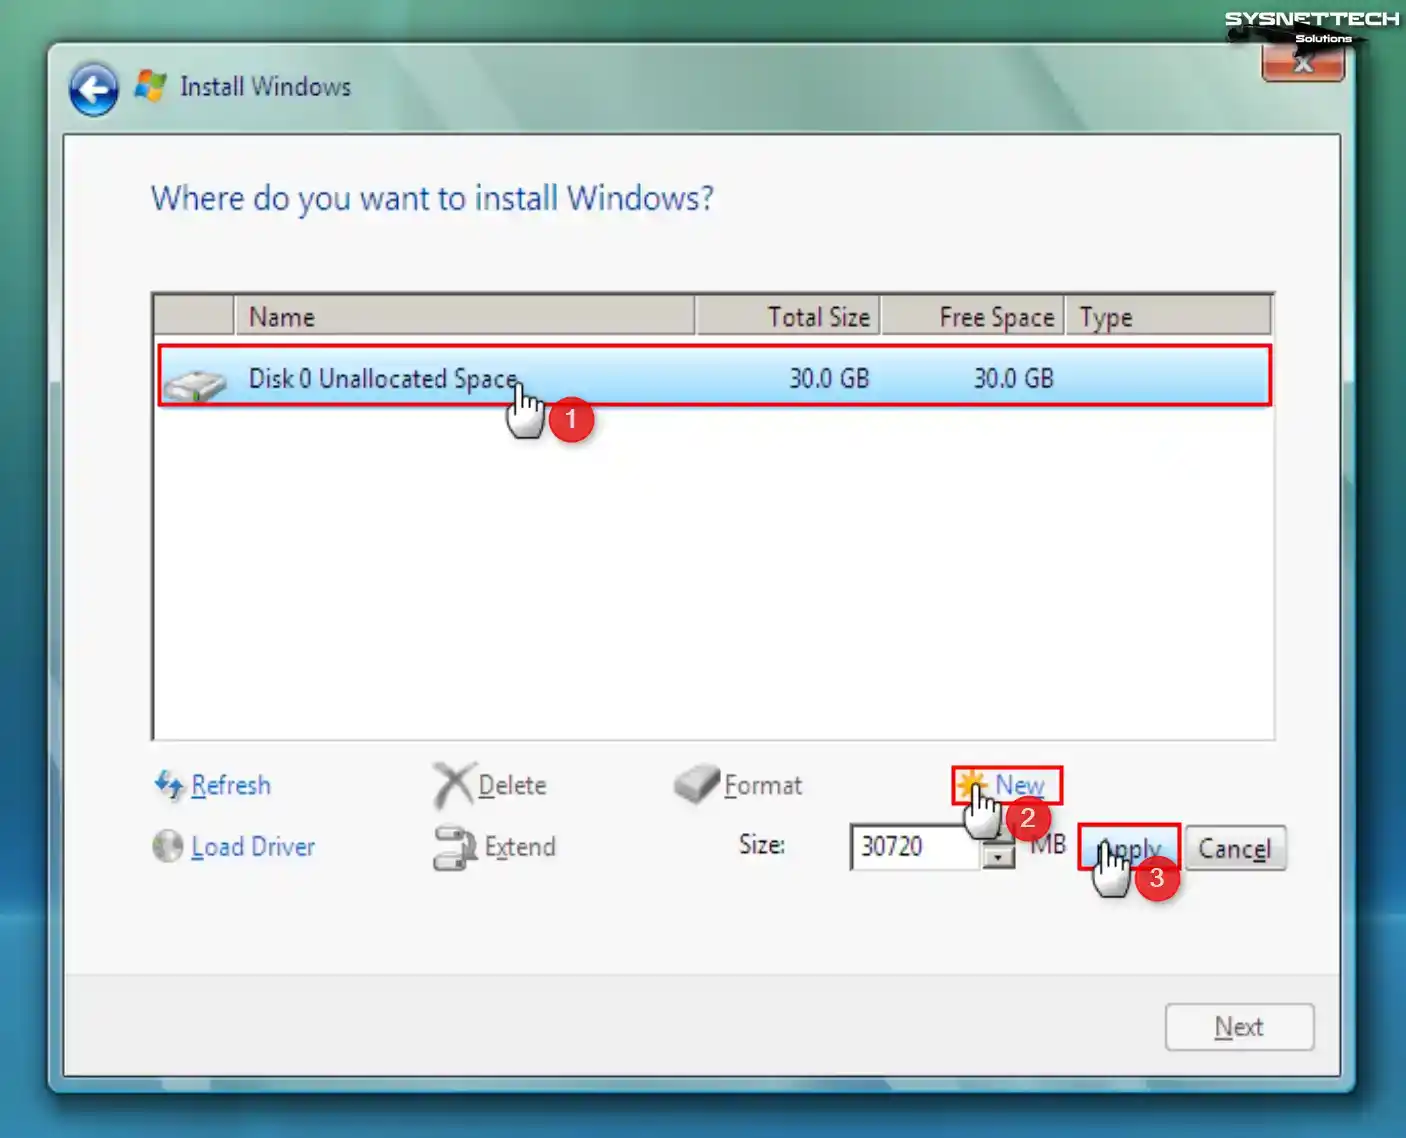
Click Drive Options in the disk configuration window. To configure the unallocated disk space, click New, then click the Apply button to ensure the disk space the system automatically determined.
Step 8
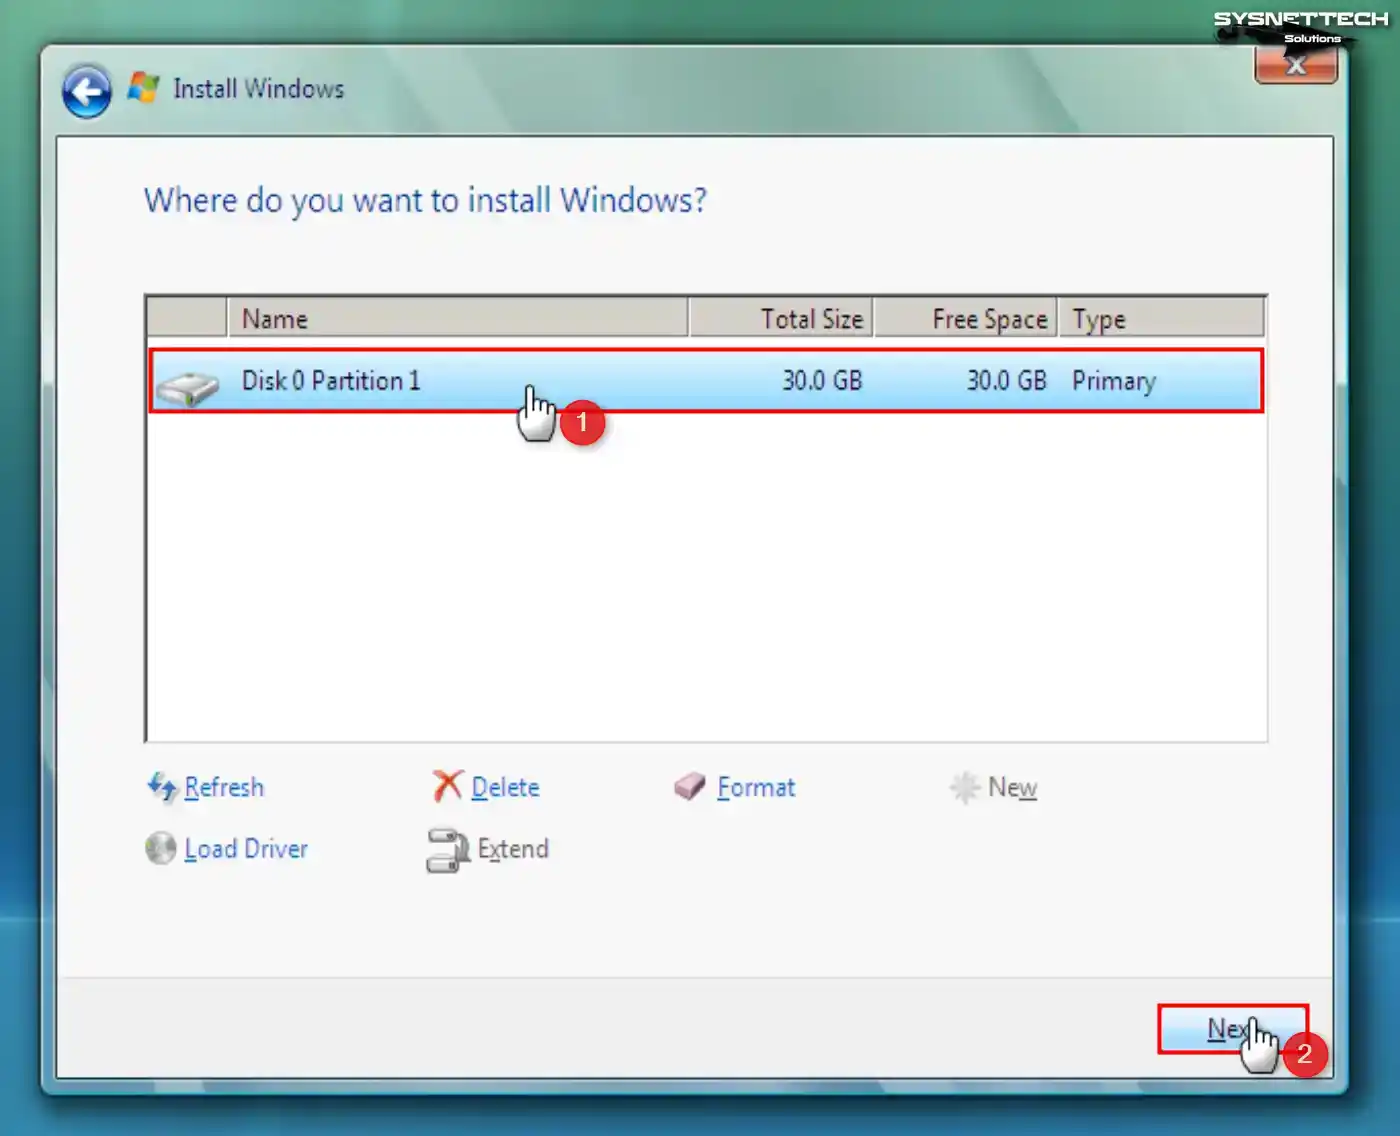
After creating a new disk space on the virtual HDD, select Disk 0 Partition 1 and click Next.
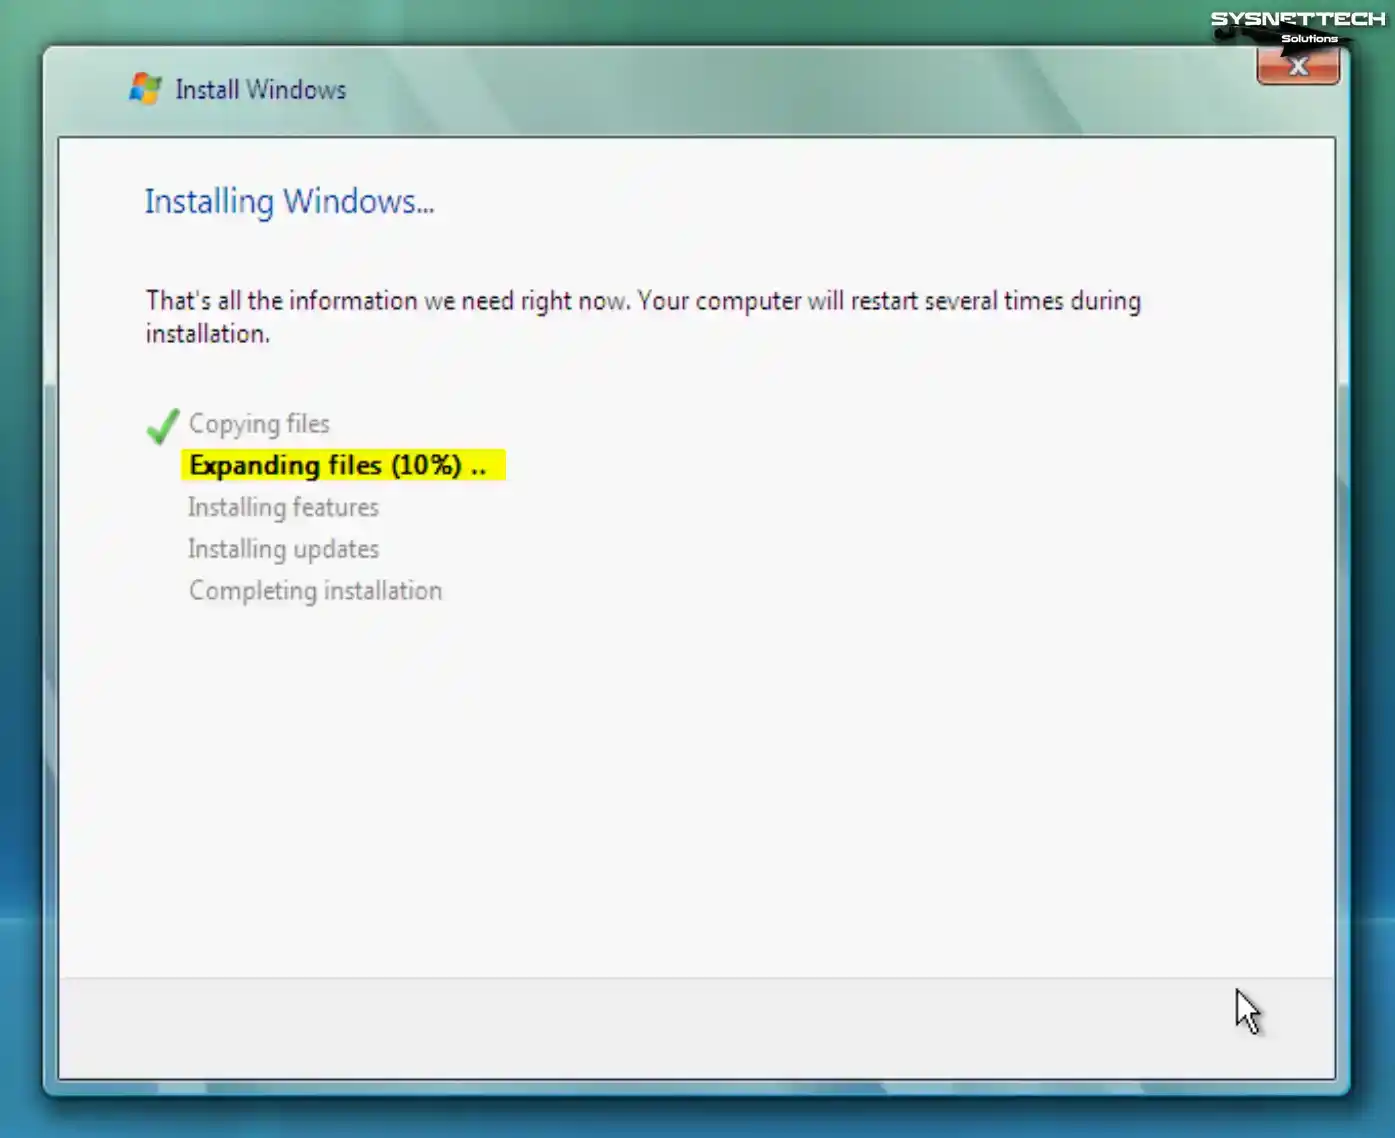
Step 9
Wait while the setup wizard expands the system files for Windows.
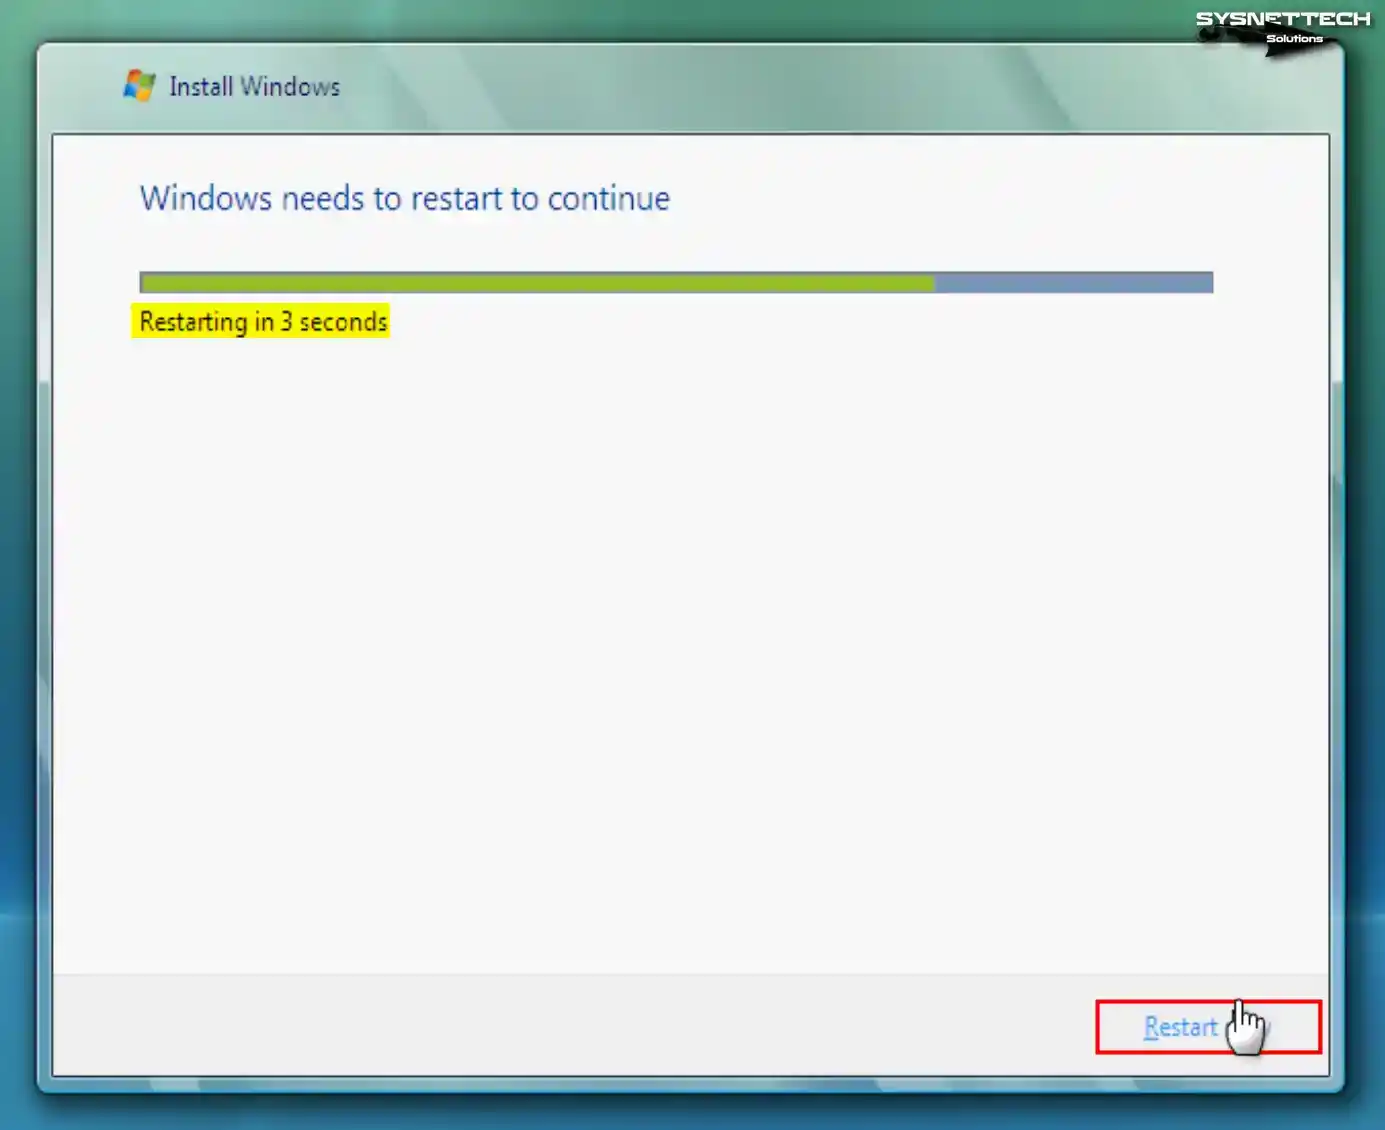
Step 10
Your guest machine will restart automatically when the specified timer expires. Click the Restart Now button to renew your virtual system immediately.
Step 11
Type a new username for your Windows Vista system, select a profile picture, and click Next.

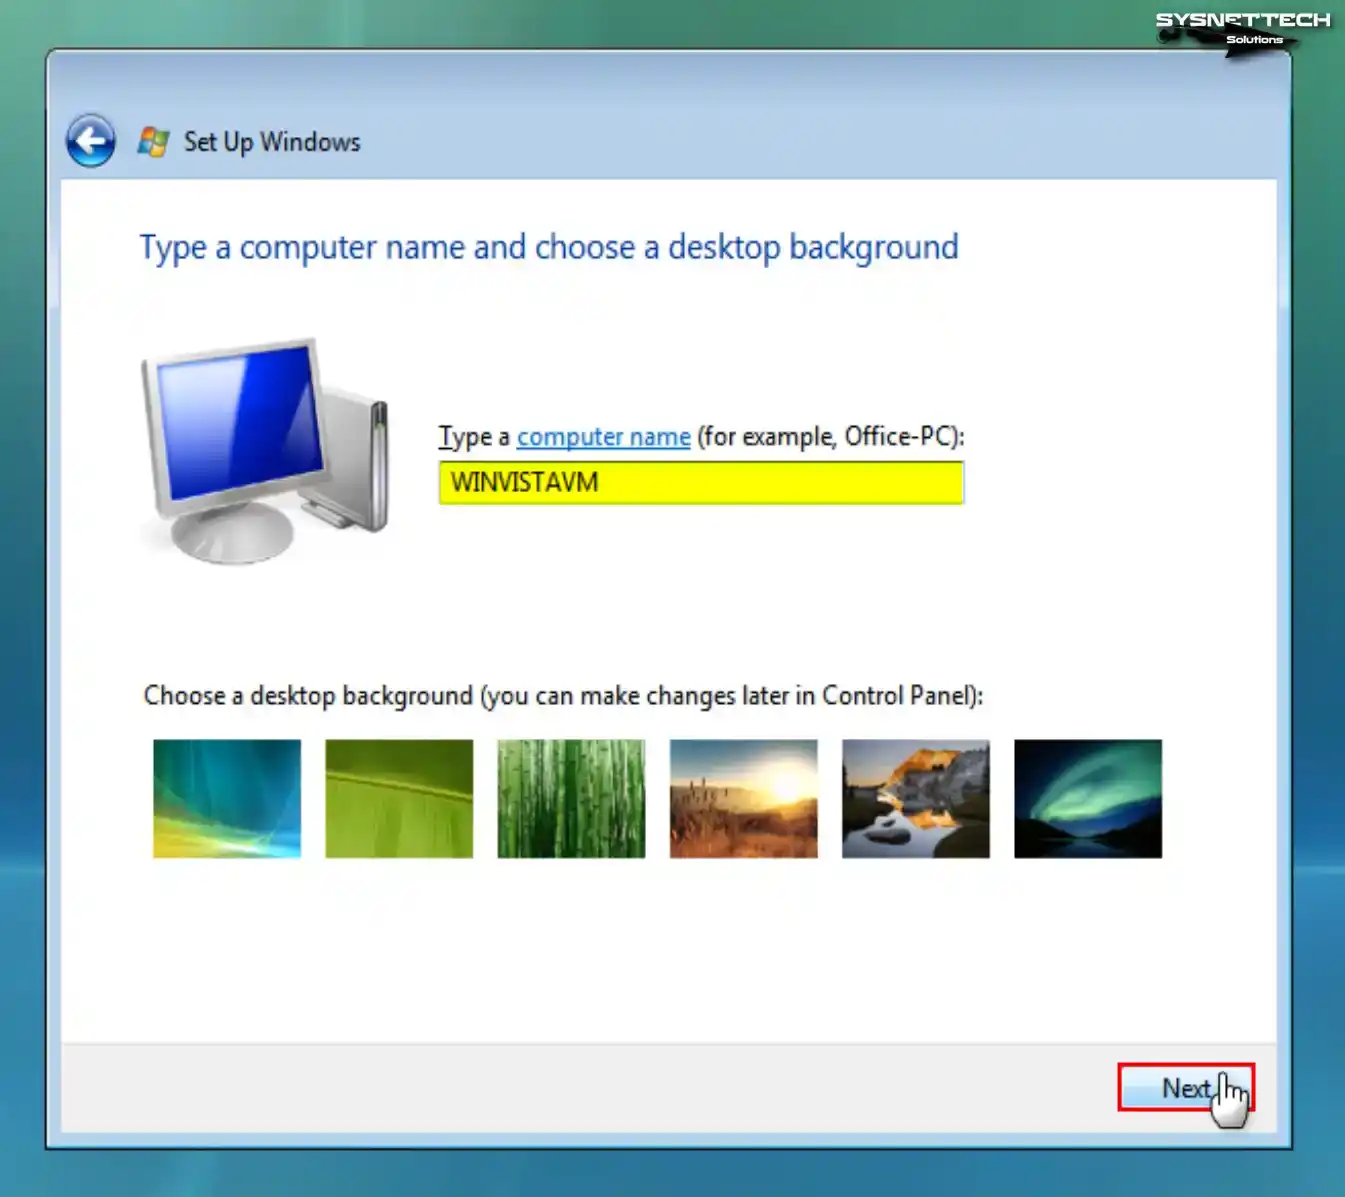
Step 12
In the same way, type your computer name, select your background wallpaper, and click Next again.
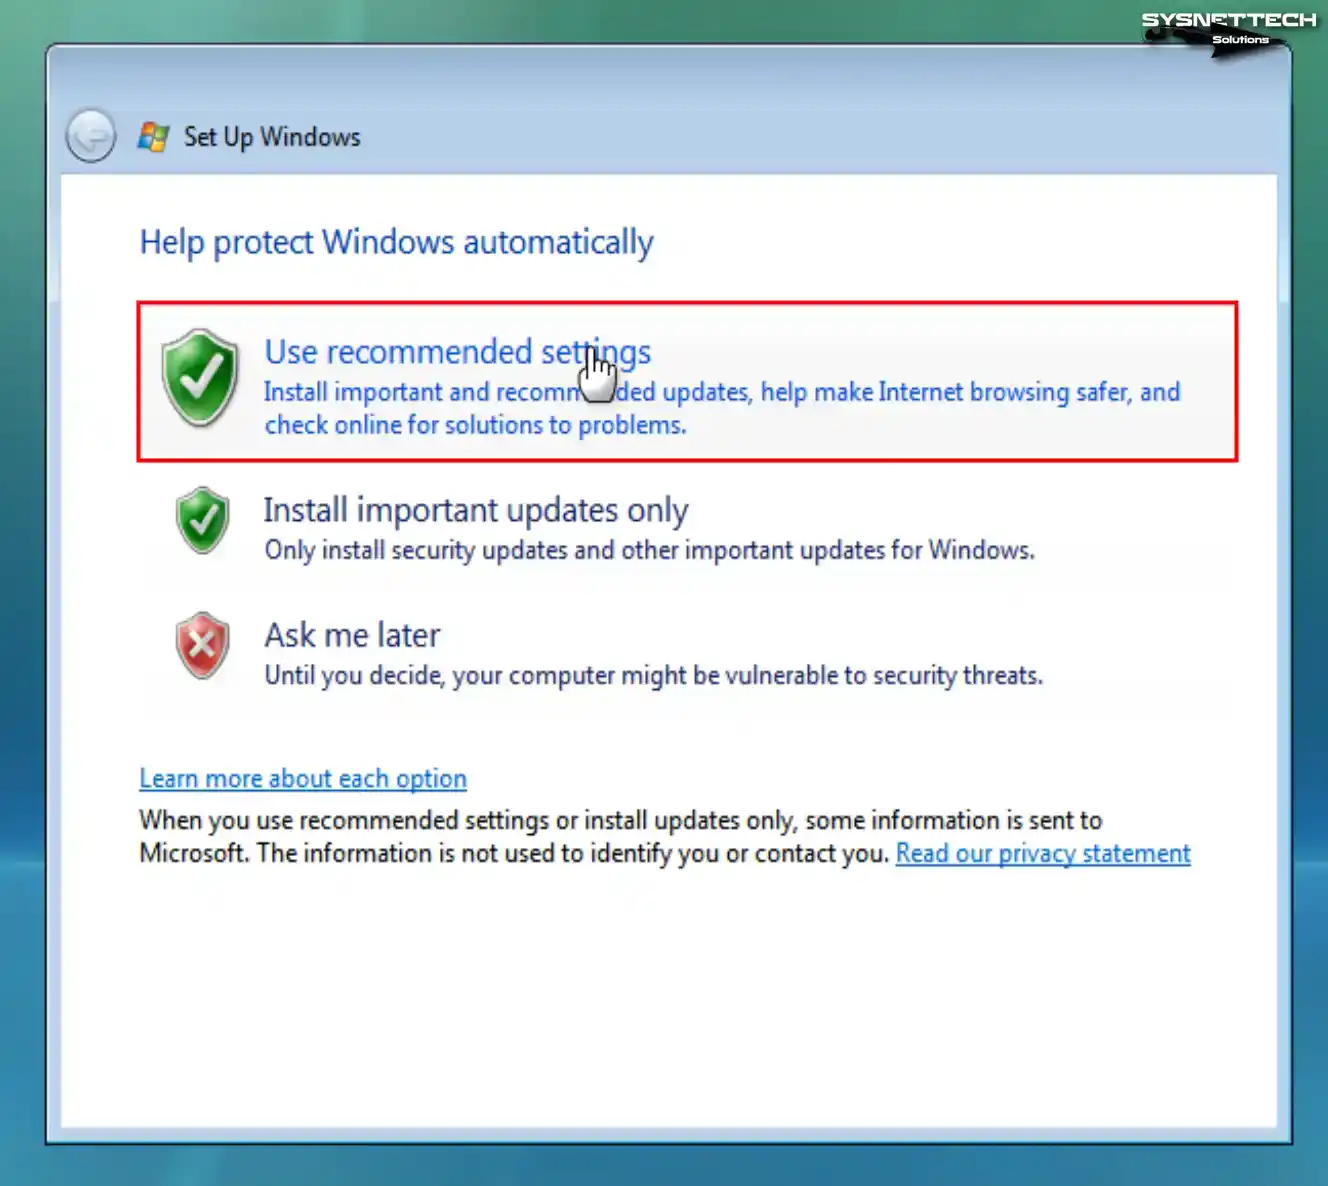
Step 13
Specify in this window how you want to select the Windows Update settings for your system. Even though the extended support of Windows Vista has ended, choose Use Recommended Settings at this stage.
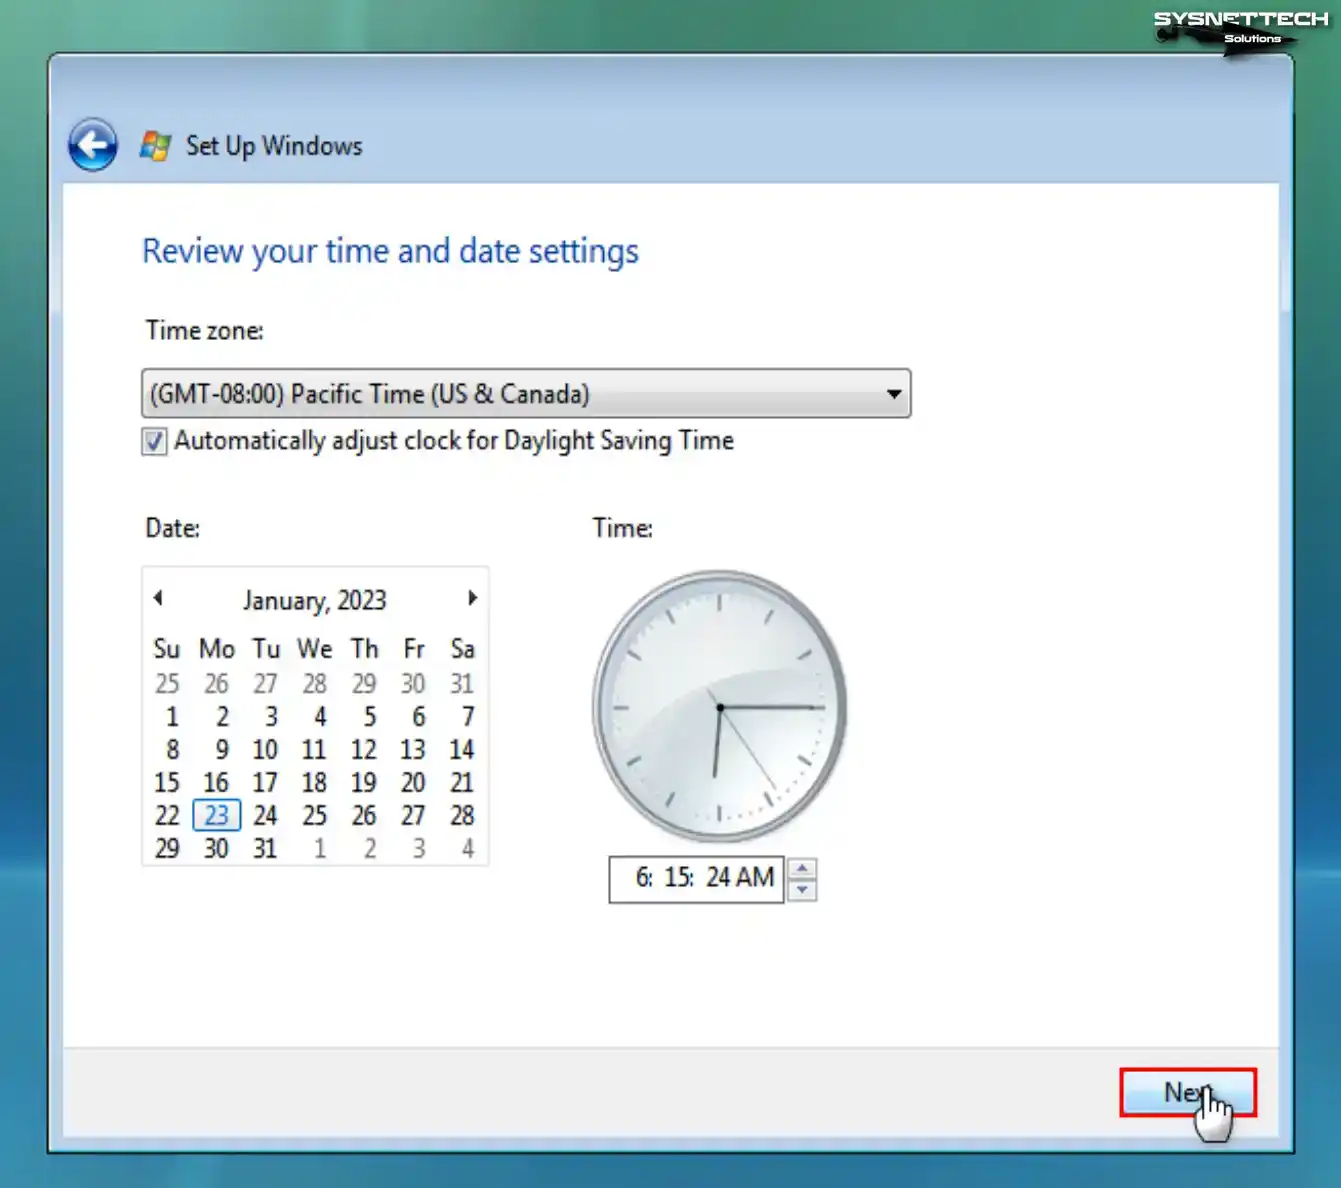
Step 14
Configure your Windows virtual machine’s date and time settings according to your country and click Next.
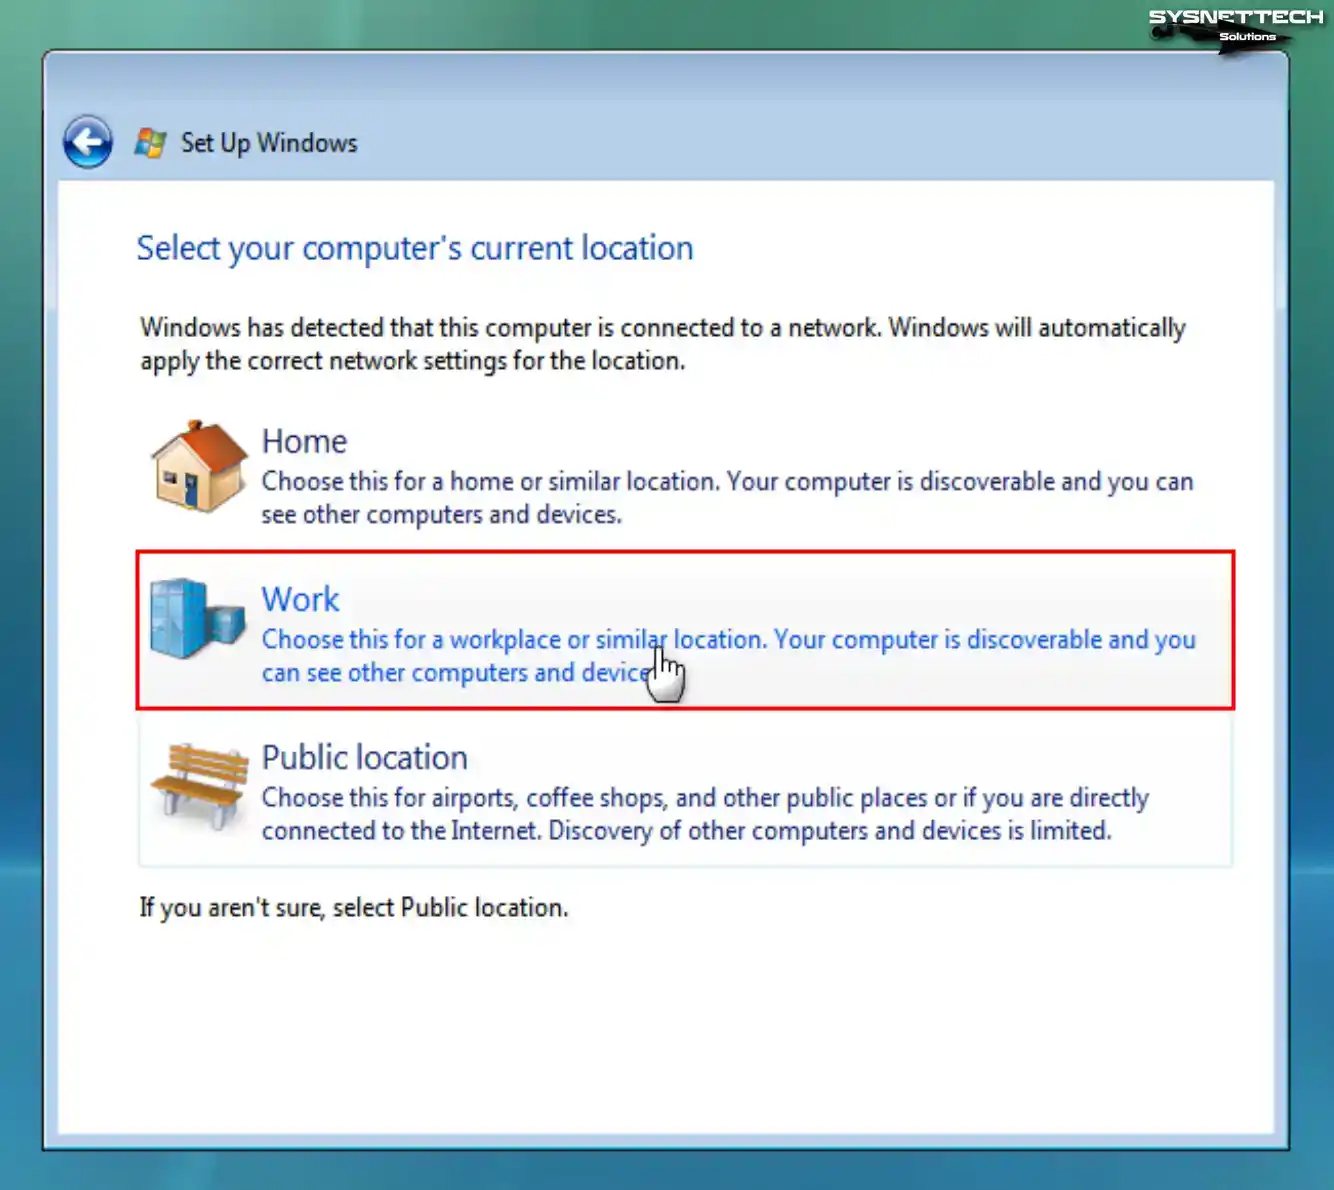
Step 15
Specify the current location of your virtual computer as Home, Work, or Public, and continue.
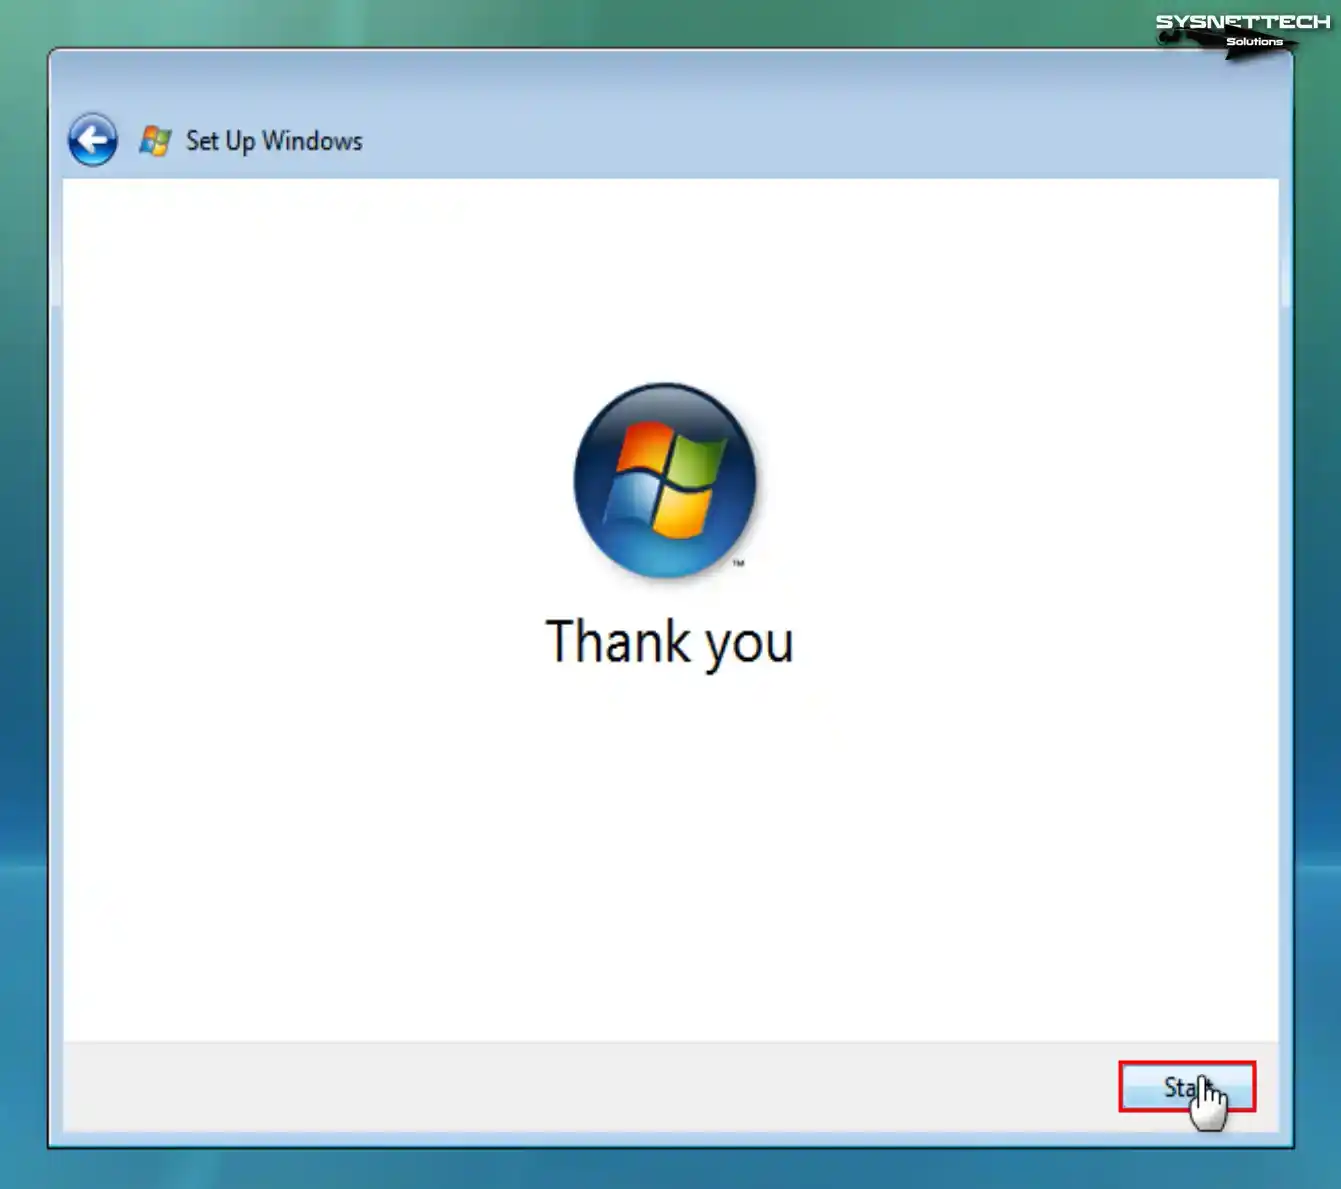
Step 16
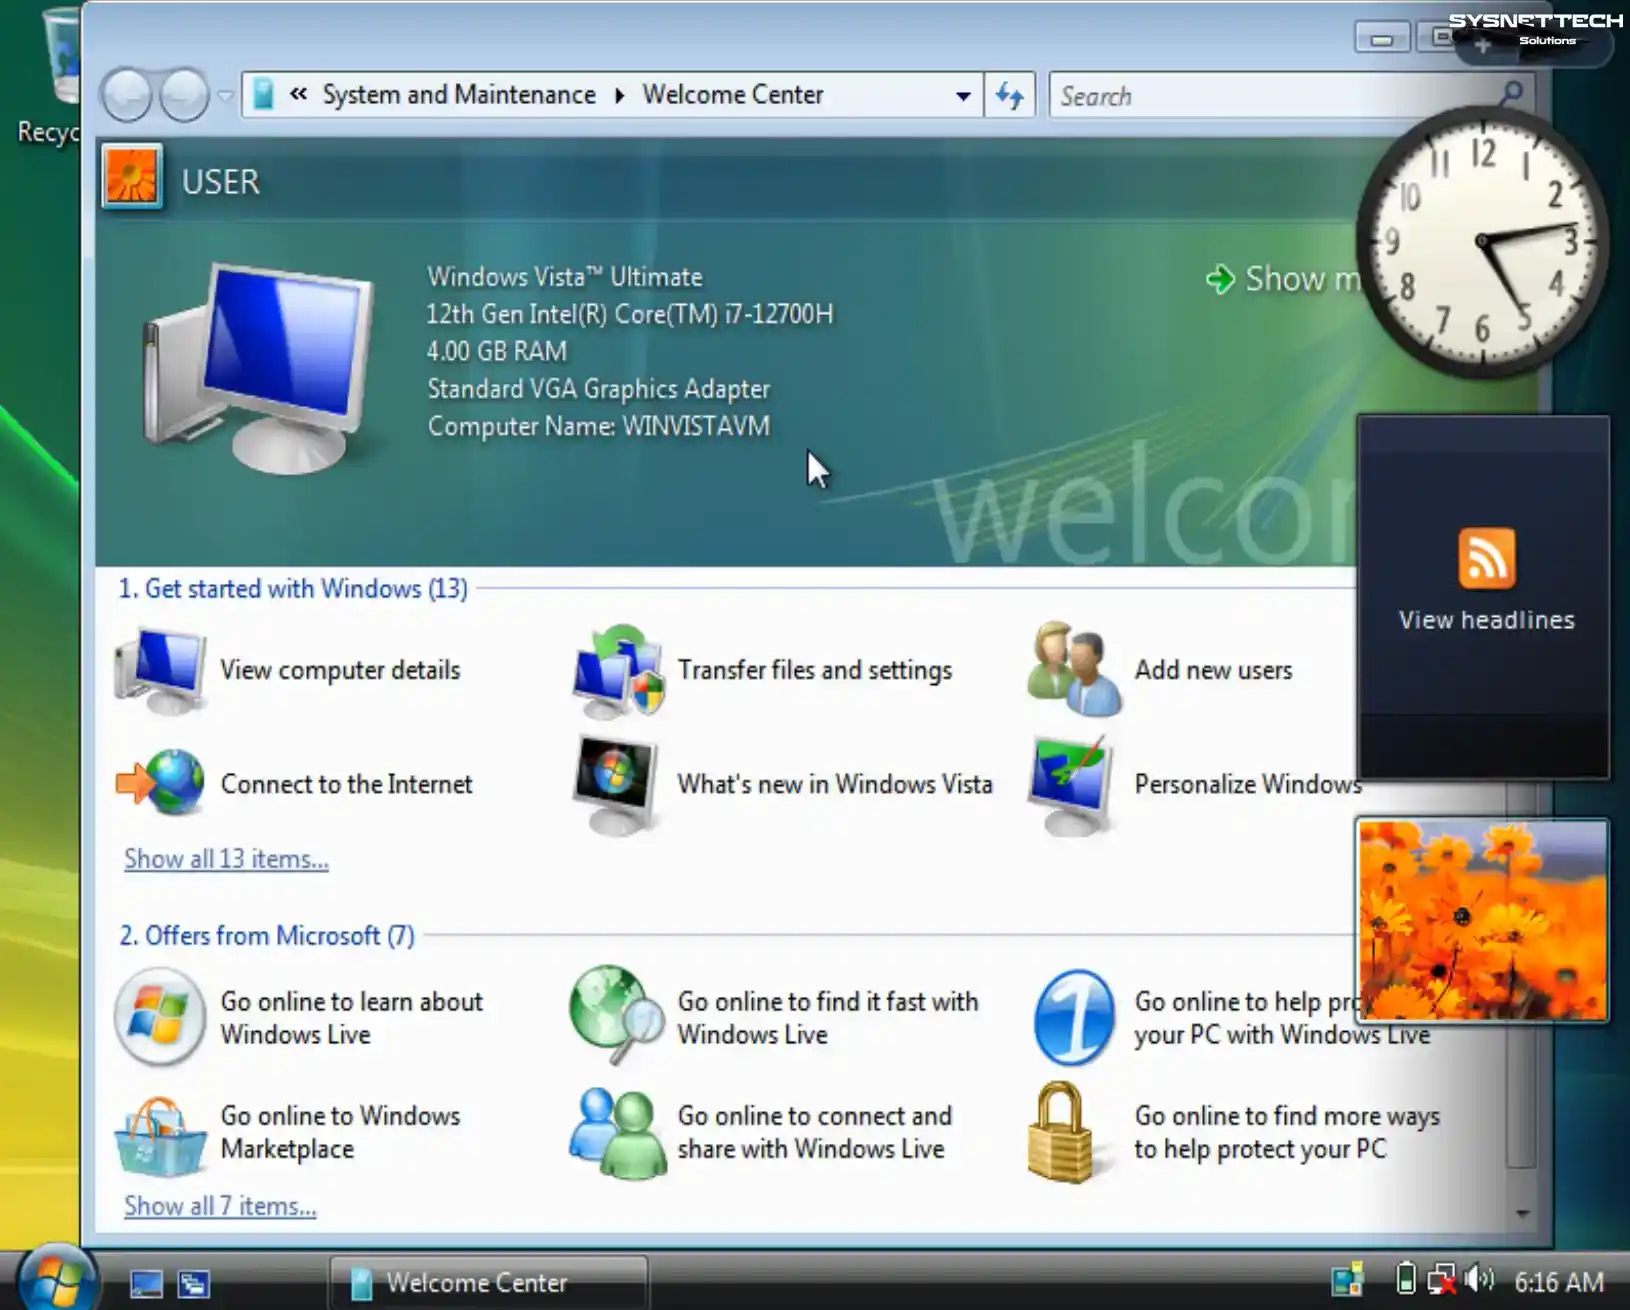
Click the Start button to determine the performance of your Windows Vista virtual system and prepare the desktop.
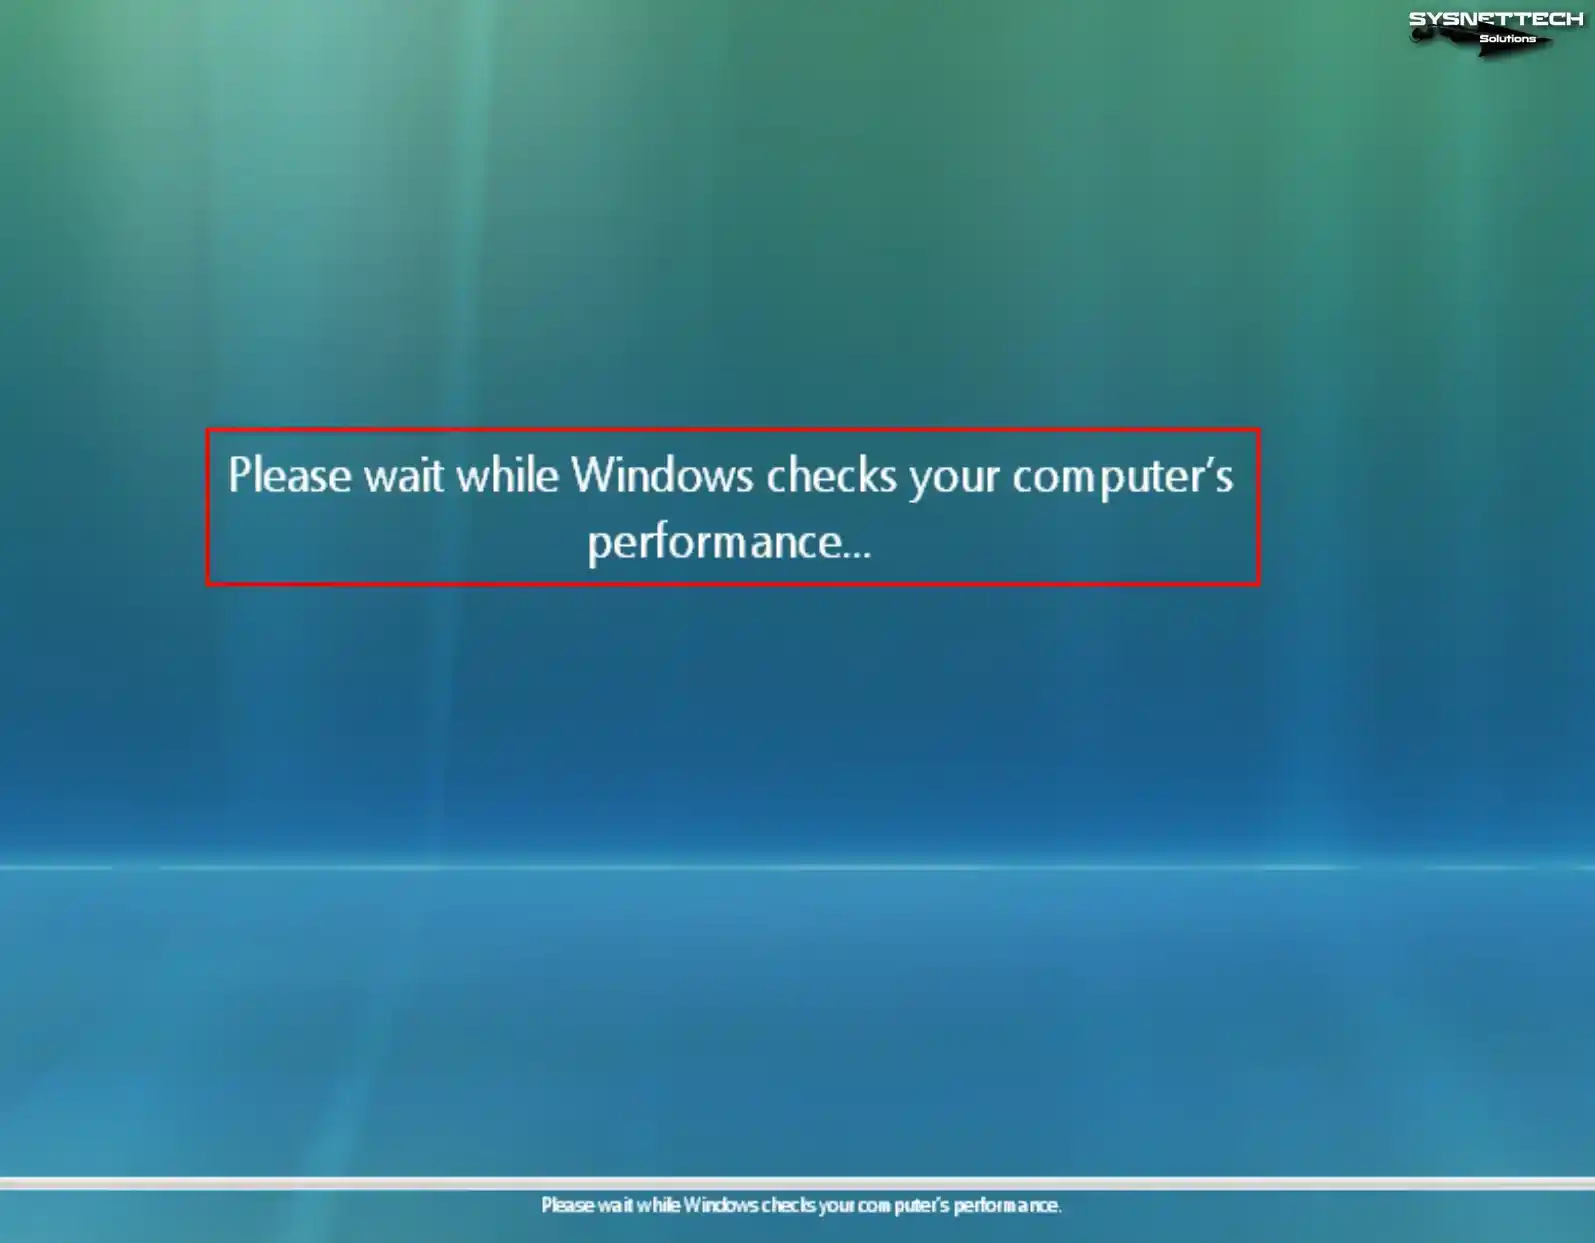
Step 17
Wait while the Windows wizard checks the guest machine’s performance.
Step 18
Wait while the desktop of your Vista system is being prepared.
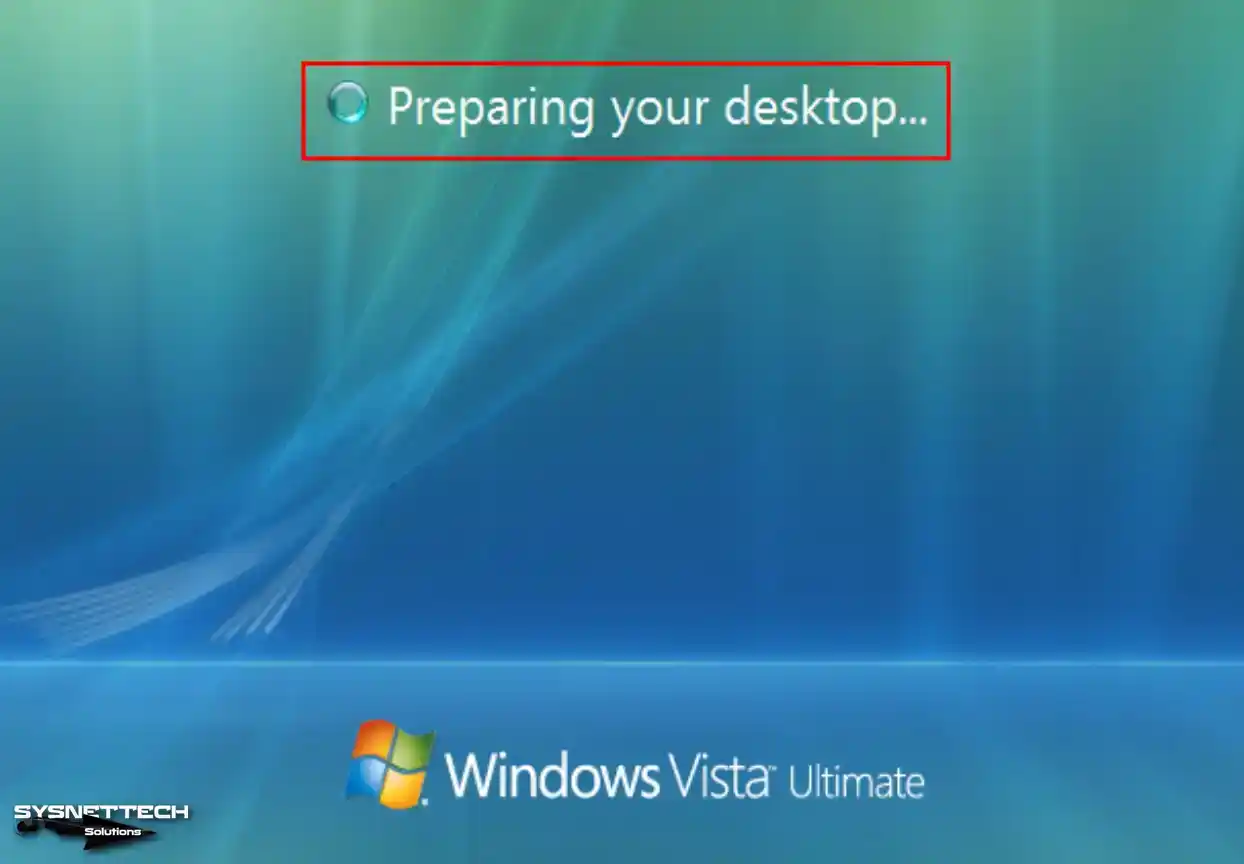
Step 19
After the installation steps, the first boot view of the Windows Vista operating system will be as follows.
How to Install Guest Additions
Upon successfully installing a Windows or Linux operating system using VirtualBox, it is essential to establish the Guest Additions software to enable the utilization of the host hardware within the virtual machine.
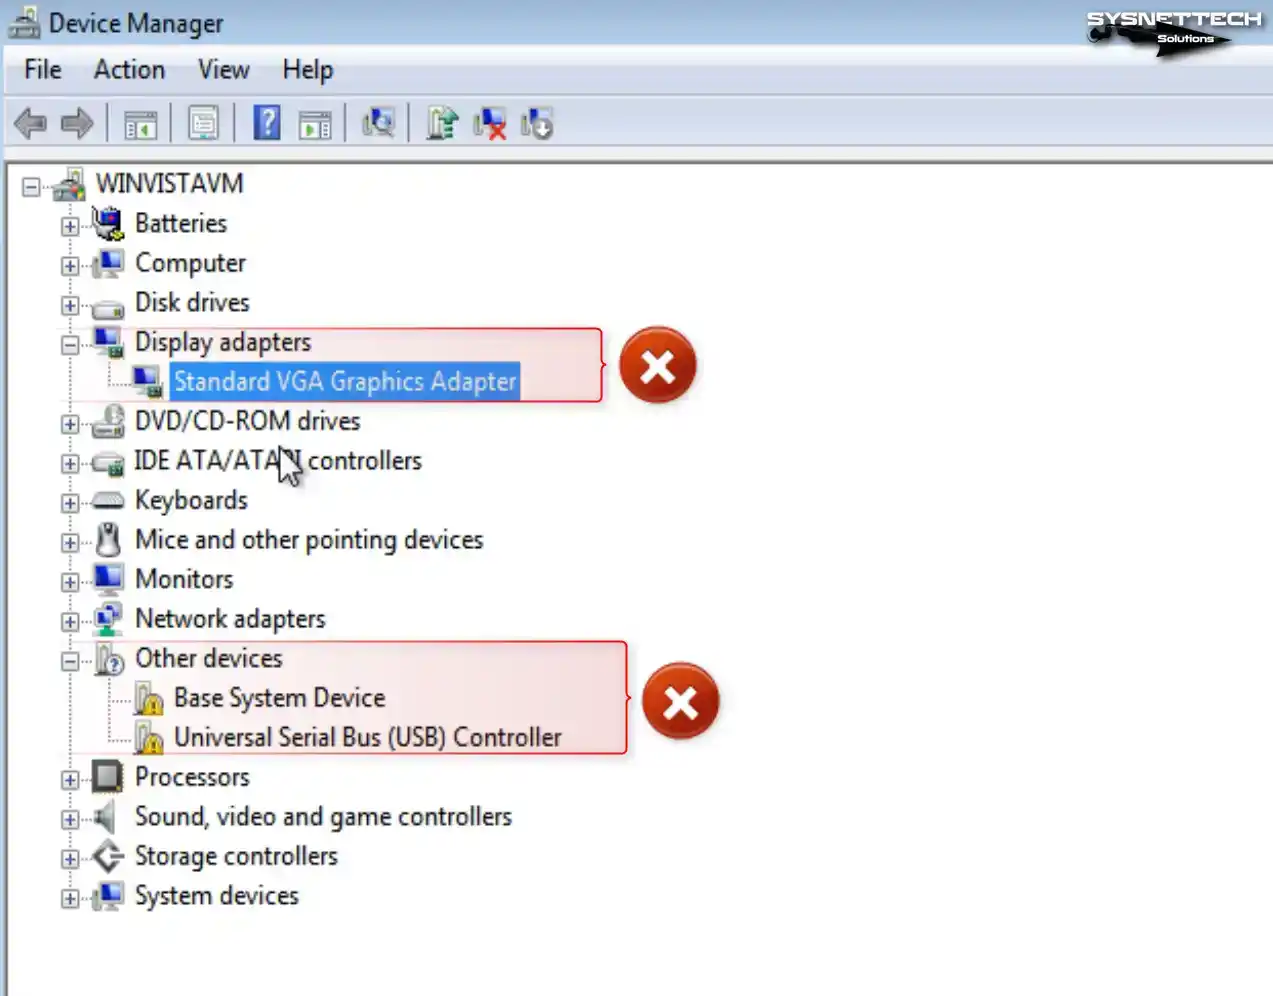
Step 1
After installing Windows Vista, when you open Device Manager and view the drivers, you can see that the Base System Device device is not installed and the virtual graphics adapter software under Display Adapter is not installed correctly.
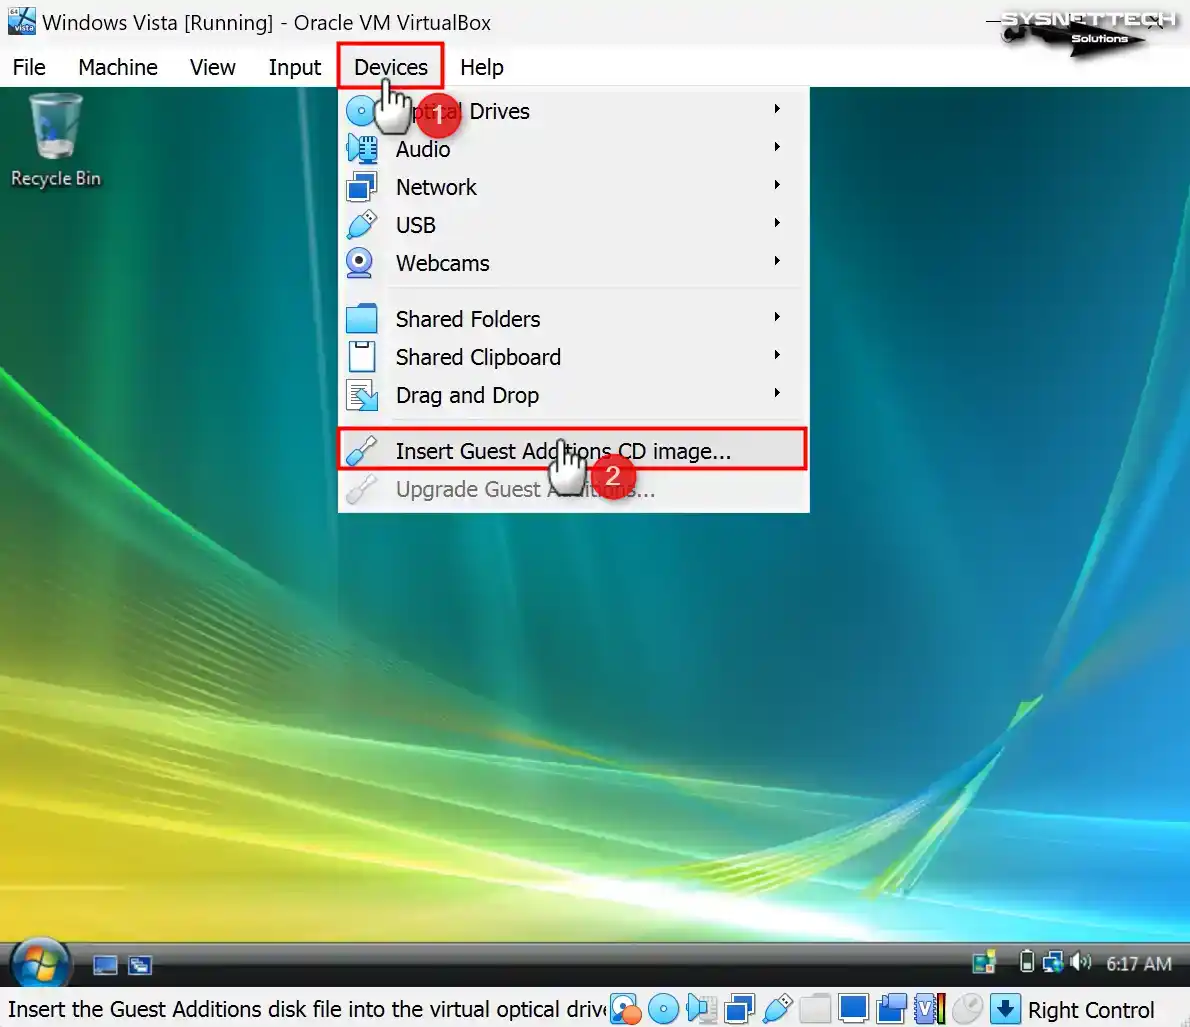
Step 2
Click Devices / Insert Guest Additions CD Image from VirtualBox’s tool menu.
While installing Vista in 6.x versions, you will get an Installation Aborted error at this stage. This error is because the latest versions of the Oracle program no longer fully support the Vista system. To fix this problem, you need to download and install the old version guest additions image file.
To download an older version of the Guest Additions software, visit this address and select version 6.1.0_RC1 or one of the other versions. Download the VBoxGuestAdditions_6.1.0_RC1.iso file to your host system.
To proceed, kindly right-click the CD/DVD icon at the bottom right of your guest machine and then select the “Choose a disk file” option. Select and open the old version guest addition image file that you downloaded to your host computer.
Step 3
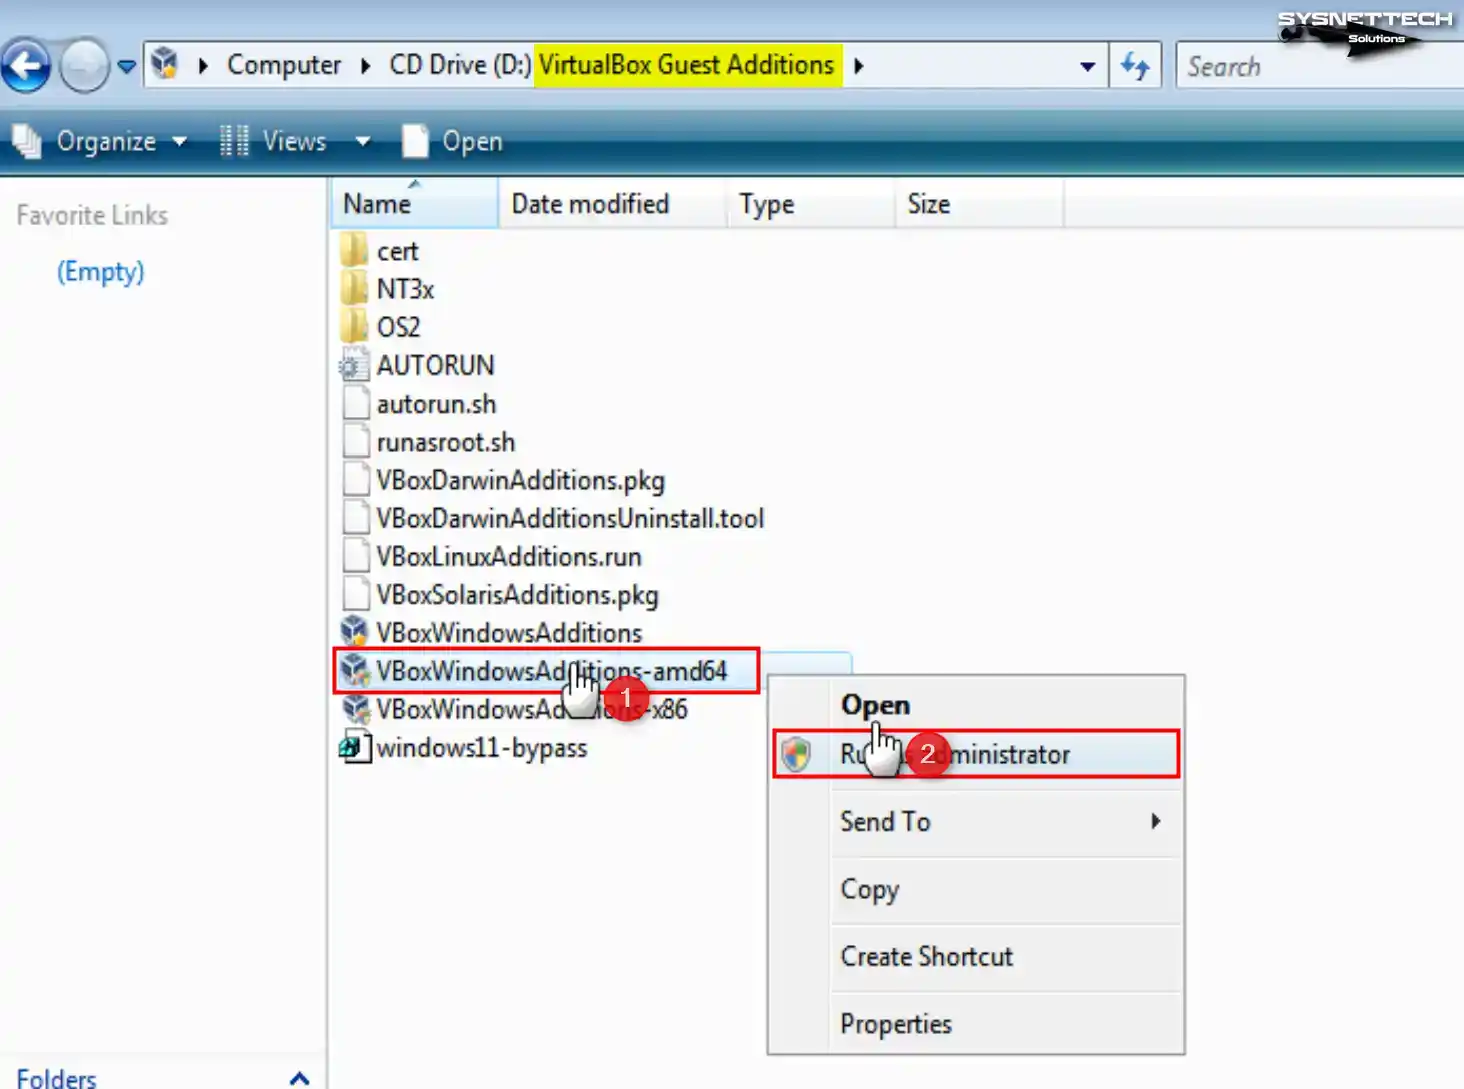
If the installation wizard does not form automatically, open My Computer and run the VBoxWindowsAdditions_amd64 file as administrator after viewing the contents of VirtualBox Guest Additions.
Step 4
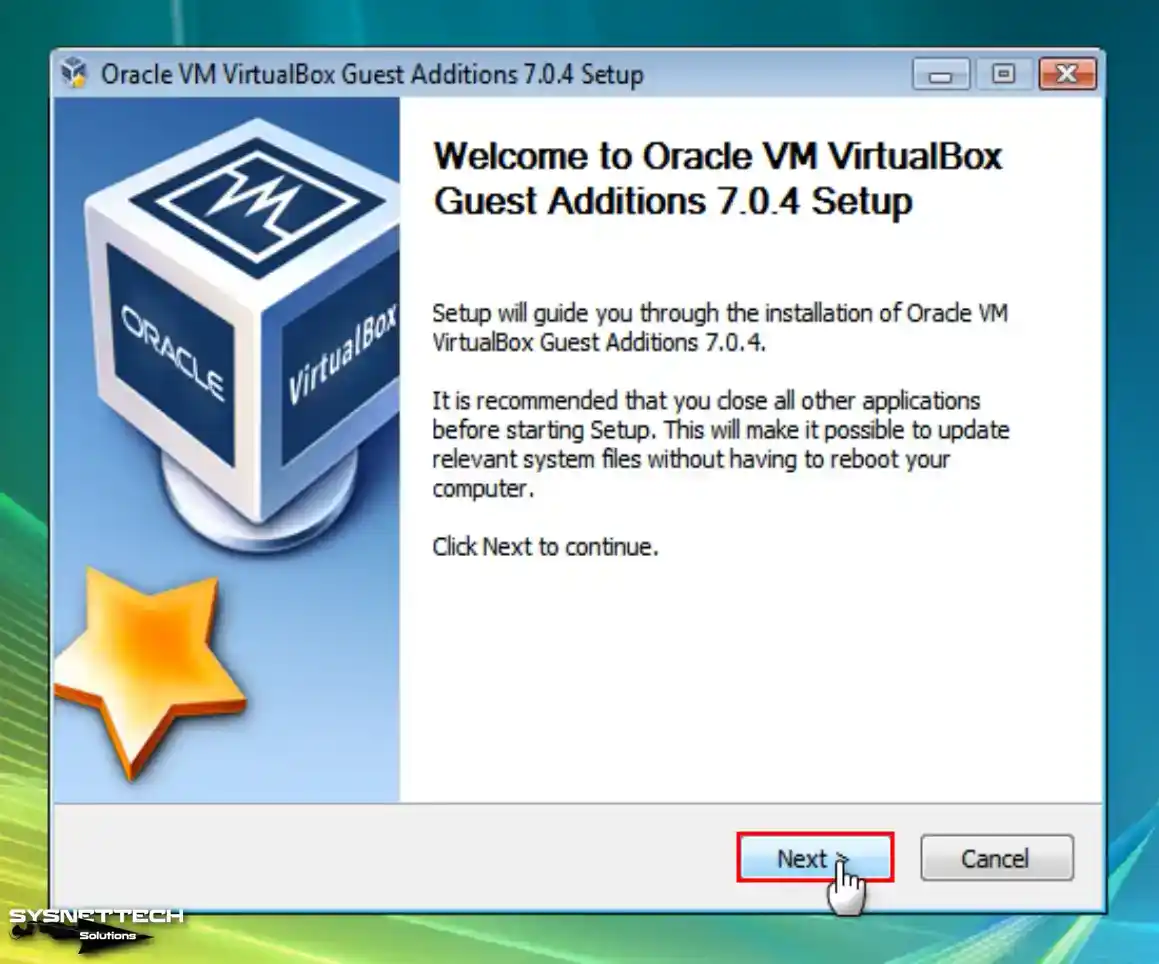
After running the setup file, when the guest add-ons setup wizard opens, click Next to continue the installation.
Step 5
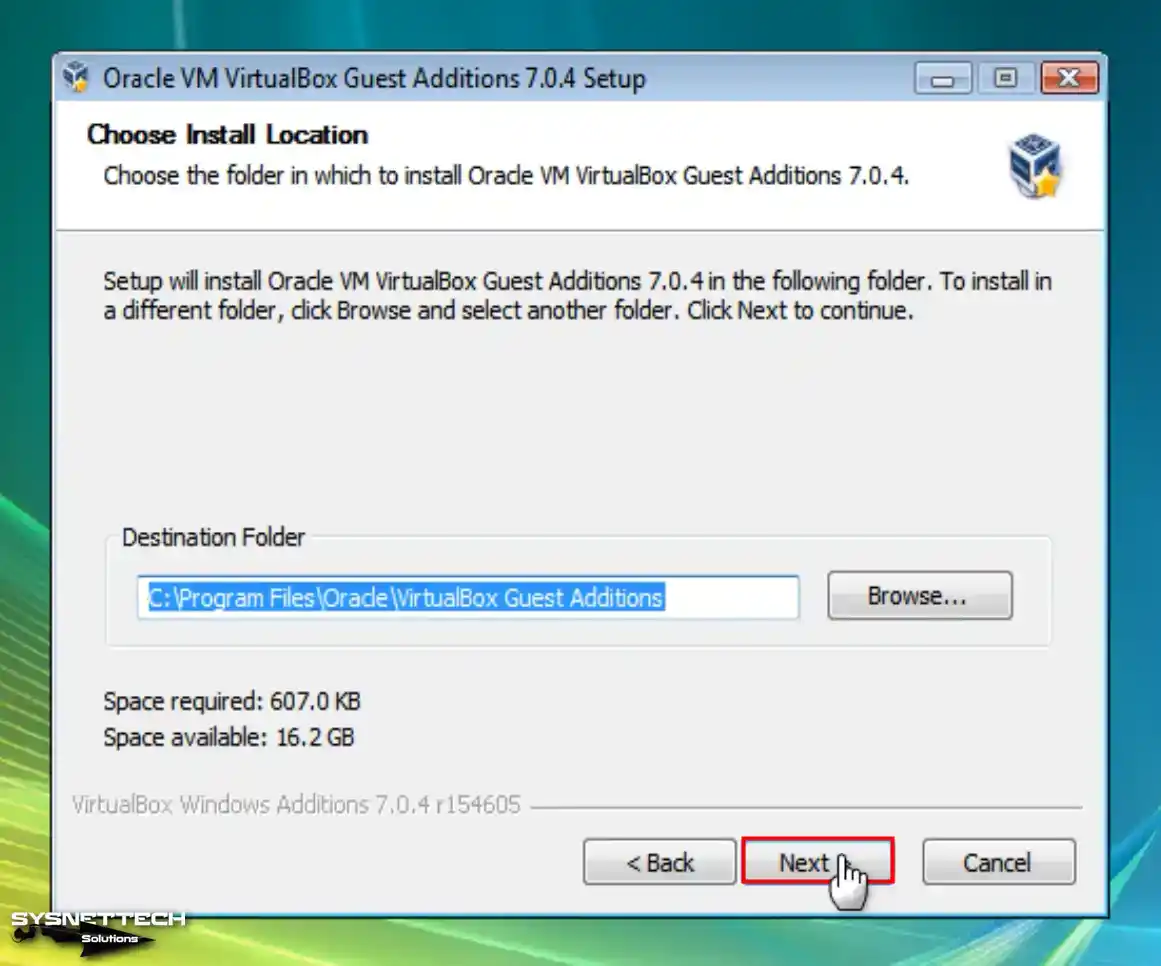
Do not change the installation location of the Guest software and click Next.
Step 6
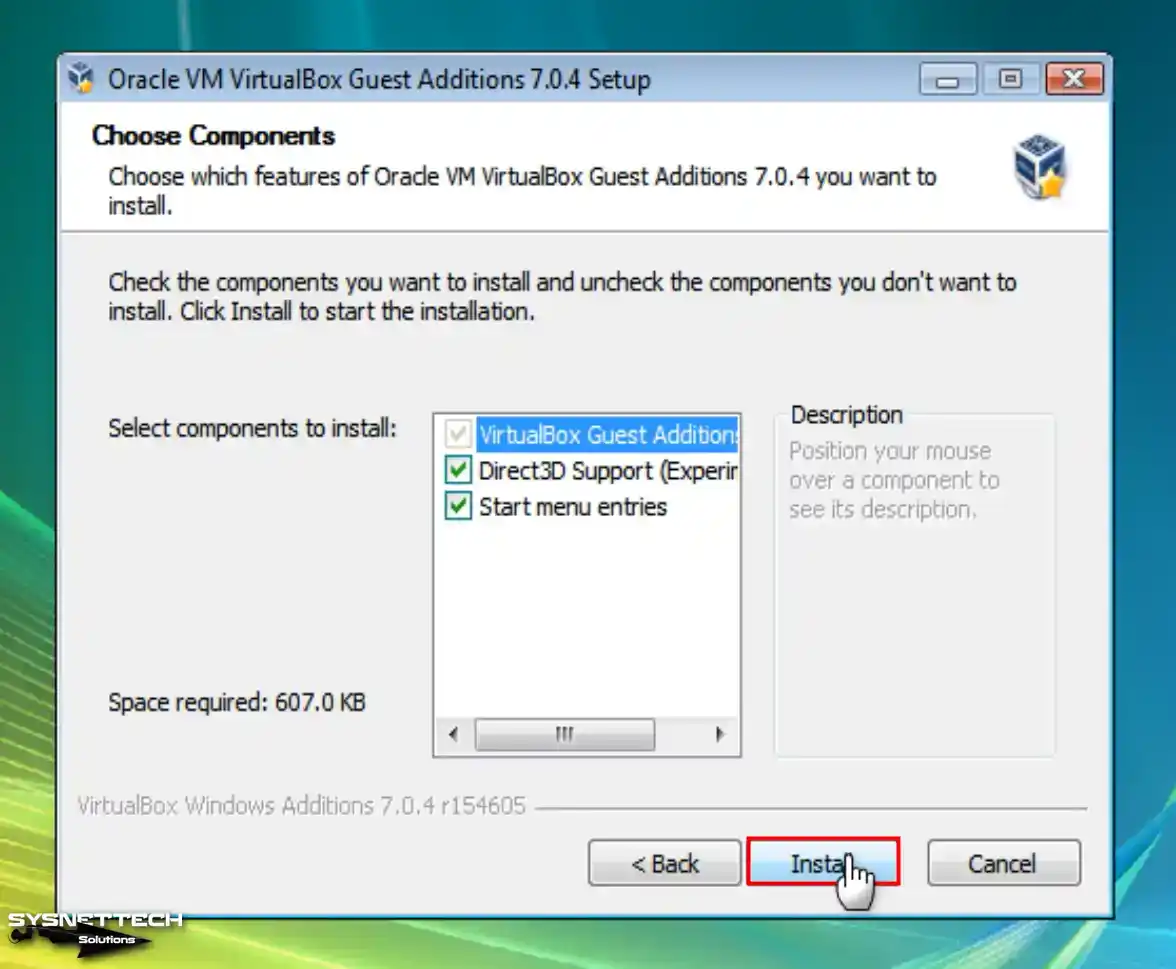
Check Direct3D support in the Choose Components window and click the Install button.
Step 7
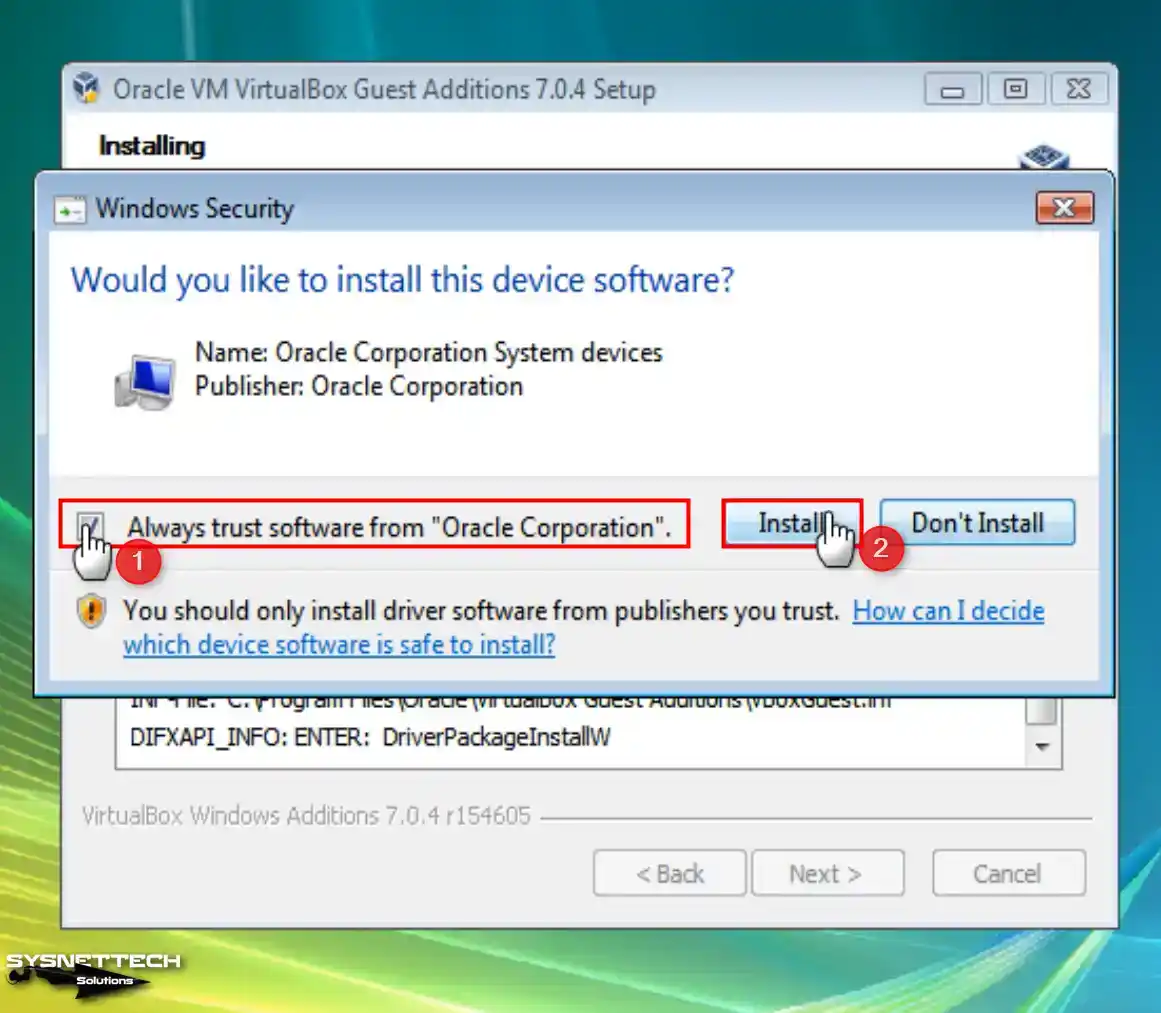
Check the Always Trust Oracle software option when installing the virtual machine drivers and click the Install button.
If Windows Security warns against installing unsigned drivers, click Install this driver software.
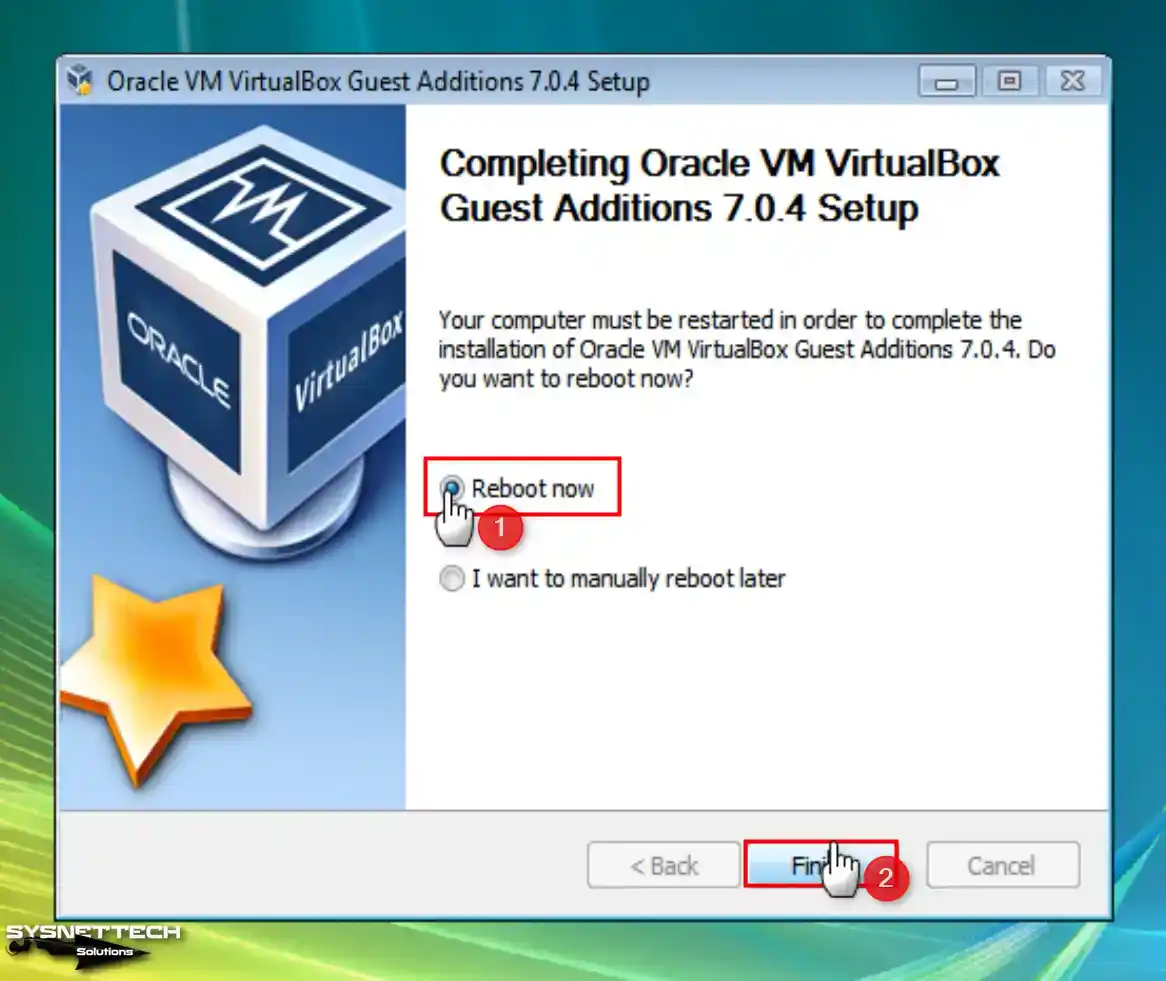
Step 8
After installing guest additions on your virtual PC, restart your VM for the modifications to take effect.
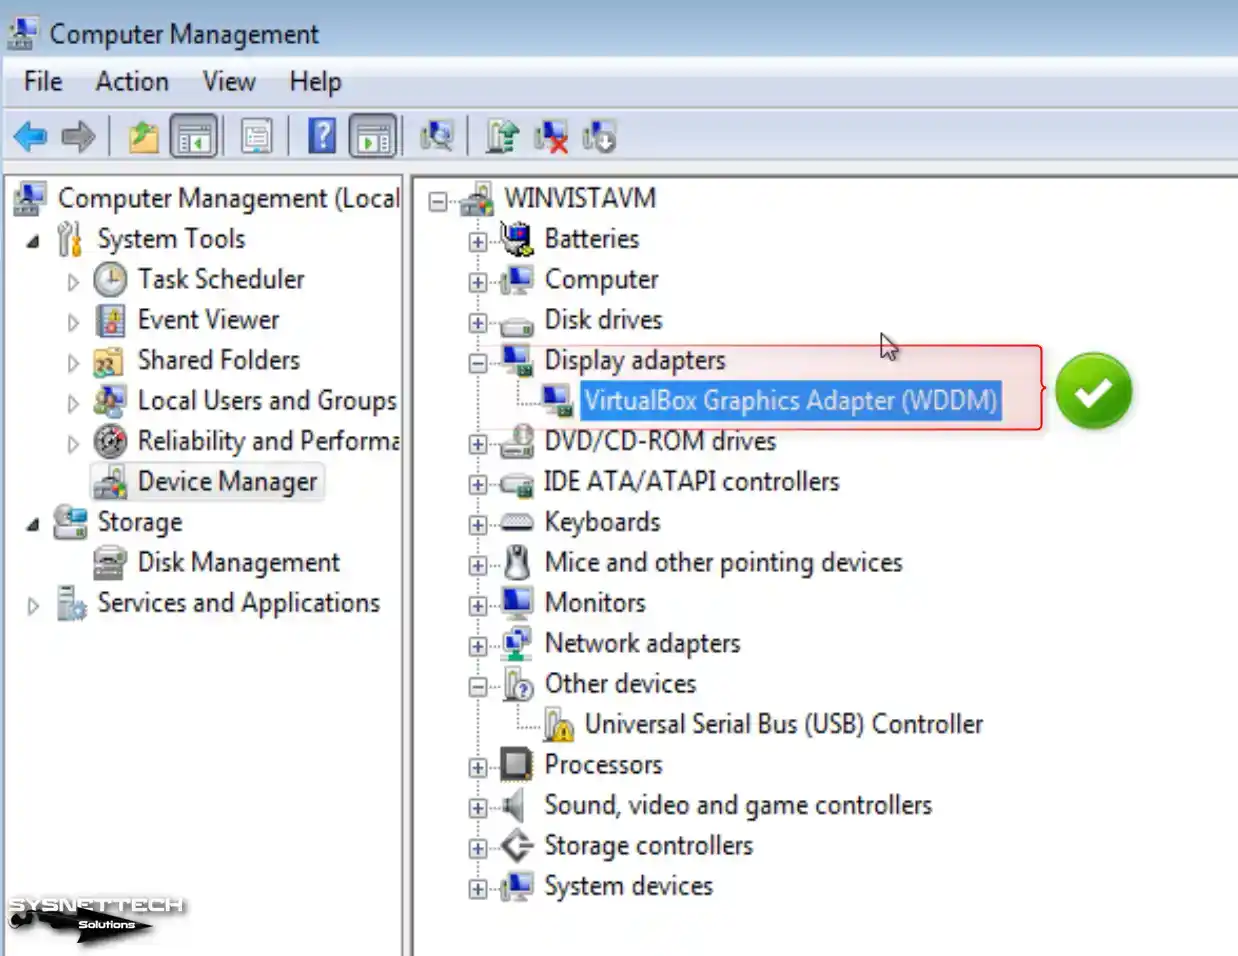
Step 9
Upon examining the Device Manager following the boot-up of your virtual system, you will observe that all the drivers have been installed successfully.
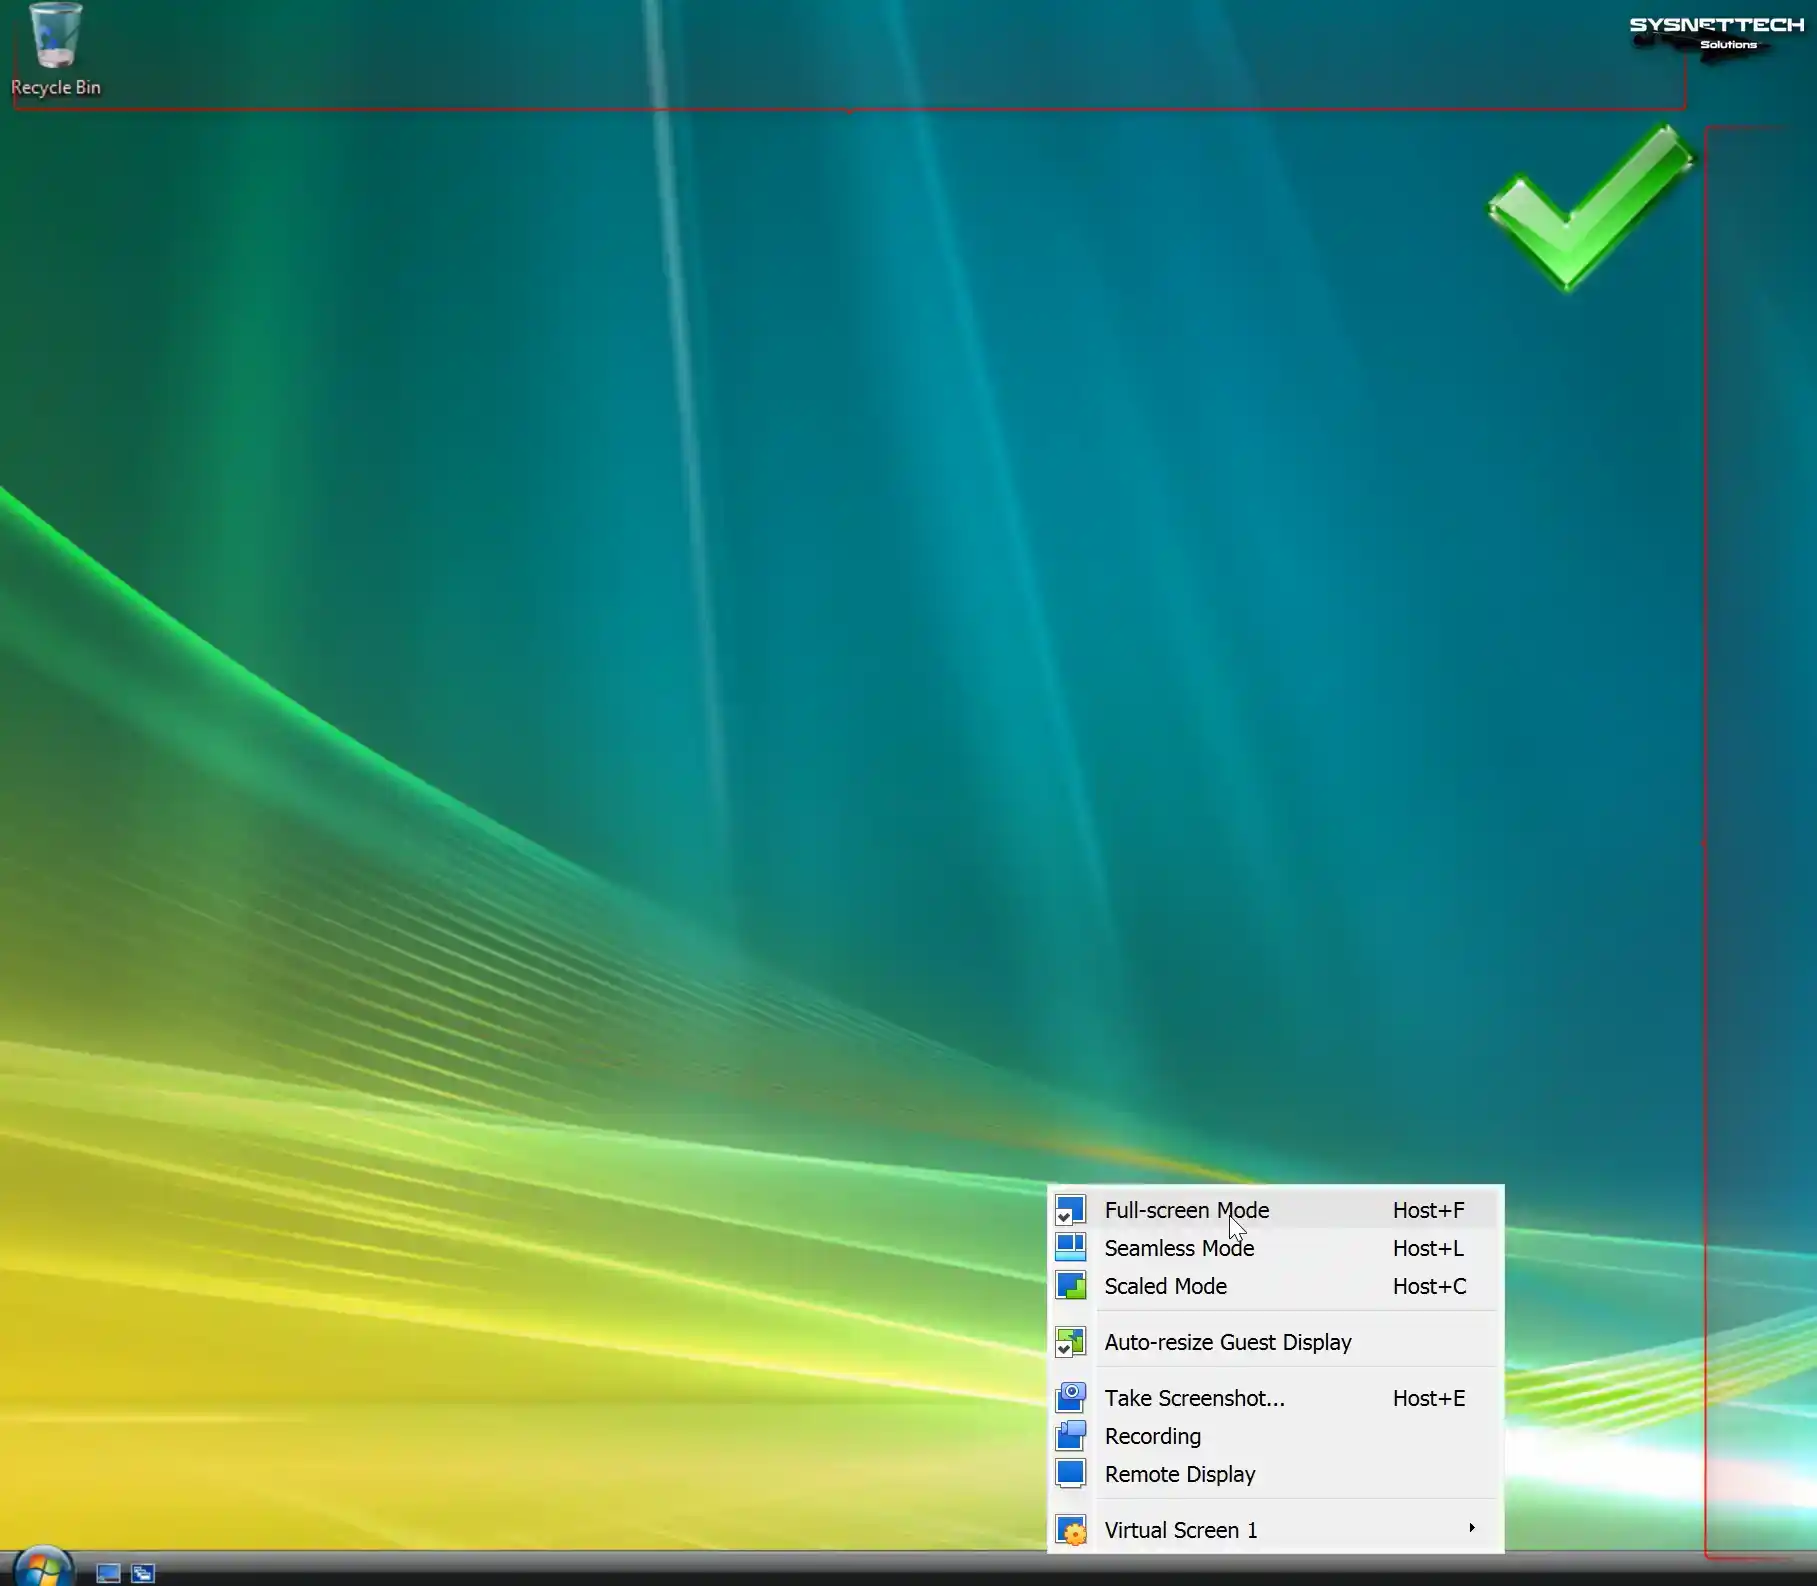
Step 10
To adapt your Windows Vista virtual computer to your host’s screen, click View / Full-Screen Mode from the tool menu and check the screen resolution.
Step 11
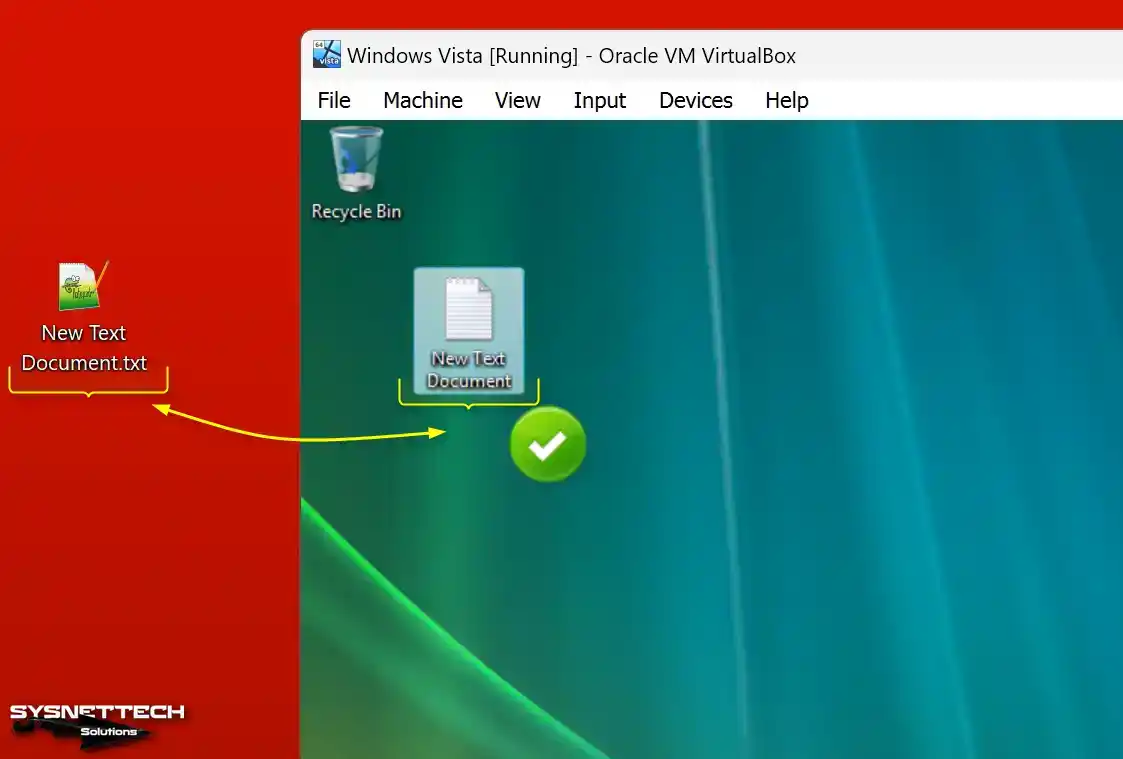
After installing the necessary software for your virtual machine, try to copy a text document from your host PC by dragging and dropping it into your guest machine. The file transfer works if you see +Copy next to the file, as in the image below.
How to Test Internet Connection
A network connection may not be established when the services of the VirtualBox program installed on your host system do not work correctly. For this reason, checking your Internet connection after each new guest machine installation is helpful.
Step 1
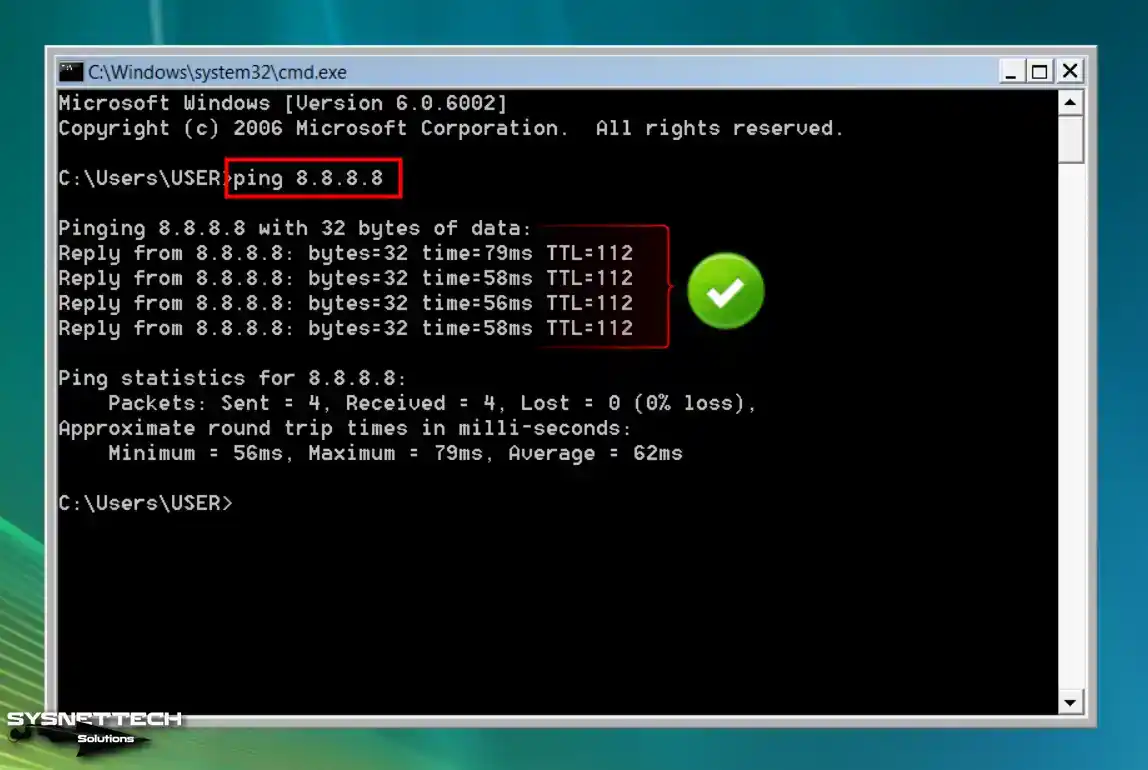
After typing cmd in the search box in the start menu on your Windows Vista system, run the tool and test your Internet connection by pinging Google servers using the ping 8.8.8.8 command.
Step 2
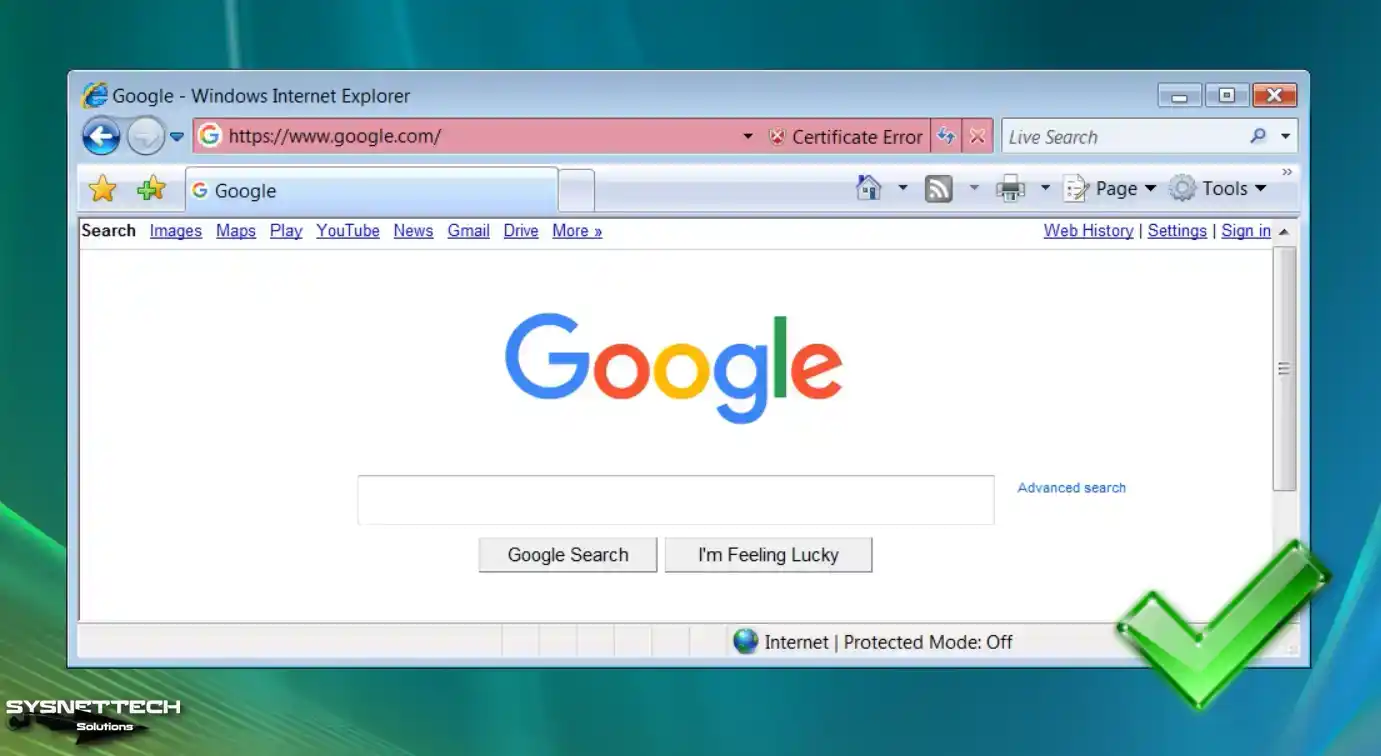
When the ping test is successful, open the Internet Explorer browser installed by default on your system and verify your connection by visiting the Google search engine.
How to Configure Shared Folder
After setting up a virtual PC with VirtualBox, we recommend using the Shared Folder feature for more efficient and error-free file copying between the host and the VM. With the assistance of the Shared Folder characteristic, you can access a folder on your host PC directly from your virtual computer.
Step 1
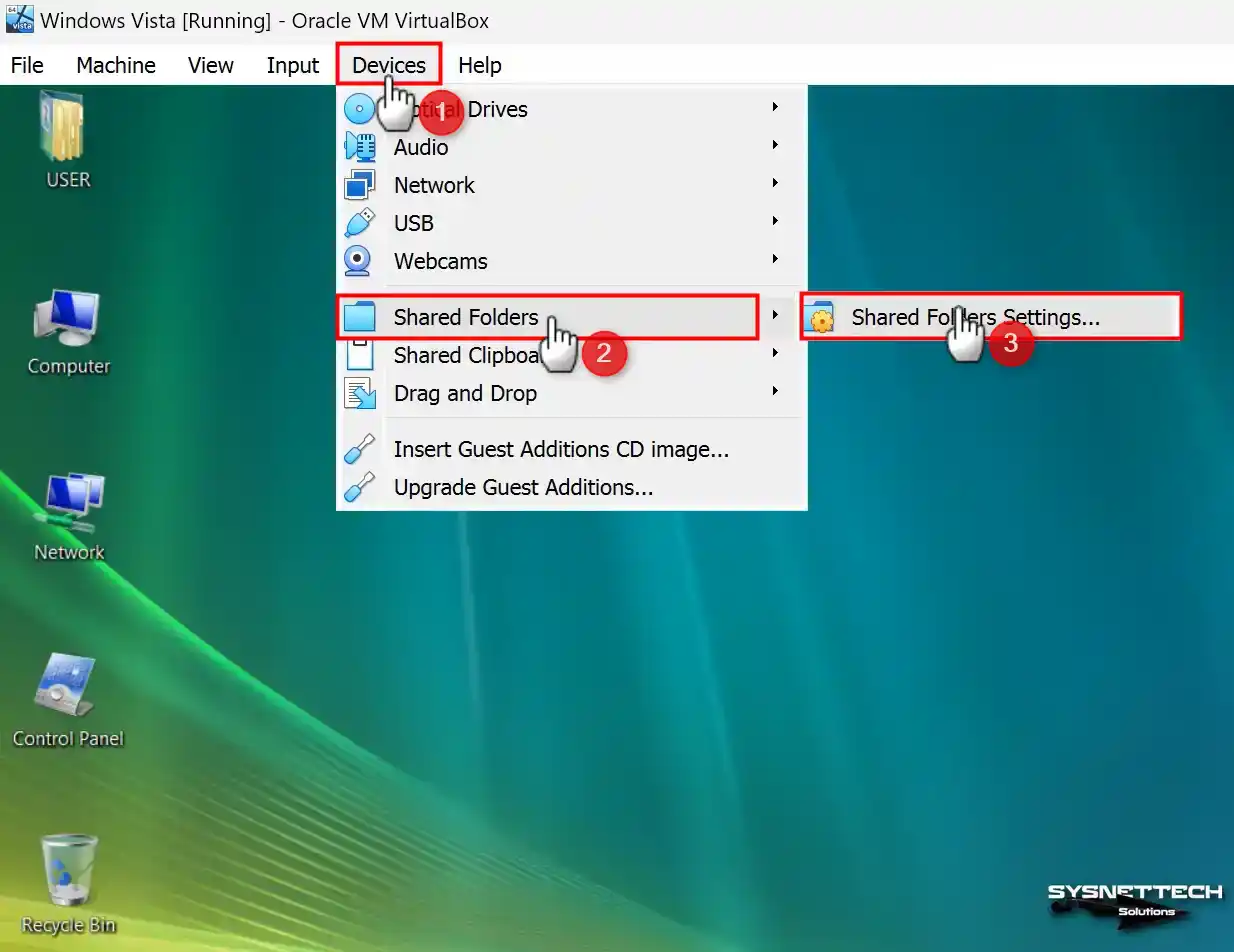
While your guest machine is running, click Devices / Shared Folders / Shared Folders Settings.
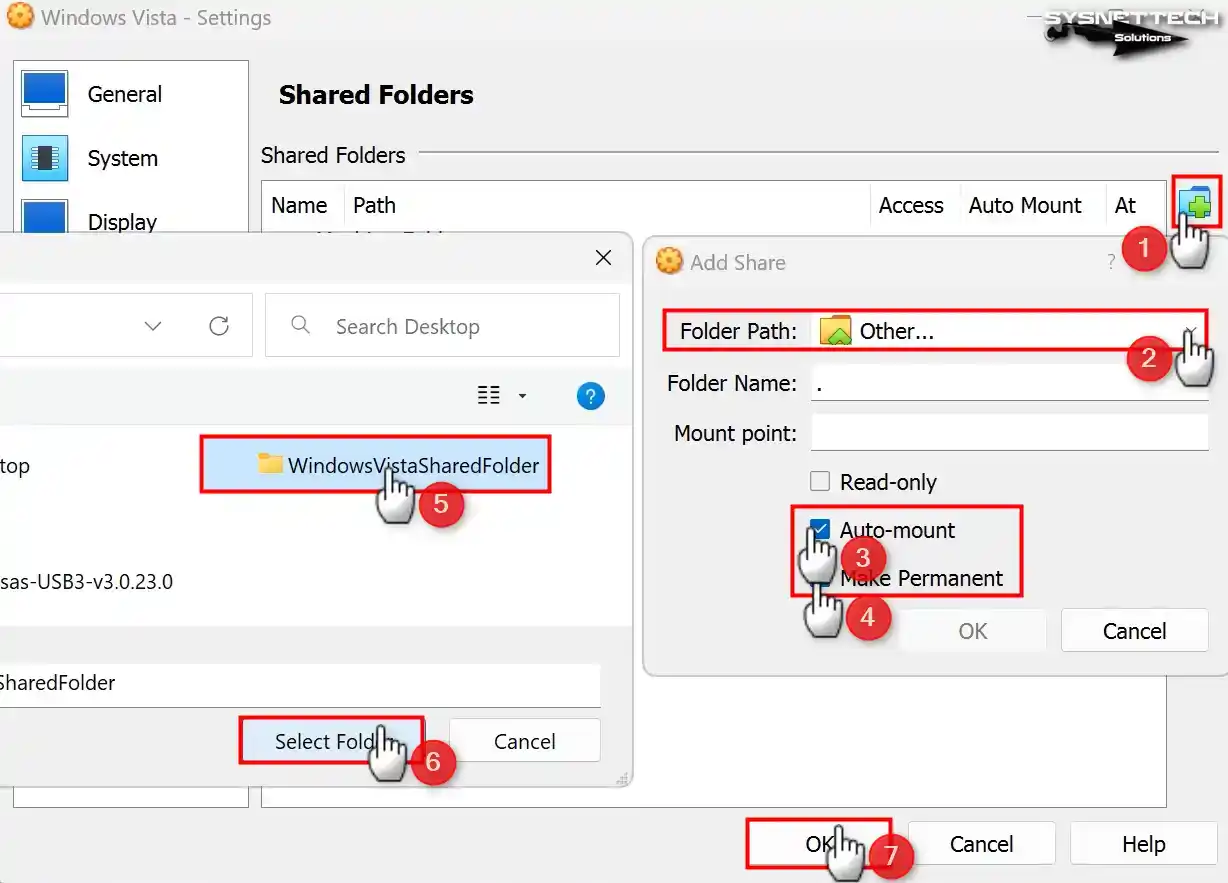
Step 2
When the Shared Folder window opens, click the green + button to open the Add Share window. In the Folder Path section, add the location of the folder you created on your host and enable Auto-Mount and Make Permanent options to use the public folder as a network drive.
Step 3
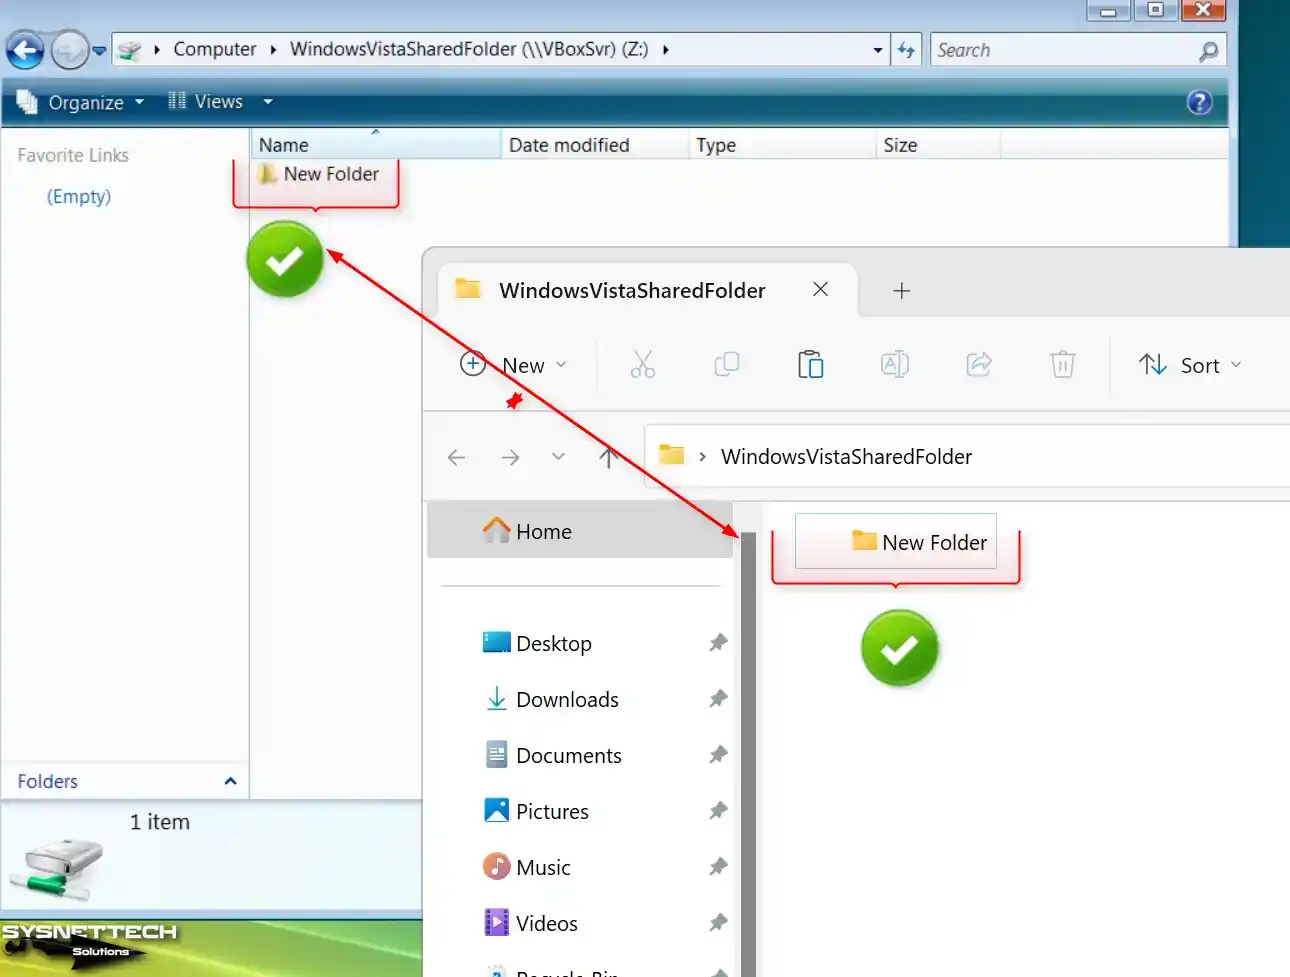
When you view the shared folder on My Computer in the virtual machine, you can see that it is added as a network drive in the Network Location section. Likewise, you can see that the public folder is active in VBOXSVR over Network.

Step 4
Create a new folder in Shared Folder and check the folder in the Host and VM.
How to Enable and Install USB 3.0 Driver
You must change the default controller before using USB 3.0/3.1 storage or other Windows Vista guest machine devices. Officially there is no USB 3.0 driver support for WinVista. Still, you can enable support by changing the controller type on the Oracle software.
Suppose you attempt to connect a USB 3.0/3.1 supported flash stick to your virtual machine without enabling 3.0 support. In that case, you will encounter an error pointing out that your storage device cannot be added.
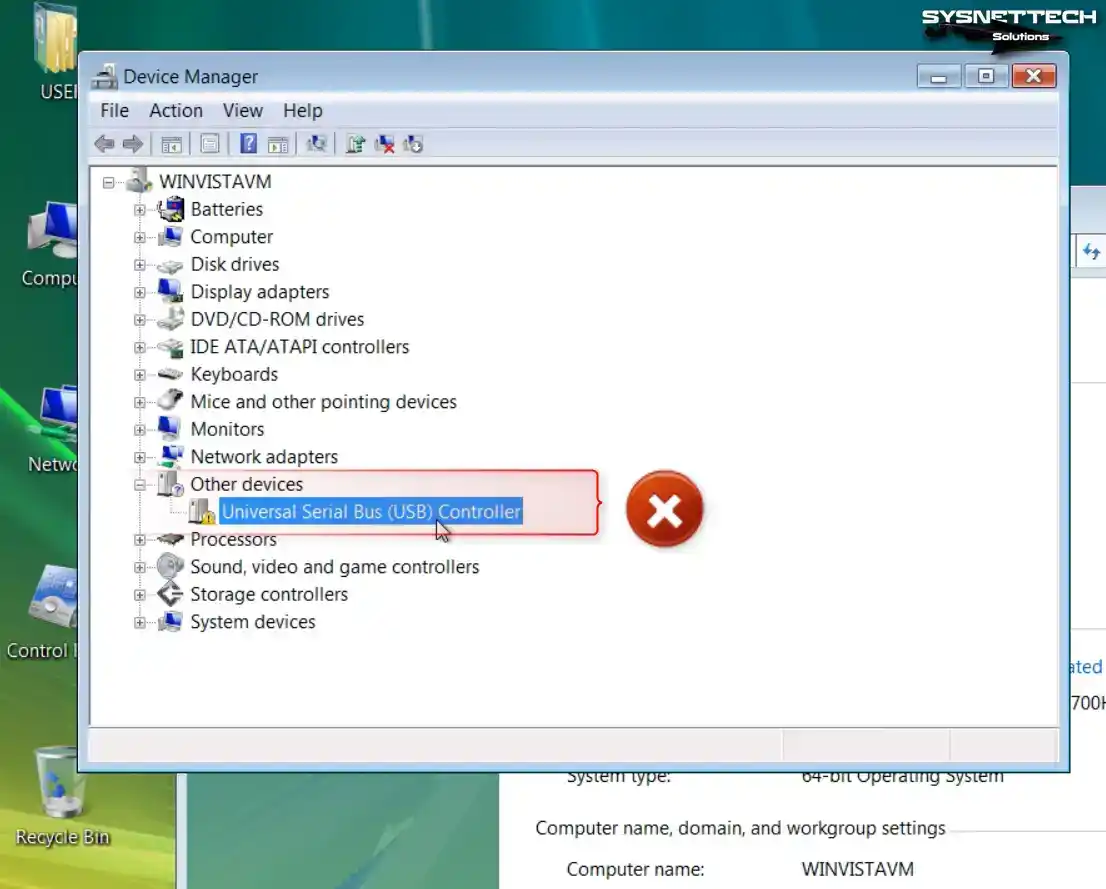
Step 1
Upon inspecting the Device Manager, it will become evident that the driver cannot be installed, even if USB 3.0 is enabled.
Step 2
To fix the USB problem, shut down your Windows Vista system entirely and then the Oracle software. Then, open PowerShell in the location where the virtualization program is installed and change the USB chip type by executing the command below.
./VBoxManage setextradata 'Windows Vista' VBoxInternal/Devices/usb-xhci/0/Config/ChipType uPD720201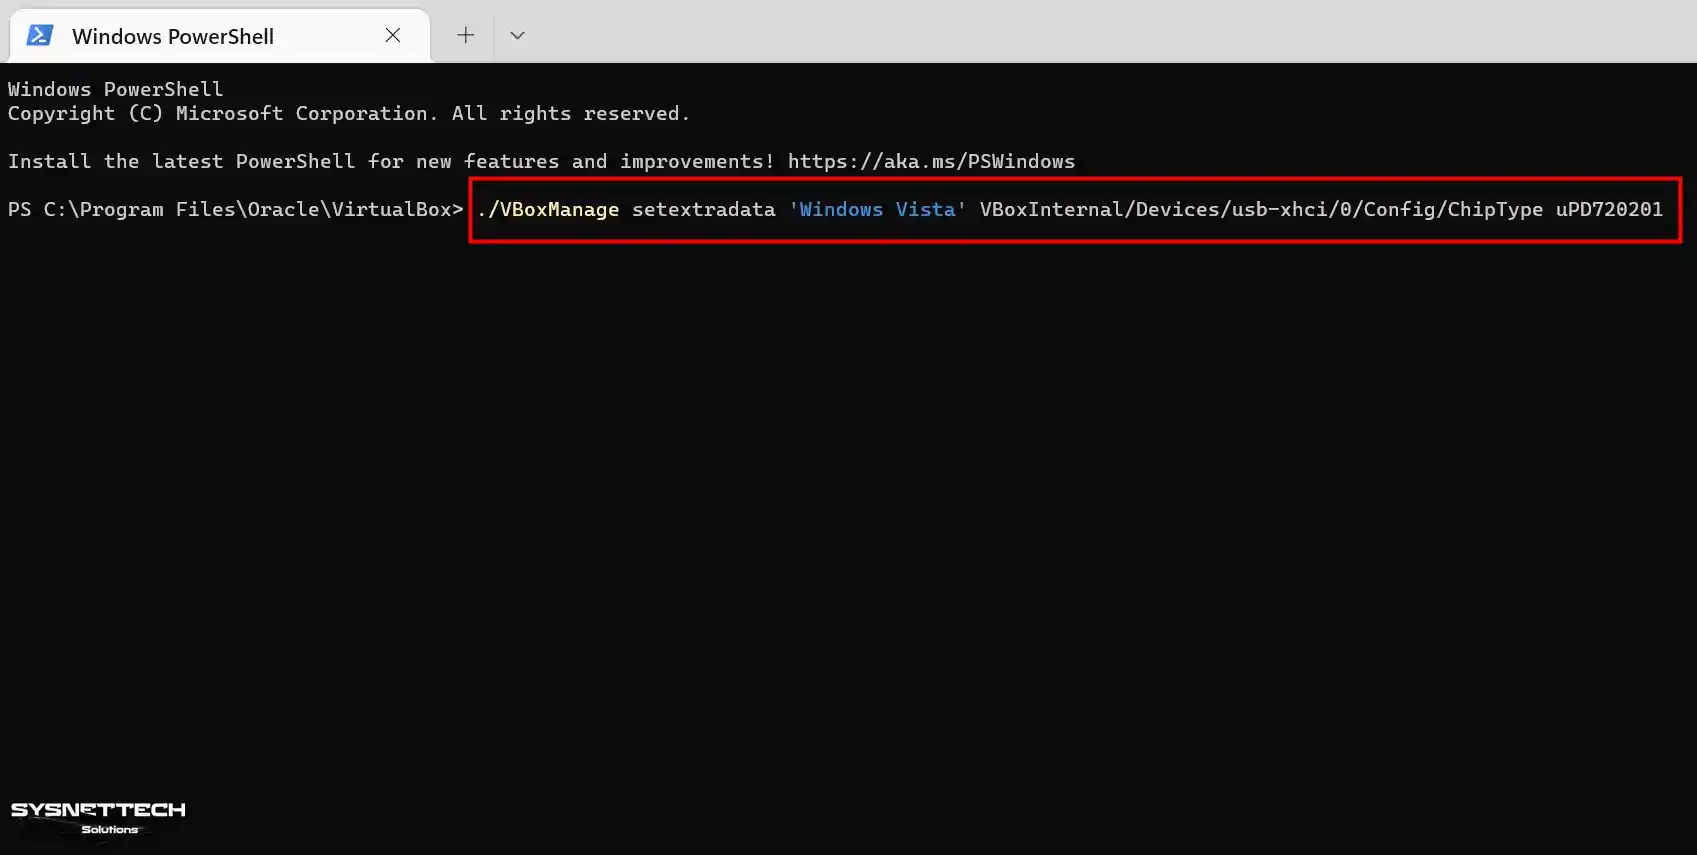
Step 3
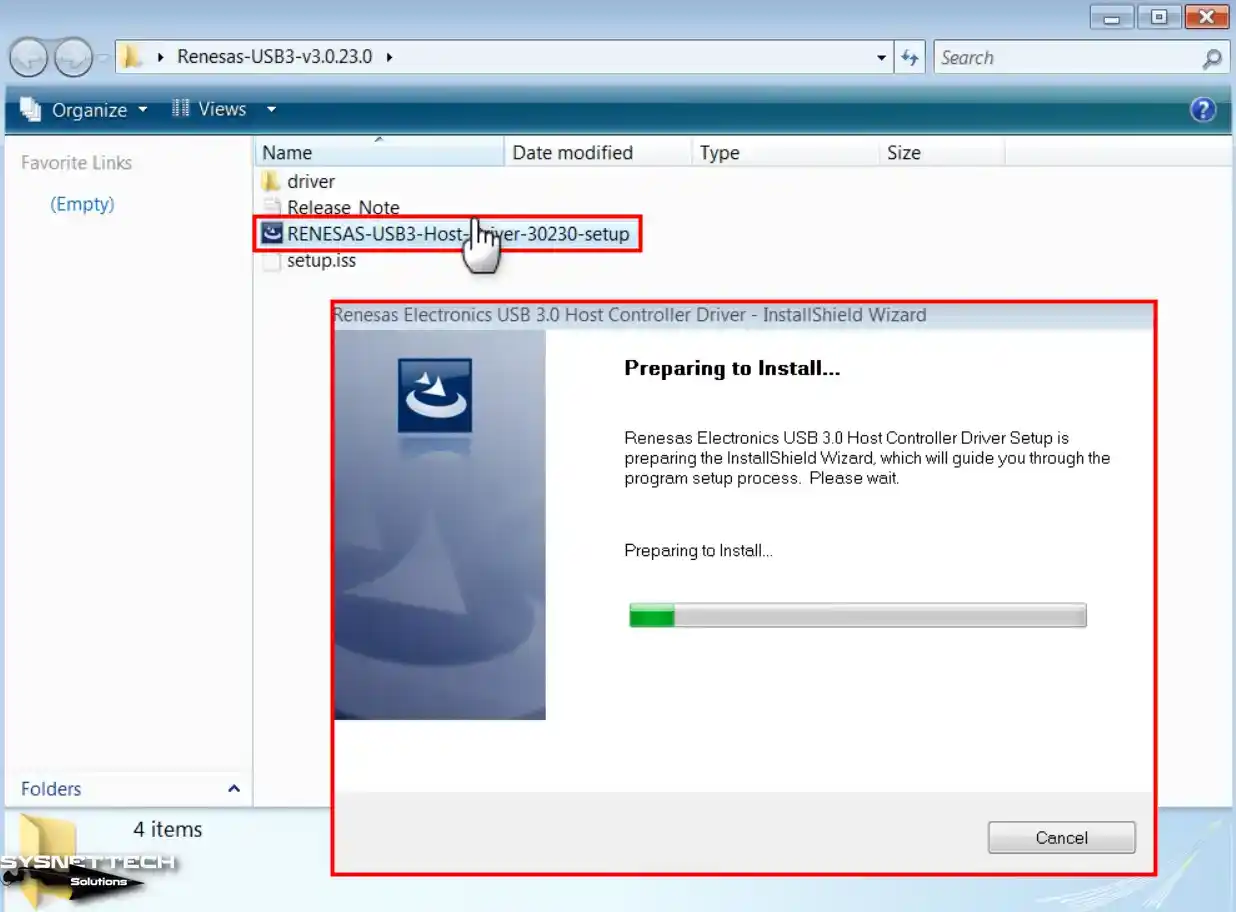
Obtain the USB 3.0 Driver specifically designed for Windows Vista x64 by downloading it from the table at the bottom of the article. After extracting the archived file to the folder, run the RENESAS-USB3-Host-Driver-30230-setup file as administrator.
Step 4
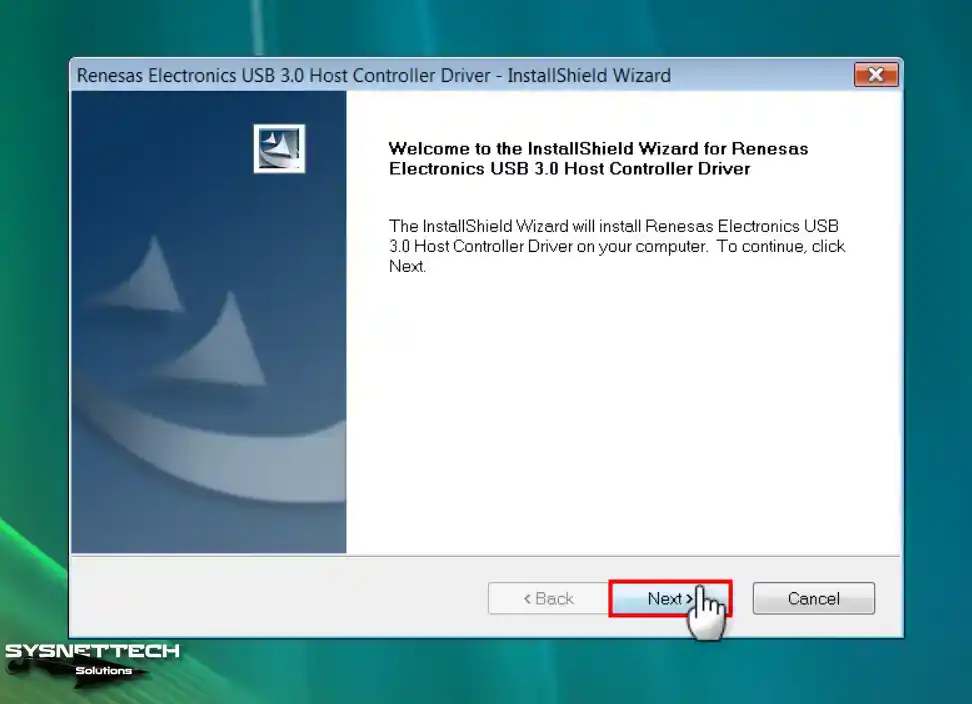
Click Next when the Renesas USB Driver wizard opens.
Step 5
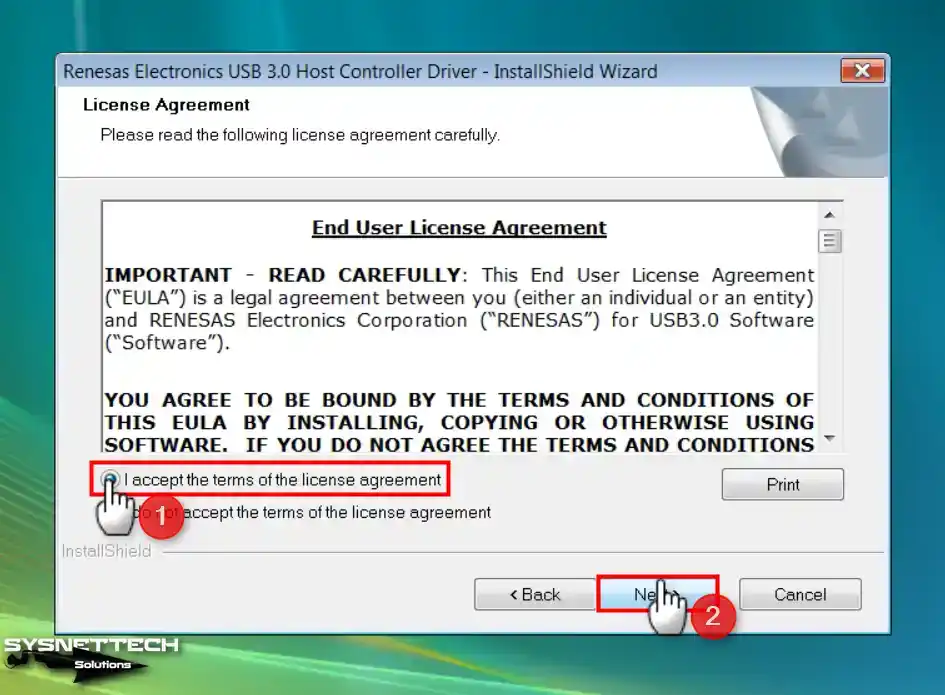
Accept the license agreement of Renesas Electronics USB 3.0 software and click Next again.
Step 6
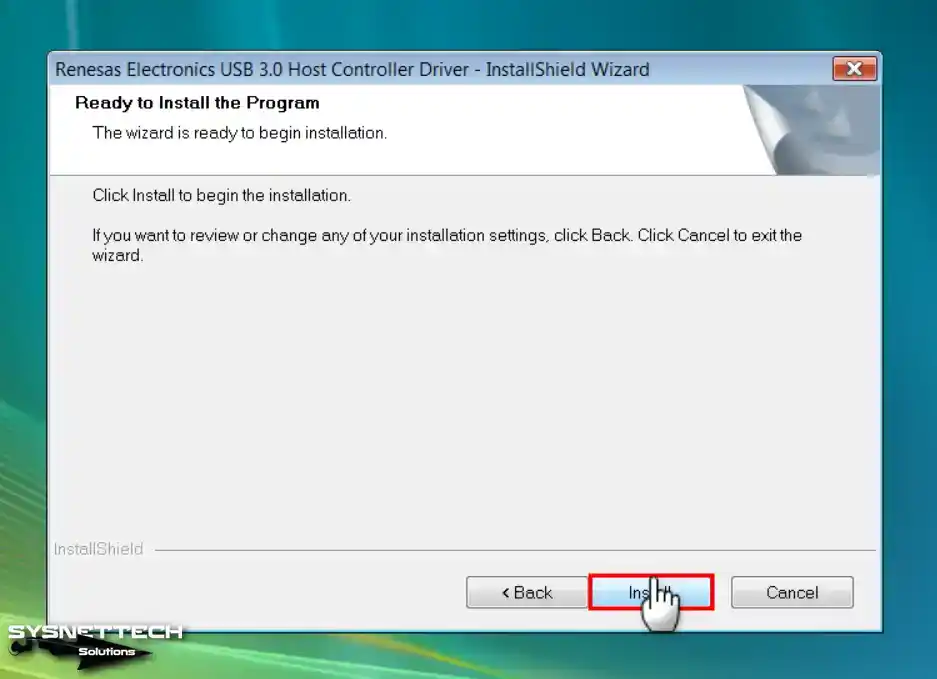
Click the Install button to build the driver for the USB hardware.
Step 7
After completing the Renesas Driver installation, click Finish.

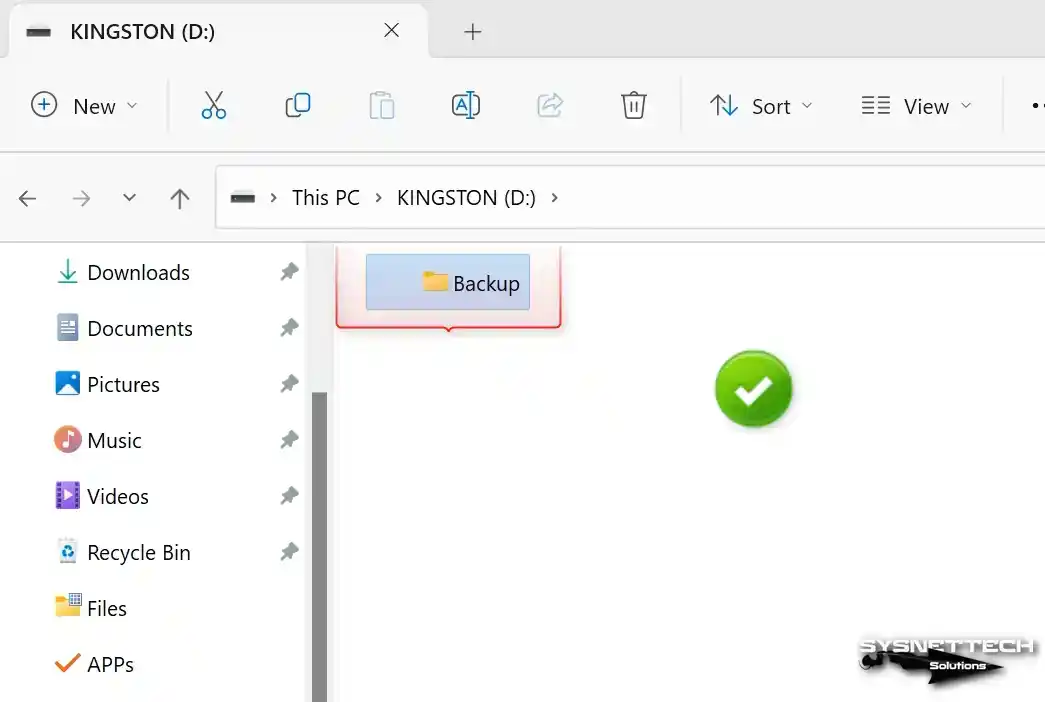
Step 8
Plug a USB 3.x supported flash memory into your host computer and create a folder named Backup.
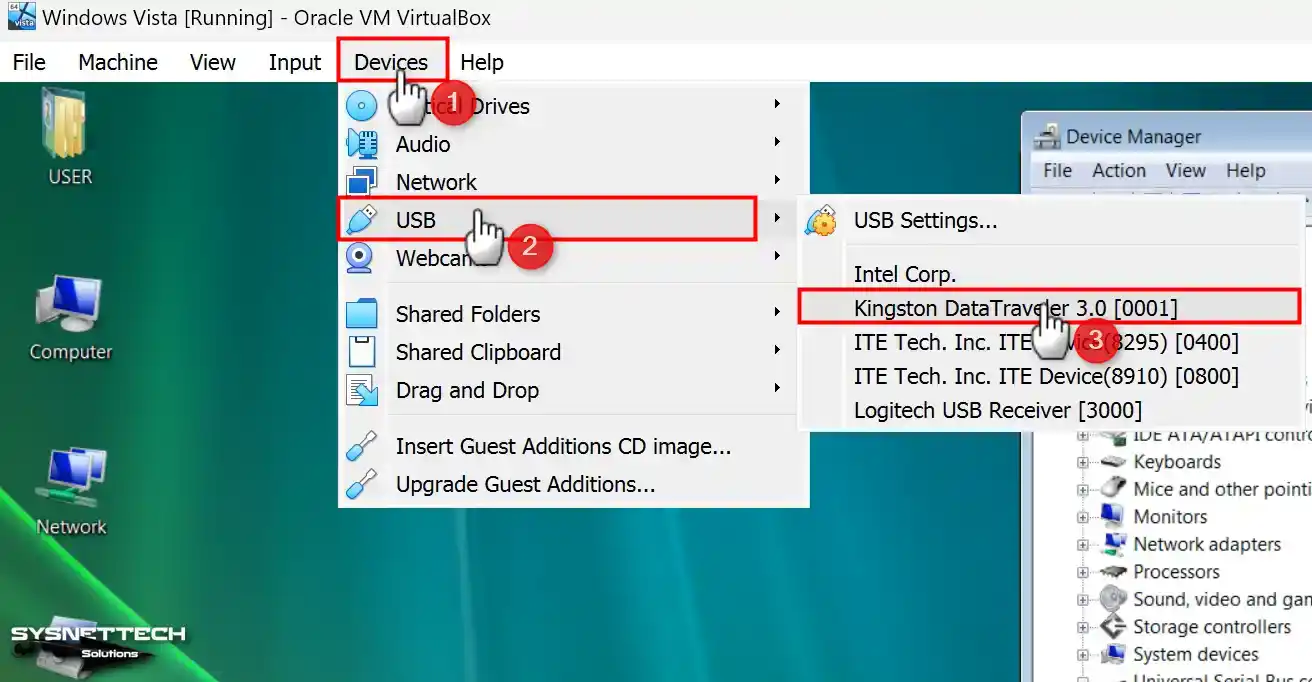
Step 9
Click Devices / USB / Kingston DataTraveler 3.0 (Name of Your USB Device) to connect the USB memory you have inserted in your host to the virtual computer.
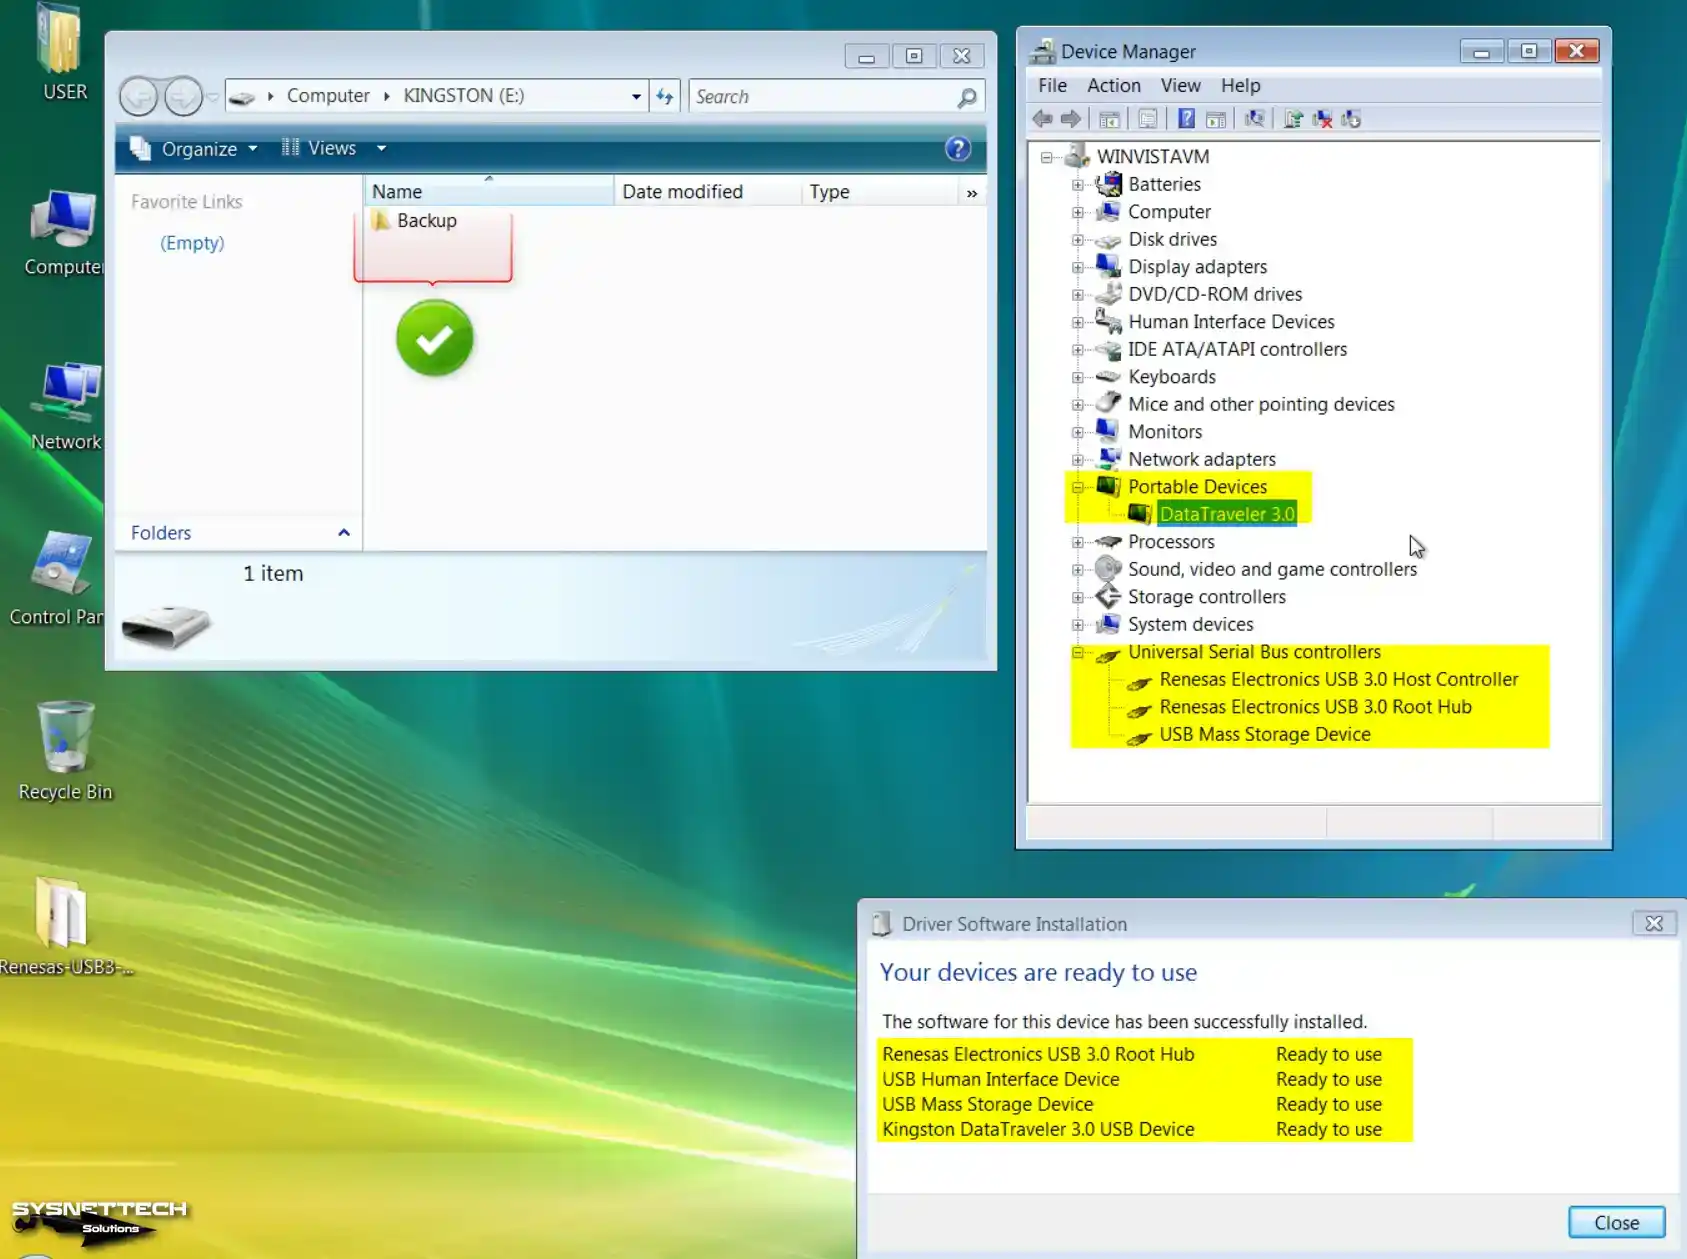
Step 10
Upon inserting the flash memory device into your virtual system, the device will be recognized and ready for use once the USB Mass Storage Device driver is established. When you view My Computer on the guest machine, you can see that the KINGSTON branded USB memory is usable by the system.
How to Change Intel Audio Controller to Realtek ICH AC97 to Fix Sound Problem in VirtualBox 6.x Versions
The default Intel Audio controller defined in the Windows Vista virtual machine causes system sounds to malfunction and echo.
- After turning off your virtual PC, open its settings and click on the Audio device, then change the Audio Controller setting to ICH AC97 and close the window.
- After running your virtual PC, you will see that the Multimedia Audio Controller device driver is not installed under Other Devices on Device Manager. To fix this problem, install the ICH AC97 audio controller driver for Windows Vista x64.
- Download the Realtek AC97 Audio Driver from the table at the bottom of the article and copy it to your VM. Then, after extracting the archived file to the folder, run the Setup file in the 6305_Vista_PG537 folder as an administrator.
- When the Realtek AC’97 Audio 6.0.1.6305 x64 Edition setup wizard opens, click Next to continue.
- Click Install this driver software anyway when you receive an unsigned driver warning during the audio driver installation.
- After installing the sound driver for Vista, restart your virtual system.
- When you recheck Device Manager on your guest machine, you can see that the Realtek AC’97 Audio device works under Sound, Video, and Game Controller.
Video
Installing Old Versions
VirtualBox Version
YouTube Video
Slide
Download Windows Vista ISO, USB, and Audio Driver
Windows Vista Ultimate x64 EN ISO
Windows Vista x64 USB 3.0 Driver
Windows Vista x64 AC97 Sound Driver
Related Articles
♦ How to Install Windows 10 with VirtualBox
♦ How to Install Windows 8 with VirtualBox
♦ How to Install Windows 7 with VirtualBox
♦ How to Install Windows XP with VirtualBox
♦ How to Install Windows 95 with VirtualBox