О LENOVO
+
О LENOVO
-
Наша компания
-
Новости
-
Контакт
-
Соответствие продукта
-
Работа в Lenovo
-
Общедоступное программное обеспечение Lenovo
КУПИТЬ
+
КУПИТЬ
-
Где купить
-
Рекомендованные магазины
-
Стать партнером
Поддержка
+
Поддержка
-
Драйверы и Программное обеспечение
-
Инструкция
-
Инструкция
-
Поиск гарантии
-
Свяжитесь с нами
-
Поддержка хранилища
РЕСУРСЫ
+
РЕСУРСЫ
-
Тренинги
-
Спецификации продуктов ((PSREF)
-
Доступность продукта
-
Информация об окружающей среде
©
Lenovo.
|
|
|
|
Much of Microsoft’s excellent work with Windows is undone by this consistently ignorant vendor, who is allegedly one of their biggest and best partners. With friends like these, hey?
It was no surprise then when we went to install Windows 10 on multiple Lenovo systems that, of course, the normal utilities didn’t work. Even Microsoft’s provided utilities to create a bootable USB to install from scratch failed on Lenovos. One of our systems even blue screened with INACESSIBLE_BOOT_DEVICE after attempting the upgrade.
By contrast, the Dell and HP systems we tried: smooth sailing.
The issue with booting from USB on Lenovo systems like Yoga 2 Pro, Yoga 3 Pro, etc. is that they use the newer (and now fairly common) UEFI instead of the old BIOS. But they, unlike many other vendors, very specifically need to boot from a USB disk formatted with a more obscure compatibility MBR Partition Scheme AND FAT32 file system. No other combination will work, and your shiny new Lenovo will happily and continuously ignore your USB drive at boot.
Ignore the other advice you may find online about switching to Legacy Modes and things of the such in the UEFI Settings. You’ll get yourself in a bigger mess, and screw up Secure Boot and lower performance.
The solution is to download the excellent free utility Rufus, and use it to create the correctly configured USB disk.
1. Use Microsoft's utility to download the combination 32 bit and 64 bit ISO installer.
This was the only option we could consistently get to work correctly.Let Microsoft's
utility create a USB drive, then copy all the files and folders in the root to a temporary
folder on your hard drive.Incidentally, you can sure tell a lot of care and attention was
put into this utility, hey Microsoft? cestina? Great default.
 Для сброса ноутбуков Lenovo на заводские настройки, обычно достаточно нажать скрытую кнопку «Novo», обычно утопленную в корпусе на левой или правой грани ноутбука, и выбрать в меню «System Recovery» или же зайти в особые варианты загрузки Windows 10 и найти пункт для восстановления в особых вариантах загрузки. Однако, это работает лишь в том случае, если на ноутбуке сохранился скрытый образ восстановления системы.
Если же образа нет, его можно скачать с официального сайта Lenovo и использовать фирменную утилиту для создания загрузочной флешки для восстановления Windows со всеми драйверами. В этой инструкции — о том, как это сделать. Также может быть полезным: Как сбросить ноутбук на заводские настройки.
Примечание: для сброса ноутбука с помощью особых вариантов загрузки вы можете на экране блокировки Windows 10 нажать по кнопке питания, изображенной справа внизу, затем, удерживая Shift, нажать «Перезагрузка». В открывшемся меню в разделе «Поиск и устранение неисправностей» присутствует пункт для сброса системы. Также, некоторые модели Lenovo по нажатию клавиши F8, F9, F4 (иногда в сочетании с Alt или Fn, на разных по-разному) во время включения показывают экран с ошибкой, с которого можно перейти в дополнительные параметры и найти пункт для сброса там.
Как скачать образ восстановления для Lenovo
Официальный сайт Lenovo предлагает загрузку образов восстановления, содержащих ОС и драйверы конкретно для вашего ноутбука. К сожалению, в отличие от Dell, Lenovo предоставляет такие образы далеко не для каждой модели своего ноутбука, тем не менее попробовать выполнить загрузку стоит: на сайте заявлено, что образы доступны для ThinkPad, «выбранных моделей IdeaPad», а также для ПК и моноблоков Lenovo.
Прежде всего, вам потребуется серийный номер, найти который можно на нижней части вашего ноутбука Lenovo, где он обозначен буквами «S/N». Дополнительно, необходима учетная запись Lenovo ID, создать которую вы можете на странице https://account.lenovo.com/ru/ru/. После того, как серийный номер найден, а аккаунт заведен, выполните следующие шаги:
- Перейдите на страницу https://pcsupport.lenovo.com/ru/ru/lenovorecovery/ и введите серийный номер вашего ноутбука.

- Если вы увидите сообщение «Это не допустимая машина Windows для восстановления», значит для вашего ноутбука скачать образ не предлагается.
- Если образ есть, вы увидите модель вашего ноутбука и возможность выбрать страну и язык загружаемого образа. Отметьте пункт «Я принимаю правила» и нажмите «Далее».

- На следующем этапе потребуется указать свои имя, фамилию, страну и адрес электронной почты.
- Вы увидите сообщение, что загрузка Lenovo Recovery доступна и ссылку, перейдите по ней.

- На следующей странице вам будет предложено загрузить одну из двух версий Lenovo USB Recovery Creator, скачайте нужную в зависимости от версии Windows.

- Подключите флешку (лучше 16 Гб и больше, данные с неё будут удалены) к компьютеру или ноутбуку, запустите утилиту Lenovo USB Recovery Creator, введите данные вашего Lenovo ID, а на следующем экране — нужный образ восстановления системы.

- Все остальные шаги достаточно понятны: вам потребуется указать место хранения файлов, а после их загрузки — выбрать флешку, на которую будет записан образ восстановления Lenovo.


По завершении процесса вы получите готовую загрузочную флешку именно для вашего ноутбука, с помощью которой легко сможете восстановить заводскую систему со всеми драйверами и ПО от Lenovo.
Если для вашего ноутбука образа нет, а восстановление системы никакими способами не получается произвести, опишите в комментариях ситуацию: точную модель ноутбука, загружается ли система, до какого этапа и какая версия системы — я постараюсь подсказать решение.
Возможно, окажется полезным материал: Как сбросить Windows 10 или автоматическая переустановка ОС.
Updated by
Cici on Aug 30, 2023
Key Takeaways:
- Boot from USB on Lenovo laptop can solve many problems.
- This guide will provide detailed information to make Lenovo boot from USB.
With high computing performance and good quality, Lenovo has become a major force in business laptops and desktops. This article will provide a quick solution if you want to boot Windows from USB or reinstall the OS on your contact laptop. EaseUS will show you detailed steps on how to boot Lenovo laptop from USB:
| ⏱️Duration | 5-7 Minutes (Step-by-step Tutorial) |
| 💻Applies to | Get the Lenovo laptop to boot from USB on Windows 11/10/8/7 |
| ⛏️ Tools |
✔️USB ✔️Windows ISO files ✔️Lenovo laptop or desktop |
| 🖌️ Stages |
1️⃣Preparations to Boot Lenovo Laptop from USB 2️⃣Stage 1. Create a Bootable USB for Lenovo Laptop 3️⃣Stage 2. Change the Lenovo laptop Boot Order |
| 🔍Required Software | USB creators and ISO burner — EaseUS Partition Master |
Many users are very concerned about booting their laptops from USB. Here is a real case from Reddit:
Anyway, it seems like I had a virus that pretty much corrupted my OS, or the OS itself did it. So I’d need a guide on what to press when to get into the boot menu and to boot from the USB, which I will insert into the laptop.
System corruption, hard drive failure, and other critical factors can prevent you from properly booting your Lenovo laptop or PC. Don’t worry; you will follow this guide to boot your Lenovo laptop from the USB.
Preparations to Boot Lenovo Laptop from USB
To boot Lenovo Laptop from USB, you need to make the USB bootable and have the operating system inside the USB. To do this, you need to do the following to create a bootable USB and boot your Windows system or other utility from the USB:
💡Download the ISO file for Windows
- Windows 10: https://www.microsoft.com/en-us/software-download/windows10
- Windows 11: https://www.microsoft.com/en-us/software-download/windows11
💡Prepare the USB
The USB drive should have at least 16GB visible available, and it needs to be formatted as FAT32:
- Hold down Windows+R and type diskmgmt.msc in the Run window.
- Right-click on the target USB drive and select Format.
💡Download Bootable USB creator and ISO burner
Windows does not provide a tool to create a bootable USB, so you need to download a professional tool — EaseUS Partition Master Free.
This tool is designed for Lenovo laptops to burn Windows ISO files. It simplifies the process of creating bootable USB. This tool can support Windows 11/10/8.1/8/7 and Windows XP/Vista.
Steps to Boot Lenovo Laptop from USB
After doing the above preparations, read on to get your Lenovo Laptop to boot from USB. We provide a variety of detailed solutions to boot Lenovo computers from USB for different user needs:
Situation 1. Run the Operating System
If you just want to run a Windows OS from USB, you have several options: clone the OS to an external drive, burn a Windows ISO to USB, or use other tools to create a bootable USB.
Read more: Create Windows 10 Bootable USB
Situation 2. Fix Boot Error
If your computer has startup errors, such as a Windows blue screen, you may want to boot your computer from USB to fix the error. You can reinstall the operating system or fix most boot issues using an ISO file.
We will give a detailed solution next.
Stage 1. Create a Bootable USB for Lenovo Laptop
Before using EaseUS Partition Master, make sure you have downloaded the correct ISO file. Then, use the tool to create the bootable USB and burn the ISO file. Even if you are newcomers, you can burn ISO to USB easily and quickly.
📖Review from LifeWire: The overall look and feel of EaseUS Partition Master Free make whatever you’re doing with your computer’s partitions easy to understand and accomplish. The options aren’t too overwhelming, and each of them is accurately named.
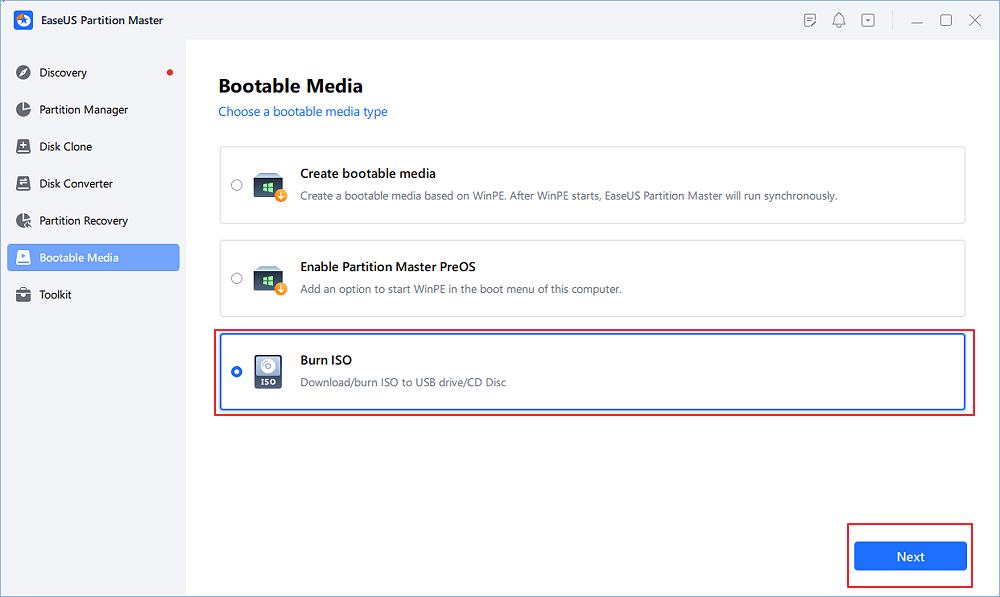
Step 1. Launch EaseUS Partition Master and go to the Bootable Media section. Click «Burn ISO» and click «Next».
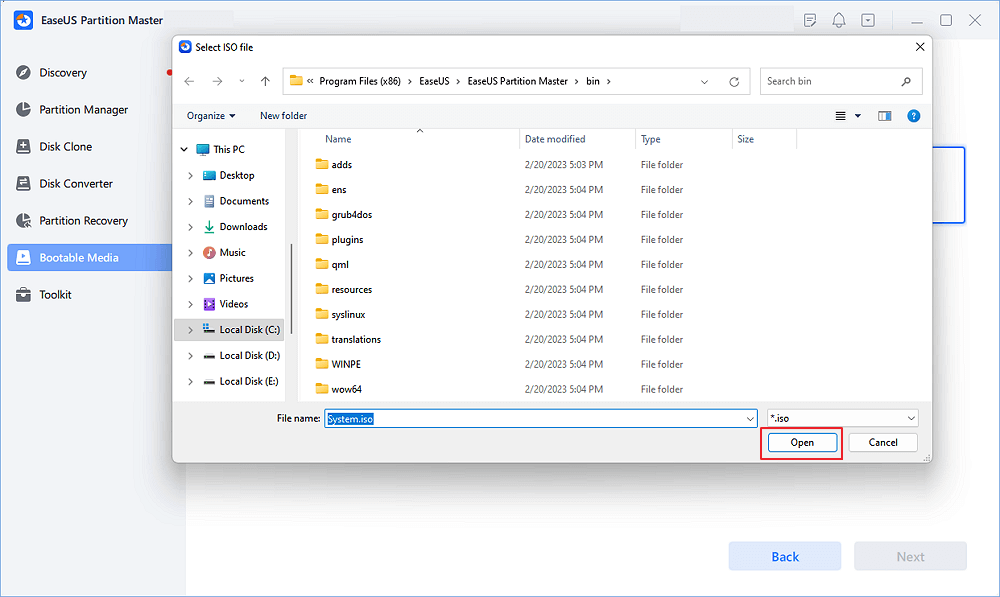
Step 2. Select the ISO image that you have downloaded on your PC, and click «Open».
Step 3. Click «Next» and select the target USB as destination and click «Burn» to execute the operation.
EaseUS Partition Master is a trustworthy free ISO burner. After you finish burning the ISO file, you can use the burned USB to install Windows and boot your Lenovo laptop from USB.
- Tip
- If you want a more accurate way to fix boot problems, you can create bootable USBs with EaseUS Partition Master and then enter the Win-PE environment to check the status of the hard disk, fix the problem, etc.
You May Also Like:
Stage 2. Change the Lenovo laptop Boot Order
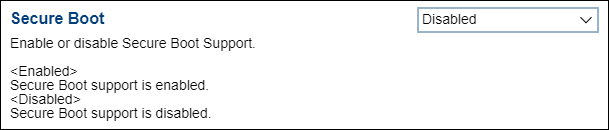
After setting up the USB, you need to change the boot order. Before booting from the USB drive, disabling Secure Boot is the first step:
- Enter BIOS (recommended way to enter BIOS-ideapad). (Read this article to learn more about the Lenovo Boot Menu Key.)
- Press F9 ( Fn+F9 ) to load the optimization defaults and select Disabled under Secure Boot.
- Notice:
- This method works for Lenovo 2020 or newer devices. For 2019 or earlier devices, please check the solution in Lenovo Support Center.
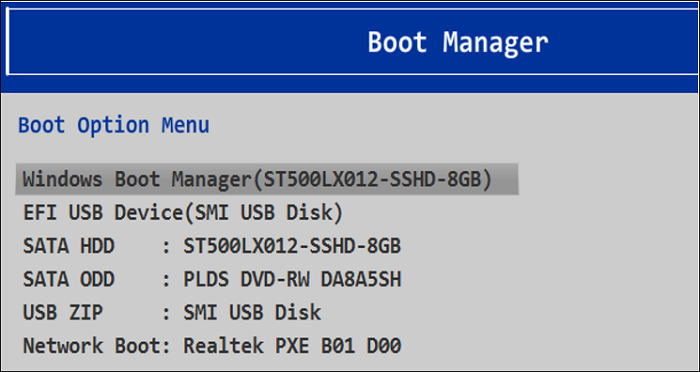
Then change the boot sequence in the BIOS as follows:
- Insert a bootable USB disk.
- Reboot the PC and access the boot menu via F12 ( Fn+F12 ) during boot.
- Press and hold Enter to select the desired boot device.
- Tip
- You can also allow the PC to boot into boot mode via the Novo button and choose to boot from the USB disk under Boot Menu.
After changing the boot order, your Lenovo laptop will automatically boot from USB. If you are familiar with this process, you can also boot ASUS laptop from USB and boot from USB on HP laptop.
Conclusion
There is no doubt that Lenovo laptops make our work and life easier and more convenient. However, you may be unable to boot your Lenovo laptop properly due to other reasons, or your Lenovo laptop may be stuck in boot loop. This article details how to create a bootable USB and burn the ISO file to the corresponding USB drive to boot your Lenovo computer from USB.
If this tutorial is helpful to you, please don’t forget to share the article to help more users.
FAQs About How to Boot Lenovo Laptop from USB
Understanding how to get Lenovo Laptop to boot from USB can bring a lot of convenience. Here, I list some other related questions; if you encounter them, please read on.
1. How to fix a Lenovo laptop that won’t boot from USB on Windows?
The bootable USB drive is not made correctly, or the computer is affected by Lenovo Service Engine (LSE) may cause Lenovo laptop won’t boot from USB. For this, you have two solutions:
Solution 1. Remove Lenovo Service Engine
Step 1. Open Settings, select System , and make a note of the system type.
Step 2. Navigate to Lenovo Security Advisory and select the date.
Step 3. Locate the Lenovo LSE Windows Disabler Tool, download, and open it.
Solution 2. Create the bootable media correctly
Step 1. Create the bootable USB using MediaCreationTool or a third-party tool.
Step 2. Select the bootable CD type.
Step 3. Insert the bootable USB into your Lenovo computer and enter BIOS. Select the bootable USB drive and press Enter to make Lenovo boot from USB.
2. How to fix the Lenovo boot menu not working?
Press F1/F2/F9/F10/F11/F12 keys to enter the boot menu at boot time. Or you can use Novo to enter BISO if these keys don’t work. In addition, users can also use Lenovo Diagnostics to test their hard drives. If the drive has a problem, users may need to replace it with a new one.
3. What is the Lenovo BIOS key?
Accessing the BIOS may take several attempts. Please repeatedly press F2 or (Fn+F2) after turning on your PC. Besides, you can also access the BIOS via the function keys: restart the System and click F1 when the Lenovo logo displays, or press F1 5–10 times as soon as you press the power on button.

The Lenovo Recovery Option enables you to get the Lenovo Recovery Media either through the Free Digital Download or Physical Recovery Media option (with a fee). You can determine your eligibility by entering your serial number on this page. In this article, we shall discuss “Windows 10 Yoga Recovery: Download the files needed to create a Lenovo USB Recovery key”. Please see How to create Windows 11 Bootable USB drive with the Media Creation Tool, and how to Create a Windows 10 or 11 bootable USB with UEFI support.
Recently, I was called upon to help out with the recovery of this device due to password loss. Unfortunately, the user does not have a Microsoft-connected account, no password reset disk was created, and no password hint whatsoever was set.
Be that as it may be, the Laptop was brought to me with a corruptable boot file. As such, I could not attempt accessing the PC via the administrator password via the safe mode.
Prerequisite for performing Yoga PC Recovery
Below are some system hardware prerequisites as specified by Lenovo in order to be able to recover your device successfully.
- 32GB or larger USB key, USB 2.0 or 3.0 key.
- A PC to download the recovery files and create the USB recovery key
- At least 20GB of free space for downloading recovery files, and a reliable internet connection.
Here are some exciting articles: How to create a dual-boot setup on Windows 11, and how to create a bootable USB using Rufus on Windows
Lenovo Digital Download Recovery Service (DDRS)
In order to proceed with this Yoga PC Recovery. Kindly submit a recovery media order, and click on Get the Recovery Media Creator tool. You will need to use this link to get the Lenovo recovery media.
Type in the serial number of your device. You will be required to log in with your Lenovo account. Note: If your serial number is not recognized, try your local support team. In my case, the device is supported but was out of warranty.

On the Support for the recovery Media System program, click on Continue as shown below. See How to format a USB on macOS, and What are the components needed to create a certificate signing request.

Select your device and continue as shown below.

The Lenovo Digital USB Recovery Creator is available for download as shown below. Click on Digital Download to get the Recovery Creator tool.

You will also receive an email confirmation, if assistance is needed, please send email to recovery@lenovo.com. Note: A digital download order is active for 72 hours (3 days). If a digital download order has not started within 72 hours, the digital download order expires, and a new digital download order must be submitted. When a digital download order has started, it will remain active until the digital download has completed.Alterntivey, you can navigate to this page to download the Lenovo USB Recovery Creator

Create a Lenova USB Recovery key
Run the Lenovo USB Recovery Creator tool, and select the Download Recovery files and Create a Recovery USB key option.
This is because we do not already have the recovery files.
Type your Lenovo ID and password that was used when the digital download order was made. Then click the Sign-in button.

You will have to select the Digital Download order. Here is how to install SCConfigMgr Driver Automation Tool on Windows 10 and Windows Server.

Select the download location and continue to the downloading process. The download location should be on your computer. Please remember the location you selected in case you need to find the downloaded files. For me, I will create a new folder and place the download there.


Depending on your network connection, this process may take several hours. The Lenovo Digital Download Tool shows the time remaining to complete the process.
You can pause the download process by clicking the Pause button and resume where you left off.

When the download is complete, click on Next to proceed with the USB selection.

Select the right USB
The recovery files have been downloaded. The inserted USB key which must be preformatted with NTFS or FAT32, and above 32GB in size must be inserted. Select the right USB and click on Next.

Note: Do not alter the recovery files or file structure after the files have been downloaded from Lenovo. Changing or deleting any file or modifying the file structure will affect the creation of the USB Recovery key.
Note: Copy any files you want to keep onto other media before you continue. Select the “Yes” button.
All the data on the selected USB key will be deleted as part of this process. 
Depending on the speed of the USB key (USB 2.0 or USB 3.0) and the PC, this process can take anywhere from 20 to 40 minutes.

As you can see, the current progress is 14%. Wait until it is completed.

When the USB recovery key is ready, You will be prompted with the option to delete the Recovery File from your system. Because I will have the option to confirm this once more, I will select “Yes”.

Note: Once this key is deleted, you cannot re-create the USB. For sure, you can click on “Yes” to delete the recovery files or No, Exit to keep them and close the tool.

Perform Lenova USB Recovery key by Installing Windows 10
Install the operating system using the newly created USB recovery drive. This will remove all data and software from your PC’s hard drive and restore the factory-installed operating system

Net, select your desired language and Region and click on Next.

Accept the “Terms and Conditions” as shown below.
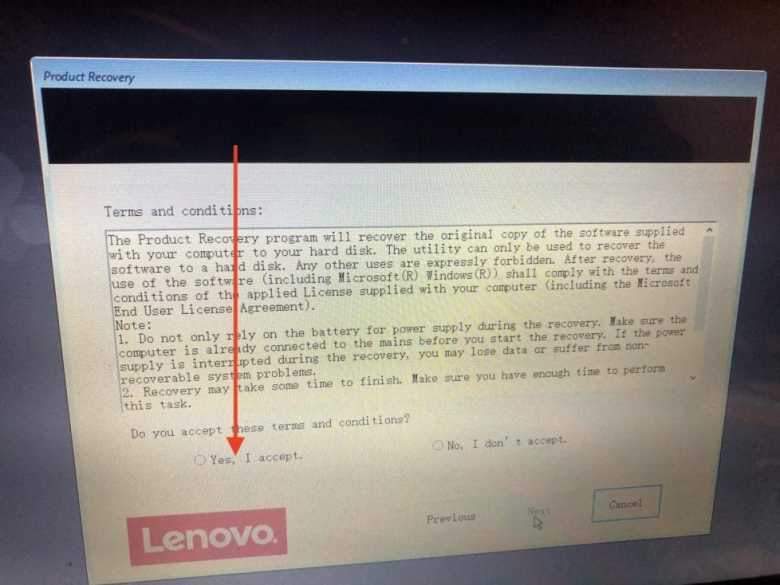
If you wish to proceed, click on Yes. With this, you are agreeing to the loss of data on your drive.

As you can see below, the recovery is in progress! When it is finished, click on Next.


The "Getting Started" Windows phase will be launched. This is an important stage of a Windows installation that is a crucial part of the process where the basic setup and initial configuration of the operating system take place. This phase occurs after you boot your computer from the Windows installation media (DVD, USB, etc.) and begin the installation process.

In summary, the "Getting Started" phase is designed to set up the fundamental elements of the operating system, enabling you to start using Windows and further customize it according to your preferences and requirements.At this time, sit back and relax. This process can take up to 20-50 minutes.

Note: This does not end the process as it can still take a while for the entire setup to complete.
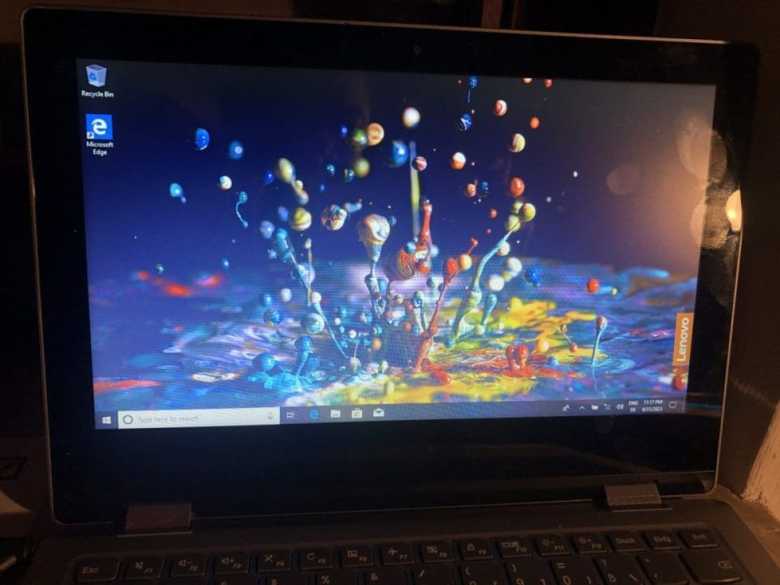
Soon you will be welcome to configure the OOBE settings. You can see, this recovery has been done successfully.
Kindly refer to this YouTube video on how to perform Lenovo Recovery
I hope you found this blog post helpful on “Windows 10 Yoga Recovery: Download the files needed to create a Lenovo USB Recovery key”. Please let me know in the comment section if you have any questions.