Windows Vista Ultimate Windows Vista Ultimate 64-bit Edition Windows Vista Enterprise Windows Vista Enterprise 64-bit Edition Windows Vista Business Windows Vista Business 64-bit Edition Windows Vista Home Premium Windows Vista Home Premium 64-bit Edition Windows Vista Home Basic Windows Vista Home Basic 64-bit Edition Windows 7 Enterprise Windows 7 Home Basic Windows 7 Home Premium Windows 7 Professional Windows 7 Starter Windows 7 Ultimate Windows 8 Windows 8 Pro More…Less
Symptoms
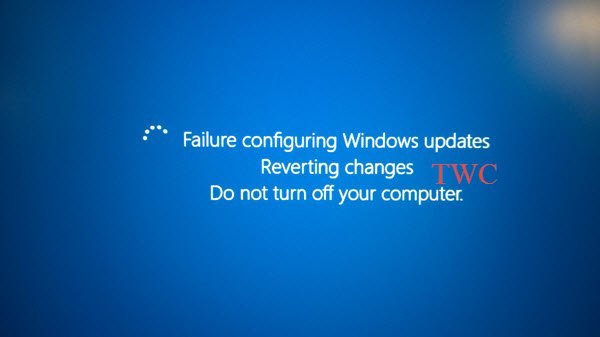
When you try to install Windows updates, you get the following error:
Failure configuring Windows updates. Reverting changes. Do not turn off your computer.
Note If this issue occurs, it may take about 30 minutes to revert the changes, and then the system will show the Windows logon screen.
Resolution
To resolve this issue, use the following methods starting with the first method below. If that doesn’t resolve your issue, click next method.
Method 1: Restart Windows and install Windows updates in a clean boot state
To perform a clean boot in Windows, see how to perform a clean boot to troubleshoot a problem in Windows 8, Windows 7, or Windows Vista. And then, install Windows Updates according to your operating system.
-
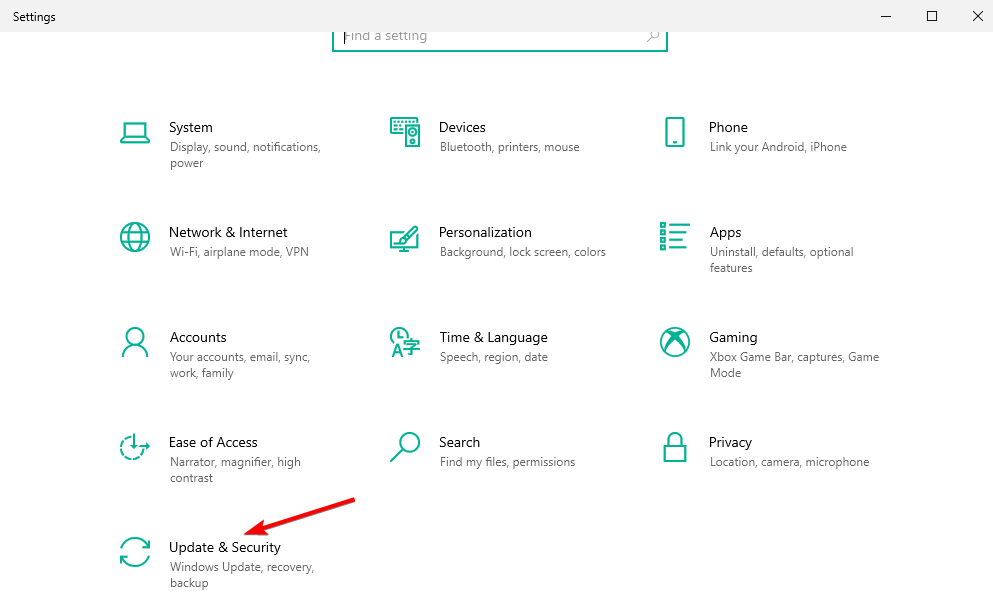
Open Windows Update by swiping in from the right edge of the screen (or, if you’re using a mouse, by pointing to the lower-right corner of the screen and moving the mouse pointer up), then selecting Settings > Change PC settings.
-
Select Update and recovery > Windows Update.
-
Try to install Windows Updates again.
-
Select the Start button. In the search box, enter Update, and then, in the list of results, select Windows Update.
-
Try to install Windows Updates again.
Note Installing Windows updates in a clean boot state will avoid the Windows updates installation being blocked by some other applications and services that are installed in Windows.
Method 2: Run the Windows Update Troubleshooter
Download the Windows Update Troubleshooter, and then select Open or Save in the pop-up window. And then, select Next and follow the steps in the wizard to find and fix problems with Windows Update .
If you don’t have an Internet connection in Windows 8, you can open the Windows Update troubleshooter that’s included in Windows 8. However, that troubleshooter does not perform all the troubleshooting steps that the linked troubleshooter above does.
-
Open the Windows Update troubleshooter by swiping in from the right edge of the screen, tapping Search (or if you’re using a mouse, pointing to the upper-right corner of the screen, moving the mouse pointer down, and then clicking Search).
-
Type Troubleshooting, tap or click on Settings, and then tap or click Troubleshooting.
-
Under System and Security, tap or click Fix Problems with Windows Update, and then select Next.
-
Download the Windows Update Troubleshooter, and then select Open or Save in the pop-up window.
-
Select Next and follow the steps in the wizard to find and fix problems with Windows Update.
Method 3: Unplug your removable media from the computer
-
Check if any removable media is not removed from the computer, such as removable disks (Blu-ray disks, DVDs, CDs), memory cards (CompactFlash card, Secure Digital card, Memory Stick), and USB flash drives.
-
Unplug all the removable media.
Note These removable media may cause this issue during the restart of Windows.
Method 4: Perform a system restore
When you start your computer by using the Windows installation disc, you can perform system recovery options on startup. To do this, follow these steps:
-
Insert the Windows 8 installation disc in the drive, and then restart the computer.
-
When you are prompted to start from the disc, press any key.
-
Tap or click Repair your computer.
-
Tap or click Troubleshoot, and then tap or click Advanced options.
-
Tap or click your version of Windows 8, tap or click System Restore, tap or click the restore point you want, and then tap or click Next.
-
Follow the onscreen instructions to perform the System Restore, and when prompted, restart your computer.
-
Insert the Windows Vista or Windows 7 installation disc in the drive, and then restart the computer.
-
When you are prompted to start from the disc, press any key.
-
When you are prompted, configure the Language to install, Time and currency format, and Keyboard or input method options that you want, and then select Next.
-
Select Repair your computer.
-
On the System Recovery Options page, click the version of the Windows operating system that you want to repair, and then select Next.
-
On the System Recovery Options page, select System Restore.
-
On the System Restore page, select Next.
-
Select a restore point at which you know that the operating system was working, and then select Next.
The restore point should be a date before the first time that you experienced the error. To select a date, use the Choose a different restore point option, and then select Next.
-
If you are prompted to specify which disk to restore, select the hard disk, and then select Next.
-
On the Confirm your restore point page, select Finish.
-
When the restoration process is complete, select Restart.
Note You must be logged on to Windows with an administrator account to complete this method. If this is a computer that is part of a network at work, you should ask the system administrator for help. For information about how to log into Windows as an administrator, click one of the following links, depending on the version of Windows that you’re running:
How to log into Windows as an administrator in Windows 8
How to log into Windows as an administrator in Windows 7 or Windows Vista
Note If your computer is not configured to start from a CD or from a DVD, or if Windows came preinstalled on your computer without the CDs or DVDs, see the documentation that was included with the computer for instruction about how to continue, or skip to the next method.
Method 5: Perform an in-place upgrade (reinstallation) (Windows 7 and Windows Vista)
Performing an in-place upgrade will restore the current Windows installation to the version of the installation DVD. This also requires the installation of all updates that are not included on the installation DVD. If your computer came with Windows pre-installed, review your computer’s documentation for instructions on how to do an in-place upgrade. Otherwise, follow these steps.
-
Insert the Windows Vista or Windows 7 DVD in the computer’s DVD drive.
-
In the Setup window, select Install Now.
-
Note If Windows does not automatically detect the DVD, follow these steps:
-
Select Start, and then type Drive:\setup.exe in the Start Search box. Note The Drive placeholder is the drive letter of the computer’s DVD drive, usually D:\.
-
In the Programs list, select Setup.exe.
-
In the Setup window, select Install Now.
-
-
-
Select Go online to obtain the latest updates for installation (recommended).
-
Type the CD key if you are prompted to do this.
-
Select the operating system in the Install Windows page you want to upgrade.
-
Select Yes to accept the Microsoft Software License Terms.
-
On the Which type of installation do you want? screen, select Upgrade.
-
When the installation is complete, restart your computer.
Note We strongly recommend that you back up all your personal files. For information, see how to back up your files.
More Information
If these methods did not fix the issue, you can use the Microsoft Customer Support Services Web site to find other solutions to your problem. Some services that the Microsoft Customer Support Services Web sites provide include the following:
-
Searchable Knowledge Base: Search technical support information and self-help tools for Microsoft products.
-
Solution Centers: View product-specific frequently asked questions and support highlights.
-
Other Support Options: Use the Web to ask a question, contact Microsoft Customer Support Services, or provide feedback.
To avoid this problem in Windows Vista, obtain and install update 937287 from the Microsoft Download Center separately from all other updates on the Windows Update site. Install the update that applies to your version of Windows Vista so that you can successfully install future updates.
The following files are available for download from the Microsoft Download Center:
Windows Vista x86-based systems
 Download the Windows6.0-KB937287-x86.msu package now.
Windows Vista x64-based systems
Download the Windows6.0-KB937287-x64.msu package now.
Status
Microsoft has confirmed that this is a problem in the Microsoft products that are listed in the «Applies to» section.
Need more help?
Want more options?
Explore subscription benefits, browse training courses, learn how to secure your device, and more.
Communities help you ask and answer questions, give feedback, and hear from experts with rich knowledge.
In the Windows versions 10, Vista, 7, and 8, sometimes the updates lag, and you may see a “Failure configuring Windows updates Reverting changes” error. This error frequently appears when people attempt to upgrade to newer versions of Windows (especially on Windows 8, which had a short lifespan and is no longer supported by Microsoft).
Failure configuring Windows updates reverting changes issue can be frustrating because you’ll likely have an unreliable PC performance. Thankfully, there are several fixes that will take care of its error for good.
Windows Automatic Repair Tool

System Information
-
Your machine is currently running Windows 10 -
Fortect is compatible with your operating system.
Recommended: To repair Windows Errors, use this software package; Fortect System Repair. This repair tool has been proven to identify and fix these errors and other Windows problems with very high efficiency.

-
100% safe as confirmed by Norton. -
Only your system and hardware are evaluated.
If you are experiencing Failure configuring Windows updates reverting changes issue, continue reading to find out how to resolve it. If you have Windows 10 and are experiencing updates that are not installing correctly, you can look here to find the answer.
What Causes Failure Configuring Windows Updates Reverting Changes Error?
During a Windows update, there are several reasons why your PC may freeze. On earlier Windows Version, failure configuring Windows updates reverting changes issue happens when the PC tries to roll back to the previous Windows version before the update.
A Windows Update can fail for a variety of reasons. Some of these include the following:
- The software you have already installed on your computer is not compatible with the Windows update.
- The Windows update itself causes an issue that did not occur during testing.
- Removable media is interfering with the way your computer restarts causing issues with your Windows update.
- Too many install Windows updates are trying to load at once.
In some cases where automatic Windows updates are on, the “Failure configuring Windows updates Reverting changes” error can create a reboot loop that is very discouraging. Help is here! Keep reading to resolve this issue on your Windows Vista, Windows 7, or Windows 8 computer.
How to Fix: Failure Configuring Windows Updates Reverting Changes error
Fix 1: Use the Advanced Repair Tool (Fortect)
If you’re looking for an easy and hassle-free solution to any critical error, then there’s an excellent tool that can help you. The Fortect program can help you identify missing system files, fix, and prevent any issues that occur including any Windows update problem. The program is simple enough to download & install, and it will fix any Windows issues within your operating system.
Follow the steps below to install and run the Advanced Repair Tool on your PC:
Step #1
Download the Advanced Repair Tool for free.
Download Now
Step #2
Run the file to start the installation process, accept the license agreement by checking the “I Accept the EULA and Privacy Policy” option, and click on the Install and Scan button.

Step #3
Once installed, the program will automatically scan and check your computer for errors. It will also check your PC for junk files and any weaknesses that make your PC vulnerable to hackers. Once complete, you will get a detailed view of any issues found on your computer. To perform a full scan, you will need to install a full version of the program.
Step #4
Once the full scan is complete, select the green “Clean Now” button to fix your issues.
The program will attempt to fix all found issues, including install Windows updates that you’re running into. Reboot your PC and check your internet connection. This should fix any errors happening within your Operating System.

If you want to address the issue manually, try one of the methods below.
Fix 2: Remove all removable memory cards, disks, flash drives, etc.
Sometimes you’ll run into install Windows updates errors when removable disks, cards, flash cards become incompatible with your PC. Typically, removable media or external devices does not create a problem with the update, however, it does cause a problem during the system restart where the updates are installed.
Step #1
To fix this Windows update error, start by checking the disk drives, USB ports, and memory card slots for any removable media such as SD cards, flash drives, CDs, and DVDs. If you don’t find any, you can continue to the next method. If you do find something, proceed to Step #2.

Step #2
Shut down the computer if it is not already shut down. You may have to perform a hard shut down by holding down the power button for thirty seconds.

Step #3
Remove the media from the computer. For memory cards and USB drives, you can pull them out as soon as the computer is completely off. If you need to remove a disk with the computer off, you insert the unfolded end of a paper clip into the manual disk eject hole. This is a tiny hole located somewhere on the front of the disk player. Examples can be seen in the following pictures.

Step #4
Once the media is removed, start your computer and see if the installing windows update error is fixed.
Fix 3: Run Windows Update Troubleshooter
The Windows Update Troubleshooter by Microsoft is an app that finds the exact problem with an update and fixes it. To run Windows Update Troubleshooter tool, you must first download it for those Windows Operating Systems with Vista or Windows 7 or 8. Make sure you only download it from the official Microsoft website.
Step #1
Visit Microsoft’s website here and click the blue highlighted “Fix it” under the appropriate version of Windows you are running.

Step #2
Choose “Run” when the popup asks if you want to save or run the file. This should automatically open the Windows Update Troubleshooter.
Step #3
Follow the onscreen prompts to run the Windows Update Troubleshooter. It will automatically detect any update problems and fix them including a problematic Windows update service
If the Troubleshooter cannot detect any problems or if after fixing the issues detected you still have trouble with the update and see the “Failure configuring Windows updates reverting changes” error, continue to another method to resolve the issue.
Fix 4: Do a Clean Reboot
Sometimes third-party apps might be interfering with the download it causes installing Windows update problems. If this is the case, restarting the computer without these apps running should resolve the matter. A “clean boot” allows your computer to start with a minimal set of applications and drivers. It is a reliable troubleshooting technique that enables you to identify any application in your Windows Operating System that may be causing problems.
- See Also: Error – Reboot and Select Proper Boot Device
Step #1
Log into your Windows computer administrator account. If at any time during the following steps you are asked for your password, type in the password for this administrator account. Press the [R] key and the [Windows] key at the same time. This opens the Run box. Type “msconfig” into it without quotation marks. Click the “OK” button.

Step #2
When the System Configuration window opens, click on the services tab and make sure that “Hide all Microsoft services” has a check mark next to it. Click the button to “Disable all.”

Step #3
If you have Windows 7 or Vista, skip this step and go to Step #4. In Windows 8, click the “Startup” tab in the System Configuration window. Then click on “Open Task Manager.”
When the Task Manager opens, click the “Startup” tab in that, and select each item you find there and click the button to “Disable” it if it isn’t already disabled. When you are finished, close the Task Manager.

Step #4
If you have Windows 8, skip this step and go to Step #5. In Windows 7 or Vista, click the “General” tab in the System Configuration window. Choose “Selective startup.” Now make sure there isn’t a checkmark in the box next to “Load startup items.”

Step #5
On the System Configuration window that is still open, click the “Apply” button and then “OK.”

Step #6
Click on the Power icon and choose “Restart” to restart the computer.

Step #7
Once the computer restarts, attempt to rerun the Windows updates. In Windows 8, you do this by opening the Start Menu, selecting “Settings” and then Change PC Settings. Then choose Update and Recovery, and Windows Update.
Finally, click the “Install Updates” button. Moreover to rerun Windows updates in Windows 7 and Windows Vista, open the Start Menu, type “Update” in the search box, and choose “Windows Update.” Again, click the “Install Updates” button.
With a clean reboot, you should be able to install the updates normally, as long as a third-party app was interfering with them and causing the “Failure configuring Windows updates Reverting changes” error.
Fix 5: Install Windows Updates in Safe Mode
In some cases, Microsoft’s apps may be interfering with the updates. Installing Windows updates in Safe Mode ensures that only the necessary programs are running in the background. Trying Windows update in safe mode will fix failure configuring windows error.
Step #1
If the Windows updates loop is continuous and you cannot access your computer, press F8 during the reboot and select “Safe Mode with Networking” when prompted. If you can get to your computer desktop, press the [R] key and the [Windows] key together to open the Run box. Type “msconfig” into it without quotation marks and click “OK.”
Step #2
Go to the “Boot” tab in the System Configuration Window that opens. Make sure the box next to “Safe Boot” is marked and choose “Minimal” underneath it. Now click “Apply” and then “OK.”
Step #3
Windows should ask if you want to restart your computer now. Click “Restart.”

Step #4
Once you have restarted in Safe Mode, open the Start Menu and choose “Control Panel.”

Step #5
When the Control Panel opens, select “System and Security” (or “Security” in some versions). Then click Windows Update to open that window. Find the button that says “Install updates” and click it.

Step #6
When the updates finish installing, you should restart your computer. Because the settings have been changed, it should automatically restart in Safe Mode. Once it does, press the [R] key and the [Windows] key together again to open the Run box. Then, you can type “msconfig” into it without quotation marks into the box and click “OK” as you did before.
Step #7
Return to the “Boot” tab in the System Configuration Window. This time, uncheck the box next to “Safe Boot.” Click “Apply” and then “OK.” Again, restart your computer.
With the updates applied in Safe Mode, you should have no problems restarting your computer. If you still did not fix failure configuring Windows updates Reverting changes error, go to the next method.
Fix 6: Break the Updates Into Smaller Groups
Update and Windows installation are necessary to ensure that your Windows computer is protected. Sometimes you get stuck in the Windows update loop because there are so many updates in the queue it takes too long to download them all at once. To fix Windows update error, you need to install the updates and Windows installation manually in smaller groups.
Step #1
If the loop is continuous and you cannot access your computer, press F8 during the reboot and enter Safe Mode when prompted. Follow the instructions in method 5 to ensure your computer continues rebooting into Safe Mode throughout this process.
Step #2
Once you are in Safe Mode, open the Start Menu and click on the “Control Panel” option.
Step #3
Choose “System and Security” in the Window that opens. (This is just called “Security” in Vista.) Now click on “Windows Update.”

Step #4
In the drop-down menu under “Important Updates,” select “Check for updates but let me choose whether to download and install them.” Make sure the box under “Recommended Updates” has a check mark in it. None of the other boxes should be marked. Now click “OK.”

Step #5
Return to the main Windows Update page. This time click on the blue words telling you the number of significant updates available.

Step #6
You should see a list of updates. Make sure only a few are selected and click “Install.” It is best to choose the lowest numbered updates first since Microsoft expects them to be installed in order.

Step #7
Continue repeating steps #4 and #5 until all the critical updates have been installed. You can then repeat the process for optional updates if you want. When you have finished, reset the Windows Update settings to update Automatically.

Step #8
After you install Windows update gradually, restart your computer in Normal Mode.
This windows update process is long, but it should resolve the “Failure configuring Windows updates reverting changes” error you have.
Fix 7: Run the System File Checker
Some files may become corrupt or damaged which affects your Microsoft services and cause Windows updates errors. The file checker will fix them for you so updates can continue normally. The Windows System File Checker (SFC) is a tool that is built into all modern versions of Windows Operating system. Using SFC scan can help fix a range of Windows update service errors. In addition, it can help with install Windows update go smoothly.
Step #1
In the Start Menu search bar, type “Command Prompt” without the quotations. Right-click the “Command Prompt” option that appears and choose “Run as administrator.” Depending on the version of Windows you are using, you may have to enter your password or click “Allow” to continue to the Command Prompt window.

Step #2
If you have Windows 7 or Windows Vista, skip this step and go to step 3. If you have Windows 8, you first need to run the DISM. To do this, you need removable media such as the Windows DVD that contains source material to repair the Updater. You can create this media from another Windows 8 computer that is not having the Failure configuring Windows updates error. Insert the media into the DVD player or the USB port (depending on what it is). Once the media is inserted, type “DISM.exe /Online /Cleanup-Image /RestoreHealth /Source:D:RepairSourceWindows /LimitAccess” into the command prompt without the quotation marks where D:RepairSourceWindows is the location of the uncorrupted Windows Updater files. Once you press enter, the repair should take place automatically, but it may take a little time.

Step #3
Now, you need to check for other corrupt files you may have. To do so, type “sfc /scannow” into the Command Prompt or cut and paste it without the quotation marks. You will need to wait for the process to be 100% complete before closing the window and exiting the Command Prompt. Many messages could appear once the scan is complete. Windows may not find corrupt files or may automatically fix them. If the message says Windows could not perform the requested operation, you need to retry the scan in Safe Mode. In some cases, Windows may fix some of the files but be unable to correct others. If this happens, you may be able to access the log and replace the files that are corrupt with good copies.

Hopefully, repairing Windows Updater will resolve your Failure configuring Windows error. If not you can still try the next method.
Fix 8: Do a System Restore
In some cases, you may need to do a system restore using the Windows installation disc. Make sure you back up any files you have before you perform this method. System Restore is a recovery tool for Windows. This process allows you to reverse certain changes that you may have applied to your operating system. With system restore, you will have a chance to install Windows update and bring your PC to your preferred restore point.
Step #1
Log in as an administrator. If at any point during this process you are asked for your password, use the password for your administrator account. Place the Windows installation disk in the disk drive. Restart your computer and press any key when it asks if you want to start the computer using the disk.
Step #2
If you have Windows 8, skip this step and go to Step #3. On Vista or 7, you will need to configure the installation language, currency and time format, and the methods of input (such as the keyboard). When you have finished, click “Next.”

Step #3
Select the option to repair your computer.

Step #4
Skip to Step #5 if you have Windows Vista or 7. In Windows 8, you need to choose Troubleshoot and “Advanced Options.”

Step #5
Click “System Restore,” choose the restore point and click “Next” on Windows 8. For Windows 7 and Vista, click “Next,” “System Restore,” “Next,” choose your restore point and click “Next” again.

Step #6
If you are asked which disk you want to restore, choose the hard disk. You may also need to confirm the restore point. When the system restore is finished, you need to “Restart” your computer to apply the changes.
Fix 9: Do a System Installation
When all else fails, you may have to reinstall windows. Again, make sure you have completely backed up all your files before you begin. There are several advantages when you choose to do a complete system installation than just doing a system restore. This can help improve Windows update agent, configuring Windows updates errors,
Step #1
Insert the installation disk in the disk drive. When the Setup window appears, choose “Install now.” Windows should automatically detect the disk. If it doesn’t, type “D:setup.exe” into the Start Menu Search bar, where D: is the drive where the disk is located.
You should see “Setup.exe” in the list of programs that appear. Clicking on that will give you the option to “Install Now.” Clicking “Install Now” will rewrite your drive back to factory standards.

Step #2
At this point, you will need to perform an extended amount of updates. It is best to install these updates in smaller groups as was done in Method 6 above. You may also need to do an Upgrade if you made any upgrades to newer versions of Windows. You will probably need to enter your product key at some point and agree to Microsoft’s licensing terms.

Step #3
When you have finished upgrading and updating, you will need to restart the computer. Check if the failure configuring Windows updates have been fixed.
Conclusion:
These methods should have resolved your “Failure configuring Windows updates Reverting changes” error. If the error occurs again, you might want to try one of the additional methods to address it since each way fixes a different problem that could be causing the issue.
Наш постоянный читатель Serg столкнулся с такой проблемой при загрузке Windows 8.
Добрый день!
Не могли бы Вы помочь мне с моей проблемой. Во время установки последних обновлений на Windows 8, в доме неожиданно отключили электричество. Ноутбук прожил на старенькой батарейке несколько минут и, естественно, аварийно сложился. После того, как свет все-таки дали, и система стала загружаться появился экран с надписью «Не удалось настроить обновления Windows. Отмена изменений. Не выключайте компьютер». Прождал несколько часов — эффекта ноль. Перезагрузка по питанию тоже не помогает, каждый раз загрузка Windows 8 останавливается на этой надписи. Самое интересное, система не висит, капс лок и нум лок при нажатии весело перемигиваются, жесткий диск иногда похрустывает, но до рабочего стола дело так и не доходит.

Вы не сталкивались с такой проблемой? Есть идеи, как мне быть? Очень уж не хочется винду переустанавливать.
Заранее спасибо!»
Итак, в этой статье мы попробуем обобщить опыт, полученный в результате решения проблемы на ноутбуке Serg-а и опыт других счастливчиков, столкнувшийся с подобной проблемой.
Судя по тексту сообщения, по каким то причинам Windows 8 не смогла корректно установить обновления (в случае Serg-а, из-за отключения электропитания). В результате чего при следующей загрузке, «умная» система решает, что ее падение вызвано проблемой в одном из установленных обновлениях и пытается их откатить, но по почему-то не может этого сделать. Как следствие загрузка компьютера с Windows 8 / Windows Server 2012 останавливается на экране с надписью:
Не удалось настроить обновления Windows. Отмена изменений. Не выключайте компьютер
На английском ошибка выглядит так:
Failure configuring Windows updates. Reverting changes. Do not turn off your computer

В некоторых случаях действительно стоит подождать несколько минут/часов, после чего система сама корректно откатит последние обновления. Но нередко случается, что эта надпись появляется при каждой загрузке и как-то убрать ее и нормально зайти в систему становится невозможно.
Вообще, данную проблему Microsoft описала в одной из статей своей базы знаний — http://support.microsoft.com/kb/949358. В статье в качестве возможных методов «лечения» предлагается выполнить такие операции (последовательно, начиная с первой, переходя к следующему решению, если предыдущее не помогло):
- Перезагрузите компьютер
- Отключите от компьютера все съемные носители и внешние жестки диски, и вновь перезагрузитесь
- Проверьте систему утилитой Windows Update Troubleshooter
- Воспользуйтесь функционалов восстановления системы (загрузка с установочного/загрузочного диска и откат к одной из предыдущих точек восстановления)
- Сбросьте Windows 8 через функции Refresh или Reset
- Переустановите ОС
1 и 2 способы в дополнительных комментариях, думаю, не нуждаются. Их стоит попробовать в первую очередь.
Windows Update Troubleshooter
Касательно 3 способа – запустить утилиту диагностики обновлений Windows 8 можно только из работающей системы, но так как она не грузится, попробуем выполнить такую проверку в безопасном режиме.
Совет. Опцию загрузки в Safe Mode в Windows 8 можно добавить в виде отдельного пункта диспетчера загрузки. Подробности в этой статье.
Для этого нужно загрузиться с загрузочного или установочного диска / флешки для Windows 8. Затем нам нужно запустить командную строку. Если используется установочный диск с Windows 8, проще всего это сделать, нажав на экране выбора языка/раскладки системы комбинацию клавиш Shift+F10.
В командной строке выполним
bcdedit /set {current} safeboot minimal

После следующей перезагрузки компьютер должен загрузиться в безопасном режиме.
Запускаем мастер диагностики службы обновлений, выполнив команду:
msdt /id WindowsUpdateDiagnostic

Затем просто следуйте инструкциям мастера.
После окончания работы мастера отключаем загрузку Windows 8 в безопасном режиме:
bcdedit /deletevalue {default} safeboot
Перезагружаем систему и пытаемся загрузится в обычном режиме. Если не помогло, переходим к следующему способу.
Восстановление системы
Если применимо, попытайтесь выполнить восстановление системы, загрузившись с загрузочного/установочного диска и проверить, исчезнет ли проблема.
Если и это не помогло, а переустанавливать / сбрасывать Windows ох как не хочется, попробуйте сначала такие мотодики.
Очистка кэша обновлений
Опять загружаемся в безопасном режиме (описано выше), открываем командную строку и выполняем очистку содержимого папки C:\Windows\SoftwareDistribution\Download\ (именно в эту папку Windows закачивает обновления и отсюда начинает их установку)). Сделать это можно прямо из проводника или такой командой:
ren C:\Windows\SoftwareDistribution\Download Download.old
Примечание. Команда не удаляет, а переименовывает каталог Download в Download.old
Отключаем автоматический старт службы Windows Update:
sc config wuauserv start= disabled
Проверяем загружается ли Windows 8 в обычном режиме, если да, включаем автостарт службы обновлений и запускаем ее:
sc config wuauserv start= auto

net start wuauserv
Система должна заново закачать обновления и установить их.
Если не помогло, идем дальше
Восстановление хранилища компонентов Windows 8
Попытаемся восстановить хранилище компонентов Windows 8 с помощью DISM. Для этого опять загружаемся в безопасном режиме и в командной строке последовательно выполняем команды:
DISM.exe /Online /Cleanup-image /Scanhealth
Примечание. Команда может выполнятся довольно долго, вплоть до нескольких часов, обязательно дождитесь ее окончания.
DISM.exe /Online /Cleanup-image /Restorehealth

Отключаем загрузку в Safe Mode и проверяем, грузится ли Windows 8 в обычном режиме.
Если и это не помогло, и надпись «Настройка обновлений Windows. Возврат изменений» не пропадает, вероятно, стоит подумать о сбросе или переустановке системы…
Download Windows Speedup Tool to fix errors and make PC run faster
If your Windows 11/10 system gives you a message Failure configuring Windows updates, Reverting changes, Do not turn off your computer message, then this post may help you troubleshoot the issue. This is a generic error that might appear any time a Windows update fails.
If you are facing this issue, your computer will normally take 20-30 minutes to revert the changes. Here are a few steps you may want to try and see if it helps resolve your problem.
1] First, you should try and restart your Windows computer and then try to install Windows Updates again. See if this helps.
2] If it does not, then run the Windows Update Troubleshooter. Although Windows includes a built-in troubleshooter, download one from there as it includes more fixes.
3] Perform a System Restore operation and then try again.
4] Boot into Safe Mode, Run msconfig.exe, select the Services tab, select Hide all Microsoft services and Disable all and Exit. Now restart your computer and run Windows Update.
5] Start your computer in Clean Boot State and see if you can now install the Windows Updates. Installing Windows updates in a clean boot state prevents them being blocked by some Windows Services and software – including security software.
6] Navigate to C:\Windows\WinSxS\ folder, search for a pending.xml file and rename it. You may even delete it. This will allow Windows Update to delete pending tasks and build a fresh new update check. See if this helps.

7] Navigate to C:\Windows\SoftwareDistribution\Download folder and delete the contents of the Software Distribution folder. Restart your computer and try now.
8] Run System File Checker.
9] Use the Deployment Imaging and Servicing Management (DISM) tool.
Run DISM.exe /Online /Cleanup-image /Scanhealth first.
Then run DISM.exe /Online /Cleanup-image /Restorehealth to repair your Windows Image.
Once the scan is completed, restart, and try again.
10] View your Windows Update History and remove any recent update which may have potentially caused this issue.
Open Settings > Windows Update > View update history.
11] Repair your Windows installation. Some of you may want to consider a Refresh or Reset operation. OEM users may want to consider a factory reset.
Read: Something didn’t go as planned, No need to worry, Undoing changes
How long does Failure configuring Windows updates reverting changes take?
If you face this Failure configuring Windows updates reverting changes issue, reverting your computer can take anywhere from 20 to 30 minutes, depending on your system configuration. Once the process is completed, you will be shown your Windows login screen.
Computer stuck in a reboot loop
If your computer gets into an endless reboot loop, try to get into Safe Mode or access Advanced Boot Options. You can open a command prompt window or system restore or perform an Automatic Startup Repair.
Let us know if anything helped you or if you have other suggestions.
Also see: We couldn’t complete the updates, Undoing changes.
Some generic links which can help you troubleshoot Windows Update errors and problems:
- Troubleshoot problems with installing Windows Updates
- Complete Master List of Windows Update Error Codes
- Troubleshoot: Windows Update Fail To Install
- Windows Update Page Is Blank In Windows
- WU Utility will re-register all required WU dll files in a click.
Anand Khanse is the Admin of TheWindowsClub.com, a 10-year Microsoft MVP (2006-16) & a Windows Insider MVP (2016-2022). Please read the entire post & the comments first, create a System Restore Point before making any changes to your system & be careful about any 3rd-party offers while installing freeware.
Find out all you need to know to fix Windows Update errors
by Ivan Jenic
Passionate about all elements related to Windows and combined with his innate curiosity, Ivan has delved deep into understanding this operating system, with a specialization in drivers and… read more
Updated on
- Disabling Secure boot during the update procedure and enabling it after the process is finished will fix the error.
- Use an uninstaller software in order to completely remove your antivirus since it can interfere with the Windows Update.
In this troubleshooting guide, we will show you how you can fix the Failure configuring Windows updates, reverting changes loop error on your Windows 7/8/10 PC.
Disabling Secure boot during the update procedure and enabling it after the process is finished solves this issue and you can get back to your everyday work on your computer. For more solutions, check out the list of methods below!
How do I get past Failure configuring Windows updates?
- Disable Secure boot
- Hard reset your laptop
- Disable your antivirus
- Run the Update Troubleshooter
- Clean boot your computer
- Restart the Windows Update Service
Before diving into the troubleshooting steps below, it might be a good idea to run a quick SFC scan. Update errors are often triggered by corrupted or missing system files.
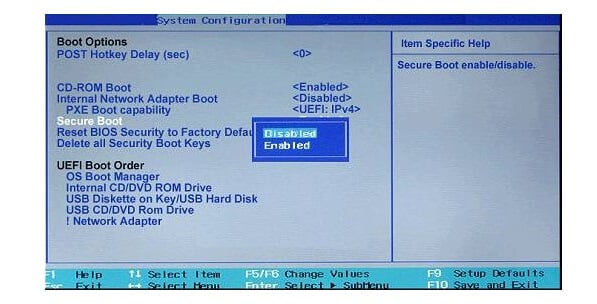
1. Disable Secure boot
- Reboot your Windows 10 system. When the system starts up you will need to continuously press the ESC button on the keyboard.
- You should have in front of you the Startup menu on a black background.
- Move to the System Configuration tab using the right arrow on the keyboard.
- In the System Configuration menu, you will need to select Boot options by pressing the Down arrow on the keyboard.
- Press the Enter button on the keyboard.
- Press the arrows on the keyboard down to the Secure boot feature.

- Press the Enter button on the keyboard.
- Select the Disable option on this feature and press the Enter button.
- Press the F10 button on the keyboard to save your changes and exit the menu.
- Press the Enter button to confirm the saved changes.
- Your Windows 10 device should reboot now.
- Check and see if you still have the same Failure configuring Windows updates stuck error. If you don’t you will need to let your system finish the updates and enable the Secure boot feature after it is done.
2. Hard reset your laptop and remove all peripherals
- Shut down your Windows 10 device.
- Remove any external USB peripherals from the laptop.
- Remove any other additional wires from your external devices to the laptop.
- Unplug the power adapter from your Windows10 device.
- Press and hold the power button on the laptop for about twenty seconds.
- Plug only the power adapter into the laptop.
- Press the power button to open your device.
- You should get to a black background screen where you have to select the Start Windows normally feature.
- Press the Enter button on the keyboard.
- Run Windows Update again.
- After the update process is finished, connect all your peripherals to the laptop.
- Reboot your Windows 10 device.
- Check and see if you still have the same issue.
3. Disable your antivirus/ firewall
Use an uninstaller software in order to completely remove your antivirus since it can interfere with the Windows Update.
How we test, review and rate?
We have worked for the past 6 months on building a new review system on how we produce content. Using it, we have subsequently redone most of our articles to provide actual hands-on expertise on the guides we made.
For more details you can read how we test, review, and rate at WindowsReport.
Alternatively, we recommend using a flexible antivirus program that offers you the option to disable it for a limited amount of time or add programs, apps, websites, and files to an exclusion list.
⇒ Get Eset
4. Run the Update Troubleshooter
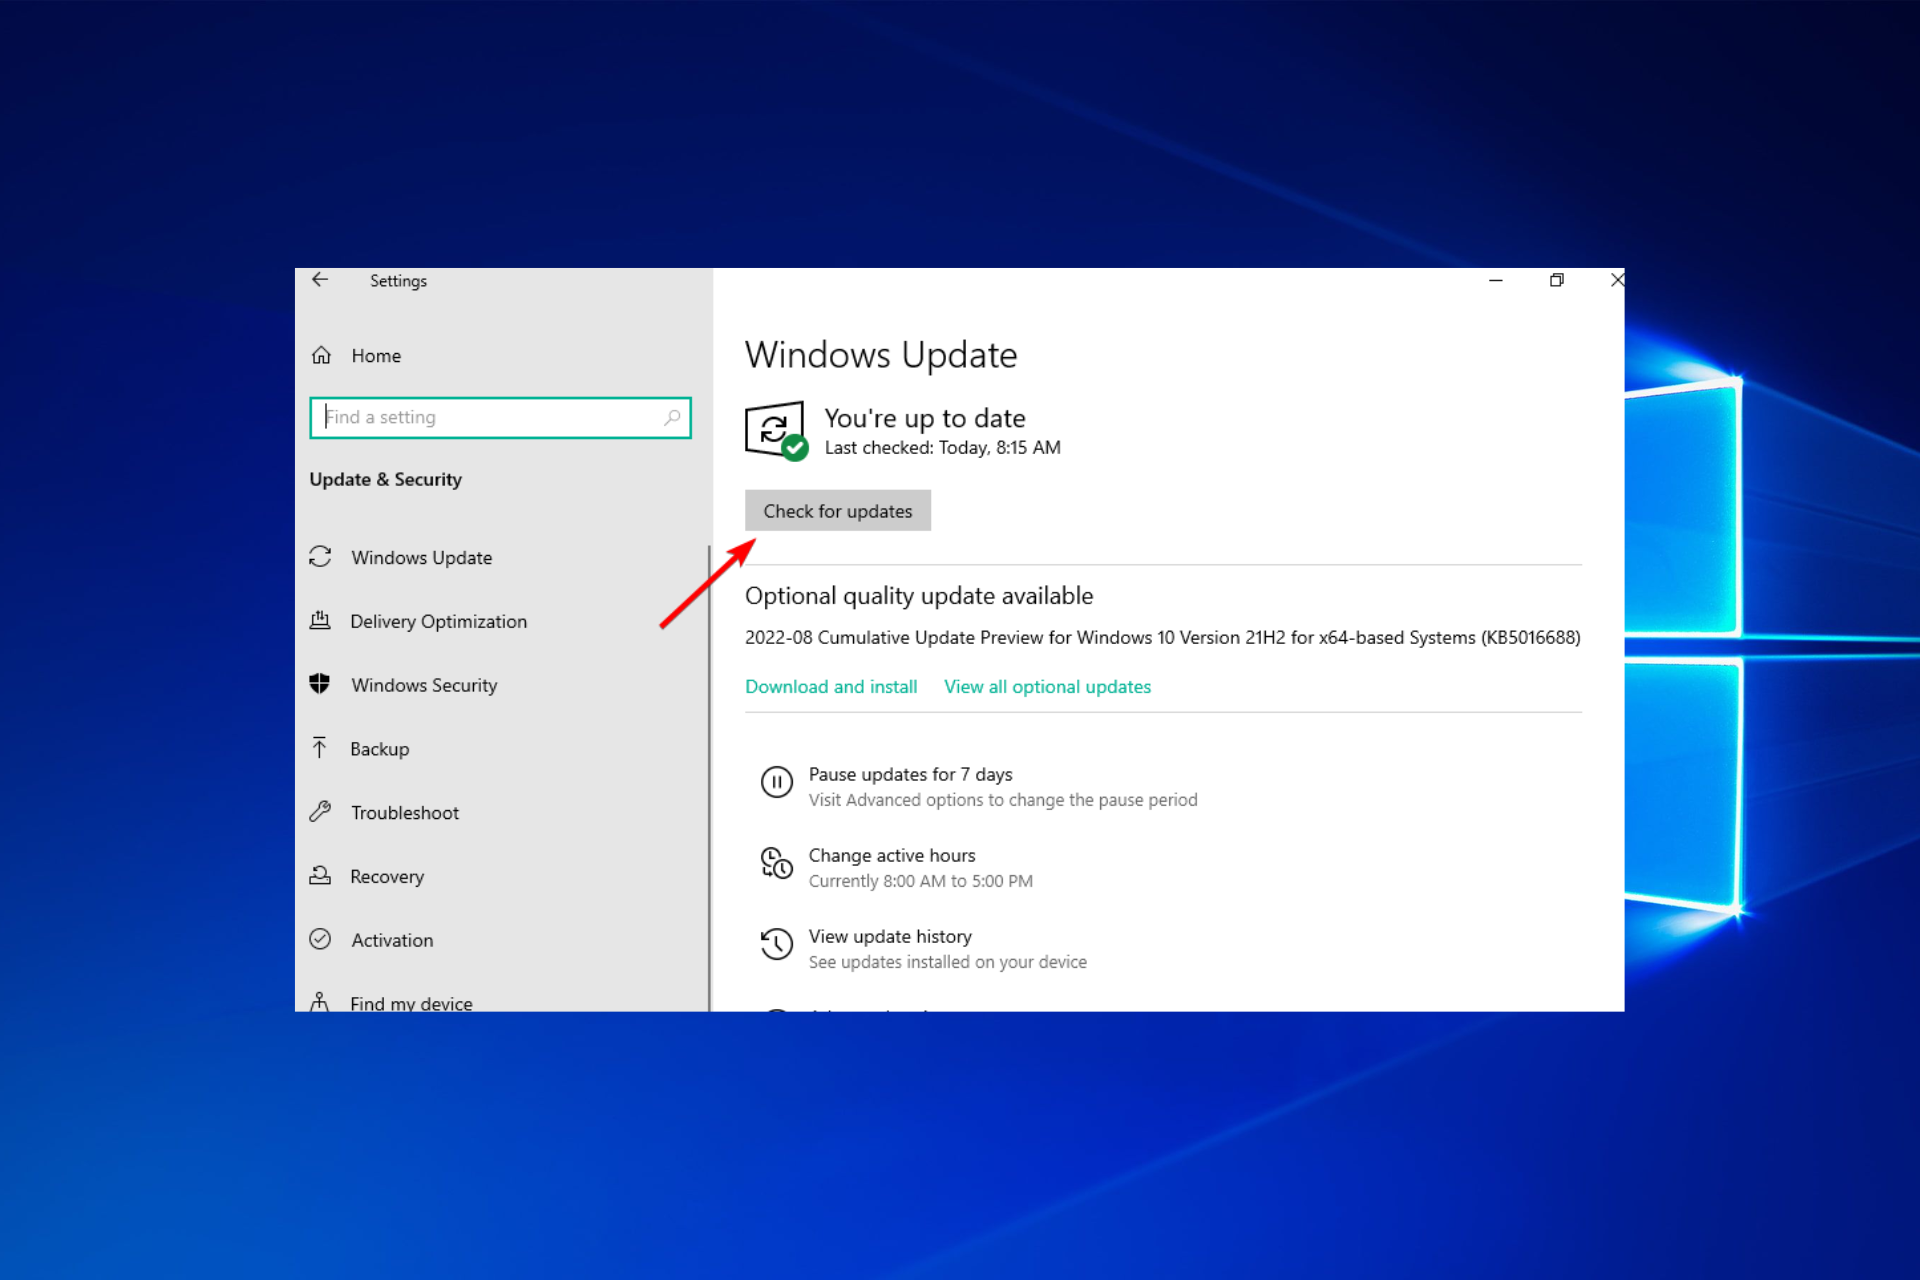
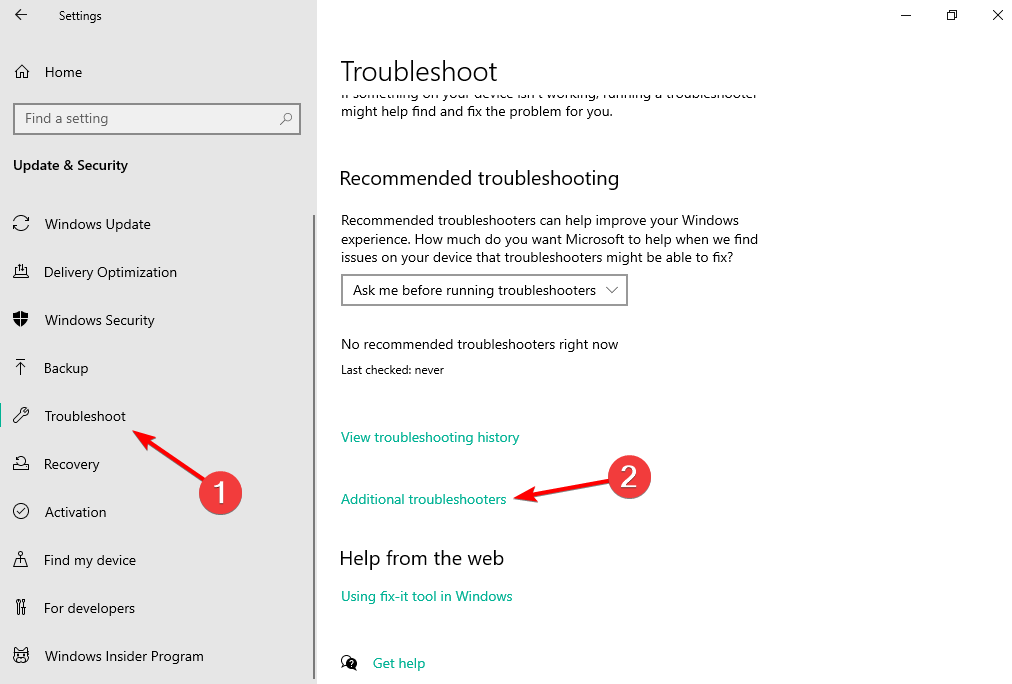
- Press Windows + I then when the Settings app opens go to Update & security.

- Select Troubleshoot from the menu on the left, followed by Additional troubleshooters on the right panel.

- Next, click the Windows Update troubleshooter and select Run.
5. Clean boot your computer
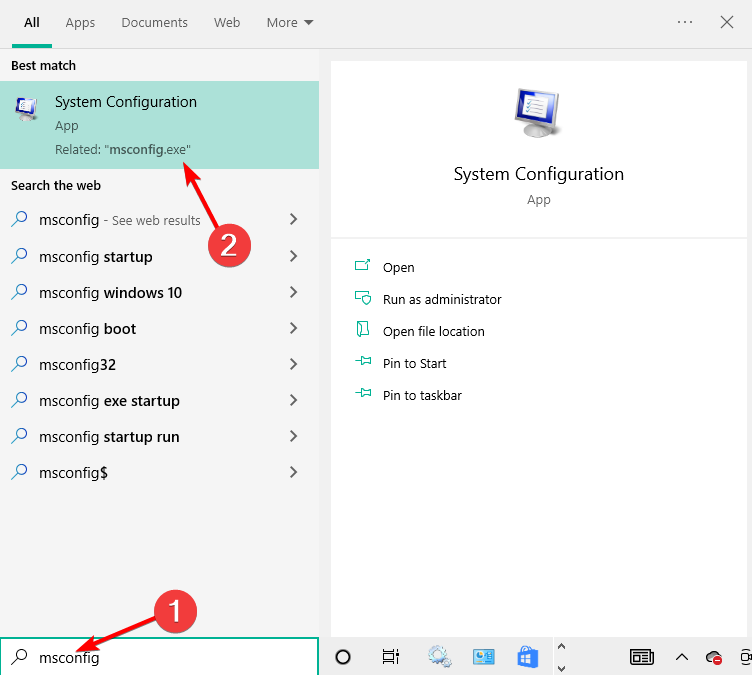
- Press Windows then enter msconfig and select System Configuration.

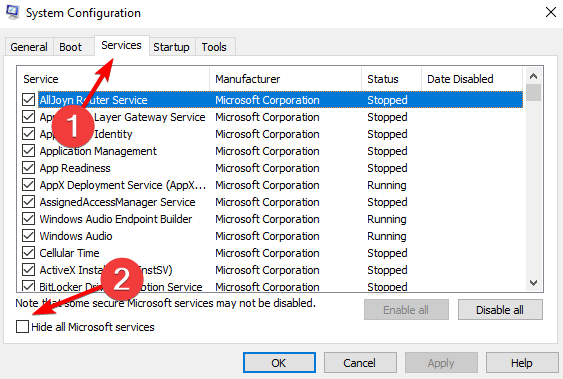
- Go to the Services tab and select Hide all Microsoft services.

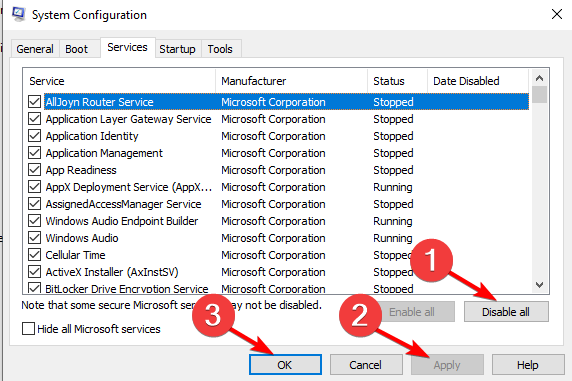
- Tap Disable all followed by Apply and OK then reboot your PC.

6. Refresh/ restart the Windows Update Service
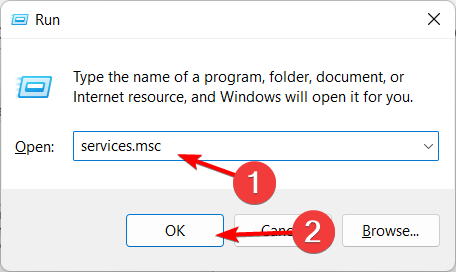
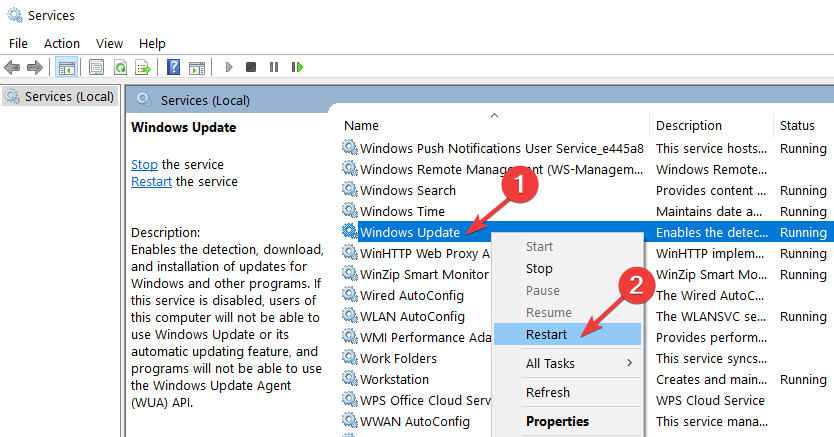
- Launch a new Run window then enter services.msc and hit Enter.

- Locate the Windows Update Service then right-click on it and select Refresh and then Restart

- Check for updates again, since the Failure configuring Windows updates reverting changes server 2008,2012 r2 error will be solved.
That’s it, there are a few simple steps on how to solve your Windows configuring updates issue and get your system up and running again.
For more solutions, check out our guide on what to do to fix Windows Update something went wrong.
Let us know if these solutions were helpful. If you have any questions about this post, write them in the comments below.
![]()