There are many reasons why you might receive an error message when upgrading or installing Windows 11, but common errors can be fixed with a few steps that you can do on your own. Note: An upgrade takes your device from an older version of Windows, such as Windows 7, Windows 8.1, or Windows 10 to Windows 11.
Before searching for a specific error code, try the tips listed in General fixes. If those don’t fix your upgrade or installation problem, check the table of error codes at the bottom of this article.
General fixes
Here are some things you can try to fix upgrade and installation errors:
Unplug any nonessential hardware devices. These could include headphones, printers, scanners speakers, USB flash drives, and external hard drives.
If you’re using a laptop and it’s plugged in to a docking station, undock it.
It’s a good idea to make sure that all important updates are installed before trying to upgrade Windows. This includes updates to hardware drivers on your device.
For information and to make sure you’re up-to-date, see Windows Update: FAQ.
Use Windows Defender to protect your device during the upgrade—non-Microsoft antivirus software can sometimes cause upgrade problems. As long as you have installation media and all required activation information, you can always reinstall the software after you upgrade.
To remove an antivirus application, go to Control Panel\Programs\Programs and Features. Select the program, and then select Uninstall. Select Yes to confirm.
Outdated software can cause problems with a Windows upgrade, so removing old or nonessential applications can help.
If you plan to reinstall the application later, make sure you have the installation media and all required activation information before removing it.
To uninstall software, go to Control Panel\Programs\Programs and Features. Select the program, and then select Uninstall. Select Yes to confirm.
To upgrade to Windows 11, you need enough space on your hard drive for the installation to take place.
To view how much hard drive space is available on your computer, select File Explorer on the taskbar (known as Windows Explorer in Windows 7) or press Windows logo key + E.
Then select Computer or This PC and look under Hard Disk Drives or under Devices and drives. If there are multiple drives listed, the system drive is the drive that includes a Microsoft Windows logo above the drive icon. You’ll see the amount of available space under the drive.
If it looks like your drive is running low on space, see Tips to free up drive space on your PC.
0xC1900101 Errors
An error that begins with 0xC1900101 is usually a driver error. If you see any of these error codes, try the following steps first to fix the problem. If these steps don’t work, see Resolve Windows upgrade errors for more detailed technical info.
-
0xC1900101 — 0x2000c
-
0xC1900101 — 0x20017
-
0xC1900101 — 0x30018
-
0xC1900101 — 0x3000D
-
0xC1900101 — 0x4000D
-
0xC1900101 — 0x40017
-
Make sure that your device has enough space. Your device requires at least 16 GB of free space to upgrade a 32-bit OS, or 20 GB for a 64-bit OS. For more info, see Free up drive space in Windows.
-
Run Windows Update a few times. Download and install any available updates in Windows Update, including software updates, hardware updates, and some third-party drivers. Use the Windows Update Troubleshooter to fix Windows 11 Update errors.
-
Check third-party drivers and download any updates. You can find third-party drivers and installation instructions for any hardware you’ve added to your device on the manufacturer’s website.
-
Unplug extra hardware. Remove all external storage devices and drives, docks, and other hardware you might have plugged into your device that isn’t needed for basic functionality.
-
Check Device Manager for errors. In the search box on the taskbar, type device manager. Choose Device Manager from the results. In the window that pops up, look for any device with a yellow exclamation mark beside it (you may have to select each category to switch to the list of devices). Press and hold (or right-click) the device name and select either Update Driver Software or Uninstall to correct the errors.
-
Remove third-party security software. Make sure you know how to reinstall your programs and that any necessary product keys are on hand. Windows Defender will help protect your device in the meantime.
-
Repair hard-drive errors. In the search box on the taskbar, type command prompt. Choose Command Prompt from the list of results. In the window that pops up, type chkdsk/f C: and press the Enter key. Repairs automatically start on your hard drive, and you’ll be asked to restart your device.
Note: You must have administrator permissions on your device to do this.
-
Do a clean restart into Windows. See How to perform a clean boot in Windows.
-
Restore and repair system files. In the search box on the taskbar, type command prompt. Choose Command Prompt from the list of results. In the window that pops up, type DISM.exe /Online /Cleanup-image /Restorehealth and press the Enter key. (Learn to repair a Windows image)
Note: You must have administrator permissions on your device to do this.
Other Common Errors
The following table lists the most common upgrade and installation errors and some things you can try to fix them. If you continue having problems upgrading or installing Windows, contact Microsoft support.
|
Error |
What it means and how to fix it |
|---|---|
|
0xc1900223 |
This indicates that there was a problem downloading and installing the selected update. Windows Update will try again later and there is nothing you need to do at this time. |
|
0xC1900208 – 0x4000C |
This could indicate that an incompatible app installed on your PC is blocking the upgrade process from completing. Check to make sure that any incompatible apps are uninstalled and then try upgrading again. |
|
0xC1900107 |
A cleanup operation from a previous installation attempt is still pending, and a system restart is required to continue the upgrade. Restart the device and run setup again. If restarting device does not resolve the issue, then use the Disk Cleanup utility and clean up the temporary files and the System files. For more information, see Disk cleanup in Windows. |
|
0x80073712 |
A file needed by Windows Update is likely damaged or missing. Try repairing your system files: In the search box on the taskbar, type command prompt. Choose Command Prompt from the list of results. In the window that appears, type DISM.exe /Online /Cleanup-image /Restorehealth and press the Enter key. |
|
0xC1900200 – 0x20008 0xC1900202 – 0x20008 |
This may signify that your PC doesn’t meet the minimum requirements to download or install the upgrade to Windows 11. Learn more about the minimum requirements for Windows 11. |
|
0x800F0923 |
This might indicate that a driver or other software on your PC isn’t compatible with the upgrade to Windows 11. For info about how to fix this problem, contact Microsoft support. |
|
0x80200056 |
This could mean that the upgrade process was interrupted because you accidentally restarted your PC or signed out of your PC. Try upgrading again and make sure your PC is plugged in and stays turned on. |
|
0x800F0922 |
This error might mean that your PC couldn’t connect to the Windows Update servers. If you’re using a VPN connection to connect to a work network, disconnect from the network and turn off the VPN software (if applicable) and try upgrading again. The error could also mean there isn’t enough free space in the System Reserved partition. You might be able to fix this problem by using third-party software to increase the size of the System Reserved partition. |
|
Error: We couldn’t complete the updates. Undoing changes. Don’t turn off your computer. Error: Failure configuring Windows Updates. Reverting changes. |
These are generic errors that might appear any time a Windows update fails. You’ll need to determine the specific error code to investigate how to best resolve this problem. You can find the error code for the failed update by viewing your update history. Look for the update that wasn’t installed, note the error code, and then contact Microsoft support. To view your update history in Windows 11:
|
|
Error: The update isn’t applicable to your computer. |
This error might mean that your PC doesn’t have the required updates installed. Check to make sure that all important updates are installed on your PC before you try upgrading. |
|
0x80070070 – 0x50011 0x80070070 – 0x50012 0x80070070 – 0x60000 |
This likely indicates that your PC doesn’t have enough space available to install the upgrade. Free some space on the drive and try again. Get tips for freeing up drive space |
|
0x80300024 |
The specified disk operation is not supported by the target disk, partition, or volume. Make sure your machine meets the minimum requirements to install Windows. |
|
0x80070002 0x20009 |
The system cannot find the file specified. If you have a disk or disks where you are not installing Windows 11 on, remove those disks. |
|
0xC1900101 0x20017 0xC1900101 0x30017 |
A driver has caused a problem. Disable or remove all 3rd party antivirus or antispyware from your system. Disconnect all peripheral devices that are connected to the system, except for the mouse, keyboard and display. Contact your hardware vendor to obtain updated device drivers. |
|
0x8007042B 0x4000D |
Windows Setup terminated unexpectedly due to another process running in the background. When you start Windows by using a normal startup, several applications and services start automatically, and then run in the background. These programs include basic system processes, antivirus software, system utility applications, and other software that has been previously installed. These applications and services can cause interference when you attempt to upgrade to the latest version of Windows 11. To help you determine whether a background program is interfering with the upgrade, a «clean boot» may be needed. See How to perform a clean boot in Windows. |
|
0x800700B7 0x2000a |
Windows Setup terminated unexpectedly due to another process running in the background. Uninstall any antivirus or antispyware software and update again. |
There are many reasons why you might receive an error message when upgrading or installing Windows 10, but common errors can be fixed with a few steps that you can do on your own. Note: An upgrade takes your device from an older version of Windows, such as Windows 7 or Windows 8.1, to Windows 10.
Before searching for a specific error code, try the tips listed in General fixes. If those don’t fix your upgrade or installation problem, check the table of error codes at the bottom of this article.
General fixes
Here are some things you can try to fix upgrade and installation errors:
Unplug any nonessential hardware devices. These could include headphones, printers, scanners speakers, USB flash drives, and external hard drives.
If you’re using a laptop and it’s plugged in to a docking station, undock it.
It’s a good idea to make sure that all important updates are installed before trying to upgrade Windows. This includes updates to hardware drivers on your device.
For information and to make sure you’re up-to-date, see Windows Update: FAQ.
Use Windows Defender to protect your device during the upgrade—non-Microsoft antivirus software can sometimes cause upgrade problems. As long as you have installation media and all required activation information, you can always reinstall the software after you upgrade.
To remove an antivirus application, go to Control Panel\Programs\Programs and Features. Select the program, and then select Uninstall. Select Yes to confirm.
Outdated software can cause problems with a Windows upgrade, so removing old or nonessential applications can help.
If you plan to reinstall the application later, make sure you have the installation media and all required activation information before removing it.
To uninstall software, go to Control Panel\Programs\Programs and Features. Select the program, and then select Uninstall. Select Yes to confirm.
To upgrade to Windows 10, you need enough space on your hard drive for the installation to take place.
To view how much hard drive space is available on your computer, select the Start button, then in the search box on the taskbar, type File Explorer (known as Windows Explorer in Windows 7).
Then select Computer or This PC and look under Hard Disk Drives or under Devices and drives. If there are multiple drives listed, the system drive is the drive that includes a Microsoft Windows logo above the drive icon. You’ll see the amount of available space under the drive.
If it looks like your drive is running low on space, see Tips to free up drive space on your PC.
0xC1900101 Errors
An error that begins with 0xC1900101 is usually a driver error. If you see any of these error codes, try the following steps first to fix the problem. If these steps don’t work, see Resolve Windows upgrade errors for more detailed technical info.
-
0xC1900101 — 0x2000c
-
0xC1900101 — 0x20017
-
0xC1900101 — 0x30018
-
0xC1900101 — 0x3000D
-
0xC1900101 — 0x4000D
-
0xC1900101 — 0x40017
-
Make sure that your device has enough space. Your device requires at least 16 GB of free space to upgrade a 32-bit OS, or 20 GB for a 64-bit OS. For more info, see Free up drive space in Windows.
-
Run Windows Update a few times. Download and install any available updates in Windows Update, including software updates, hardware updates, and some third-party drivers. Use the Windows Update Troubleshooter to fix Windows Update errors.
-
Check third-party drivers and download any updates. You can find third-party drivers and installation instructions for any hardware you’ve added to your device on the manufacturer’s website.
-
Unplug extra hardware. Remove all external storage devices and drives, docks, and other hardware you might have plugged into your device that isn’t needed for basic functionality.
-
Check Device Manager for errors. Select the Start button, then in the search box on the taskbar, type device manager. Choose Device Manager from the results. In the window that pops up, look for any device with a yellow exclamation mark beside it (you may have to select each category to switch to the list of devices). Press and hold (or right-click) the device name and select either Update Driver Software or Uninstall to correct the errors.
-
Remove third-party security software. Make sure you know how to reinstall your programs and that any necessary product keys are on hand. Windows Defender will help protect your device in the meantime.
-
Repair hard-drive errors. Select the Start button, then in the search box on the taskbar, type command prompt. Choose Command Prompt from the list of results. In the window that pops up, type chkdsk/f C: and press the Enter key. Repairs automatically start on your hard drive, and you’ll be asked to restart your device.
Note: You must have administrator permissions on your device to do this.
-
Do a clean restart into Windows.
Learn how. -
Restore and repair system files. Select the Start button, then in the search box on the taskbar, type command prompt. Choose Command Prompt from the list of results. In the window that pops up, type DISM.exe /Online /Cleanup-image /Restorehealth and press the Enter key. (Learn to repair a Windows image)
Note: You must have administrator permissions on your device to do this.
Other Common Errors
The following table lists the most common upgrade and installation errors and some things you can try to fix them. If you continue having problems upgrading or installing Windows 10, contact Microsoft support.
|
Error |
What it means and how to fix it |
|---|---|
|
0xc1900223 |
This indicates that there was a problem downloading and installing the selected update. Windows Update will try again later and there is nothing you need to do at this time. |
|
0xC1900208 – 0x4000C |
This could indicate that an incompatible app installed on your PC is blocking the upgrade process from completing. Check to make sure that any incompatible apps are uninstalled and then try upgrading again. |
|
0xC1900107 |
A cleanup operation from a previous installation attempt is still pending, and a system restart is required to continue the upgrade. Restart the device and run setup again. If restarting device does not resolve the issue, then use the Disk Cleanup utility and clean up the temporary files and the System files. For more information, see Disk cleanup in Windows. |
|
0x80073712 |
A file needed by Windows Update is likely damaged or missing. Try repairing your system files: Select the Start button and type command prompt in the search box on the taskbar. Choose Command Prompt from the list of results. In the window that appears, type DISM.exe /Online /Cleanup-image /Restorehealth and press the Enter key. |
|
0xC1900200 – 0x20008 0xC1900202 – 0x20008 |
This may signify that your PC doesn’t meet the minimum requirements to download or install the upgrade to Windows 10. Learn more about the minimum requirements for Windows |
|
0x800F0923 |
This might indicate that a driver or other software on your PC isn’t compatible with the upgrade to Windows 10. For info about how to fix this problem, contact Microsoft support. |
|
0x80200056 |
This could mean that the upgrade process was interrupted because you accidentally restarted your PC or signed out of your PC. Try upgrading again and make sure your PC is plugged in and stays turned on. |
|
0x800F0922 |
This error might mean that your PC couldn’t connect to the Windows Update servers. If you’re using a VPN connection to connect to a work network, disconnect from the network and turn off the VPN software (if applicable) and try upgrading again. The error could also mean there isn’t enough free space in the System Reserved partition. You might be able to fix this problem by using third-party software to increase the size of the System Reserved partition. |
|
Error: We couldn’t complete the updates. Undoing changes. Don’t turn off your computer. Error: Failure configuring Windows Updates. Reverting changes. |
These are generic errors that might appear any time a Windows update fails. You’ll need to determine the specific error code to investigate how to best resolve this problem. You can find the error code for the failed update by viewing your update history. Look for the update that wasn’t installed, note the error code, and then contact Microsoft support. To view your update history in Windows 8.1:
To view your update history in Windows 7:
|
|
Error: The update isn’t applicable to your computer. |
This error might mean that your PC doesn’t have the required updates installed. Check to make sure that all important updates are installed on your PC before you try upgrading. |
|
0x80070070 – 0x50011 0x80070070 – 0x50012 0x80070070 – 0x60000 |
This likely indicates that your PC doesn’t have enough space available to install the upgrade. Free some space on the drive and try again. Get tips for freeing up drive space |
|
0x80300024 |
The specified disk operation is not supported by the target disk, partition, or volume. Make sure your machine meets the minimum requirements to install Windows 10. |
|
0x80070002 0x20009 |
The system cannot find the file specified. If you have a disk or disks where you are not installing Windows 10 on, remove those disks. |
|
0xC1900101 0x20017 0xC1900101 0x30017 |
A driver has caused a problem. Disable or remove all 3rd party antivirus or antispyware from your system. Disconnect all peripheral devices that are connected to the system, except for the mouse, keyboard and display. Contact your hardware vendor to obtain updated device drivers. |
|
0x8007042B 0x4000D |
Windows Setup terminated unexpectedly due to another process running in the background. When you start Windows by using a normal startup, several applications and services start automatically, and then run in the background. These programs include basic system processes, antivirus software, system utility applications, and other software that has been previously installed. These applications and services can cause interference when you attempt to upgrade to the latest version of Windows 10. To help you determine whether a background program is interfering with the upgrade, a «clean boot» may be needed. See How to perform a clean boot in Windows. |
|
0x800700B7 0x2000a |
Windows Setup terminated unexpectedly due to another process running in the background. Uninstall any antivirus or antispyware software and update again. |
 button. In the search box, type Update, and then, in the list of results, Select Windows Update > View update history.
The Windows operating system is not new to bugs and errors. Recently, many users tried to install the Windows 11 2H22 update but to no avail. Instances quite like this have even surfaced in the previous Windows 10 versions as well where a Windows Update failed to install.
So, if this has happened to you as well, you are in luck today because here we’ll discuss all the possible things you can do if the Windows update fails to install on your Windows 11/10 PC.
It is highly recommended that after each of the methods below to fix the “Windows update failed” error, retry installing the update. This way you’ll know which of the below fixes worked out.
Why Does Windows 11/10 Update Keep Failing?
- Retry fetching Windows Update – Sometimes when you try to install a Windows update, it fails the first few times, after which you can reinstall it.
- Check storage space – Lack of storage space could be the reason why you are unable to install a Windows update.
- Antivirus might interfere – Sometime back Microsoft blocked updates to Windows 10 for users who were running Antivirus such as AVG. If that’s the case you can try out an alternative.
- Update files are corrupt – If the update has not yet been rolled out to all users or is still in the testing phase, you may want to wait for a while for a stable version.
- Some application is interfering – Try uninstalling a recently installed application to find out if it is the culprit. For this, boot your computer in a “Clean Boot State”.
We’ll be discussing fixes for all the above reasons and a few others in the post that follows.
Windows Update Fails To Install Every Single Time? Try These Fixes
1. Try Again
If the Windows update fails to install the first time, try twice or thrice more. Sometimes, you may not get it right the first time but subsequent tries may result in fetching the update successfully.
2. Check Your Internet
In case there is bad internet reception or if your internet is disconnected, your Windows update will keep failing. In either case, you can try out the fixes mentioned in this post. And, once your internet is back on track, retry installing the Windows update.
3. Run SFC Scan
By running an SFC scan you can get rid of the corrupt system files which are making it difficult for you to install updates. To run the SFC scan –
1. In the Windows search bar, type CMD and click on Run as administrator from the right-hand side.
2. When the Command Prompt opens, type sfc /scannow and press Enter.

Once the scan is over, check if you can install the update.
4. Delete Temporary Files and Browser Cache
Accumulation of temporary files or browser cache can sometimes create hindrances in fetching updates. To delete temporary files –
1. Press Windows + R to open the Run dialog box.
2. Type %Temp%, and press Enter.
3. Select all the files and delete using the shift + delete operation. Here’s how you can clear cache and cookies.

5. Run Windows Update Troubleshooter
Why not let Microsoft try and find the solution to the problem at hand? You can use the inbuilt Windows Update Troubleshooter to fix the issue. For that here are the steps –
On Windows 11
1. Open Settings by pressing Windows + I.
2. From the right-hand side, click on Troubleshoot.
3. Click on Other troubleshooters.
4. Click on Run next to Windows Update.

On Windows 10
1. Open Settings.
2. Click on Update & Security.
3. Click on Troubleshoot.
4. Under Get up and running, select Windows Update.

5. Click on Run the troubleshooter.
6. Disable Your Antivirus and Then Update
Although we highly recommend having an Antivirus ready to combat any and every malicious threat that may attack your data and computer, in this case, you may disable your Antivirus once and then try to fetch the Windows update.
7. Do You Have Sufficient Storage Space?
One of the reasons why Windows update keeps failing on your computer could be because there is not enough storage space on your hard drive. Although, Windows reserves space for an update, there is a possibility that you have run out of storage space. Here, there are many ways you can free up storage space. For instance –
- You can transfer some files onto an external hard drive.
- Remove duplicate files.
- Remove unwanted files which are unnecessarily taking up space on your computer.
- Uninstall applications that you don’t need at all.
8. Update Windows In Clean Boot State
Some programs running in the background might be interfering with Windows updates. To tackle such situations Windows comes with a clean boot state using which you can identify such issues and tackle them. Here’s how you can Clean Boot Windows. In the same post, we have also discussed in what other situations can Clean Boot be helpful.
9. Check If Windows Service Is Enabled?
Regardless of whether it is Windows 10 or 11, if Windows update keeps failing, chances are the Windows update service is not properly set up. Here are the steps to ensure it is running properly –
1. Open the Run dialog box by pressing Windows + R.
2. Type services.msc and press Enter.
3. When the Services window opens, locate Windows Update and double-click on it.
4. In the Windows Update Properties window, change the Startup type to Automatic (if not already).

5. Click on Apply and then OK.
6. Again go back to the Services window, locate the Background Intelligent Transfer Service, and do the same as above.
7. Restart your computer and try fetching the Windows update.
Wrapping Up
We are hopeful that the above-mentioned methods will help any users whose Windows updates fail to install repeatedly. And, if you have been able to fix the issue, do let us know in the comments section which of the above fixes helped you out. For more such tips and tricks, keep reading WeTheGeek. You can also find us on Instagram, Pinterest, Twitter, Flipboard, Facebook and YouTube.
Have a question in mind why does some of the Windows updates just refuse to install? Sometimes when you open Windows update history you might notice it shows some Windows updates failed to install with different errors such as 0x800f080a, or 0x800f0904. If you are experiencing a similar problem Windows Update Won’t Install Updates or Windows 10 update failed to install or stuck downloading you are right on track. In this post, we discuss some of the unique solutions you can apply to make Windows install updates again.
Contents
- 1 Windows update failed to install
- 2 Why does Windows update fail to install?
- 3 How to fix Windows update problems?
- 3.1 Check internet connection
- 3.2 Free up some disk space
- 3.3 Try to install the Windows update again
- 3.4 Start windows clean boot State
- 3.5 Try Windows Update Troubleshooter
- 3.6 Reset Windows Update cache
- 3.7 Switch Google DNS
- 3.8 Repair Corrupted Windows System Files
- 3.9 Update Windows 10 Offline
Recently Microsoft has released Windows update KB5030211 for devices running the latest Windows 10 version 22H2. Installing KB5030211 bumps OS to Windows 10 Build 19045.3324 and focuses on security and non-security fixes. However several Windows users report Windows 10 update KB5030211 fails to install with different errors 0x800f0922, 0x8000ffff, 0x800f0826.
Many users describe the problem on Microsoft’s forum
There were problems installing some updates, but we’ll try again later. If you keep seeing this and want to search the web or contact support for information, this may help:
2023-09 Cumulative Update for Windows 10 Version 22H2 for x64-based Systems (KB5030211) – Error 0x800f0831, 0x800f0900 or 0x80070005″
Why does Windows update fail to install?
There are many possible things that can cause Windows 10 Updates to fail over and over. A slow internet connection that may fail to download Windows updates from Microsoft server or a Computer that doesn’t have enough free drive space to complete Windows 10 updates are common. Again Corrupt update files, Due to some reason update service is not started, and third-party software or antivirus conflict also causes Windows update failed to install on your computer.
- Restart your computer and check for updates again probably help fix the problem.
- You need to free up disk space, disable security software and try to install Windows updates
- Ensure the Internet connection is stable and disconnect VPN (If configured on your computer)
- Running Windows update troubleshooter automatically diagnoses and fixes the related problem on Windows 10.
- Restart Windows update service and Clear Windows update cache help most users fix such problems.
How to fix Windows update problems?
The first thing we recommend is to reboot your PC, check for and try to install the Windows update again. When you reboot your PC, not only refreshes the operating system but also clears temporary glitches present there that prevent Windows updates download or apply.
Open the command prompt as administrator and run this command SC config trustedinstaller start=auto Now try to install the Windows update again.
Check internet connection
The next thing you need to check your internet connection. Yes, make sure you have a stable internet connection to download Windows update files from the Microsoft server.
- You can check your internet speed at fast.com or speedtest.net.
- Press Windows key + R, type ping google.com -t, and click ok to check if continuously getting ping replay from the Google server.

If ping replay breaks you need to troubleshoot the internet connection before downloading or installing Windows updates.
In addition, disconnect the VPN if configured on your device and temporarily disable security software before trying to install Windows updates.
Free up some disk space
You need to check and make sure you have enough free space on the system drive to download and apply the latest Windows updates. It’s important especially if you have SSD drive installed.
- Press the Windows key + E to open files explorer then click on This PC,
- Look at the system drive (usually C) minimum of 10 GB of free space there. If not you need to free up some disk space.

- To Free up disk space on your system drive, you can move some download files to an external drive.
- You can also reclaim a lot of storage by uninstalling apps and Games you rarely use.
- In addition, run Disk Clean up or read how to delete temporary files automatically on Windows 10.
Pro tip – Disconnect nonessential devices such as USB flash drives or external HDDs, headphones or printers before checking for Windows updates.
Try to install the Windows update again
As per Microsoft experts, the most common cause of Windows Update failed messages is that there are two updates waiting. If one is a servicing stack update, it has to install first, and the machine has to restart before it can install the next update. Restart Windows and try running Windows Update again, yes this is very effective for most users.
- Press the Windows key + X and select settings,
- Click on Update & Security the hit check for updates button,
- Also, make sure to click on the download and install link under optional updates (If available)
- This will start the download and install Windows updates from the Microsoft server,
- You only need to restart your PC to apply Windows updates.
Start windows clean boot State
Clean booting your computer may also help. If any third-party software causes conflict to download & install Windows updates.
Here’s how to do this:
- Go to the search box > type msconfig
- Select System Configuration > Go to the Services tab
- Select Hide all Microsoft services > Disable all

- Go to the Startup tab and click on open Task Manager
- Disable all the unnecessary services running there.
- Restart your computer and check for updates.
Now open Windows update settings and hit the check for updates button.
Try Windows Update Troubleshooter
Run the built-in Windows Update Troubleshooter that attempts to identify and fix any problems that exist that might prevent Windows 10 from downloading and installing the latest Windows Updates.
The process will automatically scan for and detect problems within your system, which can take a few minutes to complete.
To run the update troubleshooter
- Press Windows key + x and select settings,
- Go to Update & Security then Troubleshoot, Click on the additional troubleshooter link.
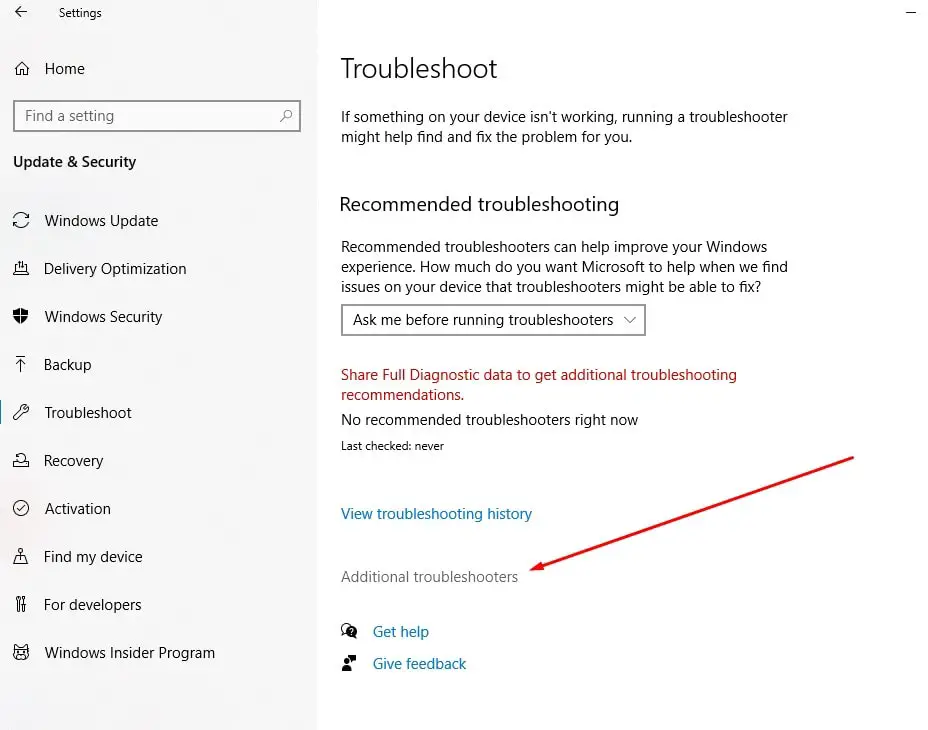
- Locate Windows Update select it and then click on Run the troubleshooter.

- The diagnosis process checks the status of Windows Update and its related Services, repairs, and resets Windows Update components.
- In Addition, the troubleshooter clears the Windows Update cache, related temporary files, checks for pending updates, and more.
- Once the troubleshooting is complete restart your computer and check for Windows updates again.
Reset Windows Update cache
If the problem continues after running the troubleshooter, the Windows update stuck download 100 or fails to install then reset Windows update components following the steps below.
Open Command Prompt as administrator, enter the following commands and hit Enter after each one:
- net stop wuauserv
- net stop cryptSvc
- net stop bits
- net stop msiserver
- Ren C:\WindowsSoftwareDistribution SoftwareDistribution.old
- net start wuauserv
- net start cryptSvc
- net start bits
- net start msiserver
These commands will first Stop the Windows update service and its related services. Then rename the SoftwareDistribution folder to SoftwareDistribution.old (Where Windows stores update files, if any files in this folder get corrupted this may cause Windows updates fail to install. ) After that restart the Windows update and its related services.
If you are not comfortable with a command prompt then
- Open the Windows services console using services.msc
- Stop Windows Update service and its related services (BITS)
- Now open File Explorer using Windows key + E and Go to the following location. C:\Windows\SoftwareDistribution\Download
- Delete everything in the folder, but do not delete the folder itself.
- To do so, press CTRL + A to select everything and then press Delete to remove the files.

Or rename the Software Distribution folder (C:\Windows\) After that restart the services you previously stopped. and check for Windows updates again.

Switch Google DNS
If you notice Windows updates won’t download or are stuck downloading updates then change your DNS address following the steps below. Several users recommended this as a working solution when Windows updates are stuck downloading.
- Press Windows key + R, type ncpa.cpl and click ok,
- This will open the network connections window,
- Locate your active network adapter, right-click and select properties,
- Double-click on Internet protocol version 4 (TCP/IPv4) to open its properties,
- Select the radio button, use the following DNS server address then set preferred DNS server 8.8.8.8 and Alternate DNS server 8.8.4.4.
- Checkmark on validate settings upon exit, click ok, apply and ok
Now try to install Windows updates again and check its status.

Repair Corrupted Windows System Files
Corrupted system files might prevent new Windows updates to apply and result Windows 10 update fails to install or is stuck download. Run DISM (Deployment Image Servicing and Management) and sfc (System file checker) utility help detect and repair missing system files automatically.
- Open the command prompt as administrator,
- First, run DISM command DISM.exe /Online /Cleanup-image /Restorehealth
- Once the command is executed run sfc /scannow command
- Both commands check system image health and check for corruption in system files if found it will restore them with the correct one.
- Let the scanning process complete 100%, Once done restart your PC and try to install the Windows update again.

Update Windows 10 Offline
Also, you can resolve Windows update installation problems by manually installing the latest Windows 10 updates.
- Visit the Windows 10 update history webpage where you can notice the logs of all the previous Windows updates that have been released.
- For the most recently released update, note down the KB number.
- Now use the Windows Update Catalog Website to search for the update specified by the KB number you noted down. (for example KB5030211) Download the update depending on if your machine is 32-bit = x86 or 64-bit = x64.
- Open the downloaded file in order to install the update.
That’s all after installing the updates simply restart the computer to apply the changes. Also, If you are getting Windows Update stuck while upgrading the process simply use the official media creation tool to upgrade to Windows 10 version 22H2 without any error or problem.
Did these solutions help to fix “Windows 10 update error 0x800f0900“? Let us know in the comments below. Also, read
- Windows 11 upgrade or installation failed? 9 Things to Try
- Solved: Windows 10 black screen with cursor after sleep
- Solved: An operating system wasn’t found on Windows 10/8.1/7
- Solved: Windows 10 start menu search not working after update
- Windows 11 Photos App not opening or Not working? Try these solutions
Microsoft recently released Windows 10 Build 19045.3448 with KB5030211 Update for Devices running Windows 10 version 22H2 with various security fixes. But it appears to be causing headaches for users. Several users complain that KB5030211 for Windows 10 version 22H2 broke some PCs. Some others 2023-09 Cumulative updates for Windows 10 version 22H2 for x64-based system (KB5030211) failed to install with different errors 0x800f0922, 0x8000ffff, 0x800f0826 and more. Also, several users mentioned on the Microsoft forum that the Windows 10 KB5030211 update was downloaded but stuck while installing these updates.
Cumulative update for Windows 10 version 22H2 for x64-based system failed to install
Several users in Microsoft community forum said that the (KB5030211) fails to install. It is worth noting that only a small number of users are experiencing such issues and Microsoft hasn’t yet acknowledged the installation problems.
Contents
— Advertisement —
- 1 How to fix Windows 10 update installation issues
- 1.1 Clear Windows Update Files
- 1.2 Run Windows Update troubleshooter
- 1.3 Disable Security Software & perform a clean boot
- 1.4 Switch to Google DNS
- 1.5 Run DISM command
- 1.6 Install Windows Update manually
How to fix Windows 10 update installation issues
- Check and make sure you have a working internet connection to download Windows Update files from the Microsoft server.
- Disconnect from VPN (if configured on your PC), and security software such as third-party antivirus.
- Make Sure that you have enough free disk space before installing the update.
- Remove all external storage media, such as USB drives and SD cards.
If Windows 10 update KB5030211 is stuck during download at 0% or 99% or completely failed to install, it might be that something went wrong with the file itself. Clearing the folder where all of the update files are stored will force Windows Update to download fresh files.
Clear Windows Update Files
- Type services.msc on the start menu search and hit the enter key.
- This will open the Windows services console, scroll down and locate the Windows update service
- Right-click on Windows update service, and select stop.
- Do the same with its related service BITS (Background Intelligent Transfer Service)

- Now press Windows + E keyboard short and Go to the following location.
C:\Windows\SoftwareDistribution\Download
— Advertisement —
- Here Delete everything inside the download folder, but do not delete the folder itself.
- To do so, press CTRL + A to select everything and then press Delete to remove the files.
- Again open Windows services and restart the services (Windows update, BITS) that you previously stopped.

Run Windows Update troubleshooter
Now run the built-in Windows update troubleshooter that automatically detects and fixes the problems that prevent Windows update installation.
- Open the Settings app using the Windows + I keyboard shortcut,
- Navigate Update & Security then troubleshoot and click on Additional Troubleshooters
- Here on the right-hand side select Windows Update and run the Troubleshooter
- This will start the diagnosis process and fix any problem preventing Windows updates to download and install.
- Once the diagnosis process is complete, Restart your PC

Disable Security Software & perform a clean boot
Also, Disable Any security software or antivirus protection (if installed), search for updates, install the available updates and then turn on your antivirus protection.
— Advertisement —
Clean booting your computer may also help. If any third-party software causes conflict to download & install Windows updates. Here’s how to do this:
- Go to the search box > type msconfig
- Select System Configuration > Go to the Services tab
- Select Hide all Microsoft services > Disable all

Go to the Startup tab > Open Task Manager > Disable all the unnecessary services running there. Restart your computer and check for updates, hope this time Windows updates download and install without any error.
Switch to Google DNS
Here is another working solution you must apply if Windows updates fail to download and install.
- Press Windows key + R, type ncpa.cpl and click ok
- This will open the network connections window, Locate your active network adapter right-click on it select properties,
- Locate and select Internet protocol version 4 (TCP/IPv4) then click properties,
- And finally, change the preferred DNS server 8.8.8.8 and Alternate DNS server 8.8.4.4.
- Checkmark on validate settings open exit, click ok apply.
- Now again open Windows Update and hit the check for updates button.

Run DISM command
There are chances that corrupted or missing system files prevent applying the latest Windows updates. Run DISM restore health command with the system file checker utility that helps deal with corrupted system files and restore them if found any.
- Open the command prompt as administrator,
- Type the command DISM /Online /Cleanup-Image /RestoreHealth and press enter key,
- Once the scanning process completes 100% run the system file checker utility command sfc /scannow.
- Wait until the scanning process completes 100% and reboot your computer.
- Let’s again open update & security settings and check for Windows updates.
Install Windows Update manually
This is another way to install Windows updates without any errors or Stuck downloading. And no need to run the Windows update troubleshooter or Clear the update cache. You can resolve the problem manually by installing the latest Windows 10 updates.
- Visit the Windows 10 update history webpage where you can notice the logs of all the previous Windows updates that have been released.
- For the most recently released update, note down the KB number.
- Now use the Windows Update Catalog Website to search for the update specified by the KB number you noted down. Download the update depending on if your machine is 32-bit = x86 or 64-bit = x64.
- (As of today – KB5030211 is the latest patch for Windows 10 version 22H2 and KB5030214 (OS Build 17763.4851) is for Windows 10 version 1809.
- You can get offline download links for these updates from here
- Open the downloaded file in order to install the update.
That’s all after installing the updates simply restart the computer to apply the changes. Also If you are getting Windows Update stuck while the Upgrade process use the official media creation tool to upgrade to Windows 10 version 22H2 without any error or problem.
Did any of these solutions help you fix the problem? Let us know in the comments below.
Also Read:
- Stop Windows 10 Update from Installing Updates Automatically
- 7 Tips to Fast a Slow Computer in Less Than 10 Minutes
- How to Well Optimize Windows 10 Performance For Gaming
- Solved: NVIDIA Installer Failed issue on Windows 10 version 22H2
- Difference Between Windows 10 Cumulative and Feature Updates
Download Windows Speedup Tool to fix errors and make PC run faster
If you are unable to install the latest Windows 10 version on your system, then this post may help you. Though there may or may not be an error message specific to this issue, the OS may fail the upgrade and revert to the previous version after a few flashes on the system. Usually, the system reboots without the upgrade. Some users said that it installs half or 75% of the update and then restarts abruptly.

In such a situation, please try the basic steps which are followed when a Windows Update fails to install. Other than those steps, a few of the following could be tried as well:
1] Delete the folder $WINDOWS.~BT
- Make Windows show Hidden files & folders. To do this, open the File Explorer and among the tabs on the top, select the View tab.
- Check the option for hidden files as in the image below.
- Search for the folder $WINDOWS.~BT in the C: drive. Once you find it, delete it.
The $Windows.~BT and $Windows.~WS folders are created by Windows, during the upgrade process. In the case of a failed upgrade, it is better to delete the folder and start the upgrade process afresh.
2] Rename the SoftwareDistribution file
Delete or rename the SoftwareDistribution folder. If your Windows Update process is not working properly or if you find that the size of this folder has really grown large, then you can consider deleting the Software Distribution folder.
If this does not work, try the following troubleshooting steps, which are specific to the Feature Update.
1] Verify hardware compatibility
Check this list to determine if your system is compatible with the Feature Update or not:
- Acer
- Dell
- HP
- Lenovo
- Samsung
- Sony
- Toshiba.
This post explains why you may receive Windows is no longer supported on this PC message.
2] Note down the error
If you can note down the error, here is a list of Windows 10 Installation or Upgrade Errors that can help troubleshoot the problem specifically. This post will help IT administrators troubleshoot Windows 10 upgrade errors.
3] Use Windows 10 Update Assistant
If the updates don’t work from the PC itself, you might consider using the Windows 10 Update Assistant to upgrade.
4] Upgrade using Windows 10 Installation Media Tool
You may try to upgrade to this Feature Update using the Windows 10 Installation Media Tool.
5] Receive CRITICAL_PROCESS_DIED error
See this post if you receive a CRITICAL PROCESS DIED error.
I hope something here helps you upgrade your Windows 10.
PS: The post has been updated for Windows 10 2022.
Anand Khanse is the Admin of TheWindowsClub.com, a 10-year Microsoft MVP (2006-16) & a Windows Insider MVP (2016-2022). Please read the entire post & the comments first, create a System Restore Point before making any changes to your system & be careful about any 3rd-party offers while installing freeware.