Sometimes, some Windows Update fails to download, or just refuse to get installed on your computer even when you try a couple of times. If you face this problem where Windows Updates will not install or download, then this Windows Updates troubleshooting tutorial will help you identify and troubleshoot the problem.

If Windows Update fails to install, is not working, updates will not download or keep failing, on your Windows 11/10/8/7 then these suggestions will help you troubleshoot & fix Windows Updates.
- Try again
- Delete Temporary Files and Browser Cache
- Disable your Firewall and Anti-virus software
- Run SFC and DISM
- Run Windows Update Troubleshooter
- Manually Reset Windows Update Components to default
- Use FixWU
- Flush the SoftwareDistribution Folder
- Reset the Catroot folder
- Check Windows Update Services status
- Check Windows Update log file
- Clear pending.xml file
- Clear the BITS queue
- Delete incorrect Registry values
- Run Windows Module Installer
- Run Background Intelligent Transfer Service Troubleshooter
- Download its stand-alone installer
- Use authenticated Proxy Servers
- Run Windows Update in Clean Boot State
- Take the help of Microsoft Virtual Agent
- Contact Microsoft Support.
Windows Updates troubleshooting tutorial
Let us see all these potential fixes in detail. Do create a system restore point first. Go through the entire post and then see which of these may apply to your system. You may then try any of these, in no particular order.
Fix Windows Update Errors
1] Try again
As mentioned earlier, many times, an update may fail to install in the first instance, but for some inexplicable reason, succeeds in the 2nd or 3rd try. So try a couple of times.
2] Delete Temporary Files and Browser Cache
If you are unable to install Windows Updates, first clear up your Temporary Files and Browser Cache, reboot, and try again. See if this helps resolve the issue. Best and easy to use the built-in Disk Cleanup utility or CCleaner.
3] Disable your Firewall and Anti-virus software
Temporarily Disable your Firewall and Anti-virus software and try again. Here is a list of Windows files and folders you may exclude from Antivirus scans.
4] Run SFC and DISM
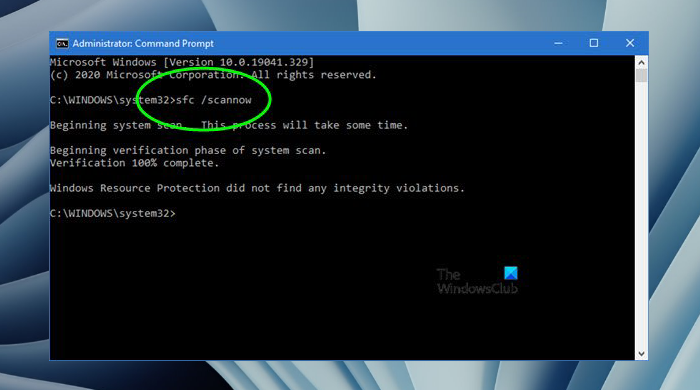
Run System File Checker to replace potentially corrupted system files.
You can also fix corrupted Windows Update system files using DISM Tool. The Dism.exe tool can be used in different situations, and one of them is to repair a corrupted Windows Update files. Do note that you need to run a different command if you want to repair corrupted Windows Update System Files. If you run the usual /RestoreHealth command, it may not necessarily help.
DISM will replace potentially corrupted or missing system files with good ones. However, if your Windows Update client is already broken, you will be prompted to use a running Windows installation as the repair source or use a Windows side-by-side folder from a network share, as the source of the files.
You will then be required to run the following command instead:
DISM.exe /Online /Cleanup-Image /RestoreHealth /Source:C:RepairSourceWindows /LimitAccess
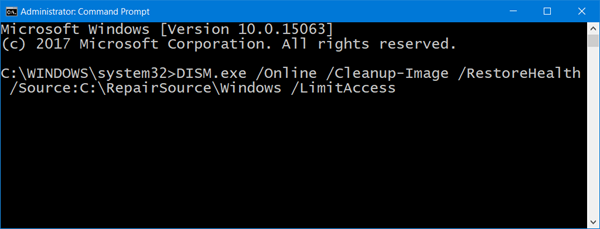
Here you have to replace the C:RepairSourceWindows placeholder with the location of your repair source.
Once the process is complete, DISM will create a log file in %windir%/Logs/CBS/CBS.log and capture any issues that the tool finds or fixes.
These can help fix problems that might prevent Windows Updates from installing.
5] Run Windows Update Troubleshooter
Use the Windows Update Troubleshooter from Microsoft. It resets Windows Updates settings to defaults. You may also run the Online Windows Troubleshooter from Microsoft.
6] Manually Reset Windows Update Components to default
Use the Reset Windows Update Agent Tool (Microsoft tool) or the Reset Windows Update Tool (From a 3rd-party) and see if it helps you. This PowerShell script will help you Reset Windows Update Client. See this post if you want to manually reset each Windows Update components to default.
7] Use FixWU
Use our Fix WU tool and see if it helps. It re-registers all the dll, ocx, and ax files required for the proper functioning of Windows Updates.
8] Flush the Software Distribution Folder
![]()
Flush the SoftwareDistribution Folder. Run Command Prompt as administrator. In the CMD box that appears on the computer screen, enter the following strings of text, one at a time, and hit Enter.
net stop wuauserv
net stop bits
Now browse to the C:WindowsSoftwareDistribution folder and delete all the files and folders inside.
If the files are in use, restart your device. After rebooting, run the commands above again. Your Windows Store App needs to be closed, by the way, so do not start it.
Now you will be able to delete the files from the mentioned Software Distribution folder. Now in the Command Prompt windows, type the following commands one at a time, and hit Enter:
net start wuauserv
net start bits
Reboot. If you are using Windows Update, try using Microsoft Updates or vice versa.
9] Reset the Catroot folder
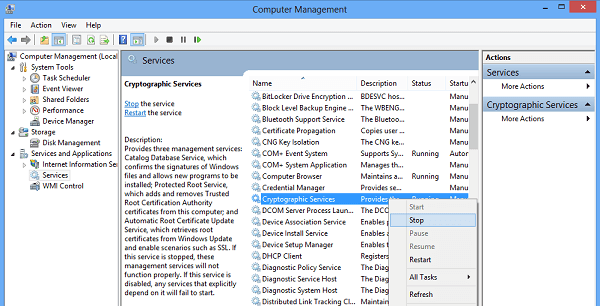
Reset the Catroot folder and see. To reset the catroot2 folder do this:
Open an elevated Command Prompt, type the following command one after the other and hit Enter:
net stop cryptsvc
md %systemroot%system32catroot2.old
xcopy %systemroot%system32catroot2 %systemroot%system32catroot2.old /s
Next, delete all the contents of the catroot2 folder.
Having done this, in the CMD windows, type the following and hit Enter:
net start cryptsvc
Your catroot folder will be reset, once you start Windows Update again.
Read: Windows Updates may fail if Fast Startup is enabled.
10] Check Windows Update Services status
Open Windows Services Manager and check the Windows Update related Services like Windows Update, Windows Update Medic, Update Orchestrator Services, etc are not disabled.
The default configuration on a standalone Windows 11/10 PC is as follows:
- Windows Update Service – Manual (Triggered)
- Windows Update Medic Services – Manual
- Cryptographic Services – Automatic
- Background Intelligent Transfer Service – Manual
- DCOM Server Process Launcher – Automatic
- RPC Endpoint Mapper – Automatic
- Windows Installer – Manual.
This will ensure that the required Services are available.
Apart from the direct service, you should find the dependencies of Windows Update service and ensure if they are running or not.
To get started, search for “services” in the Taskbar search box and click on the search result. After opening the Services window, find out Windows Update, DCOM Server Process Launcher, and RPC Endpoint Mapper. Check if they are running or not.
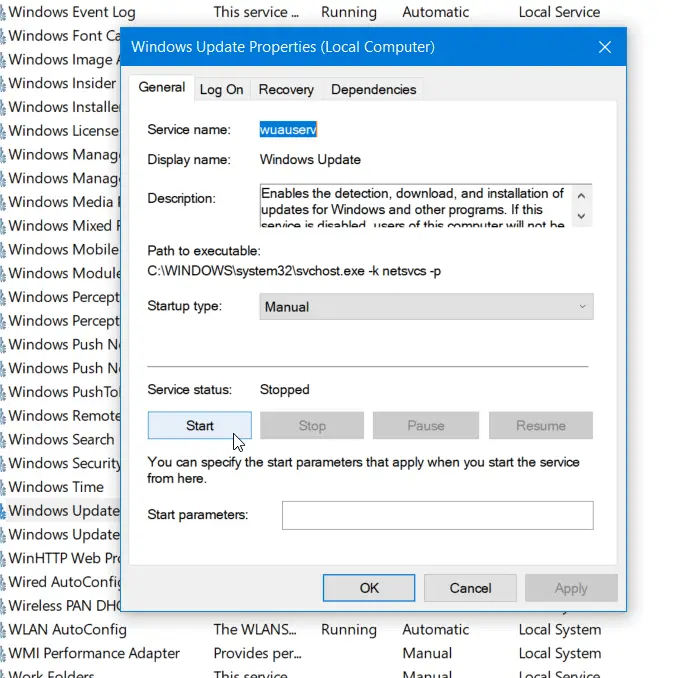
If not, you need to start those services one after one.
11] Check Windows Update log file
If still, you have a problem then, go to C:WindowsWindowsUpdate.log and look for the most recent entry. This will be present towards the end of the log. Any failed updates will have error code/s written next to them. Note them down. If you find just too many entries too confusing delete this WindowsUpdate.log and try installing the problematic updates again.
Now open the newly re-created WindowsUpdate log file and have a look at its contents.
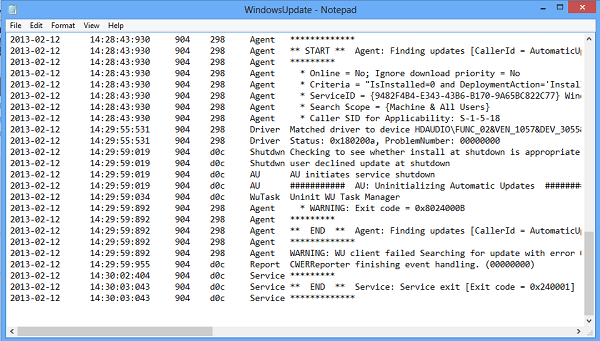
The warnings will probably appear as -: WARNING: Failed to find updates with error code AAAAAAAA.
Now Right-click Computer > Manage > Event Viewer > Applications and Service Logs > Microsoft > Windows > WindowsUpdateClient > Operational . Check out for any Critical Message or Warning.

Next, refer to the Windows Update Error Codes. This will give you the direction in which you may have to look for the solution. You may also search for the Windows Update error code here and see if a specific solution is available.
12] Clear pending.xml file
Open an elevated command prompt window, type the following and hit Enter:
Ren c:windowswinsxspending.xml pending.old
This will rename pending.xml file to pending.old. Now try again.
13] Clear the BITS queue
Clear the BITS queue of any current jobs. To do this, type the following in an elevated CMD and hit Enter:
bitsadmin.exe /reset /allusers
14] Delete incorrect Registry values
Open Registry Editor and navigate to the following key:
HKEY_LOCAL_MACHINECOMPONENTS
Right-click COMPONENTS. Now in the right-pane, delete the following if they exist:
- PendingXmlIdentifier
- NextQueueEntryIndex
- AdvancedInstallersNeedResolving
Restart your computer and try again.
15] Run Windows Module Installer
The Windows Module Installer is a built-in Windows 10 service. It lets you fix the Windows updates which are stuck.
To use this, open a command prompt with admin privileges.
Type the following and hit Enter:
SC config trustedinstaller start=auto
Once successfully executed, you should see [SC] ChangeServiceConfig SUCCESS display within the Command Prompt console.

Exit the command prompt, and check if the buttons are back to normal.
16] Run Background Intelligent Transfer Service Troubleshooter
Run the Background Intelligent Transfer Service Troubleshooter and see if it helps. Background Intelligent Transfer Service or BITS helps in the transfer, download or upload of files between a client and server, and provides progress information related to the transfers. It also plays a role in the download of files from a peer. This Windows Service is essential for Windows Updates to work properly.
17] Download its stand-alone installer
Search on the Microsoft Update Catalog website for the Windows Update patch using the Update KB number, and download its stand-alone installer. Now apply the patch manually. Search for just the number; don’t include KB.
18] Use authenticated Proxy Servers
You can use authenticated Proxy Servers to fix Windows Update and Microsoft Store app Installation errors.
19] Run Windows Update in Clean Boot State
Boot in Clean Boot State and run Windows Update and see if this helps. It works in most cases.
Read: Windows Update keeps disabling itself automatically.
20] Take the help of Microsoft Virtual Agent
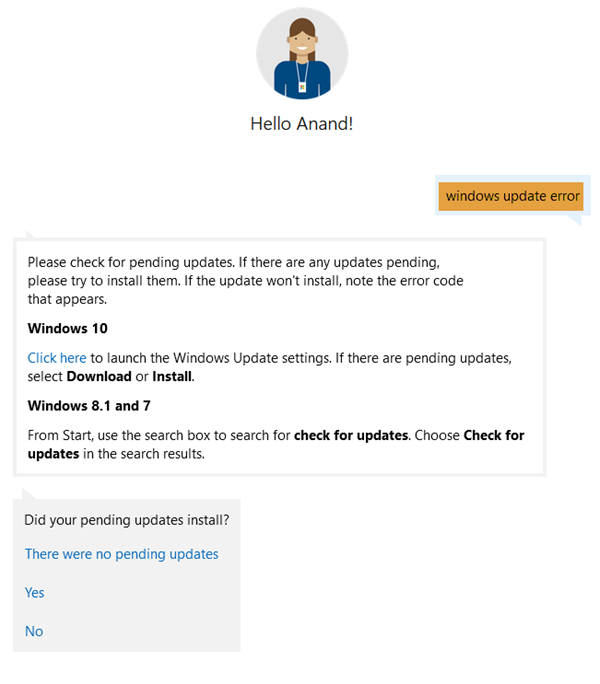
If you’re getting an error downloading or installing Windows Updates, you could also take the help of Microsoft Virtual Agent, by clicking here.
22] Windows Update URL List for whitelisting
Make sure that the following URLs related to Microsoft Update are not blocked:
- http://windowsupdate.microsoft.com
- http://*.windowsupdate.microsoft.com
- https://*.windowsupdate.microsoft.com
- http://*.update.microsoft.com
- https://*.update.microsoft.com
- http://*.windowsupdate.com
- http://download.windowsupdate.com
- https://download.microsoft.com
- http://*.download.windowsupdate.com
- http://wustat.windows.com
- http://ntservicepack.microsoft.com
- http://go.microsoft.com
- http://dl.delivery.mp.microsoft.com
- https://dl.delivery.mp.microsoft.com
- https://stats.microsoft.com
21] Contact Microsoft Support
If nothing helps, you can always contact Microsoft Support. They will surely be able to help you.
Posts that help fix related Windows Update problems:
- Windows Update is stuck downloading updates.
- Failure configuring Windows updates. Reverting changes.
- Potential Windows Update Database error detected
- Troubleshoot problems with installing Windows Updates in Windows – FAQ
- Windows keeps installing the same update
- Cannot Update Windows using Windows Update
- Your device is at risk because it’s out of date & missing important security & quality updates
- Some Updates were canceled message
- Service Registration is Missing or Corrupt.
We hope something here has helped you fix your Windows Updates issues.
Windows Update is not working or stuck on Checking for Updates
If Windows Update is not working or stuck on Checking for Updates, you may run the Windows Update Troubleshooter, Re-register these Windows Update related DLL files, or reset Windows Update components.
Windows update failed errors are frustrating for anyone who uses Windows. Whenever you experience Windows update failing repeatedly and see a blue screen with a message indicating problems updating Windows, this article will help guide you through fixing Windows update errors.
Why Windows Updates Fail?
The Windows 10 update failure to install is not uncommon but what causes win 10 update errors? There are several reasons why Windows updates keep failing:
Corrupt Update Files. In this case, try deleting the flawed file and see if that resolves the issue.
Overload in Update Queue. Perhaps, Windows require several updates at a time. Try rebooting the machine to troubleshoot the issue.
Limited Space on Your Drive. The lack of free space on your drive can be a reason why Windows update keeps failing. See if you can free up some space on your drives and try running the Windows update once again.
Conflict with Drives or Hardware. Try disconnecting any connected devices such as drives, USB, or printers that may be causing Windows updates to fail every time.
t
It automatically installs crucial drivers and updates whenever they are available. To keep Windows endpoints up to date, the best practice is to automatically install Windows updates.
How to Fix Update Error
When you wonder how you can install Windows update that keeps failing, there are certain steps you should try to finally update OS on your computer. Give a go the steps described below in the following order until your Windows update error is fixed.
1. Restart the Computer and Run Windows Update Again
Most updates run smoothly, but from time to time, several updates might queue and try to run at the same time, causing Windows update failure. For instance, a servicing stack update has to install first, and then you have to reboot the machine before running the next update installation.
2. Check for Driver or Hardware Conflict
As mentioned earlier, the connected peripheral devices may cause conflicts and be the reason why Windows is unable to update. Disconnect all printers, USBs, webcams, reboot your machine, and then try to run Windows update again.
3. Vacate Space on Your Drive
It is possible that your drive simply lacks free storage space to install the update. See if you can make space by decluttering or using an exernal drive, reboot the machine, and give a Windows update another go.
4. Try the Windows Update Troubleshooter Tool
Windows 10 comes with a designated tool to assist in troubleshooting Microsoft updates issues. Access it easily by simply typing troubleshoot in the taskbar search field. Go to the settings and click Windows Update, then Run the Troubleshooter. Then follow the prompts with instructions.
5. Stop Updates
Step 1 — Go to Settings
Step 2 — Click Update & Security
Step 3 — Click Windows Update
Step 4 — Click Advanced Options button
Step 5 — Switch the Pause Updates toggle off
Step 6 — Restart your computer
Step 7 — Rerun Windows Update
6. Erase Software Distribution Log
Step 1 — Restart computer in safe mode
Step 2 — Open File Explorer, and navigate to C:Windows
Step 3 — Locate and delete the Software Distribution folder
Step 4 — Restart your computer, and run Windows Update
7. Download the Latest Feature Update from Microsoft
When Windows Update keeps failing, you should consider visiting the Microsoft site to download the update file. Once you have downloaded the update, run it manually.
8. Run the System File Checker (SFC) Scan
The System File Checker is a default tool in Windows 10. Also known as “SFC scan,” it’s your fastest method to fix corrupted system files and other problems. Run it to attempt to fix any potential issues with Windows installation.
9. Restore Windows 10 from a Backup
If you are not successful at fixing failed Windows updates, we suggest that you check for a Restore Point on your system. Use it to restore the device to a state when the Windows Update was installed correctly. You can then update the OS to the latest version from that point.
Why Installing Windows Updates?
Microsoft regularly rolls out updates that include bug fixes, feature upgrades, and security patches to improve Windows operating systems usability and security.
Operating system updates patches protect from newly uncovered security vulnerabilities that hackers can exploit. Essentially, by delaying updating your system, you increase the risks of vulnerability exploitation.
Can I Skip Windows Update?
As a standard directive, it is advised to consistently install Windows updates once they become available. However, there are certain exceptions. If you happen to have a problematic update, then you might want to pick between bypassing the update and performing an installation of Windows 10 from scratch.
Consider Action1 RMM for Remote Update Deployment
Give Action1 RMM a try if you need to install Windows updates to remote endpoints. Action1 remote monitoring and management solution is developed to simplify and automate distributions of patches and updates and boost IT management efficiency. Action1 RMM is free to use on up to 100 endpoints and is easy to onboard in minutes.
 В этой инструкции о том, как исправить большинство типичных ошибок обновления Windows 11 или Windows 10, 8.1 и Windows 7 несколькими способами: путем использования утилиты с сайта Майкрософт, вручную в командной строке или с помощью простого скрипта, который полностью сбрасывает и очищает настройки Центра обновлений и другими методами.
С помощью описанных ниже методов можно исправить большинство ошибок, когда обновления в Центре обновлений не скачиваются или сообщается, что произошли ошибки при установке обновления. Дополнительную информацию по возможным решениям можно найти в конце руководства.
В Windows предусмотрено встроенное средство устранения неполадок при установке обновлений, это же средство можно скачать и с официального сайта Майкрософт.
При возникновении проблем с обновлениями рекомендую начать именно с этого варианта: он не самый результативный, но самый простой и безопасный:
- В Windows 11 зайдите в Параметры — Система — Устранение неполадок — Другие средства устранения неполадок — Центр обновления Windows и нажмите кнопку «Запуск».

- В Windows 10 средство устранения неполадок находится в Параметры — Обновление и безопасность — Устранение неполадок — Дополнительные средства устранения неполадок — Центр обновления Windows.
- Если доступа к Параметрам нет, вы можете скачать средство устранения неполадок обновлений Windows с официального сайта https://aka.ms/wudiag и запустить файл.

При использовании инструмента «Диагностики и предотвращения неполадок на компьютере» будет автоматически выполнен поиск возможных проблем со службами, отвечающих за установку обновлений и сброс некоторых параметров Центра обновлений.

После выполнения проверки и устранения неполадок можно попробовать установить обновления снова.
Очистка кэша обновлений Windows вручную
Этот способ срабатывает для большого количества ошибок при скачивании и установке обновлений в Windows 11, Windows 10 и Windows 8.1. Порядок действий следующий:
- Запустите командную строку от имени администратора. Для этого можно использовать поиск на панели задач: начните вводить «Командная строка», нажмите правой кнопкой мыши по результату и выберите пункт «Запуск от имени администратора».
- По порядку введите следующие команды, нажимая Enter после каждой:
net stop cryptSvc
net stop bits
net stop msiserver
ren C:WindowsSystem32catroot2 catroot2.old
ren C:WindowsSoftwareDistribution SoftwareDistribution.old
net start wuauserv
net start cryptSvc
net start bits
net start msiserver
- Закройте командную строку и попробуйте повторить поиск, скачивание и установку обновлений через Центр обновлений.
Утилита Reset Windows Update Tool
Ранее на сайте Microsoft TechNet была доступна специальная утилита для полного сброса параметров центра обновлений Windows 10, 8.1 и Windows 7 — Reset Windows Update Tool, выполняющая полный набор действий, каждое из которых направлено на исправление различных моментов, способных мешать скачиванию и установке обновлений через Центр обновлений. Сейчас официальный сайт инструмента изменился, но эффективность — нет.Перед использованием утилиты рекомендую создать точку восстановления системы. Следующие шаги будут выглядеть следующим образом:
- Скачайте Reset Windows Update Tool в нужной разрядности с сайта https://wureset.com/downloads.php.
- После установки, запустите Reset Windows Update Tool от имени администратора (правый клик — запуск от имени администратора) и выберите нужный язык, русский в наличии, но в моем случае отображается в неправильной кодировке, поэтому далее показаны действия на английском языке.

- Вам будет предложено согласиться с тем, что гарантий исправной работы утилиты не дается и ввести «Y», если вы согласны.
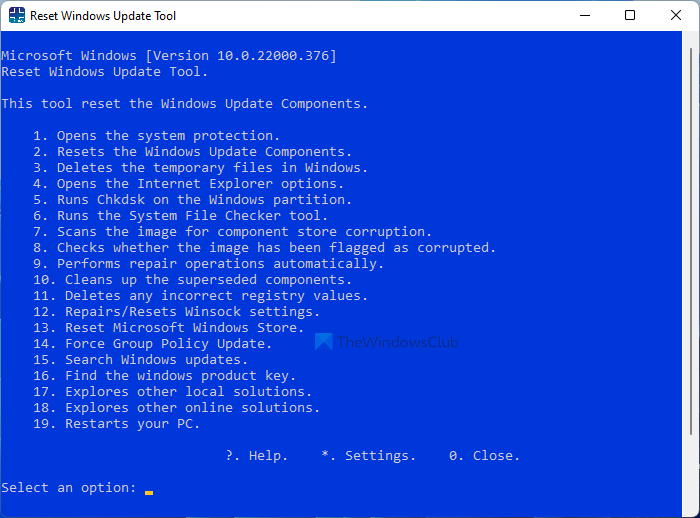
- Вы увидите меню, в котором можно выбрать, какие действия следует выполнить для исправления работы центра обновлений. Рекомендую следующий порядок: 2, 3, 6, 11, 12, 13 с последующей перезагрузкой компьютера.


Полный список доступных опций в утилите текущей версии:
- Открыть параметры защиты системы.
- Сброс компонентов Центра обновлений Windows.
- Удаление временных файлов.
- Открыть параметры Internet Explorer.
- Запуск chkdsk на системном разделе (проверка диска на ошибки).
- Запуск проверки целостности системных файлов.
- Проверка целостности хранилища компонентов.
- Проверка образа на наличие отметки «поврежденный».
- Автоматическое восстановление хранилища компонентов с помощью dism.exe
- Очистка устаревших компонентов.
- Удаление записей реестра с ошибками.
- Сброс и исправление параметров Winsock.
- Принудительное обновление локальных групповых политик.
- Запуск поиска обновлений Windows.
- Поиск ключа продукта Windows.
- Поиск других локальных исправлений (открывает устранение неполадок Windows).
- Поиск дополнительных способов исправления онлайн (открывает справку на сайте Майкрософт в браузере).
- Перезапуск ПК.
Подробно об использовании утилиты в отдельной статье: Как исправить ошибки обновлений с помощью Reset Windows Update Tool.
Сброс центра обновлений Windows для исправления ошибок с помощью bat-файла
Для того, чтобы исправить многие ошибки при установке и загрузке обновлений Windows 10, 8.1 и Windows 7, бывает достаточно полностью сбросить параметры центра обновлений. Я покажу, как сделать это автоматически. В дополнение к сбросу, предложенный скрипт запустит необходимую службу, если вы получаете сообщение о том, что Центр обновления не запущен.
Кратко о том, что происходит при выполнении нижеследующих команд:
- Останавливаются службы: Центр обновления Windows, Фоновая интеллектуальная служба передачи BITS, Службы криптографии.
- Служебные папки центра обновления catroot2, SoftwareDistribution, downloader переименовываются в catroot2.old и т.д. (которые, если что-то пошло не так, можно использовать как резервные копии).
- Все ранее остановленные службы снова запускаются.
Для того, чтобы использовать скрипт, откройте блокнот Windows и скопируйте в него команды, представленные ниже. После этого сохраните файл с расширением .bat — это и будет сценарий для остановки, сброса и перезапуска Центра обновлений Windows (подробнее: Как создать BAT-файл).
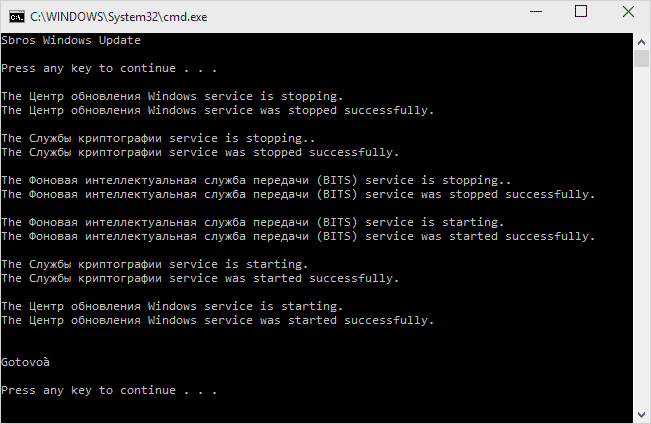
@ECHO OFF
echo Sbros Windows Update
echo.
PAUSE
echo.
attrib -h -r -s %windir%system32catroot2
attrib -h -r -s %windir%system32catroot2*.*
net stop wuauserv
net stop CryptSvc
net stop BITS
ren %windir%system32catroot2 catroot2.old
ren %windir%SoftwareDistribution SoftwareDistribution.old
ren "%ALLUSERSPROFILE%application dataMicrosoftNetworkdownloader" downloader.old
net Start BITS
net start CryptSvc
net start wuauserv
echo.
echo Gotovo
echo.
PAUSE
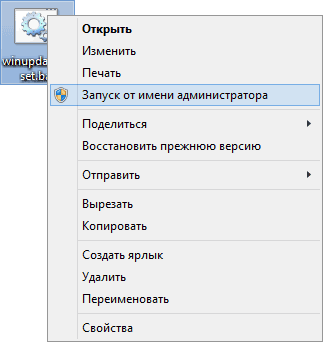
После того, как файл создан, кликните по нему правой кнопкой мыши и выберите пункт «Запуск от имени администратора», вам будет предложено нажать любую клавишу для начала, после чего по порядку будут выполнены все необходимые действия (еще раз нажимаем любую клавишу и закрываем командную строку).
И, наконец, обязательно перезагрузите компьютер. Сразу после перезагрузки снова зайдите в Центр обновления и посмотрите, исчезли ли ошибки при поиске, скачивании и установке обновлений Windows.
На сайте Майкрософт также приводятся шаги для выполнения всех необходимых действий по сбросу вручную: Сброс центра обновлений Windows вручную.
Скачивание и установка обновлений вручную
Если ошибки возникают при установке какого-то одного обновления, вы можете попробовать вручную скачать его из каталога центра обновления Майкрософт:
- Перейдите на страницу https://www.catalog.update.microsoft.com/Home.aspx
- В поле поиска на странице введите номер обновления, отображаемый в центре обновлений в формате: KB1234567

- Посмотрите, есть ли в результатах поиска доступное для загрузки обновление с этим номером для вашей версии операционной системы. При наличии — скачайте и установите его.

Быстрая переустановка системы с исправлением системных файлов и параметров, но без удаления программ и данных
Если простые способы не помогают, вы можете выполнить быструю переустановку системы с исправлением всех системных файлов и параметров, при этом все ваши программы и данные останутся на месте. Способ подходит для Windows 11 и Windows 10:
- Если у вас имеется ISO-файл с образом текущей ОС, просто смонтируйте его в системе и запустите файл setup.exe, а затем пройдите все этапы установки.

- Если файла образа нет, то для Windows 11 — скачайте оригинальный ISO Windows 11, смонтируйте в системе и запустите файл setup.exe с него. Для Windows 10 — зайдите на страницу https://www.microsoft.com/ru-ru/software-download/windows10 и нажмите кнопку «Скачать средство сейчас». Запустите скачанную программу и на экране «Что вы хотите сделать?» нажмите «Обновить этот компьютер сейчас», далее пройдите все необходимые шаги для установки системы.

К сожалению, не все возможные ошибки обновления Windows можно решить вышеописанным способом (хотя и многие). Если способ вам не помог, то обратите внимание на следующие возможные варианты:
- Попробуйте использовать сторонние программы управления обновлениями Windows для их загрузки и установки.
- Если ранее для отключения обновлений вы использовали какую-то стороннюю программу, попробуйте с помощью неё же вновь включить их.
- Если вы использовали какие-то утилиты для отключения слежки Windows 10, они могли заблокировать доступ к серверам Майкрософт, например, в файле hosts и брандмауэре.
- При наличии сторонних антивирусов на компьютере, попробуйте отключить антивирус и проверить, решило ли это проблему.
- Попробуйте установить DNS 8.8.8.8 и 8.8.4.4 в параметры Интернет-соединения. О том как это сделать: Как изменить адрес DNS-сервера в Windows.
- Отсутствие свободного места (или малое его количество) на системном разделе жесткого диска или SSD также может приводить к ошибкам при скачивании и установке обновлений. Здесь может быть полезным: Как очистить диск C от ненужных файлов.
- Проверьте, запущены ли все необходимые службы (их список приводился ранее).
- Выполните поиск в Интернете по сообщаемому коду ошибки, чтобы узнать о возможных причинах появления ошибки.
- Выполните проверку и восстановление целостности системных файлов Windows. Подробные инструкции: для Windows 11 и для Windows 10.
- Использование VPN или прокси также может влиять на возможность скачивания и установки обновлений.
- Попробуйте выполнить чистую загрузку Windows. Если при чистой загрузке ошибки пропадают, можно сделать вывод, что ошибки вызваны каким-либо сторонним ПО на компьютере.
На самом деле, разных причин, по которым не ищутся, не загружаются и не устанавливаются обновления, может быть множество, но, по моему опыту, представленная информация сможет помочь в большинстве случаев.
- Remove From My Forums
-
Question
-
Hi. I’m on Windows 10 Pro x64 10240. Windows Update keeps trying to install Win10 10586 and failing with Event ID 31 (below). Can anyone please help ?
I’ve already tried all the usual things over the last few days, like rebuilding my user profile (took ages, complete waste of time), following Microsoft’s recommended procedure for resetting and re-registering MS Update (took ages, complete waste of time),
restarting, turning off various things, switching back from MS Update to Windows Update, changing where I get my updates from (MS servers only), trying under a different user account, etc. No joy.My computer is on a domain and I have local admin privileges.
Log Name: Microsoft-Windows-WindowsUpdateClient/Operational
Source: Microsoft-Windows-WindowsUpdateClient
Date: 18/11/2015 17:11:41
Event ID: 31
Task Category: Windows Update Agent
Level: Error
Keywords: Failure,Download
User: SYSTEM
Computer: Na-0-015-WPA.nrc.ac.uk
Description:
Windows Update failed to download an update.
Event Xml:
<Event xmlns=»http://schemas.microsoft.com/win/2004/08/events/event»>
<System>
<Provider Name=»Microsoft-Windows-WindowsUpdateClient» Guid=»{945A8954-C147-4ACD-923F-40C45405A658}» />
<EventID>31</EventID>
<Version>1</Version>
<Level>2</Level>
<Task>1</Task>
<Opcode>12</Opcode>
<Keywords>0x4000000000000024</Keywords>
<TimeCreated SystemTime=»2015-11-18T17:11:41.890227600Z» />
<EventRecordID>1867</EventRecordID>
<Correlation />
<Execution ProcessID=»592″ ThreadID=»2848″ />
<Channel>Microsoft-Windows-WindowsUpdateClient/Operational</Channel>
<Computer>Na-0-015-WPA.nrc.ac.uk</Computer>
<Security UserID=»S-1-5-18″ />
</System>
<EventData>
<Data Name=»updateTitle»>Upgrade to Windows 10 Pro, version 1511, 10586</Data>
<Data Name=»errorCode»>0x80200013</Data>
<Data Name=»updateGuid»>{BAE0476D-D5E0-45C6-9F59-B87E910A2B4B}</Data>
<Data Name=»updateRevisionNumber»>201</Data>
</EventData>
</Event>
— huddie71 ~~If you~re not seeking help or offering it, you probably shouldn~t be here.~~
Answers
-
Hi,
Let’s see the description of this error code as below:
BITS can request ranges of updates. However, if the network proxy or firewall device does not support range requests, BITS cannot download updates. Therefore, BITS returns the 0x80200013 error code. When this problem occurs, the %windir%\Windowsupdate.log
displays the following entry:
Download job failed due to insufficient range support
To resolve this problem, contact the vendor of the network proxy or firewall device.To fix this issue, please first disable your 3rd party security app or firewalls, if there is any proxy settings on your computer, please remove it before install Windows updates.
Hope this could be helpful.
Please remember to mark the replies as answers if they help, and unmark the answers if they provide no help. If you have feedback for TechNet Support, contact tnmff@microsoft.com.
-
Proposed as answer by
Tuesday, December 1, 2015 3:04 AM
-
Marked as answer by
Zen the Ocelot
Friday, December 4, 2015 9:28 PM
-
Proposed as answer by
Sometimes, some Windows Updates fail to download or just refuse to get installed on your computer even when you try a few times. If you face this problem where Windows Updates will not install or download, then this Windows Updates troubleshooting tutorial will help you identify and troubleshoot the problem.

If Windows Update fails to install, is not working, updates will not download or keep failing, on your Windows 11/10/8/7 then these suggestions will help you troubleshoot & fix Windows Updates.
- Try again
- Delete Temporary Files and Browser Cache
- Disable your Firewall and Anti-virus software
- Run SFC and DISM
- Run Windows Update Troubleshooter
- Manually Reset Windows Update Components to default
- Use FixWU
- Flush the SoftwareDistribution Folder
- Reset the Catroot folder
- Check Windows Update Services status
- Check Windows Update log file
- Clear pending.xml file
- Clear the BITS queue
- Delete incorrect Registry values
- Run Windows Module Installer
- Run Background Intelligent Transfer Service Troubleshooter
- Download its stand-alone installer
- Use authenticated Proxy Servers
- Run Windows Update in Clean Boot State
- Take the help of Microsoft Virtual Agent
- Contact Microsoft Support.
Windows Updates troubleshooting tutorial
Let us see all these potential fixes in detail. Do create a system restore point first. Go through the entire post and then see which of these may apply to your system. You may then try any of these, in no particular order.
Fix Windows Update Errors
1] Try again
As mentioned earlier, many times, an update may fail to install in the first instance, but for some inexplicable reason, succeeds in the 2nd or 3rd try. So try a couple of times.
2] Delete Temporary Files and Browser Cache
If you are unable to install Windows Updates, first clear up your Temporary Files and Browser Cache, reboot, and try again. See if this helps resolve the issue. Best and easy to use the built-in Disk Cleanup utility or CCleaner.
3] Disable your Firewall and Anti-virus software
Temporarily Disable your Firewall and Anti-virus software and try again. Here is a list of Windows files and folders you may exclude from Antivirus scans.
4] Run SFC and DISM
Run System File Checker to replace potentially corrupted system files.
You can also fix corrupted Windows Update system files using DISM Tool. The Dism.exe tool can be used in different situations, and one of them is to repair a corrupted Windows Update files. Do note that you need to run a different command if you want to repair corrupted Windows Update System Files. If you run the usual /RestoreHealth command, it may not necessarily help.
DISM will replace potentially corrupted or missing system files with good ones. However, if your Windows Update client is already broken, you will be prompted to use a running Windows installation as the repair source or use a Windows side-by-side folder from a network share, as the source of the files.
You will then be required to run the following command instead:
DISM.exe /Online /Cleanup-Image /RestoreHealth /Source:C:\RepairSource\Windows /LimitAccess
Here you have to replace the C:\RepairSource\Windows placeholder with the location of your repair source.
Once the process is complete, DISM will create a log file in %windir%/Logs/CBS/CBS.log and capture any issues that the tool finds or fixes.
These can help fix problems that might prevent Windows Updates from installing.
5] Run Windows Update Troubleshooter
Use the Windows Update Troubleshooter from Microsoft. It resets Windows Updates settings to defaults. You may also run the Online Windows Troubleshooter from Microsoft.
6] Manually Reset Windows Update Components to default
Use the Reset Windows Update Agent Tool (Microsoft tool) or the Reset Windows Update Tool (From a 3rd-party) and see if it helps you. This PowerShell script will help you Reset Windows Update Client. See this post if you want to manually reset each Windows Update components to default.
7] Use FixWU
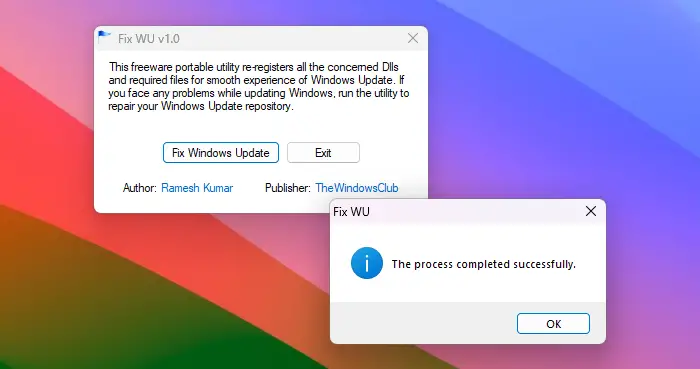
Use our Fix WU tool and see if it helps. It re-registers all the dll, ocx, and ax files required for the proper functioning of Windows Updates.
8] Flush the Software Distribution Folder
![]()
Flush the SoftwareDistribution Folder. Run Command Prompt as administrator. In the CMD box that appears on the computer screen, enter the following strings of text, one at a time, and hit Enter.
net stop wuauserv
net stop bits
Now browse to the C:\Windows\SoftwareDistribution folder and delete all the files and folders inside.
If the files are in use, restart your device. After rebooting, run the commands above again. Your Windows Store App needs to be closed, by the way, so do not start it.
Now you will be able to delete the files from the mentioned Software Distribution folder. Now in the Command Prompt windows, type the following commands one at a time, and hit Enter:
net start wuauserv
net start bits
Reboot. If you are using Windows Update, try using Microsoft Updates or vice versa.
9] Reset the Catroot folder
Reset the Catroot2 folder and see. To reset the catroot2 folder do this:
Open an elevated Command Prompt, type the following command one after the other and hit Enter:
net stop cryptsvc
md %systemroot%\system32\catroot2.old
xcopy %systemroot%\system32\catroot2 %systemroot%\system32\catroot2.old /s
Next, delete all the contents of the catroot2 folder.
Having done this, in the CMD windows, type the following and hit Enter:
net start cryptsvc
Your catroot folder will be reset, once you start Windows Update again.
Read: Windows Updates may fail if Fast Startup is enabled.
10] Check Windows Update Services status
Open Windows Services Manager and check the Windows Update related Services like Windows Update, Windows Update Medic, Update Orchestrator Services, etc are not disabled.
The default configuration on a standalone Windows 11/10 PC is as follows:
- Windows Update Service – Manual (Triggered)
- Windows Update Medic Services – Manual
- Cryptographic Services – Automatic
- Background Intelligent Transfer Service – Manual
- DCOM Server Process Launcher – Automatic
- RPC Endpoint Mapper – Automatic
- Windows Installer – Manual.
This will ensure that the required Services are available.
Apart from the direct service, you should find the dependencies of Windows Update service and ensure if they are running or not.
To get started, search for “services” in the Taskbar search box and click on the search result. After opening the Services window, find out Windows Update, DCOM Server Process Launcher, and RPC Endpoint Mapper. Check if they are running or not.
If not, you need to start those services one after one.
11] Check Windows Update log file
If still, you have a problem then, go to C:\Windows\WindowsUpdate.log and look for the most recent entry. This will be present towards the end of the log. Any failed updates will have error code/s written next to them. Note them down. If you find just too many entries too confusing delete this WindowsUpdate.log and try installing the problematic updates again.
Now open the newly re-created WindowsUpdate log file and have a look at its contents.
The warnings will probably appear as -: WARNING: Failed to find updates with error code AAAAAAAA.
Now Right-click Computer > Manage > Event Viewer > Applications and Service Logs > Microsoft > Windows > WindowsUpdateClient > Operational . Check out for any Critical Message or Warning.
Next, refer to the Windows Update Error Codes. This will give you the direction in which you may have to look for the solution. You may also search for the Windows Update error code here and see if a specific solution is available.
12] Clear pending.xml file
Open an elevated command prompt window, type the following and hit Enter:
Ren c:\windows\winsxs\pending.xml pending.old
This will rename pending.xml file to pending.old. Now try again.
13] Clear the BITS queue
Clear the BITS queue of any current jobs. To do this, type the following in an elevated CMD and hit Enter:
bitsadmin.exe /reset /allusers
14] Delete incorrect Registry values
Open Registry Editor and navigate to the following key:
HKEY_LOCAL_MACHINE\COMPONENTS
Right-click COMPONENTS. Now in the right-pane, delete the following if they exist:
- PendingXmlIdentifier
- NextQueueEntryIndex
- AdvancedInstallersNeedResolving
Restart your computer and try again.
15] Run Windows Module Installer
The Windows Module Installer is a built-in Windows 10 service. It lets you fix the Windows updates which are stuck.
To use this, open a command prompt with admin privileges.
Type the following and hit Enter:
SC config trustedinstaller start=auto
Once successfully executed, you should see [SC] ChangeServiceConfig SUCCESS display within the Command Prompt console.
Exit the command prompt, and check if the buttons are back to normal.
16] Run Background Intelligent Transfer Service Troubleshooter
Run the Background Intelligent Transfer Service Troubleshooter and see if it helps. Background Intelligent Transfer Service or BITS helps in the transfer, download or upload of files between a client and server, and provides progress information related to the transfers. It also plays a role in the download of files from a peer. This Windows Service is essential for Windows Updates to work properly.
17] Download its stand-alone installer
Search on the Microsoft Update Catalog website for the Windows Update patch using the Update KB number, and download its stand-alone installer. Now apply the patch manually. Search for just the number; don’t include KB.
18] Use authenticated Proxy Servers
You can use authenticated Proxy Servers to fix Windows Update and Microsoft Store app Installation errors.
19] Run Windows Update in Clean Boot State

Boot in Clean Boot State and run Windows Update and see if this helps. It works in most cases.
Read: Windows Update keeps disabling itself automatically.
20] Take the help of Microsoft Virtual Agent
If you’re getting an error downloading or installing Windows Updates, you could also take the help of Microsoft Virtual Agent, by clicking here.
22] Windows Update URL List for whitelisting
Make sure that the following URLs related to Microsoft Update are not blocked:
- http://windowsupdate.microsoft.com
- http://*.windowsupdate.microsoft.com
- https://*.windowsupdate.microsoft.com
- http://*.update.microsoft.com
- https://*.update.microsoft.com
- http://*.windowsupdate.com
- http://download.windowsupdate.com
- https://download.microsoft.com
- http://*.download.windowsupdate.com
- http://wustat.windows.com
- http://ntservicepack.microsoft.com
- http://go.microsoft.com
- http://dl.delivery.mp.microsoft.com
- https://dl.delivery.mp.microsoft.com
- https://stats.microsoft.com
21] Contact Microsoft Support
If nothing helps, you can always contact Microsoft Support. They will surely be able to help you.
Posts that help fix related Windows Update problems:
- Windows Update is stuck downloading updates.
- Failure configuring Windows updates. Reverting changes.
- Potential Windows Update Database error detected
- Troubleshoot problems with installing Windows Updates in Windows – FAQ
- Windows keeps installing the same update
- Cannot Update Windows using Windows Update
- Your device is at risk because it’s out of date & missing important security & quality updates
- Some Updates were canceled message
- Service Registration is Missing or Corrupt.
We hope something here has helped you fix your Windows Updates issues.
Windows Update is not working or stuck on Checking for Updates
If Windows Update is not working or stuck on Checking for Updates, you may run the Windows Update Troubleshooter, Re-register these Windows Update related DLL files, or reset Windows Update components.
This article outline all the general troubleshooting steps to resolve common Windows update installation failed or download error for common error code. Follow the recommended solution steps to fix Windows update problem.
The detail error message as below:
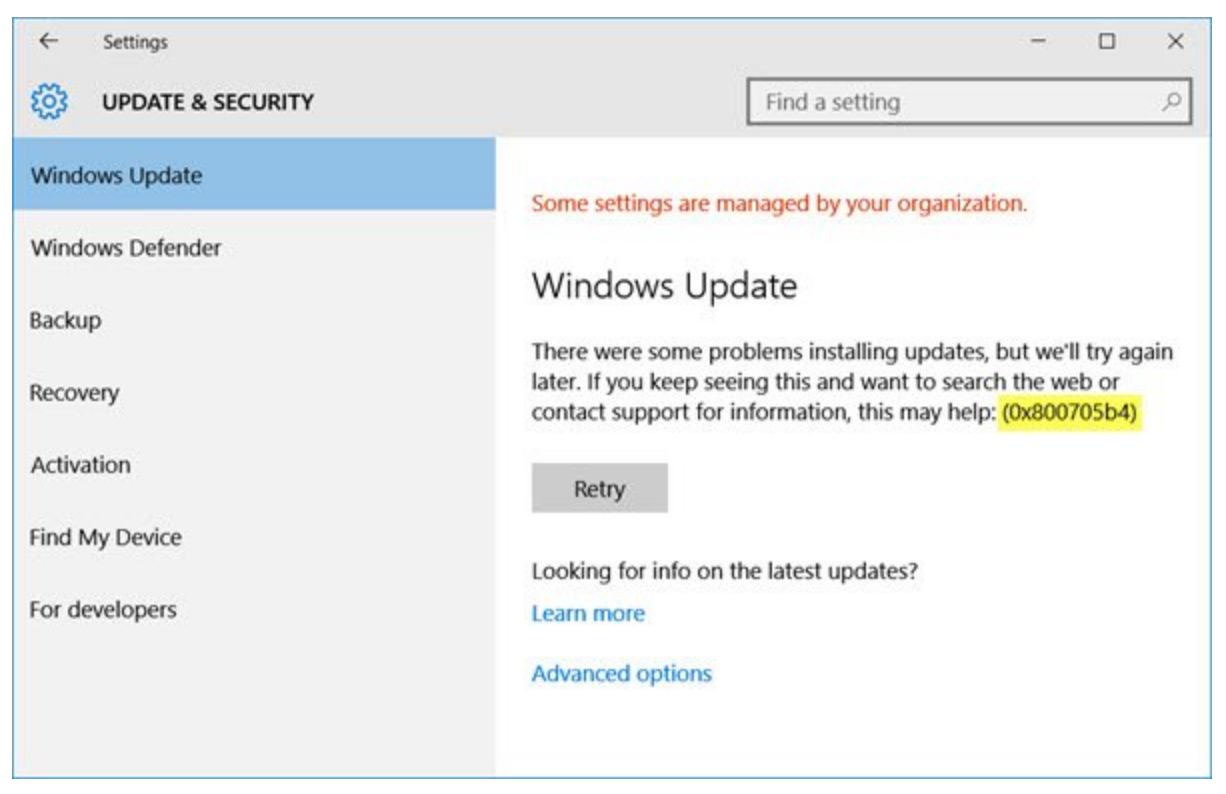
Windows Update
There were some problems installing updates, but we’ll try again later. If you keep seeing this and want to search the web or contact support for information, this may help:
Windows Update
Updates failed
There were problems installing some updates, but we’ll try again later.

Windows Update
Error encountered
There were some problems installing updates, but we’ll try again later. If you keep seeing this and want to search the web or contact support for information, this may help:

Windows Update
Updates available
Download error

Windows Update
Updates failed
Some update files are missing or have problems. We’ll try to download the update again later.

Windows Update
Windows could not search for new updates
An error occurred while checking for new updates for your computer.
Error(s) found:

Windows Update
Some updates were not installed
Error(s) found:

Table of Contents
Content Summary
Solution 1: Delete Temporary Files and Browser Cache
Solution 2: Execute Windows Update Troubleshooter
Solution 3: Change Settings in the Component Services console
Solution 4: Execute DISM to repair Windows Updates
Solution 5: Execute SFC
Solution 6: Execute System Update Readiness tool
Solution 7: Execute Background Intelligent Transfer Service Troubleshooter
Solution 8: Clear and flush the SoftwareDistribution folder
Solution 9: Clear the BITS queue
Solution 10: Manually Reset Windows Update Components to default using Reset Windows Update Agent
Solution 11: Directly download the Windows 10 ISO or the Update
Solution 12: Manually download the update from Microsoft Update Catalog
Solution 13: Execute Windows Update in Clean Boot State
Solution 14: Microsoft Virtual Agent
Solution 1: Delete Temporary Files and Browser Cache
Clear the temporary files, browser cache and cookies. Restart your Windows and try the update again. Below are the steps to clear cache and cookies in Google Chrome, Mozilla Firefox, Internet Explorer, Microsoft Edge, and Opera.
Clear cache and cookies in Google Chrome:
Step 1: At the top right, click More (the icon with 3 dots in vertical).
Step 2: Click More tools > Clear browsing data.
Step 3: At the top, choose a time range or select All time to delete everything.
Step 4: Check the box for Cookies and other site data and Cached images and files.
Step 5: Click Clear data.
Reference: Google Support > Clear cache & cookies
Clear cache in Mozilla Firefox
Step 1: In the upper right corner of the browser, click the Menu button.
Step 2: Click Preferences.
Step 3: Select Privacy & Security from the menu on the left.
Step 4: Scroll down click Clear data in the Cookies and Site Data section.
Step 5: In the Time Range to Clear dropdown menu, select Everything.
Step 6: Under History, uncheck everything except Cache.
Step 7: Click OK.
Reference: Mozilla Support > How to clear the Firefox cache
Delete Cached Files and Cookies in Internet Explorer (version 9 or later)
Step 1: Click Settings Internet Explorer Settings Icon.
Step 2: Click Internet Options.
Step 3: Under Browsing History, click Delete.
Step 4: Uncheck everything except Temporary Internet files and website files.
Step 5: Click Delete.
Reference: Pearson > Internet Explorer: Delete Cached Files and Cookies
Clear browsing data in Microsoft Edge
Step 1: In the upper right corner of the browser, click Settings and more > Settings > Privacy and services.
Step 2: Hover over History, then from the menu on the left, click Clear browsing data.
Step 3: In the Time Range drop-down menu, select All time.
Step 4: Uncheck everything except Cached images and files and Cookies and other site data.
Step 5: Click Clear now.
Reference: Microsoft Support > View and delete browser history in Microsoft Edge
Clear cookies, cache, history and everything in Opera
Step 1: Press Ctrl + H to open the history page.
Step 2: Click Clear browsing data in the top-right corner.
Step 3: Select what you want to delete and the time range, like recent history or all time.
Step 4: Click Clear data.
Reference: Opera > How to clear cookies, cache, history – everything
Solution 2: Execute Windows Update Troubleshooter
Run the in-built Windows Update Troubleshooter and see if that helps to resolve the Windows Update error.
Step 1: Go to Settings > Update & Security > Troubleshoot tab.
Step 2: Click on Windows Update option and follow the instructions on the screen after the Windows Update troubleshooter opens.
Step 3: Navigate to Troubleshoot section again and open Internet Connections troubleshooter.
Step 4: Restart the computer and perform Windows Update again.
Alternatively, you can download Windows Update Troubleshooter for Windows 10, Windows 7 and Windows 8.
For Older Versions of Windows:
Step 1: Pressing Windows key + R to open a Run box.
Step 2: Type control and press Enter to open the Classic Control Panel interface.
Step 3: Type troubleshoot in the search bar located at the top-right corner of the screen.
Step 4: From the list of search results, click on the Troubleshooting entry.
Step 5: Click on Fix problems with Windows Update under System and Security to open the Windows Update Troubleshooter.

Step 6: Click on Advanced.

Step 7: Check the box associated with Apply repairs automatically.
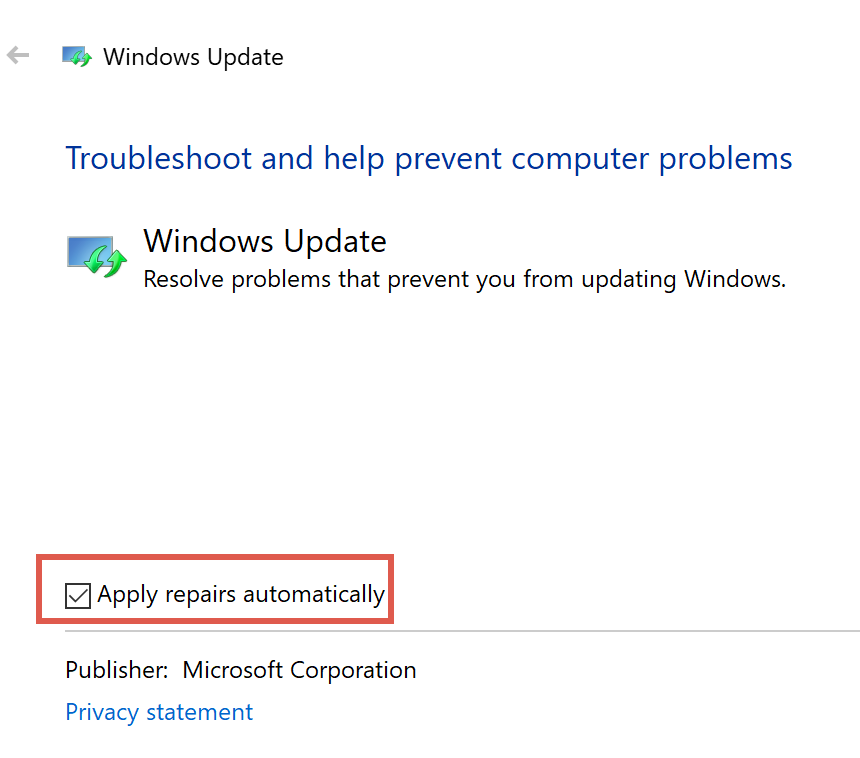
Step 8: Click on Apply this Fix and follow the on-screen prompts.

Step 9: Restart your PC.
More detail about Windows Update Troubleshooter at Windows Update: FAQ and Fix Windows Update errors.
Solution 3: Change Settings in the Component Services console
Step 1: Press Windows + R to open the Run dialogue box.
Step 2: Type dcomcnfg.exe and press Enter to open the Component Services.
Step 3: Expand Component Services in the left pane.
Step 4: Click Computers under Component Services.
Step 5: Select My computer, then right-click on it and select Properties from the context menu.
Step 6: Go to the Default Properties tab and make sure the settings below:
- Default Authentication Level: Connect
- Default Impersonation Level: Identify

Step 7: Click Apply > OK.
Step 8: Restart your Windows.
Solution 4: Execute DISM to repair Windows Updates
Deployment Image Servicing and Management (DISM) tool will replace potentially corrupted or missing system files with good ones.
Step 1: Press Windows key once.
Step 2: Type cmd in the search box.
Step 3: Choose Run as administrator option to open an elevated command prompt. If you are prompted for an administrator password or for a confirmation, type the password, or select Allow.
Step 4: Type the following command and press Enter to perform an advanced scan to check if the Windows 10 image has any problems: DISM /Online /Cleanup-Image /ScanHealth
Step 5: Type the following command and press Enter to run an advanced scan and repair any problems automatically: DISM /Online /Cleanup-Image /RestoreHealth

If the Windows Update client is already corrupted, you will be prompted to use a running Windows installation as the repair source or use a Windows side-by-side folder from a network share, as the source of the files. Type the following command and press Enter: DISM.exe /Online /Cleanup-Image /RestoreHealth /Source:C:\RepairSource\Windows /LimitAccess
*Replace the C:\RepairSource\Windows placeholder with the location of your repair source.
Alternatively, you can execute the DISM/Cleanup-Image tool in PowerShell with Run as administrator option.
Repair-WindowsImage -Online –CheckHealth

Repair-WindowsImage -Online –ScanHealth

Repair-WindowsImage -Online –RestoreHealth
Step 6: Once the process is complete, DISM will create a log file in %windir%/Logs/CBS/CBS.log and capture any issues that the tool finds or fixes.
Step 7: Once the DISM scan and repair is completed, close the elevated CMD window and restart the computer.
Solution 5: Execute SFC
Run System File Checker (SFC) to replace potentially corrupted system files.
Step 1: Press Windows key once.
Step 2: Type cmd in the search box.
Step 3: Choose Run as administrator option to open an elevated command prompt. If you are prompted for an administrator password or for a confirmation, type the password, or select Allow.
Step 4: Type the following command and press Enter: sfc /scannow

Step 5: Wait until the message The operation completed successfully or Windows Resource Protection did not find any integrity violations show then close Command Prompt.
Step 6: Restart the computer.
Also Read: How to fix vcruntime140_1.dll missing error?
Solution 6: Execute System Update Readiness tool
Step 1: Download the System Update Readiness tool.
- x86-based (32-bit) versions of Windows 7 SP1
- x64-based (64-bit) versions of Windows 7 SP1
- x64-based (64-bit) versions of Windows Server 2008 R2 SP1
- Itanium-based versions of Windows Server 2008 R2 SP1
Step 2: Double-click to tun the downloaded executable file.
Step 3: Select Download on the Download Center webpage.
Step 4: To install the tool immediately, select Open or Run, and then follow the instructions on your screen.
Step 5: In the Windows Update Standalone Installer dialogue box, select Yes.
Step 6: When you see Installation complete, select Close.
Step 7: Reinstall the update or service pack you were trying to install previously.
Solution 7: Execute Background Intelligent Transfer Service Troubleshooter
Background Intelligent Transfer Service (BITS) helps in the transfer, download or upload of files between a client and server, and provides progress information related to the transfers. BITS also plays a role in the download of files from a peer. Run the Background Intelligent Transfer Service Troubleshooter and see if it helps.
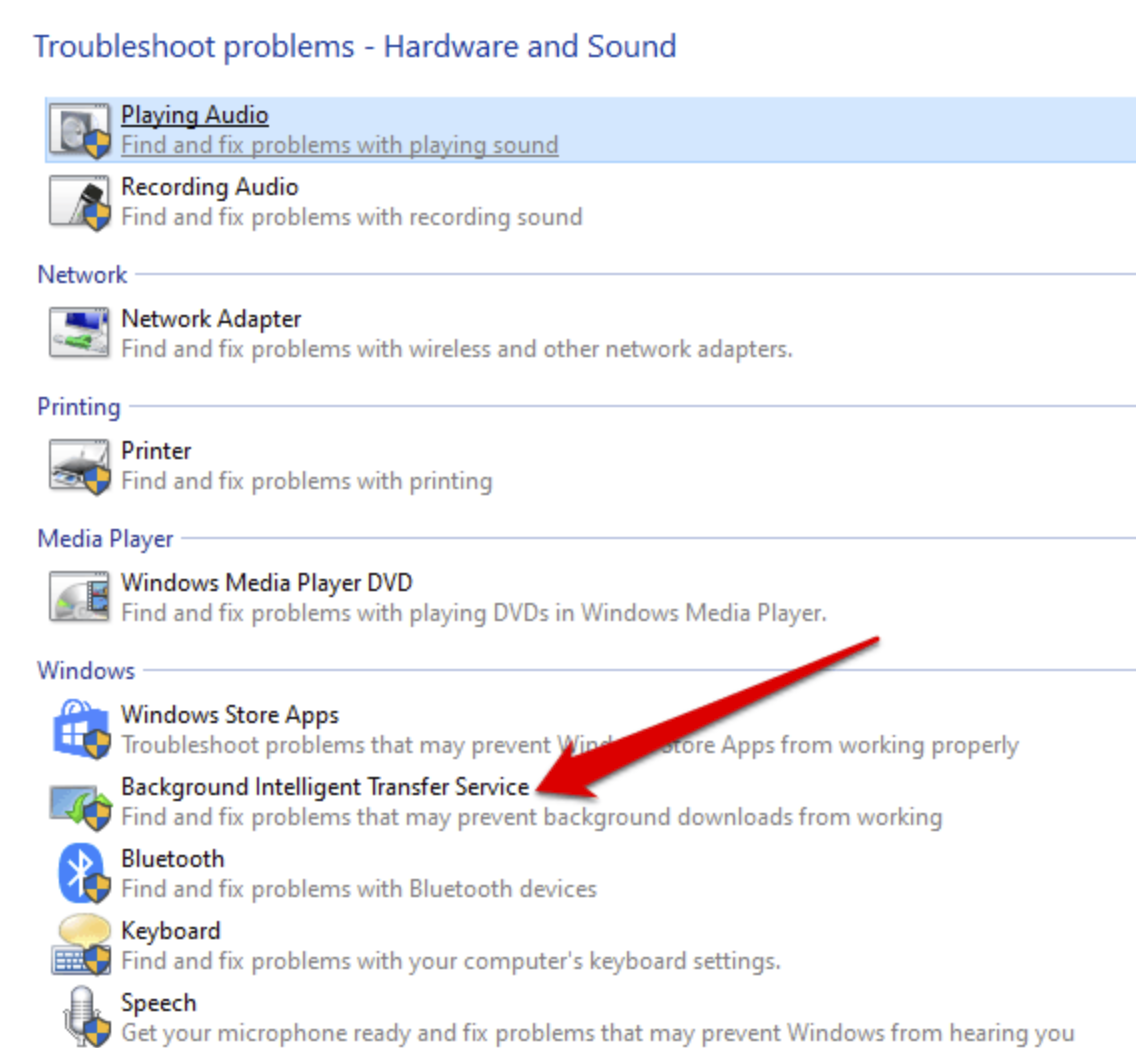
Step 1: Open Control Panel.
Step 2: Switch the View by the drop-down menu at the top-right to Large icons option.

Step 3: Click the Troubleshooting > Hardware and Sound.


Step 4: Click the Background Intelligent Transfer Service troubleshooter under Windows section. If you can’t find Background Intelligent Transfer Service troubleshooter, you can also download the troubleshooter for Windows 10.
Step 5: Click the Advanced option.

Step 6: Check the Apply repairs automatically option then click the Next button.

Step 7: Click the View detailed information option.

Step 8: Review the Detection details.

Step 9: Click the Next button.
Step 10: Click the Close button.
Solution 8: Clear and flush the SoftwareDistribution folder
The Software Distribution folder in Windows 10 operating system is a folder located in the Windows directory and used to temporarily store files that may be required to install Windows Update on your computer. Clear the contents of the SoftwareDistribution folder and then retry the update process again.
Step 1: Disable Internet connection.
Step 2: Press Windows key once.
Step 3: Type cmd in the search box.
Step 4: Choose Run as administrator option to open an elevated command prompt. If you are prompted for an administrator password or for a confirmation, type the password, or select Allow.
Step 5: Type the following command and press Enter after each command to reset the SoftwareDistribution folder:
net stop wuauserv

net stop cryptSvc

net stop bits

net stop msiserver

net stop appIDSvc

ren C:\Windows\SoftwareDistribution SoftwareDistribution.old

ren C:\Windows\System32\catroot2 Catroot2.old

rmdir C:\Windows\SoftwareDistribution\DataStore

rmdir C:\Windows\SoftwareDistribution\Download

net start wuauserv

net start cryptSvc

net start bits

net start msiserver

net start appIDSvc

exit
Step 6: Restart the computer.
Step 7: Enable back the Internet connection.
Step 8: Press the Windows logo key and type PowerShell and in the resulting list, Right-click on Windows PowerShell and select Run as Administrator option from context menu.
Step 9: Enter the following command in the PowerShell and press enter: wuauclt.exe /updatenow
Solution 9: Clear the BITS queue
Step 1: Press Windows key once.
Step 2: Type cmd in the search box.
Step 3: Choose Run as administrator option to open an elevated command prompt. If you are prompted for an administrator password or for a confirmation, type the password, or select Allow.
Step 4: Type the following command and press Enter to clear the BITS queue of any current jobs: bitsadmin.exe /reset /allusers
Solution 10: Manually Reset Windows Update Components to default using Reset Windows Update Agent
Use the Reset Windows Update Agent Tool which helps to reset and repair all Windows Update Client related components & registry keys, detect corruptions, replace corrupted system files, fix corrupted system image, Reset Winsock settings and so on.
Step 1: Download Reset Windows Update Agent from TechNet Script Center.
Step 2: Unzip ResetWUEng.zip
Step 3: Right-click on the ResetWUEng.cmd script and select Run as Administrator option from the context menu.
Step 4: Type Y and press Enter to continue.
Step 5: Type the number corresponding to the Resets the Windows Update Components option and press Enter to continue.
Step 6: Restart your Windows.
Solution 11: Directly download the Windows 10 ISO or the Update
Download the Windows 10 ISO image file from the Microsoft website, double-click the ISO image to mount it as a virtual drive then double-click the setup.exe file to start the in-place upgrade process.
Solution 12: Manually download the update from Microsoft Update Catalog
Step 1: Visit Windows update history page to find out which is the latest released update for Windows 10.
Step 2: Copy the KB (Knowledge Base) number next to the latest released update for Windows.
Step 3: Open Microsoft Update Catalog in Internet Explorer.
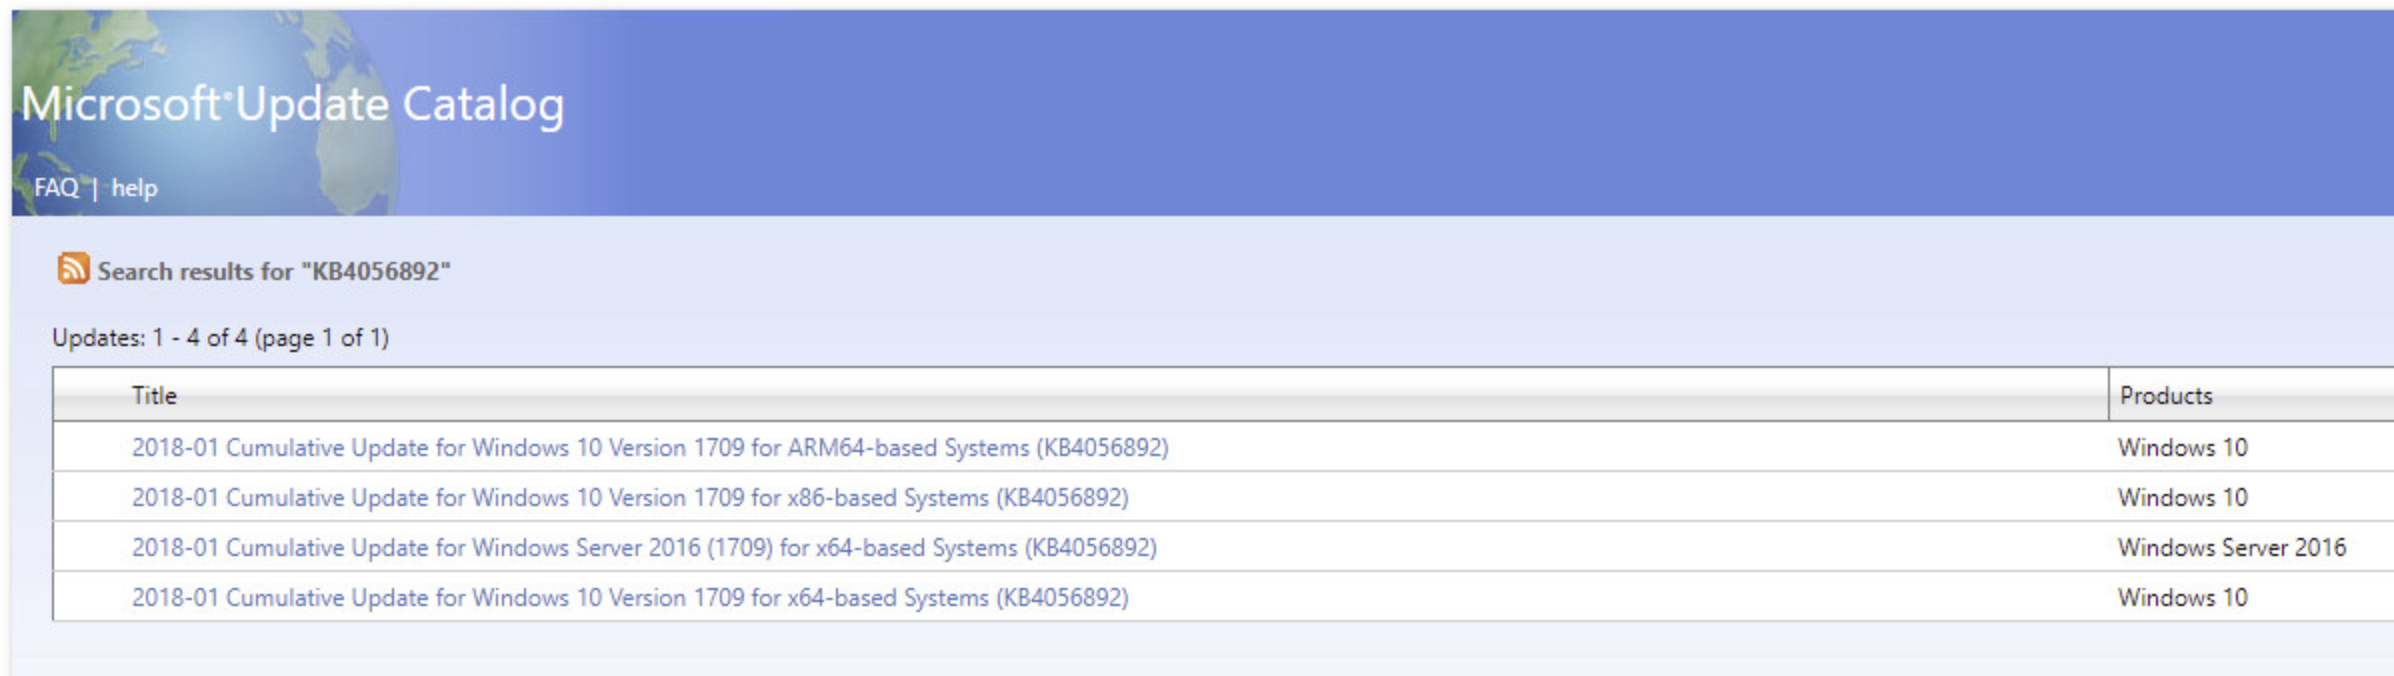
Step 4: Search for the failed update KB using the search function located at the top-left corner of the screen.

Search for the failed update KB using the search function located at the top-left corner of the screen.
Step 5: Download the appropriate Windows Update according to the CPU architecture (32bit or 64bit) and the Windows OS version.
Step 6: Execute the downloaded .msu installer with Run as Administrator option and follow the on-screen instruction to install it.
Step 7: Restart the computer.
Solution 13: Execute Windows Update in Clean Boot State
Start Windows in Clean Boot state will use a minimal set of drivers and startup programs to help eliminate software conflicts that occur when you install a program or an update or when you run a program in Windows.
Step 1: Press Windows key + R to open the Run box.
Step 2: Type msconfig and press Enter to open the System Configuration. If the UAC (User Account Control) prompted then click Yes to grant administrative access.
Step 3: In the General tab, click on the radio button beside Selective startup. Uncheck the Load startup items checkbox.

Step 4: Choose the Services Tab, then check on Hide All Microsoft services and click on Disable all button.

Step 5: Click the Apply button, and then click on the OK button. Choose Restart Later option.
Step 6: Press Windows + R key to open a Run box.
Step 7: Type msconfig and click OK to open the system configuration window.
Step 8: Choose Startup and select Open Task Manager.
Step 9: Disable all applications in the list to prevent it from startup when the computer is booting up.
Step 10: Close Task Manager and click Apply button in System Configuration windows then click OK.
Step 11: Choose to restart when prompt to do so.
Solution 14: Microsoft Virtual Agent
Ask Microsoft Virtual Agent.

It’s always a good idea to keep your Windows system fully updated, both to prevent unnecessary issues as well as to get new features on your system. However, sometimes Windows fails to download or install the update.
It can occur due to various reasons such as issues with services, drivers, and third-party programs, corruption of your system files, and so on. Since there are many causes, there are correspondingly varied solutions for each case.
In this article, we have mentioned the most common causes for this error while providing their corresponding solutions.
Table of Contents
Causes for Windows Failing to Install or Download Updates
Here are some of the potential causes for Windows failing to install or download system or optional updates:
- Lack of enough disk space.
- Incorrect date and time settings.
- Issues with update services.
- Corrupt downloaded update files.
- Third-party antivirus blocking the process.
- Conflicts due to incompatible apps and drivers.
- System file corruption
First, restart your PC and try the update again by clicking Retry or Install now on the Update Settings (ms-settings:windowsupdate on Run). If you still encounter the error, you need to follow the possible solutions we have mentioned below to resolve your issue.
Disconnect Peripheral Devices
The drivers or firmware of some external devices may conflict with the files an update is trying to install on your system. In such cases, the process can’t complete leading to this issue.

You can simply disconnect your peripheral devices while undergoing system updates to avoid such errors. If it’s a device you really need, such as a mouse, you can try using other devices in place of your original one to check for such issues.
Free Disk Space
You also need to have enough space on your system drive in order to download update files. So, if its free space is low, delete or transfer unnecessary files to make enough space available for the update. You can also refer to our article on How to Clean C Drive to learn about additional things you can do for this purpose.
Check Date and Time
Microsoft’s server checks the local time on your system before providing you with the update files. If there are large differences between the time on your computer and that of the server, it won’t provide you with the files for security purposes.
As such, your system fails to download the update. So, you need to maintain the proper date and time on your PC. To do so,
- Right-click on the date and time on your taskbar (right-side) and select Adjust date and time.
- Toggle On Set time zone automatically. If it shows an incorrect time zone, turn it Off and manually set the proper one.
- Enable Set time automatically.

- Click on Sync now.

Run Windows Update Troubleshooter
Windows comes with dedicated troubleshooters that help you in resolving many system issues. It also includes the Windows Update troubleshooter, which you can run whenever you encounter any update issues. Here’s how you can do so:
- Open Run by pressing Win + R.
- Type
ms-settings:troubleshootto open Troubleshoot Settings. - Click on Other troubleshooters or Additional troubleshooters.
- Select Run next to Windows Update (Windows 11) or select Windows Update > Run this troubleshooter (Windows 10).

- Follow the on-screen instructions.

Reset Update Components
It is possible that the necessary services for the update process are not starting properly or have gotten stuck. Additionally, the update files those services downloaded may be incomplete or corrupt, causing the update to fail.
You can resolve both situations by resetting the update components. Here, you restart the services while deleting all pre-downloaded files in order to allow your system to start the download process all over again. Here’s what you need to do:
- Open Run.
- Type
cmdand press Ctrl + Shift + Enter to open the Elevated Command Prompt. - Enter the following commands:
rmdir %systemroot%\SoftwareDistribution /S /Qrmdir %systemroot%\system32\catroot2 /S /Q
- If you can’t remove the folders, the services you stopped earlier (net stop commands) have restarted. So, run them again and then remove the folders using the
rmdircommand. - Then continue entering the commands below to reset the Winsock Catalog and then restart the above service:
netsh winsock reset
net start appidsvcnet start bitsnet start cryptsvcnet start wuauserv


Restart your PC and try updating your system again.
Disable Third-party Antivirus
Some third-party security programs may stop your system from downloading or installing some update files by considering them as threats even when they are safe. You can avoid this issue by temporarily disabling those applications until you successfully install the updates.
The process to do so differs between the various applications. So, it’s better to check official sources if you need more information.
Disable Startup Apps and Services
Some of your active applications can also conflict with the update process because of compatibility issues. You need to end all active processes that are not necessary to run the OS and try updating again to resolve them.
The easiest way to do so is to disable the startup processes and reboot your system before installing updates. Here are the necessary steps:
- Open Run.
- Type
msconfigand press Enter to open System Configuration. - Go to the Services tab.
- Check Hide all Microsoft services and click Disable all.

- Click Apply and then go to the Startup tab.
- Hit Open Task Manager.
- Here, select each Enabled program (see the Status column) and click Disable.


Restart your system and try running the update again.
Repair Corrupt System Files
Another possible reason for this issue is due to corrupt system files or drive sectors. The update process requires many system programs to be running, so you need to repair all such corruption.
You can use the Deployment Image Servicing and Management (DISM) and the System File Checker (SFC) to repair corrupt system files and the Disk Checking tool (CHKDSK) to repair corrupt boot sectors. To do so,
- Open the Elevated Command Prompt.
- Enter the following commands:
dism /online /cleanup-image /restorehealthsfc /scannowchkdsk /r /x C:

Update Drivers
Corrupt or problematic drivers can also stop your system from installing Windows updates. The updates also include changes to the driver or related system files, which is not possible if the driver restricts such actions. You need to update all your drivers to resolve such issues. Here’s how you can do so:
- Open Run.
- Type
devmgmt.mscand press Enter to open the Device Manager. - Expand the categories and right-click on individual devices.
- Click on Update driver and then Search automatically for drivers.


Update Using Update Assistant or Media Creation
If you can’t update your system through the built-in settings, you can use the Update Assistant for this purpose. However, keep in mind that you can only use it for Windows 10 as of the date of this article’s publishing. Here’s what you need to do:
- Go to Microsoft’s Windows Download webpage and select your Windows version.
- First, use the Update Assistant using the steps below:
- Select Update Now.

- Run the downloaded installer and follow the instructions.
- Select Update Now.
- If you can’t install the update, you can use Media Creation by following the steps below:
- Select Download tool now.
- Run the setup.
- Confirm UAC prompt and Accept the license terms.
- Tick Upgrade this PC now and select Next.

- Click Change what to keep to see what changes the process will make and modify them if necessary.
- Go back to the previous page and choose Install.

