Introduction
A key feature in the Windows family is to enable or disable the USB Ports. We can also use this feature in Windows 10 to enable or disable the USB Ports.
Often we have to share our laptop or PC with another person. The person who has a pen drive with viruses and infected files can inject these malicious files into the system to damage the device and also someone who has bad intentions can steal our important documents through pen drive. We can never be too careful to keep our data secure. Disabling the USB Ports is a very good solution to protect our device from viruses and other vulnerabilities.
And when we need to use the USB Devices through USB Ports we can enable these ports by using different methods like device manager, registry editor, and any other third-party applications.
This tutorial will show you various methods on, how to Enable or Disable USB Ports in Windows 10.
Method 1 — Using Registry Editor
Using the Registry Editor, you can easily enable or disable the USB Ports.
Step 1
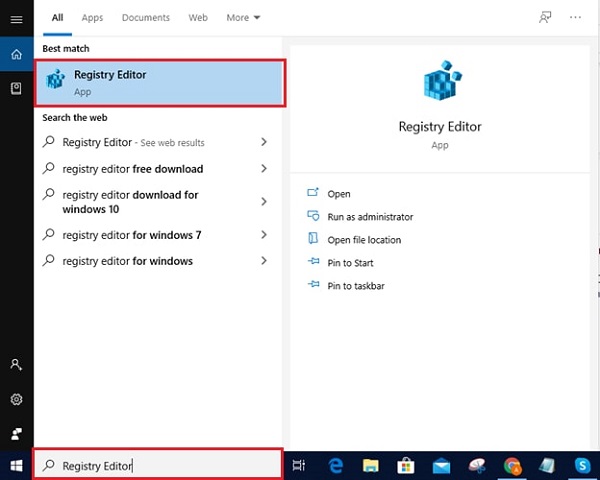
From the Start menu, open the Run dialog box or you can Press the «Window + R» key to open the RUN window.
Step 2
Type «regedit.exe» and press enter to open Registry Editor.

Step 3
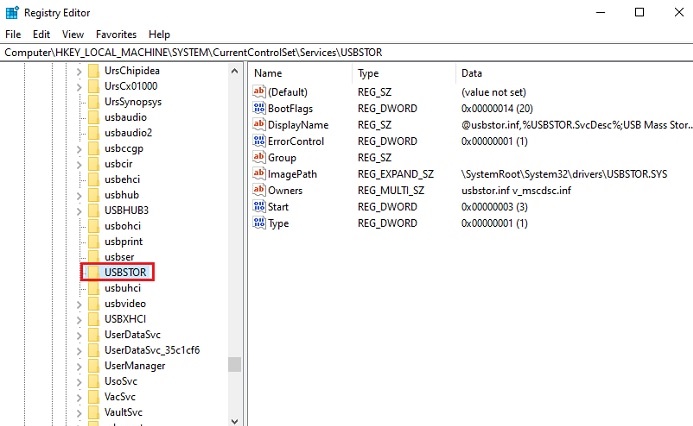
Registry Editor Window will be opened and Navigate the following path:
HKEY_LOCAL_MACHINE > SYSTEM > CurrentControlSet > Services > USBSTOR

Step 4
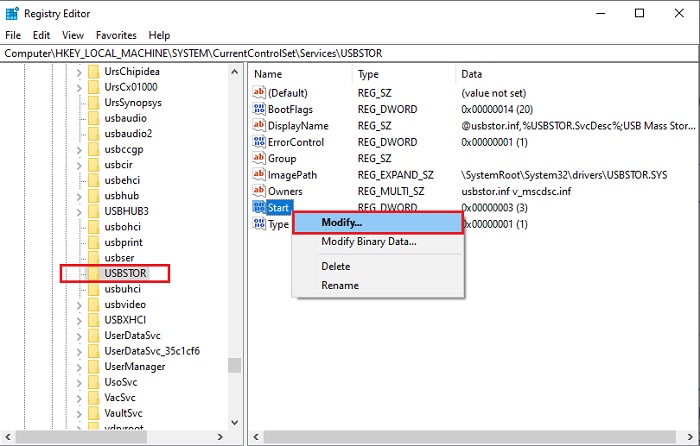
Click on the start option to open the «Edit DWORD (32-bit) Value» Window.

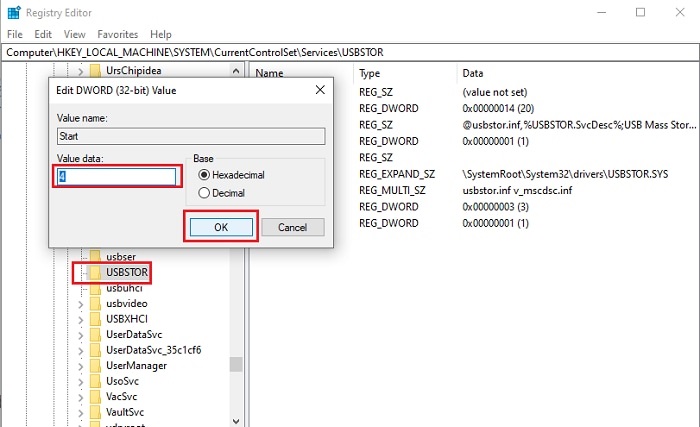
A) To disable the USB Ports or Drives, change the ‘value data’ to ‘4’ and then click OK.

B) To enable the USB Drives or Ports, change its value to 3 and then click OK.

Step 5
Restart Your Laptop or PC to see the effects.
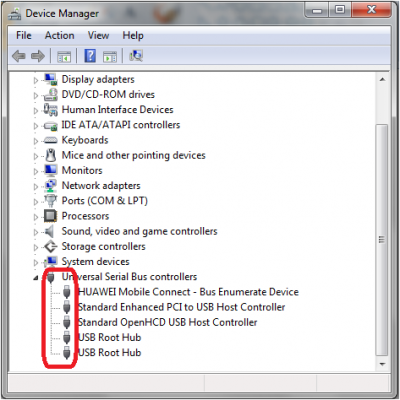
Method 2 — Via Device Manager
You can also easily enable or disable the USB Ports through Device Manager.
Step 1
You can click Start and type Device Manager. Then click Device Manager to open Windows Device Manager or press the «Windows + X» key, and click Device Manager to open it.
Step 2
Click on Universal Serial Bus Controllers and you will see various device options in it.

Step 3
A) Right-click on USB 3.0 (or any mentioned device in your PC) and click on Disable device, to disable the USB Ports in your device.

B) Right-click on USB 3.0 (or any mentioned device in your PC) and click on Enable device, to enable the USB Ports in your device.

Conclusion
By following any of the above methods, you can enable or disable the USB Ports in Windows 10.
I hope you enjoyed this article. Follow C# Corner to learn more new and amazing things about Windows 10.
Thanks for reading this article.
Современные ПК, очень производительны, они способны обрабатывать сотни задач в секунду. Если подключит к нему стороннее устройство, то производительность увеличиться в разы. Это может быть сканер или принтер, смартфон или веб-камера. Все это делает компьютер уникальным инструментом.
Неработающие USB порты нужны пользователю для того, чтобы посторонние люди не смогли утянуть с ПК важную информацию. Это своеобразная политика конфиденциальности. Человек не сможет подключить флешку или винчестер с USB разъёмом, дабы скопировать важные данные. Но важно сделать так, чтобы рабочими остались разъемы под клавиатуру и мышь. Одним из самых простых решений является отключение USB портов через реестр на Windows 10. Основной плюс этого метода в том, что не нужно скачивать разное ПО тем самым, захламляя свой ПК
Отключаем USB через реестр
Итак, приступим. Нажимаем сочетание клавиш Win + R. В командной строке пишем regedit и жмем Enter.

Перед нами появился реестр. В его левой части находим раздел *HKEY_LOCAL_MACHINE* и кликаем по нему дважды. Там есть папка *SYSTEM*, в которой спрятан подраздел *CurrentControlSe*. Далее, находим *Services* и в нем ищем *USBSTOR*. В правой части реестра находим значение *Start* и кликаем по нему. Перед вами откроется окно *Изменение параметра DWORD*. Чтобы отключить порты, выбираем в поле *Значения* 4 вместо 3.

3 — включить порты USB, 4 — выключить. Теперь перезагружаем пк и обнаруживаем, что порты USB отключены.
Отключаем порты в диспетчере устройств
Здесь все очень просто. Кликаем ПКМ по *Мой компьютер* выбираем пункт свойства.

В открывшимся окне выбираем раздел *Диспетчер устройств*.

Перед нами древо всех устройств нашего пк. Находим и выбираем пункт *Контроллеры USB*. Выбирали этот раздел и через ПКМ отключаем все необходимые порты.

Стоит заметить, что данный способ не всегда работоспособен. Бывали случаи, когда отключись 2 порта из 4 или один.
Использование сторонних программ
USB Ports Disabler
Установить запрет к USB портам можно и самым простым способом — через программы. Одна из таких — USB Ports Disabler. Это бесплатная программа, которая деактивирует все порты на вашем пк. Утилита имеет очень простой и минималистичный интерфейс. Программа бесплатна. USB Ports Disabler обнаруживает и отключает USBSTOR, которым мы видели в реестр. Так, чтение данных с USB накопителя будет невозможным.

Скачать USB Ports Disabler — http://www.softportal.com/software-42029-usb-ports-disabler.html
USB Manager
Еще одна утилита достойная внимания. Прежде всего, USB Manager совместим со всеми версия Виндовс. Сама программа маловесна, а установка не вызовет вопросов. Утилита полностью мультиязычна, трудностей с языком не возникнет. USB Manager в один клик отключает\включает все USB порты на вашем пк.

Скачать USB Manager — http://www.softportal.com/get-39722-usb-manager.html
Стоит помнить, что основные вредоносные файлы попадают в систему именно через USB накопители, поэтому отключив порты для чтения, вы тем самым образом обезопасите себя от головной боли. Вы можете выбрать определенный разъем, который хотели бы отключить, это может быть разъем под принтер или сканер. Сама программа работает быстро, четко и корректно. ПО очень часто обновляется, к слову, в последней версии обновлена система отключения для пользователя.
How often have you witnessed blocked Pen drive or USB drive access in your workplace, college, or school? I believe many times; in fact, you are not allowed every time you try to use the USB drive, simply because the administrator has disabled USB drive detection on your Windows 11/10/8/7 system. Again, how often has your data been stolen because someone connected an unauthorized USB to your computer and copied your files? Well, you don’t need to worry because the solution to disable or enable USB Ports is pretty simple.

There are several ways an administrator can prevent using of USB Ports or Drives:
- Altering the Registry values for USB Mass Storage Devices.
- Disabling USB Ports from Device Manager.
- By Uninstalling the USB Mass Storage Drivers
- Using Command-line
- Using third-party freeware
- Using Microsoft Fix It.
Lets us look at how we can fix these problems and enable USB on a Windows PC.
Restrict access to USB ports in Windows
1] Enable, Disable USB Drives & Mass Storage Devices using Registry

If the administrator is wise, then he would do this to ensure a tight blockade. He would alter the settings through the regedit command on the Run console. Now how do you unlock it? You have to go right into where the administrator has been. Here is how.
- Go to Start > Run, type “regedit,” and press enter to open the registry editor.
- Navigate to the following key
HKEY_LOCAL_MACHINE\SYSTEM\CurrentControlSet\Services\USBSTOR
In the right pane, select Start and change the value to 3. (The value 4 will disable USB Storage). Click OK. It will re-enable USB Ports and allow you to use USB or Pen drives.
2] Disable USB Ports from Device Manager
If you still don’t find your USB drive working, you may have to look into the Device Manager. The administrator could have possibly disabled the USB port here. Check out for any possibility in the Device Manager and enable the disabled port by right-clicking on the selected one and clicking Enable or Disable, as per your requirement.
Read: How to check Power Output of a USB Port on Windows 11/10.
3] Uninstall USB Mass Storage Drivers
If the authorities are apprehensive about security in the school, they will take the extreme step of uninstalling the USB Mass Storage Drivers. To make things work, install the device drivers. Here is how you do it.
When you plug in your USB drive, Windows will check for drivers; if not found, Windows will prompt you to install the driver. This would definitely unlock the Pen drive at your school or office.
Read: How to remove Removable Storage Devices folder from desktop
4] Using Command line
To enable or disable CD/DVD ROM Drives, open an elevated command prompt window, type the following, and hit Enter.
reg add HKLM\System\CurrentControlSet\Services\cdrom /t REG_DWORD /v "Start" /d 4 /f
You will get The operation completed successfully message. It will disable the DVD CD Drive.
To enable it, use:
reg add HKLM\System\CurrentControlSet\Services\cdrom /t REG_DWORD /v "Start" /d 1 /f
Restart your Windows PC.
5] Use USB Drive Disabler/Enabler

You can download and use a free tool, USB Drive Disabler/Enabler, which will allow you to enable or disable USB drives on your Windows computer easily. www.intelliadmin.com to download it.
Fix: USB ports are not working in Windows
6] Prevent users from connecting USB
If a USB storage device is already installed on your Windows computer, you can edit the Windows Registry to ensure that the USB does not work when anyone connects it to the PC, using this Microsoft Fixit 50061 [This has been taken down by Microsoft now]. Check first if it applies to your version of the Windows operating system.
How to allow only specific USB devices in Windows?
It is possible through the group policy available at Computer Configuration > Administrative Templates > System > Device Installation> Device Installation Restrictions > Allow Installation of devices that match any of these Device IDs. Here it would help if you had to enter the device ID of the USB, which can be noted from the Device Manager > Properties > Details tab > Device Instance Path.
Read: How to enable or disable Auto-Mounting of Drives, Disks, Volumes
How to Disable USB Ports?
You can either do it from the UEFI or BIOS of your motherboard and the second way is to disable the USB driver using Group Policy or Software. Always make sure you remember how to roll back if you need it for urgent use. Also, note that Group Policy or Software works when you are inside the OS, but the motherboard method works right from the boot.
Please let us know if you have any questions or observations.
You might also want to check out these USB related tools:
- Block and unblock USB port with Windows USB Blocker
- Lock, secure, password protect your USB Drive with USB Safeguard
- Keep a track of who used a USB Device on your Windows PC with USBLogView
- Prevent unauthorized use of USB and other removable media with NetWrix’s USB Blocker
- USB Disabler: A Pendrive Security Tool for Your Windows Laptop.
Иногда возникает необходимость отключить USB порты на компьютере или ноутбуке, чтобы ограничить доступ по подключению флешек, жестких дисков и других USB-устройств. Отключение портов USB поможет предотвратить подключение каких-либо накопителей, которые могут быть использованы для кражи важной информации или стать причиной заражения компьютера вирусом и распространения вредоносного программного обеспечения по локальной сети.

Содержание
- Ограничение доступа к USB портам
- 1. Отключение USB портов через настройки BIOS
- 2. Включение и отключение USB-накопителей с помощью редактора реестра
- 3. Отключение USB портов в диспетчере устройств
- 4. Удаление драйверов контроллера USB
- 5. Запрет пользователям подключение USB-устройств хранения данных с помощью приложения от Microsoft
- 6. Использование программ для отключения/включения доступа к USB-устройствам хранения данных
- 7. Отключение USB от материнской платы
- Запрет доступа к съемным носителям через редактор групповой политики
Ограничение доступа к USB портам
Рассмотрим 7 способов, с помощью которых можно заблокировать USB порты:
- Отключение USB через настройки БИОС
- Изменение параметров реестра для USB-устройств
- Отключение USB портов в диспетчере устройств
- Деинсталляция драйверов контроллера USB
- Использование Microsoft Fix It 50061
- Использование дополнительных программ
- Физическое отключение USB портов
1. Отключение USB портов через настройки BIOS
- Войдите в настройки BIOS.
- Отключите все пункты, связанные с контроллером USB (например, USB Controller или Legacy USB Support).
- После того как вы сделали эти изменения, нужно сохранить настройки и выйти из БИОС. Обычно это делается с помощью клавиши F10.
- Перезагрузите компьютер и убедитесь, что USB порты отключены.
2. Включение и отключение USB-накопителей с помощью редактора реестра
Если отключение через БИОС вам не подходит, можете закрыть доступ непосредственно в самой ОС Windows с помощью реестра.
Приведенная ниже инструкция позволяет закрыть доступ для различных USB-накопителей (например флешек), но при этом другие устройства, такие как клавиатуры, мыши, принтеры, сканеры все равно будут работать.
- Откройте меню Пуск -> Выполнить, введите команду «regedit» и нажмите ОК, чтобы открыть редактор реестра.
- Перейдите к следующему разделу
HKEY_LOCAL_MACHINE \ SYSTEM \ CurrentControlSet \ Services \ USBSTOR
- В правой части окна найдите пункт «Start» и два раза щелкните по нему, чтобы отредактировать. Введите значение «4» для блокировки доступа к USB-накопителям. Соответственно если вы введете опять значение «3», доступ будет вновь открыт.

Нажмите кнопку «ОК», закройте редактор реестра и перезагрузите компьютер.
! Вышеописанный способ работает только при установленном драйвере USB контроллера. Если по соображениям безопасности драйвер не был установлен, значение параметра «Start» может быть автоматически сброшено на значение «3», когда пользователь подключит накопитель USB и Windows установит драйвер.
3. Отключение USB портов в диспетчере устройств
- Нажмите правой кнопкой мыши на значке «Компьютер» и выберете в контекстном меню пункт «Свойства». Откроется окно в левой части которого нужно нажать на ссылку «Диспетчер устройств».
- В дереве диспетчера устройств найдите пункт «Контроллеры USB» и откройте его.
- Отключите контроллеры путем нажатия правой кнопки мыши и выбора пункта меню «Отключить».

Этот способ не всегда работает. В примере, приведенном на рисунке выше отключение контроллеров (2 первых пункта) не привело к желаемому результату. Отключение 3-го пункта (Запоминающее устройство для USB) сработало, но это дает возможность отключить лишь отдельный экземпляр USB-накопителя.
4. Удаление драйверов контроллера USB
Как вариант для отключения портов можно просто деинсталлировать драйвер USB контроллера. Но недостатком этого способа является то, что при подключении пользователем USB-накопителя, Windows будет проверять наличие драйверов и при их отсутствии предложит установить драйвер. Это в свою очередь откроет доступ к USB-устройству.
5. Запрет пользователям подключение USB-устройств хранения данных с помощью приложения от Microsoft
Еще один способ запрета доступа к USB-накопителям – это использование Microsoft Fix It 50061 (http://support.microsoft.com/kb/823732/ru — ссылка может открываться около митуты). Суть это способа заключается в том, что рассматриваются 2 условия решения задачи:
- USB-накопитель еще не был установлен на компьютер
- USB-устройство уже подключено к компьютеру
В рамках данной статьи не будем детально рассматривать этот метод, тем более, что вы можете подробно его изучить на сайте Microsoft, используя ссылку приведенную выше.
Еще следует учесть, что данный способ подходит не для всех версий ОС Windows.
6. Использование программ для отключения/включения доступа к USB-устройствам хранения данных
Существует много программ для установки запрета доступа к USB портам. Рассмотрим одну из них — программу USB Drive Disabler.

Программа обладает простым набором настроек, которые позволяют запрещать/разрешать доступ к определенным накопителям. Также USB Drive Disabler позволяет настраивать оповещения и уровни доступа.
7. Отключение USB от материнской платы
Хотя физическое отключение USB портов на материнской плате является практически невыполнимой задачей, можно отключить порты, находящиеся на передней или верхней части корпуса компьютера, отсоединив кабель, идущий к материнской плате. Этот способ полностью не закроет доступ к USB портам, но уменьшит вероятность использования накопителей неопытными пользователями и теми, кто просто поленится подключать устройства к задней части системного блока.
!Дополнение
Запрет доступа к съемным носителям через редактор групповой политики
В современных версиях Windows существует возможность ограничить доступ к съемным запоминающим устройствам (USB-накопителям в том числе) с помощью редактора локальной групповой политики.
- Запустите gpedit.msc через окно «Выполнить»(Win + R).
- Перейдите к следующей ветви «Конфигурация компьютера -> Административные шаблоны -> Система -> Доступ к съемным запоминающим устройствам»
- В правой части экрана найдите пункт «Съемные диски: Запретить чтение».
- Активируйте этот параметр (положение «Включить»).

Данный раздел локальной групповой политики позволяет настраивать доступ на чтение, запись и выполнение для разных классов съемных носителей.

While you connect external devices the threat of data damage comes along. Multiple threats can hamper data security. And not all these threats can be managed by your Antivirus. Therefore, for extra care, you must take some precautionary steps. One of these precautions is to disable the USB port on your Windows device. USB ports are the most common source of malware or errors in your computer. Also, copying data on your USB device is easy and requires no extra permissions. Therefore, it is necessary to disable USB ports.
Hence the article deals with the simple options to disable or enable USB ports. Read the complete article to find out the most simple and quick alternative to disable USB port on Windows 10,11, 8, or 7 devices. Along with the methods to disable we have also specified how to enable USB port on Windows.
But before you find out these methods here’s a recommendation: Always keep your USB drivers updated. Although there are different methods available to update we recommend users to download driver updates instantly with an automatic tool.
There are several ways through which an administrator can disable USB port on Windows PC. Here we discuss some of the most effective ones below. Along with disabling USB, we have also mentioned methods to enable USB port in Windows 11/10 blocked by Administrator.
Enable/Disable USB Port via Command Prompt
One of the most effective ways to disable USB ports in Windows 7, 8, and 10/11 is using the Command Prompt. Here are the steps that can help you to disable and enable USB port in Windows 10 using command prompt.
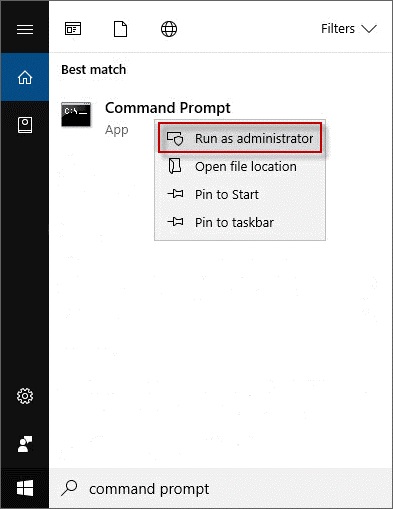
- Run Command Prompt as administrator via Windows Search box.
- Then, enter the ‘set devmgr_show_nonpresent_devices=1’ command and press the Enter Key.
- After that, type ‘start devmgmt.msc’ and press Enter.
- In the Device Manager, expand Universal Serial Bus controllers.
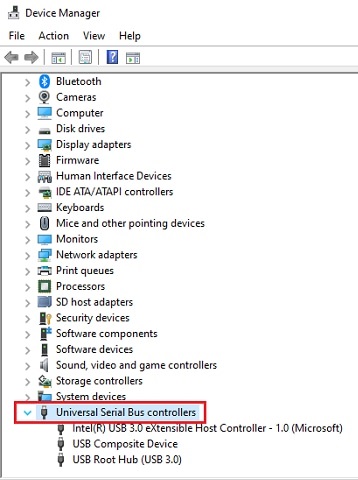
- Then, right-click on all of them and select Disable device.
To enable USB port in Windows 7, 8, and 10 again, you do not need to do much or something different. You can do it by following the same procedure, and at last, instead of selecting the Disable device option, choose Enable device.
Block USB port in Windows 10 via Group Policy
If you are using Windows 10 pro, then this method is exclusively for you. It allows you to block USB port in Windows 10 via Group Policy. However, the Group Policy Editor is only available in Windows 10 pro. Hence, we advise the users of some other versions of Windows to check some other methods mentioned in this post.
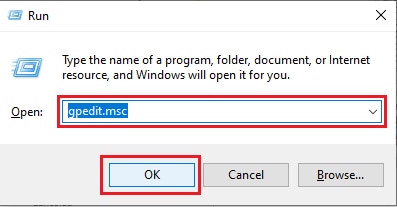
- Launch the Run command with the help of Windows key + R key.
- Then, type gpedit.msc and click OK.
- Navigate to the below path:
Computer Configuration > Administrative Templates > System > Removable Storage Access - Then, double-click on the Removable Disks: Deny write access policy which is available on the right side of the Window
- Now, click Enabled, which is available on the top-left side of the Window.
- Select Apply.
- After that, click on OK to finish it.
- Exit from the Group Policy Editor.
- At last, to implicate all the Group Policy Editor changes, reboot the PC.
However, if you want to enable USB blocked by Group Policy Editor on Windows 10/11, then you have to follow the same steps. But instead of selecting Enabled, you have to choose Disabled.
Enable/Disable USB Port via Registry Editor
The administrator can even disable the USB port by using the Windows Registry Editor. Here are all the necessary steps that you need to follow to block the USB port via Registry Editor.
- Launch the Windows Registry Editor. If you are not so familiar with the Windows shortcut keys, then you can use the Search box to open it.
- Navigate to the path mentioned below:
HKEY_LOCAL_MACHINE\SYSTEM\CurrentControlSet\ Services\USBSTOR
- Find Start and right-click on it.
- Select Modify.
- Change the Value Data to 4 and click OK. It will disable the USB port.
However, if you want to enable USB port in Windows 10 blocked by administrator, then you can do it by changing the value data to 3.
Use BIOS to Enable/Disable USB Port
Some of the PC manufacturers also allows you to make customizations to the BIOS. Hence, you can also use it to disable/enable the USB port of your Windows 11,10, 8, or 7 PC. You can follow these instructions to do it safely.
- Enter the BIOS mode.
- Select the Advanced tab.
- Disable Legacy USB Support and USB functions.
- Use F10 to exit BIOS.
- Restart your PC.
Using this method you can also turn off USB power after shutdown.
Use A Third-Party Application to Enable/Disable USB Port
If you are not interested in following the manual methods to disable the USB port, then you can try using a third-party application to lock the USB port with a password. It will provide you an additional security as nobody will be able to access your USB drives without your permission or password. It can prevent you from the risk of data theft.
However, you can also unlock USB port whenever you want. It is quite easy to lock and unlock USB ports with passwords using third-party applications.
Uninstall USB Drivers
If you want a strong solution to disable the USB ports of your PC, then we recommend you to uninstall the USB drivers. This will lead to a complete stoppage in the functioning of your USB ports. You can do it by following the steps mentioned below.
- Go to Device Manager.
- Expand Universal Serial Bus controllers.
- Then, right-click on all of them and select the Uninstall device option.
- After that, mark ‘Delete the driver software for this device’ and click OK.
However, if you want to get your USB drivers back and enable USB port, then we recommend you to use Bit Driver Updater. It is the best software to download and update device drivers on Windows PC. It is also free to try. Here is the download button.

Although, if you want to know more about this best software to update device drivers, then you can refer to our Bit Driver Updater review.
Also read: No Audio Output Device is Installed in Windows 10,11
Enable/Disable USB Port on Windows
Hopefully, you have now learned how to enable/disable the USB port on Windows 11, 10, 8, or 7 devices. We hope the above methods were helpful in resolving your concern. If you know any more tips please enlighten us too in the comments below.
For more guides on technology updates and device drivers subscribe to our blog. Also to never miss any updates stay connected through our Facebook, YouTube, and Twitter handles.