In Windows 11, Notification Center is where you can find app notifications and Quick Settings—which give you quick access to commonly used settings and apps.
You can change your notification settings at any time from the Settings app.
-
Select Start , then select Settings .
-
Go to System > Notifications.
-
Do any of the following:
-
Turn notifications, banners, and sounds on or off for some or all notification senders. To see all options, expand the notifications area.
-
Turn tips and suggestions about Windows On or Off.
Action Center in Windows 10 is where you’ll find your notifications and quick actions.
Change your settings at any time to adjust how and when you see notifications and which apps and settings are your top quick actions.
-
Select Start .
-
Select Settings > System > Notifications & actions.
-
To change notification settings for all senders, under Notifications, turn all notifications on or off, and change when and where you’ll see your notifications.

-
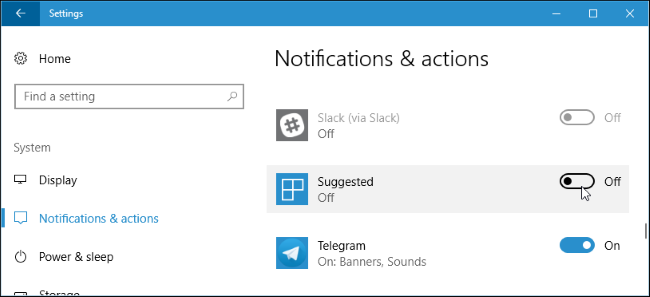
To change notification settings for individual senders, under Get notifications from these senders, turn a notification sender either on or off—or select a sender’s name and then turn on or turn off notification banners, lock screen privacy, turn notification sounds on or off, and set the priority of notifications.
-
To choose and rearrange the quick actions you see in action center, under Quick actions, select Edit your quick actions. Then drag quick actions to arrange them. This is the order they’ll appear in at the bottom of action center.

Getting pop-up notifications with important news or alerts may be convenient, but it can also be a nuisance when you’re trying to concentrate on your work or watch a movie. Over time, a lot of Windows 10 users develop an aversion to the bottom right corner of their computer screen, where something is always flying out. Fortunately, there’s an easy fix.
Note: These instructions are for Windows 10 only. Microsoft has stopped updating previous versions of the operating system, making them vulnerable to viruses, Trojans, and other threats, so if you are still using Windows 7, 8.1, or an earlier version, we recommend upgrading to Windows 10 as soon as possible.
- Which notifications should you keep?
- How to turn off notifications in Windows 10
- How to disable all notifications at once
- Configuring notifications for individual programs
- Pausing notifications with Focus Assist mode
- Peace and quiet
Which notifications should you keep?
Windows 10 users can disable almost all notifications, but we recommend leaving two categories active because they can affect the secure operation of your computer.
- Antivirus protection. You should know about any suspicious activity on your computer, even if you have to pause a TV show for it.
- System update. Operating system updates are important for security, fixing vulnerabilities that let attackers infect your computer with malware. Such updates sometimes arrive with little or no notice, particularly if malware is spreading actively through a newly discovered vulnerability. You need to install OS updates as soon as possible.
How to turn off notifications in Windows 10
You can confidently silence and hide any other notifications you find inconvenient. In fact, you have several options: turn them off completely; disable those from the most annoying programs; or use Windows 10’s Focus Assist mode to pause them.
How to disable all notifications at once
This process spares notifications regarding system updates and messages from Windows Defender, which you can configure separately. It will disable messages from other apps, such as your e-mail client or games.
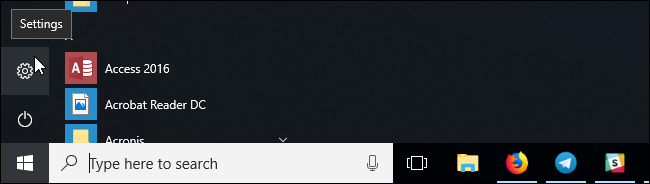
- Open the Start menu and choose Settings by clicking the gearwheel;
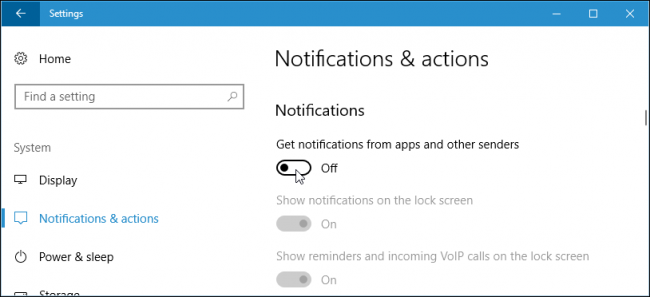
- Choose System and then Notifications & actions;
- Scroll down and turn off Get notifications from apps and other senders.
You’ll find several other useful options here, such as:
- Hiding notifications from the lock screen (so random people can’t read your personal Facebook messages);
- Disabling Windows’ tips, tricks, and suggestions about setting up your device (which appear after you install updates or simply while the system is running).
Configuring notifications for separate programs
Suppose you don’t want to disable all notifications, just those that come from certain programs. In that case:
- Open the Start menu and choose Settings;
- Choose System, then Notifications & actions;
- Scroll down to Get notifications from these senders;
- Toggle the switches for the apps on the list — on for notifications, off for none — or select individual applications for more app-specific options:
- Toggle off the Play a sound when a notification arrives switch to disable the sound but keep the pop-up alert;
- Uncheck the boxes next to Show notification banners and Show notifications in action center to remove pop-up messages but keep the sound.
If you explicitly allowed notifications such as those from websites — news alerts from media sites, promotions from online stores, and so on — you may find your browser spitting out new messages every minute. You’ll fix those notifications at the browser level; to learn how, see our instructions on managing browser notifications in Chrome, Firefox, Safari, Edge, and Opera.
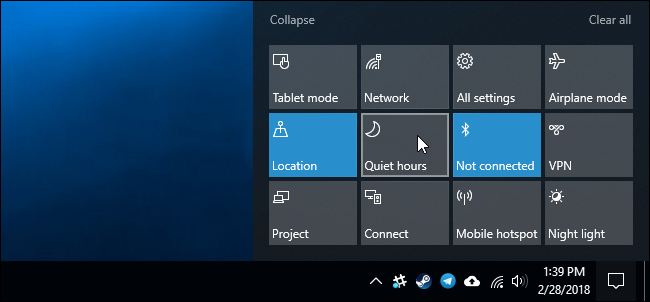
Focus Assist mode: Pausing notifications
Windows 10 includes a mode called Focus Assist that lets you pause some or all notifications instead of disabling them altogether. Focus Assist options are located in the Settings menu, under System. To configure the notifications:
- Select Alarms only to hide all notifications except for alarms or countdown timers, or
- Select Priority only if you’re concerned about a set time period — such as during working hours — and want to receive notifications only from apps or contacts from your (customizable) priority list.
Here’s how to configure your list of priority contacts and programs:
- Click Customize your priority list (right below Priority only);
- Select the types of notifications to allow — texts and incoming calls or reminders;
- Choose the contacts from whom notifications will appear in the Calling, Mail, or Skype apps;
- Customize the list of programs allowed to send you notifications when Focus Assist mode is active. For example, you might keep just your e-mail client or apps for remote working on this list. To remove unnecessary apps from the list, click on the app’s icon and then click Remove.
You can also set up automatic rules for Focus Assist mode, for example to enable it automatically during a daily meeting and to hide nonurgent notifications when you’re duplicating your display, playing a game, or using any other app in full-screen mode.
Using Focus Assist doesn’t mean you’ll never see notifications, only that they’ll remain hidden until you disable the mode. You can view those notifications anytime in the Action center, which opens with the button to the right of the system clock, at the bottom of the screen.
Rather than having to comb through all notifications, you can get a quick summary by checking the Show me a summary of what I missed while focus assist was on box. That way, each time Focus Assist ends, the system will give you a brief report on what you missed.
Peace and quiet
Now, your computer won’t get in your way when you’re working, studying, or relaxing. We advise using caution when deciding on a notification strategy — you don’t want to miss a truly important notification, so leave them active at least for protection tools and system updates, which help ensure your computer’s continued operation.
Windows 10 users aren’t the only ones who can tweak a few settings for more peaceful computing; Android, iPhone and iPad, and macOS users can also take advantage of detailed notification options. And to achieve even greater peace in our connected world, we recommend getting into your own Digital Comfort Zone.
 Центр уведомлений — элемент интерфейса Windows 10, отображающий сообщения как от приложений магазина, так и от обычных программ, а также информацию об отдельных системных событиях. В этой инструкции подробно о том, как отключить уведомления в Windows 10 от программ и системы несколькими способами, а при необходимости — полностью убрать Центр уведомлений. Также может быть полезным: Как отключить уведомления брандмауэра и защиты от вирусов и угроз, Как отключить уведомления Фокусировки внимания Windows 10, Как отключить уведомления сайтов в Chrome, Яндекс браузере и других браузерах, Как отключить звуки уведомлений Windows 10, не отключая сами уведомления.
В некоторых случаях, когда вам не требуется полное отключение уведомлений, а нужно лишь сделать так, чтобы уведомления не появлялись во время игры, просмотра фильмов или в определенное время, разумнее будет использовать встроенную функцию Фокусировка внимания.
Отключение уведомлений в настройках
Первый способ — настроить центр уведомлений Windows 10 таким образом, чтобы ненужные (или все) уведомления в нем не отображались. Сделать это можно в параметрах ОС.
- Зайдите в Пуск — Параметры (или нажмите клавиши Win+I).
- Откройте пункт Система — Уведомления и действия.
- Здесь вы сможете отключить уведомления для различных событий.


Ниже на этом же экране параметров в разделе «Получать уведомления от этих приложений» вы можете отдельно отключить уведомления для некоторых приложений Windows 10 (но не для всех).
С помощью редактора реестра
Уведомления также можно отключить в редакторе реестра Windows 10, сделать это можно следующим образом.
- Запустите редактор реестра (Win+R, ввести regedit).
- Перейдите к разделу
HKEY_CURRENT_USER\Software\Microsoft\Windows\CurrentVersion\PushNotifications
- Кликните правой кнопкой мыши в правой части редактора и выберите создать — параметр DWORD 32 бита. Задайте ему имя ToastEnabled, а в качестве значения оставьте 0 (ноль).

- Перезапустите проводник или перезагрузите компьютер.

Готово, уведомления больше не должны вас побеспокоить.
Отключение уведомлений в редакторе локальной групповой политики
Для того, чтобы выключить уведомления Windows 10 в редакторе локальной групповой политики, выполните следующие шаги:
- Запустите редактор (клавиши Win+R, ввести gpedit.msc).
- Перейдите к разделу «Конфигурация пользователя» — «Административные шаблоны» — «Меню Пуск и панель задач» — «Уведомления».
- Найдите параметр «Отключить всплывающие уведомления» и дважды кликните по нему.

- Установите значение «Включено» для этого параметра.
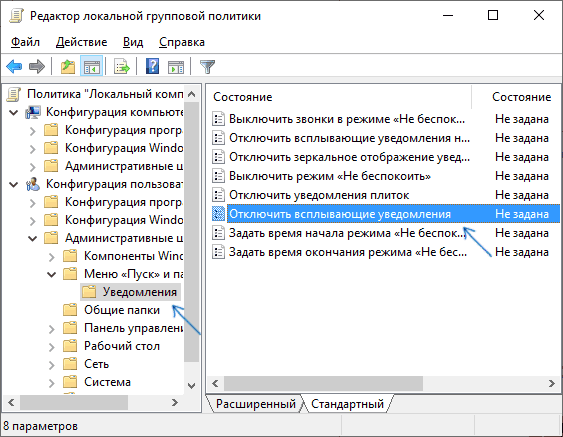
На этом всё — перезапустите проводник или перезагрузите компьютер и уведомления появляться не будут.
Кстати, в этом же разделе локальной групповой политики можно включить или отключить разные типы уведомлений, а также задать время действия режима «Не беспокоить», например, для того, чтобы уведомления не беспокоили вас в ночное время.
Как отключить Центр уведомлений Windows 10 целиком
Помимо описанных способов отключения уведомлений, вы можете полностью убрать Центр уведомлений, таким образом, чтобы его иконка не отображалась в панели задач и доступа к нему не было. Сделать это можно с помощью редактора реестра или редактора локальной групповой политики (последний пункт недоступен для домашней версии Windows 10).
В редакторе реестра для этой цели потребуется в разделе
HKEY_CURRENT_USER\Software\Policies\Microsoft\Windows\Explorer
Создать параметр DWORD32 с именем DisableNotificationCenter и значением 1 (как это сделать я подробно писал в предыдущем пункте). Если подраздел Explorer отсутствует, создайте его. Для того, чтобы снова включить Центр уведомлений либо удалите этот параметр, либо установите значение 0 для него.
Видео инструкция
В завершение — видео, в котором показаны основные способы отключить уведомления или центр уведомлений в Windows 10.
Надеюсь, всё получилось и сработало именно так, как ожидалось.
-
Home
- Computing
- Guides
Today, it seems like you get notifications for almost everything. Whether it’s a new text message or an email about your friends’ latest social media posts, the notifications never stop. But if you need to get work done on Windows 10, you need to know how to turn those distracting notifications off.
Contents
- Turn off notifications
- Temporarily hide notifications
- Permanently mute notifications
- How to dismiss notifications
- In-depth: How to customize notifications for each app
Keep reading to learn how to turn off notifications so that you can buckle down and focus. You can always reply to those messages and notifications during your next break.
Turn off notifications
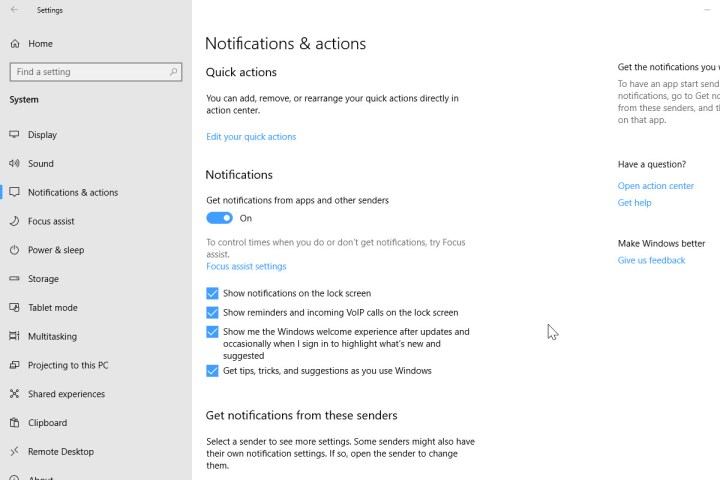
Step 1: Open the Windows Settings menu by pressing the Windows Key + I, or search for “settings” in the Windows Search Bar and click the corresponding result. Make sure you choose System in the Settings menu.
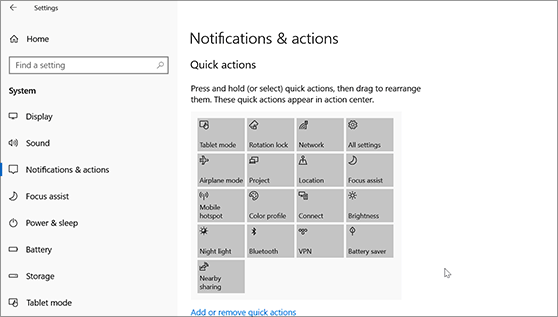
Step 2: Click Notifications & Actions in the left-hand menu. This will take you to a screen providing access to all the settings related to notifications and the Action Center.
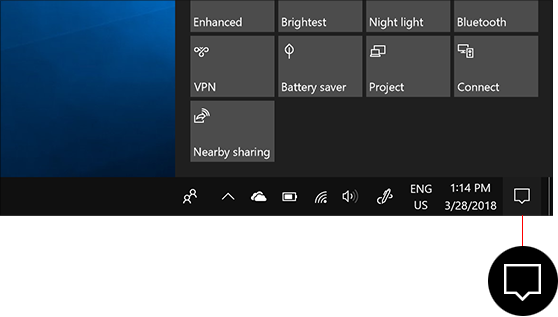
Step 3: If you want to change the Quick Actions or all the actions that appear in your Action Center, you can click Edit Your Quick Actions. This will open a side panel on the right where you can customize the different alerts that show up here. Most of the panel will be filled with recent alerts or actions that you took. But look at the bottom, and you’ll see icons for different “classes” of notifications. Click Expand to get the full view. You can click the little Pin symbols for each type of notification to remove them, or you can go to Add at the bottom to add in more notifications until it’s only what you want to see. Then click Done.

Step 4: Look for the Notifications subheading, where you will see a number of options for various types of notifications. The following is a list of the settings you can check and toggle on or off in this screen:
- Get Notifications From Apps and Other Senders
- Show Notifications on the Lock Screen
- Show Reminders and Incoming VoIP Calls on the Lock Screen
- Allow Notifications to Play Sounds
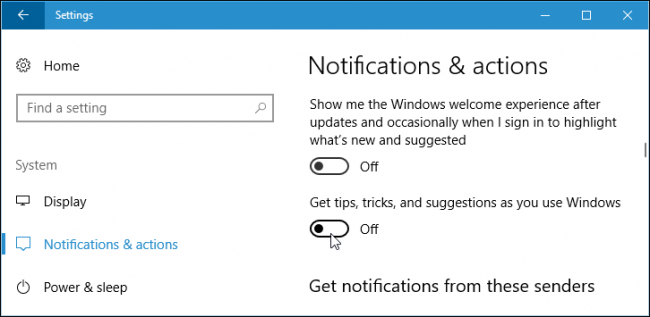
- Show Me the Windows Welcome Experience After Updates and Occasionally When I Sign In to Highlight What’s New and Suggested
- Suggest Ways I Can Finish Setting Up My Device to Get the Most Out of Windows
- Get Tips, Tricks, and Suggestions As You Use Windows
Turn them off as you need. If you don’t want any, just make sure they are all toggled off or unchecked. You’ll need to install the particular app you want to view notifications for if it’s not already built into your system, and you can receive a notification first before an app will show up in the list.
Temporarily hide notifications
If you want to hide notifications without turning them off entirely, you can always temporarily mute them using Focus Assist.
Step 1: Open up the Action Center by pressing on the Notification icon on the far right-hand side of the Windows taskbar (it looks like a little dialogue box) or by pressing the Windows key + A.

Step 2: Click on the Moon icon that’s labeled “Focus Assist.” The icon will turn blue (or whatever your chosen desktop accent color is) when on and shift between a couple of different modes. First, you will receive Priority Only alerts, and the second mode is Alarms Only alerts. Turn it to whatever works for your current project.
Step 3: You can further customize Focus Assist by adjusting your Automatic Rules for it in your Windows Settings. This will let you change times and priority levels for when you do and don’t want notifications enabled, be it during a more specific time or even when you’re playing a game. You can access these rules by going to the Settings app, selecting System, and then selecting Focus Assist.

Permanently mute notifications
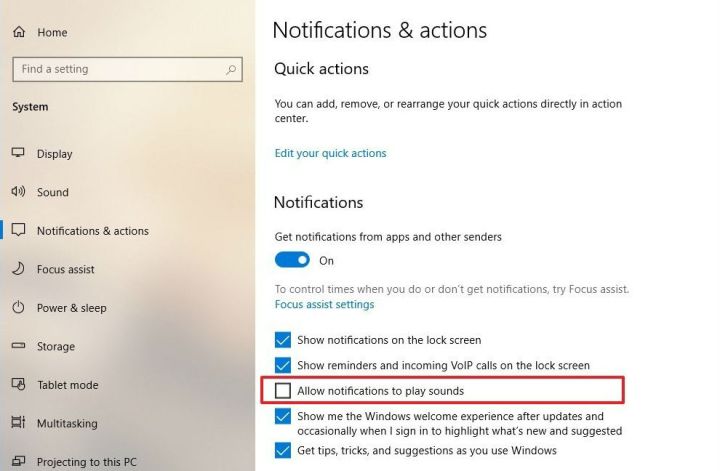
Is it the notification sound that’s primarily annoying to you? Thanks to a late-2019 update from Microsoft, you can turn off all notification sounds on Windows so everything will appear silently from now on. To turn this feature on, head back to Settings, go to System, and go to Notifications & Actions. If your Windows PC is fully up to date, you’ll see a series of checkboxes and see an option among them that says Allow Notifications to Play Sounds.
Simply make sure this box is unchecked, and your notifications won’t make any noise from now on. You can return to having alert noises whenever you want by checking the box again.
How to dismiss notifications
Notifications are a phenomenal tool for keeping up with the hustle and bustle of our digital lives. However, an excess of notifications — especially ones you’ve previously seen — can clutter the Action Center and prevent you from seeing important notifications as they arrive.
To dismiss individual notifications, click the Action Center icon located on the right-hand side of the Windows Taskbar and mouse over the notification that you’d like to dismiss. Then, click the X button directly to the right of the notification. You can also swipe a notification to the right to dismiss it quickly with either touch or by clicking and dragging with the mouse.

You can dismiss all of the notifications for a given app by clicking on the X button to the right of the app group listing. You can also click Clear All Notifications to close every notification for all apps.

In-depth: How to customize notifications for each app
You have a few options for customizing your Windows 10 notifications. You can set banner notifications, which are alerts that pop-up along the lower right corner of your screen, with or without sounds. If you find pop-up alerts more annoying than helpful, you can opt for notifications to only appear in the Action Center. The frequency of your alerts and additional options will vary from app to app.
You can modify your notifications under the Notifications & Actions tab in Settings. Once there, scroll until you see the Get Notifications From These Senders section and tap the category. Next, you’ll tap on the name of any app you’d like to change settings for. An advanced notification menu will appear. Toggle your preferred notifications, like sound options and alert style, on or off to customize your alerts.
Here are the types of settings you can configure for most app’s notifications:
- Turn notifications on or off.
- Turn notification banners — the boxes that show up for each notification and then disappear — on or off.
- Determine whether to keep notifications private on the lock screen.
- Turn notifications on or off in the Action Center.
- Determine whether a sound plays for that app’s notifications.
- Indicate how many notifications are visible in the Action Center before the drop-down show more menu appears — either one, three, five, 10, or 20 notifications.
- Determine the priority of notifications, allowing an app’s notifications to show up on top of other less-important app notifications.
Editors’ Recommendations
-
If you have an AMD GPU, stay away from the latest Windows Update
-
Surface Pro 10: here’s what to expect from the next generation
-
The best Windows 10 keyboard shortcuts
-
Windows 11 vs. Windows 10: finally time to upgrade?
-
What is ray tracing, and how will it change games?

Mark has been a geek since MS-DOS gave way to Windows and the PalmPilot was a thing. He’s translated his love for…
-
Mobile
The best tablets in 2023: our 10 favorite ones to buy

As much as we love having the best smartphones in our pockets, there are times when those small screens don’t cut it, and we just need a larger display. That’s when you turn to a tablet, which is great for being productive on the go and can be a great way to unwind and relax too. While the tablet market really took off after the iPad, it has grown to be quite diverse with a huge variety of products — from great budget options to powerhouses for professionals.
We’ve tried out a lot of tablets here at Digital Trends, from the workhorses for pros to tablets that are made for kids and even seniors, there’s a tablet for every person and every budget. For most people, though, we think Apple’s iPad Air is the best overall tablet — especially if you’re already invested in the Apple ecosystem. But if you’re not an Apple user, that’s fine too; there are plenty of other great options that you’ll find in this roundup.
Read more
-
Computing
I hope Microsoft adds this rumored AI feature to Windows 11

From smart speakers to ChatGPT and Bing Chat, AI has slowly crept into our lives, but not all instances of AI are as prominent as those three examples. Sometimes, the effect is subtle, but still pretty nice. It appears that Microsoft is working on one such instance of AI-enhanced tech that could make using Windows 11 just a little more pleasant. We’re talking about AI-powered live wallpapers, and they might be coming soon.
First spotted by Windows Latest, Microsoft is readying an AI-powered desktop that could make the whole user experience feel a lot more interactive. The idea is to adjust depth perception and make some backgrounds appear more «alive» when moving your cursor or the entire device. The wallpaper might move or shift, depending on what you’re doing on the desktop.
Read more
-
Computing
Microsoft is removing a Windows app that’s almost 30 years old

Microsoft is saying goodbye to WordPad, its long-supported rich text application, which will no longer receive updates as of September 1.
The brand recently announced that the app is now among its list of deprecated Windows features. Microsoft explained the difference between deprecation and removal, noting that the former is when a feature is at the end of its life cycle and is no longer in active development, and the latter is when a feature is removed after having been deprecated.
Read more
Notifications can be distracting, but Windows 10 has a one-click switch that disables all of them.
Quick Links
- How to Disable All Notifications
- How to Disable Individual App Notifications
- How to Temporarily Mute Notifications
- How to Disable Advertising Notifications
- How to Disable Live Tiles in the Start Menu
- How to Disable Lock Screen Notifications
- Disable Notification Area Icons
Notifications can be distracting, but Windows 10 has a one-click switch that disables all of them. You can also disable notifications for individual apps, or hide the many other notifications that appear throughout Windows.
How to Disable All Notifications
Windows 10’s Settings app allows you to control notifications. To launch it, open the Start menu, and then click the gear-shaped «Settings» icon—or press Windows+I.
Navigate to System > Notifications & Actions in the Settings window.
To disable notifications for every app on your system, turn the «Get notifications from apps and other senders» toggle off.
This option will disable the notifications for both Windows 10 Store apps and classic desktop apps.
How to Disable Individual App Notifications
To disable notifications for individual apps, head to System > Notifications & Actions, and then scroll down to the «Get notifications from these senders» list. This list shows Windows system features, Store apps, and traditional desktop apps that can send notifications.
Set an app to «Off» and Windows prevent that app from showing notifications.
The above options only work for apps that use the traditional Windows notification method. Apps with custom notification bubbles continue to show their own notifications unless you close them or disable the notifications within those specific apps. Most apps that show notifications offer an option to disable them. Just open that particular app and look in its settings window for an option that disables notifications.
How to Temporarily Mute Notifications
Windows 10 has a «Quiet Hours» feature in the Fall Creators Update, and this will be expanded upon and renamed to «Focus Assist» in the April 2018 Update. This is essentially a «Do Not Disturb» mode for Windows 10.
When Quiet Hours (or Focus Assist) is enabled, notifications are temporarily hidden. By default, when you turn Quiet Hours on, it’s enabled between midnight and 6 a.m. on the Fall Creators Update, but you’ll be able to easily customize these hours on the April 2018 Update. Head to Settings > System > Focus Assist to configure how it works if you’re running the new version of Windows 10.
To activate this feature, open the Action Center by clicking the Action Center icon near the bottom right corner of your taskbar or pressing Windows+A. Click the «Quiet hours» (or «Focus assist») tile to toggle it on or off. Select the «Expand» link at the bottom of the Action Center if you don’t see this tile in the top row.
How to Disable Advertising Notifications
Windows 10 has a lot of built-in advertising, and many of these advertisements appear as notifications. For example, you’ll sometimes see pop-up notifications on the taskbar informing you about Microsoft Edge’s features and «suggestions» about features you should use. These suggestions are also notifications.
You can disable all these advertisements with options built into Windows 10 itself, but Microsoft has scattered the options you’ll need across the operating system. Follow our guide to disabling all the advertising in Windows 10 to stop Windows from pestering you with ads.
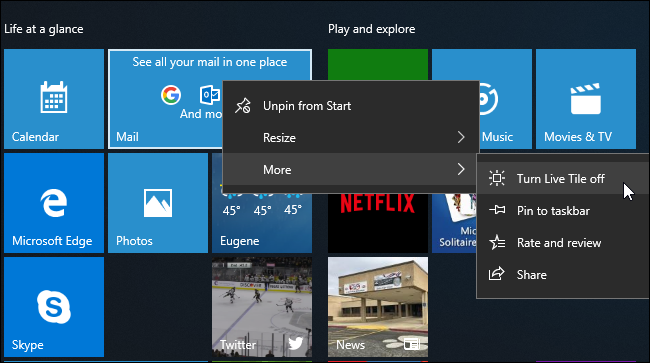
While live tiles aren’t traditional pop ups that interrupt you, they can certainly distract. For example, the News, Mail, and Facebook apps have live tiles, so you’ll find yourself notified with new headlines, emails, and Facebook messages every time you open your Start menu.
If you don’t want to see live tile notifications, just right-click or long-press a tile in your Start menu, and then select More > Turn Live Tile Off. The tile remains pinned for easy access, but it just functions as a simple shortcut and isn’t constantly updated with new content.
How to Disable Lock Screen Notifications
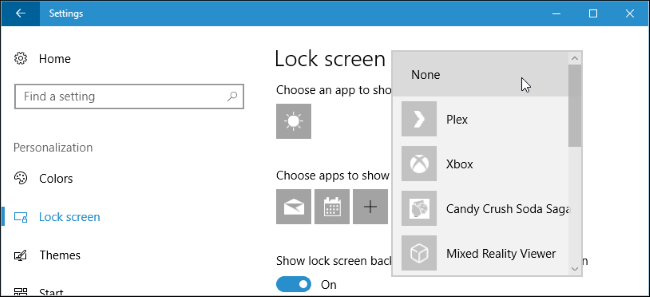
Windows 10 also allows apps to display notifications as status messages on your lock screen. If you don’t want to see status messages on your lock screen, you can remove them.
To control what appears on your lock screen, head to Settings > Personalization > Lock screen. Apps displaying content on your lock screen appear under «Choose an app to show detailed status» and «Choose apps to show quick status.» To remove an app from your lock screen, click its icon here, and then select the «None» option. You can also select another app, if you’d rather see another app’s notifications on your lock screen.
Disable Notification Area Icons
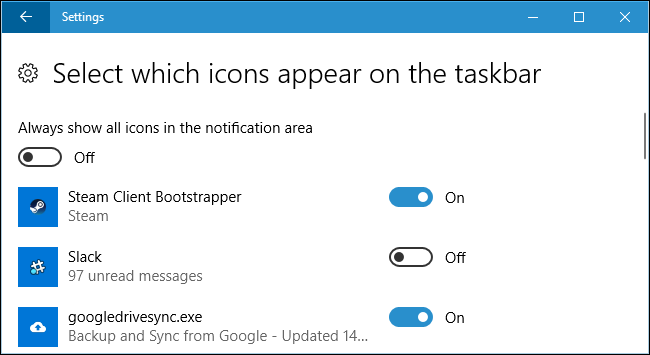
Even after you disable notifications, many apps continue running in your «Notification Area» (also known as the System Tray). These apps often update icons here with badges and animations informing you about their status.
To hide icons from your notification area, just drag them onto the up arrow to the left of the icons, and then into the little panel that appears. That panel holds any Notification Area icons that you don’t want to see right on your Taskbar. (Fun fact: the official name of that panel is the Overflow Notification Pane.) The apps you drag there remain running in the background, but you won’t see their notifications on your taskbar unless you click the up arrow. You can also right-click many of these applications and close them if you don’t want them running in the background.

The Settings app also allows you to customize your notification area icons. Just head to Settings > Personalization > Taskbar. In the right pane, scroll down to the «Notification Area» section, and then click the «Select which icons appear on the taskbar» link. Set any icon to «Off» and it will be hidden in that overflow panel. This accomplishes the same thing as quickly dragging and dropping the icons from your taskbar.
Windows 10 provides many more options for dealing with notifications than Windows 7 does. For example, when using Windows 7, you have to disable notifications from within each individual app you use. Windows 7 provides no way of blocking an app’s notifications at the system level, as Windows 10 does via the Settings app, nor does it provide a Quiet Hours or Focus Assist-like mode that temporarily mutes notifications.