(Image credit: Future)
On Windows 10, Task Scheduler is a tool that allows you to create and run tasks automatically. Usually, the system and certain apps use the scheduler to automate maintenance tasks (such as disk defragmentation, disk cleanup, and updates), but anyone can use it. Using this feature, you can launch programs, run commands, and execute scripts on a particular day and time, or you can also trigger tasks when a specific event occurs.
Task Scheduler works by monitoring the system’s time and events to execute the task as soon as the condition is met.
When trying to use the scheduler app to run a task at a specific time or when an event occurs, you can create a task in at least two different ways using the basic and advanced settings.
This guide will walk you through the steps to get started with the Task Scheduler experience to automate tasks on your device.
How to create a basic task on Task Scheduler
To create a task using basic settings on Windows 10, use these steps:
- Open Start.
- Search for Task Scheduler, and click the top result to open the app.
- Right-click the «Task Scheduler Library» branch and select the New Folder option.
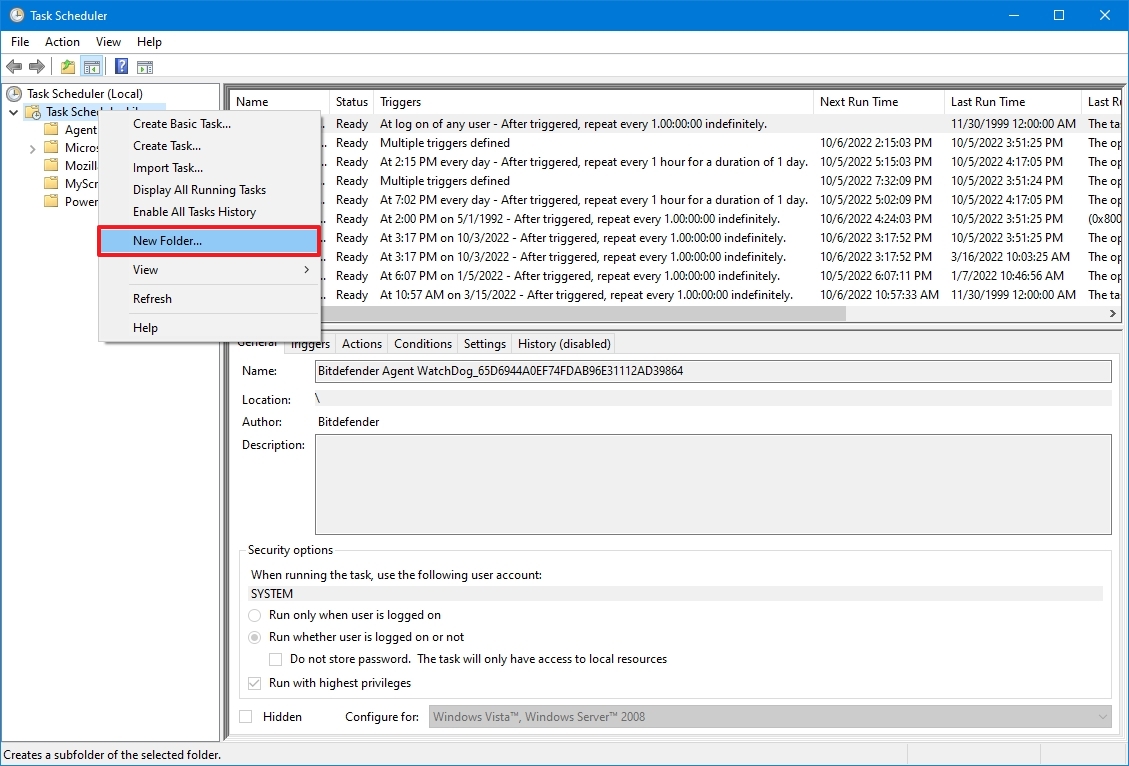
- Type a name for the folder – for example, MyTasks. (This step isn’t a requirement, but it’s a recommended step to keep your tasks separate from the system and apps tasks.)
- Click the OK button.
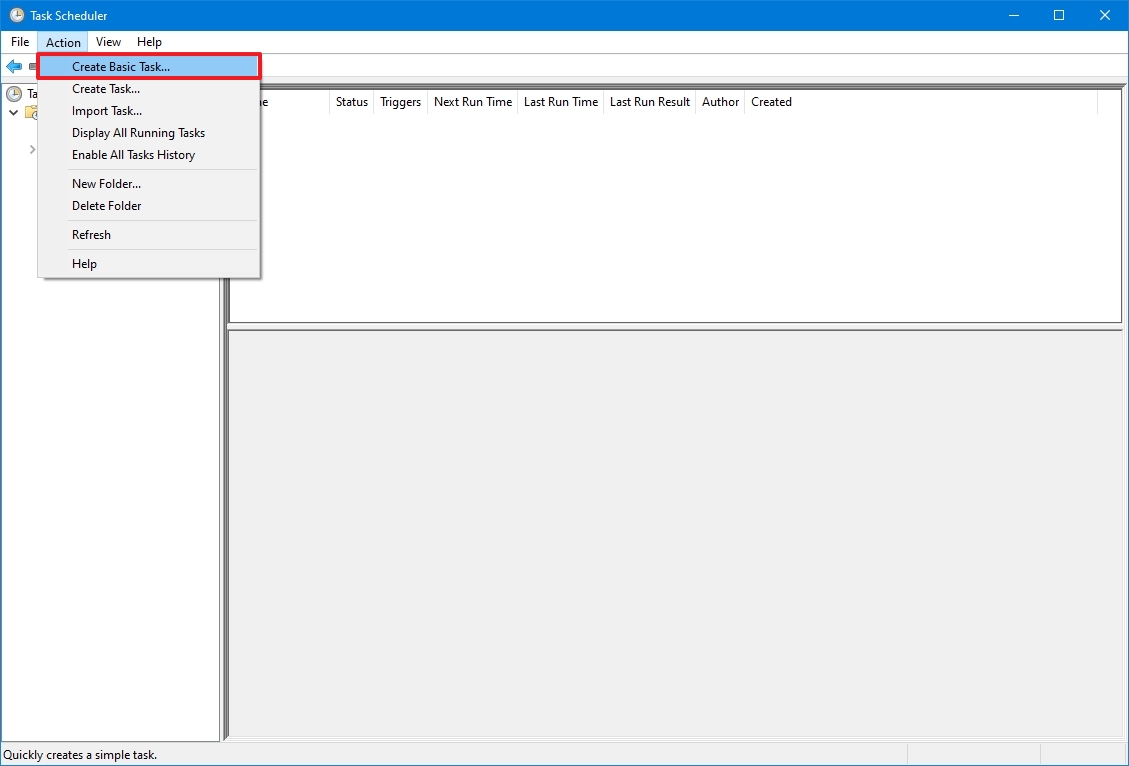
- Expand the «Task Scheduler Library» branch, and select the MyTasks folder.
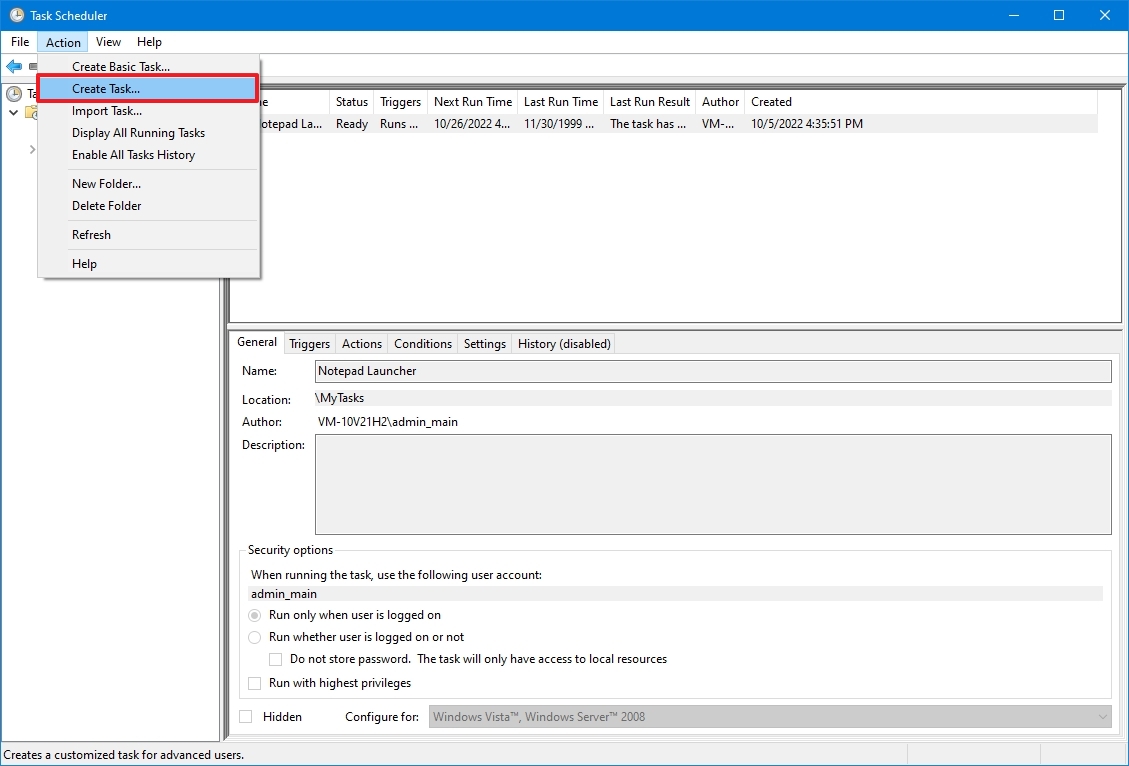
- Click the Action menu.
- Select the «Create Basic Task» option.
- In the «Name» field, type a short descriptive name for the task – for example, Notepad Launcher.
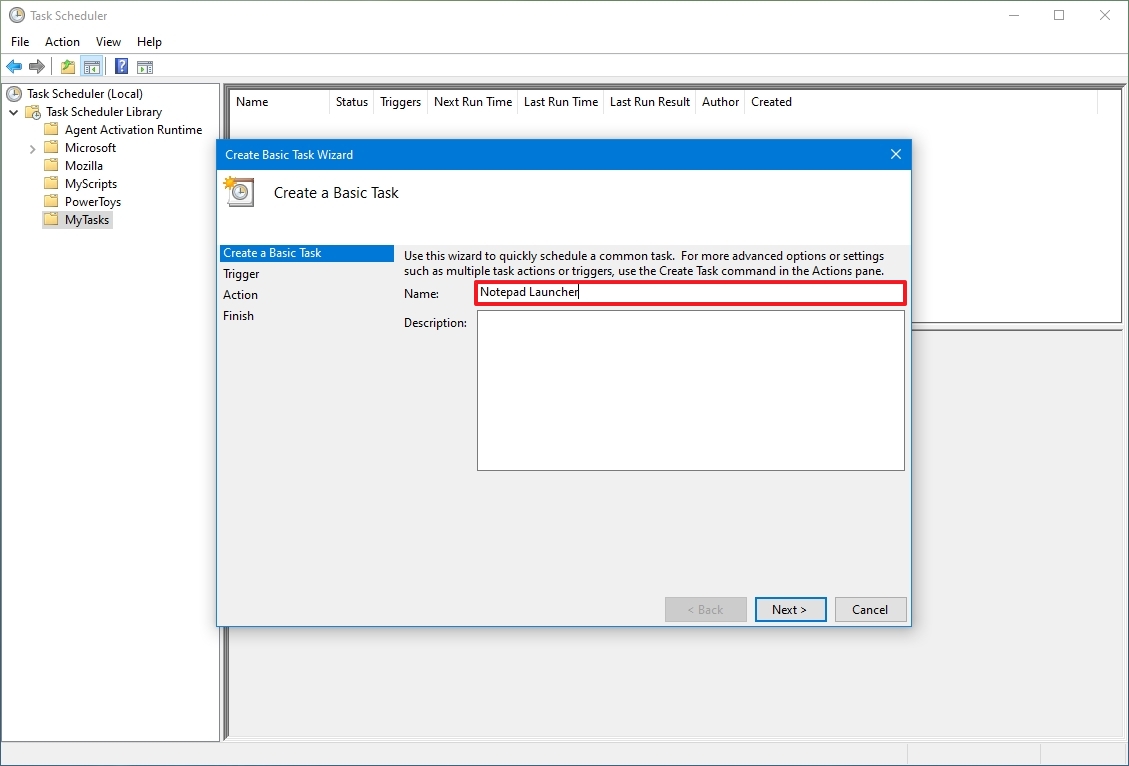
- (Optional) In the «Description» field, create a description for the task.
- Click the Next button.
- Select the Monthly option.
- Quick note: Task Scheduler allows you to select from a number of triggers, including on a specific date, during startup, or when you or a particular user signs in. Depending on your requirements, you’ll need to configure additional parameters. In this case, we’ll be selecting the option to run a task every month.
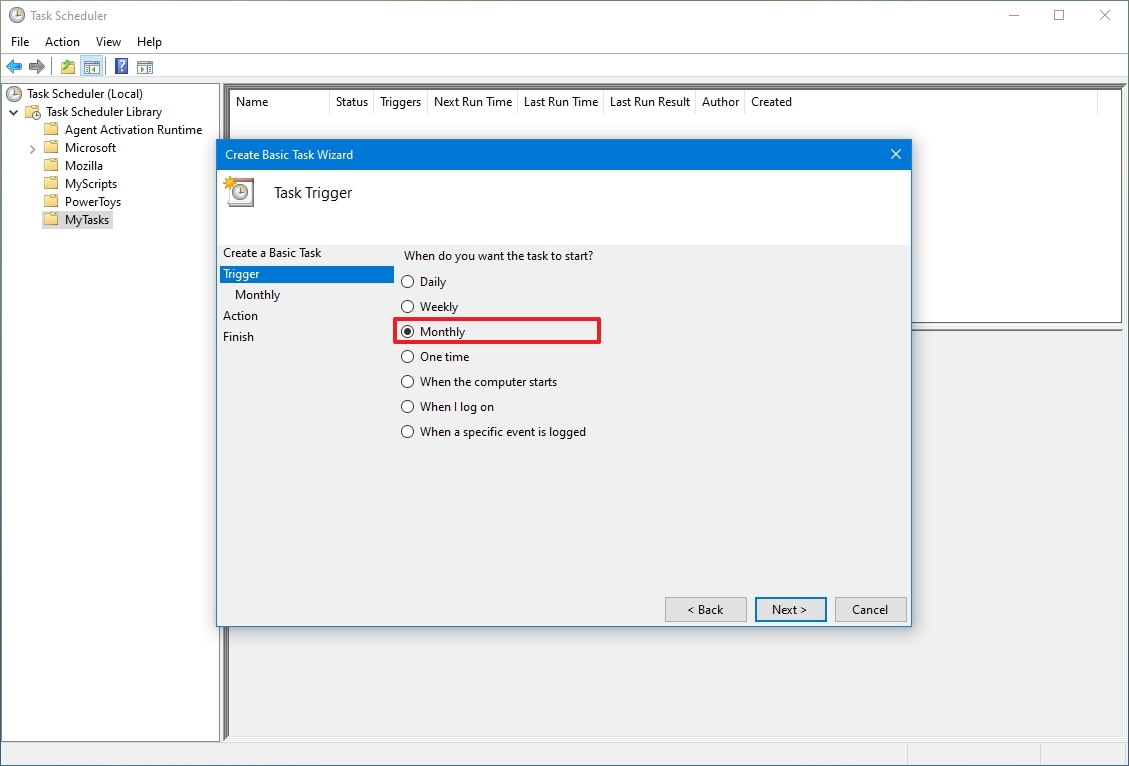
- Click the Next button.
- Using the «Start» settings, specify when the task should run and the time (very important).
- Use the «Monthly» drop-down menu for the months of the year you want to run the task.

- Use the «Days» or «On» drop-down menu to specify the days that the task will run.
- Quick tip: Using the «On» setting may be your best option if you’re planning to run a task during a specific day of the week.
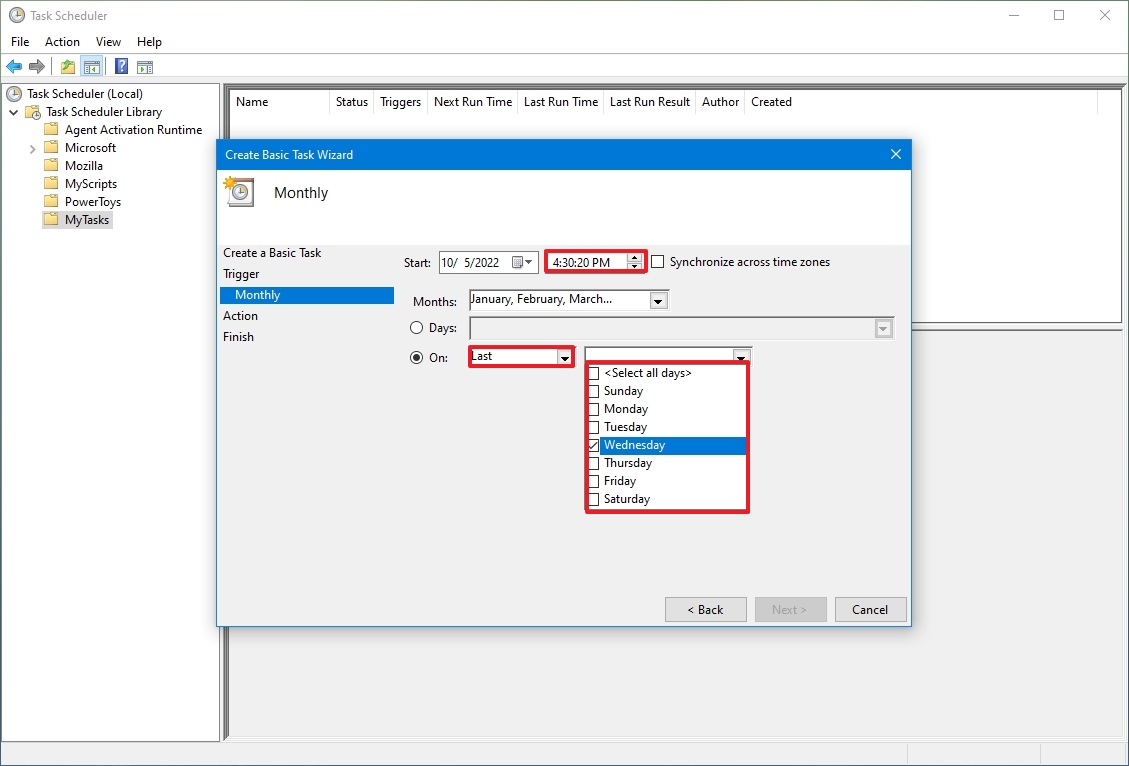
- Click the Next button.
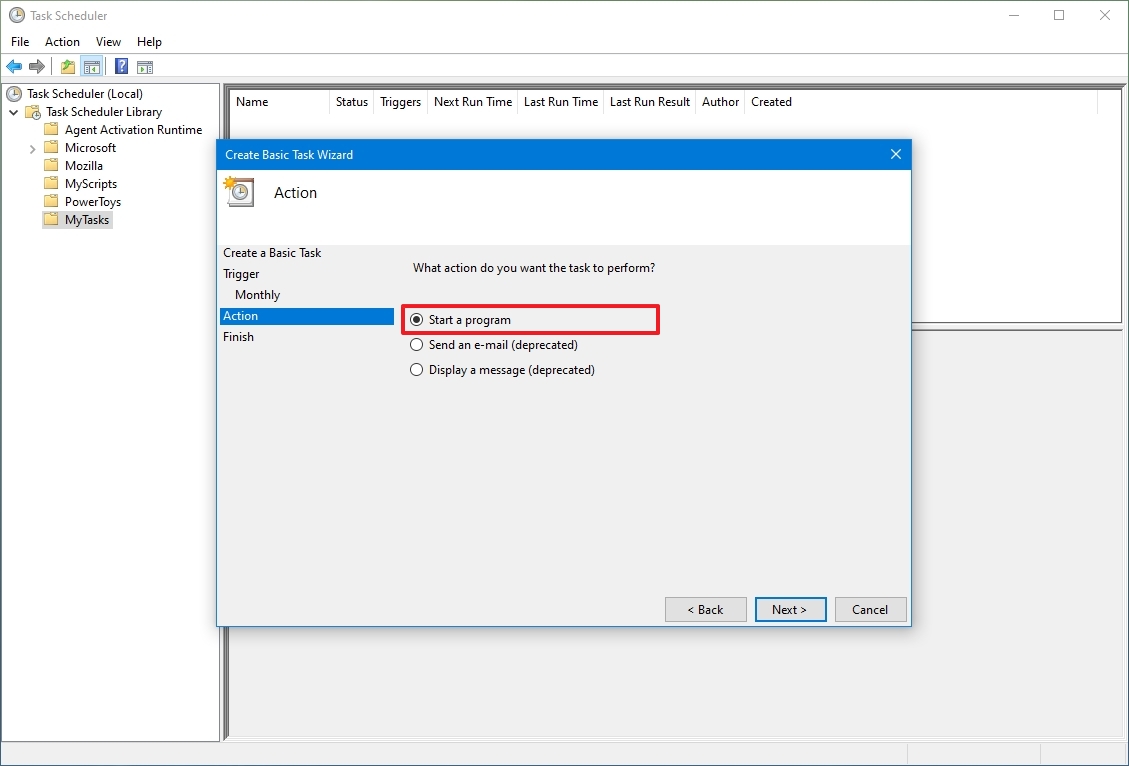
- Select the Start a program option to launch an app, run a command, or execute a script file.
- Quick note: You can select the Send an e-mail or Display a message option, but these are deprecated features, which means that they may or may not work because Microsoft is no longer maintaining them.
- In the «Program/script» field, specify the path for the application.
- Quick tip: If you don’t know the path of the app, click the Browse button to find it.
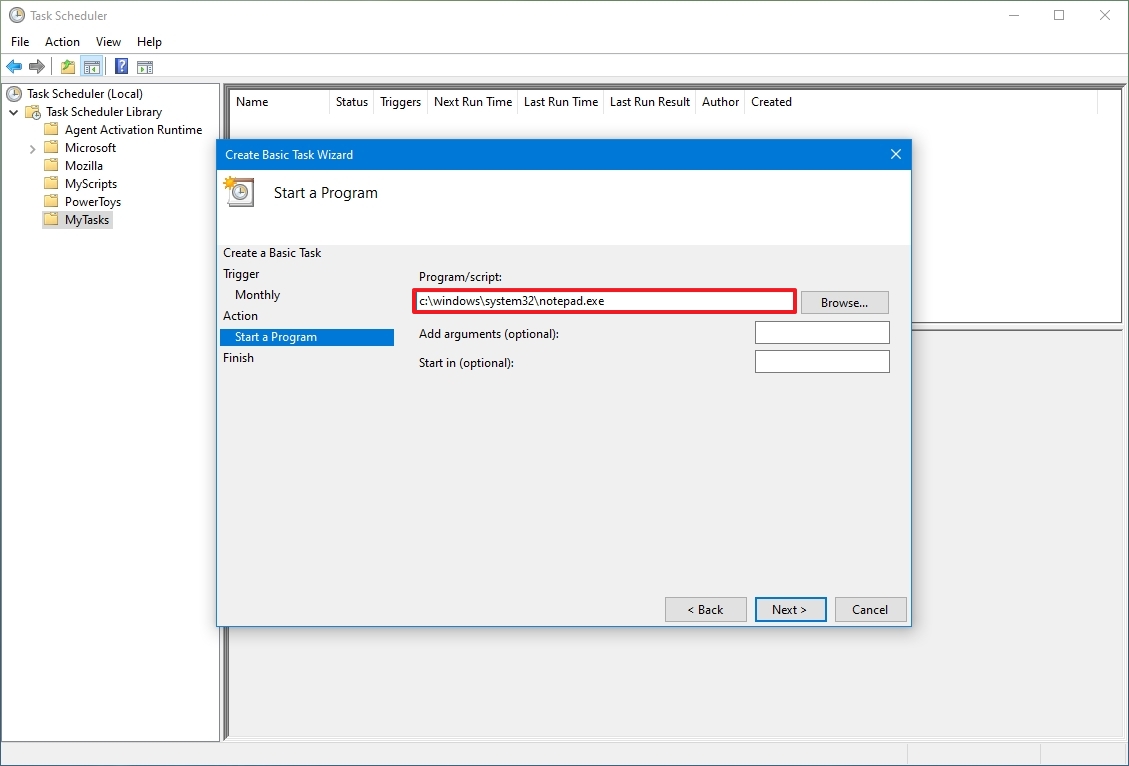
- (Optional) In the «Add arguments» field, you can specify arguments to run the task with special instructions.
- (Optional) In the «Start in» field, specify the folder in which the program will start. (Usually, you can leave this setting empty.)
- Click the Finish button.
Once you complete the steps, Task Scheduler will save the task and run automatically on your specified schedule.
How to create an advanced task on Task Scheduler
To create a task using advanced settings using the Task Scheduler, use these steps:
- Open Start.
- Search for Task Scheduler, and click the top result to open the app.
- Right-click the «Task Scheduler Library» branch and select the New Folder option.
- Type a name for the folder – for example, MyTasks.
- Click the OK button.
- Expand the «Task Scheduler Library» branch, and select the MyTasks folder.
- Click the Action menu.
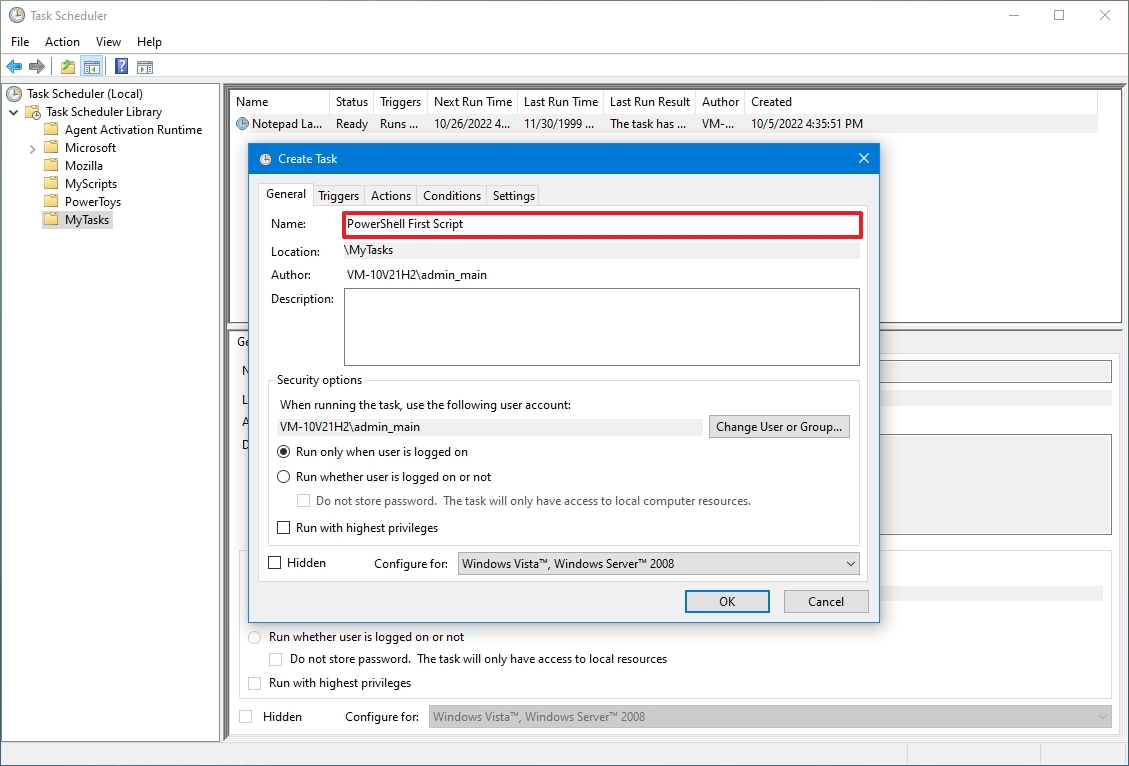
- Select the Create Task option.
- In the «Name» field, type a short descriptive name for the task – for example, PowerShell First Script.
- (Optional) In the «Description» field, create a description for the task.
- In the «Security options» section, you can configure which administrator account can run the task.
- Quick tip: The default user should be fine if you use an account with administrative privileges. If you want to run a Command Prompt or PowerShell command, you can select the «Run whether user is logged on or not» option to prevent the command window from showing up when the task runs automatically, as it’s likely that using the Hidden option won’t work.
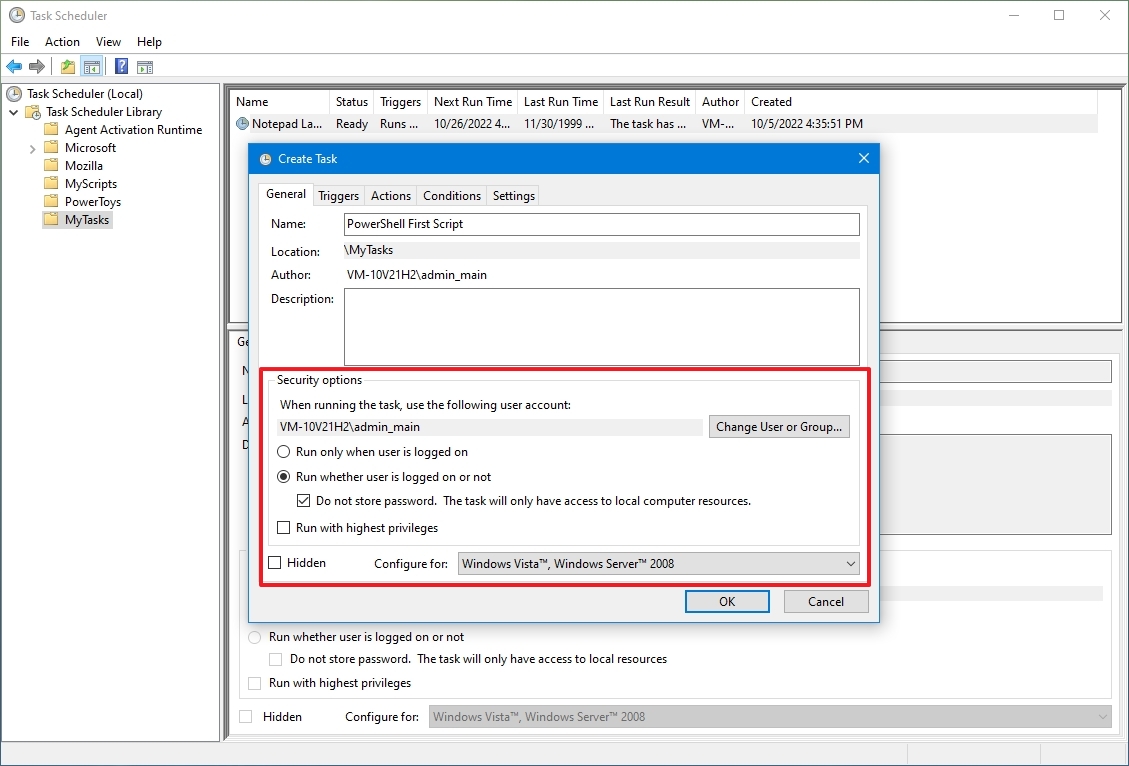
- (Optional) Check the «Run with highest privileges» option if the task requires elevated privileges.
- The «Configure for» settings should be left alone unless you’re required to use a different compatibility option.
- Click the Triggers tab.
- Click the New button.
- Use the «Begin the task» drop-down menu to select one of the many triggers, including «On a schedule,» «At startup,» «On workstation unlock,» and many others. (For this guide, select the On a schedule option.)
- Using the «Start» settings, specify when the task should start running and the time (very important).
- Select the Monthly option from the left side.
- Use the «Months» drop-down menu to select the months the task will run.
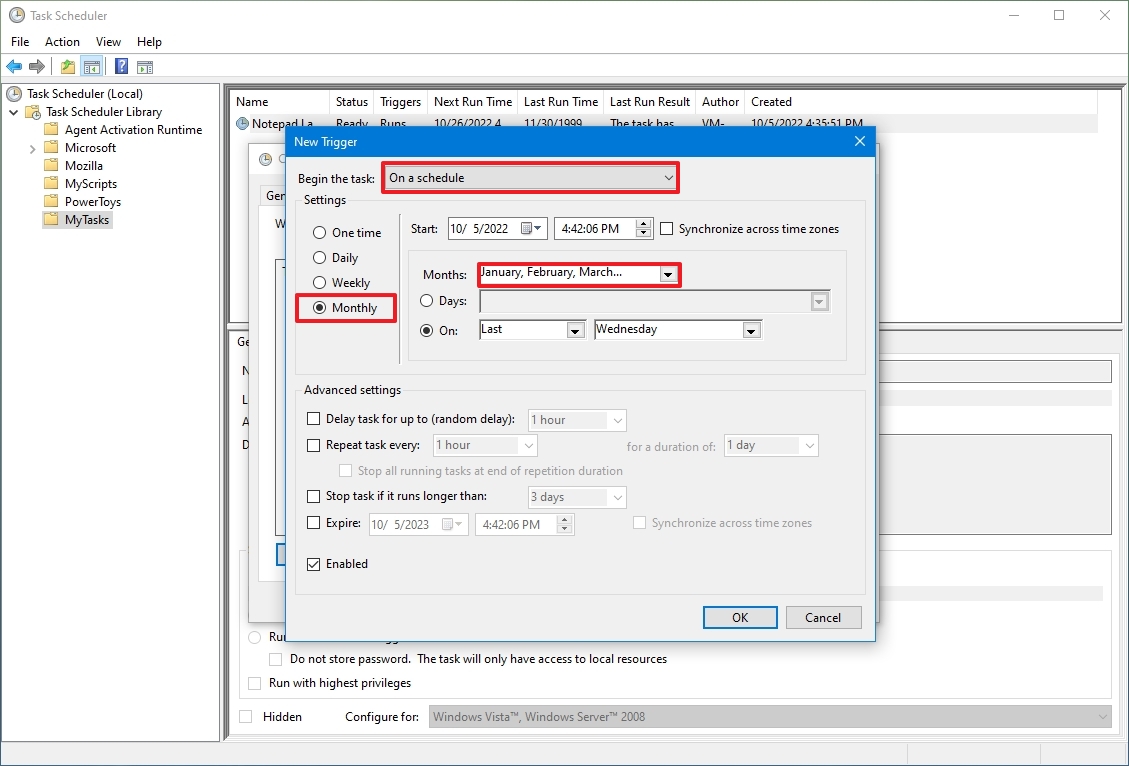
- Use the «Days» or «On» drop-down menu to specify the days that the task will run.
- (Optional) In the «Advanced settings» section, you can select options to delay, repeat, stop, and expire a task. The Enabled option is checked by default. (Usually, you don’t want to change these settings unless necessary.)
- Click the OK button.
- Click the Action tab.
- Click the New button.
- Use the «Action» drop-down menu and select the Start a program option.
- Under the «Settings» section, in the «Program/script» field, specify the path for the application – for example, powershell.exe.
- Quick tip: If you don’t know the path of the app, click the Browse button to find it. Also, if it’s a known application like PowerShell or Command Prompt, you only need to specify the file name.
- (Optional) In the «Add arguments» field, you can specify arguments to run the task with special instructions – for example -NoExit -ExecutionPolicy Bypass C:\PATH\TO\SCRIPT\first_script.ps1.
The «powershell.exe» command and the above argument will run the script named «first_script.ps1.» The argument «-ExecutionPolicy Bypass» ensures that the script runs successfully, and the «-NoExit» argument will prevent the window from closing after running the script. You can learn more about creating a PowerShell script in this guide.
- (Optional) In the «Start in» field, specify the folder in which the program will start. (Usually, you can leave this setting empty.)
- Click the OK button.
- Click the Conditions tab.
- (Optional) The «Conditions» tab includes settings that, combined with the «Triggers» settings, will determine when the task should run. (If you’re creating a simple task, you don’t need to modify these settings. However, you want to make sure the Power settings are configured to your situation.)
- Click the OK button.
- Click the Settings app.
- (Optional) The «Settings» app includes additional options that will directly affect the behavior of the task. It’s not a requirement to change these settings, but it’s a good idea to check the following options:
- Run the task as soon as possible after a scheduled start is missed.
- If the task fails, restart every. (Use this option with the default selections.)

- Click the OK button.
After you complete the steps, authenticate with your account credentials, and then the task will run automatically on schedule or event using the specified settings.
How to run, edit, and delete a task on Task Scheduler
Once you’ve created the task, you can use these steps to view, exit, or run it on demand:
- Open Start.
- Search for Task Scheduler, click the top result to open the experience.
- Expand the Task Scheduler Library branch.
- Select the folder with your tasks.
- To run a task on demand, right-click it and select the Run option.
- To edit a task, right-click it and select the Properties options.
- To delete a task, right-click it and select the Delete option.
On the page, you’ll also be able to see all your tasks with information, such as the triggers, when the task runs last, and when it’ll run the next time.
Alternatively, you can always select the task and use the Actions pane on the right to perform actions, such as run, end quickly, disable, and edit the job.
While we’re focusing this guide on Windows 10, Task Scheduler has been around for a long time so you can use the same instructions on Windows 8.1, Windows 7, and older versions.
More resources
For more helpful articles, coverage, and answers to common questions about Windows 10 and Windows 11, visit the following resources:
- Windows 11 on Windows Central — All you need to know
- Windows 10 on Windows Central — All you need to know
All the latest news, reviews, and guides for Windows and Xbox diehards.
Mauro Huculak is technical writer for WindowsCentral.com. His primary focus is to write comprehensive how-tos to help users get the most out of Windows 10 and its many related technologies. He has an IT background with professional certifications from Microsoft, Cisco, and CompTIA, and he’s a recognized member of the Microsoft MVP community.
 В рамках серии статей об инструментах администрирования Windows, которыми мало кто пользуется, но которые при этом могут быть очень полезными, сегодня расскажу об использовании планировщика заданий.
По идее, планировщик заданий Windows — это способ запустить какую-то программу или процесс при наступлении определенного времени или условий, однако его возможности этим не исчерпываются. Кстати, благодаря тому, что многие пользователи не знают об этом инструменте, удаление из автозагрузки вредоносных программ, которые умеют прописывать свой запуск в планировщике, оказывается более проблематичен, чем с теми, которые прописывают себя только в реестре.
Еще на тему администрирования Windows
- Администрирование Windows для начинающих
- Редактор реестра
- Редактор локальной групповой политики
- Работа со службами Windows
- Управление дисками
- Диспетчер задач
- Просмотр событий
- Планировщик заданий (эта статья)
- Монитор стабильности системы
- Системный монитор
- Монитор ресурсов
- Брандмауэр Windows в режиме повышенной безопасности
Запуск планировщика заданий

Как всегда, начну с того, как запустить планировщик заданий Windows из окна «Выполнить»:
- Нажмите клавиши Windows + R на клавиатуре
- В появившемся окне введите taskschd.msc
- Нажмите Ok или Enter (см. также: 5 способов открыть планировщик заданий в Windows 10, 8 и Windows 7).
Следующий способ, который будет работать в Windows 10, 8 и в Windows 7 — зайти в папку «Администрирование» панели управления и запустить планировщик заданий оттуда.
Использование планировщика заданий

Планировщик заданий имеет примерно тот же интерфейс, что и другие инструменты администрирования — в левой части древовидная структура папок, по центру — информация о выбранном элементе, справа — основные действия над задачами. Доступ к этим же действиям можно получить из соответствующего пункта главного меню (При выборе конкретной задачи или папки пункты меню меняются на относящиеся к выбранному элементу).
Основные действия в планировщике заданий
В данном инструменте вам доступны следующие действия над задачами:
- Создать простую задачу — создание задания с помощью встроенного мастера.
- Создать задачу — то же, что и в предыдущем пункте, но с ручной настройкой всех параметров.
- Импортировать задачу — импорт ранее созданной задачи, которую вы экспортировали. Может пригодиться, если вам нужно настроить выполнение определенного действия на нескольких компьютерах (например, запуск проверки антивирусом, блокировка сайтов и прочее).
- Отображать все выполняемые задачи — позволяет посмотреть список всех задач, которые запущены в настоящий момент времени.
- Включить журнал всех заданий — позволяет включить и отключить ведение журнала планировщика заданий (записывает все действия, запускаемые планировщиком).
- Создать папку — служит для создания собственных папок в левой панели. Можно использовать для собственного удобства, чтобы было понятно, что и где вы создали.
- Удалить папку — удаление папки, созданной в предыдущем пункте.
- Экспорт — позволяет экспортировать выбранную задачу для последующего использования на других компьютерах или на этом же, например, после переустановки ОС.
Кроме этого, вы можете вызвать список действий, кликнув правой кнопкой мыши по папке или задаче.
Кстати, если у вас есть подозрения на наличие вредоносного ПО, рекомендую заглянуть в список всех выполняемых задач, это может оказаться полезным. Также будет полезным включить журнал заданий (по умолчанию отключен), и заглянуть в него после пары перезагрузок, чтобы посмотреть, какие задания выполнялись (для просмотра журнала используйте вкладку «Журнал», выбрав папку «Библиотека планировщика заданий»).

В планировщике заданий уже присутствует большое количество задач, которые необходимы для работы самой Windows. Например, автоматическая очистка жесткого диска от временных файлов и дефрагментация диска, автоматическое обслуживание и проверка компьютера во время простоя и другие.
Создание простой задачи
Теперь давайте посмотрим, как создать простую задачу в планировщике заданий. Это самый легкий способ для начинающих пользователей, который не требует особенных навыков. Итак, выбираем пункт «Создать простую задачу».

На первом экране вам потребуется ввести имя задачи и, при желании, ее описание.

Следующий пункт — выбрать, когда будет выполняться задание: можно выполнять ее по времени, при входе в Windows или включении компьютера, или же по возникновению какого-либо события в системе. При выборе одного из пунктов, вам также предложат задать время выполнения и другие детали.

И последний этап, выбрать, какое именно действие будет выполняться — запуск программы (к ней можно добавить аргументы), вывод сообщения или отправка сообщения электронной почты.
Создание задачи без использования мастера
Если вам требуется более точная настройка задач в планировщике заданий Windows, нажмите «Создать задачу» и вас ждет множество параметров и опций.

Я не буду подробно описывать полный процесс создания задачи: в общем-то, в интерфейсе все достаточно ясно. Отмечу лишь существенные отличия по сравнению с простыми задачами:
- На вкладке «Триггеры» вы можете задать сразу несколько параметров для ее запуска — например, при простое и при блокировке компьютера. Также, при выборе пункта «По графику», вы можете настроить выполнение в определенные числа месяца или дни недели.

- На вкладке «Действие» вы можете определить запуск сразу нескольких программ или выполнения других действий на компьютере.

- Также вы можете настроить выполнение задачи при простое компьютера, только при питании от розетки и другие параметры.


Несмотря на то, что различных опций большое количество, думаю, в них не составит труда разобраться — все они называются достаточно ясно и означают именно то, о чем сообщают в названии.
Надеюсь, что кому-то изложенное сможет пригодиться.
PC If you frequently use certain programs in Microsoft Windows 11 and get tired of opening them after a shutdown or a reboot, you can create scheduled tasks that run at boot-up using the Windows Task Scheduler tool. Don’t know how or want to learn the advanced methods of creating a scheduled task in Windows 11? Read this step-by-step guide now!
Your Windows 11 PC comes with powerful automation features so you can do more work in less time. Also, automation enables you to focus on brainstorming new content, program, or design ideas. The Windows Task Scheduler app is your go-to software to achieve basic to advanced automation involving third-party apps, web browsers, batch files, and so on. It has been in the Windows operating environment for a long. However, using the tool is really simple and intuitive on a Windows 11 PC. Read the article until the end to learn various ways to use the Task Scheduler in Windows 11.
Also read: How to Create and Manage Tasks in Microsoft To-Do
What Is Windows Task Scheduler?
The Windows Task Scheduler app is an automation tool available from Windows NT operation systems like Windows XP, Windows 2000, etc., until the latest Windows 11 edition. The PC OS uses the tool to run several apps and services automatically. For example, when the Windows 11 PC updates the OS or downloads security patches, know that there’s an automated task behind the actions.
Similarly, when the Xbox Live saves your games automatically, the Task Scheduler app is behind this as the tool executes the XblGameSave Standby Task when your PC becomes idle. There are many other automated Windows tasks like BitLocker Encrypt All Drives, CryptoPolicyTask, CHKDSK ProactiveScan, and so on.
The best thing is that Windows 11 also lets you utilize the Task Scheduler app to schedule automatic tasks involving third-party apps. Hence, you can create robust automation on Windows PC like the Task Scheduler launching the Outlook app and sending an important business email automatically at a preconfigured date and time.
Also read: Best Planner Apps for iPad and iPhone
What Does Windows Task Scheduler Do?
Find below a comprehensive list of functionalities available in the Task Scheduler app:
- You can launch an app, service, or batch file at a specific time.
- Also, you can send email messages or texts to someone automatically using a specific program.
- The tool can send out task reminders and notifications.
- You can remotely control the security of the Windows PC. For example, when someone tries to open a specific business app and copy files to external storage, an advanced Windows scheduled task can stop this.
- No need to open required apps manually after each PC restarts or shutdowns. The Task Scheduler can open apps for you.
How to Launch Windows Task Scheduler App
There are many ways to run the Task Scheduler app on a Windows 11 PC. However, the following ones are the most effortless methods:
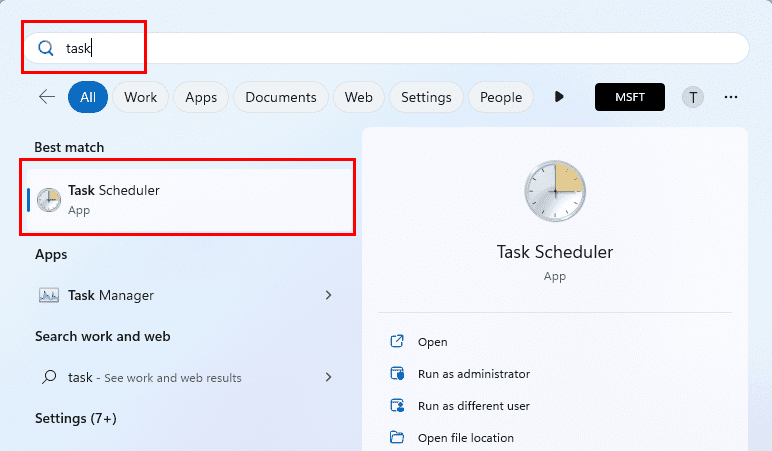
- Click Start and type Task. The Task Scheduler app will show up under the Best match section. Click it to open the utility.
- Execute the following Run command by pressing Windows + R and typing the command and hitting Enter:
taskschd.msc
- Right-click on the Start icon or Windows flag and click Computer Management. Inside this tool, you should see the Task Scheduler app on the left-side panel.
How to Use Task Scheduler in Windows
Find below the best four methods to use Task Scheduler in Windows 11:
Create a Windows Scheduled Task Using the GUI
If you’re new to task automation on a Windows PC, then you should start getting acquainted with the Task Scheduler app through its graphical user interface (GUI). Once you have launched the app by following any of the above methods, try these steps to create an automated task:
Creating a New Task Library:
- Select the Task Scheduler Library and right-click.
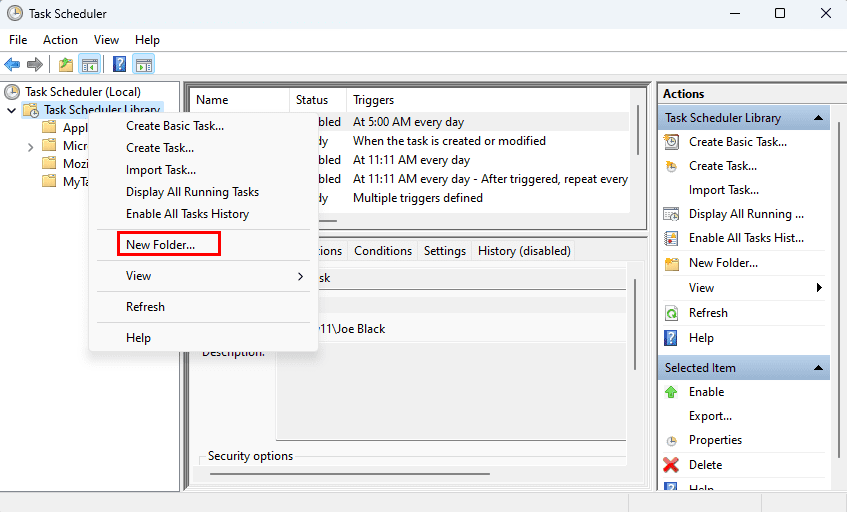
- Click the New Folder option on the context menu.
- Now, rename the folder to MyTasks.
- Click OK to save the folder.
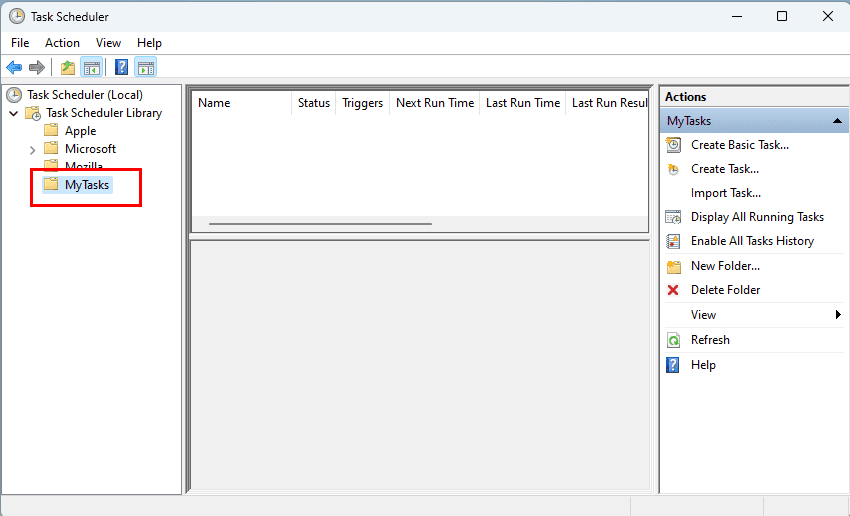
- Expand the Task Scheduler Library entry and double-click the MyTasks folder.
- From now on, any automated task you create will appear in this folder.
Creating a New Automated Task
- Click the Action menu on the top menubar and select Create Task.
- You could also choose Create Basic Task. This option doesn’t show many customization options though.
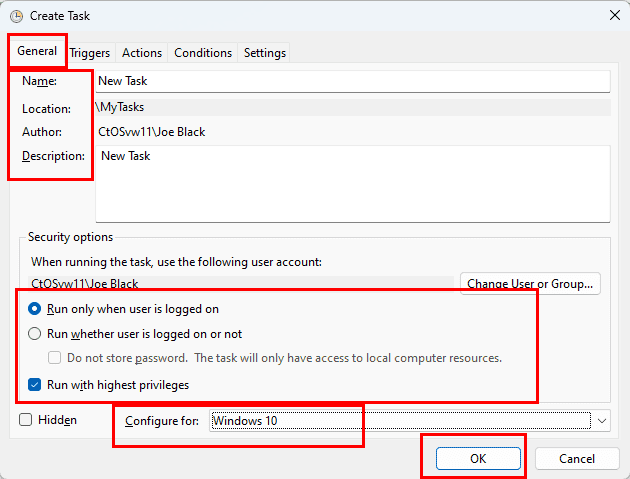
- The Create Task wizard pops up. It contains five tabs and these are General, Triggers, Actions, Conditions, and Settings.
- Inside General, you can give the task a name and a description.
- Here, you can customize security options like user logon, admin rights, and task configuration.

- Click the Triggers tab and select New to configure a trigger event for the task.
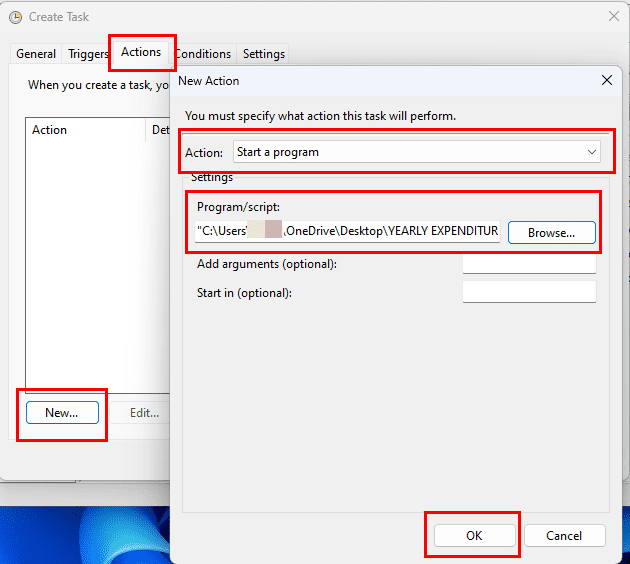
- Similarly, go to the Actions tab and create a new action as shown above. You can select any program you want.
- The task is ready. However, you can explore the customization options in the other two tabs Conditions and Settings.
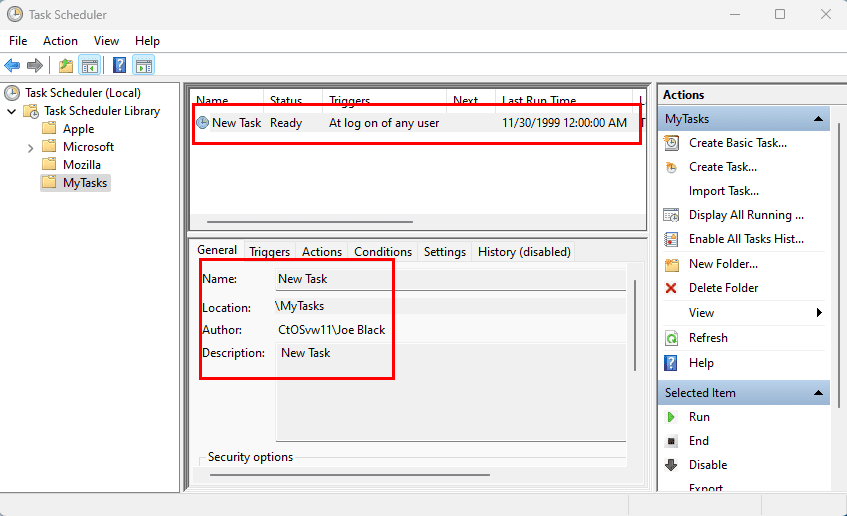
- Once done, click OK to save and activate the task. The Task Status should display the Ready tag.
Create a Windows Scheduled Task Using a Command Line
Here’s how you can use the Windows 11 Terminal or Command Prompt app to create a Windows scheduled task:
- Open the Terminal or Command Prompt tool from the Start menu.
- Don’t forget to open the app with administrator rights.
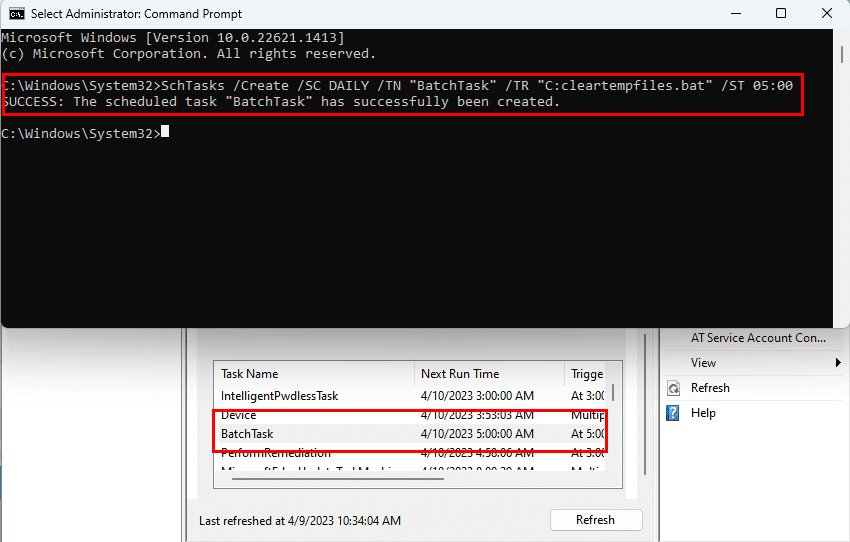
- Now, copy and paste the following command into the Terminal app:
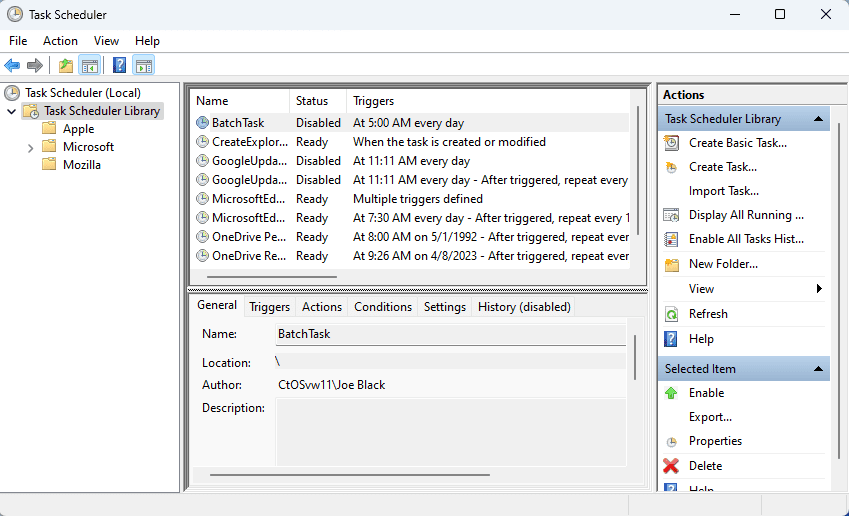
SchTasks /Create /SC DAILY /TN "BatchTask" /TR "C:cleartempfiles.bat" /ST 05:00
- Hit the Enter key to finalize the task scheduling.
The above code will create a daily task to clean up the temporary files on the Windows 11 PC. The task will execute a batch file every day at 5 AM provided that the PC is running. You can replace the components in the above code like the location of the program (batch file or EXE file), timing, schedule trigger, etc. Find below the explanation of the parameters used above:
- /Create: tells SchTasks or Task Scheduler to make a new task
- /SC: the schedule like daily, weekly, monthly, etc.
- /TN: the name of the task you want to create
- /TR: the directory of the program or batch file
- /ST: mentions the time to execute the program
There are more parameters for the SchTasks. You can find those in the following Microsoft portals:
- schtasks commands
- schtasks run
- at command to schedule tasks
- schtasks create
Create a Windows Scheduled Task Using GPO
Suppose, you’re the admin of a few hundred Windows PCs in your organization or business. You need to roll out a business app on all PCs on a specific date. Or, you want that all the PC users sign out automatically when their shift ends. You can do all these using task automation. And the most efficient and free app for task automation on Windows is the Task Scheduler app.
However, going to each computer and creating a scheduled task isn’t an economical task. Instead, you can use the Group Policy Management Console to create the tasks remotely for all devices from a centralized admin Windows PC. Here’s how you can use the GPO app to create Windows scheduled tasks:
- Launch the Group Policy Management console.
- You can execute the gpmc.msc code on the Run command tool on the Windows Server or Active Directory admin PC.
- Select the User Configuration entry on the left-side navigation panel. Now, start expanding the directory in the following order:
- User Configuration
- Preferences
- Control Panel Settings
- Scheduled Tasks
- Right-click on the Scheduled Tasks directory and hover the cursor over New.
- Another context menu will open, where you must click the Scheduled Task (At least Windows 7) option.
- The Task Scheduler console will open.
- On the General tab, you must select an Action,
- In the Change User or Group field, type in the following command:
%LogonDomain%\%LogonUser%
- Also, check the checkbox for the Run with highest privileges option.
- Then, set up other parameters for the automated task from the tabs like Trigger, Actions, Conditions, Settings, etc.
- Once done, click Apply and then select OK to finalize the task.
How to Schedule a Batch File Using Windows Task Scheduler
Executing batch files using the Task Scheduler app is another advanced way of task automation on a Windows PC. Using batch files, you can instruct an app to launch and perform some pre-configured tasks. Then, packaging the batch file in the Task Scheduler and scheduling the batch file to launch at a certain time of the day, allows you to use different apps at different times. You need to involve yourself only to plan the batch files and tasks.
Then, you can focus on other work while your Windows PC automatically does jobs that you can do on a computer. Here’s how you can execute one or more batch files on this app:
Create a Scheduled Task
- Open the Task Scheduler app from the Start menu.
- Click the Action menu on the toolbar and select Create Basic Task.
- Now, the Create Basic Task Wizard pops up.
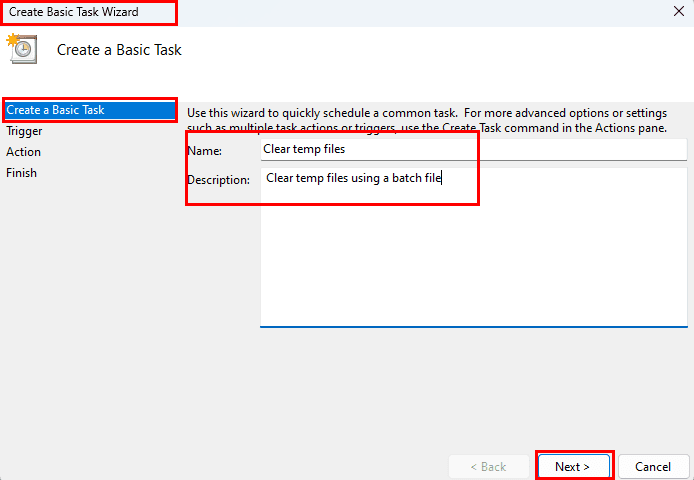
- Here, you need to type in general information. For example, the Name and Description of the task automation.
- Click Next to set up a Trigger for the batch file automation.
- Let’s choose Weekly so that the batch file can clear your Windows 11 PC’s temporary files once in a week.
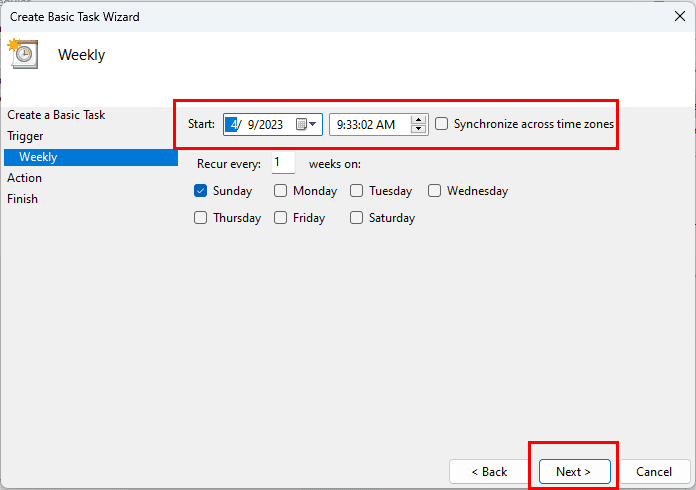
- On the Weekly screen, you can enter the start date, start time, recurrence, etc.
Browse a Batch File as a Program
- Click Next again and choose the Start a program radio button.
- Now, Windows 11 Task Scheduler will ask you to choose the program to launch.
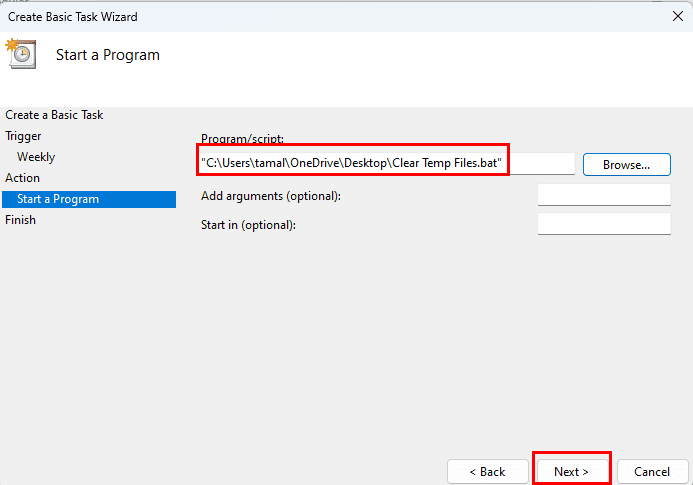
- Instead of browsing to an application, you can select your batch file saved in a folder of your choice.
- You must keep the batch file in its original location always or else the Task Scheduler will fail.
- Select Next and you arrive on the Summary page.
- Review the automated task details like Name, Description, Trigger, and Action once again.
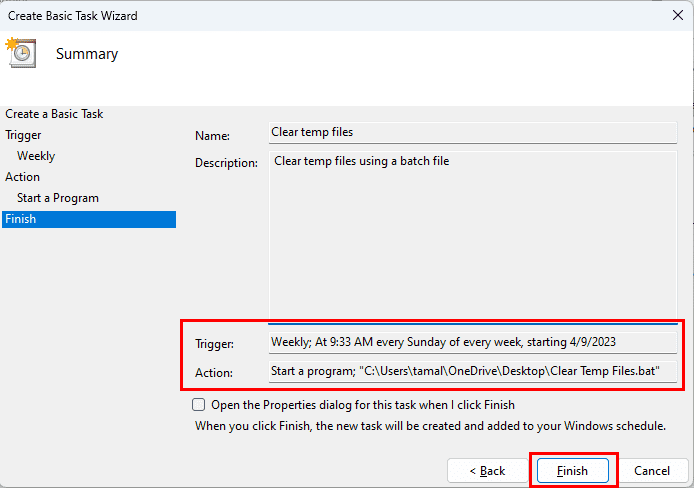
- If everything looks good, click Finish to save the task.
Great job! You’ve successfully created Windows scheduled task for a batch file using the Task Scheduler app. Create multiple automated tasks like this if needed.
Conclusion
That’s pretty much everything about creating automated tasks using the Windows Task Scheduler app on a Windows 11 PC. You can also follow the above methods on earlier Windows operating systems like Windows 10, 8, 7, Vista, etc., to apply automation in day-to-day tasks. So, give the above methods to create Windows scheduled tasks on your PC and share your experience below in the comment box. Do share the article with your friends and colleagues who are also interested in learning task automation opportunities on a Windows PC.
Next up, here’s an easy guide on how to automate tasks on macOS using the Mac Shortcuts App.
Windows Task Scheduler: Create an Automated Windows Task Tutorial. The Windows Task Scheduler is arguably one of the most underutilized Windows tools. One reason for this is its incomprehensibility – especially for non power users. However, once you understand its capabilities, you can use it to make your Windows experience easier. The following guide will show you how to create an automated task using Windows Task Scheduler.
Shall we start on Windows Task Scheduler: Create an Automated Windows Task Tutorial.
What is Windows Task Scheduler?

The Windows Task Scheduler (not to be mistaken with the Task Manager) is a Windows utility that allows you to run specific tasks after a trigger is activated (usually a time trigger). It can help you schedule Windows applications, and scripts (batch/CMD and PowerShell cmdlets), send emails or display a reminder.
For instance, you can set Windows Task Scheduler to create automatic backups. Nevertheless, this is only one example. Task Scheduler also allows you to create complex job scripts. Moreover, you can also dictate when these scripts run and the order.
Often, business users try to implement low-code/no-code tools or third-party job scheduling applications. However, in most cases, this is unnecessary as Windows Task Scheduler should be sufficient.
Windows and many of its installed applications already use the Windows Task Scheduler. As such, you can use the Windows Task Scheduler to view what jobs automatically run in the background and modify them. For example, Windows uses the Task Scheduler for much of its telemetry functionality i.e., uploading error and usage information.
The Windows Task Scheduler can be hard to find. It sits tucked away in Windows’ Administrative Tolls. With that being said, let us examine how to create an automated windows task using Windows Task Scheduler. However, you will first need to access and run it.
How to Open the Windows Task Scheduler
This section of the guide will show you how to launch Windows Task Scheduler. There are several ways to do this. The examples in this section primarily use Windows 10. However, you can adapt them to previous and later versions of Microsoft’s flagship operating system. Nevertheless, one of the most common ways to run the Task Scheduler is using Windows Control Panel.
Using Windows Control Panel
- Launch Control Panel.
- View the items as either large or small icons.
- Click on Administrative Tools.

- It is recommended that you order the items by name in ascending order. You will find the Task Scheduler as the third last item on the list.

Using the Start Menu
- Open the Start Menu (⊞).
- Next, scroll down through your apps until you find Windows Administrative Tools.
- Click on the Windows Administrative Tools.
- Finally, scroll through the list until you find the Task Scheduler. Again, this should be the third item from the bottom of the list.
Alternatively, you can use the Windows Start Menu’s search function. All you have to do is open the Start Menu and type Task Scheduler. The Windows Task Scheduler should be the first result.

Using Windows Run
This is the easiest and quickest way to open the Windows Task Scheduler. Furthermore, it will work on most versions of the Windows operating system.
- Open the Windows Run Dialog (⊞ + R).
- Type msc.
- Click on the OK button.
Alternatively, you can run the command control admintools. It will open the Windows Control Panel’s Administrative Tools section. Once again, you can scroll through the list of items and run the Task Scheduler.

Using the Command Prompt
Although the following tutorial uses Windows Command Prompt, you can use Windows PowerShell instead.
- Run CMD (as you would when changing your DNS Server Settings).
- Next type msc into the terminal screen.
- Hit the Enter The Task Scheduler will launch immediately.
Once more, you can use Command Prompt to launch the Control Panel’s Administrative Tools by typing the control admintools command.
At this point of the article with Windows Task Scheduler it is time to create automated Windows task.
How to Create an Automated Windows Task
Well at this point of Windows Task Scheduler: How to Create an Automated Windows Task Tutorial. Now that you know what the Task Scheduler’s purpose is and how to run it, you can now learn how to use it to create an automatic job. This tutorial will keep it simple. You will learn how to create a basic task that launches the Windows Disk Cleanup application weekly.
Setting up a Basic Task
- Launch Task Scheduler.
- Click on the Action menu item.
- Next, select Create Basic Task. The Task Scheduler should launch the Create Basic Task Wizard if you have followed these steps correctly.

Naming The Task
- Enter a name for your task in the Name text field. You can call it Weekly Disk Clean Up.
- Next, enter a description in the Description text area for your task. We recommend something similar to “An automated weekly task that runs the Windows Disk Clean Up application”.
- Click on the button labeled Next >. The next screen will ask you to set up a Task Trigger.

Selecting and Configuring a Trigger for the Task
- Next, click on the radio button labeled Weekly.
- Once again, click on the button marked Next >. The next screen will allow you to configure your weekly trigger.

- Set the start date and time for your task. The Task Scheduler will use the current date and time as the default.
- Next, select how often you want the task repeated. For instance, would you want the task to be triggered every single week or every two weeks? By default, it will be set to repeat every week. Again, it is recommended that you leave it as is.
- Select which date(s) you would like the task to run. This example will use Sunday.
- Once more, click on the Next > button. The next screen will ask you to choose an action.

Finalizing the Task
- Make sure that the Start a program radio button is selected. If you are still using an older version of Windows, you’ll notice that it deprecated both the Send an email and Display a message radio buttons. Essentially, this means they are obsolete and Microsoft will soon fade them out.
- Click on the Next > The next screen will ask you to select a program to launch.
- Since you will be launching the Disk Cleanup program, you can type the address C:\Windows\System32\cleanmgr.exe into the Program/script Alternatively, you can click on the Browse button and use the displayed dialog to find the application manually.
- You can leave the other fields blank.
- Click on the Next > button. The Task Wizard will take you to the final screen. This will allow you to review the settings for your automated task.

- Tick the checkbox labeled Open the Properties dialog for this task when I click Finish.
- Finally, click on the Finish button.

If you have followed the above steps correctly, the Task Scheduler will create your task and launch a dialog containing its properties. You can use this dialog to modify and amend your automated task. Once you are satisfied with the properties, you can click on the OK button.
Windows Task Scheduler: Create an Automated Windows Task Tutorial Conclusion
The above guide shows you how to create an automated Windows task using Windows Task Scheduler. It should serve as a basic primer. Once you are confident enough, you can create more complex tasks, import external tasks, view all running tasks, etc. You should explore these features and options at your discretion. However, in most cases, you will not be able to create any system breaking tasks. Nevertheless, if you have any questions, queries, or corrections, please leave them in the comment section below. As always, thank you for reading.
Windows Scheduler helps you automate your work
What to Know
- In Task Scheduler, right-click Task Scheduler Library and select New Folder to organize your scheduled tasks. Name the folder and click OK.
- Select the folder and click Create Basic Task and walk through each step of the wizard to create a trigger and action.
- Create an advanced task by selecting Create Task and select each tab to configure triggers, actions, and other task features.
This article covers how to create an automated task in Windows 10 with Task Scheduler, including creating basic and advanced automated tasks.
How Windows 10 Task Scheduler Works
Task Scheduler has been a utility included through several versions of the Windows operating system. The ability to create an automated task with Windows 10 task scheduler opens up many possibilities. You can trigger windows to run tasks based on a schedule or system events. Task scheduler can launch an application or a script that performs tasks for you.
This can be helpful to do things like:
- Launch a Chrome browser and Outlook app you use every time you use your computer.
- Launch a time logging application at the end of the day to clock your work hours.
- Trigger a batch job or PowerShell script with command prompt commands to clean your computer daily.
- Automatically shut down your computer at the same time every day.
How to Create a Basic Automated Task
Use the steps below to launch an application on your computer at the same time every morning.
These instructions will walk you through the Basic Task wizard.
-
Select the Start menu and type «Task Scheduler» and select the Task Scheduler app to launch it.
-
You can organize your automated tasks into your own folder. Just right click on Task Scheduler Library in the left navigation tree, and select New Folder.
-
Give the folder a name like «My Tasks» and select OK.
-
Select the new folder you’ve created. In the Actions navigation bar on the right, select Create Basic Task. This will open the Create Basic Task Wizard. Type a name for the task in the Name field. Select Next to continue.
-
The next step of the wizard is to choose a trigger for your task. You can choose one of the time intervals, or one of the system events. In this example, we’ll select Daily. Select Next to continue.
-
The next step is to fine tune the interval trigger. In this case we’ll set the trigger to happen at 8 AM every day, starting today. Set the recurrence to every 1 day. Select Next to continue.
-
The next step is to set up the Action for the task. In this case, select Start a Program and then select Next.
-
Select the Browse button and browse to Chrome which should be located at «C:\Program Files (x86)\Google\Chrome\Application\». The file name is chrome.exe. Once you browse to the file, select it and select Open. Select Next to continue.
-
On the Finish tab of the Wizard, you’ll see the Trigger status and Action you’ve created. Select Finish to close the Basic Task wizard.
-
You’ll see your new task in the main pane in the Task Scheduler window. You can right click the task and select Run to to test it actually launches the way you want it to. Now the task will run every day at the interval you’ve set up.
How to Create an Advanced Automated Task
Instead of using the Basic Task Wizard, you can step through the task configuration window using the regular task setup window. In this example, we’ll show how to launch Microsoft Word on the last day of the month.
-
To launch the Advanced Task configuration window, back on the main Task Scheduler window, select Create Task in the right navigation pane.
-
This will launch the Create Task window. On the General tab, type a name for your task in the Name field.
Two other settings you can adjust here include running the task only when you’re logged in or any time the computer is on. You can also set the task to run with the highest privileges.
-
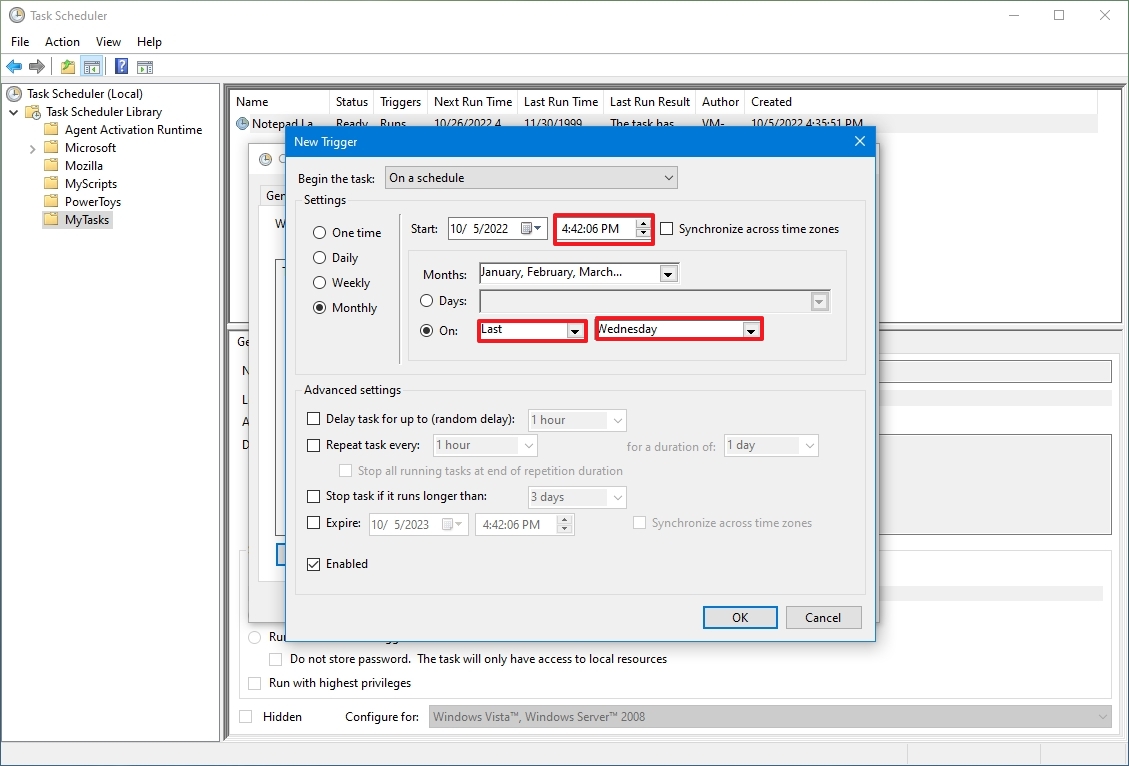
On the Triggers tab, select New. This is where you can adjust the schedule. In this case, select Monthly, select all months in the Months dropdown and set the Days dropdown to 30 for the end of the month. Make sure Enabled is selected. Select OK.
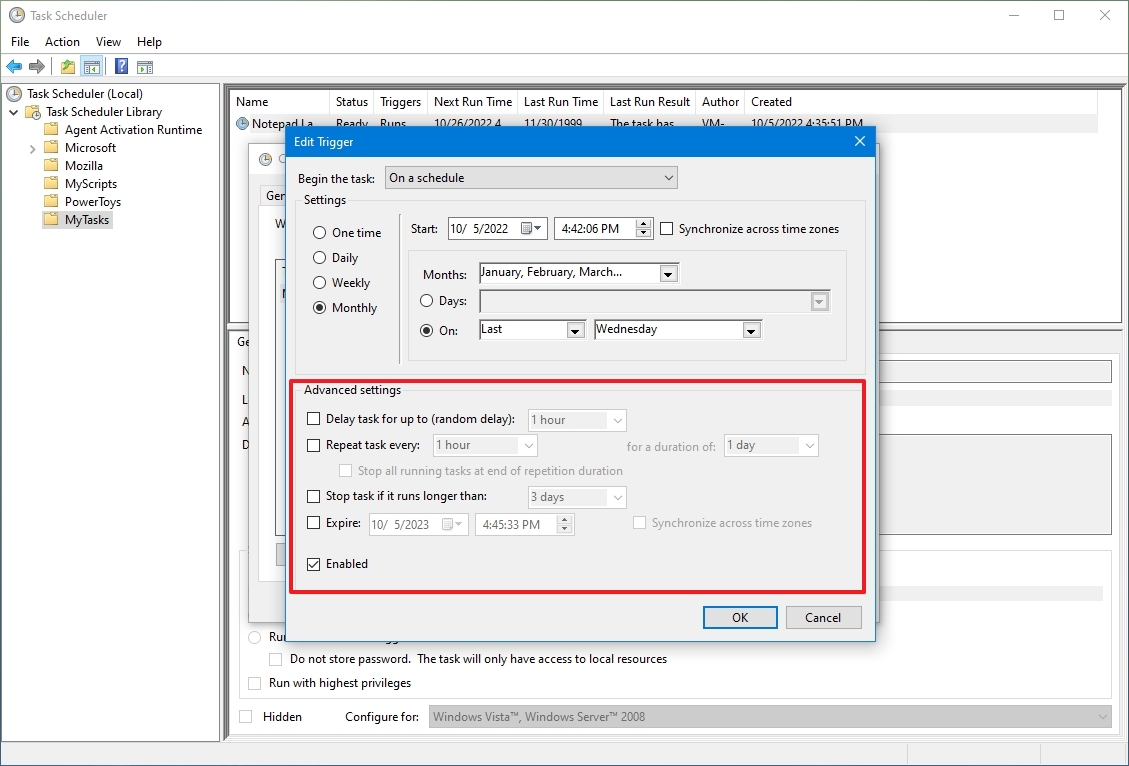
Under the Advanced settings section, you can configure delaying the task, repeating the task multiple times a day, killing a task that takes too long to run, or expiring the task.
-
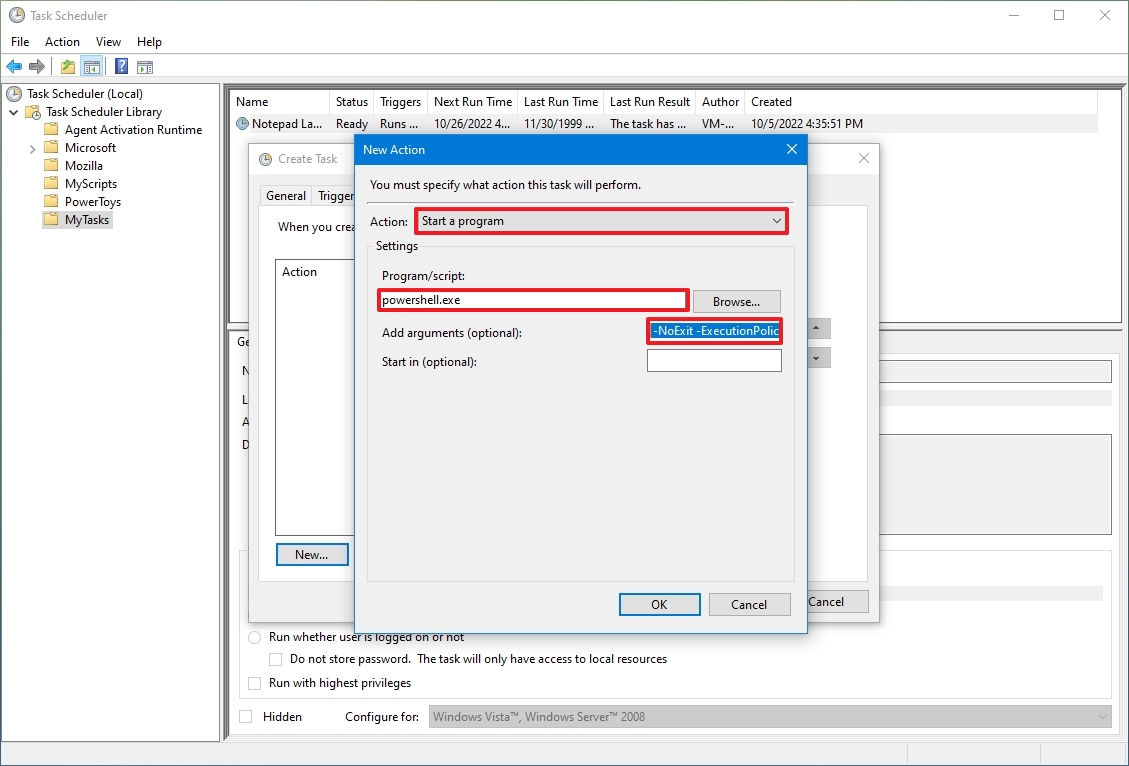
On the Actions tab, select New. Select Start a program in the Action dropdown. Select the Browse button and browse to the Word executable at «C:\Program Files\Microsoft Office\root\Office16\». The file name is winword.exe. Once you browse to the file, select it and select Open. Select OK.
-
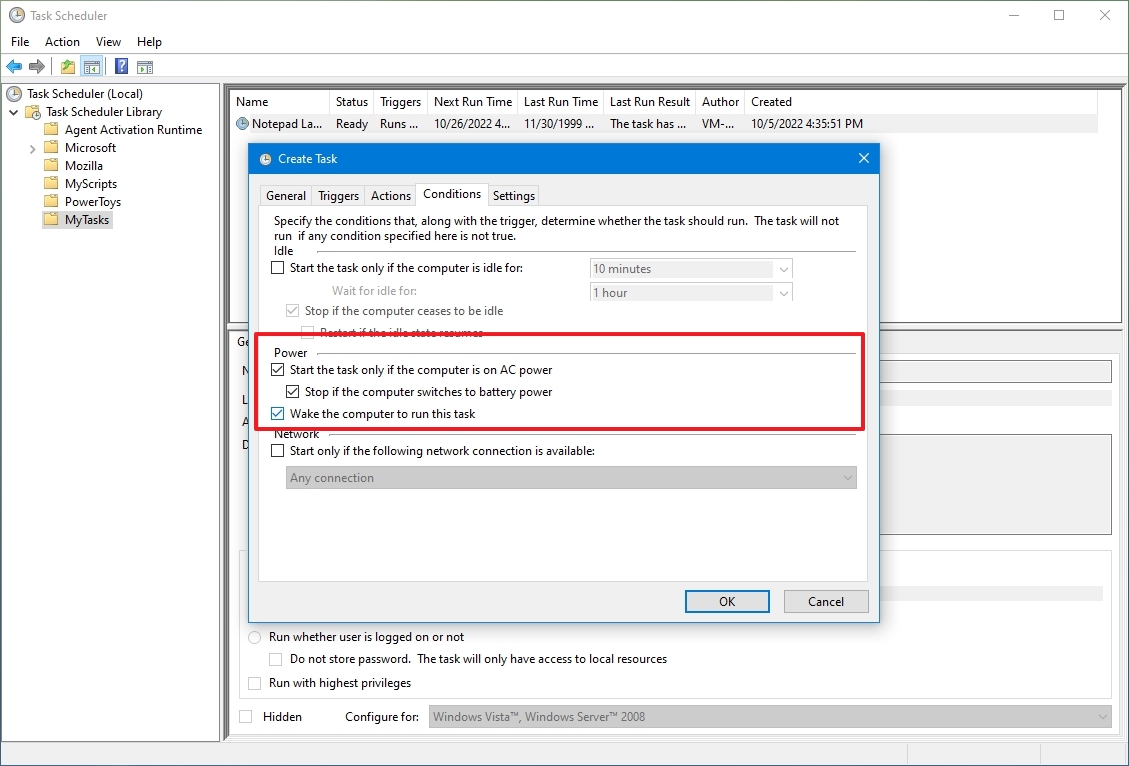
On the Conditions tab, you can further configure your task to run:
- Only if the computer is idle
- Only if the computer’s plugged in
- Wake up the computer to run it
- Only if you’re connected to your network
-
On the Settings tab, you can further configure your task:
- To be run manually
- Run again if it fails
- Automatically restart
- Stop if it runs too long
- Force to stop if it doesn’t end properly
- Delete the task if it’s not scheduled to run again
-
Once you’re done setting up all of the task tabs, select OK to finish. You’ll see the task appear in the main Task Scheduler window.
Thanks for letting us know!
Get the Latest Tech News Delivered Every Day
Subscribe