If you can’t find a file on your computer or you accidently modified or deleted a file, you can restore it from a backup (if you’re using Windows backup) or you can try to restore it from a previous version. Previous versions are copies of files and folders that Windows automatically saves as part of a restore point. Previous versions are sometimes referred to as shadow copies.
To restore a file from a backup, make sure the media or drive that your backup is saved on is available, and then follow these steps:
To restore files from a backup
-
Open Backup and Restore by selecting the Start button
 , selecting Control Panel, selecting System and Maintenance, and then selecting Backup and Restore.
 -
Select Restore my files, and then follow the steps in the wizard.
 , selecting Control Panel, selecting System and Maintenance, and then selecting Backup and Restore.
Restore deleted files and folders or restore a file or folder to a previous state.
To restore a deleted file or folder
-
Open Computer by selecting the Start button
, and then selecting Computer. -
Navigate to the folder that used to contain the file or folder, right-click it, and then select Restore previous versions. If the folder was at the top level of a drive, for example C:\, right-click the drive, and then select Restore previous versions.
You’ll see a list of available previous versions of the file or folder. The list will include files saved on a backup (if you are using Windows Backup to back up your files) as well as restore points, if both types are available.
Note: To restore a previous version of a file or folder that’s included in a library, right-click the file or folder in the location where it’s saved, rather than in the library. For example, to restore a previous version of a picture that’s included in the Pictures library but is stored in the My Pictures folder, right-click the My Pictures folder, and then select Restore previous versions.
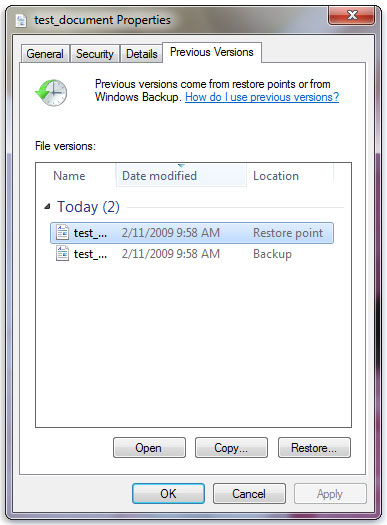
Some previous versions of files
-
Double-click a previous version of the folder that contains the file or folder you want to restore. (For example, if a file was deleted today, choose a version of the folder from yesterday, which should contain the file.)
-
Drag the file or folder that you want to restore to another location, such as your desktop or another folder.
The version of the file or folder is saved to the location that you selected.
Tip: If you don’t remember the exact file or folder name or its location, you can search for it by typing part of the name in the search box in the Documents library.
To restore a file or folder to a previous state
-
Right-click the file or folder, and then select Restore previous versions.
You’ll see a list of available previous versions of the file or folder. The list will include files saved on a backup (if you’re using Windows Backup to back up your files) as well as restore points, if both types are available.
The Previous Versions tab, showing some previous versions of files
-
Before restoring a previous version of a file or folder, select the previous version, and then click Open to view it to make sure it’s the version you want.
Note: You can’t open or copy previous versions of files that were created by Windows Backup, but you can restore them.
-
To restore a previous version, select the previous version, and then select Restore.
Warning: The file or folder replaces the current version on your computer, and the replacement can’t be undone.
Note: If the Restore button is unavailable, you can’t restore a previous version of the file or folder to its original location. You might be able to open it or save it to a different location.
Need more help?
Want more options?
Explore subscription benefits, browse training courses, learn how to secure your device, and more.
Communities help you ask and answer questions, give feedback, and hear from experts with rich knowledge.
Find solutions to common problems or get help from a support agent.
Для проверки целостности системных файлов и восстановления поврежденных файлов (библиотек) компонентов в Windows (Windows Server) можно использовать команды SFC и DISM. Эти две утилиты могут быть крайне полезными, если операционная система Windows работает нестабильно, появляются ошибки при запуске стандартных приложений или служб, после вирусного заражения и т.д.
В этой статье мы рассмотрим, как использовать команды
sfc /scannow
,
DISM /Online /Cleanup-Image /RestoreHealth
или
Repair-WindowsImage -Online -RestoreHealth
для восстановления образа и системных фалов в Windows 10/11 и Windows Server 2022/2019/2016.
Содержание:
- SFC /scannow: восстановление системных файлов Windows
- Проверка целостности хранилища компонентов Windows с помощью DISM
- Восстановление образа Windows с помощью DISM /RestoreHealth
- DISM /Source: восстановление образа Windows с установочного диска
- Восстановление образа Windows с помощью PowerShell
- DISM: восстановление поврежденного хранилища компонентов, если Windows не загружается
SFC /scannow: восстановление системных файлов Windows
Перед тем, как восстанавливать образ Windows с помощью DISM, рекомендуется сначала попробовать проверить целостность системных файлов с помощью утилиты SFC (System File Checker). Команда
sfc /scannow
позволяет проверить целостность системных файлов Windows. Если какие-то системные файлы отсутствуют или повреждены, утилита SFC попробует восстановить их оригинальные копии из хранилища системных компонентов Windows (каталог C:\Windows\WinSxS).
Утилита SFC записывает все свои действия в лог-файл
windir%\logs\cbs\cbs.log
. Для всех записей, оставленных SFC в файле CBS.log проставлен тег [SR]. Чтобы выбрать из лога только записи, относящиеся к SFC, выполните команду:
findstr /c:"[SR]" %windir%\Logs\CBS\CBS.log >"%userprofile%\Desktop\sfc.txt"
Если команда sfc /scannow возвращает ошибку “
Программа защиты ресурсов Windows обнаружила повреждённые файлы, но не может восстановить некоторые из них / Windows Resource Protection found corrupt files but was unable to fix some of them
”, скорее всего утилита не смогла получить необходимые файла из хранилища компонентов (образа) Windows.
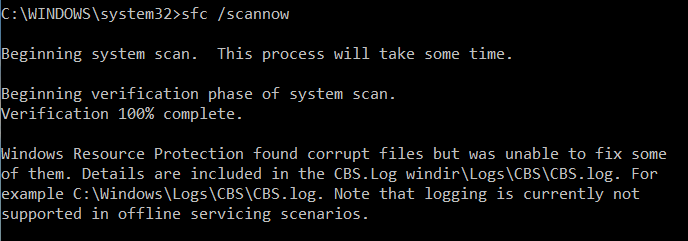
В этом случае вам нужно попробовать восстановить хранилище компонентов вашего образа Windows с помощью DISM.
После восстановления образа вы можете повторно использовать утилиту SFC для восстановления системных файлов.
Проверка целостности хранилища компонентов Windows с помощью DISM
Утилита DISM (Deployment Image Servicing and Management) доступна во всех версиях Windows, начиная с Vista.
Для сканирования образа Windows на наличие ошибок и их исправления используется параметр DISM /Cleanup-image. Команды DISM нужно запускать из командной строки, с правами администратора.
Чтобы проверить наличие признака повреждения хранилища компонентов в образе Windows (флаг CBS), выполните команду (не применимо к Windows 7/Server 2008R2):
DISM /Online /Cleanup-Image /CheckHealth
Эта команда не выполняет полное сканирование хранилища компонентов. Проверяются лишь записанные ранее маркеры повреждений и события в журнале Windows. Изменения в образ не вносятся. Команда проверит, не помечен ли ваш образ Windows как поврежденный и возможно ли исправить его.
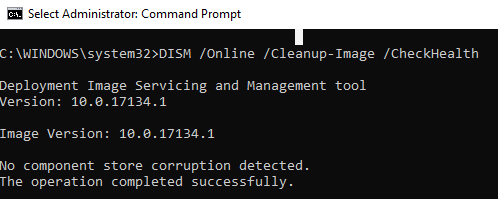
В этом примере команда вернула, что с образом все хорошо:
No component store corruption detected.
The operation completed successfully.
Чтобы выполнить полное сканирование хранилища компонентов на наличие повреждений в хранилище компонентов Windows, запустите команду:
DISM /Online /Cleanup-Image /ScanHealth
Команда проверки образа Windows может выполняться довольно долго (от 10 до 30 минут). И вернет один из трех результатов:
- No component store corruption detected – DISM не обнаружил повреждения в хранилище компонентов;
- The component store is repairable – DISM обнаружил ошибки в хранилище компонентов и может исправить их;
- The component store is not repairable – DISM не может исправить хранилище компонентов Windows (попробуйте использовать более новую версию DISM или вам придется восстанавливать образ Windows из резервной копии, сбрасывать или полностью переустанавливать вашу копию Windows.

В Windows 7 и Windows Server 2008 R2 для использования параметра DISM /ScanHealth нужно установить отдельное обновление KB2966583. Иначе при запуске DISM будет появляться “
Ошибка 87. Параметр ScanHealth не распознан в этом контексте
”.
Команда DISM /ScanHealth может вернуть ошибки:
- Ошибка: 1726. Сбой при удалённом вызове процедуры;
- Ошибка: 1910. Не найден указанный источник экспорта объекта.
Это однозначно говорит о том, что ваш образ Windows поврежден и его нужно восстановить.
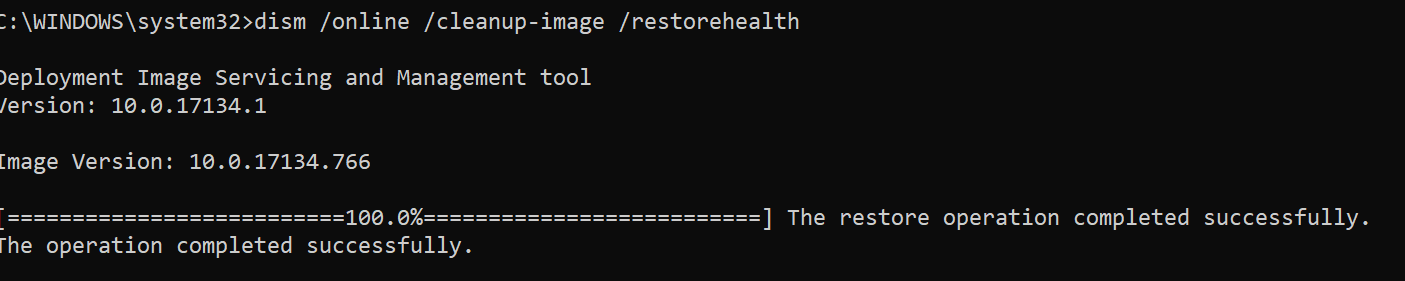
Восстановление образа Windows с помощью DISM /RestoreHealth
Чтобы исправить повреждения в хранилище компонентов образа Windows нужно использовать опцию RestoreHealth команды DISM. Эта опция позволит исправить найденные в образе ошибки, автоматически скачать и заменить файлы повреждённых или отсутствующих компонентов эталонными версиями файлов из центра обновлений Windows (на компьютере должен быть доступ в Интернет). Выполните команду:
DISM /Online /Cleanup-Image /RestoreHealth
В Windows 7/2008 R2 эта команда выглядит по другому:
DISM.exe /Online /Cleanup-Image /ScanHealth
Процесс сканирования и восстановления компонентов может быть довольно длительным (30 минут или более). DISM автоматически загрузит недостающие или поврежденные файлы образа с серверов Windows Update.
Восстановление выполнено успешно. Операция успешно завершена.
The restore operation completed successfully.
DISM /Source: восстановление образа Windows с установочного диска
Если на компьютере (сервере) отсутствует доступ в Интернет или отключена/повреждена служба Windows Update (как восстановить клиент Windows Update), то при восстановлении хранилища компонентов появятся ошибки:
- 0x800f0906 — Не удалось скачать исходные файлы. Укажите расположение файлов, необходимых для восстановления компонента, с помощью параметра Источник (0x800f0906 — The source files could not be downloaded. Use the source option to specify the location of the files that are required to restore the feature);
- Ошибка: 0x800f0950 — Сбой DISM. Операция не выполнена (0x800f0950 — DISM failed. No operation was performed);
- Ошибка:0x800F081F. Не удалось найти исходные файлы. Укажите расположение файлов, необходимых для восстановления компонента, с помощью параметра Источник (Error 0x800f081f, The source files could not be found. Use the «Source» option to specify the location of the files that are required to restore the feature).
 <
<
Во всех этих случаях вы можете использовать альтернативные средства получения оригинальных файлов хранилища компонентов. Это может быть:
- Установочный диск/флешка/iso образ Windows
- Смонтированный файл wim
- Папка \sources\SxS с установочного диска
- Файл install.wim с установочным образом Windows
Вы можете указать WIM или ESD файл с оригинальным установочным образом Windows, который нужно использовать в качестве источника для восстановления файлов системы. Предположим, вы смонтировали установочный ISO образ Windows 11 в виртуальный привод D:.
Примечание. Для восстановления поврежденных файлов в хранилище компонентов из локального источника версия и редакция Windows в образе должна полностью совпадать с вашей.
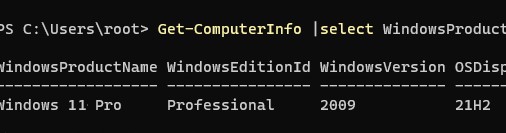
С помощью следующей PowerShell команды проверьте, какая версия Windows установлена на вашем компьютере:
Get-ComputerInfo |select WindowsProductName,WindowsEditionId,WindowsVersion, OSDisplayVersion
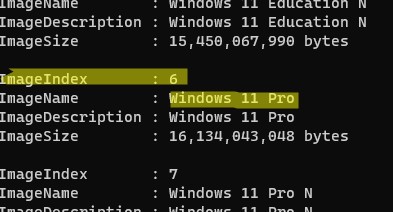
Выведите список доступных версий Windows в установочном образе:
Get-WindowsImage -ImagePath "D:\sources\install.wim"
В нашем случае образ Windows 11 Pro в образе install.wim имеет
ImageIndex = 6
.
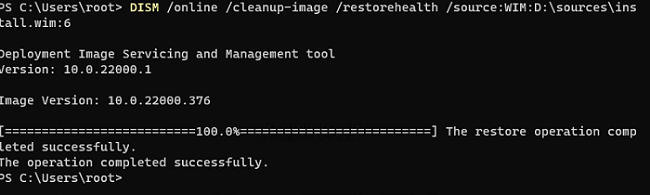
Для восстановления хранилища компонентов из локального WIM/ESD файла с блокированием доступа в интернет, выполните следующую команду (не забудьте указать ваш индекс версии Windows в файле):
DISM /online /cleanup-image /restorehealth /source:WIM:D:\sources\install.wim:6 /limitaccess
Или:
DISM /online /cleanup-image /restorehealth /source:ESD:D:\sources\install.esd:6 /limitaccess
Если при запуске появляется
- Ошибка Error: 50: DISM does not support servicing Windows PE with the /Online option, значит ваша DISM считает, что вы используете WinPE образWindows. Чтобы исправить это, удалите ветку реестра HKEY_LOCAL_MACHINE\SYSTEM\CurrentControlSet\Control\MiniNT.
Ошибка DISM Error 87: проверьте правильно написания команды, убедитесь что вы используете версию DISM для вашей версии Windows (обычно бывает при загрузке через WinPE/WinRE).
Утилита DISM пишет подробный журнал сканирования и восстановления системных файлов в файл
C:\Windows\Logs\DISM\dism.log
.
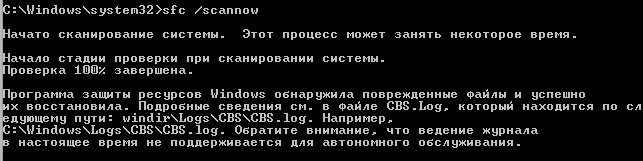
После восстановления хранилища компонентов вы можете запустить утилиту проверки системных файлов
sfc /scannow
. Скорее всего она успешно восстановит поврежденные файлы:
Программа защиты ресурсов Windows обнаружила поврежденные файлы и успешно их восстановила.
Windows Resource Protection found corrupt files and successfully repaired them.
Если все системные файлы целы, появится сообщение:
Windows Resource Protection did not find any integrity violations
Восстановление образа Windows с помощью PowerShell
В версии PowerShell в Windows 10/11 и Windows Server 2022/2019 есть аналоги рассмотренных выше команд DISM. Для сканирования хранилища компонентов и поиска повреждений в образе выполните:
Repair-WindowsImage -Online –ScanHealth
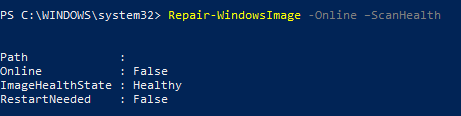
Если ошибок в хранилище компонентов не обнаружено, появится сообщение:
ImageHealth State: Healthy
Для запуска восстановления системных компонентов и файлов наберите:
Repair-WindowsImage -Online -RestoreHealth
При отсутствии доступа к интернету эта команда может зависнуть в процессе восстановления образа. Вы можете восстановить системные компоненты из локальной копии образа Windows в виде WIM/ESD файла, скопированного с установочного ISO образа Windows 10 (здесь также нужно указать индекс версии Windows в wim файле в качестве источника восстановления):
Repair-WindowsImage -Online -RestoreHealth -Source D:\sources\install.wim:5 –LimitAccess
DISM: восстановление поврежденного хранилища компонентов, если Windows не загружается
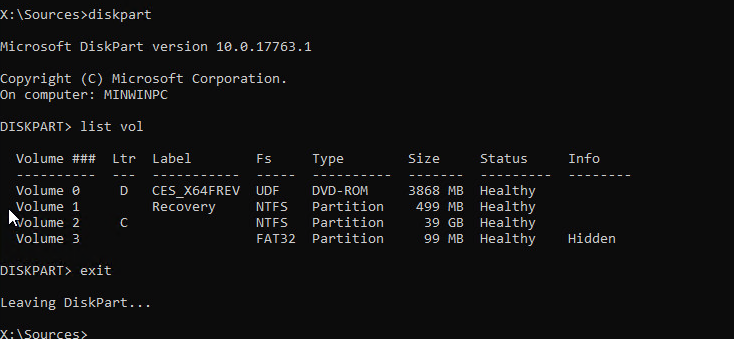
Если Windows не загружается корректно, вы можете выполнить проверку и исправление системных файлов в оффлайн режиме.
- Для этого загрузите компьютер с установочного образа Windows (проще всего создать загрузочную USB флешку с Windows 10/11 с помощью Media Creation Tool) и на экране начала установки нажмите
Shift + F10 - Чтобы разобраться с буквами дисков, назначенных в среде WinPE, выполните команду
diskpart
->
list vol
(в моем примере диску, на котором установлена Windows присвоена буква C:\, эту букву я буду использовать в следующих командах); - Проверим системные файлы и исправим поврежденные файлы командой:
sfc /scannow /offbootdir=C:\ /offwindir=C:\Windows
- Для исправления хранилища компонентов используйте следующую команду (в качестве источника для восстановления компонентов мы используем WIM файл с установочным образом Windows 10, с которого мы загрузили компьютер):
Dism /image:C:\ /Cleanup-Image /RestoreHealth /Source:WIM:D:\sources\install.wim:6
- Если на целевом диске недостаточно места, то для извлечения временных файлов нам понадобится отдельный диск достаточного размера, например F:\, на котором нужно создать пустой каталог:
mkdir f:\scratch
и запустить восстановление хранилища компонентов командой:
Dism /image:C:\ /Cleanup-Image /RestoreHealth /Source:D:\sources\install.wim /ScratchDir:F:\scratch


Совет. Другие полезные команды DISM, которые должен знать администратор:
-
DISM /Add-Package
– установка MSU/CAB файлов обновлений, интеграция обновлений в образ Windows; -
DISM /Get-Drivers
– получение списка установленных драйверов; -
DISM /Add-Driver
– добавление драйверов в образ; -
DISM /Export-Driver
– экспорт установленных драйверов Windows; -
DISM /Add-Capability
– установка дополнительных компонентов Windows через Features on Demand (например, RSAT, сервер OpenSSH или ssh клиент Windows; -
DISM /Enable-Features
и
/Disable-Features
– включение и отключение компонентов Windows (например, протокола SMBv1), -
DISM /online /Cleanup-Image /StartComponentCleanup
– очистка хранилища компонентов и удаление старых версий компонентов (папки WinSxS); -
DISM /set-edition
– конвертирование ознакомительной редакции Windows на полную без переустановки.
Did you perform a System Restore only to find that many files are missing? Then follow this easy guide to restore deleted files after System Restore.
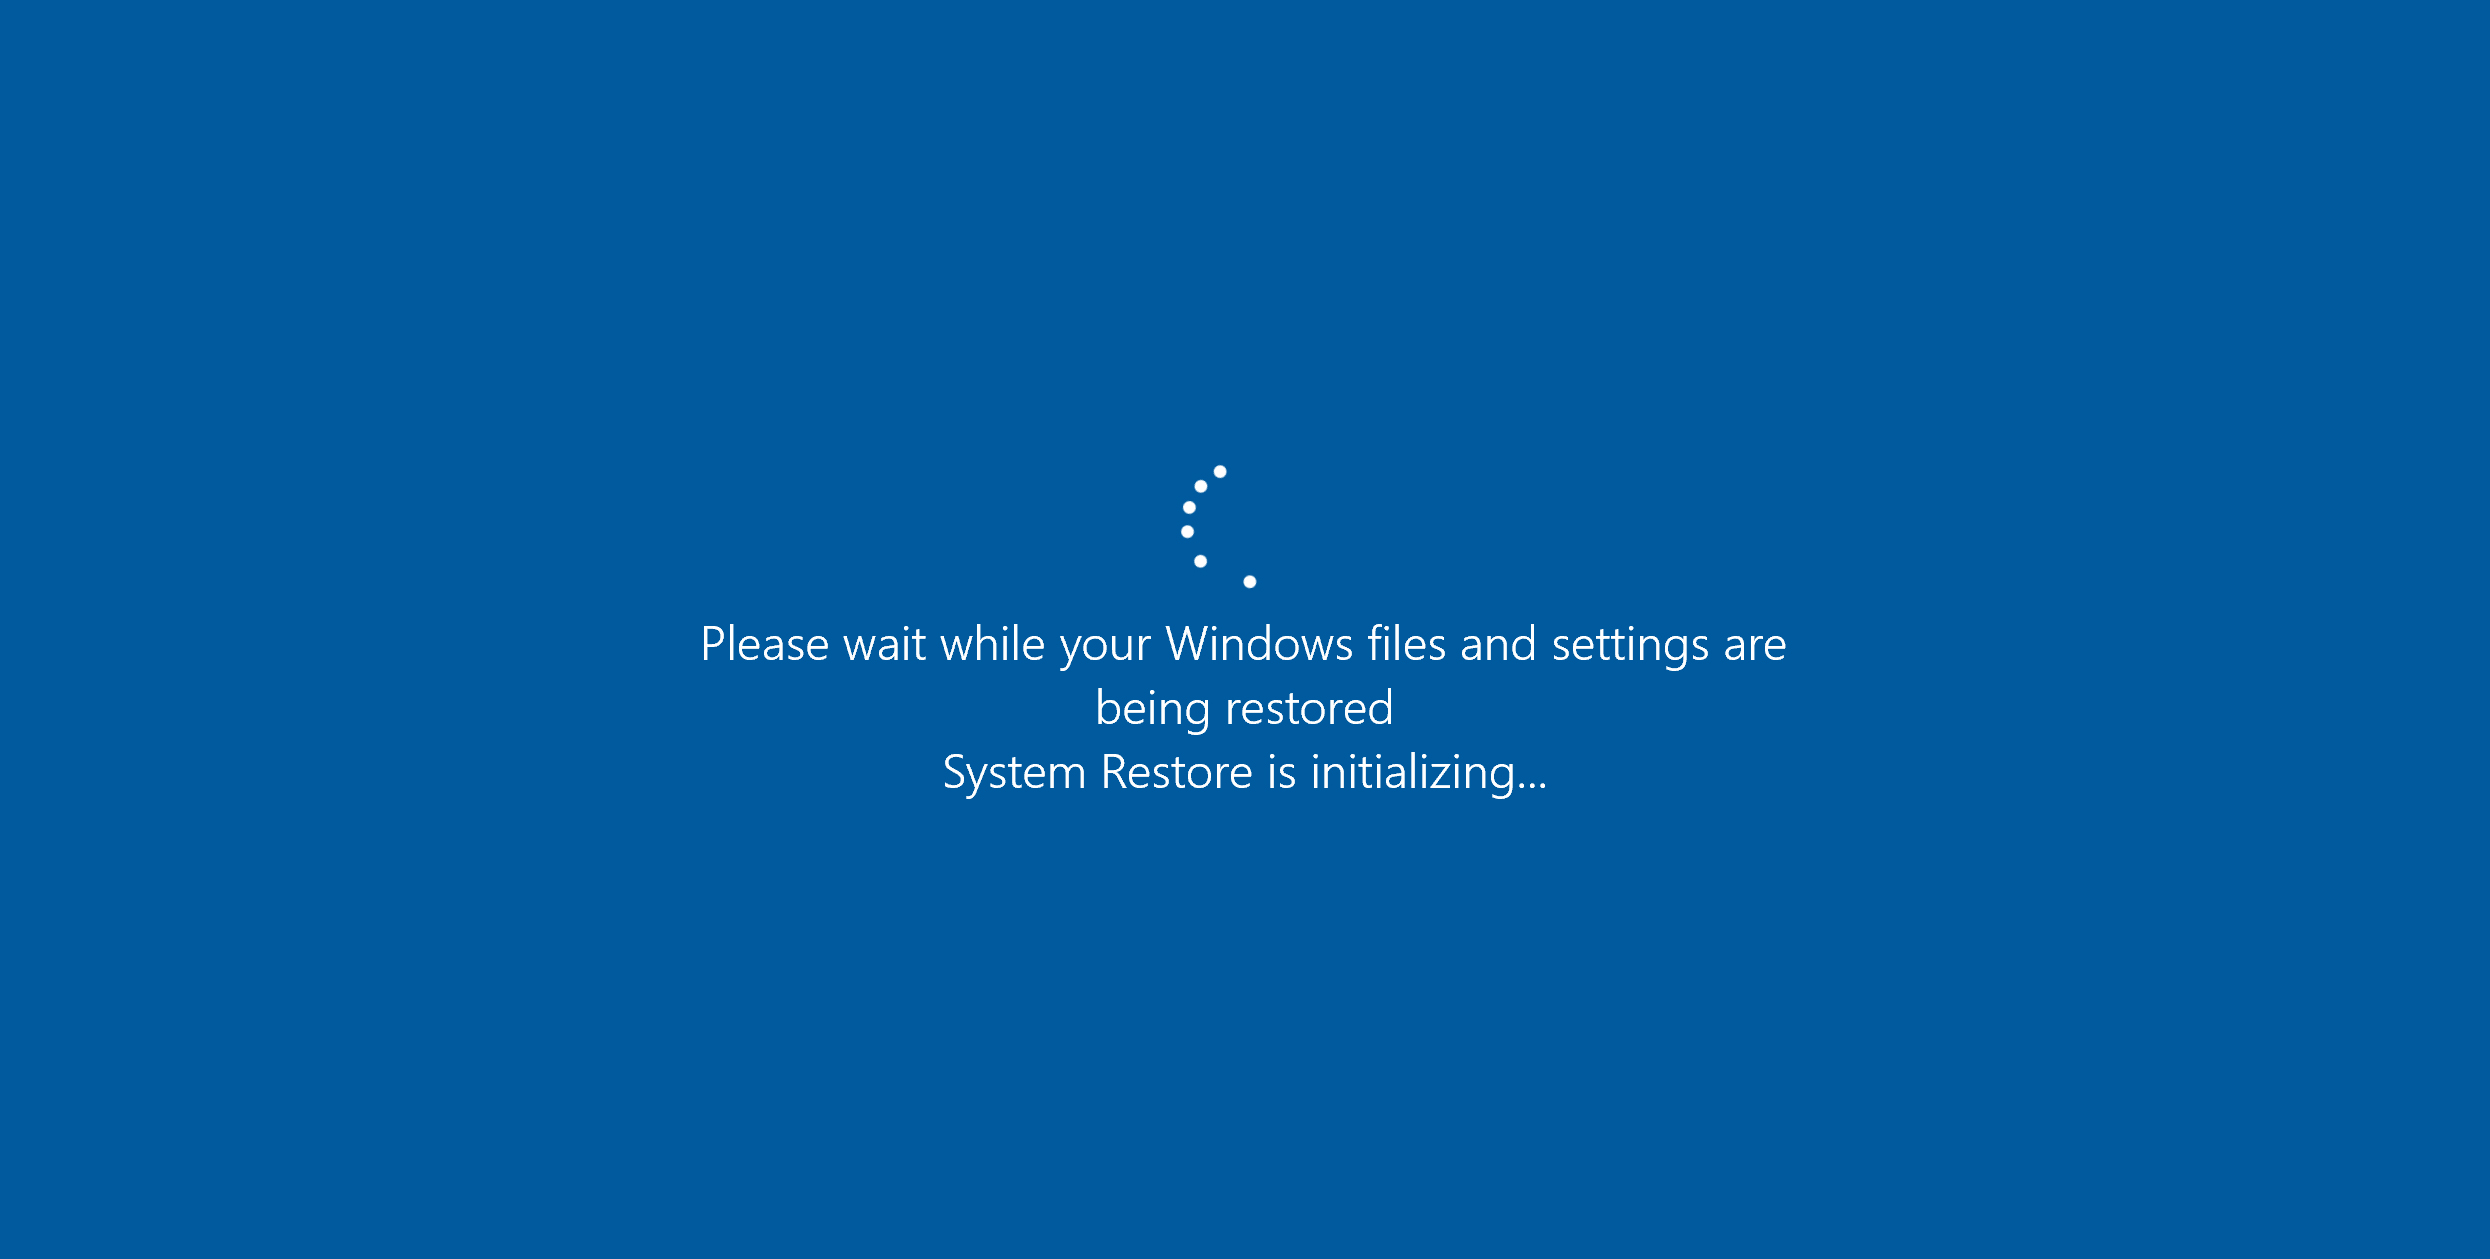
Whenever Windows faces any error, System Restore emerges as a go-to fix. It is a built-in feature that allows you to revert your computer’s current state to any other saved state in the past. In other words, it rolls back the system files, settings, installed apps, etc.
However, performing a System Restore will not delete your computer’s personal files and other data since you created a System Restore point. Unlike System Image creation, System Restore only captures and restores critical system files.
Similarly, performing a System Restore point will not affect the files stored on your external drivers or network locations.

What System Restore can recover, and what can it not?
What System Restore can recover:
- System Configuration: System settings, Registry entries, and configuration files.
- System Components and Software Applications
- Windows Updates
What System Restore cannot recover after the creation of the restore point
- Personal Files
- Installed programs
- User account changes
When restoring deleted files after performing System Restore – the options are limited. But Windows offers a few ways to recover lost files. These options are:
- Recover Files from OneDrive
- Check with the Backup and Restore Feature
- Windows File Recovery
Now let us talk about these steps briefly below:
1] Recover Files from OneDrive
Almost all Windows users have set up OneDrive as their go-to backup solution for personal data like documents, images, music, and other files. By doing so, Windows automatically takes a backup of specific files from time to time and allows you to restore the files when deleted.
So if you did have OneDrive setup, you can quickly recover files using it by following the below steps:
- First, visit onedrive.live.com and log in using your Microsoft account credentials.
- Next, you should see all the available files backed up by OneDrive.
- Right-click on the data you wish to recover and select Download.

- It will start downloading a Zip file which you can later execute and restore your files.
However, the only drawback of this method is that there is no automatic way to restore the backup in its respective folders or directories. So you have to do that manually.
Read: OneDrive Shared folder not syncing or updating
2] Check with Backup and Restore Feature
You can quickly restore your files if you have created a backup using the Backup and Restore or File History feature.
However, this feature needs to be enabled before you can use it. So if you have luckily had the feature enabled, here is how you can recover your files:
- First, connect the external storage device that contains your backup files.
- Next, use Windows search to find Control Panel and launch it.
- Next, in the Control Panel search, type File History and click on Save backup copies of your files with File History from the search results.
- Now on the sidebar, click on Restore personal files.
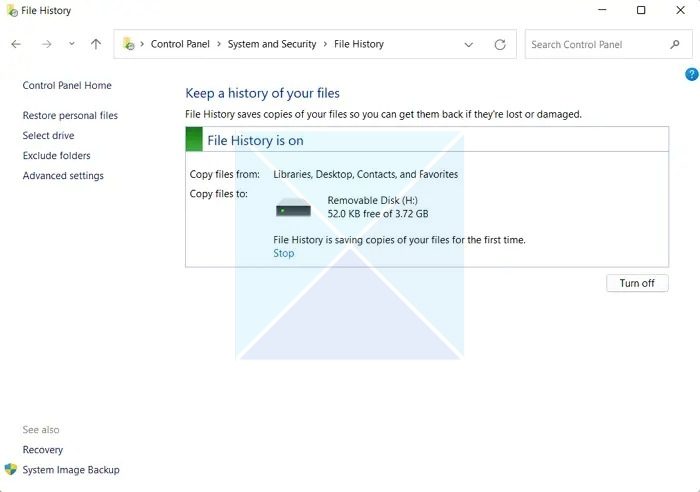
- Next, you should get to see all your backup files. Select them and restore the files back to your computer.
Read: How to use Version History on OneDrive for all File Types to recover files
3] Windows File Recovery
Microsoft offers a Windows File Recovery tool that works on a command line interface. You can use it to recover accidentally deleted files from various internal or external storage devices without needing third-party data recovery solutions. It can recover all data types- photos, documents, videos, and more.

The command line interface offers various options, types of recovery modes, and support for NTFS, FAT, exFAT, and ReFS file systems. Please read our complete guide on how to use it to recover deleted files.
If nothing else works, you can check out some of the best recovery software that can scan and help to restore files if they are still available on the drive.
Conclusion
So those were three quick ways to restore deleted files after System Restore. The above steps will help you to recover and restore your data from various incidents. However, in the future, back up your essential data from time to time to enjoy a smoother data restoration process.
Is it possible to recover permanently deleted files?
Yes, there is a partial change that you can recover deleted files. If you use the right recovery software and do not use the PC from which the files had been deleted, there is a bright chance to get back the files.
How to recover permanently deleted files in Windows using the command prompt?
You can use the Windows File Recovery tool to recover deleted files in Windows using Windows Terminal or command prompt. The tool offers various options to help you scan and recover the files. However, make sure to learn it by deleting a file and then try to recover it.
Dealing with lost files is a significant headache for Windows 10 users. Whether you’ve accidentally deleted an important document or experienced data loss due to hardware failure, it’s an unwelcome disruption to your workflow. Thankfully, the System Restore point can recover those deleted files in Windows 10 — but does it actually work? In this blog post, we’ll provide all the information you need on how you can use System Restore in Windows 10 and reassure yourself that those precious documents are secure.
Will System Restore Recover Deleted Files in Windows 10
System Restore will not recover deleted files in Windows 10. System Restore is designed to fix various Windows 10 operating system issues. It will revert your computer to an earlier point in time, thus undoing any recent changes made by programs and applications.
However, it will not recover any deleted files, such as documents and photos. This is because System Restore will not overwrite already removed data from your device; instead, it will simply restore the previous state of your computer’s software configuration. You should regularly back up or save them to a secure storage space or external drive.
System Restore backs up and restores Windows:
- System files
- System settings
System Restore doesn’t contain any personal data created by users, such as:
- Documents
- Images
- Movies
- Music
That’s why you can’t recover deleted files using Windows’ System Restore.
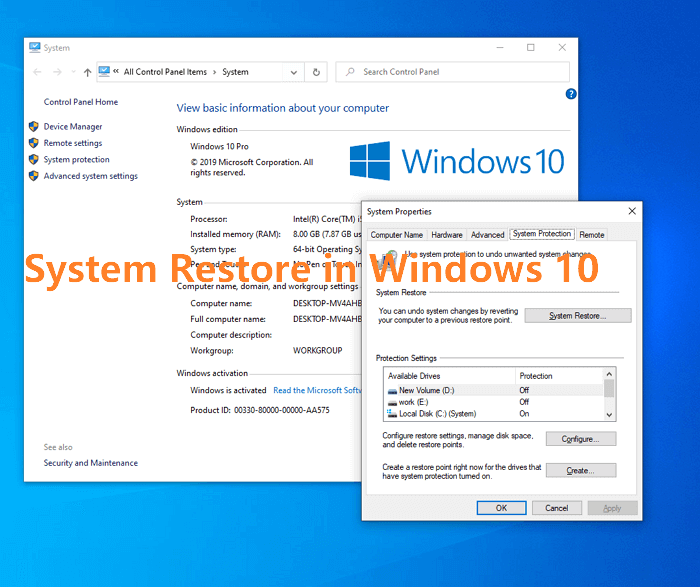
How to Turn On System Restore Point in Windows 11/10
A System Restore point helps you keep your system settings and revert to the previous state of your PC. But how to turn on a System Restore point? Here are the steps to turn on System Restore in Windows 10.
Step 1. Right-click on This PC in Windows 10 and choose «Properties».
Step 2. Click «System protection». Now the System Properties window will open.
Step 3. If you didn’t turn on the System Restore option before, you could see the protection status of each drive partition is labeled as «off».
Step 4. To enable the System Restore feature on the C drive, click the C drive option and then «Configure».
Step 5. Under the Restore Settings, tick the option «Turn on system protection».
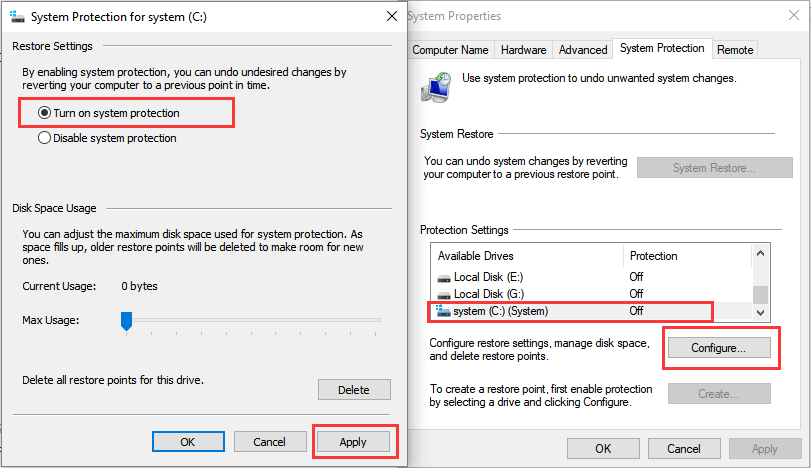
You can set a backup reservation strategy to adjust the maximum disk space used for system protection, and it’s helpful to manage your backup hard drive disk space. After the changes are made, click «Apply». Your System Restore should now be up and running!
If you have created a System Restore point, you can learn how to turn off System Restore to free up disk space.
How to Recover Deleted Files in Windows 11/10/8/7
Since System Restore can’t recover deleted files, what can you do to recover deleted files? All you need is effective data recovery software — EaseUS Data Recovery Wizard.
It is a powerful data recovery solution that can help users safely recover their deleted files. EaseUS Data Recovery Wizard offers extensive scanning capabilities and support for disk partition recovery, making it the perfect solution for recovering deleted files.
- Recover all kinds of files like documents, photos, videos, and more.
- Restore files after formatting, deleting, virus attacks, and more.
- Support hard drive recovery, SSD data recovery, SD card recovery, memory card recovery, and more.
With EaseUS Data Recovery Wizard, recovering your deleted files has never been easier! Download this software and recover deleted files in Windows 11/10/8/7.
Step 1. Choose the exact file location and then click the «Scan» button to continue.
Step 2. After the process, select the «Deleted Files» and «Other Lost Files» folders in the left panel. Then, you can apply the «Filter» feature or click the «Search files or folders» button to find the deleted files.

Step 3. Click the «Recover» button and save the restored files – ideally, it should be different from the original one.

Conclusion
While System Restore can help you roll back to a previous system state, it cannot recover deleted files. If you need to recover deleted files in Windows 10, you will need to use other methods, such as EaseUS hard drive recovery software. We hope this article was helpful and that you successfully turned on System Restore Point in Windows 11/10.
Does Windows System Restore Recover Deleted Files FAQs
Read the questions and answers below to get additional help.
1. Will system recovery delete my files?
Will system recovery delete my files? No. System Image Recovery is to restore a computer from a system image you created on a disk. It won’t delete your files.
2. Where do permanently deleted files go to Windows 10?
Where do deleted files go? They are still on the device or in the Recycle Bin. If you are using an internal hard drive, they may go to the Recycle Bin or still be on the drive. The files will not go to the Recycle Bin if you use an external hard drive. It remains on the drive.
3. Can we recover permanently deleted files in Windows 10?
You need to use data recovery software to recover permanently deleted files:
- Download and run EaseUS Data Recovery Wizard
- Select the drive and click Scan
- Wait patiently and preview the files
- Select the files and click Recover
🗨️
If you’re looking for an easy solution to recover files after system restore on Windows 10 or earlier versions, look no further. We’ll show you which data recovery apps can help you the most, how to use them, and more!
Is It Possible to Recover Files After System Restore?
Yes, you can recover your files after a system restore, so this situation isn’t as scary as it might seem.
👀
If you perform a system restore, it could delete or alter files on your computer. The outcome depends on the specific settings and options you select during the process. A system restore is designed to return your computer to its previous state. This means it may change system files, program files, and settings. However, the status of your personal files, such as documents, pictures, and videos, can vary. They may or may not be altered, depending on the settings you select when initiating the restore.
If you are among those who have lost important files after a system restore, do not despair. To can get your files back using data recovery software, which relies on sophisticated algorithms to find and recover deleted files. You can download free data recovery software, but paid data recovery applications typically deliver better performance, and they also come with extra features.
How To Recover Files After System Restore on Any Windows Version
The first step you need to take to recover files after system restore on any Windows version is to download a capable data recovery software application. Below are the programs we recommend the most, as they’ve proven themselves to be some of the best data recovery software we’ve encountered during our tests.
Option A: Disk Drill for Windows
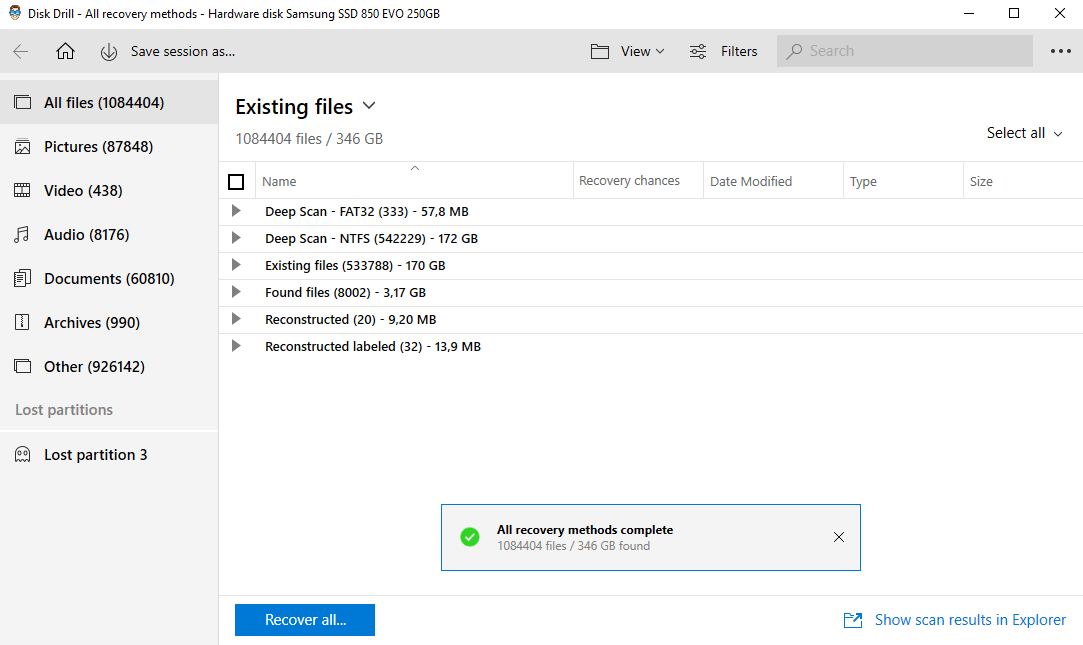
![]() Disk Drill is a well-known program in the data recovery world. It has become known for its reliability, affordable pricing, and powerful recovery capabilities. The program’s free version allows you to recover up to 500 MB worth of files, no matter which version of Windows you’re using. Disk Drill also has a user-friendly interface, making it suitable even for complete novices with no technical skills.
Disk Drill is a well-known program in the data recovery world. It has become known for its reliability, affordable pricing, and powerful recovery capabilities. The program’s free version allows you to recover up to 500 MB worth of files, no matter which version of Windows you’re using. Disk Drill also has a user-friendly interface, making it suitable even for complete novices with no technical skills.
To recover files after system restore with Disk Drill, you need to:
- Download Disk Drill from the company’s official homepage.

- Install Disk Drill and then launch it (don’t install the application on the drive you’re trying to recover).
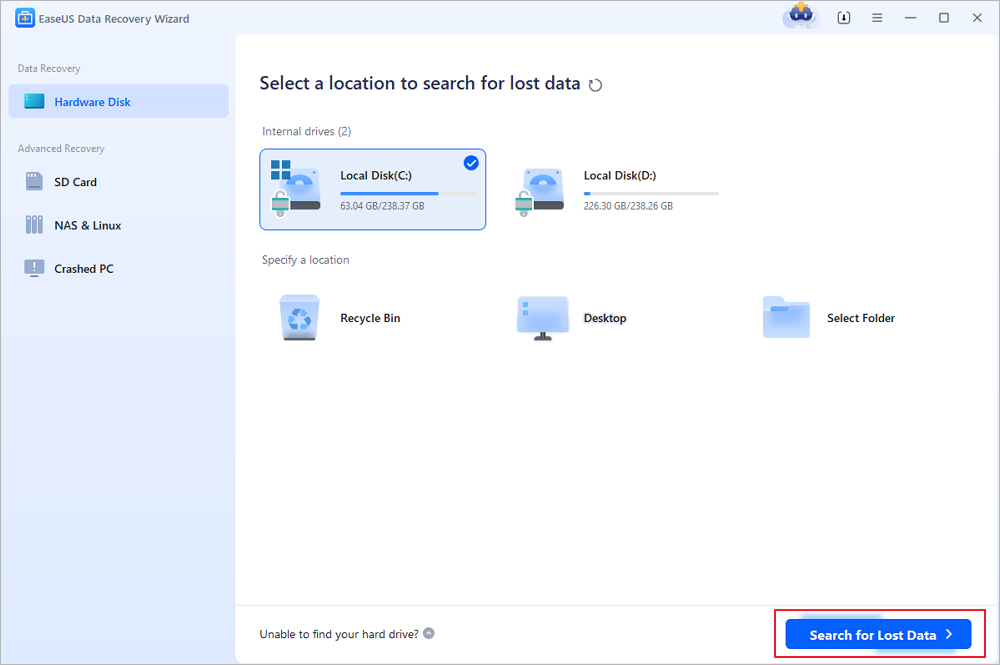
- Click on the ‘Search for lost data’ button.

- Go through the list of recovered files and select the ones you want to save (Pro tip: if you can preview the file, it means you can recover it as well).

- Hit the ‘Recover’ button and choose a destination where you want Disk Drill to store your recovered files (it’s advisable to recover files to a different storage devices to avoid overwriting).


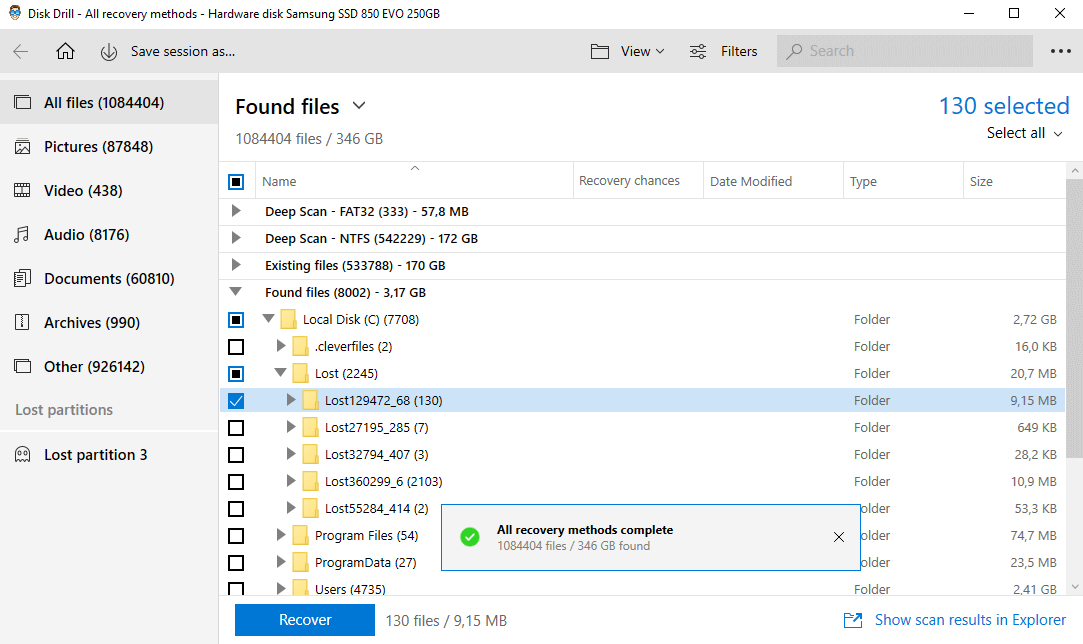
You should also keep in mind that if you want to recover more than 500 MB worth of files with Disk Drill, you need to switch to purchase a license. Make sure to check Disk Drill’s website for discounts, which are more than frequent.
🔗
With Disk Drill, it takes just a couple of steps to solve even the most complicated data loss scenarious. This software can help not only with system restore, but Disk Drill can also recover files after Windows factory reset and even help recover files that were lost after updating Windows. So far, my team and I have run it through numerous tests on different devices, and it’s shown nothing but excellent results. The tool is also completely safe to use.
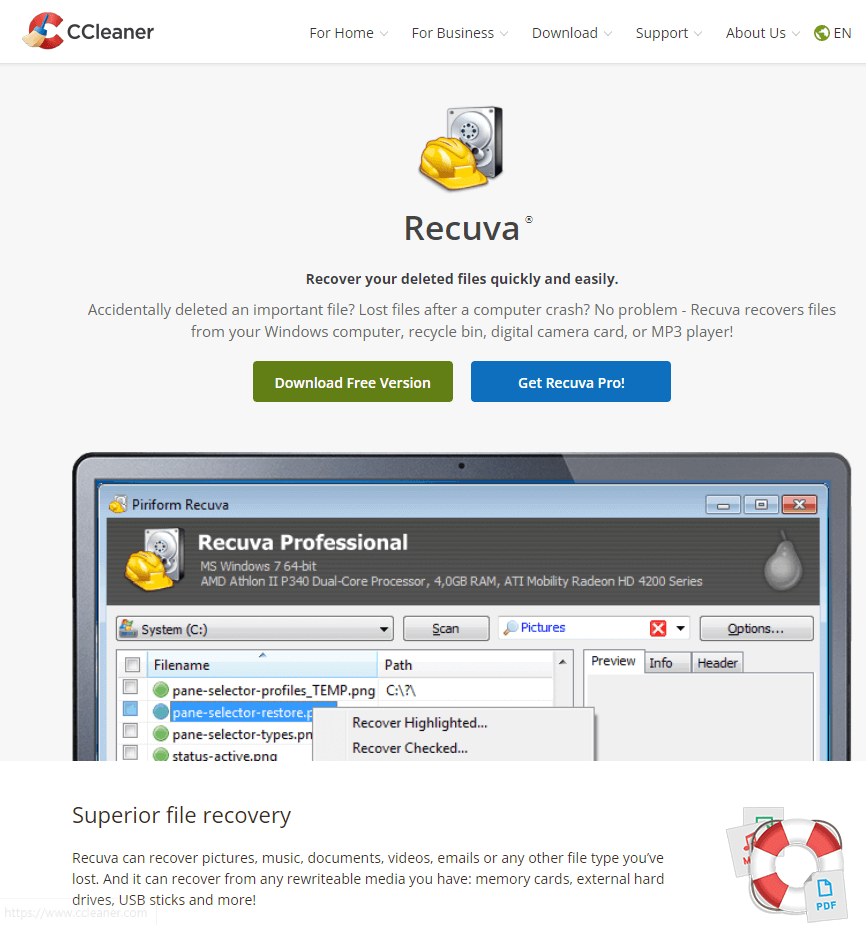
Option B: Recuva
![]() Recuva is a freemium data recovery program that you can try for free. It does its job pretty well considering how much the full version costs, making it a good budget-friendly alternative to Disk Drill. Although Recuva supports only a limited number of file formats, all the basics are covered well.
Recuva is a freemium data recovery program that you can try for free. It does its job pretty well considering how much the full version costs, making it a good budget-friendly alternative to Disk Drill. Although Recuva supports only a limited number of file formats, all the basics are covered well.
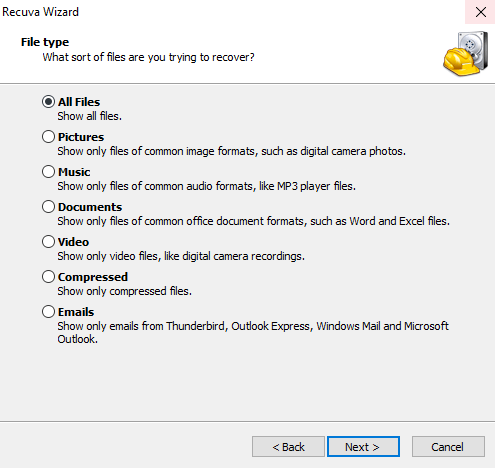
To restore files after system restore with Recuva, all you have to do is:
- Visit the Recuva official website.
- Download the free version of the software.

- Install and then open the program<./li>
- Select the type of files you wish to restore (in case you don’t know which type of files you want to recover, select the All Files option).

- Hit the Next button.
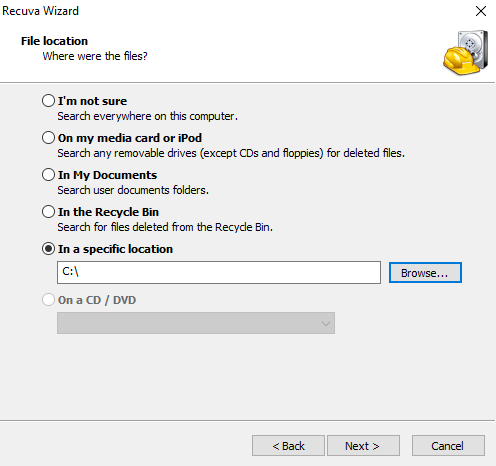
- Select the drive you did a System Recovery on.

- Click the Next and then Start button.
- Select the deleted files you want to restore once Recuva is done scanning.
- Click the Recover button.

- Choose a location where you want to save your lost files.
- Click the Ok button twice.
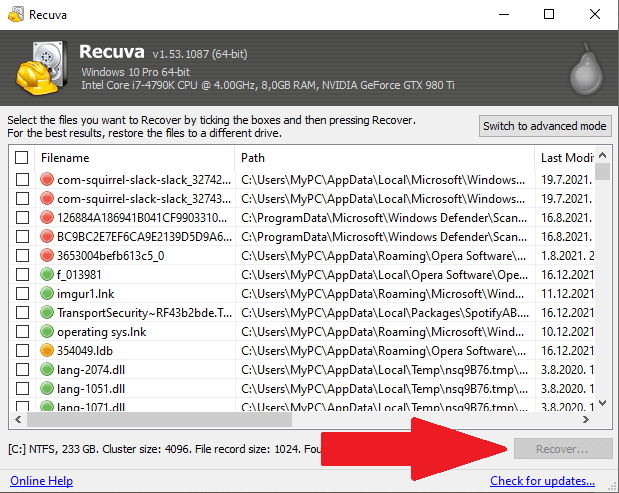
Once you complete all of these steps, you should have your files waiting for you at the location you selected. Note that Recuva works on all recent Windows versions, and it can even recover deleted files on the ever popular Windows 7.
How To Undo System Restore on Different Windows Versions
👀
The process of undoing system restore is always tedious and drawn-out. The steps you need to take to undo system restore depend on which Windows version you’re using. That’s why we’ll explain what you need to do for various Windows versions, such as Windows 10 & 8, 7, and XP.
Windows 10 & 8
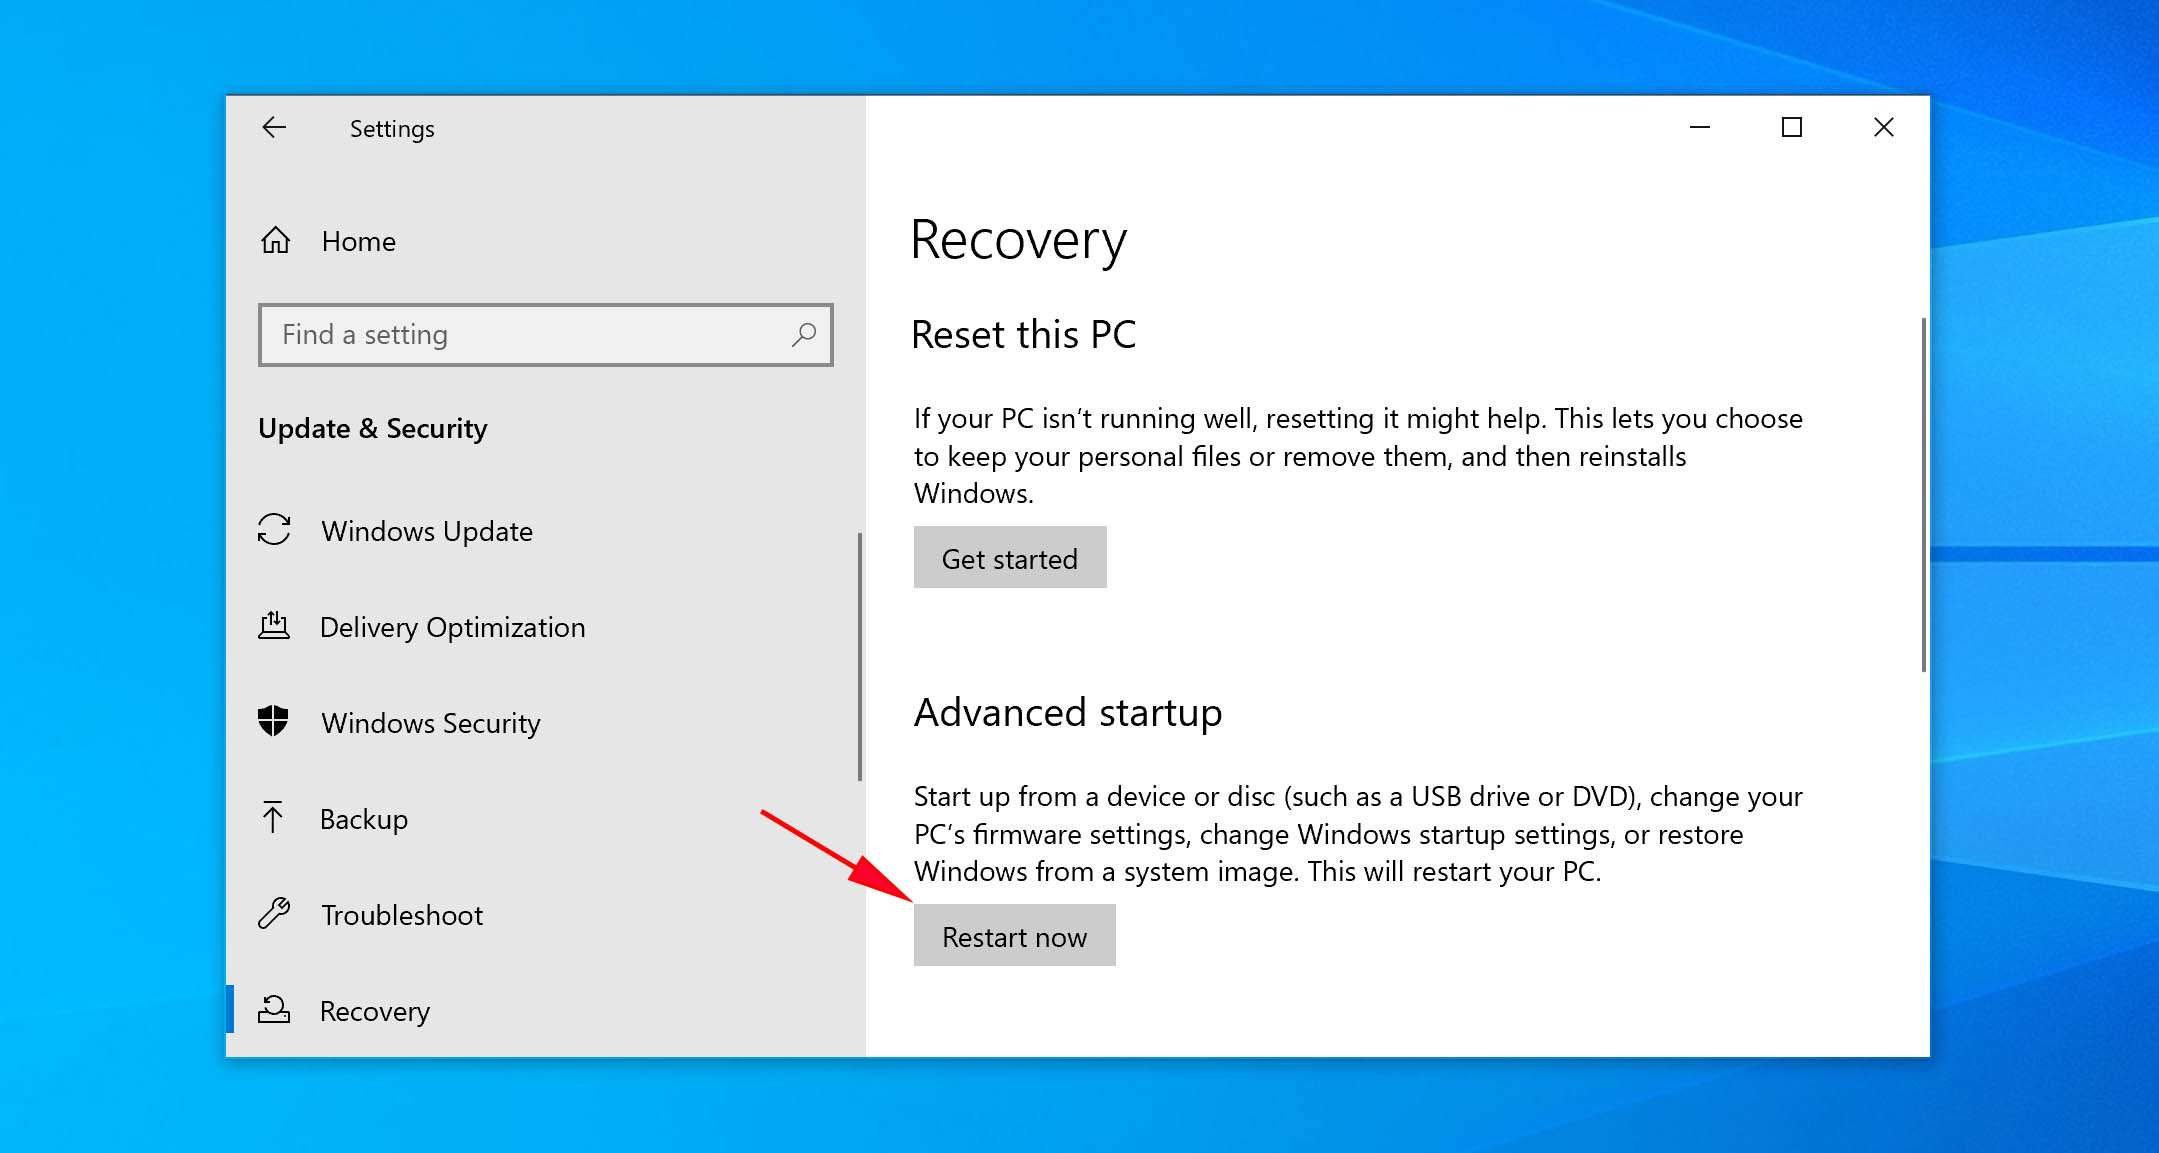
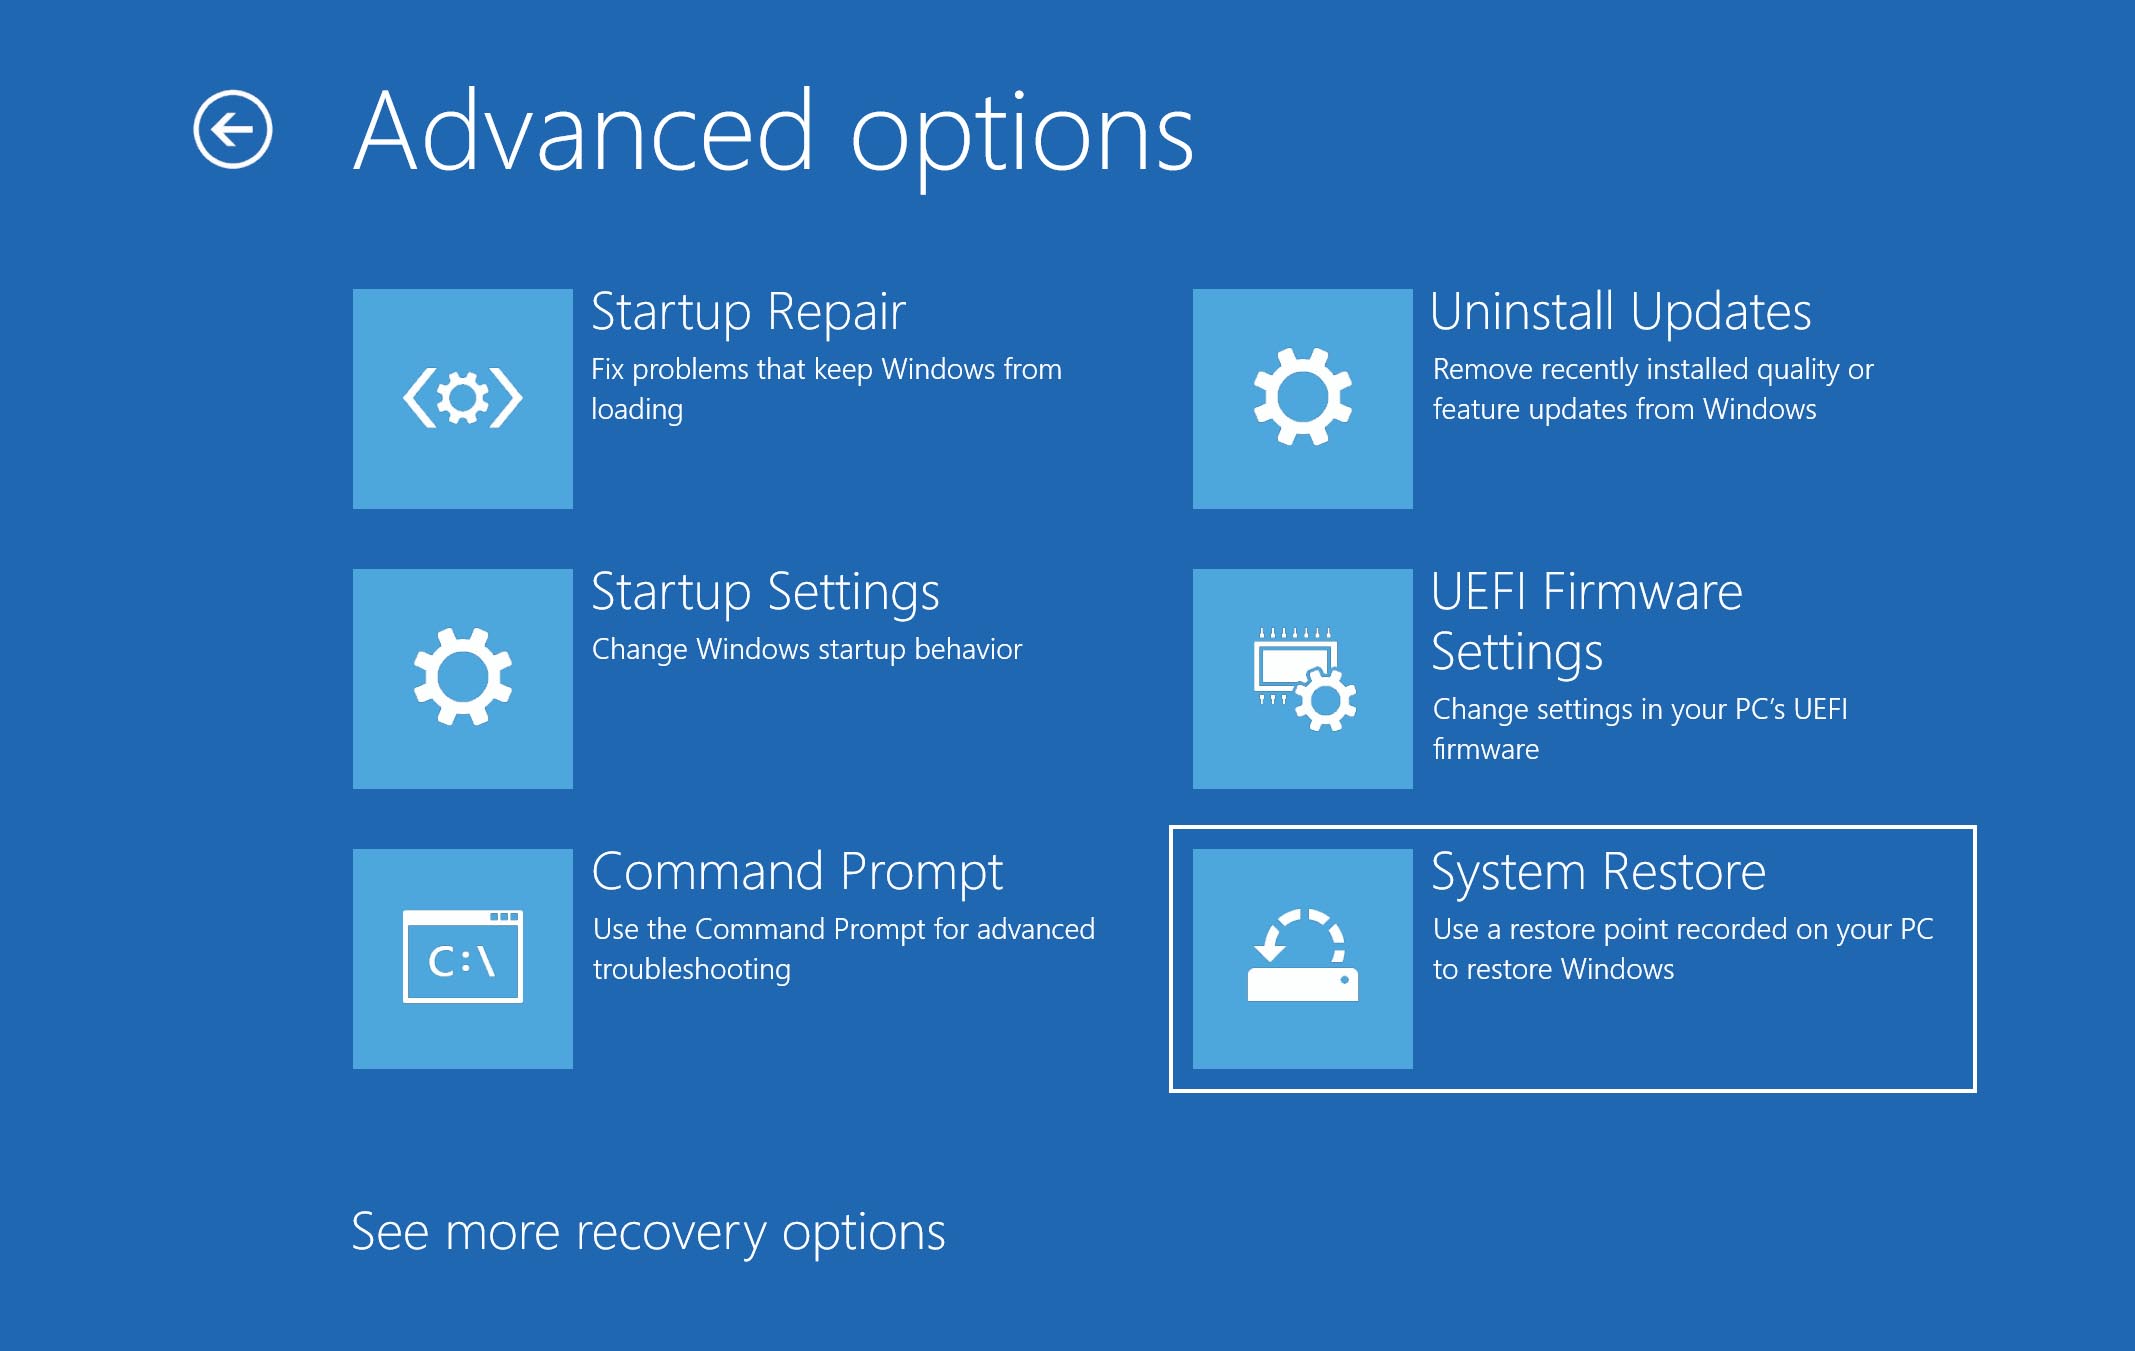
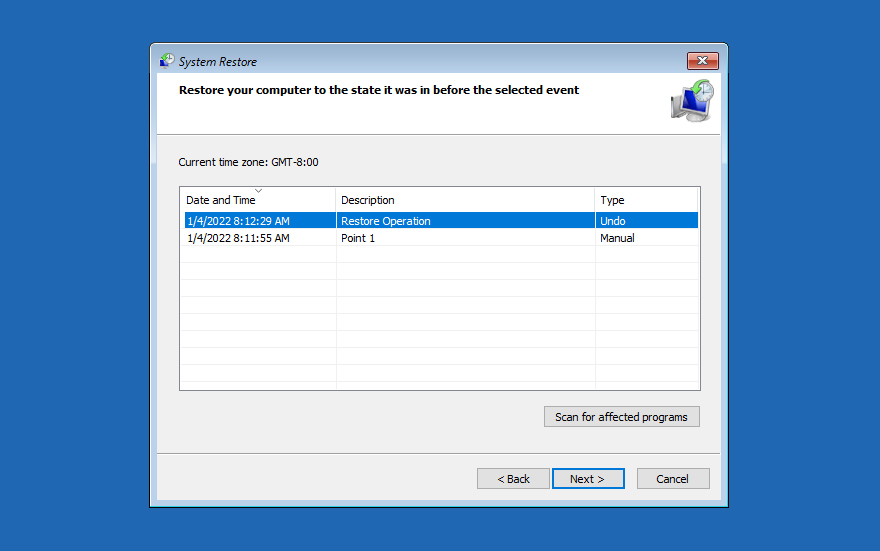
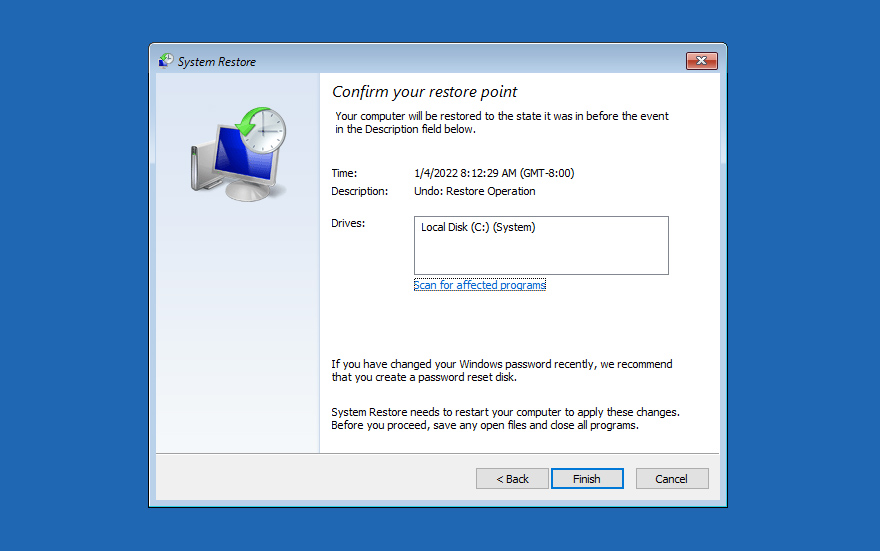
To undo system restore on Windows 10 and 8, you need to follow the next few steps:
- Reboot your PC into Advanced Startup.

- Click on ‘Troubleshoot’.
- Select the ‘Advanced options’ and choose ‘System Restore’.

- Choose the Administrator Account and then type in your password.
- Click on ‘Continue’.
- Hit the ‘Next’ button on the following window.
- Select the restore point (it’s labeled as Undo under the Type column).

- Hit on ‘Finish’.
- Click ‘Yes’ when the next window pops up and then ‘Restart’.
Windows 7
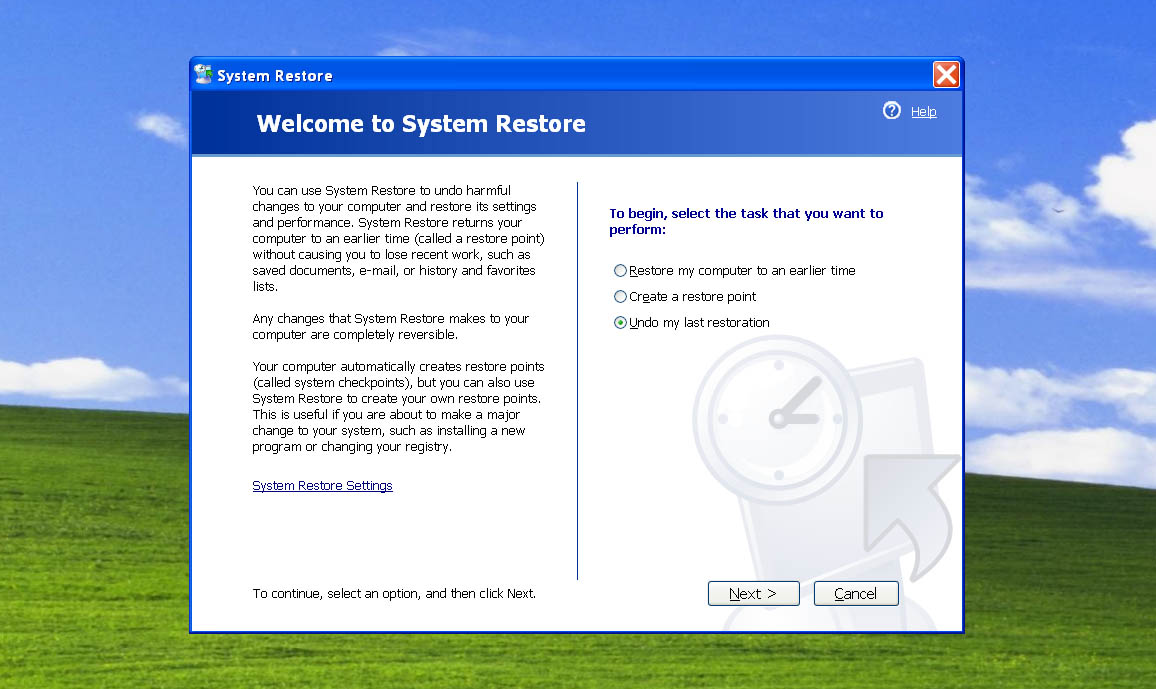
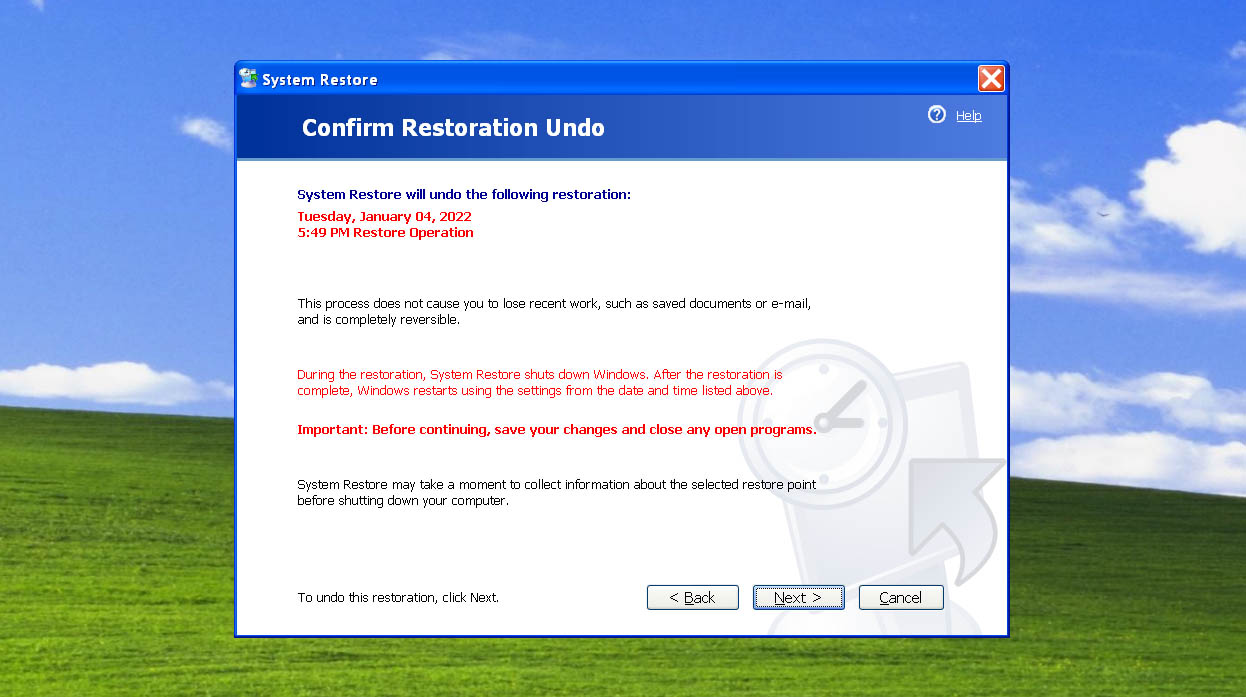
Complete the following steps to undo system restore on Windows 7:
- Click Start.
- Type ‘System Restore’ in the search box and then click on the first result that comes out.

- Hit the ‘Undo my last restoration’ button on the System Restore window.

- Click Next.
- Hit the Finish button.
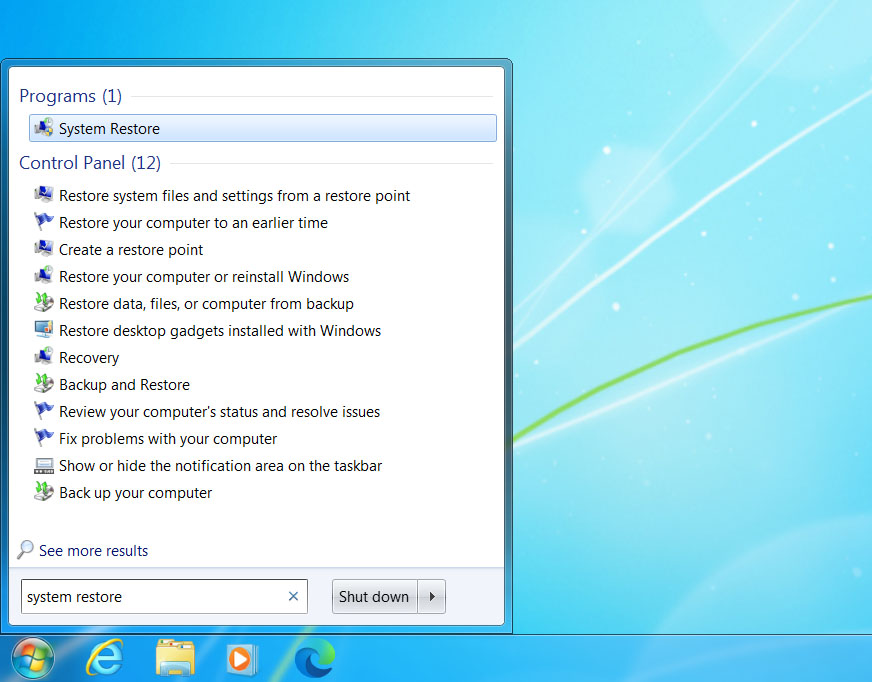

Once you complete these steps, your computer will restart automatically and the process will be completed.
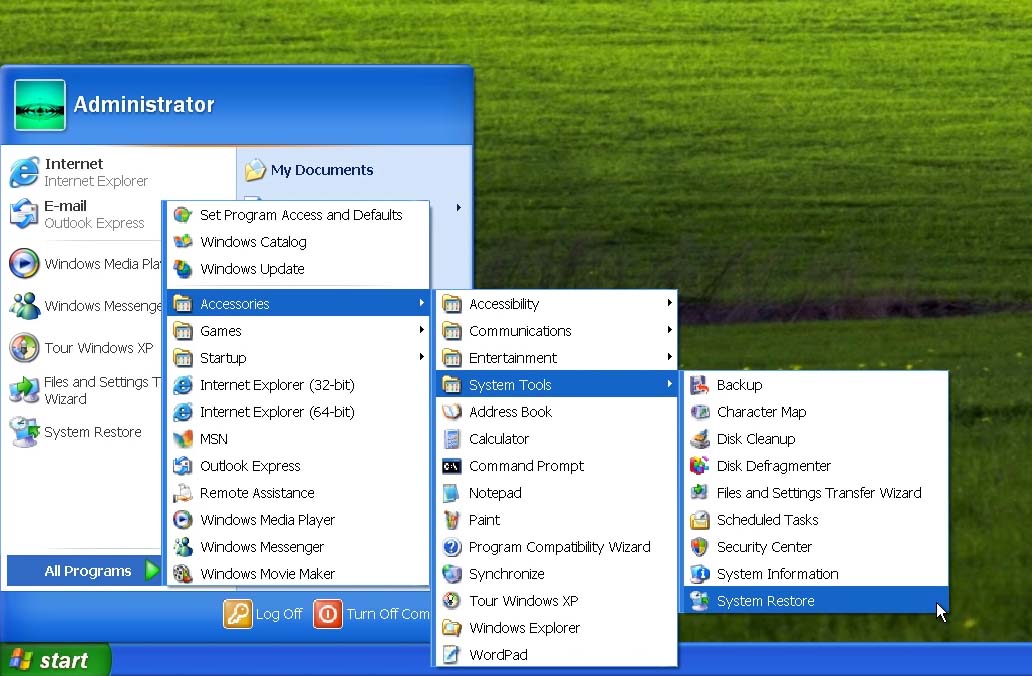
Windows XP
If you’re a Windows XP user, complete the following steps to undo system restore on your computer:
- Click on the start button.
- Choose All Programs > Accessories > System Tools > System Restore.

- Click on the ‘Undo My Last Restoration’ option.
- Click the Next button.

- Hit the Undo button.

- Wait for your computer to restart and then click the Ok button in the System Restore window.
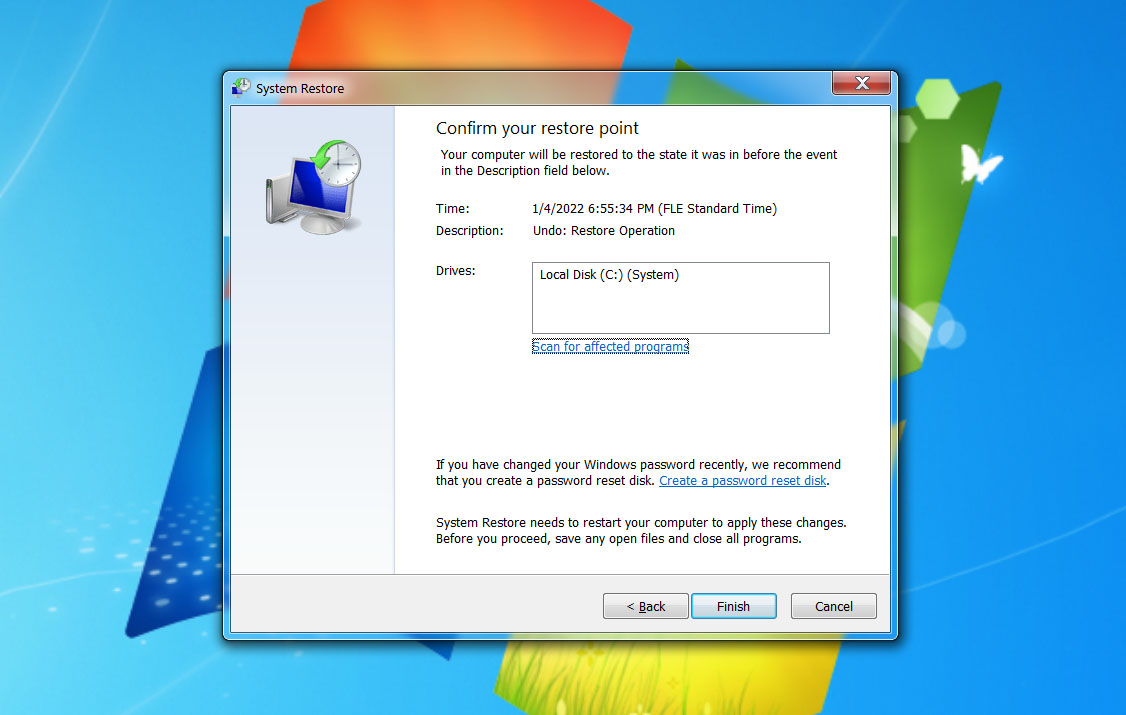
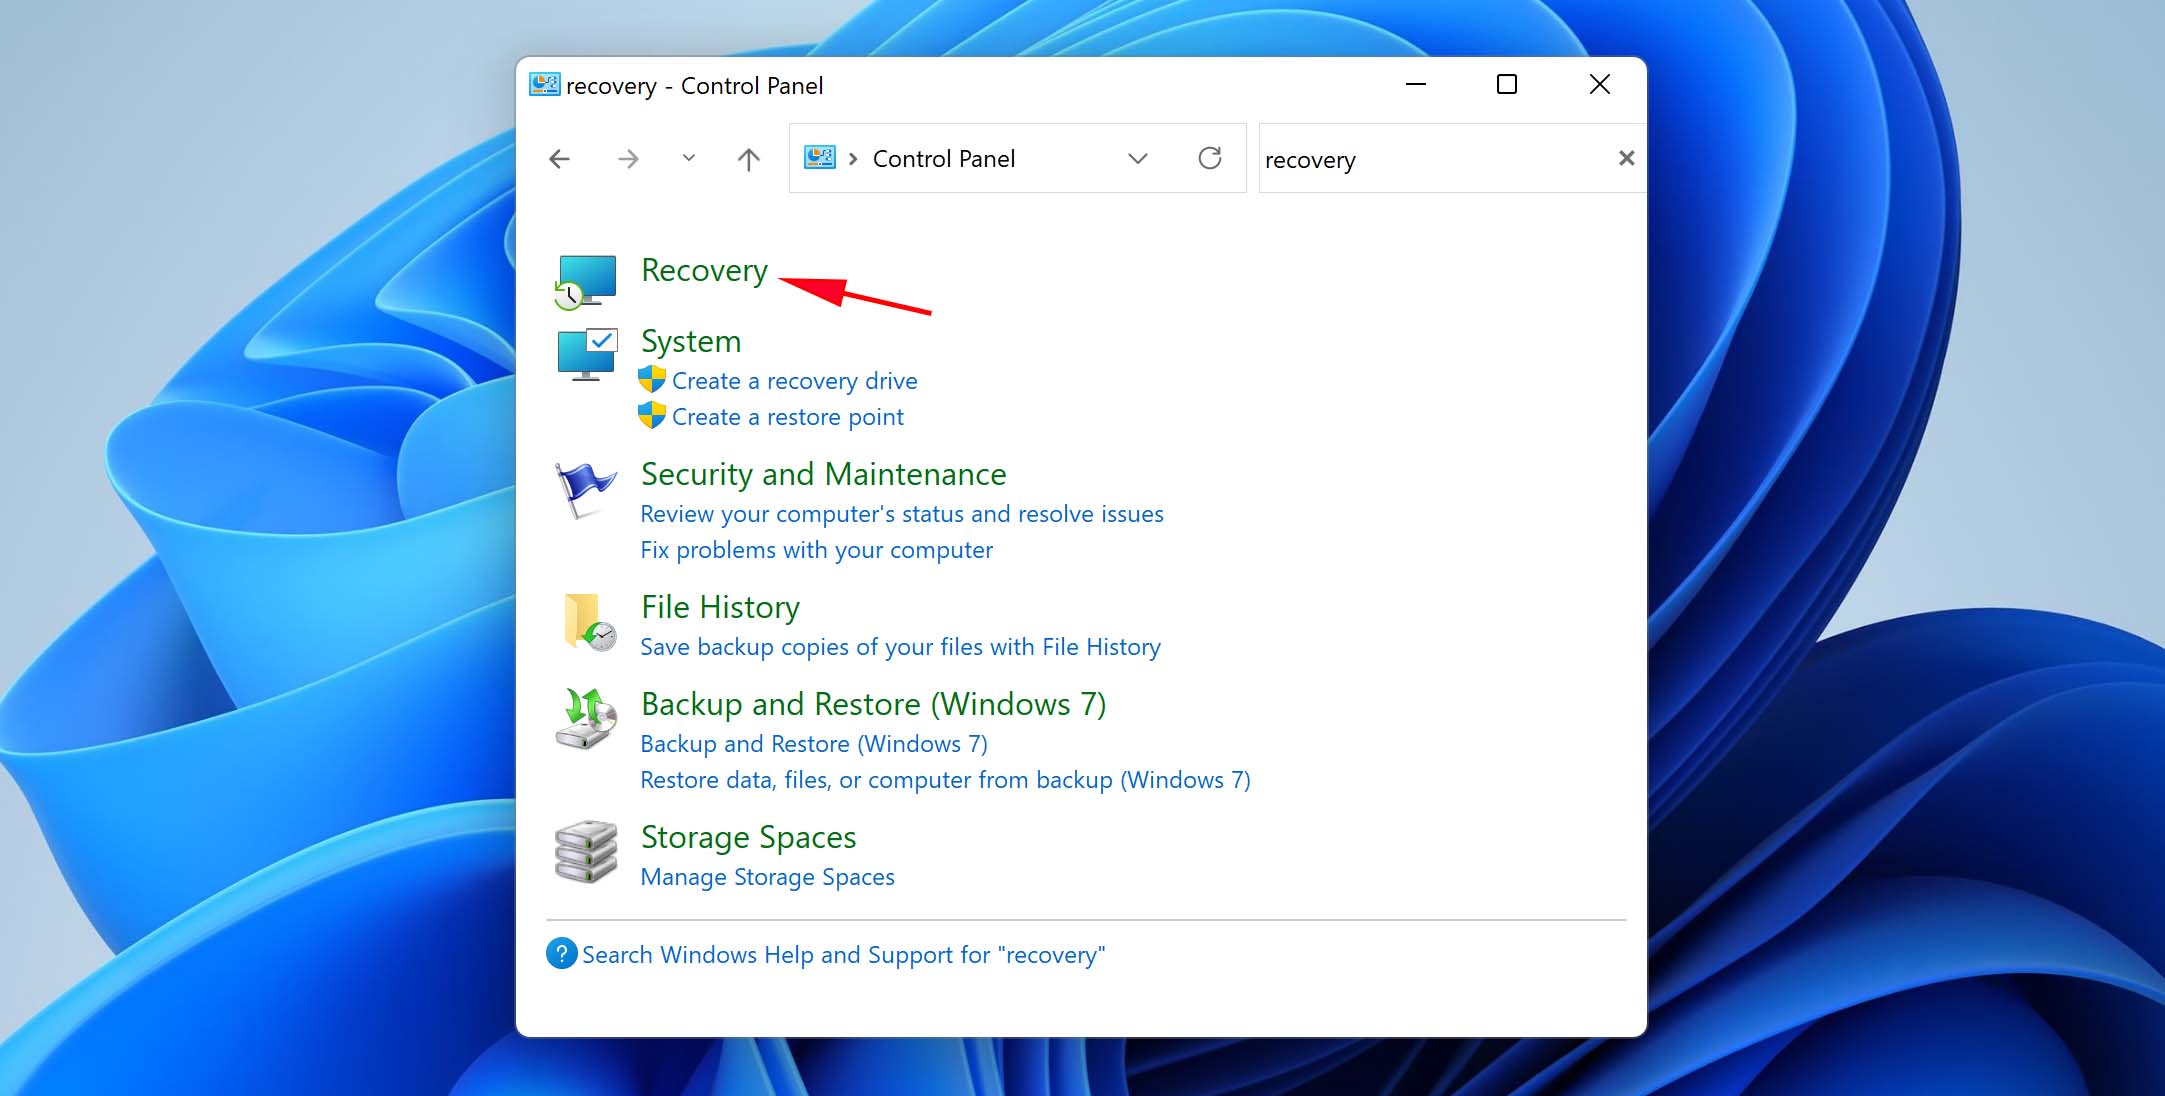
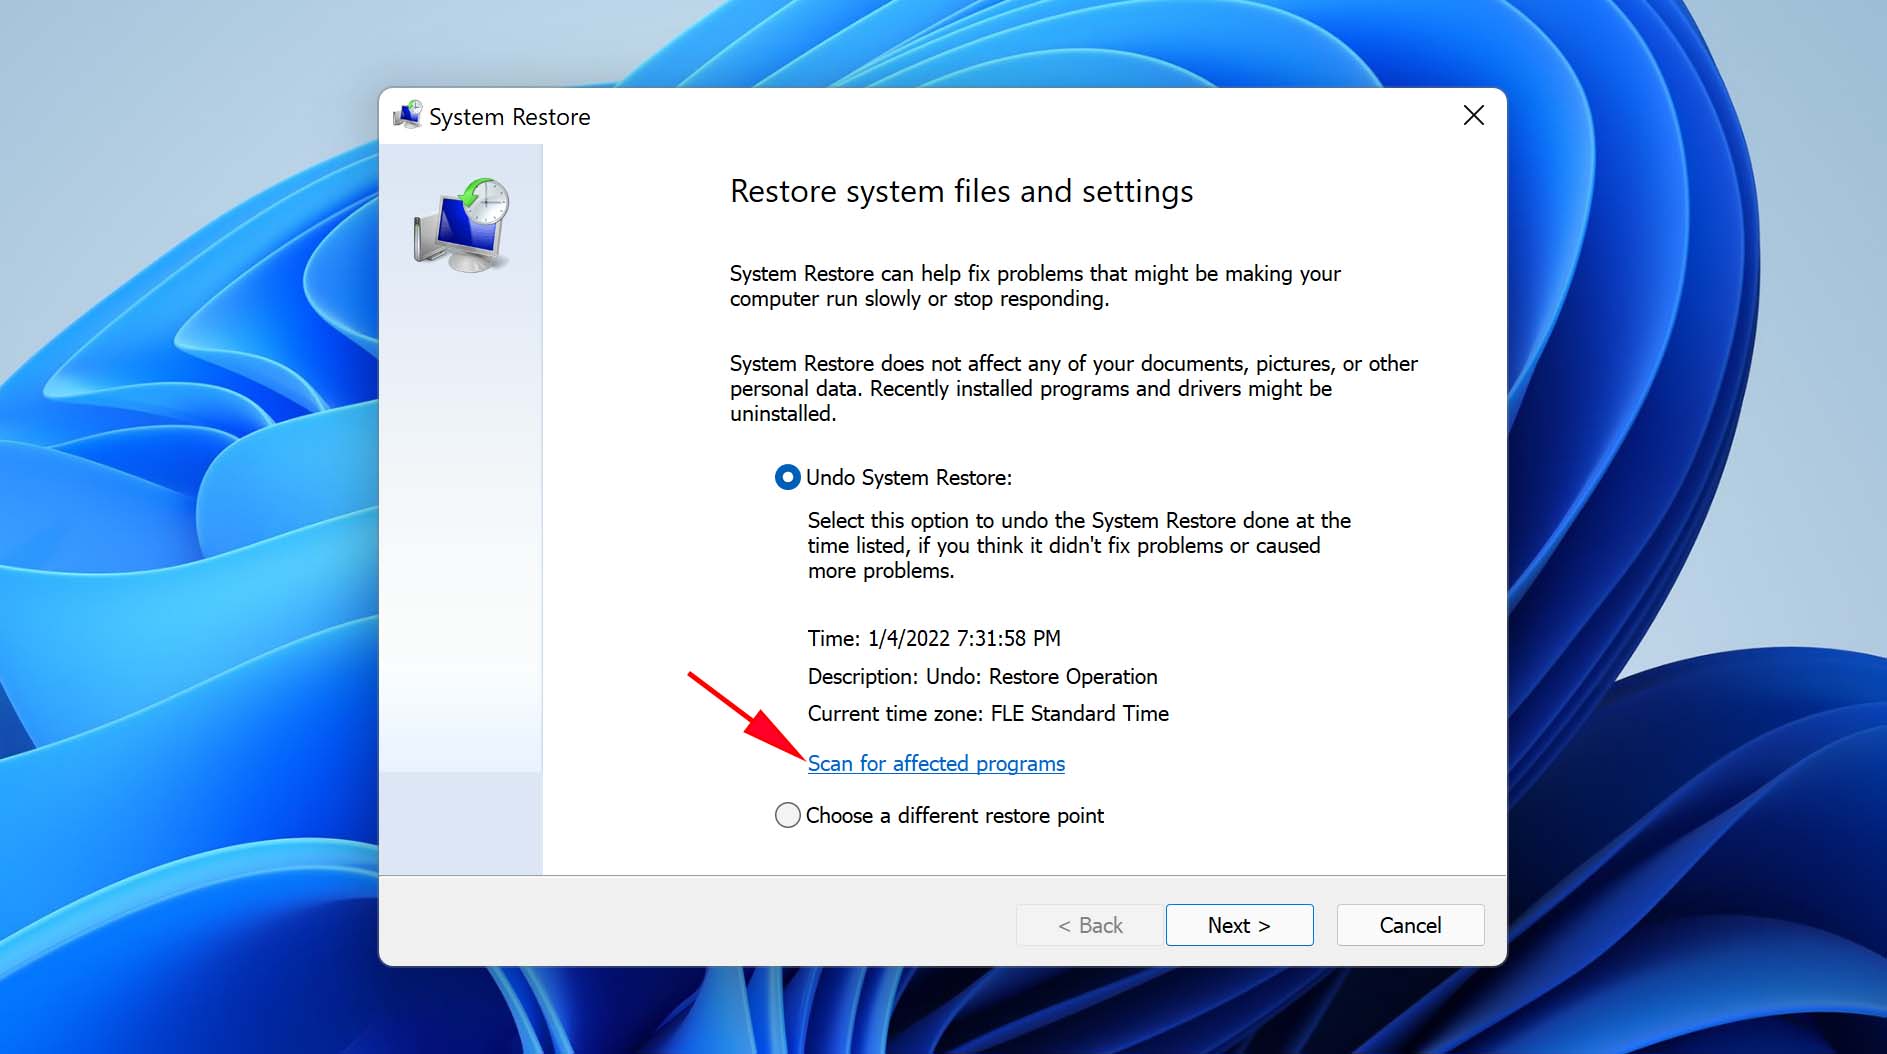
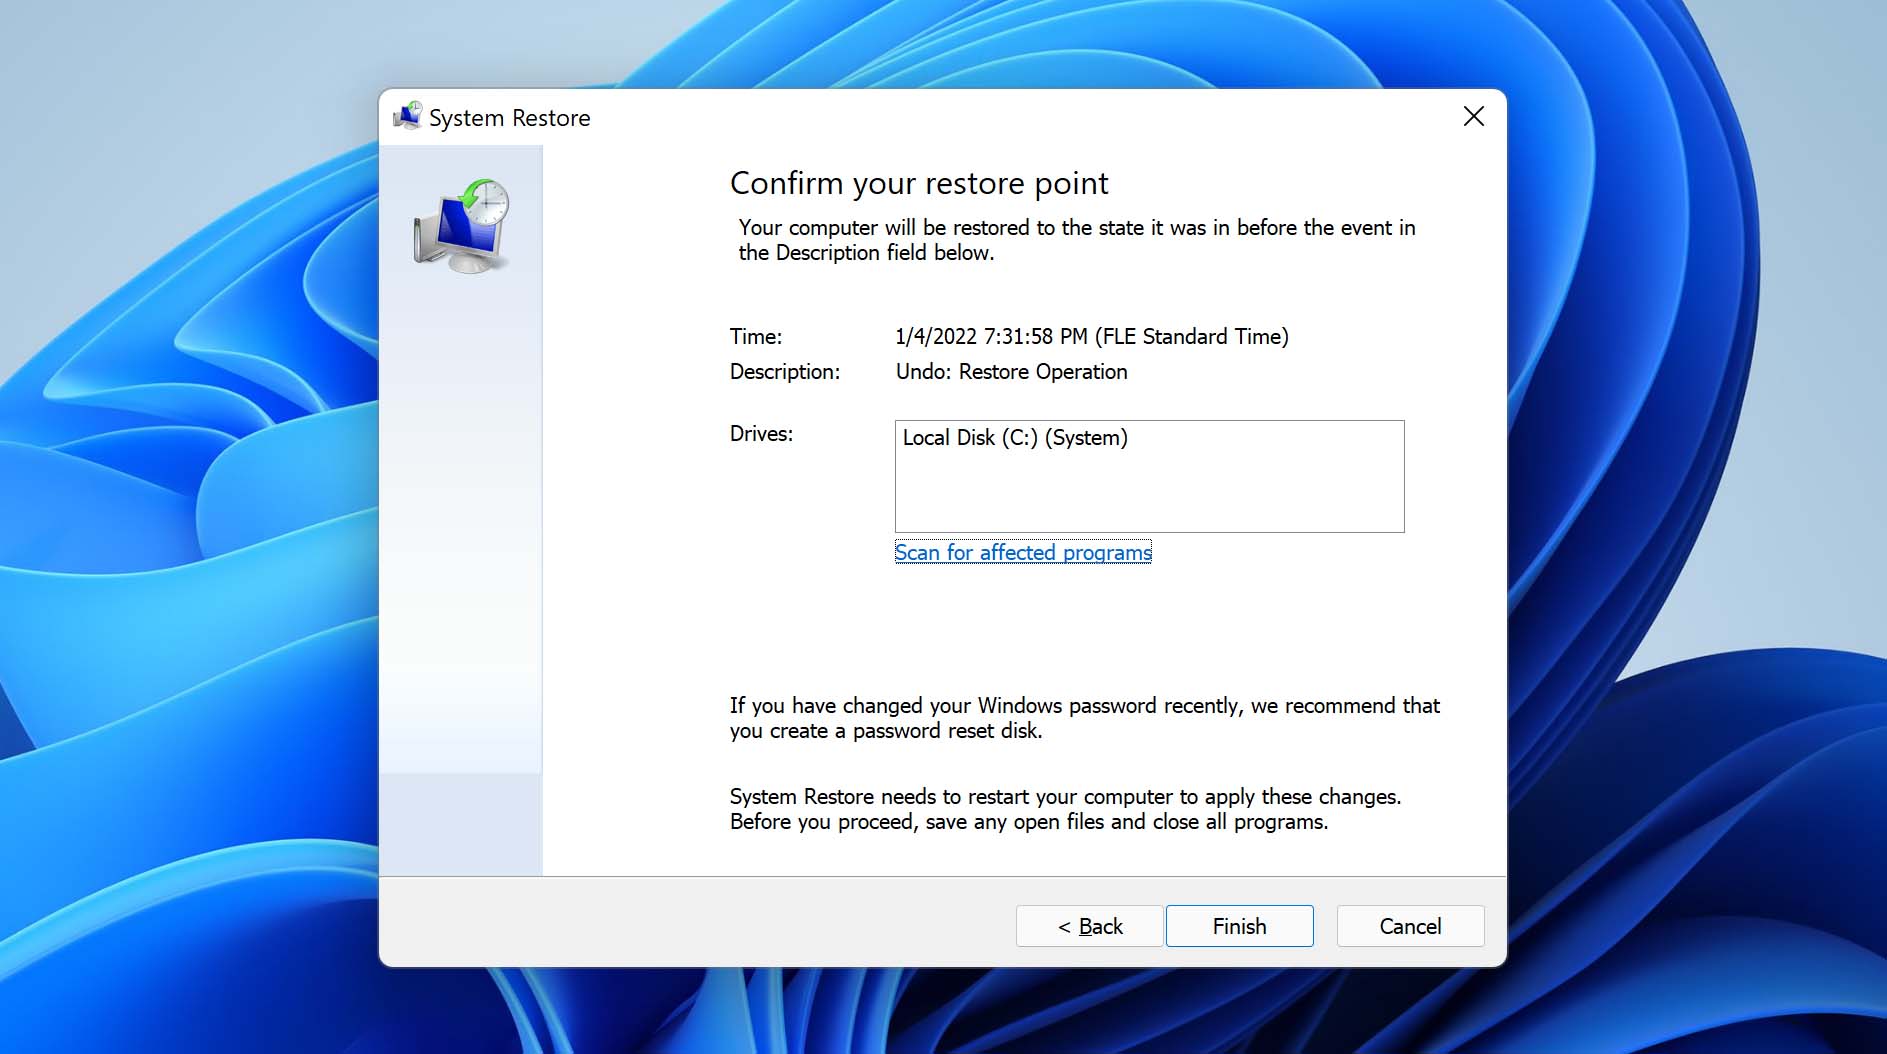
What About Windows 11?
Don’t worry, you can still undo a system restore on Windows 11. To do so, all you have to do is:
- Go to the Control Panel.
- Type ‘recovery’ and then select the first result.

- Click on ‘Open System Restore’.

- Select ‘Next’ when the Restore system files and settings box comes up.
- Choose the restore point you want to use in the list of results.
- Select ‘scan for affected programs’.

- Go through the list of items that will be deleted and click on Close>Next>Finish when you’re ready to move on.

FAQ
In case you have lost personal files such as photos, emails, videos, documents, etc., you cannot recover them with System Restore. To restore these types of files, you have to use data recovery software.
If you have done a system restore and lost some valuable files in the process, you don’t have much hope for them unless you use data recovery programs.
Changes made by the system restore cannot be undone if you did a system restore in safe mode or from the Advanced Start Options menu at boot.
You have several methods available if you want to find lost files on your Windows computer. You can either use the Windows search function or try restoring the deleted files from a backup. Both of these options are time-consuming, so if you want an easier solution to install a data recovery program. Take Disk Drill for example–it will allow you to find your lost files in no time and without having to do much tinkering.
Conclusion
All in all, if you want to recover lost files after doing a system restore, your best bet would be to use data recovery software. Programs like Disk Drill allow you to get ahold of your lost files fast and easily. The only thing you have to do is follow the program’s prompts and try not to panic!
Logan tried many things before he fell in love with writing in 2011. HandyRecovery gives him a chance to share his knowledge and produce useful and fact-filled articles about tech-related topics. This freelance writer has been working on many projects, and combining writing with his passion for technology is a dream come true for him. People always considered him a computer geek, which is probably a good description.
Andrey Vasilyev is an Editorial Advisor for Handy Recovery. Andrey is a software engineer expert with extensive expertise in data recovery, computer forensics, and data litigation. Andrey brings over 12 years of experience in software development, database administration, and hardware repair to the team.