
Welcome to the exciting world of Windows system files and boot partitions! If you’ve ever been curious about what these sections are and how they’re important to the way your computer works, you’re in the right place. In this guide, we’ll go into detail about system partitions and boot partitions. We’ll talk about how to find these partitions, figure out what they do, and even show you how to set them up and manage them. Whether you’re just interested in technology or you are an aspiring IT professional, learning about the system and boot files in Windows is a useful skill that will help you manage the complicated boot process and solve any problems that may come up. First, let’s figure out what these “partitions” are. Please see How to Find Security Identifier on Windows.
Partitions
Partitions on your computer’s hard drive are like different neighbourhoods, each with its own set of files and purpose. Think of them as different areas that help you organise and control how your computer uses its disk space. These sections are very important to how your operating system works and how your files are saved. When you get a new computer or install an operating system like Windows, the hard drive is generally partitioned into one or more sections. These sections are like virtual bins that keep your files and system data organised and easy to find.

So, why do we need partitions? Well, imagine having all your files and system data dumped into one massive pile. It would be incredibly chaotic and difficult to manage. Partitions help bring order to the chaos by creating distinct areas for specific purposes. Here is how to fix Failure 5456: Unable to determine destination disk, partition, and/or drive, see BDD Log.
What are System and Boot Partitions?
In Windows, the system partition and the boot partition are two different things that work together to make sure the boot process goes smoothly. The system partition is a special part of your hard drive that holds the important files your operating system needs to run well. It holds important system files like the Windows bootloader, configuration data, and other components that are needed for the computer to start up properly.

On the other hand, the magic happens on the boot partition, which is also called the active partition. This drive holds the operating system’s boot files, which are needed to start it up. It has important parts like the Windows kernel, device drivers, and system libraries. When you turn on your computer, the boot drive is in charge of putting these important files into memory, starting the boot process, and bringing your system to life.
Importance of System and Boot Partitions
System and boot folders are important for Windows to start up smoothly. The system partition gives your computer the machinery it needs to find and use the boot partition well. The Windows kernel, device drivers, and system libraries are all important files that must be on the boot folder for the operating system to start up. Understanding how these files work is important for fixing boot-related problems and keeping Windows running well.
Identifying System and Boot Partitions
Using Disk Management
Disk Management is a built-in Windows tool that provides a graphical interface for managing and viewing disk partitions. Follow these steps to identify system and boot partitions using Disk Management:
Step 1: Press the Windows key + R to open the Run dialog box. Type “diskmgmt.msc” and press Enter. This will launch the Disk Management tool.

Step 2: Once Disk Management opens, you’ll see a visual representation of your disk partitions. Look for the partitions labeled “System” and “Boot” to identify the respective partitions.
Step 3: The System partition will typically be a small, active partition marked as “System Reserved” or “EFI System Partition” (ESP), depending on your system configuration. The Boot partition is usually the partition with the Windows operating system installed. To gather more information about a specific partition, right-click on it and select “Properties.” This will provide details such as the file system, partition type, and volume size.
Command-Line Tools for Identification
If you prefer using the command-line interface, Windows offers alternative tools to identify system and boot partitions. Here are two commonly used command-line tools:
Please see BitLocker System Partition: Detailed steps to troubleshoot and fix System Partition not available or large enough [Part 2], A brief Introduction to Linux and how to create disk partition in Ubuntu Linux, and MBAM Frequent Report Errors: Understanding Microsoft BitLocker Administration and Monitoring compliance state and error status.
DiskPart
DiskPart is a command-line disk partitioning utility that provides advanced options for managing partitions. To identify system and boot partitions using DiskPart, follow these steps:
Step 1: Open a Command Prompt window with administrative privileges. Press the Windows key, type “cmd,” right-click on “Command Prompt,” and select “Run as administrator.“

Step 2: In the Command Prompt window, type “diskpart” and press Enter. This will launch the DiskPart utility.
Step 3: In the DiskPart prompt, type “list disk” and press Enter. This command will display a list of disks attached to your system.
Step 4: Identify the disk containing the system and boot partitions based on their sizes and volumes.

Step 5: To gather more information about a specific disk, type “select disk X” (replace X with the disk number) and press Enter. Then, type “list partition” and press Enter to see the disk’s partitions.

Step 6: Locate the system and boot partitions based on their sizes, labels, or other characteristics.
PowerShell
PowerShell is a powerful scripting language in Windows that provides extensive capabilities for system administration. You can use PowerShell commands to identify system and boot partitions. Follow these steps:
Step 1: Open a PowerShell window with administrative privileges. Press the Windows key, type “powershell,” right-click on “Windows PowerShell,” and select “Run as administrator.“

Step 2: In the PowerShell window, enter the following command: “Get-Partition | Format-Table“.

Step 3: This command will display a table with information about all the partitions on your system. Look for the “Type” column to identify system and boot partitions. Depending on how your system is set up, the type values can be different. However, “System” or “EFI System” often refers to the system partition type, while “Basic Data” or “NTFS” is a common boot partition type.
Creating and Managing System and Boot Partitions
During the Windows Installation Process:
During the Windows setup, if you want to create a separate data partition, you should choose the Custom Installation option. Proceed with the installation process until you reach the screen that asks, “Which type of installation do you want?” and select the Custom option.

To create multiple partitions, click the New button and specify the size for each partition.

Once you are satisfied with the partition sizes, choose the partition where you want to install Windows and click the Next button.

Windows will be installed on that selected partition. The remaining space on the other partition will be accessible as a separate drive with its own drive letter in Windows.
Using Disk Management:
Press the Windows key + R to open the Run dialog box. Type “diskmgmt.msc” and press Enter to open Disk Management.
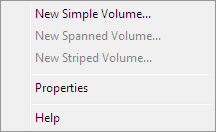
In Disk Management, right-click on the unallocated space on your hard drive where you want to create the partition and select “New Simple Volume.“

Click “Next” to continue, set the new partition size, drive letter, file system, click “Finish“.

Resizing and Modifying Partitions
Open Disk Management by pressing the Windows key + R, typing “diskmgmt.msc,” and pressing Enter. In Disk Management, locate the partition you want to resize or modify.
Right-click on the partition and select the appropriate option based on your needs:
Extend Volume: If you want to increase the size of the partition, select this option and follow the wizard to specify the additional space.
Shrink Volume: If you want to decrease the size of the partition, select this option and enter the desired amount of space to shrink.
Change Drive Letter and Paths: If you want to modify the drive letter assigned to the partition, select this option and choose a new letter.
Format: If you want to change the file system format of the partition, select this option and follow the wizard to select the desired format.
Third-Party Partitioning Software
Third-party partitioning software like EaseUS Partition Master, MiniTool Partition Wizard, and AOMEI Partition Assistant has advanced tools for making, changing, and controlling system and boot partitions. Compared to the tools that come with Windows, these tools are often more flexible and have more features. You can choose the partitioning software you want to use, download and install it, and then follow the instructions to manage your partitions.
This guide is about boot partitions for the following Windows versions: Windows XP, Vista, 7, 8, 8.1 and 10
What is a boot partition?
A Windows boot partition is the partition that holds the necessary files for the Windows operating system (either XP, Vista, 7, 8, 8.1 or 10).
A boot partition is also known as a boot volume.
Whenever you install another operating system, e.g. Windows Vista if you already have Windows XP installed or Ubuntu (Linux) next to your already installed Windows Vista, you’ll have two partitions. This is called a dual-boot or a multi-boot configuration.
For each operating system you install, you’ll have boot partitions for each. A system partition will contain the hardware-related files.
You can identify which partition is a boot partition or a system partition, in Windows Vista and Windows 7, using the Disk Management wizard:

To do so, follow these steps:
- Open Disk Management from Control Panel (System and Security > Administrative Tools > Computer Management)
- At the Status column, the boot partitions are identified using the (Boot) word, while the system partitions are with the (System) word.
You can create a new partition on your PC if you have unallocated space disk available on the hard disk.
If the current installed operating system occupies the entire hard disk space, you’ll need to shrink or delete the partition used by that operating system.
Boot partition and System partition
The system partition contains the files that your Windows needs to start (the Boot Configuration Data or BCD). The reserved partitions (or the system partitions) do not have a letter assigned to them. You can see these partitions with a Partition Editor software or through Disk Management.
The boot partition is the partition that holds the Windows installation.
Create boot partition in Windows XP
You must run all the steps as an Administrator on your Windows XP PC or as any user that has administrative rights to the system.
To create a new boot partition on a Windows XP computer, follow the steps below:
- Boot into Windows XP
- Click Start
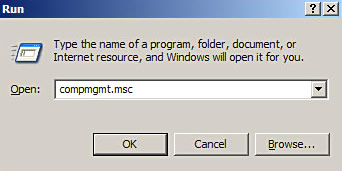
- Click Run
- Type
compmgmt.mscto open Computer Management
- Click OK or press Enter
- Go to Disk Management (Computer Management (Local) > Storage > Disk Management)
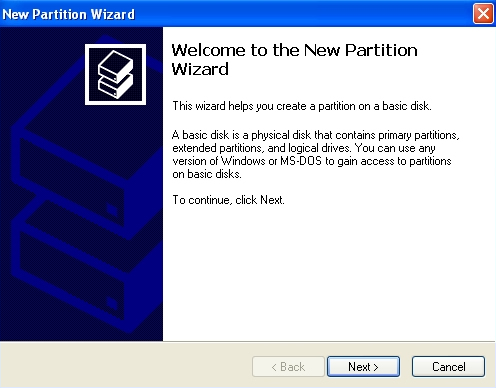
- Right-click on a unallocated space available on your hard disk and click New Partition
- In the New Partition wizard, follow the instructions to complete the process

You can also create a partition with the diskpart utility using Command Prompt:
- Open Command Prompt

- Type
diskpartand press Enter - Type
list diskand press Enter. You will now see a list of available disks. Note the number of the disk that you want to use as a new partition. - Type
select disk x, wherexis the number of the disk that you want to use - Press Enter
- Type the following commands, depending on which type of partition you want to create:
create partition primary size=SIZE_IN_MBto create a primary partitioncreate partition extended size=SIZE_IN_MBto create an extended partitioncreate partition logical size=SIZE_IN_MBto create a logical partition
where
SIZE_IN_MBshould be the size of the partition you want to create, in MB.

Create boot partition in Windows Vista
All the below steps must be performed as an Administrator or as any user with administrative rights to the system.
If you install different versions of Windows, such as Vista and 7, you need to install Windows Vista first. The earliest version of Windows must be installed first on your PC.
To create a new boot partition in Windows Vista, follow these steps:
- Boot into Windows Vista
- Click Start
- Click Control Panel
- Click System and Maintenance

- Click Administrative Tools
- Click Computer Management
- Under the Storage section, click Disk Management
- At this step you should see how much unallocated space you have on your hard disk
- Right-click on the unallocated box and click New Simple Volume

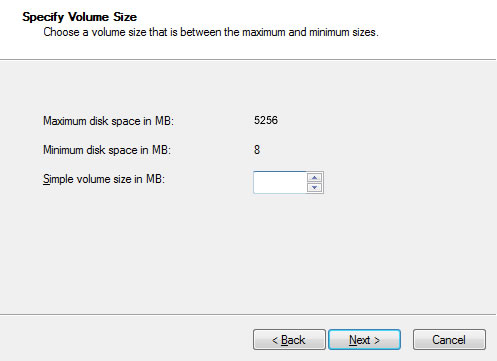
- At the New Simple Volume wizard, click Next
- Type the size of the boot volume you want to create, in MB, and click Next

- Choose a drive letter for the boot volume and click Next
- At the Format Partition screen, you can select Do not format this volume and click Next to format the partition later on. If you want to format the partition now, do not select Do not format this volume, and click Next.
- Click Finish
If you don’t have enough unallocated space available, you either need to shink or delete already used partitions.
To shrink a boot volume (or boot partition), follow these steps:
- Right-click on the volume you want to shrink
- Click Shrink Volume
- Follow the instructions to complete the process
Create boot partition in Windows 7
The steps to create a boot partition in Windows 7 are similar to those of Windows Vista.
You must perform these steps as an Administrator
If you install multiple Windows versions, the first Windows version installed on your PC must be the earliest, e.g. install Windows Vista and then Windows 7 and not the other way around
The steps to create a new boot partition in Windows 7 are:
- Boot into Windows 7
- Click Start, then click Control Panel
- Go to System and Maintenance and click Administrative Tools
- Click Computer Management
- If you’re prompted for the Administrator password, enter it and click OK or press Enter
- At the Storage section, click Disk Management

- Right-click on the unallocated space box and click New Simple Volume
- Click Next
- Type the size you want for this new boot partition you’re creating now
- Click Next
- Type the drive letter for the partition. Make sure it’s unique or leave the default as suggest by Windows 7.
- Click Next
- At the Format Partition dialog, choose to either format the partition now or later and click Next. To format it later, check the Do not format this volume option and then click Next.
- Click Finish

If you don’t have enough unallocated space available, you either need to shink or delete already used partitions.
To shrink a boot volume (or boot partition), follow these steps:
- Right-click on the volume you want to shrink
- Click Shrink Volume
- Follow the instructions to complete the process
Create boot partition in Windows 8
To create a new boot partition on a Windows 8, follow the steps below.
If you perform these steps to install Windows 7 along with Windows 8, it won’t work. You need to install Windows 7 first, use Disk Management from Windows 7 to create the boot partition and then install Windows 8.
You can install Windows 10 along with Windows 8. Use the Disk Management from Windows 8 to install Windows 10 on a new partition.
The steps to create a new boot partition in Windows 8 are:
- Boot into Windows 8
- Press the
 key and R to open Run
 - Type
diskmgmt.mscto open Disk Management
- Click OK or press Enter
- Check if you have any unallocated space available on the hard disk. If so, right-click on that unallocated space and click New Simple Volume.If you don’t have unallocated space space, you can shrink a volume Windows 8 already uses. To do so, right-click on the volume and click Shrink Volume.
- Continue with the instructions to finish the process


Create boot partition in Windows 10
To create a new boot partition on a Windows 10, follow the steps below.
If you perform these steps to install Windows 7 along with Windows 10, it won’t work. You need to install Windows 7 first, use Disk Management from Windows 7 to create the boot partition and then install Windows 10.
You can install Windows 10 along with Windows 8. Use the Disk Management from Windows 8 to install Windows 10 on a new partition.
The steps to create a new boot partition in Windows 10 are:
- Boot into Windows 10
- Open the Start Menu
- Type
diskmgmt.mscto access Disk Management
- Click OK or press Enter
- Check if you have any unallocated space available on the hard disk. If so, right-click on that unallocated space and click New Simple Volume.If you don’t have unallocated space space, you can shrink a volume Windows 8 already uses. To do so, right-click on the volume and click Shrink Volume.
- Continue with the instructions to finish the process

More Information
Support Links
- Easy Recovery Essentials for Windows – our repair and recovery disk.
It’s an easy-to-use and automated diagnostics disk. It’s available for Windows 8, Windows 7 and Windows Vista. It’s also available for Windows XP and Windows Server.
Read more at Windows Recovery Disks.
- The NeoSmart Support Forums, member-to-member technical support and troubleshooting.
- Get a discounted price on replacement setup and installation discs: Windows XP, Windows Vista, Windows 7, Windows 8, Windows 10.
Applicable Systems
This Windows-related knowledgebase article applies to the following operating systems:
- Windows XP (all editions)
- Windows Vista (all editions)
- Windows 7 (all editions)
- Windows 8 (all editions)
- Windows 8.1 (all editions)
- Windows 10 (all editions)
- Windows Server 2003 (all editions)
- Windows Server 2008 (all editions)
- Windows Server 2012 (all editions)
Propose an edit
From Wikipedia, the free encyclopedia
«Boot partition» redirects here. Not to be confused with BIOS boot partition.
The system partition and the boot partition (also known as the system volume and the boot volume) are computing terms for disk partitions of a hard disk drive or solid-state drive that must exist and be properly configured for a computer to operate. There are two different definitions for these terms: the common definition and the Microsoft definition.
Common definition[edit]
In context of every operating system, except those developed by Microsoft, the system partition and the boot partition are defined as follows:
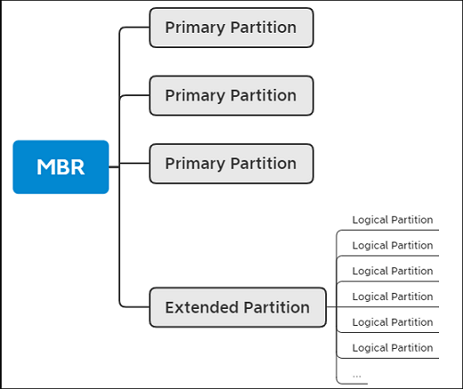
- The boot partition is a primary partition that contains the boot loader, a piece of software responsible for booting the operating system. For example, in the standard Linux directory layout (Filesystem Hierarchy Standard), boot files (such as the kernel, initrd, and boot loader GRUB) are mounted at
/boot/.[1] Despite Microsoft’s radically different definition (see below), System Information, a utility app included in Windows NT family of operating systems, refers to it as «boot device».[2][3] - The system partition is the disk partition that contains the operating system folder, known as the system root. By default, in Linux, operating system files are mounted at
/(the root directory).
In Linux, a single partition can be both a boot and a system partition if both /boot/ and the root directory are in the same partition.
Microsoft definition[edit]
Since Windows NT 3.1 (the first version of Windows NT),[4] Microsoft has defined the terms as follows:
- The system partition (or system volume)[5] is a primary partition that contains the boot loader, a piece of software responsible for booting the operating system.[6]: 1087 This partition holds the boot sector and is marked active.[7]: 970
- The boot partition (or boot volume)[5] is the disk partition that contains the operating system folder, known as the system root or
%systemroot%in Windows NT.[6]: 174
Before Windows 7, the system and boot partitions were, by default, the same and were given the «C:» drive letter.[7]: 971 Since Windows 7, however, Windows Setup creates, by default, a separate system partition that is not given an identifier and therefore is hidden. The boot partition is still given «C:» as its identifier. This configuration is suitable for running BitLocker, which requires a separate unencrypted system partition for booting. As of Windows 11, this nomenclature is still used by the «Disk Management» utility.
See also[edit]
- NTLDR
- Windows startup process
- Windows NT startup process
- Windows Vista startup process
- Windows To Go
References[edit]
- ^ Petersen, Richard (2009). «Chapter 21: Basic System Administration». Ubuntu The Complete Reference. New York: McGraw-Hill. p. 473. ISBN 978-0-07-164368-9.
- ^ Andrews, Jean; Chellis, James (13 August 2012). A+ Guide to Software (6th ed.). Cengage Learning. p. 21. ISBN 9781285414980.
- ^ Donald, Lisa (2008). MCSA / MCSE: Windows Server 2003 Environment Management and Maintenance Study Guide: Exam 70-290 (2nd ed.). John Wiley & Sons. pp. 116–117. ISBN 9780470327616.
- ^ «Definition of System and Boot Partition». Support. Microsoft. 20 February 2007. Archived from the original on 13 March 2016.
- ^ a b «Definitions for system volume and boot volume». Support. Microsoft. 29 October 2009. Archived from the original on 2017-09-13.
- ^ a b Tulloch, Mitch; Tulloch, Ingrid (2002). Microsoft Encyclopedia of Networking (2nd ed.). Redmond, WA: Microsoft Press. ISBN 0-7356-1378-8.
- ^ a b Russinovich, Mark E; Ionescu, Alex; Solomon, David A (2008). Windows Internals (5th ed.). Redmond, WA: Microsoft Press. ISBN 978-0-7356-2530-3.
Содержание:
Здравствуйте админ! На моём ноутбуке не загружается Windows 10. Статью на вашем сайте о восстановлении загрузчика читал, но она к сожалению мне не помогла, хотя испробовал все приведённые в ней способы. В комментариях к статье один пользователь посоветовал мне создать загрузчик Windows 10 заново, но подробностей не привёл. Скажите, как это можно сделать?
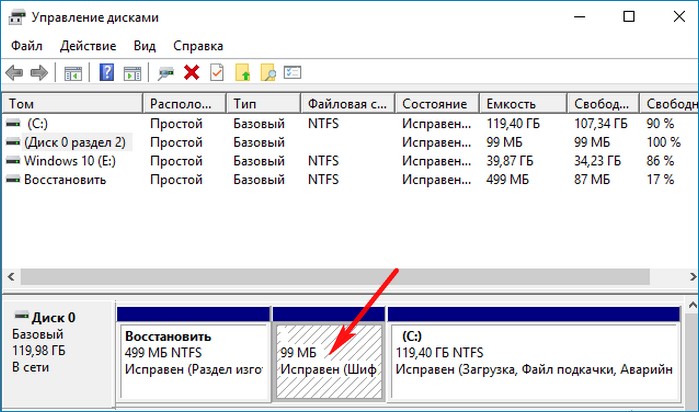
Привет друзья! Если ваша Windows 10 не загружается из-за проблем с файлами, ответственными за загрузку операционной системы, располагающимися на скрытом шифрованном (EFI) системном разделе FAT32 (размер 99 Мб), то можно удалить этот раздел и затем создать заново. В результате файлы загрузчика обновятся и вполне возможно такое решение приведёт к успешной загрузке Windows. Здесь не лишним будет заметить, что за загрузку Windows отвечают файлы конфигурации хранилища загрузки (BCD) в папке Boot и менеджер загрузки системы (файл bootmgr).
Шифрованный (EFI) системный раздел FAT32, размер 99 Мб, можно увидеть в «Управлении дисками» вашего компьютера. Нам также придётся удалить первый раздел со средой восстановления (499 Мб), так как после пересоздания загрузчика она перестанет функционировать (среду восстановления можно будет позже создать заново).
Ещё мы создадим заново не отображаемый в Управлении дисками служебный раздел MSR, обязателен для разметки GPT в системах UEFI (размер 16 Мб).
Итак, перед работой ещё раз уточним, какие именно разделы мы будем удалять и затем создавать заново:
1. Раздел (499 Мб) содержащий среду восстановления Windows 10 (от данного раздела можно избавиться и пользоваться при необходимости средой восстановления, находящейся на загрузочном носителе с Win 10).
2. Раздел (99 Мб), шифрованный (EFI) системный раздел, содержащий все файлы загрузчика Windows 10.
3. Служебный раздел MSR (Microsoft System Reserved) 16 Мб, обязательный для разметки дисков GPT.
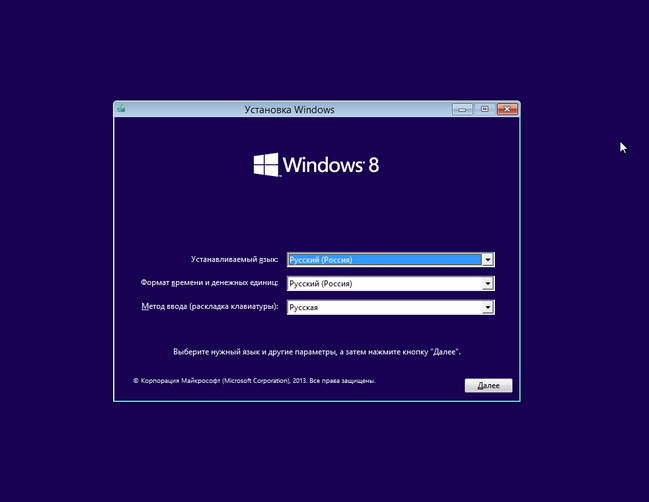
Загружаем ноутбук с загрузочной флешки с Windows 10 и в начальном окне установки системы жмём клавиатурное сочетание Shift + F10,
открывается окно командной строки, вводим команды:
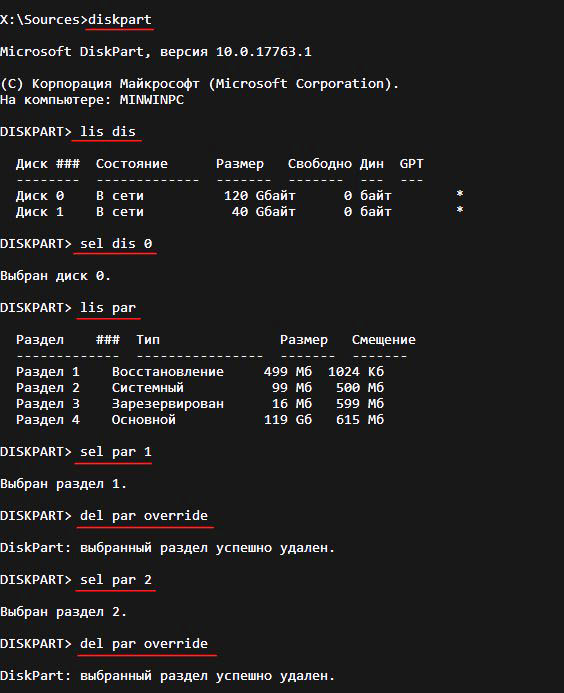
diskpart
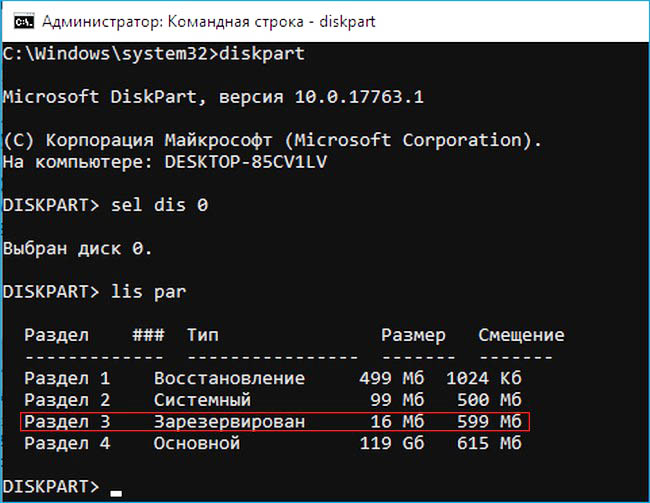
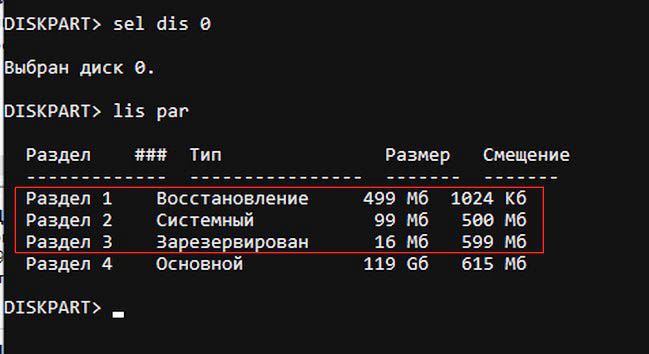
lis dis (выводит список физических дисков).
sel dis 0 (выбираем жёсткий диск ноутбука 120 Гб).
lis par (показ всех разделов выбранного диска, первые три раздела будем удалять).
sel par 1 (выбираем первый раздел
del par override (удаляем раздел, для удаления раздела ESP и MSR или раздела OEM-изготовителя ноутбука, необходимо указать параметр override)
sel par 2
del par override
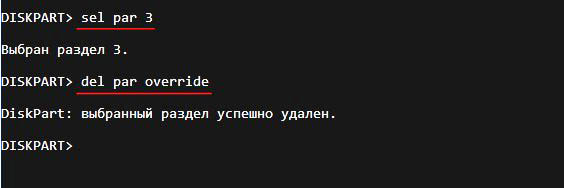
sel par 3
del par override
Всё, все три скрытых раздела мы удалили.
Вводим команды:
diskpart
lis dis (выводим список дисков).
sel dis 0 (выбираем жёсткий диск ноутбука).
create par efi size=99 (создаём шифрованный (EFI) системный раздел 99 Мб).
format fs=fat32 (форматируем его в файловую систему FAT32).
creat par msr size=16 (создаём раздел MSR 16 Мб)
lis vol (выводятся все разделы жёсткого диска).
exit (выходим из diskpart)
Создаём загрузчик командой
bcdboot C:\Windows, так как буква диска операционной системы в среде восстановления (C:).
Файлы загрузки успешно созданы.
Перезагружаемся и Windows 10 должна загрузиться.

Рекомендуем другие статьи по данной теме
Заметили ошибку
Выделите и нажмите Ctrl+Enter
Diskpart, a command-line disc management utility bundled into Windows, allows users to add the active marker to the hard drive partition. Therefore, the following section will cover a manual technique with the help of the software EaseUS Partition Master for Diskpart set boot partition Windows 10.
Can Diskpart Set Boot Partition in Windows 10
Yes, Diskpart can set the boot partition in Windows 10. A Diskpart command interpreter is a tool that assists you in managing the devices on your computer (disks, partitions, volumes, or virtual hard disks).
To utilize the Diskpart commands, you must first list the objects on the disc and then select one of those objects to make it the active partition. Any Diskpart commands you type will operate on the currently-focused thing once it has been given the focus.
However, do you know how to use Diskpart commands to set an active partition? Don’t worry. The next section will guide you step-by-step on how to set a bootable partition via Diskpart.
There is a link for you to learn more about an active partition before setting the partition active.
![]()
Diskpart Set Boot Partition in Windows 10 — [Step-by-Step Guide]
Herein, you will learn how to perform the process to make a hard drive partition bootable in Windows 10, 8, and 7 via the Command Prompt and Diskpart.
Follow the procedures below to make the partition bootable at the command prompt:
Step 1. Right-click the Windows icon, select «Search,» and type «command prompt» into the search bar.
Step 2. Select «Run as administrator» by right-clicking Command Prompt.
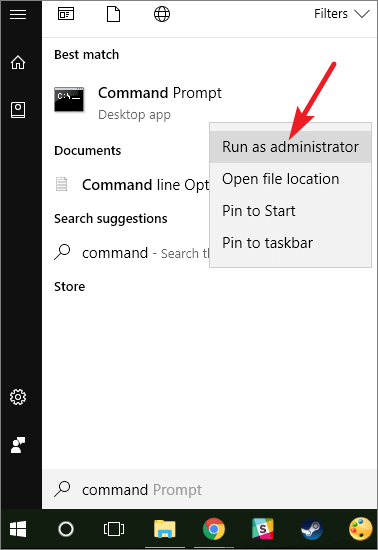
Step 3. Type «diskpart» in the Command Prompt and click Enter.
Step 4. Type the following command lines in Diskpart and press Enter each time:
- list disk
- select disk 0 (Replace 0 with your disc number)
- list volume
- select volume 3 (Replace 3 with the volume number of the target partition)
- active
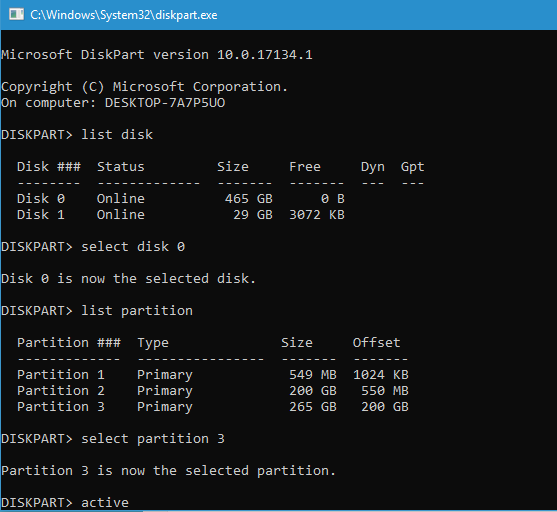
Step 5. Type exit and click Enter to close the software.
This is a comprehensive guide to setting an active partition using Diskpart’s rapid commands. EaseUS Partition Master, on the other hand, can make the partition bootable without requiring any commands.
Alternative to Diskpart Set Boot Partition in Windows 10
You can use EaseUS Partition Master Free as an alternative to Diskpart. It aims to make managing your hard drives less chore. Its «set active» feature can make a partition active without requiring any commands, making it friendly to even beginners. Besides, it supports almost popular Windows versions, like Windows XP/Vista/7/8/10/11. Now, download it and follow the guide below.
Step 1. Run EaseUS partition manager software. On the disk map, right-click the target partition and choose «Advanced».
Step 2. Then, select «Set Active» from the drop-down menu. Click «Yes». And choose «Execute 1 Task(s)» and click «Apply».
Besides, to manage your disk partition well, EaseUS Partition Master has the following features:
- Hard drive defragmentation
- Remove active flag from partition
- Set partition active/inactive effortlessly
- Clone SD card/hard drive and make it bootable
- Create/resize/format/erase hard drive partitions without difficulty
- Change the file system types and set the cluster size, like exFAT allocation unit size
Try the reliable bootable partition manager instead of the Diskpart if you’re having trouble with it. Just get EaseUS Partition Master now. It is easier to use. Try it now!
Conclusion
In this article, we went through a step-by-step approach that can be used to Diskpart set the boot partition in Windows 10 manually and with the assistance of the software EaseUS Partition Master. This software can make the partition bootable without requiring any commands to be entered by the user.
By the way, there are some other links related to the active partition you may be concerned about. Click the following links if you are facing similar problems.
Diskpart Set Boot Partition Windows 10 FAQs
If you still have some confusion, you can go through the frequently asked question to avoid confusion.
1. How to create a boot partition using Diskpart?
Follow these steps, and you can create a boot partition using Diskpart:
Step 1. Search «command prompt» in the search box and run it as administrator.
Step 2. Then type diskpart and press the Enter key.
Step 3. Type these commands below, and press Enter each time:
- list disk
- select disk 1 (Replace 1 with the correct disk number)
- list volume
- select volume 1 (Replace 1 with the correct partition number)
- active
- exit
2. How do I change the boot drive?
You can turn to EaseUS Partition Master. It is a trustworthy utility to change the boot drive. Follow the steps here:
Step 1. Launch EaseUS Partition Master on your PC.
Step 2. Right-click on the new boot partition and choose «Advanced.»
Step 3. Click «Set active.»
3. Should I use GPT or MBR for the boot drive?
It depends on the partition numbers and the OS requirements. GPT allows users to have up to 128 primary partitions, while MBR can only create 4 primary partitions. Besides, you can’t use MBR as the primary disk in Windows 11.