![]()
![]()
![]()
![]()
![]()
![]()
![]()
![]()
241.1 k скачиваний
![]()
Установите приложения для Android и магазин Uptodown в Windows 11
Приложения, рекомендуемые для вас
![]()
Браузер, ориентированный на игроков
![]()
Автоматизация нажатий мышкой на компьютере
![]()
Возможность наслаждаться играми Android на Windows в естественном режиме
![]()
Надежный, универсальный и настраиваемый браузер
![]()
Инструмент редактирования с богатыми возможностями
![]()
Используйте WhatsApp на своем компьютере
![]()
Эмулируйте любые Android-приложения на своем ПК
![]()
Общайтесь со всеми контактами в Telegram с рабочего стола своего компьютера
Больше информации
| Лицензия | Бесплатно | |
| ОС | Windows | |
| Раздел | Эмуляторы | |
| Язык | Pусский | |
| Автор | Microsoft Corporation | |
| Размер | 1.36 GB | |
| Загрузки | 241,092 | |
| Дата | 25 сен 2023 | |
| Тип файла | MSIXBUNDLE | |
| Возрастные ограничения | Для всех возрастов | |
| SHA256 | 237ba622d329cf6f35e0355b08c3f22abc6a522a0fbb7e80aa854298adfb4ef1 | |
| Почему это приложение опубликовано на Uptodown? |
(Больше информации) |
Похожие на Windows Subsystem for Android (WSA)
![]()
Эмулируйте любые Android-приложения на своем ПК
![]()
Потрясающий эмулятор Android 7.1
![]()
Официальный эмулятор Tencent для Tencent
![]()
Мощный эмулятор Android с правами суперпользователя
![]()
Эмулятор Android-игр на ПК
![]()
Мощный эмулятор Android 5.1
![]()
Возможность наслаждаться играми Android на Windows в естественном режиме
![]()
Наслаждайтесь всеми играми для Android на ПК
![]()
Drazen Beljan
![]()
Мир Xbox в вашем ПК
![]()
Лучший инструмент Windows для геймеров
![]()
Cxong
![]()
Бесплатная версия Imperium Galactica с открытым исходным кодом
![]()
OpenFodder
![]()
YUKE’S Co., Ltd
![]()
Сотни возможностей и режимов игры в пасьянс
Windows Subsystem For Android v2309.40000.2.0: Windows 11 for ARM Processors

Builds Last Updated:
— 27/09/2023 11:00 GMT (Reason: Initial Release)
Information:
For anyone updating from a previous WSA Build, please backup your Userdata VHDX using this guide, in the case that the builds in this release do not work as intended (crashes, bugs or not working), so that you can revert to the old version if needs be.
Please rename the folder (after extraction) to a shorter name, for example WSA. This will help you avoid the potential issues that may occur during installation and after install.
Warning
Read the guide in full before installing. Ensure you meet the full requirements for an installation on Windows 11.
Note
If you’re updating WSA, merge the folders and replace the files for all items when asked
Follow these steps to install on Windows 11.
Note :
If you have the official WSA installed, you must completely uninstall it to use MagiskOnWSA
- Extract the .7z archive using 7-zip (recommended) and rename the extracted folder to
WSA - Delete the .7z archive (It is recommended to keep the .7z archive until WSA has been installed and is working properly)
- Move the newly extracted folder to a suitable location (Documents folder is a good choice), as you will need to keep the folder on your PC to use MagiskOnWSA
- Open the WSA folder and double-click Run.bat
Notice:
- As stated in the Requirements, You can only install WSA on a NTFS partition, not on an exFAT partition.
- You can NOT delete the WSA installation folder.
WhatAdd-AppxPackage -Register .\AppxManifest.xmldoes is to register an appx package with some existing unpackaged files,
so you need to keep them as long as you want to use WSA.
Check https://learn.microsoft.com/en-us/powershell/module/appx/add-appxpackage?view=windowsserver2022-ps for more details. - You need to register your WSA appx package before you can run WSA.
For WSABuilds and MagiskOnWSALocal users, you need to runRun.batin the extracted dir.
If the script fails, you can take the following steps for diagnosis (admin privilege required):- Open a PowerShell window and change working directory to your WSA directory.
- Run
Add-AppxPackage -ForceApplicationShutdown -ForceUpdateFromAnyVersion -Register .\AppxManifest.xmlin PowerShell.
This should fail with an ActivityID, which is a UUID required for the next step. - Run
Get-AppPackageLog -ActivityID <UUID>in PowerShell.
This should print the log of the failed operation. - Check the log for the reason of failure and fix it.
Changelog
- Microsoft’s Official Changelog
- Update from WSA
v2308.40000.3.0arm64 —->v2309.40000.2.0arm64 - WSA Android Version: Android 13
- MindTheGapps 13.0 arm64
- Magisk Canary
d4e552d0 (26301) - Magisk Stable
v26.3 - KernelSU
v0.6.8 - Amazon Appstore Removed
Difference Between Versions In This Release:
- WSA_XXXX.X0000.X.0_XXXX_Release-Nightly-MindTheGapps-XX.X-RemovedAmazon.7z
— Contains Google Play Store and Services
— No Amazon App Store
- WSA_XXXX.X0000.X.0_XXXX_Release-Nightly-MindTheGapps-XX.X.7z
— Contains Google Play Store and Services
— Contains Amazon App Store
- WSA_XXXX.X0000.X.0_XXXX_Release-Nightly-NoGApps-RemovedAmazon.7z
— No Amazon App Store
— No Google Play Store and Services
- WSA_XXXX.X0000.X.0_XXXX_Release-Nightly-NoGApps.7z
— Amazon App Store Included
— No Google Play Store and Services
- WSA_XXXX.X0000.X.0_XXXX_Release-Nightly-kernelsu-vX.X.X-MindTheGapps-XX.X-RemovedAmazon.7z
— No Amazon App Store
— Contains Google Play Store and Services
— Contains KernelSU (for Root Access)
- WSA_XXXX.X0000.X.0_XXXX_Release-Nightly-with-magisk-XX.X.XXXX.-stable-MindTheGapps-XX.X.7z
— Amazon App Store Included
— Contains Google Play Store and Services
— Contains Magisk Stable (for Root Access)
- WSA_XXXX.X0000.X.0_XXXX_Release-Nightly-with-magisk-XX.X.XXXX.-stable-NoGApps-RemovedAmazon.7z
— No Amazon App Store
— Contains Magisk Stable (for Root Access)
- WSA_XXXX.X0000.X.0_XXXX_Release-Nightly-magisk-XXXXX.XXXX.-canary-MindTheGapps-XX.X-RemovedAmazon.7z
— No Amazon App Store
— Contains Google Play Store and Services
— Contains Magisk Canary (for Root Access)
Additional Information
-
If the Magisk App does not appear after the installation of the WSA build with Magisk, download it from here and sideload it into WSA
-
For Builds with KernelSU, you will need to sideload the KernelSU Manager in order to use it. You can get this by going to the releases here, and scrolling down the list of assets, until you find it
Credits:
https://github.com/LSPosed/MagiskOnWSALocal
Windows Subsystem For Android v2309.40000.2.0: Windows 11 x64
Builds Last Updated:
— 27/09/2023 11:00 GMT (Reason: Initial Release)
Information:
For anyone updating from a previous WSA Build, please backup your Userdata VHDX using this guide, in the case that the builds in this release do not work as intended (crashes, bugs or not working), so that you can revert to the old version if needs be.
Please rename the folder (after extraction) to a shorter name, for example WSA. This will help you avoid the potential issues that may occur during installation and after install.
Warning
Read the guide in full before installing. Ensure you meet the full requirements for an installation on Windows 11.
Note
If you’re updating WSA, merge the folders and replace the files for all items when asked
Follow these steps to install on Windows 11.
Note :
If you have the official WSA installed, you must completely uninstall it to use MagiskOnWSA
- Extract the .7z archive using 7-zip (recommended) and rename the extracted folder to
WSA - Delete the .7z archive (It is recommended to keep the .7z archive until WSA has been installed and is working properly)
- Move the newly extracted folder to a suitable location (Documents folder is a good choice), as you will need to keep the folder on your PC to use MagiskOnWSA
- Open the WSA folder and double-click Run.bat
Notice:
- As stated in the Requirements, You can only install WSA on a NTFS partition, not on an exFAT partition.
- You can NOT delete the WSA installation folder.
WhatAdd-AppxPackage -Register .\AppxManifest.xmldoes is to register an appx package with some existing unpackaged files,
so you need to keep them as long as you want to use WSA.
Check https://learn.microsoft.com/en-us/powershell/module/appx/add-appxpackage?view=windowsserver2022-ps for more details. - You need to register your WSA appx package before you can run WSA.
For WSABuilds and MagiskOnWSALocal users, you need to runRun.batin the extracted dir.
If the script fails, you can take the following steps for diagnosis (admin privilege required):- Open a PowerShell window and change working directory to your WSA directory.
- Run
Add-AppxPackage -ForceApplicationShutdown -ForceUpdateFromAnyVersion -Register .\AppxManifest.xmlin PowerShell.
This should fail with an ActivityID, which is a UUID required for the next step. - Run
Get-AppPackageLog -ActivityID <UUID>in PowerShell.
This should print the log of the failed operation. - Check the log for the reason of failure and fix it.
Changelog
- Microsoft’s Official Changelog
- Update from WSA
v2308.40000.3.0x86_64 —>v2309.40000.2.0x86_64 - WSA Android Version: Android 13
- MindTheGapps 13.0 x86_64
- Magisk Canary
d4e552d0 (26301) - Magisk Stable
v26.3 - KernelSU
v0.6.8 - Amazon Appstore Removed
Difference Between Versions In This Release:
- WSA_XXXX.X0000.X.0_XXXX_Release-Nightly-MindTheGapps-XX.X-RemovedAmazon.7z
— Contains Google Play Store and Services
— No Amazon App Store
- WSA_XXXX.X0000.X.0_XXXX_Release-Nightly-MindTheGapps-XX.X.7z
— Contains Google Play Store and Services
— Contains Amazon App Store
- WSA_XXXX.X0000.X.0_XXXX_Release-Nightly-NoGApps-RemovedAmazon.7z
— No Amazon App Store
— No Google Play Store and Services
- WSA_XXXX.X0000.X.0_XXXX_Release-Nightly-NoGApps.7z
— Amazon App Store Included
— No Google Play Store and Services
- WSA_XXXX.X0000.X.0_XXXX_Release-Nightly-kernelsu-vX.X.X-MindTheGapps-XX.X-RemovedAmazon.7z
— No Amazon App Store
— Contains Google Play Store and Services
— Contains KernelSU (for Root Access)
- WSA_XXXX.X0000.X.0_XXXX_Release-Nightly-with-magisk-XX.X.XXXX.-stable-MindTheGapps-XX.X.7z
— Amazon App Store Included
— Contains Google Play Store and Services
— Contains Magisk Stable (for Root Access)
- WSA_XXXX.X0000.X.0_XXXX_Release-Nightly-with-magisk-XX.X.XXXX.-stable-NoGApps-RemovedAmazon.7z
— No Amazon App Store
— Contains Magisk Stable (for Root Access)
- WSA_XXXX.X0000.X.0_XXXX_Release-Nightly-magisk-XXXXX.XXXX.-canary-MindTheGapps-XX.X-RemovedAmazon.7z
— No Amazon App Store
— Contains Google Play Store and Services
— Contains Magisk Canary (for Root Access)
Additional Information
-
If the Magisk App does not appear after the installation of the WSA build with Magisk, download it from here and sideload it into WSA
-
For Builds with KernelSU, you will need to sideload the KernelSU Manager in order to use it. You can get this by going to the releases here, and scrolling down the list of assets, until you find it
Credits:
https://github.com/LSPosed/MagiskOnWSALocal
Windows Subsystem For Android v2309.40000.2.0: Windows 10 x64
Builds Last Updated:
— 27/09/2023 11:00 GMT (Reason: Initial Release)
Information:
For anyone updating from a previous WSA Build, please backup your Userdata VHDX using this guide, in the case that the builds in this release do not work as intended (crashes, bugs or not working), so that you can revert to the old version if needs be.
Please rename the folder (after extraction) to a shorter name, for example WSA. This will help you avoid the potential issues that may occur during installation and after install.
Warning
Read the guide in full before installing. Ensure you meet the full requirements for an installation on Windows 11.
Note
If you’re updating WSA, merge the folders and replace the files for all items when asked
Follow these steps to install on Windows 10.
Note :
If you have the official WSA installed, you must completely uninstall it to use MagiskOnWSA
- Extract the .7z archive using 7-zip (recommended) and rename the extracted folder to
WSA - Delete the .7z archive (It is recommended to keep the .7z archive until WSA has been installed and is working properly)
- Move the newly extracted folder to a suitable location (Documents folder is a good choice), as you will need to keep the folder on your PC to use MagiskOnWSA
- Open the WSA folder and double-click Run.bat
Notice:
- As stated in the Requirements, You can only install WSA on a NTFS partition, not on an exFAT partition.
- You can NOT delete the WSA installation folder.
WhatAdd-AppxPackage -Register .\AppxManifest.xmldoes is to register an appx package with some existing unpackaged files,
so you need to keep them as long as you want to use WSA.
Check https://learn.microsoft.com/en-us/powershell/module/appx/add-appxpackage?view=windowsserver2022-ps for more details. - You need to register your WSA appx package before you can run WSA.
For WSABuilds and MagiskOnWSALocal users, you need to runRun.batin the extracted dir.
If the script fails, you can take the following steps for diagnosis (admin privilege required):- Open a PowerShell window and change working directory to your WSA directory.
- Run
Add-AppxPackage -ForceApplicationShutdown -ForceUpdateFromAnyVersion -Register .\AppxManifest.xmlin PowerShell.
This should fail with an ActivityID, which is a UUID required for the next step. - Run
Get-AppPackageLog -ActivityID <UUID>in PowerShell.
This should print the log of the failed operation. - Check the log for the reason of failure and fix it.
Changelog
- Microsoft’s Official Changelog
- Windows 10 Patch Applied (Credit: Cinit)
- Update from WSA
v2308.40000.3.0x86_64 —>v2309.40000.2.0x86_64 - WSA Android Version: Android 13
- MindTheGapps 13.0 x86_64
- Magisk Canary
d4e552d0 (26301) - Magisk Stable
v26.3 - KernelSU
v0.6.8 - Amazon Appstore Removed
Difference Between Versions In This Release:
- WSA_XXXX.X0000.X.0_XXXX_Release-Nightly-MindTheGapps-XX.X-RemovedAmazon_Windows_10.7z
— Contains Google Play Store and Services
— No Amazon App Store
- WSA_XXXX.X0000.X.0_XXXX_Release-Nightly-MindTheGapps-XX.X_Windows_10.7z
— Contains Google Play Store and Services
— Contains Amazon App Store
- WSA_XXXX.X0000.X.0_XXXX_Release-Nightly-NoGApps-RemovedAmazon_Windows_10.7z
— No Amazon App Store
— No Google Play Store and Services
- WSA_XXXX.X0000.X.0_XXXX_Release-Nightly-NoGApps_Windows_10.7z
— Amazon App Store Included
— No Google Play Store and Services
- WSA_XXXX.X0000.X.0_XXXX_Release-Nightly-kernelsu-vX.X.X-MindTheGapps-XX.X-RemovedAmazon_Windows_10.7z
— No Amazon App Store
— Contains Google Play Store and Services
— Contains KernelSU (for Root Access)
- WSA_XXXX.X0000.X.0_XXXX_Release-Nightly-with-magisk-XX.X.XXXX.-stable-MindTheGapps-XX.X_Windows_10.7z
— Amazon App Store Included
— Contains Google Play Store and Services
— Contains Magisk Stable (for Root Access)
- WSA_XXXX.X0000.X.0_XXXX_Release-Nightly-with-magisk-XX.X.XXXX.-stable-NoGApps-RemovedAmazon_Windows_10.7z
— No Amazon App Store
— Contains Magisk Stable (for Root Access)
- WSA_XXXX.X0000.X.0_XXXX_Release-Nightly-magisk-XXXXX.XXXX.-canary-MindTheGapps-XX.X-RemovedAmazon_Windows_10.7z
— No Amazon App Store
— Contains Google Play Store and Services
— Contains Magisk Canary (for Root Access)
Additional Information
-
If the Magisk App does not appear after the installation of the WSA build with Magisk, download it from here and sideload it into WSA
-
For Builds with KernelSU, you will need to sideload the KernelSU Manager in order to use it. You can get this by going to the releases here, and scrolling down the list of assets, until you find it
Credits:
https://github.com/LSPosed/MagiskOnWSALocal
https://github.com/cinit/WSAPatch
Windows Subsystem For Android v2308.40000.3.0: Windows 11 for ARM Processors
Builds Last Updated:
— 19/09/2023 12:00 GMT (Reason: Initial Release)
Information:
For anyone updating from a previous WSA Build, please backup your Userdata VHDX using this guide, in the case that the builds in this release do not work as intended (crashes, bugs or not working), so that you can revert to the old version if needs be.
Please rename the folder (after extraction) to a shorter name, for example WSA. This will help you avoid the potential issues that may occur during installation and after install.
Warning
Read the guide in full before installing. Ensure you meet the full requirements for an installation on Windows 11.
Note
If you’re updating WSA, merge the folders and replace the files for all items when asked
Follow these steps to install on Windows 11.
Note :
If you have the official WSA installed, you must completely uninstall it to use MagiskOnWSA
- Extract the .7z archive using 7-zip (recommended) and rename the extracted folder to
WSA - Delete the .7z archive (It is recommended to keep the .7z archive until WSA has been installed and is working properly)
- Move the newly extracted folder to a suitable location (Documents folder is a good choice), as you will need to keep the folder on your PC to use MagiskOnWSA
- Open the WSA folder and double-click Run.bat
Notice:
- As stated in the Requirements, You can only install WSA on a NTFS partition, not on an exFAT partition.
- You can NOT delete the WSA installation folder.
WhatAdd-AppxPackage -Register .\AppxManifest.xmldoes is to register an appx package with some existing unpackaged files,
so you need to keep them as long as you want to use WSA.
Check https://learn.microsoft.com/en-us/powershell/module/appx/add-appxpackage?view=windowsserver2022-ps for more details. - You need to register your WSA appx package before you can run WSA.
For WSABuilds and MagiskOnWSALocal users, you need to runRun.batin the extracted dir.
If the script fails, you can take the following steps for diagnosis (admin privilege required):- Open a PowerShell window and change working directory to your WSA directory.
- Run
Add-AppxPackage -ForceApplicationShutdown -ForceUpdateFromAnyVersion -Register .\AppxManifest.xmlin PowerShell.
This should fail with an ActivityID, which is a UUID required for the next step. - Run
Get-AppPackageLog -ActivityID <UUID>in PowerShell.
This should print the log of the failed operation. - Check the log for the reason of failure and fix it.
Changelog
- Microsoft’s Official Changelog
- Update from WSA
v2308.40000.1.0arm64 —->v2308.40000.3.0arm64 - WSA Android Version: Android 13
- MindTheGapps 13.0 arm64
- Magisk Canary
0fe46c5a (26301)—>d4e552d0 (26301) - Magisk Stable
v26.3 - KernelSU
v0.6.7—>v0.6.8 - Amazon Appstore Removed
Difference Between Versions In This Release:
- WSA_XXXX.X0000.X.0_XXXX_Release-Nightly-MindTheGapps-XX.X-RemovedAmazon.7z
— Contains Google Play Store and Services
— No Amazon App Store
- WSA_XXXX.X0000.X.0_XXXX_Release-Nightly-MindTheGapps-XX.X.7z
— Contains Google Play Store and Services
— Contains Amazon App Store
- WSA_XXXX.X0000.X.0_XXXX_Release-Nightly-NoGApps-RemovedAmazon.7z
— No Amazon App Store
— No Google Play Store and Services
- WSA_XXXX.X0000.X.0_XXXX_Release-Nightly-NoGApps.7z
— Amazon App Store Included
— No Google Play Store and Services
- WSA_XXXX.X0000.X.0_XXXX_Release-Nightly-kernelsu-vX.X.X-MindTheGapps-XX.X-RemovedAmazon.7z
— No Amazon App Store
— Contains Google Play Store and Services
— Contains KernelSU (for Root Access)
- WSA_XXXX.X0000.X.0_XXXX_Release-Nightly-with-magisk-XX.X.XXXX.-stable-MindTheGapps-XX.X.7z
— Amazon App Store Included
— Contains Google Play Store and Services
— Contains Magisk Stable (for Root Access)
- WSA_XXXX.X0000.X.0_XXXX_Release-Nightly-with-magisk-XX.X.XXXX.-stable-NoGApps-RemovedAmazon.7z
— No Amazon App Store
— Contains Magisk Stable (for Root Access)
- WSA_XXXX.X0000.X.0_XXXX_Release-Nightly-magisk-XXXXX.XXXX.-canary-MindTheGapps-XX.X-RemovedAmazon.7z
— No Amazon App Store
— Contains Google Play Store and Services
— Contains Magisk Canary (for Root Access)
Additional Information
-
If the Magisk App does not appear after the installation of the WSA build with Magisk, download it from here and sideload it into WSA
-
For Builds with KernelSU, you will need to sideload the KernelSU Manager in order to use it. You can get this by going to the releases here, and scrolling down the list of assets, until you find it
Credits:
https://github.com/LSPosed/MagiskOnWSALocal
Windows Subsystem For Android v2308.40000.3.0: Windows 11 x64
Builds Last Updated:
— 19/09/2023 12:00 GMT (Reason: Initial Release)
Information:
For anyone updating from a previous WSA Build, please backup your Userdata VHDX using this guide, in the case that the builds in this release do not work as intended (crashes, bugs or not working), so that you can revert to the old version if needs be.
Please rename the folder (after extraction) to a shorter name, for example WSA. This will help you avoid the potential issues that may occur during installation and after install.
Warning
Read the guide in full before installing. Ensure you meet the full requirements for an installation on Windows 11.
Note
If you’re updating WSA, merge the folders and replace the files for all items when asked
Follow these steps to install on Windows 11.
Note :
If you have the official WSA installed, you must completely uninstall it to use MagiskOnWSA
- Extract the .7z archive using 7-zip (recommended) and rename the extracted folder to
WSA - Delete the .7z archive (It is recommended to keep the .7z archive until WSA has been installed and is working properly)
- Move the newly extracted folder to a suitable location (Documents folder is a good choice), as you will need to keep the folder on your PC to use MagiskOnWSA
- Open the WSA folder and double-click Run.bat
Notice:
- As stated in the Requirements, You can only install WSA on a NTFS partition, not on an exFAT partition.
- You can NOT delete the WSA installation folder.
WhatAdd-AppxPackage -Register .\AppxManifest.xmldoes is to register an appx package with some existing unpackaged files,
so you need to keep them as long as you want to use WSA.
Check https://learn.microsoft.com/en-us/powershell/module/appx/add-appxpackage?view=windowsserver2022-ps for more details. - You need to register your WSA appx package before you can run WSA.
For WSABuilds and MagiskOnWSALocal users, you need to runRun.batin the extracted dir.
If the script fails, you can take the following steps for diagnosis (admin privilege required):- Open a PowerShell window and change working directory to your WSA directory.
- Run
Add-AppxPackage -ForceApplicationShutdown -ForceUpdateFromAnyVersion -Register .\AppxManifest.xmlin PowerShell.
This should fail with an ActivityID, which is a UUID required for the next step. - Run
Get-AppPackageLog -ActivityID <UUID>in PowerShell.
This should print the log of the failed operation. - Check the log for the reason of failure and fix it.
Changelog
- Microsoft’s Official Changelog
- Update from WSA
v2308.40000.1.0x86_64 —>v2308.40000.3.0x86_64 - WSA Android Version: Android 13
- MindTheGapps 13.0 x86_64
- Magisk Canary
0fe46c5a (26301)—>d4e552d0 (26301) - Magisk Stable
v26.3 - KernelSU
v0.6.7—>v0.6.8 - Amazon Appstore Removed
Difference Between Versions In This Release:
- WSA_XXXX.X0000.X.0_XXXX_Release-Nightly-MindTheGapps-XX.X-RemovedAmazon.7z
— Contains Google Play Store and Services
— No Amazon App Store
- WSA_XXXX.X0000.X.0_XXXX_Release-Nightly-MindTheGapps-XX.X.7z
— Contains Google Play Store and Services
— Contains Amazon App Store
- WSA_XXXX.X0000.X.0_XXXX_Release-Nightly-NoGApps-RemovedAmazon.7z
— No Amazon App Store
— No Google Play Store and Services
- WSA_XXXX.X0000.X.0_XXXX_Release-Nightly-NoGApps.7z
— Amazon App Store Included
— No Google Play Store and Services
- WSA_XXXX.X0000.X.0_XXXX_Release-Nightly-kernelsu-vX.X.X-MindTheGapps-XX.X-RemovedAmazon.7z
— No Amazon App Store
— Contains Google Play Store and Services
— Contains KernelSU (for Root Access)
- WSA_XXXX.X0000.X.0_XXXX_Release-Nightly-with-magisk-XX.X.XXXX.-stable-MindTheGapps-XX.X.7z
— Amazon App Store Included
— Contains Google Play Store and Services
— Contains Magisk Stable (for Root Access)
- WSA_XXXX.X0000.X.0_XXXX_Release-Nightly-with-magisk-XX.X.XXXX.-stable-NoGApps-RemovedAmazon.7z
— No Amazon App Store
— Contains Magisk Stable (for Root Access)
- WSA_XXXX.X0000.X.0_XXXX_Release-Nightly-magisk-XXXXX.XXXX.-canary-MindTheGapps-XX.X-RemovedAmazon.7z
— No Amazon App Store
— Contains Google Play Store and Services
— Contains Magisk Canary (for Root Access)
Additional Information
-
If the Magisk App does not appear after the installation of the WSA build with Magisk, download it from here and sideload it into WSA
-
For Builds with KernelSU, you will need to sideload the KernelSU Manager in order to use it. You can get this by going to the releases here, and scrolling down the list of assets, until you find it
Credits:
https://github.com/LSPosed/MagiskOnWSALocal
Windows Subsystem For Android v2308.40000.3.0: Windows 10 x64
Builds Last Updated:
— 19/09/2023 12:00 GMT (Reason: Initial Release)
Information:
For anyone updating from a previous WSA Build, please backup your Userdata VHDX using this guide, in the case that the builds in this release do not work as intended (crashes, bugs or not working), so that you can revert to the old version if needs be.
Please rename the folder (after extraction) to a shorter name, for example WSA. This will help you avoid the potential issues that may occur during installation and after install.
Warning
Read the guide in full before installing. Ensure you meet the full requirements for an installation on Windows 11.
Note
If you’re updating WSA, merge the folders and replace the files for all items when asked
Follow these steps to install on Windows 10.
Note :
If you have the official WSA installed, you must completely uninstall it to use MagiskOnWSA
- Extract the .7z archive using 7-zip (recommended) and rename the extracted folder to
WSA - Delete the .7z archive (It is recommended to keep the .7z archive until WSA has been installed and is working properly)
- Move the newly extracted folder to a suitable location (Documents folder is a good choice), as you will need to keep the folder on your PC to use MagiskOnWSA
- Open the WSA folder and double-click Run.bat
Notice:
- As stated in the Requirements, You can only install WSA on a NTFS partition, not on an exFAT partition.
- You can NOT delete the WSA installation folder.
WhatAdd-AppxPackage -Register .\AppxManifest.xmldoes is to register an appx package with some existing unpackaged files,
so you need to keep them as long as you want to use WSA.
Check https://learn.microsoft.com/en-us/powershell/module/appx/add-appxpackage?view=windowsserver2022-ps for more details. - You need to register your WSA appx package before you can run WSA.
For WSABuilds and MagiskOnWSALocal users, you need to runRun.batin the extracted dir.
If the script fails, you can take the following steps for diagnosis (admin privilege required):- Open a PowerShell window and change working directory to your WSA directory.
- Run
Add-AppxPackage -ForceApplicationShutdown -ForceUpdateFromAnyVersion -Register .\AppxManifest.xmlin PowerShell.
This should fail with an ActivityID, which is a UUID required for the next step. - Run
Get-AppPackageLog -ActivityID <UUID>in PowerShell.
This should print the log of the failed operation. - Check the log for the reason of failure and fix it.
Changelog
- Microsoft’s Official Changelog
- Windows 10 Patch Applied (Credit: Cinit)
- Update from WSA
v2308.40000.1.0x86_64 —>v2308.40000.3.0x86_64 - WSA Android Version: Android 13
- MindTheGapps 13.0 x86_64
- Magisk Canary
0fe46c5a (26301)—>d4e552d0 (26301) - Magisk Stable
v26.3 - KernelSU
v0.6.7—>v0.6.8 - Amazon Appstore Removed
Difference Between Versions In This Release:
- WSA_XXXX.X0000.X.0_XXXX_Release-Nightly-MindTheGapps-XX.X-RemovedAmazon_Windows_10.7z
— Contains Google Play Store and Services
— No Amazon App Store
- WSA_XXXX.X0000.X.0_XXXX_Release-Nightly-MindTheGapps-XX.X_Windows_10.7z
— Contains Google Play Store and Services
— Contains Amazon App Store
- WSA_XXXX.X0000.X.0_XXXX_Release-Nightly-NoGApps-RemovedAmazon_Windows_10.7z
— No Amazon App Store
— No Google Play Store and Services
- WSA_XXXX.X0000.X.0_XXXX_Release-Nightly-NoGApps_Windows_10.7z
— Amazon App Store Included
— No Google Play Store and Services
- WSA_XXXX.X0000.X.0_XXXX_Release-Nightly-kernelsu-vX.X.X-MindTheGapps-XX.X-RemovedAmazon_Windows_10.7z
— No Amazon App Store
— Contains Google Play Store and Services
— Contains KernelSU (for Root Access)
- WSA_XXXX.X0000.X.0_XXXX_Release-Nightly-with-magisk-XX.X.XXXX.-stable-MindTheGapps-XX.X_Windows_10.7z
— Amazon App Store Included
— Contains Google Play Store and Services
— Contains Magisk Stable (for Root Access)
- WSA_XXXX.X0000.X.0_XXXX_Release-Nightly-with-magisk-XX.X.XXXX.-stable-NoGApps-RemovedAmazon_Windows_10.7z
— No Amazon App Store
— Contains Magisk Stable (for Root Access)
- WSA_XXXX.X0000.X.0_XXXX_Release-Nightly-magisk-XXXXX.XXXX.-canary-MindTheGapps-XX.X-RemovedAmazon_Windows_10.7z
— No Amazon App Store
— Contains Google Play Store and Services
— Contains Magisk Canary (for Root Access)
Additional Information
-
If the Magisk App does not appear after the installation of the WSA build with Magisk, download it from here and sideload it into WSA
-
For Builds with KernelSU, you will need to sideload the KernelSU Manager in order to use it. You can get this by going to the releases here, and scrolling down the list of assets, until you find it
Credits:
https://github.com/LSPosed/MagiskOnWSALocal
https://github.com/cinit/WSAPatch
Windows Subsystem For Android v2308.40000.1.0: Windows 11 for ARM Processors
Builds Last Updated:
— 08/09/2023 11:20 GMT (Reason: Initial Release)
Information:
For anyone updating from a previous WSA Build, please backup your Userdata VHDX using this guide, in the case that the builds in this release do not work as intended (crashes, bugs or not working), so that you can revert to the old version if needs be.
Please rename the folder (after extraction) to a shorter name, for example WSA. This will help you avoid the potential issues that may occur during installation and after install.
Warning
Read the guide in full before installing. Ensure you meet the full requirements for an installation on Windows 11.
Note
If you’re updating WSA, merge the folders and replace the files for all items when asked
Follow these steps to install on Windows 11.
Note :
If you have the official WSA installed, you must completely uninstall it to use MagiskOnWSA
- Extract the .7z archive using 7-zip (recommended) and rename the extracted folder to
WSA - Delete the .7z archive (It is recommended to keep the .7z archive until WSA has been installed and is working properly)
- Move the newly extracted folder to a suitable location (Documents folder is a good choice), as you will need to keep the folder on your PC to use MagiskOnWSA
- Open the WSA folder and double-click Run.bat
Notice:
- As stated in the Requirements, You can only install WSA on a NTFS partition, not on an exFAT partition.
- You can NOT delete the WSA installation folder.
WhatAdd-AppxPackage -Register .\AppxManifest.xmldoes is to register an appx package with some existing unpackaged files,
so you need to keep them as long as you want to use WSA.
Check https://learn.microsoft.com/en-us/powershell/module/appx/add-appxpackage?view=windowsserver2022-ps for more details. - You need to register your WSA appx package before you can run WSA.
For WSABuilds and MagiskOnWSALocal users, you need to runRun.batin the extracted dir.
If the script fails, you can take the following steps for diagnosis (admin privilege required):- Open a PowerShell window and change working directory to your WSA directory.
- Run
Add-AppxPackage -ForceApplicationShutdown -ForceUpdateFromAnyVersion -Register .\AppxManifest.xmlin PowerShell.
This should fail with an ActivityID, which is a UUID required for the next step. - Run
Get-AppPackageLog -ActivityID <UUID>in PowerShell.
This should print the log of the failed operation. - Check the log for the reason of failure and fix it.
Changelog
- Microsoft’s Official Changelog
- Update from WSA v2307.40000.6.0 arm64 —-> WSA v2308.40000.1.0 arm64
- WSA Android Version: Android 13
- MindTheGapps 13.0 arm64
- Magisk Canary de00f1d5 (26202) —-> Magisk Canary 0fe46c5a (26301)
- Magisk Stable v26.3
- KernelSU v0.6.7
- Amazon Appstore Removed
Difference Between Versions In This Release:
- WSA_XXXX.X0000.X.0_XXXX_Release-Nightly-MindTheGapps-XX.X-RemovedAmazon.7z
— Contains Google Play Store and Services
— No Amazon App Store
- WSA_XXXX.X0000.X.0_XXXX_Release-Nightly-MindTheGapps-XX.X.7z
— Contains Google Play Store and Services
— Contains Amazon App Store
- WSA_XXXX.X0000.X.0_XXXX_Release-Nightly-NoGApps-RemovedAmazon.7z
— No Amazon App Store
— No Google Play Store and Services
- WSA_XXXX.X0000.X.0_XXXX_Release-Nightly-NoGApps.7z
— Amazon App Store Included
— No Google Play Store and Services
- WSA_XXXX.X0000.X.0_XXXX_Release-Nightly-kernelsu-vX.X.X-MindTheGapps-XX.X-RemovedAmazon.7z
— No Amazon App Store
— Contains Google Play Store and Services
— Contains KernelSU (for Root Access)
- WSA_XXXX.X0000.X.0_XXXX_Release-Nightly-with-magisk-XX.X.XXXX.-stable-MindTheGapps-XX.X.7z
— Amazon App Store Included
— Contains Google Play Store and Services
— Contains Magisk Stable (for Root Access)
- WSA_XXXX.X0000.X.0_XXXX_Release-Nightly-with-magisk-XX.X.XXXX.-stable-NoGApps-RemovedAmazon.7z
— No Amazon App Store
— Contains Magisk Stable (for Root Access)
- WSA_XXXX.X0000.X.0_XXXX_Release-Nightly-magisk-XXXXX.XXXX.-canary-MindTheGapps-XX.X-RemovedAmazon.7z
— No Amazon App Store
— Contains Google Play Store and Services
— Contains Magisk Canary (for Root Access)
Additional Information
-
If the Magisk App does not appear after the installation of the WSA build with Magisk, download it from here and sideload it into WSA
-
For Builds with KernelSU, you will need to sideload the KernelSU Manager in order to use it. You can get this by going to the releases here, and scrolling down the list of assets, until you find it
Credits:
https://github.com/LSPosed/MagiskOnWSALocal
Windows Subsystem For Android v2308.40000.1.0: Windows 11 x64
Builds Last Updated:
— 08/09/2023 11:20 GMT (Reason: Initial Release)
Information:
For anyone updating from a previous WSA Build, please backup your Userdata VHDX using this guide, in the case that the builds in this release do not work as intended (crashes, bugs or not working), so that you can revert to the old version if needs be.
Please rename the folder (after extraction) to a shorter name, for example WSA. This will help you avoid the potential issues that may occur during installation and after install.
Warning
Read the guide in full before installing. Ensure you meet the full requirements for an installation on Windows 11.
Note
If you’re updating WSA, merge the folders and replace the files for all items when asked
Follow these steps to install on Windows 11.
Note :
If you have the official WSA installed, you must completely uninstall it to use MagiskOnWSA
- Extract the .7z archive using 7-zip (recommended) and rename the extracted folder to
WSA - Delete the .7z archive (It is recommended to keep the .7z archive until WSA has been installed and is working properly)
- Move the newly extracted folder to a suitable location (Documents folder is a good choice), as you will need to keep the folder on your PC to use MagiskOnWSA
- Open the WSA folder and double-click Run.bat
Notice:
- As stated in the Requirements, You can only install WSA on a NTFS partition, not on an exFAT partition.
- You can NOT delete the WSA installation folder.
WhatAdd-AppxPackage -Register .\AppxManifest.xmldoes is to register an appx package with some existing unpackaged files,
so you need to keep them as long as you want to use WSA.
Check https://learn.microsoft.com/en-us/powershell/module/appx/add-appxpackage?view=windowsserver2022-ps for more details. - You need to register your WSA appx package before you can run WSA.
For WSABuilds and MagiskOnWSALocal users, you need to runRun.batin the extracted dir.
If the script fails, you can take the following steps for diagnosis (admin privilege required):- Open a PowerShell window and change working directory to your WSA directory.
- Run
Add-AppxPackage -ForceApplicationShutdown -ForceUpdateFromAnyVersion -Register .\AppxManifest.xmlin PowerShell.
This should fail with an ActivityID, which is a UUID required for the next step. - Run
Get-AppPackageLog -ActivityID <UUID>in PowerShell.
This should print the log of the failed operation. - Check the log for the reason of failure and fix it.
Changelog
- Microsoft’s Official Changelog
- Update from WSA v2307.40000.6.0 x86_64 —-> WSA v2308.40000.1.0 x86_64
- WSA Android Version: Android 13
- MindTheGapps 13.0 x86_64
- Magisk Canary de00f1d5 (26202) —-> Magisk Canary 0fe46c5a (26301)
- Magisk Stable v26.3
- KernelSU v0.6.7
- Amazon Appstore Removed
Difference Between Versions In This Release:
- WSA_XXXX.X0000.X.0_XXXX_Release-Nightly-MindTheGapps-XX.X-RemovedAmazon.7z
— Contains Google Play Store and Services
— No Amazon App Store
- WSA_XXXX.X0000.X.0_XXXX_Release-Nightly-MindTheGapps-XX.X.7z
— Contains Google Play Store and Services
— Contains Amazon App Store
- WSA_XXXX.X0000.X.0_XXXX_Release-Nightly-NoGApps-RemovedAmazon.7z
— No Amazon App Store
— No Google Play Store and Services
- WSA_XXXX.X0000.X.0_XXXX_Release-Nightly-NoGApps.7z
— Amazon App Store Included
— No Google Play Store and Services
- WSA_XXXX.X0000.X.0_XXXX_Release-Nightly-kernelsu-vX.X.X-MindTheGapps-XX.X-RemovedAmazon.7z
— No Amazon App Store
— Contains Google Play Store and Services
— Contains KernelSU (for Root Access)
- WSA_XXXX.X0000.X.0_XXXX_Release-Nightly-with-magisk-XX.X.XXXX.-stable-MindTheGapps-XX.X.7z
— Amazon App Store Included
— Contains Google Play Store and Services
— Contains Magisk Stable (for Root Access)
- WSA_XXXX.X0000.X.0_XXXX_Release-Nightly-with-magisk-XX.X.XXXX.-stable-NoGApps-RemovedAmazon.7z
— No Amazon App Store
— Contains Magisk Stable (for Root Access)
- WSA_XXXX.X0000.X.0_XXXX_Release-Nightly-magisk-XXXXX.XXXX.-canary-MindTheGapps-XX.X-RemovedAmazon.7z
— No Amazon App Store
— Contains Google Play Store and Services
— Contains Magisk Canary (for Root Access)
Additional Information
-
If the Magisk App does not appear after the installation of the WSA build with Magisk, download it from here and sideload it into WSA
-
For Builds with KernelSU, you will need to sideload the KernelSU Manager in order to use it. You can get this by going to the releases here, and scrolling down the list of assets, until you find it
Credits:
https://github.com/LSPosed/MagiskOnWSALocal
Windows Subsystem For Android v2308.40000.1.0: Windows 10 x64
Builds Last Updated:
— 08/09/2023 11:20 GMT (Reason: Initial Release)
Information:
For anyone updating from a previous WSA Build, please backup your Userdata VHDX using this guide, in the case that the builds in this release do not work as intended (crashes, bugs or not working), so that you can revert to the old version if needs be.
Please rename the folder (after extraction) to a shorter name, for example WSA. This will help you avoid the potential issues that may occur during installation and after install.
Warning
Read the guide in full before installing. Ensure you meet the full requirements for an installation on Windows 11.
Note
If you’re updating WSA, merge the folders and replace the files for all items when asked
Follow these steps to install on Windows 11.
Note :
If you have the official WSA installed, you must completely uninstall it to use MagiskOnWSA
- Extract the .7z archive using 7-zip (recommended) and rename the extracted folder to
WSA - Delete the .7z archive (It is recommended to keep the .7z archive until WSA has been installed and is working properly)
- Move the newly extracted folder to a suitable location (Documents folder is a good choice), as you will need to keep the folder on your PC to use MagiskOnWSA
- Open the WSA folder and double-click Run.bat
Notice:
- As stated in the Requirements, You can only install WSA on a NTFS partition, not on an exFAT partition.
- You can NOT delete the WSA installation folder.
WhatAdd-AppxPackage -Register .\AppxManifest.xmldoes is to register an appx package with some existing unpackaged files,
so you need to keep them as long as you want to use WSA.
Check https://learn.microsoft.com/en-us/powershell/module/appx/add-appxpackage?view=windowsserver2022-ps for more details. - You need to register your WSA appx package before you can run WSA.
For WSABuilds and MagiskOnWSALocal users, you need to runRun.batin the extracted dir.
If the script fails, you can take the following steps for diagnosis (admin privilege required):- Open a PowerShell window and change working directory to your WSA directory.
- Run
Add-AppxPackage -ForceApplicationShutdown -ForceUpdateFromAnyVersion -Register .\AppxManifest.xmlin PowerShell.
This should fail with an ActivityID, which is a UUID required for the next step. - Run
Get-AppPackageLog -ActivityID <UUID>in PowerShell.
This should print the log of the failed operation. - Check the log for the reason of failure and fix it.
Changelog
- Microsoft’s Official Changelog
- Windows 10 Patch Applied (Credit: Cinit)
- Update from WSA v2307.40000.6.0 x86_64 —-> WSA v2308.40000.1.0 x86_64
- WSA Android Version: Android 13
- MindTheGapps 13.0 x86_64
- Magisk Canary de00f1d5 (26202) —-> Magisk Canary 0fe46c5a (26301)
- Magisk Stable v26.3
- KernelSU v0.6.7
- Amazon Appstore Removed
Difference Between Versions In This Release:
- WSA_XXXX.X0000.X.0_XXXX_Release-Nightly-MindTheGapps-XX.X-RemovedAmazon_Windows_10.7z
— Contains Google Play Store and Services
— No Amazon App Store
- WSA_XXXX.X0000.X.0_XXXX_Release-Nightly-MindTheGapps-XX.X_Windows_10.7z
— Contains Google Play Store and Services
— Contains Amazon App Store
- WSA_XXXX.X0000.X.0_XXXX_Release-Nightly-NoGApps-RemovedAmazon_Windows_10.7z
— No Amazon App Store
— No Google Play Store and Services
- WSA_XXXX.X0000.X.0_XXXX_Release-Nightly-NoGApps_Windows_10.7z
— Amazon App Store Included
— No Google Play Store and Services
- WSA_XXXX.X0000.X.0_XXXX_Release-Nightly-kernelsu-vX.X.X-MindTheGapps-XX.X-RemovedAmazon_Windows_10.7z
— No Amazon App Store
— Contains Google Play Store and Services
— Contains KernelSU (for Root Access)
- WSA_XXXX.X0000.X.0_XXXX_Release-Nightly-with-magisk-XX.X.XXXX.-stable-MindTheGapps-XX.X_Windows_10.7z
— Amazon App Store Included
— Contains Google Play Store and Services
— Contains Magisk Stable (for Root Access)
- WSA_XXXX.X0000.X.0_XXXX_Release-Nightly-with-magisk-XX.X.XXXX.-stable-NoGApps-RemovedAmazon_Windows_10.7z
— No Amazon App Store
— Contains Magisk Stable (for Root Access)
- WSA_XXXX.X0000.X.0_XXXX_Release-Nightly-magisk-XXXXX.XXXX.-canary-MindTheGapps-XX.X-RemovedAmazon_Windows_10.7z
— No Amazon App Store
— Contains Google Play Store and Services
— Contains Magisk Canary (for Root Access)
Additional Information
-
If the Magisk App does not appear after the installation of the WSA build with Magisk, download it from here and sideload it into WSA
-
For Builds with KernelSU, you will need to sideload the KernelSU Manager in order to use it. You can get this by going to the releases here, and scrolling down the list of assets, until you find it
Credits:
https://github.com/LSPosed/MagiskOnWSALocal
https://github.com/cinit/WSAPatch
Windows Subsystem For Android v2307.40000.6.0: Windows 11 for ARM Processors
Builds Last Updated:
— 31/08/2023 23:30 GMT (Reason: Initial Release)
Information:
For anyone updating from a previous WSA Build, please backup your Userdata VHDX using this guide, in the case that the builds in this release do not work as intended (crashes, bugs or not working), so that you can revert to the old version if needs be.
Please rename the folder (after extraction) to a shorter name, for example WSA. This will help you avoid the potential issues that may occur during installation and after install.
Warning
Read the guide in full before installing. Ensure you meet the full requirements for an installation on Windows 11.
Note
If you’re updating WSA, merge the folders and replace the files for all items when asked
Follow these steps to install on Windows 11.
Note :
If you have the official WSA installed, you must completely uninstall it to use MagiskOnWSA
- Extract the .7z archive using 7-zip (recommended) and rename the extracted folder to
WSA - Delete the .7z archive (It is recommended to keep the .7z archive until WSA has been installed and is working properly)
- Move the newly extracted folder to a suitable location (Documents folder is a good choice), as you will need to keep the folder on your PC to use MagiskOnWSA
- Open the WSA folder and double-click Run.bat
Notice:
- As stated in the Requirements, You can only install WSA on a NTFS partition, not on an exFAT partition.
- You can NOT delete the WSA installation folder.
WhatAdd-AppxPackage -Register .\AppxManifest.xmldoes is to register an appx package with some existing unpackaged files,
so you need to keep them as long as you want to use WSA.
Check https://learn.microsoft.com/en-us/powershell/module/appx/add-appxpackage?view=windowsserver2022-ps for more details. - You need to register your WSA appx package before you can run WSA.
For WSABuilds and MagiskOnWSALocal users, you need to runRun.batin the extracted dir.
If the script fails, you can take the following steps for diagnosis (admin privilege required):- Open a PowerShell window and change working directory to your WSA directory.
- Run
Add-AppxPackage -ForceApplicationShutdown -ForceUpdateFromAnyVersion -Register .\AppxManifest.xmlin PowerShell.
This should fail with an ActivityID, which is a UUID required for the next step. - Run
Get-AppPackageLog -ActivityID <UUID>in PowerShell.
This should print the log of the failed operation. - Check the log for the reason of failure and fix it.
Changelog
- Microsoft’s Official Changelog: No Changelog at the time of this release. I will update this release, if one is made available.
- Update from WSA v2307.40000.5.0 arm64 —-> WSA v2307.40000.6.0 arm64
- Adding
VPNDialogsback into the releases - Added Post-installation pages for builds
- Shorten name of folder inside .7z builds to avoid issues during and after install
- WSA Android Version: Android 13
- MindTheGapps 13.0 arm64)
- Magisk Canary de00f1d5 (26202)
- KernelSU v0.6.7
- Amazon Appstore Removed
Difference Between Versions In This Release:
- WSA_XXXX.X0000.X.0_XXXX_Release-Nightly-MindTheGapps-XX.X-RemovedAmazon.7z
— Contains Google Play Store and Services only
— No Amazon App Store
- WSA_XXXX.X0000.X.0_XXXX_Release-Nightly-MindTheGapps-XX.X.7z
— Contains Google Play Store and Services
— Contains Amazon App Store
- WSA_XXXX.X0000.X.0_XXXX_Release-Nightly-NoGApps-RemovedAmazon.7z
— Base Window Subsystem for Android
— No Amazon App Store
- WSA_XXXX.X0000.X.0_XXXX_Release-Nightly-NoGApps.7z
— Base Window Subsystem for Android
— Amazon App Store Included
- WSA_XXXX.X0000.X.0_XXXX_Release-Nightly-magisk-XXXXX.XXXX.-canary-MindTheGapps-XX.X-RemovedAmazon.7z
— No Amazon App Store
— Contains Google Play Store and Services
and
— Contains Magisk (for Root Access)
- WSA_XXXX.X0000.X.0_XXXX_Release-Nightly-kernelsu-vX.X.X-MindTheGapps-XX.X-RemovedAmazon.7z
— No Amazon App Store
— Contains Google Play Store and Services
and
— Contains KernelSU (for Root Access)
Additional Information
-
If the Magisk App does not appear after the installation of the WSA build with Magisk, download it from here and sideload it into WSA
-
For Builds with KernelSU, you will need to sideload the KernelSU Manager in order to use it. You can get this by going to the releases here, and scrolling down the list of assets, until you find it
Credits:
https://github.com/LSPosed/MagiskOnWSALocal
UPD: Возможна установка и на Release билды Windows 11. Регион не имеет значения. Спасибо за проверку @De Lancre
Вторая часть статьи:
Вчера (20.10.2021) Microsoft официально выпустила Windows Subsystem for Android, который позволил пользователям Windows 11 устанавливать приложения из Amazon Appstore (на самом деле, можно устанавливать совершенно любые Android-приложения, но про это уже в другой статье).
Однако, нововведение получили только участники канала Beta обновлений, то есть канал Dev, который по логике должен был получить его уже давно, остался на данный момент ни с чем.
UPD: Способ работает и на стабильных (Release) версиях Windows 11.
Данное недоразумение достаточно легко решить и вот шаги, которые помогут вам достичь цели:
Скачиваем .msixbundle (установщик)
Из Microsoft Store нам напрямую никак не удастся получить его, так что нужно прибегнуть к некоторой хитрости — мы скачаем этот пакет прямой ссылкой, без всяких магазинов.
Если браузер будет выдавать ошибку при открытии ссылки, то удостоверьтесь, что он не использует Always HTTPS.
Зеркало:
Устанавливаем его
Казалось бы, что только и нужно нажать и оно спокойно установится, но нет. Установщик пакетов выдаст ошибку.
Поэтому мы должны использовать консоль Powershell. Её надо запустить от имени администратора и ввести следующую команду:
add-appxpackage <путь до .msixbundle пакета>
Теперь всё устанавливается и нам остаётся подождать пару минут.
И вот мы попадаем в заветное меню
Для доступа к файловой системе Android необходимо нажать на кнопку Files.
…но тут приключения не заканчиваются
Хотели мы уже наконец во всю начать пользоваться новыми возможностями, но вот незадача — ошибочка появляется…
Собственно, для соответствия требованиям, показанным в ошибке, нам потребуется:
1) Включить Virtual Machine Platform в optionalfeatures (можно вбить в поиск по приложениям и оно покажет нужный пункт)
2) Включить виртуализацию в BIOS вашей материнской платы.
Тут общего решения нет — материнки у всех разные, так что из решений только могу предложить гугление того, где находится виртуализация конкретно у вас.
И вот теперь уже всё точно работает!
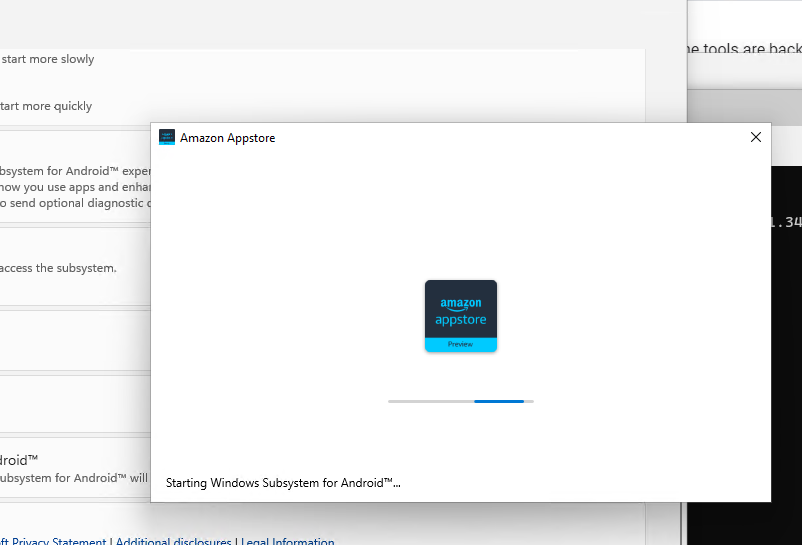
«Откуда взять Amazon Appstore?»
Amazon Appstore автоматически появится в системе как только вы впервые успешно запустите субсистему (без ошибки о выключенной виртуализации, которая была разобрана выше).
Удалить его будет нельзя, ибо он утащит за собой субсистему заодно, о чём предупредит перед удалением.
Как вы уже могли понять по снимку экрана выше, на WSfA можно поставить свои приложения. Использовать их получается без лишних зависаний (!), но с некоторыми ограничениями (одно из главных — доступ к файловой системе у них фактически полностью обрезан).
Про установку различных приложений, встреченные проблемы и даже неожиданные открытия следующая статья:
В Windows 11 вы можете использовать Windows Subsystem for Android (WSA) для установки и запуска Android приложений. Windows Subsystem для Android работает по аналогии с WSL (Windows Subsystem для Linux). Ядро Android устанавливается в виде легкой виртуальной машины и не требует установки роли Hyper-V. На данный момент подсистема Windows для Android официально доступна только для участников Windows Insiders. Однако вы можете установить Windows Subsystem for Android и на обычном образе Windows 11.
Установка в Windows Subsystem for Android в Windows 11
Чтобы установить виртуальную машину с Android, ваш компьютер должен поддерживать аппаратную виртуализацию Intel VT (Intel Virtualization Technology) или AMD-V. Проверьте, что она включена в BIOS/UEFI.
Можно проверить поддержку виртуализации в Windows такой командой PowerShell:
Get-ComputerInfo -property "HyperV*"
HyperVRequirementDataExecutionPreventionAvailable : True
HyperVRequirementSecondLevelAddressTranslation : True
HyperVRequirementVirtualizationFirmwareEnabled : True
HyperVRequirementVMMonitorModeExtensions : True
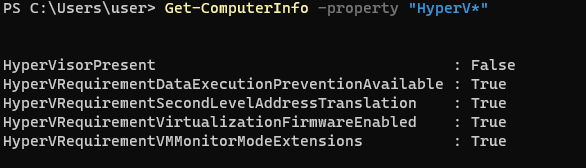
В нашем примере виртуализации поддерживаются и включены.
Также рекомендуется как минимум 8 Гб RAM на компьютере для нормальной работы Android подсистемы и приложений.
Установите компонент Windows VirtualMachinePlatform (понадобится перезагрузка):
Enable-WindowsOptionalFeature -Online -FeatureName VirtualMachinePlatform

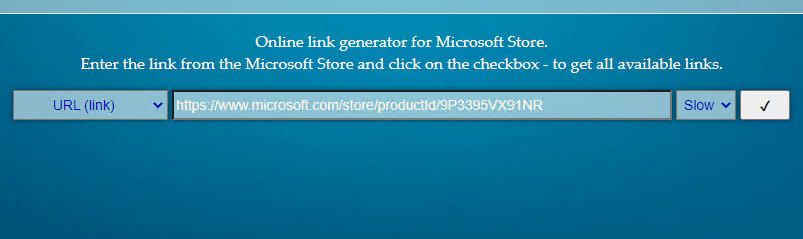
Теперь нужно скачать установочный файл Windows Subsystem for Android в формате MSIXBUNDLE из Microsoft Store. Ранее мы показывали, как скачать установочный APPX файл любого приложения из Microsoft Store. Здесь все действия выполняются аналогично.
- Перейдите на https://store.rg-adguard.net/ (этот сервис позволяет получить прямые ссылки на установочные файлы приложений в Microsoft Store);
- Вставьте в поле поиска URL ссылку
https://www.microsoft.com/store/productId/9P3395VX91NR
и выберите Slow;
- Найдите в списке
MicrosoftCorporationII.WindowsSubsystemForAndroid_1.8.32828.0_neutral_~_8wekyb3d8bbwe.msixbundle
и скачайте файл (1.2 Гб); - Откройте Windows Terminal и выполните следующую команду для установки файла msixbundle:
Add-AppxPackage -Path "C:\Users\root\Downloads\MicrosoftCorporationII.WindowsSubsystemForAndroid_1.8.32828.0_neutral___8wekyb3d8bbwe.Msixbundle"
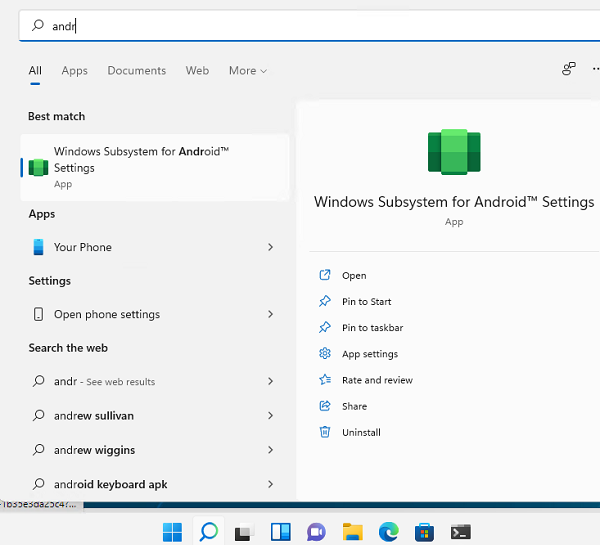
- После этого в стартовом меню Windows 11 появится пункт Windows Subsystem for Android Settings.

Установка приложений Android в Windows 11
Теперь вы можете установить приложения Android. На данный момент установка Android приложений доступна только с американских IP адресов для инсайдеров Windows 11 в канале Beta и только через Amazon AppStore (устанавливается вместе с WSA). Ограничений довольно много….
Но вы можете установить любую программу Android с помощью APK файла в режиме отладки.
Чтобы скачать APK файл любого приложения из Google Play, скопируйте его URL адрес. В этом примере я хочу скачать FBReader (привычная мне fb2/epub читалка для Android).
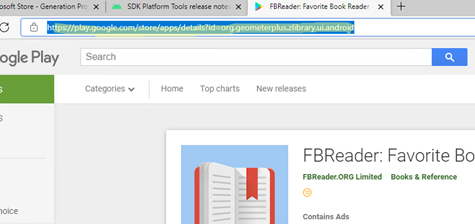
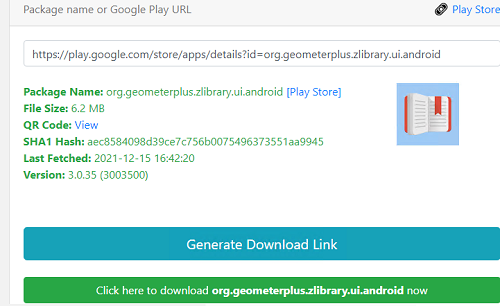
Перейдите на сайт http://apps.evozi.com/apk-downloader/ , вставьте URL адрес приложения в Google Play и нажмите Generate Download Link. Скачайте установочный apk файл приложения на диск.
Скачайте Android SDK Platform для Windows (https://developer.android.com/studio/releases/platform-tools ) и распакуйте в каталог C:\tools\platform-tools.
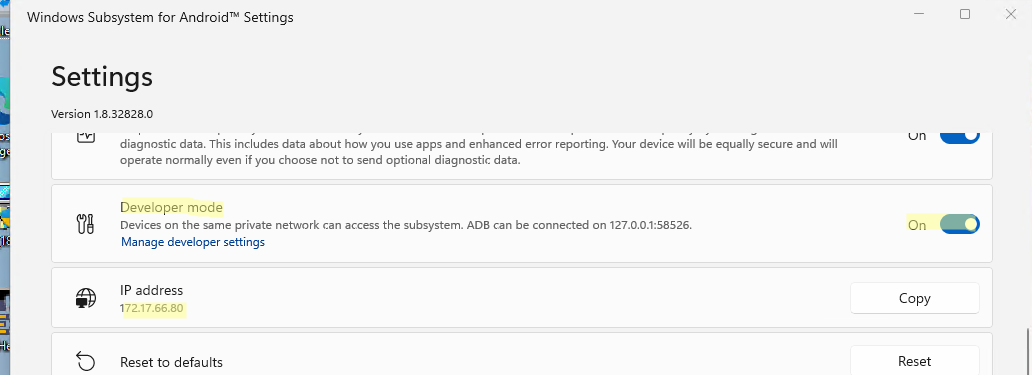
Включите режим разработчика (Developer Mode) в настройках Windows Subsystem for Android. Нажмите на кнопку Refresh в поле IP address и дождитесь, пока вашему инстансу будет присвоен IP адрес. Скопируйте его (иногда он указан вместе с портом в формате 127.0.0.1:58526).
Откройте консоль PowerShell и перейдите в каталог с Android SDK:
cd C:\tools\platform-tools
Подключитесь к виртуальной машине Android по полученному ранее IP адресу:
./adb.exe connect 172.17.66.80
connected to 172.17.66.80:5555

Убедитесь, что вы подключены только к одному устройству Android:
adb devices
Для установки приложения Android из полученного ADK файла, выполните команду:
./adb install "C:\Users\root\Downloads\org.geometerplus.zlibrary.ui.android_3003500_apps.evozi.com.apk"

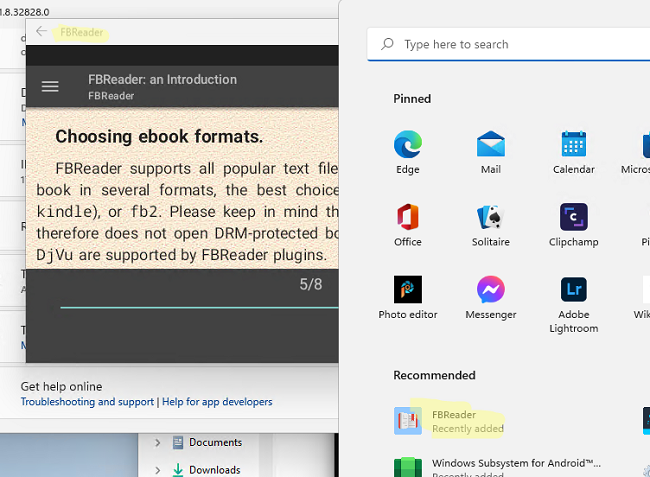
После этого ярлык приложения Android появится списке установленных программ в стартовом меню Windows. Запустите его.
В моем случае программа FBreader в видит только свою эмулированную файловую систему Android. Чтобы скопировать файл (книгу) в каталог books на Android, нужно опять воспользоваться adk:
./adb push "C:\Users\root\Downloads\Mark-Twain-adv-Huckleberry Finn.epub"/storage/emulated/0/books
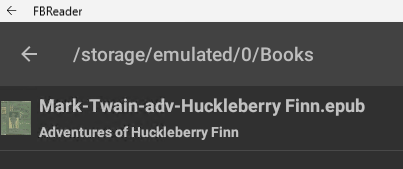
Epub файл теперь доступен в из приложений Android.
Чтобы скопировать файл из Android в Windows, используется команда adb pull:
adb pull "/storage/emulated/0/books/file.fb2 C:\Users\root\Downloads