Deploying software and patching systems was always a challenge for system administrators because of the lack of automation, control and reporting. WSUS solves some of these issues but as you probably know, it has some limitations which do not suit well in medium to large environments. Off course, we ca use scripting with WSUS to make it work even better, but what about the advanced reporting and software deployment? To overcome all these limitations and improve the work for system administrators, Microsoft created Endpoint Configuration Manager (MECM), formerly System Center Configuration Manager or SCCM for short. Using MECM we are not just deploying software and patching systems, but also create baselines, deploy certificates on endpoint devices, install Windows OSs and some other very useful and nice stuff.
In this article I am going to use the names SCCM and MECM interchangeably since it points to the same product, just different branding, but SCCM is mostly used because of the popularity in the industry.
SCCM it’s a very complicated service when you deploy it in large environments since it has multiple parts which I am going to treat in some future series articles. Right now, let’s start small then expand. The first part of SCCM is the installation, which is not just clicking the Next button of the wizard but doing things like extending the Schema, creating entries in the Active Directory Configuration partition and some other security tasks that I am going to show in this article. Since there are a lot of software prerequisites for SCCM, I really like taking care of them one-by-one since the installation wizard shows us the ones that are missing/needed.
For this article we are going to deploy SCCM with a single Primary Site System role which is one server doing it all. There are multiple Site System server roles in SCCM and I am going to explain them in the series that will come up, since these are more like design things.
1. Installing the SCCM prerequisites
For this lab I have three machines: the Domain Controller, the SCCM (build 2002) machine with 6GB of RAM, two vCPUs and a second disk for hosting the software/patches. The third machine is a SQL Server 2019 VM with Reporting Services installed for the SCCM database having 12 GB of RAM and two vCPUs. All the VMs are running Windows Server 2019 with the latest updates installed and joined to an Active Directory domain. Again, you will have to size your machines accordingly once you go into production, and as an idea, you can take a look at this Technet article. When it comes to the firewall configuration, I am going to allow everything between the mentioned machines since this is a large subject and it requires it’s own topic.
As it comes to hardware requirements it all depends how large the SCCM infrastructure is and how many clients it will manage. Microsoft posted some recommendations which are huge, but I find SCCM working for way less. Depending on the number of endpoints you have in your infrastructure you can start small and increase the resources as you go; virtualization makes it very easy.
SCCM has a lot of software requirements and if we do one or two new deployments in a year, we are not going to remember them. A better approach that I like to use is to let SCCM tell me what prerequisite should I install, and this way I know that everything it needs it’s in the system and configured for the deployment.
1.1 Running the SCCM prerequisites checker
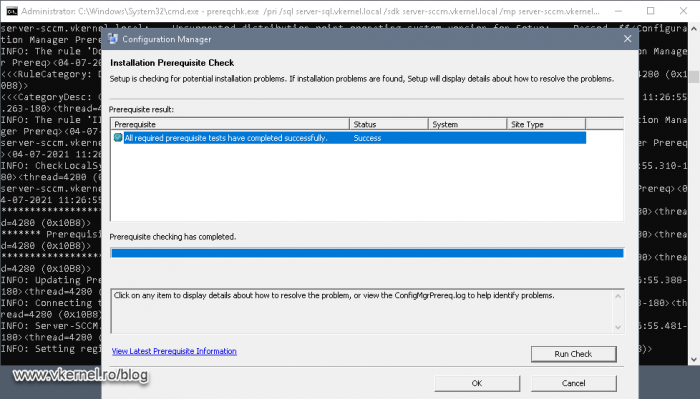
The first thing that I like to do in order to see what’s needed for the SCCM installation, is to launch the SCCM Prerequisites Checker from the installation ISO.
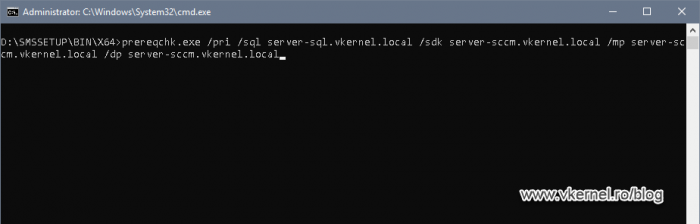
On the SCCM server, mount the downloaded SCCM ISO then open a command prompt and browse to Configuration Manager installation media > SMSSETUP > BIN > X64. Here, type the bellow command line to launch the Prerequisites Checker on the server so we can see what prerequisites are missing and what configurations we need to fix. Off course you will need to replace the server names with your own, like the SQL server name and the SCCM one; and don’t freak out about the errors and warnings presented in the wizard, because remember…this is a clean servers with nothing on it, so it is expected.
prereqchk.exe /pri /sql <SQL server FQDN> /sdk <SCCM (local server) FQDN> /mp <SCCM (local server) FQDN> /dp <SCCM (local server) FQDN>
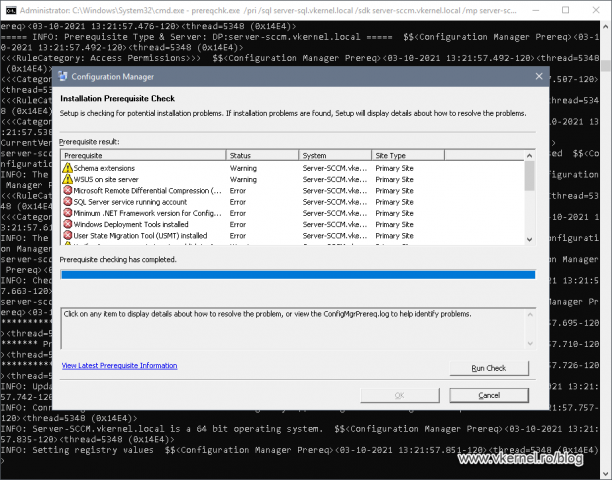
The operation will take a few minutes to complete, and once it is done, we will have all the missing software and miss-configurations in a nice colored list. The next thing is to go over all the prerequisites one-by-one until the list it’s empty on the next prerequisites check. The Prerequisites Checker also creates a log file on the root of the C drive if you want more details about what it finds.
1.2 Extending the AD schema for SCCM
This is the first task in the list and it’s not mandatory, but it’s recommended so we can benefit from all the SCCM features. By extending the Active Directory schema we are simplifying the deployment and configuration of clients and also let them locate resources (content servers) more efficiently.
In order to extend the AD schema we need to mount the SCCM ISO on a domain controller, open the command prompt and browse to Configuration Manager installation media > SMSSETUP > BIN > X64. From this path just type extadsch.exe and press Enter. In a few seconds the process of schema extension will be done.
To extend the Schema, the account used will need to be part of the Schema Admins security group
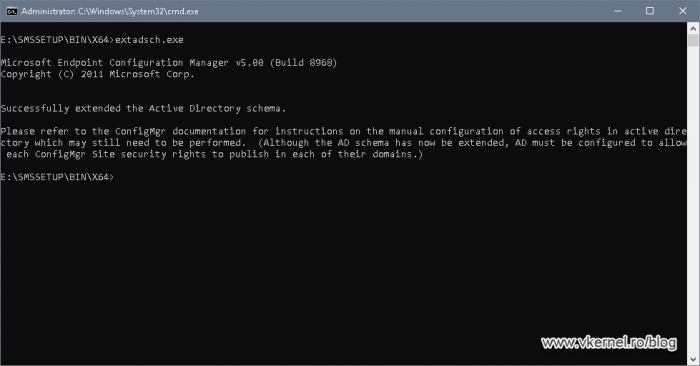
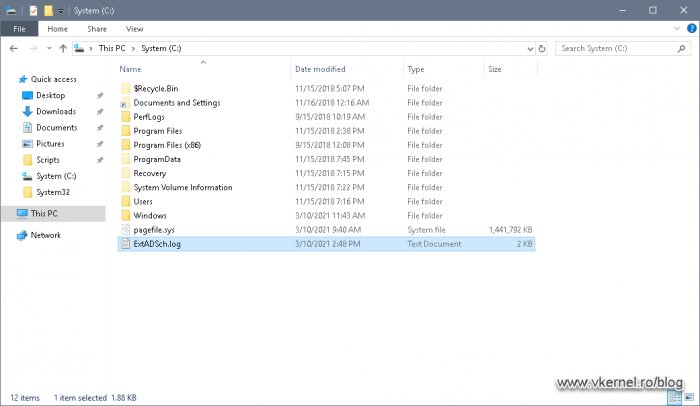
The command also creates a log file –ExADSch.log– on the root of the C drive if we want to see what classes and attributes it adds to the schema.
1.3 Creating the System Management Container
Since we are on the domain controller, we will go a little bit out of order from the SCCM prerequisites check list so we don’t have to come back later on. What we are trying to resolve here is the Verify site server permissions to publish to Active Directory warning. This is also not mandatory, but highly recommended to do so Configuration Manager can publish data like Management Points (MP) and Boundary details in order for clients to select the best one possible.
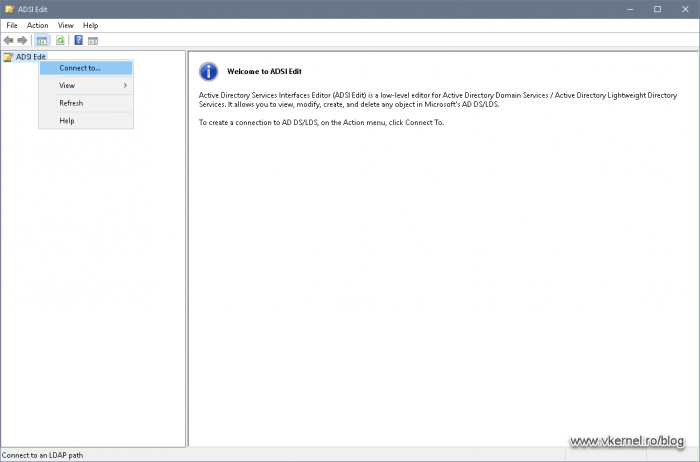
On one of the domain controllers, open the ADSI Editor console, right-click the ADSI Edit node and choose Connect to.
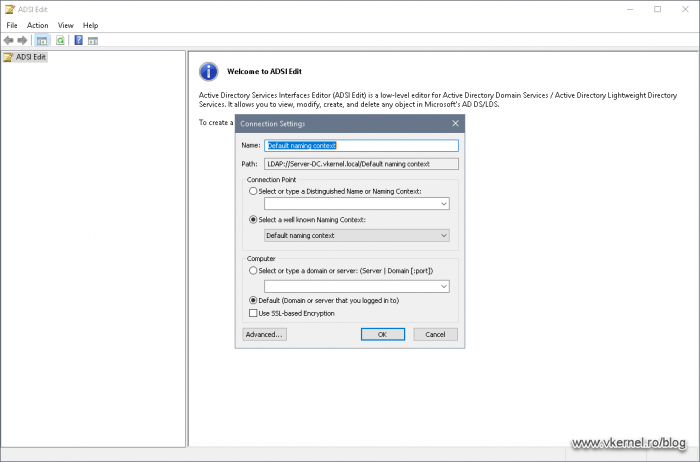
On the Connection Settings window that pops-up, just leave the defaults and hit OK.
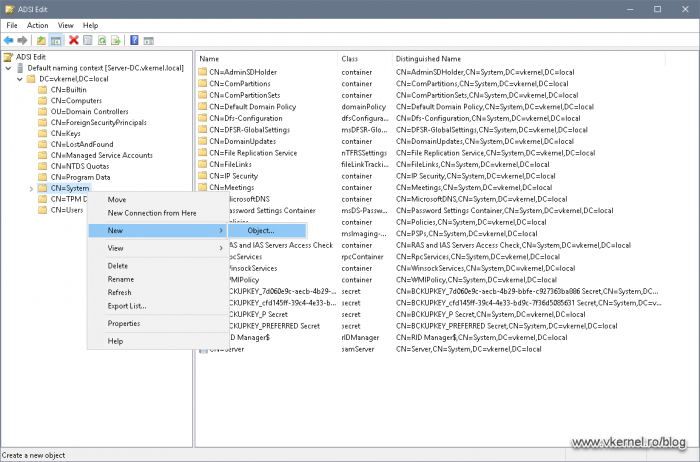
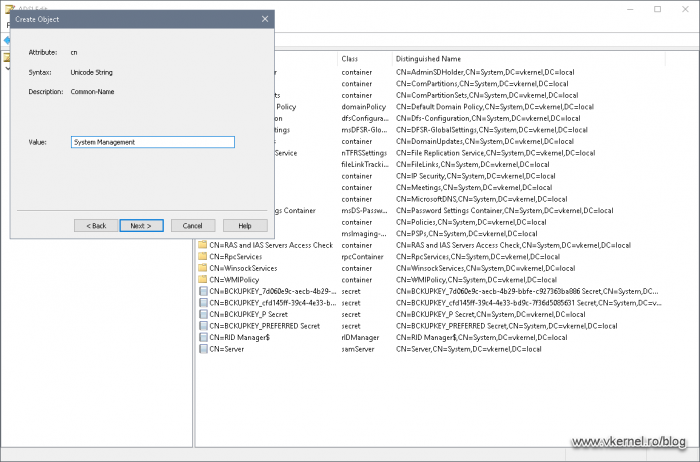
Expand the Default naming context then the domain name. Right-click CN=System and choose New > Object.
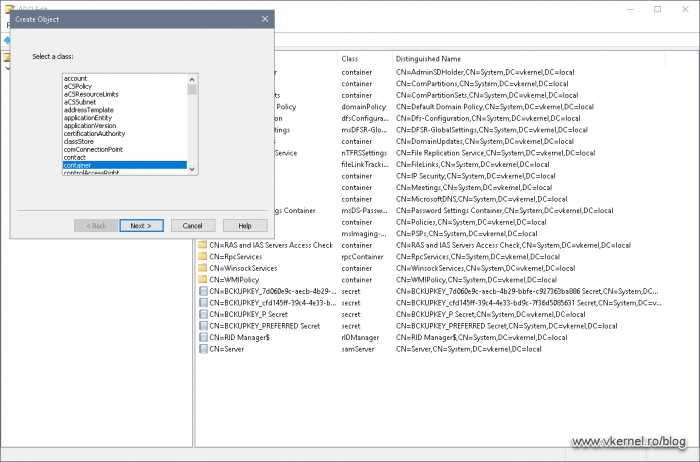
From the Create Object wizard that opens up, select container and click Next.
In the Value box type System Management then continue the wizard.
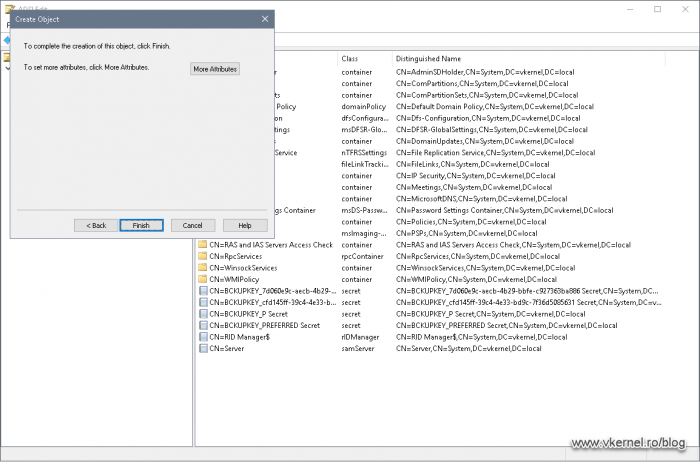
Click Finish to close the wizard.
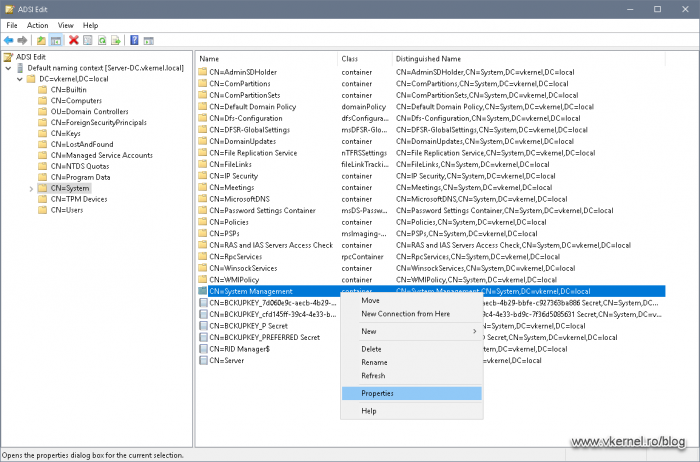
Now that our container is created, we need to set up the proper security permissions so SCCM can publish the necessary data in it. Right-click the System Management container and choose Properties.
From the Security tab hit the Add button and search for the SCCM server.
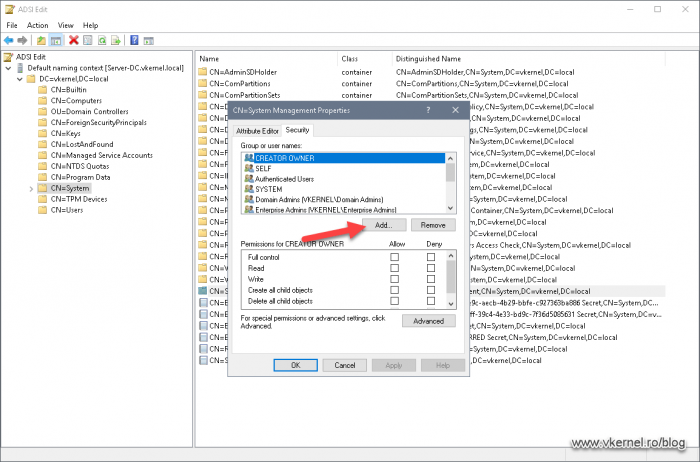
Once the SCCM server is in the Access Control List (ACL) give it full permissions on the System Management container by clicking the Full control box.
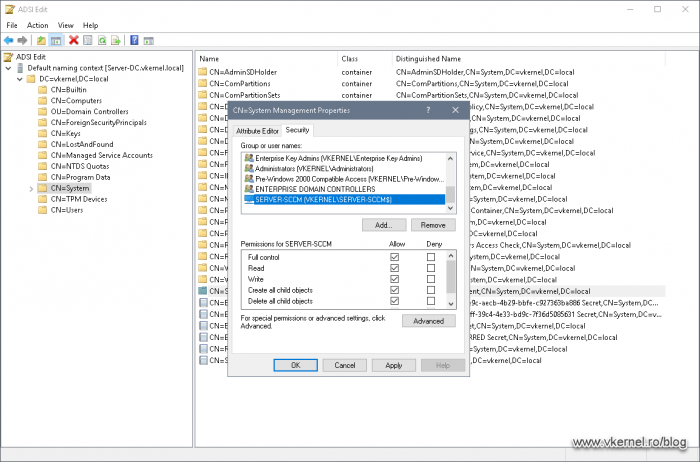
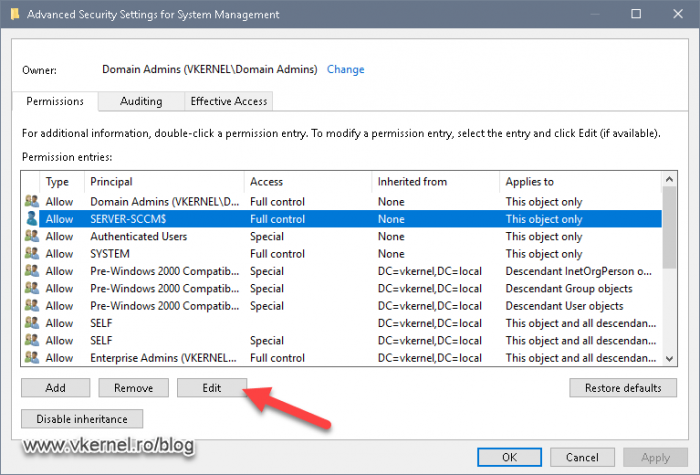
Click the Advanced button. From the Advanced Security Settings window that opens up, select our SCCM server then hit Edit.
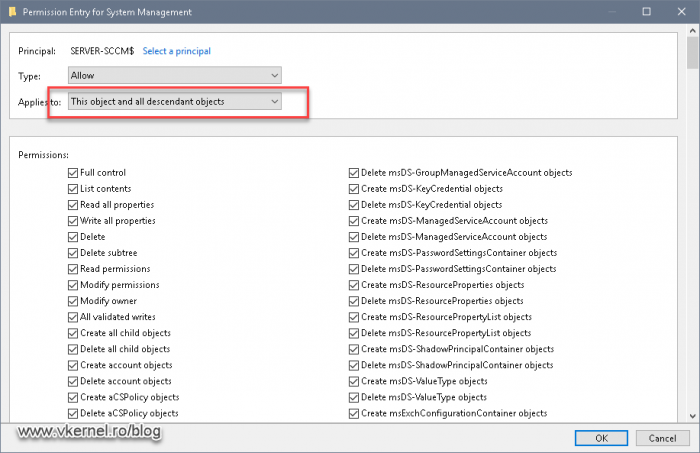
From the Applies to drop-down box select This object and all descendant objects. Click OK on all properties windows to close them and save the changes.
1.4 Creating the SQL Server service account
Still on the domain controller, open Active Directory Users and Computers (ADUC) and create a simple user account which later on we are going to use it a service account for our SQL Server instance. Make sure you set the password for the account to never expire.

1.5 Configuring the SQL Server
SCCM supports a wide majority of SQL Server versions, and since we are using SQL 2019 for this SCCM instance, we need to have at least CU5 installed on our SQL server. More details can be found in this Technet article.
| SQL Server Version | Edition | Min Cumulative Update |
| SQL Server 2019 | Standard, Enterprise | CU5 |
| SQL Server 2017 | Standard, Enterprise | CU2 |
| SQL Server 2016 SP2 | Standard, Enterprise | Not CU Required |
| SQL Server 2016 | Standard, Enterprise | Not CU Required |
| SQL Server 2014 SP3 | Standard, Enterprise | No CU Required |
| SQL Server 2012 SP3 | Standard, Enterprise | No CU Required |
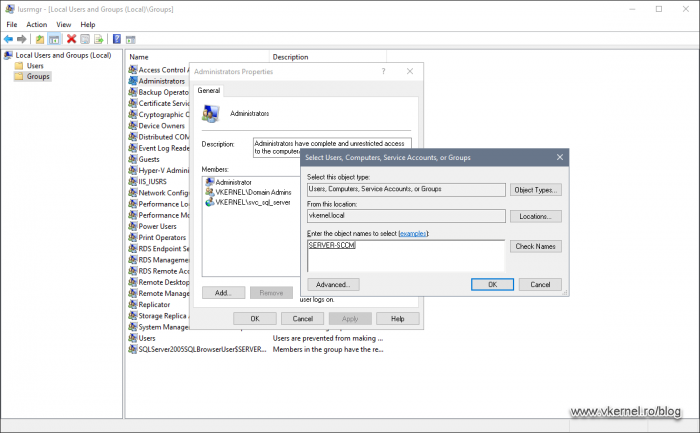
1.5.1 Adding the service account and SCCM host to the local Administrators group
Presuming you already have your SQL Server and the SQL Server Reporting Services installed, we can move forward with our SCCM setup by login into our SQL host and open the Local Users and Groups console (lusrmgr.msc). Once the console opens, click the Groups folder, and open the Administrators group properties.
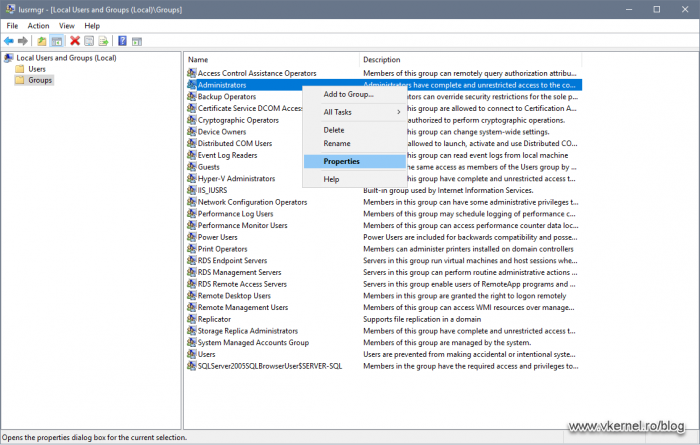
Click the Add button and search for the service account that we created in section 1.4.

Add the account to the Administrators group then click Apply to save the changes. Don’t close the Administrators Properties window yet!
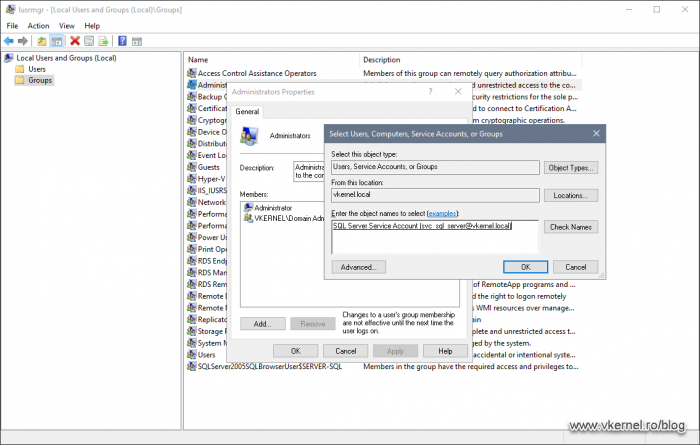
Click the Add button again, and this time we need to add the SCCM computer account as a member of the local Administrators group on our SQL server. Click OK when done.
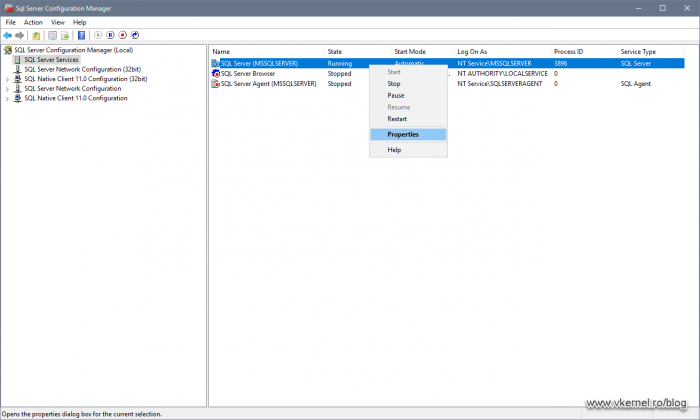
1.5.2 Configuring the SQL service running account
Now we need to set our SQL service to use the domain service account, and for that, we are going to use the SQL Server Configuration Manager console that can be found in the Start menu. Once the console opens and we click the SQL Server Services object, we can see on the right-hand side that our SQL Service is running under a local account. To change that, right-click the SQL Server service and choose Properties.
From the Log On tab, click the Browse button.
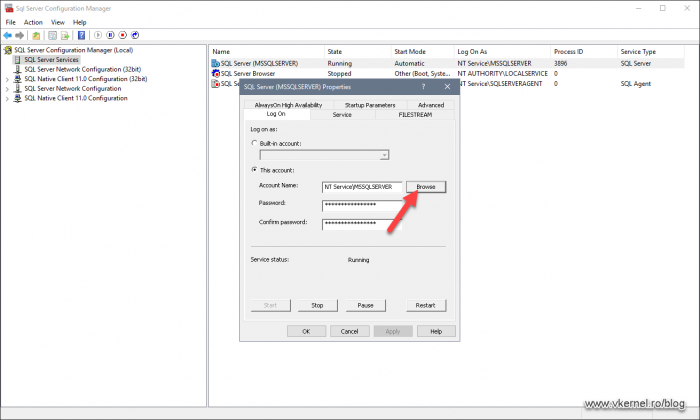
Here we need to add our SQL service account created in section 1.4. To be able to add the account we need to select our domain using the Locations button then search for the account. Click OK when done.
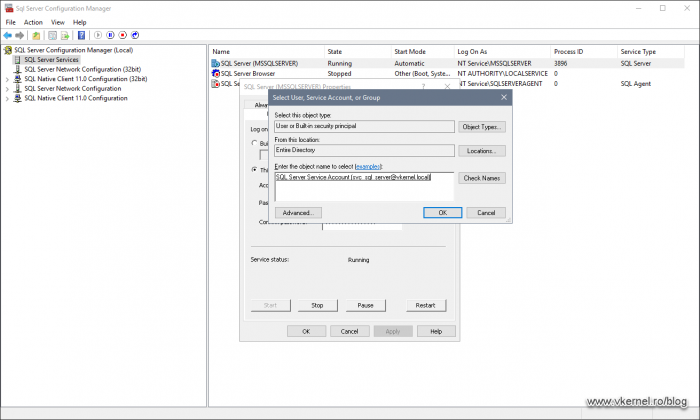
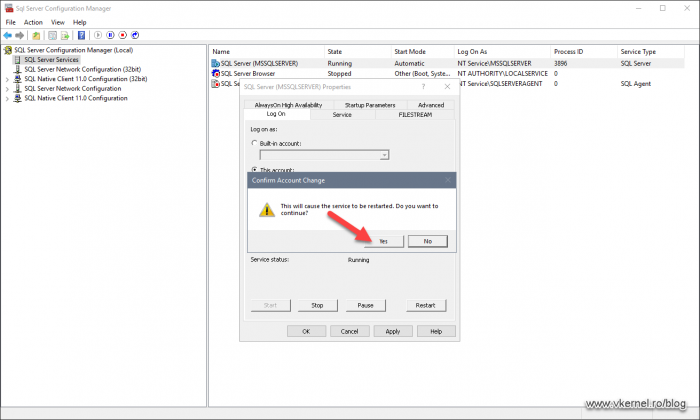
Back on the SQL Server service Properties window, we need to provide the service account password in the two password boxes then hit OK. Choose Yes on the warning that pops-up to restart the SQL service and apply the changes.
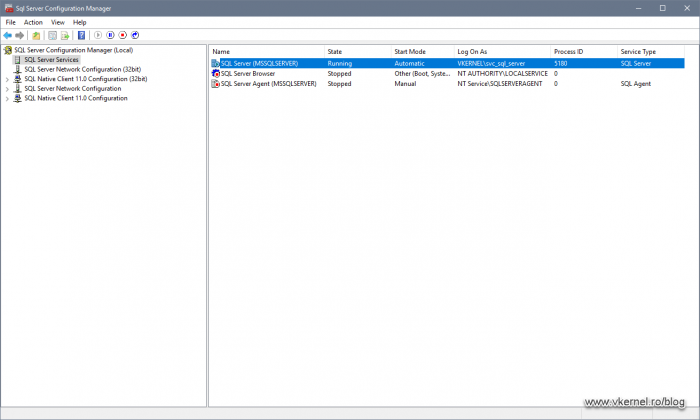
And there you have it, our SQL Server service is now running under a domain service account, which is what SCCM wants for us.
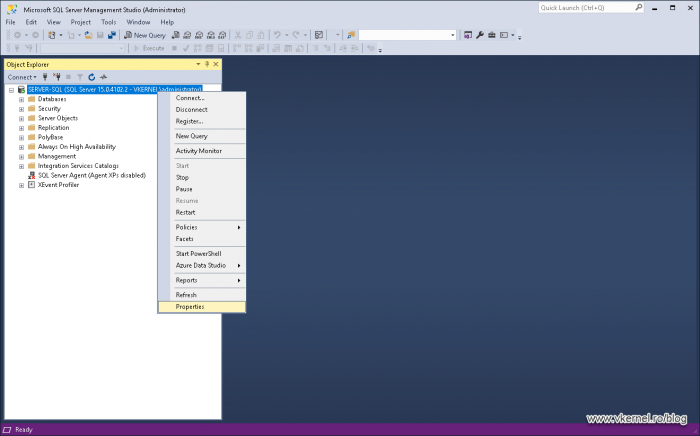
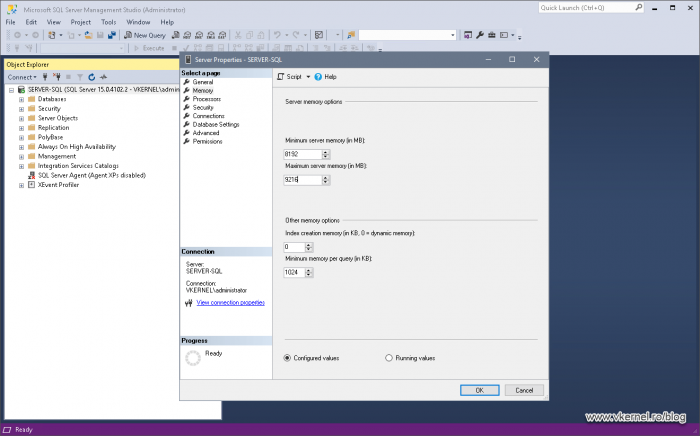
1.5.3 Setting up memory usage for the SQL instance
We still have one more to go on the SQL Server configuration side, and that is setting up a minimum and maximum memory for the instance to use. For this, we are going to use SQL Management Studio. Once we log in, we need to right-click the server name and choose Properties.
On the Properties window, click the Memory page then on the right-hand side set a minimum value of 8GB of RAM -which is what SCCM requires- and as a maximum value set it close to what your SQL system has. Since I have 12 GB of RAM on this host, I will set the maximum value to 9 GB and leave something for the system. Click OK when done.
1.6 Installing missing features on the SCCM server
The next prerequisite will be WSUS, which is also not mandatory but since we are deploying a single Primary Site which is also our Management Point and Distribution Point site, we need this role. Also, by opening the Add Roles and Features Wizard, it will be a good time to install the rest of the missing features and roles for SCCM not just WSUS.
On the SCCM server open Server Manager and click Manage > Add Roles and Features.

Once at the Select server roles screen, tick the Web Server (IIS) and Windows Server Update Services boxes then click Next.
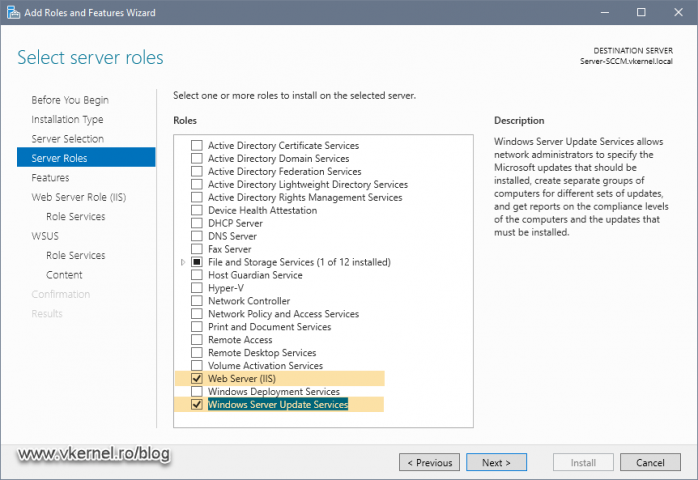
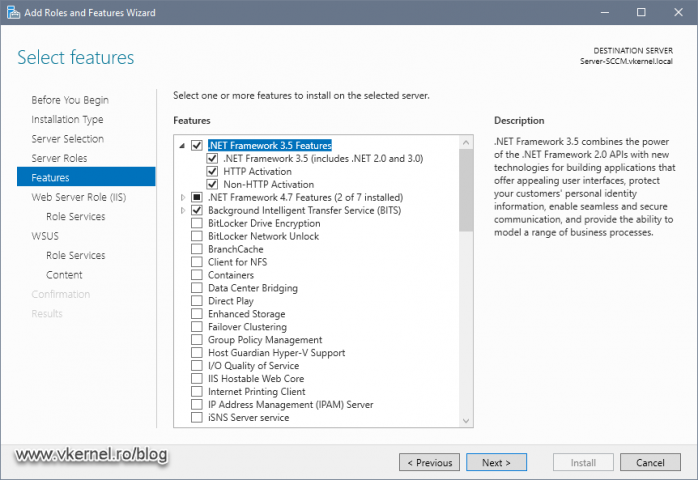
On the next screen of the wizard select .NET Framework 3.5 Features and all sub-features, Background Intelligent Transfer Service (BITS), Remote Differential Compression and click Next.
In the IIS Role Services page, scroll down at the bottom, expand Management Tools > IIS 6 Management Compatibility then tick the IIS 6 WMI Compatibility box.

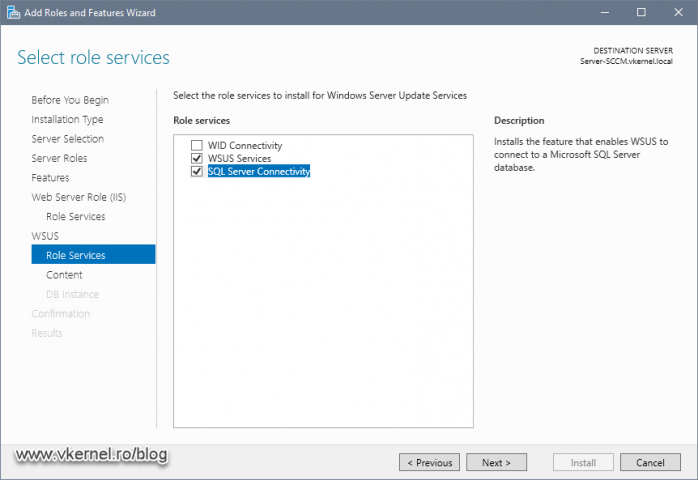
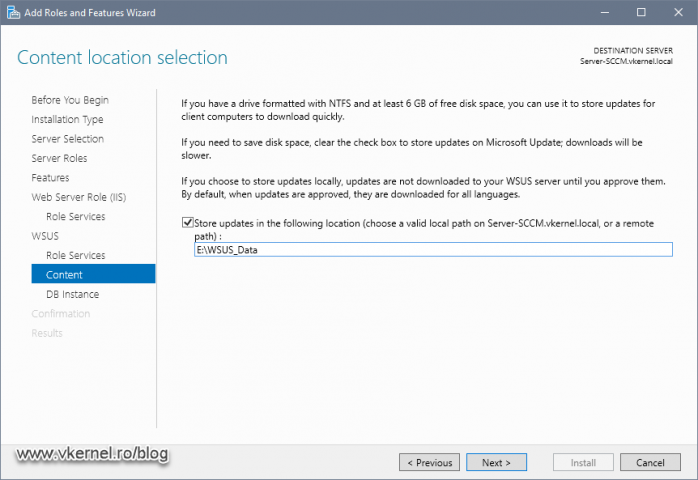
Since we already have a SQL server deployed, we can use it to store our WSUS database. On the WSUS Role services screen select the SQL Server Connectivity option and continue the Add Roles and Features Wizard.
Here we tell WSUS where to store the updates. This is a bit misleading in this case since updates will be stored on the so called SCCM Distribution Point, but we need to set this up so we can continue the wizard.
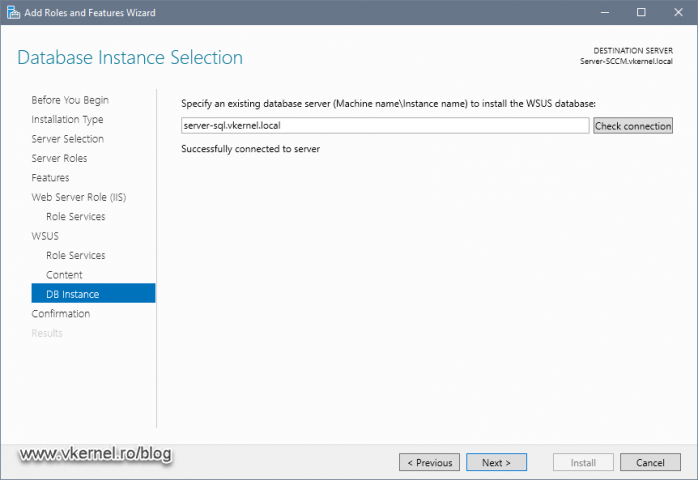
On the next screen of the wizard we configure the SQL server for our WSUS instance.
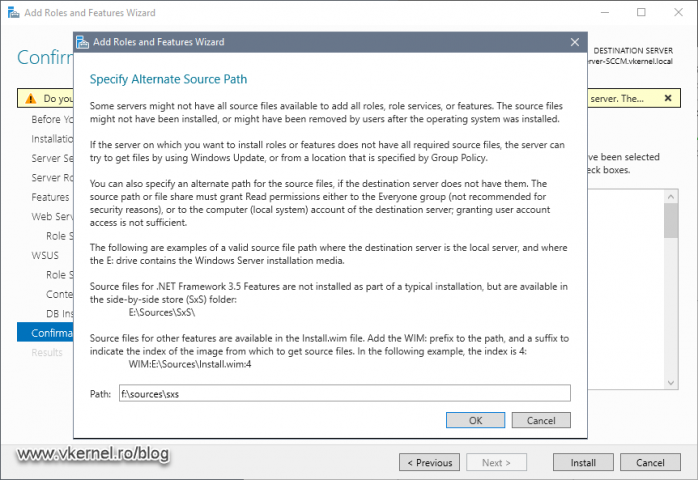
One other thing that I like to do is to provide a custom path for the .NET Framework 3.5 source files. It is way faster than letting the wizard connect to Microsoft’s update site.
Mount the Windows Server 2019 ISO then click Specify and alternate source path link from the bottom of the wizard.
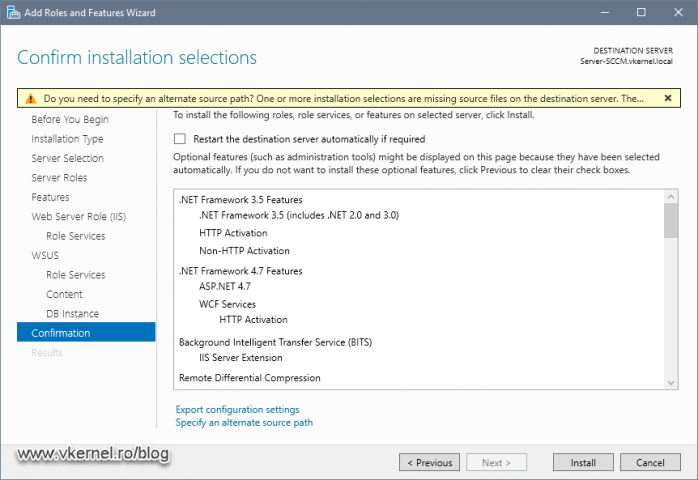
In the Path box type <Windows Server installation media> > sources > sxs and click OK.
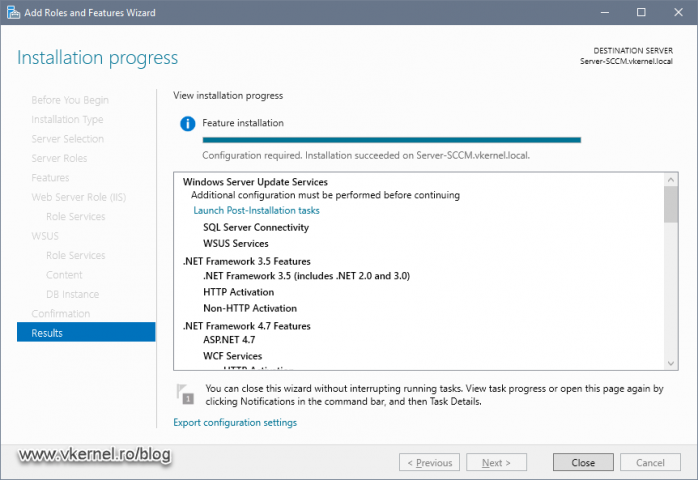
Click the Install button and let the wizard install all the features and roles we selected. After a few minutes everything should be set up. One important thing is NOT to launch the post-installations tasks of WSUS. The role is configure from SCCM after we finish it’s installation, so just hit Close here.
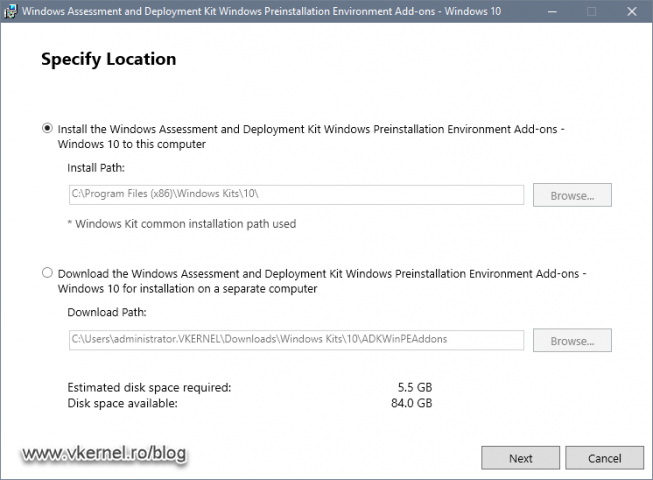
1.7 Installing Windows ADK
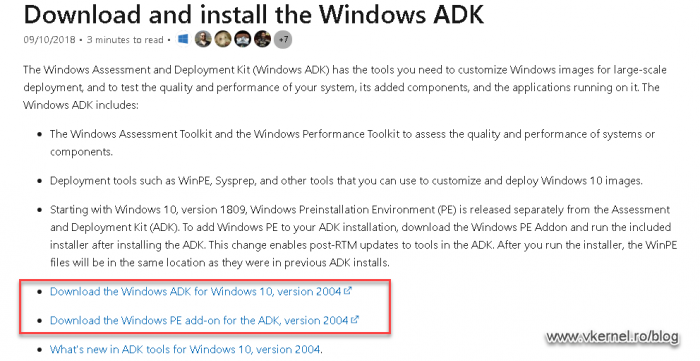
Another SCCM prerequisite that we need to take care of, is the Windows Assessment and Deployment Kit (Windows ADK) which is mandatory as we can see in the prerequisites checker tool. Go and download the latest version of ADK from Microsoft’s website but make sure you download both components of ADK since the Windows PE add-on and ADK were separated starting with version 1809.
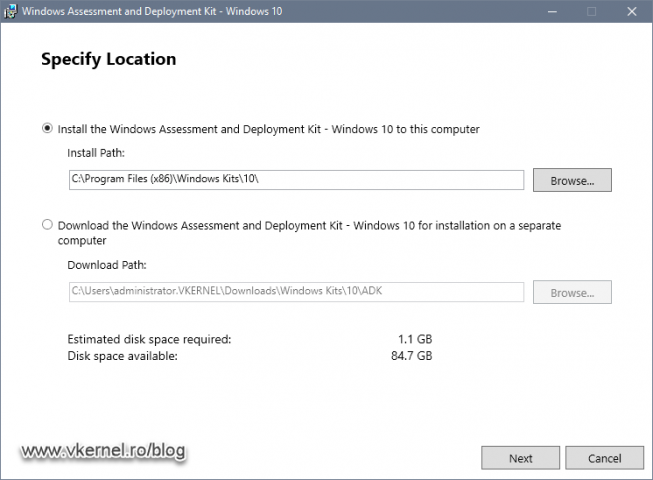
Once both packages were downloaded, let’s run the installation of ADK first by executing adksetup.exe. Right from the start we are given the option to change the installation path of the software, but most of the times the default one will work just fine. Click Next.
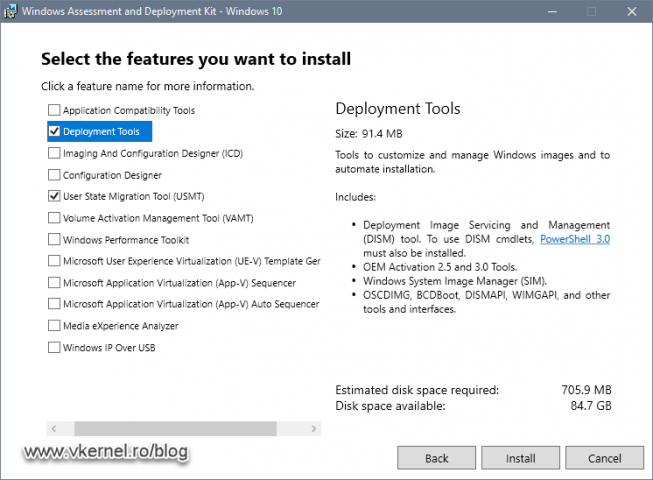
In the Select the features you want to install screen all we need are the Deployment Tools and the User State Migration Tool options. Select just the two then hit Install.
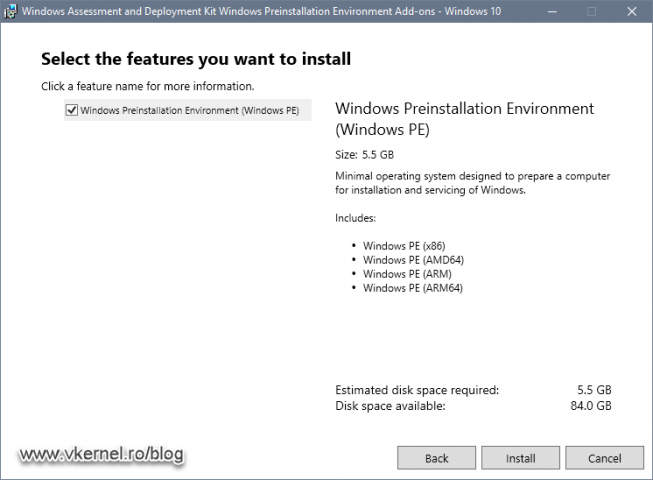
Now let’s go to our Windows PE ADK add-on and run the adkwinpesetup.exe to start the installation wizard. The installer automatically find where our ADK software was installed and it will set itself up to the same installation path with no possibility to change it. Click Next.
In the features screen, all we have is one option. Click the Install button to begin the ADK Windows PE add-on.
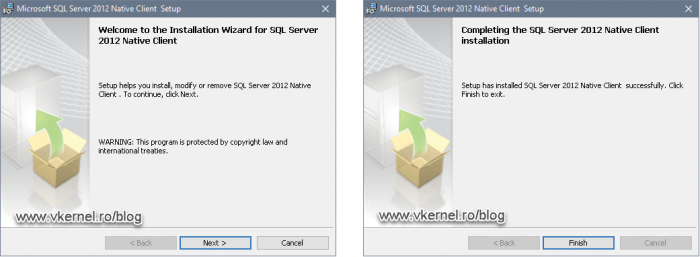
1.8 Installing the SQL Native client
This requirement it’s an easy and fast one. All we need to do, is go and download the SQL Native client installer and run it.
1.9 Re-run the Prerequisite Check
Now let’s take a look and see if we have any more warnings or errors in the prerequisite checker. If we click click the Run Check button again, after a few minutes we should have a green check mark and a message saying that we have passed all the prerequisites. If you have some warning or errors, I recommend you treat them first then continue with the deployment.
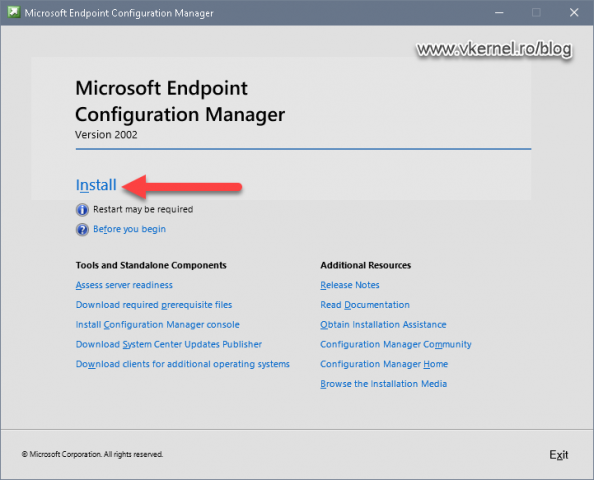
2. Installing System Center Configuration Manager
After a long road of installing and configuring the prerequisites for our SCCM instance, we are finally at the point of deploying it. So go and download the installation media if you don’t have it already, mount the ISO then launch the installer. Once we launch the installer, all we have to do is click the Install button to open the SCCM installation wizard.
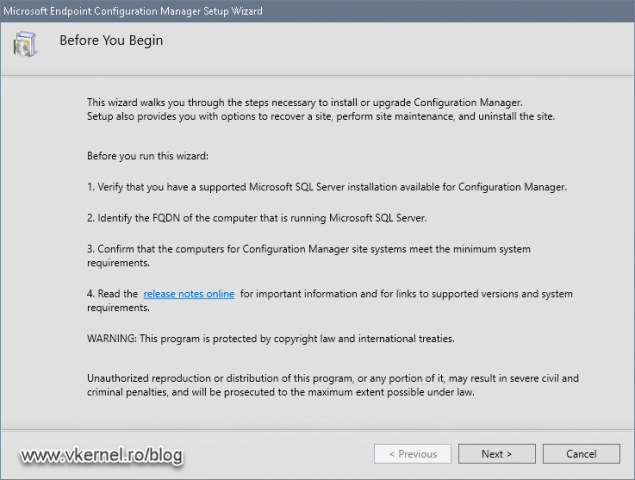
On the Before You Begin page just click the Next button since all the prerequisites are already set up.
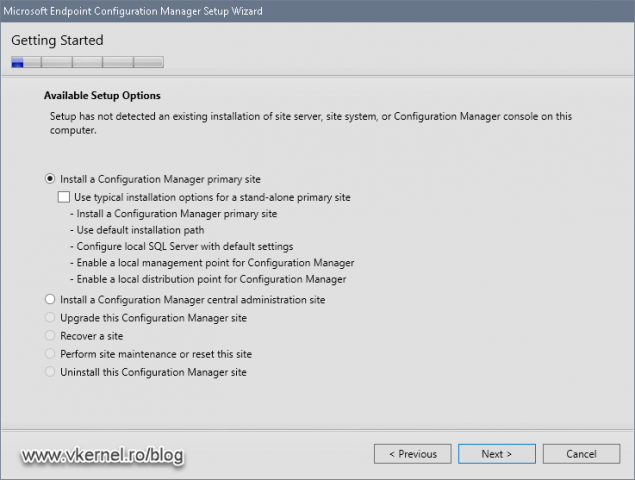
In the next wizard screen we have a few options to choose from on how we want to install SCCM, but since we are deploying just a single primary site, we will go with the default option Install a Configuration Manager primary site. Since I am not a fan of a typical installation, and because we have a dedicated SQL Server for this SCCM instance, we are NOT going to tick the box Use typical installation options for a stand-alone primary site. The second radio button Install a Configuration Manager central administration site, it’s there in case we have a large environment with multiple primary sites. This way we centralize them with an administration site. Click Next to continue the wizard.
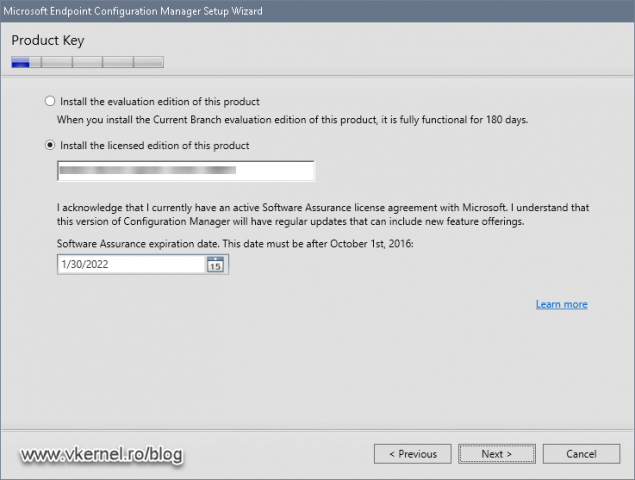
Type the product key and set the expiration of your software assurance then hit Next. If you want to evaluate the product just select the first radio button Install the evaluation edition of this product.
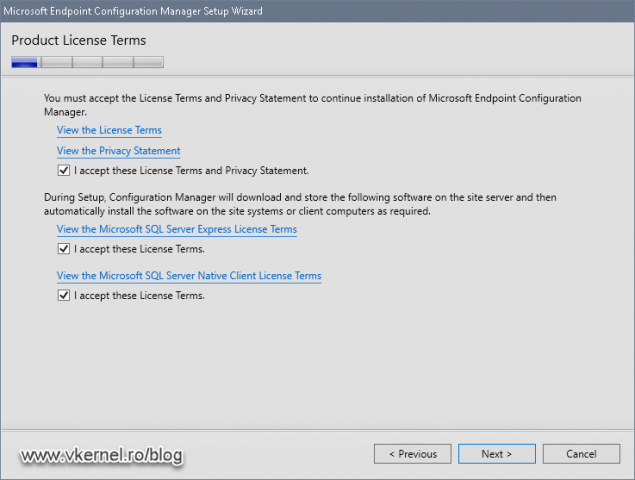
Accept the license agreements and continue the wizard.
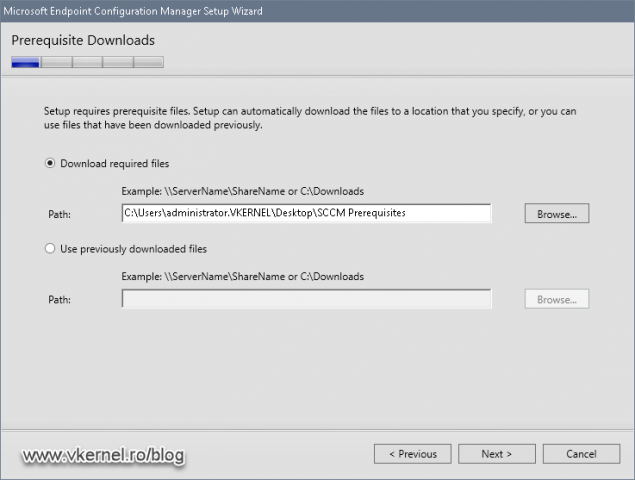
This is where the wizard needs to download some prerequisite files from Microsoft that are needed for the installation, but we also have the choice to use previously downloaded files. Since this is our first deployment, we don’t have those files and we need to download them, so select the option Download required files and then, by using the Browse button, provide a directory to store the files.
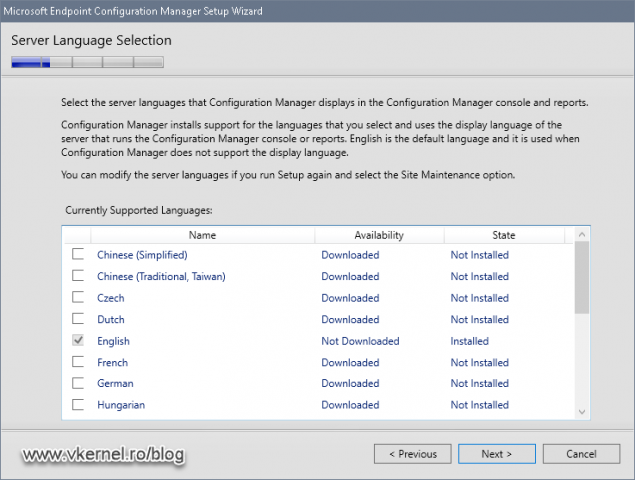
In the Server Language Selection page we have the option to install additional languages for our SCCM server which will change the language on the console and reports.
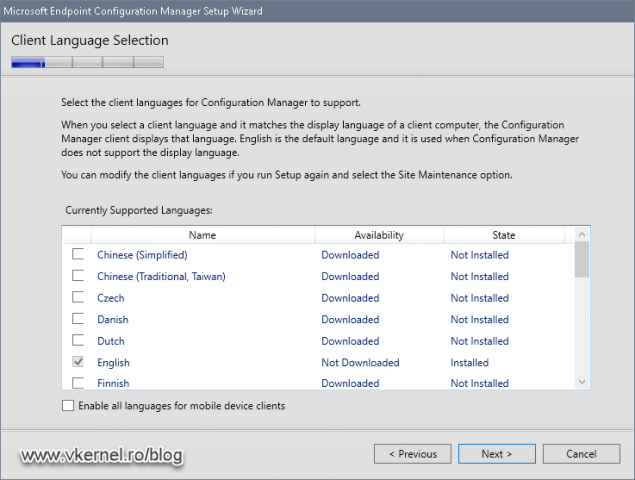
This wizard screen is similar with the previous one, but this time the installed language(s) will apply to the SCCM clients/agents. Make your selection then click Next.
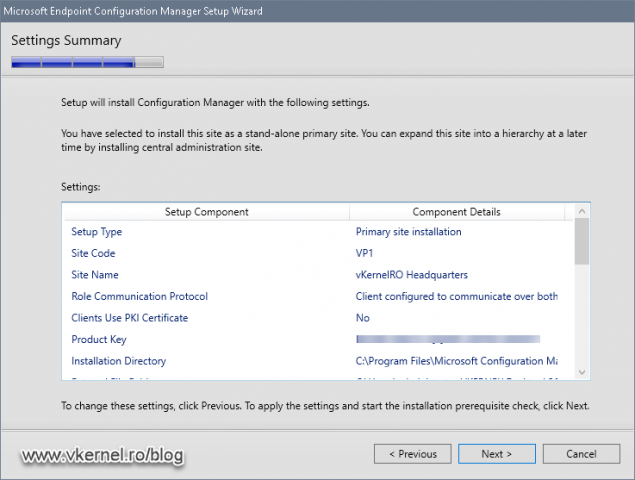
Here we have an important box, and that’s the side code box which uniquely identifies this configuration manager site in the hierarchy. That’s true, we don’t have much of a hierarchy right now with only one server, but the site code still needs to be present and unique. The side code can have only letters from A to Z and numbers from 0 (zero) to 9 and cannot use the following names since they are reserved for Configuration Manager: AUX, CON, NUL, PRN, SMS, ENV. Make sure you give it a thought about what site code you want to type in because it cannot be changed after the installation is done. Type a three letter/number code then move to the Site name box and give this site a name -which will be displayed in the SCCM console-.
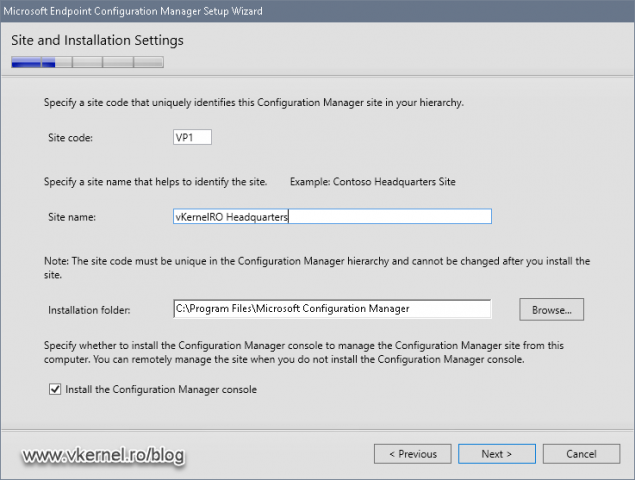
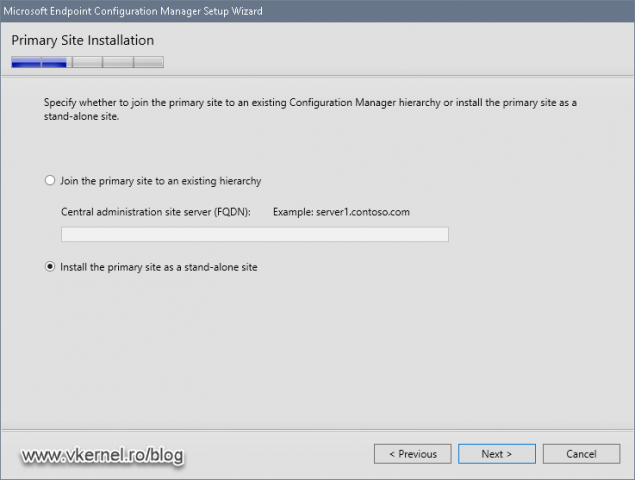
Since this is our first site, and we also don’t have an administration site to join it to, we need to choose the second option Install the primary site as a stand-alone site then continue the wizard. Click Yes on the warring that pops-up.
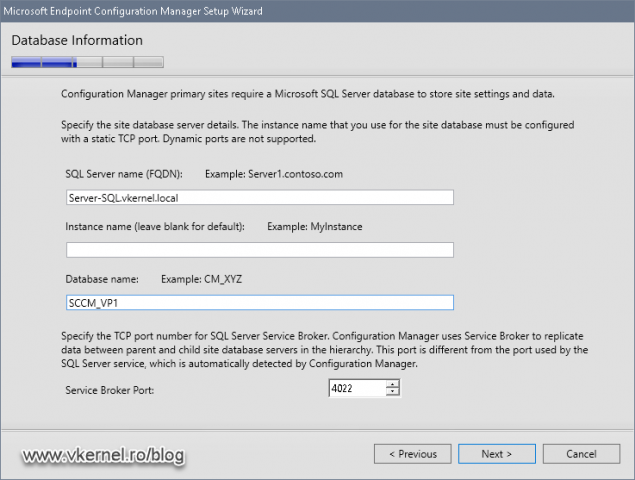
We are now given the option to type in our remote SQL server name, instance and SCCM database. Type your values then click Next.
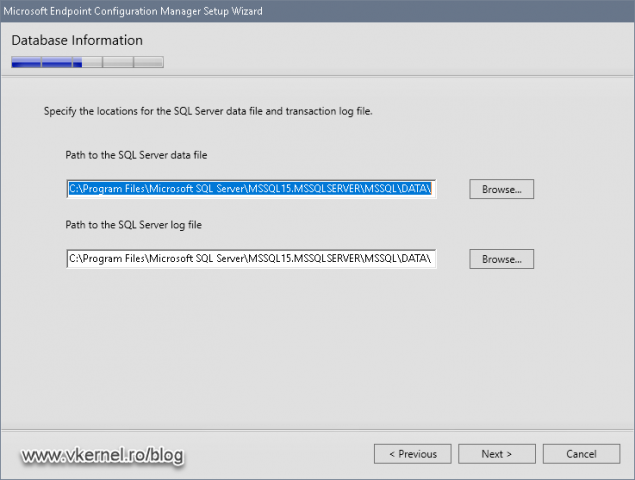
In the Database information screen we have the option to change the default SCCM database and log files location on the remote SQL server. If you have a dedicated volume for your databases on the SQL server, type the new path here.
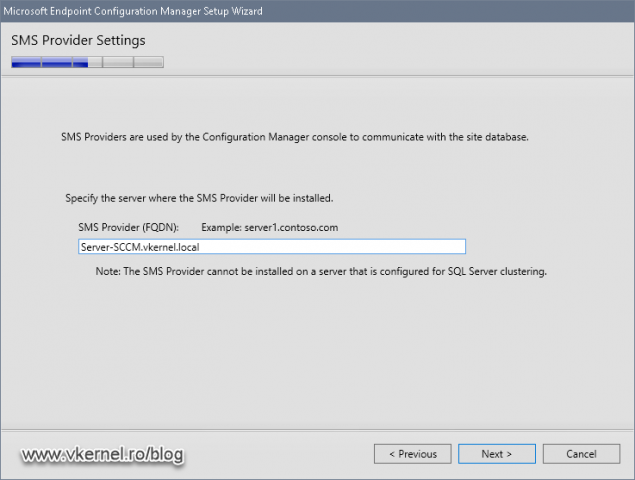
All we have to do here is click Next since we want the SMS provider to be installed on the SCCM server.
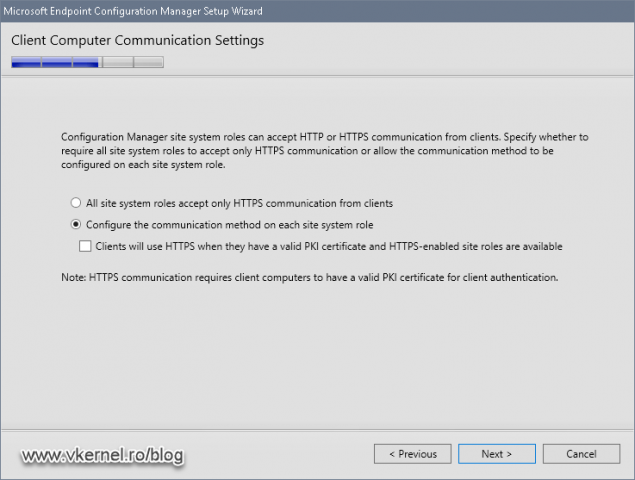
Because we want our clients/agents to be able to communicate with our primary site server, we need to choose the second option here Configure the communication method on each site site role and click Next. Going with HTTPS it’s a little bit complicated and involves deploying certificates to clients and changing some configurations in the SCCM site server(s) that are not always friendly. I will threat this subject in a future article of these SCCM series.
In the Site System Roles screen we have the options to install the management and distribution points on this server or on a different one. Since we want to start small and grow as our infrastructure grows, we are going to install these two site roles on this server. These can be moved later on to a different site server if needed.

In this wizard screen we have no option to configure so click Next to continue.
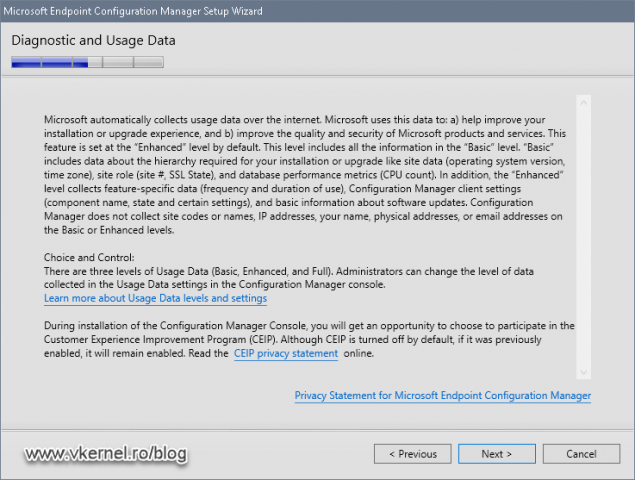
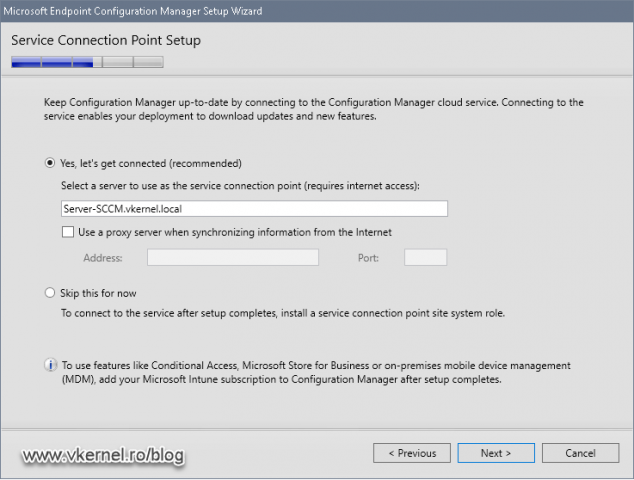
In order to keep SCCM updated with the latest builds and features, we need to connect to the Microsoft cloud. We can do this here in the wizard or later on after the installation completes. For the sake of this example I will just leave the default option so the wizard can configure the connection.
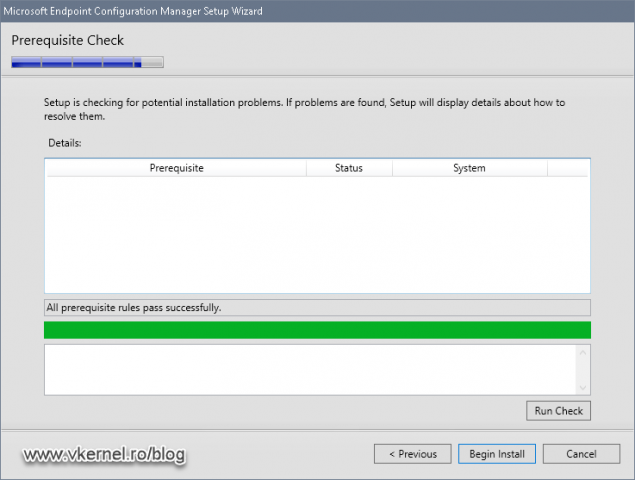
And here is a summary of all our configuration trough the wizard. Click Next and let the wizard have another prerequisite check.
Since we already installed and configured all of the prerequisites for this site system installation, we should have an empty list with no errors or warnings. If that’s not the case, please review and fix the errors/warnings before continuing. You can also ask for help in the comments area.
Click the Begin Install button to start the SCCM installation.
Once the installation starts, the wizard will show all the steps that is doing. We also have a log view button just in case we need more details about the deployment.
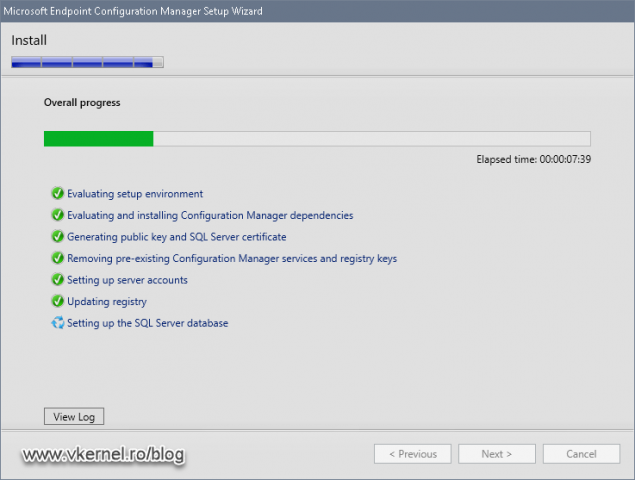
Depending on the system, the installation can take anywhere between 40 and 90 minutes and in the end we should have a nice success message. If everything is green, the installation was a success.

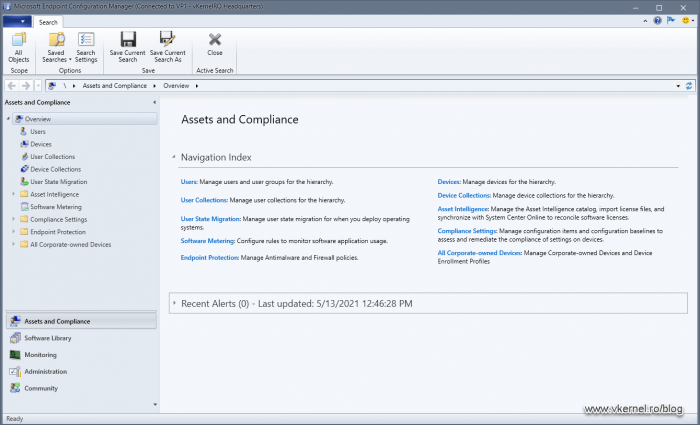
And from the Start menu we can open the console and view our first SCCM Primary site system.
Summary
In this article we have successfully installed our first SCCM Primary site which was not that easy if you are just starting to learn the product. Beside the multitude of software prerequisites we also had to do a lot of configurations. The thing that helps with all of this is the prerequisite checker, which I encourage you to use. Let me know in the comments area how your installation worked.
Want content like this delivered right to your
email inbox?
Microsoft System Center Configuration Manager (SCCM) is a systems management tool. Learn everything you need to know about it in this article.
Microsoft System Center Configuration Manager (SCCM) is a systems management tool designed for monitoring network devices that was recently updated by a new tool called Microsoft Endpoint Configuration Manager (MECM)
The decision to redesign SCCM surprised many given the number of enterprises that relied on the program.
In this article, our main goal is to look at what SCCM is, and while we’ll briefly take a look at the Microsoft Endpoint Configuration Manager rebrand, the main focus will be on the original SCCM most enterprises are familiar with.
What is SCCM?
Before SCCM was rebranded as Microsoft Endpoint Configuration Manager, it was an application designed for managing Windows and Mac OS computers, Linux/Unix servers, and mobile devices using Windows/iOS/Android.
Some of the features SCCM could be used for include:
- OS deployment Create images of operating systems and deploy them.
- Remote Control An administrator can take control of a remote device to troubleshoot if a device experiences performance issues.
- Maintenance Windows A user can define a time when configuration management can be completed on a collection of devices (i.e. carry out updates when they won’t affect productivity).
- Integration with Microsoft Intune Manage mobile devices for iOS, Android, and Windows with Microsoft Intune.
- Scheduling Schedule updates to make sure that your network infrastructure is periodically updated (useful for minimizing vulnerabilities).
- Reporting Create reports on systems for further information on patch status. For example, you can create a report on systems that have missed patches.
- Endpoint protection Manage anti malware policies and firewall security from one location to protect computers.
For example, you could distribute updates to Windows 10 devices throughout your entire network. SCCM is a staple for many enterprises because it offers an efficient means of updating multiple devices.
SCCM is part of the System Center family of products, which includes tools such as:
- System Center Operations Manager
- System Center Data Protection Manager
- System Center Virtual Machine Manager
- System Center Service Manager
- System Center Capacity Planner
- System Center Mobile Device Manager
- System Center Essentials
SCCM is sometimes mistaken for Microsoft System Center Operations Manager (SCOM), a platform used for monitoring the health and performance of systems. The main difference between the two is that SCCM is used for configuration management and SCOM is used to monitor applications and services.
Why Do I Need to Use SCCM?
Using SCCM is a good idea if you’re in need of a solution for configuring and managing systems in an enterprise network environment. SCCM provides you with a single tool to deploy installations to multiple devices which streamlines the hardware management process.
Overseeing the updates and configurations of devices from a top-down viewpoint saves you from having to manage devices individually on every single device. There’s manual work to do as you can manage everything from one location.
Creating an inventory of hardware and software, updating OS’s, deploying applications, monitoring configurations, and managing endpoint protection (anti-malware) are just some of the things that you can use the software for.
Windows Management / Patch Management
Windows management or patch management is one of the main use cases offered by SCCM. With SCCM you can manage Windows devices and remotely update software. The program uses Microsoft WSUS to check for updates and deploy patches to devices.
Through one console you can maintain multiple Windows devices, and schedule/deploy patches to devices periodically. From a security standpoint, deploying patches is essential for keeping your software updated and reducing the likelihood of a cyber attacker exploiting a vulnerability.
Patches run in the background to minimize disruption. However, it is important to note that the patch management capabilities offered by SCCM do have limitations. One of the most significant is the limited support for third-party patching.
The inability to patch third-party applications leaves open vulnerabilities that can be exploited by attackers. Issues like this can be fixed by using external tools, such as SolarWinds Patch Manager or ManageEngine Connect Plus, which extend SCCM’s patching for third-party applications.
Endpoint Protection
Endpoint protection is another main function of SCCM. SCCM enables you to configure anti-malware policies and firewall settings, set automatic deployment rules for software updates, configure Endpoint Protection client configurations, send notifications, and more.
Essentially you can create anti-malware policies and then deploy them to devices throughout your network. From then onward you can monitor endpoints with activity reports. For example, you can create an Antimalware Activity Report that tells you about the security status of your infrastructure (see the next section for more information on reports).
There are also malware alerts. Alerts notify you about the presence of malicious activity in the network and can be seen through the dashboard or sent to individual users. You can configure your own alert conditions to determine when notifications will be generated and set the severity of the alerts.
Reporting
Another key function of SCCM is report creation. SCCM comes with out-of-the-box reports for monitoring devices throughout the network. The default reports cover everything from asset management to vulnerability assessments and user data. In order to run reports, you need to have the appropriate permissions. Reports are customizable so you can pick which information to monitor.
You can edit reports with the Report Builder. The Report Builder gives you the option to add visual elements like charts, maps, sparklines, and data bars for greater clarity. It is important to note that the Report Builder must be installed from SSRS or Microsoft websites.
The reporting features offered by SCCM are extremely valuable from a regulatory compliance perspective and display that systems have been updated. Once you’ve completed a report you can export it in a PDF, CSV, or Microsoft Excel format.
Why is SCCM now Microsoft Endpoint Configuration Manager? And What is Microsoft Endpoint Manager?
Recently, Brad Anderson, Corporate Vice President for Microsoft 365 announced the decision to rebrand SCCM and combine it with Microsoft Intune, a mobile management solution to form Microsoft Endpoint Manager.
SCCM has now been renamed to Microsoft Endpoint Configuration Manager and is one of several services that make up Microsoft Endpoint Manager including Device Management Admin Center (DMAC) and Desktop Analytics.
The rebrand took place in an attempt to provide users with a complete endpoint management solution for cloud environments with intelligence features. In other words, the update was designed to give enterprises the features they need to thrive in the modern workplace with all the range of devices making their way into the workplace.
The Benefits of Using SCCM
Using SCCM brings to the table a number of benefits for enterprises managing a network full of devices:
- Unified management of Windows endpoints
- Integration with Windows systems
- Simple to administrate (compare to other tools like Chef and Puppet)
Perhaps the biggest advantage is that SCCM unifies the management of Windows endpoints. An administrator can manage dozens of devices through a single platform, push updates to devices, and update configurations remotely. Having a configuration management tool saves time that would be lost manually updating devices.
Overall administration is also much easier. An administrator has access to an inventory of IT assets without having to create one manually. Having a clear inventory enhances visibility and enables the user to keep systems compliant more easily.
From a security standpoint, being able to identify and fix non-compliant systems reduces cybersecurity risks and helps to ensure compliance with industry regulations. As the WannaCry outbreak showed enterprises in 2017, unpatched devices can have a devastating impact on a company’s operations.
The Limitations of SCCM
While SCCM is a very useful tool it does have some substantial limitations:
- Support is limited for non-Windows devices
- Limited support for third-party application patches
- Pricing is complex and expensive
Given that SCCM was designed for Windows devices there is limited support for Mac and Linux tools. You must have a Windows server to run the platform, which immediately rules out many cross-platform environments. SCCM is recommended to users whose infrastructure is dominated by Windows devices unless you want to do additional manual patching.
As we noted further above, there’s also limited support for third-party application patching. SCCM is largely ineffective at patching third-party applications. This is a substantial weakness given that third-party software still needs to be secured, and can be used as an entry point to a network by cyber attackers.
Finally, the pricing of SCCM can be costly for enterprise users. Individual client licenses range from $41 (£33) for the Client ML to $430 (£353) for the Enterprise ML version. When you can consider the cost alongside the limitations in third-party patching and limited support for non-Windows devices, it’s a lot of money for incomplete coverage.
Microsoft Intune vs SCCM
One solution that’s often compared with SCCM is Microsoft Intune. Before Microsoft Intune was merged into Endpoint Manager alongside SCCM, the former was a cloud-based mobile device management and system management solution. The intention behind the program was to equip customers to manage cloud-based infrastructure.
Features include:
- Bring Your Own Device (BYOD)
- A central admin portal
- Application Level Management
- Integration with SCCM
- Microsoft Malware Protection Engine
- Reporting
The key difference between SCCM and Intune is that the former was aimed at managing on-premises infrastructure, while the latter was aimed at cloud-based services. SCCM has some key advantages over Intune:
- You can manage systems that aren’t connected to the internet
- You don’t need to use Microsoft Cloud
- You can manage Windows Servers
In contrast, Intune has a number of advantages over SCCM:
- Mobile device management (MDM) for mobile devices
- You don’t need local infrastructure
- You don’t need to maintain the program or infrastructure
It’s important to note that you don’t need to choose between the two, even though it’s useful to have an idea of each solution’s strengths. Combining the two gives users a lot more co-management options to work with. The user can combine both to manage on-premise and cloud-based infrastructure from computers to mobile devices, and applications.
Is SCCM Dead?
SCCM has a long way to go before it’s obsolete. Microsoft still supports the software and while the rebranding to MECM may have changed the nature of endpoint management with a new cloud-based console, the SCCM capabilities enterprises are familiar with are still there. The addition of intelligent features and analytics will only serve to enhance the device management process.
For now, SCCM or MECM still has a significant role to play in managing configurations and OS deployments. As more updates roll out in the foreseeable future we can expect to see configuration management capabilities grow with the needs of enterprises.
SCCM FAQs
What is SCCM used for?
SCCM is the System Center Configuration Manager from Microsoft. It is designed to support operating systems and software packages produced by Microsoft. The system is concerned with the security and availability of software within a business. Two of the major functions of SCCM are software distribution and installation and patch management. The package also has some security management tools included.
What is SCCM called today?
In 2019, Microsoft introduced the Microsoft Endpoint Manager with version 1910 of Windows. SCCM is now part of this package and it is called Microsoft Endpoint Configuration Manager (MECM).
What are the SCCM services?
Microsoft Systems Center Configuration Manager (SCCM) provides the following services:
- Centralized endpoint management
- Remote control
- Operating system deployment
- Hardware inventory
- Software inventory
- Software distribution
- Patch management
- Network access protection
Введение
Прежде, чем приступить к установке и настройке System Center Configuration Manager, давайте немного уделим времени паре пунктов. Во-первых, для чего же нужен этот продукт. Во-вторых, очень важно не упустить некоторые подготовительные работы. Иначе у вас просто не получится запустить нужные программы и утилиты. Сразу предупредим вас, что процесс займёт достаточно длительное время — если вы спешите, то не приступайте к выполнению действий. Установка System Center Configuration Manager 2012 r2, то как этот configuration manager client запустить, настроить и удалить, рассматривается ниже (если вы уже ранее подготовили свою систему).

System Center Configuration Manager 2012 r2 — это очень хорошая программа, которая поможет вам управлять своими ресурсами более продуктивно
Продукт System Center Configuration Manager 2012 r2 представляет собой сферу для регулирования инфраструктуры IT, основываясь на Microsoft Windows и смежных устройствах. Что же может делать пользователь или разработчик в этой системе? Например, можно регулировать обновления, разворачивать программное обеспечение и операционные системы, управлять удалённым доступом и делать другие подобные вещи. На сегодняшний день последней версией этого продукта является выпуск 2012 года — это System Center Configuration Manager 2012 r2. Именно на примере этой версии мы сегодня и рассмотрим все нюансы использования программного обеспечения. Для начала мы проведём некоторые подготовительные работы. Так сказать, приведём «почву» к нужной консистенции, прежде, чем сажать туда семена.
Подготовительные настройки
Добавление ролей и компонентов

- Во-первых, нужно определиться с системными требованиями программы: вы должны иметь Windows Server 2008 или SQL Server 2008 с соответствующими обновлениями. То же самое касается и поддерживаемых клиентских операционных систем — Windows XP, Vista, 7, 8, Server 2003, 2008, 2012 или MacOS. Везде должны быть установлены последние требуемые для работы SCCM обновления ПО.
- Во-вторых, нам потребуется добавить специальные компоненты для корректной работы. Для этого запустите «Диспетчер серверов» (или server) на компьютере или ноутбуке.
- На верхней панели инструментов нажмите на кнопку «Управление» и в появившемся списке выберите «Добавить роли и компоненты».
- Теперь перед вами будет открыто диалоговое окно мастера добавления ролей и компонентов. После ознакомления с представленным текстом нажимаем «Далее».
- Так как нам не нужна установка служб удалённых рабочих столов, мы выбираем первый пункт «Установка ролей и компонентов». Подтверждаем свой выбор уже знакомой кнопкой «Далее».
- На следующей странице нам нужно будет выбрать сервер из пула серверов. Кликаем один раз на нужный нам из специального списка в таблице и кликаем на «Далее».
- В окне ролей сервера по умолчанию стоит галочка в пункте файловых служб и хранилищ. Больше ничего мы не отмечаем дополнительно и нажимаем «Далее» для перехода на следующую страницу.
- В выборе компонентов нам уже придётся выбрать ещё несколько пунктов, помимо стандартного отмеченного — функции NET Framework5, фоновая интеллектуальная служба передачи, удалённое разносное сжатие и средства удалённого администрирования Server. Потом можете двигаться дальше.
- На девятом шаге открывается мастер по установке ISS, в котором вам нужно будет отметить ASP.NET5 и 4.5. Также отметьте проверку подлинности Windows, совместимость WMI и IIS6. Нажимаем «Далее».
- Итак, мы добрались до финишной черты, где нужно нажать долгожданную кнопку «Установить». Теперь осталось дождаться окончания процесса, после чего можно будет приступить к подготовке SQL.
Настройка SQL 2012
- Для начала запускаем установочный файл. После этого запустится окно центра установки SQL Server. Нажимаем на «Установка».
- Естественно, это у нас новая установка изолированного экземпляра, поэтому выбираем соответствующий пункт в перечне.
- Далее правила поддержки определят некоторые ошибки или проблемы, которые могут появиться в дальнейшем. Если таковых у вас не будет, то нажимаем ОК. В противном случае эти неполадки потребуется устранить самостоятельно.
- На следующем этапе программа потребует вести ключи продукта. После ввода нажмите на «Далее».
- Ознакомьтесь с условиями лицензии на устанавливаемое ПО. Если вы соглашаетесь с ними, то поставьте галочку ниже и кликните «Далее».
- Теперь установите флажок для включения обновления SQL Server (если программа сама предложит), затем нажимаем «Далее».
- Дожидаемся завершения операции и переходим к следующему окну, где потребуется установить компоненты. Ставим галочку, отмечаем ниже представленные пункты и нажимаем «Далее».
- Службы компонента Database Engine
- Службы Reporting Service
- Средства управления
- В окне экземпляра ничего не трогаем и переходим к следующему окну требований и к свободному месту. Здесь просто будет указан факт возможности установки на жёсткий диск. Поэтому можно идти дальше.
- Выбираем имя, от которого будет производиться запуск службы и переходим в следующее диалоговое окно.
- Итак, окно с конфигурацией сервера. Здесь будут представлены две вкладки: учётные записи служб и параметры сортировки. Кликаем по второй и вводим туда следующий Database Engine: SQL_Latin1_General_CP1_CI_AS. Идём далее.
- Теперь назначаем администраторов SQL сервера с помощью кнопки «Добавить» и переходим в следующий раздел.
- В основном режиме служб Reporting Services должен стоять пункт «Установить и настроить». Идём дальше.
- Можете при желании выбрать пункт об отправке ошибок в корпорацию Microsoft. Это необязательно, поэтому остаётся на ваше усмотрение.
- Проверяем окно правил конфигурации установки и нажимаем «Далее», если никаких ошибок нет.
- Ну и предпоследний шаг — посмотреть отчёт выбранных параметров и нажать заветную кнопку «Установить».
- После окончания процесса установки, закрываем программу. Для полного завершения вам нужно будет самостоятельно поставить SP и CU для SQL Server, а потом интегрировать с AD.

Установка и настройка System Center Configuration Manager 2012 r2
Как установить?
- Запустите установочный файл. В окне приветствия ознакомьтесь с текстом и переходите к следующему.
- В новом окне установите флажок возле первого пункта «Установить первичный сайт Configuration Manager» и нажмите «Далее».
- Теперь выберите тип лицензии на устанавливаемый продукт. Если у вас есть специальный ключ, который вы ранее приобрели, то отметьте установку лицензированной версии. В противном случае выберите первый вариант.
- Следующее окно покажет вам лицензионное соглашение, которое мы принимаем соответствующей галочкой и кликом по кнопке «Далее». Обратите внимание, что дальше вам нужно будет повторить похожий процесс.
- Итак, мы дошли до загрузки необходимых компонентов. Выбираем подходящий пункт галочкой и двигаемся вперёд.
- Если вы выбрали способ с загрузкой новых файлов из сети, то дождитесь, пока загрузчик скачает необходимые документы, которые доступны для просмотра в папке.
- Затем появятся по очереди два окна выбора языков программы и клиента (client) — отмечаем нужные и идём дальше.
- Мастер установки требует указать код сайта, который потом исправить будет нельзя. Вот почему рекомендуется не писать его просто так, а только хорошо обдумав пароль. Также напишите имя сайта, поставьте галочку возле установки консоли внизу окна и нажимайте «Далее».
- В окне установки первичного сайта выбираем второй пункт (как автономный сайт). Если у вас уже существует определённая иерархия, то отметьте первый вариант и напишите полное доменное имя (сервер сайта центра администрирования).
- При необходимости заполните поля в окне сведений о базе данных и двигайтесь дальше.
- Напишите имя сервера, где нужно будет подключить поставщик SMS.
- Пришла пора установить параметры связи: если протокол HTTPS вы не собираетесь применять, как непосредственный метод, то ставим кружок на втором пункте. В противном случае — на первом. Идём дальше.
- Теперь укажите, должна ли программа мастера установить точку управления или точку распространения путём заполнения полного доменного имени.
- В следующем окне вы увидите сводку параметров, которую желательно перепроверить, чтобы потом не кусать локти за свои ошибки. Нажимаем «Далее» и дожидаемся окончания процесса установки.
- Если у вас возникли какие-либо ошибки в это время, то их стоит непременно ликвидировать. Только потом повторить попытку.
Как настроить?
Чтобы установить основные параметры, нужно запустить System Center Configuration Manager 2012 r2. Здесь вам потребуется настроить некоторые типы обнаружения, а именно:
- Heartbeat, который по умолчанию включается автоматически.
- Метод обнаружения в лесах AD, с помощью которого вы можете установить границы сайта AD и подсетей IP в автоматическом порядке.
- Группы AD, способ которых занимается их извлечением.
- Система обнаружения активной директории предоставляет пользователю получение информации о ПК, а именно, его имя, адрес, сайт AD и другие данные.
- Пользователи AD. Их обнаружение предоставляет сведения об учётных записях пользователей.
- Сетевые ресурсы, источником информирования которых является специальный маршрутизатор через протокол SNMP.
Любое из этих обнаружений можно без проблем настроить путём нажатия правой кнопкой мыши по выбранному методу. Затем выберите «Свойства» и поставьте галочку напротив пункта о включении. Можете здесь же установить параметры конфигурации при необходимости и нажать ОК.
Как удалить Configuration Manager Client
- Чтобы удалить Configuration Manager Client нужно запустить командную строку.
- Для этого откройте меню «Пуск» на нижней панели инструментов на рабочем столе компьютера или ноутбука.
- В поле поиска введите «Командная строка» и с помощью найденного ярлыка приложения запустите исполнительный файл.
- В окне программы введите: Ccmsetup.exe /uninstall.
- Теперь нажмите клавишу ввода «Enter».
- Обратите внимание, что вы не будете видеть, как происходит само удаление. То есть, никаких ползунков, процентов выполненной работы или других показателей продвижения процесса перед вами не покажутся. Чтобы убедиться в том, что вам удалось удалить System Center Configuration Manager 2012 r2, найдите журнал CCMSetup.log, находящийся в папке «ccmsetup» по пути %windir%\system32\. В этом файле и будет представлена вся необходимая информация.

Подведём итоги
Дорогие друзья, сегодня мы с вами попытались установить, запустить и настроить System Center Configuration Manager 2012 r2. Также мы рассмотрели, как удалить Configuration Manager Client в случае необходимости. Надеемся, что у вас всё получилось. Делитесь в комментариях своей историей о том, как прошла ваша установка System Center Configuration Manager 2012 r2.
System Center Configuration Manager (ранее Systems Management Server, SMS) — продукт для управления ИТ-инфраструктурой на основе Microsoft Windows и смежных устройств. Configuration Manager предоставляет такие основные возможности: управление обновлениями, развёртывание ПО и операционных систем, интеграция с NAP, инвентаризация аппаратного и программного обеспечения, удалённое управление, управление виртуализированными и мобильными системами на базе Windows.
В SCCM технологии и функциональные возможности, реализованные в прежних версиях SMS, подверглись значительной переработке.
История версий[]
- 1994 — Microsoft Systems Management Server 1.0
- 1995 — Microsoft Systems Management Server 1.1
- 1996 — Microsoft Systems Management Server 1.2
- 1999 — Microsoft Systems Management Server 2.0
- 2003 — Microsoft Systems Management Server 2003
- 2007 — System Center Configuration Manager 2007 [Changed from: Microsoft Systems Management Server version 4]
- 2007 — System Center Essential 2007 (комбинация Microsoft SCOM и SMS серверов)
- 2010 — System Center Essential 2010 (комбинация Microsoft SCOM и SMS серверов)
- 2012 — System Center 2012 Configuration Manager
System Center Configuration Manager[]
Configuration Manager RTM
- Выпущен в сентябре 2007
- Значительное обновление SMS 2003
- Расширенный список возможностей
Service Pack 1
- Выпущен в апреле 2008
- Полная поддержка Windows Server 2008/Vista SP1
- Asset Intelligence 1.5
- Интеграция с Intel vPro
R2
- Выпущен в августе 2008
- Application Virtualization Management
- Интеграция с SQL Reporting Services
- Client Status Reporting
- Интеграция с Forefront Client Security
- Расширение возможностей развертывания ОС
Service Pack 2
- Выпущен в ноябре 2009
- Полная поддержка Windows Server 2008R2/Windows 7
- Поддержка Intel vPro 5й версии
- Обновлён Asset Intelligence
Функциональные возможности SCCM[]
System Center Configuration Manager[]
- Инвентаризация аппаратных компонентов и программного обеспечения
- Автоматизированное развертывание ПО
- Управление обновлениями ПО
- Мониторинг использования ПО
- Мониторинг конфигураций
- Развертывание операционных систем Microsoft Windows
- Управление мобильными устройствами на базе Windows Mobile и Windows CE
- Удаленное управление
- Управление виртуализированным ПО
Configuration Manager Service Pack 1[]
Поддержка Windows Server 2008
- Поддержка планирования, развертывания и управления Windows Server 2008
- Поддержка в качестве системы сайта SCCM
Поддержка Vista SP1
- Поддержка планирования, развертывания и управления Windows Vista Service Pack 1
Asset Intelligence 1.5
- Значительно обновлён
- Изменения в консоли администратора
- Поддержка новых каталогов и лицензий
- Синхронизация с System Center Online
Интеграция с Intel AMT
- Функциональная интеграция с Intel vPro Technology
Инфраструктура для поддержки R2
- Обновлённые компоненты Service Pack 1 содержат основу для развертывания R2
Изменения по заявкам Заказчиков
- Некоторое количество изменений по заявкам Заказчиков
Набор исправлений
- Набор исправлений (Hotfixes)
Выпущено накопительное обновление 3 для System Center Configuration Manager SP1 Накопительное обновление 3 для System Center Configuration Manager 2012 SP1 теперь доступно для загрузки как KB2882125. Это обновление содержит обновлённую версию клиента Endpoint Protection, а также в него добавлена поддержка клиентов Windows 8.1.
Configuration Manager R2[]
Управление виртуализованными приложениями
- Интеграция с Microsoft Application Virtualization
Новые возможности OSD
- Поддержка Multicast и «неизвестных» компьютеров
Отчётность о состоянии клиентов
- Сводка по ключевым показателям активности клиентов
Интеграция с SQL Reporting Services
- Миграция встроенных отчётов ConfigMgr на новую платформу
Интеграция с Forefront Client security
- Статус клиентов Forefront через DCM
Архитектура System Center Configuration Manager[]
С логической точки зрения все управляемые системы объединяются в сайты (площадки).
Сайты содержат в себе:
- серверы сайта;
- системы сайта, выполняющие определенные роли по управлению инфраструктурой;
- собственно управляемые клиенты.
Каждый из серверов сайта должен иметь доступ к базе данных Microsoft SQL Server. Сайты могут подразделяться на административные (Administrative Site), основные (Primary Site) и дополнительные (Secondary Site), в SCCM 2012 все сайты имеют собственную базу данных.
Сайты также образуют иерархию родительских (Parent Site) и дочерних (Child Site). Каждый дочерний сайт имеет только один родительский сайт. Дочерние сайты, в свою очередь, могут иметь свои дочерние сайты и так далее. Вторичные сайты не могут быть родительскими.
Microsoft System Center Configuration Manager (SCCM) is a Windows product that enables the management, deployment and security of devices and applications across an enterprise. Amongst other potential uses, administrators will commonly use SCCM for endpoint protection, patch management and software distribution. SCCM is part of the Microsoft System Center systems management suite.
The SCCM integrated console enables management of Microsoft applications such as Application Virtualization (App-V), Microsoft Enterprise Desktop Virtualization (Med-V), Citrix XenApp, Microsoft Forefront and Windows Phone applications. All these applications can then be managed by a single location.
System Center Configuration Manager relies on a single infrastructure, with the goal of unifying physical and virtual clients under one umbrella. SCCM also adds tools to help IT administrators with access control. SCCM discovers servers, desktops and mobile devices connected to a network through Active Directory and installs client software on each node. It then manages application deployments and updates on a device or group basis, allowing for automated patching with Windows Server Update Services and policy enforcement with Network Access Protection. System Center Endpoint Protection Manager is built into System Center Configuration Manager to secure data stored on those devices.
Core features of Microsoft SCCM
Some core features in Microsoft System Center Configuration Manager include:
- Windows management — to keep pace with updates to Windows 10.
- Endpoint protection — to provide identification and malware protection.
- Reporting — to present information on users, hardware, software, applications and software updates.
- Operating system (OS) deployment — to distribute operating systems to devices in an enterprise.
- Software update management —which allows users administrators to deliver and manage updates to devices across an enterprise.
- Application delivery —which allows administrators to deliver an application to all devices across an enterprise.
- Health monitoring — which shows client activities and health in the console, and can alert users if health statistics decrease past a specified level.
Several key features of System Center Configuration Manager help administrators address the bring-your-own-device (BYOD) trend in enterprise organizations, including user-centric management. End users can search for applications with a self-service software center and specify times when installations and upgrades take place. IT administrators can install applications on different devices. For example, SCCM can be used to install a native application on a primary device, as a Remote Desktop Services app, or as an App-V program on a tablet. SCCM also includes role-based access control (RBAC), which enhances system security by only showing end users the interface elements that apply to their specific roles as defined by Active Directory.
SCCM Vs. SCOM
Microsoft System Center Configuration Manager is similar to Microsoft System Center Operations Manager (SCOM). The two can be easily confused upon first appearances. SCOM allows system and application administrators to deploy, configure, manage and monitor operations, services and applications of many devices. SCOM does this within an enterprise through a management console.
SCCM and SCOM are both Microsoft enterprise applications. SCOM, however, focuses on enterprise monitoring on the server-side. SCCM, instead, is not considered a monitoring application and focuses on the client-side.
This was last updated in October 2020
Continue Reading About Microsoft System Center Configuration Manager (SCCM)
- How to deploy Microsoft Endpoint Manager step by step
- SCCM 2012 deployment and technical infrastructure overview
- When to use SCCM in the cloud with a CMG
- Is SCCM in Azure right for your organization?
- How does Parallels Mac Management for Microsoft SCCM work?
Dig Deeper on IT operations and infrastructure management
-

Microsoft SCOM (System Center Operations Manager)
By: Rahul Awati
-
Microsoft Monitoring Agent (MMA)
By: Stephen Bigelow
-
5 macOS management software options for the enterprise
By: Robert Sheldon
-
How to work with an SCCM technical preview lab
By: Daniel Engberg