WSABuilds 

MagiskOnWSA (For Windows™ 10 and 11) 
Windows Subsystem For Android™ (WSA) with Google Play Services and (or) Magisk
Downloads
WSABuilds Builds Status (⚠️❗IMPORTANT: Read Before Downloading❗⚠️)
Builds Status and Stability
Known Issues that may affect your WSA experiences:
- GApps Issues : LSPosed/MagiskOnWSALocal#595
- Folder Issue : Long folder name for the WSA Folder (auto generated by the MagiskOnWSALocal script) may cause WSA to not start. Rename the folder to
WSAafter extracting and before installing WSA. - Installed Magisk Modules disappear after install and subsequent reboot (WSA v2307): #154
| WSA Version: | ||
|---|---|---|
| v2210.40000.7.0 | ✅ | ✅ |
| v2211.40000.10.0 | ✅ | ✅ |
| v2211.40000.11.0 | ✅ | ✅ |
| v2301.40000.4.0 | ✅ | ✅ |
| v2301.40000.7.0 | ✅ | ✅ |
| v2302.40000.6.0 | ✅ | ✅ |
| v2302.40000.8.0 | ✅ | ✅ |
| v2302.40000.9.0 | ✅ | ✅ |
| v2303.40000.2.0 | ✅ | ✅ |
| v2303.40000.3.0 | ✅ | ✅ |
| v2303.40000.4.0 | ✅ | ✅ |
| v2303.40000.5.0 | ✅ | ✅ |
| v2304.40000.5.0 | ⚠️ | ⛔ |
| v2304.40000.6.0 | ⚠️ | ⛔ |
| v2304.40000.7.0 | ✅ | ⛔ |
| v2304.40000.10.0 | ✅ | ⛔ |
| v2305.40000.2.0 | ✅ | ⛔ |
| v2305.40000.3.0 | ✅ | ✅ |
| v2305.40000.4.0 | ✅ | ✅ |
| v2305.40000.5.0 | ✅ | ✅ |
| v2305.40000.6.0 | ✅ | ✅ |
| v2306.40000.1.0 | ✅ | ✅ |
| v2306.40000.2.0 | ✅ | ✅ |
| v2306.40000.3.0 | ✅ | ✅ |
| v2306.40000.4.0 | ✅ | ✅ |
| v2307.40000.2.0 | ✅ | ✅ |
| v2307.40000.3.0 | ✅ | ✅ |
| v2307.40000.5.0 | ✅ | ✅ |
| v2307.40000.6.0 | ✅ | ✅ |
| v2308.40000.1.0 | ✅ | ✅ |
| v2308.40000.2.0 | Update Skipped to allow time for adjusting the Docs and the build script (MagiskOnWSALocal). Sorry for any Inconvenence. Updates will resume as normal after this. |
|
| v2308.40000.3.0 | ✅ | ✅ |
| v2309.40000.2.0 | ➖ | ➖ |
| Indicator Keys | |||
|---|---|---|---|
| ✅ | Stable | Everything works as intended. If you think that the build is not stable, please open a GitHub Issue or report the issue in our Discord |
|
| ⚠️ | Unstable | Experience may not be smooth due to known bugs or issues | Click on the Emoji for more information |
| ⛔ | Not Working | Build is not working. DO NOT DOWNLOAD! | Click on the Emoji for more information |
| ➖ | No Information Yet | Not enough information to confirm status. Please join the Discord and confirm whether or not the builds are working. |
| Download Variant | ||
|---|---|---|
| Differences: | Follows the «WSA Preview Program Channel» | Follows the «WSA Retail» or «Insider Fast Channel» |
| Builds are generally newer than the «WSA Retail» and «Insider Fast Channel» | Builds are generally more stable than the builds in the «WSA Preview Program Channel» | |
| Current Version: | 2309.40000.2.0 | 2308.40000.3.0 |
| Release Date: | Builds Released: 27/09/2023 | Builds Released: 19/09/2023 |
| Update Frequency: | Multiple Updates Every Month | One Update Every Month |
It is recommend to check this table regularly to see if there is a newer update avaliable for WSA for the Stable Builds and Pre-Release Builds |
| Operating System | Download Page | Download Mirror |
|---|---|---|
|
|
|
|
|
|
||
|
|
|
|
|
|
||
|
|
|
|
|
|
|
|
|
|
|
|
|
|
Custom Builds: |
|
|
|
|
|
Requirements
Windows Build Number |
Windows™ 11: Build 22000.526 or higher. | Windows™ 10: 22H2 10.0.19045.2311 or higher.
May work on Windows™ 10: 20H1 10.0.19041.264 or higher.1 1. You may need to install KB5014032 then install KB5022834 to use WSA on these older Windows 10 builds |
Custom/modfied Windows OS installations (such as ReviOS, Tiny 10/11 and Ghost Spectre etc.) may have issues with running WSA.
|
||
RAM |
|
|
Processor |
CPU Architecture: x86_64 or arm64 | |
| Your PC should meet the basic Windows™ 11 requirements i.e Core i3 8th Gen, Ryzen 3000, Snapdragon 8c, or above | N/A
This is a bit of a hit or miss, but it is highly recommended that your processor is listed in the supported CPU lists for Windows 11 requirements |
|
GPU |
Any compatible Intel, AMD or Nvidia GPU. GPU Performance may vary depending on its compatibility with Windows Subsystem For Android™ Users with Intel HD Graphics 530 and olderWSA may not start or graphical glitches will occur when Intel HD Graphics 530 and Older iGPUs are used. This is a known issue, but unfortunately there are no fixes that I currently know of, plus, these GPUs are too old and do not meet Windows 11 requirements and hence are not official supported. Follow this guide to switch to another iGPU/dGPU/eGPU that you may have or Microsoft Basic RendererUsers with Nvidia GPUsNvidia GPUs are known to cause problems. If Windows Subsystem For Android™ does not start or there are graphical glitches when an Nvidia GPU is used, follow this guide to switch to another iGPU/dGPU/eGPU that you may have or Microsoft Basic Renderer |
|
Storage |
Solid-state drive (RECOMMENDED) OR Hard Disk Drive (HDD) (NOT RECOMMENDED) |
|
| Minimum Storage Requirements: You must have at least 10GB free on the system drive (C:\) | ||
Partition |
NTFS ONLY
Windows Subsystem For Android™ can only be installed on a NTFS partition, not on an exFAT partition |
|

Windows Features Needed |
Virtual Machine Platform Enabled | |
| Windows Hypervisor Platform Enabled | ||
| These optional settings are for virtualization and provide components that are needed to run WSA. You can enable these settings by pressing the Windows Key + R on your keyboard and typing «OptionalFeatures.exe» into the box, pressing enter and selecting the features above followed by pressing apply | ||
Virtualization |
The Computer must support virtualization and be enabled in BIOS/UEFI and Optional Features.
Guide on how to enable |
Installation
Note
If you have the official Windows Subsystem For Android™ installed, you must completely uninstall it to use MagiskOnWSA.
Important
In case you want to preserve your data from the previous installation (official or MagiskOnWSA), you can backup Userdata.vhdx, located at %LOCALAPPDATA%\Packages\MicrosoftCorporationII.WindowsSubsystemForAndroid_8wekyb3d8bbwe\LocalCache\userdata.vhdx before uninstallation and restore it after installation. A guide for this process is located further down in this README.
- Go to the Releases page
- In the latest release, go to the Assets section and download the Windows Subsystem For Android™ version of your choosing (do not download «Source code»)
- Extract the .7z archive and rename the folder (that you extracted) to
WSA - Delete the .7z archive
- Move the newly extracted folder to a suitable location (Documents folder is a good choice), as you will need to keep the folder on your PC to use MagiskOnWSA
Note
If you’re updating WSA, merge the folders and replace the files for all items when asked
-
Open the Windows Subsystem For Android™ folder: Search for and double-click
Run.bat-
If you previously have a MagiskOnWSA installation, it will automatically uninstall the previous one while preserving all user data and install the new one, so don’t worry about your data.
-
If the popup windows disappear without asking administrative permission and Windows Subsystem For Android™ is not installed successfully, you should manually run Install.ps1 as administrator:
-
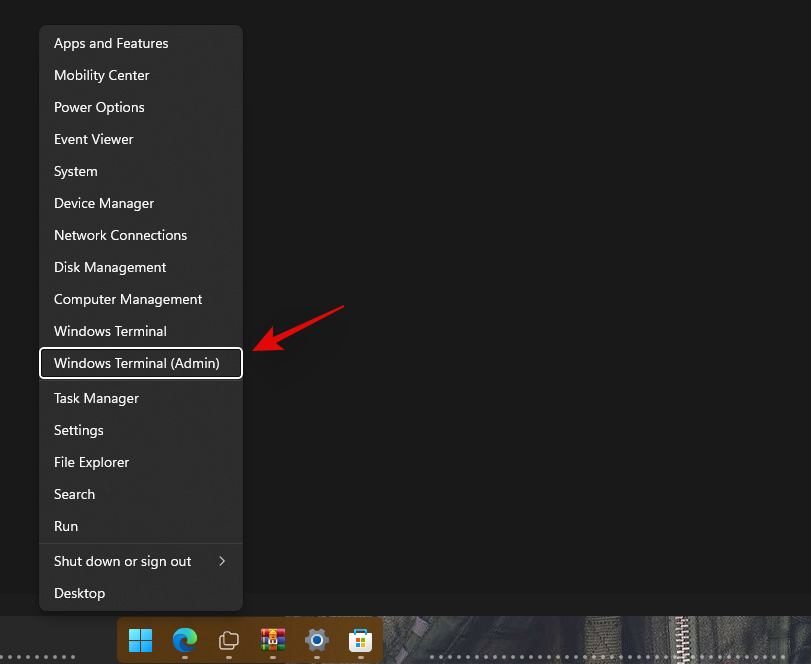
Press Win+x and select Windows™ Terminal (Admin)
-
Input the command below and press enter, replacing {X:\path\to\your\extracted\folder} including the {} with the path of the extracted folder
cd "{X:\path\to\your\extracted\folder}" -
Input the command below and press enter
PowerShell.exe -ExecutionPolicy Bypass -File .\Install.ps1
-
The script will run and Windows Subsystem For Android™ will be installed
-
If this workaround does not work, your PC is not supported for WSA
-
-
-
Once the installation process completes, Windows Subsystem For Android™ will launch (if this is a first-time install, a window asking for consent to diagnositic information will be shown instead. Sometimes two identical windows will show, this is fine and nothing bad happens if you click OK in both windows)
-
Click on the PowerShell window, then press any key on the keyboard, the PowerShell window should close
-
Close File Explorer
-
Enjoy
Notice (Applicable for both Windows 10 and 11):
- You can NOT delete the Windows Subsystem For Android™ installation folder.
WhatAdd-AppxPackage -Register .\AppxManifest.xmldoes is to register an appx package with some existing unpackaged files,
so you need to keep them as long as you want to use Windows Subsystem For Android™.
Check https://learn.microsoft.com/en-us/powershell/module/appx/add-appxpackage?view=windowsserver2022-ps for more details. - You need to register your Windows Subsystem For Android™ appx package before you can run Windows Subsystem For Android™.
For WSABuilds and MagiskOnWSALocal users, you need to runRun.batin the extracted dir.
If the script fails, you can take the following steps for diagnosis (admin privilege required):-
Open a PowerShell window and change working directory to your Windows Subsystem For Android™ directory.
-
Run the command below in PowerShell. This should fail with an ActivityID, which is a UUID required for the next step.
Add-AppxPackage -ForceApplicationShutdown -ForceUpdateFromAnyVersion -Register .\AppxManifest.xml
-
Run the command below in PowerShell. This should print the log of the failed operation.
Get-AppPackageLog -ActivityID <UUID>
-
Check the log for the reason of failure and fix it.
-
Updating
How do I update without losing any of my apps and data on Windows Subsystem for Android (WSA)
Important
Make sure that WSA has been turned off from the settings and that tools such has WSA-System-Control, WSA-Sideloader, WSAPacman etc are not running.
- Download the latest build (that you want to update to)
- Make sure Windows Subsystem For Android is not running (Click on «Turn off» in the WSA Settings and wait for the spinning loader to disappear)
- Using 7-Zip, WinRAR or any other tool of choice, open the .7z archive
- Within the .7z archive, open the subfolder (Example: WSA_2xxx.xxxxx.xx.x_xx_Release-Nightly-with-magisk-xxxxxxx-MindTheGapps-xx.x-RemovedAmazon)
- Select all the files that are within this subfolder and extract them to the current folder where the file for Windows Subsystem For Android (the folder you extracted, and installed WSA from) are located
- When prompted to replace folders, select «Do this for all current items» and click on «Yes»
- When prompted to replace files, click on «Replace the files in the destination»
- Run the
Run.batfile - Launch Windows Subsystem For Android Settings app and go to the
Abouttab using the sidebar - Check if the WSA version matches the latest version/ the version number that you want to update to
Join the Discord if you are having any difficulties
Uninstallation
Note
If you want to preseve your data, make a backup of the %LOCALAPPDATA%\Packages\MicrosoftCorporationII.WindowsSubsystemForAndroid_8wekyb3d8bbwe\LocalCache\userdata.vhdx file. After uninstalling, copy the VHDX file back to the %LOCALAPPDATA%\Package\MicrosoftCorporationII.WindowsSubsystemForAndroid_8wekyb3d8bbwe\LocalCache folder. For a more comprehensive and detailed guide, take a look at the Backup and Restore section in this README markdown
To remove WSA installed through WSABuild:
- 1.) Make sure that Windows Subsystem For Android™ is not running
- 2.) Search for
Windows Subsystem For Android™ Settingsusing the built-in Windows Search, or through Add and Remove Programs and press uninstall
- 3.) Delete the WSA folder that extracted you extracted and Run.bat was run from to install WSA (MagiskOnWSA folder)
- 4.) Go to
%LOCALAPPDATA%/Packages/and check if the folder:MicrosoftCorporationII.WindowsSubsystemForAndroid_8wekyb3d8bbweis still present:- If the folder is still present: Delete it
- If you get an error that states that the file(s) could not be deleted, make sure that WSA is turned off
- If the folder does not exist: Skip this step
- If the folder is still present: Delete it
To remove WSA installed from the Microsoft Store:
- 1.) Search for
Windows Subsystem For Android™ Settingsusing the built-in Windows Search, or through Add and Remove Programs and press uninstall
Backup and Restore Userdata
Backing Up Your Userdata
In order to make a backup of your WSA data you must copy the Userdata.vhdx (which includes, but is not limited Android Apps and their data, settings etc.), located at %LOCALAPPDATA%\Packages\MicrosoftCorporationII.WindowsSubsystemForAndroid_8wekyb3d8bbwe\LocalCache\userdata.vhdx, to a safe location
Restoring Your Backup
Before attempting to restore your backup, you must remove WSA if installed. Then before you run the Run.bat script (to reinstall WSA after removing it), you need to remove these lines from Install.ps1, located in the your extracted WSA folder:
The Lines (as shown below) that you need to remove in
Install.ps1may vary depending on the type of WSA Build that you are trying to install.
Android Settings:
Start-Process "wsa://com.android.settings"
Official Magisk:
Start-Process "wsa://com.topjohnwu.magisk"
Magisk Delta:
Start-Process "wsa://io.github.huskydg.magisk"
Magisk Alpha:
Start-Process "wsa://io.github.vvb2060.magisk"
Google Play Store:
Start-Process "wsa://com.android.vending"
Amazon Appstore:
Start-Process "wsa://com.amazon.venezia"
After running the script, do not run WSA at all, and go to %localappdata%\Packages and (if the folders do not exist, create them) in MicrosoftCorporationII.WindowsSubsystemForAndroid_8wekyb3d8bbwe\LocalCache\ paste the userdata.vhdx
Now run WSA and your userdata should hopefully be restored
FAQ
Help me, I am having problems with the MagiskOnWSA Builds
- Open an issue in Github or join the Discord and describe the issue with sufficent detail
Help me, I am having problems with installing Windows Subsystem For Android™ on Windows™ 10
- I am not working on the patch, and nor claim to. Open an issue in the Discord or Github, and I will try to assist you with the problem if possible. For full support visit the project homepage and open an issue there: https://github.com/cinit/WSAPatch/issues/
How do I get a logcat?
-
There are two ways:
or
-
Location in Windows —>
%LOCALAPPDATA%\Packages\MicrosoftCorporationII.WindowsSubsystemForAndroid_8wekyb3d8bbwe\LocalState\diagnostics\logcat
Can I delete the installed folder?
- No.
How can I update Windows Subsystem For Android™ to a new version?
- As Explained Installation instructions. Download the latest Windows Subsystem For Android™ Version and replace the content of your previous installation and rerun Install.ps1. Don’t worry, your data will be preserved
How do I update Magisk?
- Do the same as updating Windows Subsystem For Android™. Wait for a new MagiskOnWSA release that includes the newer Magisk version, then follow the Installation instructions to update
Can I pass SafetyNet/Play Integrity?
- No. Virtual machines like Windows Subsystem For Android™ cannot pass these mechanisms on their own due to the lack of signing by Google. Passing requires more exotic (and untested) solutions like: kdrag0n/safetynet-fix#145 (comment)
What is virtualization?
- Virtualization is required to run virtual machines like Windows Subsystem For Android™.
Run.bathelps you enable it. After rebooting, re-runRun.batto install Windows Subsystem For Android™. If it’s still not working, you have to enable virtualization in your BIOS/UEFI. Instructions vary by PC vendor, look for help online
Can I remount system partition as read-write?
- No. Windows Subsystem For Android™ is mounted as read-only by Hyper-V. You can, however, modify the system partition by creating a Magisk module, or by directly modifying the system.img file
I cannot adb connect localhost:58526
-
Make sure developer mode is enabled. If the issue persists, check the IP address of Windows Subsystem For Android™ on the Settings —> Developer page and try
Magisk online module list is empty?
-
Magisk actively removes the online module repository. You can install the module locally or by
Step 1
adb push module.zip /data/local/tmpStep 2
adb shell su -c magisk --install-module /data/local/tmp/module.zip
How do I uninstall Magisk?
- Request, using Issues, a Windows Subsystem For Android™ version that doesn’t include Magisk from the Releases page. Then follow the Installation instructions
Can I switch between OpenGApps and MindTheGapps?
- No. GApps will no longer function. Do a complete uninstallation before switching
How do I install custom Magisk or GApps?
- To request a build with custom Magisk or GApps, feel free to open an issue in the Issues page You can also achieve this by using the MagiskOnWSALocal Script and following the provided instructions located in the repo.
Usage Guides
GPU Guide:
Sideload Guide/Installing an APK:
Moving WSA to another drive or partition:
Installing KernelSU
Installing BusyBox
Localhost Loopback Guide
Having Issues?
Common Issues:
Custom Builds Requests
❓Want to request a prebuilt custom build❓
If you can’t find the build that you are looking for, I will be happy to fufill any custom build requests.
Open an issue in the [Issues page](https://github.com/MustardChef/WSABuilds/issues) with the information below.
[!IMPORTANT]
- State the Device Model (Default: Pixel 5)?
— Root Solution (Magisk, KernelSU or none)?
— If you want a WSA build with Magisk, what variant of magisk would you like?
— Would you like GApps (Google Play Store and Play Services (GMS))?
— Would you like to keep the Amazon Appstore?
[!IMPORTANT]
- State the Device Model (Default: Pixel 5)?
— Root Solution (Magisk, KernelSU or none)?
— If you want a WSA build with Magisk, what variant of magisk would you like?
— Would you like GApps (Google Play Store and Play Services (GMS))?
— Would you like to keep the Amazon Appstore?
Credits
- Microsoft: For providing Windows Subsystem For Android™ and related files. Windows Subsystem For Android™, Windows Subsystem For Android™ Logo, Windows™ 10 and Windows™ 11 Logos are trademarks of Microsoft Corporation. Microsoft Corporation reserves all rights to these trademarks. By downloading and installing Windows Subsystem For Android™, you agree to the Terms and Conditions and Privacy Policy
- YT-Advanced: For providing and continuing the development of the script made by LSPosed, the Github Action workflow guide is based on his Github Repo. I do not claim his work and the work of the many contributers as my own and nor intend to do so.
- Cinit and the WSAPatch Guide: Many thanks for the comprehensive guide, files and support provided by Cinit and the contributers at the WSAPatch repository. Windows™ 10 Builds in this repo rely on the hard work of this project and hence credit is given where due
- StoreLib: API for downloading WSA
- Magisk: The Magic Mask for Android
- The Open Google Apps Project: Script the automatic generation of up-to-date Google Apps packages
- KernelSU: A Kernel based root solution for Android
- WSAGAScript: The first GApps integration script for WSA
- MagiskOnWSA:
DeprecatedIntegrate Magisk root and Google Apps into WSA - MagiskOnWSALocal: Integrate Magisk root and Google Apps into WSA
- Icons8: Icons used in this repo were obtained from Icon8. To view the links to the specific icons used in this Markdown, press here
The repository is provided as a utility.
Android is a trademark of Google LLC. Windows™ is a trademark of Microsoft LLC.
В Windows 11 с помощью подсистемы Windows для Android (WSA) вы можете установить магазин Google Play Store, загружать и устанавливать любые приложения Android на свой компьютер с помощью определенных действий, которые включает в себя множество шагов.
Это был просто вопрос времени, теперь вы можете устанавливать Android приложения из Play Store в Windows 11, но не официально. Пользователь твиттера — ADeltaX, разработал процедуру, позволяющую обойти подсистему Windows для Android и установить приложение Google Play Store, что дает вам доступ в Windows 11 ко всему каталогу приложений для Android.
Пока, неясно, как это повлияет на будущие обновления. Другими словами, данный способ вполне может быть только временным решением, поскольку до сих пор не понятно, что произойдет после того, как WSA получит обновление через Магазин Microsoft. Вероятно, любому, кто использует этот метод, придется повторить весь процесс настройки. Конечно, если вы не отключите автоматическое обновление приложений в параметрах приложения Магазин Microsoft.
Этот способ установки магазина Google Play Store в Windows 11 является сокращением инструкций ADeltaX, но, если есть желание, вы можете следовать полной инструкции из репозитория Github.
Следуйте шагам ниже, чтобы установить магазин приложений Google и иметь возможность устанавливать приложения для Android в Windows 11.
Подготовка компьютера с Windows 11 для установки WSA
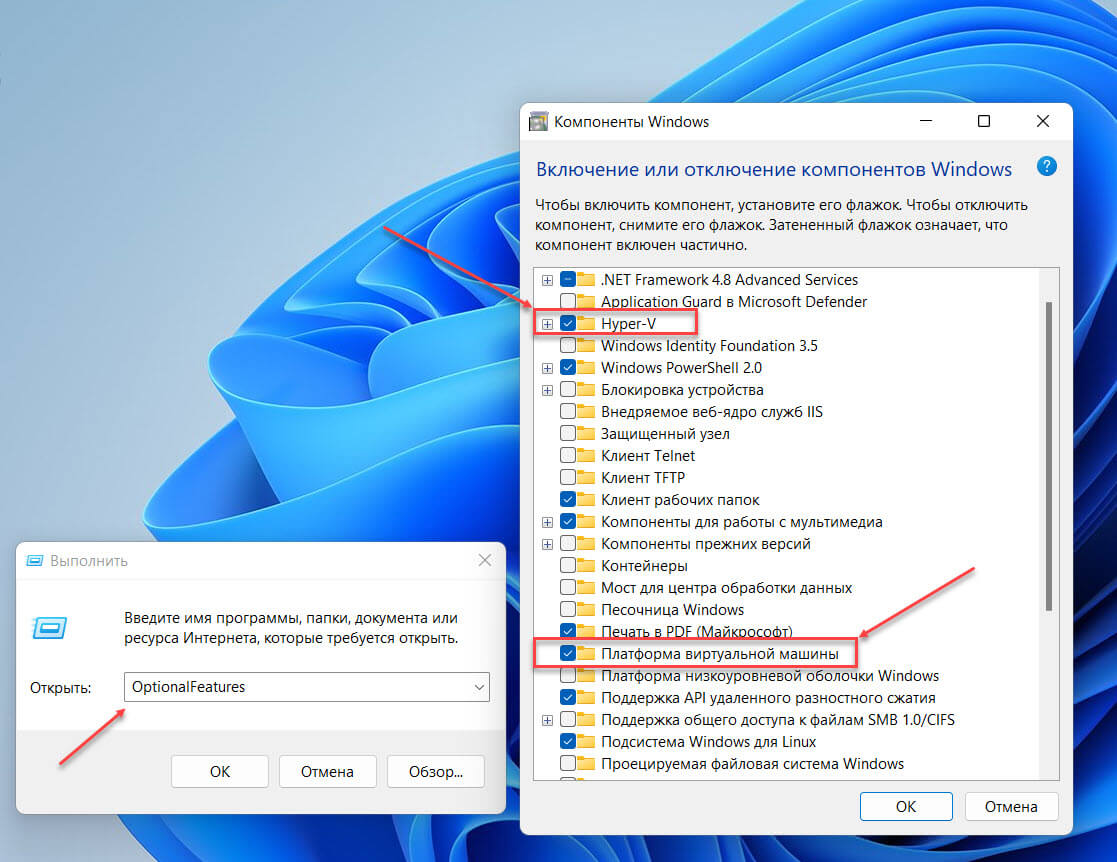
Прежде чем перейти к загрузке и установке, необходимо убедиться, что на вашем компьютере включены дополнительные функции Hyper-V и Virtual Machine Platform.
Шаг 1: Для этого, нажмите сочетание клавиш Win R, чтобы открыть диалоговое окно «Выполнить».
Шаг 2: Введите или скопируйте и вставьте:
OptionalFeatures
Шаг 3: Здесь в окне «Компоненты Windows» для «Hyper-V» и «Платформа виртуальной машины» установите флажок, чтобы включить его.
Шаг 4: Нажмите кнопку «ОК», чтобы установить эти дополнительные функции на свой компьютер с Windows.
Удалите любой ранее установленный пакет WSA
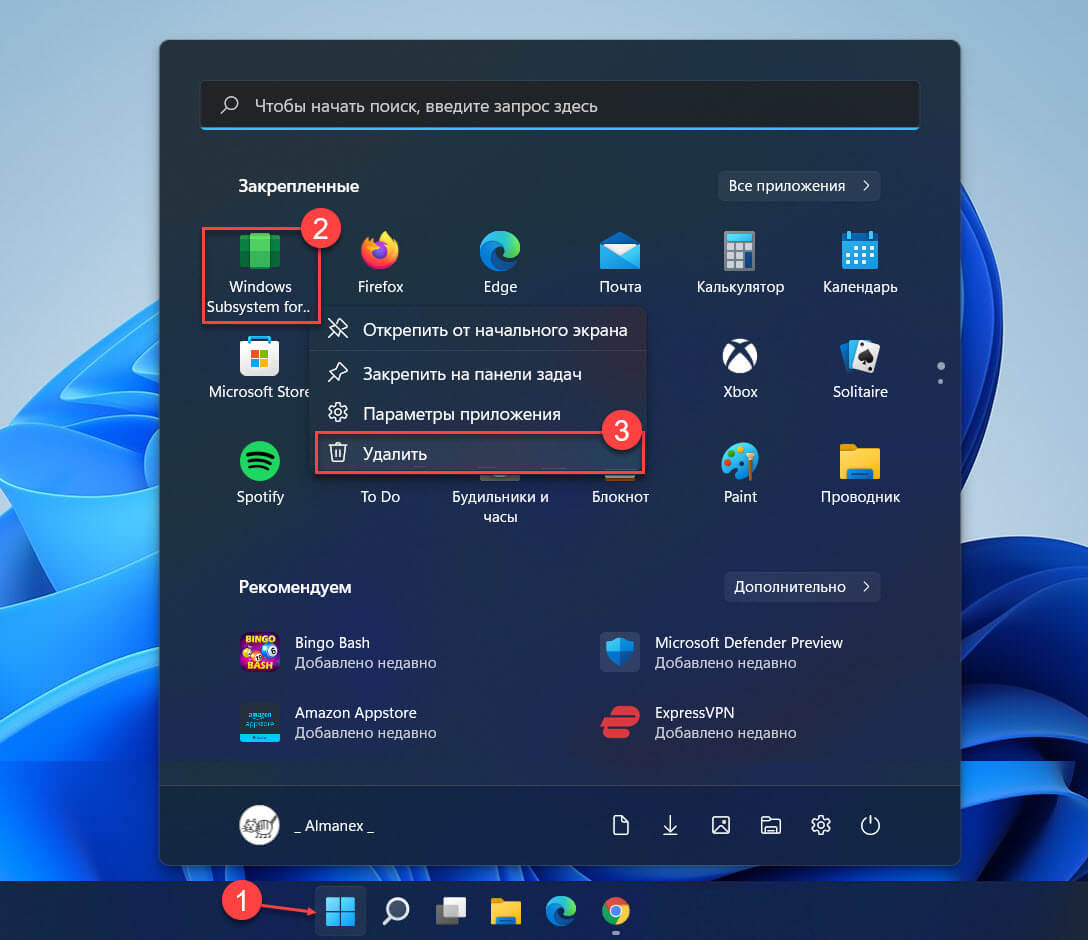
Удалите подсистему Windows для Android, если она уже установлена. Это связано с тем, что мы будем устанавливать новую подсистему Windows для Android, в которой существует интеграция Google Apps.
Шаг 5: Для этого, откройте меню «Пуск», найдите и кликните на подсистему «Windows Subsystem for Android» правой кнопкой мыши и выберите в контекстном меню пункт «Удалить». Затем следуйте инструкциям на экране, чтобы завершить процесс удаления.
Включите параметры разработчика в Windows 11.
Вам нужно будет включить параметры разработчика в Windows (в Windows 11, а не в WSA!).
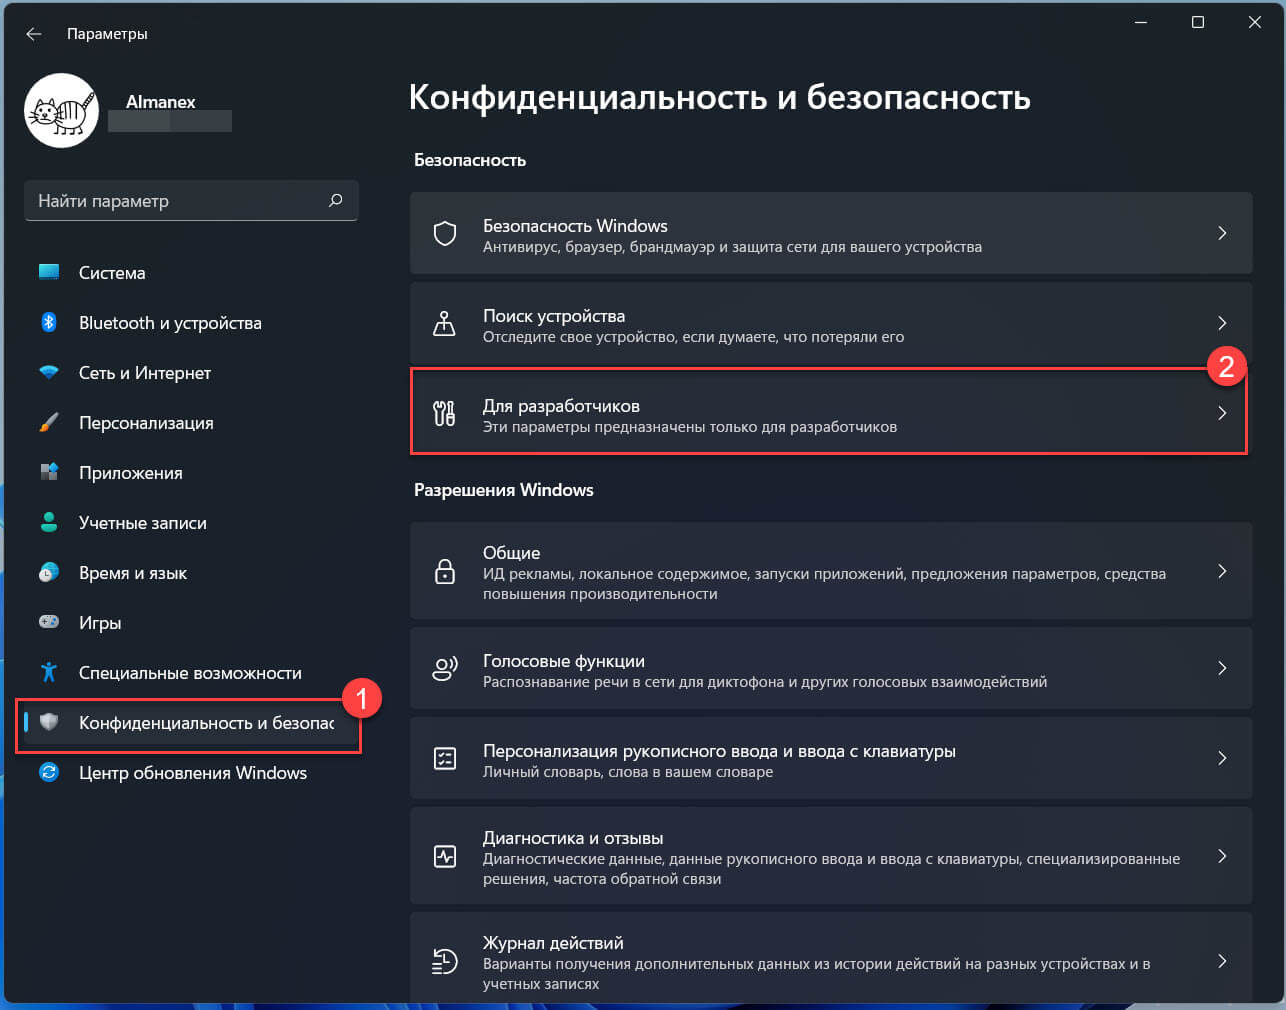
Шаг 6: Откройте параметры Windows 11, перейдите в раздел «Конфиденциальность и безопасность» → «Для разработчиков».
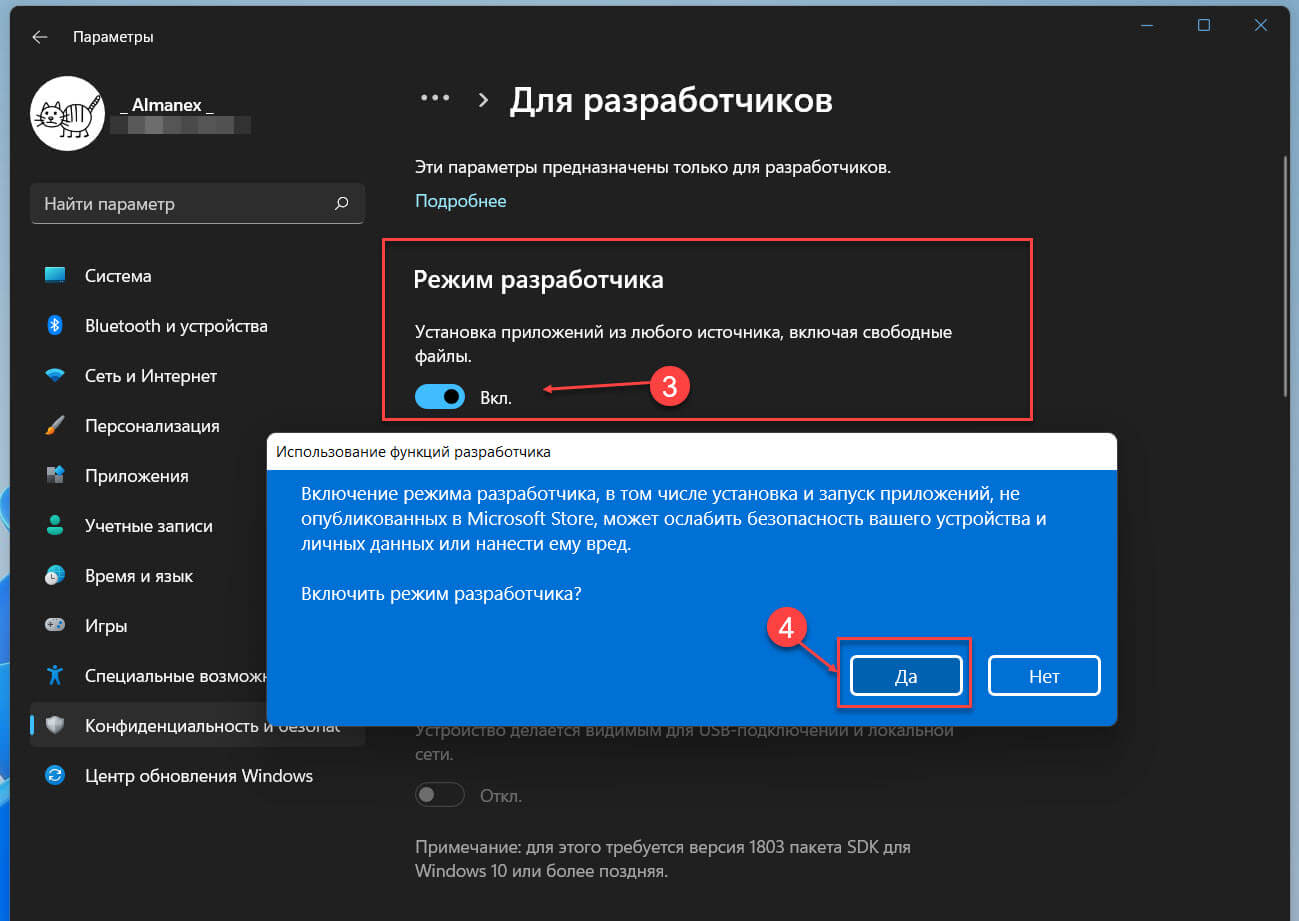
Шаг 7: В разделе режим разработчика передвиньте ползунок переключателя в положение «Вкл.»
Шаг 8: В следующем всплывающем окне подтвердите свои действия нажав кнопку «Да».
Загрузите WSA + GApps пакет MSIX:
Выберите для загрузки файл в зависимости от вашего устройства.
Шаг 9: Это модифицированная версия – «Windows Subsystem for Android (WSA-x86 64-бит + GApps)».
Модифицированная версия файл MSIX для 64-разрядных компьютеров ARM, таких как Surface Pro X.
Обновление: Благодаря новому методу от LSPposed у нас теперь есть WSA со встроенной поддержкой Magisk.
Вам понадобится приложение Magisk после установки одного из пакетов ниже.
- Модифицированная версия 64-разрядной версии WSA x86, в нее встроены приложения Google и поддержка Magisk.
- Модифицированная версия 64-разрядной версии WSA ARM, в нее встроены приложения Google и поддержка Magisk.
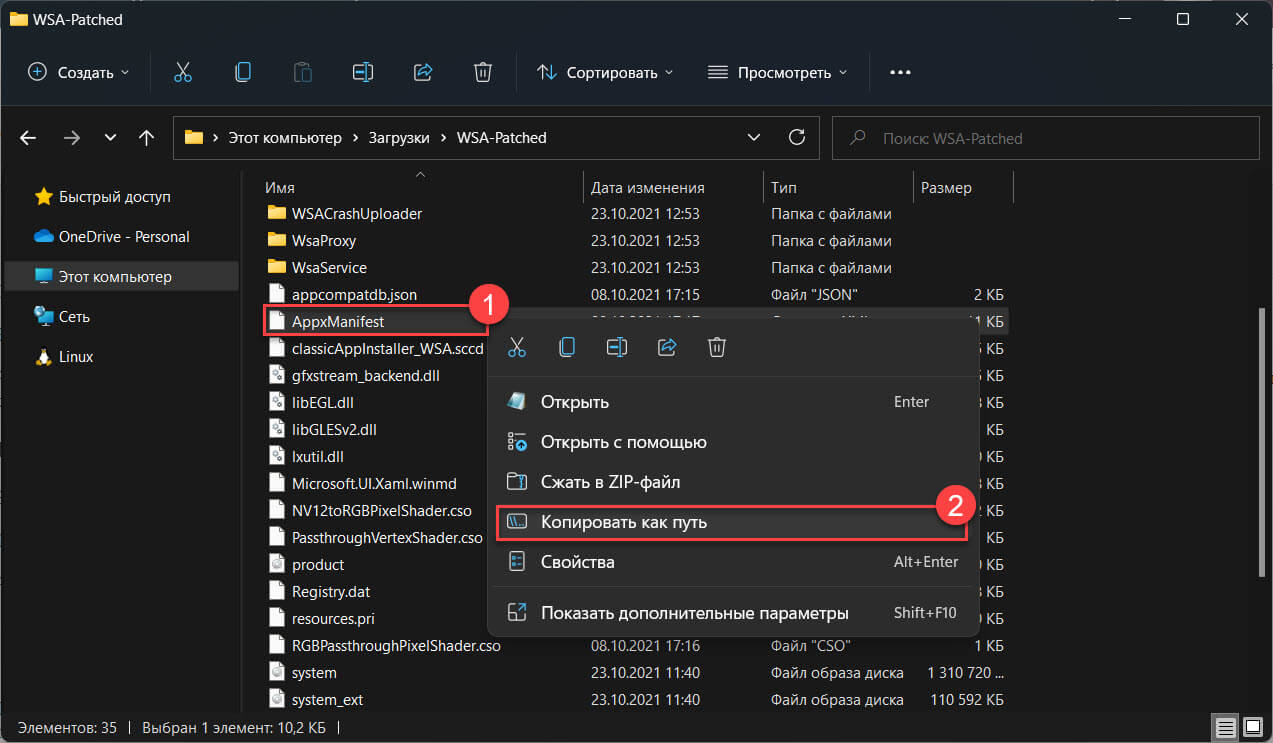
Шаг 10: Распакуйте загруженный Zip-архив в любое расположение, в дальнейшем нам потребуется указать путь к файлу AppxManifest.xml из этой папки.
Чтобы быстро получить путь к расположению файла, кликните на AppxManifest.xml правой кнопкой мыши и выберите «Копировать как путь», чтобы скопировать путь к файлу в буфер обмена ПК с Windows 11.
Зарегистрируйте пакет WSA + GApps:
Шаг 11: Запустите Powershell от имени администратора с помощью Терминала или любым другим удобным вам способом.
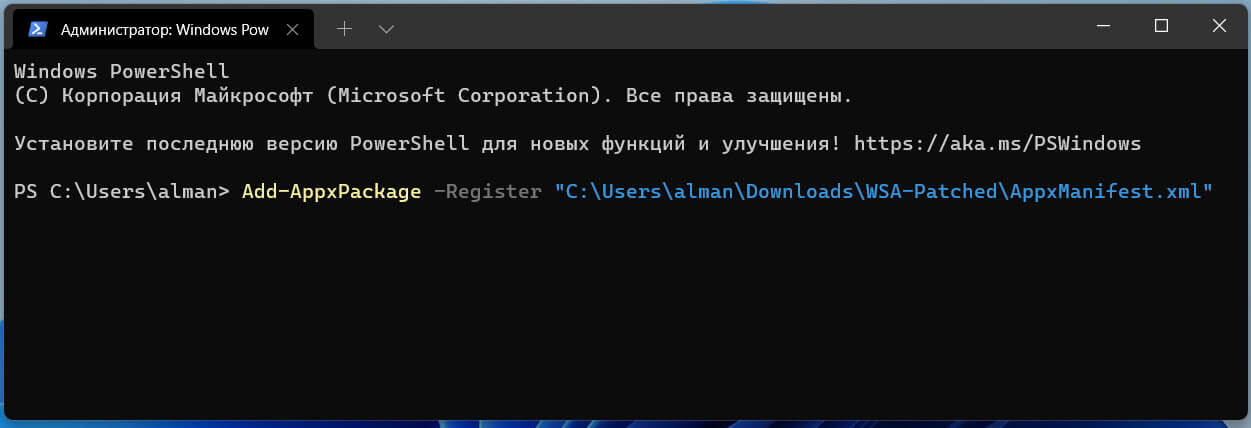
Шаг 12: Измените команду Powershell, указав расположение извлеченного Zip-файла
Add-AppxPackage -Register "Путь_к_папке_с_WSA\AppxManifest.xml"
В моем случае команда выглядит так:
Add-AppxPackage -Register "C:\Users\almanex\Downloads\WSA-Patched\AppxManifest.xml"
Приложение WSA будет установлено на ваше устройство в фоновом режиме. Если вы получите сообщение об ошибке, убедитесь, что все шаги были выполнены правильно.
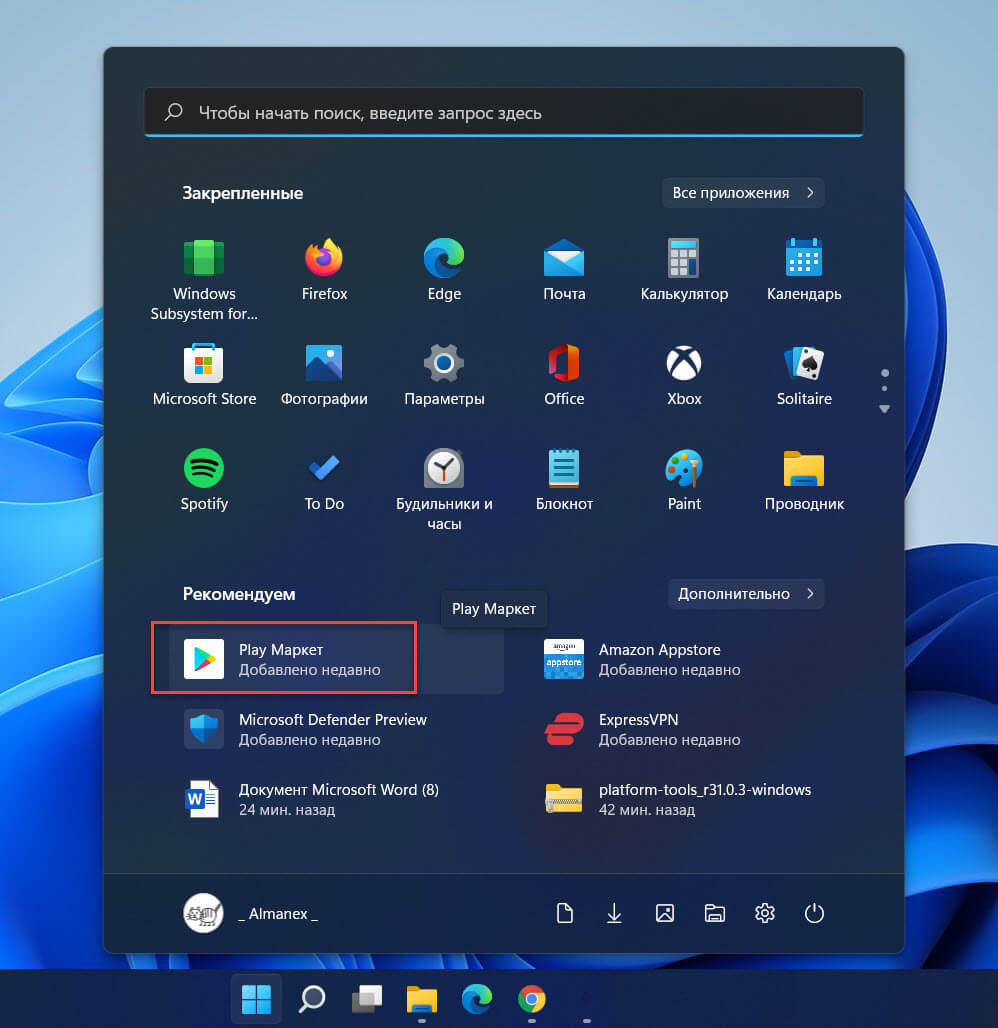
После регистрации WSA, магазин Google Play должен быть доступен в меню «Пуск».
И последнее, что нужно сделать, прежде чем вы сможете войти в свою учетную запись Google.
Загрузите ADBKit:
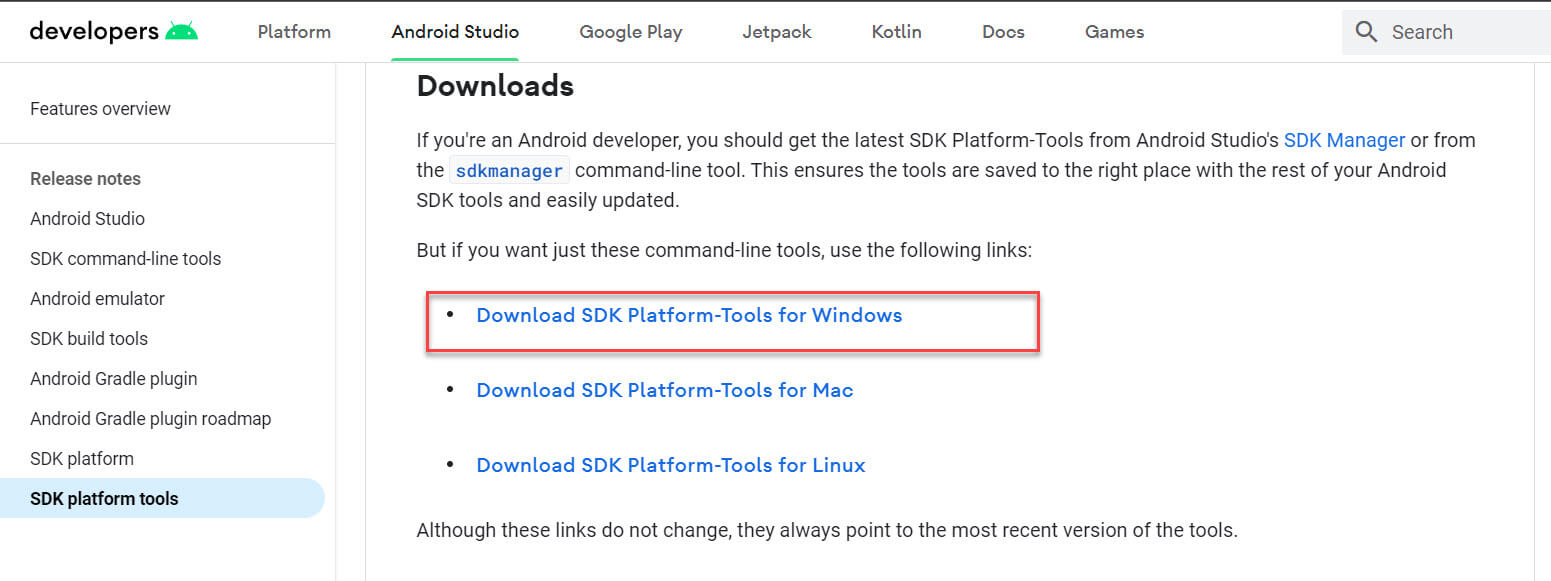
Шаг 13: На странице developer.android.com загрузите «SDK Platform-Tools for Windows».
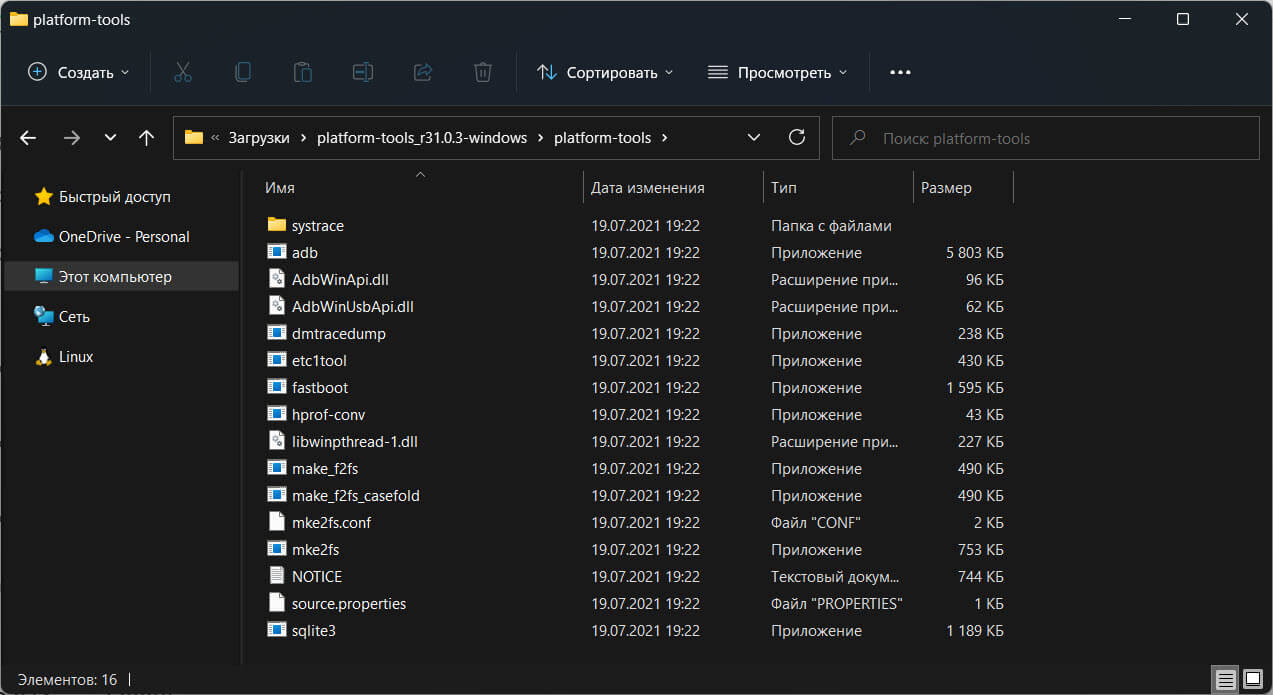
Шаг 14: Pаспакуйте zip-архив в любую папку.
Настройка WSA
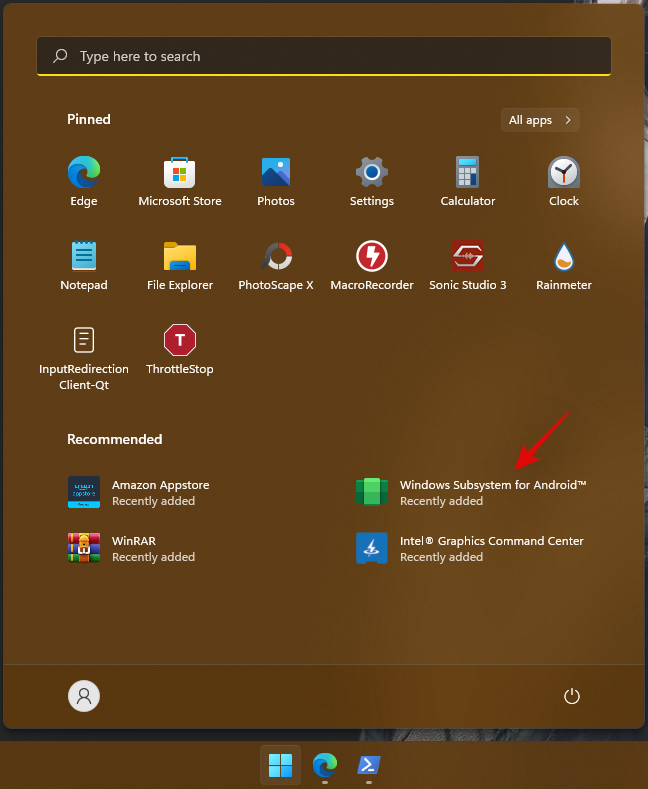
Шаг 15: С помощью меню «Пуск» откройте приложение «Windows Subsystem for Android».
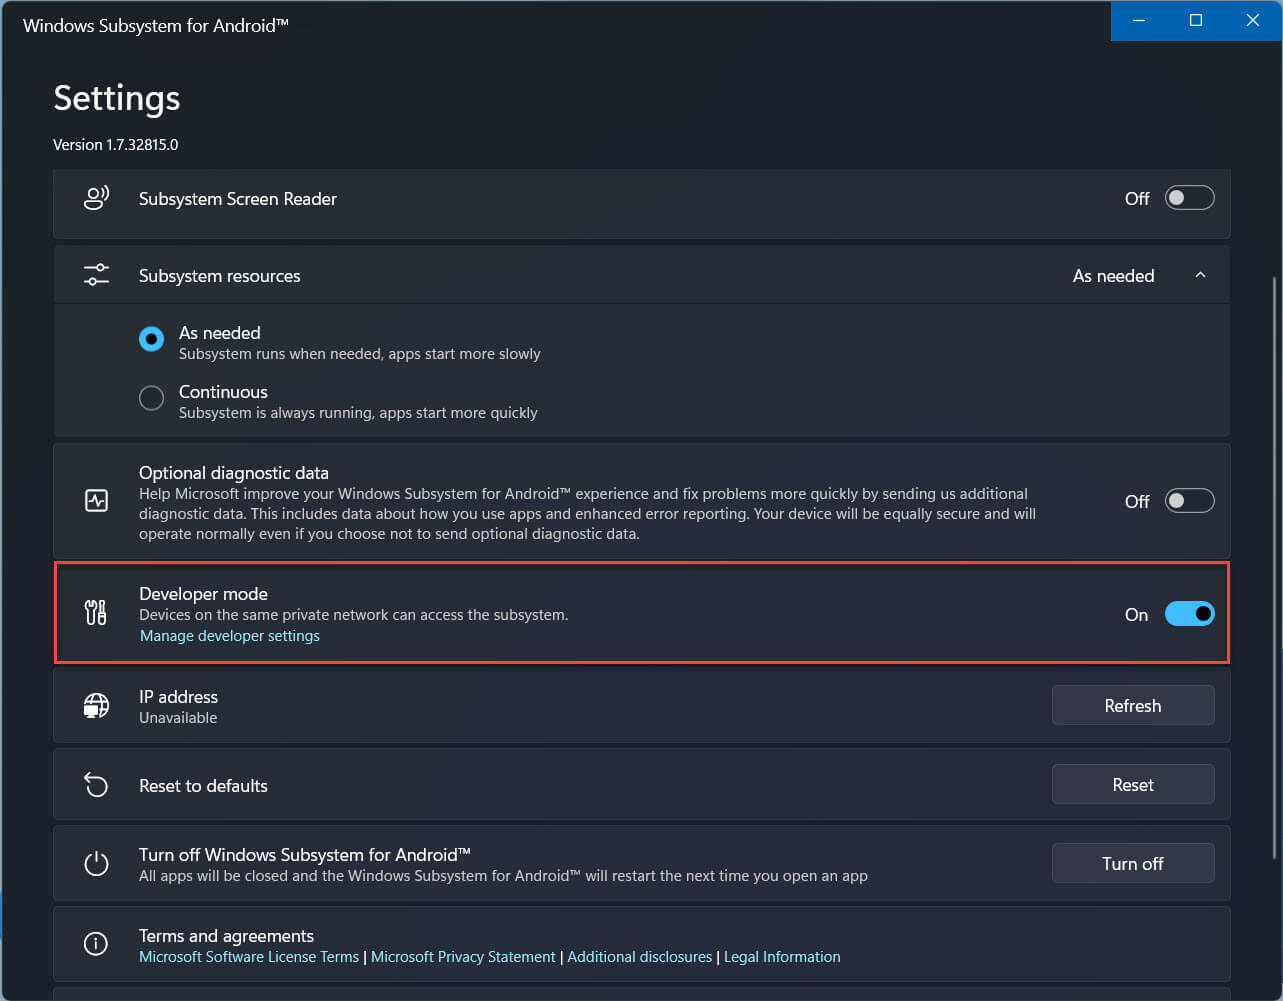
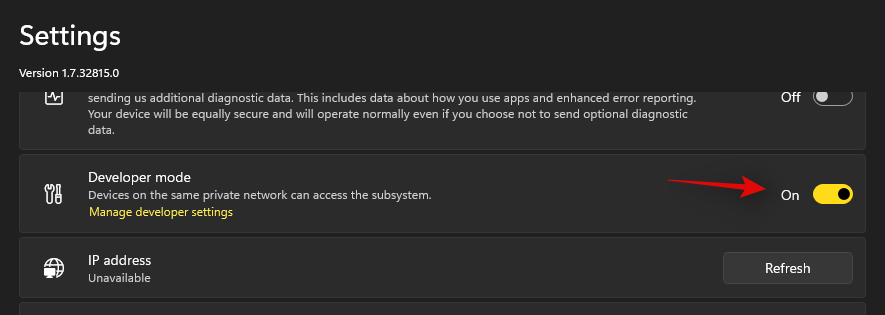
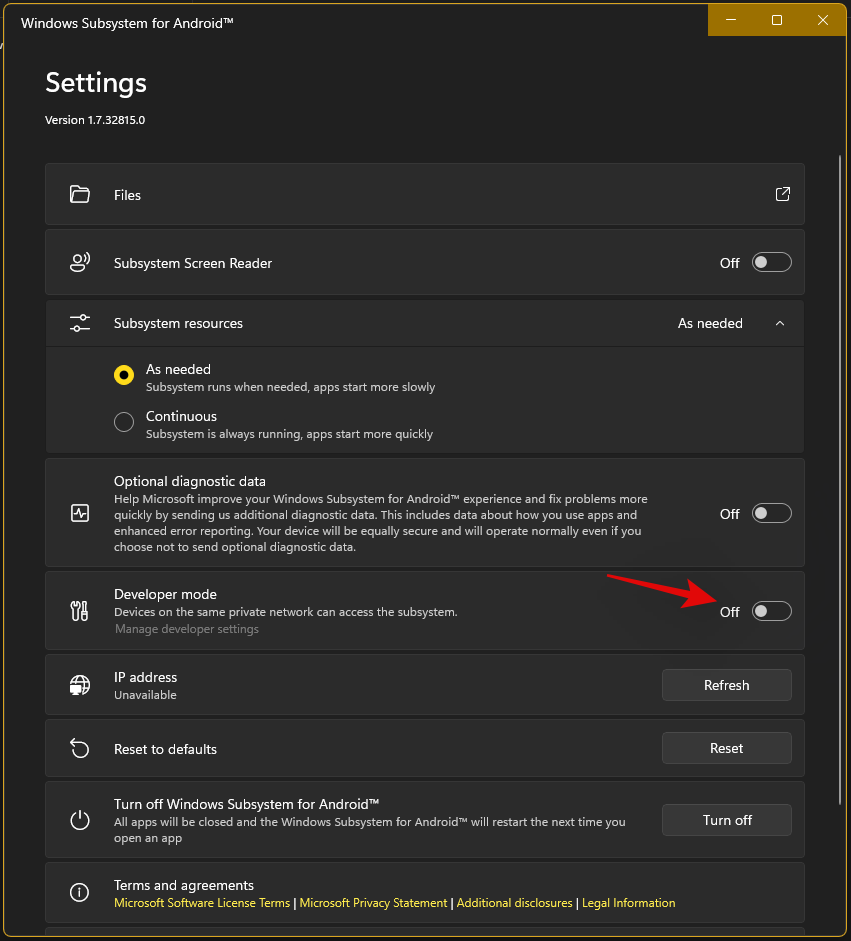
Шаг 16: В разделе «Режим разработчика» передвиньте ползунок переключателя в положение «Вкл.», как показано на экране ниже.
При появлении запроса брандмауэра разрешите доступ ADB.
Скопируйте IP-адрес
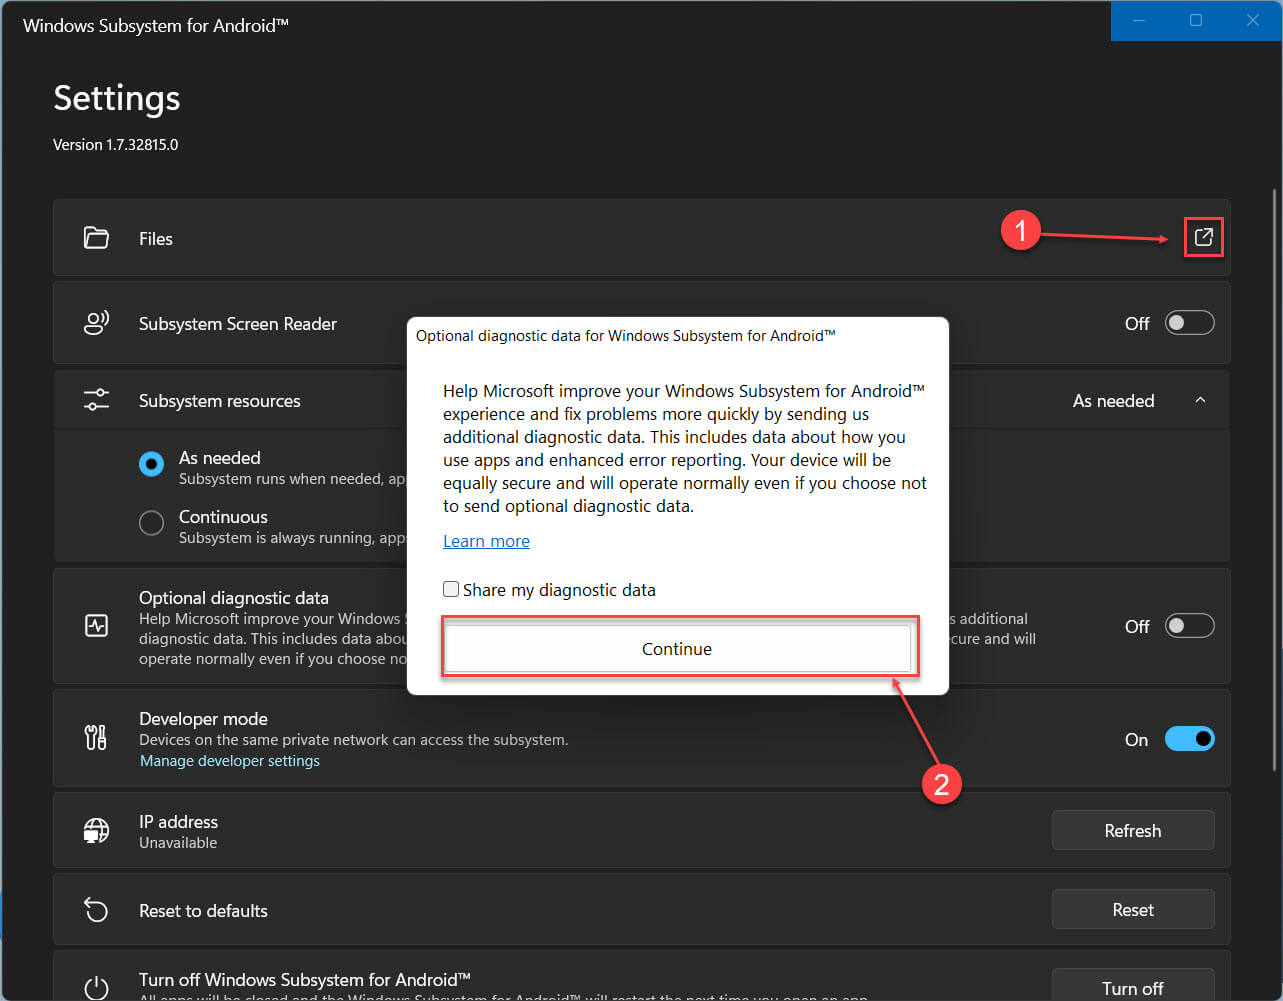
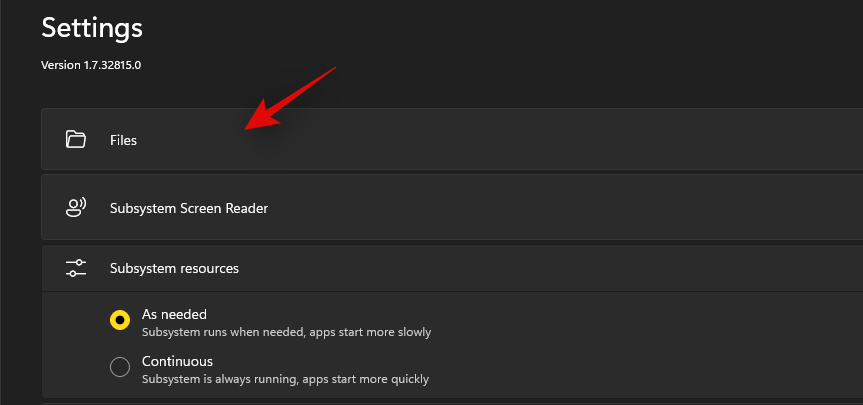
Шаг 17: Теперь в верхней части страницы параметров WSA откройте опцию «Файлы», в появившемся диалоговом окне нажмите «Продолжить».
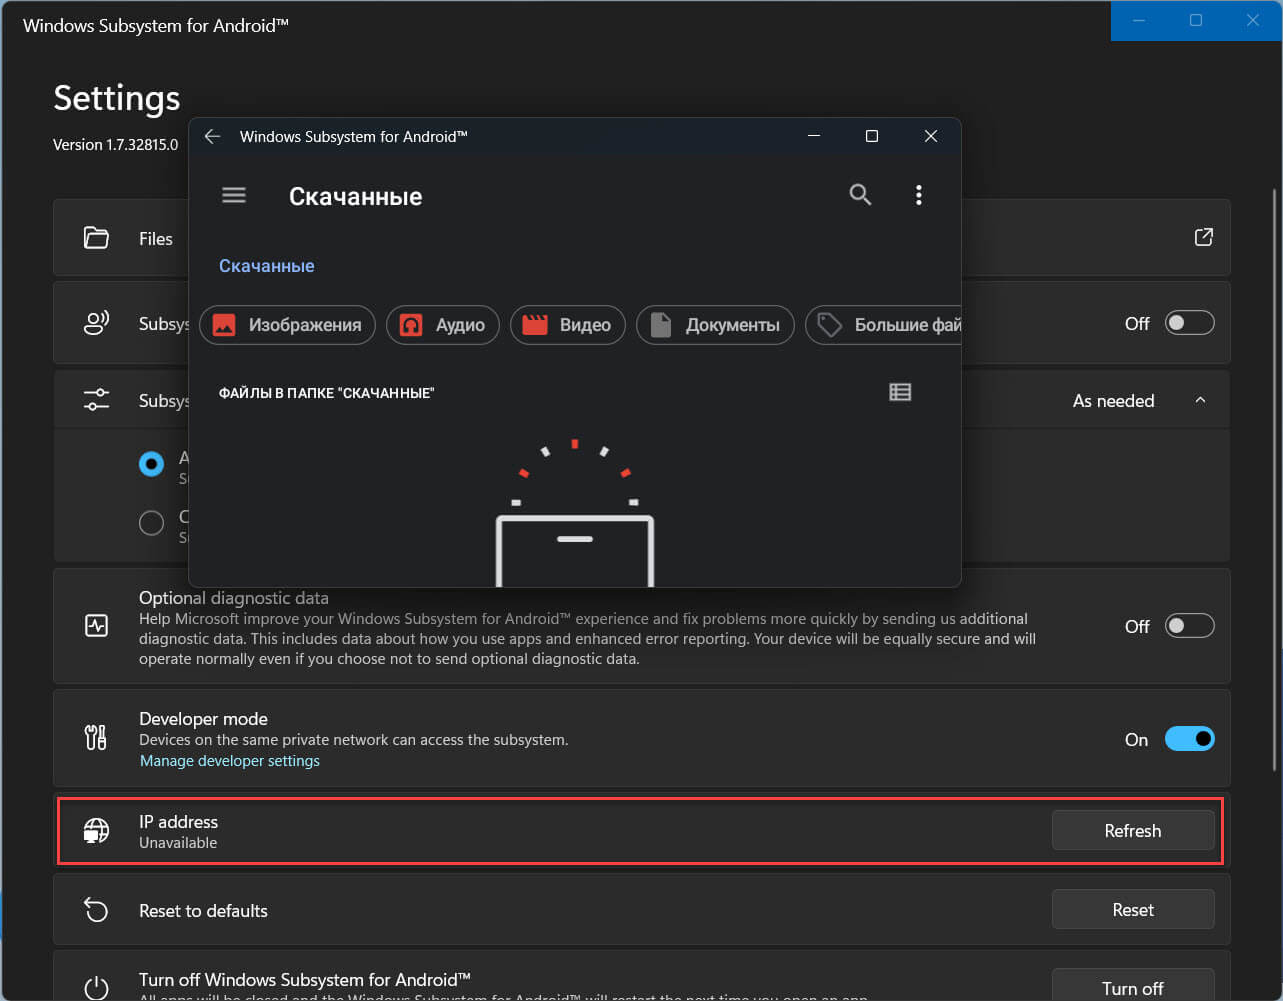
Шаг 18: Затем нажмите кнопку «Обновить» напротив опции IP-адрес.
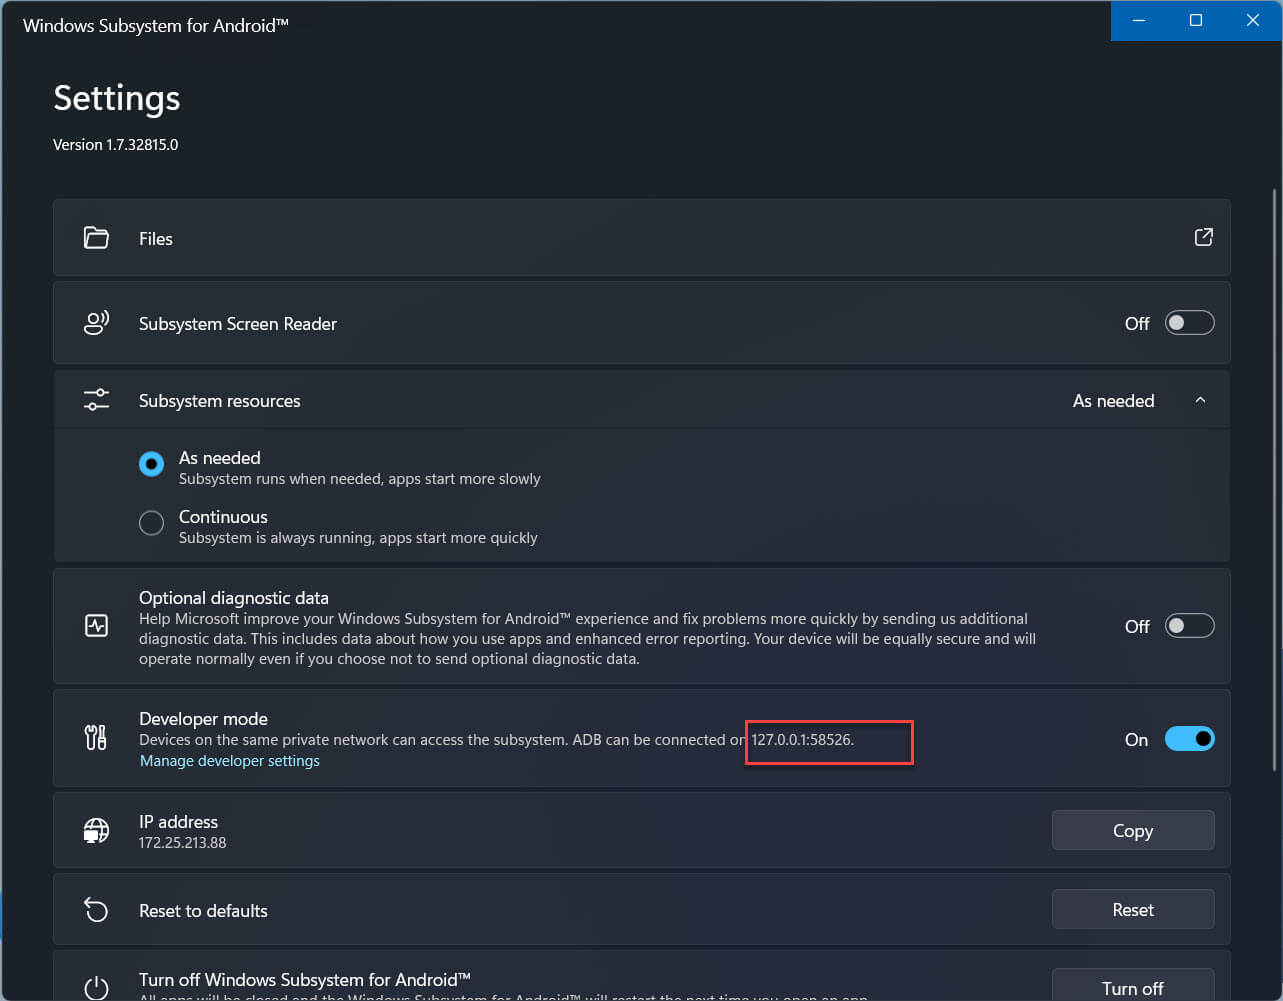
Шаг 19: Обратите внимание на адрес ADB, в разделе «Developer mode» отображается как 127.0.0.1:58526 (он должен быть таким же для вас)
Установите соединение
Шаг 20: Откройте Powershell от имени администратора и перейдите в папку «C:\Users\Almanex\Downloads\platform-tools_r32.0.0-windows\platform-tools» для этого можно использовать команду, предварительно заменив Имя_пользователя:
cd C:\Users\Имя_пользователя\Downloads\platform-tools_r32.0.0-windows\platform-tools
Теперь, выполните команду:
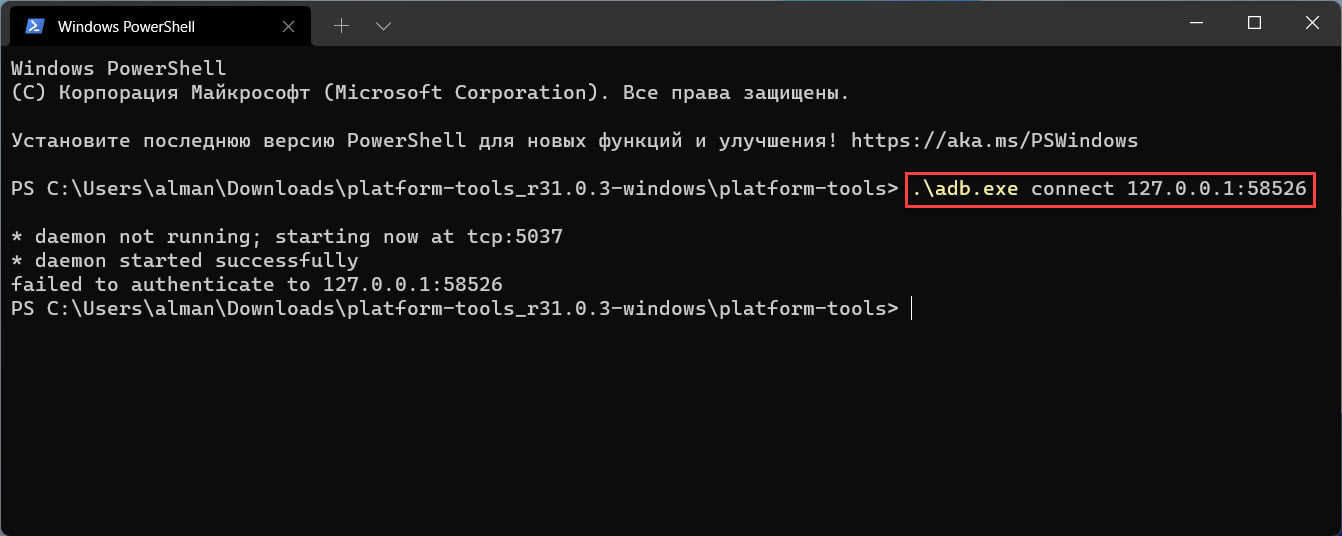
.\adb.exe connect 127.0.0.1:58526
Шаг 21: Убедитесь, что adb подключен, выполнив:
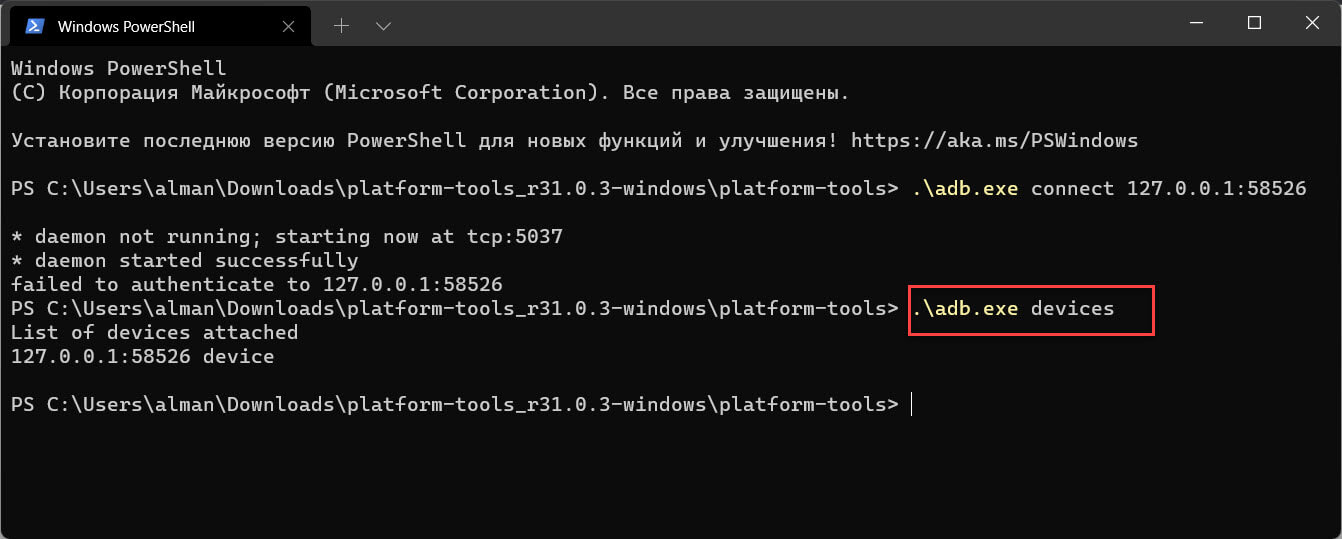
.\adb.exe devices
Установите Google Play Store в Windows 11
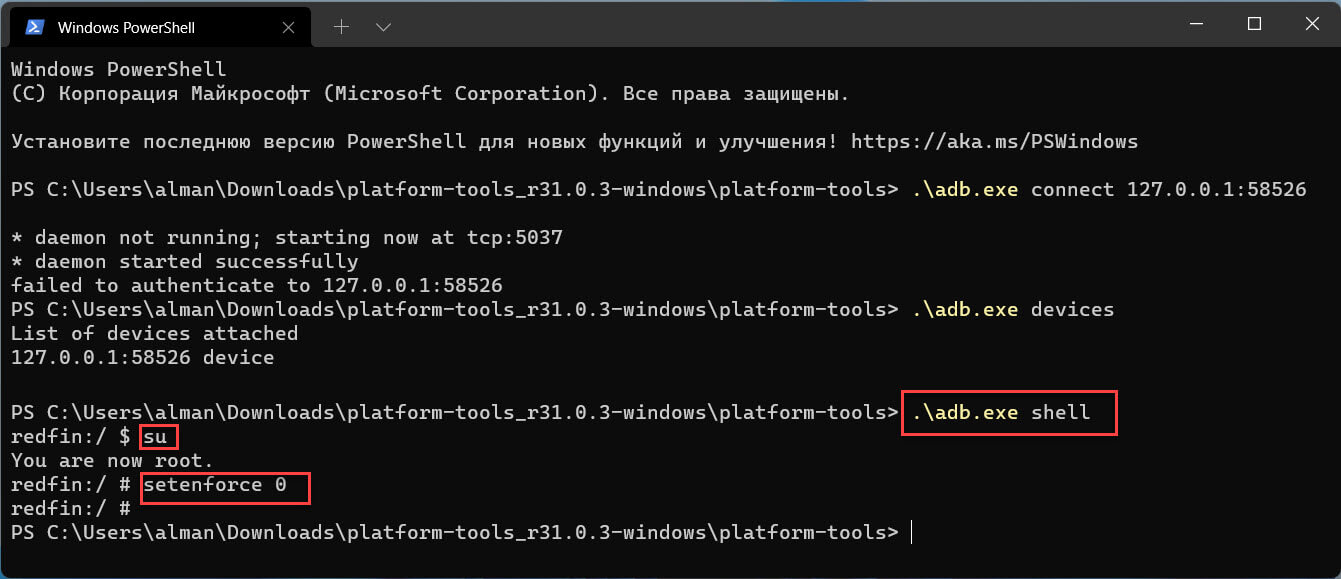
Шаг 22: Чтобы иметь возможность авторизироваться в магазине Google Play, выполните по очереди три команды:
.\adb.exe shell
su
setenforce 0
Если вы все сделали правильно, вы сможете войти в Google Play Store со своей учетной записью Google.
Теперь вы можете пользоваться полным набором приложений Google Play на наших компьютерах с Windows 11.
Большое спасибо ADeltaX, благодаря которому это стало возможным!
На этом мы завершаем руководство о том, как установить Google Play Store на ПК с Windows 11 с помощью подсистемы Windows для Android. Play Маркет, вероятно, лучший вариант, потому что он может похвастаться большим каталогом приложений и обеспечивает безопасную и надежную экосистему.
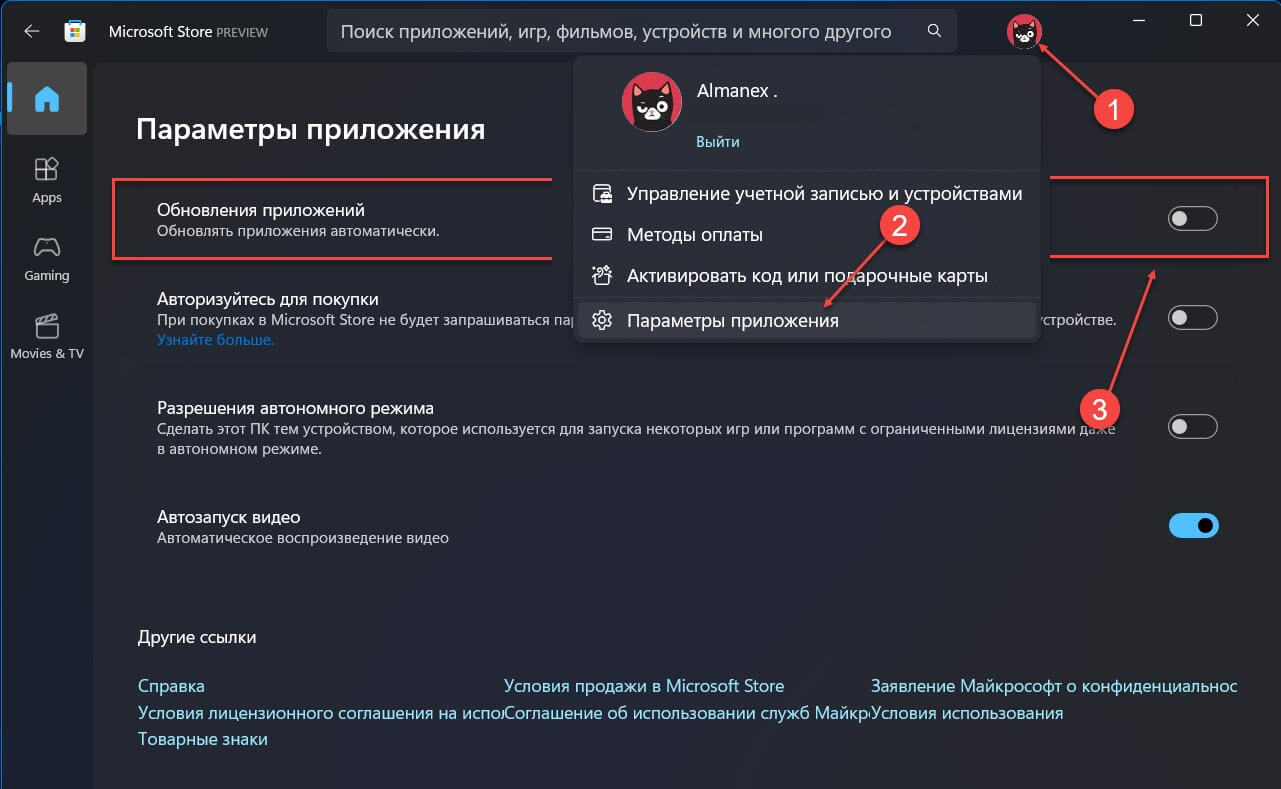
Если вы хотите, чтобы будущие обновления для подсистемы Windows для Android не сбросили выполненный вами процесс, вы можете отключить автоматические обновления для приложений в Магазине Microsoft: перейдите в меню «Профиль» → «Параметры приложения» и отключите автоматическое «Обновление приложений». Если вы хотите обновить другие приложения, вам необходимо обновить их вручную.
Вопросы.
- Могу ли я использовать Google Play Store для установки приложений в Windows 11?
Да, Google Play Store полностью работает в Windows 11. Спасибо пользователю Twitter ADeltaX.
- Нужен ли мне канал Windows Beta для запуска приложений Android в Windows 11?
Официально да. Но вы можете установить модифицированный пакет Msixbundle, чтобы он работал в любой сборке Windows 11.
- Как удалить приложение Android из Windows 11?
Чтобы удалить приложение Android из Windows 11, откройте меню «Пуск» найдите приложение, которое хотите удалить. кликните приложение правой кнопкой мыши и выберите «Удалить».
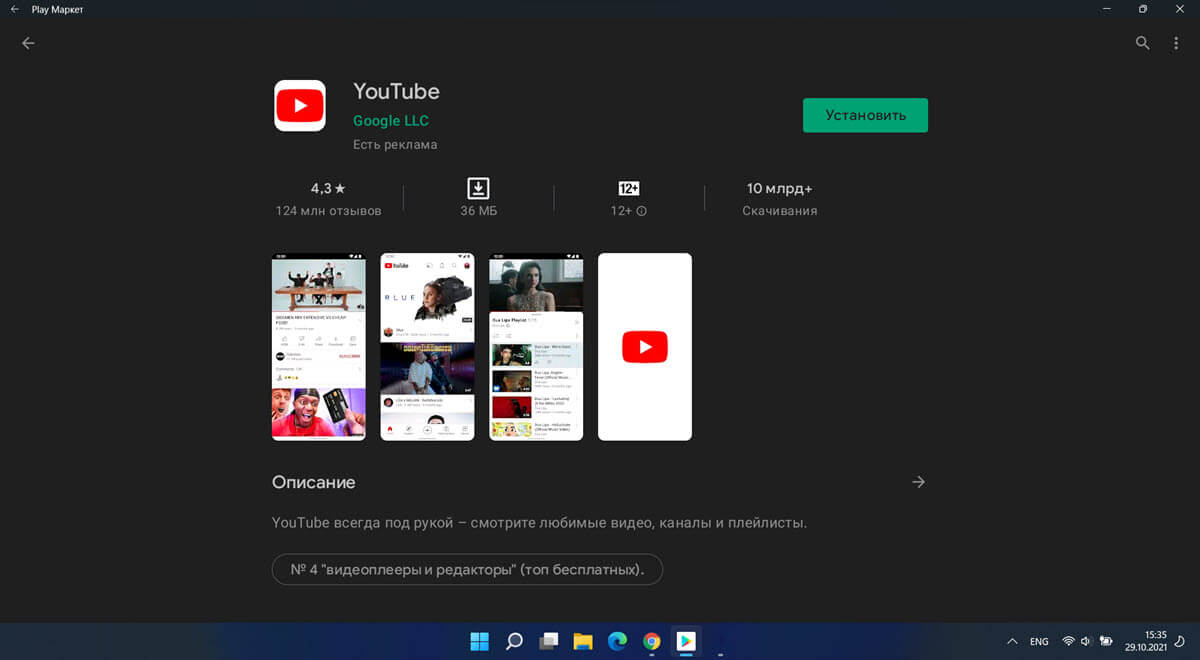
When Windows 11 announced the ability to install and use Android apps, everybody was over the moon. People were excited to run social media apps, games, and more directly from their PC. Sadly this excitement was cut short when Microsoft revealed that they would be using the Amazon App Store instead of the Google Play Store.
For comparison, the Amazon apps store only has around 460,000 while the Google alternative has 3.48 million apps in total. This is one of the reasons many users have been looking to install Google Play Services and Store manually. Are you in the same boat? Then we have the perfect guide for you!
Use the methods below to get and use Google Play Store and Gapps on your Windows 11 PC.
Related: How to Ungroup Icons on Windows 11 Taskbar With a Registry Hack
Method #1: Install custom WSA with Gapps and Play Store pre-installed
A simpler way to get Google Apps and Google Play Store with WSA is by using a pre-modified WSA that has the Gapps pre-installed. This WSA was shared by a Redditor called Rageman666 (see here). Once downloaded, you can use the mod given below to sign in to Google Play Store with your Google account. (However, if you want to install WSA officially only and then take on the complex method of installing Gapps yourself, then look at Method 2 below.)
What do you need
- Modified WSA | Download Link (Mirror | Mirror 2)
- ADBToolkit | Download Link
- Important: You will need to uninstall the original WSA from your system in case you have it installed before proceeding with this guide.
Step-by-step guide
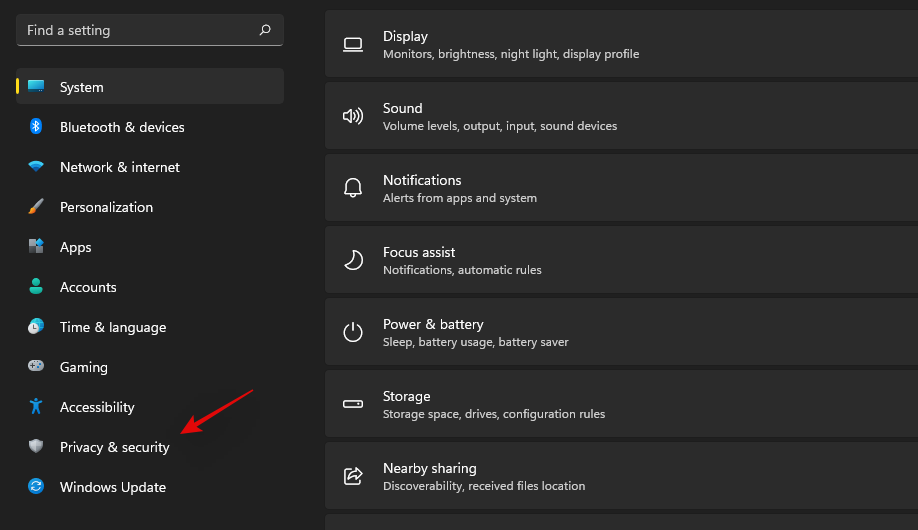
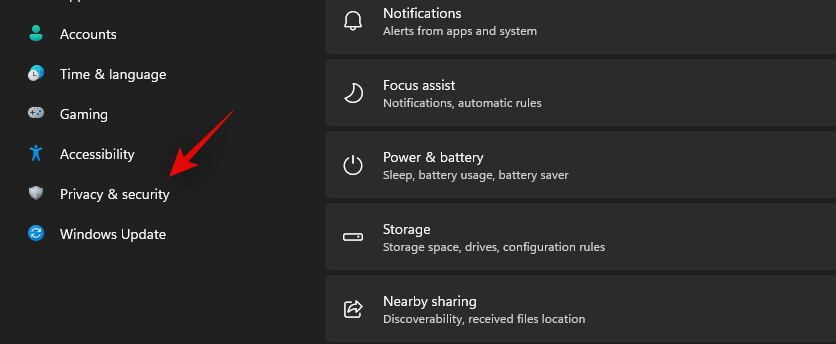
We will first need to enable developer mode on your installation of Windows 11. Press Windows + i on your keyboard and select ‘Privacy & security’ from the left sidebar.
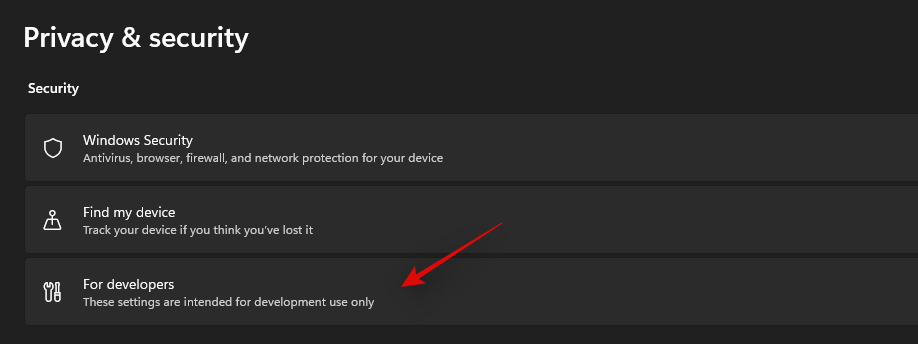
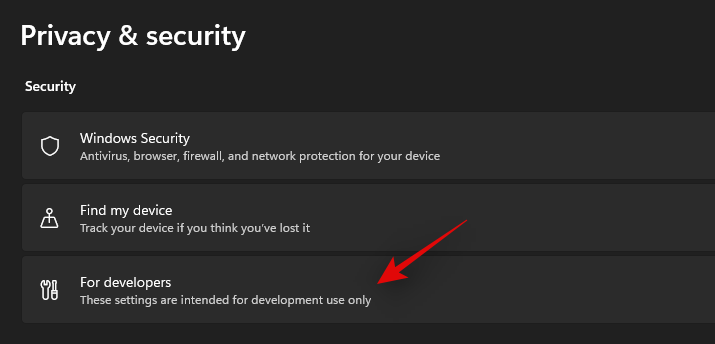
Click on ‘For developers’ on your right.
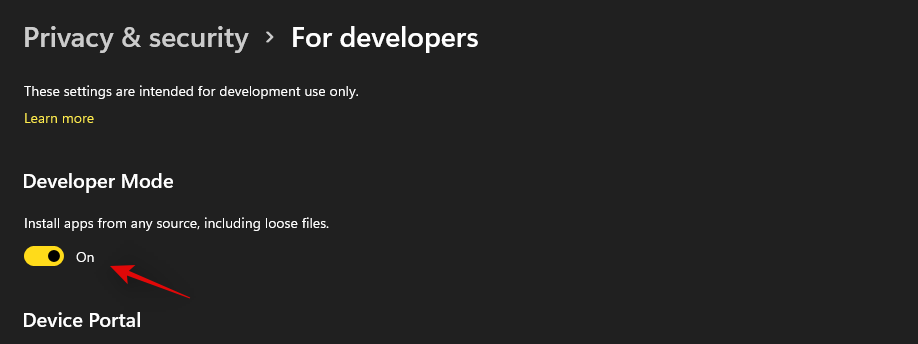
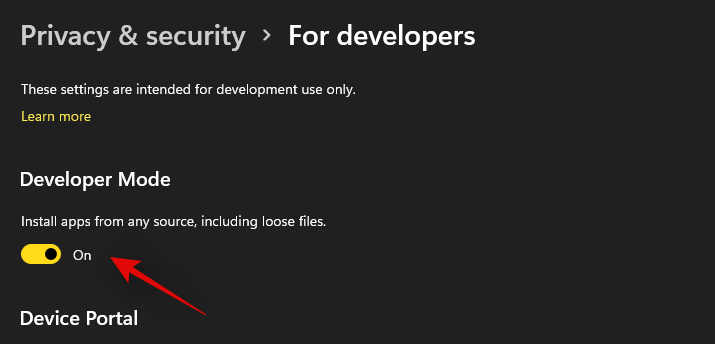
Click and turn on the toggle for ‘Developer Mode’. Click on ‘Yes’ to confirm your choice.
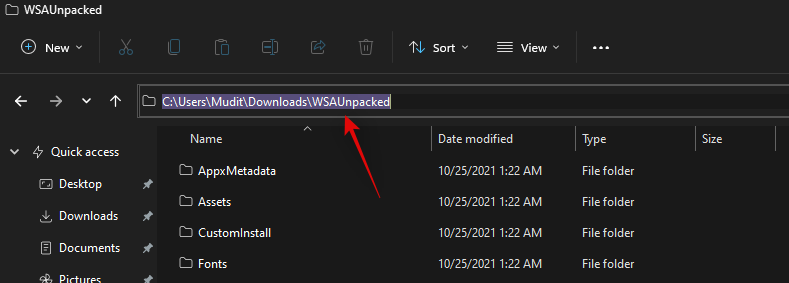
Now download the WSA linked above to a convenient location on your local storage. Unzip the files to a new folder named ‘WSAUnpacked’. Click on the address bar in the ‘WSAUnpacked’ folder and copy the path to your clipboard.
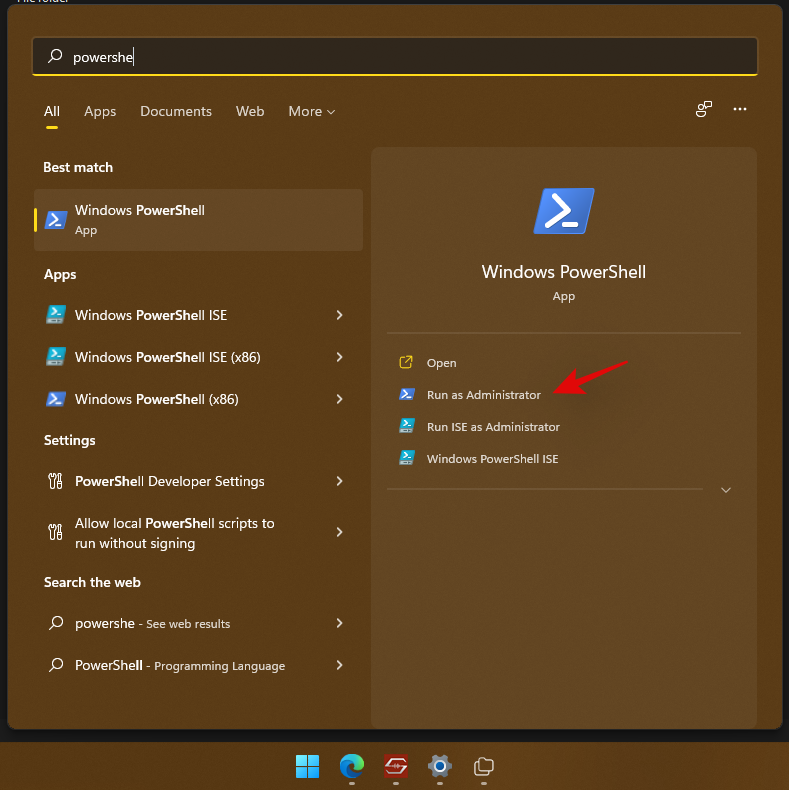
Press Windows + S on your keyboard, search for ‘Powershell’ and click on ‘Run as administrator’ once it shows up in your search results.
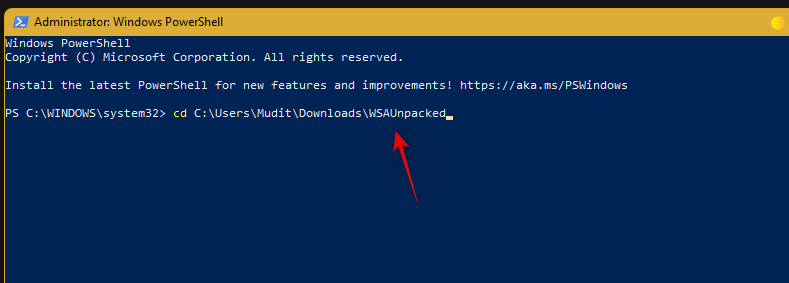
Type in the following command and replace PATH with the path we copied to your clipboard. Ensure that you remove the quotes from the pasted path.
cd PATH
Now type in and execute the following command.
Add-AppxPackage -Register .\AppxManifest.xml
The modified WSA will now be installed on your system. Press the Windows key and launch the same from your Start menu.
Once the Subsystem launches, click and enable ‘Developer Mode’.
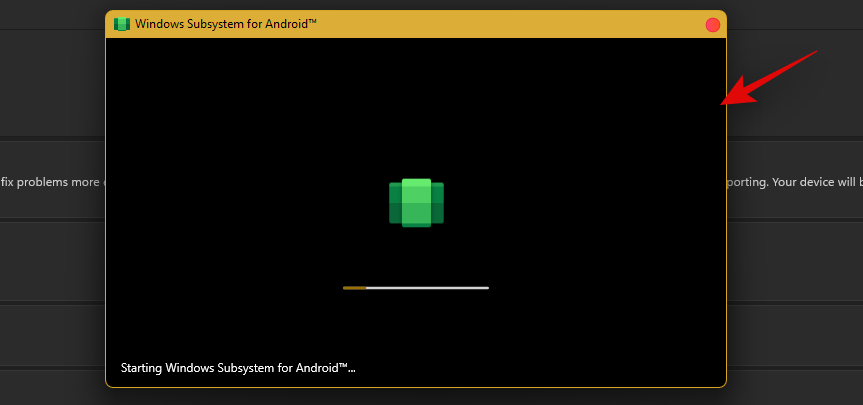
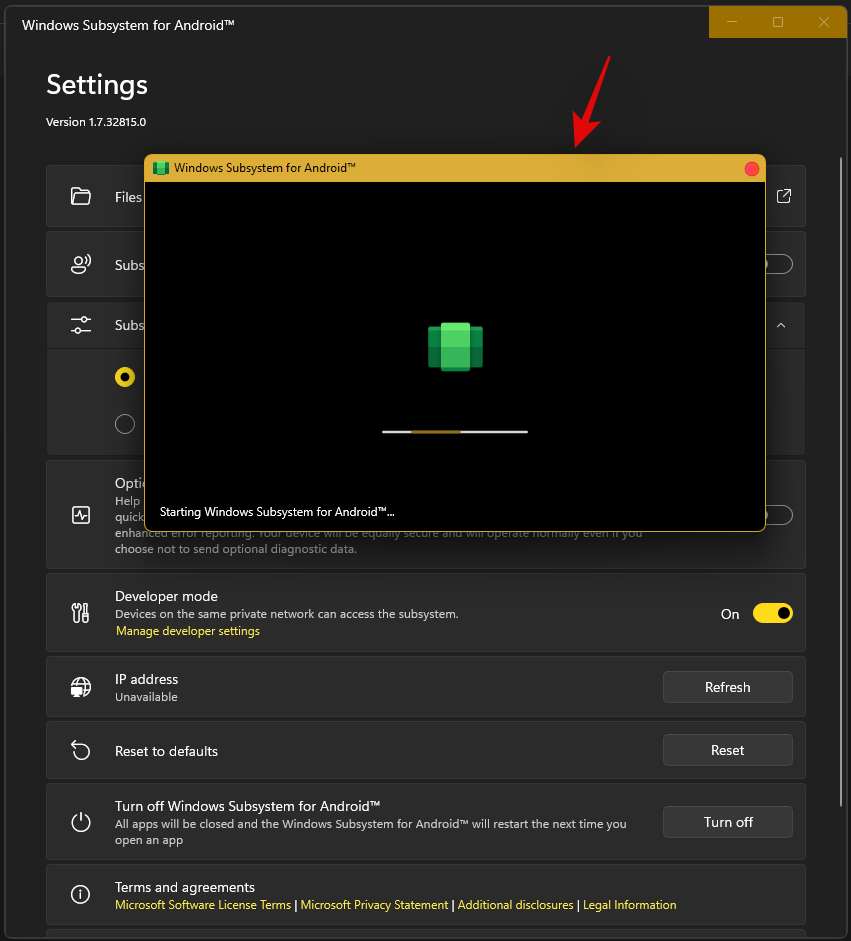
Now click on ‘Files’ at the top so that it launches Windows Subsystem for Android on your system.
Close the Files app. We now need to use a workaround to sign in to the Play Store.
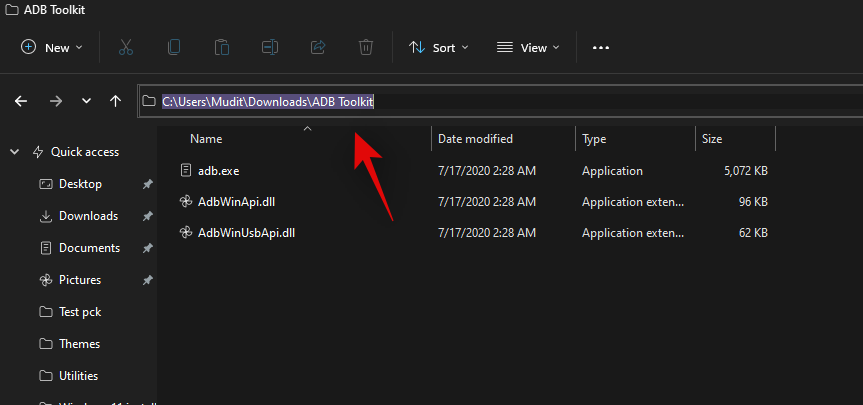
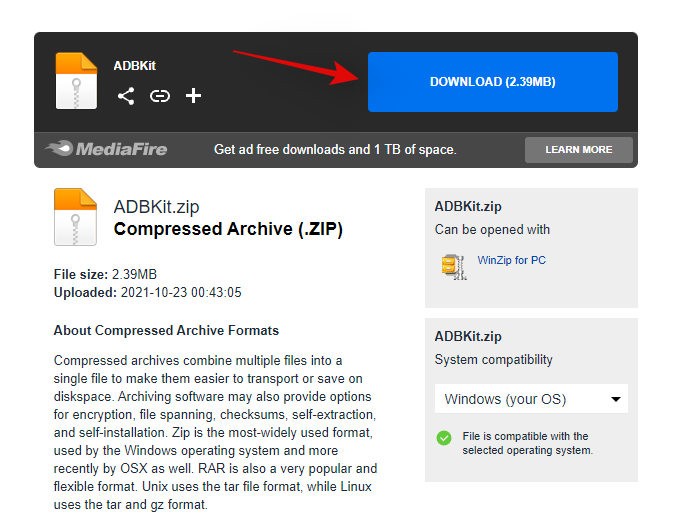
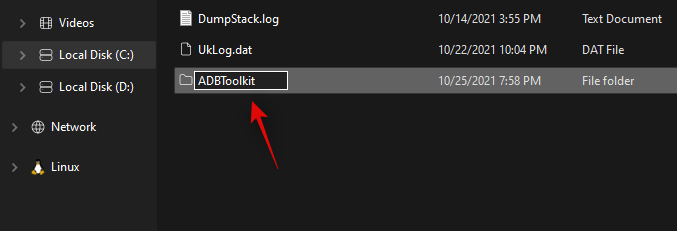
Download ADBToolkit linked above and extract it to a new folder on your desktop named ‘ADBToolkit’. Once extracted, click on the address bar at the top and copy the address to your clipboard.
Press Windows + S on your keyboard and search for Powershell. Click on ‘Run as administrator’ once Powershell shows up in your search results.
Type in the following command and replace PATH with the path to ADBToolkit we copied earlier.
cd PATH
Note: Ensure that you remove the quotes from the pasted path to ADBToolkit.
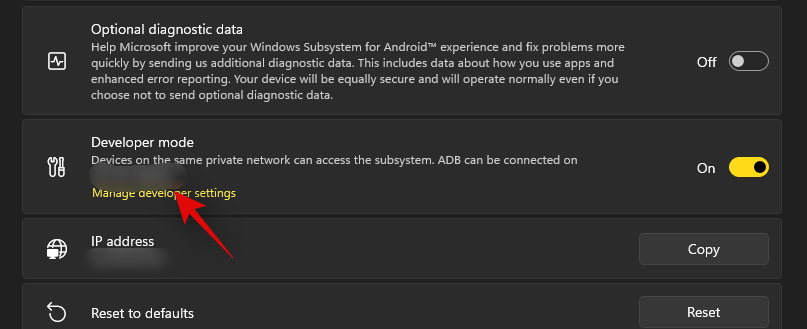
Now switch back to the subsystem window and copy the address given below ‘Developer Mode’.
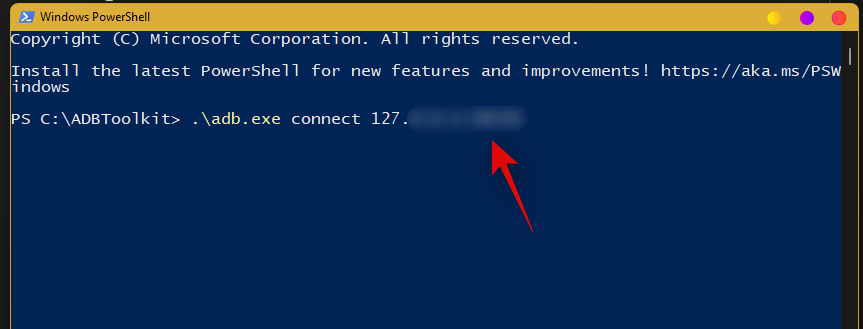
Execute the command given below to launch and connect ADB. Replace ‘ADDRESS’ with the address copied to your clipboard (from above).
.\adb.exe connect ADDRESS
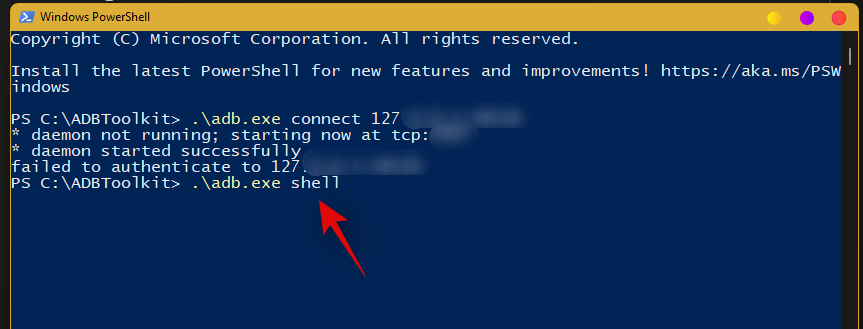
Type in the following command to launch ADB shell.
.\adb.exe shell
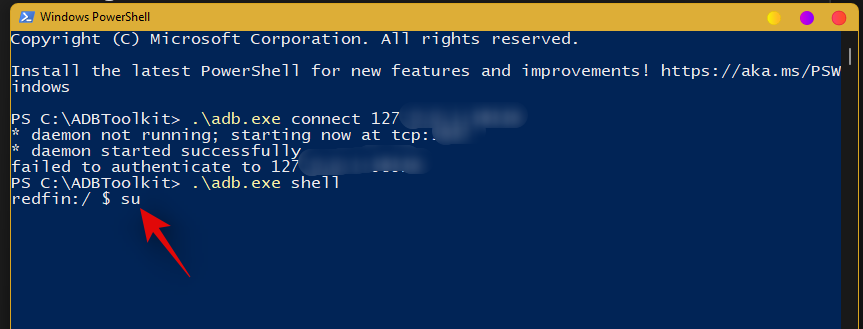
Now use the following command to gain root access.
su
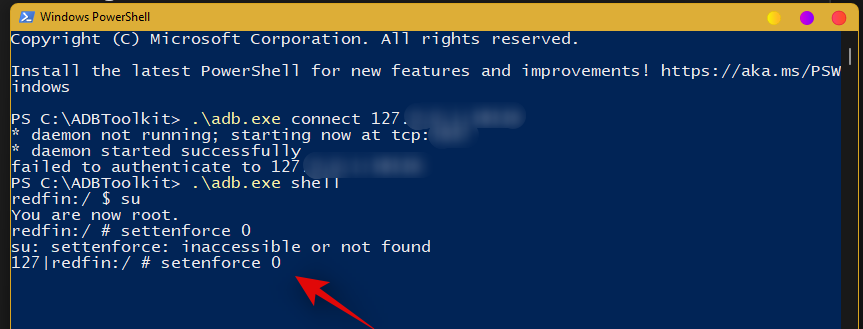
Now type in the following command.
setenforce 0
Type in ‘Exit’ to exit PowerShell.
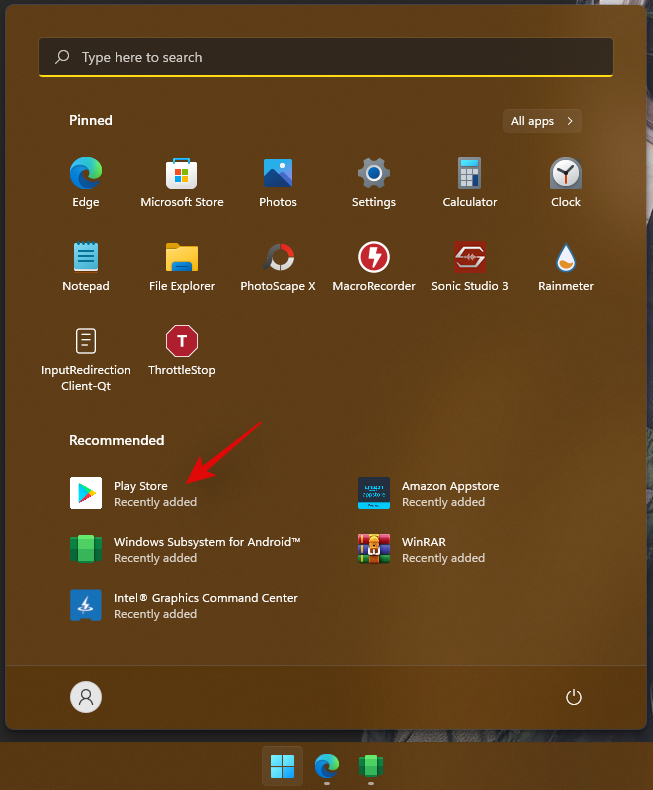
You can now close all the windows open on your desktop. Press Windows + S and search for ‘Play Store’ now. Click and launch the app once it shows up in your search results.
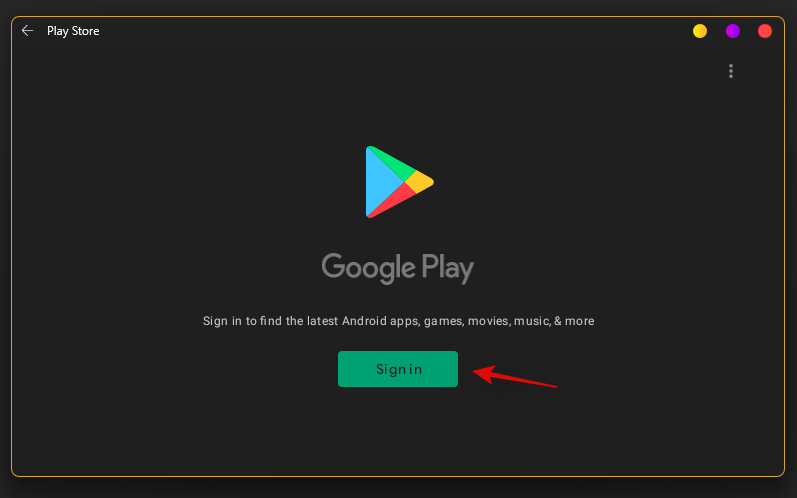
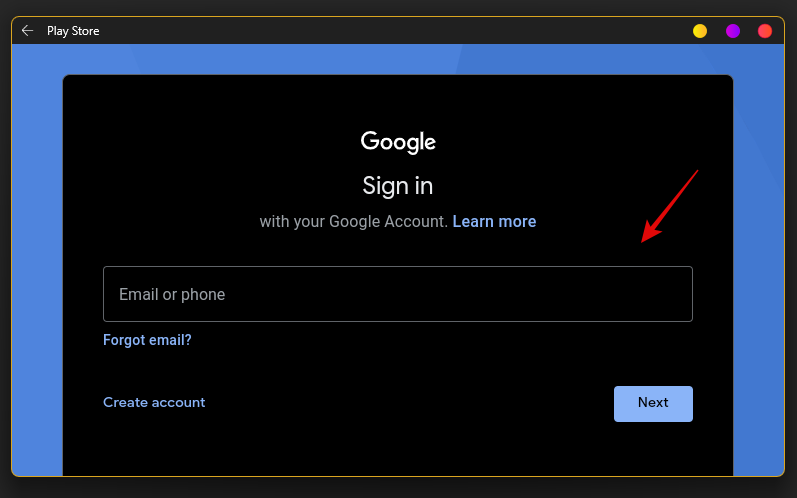
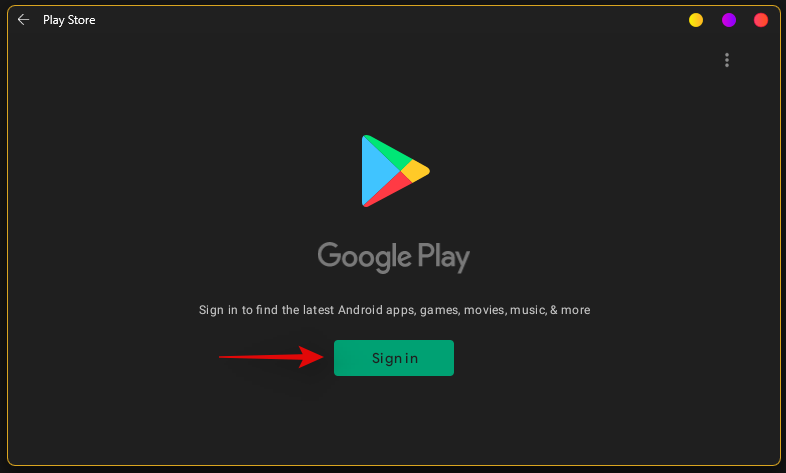
Now click on ‘Sign in’ and sign in with your Google account.
You will now be signed in with your Google Account and you should now be able to use Google Play Store on your Windows 11 PC.
And that’s it! You can now download and install the desired Android apps on your system directly from the Google Play Store.
Related: Sideload APK on Windows 11 using ADB manually | Automatically with a script
Method #2: Install WSA and then install Gapps yourself
The method above is much easier and thus easy to go with even though not exactly recommendable, as it’s a pre-modified (custom) WSA package. But if you want an official WSA package from Microsoft and want to install Gapps yourself over this, then this is the method for you. It’s quite complex btw, so may often wonder whether simply installing a custom WSA package that comes with Gapps pre-installed is worth it, which we’d say, is.
Getting Google Apps and Play Store on your PC on official WSA by installing Gapps package yourself is recommended as you wouldn’t need a pre-modified WSA which helps if you are concerned about the security of a custom WSA package under method 1.
What do you need
- WSGA script | Download Link (Gapps script for Windows Subsystem for Android)
- Windows Subsystem For Android | Link
- Store Adguard | Link
- OpenGApps | Link
- ADBToolkit | Download Link
- WinRAR | Download Link
- WSL: Windows Subsystem for Linux
- Ubuntu: Download Link
- Important: Uninstall the original Windows Subsystem For Android if you already have it installed on your PC before proceeding with this guide.
Step-by-step guide
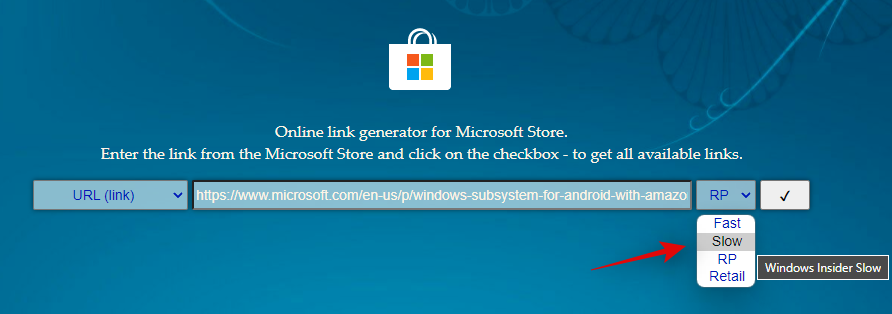
Visit the WSA link above and copy and paste the following link given below or above in the text box.
Link
Now click on the drop-down menu beside the text box and click on ‘Slow’.
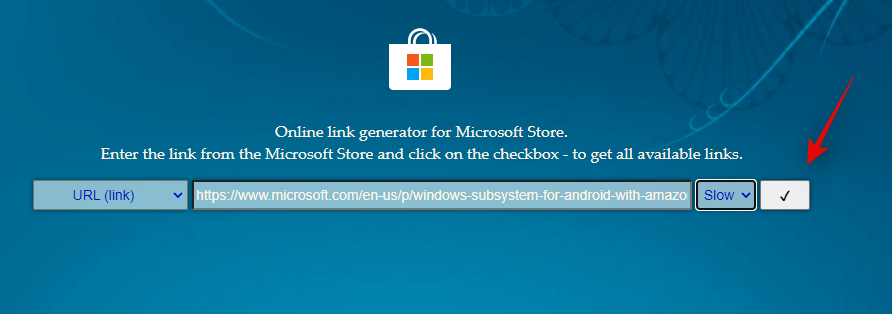
Click on the ‘Check Mark’ to process the given link.
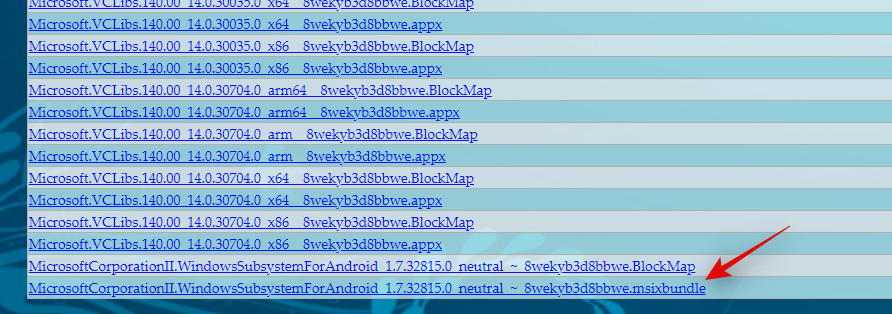
Once processed, all the linked download files will now be available on your screen. Scroll to the bottom and click on the .msix bundle at the bottom and download it to a convenient location on your local storage.
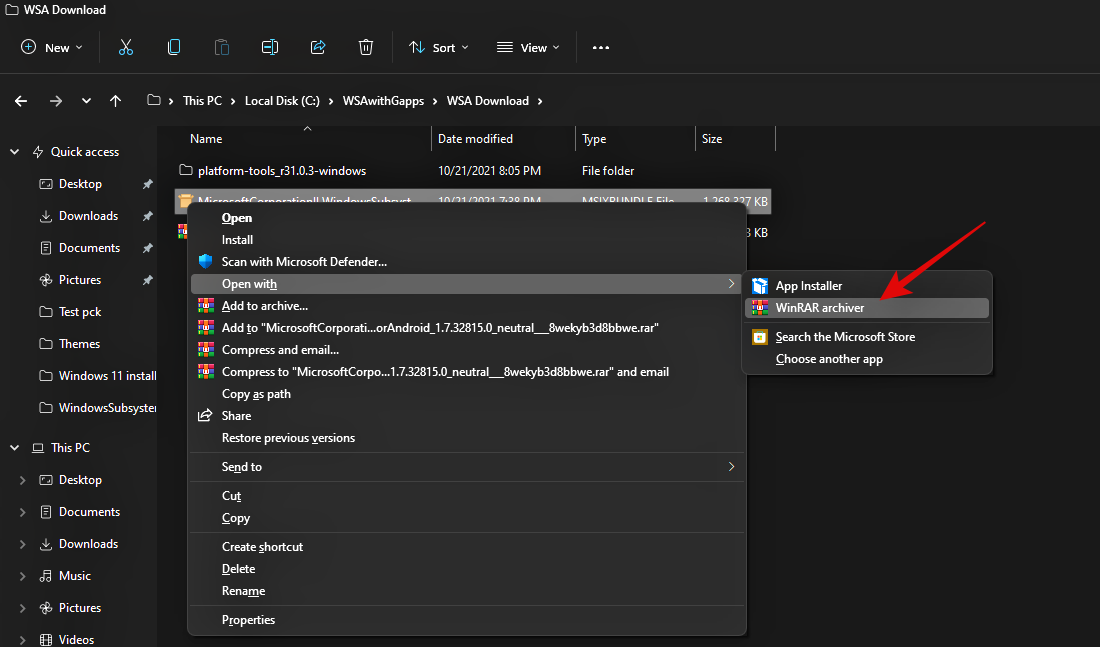
Now go to the downloaded file, right-click on it and open it with WinRAR. If you do not have WinRAR on your PC then use the link above to download and install the same.
Once the bundle is open in WinRAR, scroll to the bottom and check the architecture of the .msix bundle. It should match your CPU architecture, if not, you can select the desired version from the list and proceed with the guide.
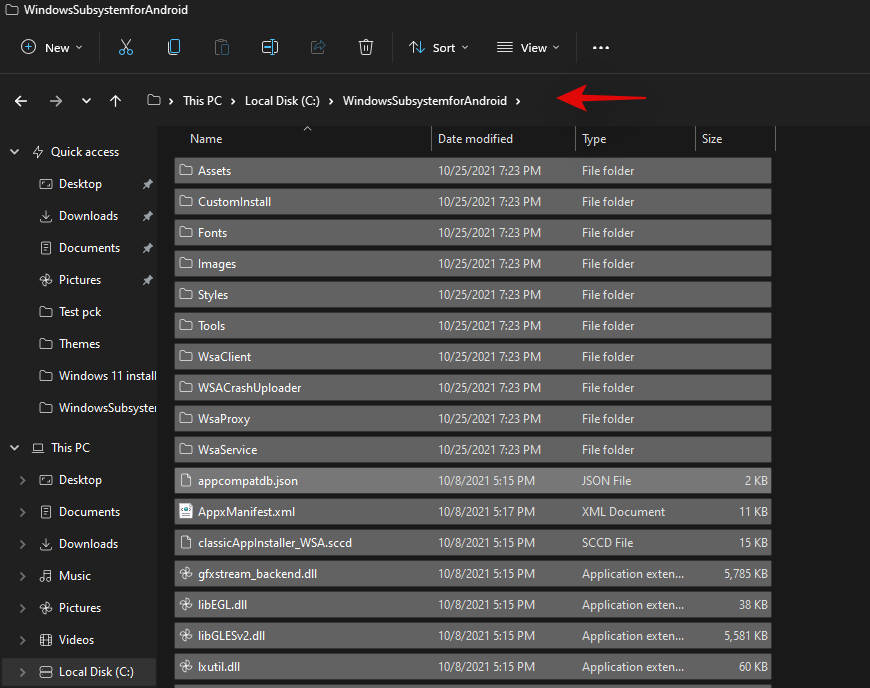
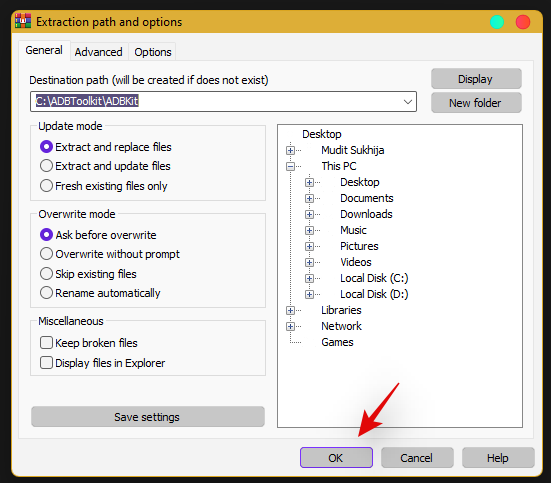
Double click and open the same bundle in WinRAR. Once you are done, go to your C/boot drive and create a new folder named ‘WindowsSubsystemForAndroid’.
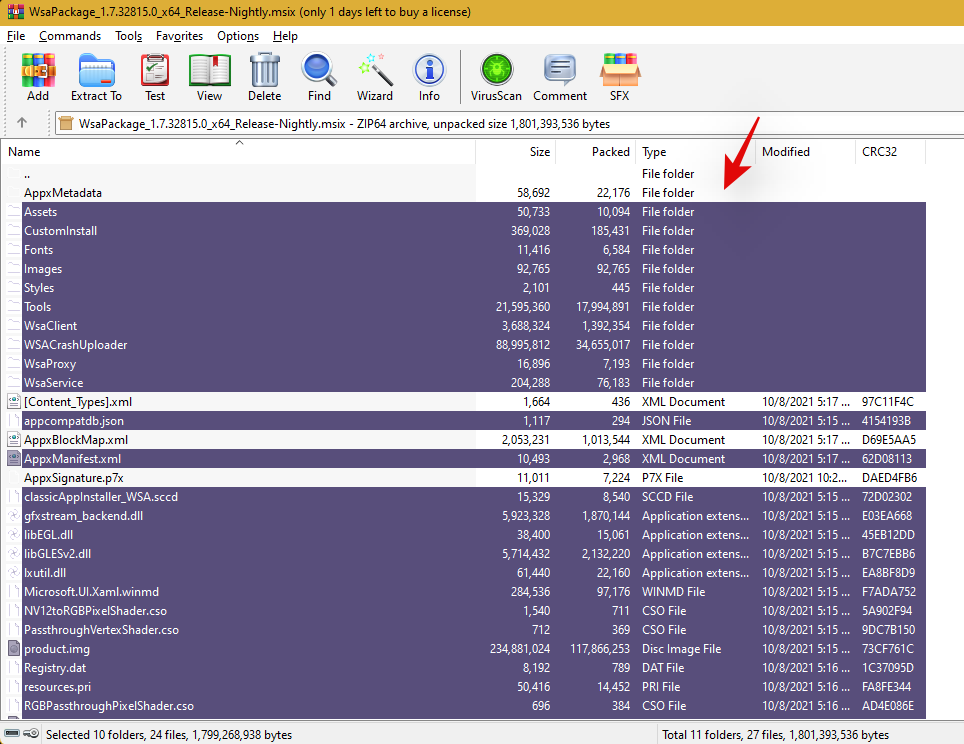
Switch back to Winrar and select all the files except the following folders and files.
- AppxMetadata (folder)
- AppxBlockMap.xml (file)
- AppxSignature.p7x (file)
- [Content Types].xml (file)
Copy all the selected files to the new ‘WindowsSubsystemForAndroid’ folder we created earlier.
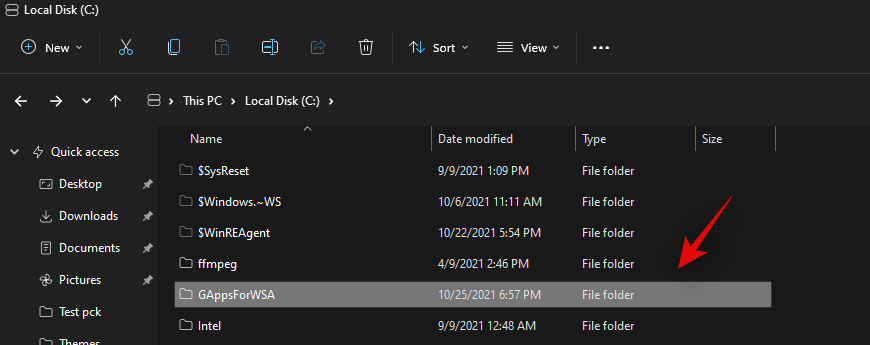
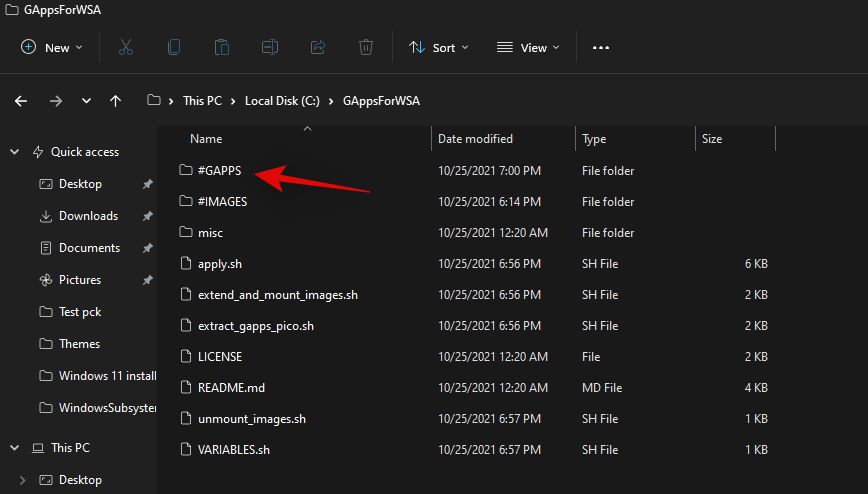
Once copied, create another new folder on your boot drive named ‘GAppsForWSA’.
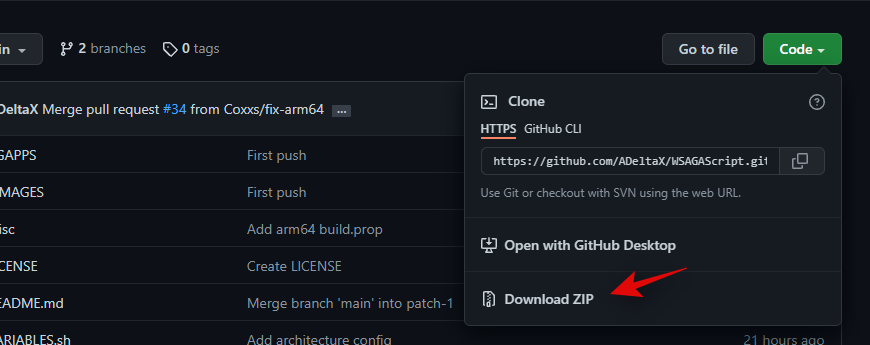
Open the link for the WSGA script at the top and download the same as a .zip to your local storage.
Extract the .zip to the new ‘GAppsForWSA’ folder that we created in your boot drive.
Note: Extract the contents of the ‘WSGAScript-main’ folder contents inside the archive.
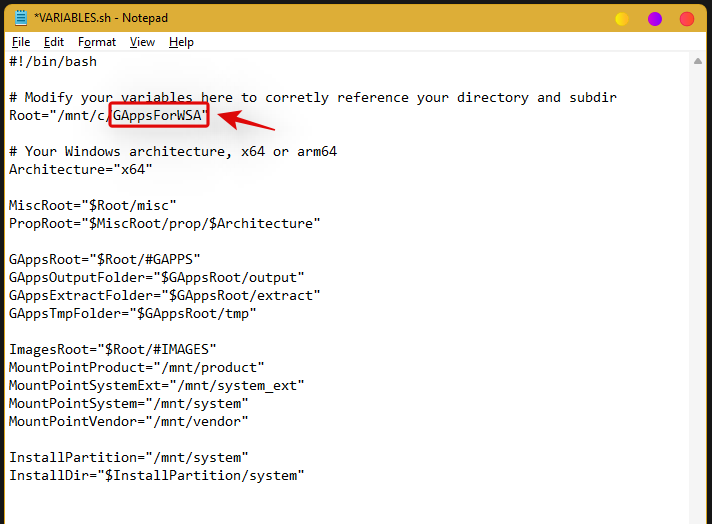
With the contents archived, right-click on ‘VARIABLEs.sh’ and open it with Notepad.
Replace ‘GAppsWSA’ with ‘GAppsForWSA’.
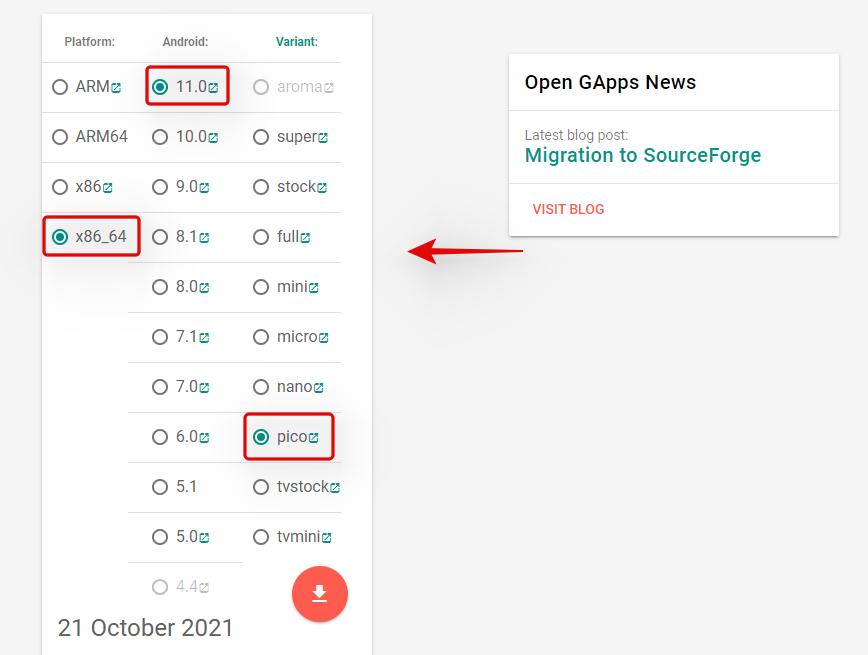
Press Ctrl + S on your keyboard to save the changes. We will now download GApps for your WSA installation. Visit the link for OpenGApps at the top and select the following options given below.
- Platform: x86_64
- Android: 11.0
- Variant: pico
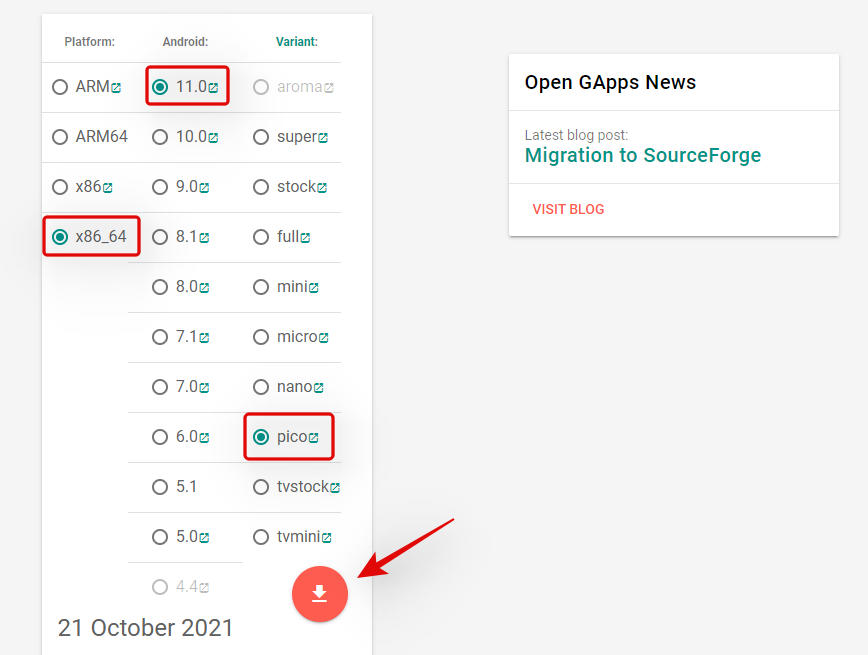
Click on the ‘Download icon’.
You will now be redirected to Sourceforge, wait a few seconds and the download should automatically be initiated for you.
Download and store the archive in the following location in the ‘GAppsForWSA’ folder on your boot drive.
Boot Drive\GAppsForWSA\#GAPPS
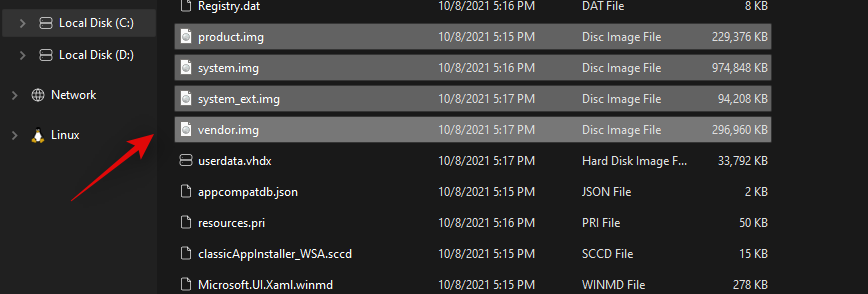
Now go back to your boot drive and open the ‘WindowsSubsystemForAndroid’. Copy the following 4 files.
- vendor.img
- system_ext.img
- system.img
- product.img
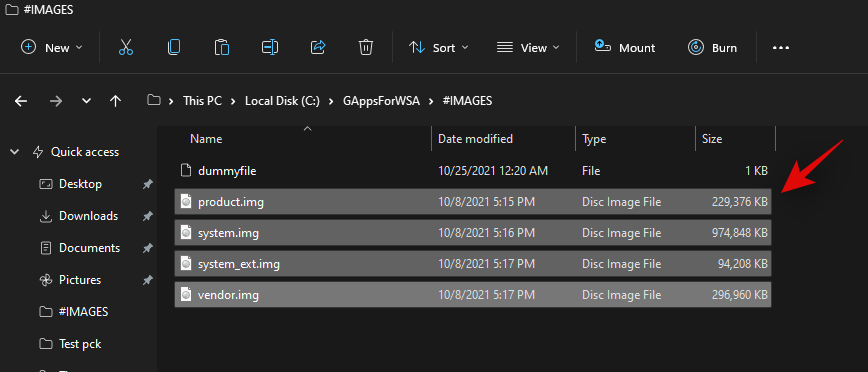
Navigate to the following location and paste all your copied files.
Boot Drive\GAppsForWSA\#IMAGES
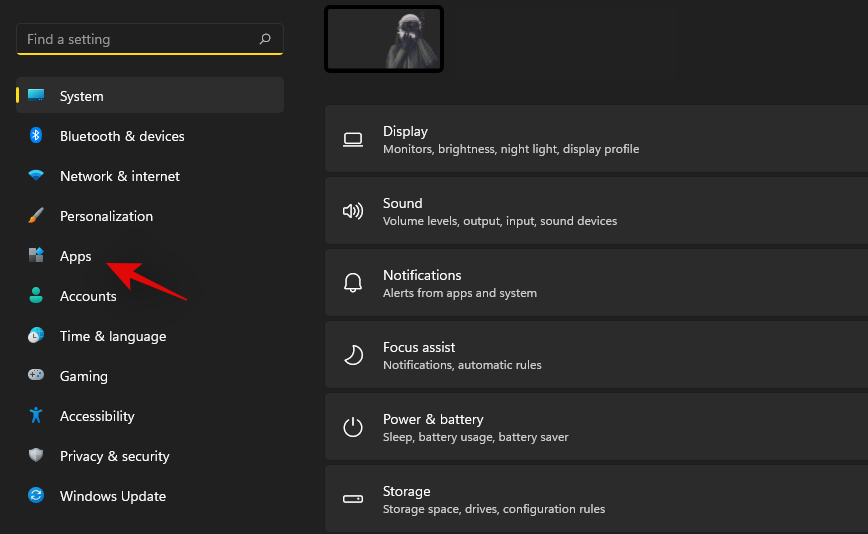
We will now install WSL for your system. WSL is a Linux Subsystem that will allow you to use executables and scripts developed for Linux. Press Windows + i on your keyboard to open the Settings app and then click on ‘Apps’ on your left.
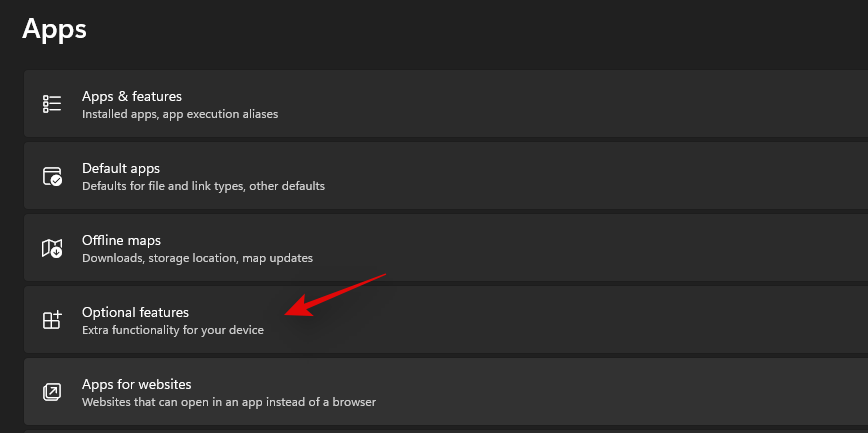
Now click on ‘Optional Features’.
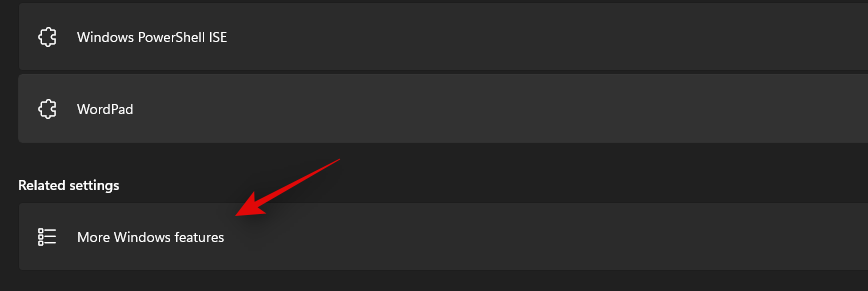
Scroll down and click on ‘More Windows features’.
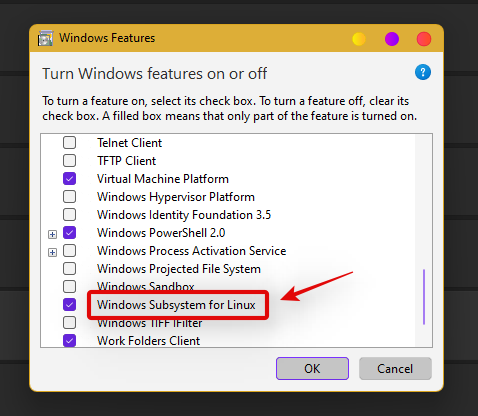
A new window for available features will now open on your screen. Scroll to the bottom and check the box for ‘Windows Subsystem for Linux’.
Click on ‘Ok’ once you are done. The Linux Subsystem will now be installed on your PC. You will now be prompted to restart your PC. We recommend you restart your PC at this point even if you are not prompted.
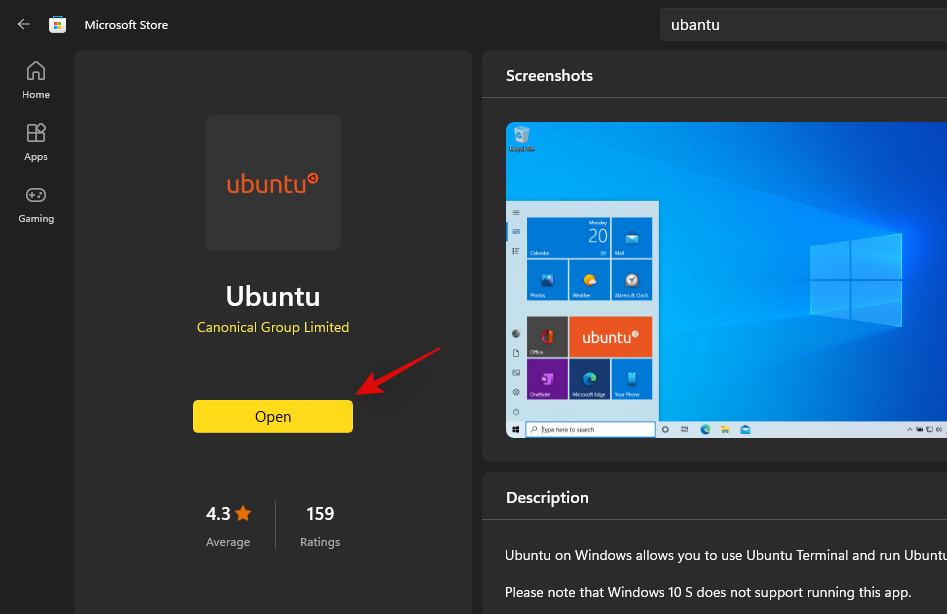
We will now install a distro that will help us during this setup. We recommend you use Ubuntu available on the Microsoft Store as it is easily downloaded and removed from your system. Use the link below to visit and download Ubuntu in the Microsoft Store.
- Ubuntu | Microsoft Store Link
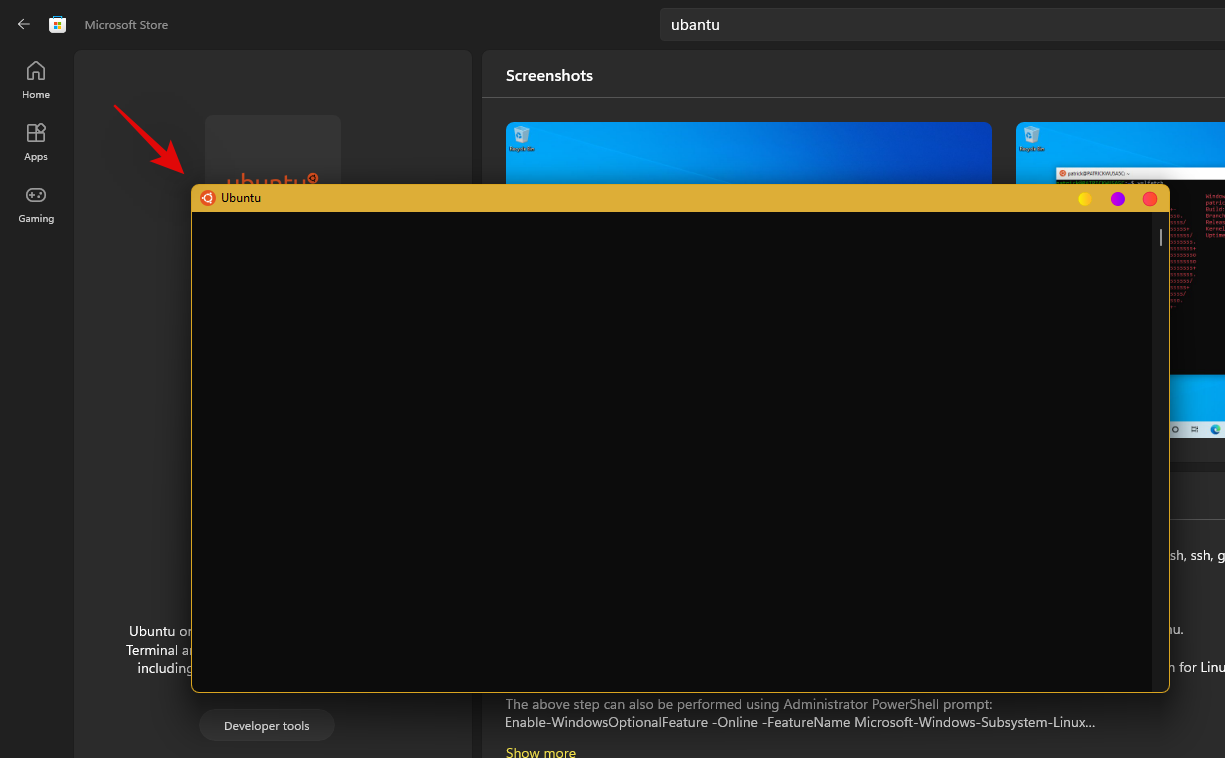
Click on ‘Open’ once the app is installed to configure your installation. You can also launch the app from your Start menu depending on your preference.
Ubuntu will now be installed on your system. Once installed, proceed to set a Username to protect your installation. Subsequently, enter a password to protect root access on your system.
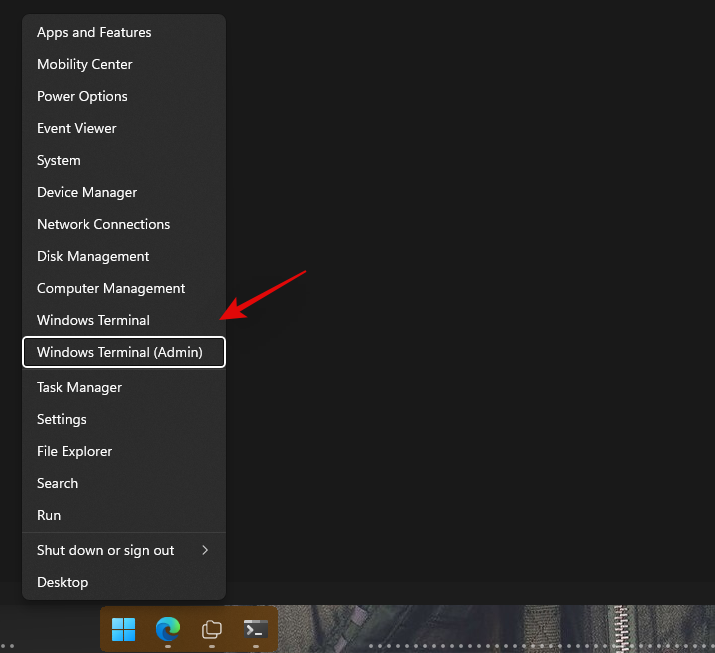
The Distro has now been setup on your system, you can close the current window and press Windows + X instead. Select ‘Windows Terminal (admin)’.
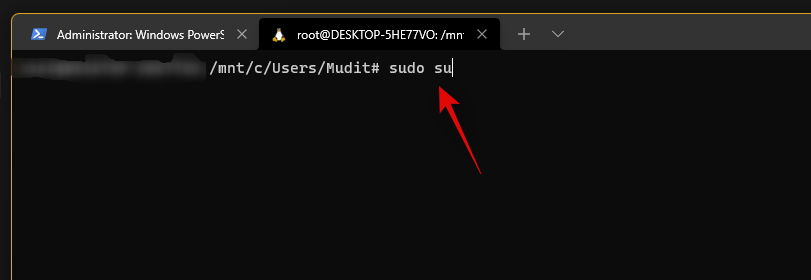
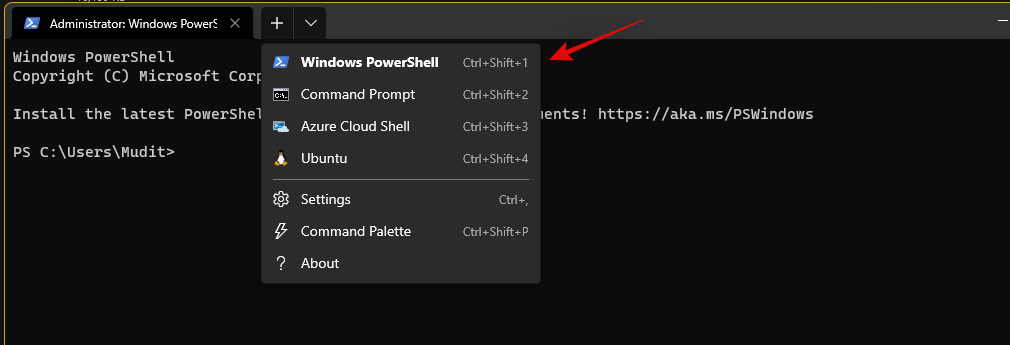
Click on the drop-down arrow at the top and select the same to launch a WSL terminal in the new tab. We’ll now need root access to modify your WSA with GApps. Type in the following command and press Enter on your keyboard. If you did not set a username or password then you should already have root access in the terminal. You can skip this step and move to the next one instead.
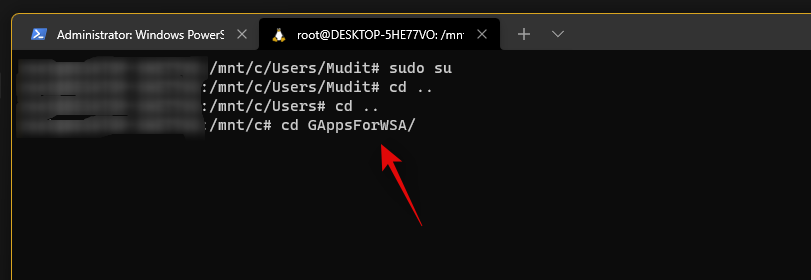
sudo su
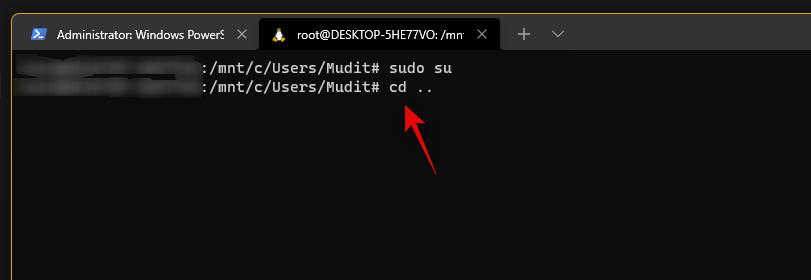
Enter your password to grant root access (if applicable). Now type in the following commands one by one.
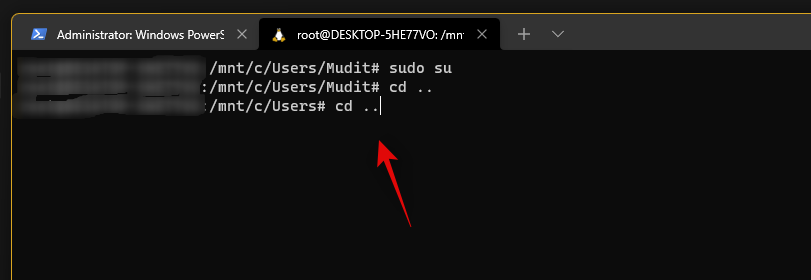
cd ..
cd ..
Finally use the command below to navigate to ‘GAppsForWSA’.
cd GAppsForWSA/
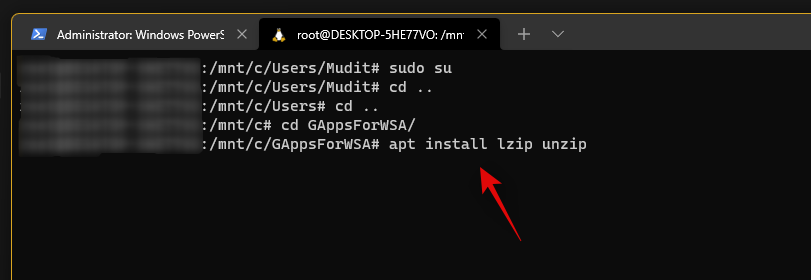
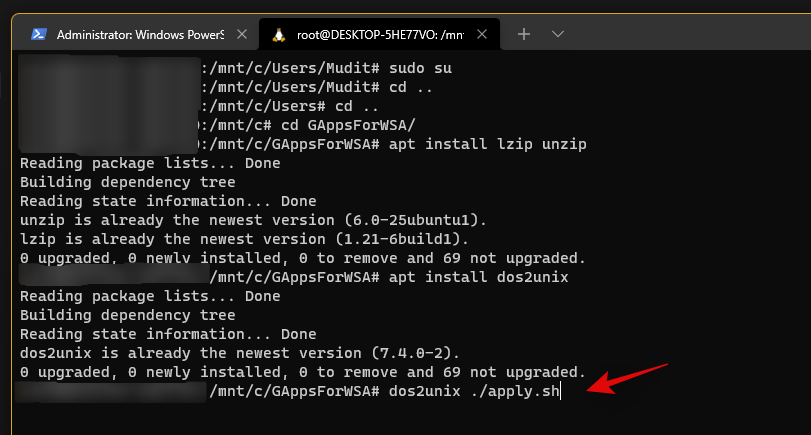
Now type in the following command to install ‘lzip’ and ‘unzip’ which will be needed for this process.
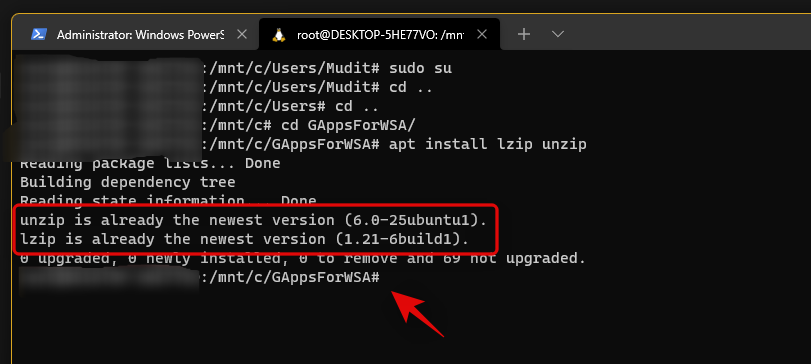
apt install lzip unzip
Note: If you are unable to get lzip or unzip setup, then run apt-get update -y to update your repositories and packages.
Confirm your choice by typing in ‘Y‘.
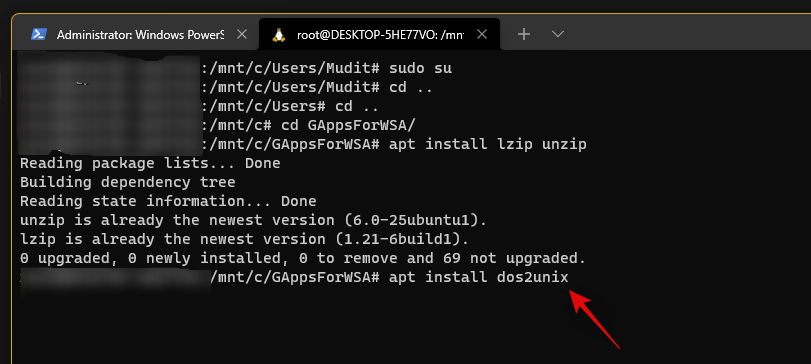
We will now install ‘dos2unix’ which will also be needed for this modification. Use the command below to install the same on your PC.
apt install dos2unix
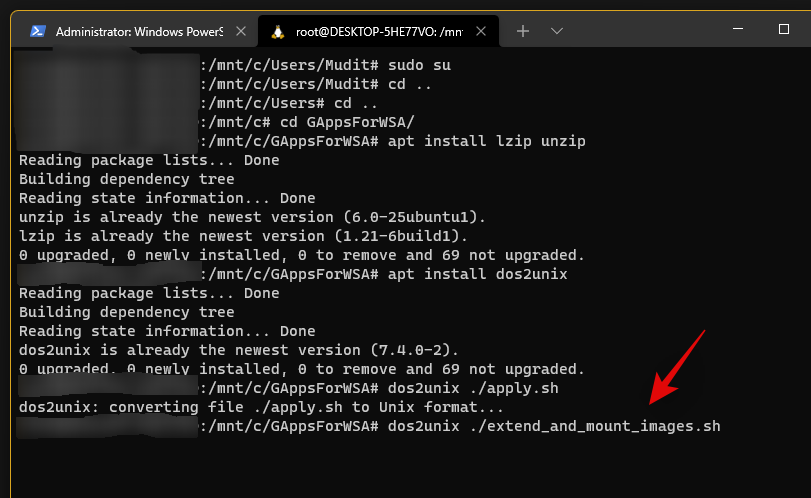
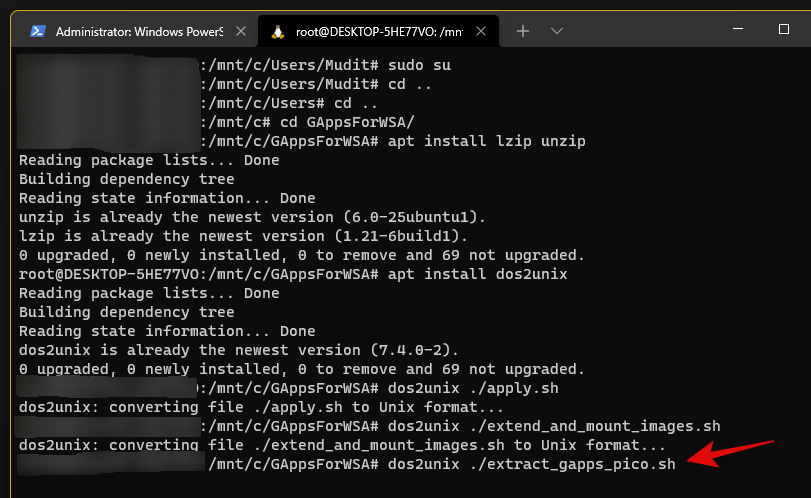
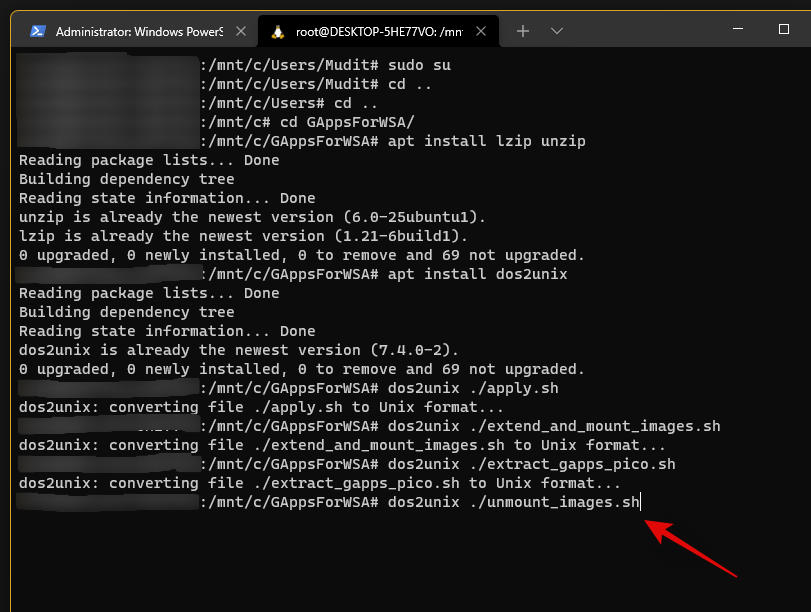
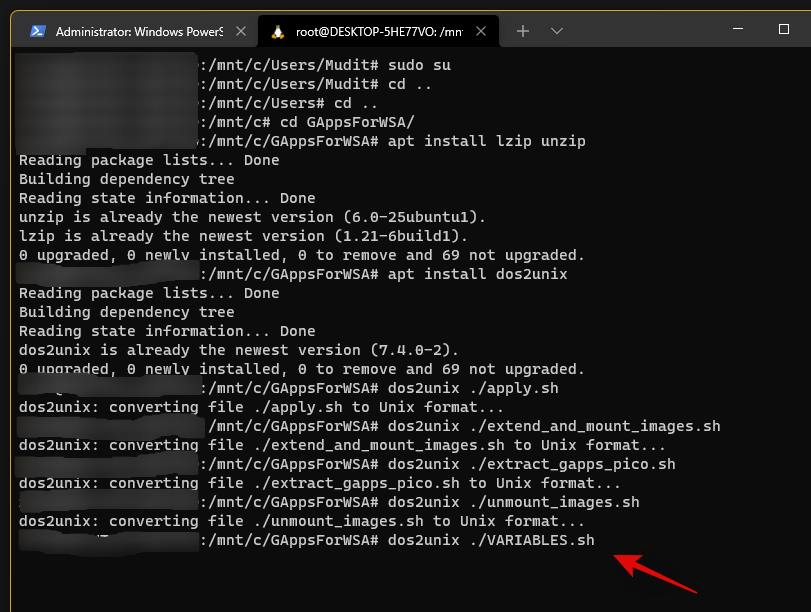
Now it’s time to modify your WSA image. Type in and execute the following commands in the terminal one by one in the same order.
- Command 1:
dos2unix ./apply.sh
- Command 2:
dos2unix ./extend_and_mount_images.sh
- Command 3:
dos2unix ./extract_gapps_pico.sh
- Command 4:
dos2unix ./unmount_images.sh
- Command 5:
dos2unix ./VARIABLES.sh
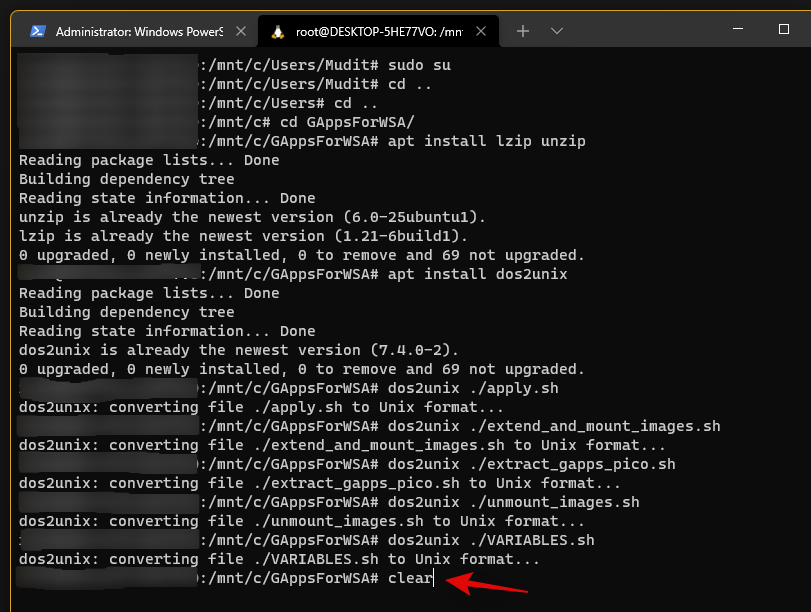
Once the process completes, type in the following to clear up your terminal for better management.
clear
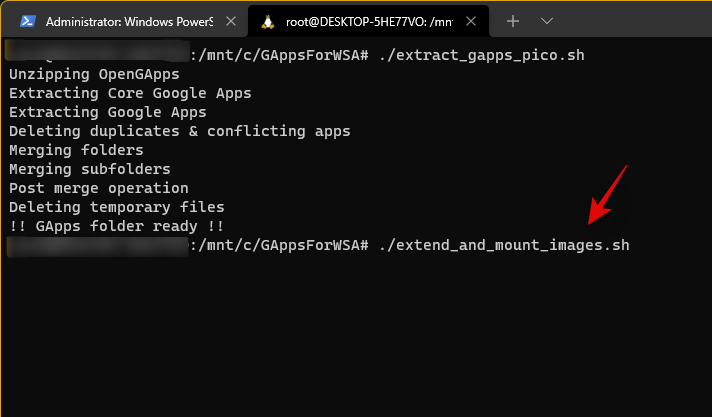
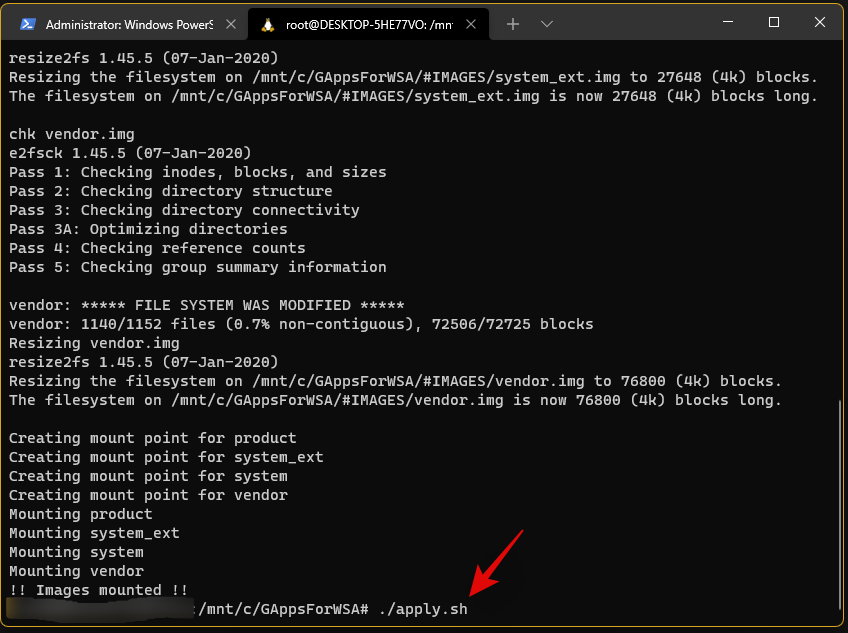
Now that we have our scripts, let’s execute them. Type in and execute the commands given below one by one in the same order.
- Command 1:
./extract_gapps_pico.sh
- Command 2:
./extend_and_mount_images.sh
- Command 3:
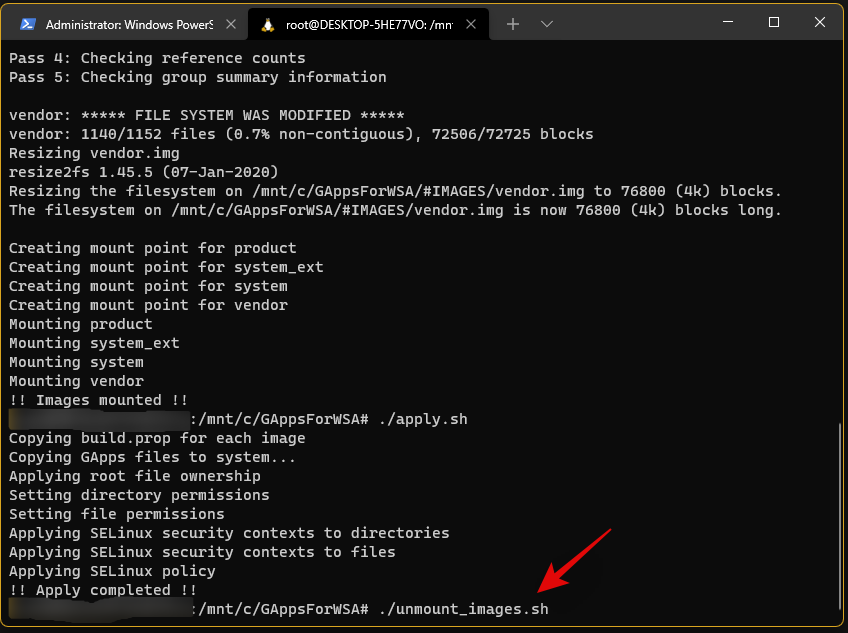
./apply.sh
- Command 4:
./unmount_images.sh
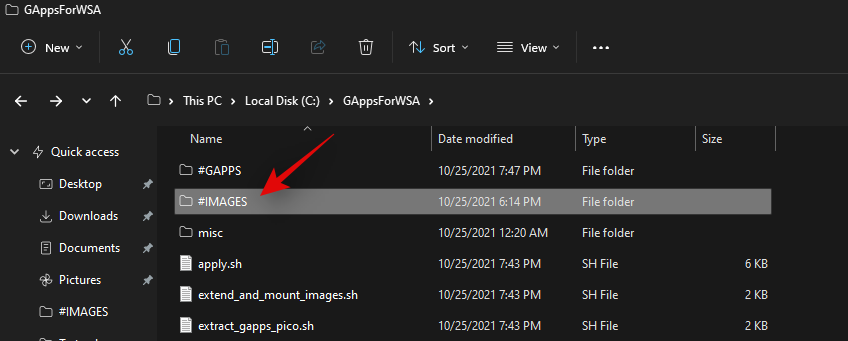
We are now done with the console, for now, you can close the same. Go to your boot drive and navigate to the following location.
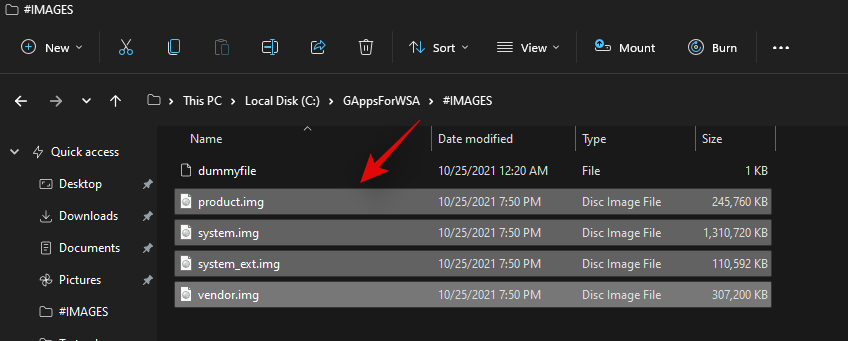
\GAppsForWSA\#IMAGES
Copy the following files to your clipboard.
- product.img
- system.img
- system_ext.img
- vendor.img
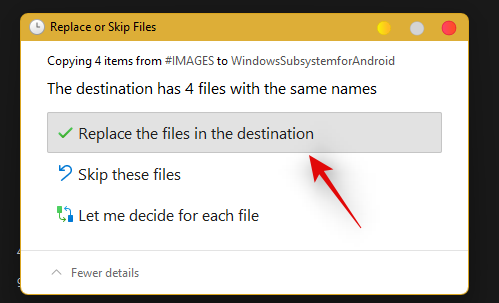
Now navigate to the ‘WindowsSubsystemForAndroid’ folder on your boot drive and paste all the copied images in the same location. Choose to replace the files when prompted.
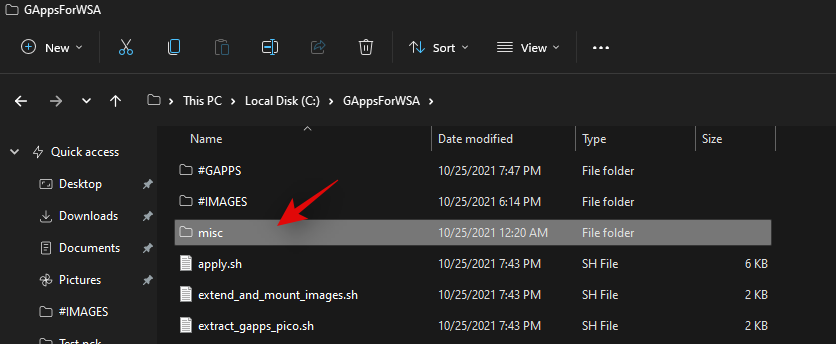
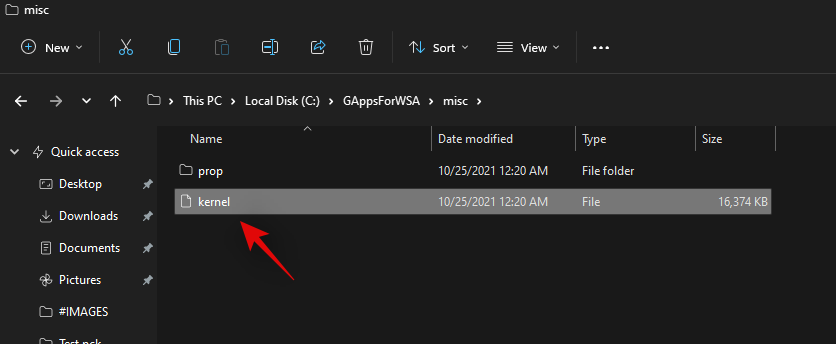
We’re almost done with the modification now. Navigate to your ‘GAppsForWSA’ folder on your boot drive and double click and open the ‘misc’ folder.
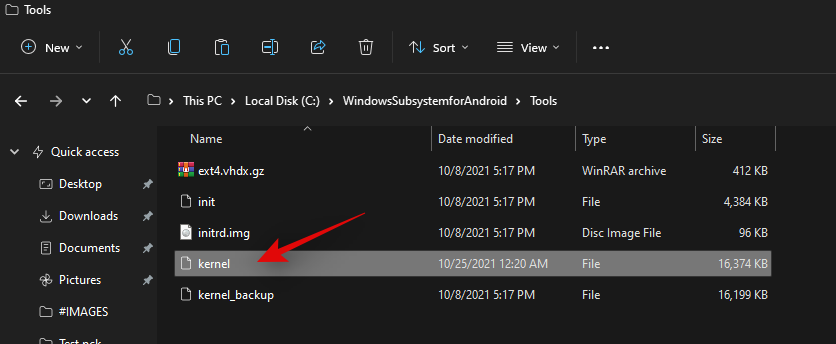
Copy ‘kernel’ to your clipboard.
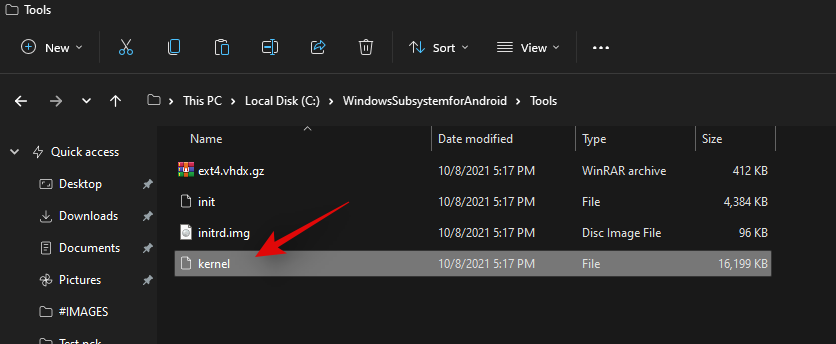
Navigate to the following location.
Boot drive\WindowsSubsystemForAndroid\Tools
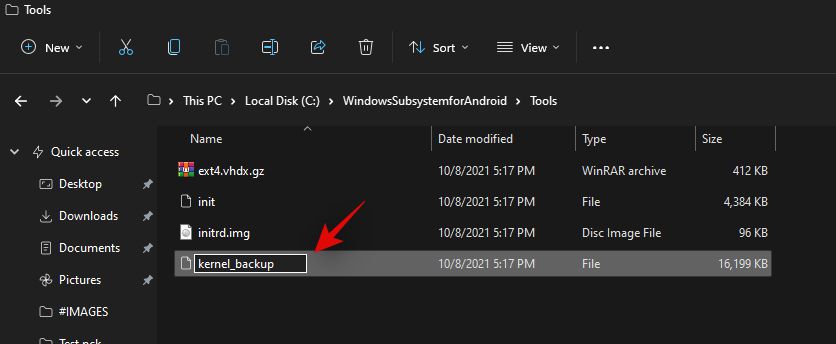
Rename ‘kernel’ to ‘kernel_backup’.
Now paste the kernel file we copied to your clipboard earlier in the same location.
We will now need to enable developer mode for your installation of Windows 11. Press Windows + i to open the Settings app and then click on ‘Privacy and Security’ on your right.
Click on ‘For developers’.
Enable the toggle for ‘Developer Mode’ at the top.
Click on ‘Yes’ to confirm your choice. Now press Windows + X and select ‘Windows Terminal (admin)’.
Click on the drop-down arrow at the top and select ‘Windows Powershell’.
Note: Do not select ‘Powershell’, ensure that you select ‘Windows Powershell’.
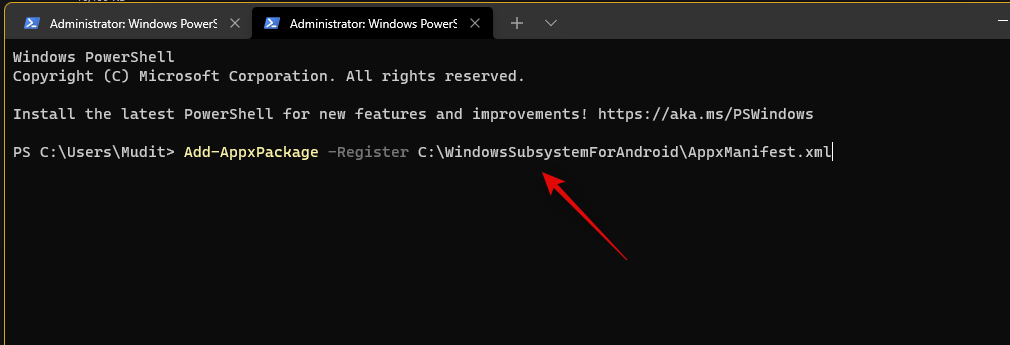
Now run the following command.
Add-AppxPackage -Register C:\WindowsSubsystemForAndroid\AppxManifest.xml
The modified subsystem will now be installed on your PC.
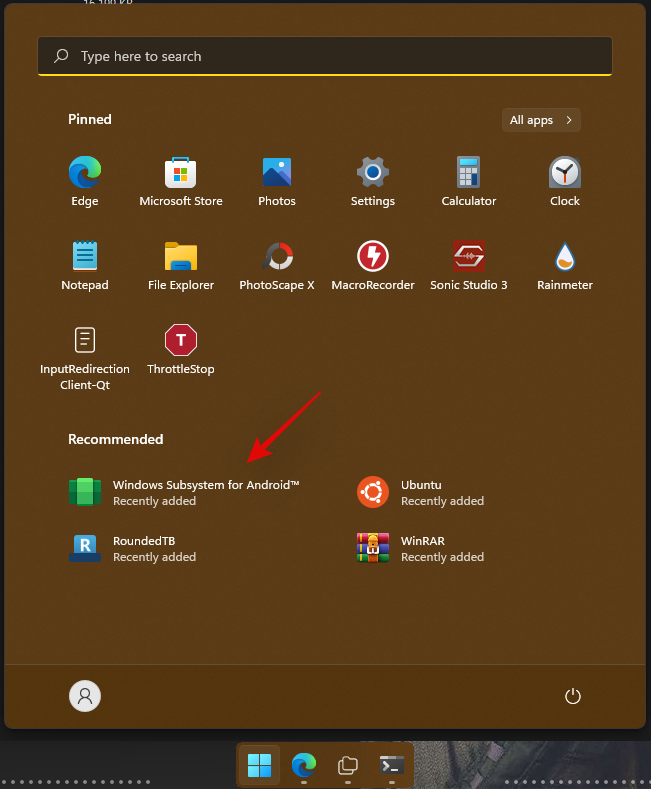
Press the Windows key and launch the same once the process completes.
Enable the toggle for ‘Developer mode’ in the Android Subsystem.
Click on ‘Files’ at the top to launch the Subsystem on your PC. You might have to wait a few minutes now depending on your PC.
Close the Files app once it opens and download the ADBToolkit linked above.
Now create a new folder on your boot drive and name it ‘ADBToolkit’.
Extract the archive in the same location, and delete the archive and the original folder.
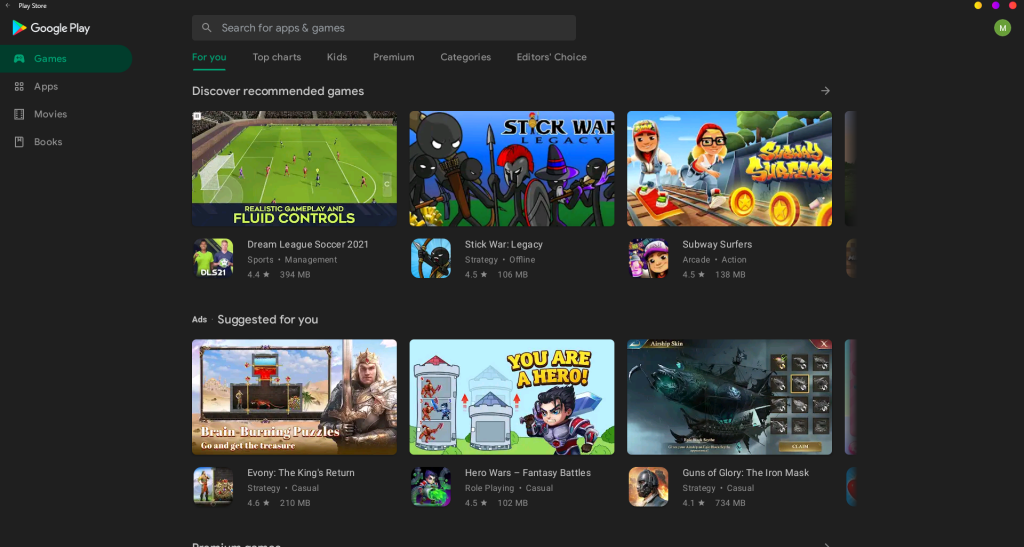
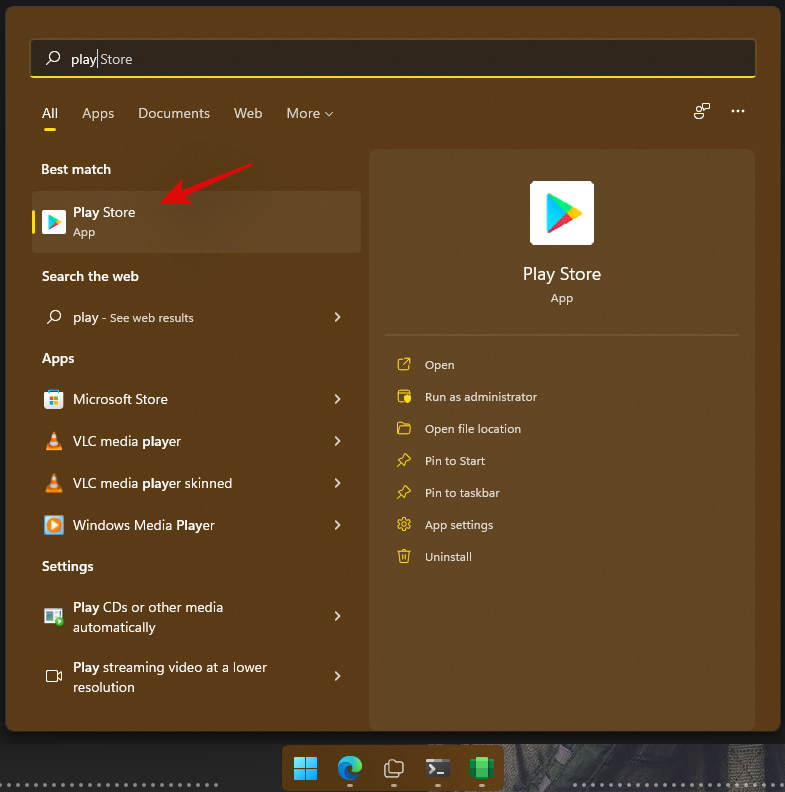
Press the Windows key, search for Play Store and launch it on your system. Do not click ‘Sign-in’ yet.
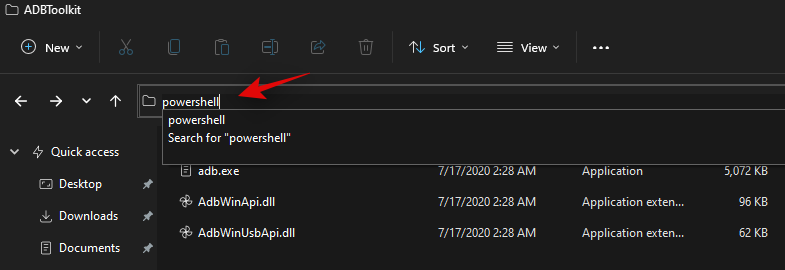
Go back to the ‘ADBToolkit’ folder and click on the address bar at the top, type in ‘Powershell’ and press Enter on your keyboard.
Go back to the Android Subsystem and note down the address shown below ‘Developer Mode’.
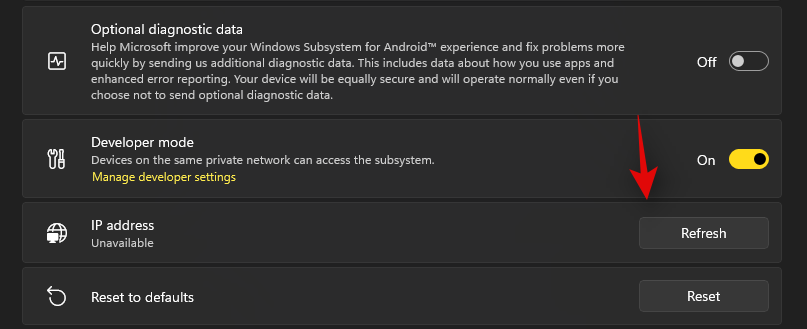
Note: If the address does not show up, simply click on ‘Refresh’ beside IP address.
Type in and execute the following command. Replace ADDRESS with the address shown in the ‘Developer Mode’ section in the Android Subsystem.
.\adb.exe connect ADDRESS
Once you are connected, execute the following command.
.\adb.exe shell
Type in the following command to gain root access.
su
Execute the following command next.
setenforce 0
Now go back to the Play Store and click on ‘Sign-in’.
Sign in with your desired Google account now.
Note: This will also enable Google Sync, which by default will sync your Google data to Windows including things like Contacts, Calendar events, Browser history, and more.
Once you are signed in, close the Play Store. We now need to restore your original kernel. Open the Windows Subsystem for Android window and click on ‘Turn off’.
The Subsystem will now stop running in the background on your PC. Navigate to the ‘WindowsSubsystemForAndroid’ folder on your boot drive and open the ‘Tools’ folder.
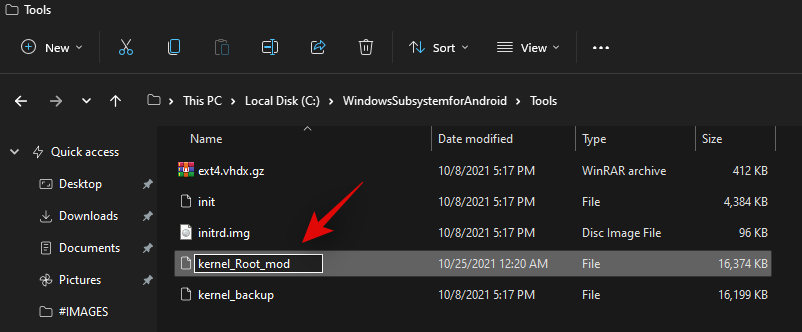
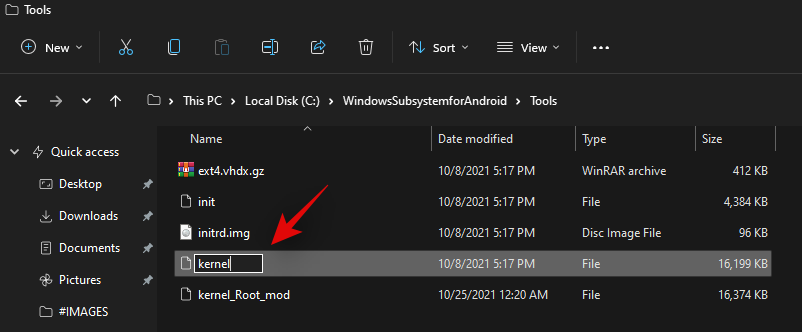
Rename the ‘kernel’ file to ‘kernel_Root_mod’.
Similarly, rename ‘kernel_backup’ to ‘kernel’.
You can now close everything. We recommend you restart your system at this point. Once restarted, you should now be able to use the Play Store on your system while signed in with your Google account.
We hope you were able to easily set up and use GApps and Play Store on your PC using the guide above. If you face any issues or have any questions, feel free to reach out using the comments section below.
Related:
- How to Remove Appraiserres.dll to Bypass Requirements When Using Windows 11 Setup
- How to Install WSA Manually Using Msixbundle
- How to Fix ‘Virtualization Not Enabled’ Error for WSA on Windows 11
- How to Change Refresh Rate on Windows 11
- Windows 11 Start Menu Not Working: How to Fix
- Fix VAN 1067 Valorant Issue on Windows 11
- How to Disable CSM to install Windows 11
- How To Remove Language Switcher on Windows 11
- Right Click Menu Not working on Windows 11? How to Fix
Last year, Microsoft released Windows 11 after testing some beta tests, and they also tested Android on Windows 11 with Windows Subsystem for Android. Since then, developers have been modifying and adjusting the Windows Subsystem for Android (WSA) on Windows 11. GitHub dev also managed to install Google Play Store (Gapps) on Windows Subsystem for Android WSA. After many customization and developments, GitHub developers manage to root Windows Subsystem for Android. In this post, we will guide you on How to Install Rooted Windows Subsystem for Android with Google Apps GApps.
If you are an Android user you will really know that Magisk most popular tool that exploits to gain root access to the Android operating system. GitHub user successfully installed Magisk, Riru, and LSPosed on WSA with some patches. Some GitHub users also created a script that will build the latest Rooted Windows Subsystem for Android with Google Apps GApps.
What is the Windows Subsystem for Android and How Does it Work?
Windows Subsystem for Android is a new feature in Windows 11 that allows you to run Android apps on your Windows PC. It’s an emulation layer that lets you run the same code that would run on an Android device, but with some tweaks and optimizations to make it work better on a PC. Keep in mind that this is an emulator, so it’s not exactly the same as running Android on your PC. It will use some hardware acceleration to speed up performance and is limited to a version of Android that’s compatible with 64-bit Windows 11. The Windows Subsystem for Android doesn’t have any limitations to what you can do with it, but it does have some compatibility issues that you should be aware of before installing apps.
Here are some limitations of the Windows Subsystem for Android: You cannot install Android apps that require a camera or microphone unless compatible with Windows Mobile devices. Some banking apps may not work with the Rooted Windows Subsystem as the safety net test is still not passed with Magisk.
Requirements:-
Here are some requirements and preparation you should follow before installing the Subsystem
- Latest 64-bit Windows 11 Build.
- Minimum 4GB of ram.
- 10 GB of free disk space.
- Developer mode must be installed on your Windows 11.
- Remove any existing WSA instances from Windows 11. (Click WIN+X key – Apps And Features – Windows Subsystem for Android – Uninstall)
Download the Latest build of Rooted Windows Subsystem for Android with GApps
Here we have created the Latest build of Windows Subsystem for Android 13 WSA_2211 Build on 28 December from EricFengFuuuu / MagiskOnWSA GitHub page that is rooted with magisk and included with Pico Google Apps.
WSA Android 13 with magisk and GApps –
WSA_2211.40000_x64-magisk-Android-13.zip
WSA Android 12 with magisk and GApps – WSA-with-magisk-GApps-pico_x64_Release-Nightly.zip
How to build Rooted Windows Subsystem for Android with GApps from GitHub
Here is the guide to build the latest Windows Subsystem for Android from the GitHub page using the EricFengFuuuu/MagiskOnWSA script.
1. First visit the MagiskOnWSA GitHub page and log in with your GitHub account.
2. At the top of the MagiskOnWSA GitHub page click star then fork.

3. Create a new fork with your GitHub account.

4. Go to the Action tab in your forked repo.

5. Click I understand my workflow, go ahead and enable them.
6. Click on Build WSA and the Run Workflow.

7. Select the packages you want with your Windows Subsystem for Android13 (WSA) package then click Run Workflow.

8. Wait for a few minutes then download the complete package in the zip file.

That’s it now follow the installation guide to install WSA on Windows 11.
How to Install Windows Subsystem for Android on Windows 11
1. Download the Rooted Windows Subsystem for Android with the GApps WSA package zip file.
2. Create wsa folder in C Drive and Unzip the package zip on it.
3. Open the wsa folder and run Install.ps1 with PowerShell to start the installation process and follow the steps.
4. If the installation failed for some permission issues then run the Install.ps1 as Administrator from the CMD terminal.
5. Run CMD as Administrator and copy and paste the commands one by one first cd C:\wsa then PowerShell.exe -ExecutionPolicy Bypass -File .\Install.ps1 hit enter.

6. The installation process may ask for a reboot to disable the virtual machine platform type y and enter to reboot then follow the process once more to finish the installation.

After the installation process is done log in with your google account to enjoy Android Apps on your Windows PC.
VIDEO GUIDE ON HOW TO INSTALL WSA ON WINDOWS 11
Microsoft just announced the Windows Subsystem for Android (WSA) for Windows 11 beta builds. While it is only for the Windows 11 Insider Preview beta channel, we posted a way to install Windows Subsystem for Android onto the dev channel and also the final Windows 11 21H2 22000 build or later. However, because it comes Amazon, you do not get Google Play Store or Play Services with WSA. As ana alternatively, you can download Windows Subsystem For Android with Google Play Store and Play Services pre-installed. Get WSA with Gapps!
Windows Subsystem for Android comes into existance with the collaboration between Amazon’s App Store for Android and Microsoft’s Windows 11. So basically, you can download and install Android apps onto Windows 11 via WSA. As it comes from Amazon, it naturally does not feature Google Play Services and Play Store; which is quite important to run Google apps like YouTube, Gmail, etc. Also, some third-party apps will refuse to run without Google Play Services.
Thankfully, someone managed to install Magisk, Riru, and LSPosed onto WSA! If you don’t already know, Magisk is the most popular exploit to gain root access on the Android operating system. However, the developer did not mention on instruction to gain it.
While we wait for the exploit, another developer ADeltaX managed to install Google Play Services or Play Store onto Windows Subsystem for Android. So now you can also install apps directly from Google Play Store. You can check it out on the Github project WSAGAScript.
You can also download the Linux kernel source code of WSA from here.
Update: How to Root Windows Subsystem for Android using Magisk | Download WSA with Magisk and Gapps
However, the installation procedure is quite complicated. Here is an easier way to install Google Play Services or Play Store onto Windows Subsystem for Android on Windows 11. We go about doing this by installing a modded WSA package consisting of Google Play Store. You can also sign in with your Google account. Thanks to u/Sm0g3R.
- Windows Subsystem For Android (WSA) with Gapps:|
- Telegram channel link | Download (Mediafire) | Mirror link (MegaNZ)
Filename: WsaPackage_1.7.32815.0_x64_Release-Nightly.zip
Download WSA with Gapps
Thanks to ahaan for the latest WSA with Gapps for x86 64 bit devices (Intel or AMD chipset) as well as the ARM64 based laptops and computers like Surface Pro X.
Windows Subsystem for Android x86 64-Bit with Gapps (Play Store)
- Download | Telegram channel link | MegaNZ link (open on desktop)
Download Windows Subsystem for Android ARM 64-bit with Gapps (Play Store)
This includes an MSIX file for ARM 64-bit computers such as the Surface Pro X.
- Download | Telegram channel link | MegaNZ link (open on desktop)
How to install WSA with Google Play Store for Windows 11
- Download Windows Subsystem For Android (WSA) with Gapps from above.
- Setup ADB for Windows OS. OR download the Android SDK Tools by Google.
- Delete any existing WSA instances from Windows 11. (WIN+X -> Apps And Features -> Windows Subsystem for Android -> Uninstall)
- Extract WSA zip files downloaded in step 1 to a location where you want to install WSA.
- Make sure to enable Developer mode in Windows (Search -> developer settings -> developer mode)
- Go to Win+X -> Terminal (Admin) -> paste the following this:
Add-AppxPackage -Register "<path>\AppxManifest.xml"
Note: replace <path> with the actual location where you extracted WSA files. For example:
Add-AppxPackage -Register D:\WSA\AppxManifest.xml
Alternative: Go to the path where all the files are and hold Shift key + Right click and choose Open Powershell window here.
Add-AppxPackage -Register .\AppxManifest.xml
- This should install WSA onto Windows 11.
- Launch WSA -> enable developer mode; refresh IP address ; Copy IP Address
- Ensure you have ADB setup o Windows 11.
- If you have downloaded the files step 2, extract it to a location. (Used to sideload Android Apps)
- Enter the folder.
- Hold Shift key + Right click -> Open PowerShell window here.
- Enter the following in the terminal
adb connect <IP>
(Replace <IP> with IP address you copied earlier) (A more precise tutorial is here)
adb shell
su
setenforce 0
- You should now be able to sign into the Play Store on WSA
- Launch WSA from start menu.
Source

