Windows Subsystem For Android v2309.40000.2.0: Windows 11 for ARM Processors

Builds Last Updated:
— 27/09/2023 11:00 GMT (Reason: Initial Release)
Information:
For anyone updating from a previous WSA Build, please backup your Userdata VHDX using this guide, in the case that the builds in this release do not work as intended (crashes, bugs or not working), so that you can revert to the old version if needs be.
Please rename the folder (after extraction) to a shorter name, for example WSA. This will help you avoid the potential issues that may occur during installation and after install.
Warning
Read the guide in full before installing. Ensure you meet the full requirements for an installation on Windows 11.
Note
If you’re updating WSA, merge the folders and replace the files for all items when asked
Follow these steps to install on Windows 11.
Note :
If you have the official WSA installed, you must completely uninstall it to use MagiskOnWSA
- Extract the .7z archive using 7-zip (recommended) and rename the extracted folder to
WSA - Delete the .7z archive (It is recommended to keep the .7z archive until WSA has been installed and is working properly)
- Move the newly extracted folder to a suitable location (Documents folder is a good choice), as you will need to keep the folder on your PC to use MagiskOnWSA
- Open the WSA folder and double-click Run.bat
Notice:
- As stated in the Requirements, You can only install WSA on a NTFS partition, not on an exFAT partition.
- You can NOT delete the WSA installation folder.
WhatAdd-AppxPackage -Register .\AppxManifest.xmldoes is to register an appx package with some existing unpackaged files,
so you need to keep them as long as you want to use WSA.
Check https://learn.microsoft.com/en-us/powershell/module/appx/add-appxpackage?view=windowsserver2022-ps for more details. - You need to register your WSA appx package before you can run WSA.
For WSABuilds and MagiskOnWSALocal users, you need to runRun.batin the extracted dir.
If the script fails, you can take the following steps for diagnosis (admin privilege required):- Open a PowerShell window and change working directory to your WSA directory.
- Run
Add-AppxPackage -ForceApplicationShutdown -ForceUpdateFromAnyVersion -Register .\AppxManifest.xmlin PowerShell.
This should fail with an ActivityID, which is a UUID required for the next step. - Run
Get-AppPackageLog -ActivityID <UUID>in PowerShell.
This should print the log of the failed operation. - Check the log for the reason of failure and fix it.
Changelog
- Microsoft’s Official Changelog
- Update from WSA
v2308.40000.3.0arm64 —->v2309.40000.2.0arm64 - WSA Android Version: Android 13
- MindTheGapps 13.0 arm64
- Magisk Canary
d4e552d0 (26301) - Magisk Stable
v26.3 - KernelSU
v0.6.8 - Amazon Appstore Removed
Difference Between Versions In This Release:
- WSA_XXXX.X0000.X.0_XXXX_Release-Nightly-MindTheGapps-XX.X-RemovedAmazon.7z
— Contains Google Play Store and Services
— No Amazon App Store
- WSA_XXXX.X0000.X.0_XXXX_Release-Nightly-MindTheGapps-XX.X.7z
— Contains Google Play Store and Services
— Contains Amazon App Store
- WSA_XXXX.X0000.X.0_XXXX_Release-Nightly-NoGApps-RemovedAmazon.7z
— No Amazon App Store
— No Google Play Store and Services
- WSA_XXXX.X0000.X.0_XXXX_Release-Nightly-NoGApps.7z
— Amazon App Store Included
— No Google Play Store and Services
- WSA_XXXX.X0000.X.0_XXXX_Release-Nightly-kernelsu-vX.X.X-MindTheGapps-XX.X-RemovedAmazon.7z
— No Amazon App Store
— Contains Google Play Store and Services
— Contains KernelSU (for Root Access)
- WSA_XXXX.X0000.X.0_XXXX_Release-Nightly-with-magisk-XX.X.XXXX.-stable-MindTheGapps-XX.X.7z
— Amazon App Store Included
— Contains Google Play Store and Services
— Contains Magisk Stable (for Root Access)
- WSA_XXXX.X0000.X.0_XXXX_Release-Nightly-with-magisk-XX.X.XXXX.-stable-NoGApps-RemovedAmazon.7z
— No Amazon App Store
— Contains Magisk Stable (for Root Access)
- WSA_XXXX.X0000.X.0_XXXX_Release-Nightly-magisk-XXXXX.XXXX.-canary-MindTheGapps-XX.X-RemovedAmazon.7z
— No Amazon App Store
— Contains Google Play Store and Services
— Contains Magisk Canary (for Root Access)
Additional Information
-
If the Magisk App does not appear after the installation of the WSA build with Magisk, download it from here and sideload it into WSA
-
For Builds with KernelSU, you will need to sideload the KernelSU Manager in order to use it. You can get this by going to the releases here, and scrolling down the list of assets, until you find it
Credits:
https://github.com/LSPosed/MagiskOnWSALocal
Windows Subsystem For Android v2309.40000.2.0: Windows 11 x64
Builds Last Updated:
— 27/09/2023 11:00 GMT (Reason: Initial Release)
Information:
For anyone updating from a previous WSA Build, please backup your Userdata VHDX using this guide, in the case that the builds in this release do not work as intended (crashes, bugs or not working), so that you can revert to the old version if needs be.
Please rename the folder (after extraction) to a shorter name, for example WSA. This will help you avoid the potential issues that may occur during installation and after install.
Warning
Read the guide in full before installing. Ensure you meet the full requirements for an installation on Windows 11.
Note
If you’re updating WSA, merge the folders and replace the files for all items when asked
Follow these steps to install on Windows 11.
Note :
If you have the official WSA installed, you must completely uninstall it to use MagiskOnWSA
- Extract the .7z archive using 7-zip (recommended) and rename the extracted folder to
WSA - Delete the .7z archive (It is recommended to keep the .7z archive until WSA has been installed and is working properly)
- Move the newly extracted folder to a suitable location (Documents folder is a good choice), as you will need to keep the folder on your PC to use MagiskOnWSA
- Open the WSA folder and double-click Run.bat
Notice:
- As stated in the Requirements, You can only install WSA on a NTFS partition, not on an exFAT partition.
- You can NOT delete the WSA installation folder.
WhatAdd-AppxPackage -Register .\AppxManifest.xmldoes is to register an appx package with some existing unpackaged files,
so you need to keep them as long as you want to use WSA.
Check https://learn.microsoft.com/en-us/powershell/module/appx/add-appxpackage?view=windowsserver2022-ps for more details. - You need to register your WSA appx package before you can run WSA.
For WSABuilds and MagiskOnWSALocal users, you need to runRun.batin the extracted dir.
If the script fails, you can take the following steps for diagnosis (admin privilege required):- Open a PowerShell window and change working directory to your WSA directory.
- Run
Add-AppxPackage -ForceApplicationShutdown -ForceUpdateFromAnyVersion -Register .\AppxManifest.xmlin PowerShell.
This should fail with an ActivityID, which is a UUID required for the next step. - Run
Get-AppPackageLog -ActivityID <UUID>in PowerShell.
This should print the log of the failed operation. - Check the log for the reason of failure and fix it.
Changelog
- Microsoft’s Official Changelog
- Update from WSA
v2308.40000.3.0x86_64 —>v2309.40000.2.0x86_64 - WSA Android Version: Android 13
- MindTheGapps 13.0 x86_64
- Magisk Canary
d4e552d0 (26301) - Magisk Stable
v26.3 - KernelSU
v0.6.8 - Amazon Appstore Removed
Difference Between Versions In This Release:
- WSA_XXXX.X0000.X.0_XXXX_Release-Nightly-MindTheGapps-XX.X-RemovedAmazon.7z
— Contains Google Play Store and Services
— No Amazon App Store
- WSA_XXXX.X0000.X.0_XXXX_Release-Nightly-MindTheGapps-XX.X.7z
— Contains Google Play Store and Services
— Contains Amazon App Store
- WSA_XXXX.X0000.X.0_XXXX_Release-Nightly-NoGApps-RemovedAmazon.7z
— No Amazon App Store
— No Google Play Store and Services
- WSA_XXXX.X0000.X.0_XXXX_Release-Nightly-NoGApps.7z
— Amazon App Store Included
— No Google Play Store and Services
- WSA_XXXX.X0000.X.0_XXXX_Release-Nightly-kernelsu-vX.X.X-MindTheGapps-XX.X-RemovedAmazon.7z
— No Amazon App Store
— Contains Google Play Store and Services
— Contains KernelSU (for Root Access)
- WSA_XXXX.X0000.X.0_XXXX_Release-Nightly-with-magisk-XX.X.XXXX.-stable-MindTheGapps-XX.X.7z
— Amazon App Store Included
— Contains Google Play Store and Services
— Contains Magisk Stable (for Root Access)
- WSA_XXXX.X0000.X.0_XXXX_Release-Nightly-with-magisk-XX.X.XXXX.-stable-NoGApps-RemovedAmazon.7z
— No Amazon App Store
— Contains Magisk Stable (for Root Access)
- WSA_XXXX.X0000.X.0_XXXX_Release-Nightly-magisk-XXXXX.XXXX.-canary-MindTheGapps-XX.X-RemovedAmazon.7z
— No Amazon App Store
— Contains Google Play Store and Services
— Contains Magisk Canary (for Root Access)
Additional Information
-
If the Magisk App does not appear after the installation of the WSA build with Magisk, download it from here and sideload it into WSA
-
For Builds with KernelSU, you will need to sideload the KernelSU Manager in order to use it. You can get this by going to the releases here, and scrolling down the list of assets, until you find it
Credits:
https://github.com/LSPosed/MagiskOnWSALocal
Windows Subsystem For Android v2309.40000.2.0: Windows 10 x64
Builds Last Updated:
— 27/09/2023 11:00 GMT (Reason: Initial Release)
Information:
For anyone updating from a previous WSA Build, please backup your Userdata VHDX using this guide, in the case that the builds in this release do not work as intended (crashes, bugs or not working), so that you can revert to the old version if needs be.
Please rename the folder (after extraction) to a shorter name, for example WSA. This will help you avoid the potential issues that may occur during installation and after install.
Warning
Read the guide in full before installing. Ensure you meet the full requirements for an installation on Windows 11.
Note
If you’re updating WSA, merge the folders and replace the files for all items when asked
Follow these steps to install on Windows 10.
Note :
If you have the official WSA installed, you must completely uninstall it to use MagiskOnWSA
- Extract the .7z archive using 7-zip (recommended) and rename the extracted folder to
WSA - Delete the .7z archive (It is recommended to keep the .7z archive until WSA has been installed and is working properly)
- Move the newly extracted folder to a suitable location (Documents folder is a good choice), as you will need to keep the folder on your PC to use MagiskOnWSA
- Open the WSA folder and double-click Run.bat
Notice:
- As stated in the Requirements, You can only install WSA on a NTFS partition, not on an exFAT partition.
- You can NOT delete the WSA installation folder.
WhatAdd-AppxPackage -Register .\AppxManifest.xmldoes is to register an appx package with some existing unpackaged files,
so you need to keep them as long as you want to use WSA.
Check https://learn.microsoft.com/en-us/powershell/module/appx/add-appxpackage?view=windowsserver2022-ps for more details. - You need to register your WSA appx package before you can run WSA.
For WSABuilds and MagiskOnWSALocal users, you need to runRun.batin the extracted dir.
If the script fails, you can take the following steps for diagnosis (admin privilege required):- Open a PowerShell window and change working directory to your WSA directory.
- Run
Add-AppxPackage -ForceApplicationShutdown -ForceUpdateFromAnyVersion -Register .\AppxManifest.xmlin PowerShell.
This should fail with an ActivityID, which is a UUID required for the next step. - Run
Get-AppPackageLog -ActivityID <UUID>in PowerShell.
This should print the log of the failed operation. - Check the log for the reason of failure and fix it.
Changelog
- Microsoft’s Official Changelog
- Windows 10 Patch Applied (Credit: Cinit)
- Update from WSA
v2308.40000.3.0x86_64 —>v2309.40000.2.0x86_64 - WSA Android Version: Android 13
- MindTheGapps 13.0 x86_64
- Magisk Canary
d4e552d0 (26301) - Magisk Stable
v26.3 - KernelSU
v0.6.8 - Amazon Appstore Removed
Difference Between Versions In This Release:
- WSA_XXXX.X0000.X.0_XXXX_Release-Nightly-MindTheGapps-XX.X-RemovedAmazon_Windows_10.7z
— Contains Google Play Store and Services
— No Amazon App Store
- WSA_XXXX.X0000.X.0_XXXX_Release-Nightly-MindTheGapps-XX.X_Windows_10.7z
— Contains Google Play Store and Services
— Contains Amazon App Store
- WSA_XXXX.X0000.X.0_XXXX_Release-Nightly-NoGApps-RemovedAmazon_Windows_10.7z
— No Amazon App Store
— No Google Play Store and Services
- WSA_XXXX.X0000.X.0_XXXX_Release-Nightly-NoGApps_Windows_10.7z
— Amazon App Store Included
— No Google Play Store and Services
- WSA_XXXX.X0000.X.0_XXXX_Release-Nightly-kernelsu-vX.X.X-MindTheGapps-XX.X-RemovedAmazon_Windows_10.7z
— No Amazon App Store
— Contains Google Play Store and Services
— Contains KernelSU (for Root Access)
- WSA_XXXX.X0000.X.0_XXXX_Release-Nightly-with-magisk-XX.X.XXXX.-stable-MindTheGapps-XX.X_Windows_10.7z
— Amazon App Store Included
— Contains Google Play Store and Services
— Contains Magisk Stable (for Root Access)
- WSA_XXXX.X0000.X.0_XXXX_Release-Nightly-with-magisk-XX.X.XXXX.-stable-NoGApps-RemovedAmazon_Windows_10.7z
— No Amazon App Store
— Contains Magisk Stable (for Root Access)
- WSA_XXXX.X0000.X.0_XXXX_Release-Nightly-magisk-XXXXX.XXXX.-canary-MindTheGapps-XX.X-RemovedAmazon_Windows_10.7z
— No Amazon App Store
— Contains Google Play Store and Services
— Contains Magisk Canary (for Root Access)
Additional Information
-
If the Magisk App does not appear after the installation of the WSA build with Magisk, download it from here and sideload it into WSA
-
For Builds with KernelSU, you will need to sideload the KernelSU Manager in order to use it. You can get this by going to the releases here, and scrolling down the list of assets, until you find it
Credits:
https://github.com/LSPosed/MagiskOnWSALocal
https://github.com/cinit/WSAPatch
Windows Subsystem For Android v2308.40000.3.0: Windows 11 for ARM Processors
Builds Last Updated:
— 19/09/2023 12:00 GMT (Reason: Initial Release)
Information:
For anyone updating from a previous WSA Build, please backup your Userdata VHDX using this guide, in the case that the builds in this release do not work as intended (crashes, bugs or not working), so that you can revert to the old version if needs be.
Please rename the folder (after extraction) to a shorter name, for example WSA. This will help you avoid the potential issues that may occur during installation and after install.
Warning
Read the guide in full before installing. Ensure you meet the full requirements for an installation on Windows 11.
Note
If you’re updating WSA, merge the folders and replace the files for all items when asked
Follow these steps to install on Windows 11.
Note :
If you have the official WSA installed, you must completely uninstall it to use MagiskOnWSA
- Extract the .7z archive using 7-zip (recommended) and rename the extracted folder to
WSA - Delete the .7z archive (It is recommended to keep the .7z archive until WSA has been installed and is working properly)
- Move the newly extracted folder to a suitable location (Documents folder is a good choice), as you will need to keep the folder on your PC to use MagiskOnWSA
- Open the WSA folder and double-click Run.bat
Notice:
- As stated in the Requirements, You can only install WSA on a NTFS partition, not on an exFAT partition.
- You can NOT delete the WSA installation folder.
WhatAdd-AppxPackage -Register .\AppxManifest.xmldoes is to register an appx package with some existing unpackaged files,
so you need to keep them as long as you want to use WSA.
Check https://learn.microsoft.com/en-us/powershell/module/appx/add-appxpackage?view=windowsserver2022-ps for more details. - You need to register your WSA appx package before you can run WSA.
For WSABuilds and MagiskOnWSALocal users, you need to runRun.batin the extracted dir.
If the script fails, you can take the following steps for diagnosis (admin privilege required):- Open a PowerShell window and change working directory to your WSA directory.
- Run
Add-AppxPackage -ForceApplicationShutdown -ForceUpdateFromAnyVersion -Register .\AppxManifest.xmlin PowerShell.
This should fail with an ActivityID, which is a UUID required for the next step. - Run
Get-AppPackageLog -ActivityID <UUID>in PowerShell.
This should print the log of the failed operation. - Check the log for the reason of failure and fix it.
Changelog
- Microsoft’s Official Changelog
- Update from WSA
v2308.40000.1.0arm64 —->v2308.40000.3.0arm64 - WSA Android Version: Android 13
- MindTheGapps 13.0 arm64
- Magisk Canary
0fe46c5a (26301)—>d4e552d0 (26301) - Magisk Stable
v26.3 - KernelSU
v0.6.7—>v0.6.8 - Amazon Appstore Removed
Difference Between Versions In This Release:
- WSA_XXXX.X0000.X.0_XXXX_Release-Nightly-MindTheGapps-XX.X-RemovedAmazon.7z
— Contains Google Play Store and Services
— No Amazon App Store
- WSA_XXXX.X0000.X.0_XXXX_Release-Nightly-MindTheGapps-XX.X.7z
— Contains Google Play Store and Services
— Contains Amazon App Store
- WSA_XXXX.X0000.X.0_XXXX_Release-Nightly-NoGApps-RemovedAmazon.7z
— No Amazon App Store
— No Google Play Store and Services
- WSA_XXXX.X0000.X.0_XXXX_Release-Nightly-NoGApps.7z
— Amazon App Store Included
— No Google Play Store and Services
- WSA_XXXX.X0000.X.0_XXXX_Release-Nightly-kernelsu-vX.X.X-MindTheGapps-XX.X-RemovedAmazon.7z
— No Amazon App Store
— Contains Google Play Store and Services
— Contains KernelSU (for Root Access)
- WSA_XXXX.X0000.X.0_XXXX_Release-Nightly-with-magisk-XX.X.XXXX.-stable-MindTheGapps-XX.X.7z
— Amazon App Store Included
— Contains Google Play Store and Services
— Contains Magisk Stable (for Root Access)
- WSA_XXXX.X0000.X.0_XXXX_Release-Nightly-with-magisk-XX.X.XXXX.-stable-NoGApps-RemovedAmazon.7z
— No Amazon App Store
— Contains Magisk Stable (for Root Access)
- WSA_XXXX.X0000.X.0_XXXX_Release-Nightly-magisk-XXXXX.XXXX.-canary-MindTheGapps-XX.X-RemovedAmazon.7z
— No Amazon App Store
— Contains Google Play Store and Services
— Contains Magisk Canary (for Root Access)
Additional Information
-
If the Magisk App does not appear after the installation of the WSA build with Magisk, download it from here and sideload it into WSA
-
For Builds with KernelSU, you will need to sideload the KernelSU Manager in order to use it. You can get this by going to the releases here, and scrolling down the list of assets, until you find it
Credits:
https://github.com/LSPosed/MagiskOnWSALocal
Windows Subsystem For Android v2308.40000.3.0: Windows 11 x64
Builds Last Updated:
— 19/09/2023 12:00 GMT (Reason: Initial Release)
Information:
For anyone updating from a previous WSA Build, please backup your Userdata VHDX using this guide, in the case that the builds in this release do not work as intended (crashes, bugs or not working), so that you can revert to the old version if needs be.
Please rename the folder (after extraction) to a shorter name, for example WSA. This will help you avoid the potential issues that may occur during installation and after install.
Warning
Read the guide in full before installing. Ensure you meet the full requirements for an installation on Windows 11.
Note
If you’re updating WSA, merge the folders and replace the files for all items when asked
Follow these steps to install on Windows 11.
Note :
If you have the official WSA installed, you must completely uninstall it to use MagiskOnWSA
- Extract the .7z archive using 7-zip (recommended) and rename the extracted folder to
WSA - Delete the .7z archive (It is recommended to keep the .7z archive until WSA has been installed and is working properly)
- Move the newly extracted folder to a suitable location (Documents folder is a good choice), as you will need to keep the folder on your PC to use MagiskOnWSA
- Open the WSA folder and double-click Run.bat
Notice:
- As stated in the Requirements, You can only install WSA on a NTFS partition, not on an exFAT partition.
- You can NOT delete the WSA installation folder.
WhatAdd-AppxPackage -Register .\AppxManifest.xmldoes is to register an appx package with some existing unpackaged files,
so you need to keep them as long as you want to use WSA.
Check https://learn.microsoft.com/en-us/powershell/module/appx/add-appxpackage?view=windowsserver2022-ps for more details. - You need to register your WSA appx package before you can run WSA.
For WSABuilds and MagiskOnWSALocal users, you need to runRun.batin the extracted dir.
If the script fails, you can take the following steps for diagnosis (admin privilege required):- Open a PowerShell window and change working directory to your WSA directory.
- Run
Add-AppxPackage -ForceApplicationShutdown -ForceUpdateFromAnyVersion -Register .\AppxManifest.xmlin PowerShell.
This should fail with an ActivityID, which is a UUID required for the next step. - Run
Get-AppPackageLog -ActivityID <UUID>in PowerShell.
This should print the log of the failed operation. - Check the log for the reason of failure and fix it.
Changelog
- Microsoft’s Official Changelog
- Update from WSA
v2308.40000.1.0x86_64 —>v2308.40000.3.0x86_64 - WSA Android Version: Android 13
- MindTheGapps 13.0 x86_64
- Magisk Canary
0fe46c5a (26301)—>d4e552d0 (26301) - Magisk Stable
v26.3 - KernelSU
v0.6.7—>v0.6.8 - Amazon Appstore Removed
Difference Between Versions In This Release:
- WSA_XXXX.X0000.X.0_XXXX_Release-Nightly-MindTheGapps-XX.X-RemovedAmazon.7z
— Contains Google Play Store and Services
— No Amazon App Store
- WSA_XXXX.X0000.X.0_XXXX_Release-Nightly-MindTheGapps-XX.X.7z
— Contains Google Play Store and Services
— Contains Amazon App Store
- WSA_XXXX.X0000.X.0_XXXX_Release-Nightly-NoGApps-RemovedAmazon.7z
— No Amazon App Store
— No Google Play Store and Services
- WSA_XXXX.X0000.X.0_XXXX_Release-Nightly-NoGApps.7z
— Amazon App Store Included
— No Google Play Store and Services
- WSA_XXXX.X0000.X.0_XXXX_Release-Nightly-kernelsu-vX.X.X-MindTheGapps-XX.X-RemovedAmazon.7z
— No Amazon App Store
— Contains Google Play Store and Services
— Contains KernelSU (for Root Access)
- WSA_XXXX.X0000.X.0_XXXX_Release-Nightly-with-magisk-XX.X.XXXX.-stable-MindTheGapps-XX.X.7z
— Amazon App Store Included
— Contains Google Play Store and Services
— Contains Magisk Stable (for Root Access)
- WSA_XXXX.X0000.X.0_XXXX_Release-Nightly-with-magisk-XX.X.XXXX.-stable-NoGApps-RemovedAmazon.7z
— No Amazon App Store
— Contains Magisk Stable (for Root Access)
- WSA_XXXX.X0000.X.0_XXXX_Release-Nightly-magisk-XXXXX.XXXX.-canary-MindTheGapps-XX.X-RemovedAmazon.7z
— No Amazon App Store
— Contains Google Play Store and Services
— Contains Magisk Canary (for Root Access)
Additional Information
-
If the Magisk App does not appear after the installation of the WSA build with Magisk, download it from here and sideload it into WSA
-
For Builds with KernelSU, you will need to sideload the KernelSU Manager in order to use it. You can get this by going to the releases here, and scrolling down the list of assets, until you find it
Credits:
https://github.com/LSPosed/MagiskOnWSALocal
Windows Subsystem For Android v2308.40000.3.0: Windows 10 x64
Builds Last Updated:
— 19/09/2023 12:00 GMT (Reason: Initial Release)
Information:
For anyone updating from a previous WSA Build, please backup your Userdata VHDX using this guide, in the case that the builds in this release do not work as intended (crashes, bugs or not working), so that you can revert to the old version if needs be.
Please rename the folder (after extraction) to a shorter name, for example WSA. This will help you avoid the potential issues that may occur during installation and after install.
Warning
Read the guide in full before installing. Ensure you meet the full requirements for an installation on Windows 11.
Note
If you’re updating WSA, merge the folders and replace the files for all items when asked
Follow these steps to install on Windows 10.
Note :
If you have the official WSA installed, you must completely uninstall it to use MagiskOnWSA
- Extract the .7z archive using 7-zip (recommended) and rename the extracted folder to
WSA - Delete the .7z archive (It is recommended to keep the .7z archive until WSA has been installed and is working properly)
- Move the newly extracted folder to a suitable location (Documents folder is a good choice), as you will need to keep the folder on your PC to use MagiskOnWSA
- Open the WSA folder and double-click Run.bat
Notice:
- As stated in the Requirements, You can only install WSA on a NTFS partition, not on an exFAT partition.
- You can NOT delete the WSA installation folder.
WhatAdd-AppxPackage -Register .\AppxManifest.xmldoes is to register an appx package with some existing unpackaged files,
so you need to keep them as long as you want to use WSA.
Check https://learn.microsoft.com/en-us/powershell/module/appx/add-appxpackage?view=windowsserver2022-ps for more details. - You need to register your WSA appx package before you can run WSA.
For WSABuilds and MagiskOnWSALocal users, you need to runRun.batin the extracted dir.
If the script fails, you can take the following steps for diagnosis (admin privilege required):- Open a PowerShell window and change working directory to your WSA directory.
- Run
Add-AppxPackage -ForceApplicationShutdown -ForceUpdateFromAnyVersion -Register .\AppxManifest.xmlin PowerShell.
This should fail with an ActivityID, which is a UUID required for the next step. - Run
Get-AppPackageLog -ActivityID <UUID>in PowerShell.
This should print the log of the failed operation. - Check the log for the reason of failure and fix it.
Changelog
- Microsoft’s Official Changelog
- Windows 10 Patch Applied (Credit: Cinit)
- Update from WSA
v2308.40000.1.0x86_64 —>v2308.40000.3.0x86_64 - WSA Android Version: Android 13
- MindTheGapps 13.0 x86_64
- Magisk Canary
0fe46c5a (26301)—>d4e552d0 (26301) - Magisk Stable
v26.3 - KernelSU
v0.6.7—>v0.6.8 - Amazon Appstore Removed
Difference Between Versions In This Release:
- WSA_XXXX.X0000.X.0_XXXX_Release-Nightly-MindTheGapps-XX.X-RemovedAmazon_Windows_10.7z
— Contains Google Play Store and Services
— No Amazon App Store
- WSA_XXXX.X0000.X.0_XXXX_Release-Nightly-MindTheGapps-XX.X_Windows_10.7z
— Contains Google Play Store and Services
— Contains Amazon App Store
- WSA_XXXX.X0000.X.0_XXXX_Release-Nightly-NoGApps-RemovedAmazon_Windows_10.7z
— No Amazon App Store
— No Google Play Store and Services
- WSA_XXXX.X0000.X.0_XXXX_Release-Nightly-NoGApps_Windows_10.7z
— Amazon App Store Included
— No Google Play Store and Services
- WSA_XXXX.X0000.X.0_XXXX_Release-Nightly-kernelsu-vX.X.X-MindTheGapps-XX.X-RemovedAmazon_Windows_10.7z
— No Amazon App Store
— Contains Google Play Store and Services
— Contains KernelSU (for Root Access)
- WSA_XXXX.X0000.X.0_XXXX_Release-Nightly-with-magisk-XX.X.XXXX.-stable-MindTheGapps-XX.X_Windows_10.7z
— Amazon App Store Included
— Contains Google Play Store and Services
— Contains Magisk Stable (for Root Access)
- WSA_XXXX.X0000.X.0_XXXX_Release-Nightly-with-magisk-XX.X.XXXX.-stable-NoGApps-RemovedAmazon_Windows_10.7z
— No Amazon App Store
— Contains Magisk Stable (for Root Access)
- WSA_XXXX.X0000.X.0_XXXX_Release-Nightly-magisk-XXXXX.XXXX.-canary-MindTheGapps-XX.X-RemovedAmazon_Windows_10.7z
— No Amazon App Store
— Contains Google Play Store and Services
— Contains Magisk Canary (for Root Access)
Additional Information
-
If the Magisk App does not appear after the installation of the WSA build with Magisk, download it from here and sideload it into WSA
-
For Builds with KernelSU, you will need to sideload the KernelSU Manager in order to use it. You can get this by going to the releases here, and scrolling down the list of assets, until you find it
Credits:
https://github.com/LSPosed/MagiskOnWSALocal
https://github.com/cinit/WSAPatch
Windows Subsystem For Android v2308.40000.1.0: Windows 11 for ARM Processors
Builds Last Updated:
— 08/09/2023 11:20 GMT (Reason: Initial Release)
Information:
For anyone updating from a previous WSA Build, please backup your Userdata VHDX using this guide, in the case that the builds in this release do not work as intended (crashes, bugs or not working), so that you can revert to the old version if needs be.
Please rename the folder (after extraction) to a shorter name, for example WSA. This will help you avoid the potential issues that may occur during installation and after install.
Warning
Read the guide in full before installing. Ensure you meet the full requirements for an installation on Windows 11.
Note
If you’re updating WSA, merge the folders and replace the files for all items when asked
Follow these steps to install on Windows 11.
Note :
If you have the official WSA installed, you must completely uninstall it to use MagiskOnWSA
- Extract the .7z archive using 7-zip (recommended) and rename the extracted folder to
WSA - Delete the .7z archive (It is recommended to keep the .7z archive until WSA has been installed and is working properly)
- Move the newly extracted folder to a suitable location (Documents folder is a good choice), as you will need to keep the folder on your PC to use MagiskOnWSA
- Open the WSA folder and double-click Run.bat
Notice:
- As stated in the Requirements, You can only install WSA on a NTFS partition, not on an exFAT partition.
- You can NOT delete the WSA installation folder.
WhatAdd-AppxPackage -Register .\AppxManifest.xmldoes is to register an appx package with some existing unpackaged files,
so you need to keep them as long as you want to use WSA.
Check https://learn.microsoft.com/en-us/powershell/module/appx/add-appxpackage?view=windowsserver2022-ps for more details. - You need to register your WSA appx package before you can run WSA.
For WSABuilds and MagiskOnWSALocal users, you need to runRun.batin the extracted dir.
If the script fails, you can take the following steps for diagnosis (admin privilege required):- Open a PowerShell window and change working directory to your WSA directory.
- Run
Add-AppxPackage -ForceApplicationShutdown -ForceUpdateFromAnyVersion -Register .\AppxManifest.xmlin PowerShell.
This should fail with an ActivityID, which is a UUID required for the next step. - Run
Get-AppPackageLog -ActivityID <UUID>in PowerShell.
This should print the log of the failed operation. - Check the log for the reason of failure and fix it.
Changelog
- Microsoft’s Official Changelog
- Update from WSA v2307.40000.6.0 arm64 —-> WSA v2308.40000.1.0 arm64
- WSA Android Version: Android 13
- MindTheGapps 13.0 arm64
- Magisk Canary de00f1d5 (26202) —-> Magisk Canary 0fe46c5a (26301)
- Magisk Stable v26.3
- KernelSU v0.6.7
- Amazon Appstore Removed
Difference Between Versions In This Release:
- WSA_XXXX.X0000.X.0_XXXX_Release-Nightly-MindTheGapps-XX.X-RemovedAmazon.7z
— Contains Google Play Store and Services
— No Amazon App Store
- WSA_XXXX.X0000.X.0_XXXX_Release-Nightly-MindTheGapps-XX.X.7z
— Contains Google Play Store and Services
— Contains Amazon App Store
- WSA_XXXX.X0000.X.0_XXXX_Release-Nightly-NoGApps-RemovedAmazon.7z
— No Amazon App Store
— No Google Play Store and Services
- WSA_XXXX.X0000.X.0_XXXX_Release-Nightly-NoGApps.7z
— Amazon App Store Included
— No Google Play Store and Services
- WSA_XXXX.X0000.X.0_XXXX_Release-Nightly-kernelsu-vX.X.X-MindTheGapps-XX.X-RemovedAmazon.7z
— No Amazon App Store
— Contains Google Play Store and Services
— Contains KernelSU (for Root Access)
- WSA_XXXX.X0000.X.0_XXXX_Release-Nightly-with-magisk-XX.X.XXXX.-stable-MindTheGapps-XX.X.7z
— Amazon App Store Included
— Contains Google Play Store and Services
— Contains Magisk Stable (for Root Access)
- WSA_XXXX.X0000.X.0_XXXX_Release-Nightly-with-magisk-XX.X.XXXX.-stable-NoGApps-RemovedAmazon.7z
— No Amazon App Store
— Contains Magisk Stable (for Root Access)
- WSA_XXXX.X0000.X.0_XXXX_Release-Nightly-magisk-XXXXX.XXXX.-canary-MindTheGapps-XX.X-RemovedAmazon.7z
— No Amazon App Store
— Contains Google Play Store and Services
— Contains Magisk Canary (for Root Access)
Additional Information
-
If the Magisk App does not appear after the installation of the WSA build with Magisk, download it from here and sideload it into WSA
-
For Builds with KernelSU, you will need to sideload the KernelSU Manager in order to use it. You can get this by going to the releases here, and scrolling down the list of assets, until you find it
Credits:
https://github.com/LSPosed/MagiskOnWSALocal
Windows Subsystem For Android v2308.40000.1.0: Windows 11 x64
Builds Last Updated:
— 08/09/2023 11:20 GMT (Reason: Initial Release)
Information:
For anyone updating from a previous WSA Build, please backup your Userdata VHDX using this guide, in the case that the builds in this release do not work as intended (crashes, bugs or not working), so that you can revert to the old version if needs be.
Please rename the folder (after extraction) to a shorter name, for example WSA. This will help you avoid the potential issues that may occur during installation and after install.
Warning
Read the guide in full before installing. Ensure you meet the full requirements for an installation on Windows 11.
Note
If you’re updating WSA, merge the folders and replace the files for all items when asked
Follow these steps to install on Windows 11.
Note :
If you have the official WSA installed, you must completely uninstall it to use MagiskOnWSA
- Extract the .7z archive using 7-zip (recommended) and rename the extracted folder to
WSA - Delete the .7z archive (It is recommended to keep the .7z archive until WSA has been installed and is working properly)
- Move the newly extracted folder to a suitable location (Documents folder is a good choice), as you will need to keep the folder on your PC to use MagiskOnWSA
- Open the WSA folder and double-click Run.bat
Notice:
- As stated in the Requirements, You can only install WSA on a NTFS partition, not on an exFAT partition.
- You can NOT delete the WSA installation folder.
WhatAdd-AppxPackage -Register .\AppxManifest.xmldoes is to register an appx package with some existing unpackaged files,
so you need to keep them as long as you want to use WSA.
Check https://learn.microsoft.com/en-us/powershell/module/appx/add-appxpackage?view=windowsserver2022-ps for more details. - You need to register your WSA appx package before you can run WSA.
For WSABuilds and MagiskOnWSALocal users, you need to runRun.batin the extracted dir.
If the script fails, you can take the following steps for diagnosis (admin privilege required):- Open a PowerShell window and change working directory to your WSA directory.
- Run
Add-AppxPackage -ForceApplicationShutdown -ForceUpdateFromAnyVersion -Register .\AppxManifest.xmlin PowerShell.
This should fail with an ActivityID, which is a UUID required for the next step. - Run
Get-AppPackageLog -ActivityID <UUID>in PowerShell.
This should print the log of the failed operation. - Check the log for the reason of failure and fix it.
Changelog
- Microsoft’s Official Changelog
- Update from WSA v2307.40000.6.0 x86_64 —-> WSA v2308.40000.1.0 x86_64
- WSA Android Version: Android 13
- MindTheGapps 13.0 x86_64
- Magisk Canary de00f1d5 (26202) —-> Magisk Canary 0fe46c5a (26301)
- Magisk Stable v26.3
- KernelSU v0.6.7
- Amazon Appstore Removed
Difference Between Versions In This Release:
- WSA_XXXX.X0000.X.0_XXXX_Release-Nightly-MindTheGapps-XX.X-RemovedAmazon.7z
— Contains Google Play Store and Services
— No Amazon App Store
- WSA_XXXX.X0000.X.0_XXXX_Release-Nightly-MindTheGapps-XX.X.7z
— Contains Google Play Store and Services
— Contains Amazon App Store
- WSA_XXXX.X0000.X.0_XXXX_Release-Nightly-NoGApps-RemovedAmazon.7z
— No Amazon App Store
— No Google Play Store and Services
- WSA_XXXX.X0000.X.0_XXXX_Release-Nightly-NoGApps.7z
— Amazon App Store Included
— No Google Play Store and Services
- WSA_XXXX.X0000.X.0_XXXX_Release-Nightly-kernelsu-vX.X.X-MindTheGapps-XX.X-RemovedAmazon.7z
— No Amazon App Store
— Contains Google Play Store and Services
— Contains KernelSU (for Root Access)
- WSA_XXXX.X0000.X.0_XXXX_Release-Nightly-with-magisk-XX.X.XXXX.-stable-MindTheGapps-XX.X.7z
— Amazon App Store Included
— Contains Google Play Store and Services
— Contains Magisk Stable (for Root Access)
- WSA_XXXX.X0000.X.0_XXXX_Release-Nightly-with-magisk-XX.X.XXXX.-stable-NoGApps-RemovedAmazon.7z
— No Amazon App Store
— Contains Magisk Stable (for Root Access)
- WSA_XXXX.X0000.X.0_XXXX_Release-Nightly-magisk-XXXXX.XXXX.-canary-MindTheGapps-XX.X-RemovedAmazon.7z
— No Amazon App Store
— Contains Google Play Store and Services
— Contains Magisk Canary (for Root Access)
Additional Information
-
If the Magisk App does not appear after the installation of the WSA build with Magisk, download it from here and sideload it into WSA
-
For Builds with KernelSU, you will need to sideload the KernelSU Manager in order to use it. You can get this by going to the releases here, and scrolling down the list of assets, until you find it
Credits:
https://github.com/LSPosed/MagiskOnWSALocal
Windows Subsystem For Android v2308.40000.1.0: Windows 10 x64
Builds Last Updated:
— 08/09/2023 11:20 GMT (Reason: Initial Release)
Information:
For anyone updating from a previous WSA Build, please backup your Userdata VHDX using this guide, in the case that the builds in this release do not work as intended (crashes, bugs or not working), so that you can revert to the old version if needs be.
Please rename the folder (after extraction) to a shorter name, for example WSA. This will help you avoid the potential issues that may occur during installation and after install.
Warning
Read the guide in full before installing. Ensure you meet the full requirements for an installation on Windows 11.
Note
If you’re updating WSA, merge the folders and replace the files for all items when asked
Follow these steps to install on Windows 11.
Note :
If you have the official WSA installed, you must completely uninstall it to use MagiskOnWSA
- Extract the .7z archive using 7-zip (recommended) and rename the extracted folder to
WSA - Delete the .7z archive (It is recommended to keep the .7z archive until WSA has been installed and is working properly)
- Move the newly extracted folder to a suitable location (Documents folder is a good choice), as you will need to keep the folder on your PC to use MagiskOnWSA
- Open the WSA folder and double-click Run.bat
Notice:
- As stated in the Requirements, You can only install WSA on a NTFS partition, not on an exFAT partition.
- You can NOT delete the WSA installation folder.
WhatAdd-AppxPackage -Register .\AppxManifest.xmldoes is to register an appx package with some existing unpackaged files,
so you need to keep them as long as you want to use WSA.
Check https://learn.microsoft.com/en-us/powershell/module/appx/add-appxpackage?view=windowsserver2022-ps for more details. - You need to register your WSA appx package before you can run WSA.
For WSABuilds and MagiskOnWSALocal users, you need to runRun.batin the extracted dir.
If the script fails, you can take the following steps for diagnosis (admin privilege required):- Open a PowerShell window and change working directory to your WSA directory.
- Run
Add-AppxPackage -ForceApplicationShutdown -ForceUpdateFromAnyVersion -Register .\AppxManifest.xmlin PowerShell.
This should fail with an ActivityID, which is a UUID required for the next step. - Run
Get-AppPackageLog -ActivityID <UUID>in PowerShell.
This should print the log of the failed operation. - Check the log for the reason of failure and fix it.
Changelog
- Microsoft’s Official Changelog
- Windows 10 Patch Applied (Credit: Cinit)
- Update from WSA v2307.40000.6.0 x86_64 —-> WSA v2308.40000.1.0 x86_64
- WSA Android Version: Android 13
- MindTheGapps 13.0 x86_64
- Magisk Canary de00f1d5 (26202) —-> Magisk Canary 0fe46c5a (26301)
- Magisk Stable v26.3
- KernelSU v0.6.7
- Amazon Appstore Removed
Difference Between Versions In This Release:
- WSA_XXXX.X0000.X.0_XXXX_Release-Nightly-MindTheGapps-XX.X-RemovedAmazon_Windows_10.7z
— Contains Google Play Store and Services
— No Amazon App Store
- WSA_XXXX.X0000.X.0_XXXX_Release-Nightly-MindTheGapps-XX.X_Windows_10.7z
— Contains Google Play Store and Services
— Contains Amazon App Store
- WSA_XXXX.X0000.X.0_XXXX_Release-Nightly-NoGApps-RemovedAmazon_Windows_10.7z
— No Amazon App Store
— No Google Play Store and Services
- WSA_XXXX.X0000.X.0_XXXX_Release-Nightly-NoGApps_Windows_10.7z
— Amazon App Store Included
— No Google Play Store and Services
- WSA_XXXX.X0000.X.0_XXXX_Release-Nightly-kernelsu-vX.X.X-MindTheGapps-XX.X-RemovedAmazon_Windows_10.7z
— No Amazon App Store
— Contains Google Play Store and Services
— Contains KernelSU (for Root Access)
- WSA_XXXX.X0000.X.0_XXXX_Release-Nightly-with-magisk-XX.X.XXXX.-stable-MindTheGapps-XX.X_Windows_10.7z
— Amazon App Store Included
— Contains Google Play Store and Services
— Contains Magisk Stable (for Root Access)
- WSA_XXXX.X0000.X.0_XXXX_Release-Nightly-with-magisk-XX.X.XXXX.-stable-NoGApps-RemovedAmazon_Windows_10.7z
— No Amazon App Store
— Contains Magisk Stable (for Root Access)
- WSA_XXXX.X0000.X.0_XXXX_Release-Nightly-magisk-XXXXX.XXXX.-canary-MindTheGapps-XX.X-RemovedAmazon_Windows_10.7z
— No Amazon App Store
— Contains Google Play Store and Services
— Contains Magisk Canary (for Root Access)
Additional Information
-
If the Magisk App does not appear after the installation of the WSA build with Magisk, download it from here and sideload it into WSA
-
For Builds with KernelSU, you will need to sideload the KernelSU Manager in order to use it. You can get this by going to the releases here, and scrolling down the list of assets, until you find it
Credits:
https://github.com/LSPosed/MagiskOnWSALocal
https://github.com/cinit/WSAPatch
Windows Subsystem For Android v2307.40000.6.0: Windows 11 for ARM Processors
Builds Last Updated:
— 31/08/2023 23:30 GMT (Reason: Initial Release)
Information:
For anyone updating from a previous WSA Build, please backup your Userdata VHDX using this guide, in the case that the builds in this release do not work as intended (crashes, bugs or not working), so that you can revert to the old version if needs be.
Please rename the folder (after extraction) to a shorter name, for example WSA. This will help you avoid the potential issues that may occur during installation and after install.
Warning
Read the guide in full before installing. Ensure you meet the full requirements for an installation on Windows 11.
Note
If you’re updating WSA, merge the folders and replace the files for all items when asked
Follow these steps to install on Windows 11.
Note :
If you have the official WSA installed, you must completely uninstall it to use MagiskOnWSA
- Extract the .7z archive using 7-zip (recommended) and rename the extracted folder to
WSA - Delete the .7z archive (It is recommended to keep the .7z archive until WSA has been installed and is working properly)
- Move the newly extracted folder to a suitable location (Documents folder is a good choice), as you will need to keep the folder on your PC to use MagiskOnWSA
- Open the WSA folder and double-click Run.bat
Notice:
- As stated in the Requirements, You can only install WSA on a NTFS partition, not on an exFAT partition.
- You can NOT delete the WSA installation folder.
WhatAdd-AppxPackage -Register .\AppxManifest.xmldoes is to register an appx package with some existing unpackaged files,
so you need to keep them as long as you want to use WSA.
Check https://learn.microsoft.com/en-us/powershell/module/appx/add-appxpackage?view=windowsserver2022-ps for more details. - You need to register your WSA appx package before you can run WSA.
For WSABuilds and MagiskOnWSALocal users, you need to runRun.batin the extracted dir.
If the script fails, you can take the following steps for diagnosis (admin privilege required):- Open a PowerShell window and change working directory to your WSA directory.
- Run
Add-AppxPackage -ForceApplicationShutdown -ForceUpdateFromAnyVersion -Register .\AppxManifest.xmlin PowerShell.
This should fail with an ActivityID, which is a UUID required for the next step. - Run
Get-AppPackageLog -ActivityID <UUID>in PowerShell.
This should print the log of the failed operation. - Check the log for the reason of failure and fix it.
Changelog
- Microsoft’s Official Changelog: No Changelog at the time of this release. I will update this release, if one is made available.
- Update from WSA v2307.40000.5.0 arm64 —-> WSA v2307.40000.6.0 arm64
- Adding
VPNDialogsback into the releases - Added Post-installation pages for builds
- Shorten name of folder inside .7z builds to avoid issues during and after install
- WSA Android Version: Android 13
- MindTheGapps 13.0 arm64)
- Magisk Canary de00f1d5 (26202)
- KernelSU v0.6.7
- Amazon Appstore Removed
Difference Between Versions In This Release:
- WSA_XXXX.X0000.X.0_XXXX_Release-Nightly-MindTheGapps-XX.X-RemovedAmazon.7z
— Contains Google Play Store and Services only
— No Amazon App Store
- WSA_XXXX.X0000.X.0_XXXX_Release-Nightly-MindTheGapps-XX.X.7z
— Contains Google Play Store and Services
— Contains Amazon App Store
- WSA_XXXX.X0000.X.0_XXXX_Release-Nightly-NoGApps-RemovedAmazon.7z
— Base Window Subsystem for Android
— No Amazon App Store
- WSA_XXXX.X0000.X.0_XXXX_Release-Nightly-NoGApps.7z
— Base Window Subsystem for Android
— Amazon App Store Included
- WSA_XXXX.X0000.X.0_XXXX_Release-Nightly-magisk-XXXXX.XXXX.-canary-MindTheGapps-XX.X-RemovedAmazon.7z
— No Amazon App Store
— Contains Google Play Store and Services
and
— Contains Magisk (for Root Access)
- WSA_XXXX.X0000.X.0_XXXX_Release-Nightly-kernelsu-vX.X.X-MindTheGapps-XX.X-RemovedAmazon.7z
— No Amazon App Store
— Contains Google Play Store and Services
and
— Contains KernelSU (for Root Access)
Additional Information
-
If the Magisk App does not appear after the installation of the WSA build with Magisk, download it from here and sideload it into WSA
-
For Builds with KernelSU, you will need to sideload the KernelSU Manager in order to use it. You can get this by going to the releases here, and scrolling down the list of assets, until you find it
Credits:
https://github.com/LSPosed/MagiskOnWSALocal
Install Android apps from Amazon Appstore on Windows 11
One feature that Microsoft announced Windows 11 would have is the native execution of Android applications without having to go through any emulator like BlueStacks. However Windows 11 arrived and this feature was not standard, instead, it has been enabled later by installing Windows Subsystem for Android.
Run Amazon Appstore applications
This tool allows a Windows 11 computer to run Android apps available for download from the Amazon Appstore. This store will appear in the operating system’s Start menu and will also be available in search, offering the selected catalog of apps that can be installed on your PC. Of course, for now it is not very extensive, but hopefully in the near future, the offer will be expanded.
Subsystem Windows for Android can be run in two ways: one is when you open a mobile app, which will call the subsystem for execution. Another is open and running in the background, using more memory and processing power of your device. Remember that you will need to have an Amazon account.
Finally, note that the Amazon app store has regional blocking, so you will need to have a VPN if you want to take full advantage of it, as it is initially only available to users in the United States.
Requirements and additional information:
- Minimum operating system requirements:
Windows 10.

Elies Guzmán
With a degree in History, and later, in Documentation, I have over a decade of experience testing and writing about apps: reviews, guides, articles, news, tricks, and more. They have been countless, especially on Android, an operating system…
Install Windows Subsystem For Android With Amazon App Store on Windows 11 Unsupported PC: I’ll be showing you how to Install Windows Subsystem for android on windows 11 Unsupported PC. So that you’re able to run android apps that are currently available to the windows insiders running windows 11 beta, this feature was released on the 20th of October 2021.
Even if I can’t get it working on this virtual machine over here, you’ll understand by the end of the article how to run android apps on your own computer. It’s very exciting, and of course, this is just the start of it.
You can read about it on the Microsoft blog. this page will tell you what you need to do to get the windows 11 beta or Dev and set up android apps getting started.
System Requirements For Install Windows Subsystem For Android On Windows 11
- You’ll need to be running the latest version and meet these hardware requirements.
- Turn on Developer Mode.
- Then you may need to enable virtualization in your PC’s bios UEFI.
- Next, you’ll need to make sure that you’re running the latest Microsoft store version.
- Your PC’s region must be set to the USA.
- Your pc must be in the BETA or DEV Channel.
- You’ll also need to have a US-based Amazon account in order to use the amazon app store.
Recommended: Install Google Play Store (With Root) On Windows 11 – WAS
How To Check RAM and OS Build Version?
You need to open the Settings. Head to the System tab and click on About at the very bottom. You’ll need to make sure that you have at least 8 gigabytes of RAM, and you’re running Build OS 22000 or higher. i.e., the latest beta build is awesome.
Speed Up Windows 11 | Optimization For Gaming and Development
So, let’s get started and Install Windows Subsystem For Android with Amazon App Store on Windows 11.
Step 1, Check Running Windows 11 Channel And Region in USA
1. First of all, You’ll need to make sure you’re running the Windows 11 beta build or DEV build.

2. Click on Start > open Settings, then head across to Windows update. Then Click on Windows Insider Program and choose your Insider settings. Choose the Beta or Dev channel over here.
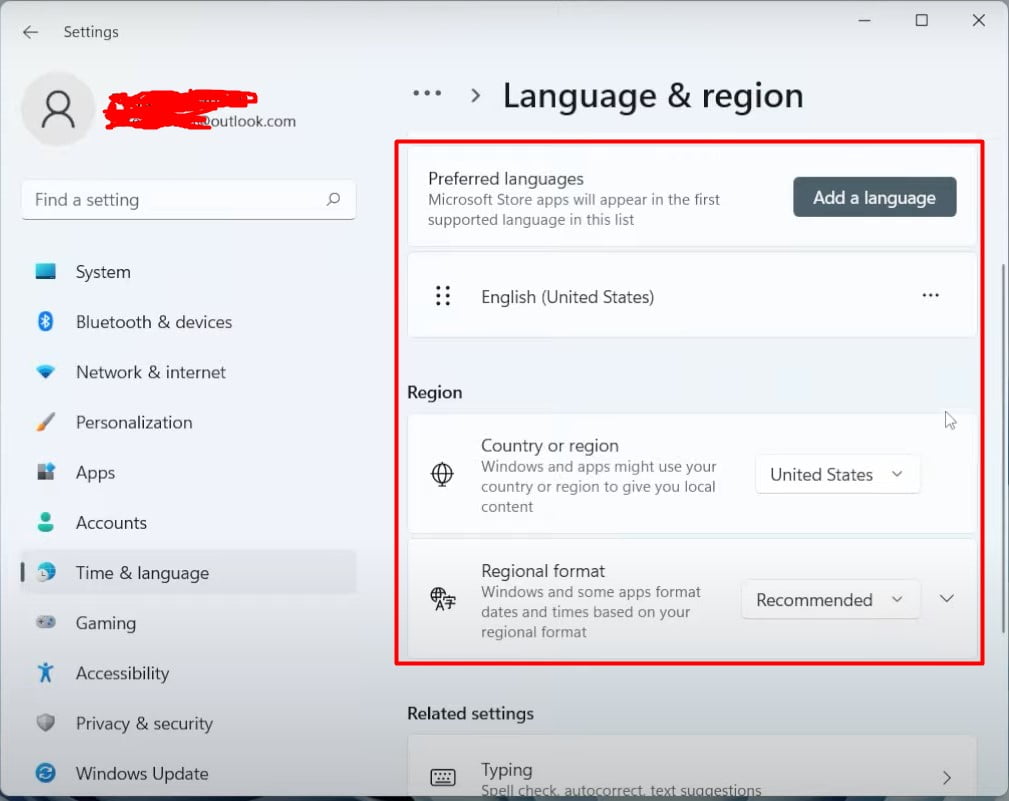
3. Next in Settings > Time and language. Select the language and region here. So basically, here, you need to change all the settings to the United States.
Just click on Add a language and type here the US and select the United States. You need to change the Country or Region here; select the United States here because it is currently available for United States users.

4. Next, Turn on Developer Mode. Search for Developer and Click to Developer Settings. Now, Turn On the Developer Mode.
I’m running the latest version of the dev channel. So it should be included here as well, and you’ll also need to be signed in with an insider account to be running the insider build. I’ve installed this on a fresh VMware without the need for such.
Step 2, Enable Virtual Machine and Hyper-V On Windows 11
1. So first of all, we need to enable the virtual machine platform and Hyper-V on our computer.
2. Click on Start and type in Windows features. And then click on Turn Windows features on or off.

3. When this new pop-up window opens up. Scroll down until you see Virtual Machine Platform and check this. You may also be required to check the Windows Hypervisor Platform. I’m not entirely sure, then hit OK.
4. Next, You’ll need to restart your computer.
Windows 11 Slow Startup? Most Effective Fixes Slow Boot
Step 3, Installing Windows Subsystem For Android With Amazon Appstore
Now the Virtual Machine and Windows Hypervisor features have been enabled. All we need to do is install the Amazon app store, which should install the Windows subsystem for android, which comes with the amazon app store.

1. Just in case it doesn’t, head back to the page and click this link here (Windows Subsystem for Android With Amazon App Store). It will take you across to the Microsoft app store download page. Here you can see the blue Get button. Click on it
2. Next, you will see a prompt asking you to be redirected from your current location and directed towards the Microsoft Store. Clicking on ‘Yes’ will open it up in a new tab or Window Store on the Windows system!
3. The installation process is easy and straightforward, once you have found the app. All that’s left for me to do now are two steps: 1) Click “Get/Install” on this Microsoft Store window 2) Install it!
If you experience that this app will not work on your device issue, then follow the next step to fix the WIndows subsystem error on unsupported pc.
Step 4, If “This app will not work on your device” Workaround.
Unfortunately, once you are in the Microsoft store, if you can see that this isn’t working, this app will not work on your device, even though my device does reach the minimum requirements. What exactly can we do from here? I found the solution to get this app through other sources.

1. Visit the site store.rg-adguard.net. On this site, you can see an input box here. You need to put the URL here. open the Windows Subsystem For Android with Amazon App Store in another tab on the browser.
2. Now copy the Windows Subsystem for android Url and Paste it into the input box on the store.rg sites. Change the select box RP to Slow.
3. Click on the Tick mark.

4. Then scroll down here, and you’ll see a bunch of links at the very bottom. All we need to do is download this msixbundle at the very bottom here. The size is 1.2 gigabytes.
It’ll then download onto your computer. This will, of course, take some time, depending on your internet speed once the download is finished. Follow the next step.
Step 5, Install Windows Subsystem for Android & Amazon Appstore Manually
What you need to do now is open the Command prompt or Powershell console in the download folder. SP to do that.
1. Hit Start type in PowerShell and open up windows PowerShell as administrator.
2. Now, In PowerShell, You need to switch the folder System32 to the Download location (The folder where you just download the WindowsSubsytsemAndroid file).

3. In my case, It’s a downloads folder in the C drive. So I will type the first command:
Cd C:\
Cd .\Users\{username}\Downloads
Hit Enter.
4. Now install the package.
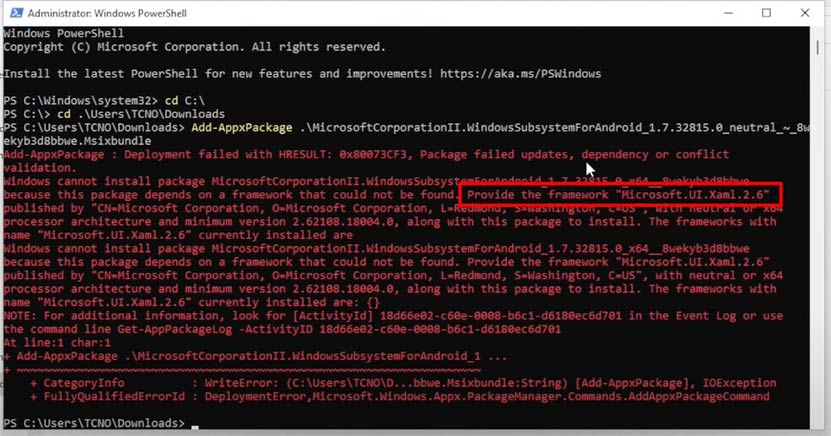
Add-AppxPackage .\<package name>.msixbundleOr, Another method is”

Add-AppxPackage "file-location"Hit Enter. It should be installed in the Windows Subsystem For Android on Unsupported PC. If you experience any error after running this command, or Even Amazon App Store not installing or installed, please follow the next step.
Windows 11 Black Screen Of Death,Infinite Loading,Bootloop
Step 6, Fix The “Microsoft.UI.xaml” Framework Error
If you see something like “Microsoft.UI.xaml framework error”, talking about a framework that couldn’t be found, which in my case is Microsoft.UI.xaml 2.6. You have to know that Microsoft needs the following framework that can be provided in the Microsoft store. So to fix this issue:
1. Just open up the Microsoft store. Make sure you are logged into the Microsoft store.

2. Click on the Library and then click on the “Get updates” button.
Important: Update every app from the Microsoft store. After that, go back to PowerShell and rerun the command, and the Windows Subsystem for android with Amazon Store should be successfully installed.
Step 6, Manually Install Amazon App Store
1. You just need to go into the Microsoft Store app and type in the search box amazon app store. And now you will see the amazon app store here. That’s how you can get the Amazon app store on your Windows 11.
2. Next, Click on install. It will start installing Windows subsystems for android. That’s why we are using this amazon app store. And that’s why people are looking for the amazon app store because it will give you the Windows Subsystem for android, right? which will be used if you install any APK in your system.
Check How to Install Google Play Store (With Root) On Windows 11
Установите приложения Android на свой компьютер с помощью подсистемы Windows для Android (WSA) и Amazon App Store. Вы сможете загружать APK-файлы приложений Android и запускать их без особых усилий.
После выпуска ОС Windows 11 Microsoft не остановилась на достигнутом и пошла еще дальше, сделав рывок вперед по сравнению с любой другой предыдущей версией Windows с точки зрения взаимодействия.
В Windows 11 вы можете официально устанавливать приложения Android на свой ПК с помощью Amazon Appstore, или самостоятельно загружать и устанавливать APK-файлы приложений. Также возможно устанавливать неопубликованные приложения для Android с помощью ADB, что означает, что вы можете наслаждаться всеми наворотами, не ограничивая себя предложениями из Amazon Appstore.
Примечание: На момент написания этой статьи ( 25 октября 21 г. ) эта функция доступна только для пользователей, зарегистрированных в программе предварительной оценки Windows (бета, dev и канал предварительного выпуска).
Подготовка компьютера с Windows 11 для установки WSA
Предполагается что ваше устройство имеет 8 ГБ ОЗУ (рекомендуется 16 ГБ), твердотельный накопитель (SSD) и поддерживаемый процессор (Intel Core i3 8-го поколения, AMD Ryzen 3000, Qualcomm Snapdragon 8c или выше) и приложение «Microsoft Store» версии 22110.1402.6.0 или выше.
Прежде чем перейти к загрузке и установке приложений Android на устройство с Windows, необходимо убедиться, что на вашем компьютере включены дополнительные функции Hyper-V и Virtual Machine Platform.
Шаг 1: Запустите приложение «Параметры» с помощью меню «Пуск» или используйте сочетания клавиш Windows I
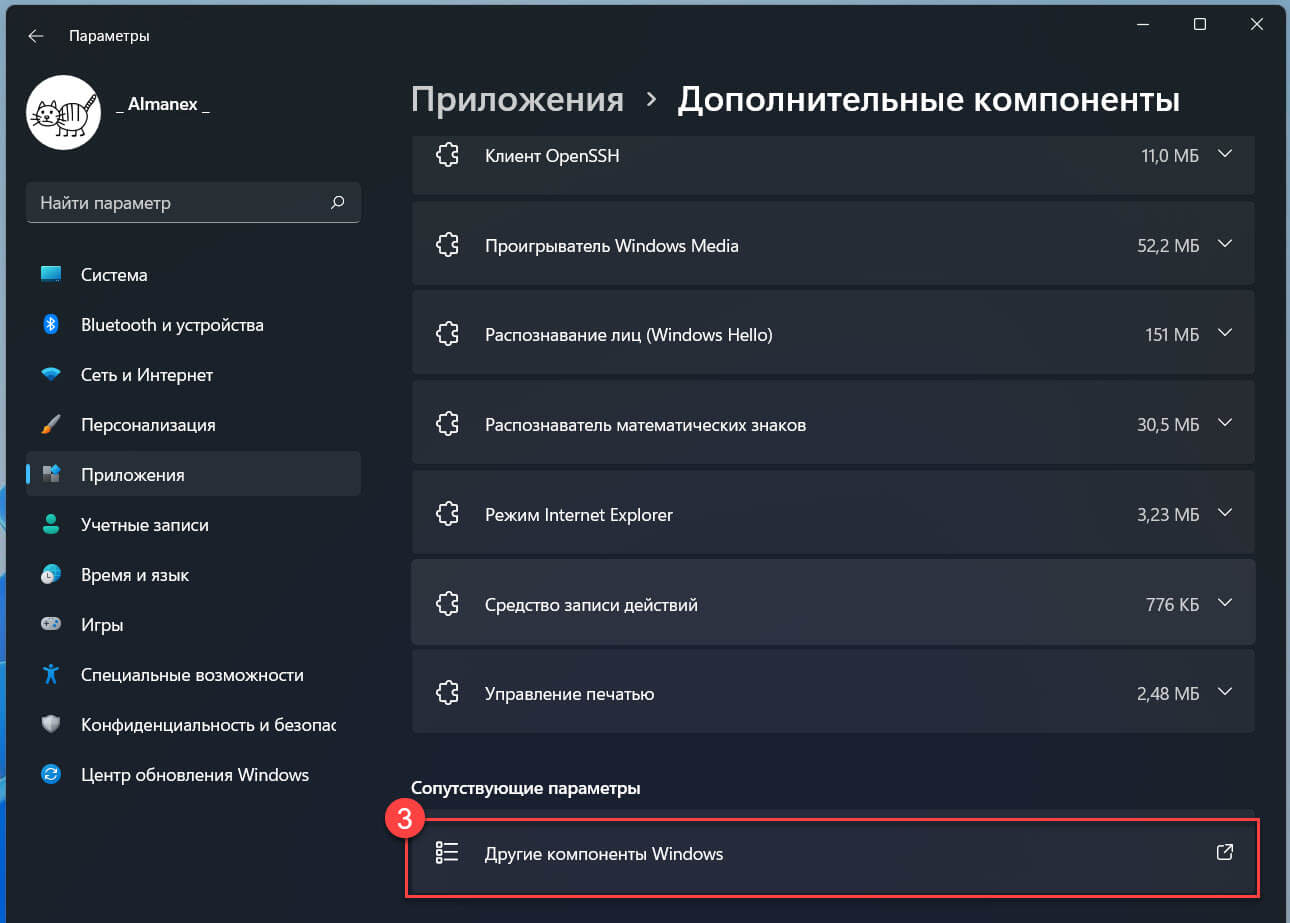
Шаг 2: На левой боковой панели параметров перейдите в раздел «Приложения» → «Дополнительные компоненты».
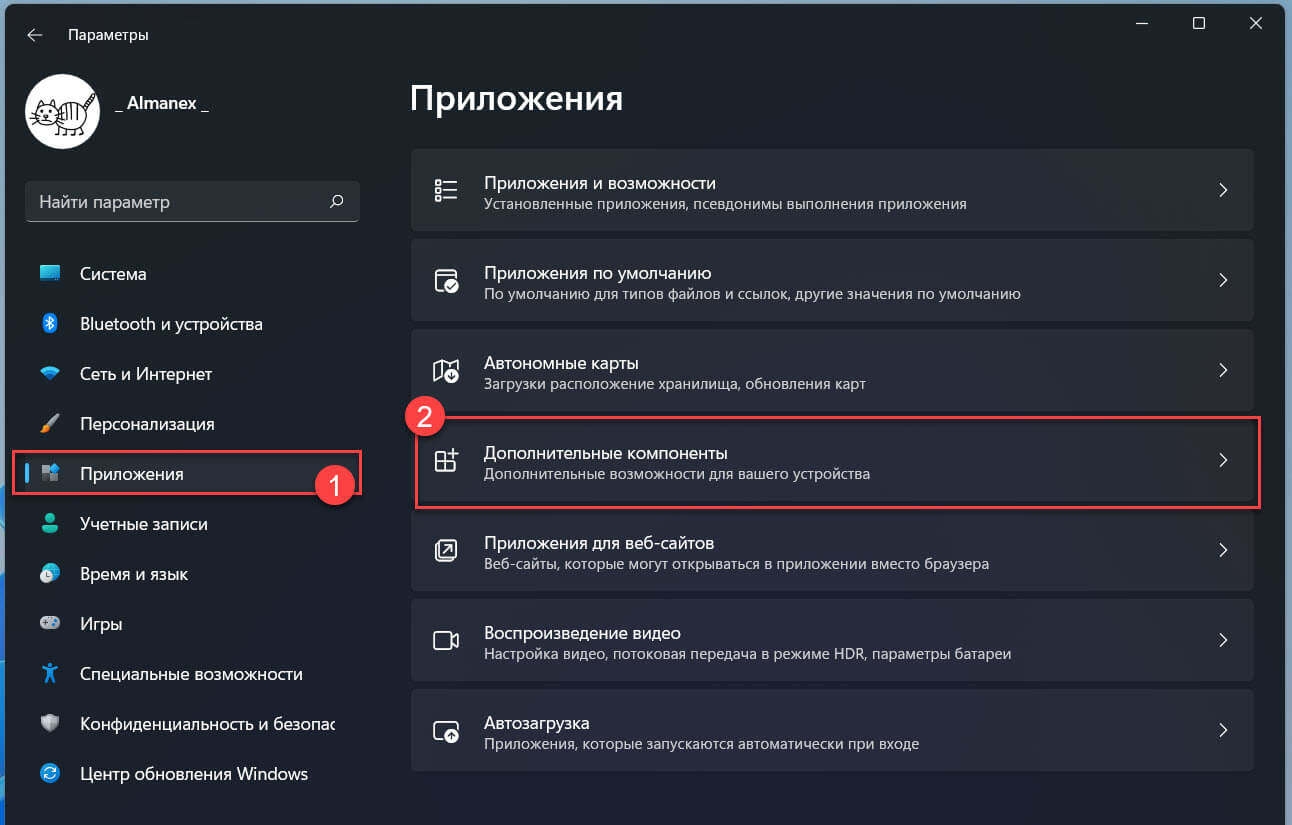
Шаг 3: Прокрутите страницу в низ до раздела «Сопутствующие параметры» и откройте вкладку «Другие компоненты Windows». На вашем экране откроется отдельное окно.
Шаг 4: Теперь в окне «Компоненты Windows» найдите параметр «Hyper-V» и установите флажок перед функцией, чтобы включить его.
Шаг 5: Затем прокрутите вниз, найдите функцию «Платформа виртуальной машины» и установите флажок перед ней. Наконец, нажмите кнопку «ОК», чтобы установить эти дополнительные функции на свой компьютер с Windows.
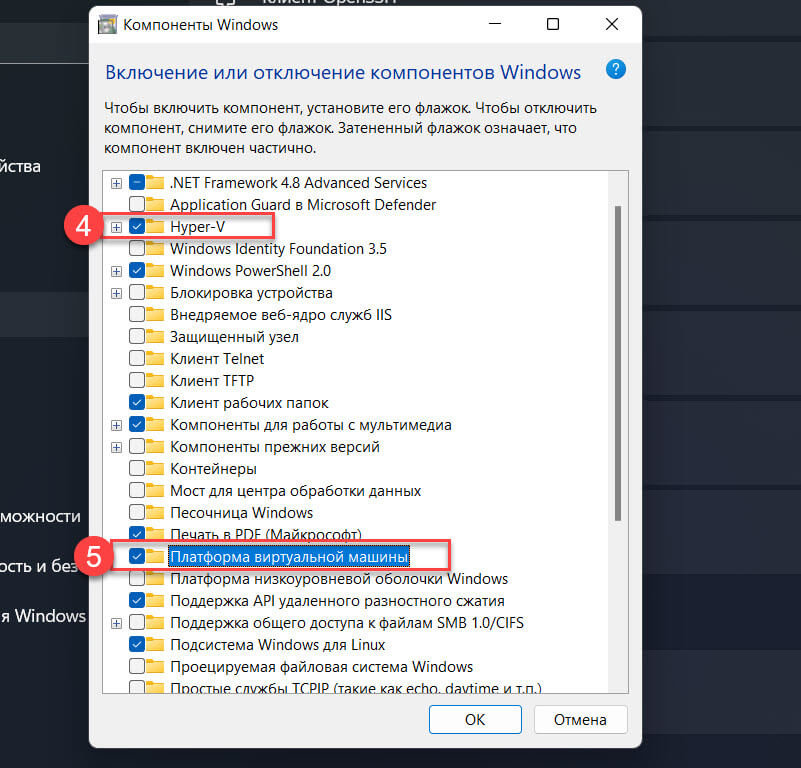
Это действие откроет отдельное окно на экране вашего ПК, будут загружены необходимые файлы, терпеливо дождитесь завершения установки.
Загрузите и установите Windows Subsystem for Android и Amazon App Store
Подсистема Windows для Android — это новая проприетарная технология платформы Windows 11, которая состоит из ядра Linux и ОС Android, и может запускать приложения Andriod в вашей системе.
Технический это может показаться слишком сложным. Но при этом Microsoft будет устанавливать «Подсистему Windows для Andriod» в виде приложения из Microsoft Store, это позволит пользователям легко загружать и устанавливать приложения APK.
Примечание: Пока WSA находится на стадии тестирования, для возможности установки подсистемы из магазина необходимо изменить ваш домашний регион на США (временное требование, в дальнейшем будет отменено), на данный момент, рекомендуем использовать руководство по ручной установке Подсистемы Windows для Android в Windows 11.
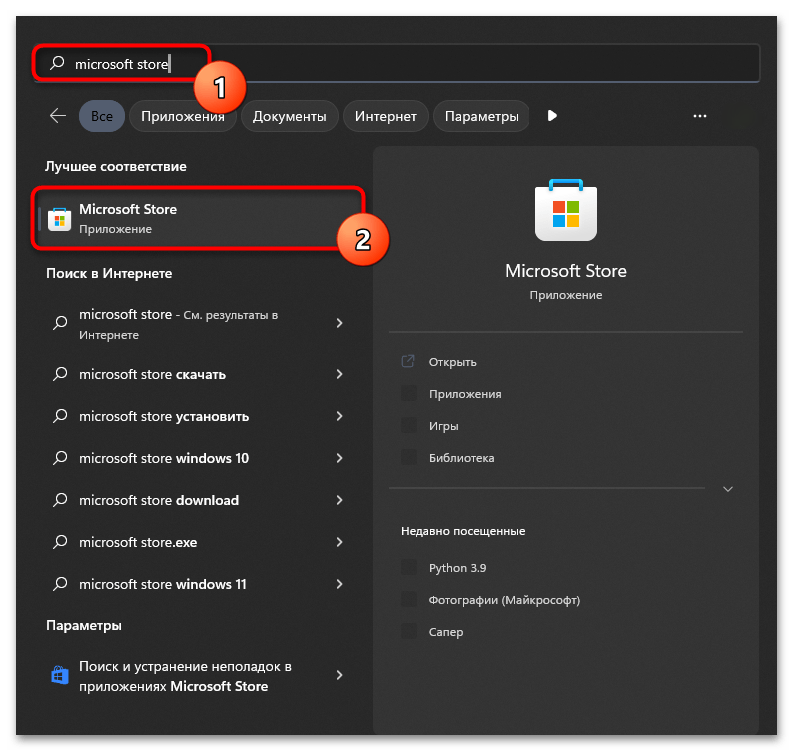
Шаг 1: Откройте приложение магазина «Microsoft Store» с помощью меню «Пуск» или найдите его в поиске Windows.
Шаг 2: В окне Microsoft Store кликните строку поиска и введите «Подсистема Windows для Android», нажмите Enter, чтобы выполнить поиск.
Кроме того, вы также можете перейти к приложению, перейдя на официальный веб-сайт Microsoft Store по адресу microsoft.com/windows-subsystem-for-android…, а затем нажмите кнопку «Install/open» на веб-странице.
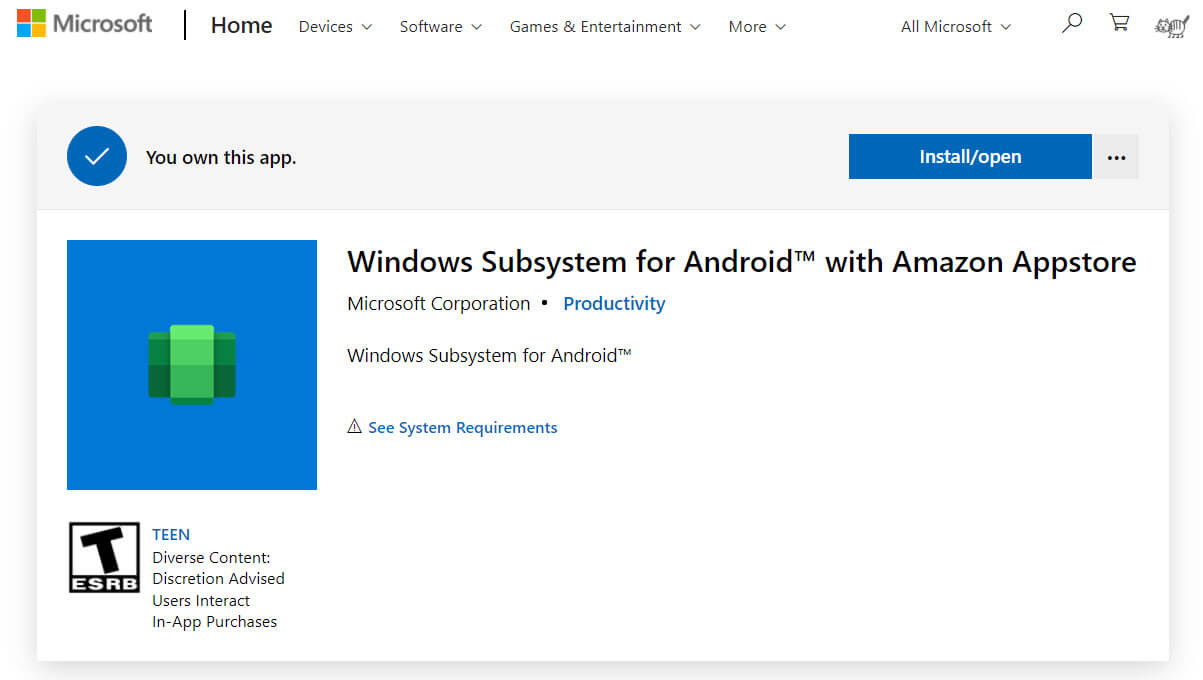
Вы получите запрос перенаправления в Microsoft Store, нажмите кнопку «Открыть приложение Microsoft Store». Это откроет магазин на вашем компьютере с Windows, здесь, нажмите кнопку «Установить», чтобы получить приложение.
Внимание: Если по какой-либо причине вы не можете загрузить подсистему Windows для Android из Microsoft Store, вы также можете установить ее вручную, загрузив для нее установочный пакет.
Установить подсистему Windows для Android вручную
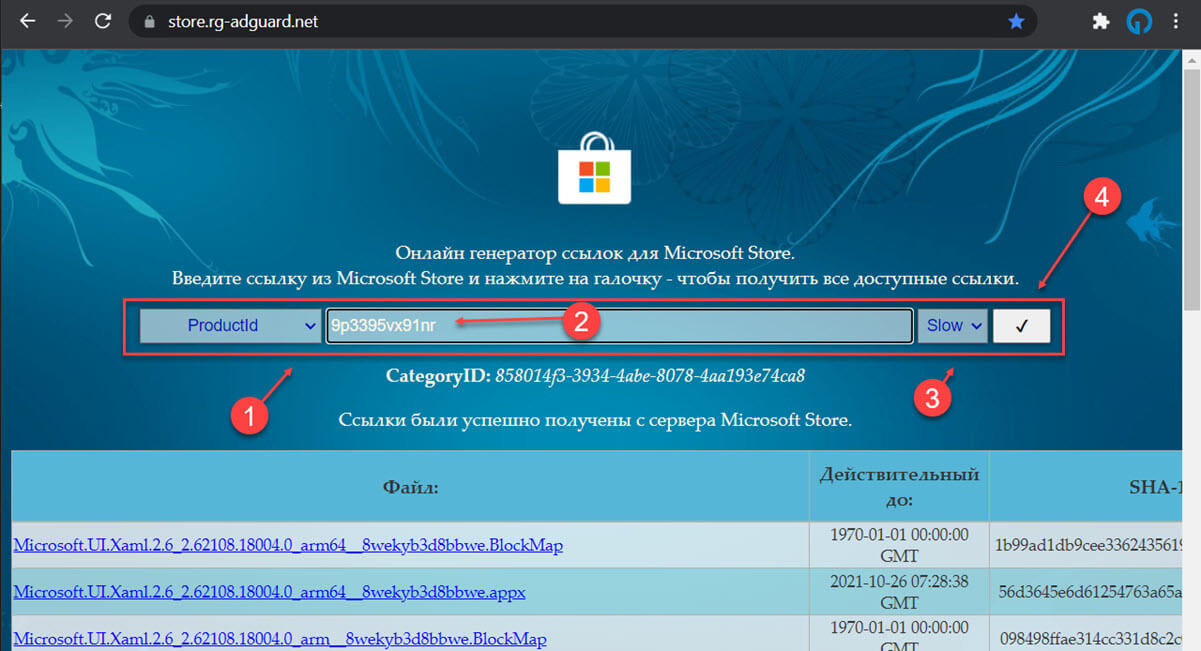
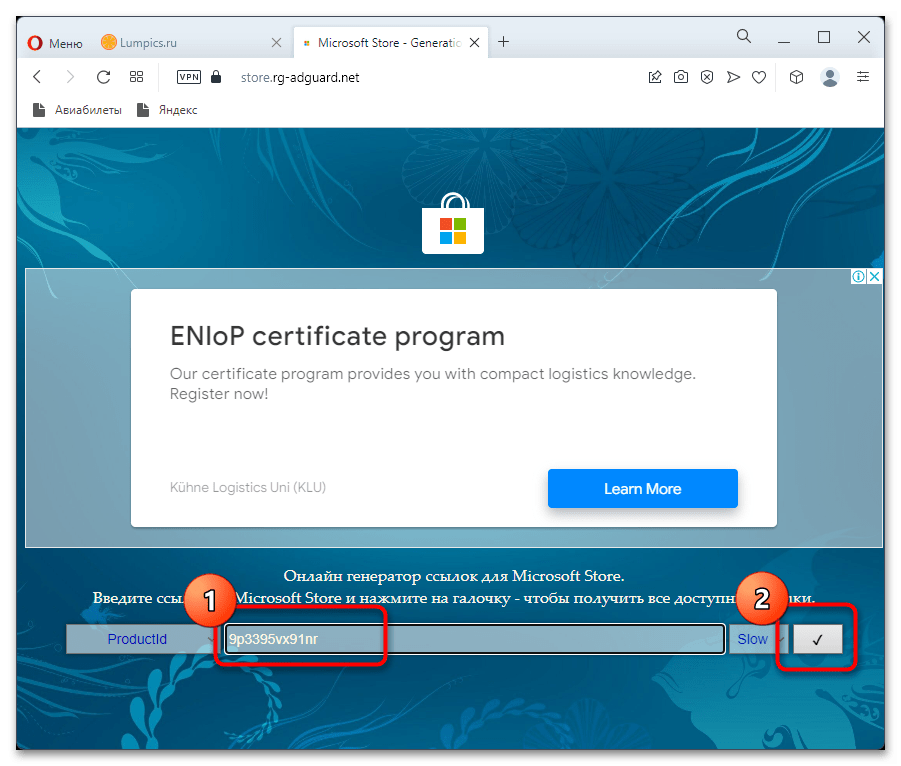
Шаг 1: Перейдите на страницу — Онлайн генератор ссылок для Microsoft Store
Шаг 2: Замените в выпадающем меню «Url link» на «ProductId», далее введите или скопируйте и вставьте идентификатор: 9p3395vx91nr, выберите параметр «Slow» и нажмите кнопку «Проверить», смотри скрин ниже.
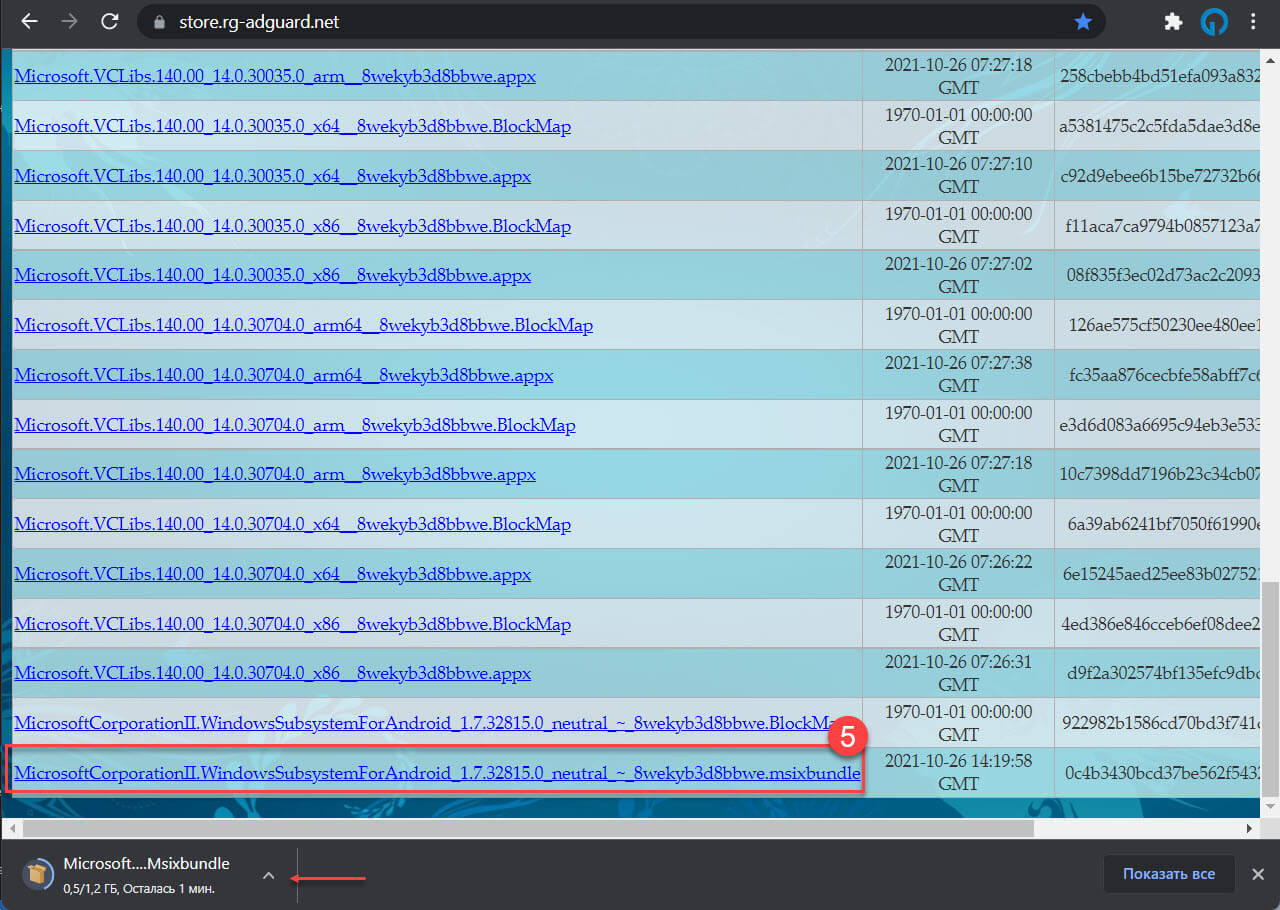
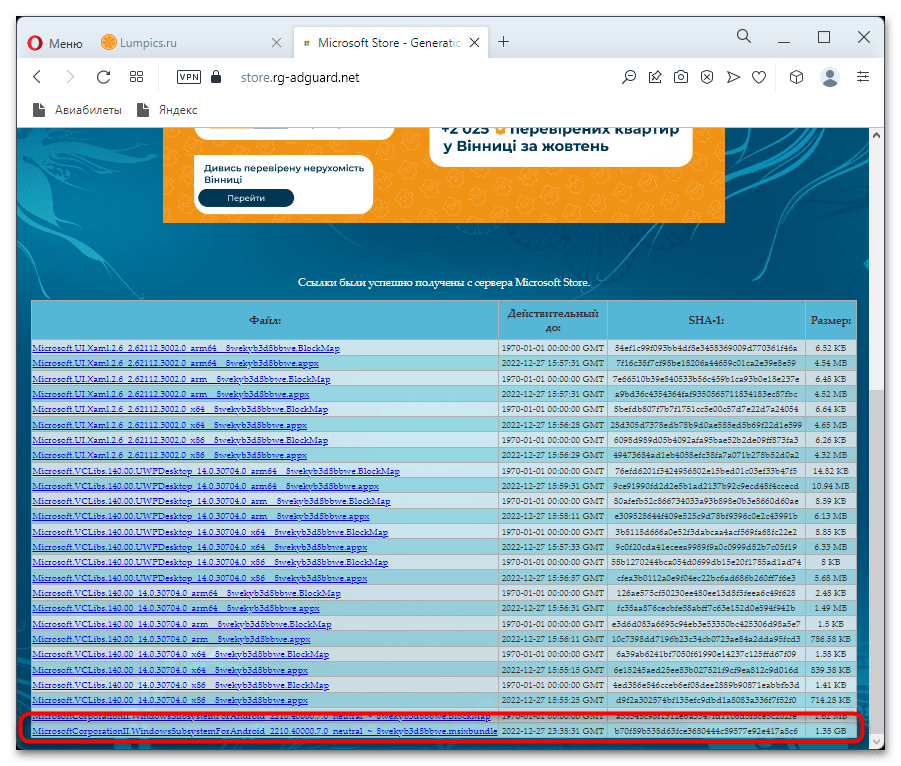
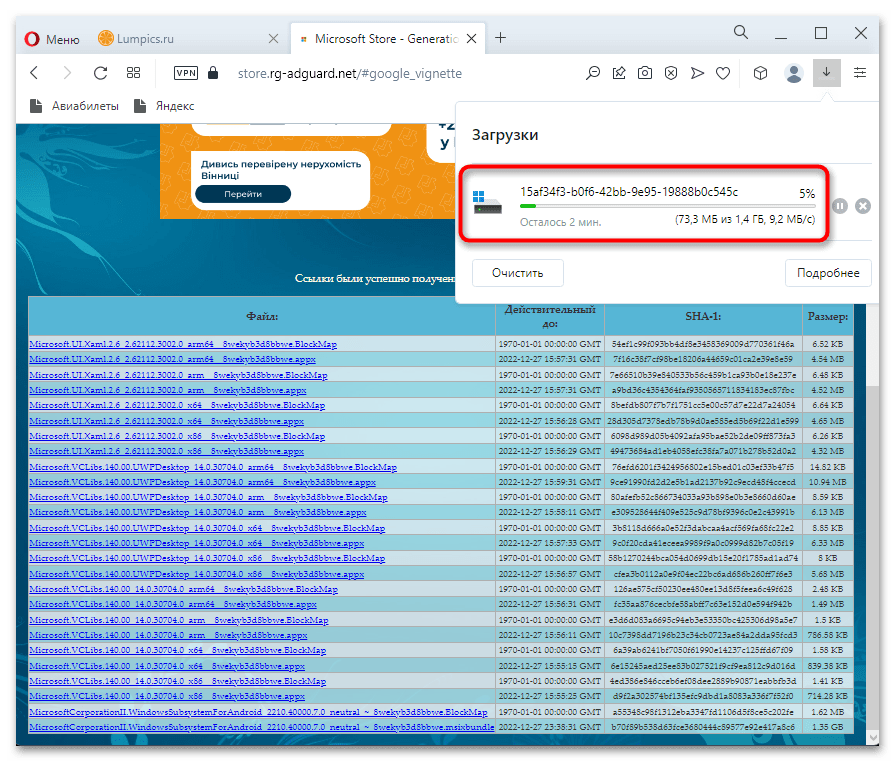
Шаг 3: В низу страницы кликните ссылку «MicrosoftCorporationII.WindowsSubsystemForAndroid_1.7.32815.0_neutral_ ~ _8wekyb3d8bbwe.msixbundle», чтобы сохранить пакет приложения (1,2 ГБ) в папку загрузки.
Шаг 4: Откройте Терминал Windows от имени администратора, перейдите на вкладку PowerShell.
Шаг 5: Введите следующую команду, чтобы перейти в каталог с загруженным файлом Msixbundle, и нажмите Enter:
cd C:\PATH\TO\Msixbundle
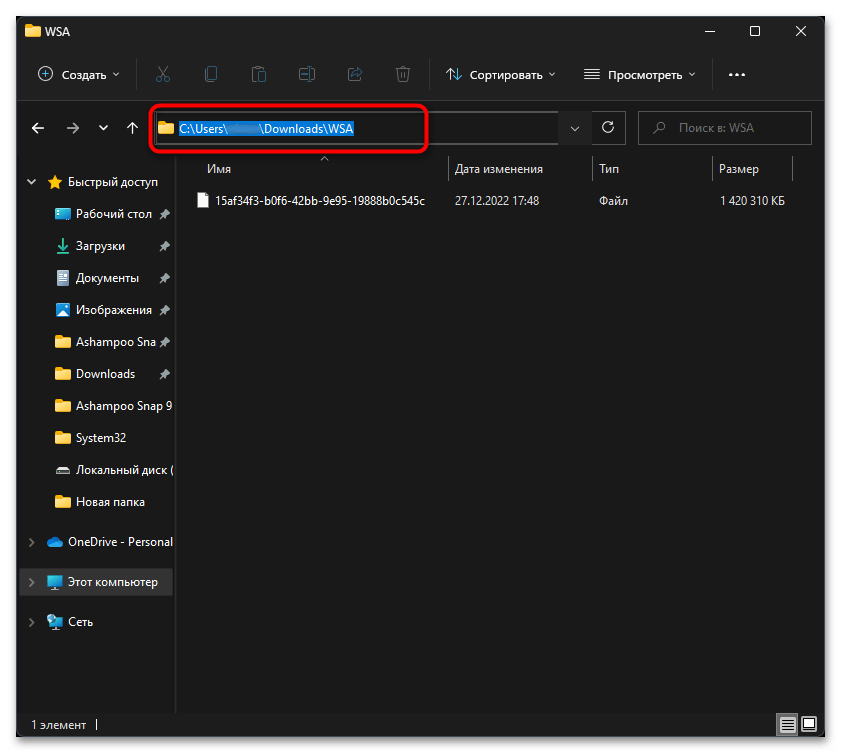
В команде обновите путь, указав расположение, в котором вы сохранили файл пакета. В моем случае, команда будет выглядеть так:
cd C:\Users\alman\Downloads
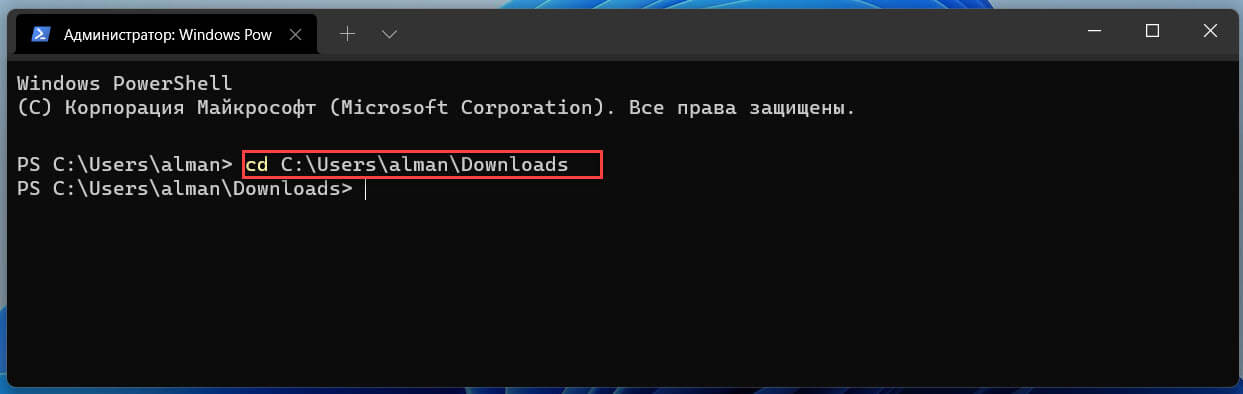
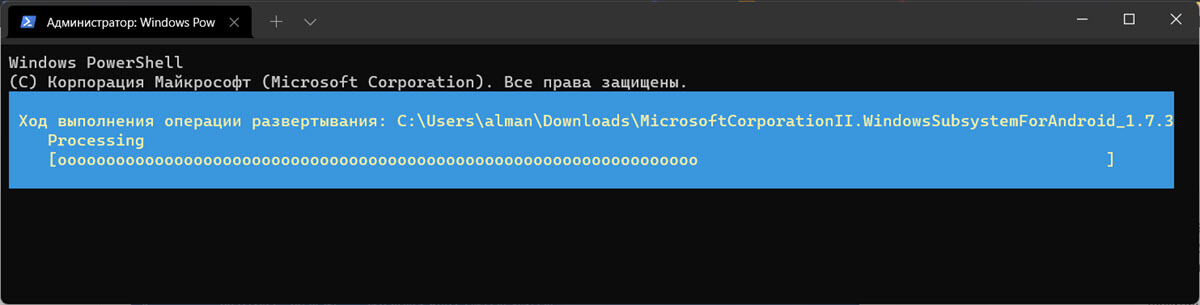
Шаг 6: Теперь введите следующую команду, чтобы установить подсистему Windows для Android в Windows 11, и нажмите Enter:
Add-AppxPackage MicrosoftCorporationII.WindowsSubsystemForAndroid_1.7.32815.0_neutral___8wekyb3d8bbwe.msixbundle
Примечание: В команде обязательно обновите имя пакета приложения тем, которое вы скачали.
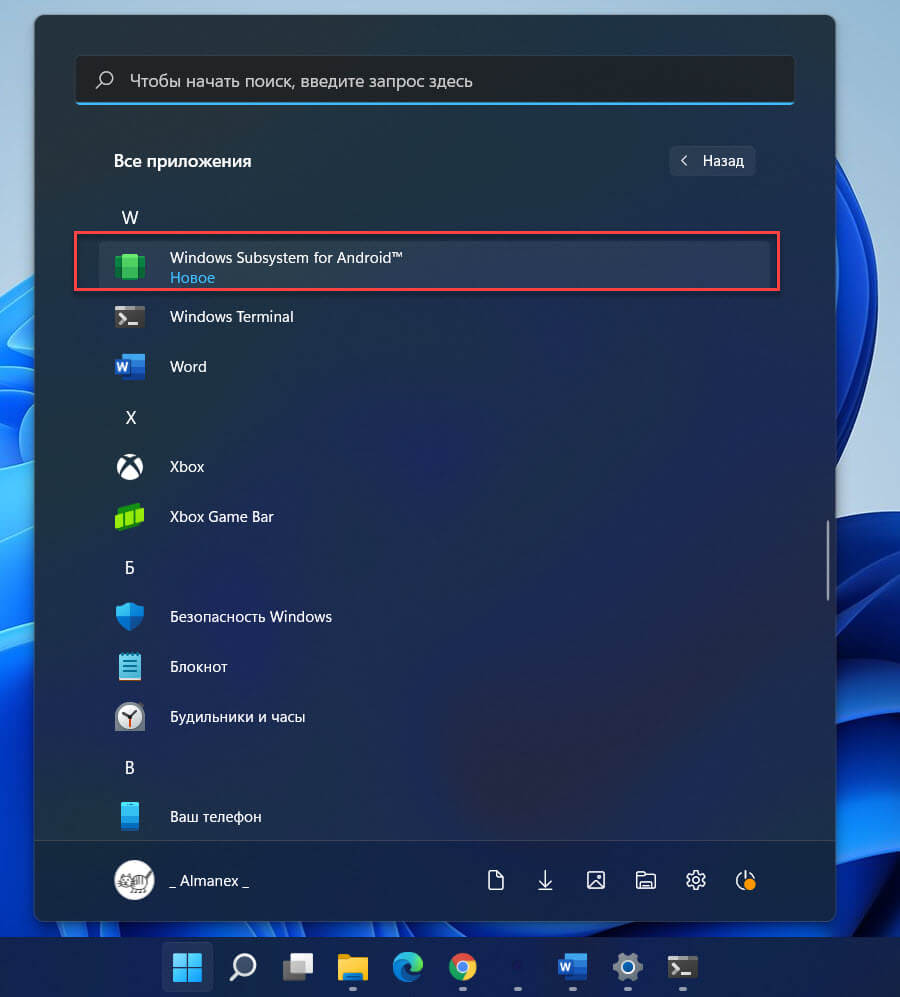
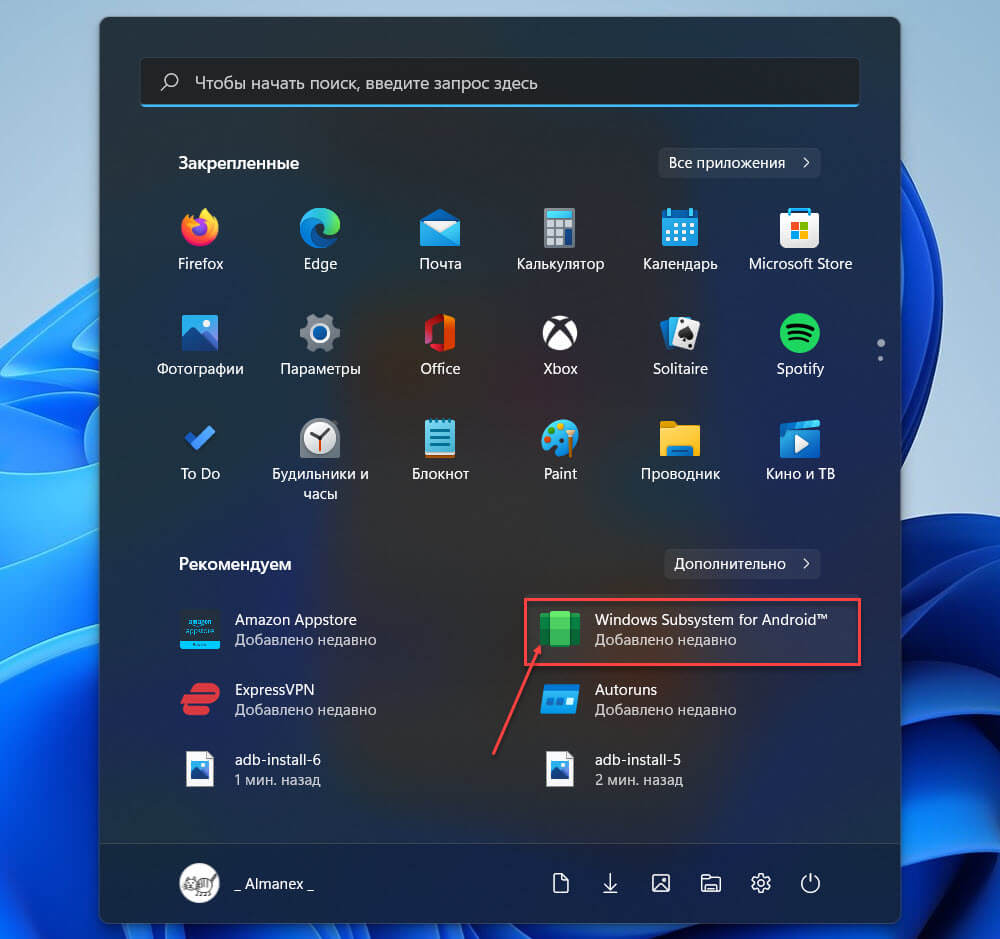
После того, как вы выполните эти шаги, на ваш компьютер будут установлены подсистема Windows для Android и приложение Amazon Appstore и вы сможете найти приложение в разделе «Рекомендуемые» меню «Пуск» Windows.
Установка магазина приложений «Amazon Appstore»
После установки пакета Windows Subsystem for Android, будет установлен магазин Amazon Appstore (не обязательно), пользователи, не из США, будут уведомлены о том, что Amazon Appstore недоступен в их стране.
Чтобы обойти региональные ограничения для магазина Amazon Appstore, необходимо выполнить следующие шаги:
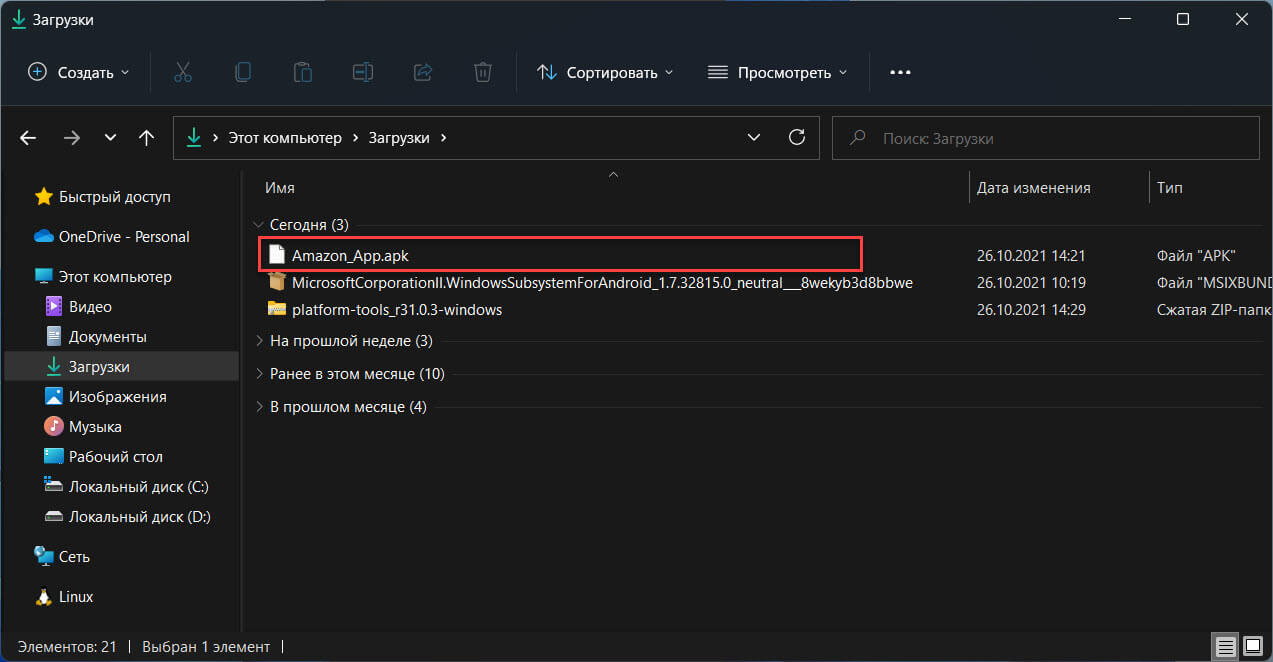
Шаг 1: Скачайте APK-файл приложения Amazon Appstore по ссылке из официального источника.
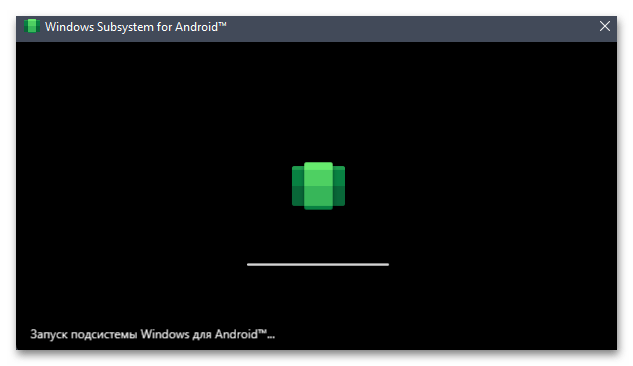
Шаг 2: Запустите подсистему WSA с помощью меню «Пуск»
Шаг 3: В разделе «Режим разработчика» передвиньте ползунок переключателя в положение «Вкл.»
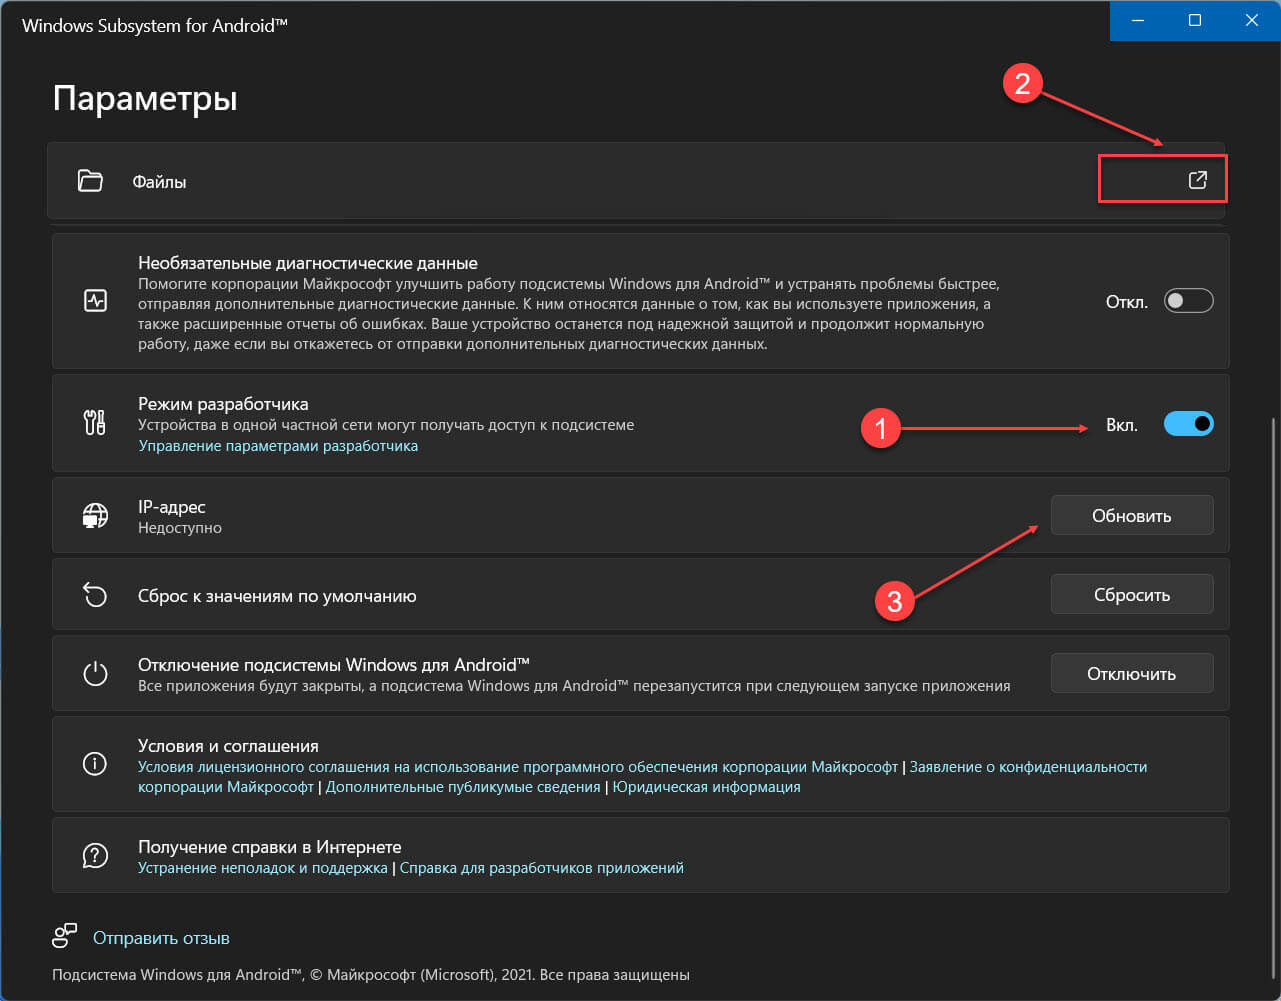
Шаг 4: Теперь в верхней части экрана откройте опцию «Файлы». Затем нажмите кнопку «Обновить» напротив опции IP-адрес. После чего вы можете скопировать IP-адрес нажав соответствующую кнопку.

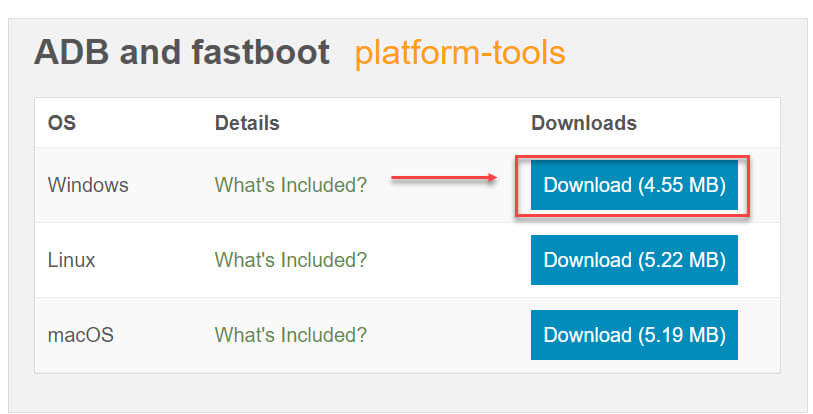
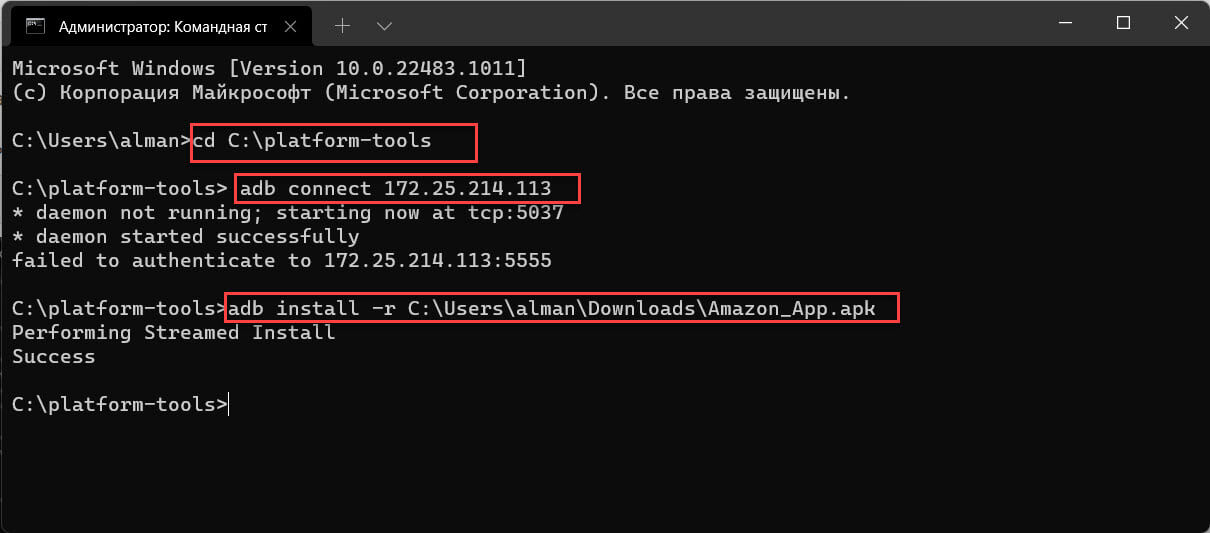
Установка ADB:
Шаг 5: Откройте сайт ADB Installer и скачайте «platform-tools» для Windows.
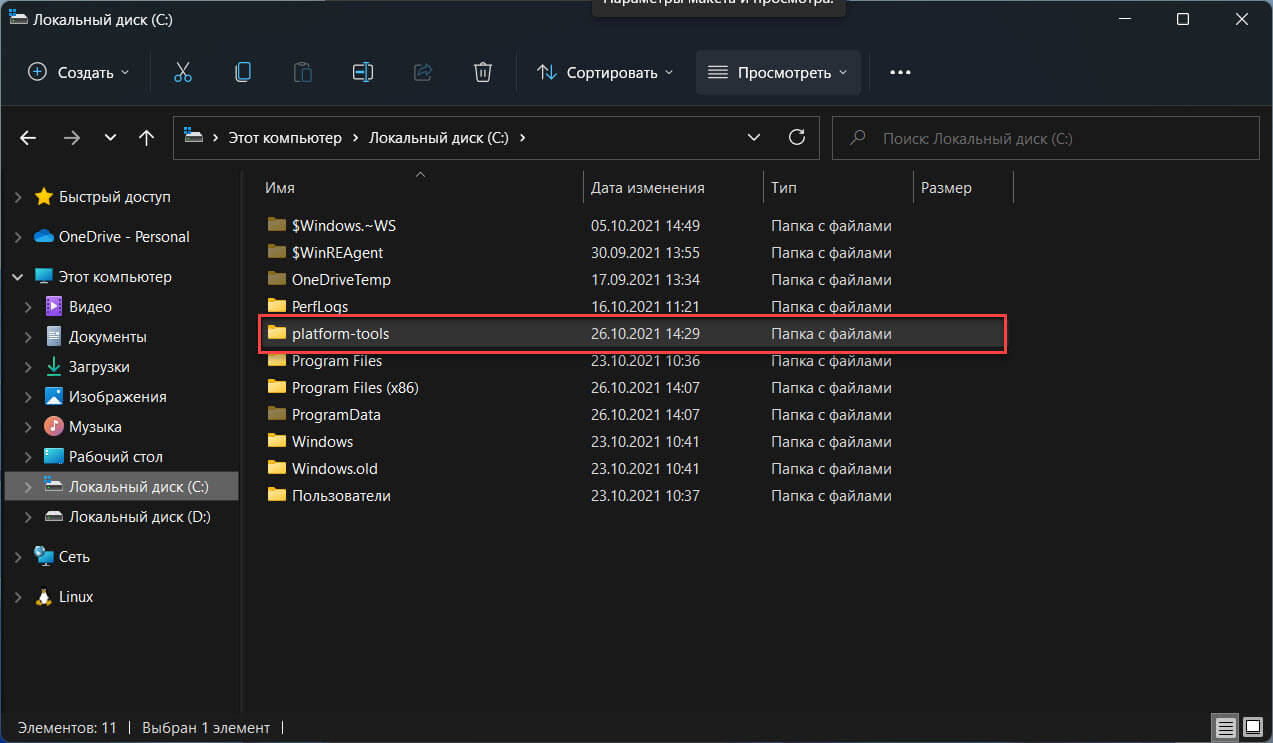
Шаг 6: Распакуйте архив и переместите папку platform-tools на диск C:\platform-tools
Шаг 7: Чтобы подключиться с помощью ADB из хост-системы Windows 11, откройте Терминал от имени администратора и перейдите на вкладку «Командная строка».
Шаг 8: Выполните команду, чтобы перейти в папку:
cd C:\platform-tools
Шаг 9: Ведите команду предварительно заменив <IP-адрес> на IP из Шага 4:
adb connect <IP-адрес>
Шаг 10: Установите APK магазина с помощью ADB используя параметр -r, Это позволит заменить текущую версию Amazon Appstore в Windows Subsystem for Android:
adb install -r <путь-к-Amazon_App.apk>
Где вместо <путь-к-Amazon_App.apk> укажите расположение файла.
Шаг 11: После этого Вы сможете найти Amazon Appstore в разделе «Рекомендуемые» в меню «Пуск», как только он будет установлен в системе.
Примечание: Точно так же, вы можете установить любой другой файл с расширением .apk.
Шаг 12: Откройте магазин Amazon Appstore, войдите в свой аккаунт, теперь вы сможете, установить APK приложения в Windows 11, одобренные Microsoft и Amazon, независимо от вашего региона.
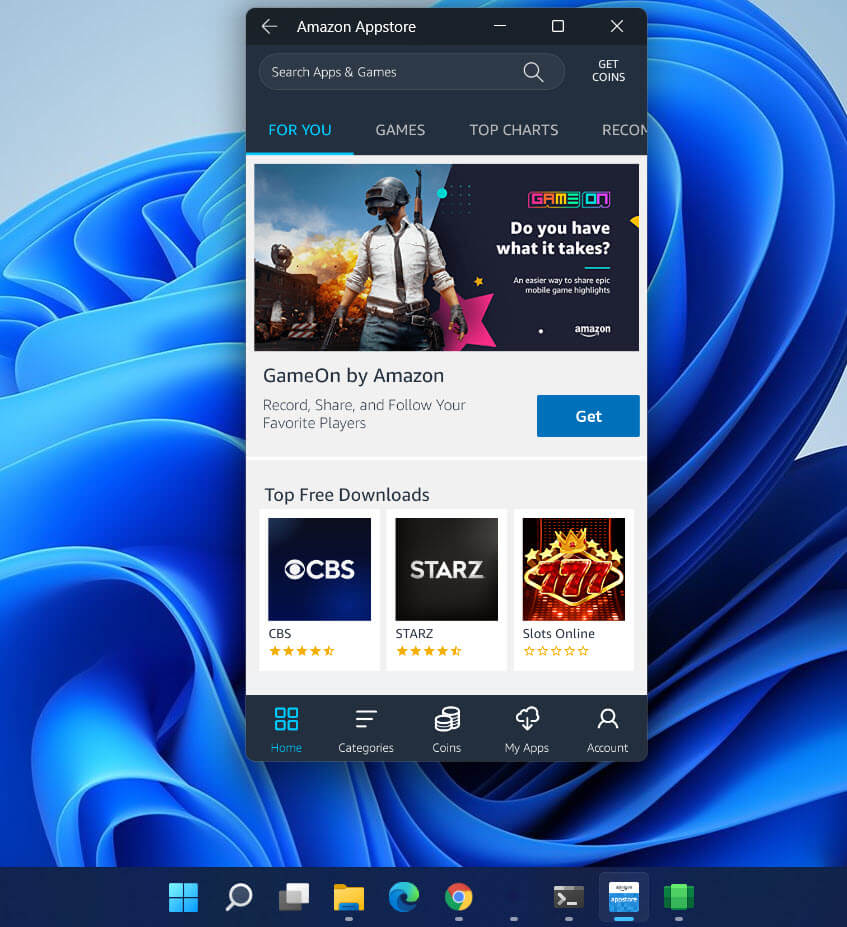
Что вы думаете о Windows Subsystem for Android будете устанавливать предварительную версию или будете ждать стабильного релиза? Какие Android приложения вы бы хотели запускать в Windows 11? Поделитесь с нами в комментариях ниже.
Рекомендуем: Как сбросить приложение Windows Subsystem for Android в Windows 11, чтобы исправить проблемы
Содержание
- Включение необходимого компонента
- Способ 1: Установка инсталляторов с поддержкой WSA
- Способ 2: Получение Amazon Appstore
- Способ 3: Принудительная установка WSA
- Способ 4: Установка пакетов через PowerShell
- Вопросы и ответы

Включение необходимого компонента
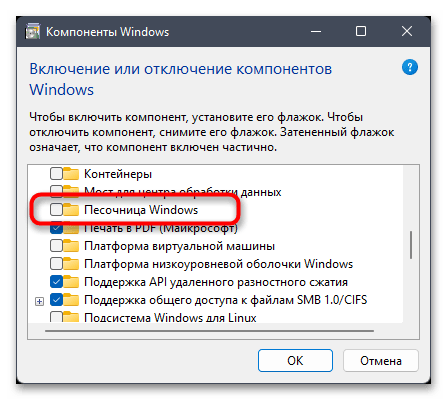
Для работы WSA в Windows 11 обязательно необходимо включить песочницу, что осуществляется через дополнительные компоненты ОС. Без этого вы хоть и сможете инсталлировать необходимые файлы, но запуск приложений не будет успешным.
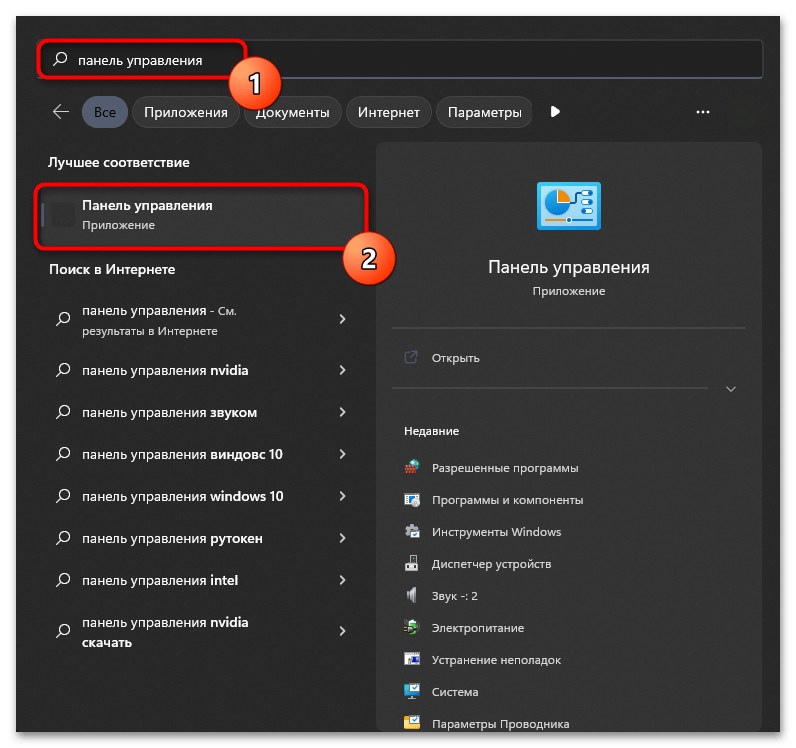
- Откройте меню «Пуск» и через поиск отыщите «Панель управления».
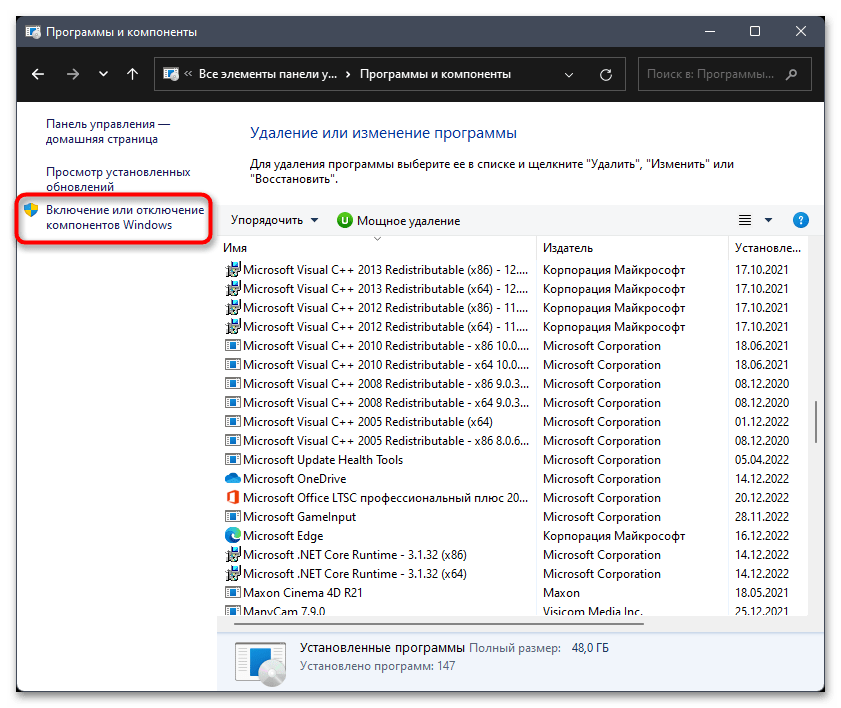
- После запуска классического приложения найдите «Программы и компоненты» и перейдите к данному разделу.
- На панели слева щелкните по ссылке «Включение или отключение компонентов Windows».
- В списке компонентов найдите «Песочница Windows» и поставьте галочку возле данного пункта. Далее обязательно перезагрузите компьютер, чтобы изменения вступили в силу.

Подсистема Windows для Android работает далеко не на всех компьютерах, поэтому официальные методы запуска могут не подойти. Если вы по умолчанию не можете запустить данный компонент, отыскав его через поиск в «Пуске», из-за чего и заинтересовались установкой, попробуйте сторонние пакеты, поддерживающие WSA. Они позволяют устанавливать и запускать APK-файлы в обход ограничений.
- Установка таких пакетов происходит безопасно – через «Microsoft Store», поэтому запустите приложение, отыскав его в «Пуске».
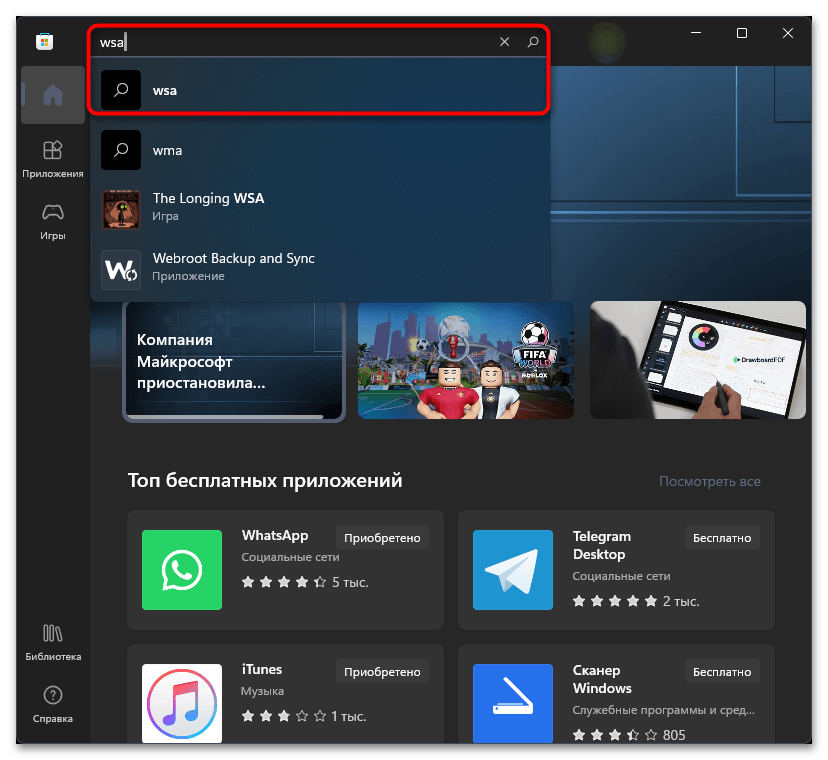
- В поиске введите «WSA» и переходите к просмотру результатов.
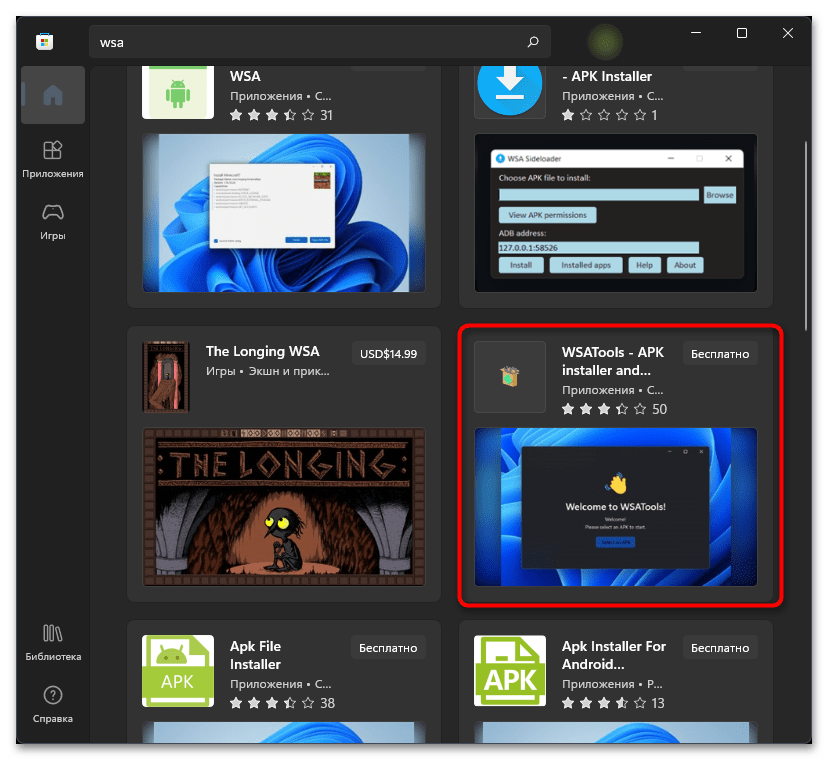
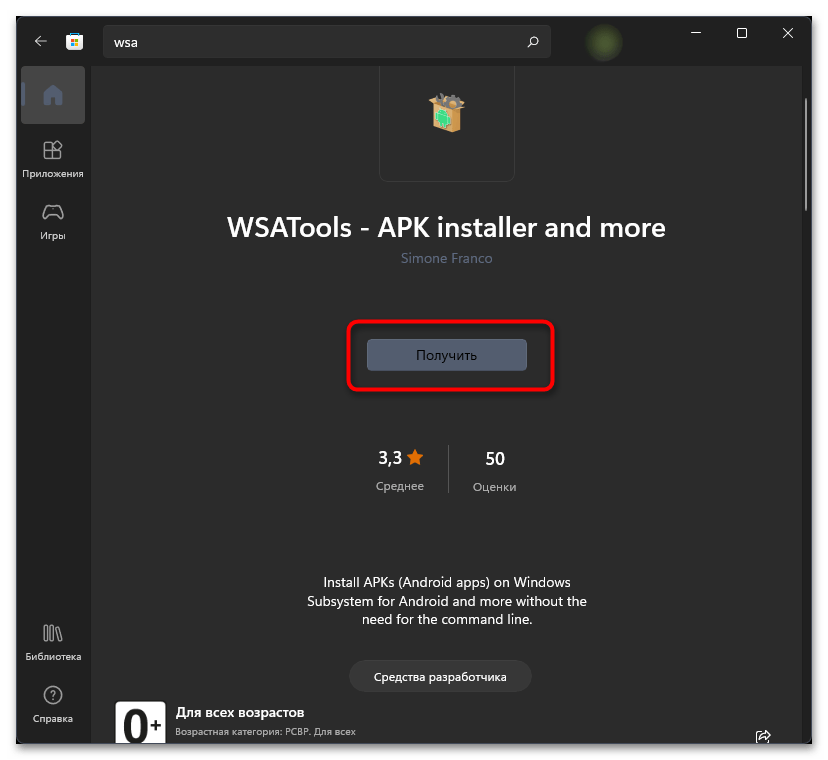
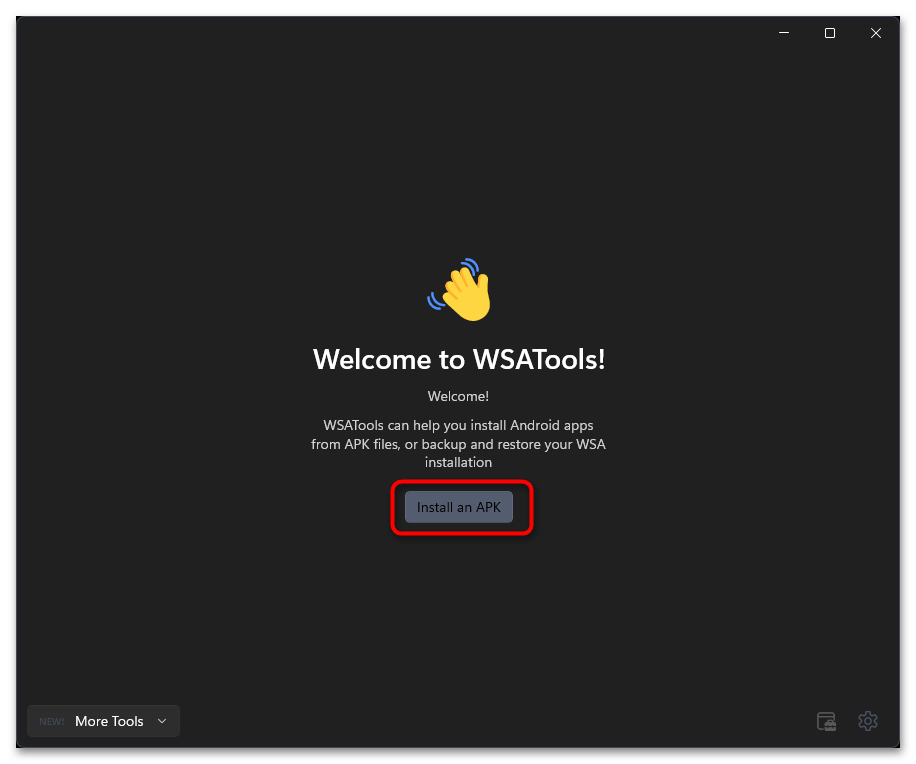
- Отыщите любое приложение, предназначенное для установки APK-файлов. В рамках этой статьи мы сосредоточим внимание вокруг WSATools.
- На странице приложения нажмите кнопку «Получить», чтобы запустить его инсталляцию.
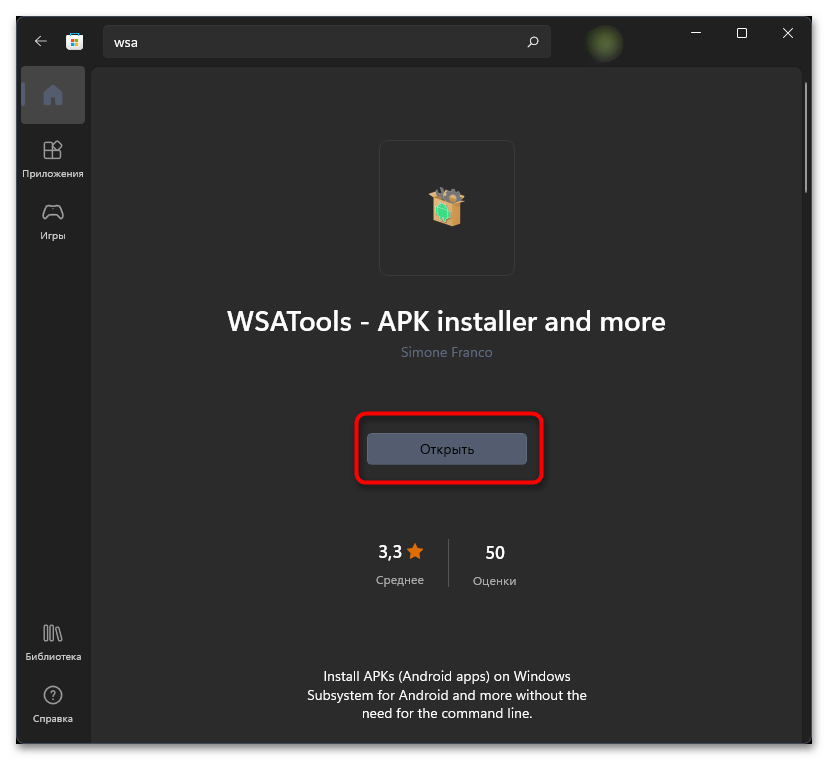
- По завершении щелкните «Открыть», запуская тем самым полученное средство работы с мобильными приложениями.
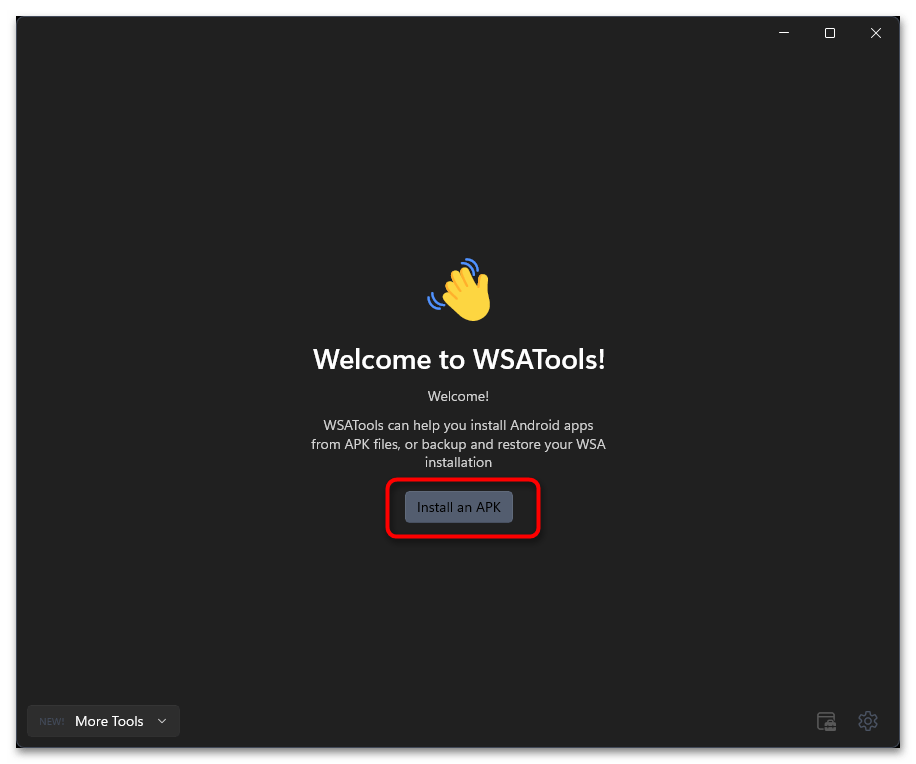
- В нем нажмите «Install an APK» или используйте встроенный менеджер файлов для поиска файлов, что зависит непосредственно от типа установленного приложения.
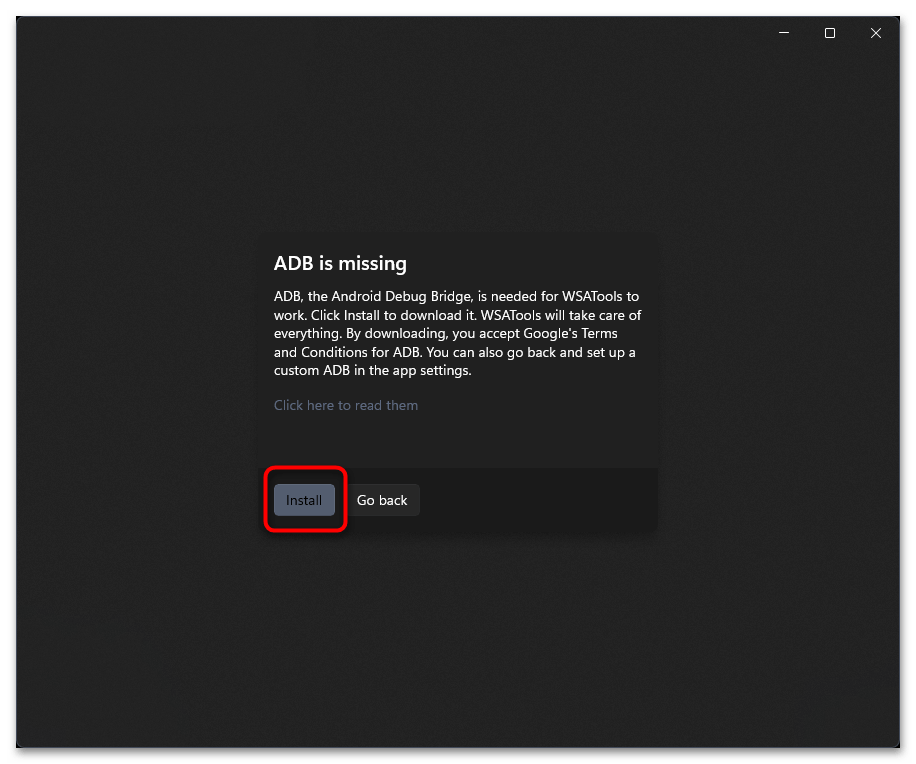
- Если на экране появилось уведомление о необходимости установки каких-либо компонентов, обязательно подтвердите это.
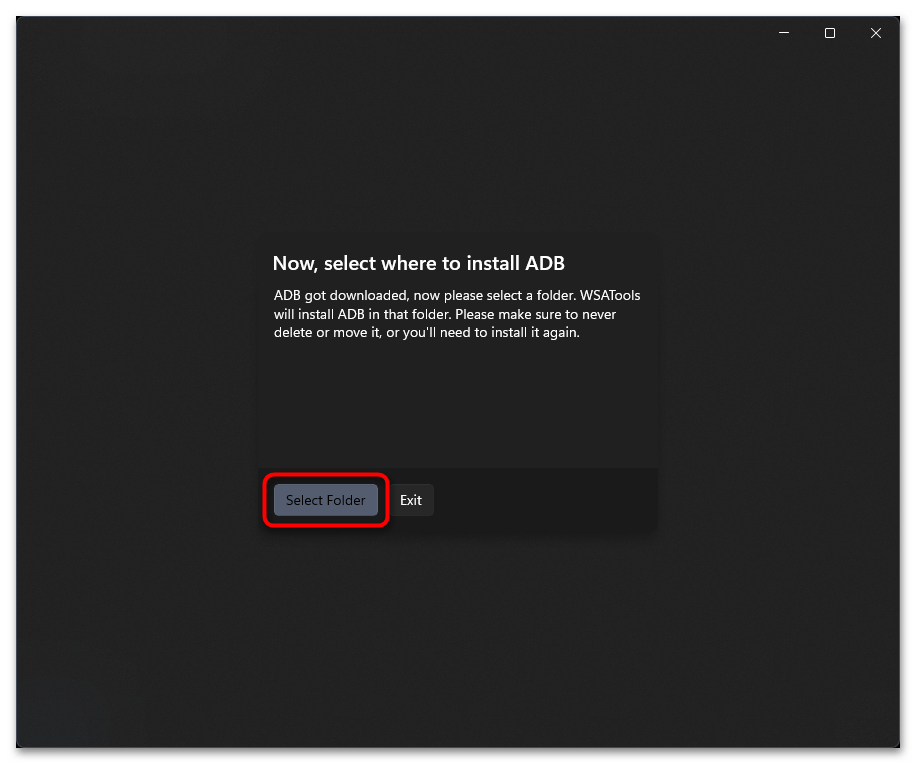
- Выберите удобное место на ПК для расположения файлов и ожидайте окончания их загрузки.
- Снова можете нажать кнопку для установки APK, чтобы перейти к работе с мобильными приложениями в Windows 11.
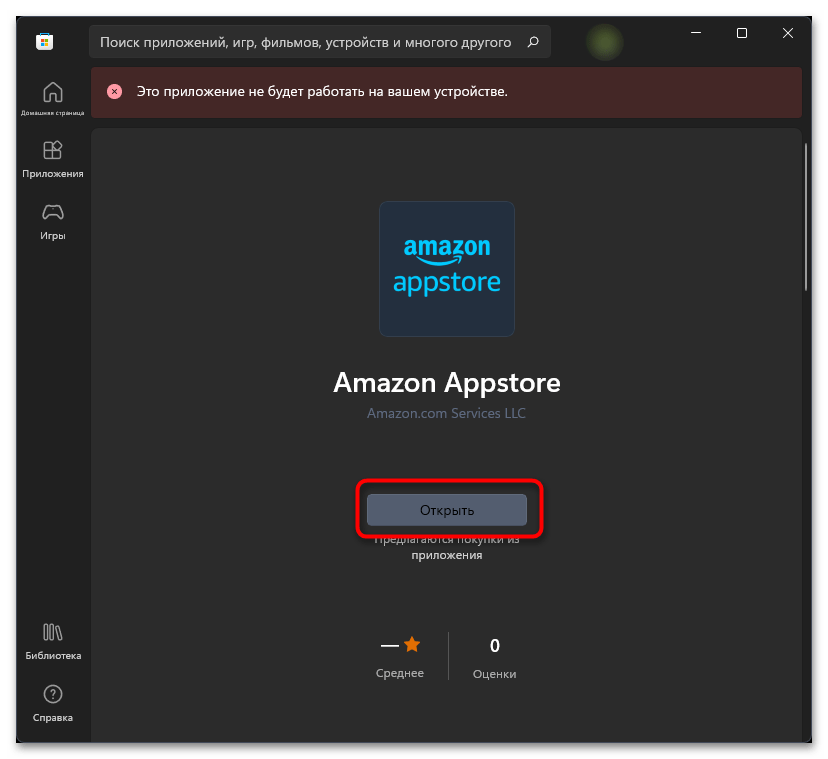
Способ 2: Получение Amazon Appstore
Установка Amazon Appstore в Windows 11 – отличный вариант для настройки WSA, поскольку при инсталляции данного приложения происходит загрузка всех необходимых файлов для работы подсистемы Android. Если изначально WSA не совместима с вашим компьютером, отыскать приложение через магазин не получится, поэтому понадобится выбрать другой метод инициализации установки.
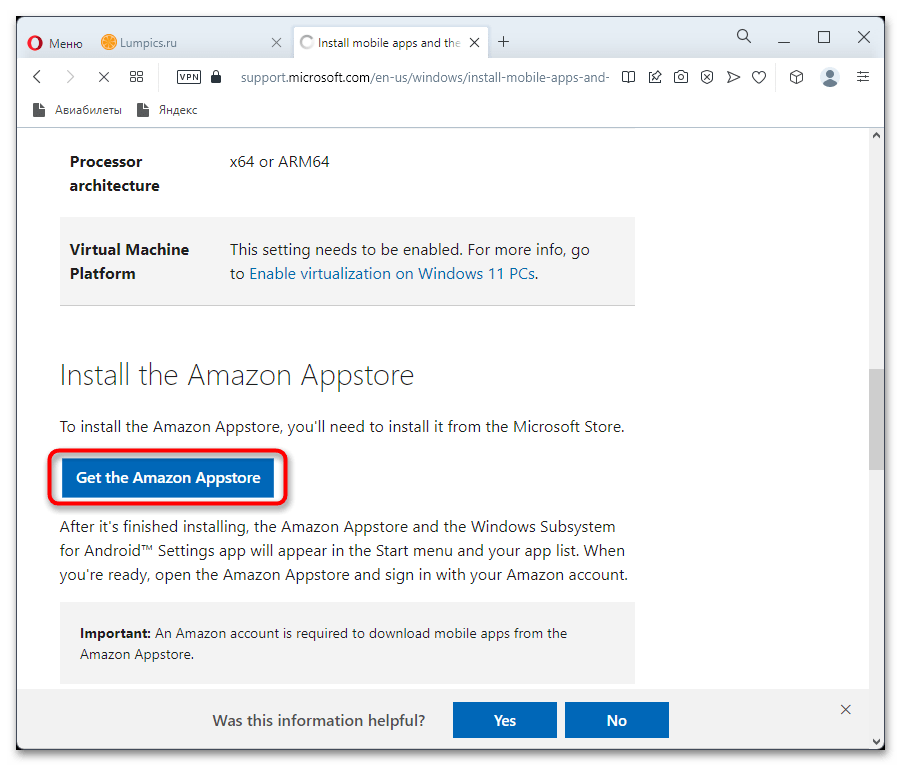
Скачать Amazon Appstore с официального сайта Microsoft
- Вам понадобится перейти на страницу поддержки Майкрософт, щелкнув по ссылке выше. Здесь найдите кнопку «Get the Amazon Appstore» и нажмите по ней для перехода к следующему шагу.
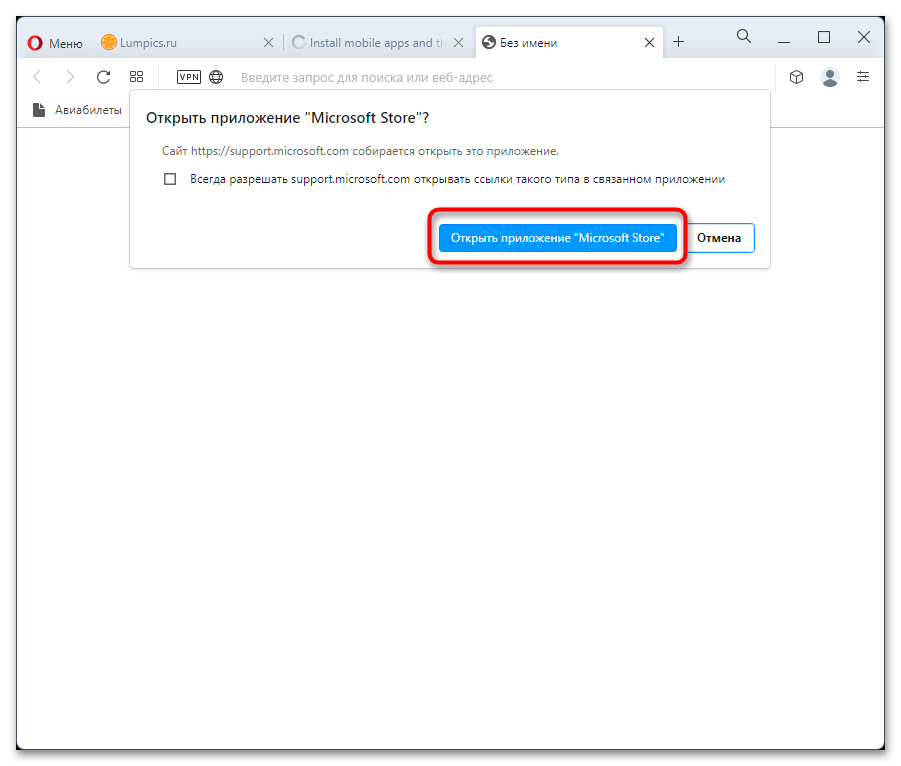
- В окне браузера появится сообщение о необходимости перехода к Microsoft Store. Подтвердите это действие, чтобы открыть страницу Amazon Appstore в магазине приложений.
- Начните установку компонентов, а по завершении нажмите «Открыть», чтобы запустить эмулятор мобильной операционной системы.
- Дождитесь загрузки Windows Subsystem for Android и приступайте к работе с ней, инсталлируя и запуская различные мобильные приложения.
Способ 3: Принудительная установка WSA
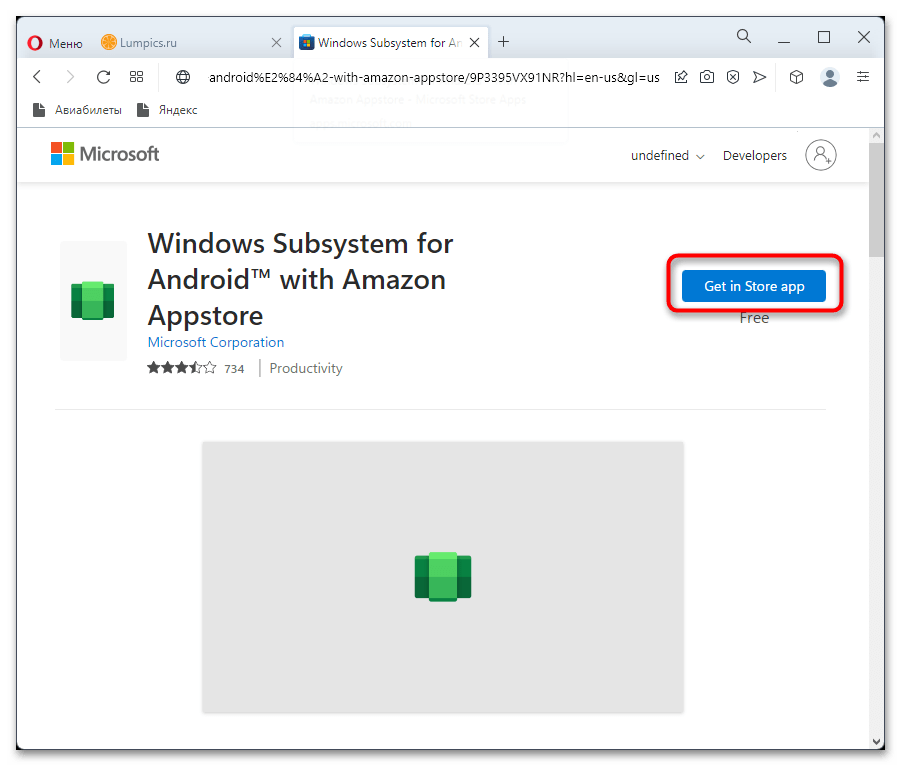
Скорее всего, вы не нашли WSA в своей операционной системе, поэтому и заинтересованы в установке компонентов для запуска мобильных приложений. Открыть страницу подсистемы через магазин приложений не получится, но есть обходной путь, подразумевающий переход к ней с сайта Microsoft.
Скачать Windows Subsystem for Android из Microsoft Store
- Щелкните по ссылке выше, чтобы перейти к нужной странице в веб-версии магазина. На ней нажмите кнопку «Get in Store app».
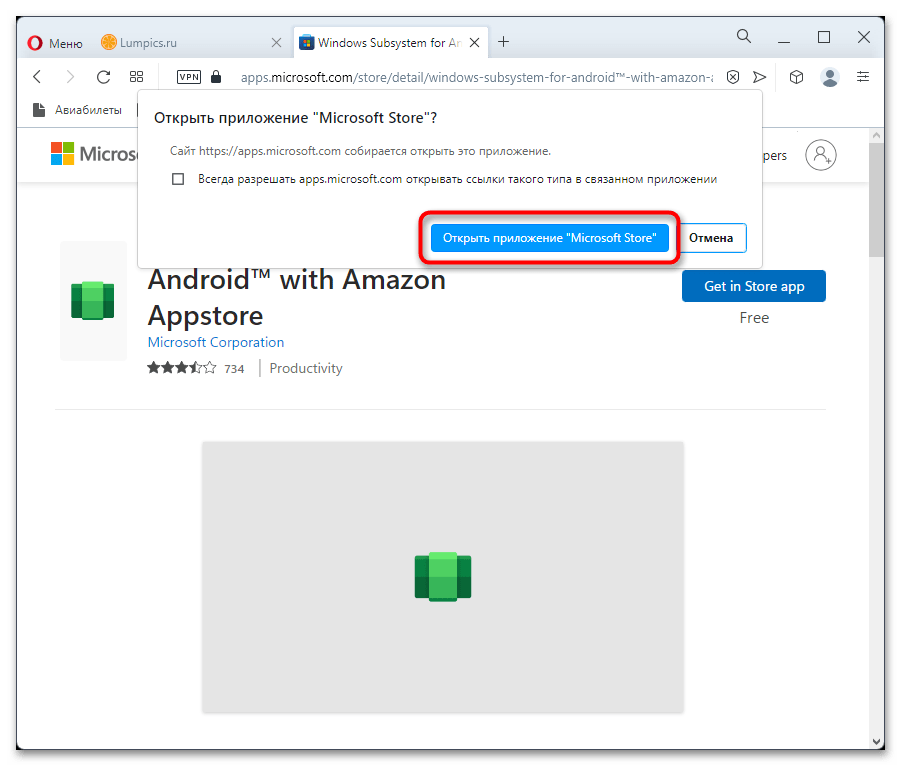
- Подтвердите открытие Microsoft Store, чтобы продолжить установку.
- Начнется загрузка магазина, поэтому не закрывайте текущее окно.
- Если у вас отображается кнопка «Получить», нажмите ее и ожидайте окончания инсталляции файлов. После этого щелкните по «Открыть» и дождитесь загрузки мобильной подсистемы.
Способ 4: Установка пакетов через PowerShell
Этот метод является самым сложным, но подойдет тем, кому не удается обойти ограничения и запустить подсистему Android ни одним из предыдущих методов. В этом вам понадобится самостоятельно сгенерировать ссылку на скачивание пакетов, получить их и инициировать установку через PowerShell. Выполните следующую пошаговую инструкцию, чтобы разобраться во всем процессе.
Сгенерировать ссылку на скачивание WSA
- Нажмите по ссылке выше для перехода на специальный сайт от Adguard, который предназначен для генерирования ссылок из Microsoft Store.
- Первым параметром в строке выберите «ProductId».
- В правом списке укажите «Slow».
- В центральное поле ввода вставьте
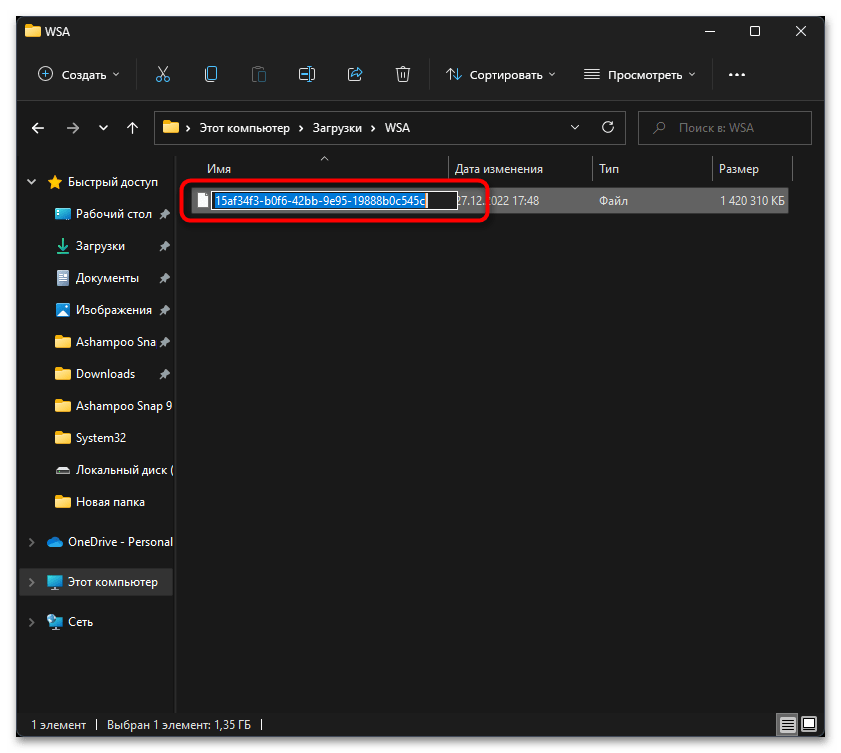
9p3395vx91nrи нажмите по галочке для генерирования ссылки. - Найдите файл, который весит больше всего. Начните его скачивание, нажав по ссылке.
- Ожидайте завершения загрузки, после чего перейдите к папке, куда был помещен данный файл.
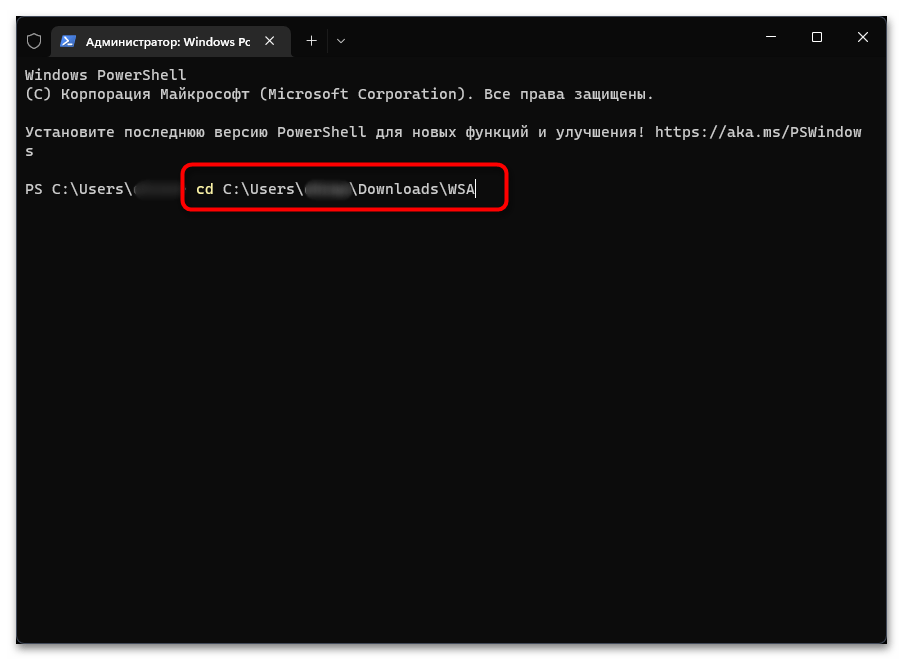
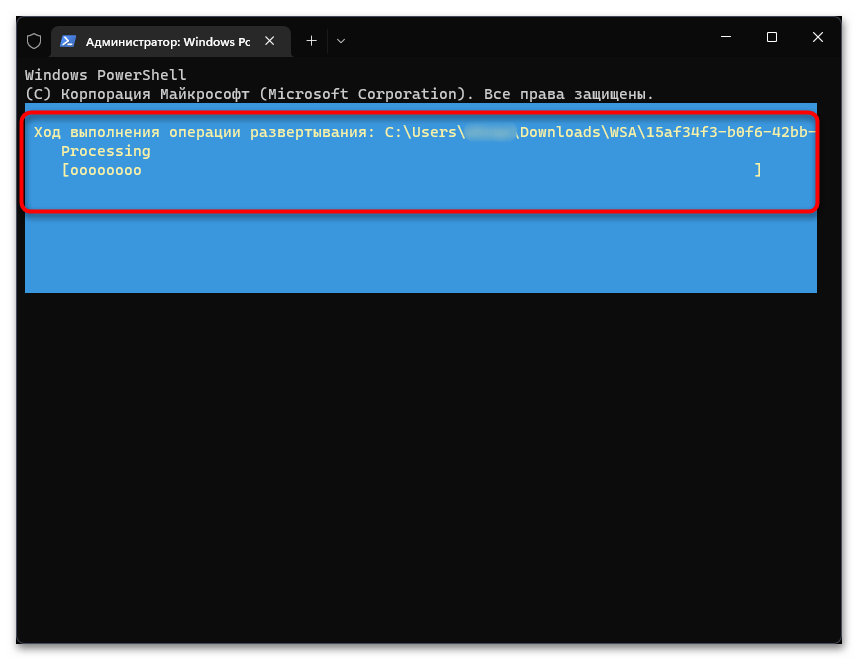
- Скопируйте путь к данному каталогу, поскольку далее понадобится использовать его в «PowerShell».
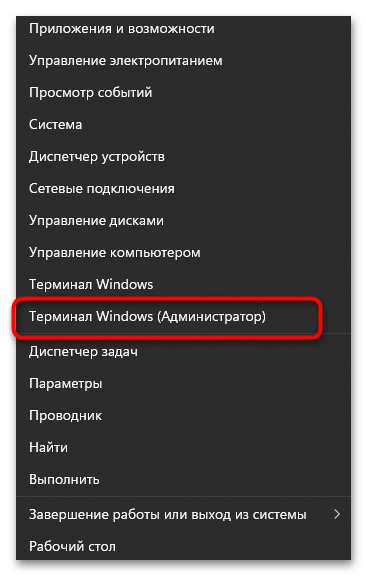
- Щелкните по «Пуску» правой кнопкой мыши и из появившегося контекстного меню выберите пункт «Терминал Windows (Администратор)».
- Введите команду
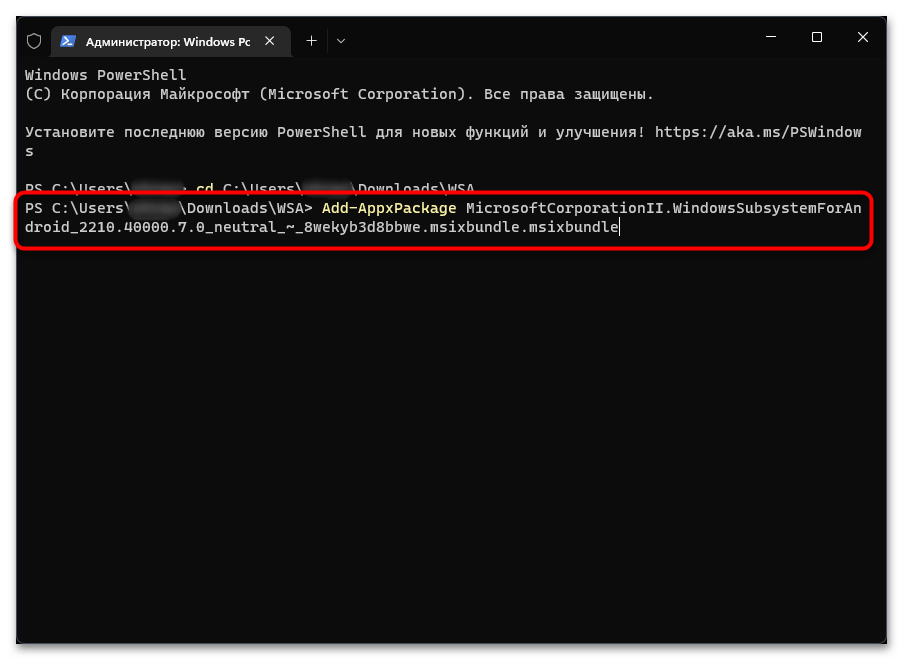
cd + путь к вашему файлу. - После перемещения консоли по нужному расположению введите
Add-AppxPackage название вашего файла. - Можете просто скопировать его через режим переименования.
- После активации команды начнется процесс установки. Это не займет много времени, а в конце появится уведомление об успешной распаковке файлов. После этого закройте консоль и приступайте к работе с подсистемой Android.

Еще статьи по данной теме: