While starting Windows Subsystem for Android on Windows 11, if you are unable to start Windows Subsystem for Android, here are some fixes you need to check. If you get this error, you cannot open and use Windows Subsystem for Android on your Windows 11 computer even if it is installed correctly.

The entire error message says:
Unable to start Windows Subsystem for Android
Ensure that Virtual Machine Platform is enabled in optional Windows feature. Entire that your device has virtualization enabled in the bios. If you’re running Windows Subsystem for Android in a VM ensure that you have enabled nested virtualization for the VM on the host. See http://aka.ms/enablevirtualization for more information.
Although the solutions are already mentioned in the error message, you might not be able to fix them at times. Therefore, you may need to follow all the subsequent steps one after one.
If you are unable to start Windows Subsystem for Android on Windows 11, follow these suggestions:
- Enable Virtual Machine Platform
- Enable Hyper-V
- Enable Windows Hypervisor Platform
- Turn on Virtualization
- Enable Nested virtualization
1] Enable Virtual Machine Platform
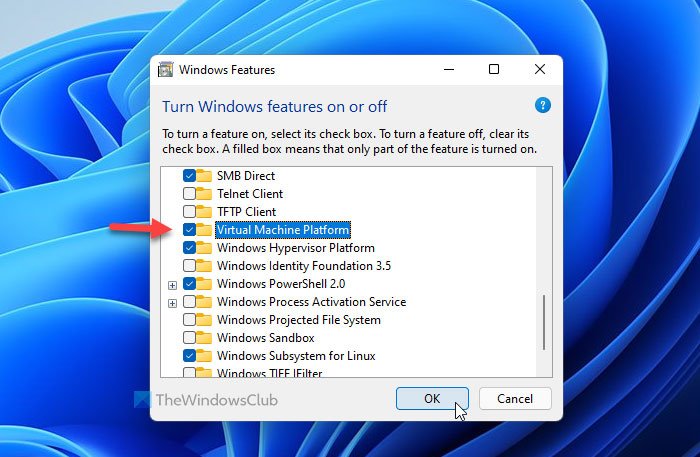
It is the first thing you need to check. Even when you try to install the Windows Subsystem for Android on Windows 11, you must have Virtual Machine Platform enabled on your PC. Otherwise, it might cause some issues. If you disabled it by mistake, you would get the aforementioned error message while opening Windows Subsystem for Android. Therefore, follow these steps to verify or enable Virtual machine platform on Windows 11:
- Press Win+S and type turn Windows features on or off.
- Click on the individual search result.
- Ensure that the Virtual Machine Platform is ticked.
- If not, make a tick and click the OK button.
After that, it might take some time to get installed on your computer. Following that, restart your computer and check if it solves the issue or not.
2] Enable Hyper-V
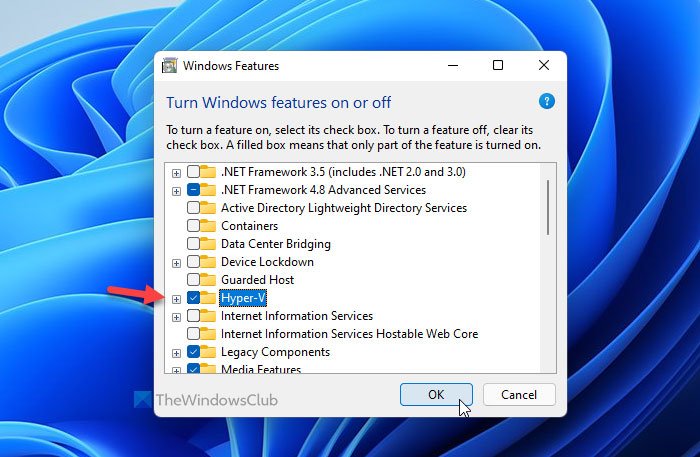
It is the second thing you need to verify if it is enabled on your computer or not. For that, you need to open the Windows Features panel. To do so, search for Windows features in the Taskbar search box and click on the corresponding search result. After that, check if there is a tick in the Hyper-V checkbox. If not, make a tick and click the OK button.
Next, you need to restart your computer to get the change. Once done, you can try to open the Windows System for Android app.
3] Enable Windows Hypervisor Platform
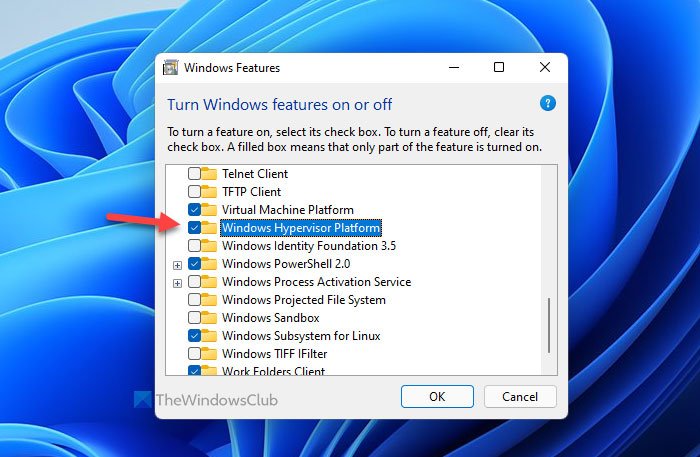
It is another feature that needs to be activated to open Windows Subsystem for Android on Windows 11. The best thing is that you can find it in the same place where you got others. Therefore, open the Windows Features window on your computer, and check if the Windows Hypervisor Platform is checked or not. If not, make a tick and click the OK button.
4] Turn on Virtualization
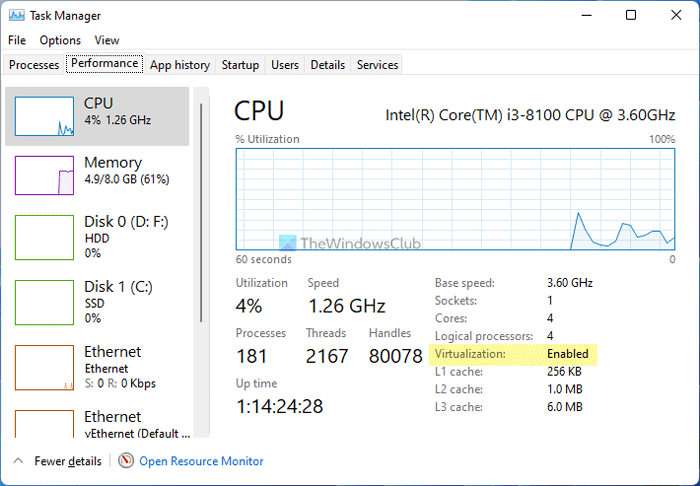
In order to use Windows Subsystem for Android, you must enable virtualization at the hardware level. To verify if you have enabled it already or not, you can press Ctrl + Shift + Esc and switch to the Performance tab. Then, check if the status of Virtualization is Enabled or Disabled. If it is showing as Disabled, you need to open BIOS and enable virtualization.
5] Enable Nested virtualization
It is probably the last thing you need to check when using Windows Subsystem for Android on a virtual machine. Let’s assume that you installed Windows 11 on the virtual machine. If you try to install Windows Subsystem for Android on Windows 11, you must enable Nested Virtualization. Otherwise, you cannot use another virtual machine inside of Windows 11 that is installed on VirtualBox or any other virtual machine software.
How do you fix the Unable to start Windows Subsystem for Android?
To fix the Unable to start Windows Subsystem for Android error on Windows 11, you need to turn on the Virtual Machine Platform, enable virtualization at hardware level from BIOS, and activate nested virtualization. Other than these, you can enable Hyper-V and Windows Hypervisor Platform.
How to start Android Subsystem in Windows 11?
To start the Android Subsystem in Windows 11, you need to install the app first. Then, you can open the Start Menu, find the Windows Subsystem for Android, and click on it. It is always recommended to click the Yes button on the UAC prompt so that you can use all the features included the Windows Subsystem for Android.
That’s all! Hope this guide helped.
Windows users always resorted to emulator software to run Android apps on their systems. But that changed ever since Windows Subsystem for Android (WSA) launched. You can run a select bunch of apps available on Amazon Appstore on Windows 11 using Windows Subsystem for Android. However, many users report that Windows Subsystem for Android is not working on their Windows 11 systems.

If you face a similar issue and can’t use the Windows Subsystem for Android successfully, don’t worry. The issue can arise due to missing Virtualization and Windows features, meddling anti-virus programs, or a recent Windows update. We will list multiple methods to get the app working again. Before you begin, make sure your computer runs the latest version of the app.
Get Windows Subsystem for Android
1. Terminate and Restart Windows Subsytem for Android
Windows Subsystem for Android and its related processes can encounter a glitch and stop working properly. To fix this, you need to terminate Windows Subsystem for Android and its related processes and restart it. Here’s how to do it using the Settings app.
Step 1: Press the Windows key + I to launch the Settings App.
Step 2: Select App from the left sidebar and click on the Installed apps option from the right pane.

Step 3: On the Installed Apps page, locate the Windows Subsystem for the Android app. Click on the three vertical dots and select the Advanced options.

Step 4: Lastly, scroll down and click on the Terminate button. Close the Settings app.

2. Enable Hardware Virtualization on Your System
Windows Subsystem for Android needs hardware virtualization to work. If you haven’t enabled virtualization on your Windows system, it won’t be able to run Windows Subsystem for Android. Here’s how to enable hardware virtualization:
Step 1: Press the Alt key + F4 to open the ‘Shut Down Windows’ utility. Select the Restart option from the list and click on the OK button.

Step 2: When your computer restarts, press the designated Function key (in our case it is the F2 key) repeatedly to enter the BIOS settings.
Step 3: In BIOS settings, switch to the Advanced Settings page. The BIOS settings on your computer may be appear different.
Step 4: Enable the Virtualization Technology option (SVM mode) and press F10 to save changes and exit the BIOS settings.

Wait for your system to restart and boot to the desktop. Try to run Windows Subsystem for Android and check if it works now.
3. Turn on All Windows Features Required for Windows Subsystem for Android
Apart from hardware virtualization, Windows Subsystem for Android needs the Virtual Machine Platform feature to work properly. If it is disabled on your system, the Windows Subsystem for Android app will throw an error and won’t run. Here’s how to enable the feature:
Step 1: Press the Windows key + R to open the Run dialog box. Type appwiz.cpl and press Enter.
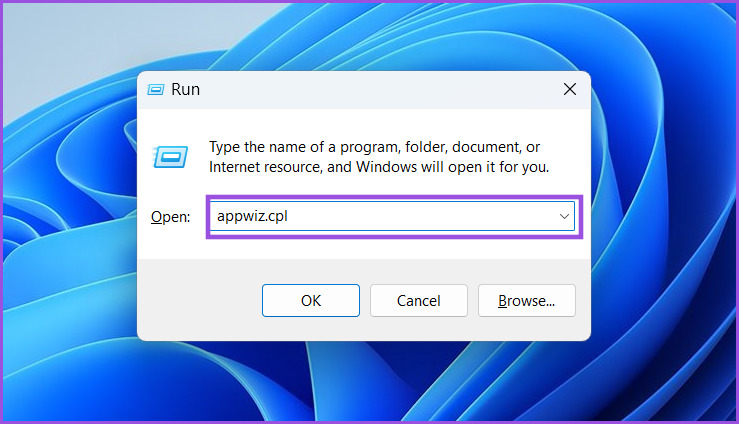
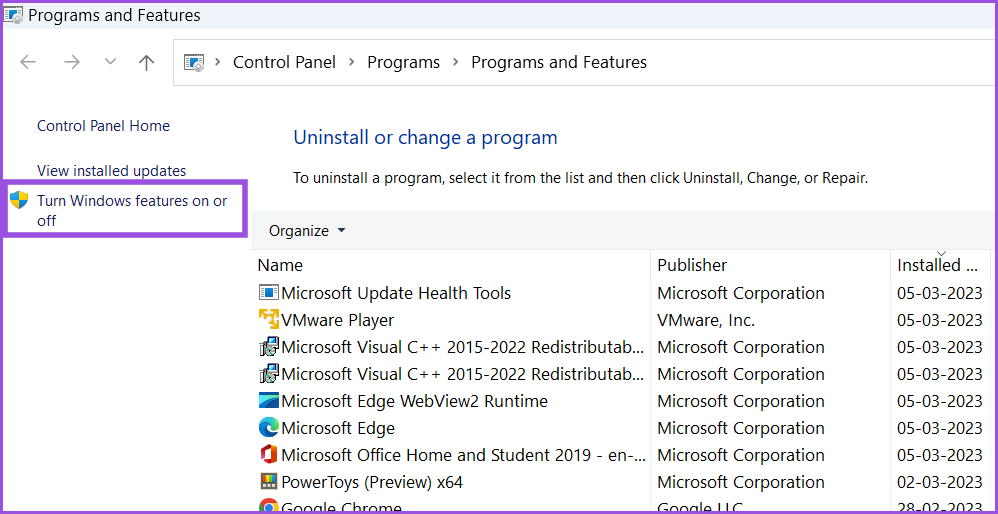
Step 2: The Programs and Features window will launch with the Control Panel. Click on the ‘Turn Windows Features on or off’ option in the left sidebar. You’ll need administrator privileges to use this feature.
Step 3: Scroll down the list of available Windows Features and locate the ‘Virtual Machine Platform’ feature. Click on the checkbox next to it and then click on the OK button.

Step 4: You will see a prompt to restart Windows. Click on the Restart now button.

Windows will restart and install the Virtual Machine Platform feature on your system.
4. Uninstall a Third-Party Hypervisor App
A third-party Hypervisor app can conflict with Windows Subsystem for Android. So, it is best to uninstall it and then attempt to run Windows Subsystem for Android on your system. Don’t worry, your virtual machines will stay intact; you can install the Hypervisor app again. Repeat the following steps:
Step 1: Press the Windows key + S to open Windows Search. Type appwiz.cpl and press Enter.

Step 2: On the Program and Features page, locate the hypervisor app in the list of installed apps. Right-click on it and select the Uninstall option from the context menu.

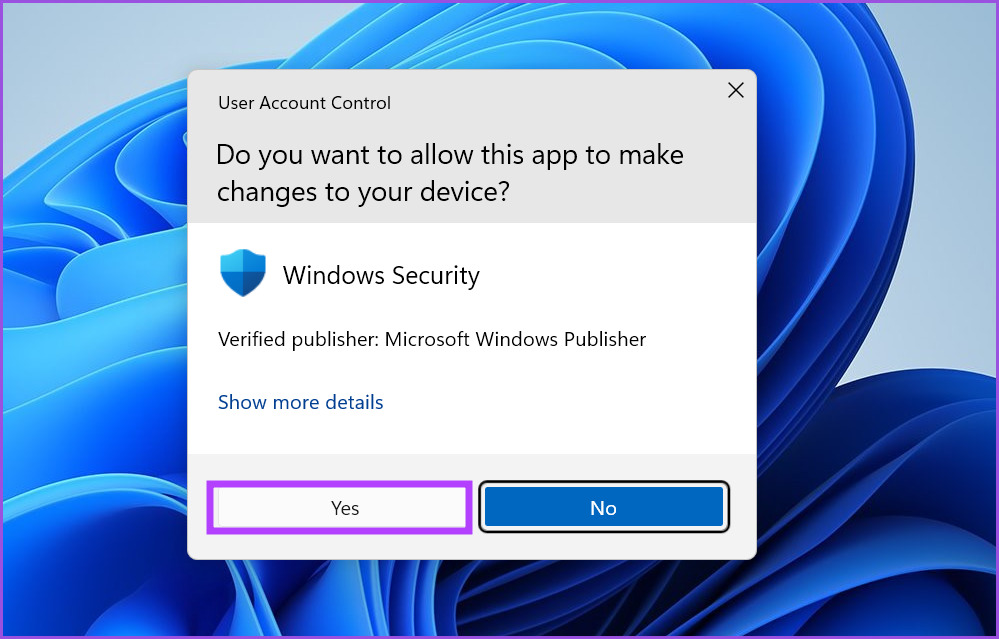
Step 3: User Account Control prompt will pop up. Click on the Yes button to begin the uninstallation.

Step 4: After the program uninstalls, restart your system and attempt to launch Windows Subsystem for Android.
5. Temporarily Disable Windows Defender
Windows Defender can block apps from running and accessing system components. To rule out this issue, disable Windows Defender temporarily and then run Windows Subsystem for Android.
Step 1: Launch the Start menu, type Windows Security, and click Open.

Step 2: Click on the ‘Virus & threat protection’ icon.

Step 3: Scroll down and locate the ‘Virus & threat protection settings’ section. Click on the Manage Settings option.

Step 4: Turn off the toggle for Real-time protection to disable it.

Step 5: The User Account Control prompt will pop up and click on the Yes button to confirm your decision.
If you have a third-party anti-virus program on your computer, access its settings page and disable it until the next boot.
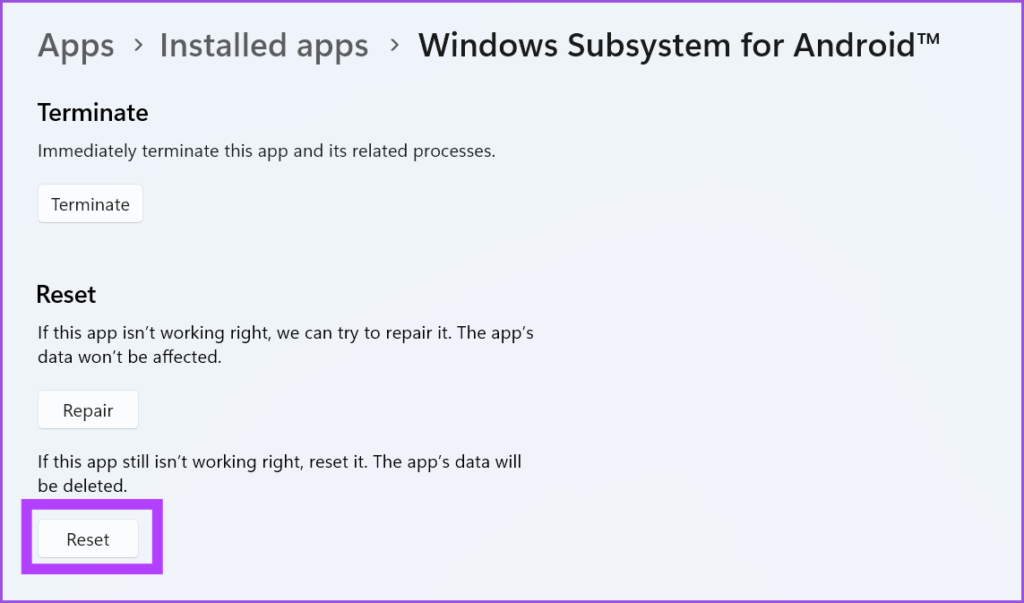
6. Repair or Reset the Windows Subsystem for Android App
Windows offers the option to repair a Microsoft Store app. If something is wrong with the app installation, you can use the repair option to fix it.
Step 1: Right-click on the Start button to launch the Power User menu. Select the Installed Apps option.

Step 2: Locate the Windows Subsystem for Android app and click on the three horizontal dots to open the context menu. Select the Advanced options from the list.
Step 3: On the Advanced options page, scroll down to the Reset section and click on the Repair button.
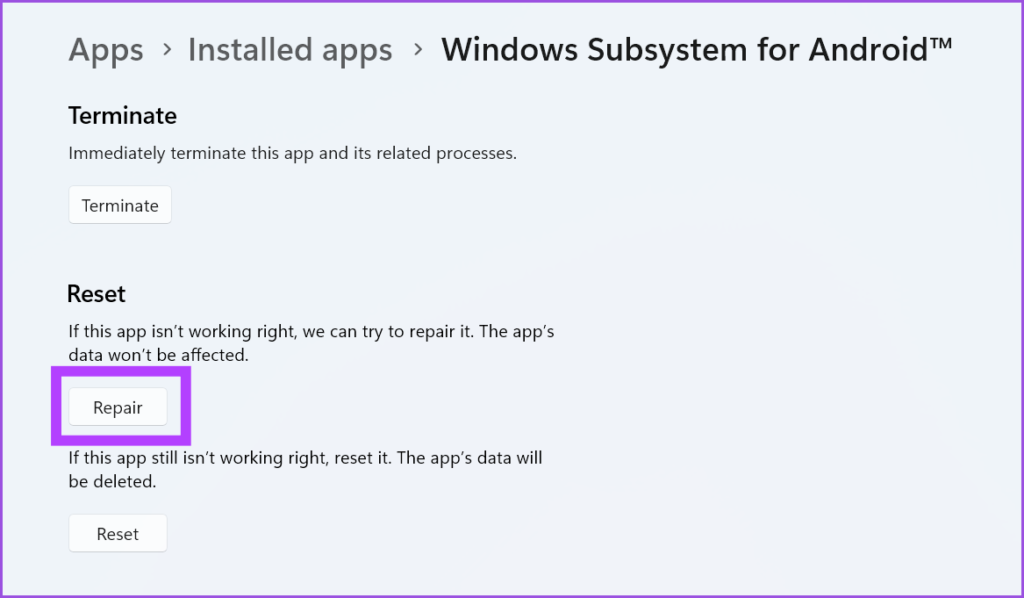
Step 4: If the app repair doesn’t fix the issue, you must Reset the app. Make note that you will lose all the app data and will have to sign in again. On the same page, click on the Reset button.
7. Rollback Windows Update
New Windows updates can sometimes break apps and system features. If the Windows Subsystem for Android app worked fine before and encounters problems after a recent automatic Windows update, you’ll need to roll back the update. Here’s how:
Step 1: Right-click on the Start button and select the Settings option from the Power User menu.
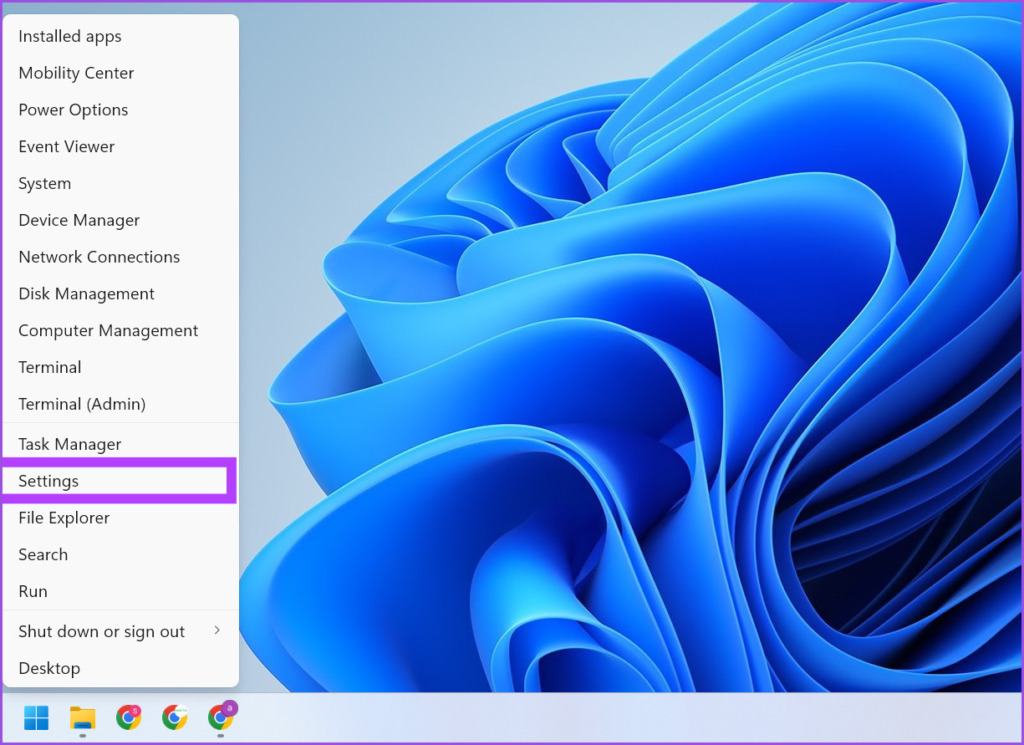
Step 2: After that, Click on the Windows Update icon at the top-right corner.

Step 3: Click on the Update history option.
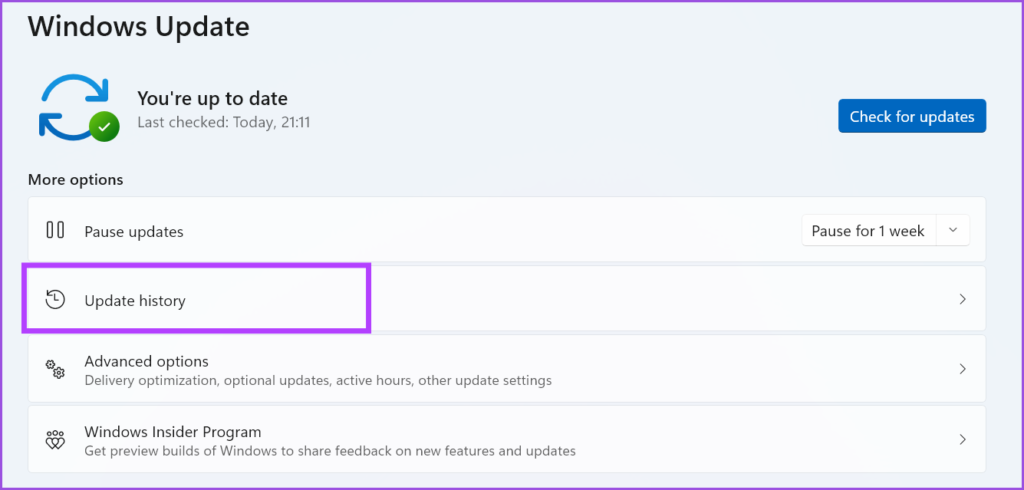
Step 4: Under the Related settings section, click on the Uninstall updates option.
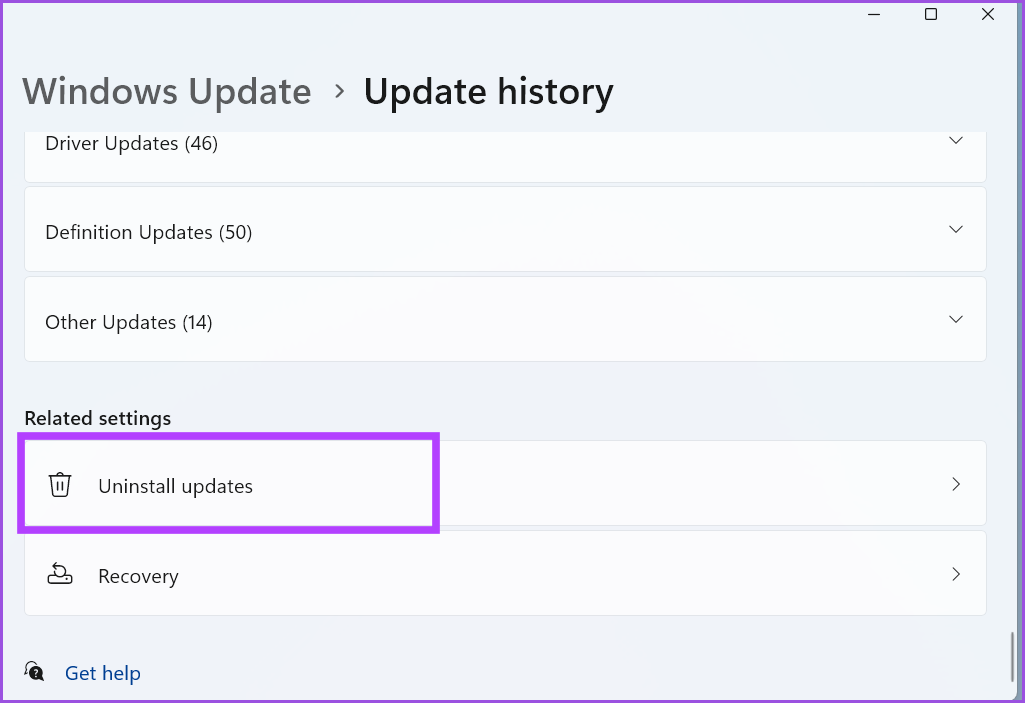
Step 5: Locate the most recently installed update from the list and click on the Uninstall option.

Step 6: Lastly, click on the Uninstall button to confirm your action.

Windows will remove the update from your system.
Run Android Apps on Windows Without Issues
Windows Subsystem for Android made running Android Apps on Windows 11 possible. The app library is limited, but you can sideload apps from other sources. Moreover, ensure that your system has hardware virtualization active and all the necessary Windows features installed.
Several users have claimed that while starting the Windows Subsystem for Android on Windows 11, they are unable to start the Windows Subsystem for Android. Additionally they have also claimed that whey they encounter the issue they are unable to open and use the Windows Subsystem for Android on Windows even if it is installed properly and they get prompted with the below mention error message.
Unable to start Windows Subsystem for Android
Ensure that Virtual Machine Platform is enabled in optional Windows feature. Entire that your device has virtualization enabled in the bios. If you’re running Windows Subsystem for Android in a VM ensure that you have enabled nested virtualization for the VM on the host. See http://aka.ms/enablevirtualization for more information.
Try these fixes for Unable to start Windows Subsystem for Android on Windows 11
Method 1: Enable Hyper-V
In this method we suggest you to verify whether Hyper-V is enabled on our computer or not. And to do the same you need to open Windows features panel. And then search for Windows features in Taskbar search box and tap on the corresponding search result. Then check if there is a tick in the Hyper-V checkbox. And if not then make a tick and tap on OK button. After that Restart your computer to see the change.
Method 2: Enable Windows Hypervisor Platform
Another effective option to resolve the issue is enable Windows Hypervisor Platform. In order to proceed with the method open Windows Features Window on your system and then check if the Windows Hypervisor Platform is checked or not. If not, then kindly make a tick and click OK button.
Method 3: Enable Virtual Machine Platform
If you are still struggling with the above mention error then you have probably disabled the Virtual Machine Platform on your computer. So it is suggested to enable Virtual Machine Platform and to do so follow the below mention instructions:
Step 1: First of all press Win + S and then type turn Windows features on or off
Step 2: Tap on individual search result
Step 3: Make sure that the Virtual Machine Platform is ticked.
Step 4: If not, then make a tick and tap on OK button
Note that it might take some time to get installed on your machine. We suggest you to restart your system to apply the changes.
Method 4: Turn on Virtualization
Here in this method it is suggested to enable virtualization at hardware level. In order to verify if you have enabled it or not, simply press Ctrl + Shift + Esc and then switch to Performance tab. Now check the status of Virtualization is enabled or disabled. If it is disabled then you have to open BIOS and enable virtualization.
Method 5: Enable Nested Virtualization
If none of the above mentioned methods works for you then it is advised to check when using Windows Subsystem for Android on Virtual machine. Suppose that you installed Windows 11 on virtual machine. So if you try to install Windows Subsystem for Android on Windows 11 then you need to enable Nested Virtualization. If you are not doing so, then you cannot use another virtual machine inside Windows 11 that is installed on the VirtualBox or any other virtual machine software.
Instant Solution for PC Problems
Though all the above mentioned methods are effective but sometimes manual methods are not enough to get past the Windows error, in such cases you need a professional tool. And we recommend you a PC Repair Tool; it will scan your PC thoroughly to replace the corrupted and missing files. It will also speed up your PC for better performance.
⇑Get PC Repair Tool⇓
Bottom Line
That’s all about Unable to start Windows Subsystem for Android on Windows 11.I hope you liked the blog and it was helpful for you in getting past the error.
With the release of Windows Subsystem for Android, users have been encountering the “Unable to start Windows Subsystem for Android” error message while trying to start the environment. The reason that this problem occurs is very well explained in the error message as well which essentially is virtualization. If you do not have virtualization enabled on your Windows 11 operating system, the Windows Subsystem for Android environment will not be able to initialize and thus the error message occurs. You can fix this problem pretty simply by enabling virtualization on your computer which is what we are going to show you in this article so just follow through.

As it turns out, Microsoft recently made the Windows Subsystem for Android available to the Insider Preview users which, much like the working of the Windows Subsystem for Linux, allows you to run Android apps natively on your computer. This means that you do not have to install a third party emulator on your system in order to play an Android game or use any other Android app on your computer.
However, since the feature is just available in the Insiders Preview Beta channel, there also are not many options to choose from when it comes down to installing the applications. This is because Microsoft has limited the apps, for now, and only a selected group of applications are allowed to be installed via the Amazon Appstore. Luckily, you can sideload Android apps which allows you to essentially run any Android application on your computer using Windows Subsystem for Android. In addition to that, since this is based on the Windows Subsystem for Android, you are going to enable virtualization on your computer otherwise the error message mentioned above will appear. This can be pretty easily fixed, so let us get started with that without further delay.
Turn on Windows Virtual Machine Platform
As it turns out, the first thing that you should do when you encounter the error message in question is to make sure that you have the Virtual Machine Platform feature enabled on your computer. Windows has a bunch of optional features that come built-in that you can choose to install or turn on via the Windows Features window.
While some of these features are enabled by default when you install Windows, most of them are not which is quite obvious because not everyone is going to need them. Thus, if you do need a specific feature, you will have to turn it on manually which is pretty convenient and easy to do. To do this, follow the instructions given down below:
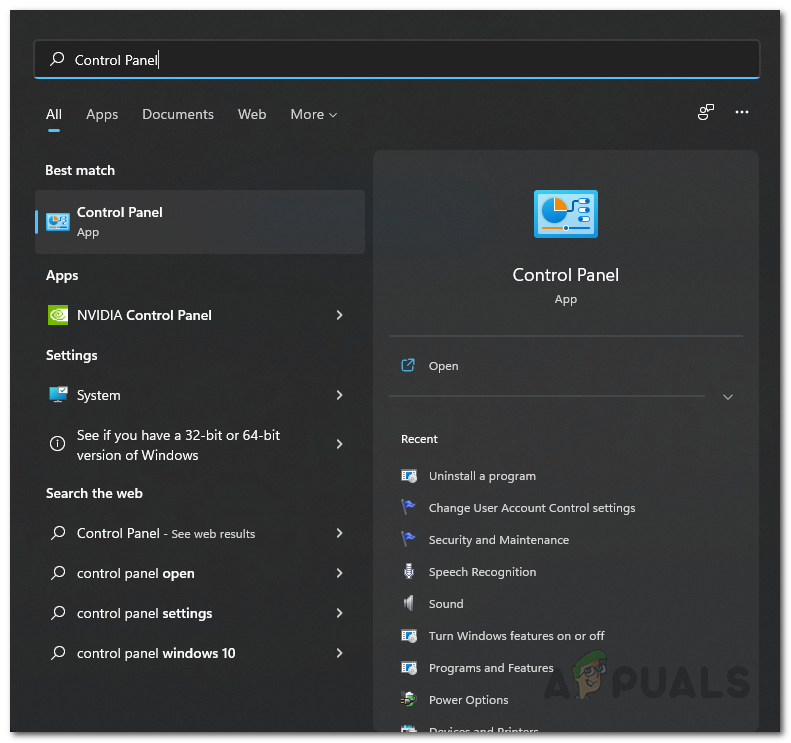
- First of all, open up the Control Panel by searching for it in the Start Menu.

Opening up Control Panel - Then, in the Control Panel window, click on the Programs option.

Control Panel - There, click on the Turn Windows Features on or off option.
Opening up Windows Features Window - This will bring up another window called Windows Features.
- Inside that window, from the list of features, look for Virtual Machine Platform and click on the checkbox to tick it.

Enabling Virtual Machine Platform - Then, click the OK button.
- Once you have done that, go ahead and restart your computer for the feature to be installed.
- After your system boots up, try using the Windows Subsystem for Android again to see if the error message still appears.


Enable Virtualization from BIOS
In addition to turning on the Virtual Machine Platform feature on your computer, you will also have to enable virtualization from BIOS. Since you are going to run Android applications, virtualization is pretty important as it allows programs to emulate hardware which then enables it to run other operating systems like Android.
If this case is applicable, you can enable virtualization pretty easily from the BIOS menu. The exact steps may vary a little depending on the manufacturer of your motherboard but the overall procedure remains the same. Follow the instructions down below to enable virtualization:
- First of all, go ahead and restart your computer.
- As your computer is booting up, you will have to boot into the BIOS menu. To do that, press the respective key for your motherboard which usually is DEL, F2, F10 or ESC.
- Once you have booted into BIOS, you will have to go to Advanced Mode. For that, press the F7 button on your keyboard to switch from EZ Mode.

Switching to Advanced Mode - After you are in Advanced Mode, switch to the Advanced tab given at the top.

Navigating to Advanced TAB - There, click on the CPU Configuration option.

Navigating to CPU Configuration - Now, if you are using an Intel CPU, you need to look for Intel Virtualization Technology. Once located, go ahead and switch it to Enabled.
- In case of AMD processors, you should be looking for SVM Mode which stands for Secure Virtual Machine. Once you have found it, switch it to Enabled.

Enabling SVM Mode - After that, press the F10 key on your keyboard to save the changes and restart your computer.
- Once your computer boots up, you should no longer be getting the error message in question.


Enable Nested Virtualization
Finally, if you have installed Windows 11 in a virtual machine to use the Windows Subsystem for Android, you will need to enable nested virtualization for the virtual machine on the host. As apparent from the name itself, nested virtualization essentially allows you to run virtual machine instances inside a virtual machine. It is basically a virtualception.
Now, the process of enabling nested virtualization may differ depending on the hypervisor that you are using. For VirtualBox and VMware, the procedure is pretty simple as you can find the option in the virtual machine settings. In case of VirtualBox, the option is called Nested VT-x/AMD-V while in case of VMware, you will be looking for nested virtualization. If you are using Hyper-V, you will have to take a command line approach but it is rather simple to do and you can find various guides on the internet. Once you have enabled nested virtualization, the error message should just go away.

Kamil Anwar
Kamil is a certified MCITP, CCNA (W), CCNA (S) and a former British Computer Society Member with over 9 years of experience Configuring, Deploying and Managing Switches, Firewalls and Domain Controllers also an old-school still active on FreeNode.
Как мы все знаем, Microsoft позволяет пользователям запускать Android-приложения в Windows 11 на основе WSA, полное название — Windows Subsystem for Android. То есть, если WSA не работает в Windows 11, вы не сможете запускать приложения Android в Windows 11. Не беспокойтесь слишком сильно, в этой статье показано, как исправить, что WSA не работает в Windows 11.
Ниже приведен список возможных причин, по которым WSA (подсистема Windows для Android) может не работать:
- Поврежденная установка WSA.
- Программное вмешательство в виртуальную частную сеть (VPN).
- Антивирусное ПО запрещает работу WSA.
- Повреждены временные файлы WSA.
- Устаревшая платформа Microsoft Store, интеграция WSA используется только в обновленных версиях системы Microsoft.
Зная вышеуказанные причины, давайте быстрее найдем решение, почему WSA не работает в Windows 11.
Как исправить, что WSA не работает в Windows 11?
1 Удалите ваш VPN
Нажмите Windows + R, чтобы открыть новое окно «Выполнить», затем введите или вставьте appwiz.cpl и нажмите Enter.

Теперь найдите приложение VPN, щелкните его правой кнопкой мыши и выберите «Удалить».

Непонятно, почему из-за VPN не работает WSA, но, согласно отчету Microsoft, удаление VPN решает проблему.
2 Ремонт ВСА
Нажмите Windows + I, чтобы открыть приложение «Настройки», затем перейдите в «Приложения», затем «Приложения и функции».

В окне «Приложения и функции» вы можете выполнить поиск «Подсистема Windows для Android» в поле поиска. Затем щелкните меню из трех точек рядом с ним, а затем нажмите «Дополнительные параметры».
Прокрутите вниз, пока не дойдете до раздела «Сброс» и нажмите кнопку «Восстановить», чтобы начать процесс.

После завершения восстановления перезагрузите компьютер, чтобы проверить, может ли приложение WSA работать нормально.
3 Сбросить WSA
Перед сбросом приложения WSA сделайте резервную копию всех важных данных.

Нажмите Windows + I, чтобы открыть приложение «Настройки», затем перейдите в «Приложения», затем «Приложения и функции».
В окне «Приложения и функции» найдите «Подсистема Windows Android» в строке поиска, затем щелкните меню из трех точек рядом с ним и нажмите «Дополнительные параметры».

Прокрутите вниз, пока не найдете раздел «Сброс» и нажмите кнопку «Сброс».
4 Обновить платформу Microsoft Store
Нажмите Windows + R, чтобы открыть новое окно «Выполнить», затем введите или вставьте msi-windows-store: и нажмите Enter.

Оказавшись на главной странице, нажмите на библиотеку в левом нижнем углу.

Теперь нажмите «Получить обновления», чтобы обновить всю платформу Microsoft Store Framework, включая WSA.

5 Обновите Windows
Нажмите Windows + I и выберите параметр «Центр обновления Windows» на левой панели, чтобы получить доступ ко всем обновлениям.

Если вам нужно загрузить какие-либо новые обновления, нажмите «Установить сейчас» и дождитесь завершения процесса; в противном случае нажмите кнопку «Проверить наличие обновлений».

6 Временно отключите антивирус
Если вы установили антивирусную программу на свой компьютер, вы можете попытаться временно отключить приложение, чтобы увидеть, устранена ли проблема с неработающей WSA или нет. Если это исправлено, проблема вызвана вашим антивирусным приложением. Чтобы решить проблему WSA и одновременно защитить свой компьютер, вам следует рассмотреть возможность замены другого антивирусного приложения, совместимого с Windows 11.

Если вы столкнулись с проблемой, когда WSA не работает в Windows 11, вы можете быстро решить ее, используя описанные выше способы. Если вы хотите установить приложения для Android в Windows 11, обязательным условием является WSA.