For quite a while we have heard of some Windows 11 users having problems with installing the Amazon Appstore to their system. Apparently, they get an error that states, “This app will not work on your device.” From what we have gathered, this error message tends to pop up when the System requirements to install Amazon Appstore on Windows 11 are not met – like, maybe Virtualization is not enabled or the Microsoft Store is not updated.

Getting this issue under control is easier than you might think, though some instances will require some effort on your part. Keep reading the information below to learn more about what to do-
- Enable the Hyper-V Windows Feature
- Update the Microsoft Store
1] Enable the Hyper-V Windows Feature
To ensure the Amazon AppStore works on your Windows 11 computer, you must first understand that Windows Subsystem for Android relies on Virtualization. Therefore, you will need to enable Hyper-V if such actions haven’t been taken already.
- Go to the Control Panel
- Make your way to programs
- Open the Windows Features window
- Enable the needed features.
Read: How to enable or disable Hardware virtualization via BIOS.
Go to the Control Panel
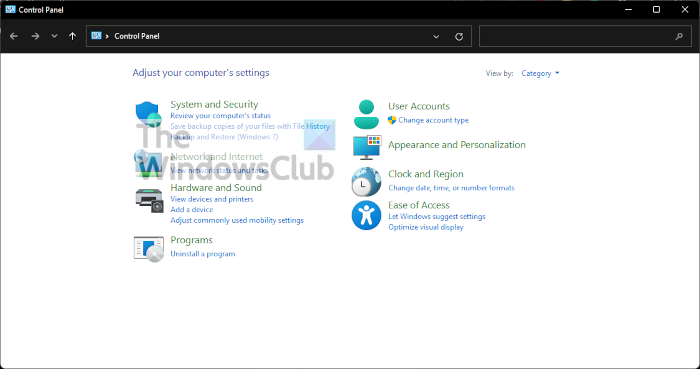
If you want to fire up the Control Panel, please click on the Search icon on the Taskbar, then type Control Panel into the search box. When the relevant results have appeared, select Control Panel to fire it up.
Make your way to Programs
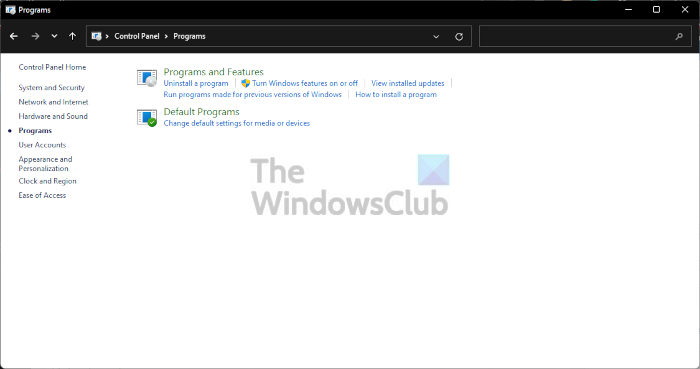
Now, the next thing you should do here is to click on Programs. Do this by changing the View By section to Category, then from the bottom-left list, you should see Programs. Go ahead and select it.
Open the Windows Features window
To do this, you must click on Turn Windows Features on or off. This should be visible from under Programs and Features, so you can’t miss it.
Enable the needed features
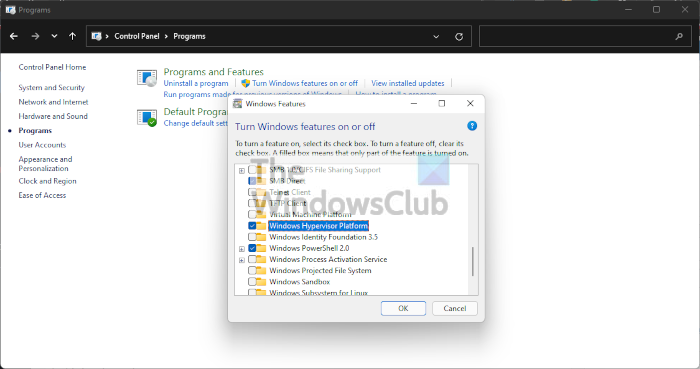
From the new window known as Windows Features, you must scroll until you come across Hyper-V, Virtual Machine Platform, and Windows Hypervisor Platform. Tick the boxes next to each, then complete the task by hitting the OK button.
2] Update the Microsoft Store
Before we look at other solutions, we believe updating the Microsoft Store could set things right again, and as such, it should be the first step to take.
- Open the Microsoft Store
- Navigate to Library
- Get Updates
Open the Microsoft Store
To update the Store, you must first open it. You can do this by clicking on the relevant icon located on the Taskbar. If it’s not there, we suggest clicking on the Windows key and have a look around in the Start Menu.
Navigate to Library
Once the Microsoft Store is up and running, you must now move to a section that reads, Library. It is usually located at the bottom left corner, right above Help.
Get Updates
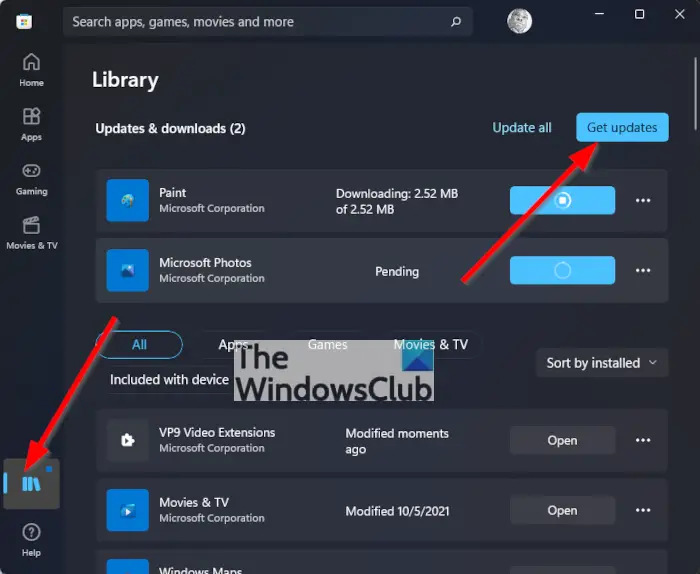
The final step here after opening the Library section is to click on Get Updates. This will automatically check for any available updates for all apps, and that includes the Microsoft Store. If any are found, the system will automatically download and install.
Do I need the Microsoft Store?
Here’s the thing, the Microsoft Store is an important aspect of Windows 11/10 since they are closely connected. You see, many of the key pre-installed apps require the Microsoft Store to get updates, but not only that, it’s the best place right now to download apps securely.
Can you get Amazon AppStore on Windows 10?
No, it’s not possible to get the Amazon AppStore on Windows 10. You will need a Windows 11 computer, and from what we’ve gathered, users must reside in the United States to take enable and take advantage of what the Amazon AppStore has to offer.
Read: Fix Microsoft Store Error 0x803F800A.
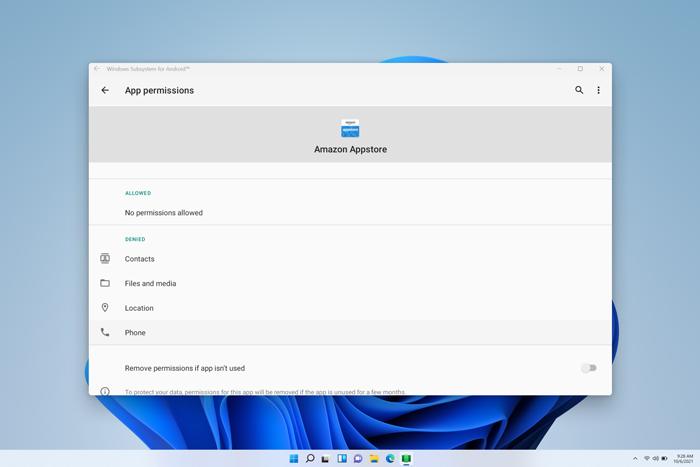
If you’re having problems with the Amazon Appstore and mobile apps in Windows 11, here are some things you can try in the Windows Subsystem for Android™ Settings app. To find the Settings app, select Start > All apps > Windows Subsystem for Android™.
Android is a trademark of Google LLC.
Installing the Amazon Appstore
If you still can’t install the Amazon Appstore from the Microsoft Store app, check the region of your Windows 11 PC. Here’s how:
-
Select Start > Settings > Time & language > Language & region.
-
In Region, find Country or Region and change it to a supported country or region.
Note: You need an Amazon account in that country or region to install apps from the Amazon Appstore.
Troubleshooting mobile apps
The Windows Subsystem for Android™ is what helps your PC install and open mobile apps. Most problems will be resolved by restarting it. Here’s how:
-
Select Start, search for Windows Subsystem for Android™ Settings, and open it.
-
In this app, select Shutdown Subsystem. The Subsystem and any open mobile apps will be closed.
-
Open any mobile app to restart the Subsystem automatically.
Each mobile app has specific app settings, here’s how to check what they are:
-
Select Start, then search for Apps & features.
-
Find the app you want to remove, then select More > Advanced options.
Settings for this specific app will open and you’ll be able to adjust app notifications, permissions, and storage. You’ll also be able to uninstall, open, or force the app to close.
The Windows Subsystem for Android™ Settings app can be used to adjust resources, graphics, screen reader settings and more. Changing these settings might improve mobile app performance:
-
Subsystem Screen Reader
-
If touch input isn’t working, make sure the Subsystem Screen Reader is turned off. For more info, go to Accessibility for mobile apps on Windows.
-
-
Subsystem resources
-
Changing this setting to Continuous might improve app performance.
-
For more info on all settings, go to Manage settings for mobile apps on Windows.
FAQs about mobile apps and the Amazon Appstore
If troubleshooting the mobile apps and Subsystem didn’t fix your issue, check out these possible solutions.
Here’s what to try:
-
Restart the Subsystem with the Windows Subsystem for Android™ Settings app, then try opening the app again.
-
Leave feedback in Feedback Hub to let us know that the app isn’t installing. Learn how
If your apps won’t open, you need to make sure Control flow guard is turned on. Here’s how to check:
-
Select Start > Settings > Privacy & security, then open Windows Security.
-
In the new Windows Security window, select App & browser control > Exploit protection settings.
-
In Exploit protection > System settings, find Control flow guard (CFG) and make sure it’s set to Use default (On).
Here’s what to try:
-
Restart the Subsystem with the Windows Subsystem for Android™ Settings app, then try opening the app again.
-
Force the app to close by selecting Start > Settings > Apps & features, then find the app. Select More > Advanced options > Terminate, then try to open the app again.
If your apps won’t open, check your Windows Firewall settings.
-
Open the Windows Subsystem for Android™ app and check your Advanced networking setting.
-
If it’s turned On, changing the firewall settings won’t affect your connectivity.
-
If it’s turned Off, continue to the next steps.
-
-
Select Start > Settings > Privacy & security, then open Windows Security.
-
In the Windows Security window, select App & browser control > Firewall & network protection.
-
Select the network type you’re currently using. It will show (active) next to the network type.
-
In Incoming connections, make sure Block all incoming connections isn’t selected.
Note: If your PC is managed by your company or organization, you might not be able to change these settings. Contact your IT admin or support person for more info.
Here’s what to try:
-
If you have multiple graphics processing units (GPU) in your PC, try changing which one is used.
-
In the Windows Subsystem for Android™ Settings app, change Subsystem resources from As needed to Continuous.
For more info on these settings, go to Manage settings for mobile apps on Windows.
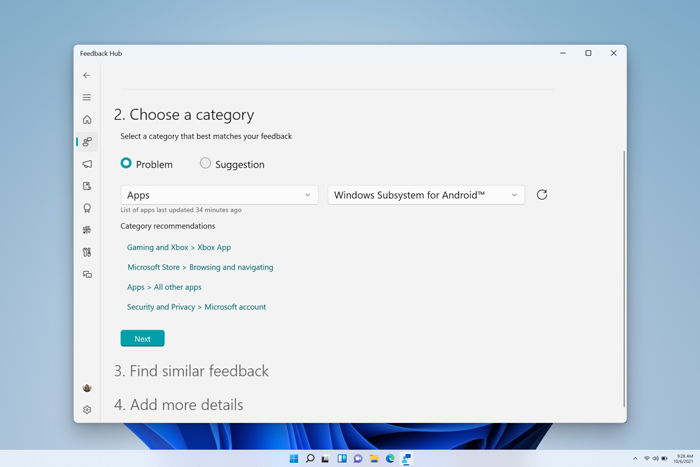
Leave feedback
If issues with the Subsystem or mobile app still aren’t resolved, you can leave feedback to help us improve your experience. Here’s how:
-
Press Windows logo key + F to open Feedback Hub.
-
Include details about your experience.
-
Make sure you select Apps > Windows Subsystem for Android™ as the category for your feedback.
For all other questions and support, visit Microsoft Support.
Related
-
More on apps from the Amazon Appstore
-
Accessibility on Windows Subsystem for Android™
-
Mobile apps and the Windows Subsystem for Android™
Need more help?
Want more options?
Explore subscription benefits, browse training courses, learn how to secure your device, and more.
Communities help you ask and answer questions, give feedback, and hear from experts with rich knowledge.
Как мы все знаем, Microsoft позволяет пользователям запускать Android-приложения в Windows 11 на основе WSA, полное название — Windows Subsystem for Android. То есть, если WSA не работает в Windows 11, вы не сможете запускать приложения Android в Windows 11. Не беспокойтесь слишком сильно, в этой статье показано, как исправить, что WSA не работает в Windows 11.
Ниже приведен список возможных причин, по которым WSA (подсистема Windows для Android) может не работать:
- Поврежденная установка WSA.
- Программное вмешательство в виртуальную частную сеть (VPN).
- Антивирусное ПО запрещает работу WSA.
- Повреждены временные файлы WSA.
- Устаревшая платформа Microsoft Store, интеграция WSA используется только в обновленных версиях системы Microsoft.
Зная вышеуказанные причины, давайте быстрее найдем решение, почему WSA не работает в Windows 11.
Как исправить, что WSA не работает в Windows 11?
1 Удалите ваш VPN
Нажмите Windows + R, чтобы открыть новое окно «Выполнить», затем введите или вставьте appwiz.cpl и нажмите Enter.

Теперь найдите приложение VPN, щелкните его правой кнопкой мыши и выберите «Удалить».

Непонятно, почему из-за VPN не работает WSA, но, согласно отчету Microsoft, удаление VPN решает проблему.
2 Ремонт ВСА
Нажмите Windows + I, чтобы открыть приложение «Настройки», затем перейдите в «Приложения», затем «Приложения и функции».

В окне «Приложения и функции» вы можете выполнить поиск «Подсистема Windows для Android» в поле поиска. Затем щелкните меню из трех точек рядом с ним, а затем нажмите «Дополнительные параметры».
Прокрутите вниз, пока не дойдете до раздела «Сброс» и нажмите кнопку «Восстановить», чтобы начать процесс.

После завершения восстановления перезагрузите компьютер, чтобы проверить, может ли приложение WSA работать нормально.
3 Сбросить WSA
Перед сбросом приложения WSA сделайте резервную копию всех важных данных.

Нажмите Windows + I, чтобы открыть приложение «Настройки», затем перейдите в «Приложения», затем «Приложения и функции».
В окне «Приложения и функции» найдите «Подсистема Windows Android» в строке поиска, затем щелкните меню из трех точек рядом с ним и нажмите «Дополнительные параметры».

Прокрутите вниз, пока не найдете раздел «Сброс» и нажмите кнопку «Сброс».
4 Обновить платформу Microsoft Store
Нажмите Windows + R, чтобы открыть новое окно «Выполнить», затем введите или вставьте msi-windows-store: и нажмите Enter.

Оказавшись на главной странице, нажмите на библиотеку в левом нижнем углу.

Теперь нажмите «Получить обновления», чтобы обновить всю платформу Microsoft Store Framework, включая WSA.

5 Обновите Windows
Нажмите Windows + I и выберите параметр «Центр обновления Windows» на левой панели, чтобы получить доступ ко всем обновлениям.

Если вам нужно загрузить какие-либо новые обновления, нажмите «Установить сейчас» и дождитесь завершения процесса; в противном случае нажмите кнопку «Проверить наличие обновлений».

6 Временно отключите антивирус
Если вы установили антивирусную программу на свой компьютер, вы можете попытаться временно отключить приложение, чтобы увидеть, устранена ли проблема с неработающей WSA или нет. Если это исправлено, проблема вызвана вашим антивирусным приложением. Чтобы решить проблему WSA и одновременно защитить свой компьютер, вам следует рассмотреть возможность замены другого антивирусного приложения, совместимого с Windows 11.

Если вы столкнулись с проблемой, когда WSA не работает в Windows 11, вы можете быстро решить ее, используя описанные выше способы. Если вы хотите установить приложения для Android в Windows 11, обязательным условием является WSA.
Пользователи Windows столкнулись с сообщением об ошибке при попытке установить Amazon Appstore на свои системы. Как выяснилось, при переходе на страницу Microsoft Store для Amazon Appstore отображается “Это приложение не будет работать на вашем устройстве” сообщение об ошибке в верхней части. Обычно это происходит, когда ваш Microsoft Store не обновлен или когда у вас не включены функции Windows, необходимые для Windows Subsystem for Android. В этой статье мы расскажем вам, как устранить указанное сообщение об ошибке, поэтому просто следуйте инструкциям, и Amazon Appstore будет установлен в кратчайшие сроки.

Как оказалось, подсистема Windows для Android является одной из главных особенностей новой операционной системы i.e. Windows 11. WSA позволит пользователям запускать приложения Android на компьютере с Windows без использования эмулятора, как это обычно делается. Чтобы сделать это возможным, Microsoft сотрудничает с Amazon, и поэтому пользователи могут устанавливать приложения для Android на свои системы с помощью Amazon Appstore. Однако для пользователей, которые, возможно, захотят установить Google Play Store, вы можете боковая загрузка приложений android на Windows 11 довольно легко.
Как мы уже упоминали выше, основные причины, по которым может возникнуть рассматриваемое сообщение об ошибке, заключаются в том, что версия Microsoft Store не обновлена. Кроме того, для запуска Windows Subsystem for Android на вашем компьютере необходимо включить Hyper-V в функциях Windows. В случае, если вы не соответствуете этим требованиям, скорее всего, появится рассматриваемое сообщение об ошибке. С учетом сказанного, давайте начнем и покажем вам различные методы, которые вы можете использовать для решения этой проблемы. Итак, без лишних слов, давайте перейдем непосредственно к делу.
Обновить Microsoft Store
Первое, что вы должны сделать, столкнувшись с сообщением об ошибке “Это приложение не работает на вашем устройстве”, — убедиться, что ваш Microsoft Store обновлен. Как выясняется, в большинстве случаев, когда ваш Microsoft Store не обновлен, это может привести к появлению сообщения об ошибке. Это связано с тем, что Amazon Appstore пока недоступен в стабильных сборках, а для того, чтобы опробовать его, вам придется войти в предварительную версию Insiders Preview.
Как таковая, может существовать разница между версиями, используемыми в постоянных сборках и в версии Insiders Preview. Чтобы обновить Microsoft Store, просто следуйте инструкциям, приведенным ниже:
- Прежде всего, откройте Microsoft Store на свой ПК.
- Когда окно Microsoft Store откроется, с левой стороны нажмите на кнопку Библиотека опцию, указанную внизу.

Переход к библиотеке Microsoft Store - После этого вам будет показан список всех различных приложений, которые вы установили на свою систему через Microsoft Store.
Библиотеку Microsoft Store - В списке найдите Microsoft Store и нажмите кнопку Обновление рядом с ним, чтобы обновить его.
- Дождитесь завершения. После этого откройте его снова и посмотрите, сохранилось ли сообщение об ошибке.


Включение Hyper-V в функциях Windows
Как выяснилось, Windows Subsystem для Android работает по принципу виртуализации. Это похоже на то, как работает Windows Subsystem для Linux. По сути, все происходит так, когда вы хотите запустить приложение для Android на вашем ПК создается виртуальная машина с помощью Hyper-V, которая позволяет операционной системе получить доступ к системным ресурсам — доступ, однако, ограничен. Поэтому, чтобы все работало правильно и без проблем, вам необходимо включить виртуализацию в вашей операционной системе Windows.
Для этого в Windows есть набор различных функций, которые не устанавливаются по умолчанию, поскольку большинству пользователей они не нужны. Далее вам предстоит включить Hyper-V, чтобы устранить сообщение об ошибке. Для этого следуйте приведенным ниже инструкциям:
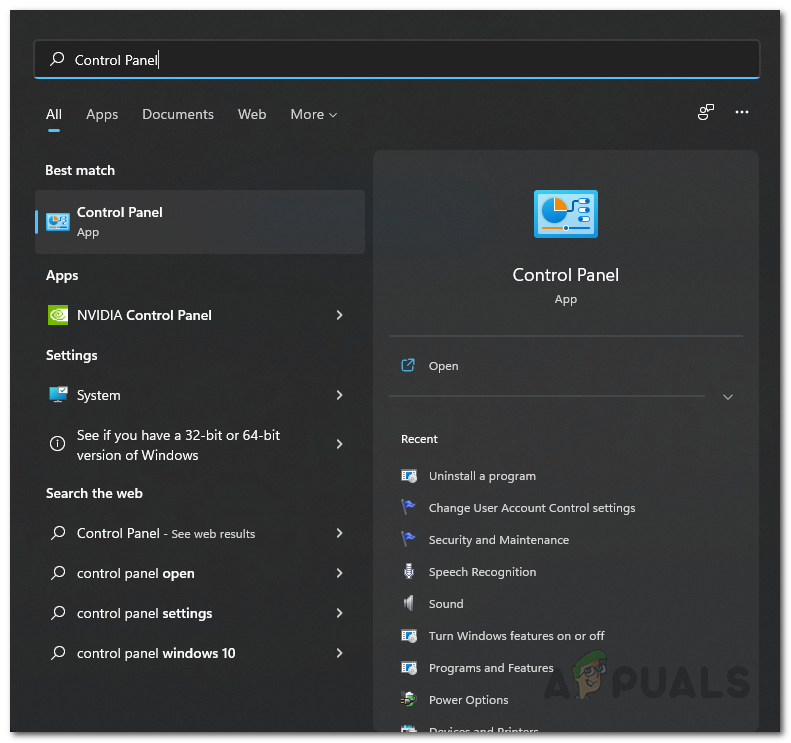
- Прежде всего, откройте Панель управления путем поиска его в меню Пуск.

Открываем Панель управления - В окне Панель управления перейдите к пункту Программы.

Панель управления - Как только вы окажетесь там, нажмите на Включите или выключите функции Windows предоставленный вариант.
Открытие функций Windows - Появится окно Windows Features. Из списка найдите Hyper-V а затем установить флажок.

Включение Hyper-V - В дополнение к этому, убедитесь, что вы также включили Платформа виртуальной машины и Платформа гипервизора Windows внизу.

Включение виртуализации Windows - После этого нажмите на кнопку OK. После этого перезагрузите систему.
- После загрузки компьютера откройте Microsoft Store и посмотрите, сохранилось ли сообщение об ошибке.


Установите Amazon Appstore вручную
Если вышеперечисленные способы не сработали, не расстраивайтесь, так как у вас еще есть возможность установить Amazon Appstore. Прежде чем продолжить, необходимо убедиться, что вы соответствуете требованиям для Windows Subsystem for Android. Если у вас все в порядке, то одним из способов обойти сообщение об ошибке будет установка Amazon Appstore вручную на вашу систему.
Установка Amazon Appstore вручную довольно проста. Вам нужно будет просто загрузить пакет, а затем запустить его в вашей системе. Для этого следуйте инструкциям, приведенным ниже:
- Прежде всего, перейдите на веб-страницу Microsoft Store по адресу Amazon Appstore в вашем браузере, нажав здесь.
- Скопируйте URL-адрес страницы, а затем перейдите на страницу rg-adguard веб-сайт, нажав сюда.
- После этого, вставьте скопированную ссылку Microsoft Store для Amazon Appstore в строке поиска, расположенной.

Поиск пакета Amazon Appstore - После этого нажмите на кнопку кнопка с галочкой предоставленный.
- На следующей странице найдите Amazon.comServicesLLC.AmazonAppstore ссылка, которая заканчивается на .msixbundle.

Загрузка пакета Amazon Appstore - Нажмите на него, чтобы загрузить пакет.
- После того как пакет будет загружен, откройте его.
- Появится всплывающее окно, нажмите на кнопку Установите для установки пакета в систему.

Установка Amazon Appstore - После этого перезагрузите компьютер. Если вы не можете открыть Amazon Appstore сразу после установки, откройте Microsoft Store и перейдите на страницу Amazon Appstore. Нажмите кнопку «Открыть».


With the release of Windows Subsystem for Android, users have been encountering the “Unable to start Windows Subsystem for Android” error message while trying to start the environment. The reason that this problem occurs is very well explained in the error message as well which essentially is virtualization. If you do not have virtualization enabled on your Windows 11 operating system, the Windows Subsystem for Android environment will not be able to initialize and thus the error message occurs. You can fix this problem pretty simply by enabling virtualization on your computer which is what we are going to show you in this article so just follow through.

As it turns out, Microsoft recently made the Windows Subsystem for Android available to the Insider Preview users which, much like the working of the Windows Subsystem for Linux, allows you to run Android apps natively on your computer. This means that you do not have to install a third party emulator on your system in order to play an Android game or use any other Android app on your computer.
However, since the feature is just available in the Insiders Preview Beta channel, there also are not many options to choose from when it comes down to installing the applications. This is because Microsoft has limited the apps, for now, and only a selected group of applications are allowed to be installed via the Amazon Appstore. Luckily, you can sideload Android apps which allows you to essentially run any Android application on your computer using Windows Subsystem for Android. In addition to that, since this is based on the Windows Subsystem for Android, you are going to enable virtualization on your computer otherwise the error message mentioned above will appear. This can be pretty easily fixed, so let us get started with that without further delay.
Turn on Windows Virtual Machine Platform
As it turns out, the first thing that you should do when you encounter the error message in question is to make sure that you have the Virtual Machine Platform feature enabled on your computer. Windows has a bunch of optional features that come built-in that you can choose to install or turn on via the Windows Features window.
While some of these features are enabled by default when you install Windows, most of them are not which is quite obvious because not everyone is going to need them. Thus, if you do need a specific feature, you will have to turn it on manually which is pretty convenient and easy to do. To do this, follow the instructions given down below:
- First of all, open up the Control Panel by searching for it in the Start Menu.
Opening up Control Panel - Then, in the Control Panel window, click on the Programs option.
Control Panel - There, click on the Turn Windows Features on or off option.
Opening up Windows Features Window - This will bring up another window called Windows Features.
- Inside that window, from the list of features, look for Virtual Machine Platform and click on the checkbox to tick it.
Enabling Virtual Machine Platform - Then, click the OK button.
- Once you have done that, go ahead and restart your computer for the feature to be installed.
- After your system boots up, try using the Windows Subsystem for Android again to see if the error message still appears.


Enable Virtualization from BIOS
In addition to turning on the Virtual Machine Platform feature on your computer, you will also have to enable virtualization from BIOS. Since you are going to run Android applications, virtualization is pretty important as it allows programs to emulate hardware which then enables it to run other operating systems like Android.
If this case is applicable, you can enable virtualization pretty easily from the BIOS menu. The exact steps may vary a little depending on the manufacturer of your motherboard but the overall procedure remains the same. Follow the instructions down below to enable virtualization:
- First of all, go ahead and restart your computer.
- As your computer is booting up, you will have to boot into the BIOS menu. To do that, press the respective key for your motherboard which usually is DEL, F2, F10 or ESC.
- Once you have booted into BIOS, you will have to go to Advanced Mode. For that, press the F7 button on your keyboard to switch from EZ Mode.

Switching to Advanced Mode - After you are in Advanced Mode, switch to the Advanced tab given at the top.

Navigating to Advanced TAB - There, click on the CPU Configuration option.

Navigating to CPU Configuration - Now, if you are using an Intel CPU, you need to look for Intel Virtualization Technology. Once located, go ahead and switch it to Enabled.
- In case of AMD processors, you should be looking for SVM Mode which stands for Secure Virtual Machine. Once you have found it, switch it to Enabled.

Enabling SVM Mode - After that, press the F10 key on your keyboard to save the changes and restart your computer.
- Once your computer boots up, you should no longer be getting the error message in question.


Enable Nested Virtualization
Finally, if you have installed Windows 11 in a virtual machine to use the Windows Subsystem for Android, you will need to enable nested virtualization for the virtual machine on the host. As apparent from the name itself, nested virtualization essentially allows you to run virtual machine instances inside a virtual machine. It is basically a virtualception.
Now, the process of enabling nested virtualization may differ depending on the hypervisor that you are using. For VirtualBox and VMware, the procedure is pretty simple as you can find the option in the virtual machine settings. In case of VirtualBox, the option is called Nested VT-x/AMD-V while in case of VMware, you will be looking for nested virtualization. If you are using Hyper-V, you will have to take a command line approach but it is rather simple to do and you can find various guides on the internet. Once you have enabled nested virtualization, the error message should just go away.

Kamil Anwar
Kamil is a certified MCITP, CCNA (W), CCNA (S) and a former British Computer Society Member with over 9 years of experience Configuring, Deploying and Managing Switches, Firewalls and Domain Controllers also an old-school still active on FreeNode.