Содержание
- Расположение каталога «Автозагрузка» в Виндовс 10
- Способ 1: Прямой путь к папке
- Способ 2: Команда для окна «Выполнить»
- Управление автозагрузкой приложений
- Заключение
- Вопросы и ответы
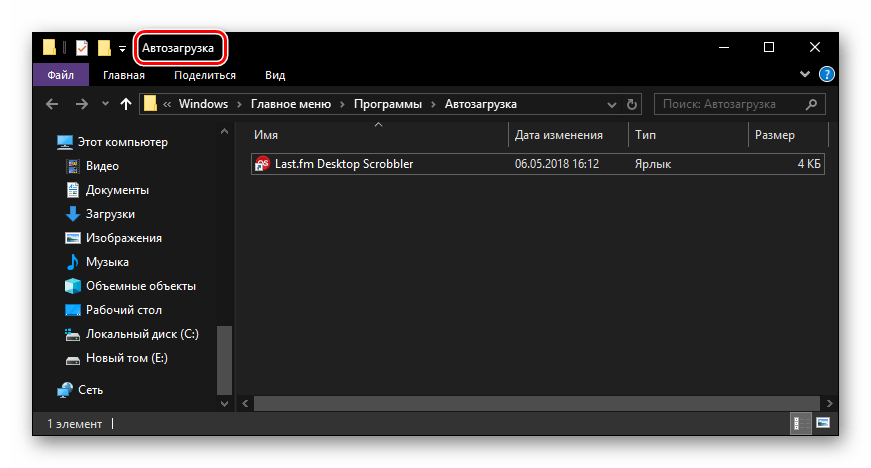
«Автозагрузка» или «Startup» — полезная функция Windows, предоставляющая возможность управления автоматическим запуском стандартных и сторонних программ вместе с загрузкой операционной системы. По своей сути это не только интегрированный в ОС инструмент, но и обычное приложение, а значит, у него есть свое расположение, то есть отдельная папка на диске. В нашей сегодняшней статье мы расскажем, где же находится директория «Автозагрузки» и как в нее попасть.
Как и полагается любому стандартному инструменту, папка «Startup» находится на том же диске, на котором установлена операционная система (чаще всего таковым является C:\). Путь к ней в десятой версии Windows, как и в предшествующих ей, является неизменным, отличается в нем лишь имя пользователя компьютера.
Попасть в директорию «Автозагрузки» можно двумя способами, причем для одного из них даже не потребуется знать точное расположение, а вместе с ним и имя юзера. Рассмотрим все более подробно.
Способ 1: Прямой путь к папке
Каталог «Startup», содержащий в себе все программы, которые запускаются вместе с загрузкой операционной системы, в Виндовс 10 располагается по следующему пути:
C:\Users\Username\AppData\Roaming\Microsoft\Windows\Start Menu\Programs\Startup
При этом важно понимать, что буква С – это обозначение диска с установленной Windows, а Username – директория, название которой должно соответствовать имени пользователя ПК.
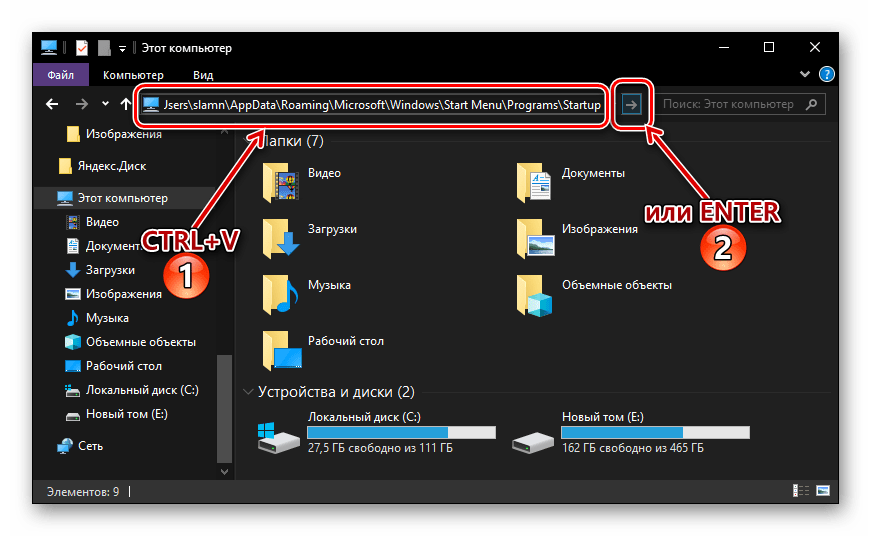
Для того чтобы попасть в данный каталог, подставьте в указанный нами путь свои значения (например, предварительно скопировав его в текстовый файл) и вставьте полученный результат в адресную строку «Проводника». Для перехода нажмите «ENTER» или указывающую вправо стрелку, расположенную в конце строки.
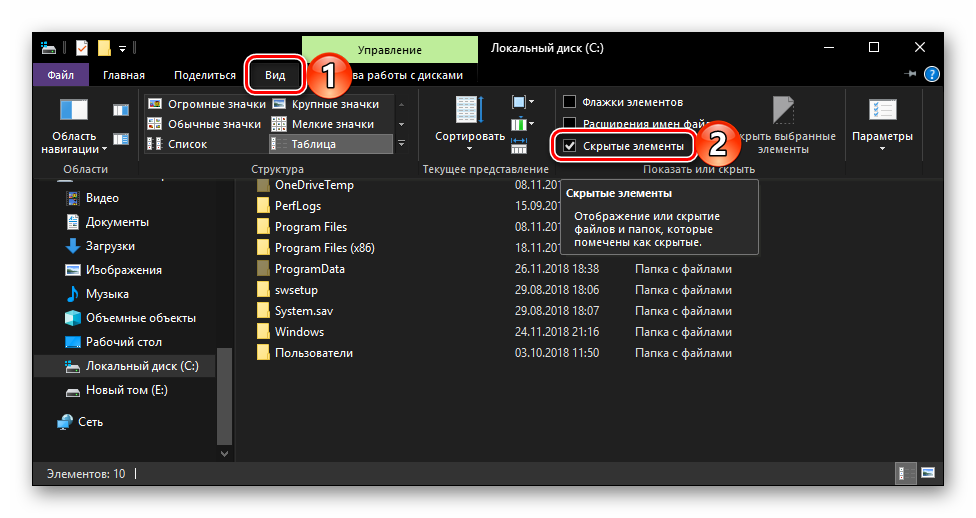
Если же вы захотите самостоятельно перейти в папку «Автозагрузки», для начала включите отображение скрытых файлов и папок в системе. О том, как это делается, мы рассказывали в отдельной статье.
Подробнее: Включение отображения скрытых элементов в ОС Виндовс 10
Если же вы не хотите запоминать путь, по которому располагается директория «Startup», или считаете такой вариант перехода к ней слишком сложным, рекомендуем ознакомиться со следующей частью данной статьи.
Способ 2: Команда для окна «Выполнить»
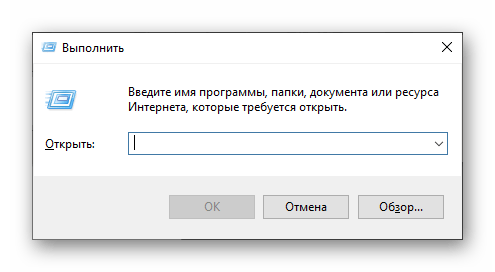
Получить мгновенный доступ к практически любому разделу операционной системы, стандартному инструменту или приложению можно посредством окна «Выполнить», предназначенного для ввода и выполнения различных команд. К счастью, существует и возможность быстрого перехода в директорию «Автозагрузки».
- Нажмите «WIN+R» на клавиатуре.
- Введите команду
shell:startup, после чего нажмите «ОК» или «ENTER» для ее выполнения. - Папка «Startup» будет открыта в окне системного «Проводника».
Используя стандартный инструмент «Выполнить» для перехода в каталог «Автозагрузки», вы не только экономите время, но и избавляете себя от необходимости запоминания довольно длинного адреса, по которому он располагается.
Управление автозагрузкой приложений
Если же поставленная перед вами задача заключается не только в переходе к директории «Startup», но и в управлении данной функцией, наиболее простым и удобным в реализации, но все же не единственным, вариантом будет обращение к системным «Параметрам».
- Откройте «Параметры» Windows, нажав левой кнопкой (ЛКМ) мышки по значку шестеренки в меню «Пуск» или воспользовавшись быстрыми клавишами «WIN+I».
- В окне, которое появится перед вами, перейдите в раздел «Приложения».
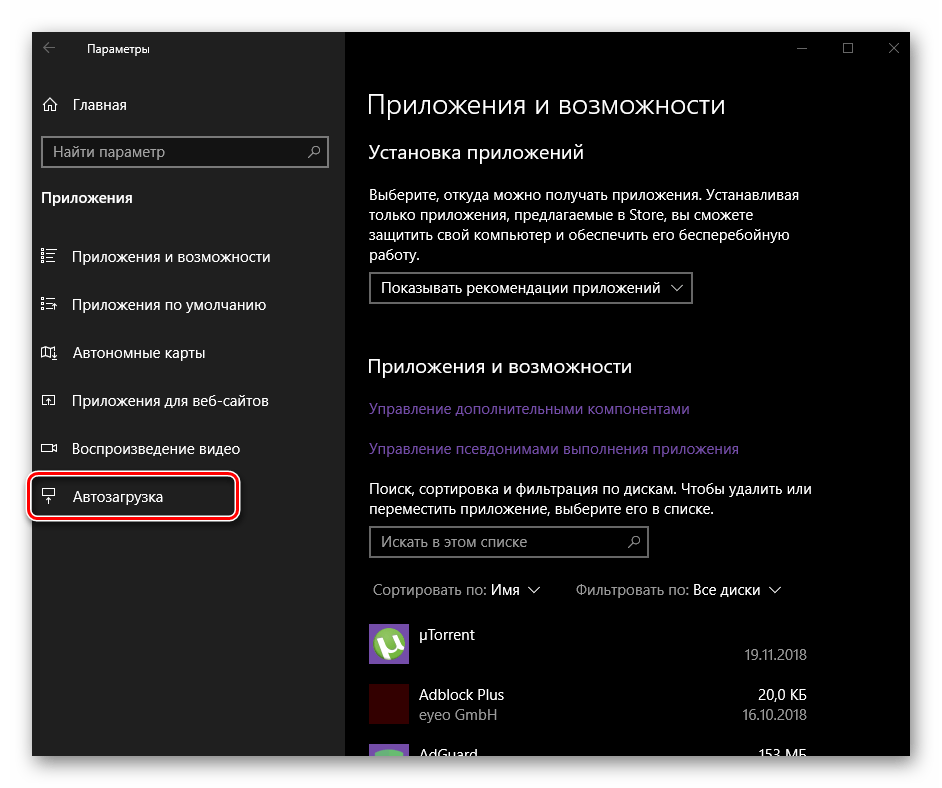
- В боковом меню кликните ЛКМ по вкладке «Автозагрузка».
Непосредственно в этом разделе «Параметров» вы можете определить то, какие приложения будут запускаться вместе с системой, а какие нет. Узнать более детально о том, какими еще способами можно настроить «Автозагрузку» и в целом эффективно управлять этой функцией, вы можете из отдельных статей на нашем сайте.
Подробнее:
Добавление программ в автозагрузку Виндовс 10
Удаление программ из списка автозагрузки в «десятке»
Заключение
Теперь вы точно знаете, где находится папка «Автозагрузка» на компьютерах, работающих под управлением Windows 10, а также знаете и о том, как можно в нее максимально быстро попасть. Надеемся, данный материал был полезен для вас и по рассмотренной нами теме не осталось вопросов. Если же таковые имеются, смело задавайте их в комментариях.
Download Windows Speedup Tool to fix errors and make PC run faster
The Startup folder in Windows 11/10 contains a list of shortcuts of those applications that start when your Windows start. Earlier, you could easily access the Windows 7 startup folder from Start Menu > Startup. But where is the Startup folder in Windows 11/10?
What is Windows Startup folder?
The Startup folder in Windows OS is a folder where the operating system places shortcuts of programs that are needed to start with Windows. It is just one of such locations. If you open it, you will see a list of program shortcuts for apps that are meant to run automatically whenever the computer boots up.
To open the Windows 11/10 Startup folder:
- Open the WinX Menu
- Select Run to open the Run box
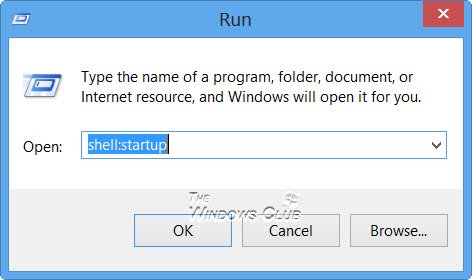
- Type shell:startup and hit Enter to open the Current Users Startup folder
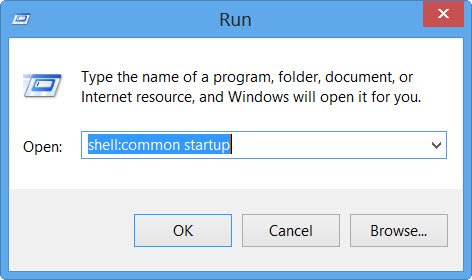
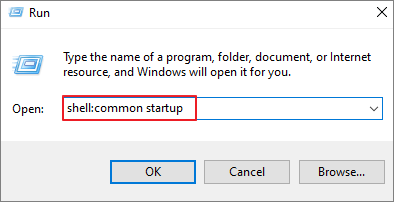
- Type shell:common startup and hit Enter to open the All Users Startup folder.
Where is the Startup folder in Windows 11/10?
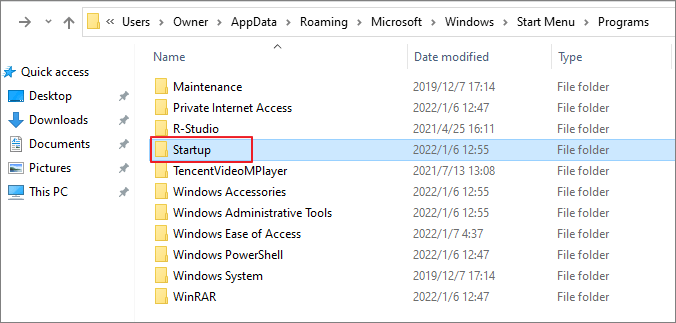
The Current Users Startup folder in Windows 11/10 is located at:
C:\Users\Username\AppData\Roaming\Microsoft\Windows\Start Menu\Programs\Startup
These programs start up for the current logged-in user only. To directly access this folder, open Run, type shell:startup and hit Enter.
Or to quickly open the folder, press WinKey, type shell:startup and hit Enter.
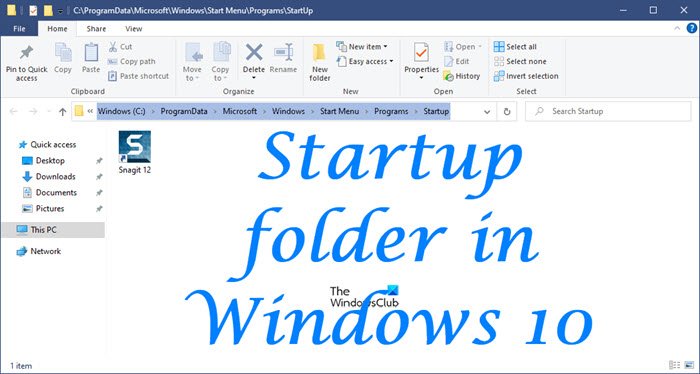
Startup folder in Windows 11/10
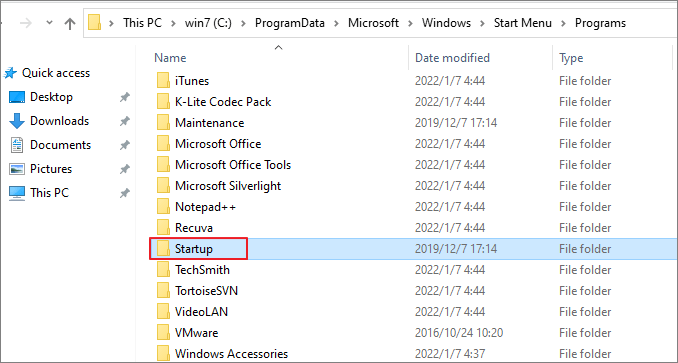
The All Users Windows 11/10 Startup folder is located at:
C:\ProgramData\Microsoft\Windows\Start Menu\Programs\StartUp
These programs start up for all users. To open this folder, bring up the Run box, type shell:common startup and hit Enter.
Or to open the folder quickly, you can press WinKey, type shell:common startup and hit Enter.
You can add shortcuts of the programs you want to start with your Windows in this folder.
Related: There are no startup items to display
How do I change what programs run at startup in Windows 11/10?
You may use msconfig in Windows 7 or Task Manager in Windows 11/10 to manage startup programs.
You can also delay Startup Programs or control the order in which they load when Windows boots.
This post on Windows Registry Startup Paths may also interest you.
Anand Khanse is the Admin of TheWindowsClub.com, a 10-year Microsoft MVP (2006-16) & a Windows Insider MVP (2016-2022). Please read the entire post & the comments first, create a System Restore Point before making any changes to your system & be careful about any 3rd-party offers while installing freeware.
На чтение 5 мин Просмотров 1.2к. Опубликовано
Всем привет! Сегодня мы разберем с вами очень важную тему – управление автозагрузкой в Windows. К сожалению у большинства пользователей не получается ответить на простейший вопрос: где находится автозагрузка в Windows 10? Это не потому что знаний недостаточно, виной всему смена привычного расположения, которое оставалось неизменно много лет подряд (если не десятилетий).
🔥 Лучшее в телеграм: Где находится автозагрузка в Windows 10… Присоединиться!
Так почему же так важна автозагрузка в Windows? – При долгосрочном использовании компьютера вы наверняка устанавливаете множество различных приложений, которыми пользуетесь достаточно редко… а некоторые из них упорно стартуют вместе с запуском операционной системы и могут значительно снизить производительность вашего компьютера. В данном руководстве я опишу способы управления автозагрузкой (например исключения программы из автозапуска) или как добавить в список автозапуска свое приложение.
Содержание
- Контроль автозапуска программ в Windows
- Как зайти в автозагрузку Windows 10
- Автозагрузка Windows 10 (версия выше 1803 / МАЙ 2018)
- Папка автозагрузки в Windows 10
- Папка с автозагрузкой для конкретного пользователя
- Папка с автозагрузкой для всех пользователей системы
- Почему важно знать где находится автозагрузка в Windows 10
Контроль автозапуска программ в Windows
Если мы говорим про автозагрузку, то следует различать несколько ее видов. Существует, так сказать встроенная возможность приложения запускаться самому, а есть пользовательские (обычные ярлычки в папке с автозагрузкой). Следовательно если вы хотите добавить или убрать приложение из автозапуска, нужно проверить эту возможность в двух местах (но использовать только один из вариантов)
Как зайти в автозагрузку Windows 10
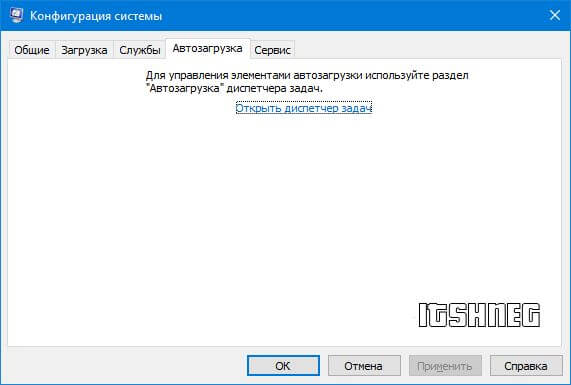
Как это происходило в Windows 7? – мы набирали в окне “Выполнить” команду msconfig и нам оставалось только перейти на вкладку “Автозагрузка”. В случае с Windows 10 вас ждет обломинго – вкладка на месте, а функционал переехал в другое место… теперь управление автозагрузкой находится в диспетчере задач (что вполне логично)
В Windows 10 или Windows 8.1 для отключения или управления автозагрузкой необходимо открыть “Диспетчер задач” и перейти на вкладку “Автозагрузка”. Здесь вы можете просмотреть список программ и менять настройки автозапуска программ кликнув по ней правой кнопкой мыши.
Не так давно в заметке о способах узнать модель материнской платы я упомянул возможность определить модельку используя командную строку. В случае с автозагрузкой все аналогично – при помощи командной строки можно проследить кто и откуда подгружается при старте операционной системе (очень полезная информация на самом деле)
Для этого откройте командную строку (если не знаете как – то прочтите 10 способов открыть командную строку в Windows 10). Введите wmic и нажмите Enter. Затем введите команды startup и нажмите еще раз Enter.
Отобразится подробная информация со списком программ, которые автоматически запускаются при включении компьютера и загрузке Windows.
Автозагрузка Windows 10 (версия выше 1803 / МАЙ 2018)
Если вы уже обновились до Windows 10 Spring Creator Updates v1803… то можете использовать еще один инструмент системы для управления автозагрузкой программ. Откройте меню “Пуск” и перейдите в “Настройки”. Нас интересует пункт “Приложения” > “Автозагрузка”. С правой стороны вы найдете приложения, которые запускаются при входе в систему. Напротив каждого из них присутствует переключалка, которая и отвечает за старт программы вместе с компьютером.
Очень удобны подсказки системы, которые помогаю определить причину медленного запуска Windows (если у вас присутствуют приложения с высоким влиянием на загрузку – обязательно проверьте их, действительно ли они вам нужны)
Папка автозагрузки в Windows 10
В Windows 10 можно задать параметры автозапуска как для компьютера целиком (например запуск антивируса у всех пользователей) или же старт программы у конкретного юзера (например, я хочу чтобы у меня при запуске запускался Google Chrome – а другие пользователи этого компьютера такого желания не имеют). Исходя из ваших задач выберите наиболее подходящий вариант для вас.
Папка с автозагрузкой для конкретного пользователя
Папка с автозагрузкой конкретного пользователя в Windows 10/8 находится по адресу (где Имя_пользователя необходимо поменять на свои)
C:\Users\Имя_пользователя\AppData\Roaming\Microsoft\Windows\Start Menu\Programs\Startup
Для быстрого открытия папки откройте “Пуск” > “Выполнить”, введите команду shell:startup и нажмите Enter на клавиатуре – откроется необходимая папка.
Команду shell:startup можно вводить прямо в окно проводника Windows – нажмете Enter и попадете в нужную вам папку
Папка с автозагрузкой для всех пользователей системы
Папка с автозапуском для всех пользователей Windows 10 находится по адресу:
C:\ProgramData\Microsoft\Windows\Start Menu\Programs\StartUp
В меню “Пуск” откройте “Выполнить” и введите команду shell:common startup и нажмите ОК. Таким образом вы перейдете в нужную вам папку. Останется только перенести туда ярлыки программ, которые необходимо запускать при включении компьютера.
Команду shell:common startup можно вводить прямо в окно проводника Windows – нажмете Enter и попадете в нужную вам папку
Почему важно знать где находится автозагрузка в Windows 10
Никто не застрахован от различных вредоносных программ, поэтому автозагрузка нужна не только в случае если ваш компьютер тормозит… это будет полезно, если с запуском компьютера запускается сайт казино или другой рекламой. Конечно, бывает что такие вредители прячутся достаточно хорошо и без тщательного анализа нам просто не обойтись – но это отдельная тема, достойная отдельной заметки.
The Windows Startup folder is a hidden and important system folder, and any program in the startup folder will automatically start and run when the computer is turned on. You will learn the full guide of the Windows 10 Startup folder, including:
Where Is the Startup Folder in Windows 10
The startup folder keeps shortcuts of programs that needed to run with Windows. You can find and access the Startup folder in Windows 10/11 through the following paths:
The current users’ Startup folder location is located at:
- C:\Users\Username\AppData\Roaming\Microsoft\Windows\Start Menu\Programs\Startup
The Startup folder locations for all users is located at:
- C:\ProgramData\Microsoft\Windows\Start Menu\Programs
Find Windows 10 Startup folder in Command
Or, you can access Windows 10 Startup folder in Command.
Step 1. Press Win+ R keys to open the Run box.
Step 2. Type shell:startup and hit «OK» to open the Current Users Startup folder.
Or type shell:common startup and hit «Enter» to open the All Users Startup folder.
Show Hidden Files on Windows 10
Note that AppData is a system-protected and hidden folder. To access it, you need to change some settings to show hidden files.
Step 1. Press Win + E to open Windows File Explorer.
Step 2. In the top toolbar, click «View» tab > «Options».
Step 3. Click the View tab in Folder Options windows, tick «Show hidden files, folders and drives».
Step 4. Uncheck the «Hide protected operating system files» option if it is selected.
Step 5. Then, click «OK» to save all the changes.
How to Change What Programs Run in Startup Folder on Windows 10
How do I change programs that run at the Startup folder Windows 10? You can easily add or remove an app from the Startup folder by taking the steps below.
Add an App to Run at Startup Folder
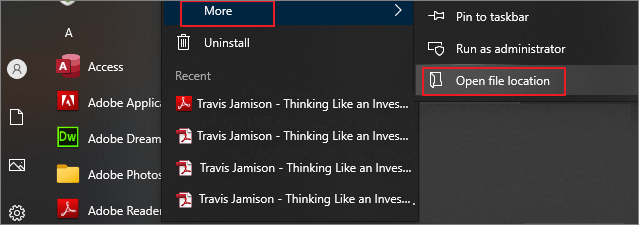
Step 1. Find the app you need to start automatically. Right-click it, select «More», and then select «Open file location». This will open the location where the program saves its shortcut. If there is no Open file location option, this means that the application cannot run at startup.
Step 2. Go to the Startup folder location on your computer or open it using the command above.
Step 3. Copy and paste the application shortcut to the Startup folder. Then, it will start automatically when Windows boots.
Remove Windows 10 Startup Programs in Startup Folder
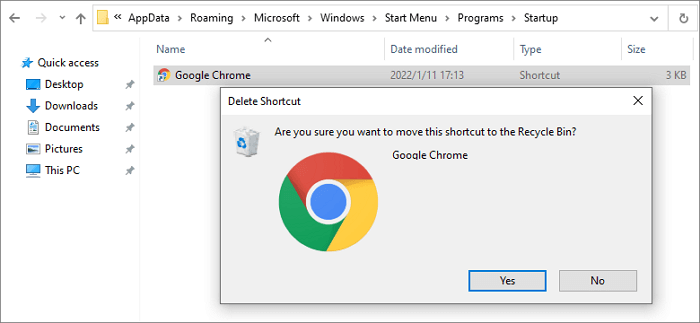
Step 1. Access the Startup folder in this file path: C:\Users\Username\AppData\Roaming\Microsoft\Windows\Start Menu\Programs\Startup
Step 2. Right-click the program you don’t want to open at startup and click «Delete». Then, the app won’t start when you boot the computer.
The program shortcut will remain in the Recycle Bin until you empty it.
How to Fix Windows 10 Startup Folder Not Working in 4 Simple Ways
Every time you log into the computer, your favorite program already opens automatically, this will save you a lot of time. What if the program no longer opens automatically? How to fix Windows 10 startup folder not working? Try these methods.
Fix 1. Check Windows Startup in Task Manager
Go to Task Manager to find the application that prevents the Startup folder from loading apps.
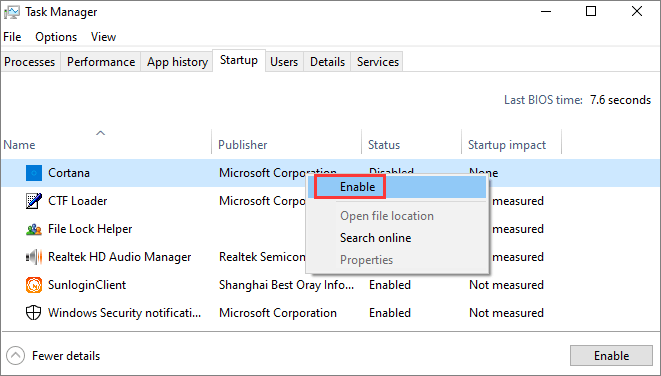
Step 1. Pres CTRL + SHIFT + ESC or CTRL + ALT + Delete keys to open Task Manager .
Step 2. Click the «Startup» tab in the Task Manager window.
Step 3. Right-click the program you want to boot automatically and choose «Enable».
Step 4. Restart your PC and check if the program runs automatically.
Fix 2. Copy the App’s Shortcut Manually
Step 1. Press Windows + R to open the Run command line.
Step 2. Type shell:startup in the Run box to open the Startup folder.
Step 3. Copy the program’s shortcut and paste it into the Startup folder.
Step 4. Restart your PC and check for changes.
Fix 3. Create a Batch File to Force a Program to Start
You can try creating and running the batch file that enables you to run any program at the startup:
Step 1. Open a New text document.
Step 2. In the document, paste the following lines. Change the file path with your own program’s location.
@echo off
C:\Program Files (x86)\Google\Chrome\Application\chrome.exe
Exit
Step 3. Click «File > Save As…». Change the TXT’s extension to .bat.
Step 4. Double-click the batch file to run it. Next time you start your system, the program will run simultaneously.
Fix 4. Edit Windows 10 Registry
If all the above-given solutions fail to fix Windows 10 startup folder not working issue, then you may finally try to edit your registry.
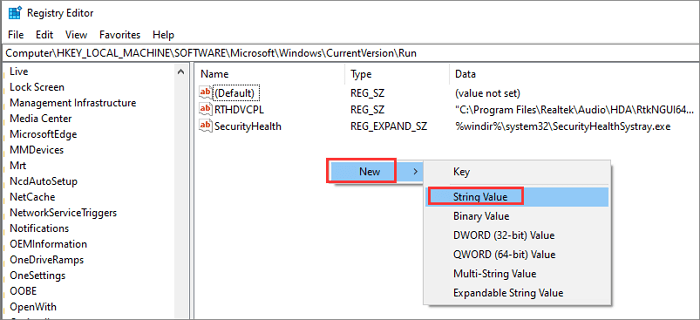
Step 1. Open the search bar > type regedit in the search bar. Click «Registry Editor» in the search results.
Step 2. Go to the following path to make changes to the certain registry key:
HKEY_LOCAL_MACHINE\Software\Microsoft\Windows\CurrentVersion\Run
Step 3. Right-click on the empty space and choose «New > String Value».
Step 4. The value name is exactly the same as the name of the program to run.
Step 5. Next, right-click on the newly-created value and choose «Modify».
Step 6. In the Value Data Field, paste the path of the.EXE (executable) for the program you want to run.
Step 7. Finally, save the changes and restart your computer.
How to Restore Startup Folder on Windows 10/11
Some users reported that the Startup folder and programs disappeared on Windows 10 due to uncertain causes. If you run into the same problem and want to restore the lost Startup folder on a Windows computer, try EaseUS data recovery software.
EaseUS Data Recovery Wizard is developed with the most advanced data recovery algorithms that cover all storage media like HDD, SSD, external devices, memory cards, USB drives, and other devices. You can easily use this software to recover permanently deleted files and folders due to accidental deletion, hard drive formatting/corrupting, OS crash, virus attack, etc.
This tool still enables you to repair corrupted files after data recovery. Document recovery, photo recovery, and video recovery in all file formats are supported. Download this full-round file recovery and repair tool to get back lost folders.
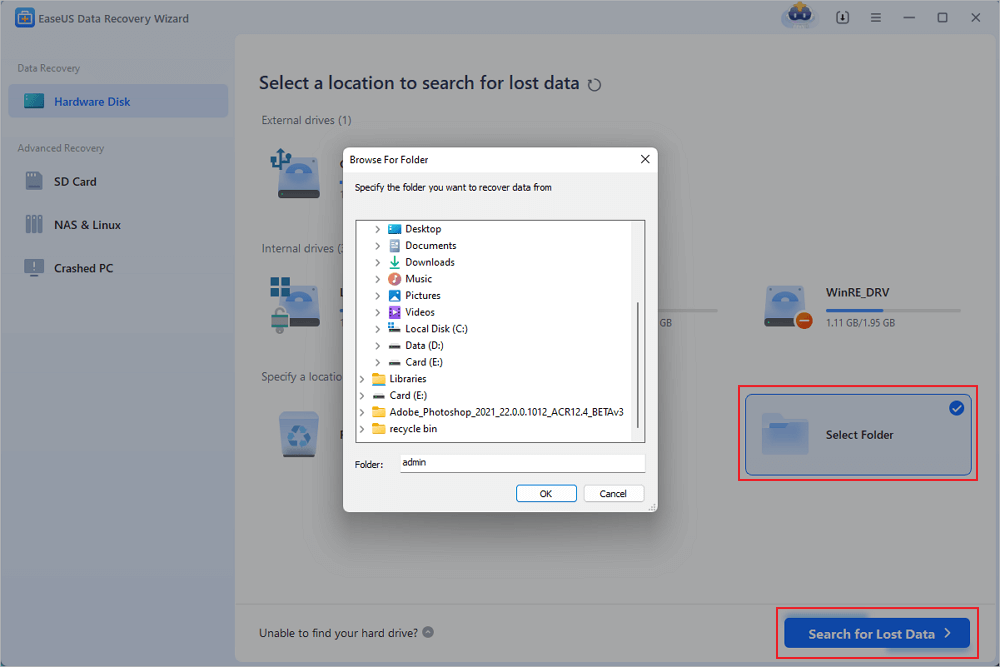
Step 1. Select a folder to scan for lost files
Launch EaseUS Data Recovery Wizard. Choose «Select Folder» under Specify a location. Click «Browse» to choose the location where you lost the folder and click «OK» to scan the lost folder.
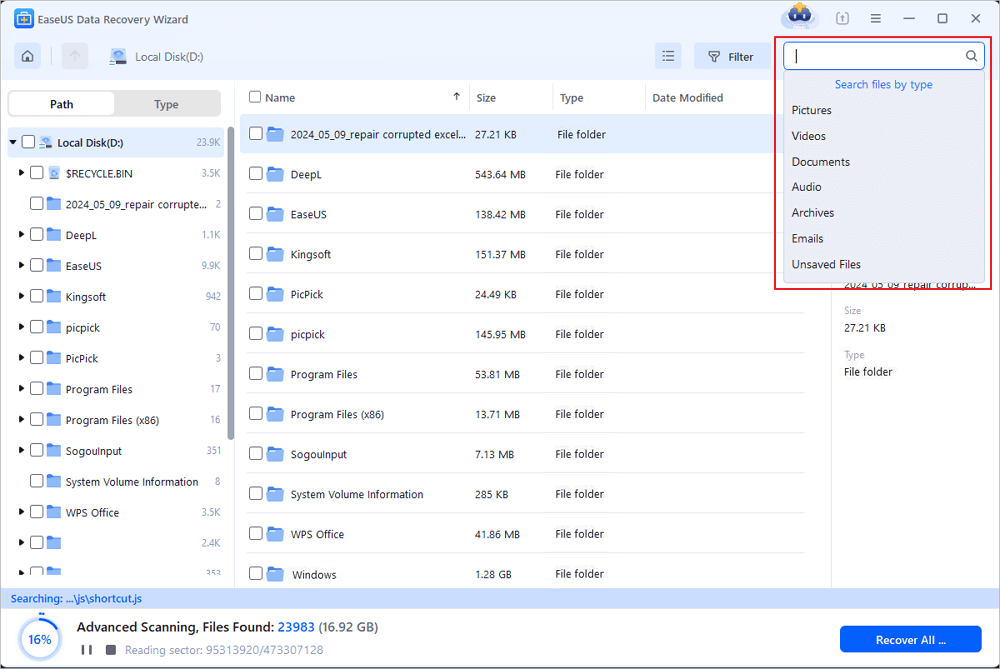
Step 2. Find and preview found files in the lost folder
If you remember the folder name, type the folder name in search box to quickly find the lost files. Then, open the found folder and double-click to preview scanned files. Or you can use the Filter feature to find a certain type of files.
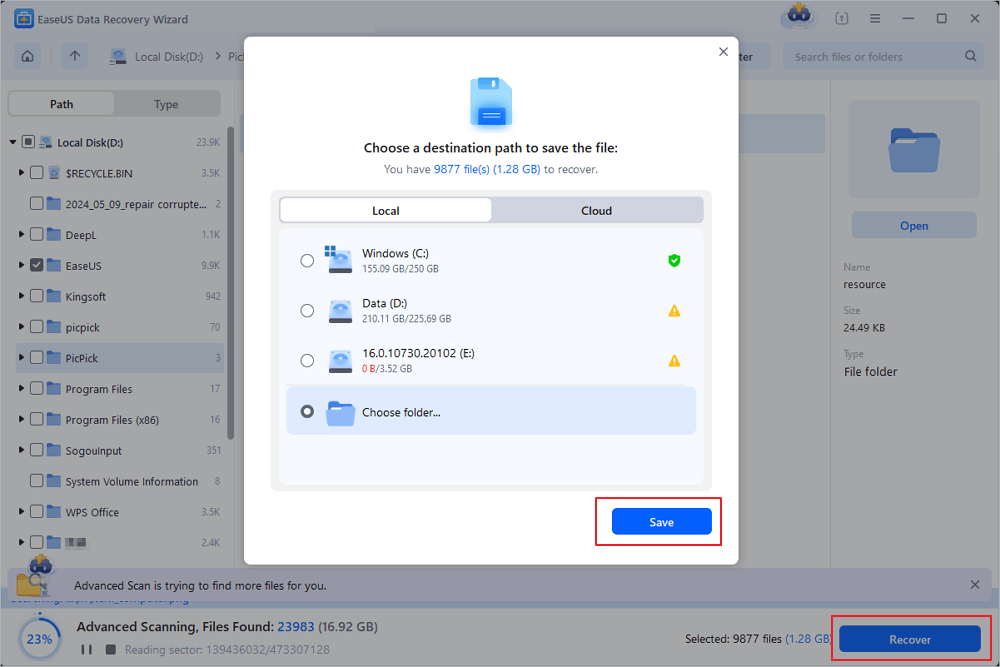
Step 3. Recover and save the lost folder
Last, select the folder and files you need, click «Recover» and choose a new & secure location on your PC to keep the recovered data.
Concluding Words
The startup folder on a Windows computer is helpful to manage the startup programs in an easy way. The Windows 10 Startup folder location is: C:\Users\Username\AppData\Roaming\Microsoft\Windows\Start Menu\Programs\Startup. You can also access the Startup folder with shell:startup command.
This post also shows you several useful ways to fix the Startup folder not working problem and how to use EaseUS data recovery software to restore deleted or lost Startup folder with simple clicks.
The Startup folder has been a part of Windows for decades and went through many changes. Learn how to locate and access the Windows 10 Startup folder here.
You might be asking yourself: what is the Windows 10 Startup folder? The startup folder contains shortcuts to every application that launches when you sign in with your local Windows 10 account. Having direct access to this folder allows you to quickly add or remove startup apps without the hassle of using the Task Manager and other means.
In the past, specifically in Windows 7, the folder was easily accessible from the Start menu itself. This was later changed in newer systems created by Microsoft, but some users still look to utilize it.
Recommended: How to remove the Activate Windows 10 watermark
Table of Contents
- Where is the Startup folder in Windows 10?
- How to find the personal Startup folder
- How to find the Startup folder for all users
- How to disable startup apps in Windows 10
- Add an app to run automatically at startup in Windows 10
Where is the Startup folder in Windows 10?
Let’s see how to locate the Startup folder in Windows 10.
There are two versions of this folder: your one, and one for all users on the device. This is only applicable if you have or plan to have multiple local users on Windows 10. Otherwise, focus on the personal Startup folder.
How to find the personal Startup folder
With the steps below, you can easily locate the Startup folder for the local user currently logged in on the system.
- Open the File Explorer. This can be done by clicking on the Explorer icon in your taskbar, or by pressing the Windows + E keys on your keyboard.
- Navigate to the following location: %appdata%\Microsoft\Windows\Start Menu\Programs\Startup
Alternatively, you can use the Run utility to reach the same location using a different approach.
- Press the Windows + R keys on your keyboard. This is going to bring up the Run utility.
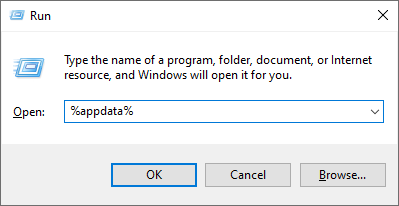
- Type in “%appdata%” without quotation marks and press the Enter key on your keyboard. This will launch File Explorer with the correct folder open.
- Navigate to Microsoft → Windows → Start Menu → Programs → Startup.
How to find the Startup folder for all users
If you have 2 or more local users on your Windows 10 system, a different Startup folder controls what applications launch when a user signs into Windows 10. As the name suggests, these are universal, meaning that the same applications will launch for every user when they log into their accounts on the computer.
- Open the File Explorer. This can be done by clicking on the Explorer icon in your taskbar, or by pressing the Windows + E keys on your keyboard.
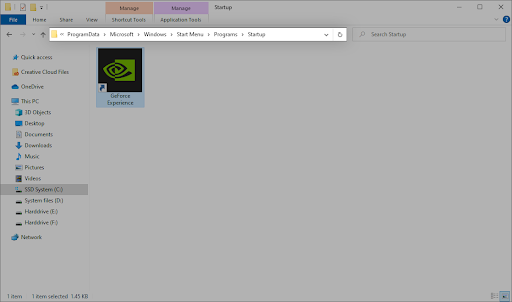
- Navigate to the following location: C:\ProgramData\Microsoft\Windows\Start Menu\Programs\StartUp
Alternatively, you can use the Run utility to reach the same location using a different approach.
- Press the Windows + R keys on your keyboard. This is going to bring up the Run utility.
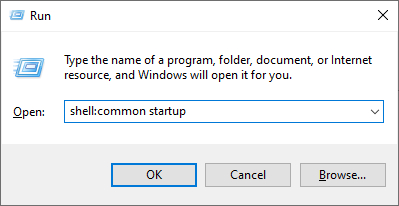
- Type in “shell: common startup” without quotation marks and press the Enter key on your keyboard. This will launch File Explorer with the correct folder open.
How to disable startup apps in Windows 10
Some apps, especially freeware, often make modifications to your system and set unnecessary startup apps. This doesn’t only slow down your boot time, but may cause serious performance drops as these applications continue running in the background.
Here’s how you can disable unwanted startup apps to improve the speed of your Windows 10 operating system.
- Open the Task Manager using one of the following ways:
- Right-click on any space in your taskbar. This will open up a context menu. Here, click on Task Manager.
- Alternatively, press the Ctrl, Alt, and Esc keys simultaneously on your keyboard.
- If your Task Manager launched in the compact view, click on the More details option seen in the bottom left of the window. This will expand the window and show you the necessary taps to access startup applications.
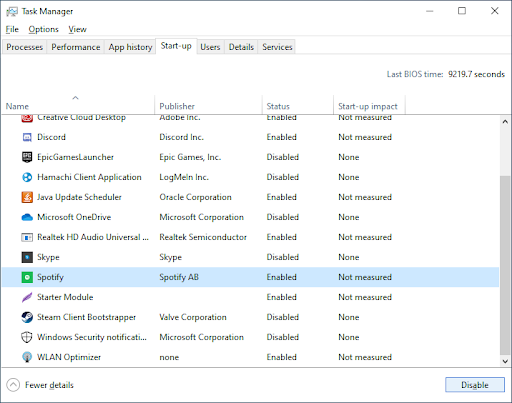
- Switch to the Startup tab using the menu at the top of the Task Manager window. Here, you can see all of the applications that start along with your computer at launch.
- You can check the Start-up impact column to determine which applications have a high impact measurement on your computer’s performance.
- Note: Make sure that the application you’re trying to disable doesn’t have Microsoft Corporation stated in the Publisher column. These applications usually don’t impact your system’s performance and might be required for Windows 10 to run as intended.
- Select an application you want to disable, then click on the Disable button in the bottom right of the window. Its status should change to Disabled.
- Repeat this process for every app you don’t need at startup, then restart your computer.
Now, your computer should launch up without any impact-heavy or unnecessary apps automatically launching. This gives you the ability to test your boot time and the performance of your device as well.
You should see the changes you make reflected in the Startup folder as well.
Add an app to run automatically at startup in Windows 10
Select the Start button and scroll to find the app you want to run at startup.
- Right-click the app, select More, and then select Open file location.
- This opens the location where the shortcut to the app is saved. If there isn’t an option for Open file location, it means the app can’t run at startup.
- With the file location open, press the Windows logo key + R, type shell:startup, then select OK. This opens the Startup folder.
- Copy and paste the shortcut to the app from the file location to the Startup folder.
Final thoughts
We hope this helps. Our Help Center offers hundreds of guides to assist you if you require further help. Return to us for more informative articles, or get in touch with our experts for immediate assistance.
One more thing
Would you like to receive promotions, deals, and discounts to get our products for the best price? Don’t forget to subscribe to our newsletter by entering your email address below! Be the first to receive the latest news in your inbox.
You may also like
» How To Find Your Windows 10 Product Key
» How To Activate Windows 10 God Mode
» How To Create Partitions on Windows 10

