В этой инструкции описан процесс установки MS SQL Server 2017 Express на Windows Server 2012 R2/2016/2019. Следуя ей вы получите готовый инструмент для знакомства с языком программирования SQL, для проверок собственных наработок или запуска небольшого ресурса, не требующего больших объемов хранения баз данных.
Ограничения выпуска SQL Server 2017 Express
Данный выпуск является бесплатным и подходит для коммерческого использования, но имеет ряд ограничений:
- Максимальное количество ядер процессора: 4;
- Максимальный размер базы данных: 10 ГБ;
- Максимальный размер пула буфера на экземпляр базы данных: 1410 МБ.
Если у вас есть необходимость выйти за пределы этих ограничений, советуем приобрести лицензию Microsoft SQL Server Standard.
Требования к операционной системе
SQL Server 2017 Express доступен для установки на следующих операционных системах:
- Windows 8/8.1/10 и новее;
- Windows Server 2012, 2012 R2, 2016, 2019 и новее.
Процедура установки
Чтобы установить SQL Server 2017 Express, перейдите по ссылке, выберите язык установки и нажмите Download:

После запуска скачанного файла установщик откроет специальное окно, в котором предложит несколько вариантов установки на выбор. Для контроля за параметрами установки выберите Custom:

Далее выберите место, куда будут скачаны установочные файлы, при необходимости поменяйте его на нужное и нажмите Install:

Дождитесь завершения процесса скачивания установочных файлов:

Далее выберите первый пункт установки New SQL Server stand-alone installation:

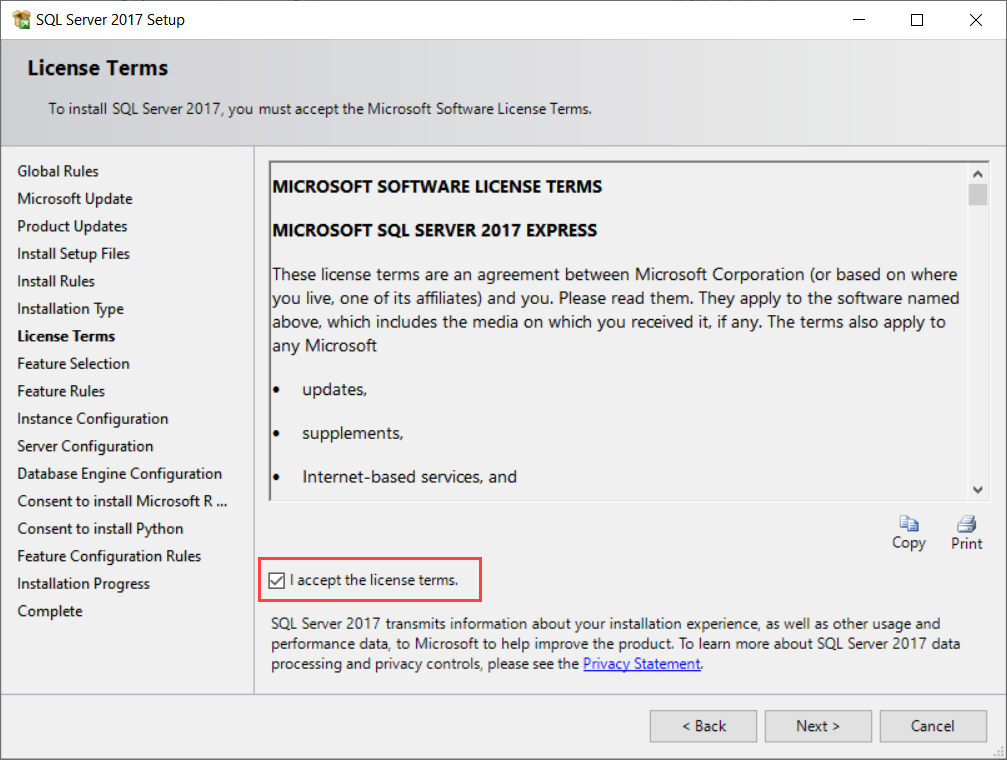
Ознакомьтесь с условиями лицензионного соглашения и нажмите Next:

При необходимости получать обновления из Windows Update поставьте галочку и нажмите Next:

Ознакомьтесь с предупреждением о возможных проблемах, а при их отсутствии нажмите Next:

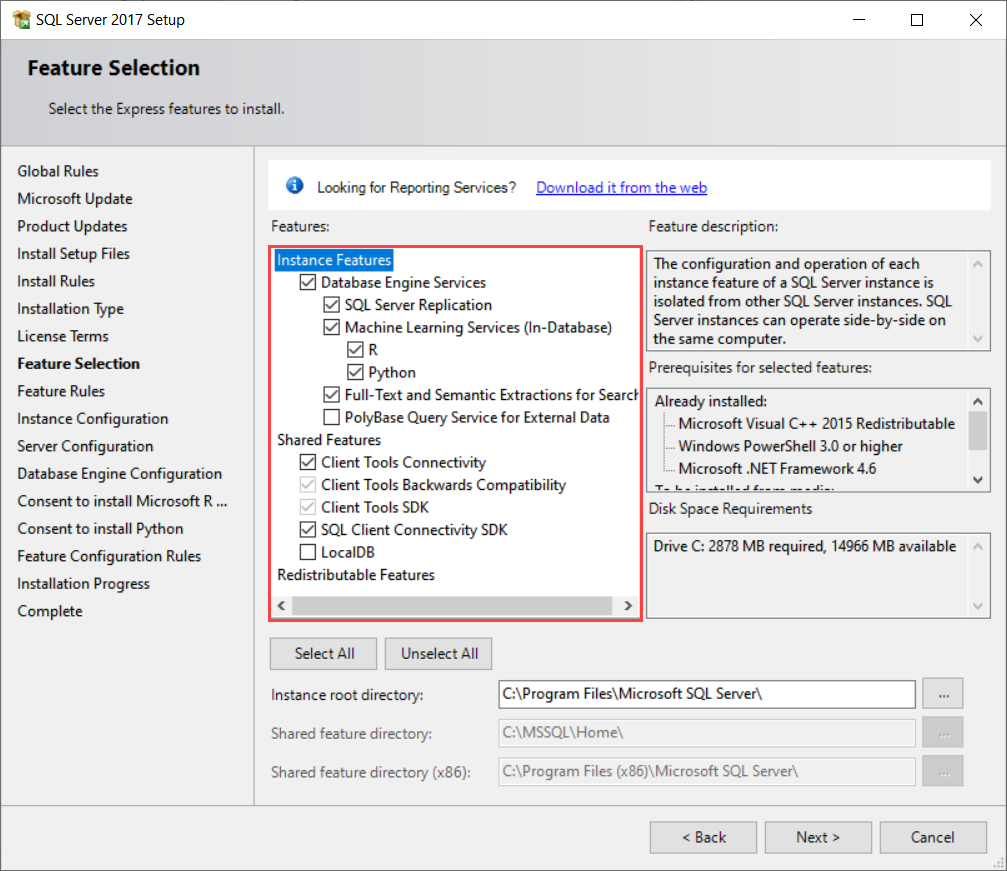
Перейдите на экран выбора функционала, где можно, при необходимости, выбрать или убрать дополнительные возможности для сервера баз данных, оставьте без изменений и нажмите Next:

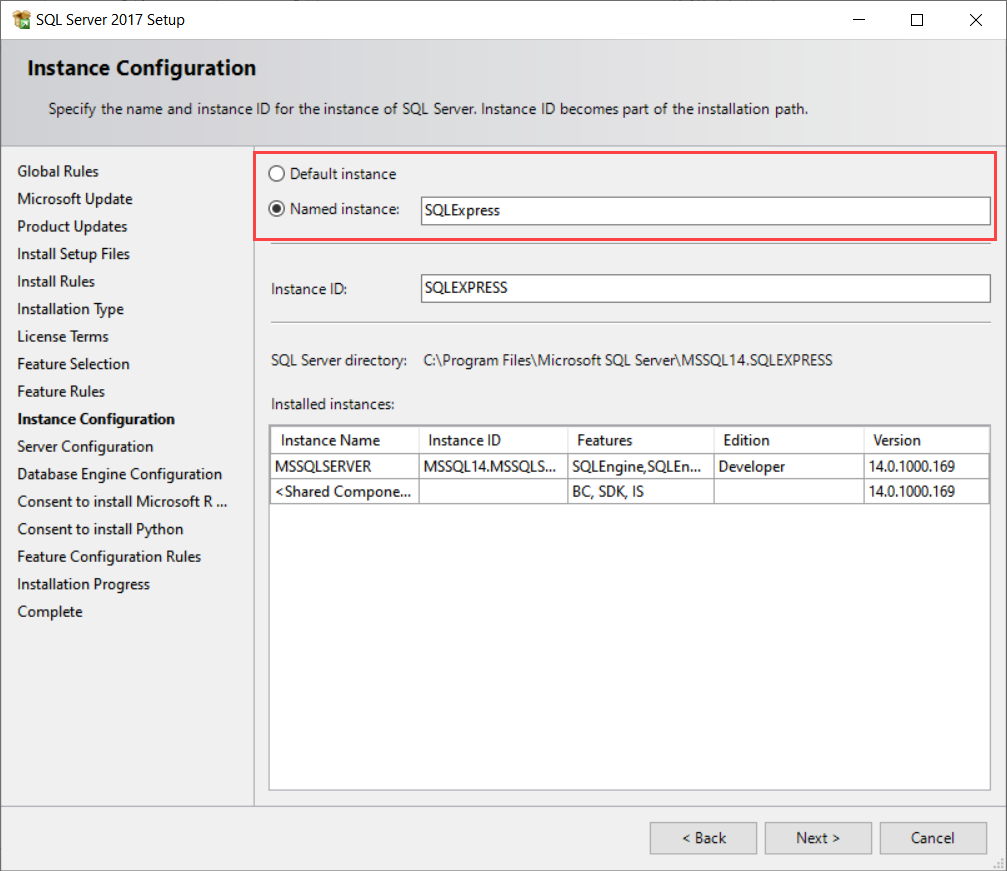
Выберите имя и идентификатор сервера. Идентификатор сервера будет включен в путь установки. Оставьте по умолчанию и нажмите Next:

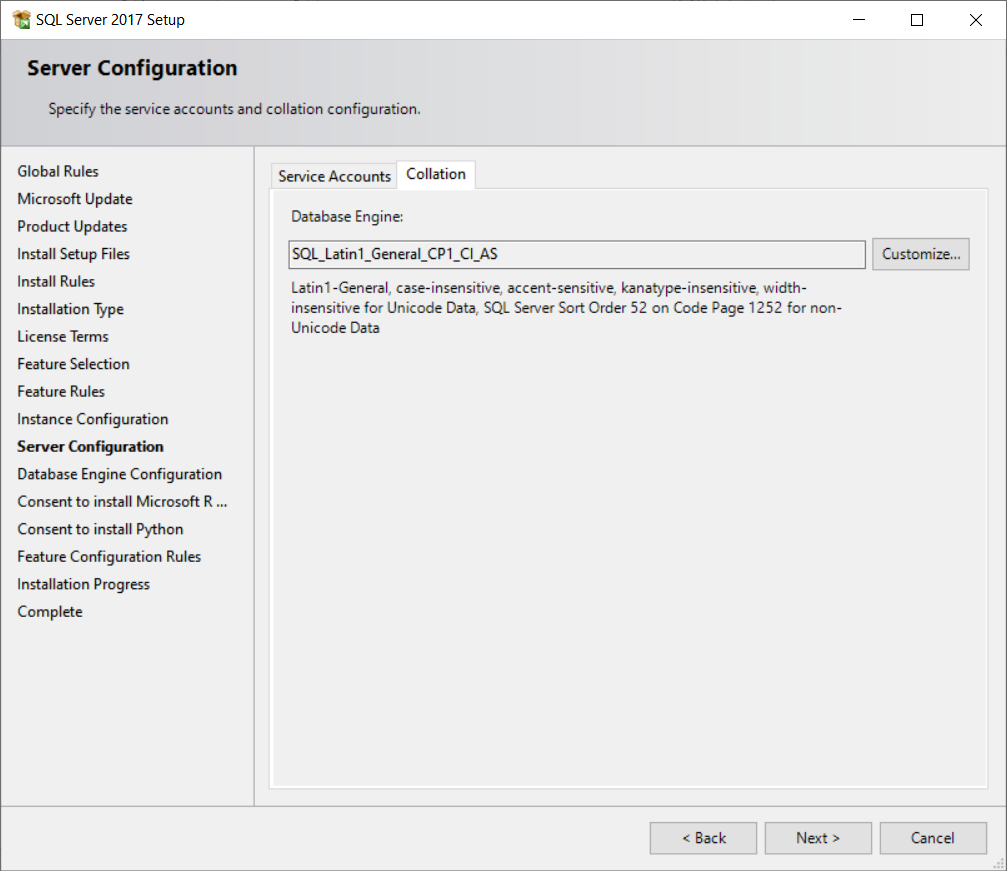
На следующем экране можно указать сервисные аккаунты, отличные от стандартных, и предоставить право на выполнение задач обслуживания тома службе ядра СУБД SQL Server, что повысит скорость инициализации файлов, но СУБД может получить доступ к удаленному контенту. На вкладке Collation можно изменить параметры сортировки движка базы данных. На указанном примере мы предоставим привилегии, оставим по умолчанию параметры сортировки и нажмем Next:

На следующем этапе установки необходимо настроить конфигурацию ядра базы данных. Для этого предусмотрены следующие вкладки:
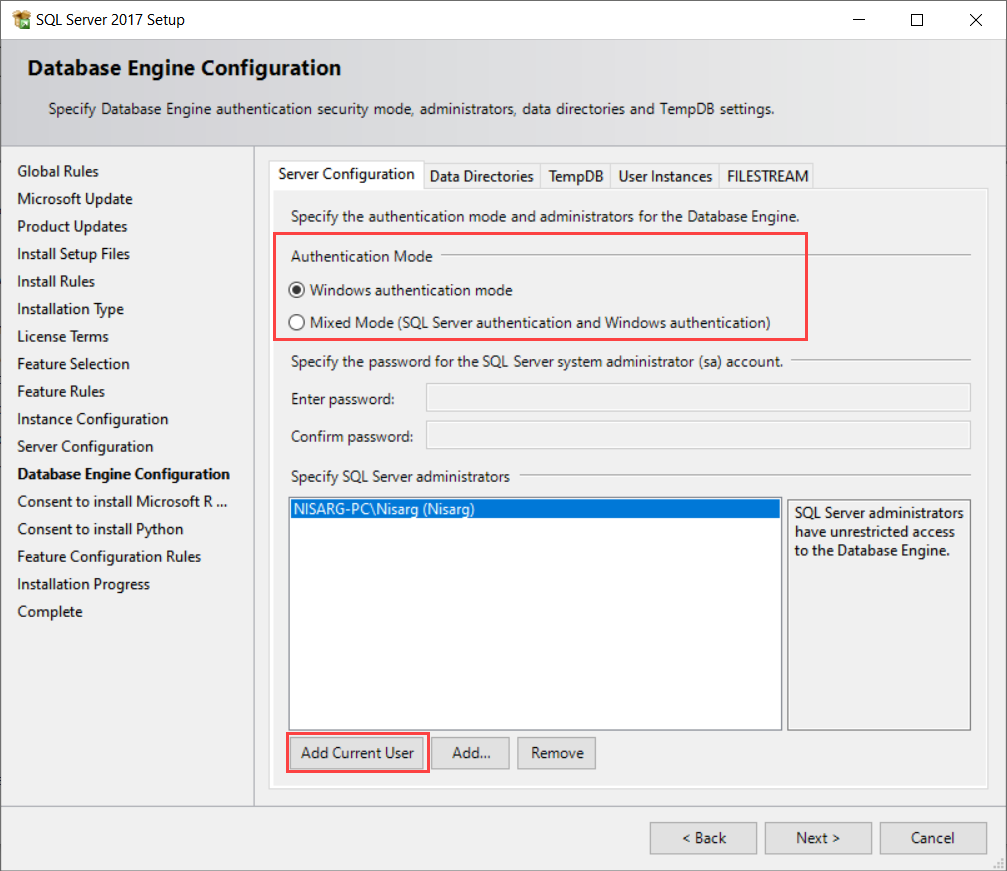
- Server Configuration — указывается способ авторизации в базу данных: средствами Windows или смешанный режим, включающий в себя авторизацию Windows и собственную авторизацию SQL Server. При выборе второго варианта следует указать пароль администратора SQL Server;
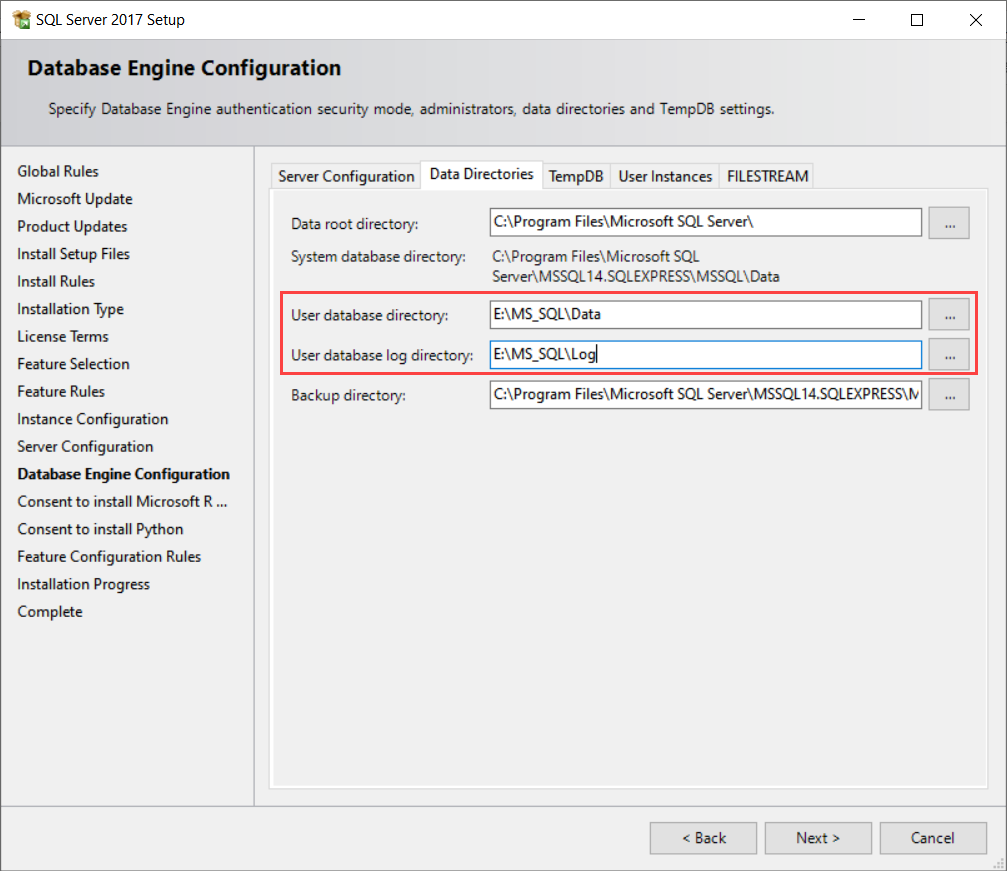
- Data Directories — указывается расположение исполняемых файлов SQL Server и данных;
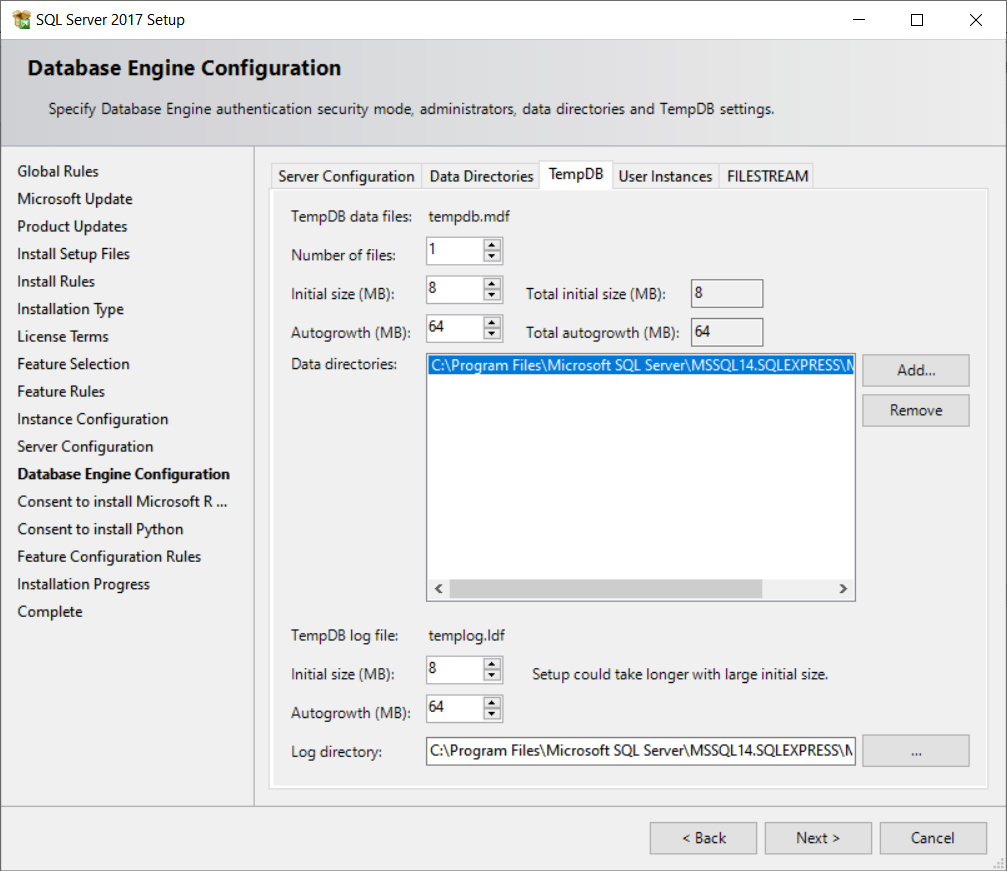
- TempDB — параметры TempDB, используемой внутренними ресурсами SQL Server, временными объектами пользователей и хранилищем версий;
- User instances — позволяет дать права пользователям, не имеющим прав администратора, запускать отдельные экземпляры баз данных;
- FILESTREAM — включается при необходимости использовать оптимизированные для памяти (Memory Optimized) таблицы.

Так как при установке по умолчанию был выбран пункт Microsoft R (Machine Learning Services) и Python, следует согласиться с условиями его использования на этом и следующем этапе, последовательно нажав Accept и Next:

Запустится процесс установки, после чfего появится окно о завершении работ установщика SQL Server 2017. Нажмите Close:

На этом установка SQL Server 2017 Express завершена.
Аverage rating : 4.4
Оценок: 4
191028
Санкт-Петербург
Литейный пр., д. 26, Лит. А
+7 (812) 403-06-99
![]()
700
300
ООО «ИТГЛОБАЛКОМ ЛАБС»
191028
Санкт-Петербург
Литейный пр., д. 26, Лит. А
+7 (812) 403-06-99
![]()
700
300
ООО «ИТГЛОБАЛКОМ ЛАБС»
![]()
700
300
In this article, I am going to explain how to install the SQL Server Express edition. We will download the SQL Server 2017 Express edition and perform the custom installation. Before we dive-in into the installation and configuration process, let me introduce you to the SQL Server Express edition.
SQL Server Express edition is the entry-level and the free-to-use edition of SQL Server. It can be used to deploy a small application or a website. You do not have to pay the license cost even though you’re using it in a production environment. It can be used to reduce the overall license cost as well; for example, you’re deploying a database mirroring. (Even though this feature is deprecated, a few organizations still using it). To configure High Safety with automatic failover, you must configure a witness server that keeps an eye on both servers. So, instead of paying for SQL Server standard edition just to monitor the mirror, we can use the Express edition of SQL Server. It will reduce the overall cost of database mirroring. You can review the limitations and list of supported features here.
Installation of SQL Server Express edition
The SQL Server 2017 Express edition comes in three variants:
- SQL Server 2017 Express edition. You can download it from here
- SQL Server 2017 Express edition with advanced series. You can download it from here
- SQL Server 2017 Express edition with localDB. You can download it from here
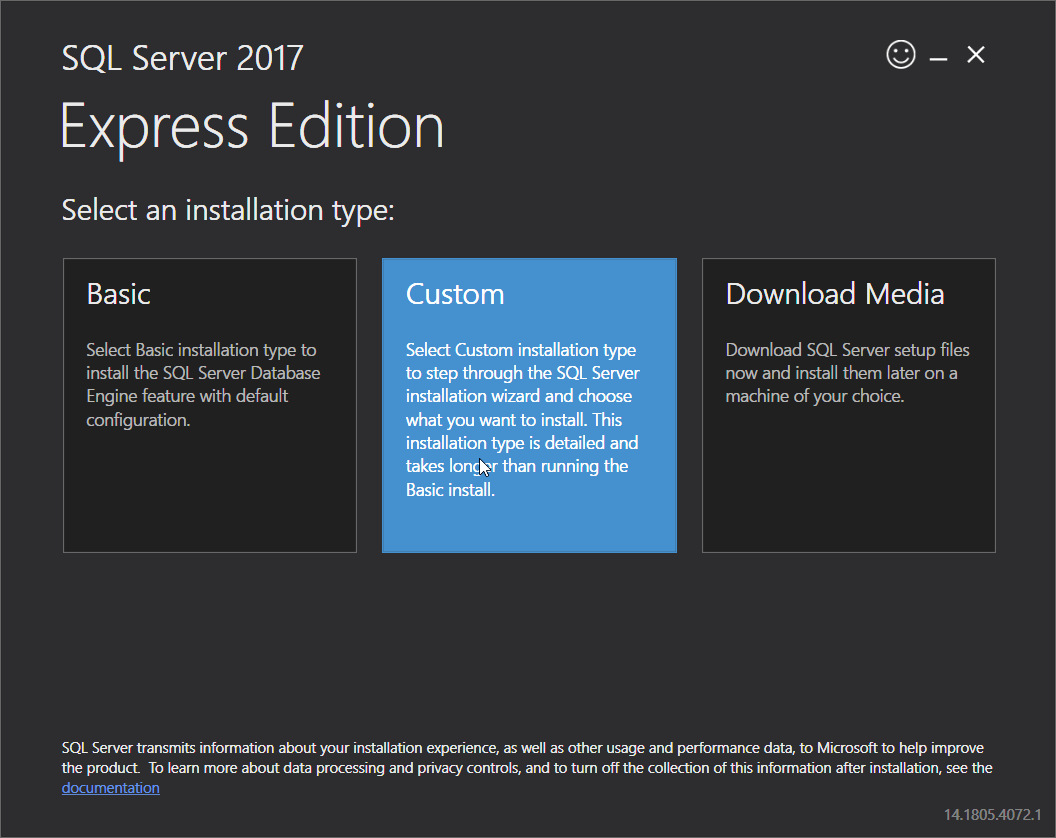
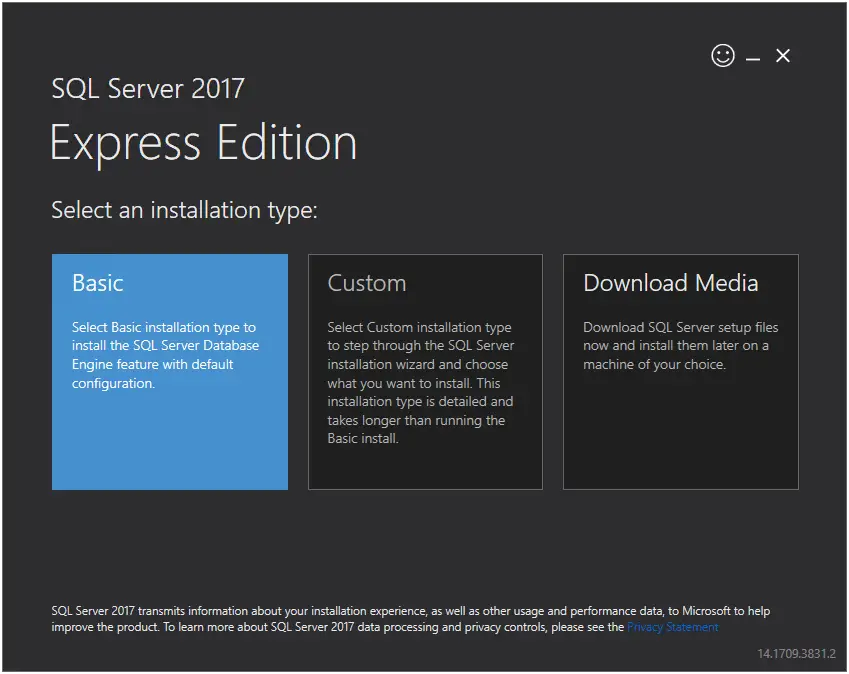
Once you download the installation file, run it by double-clicking on it. It starts another installer, which provides us three installation types to install the SQL Server.
- Basic Installation: It installs the SQL Server with pre-defined basic configuration
- Custom Installation: This option can be used when you want to customize the database configurations. This option is used when we want to install specific components only
- Download media: This option will download the iso file of the SQL Server Express edition. We can install it later
We are going to perform a custom installation. To do that, click on the Custom type:
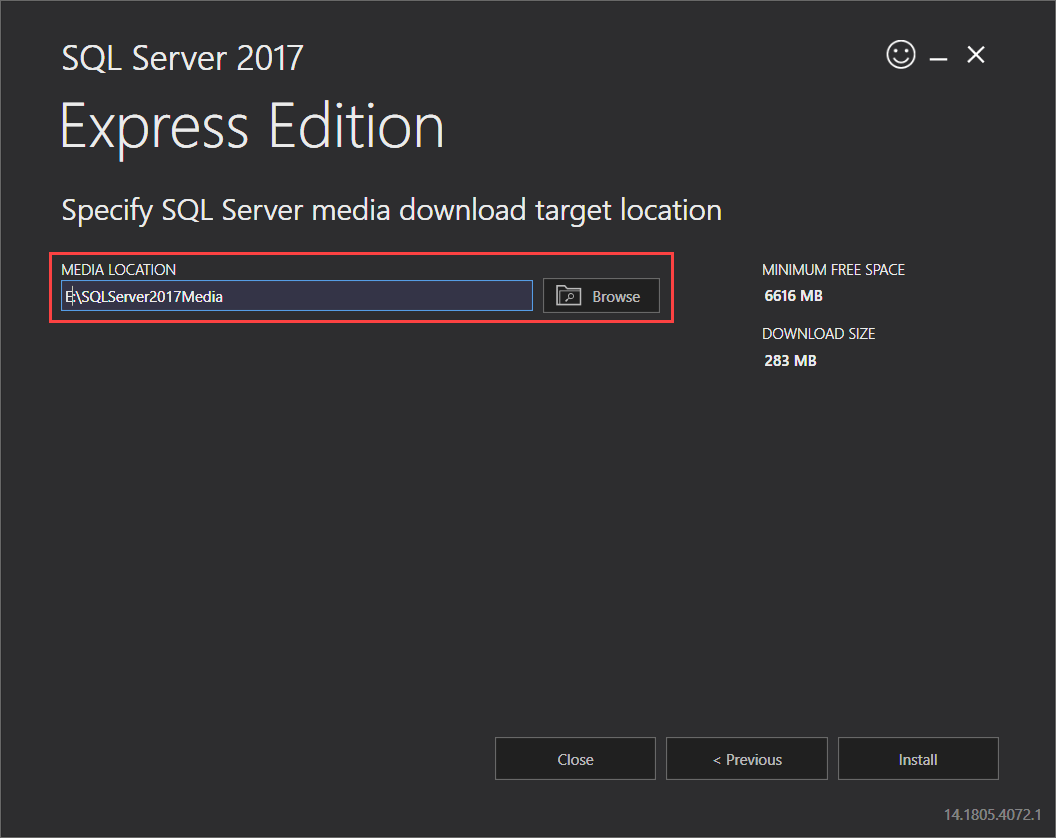
In the next step, we must specify the location where we want to download the SQL Server Express edition media files. Click on Browse to navigate to the desired location. Specify the desired location in the MEDIA LOCATION text box and click on Install:
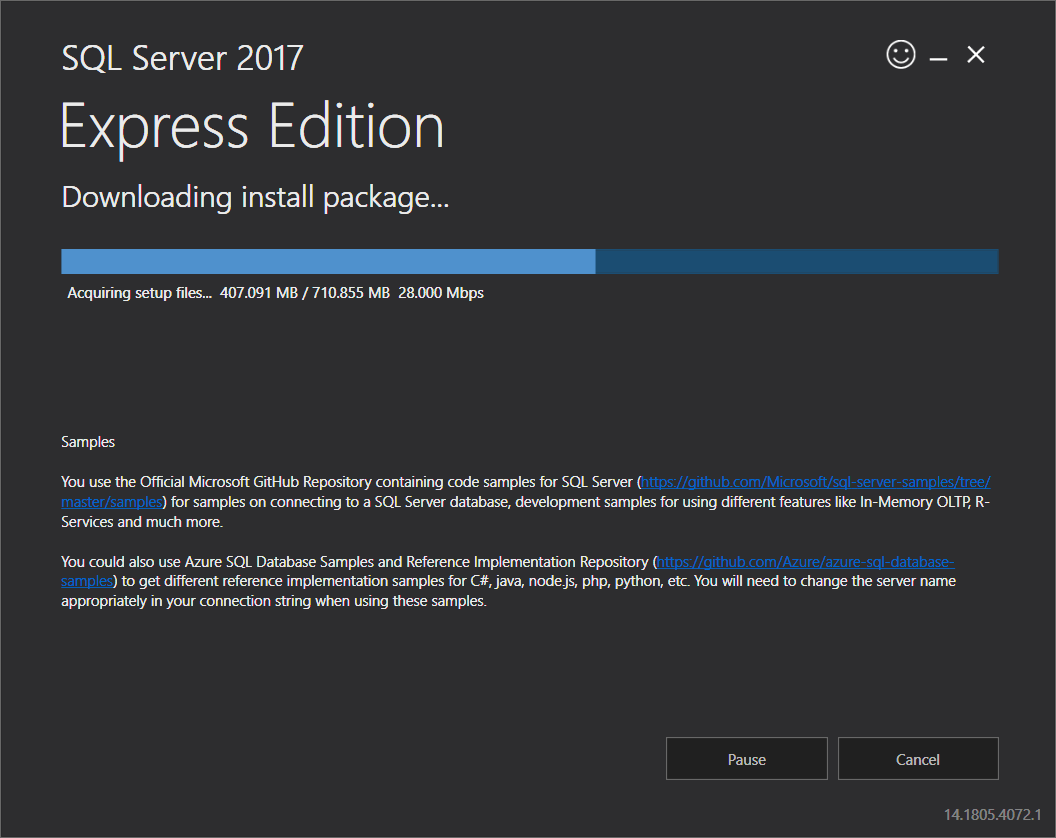
The installer will start the download process of the SQL Server install package:
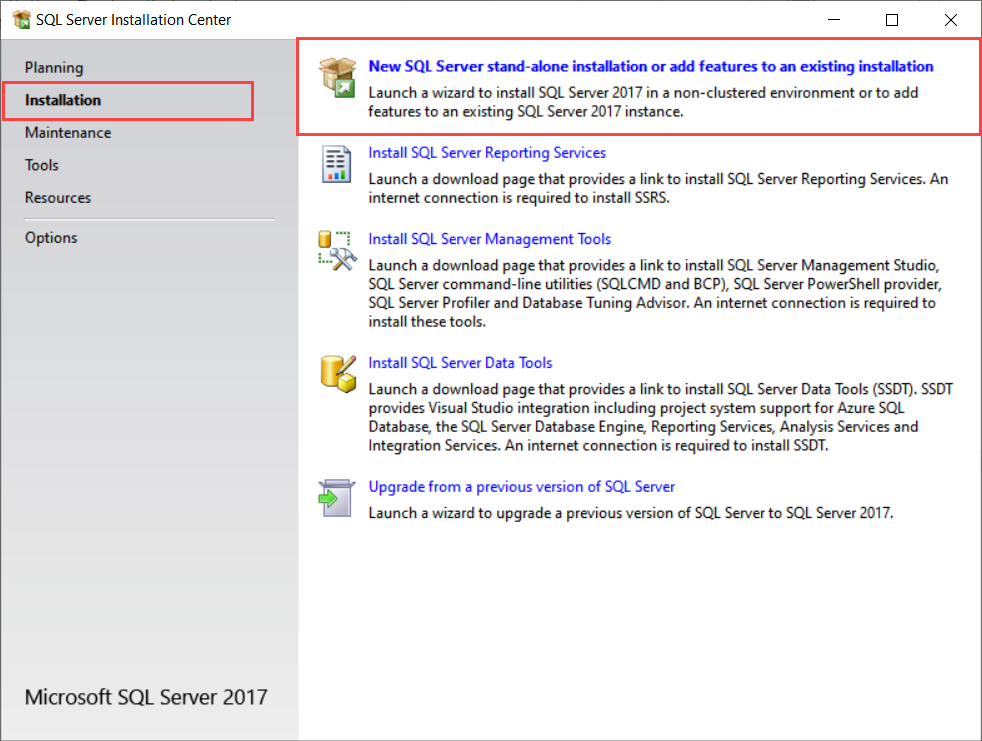
Once the install package is downloaded, the installer will extract it and begin the installation process. The installation is performed by the SQL Server Installation Center. On the installation screen, you can choose any of the following options:
- SQL Server standalone or add the feature to an existing installation
- Install SQL Server Reporting Services
- Install the SQL Server Management Studio
- Upgrade from old version to new version of SQL Server
We want to install SQL Server; hence, click on the New SQL Server stand-alone installation or add features to the existing installation option. See the following image:
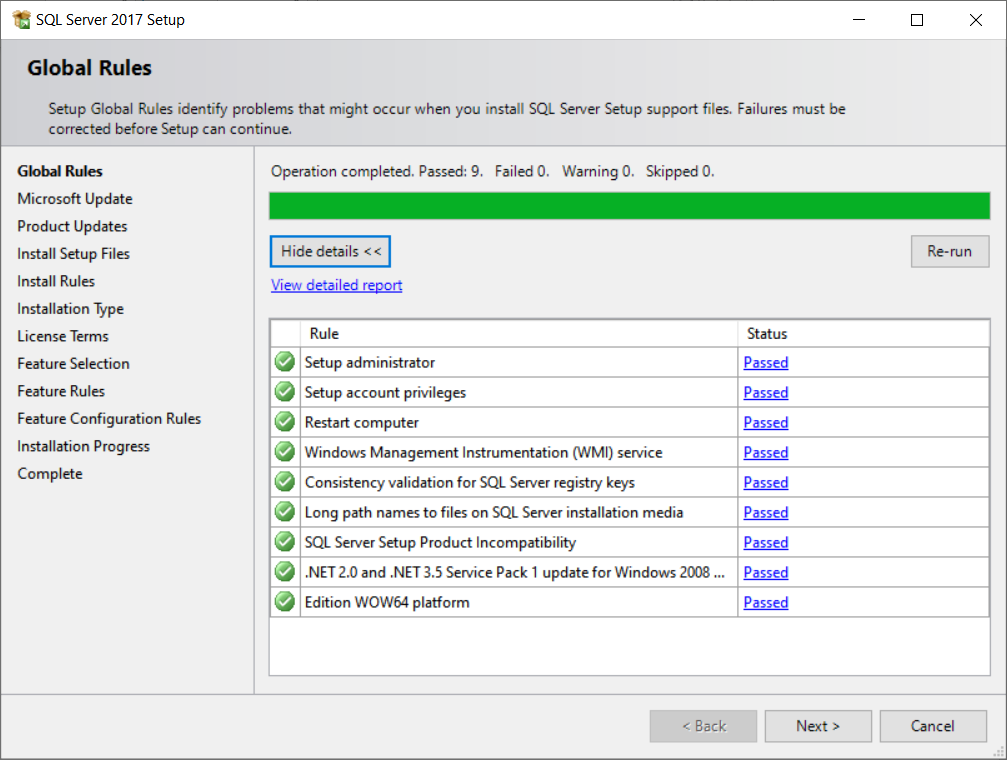
In the Global Rules step, the installer will verify that all the global rules are passed successfully. If any of the rules fail, we must fix the error to continue the installation process. See the following image:
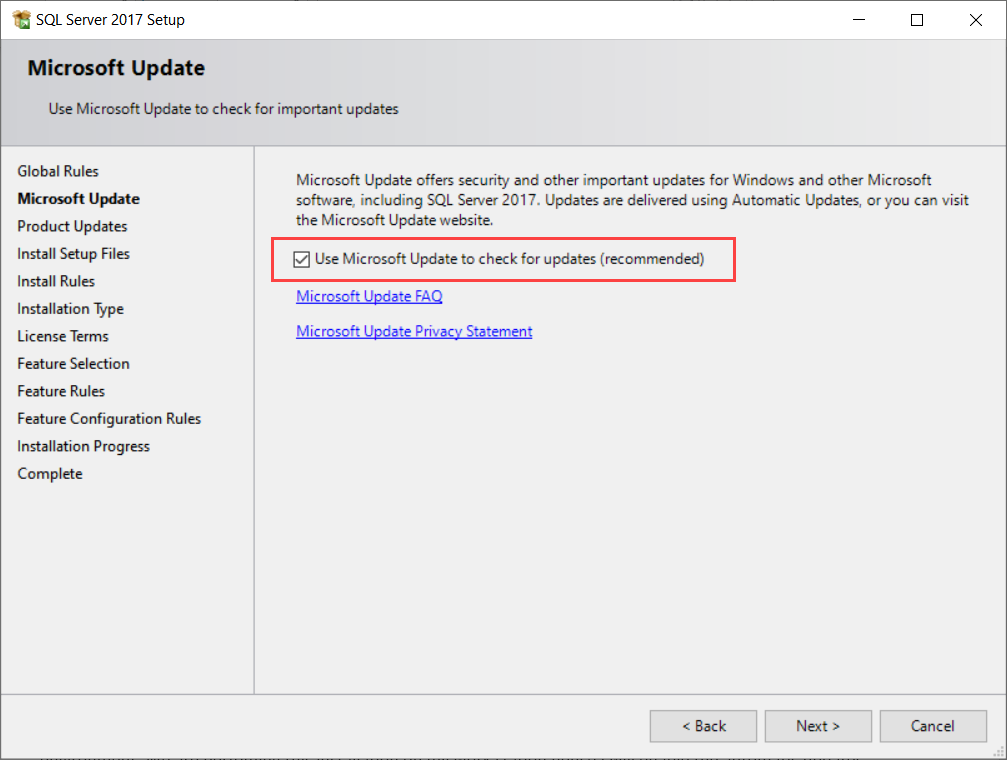
In the Microsoft Update step, you can decide whether to enable automatic updates or not. It is always recommended to not enable this option because all the security updates and patches must be tested thoroughly in a non-production environment. We are performing this installation on my work station; hence I will enable automatic updates:
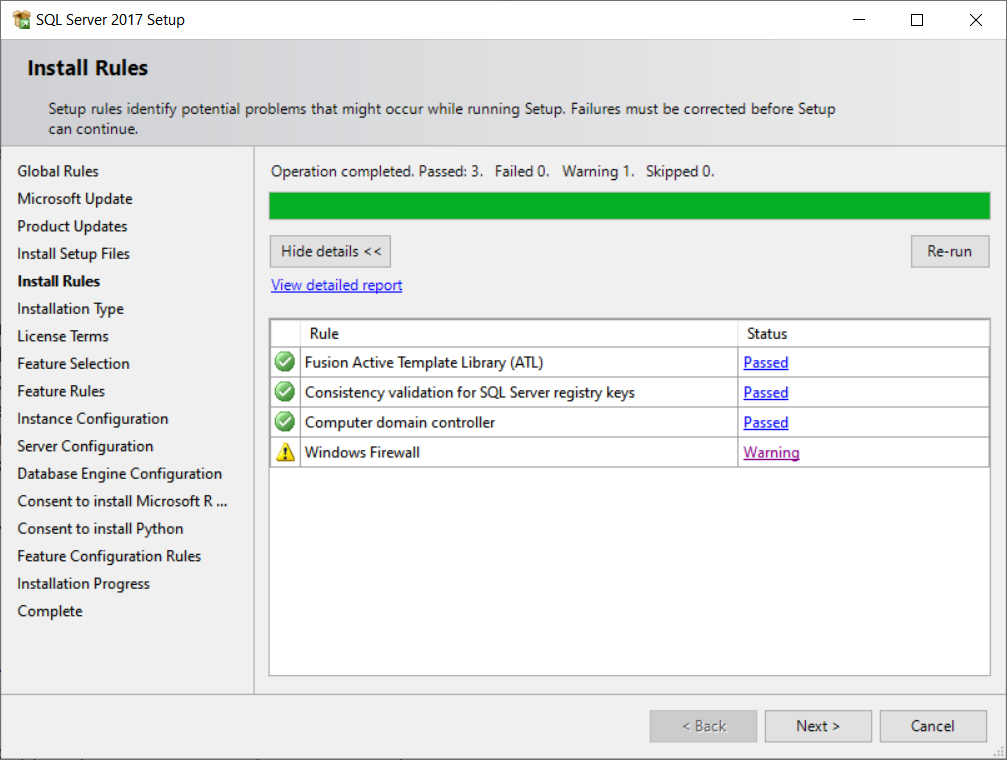
Now, in the Install Rules step, the SQL Server installer verifies that all the install rules must be passed successfully. If any of the rules failed, we must fix the error to continue the installation. See the following image:
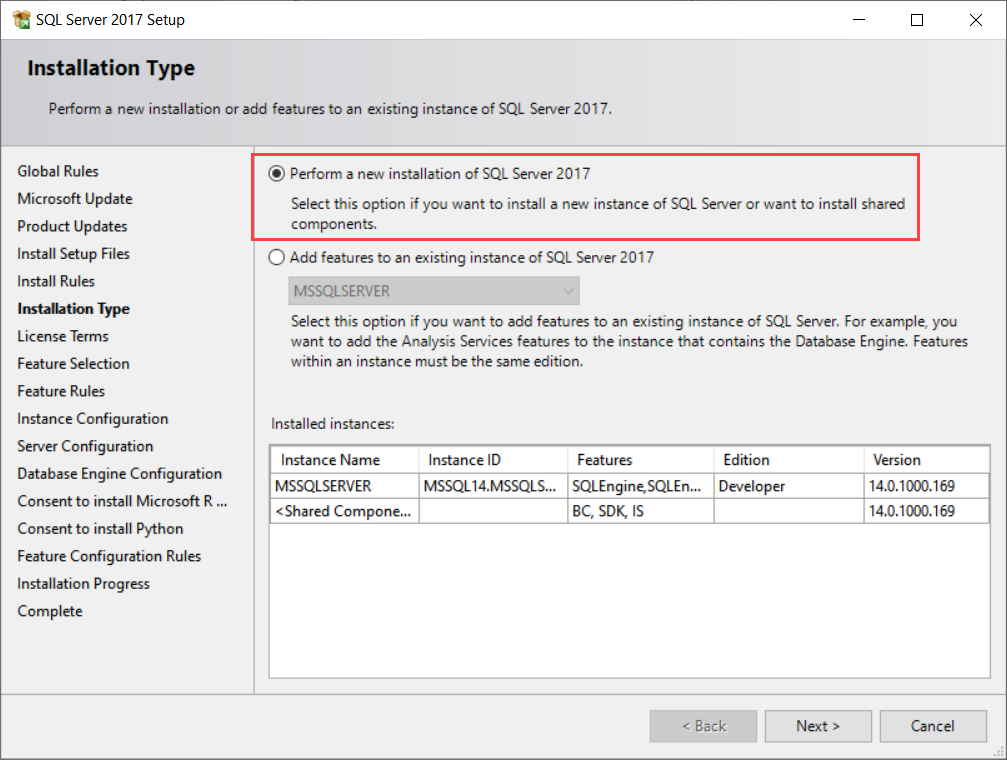
In the Installation Type step, you can perform any of the following operations:
- Install a new instance of the SQL Server 2017 Express edition
- Add new features to the existing installation
We are performing a new installation; hence select the Perform a new installation of SQL Server 2017 option. See the following image:
On license terms screen, read the Microsoft software license terms for SQL Server Express edition and select the I accept the license terms checkbox:
In the Feature Selection step, choose the features you want to install and click on Next. See below:
In the Instance Configuration step, you can choose to create a default instance or named instance. I have already installed a default instance on my workstation; hence, I will choose the named instance. See the following screenshot:
In the Server Configuration step, you can configure the SQL Server service accounts. It is recommended to use the domain account as a SQL Server service account. You can also enable instant file initialization. To do that, click on Grant perform volume maintenance task privileges to the SQL Server database engine service. I will not make any changes:
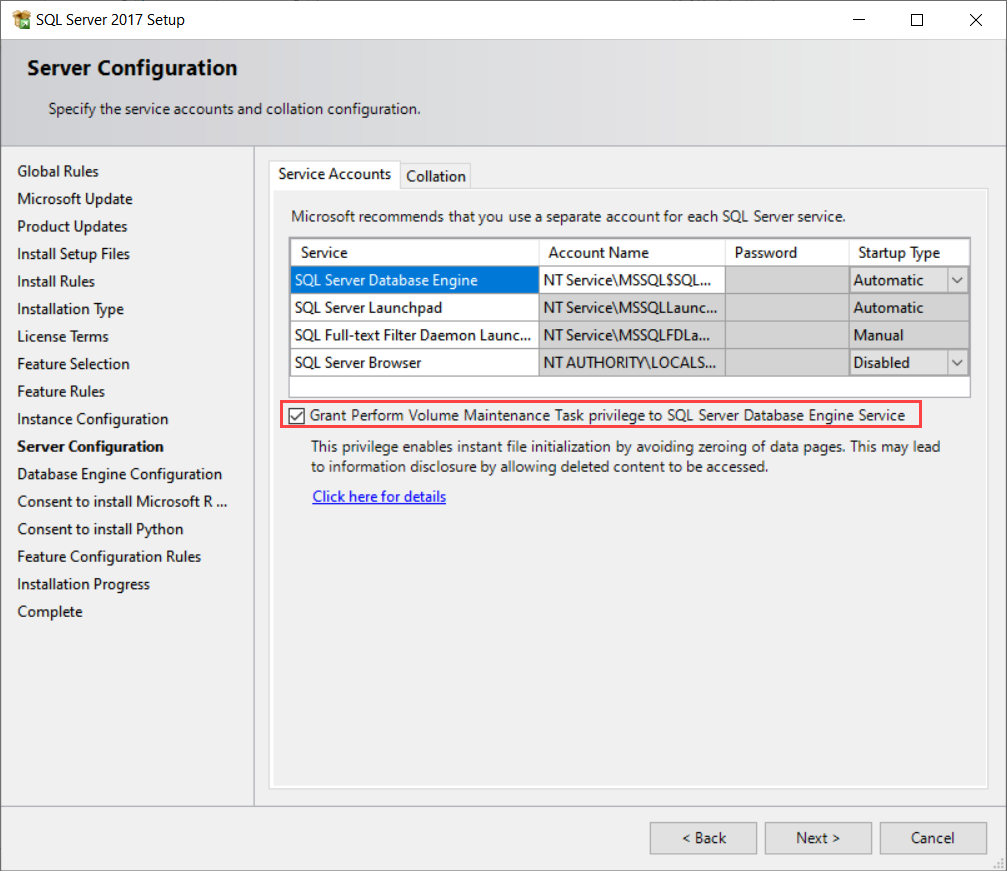
In the Collation tab, you can choose the default collation of SQL Server. I won’t change the default collation:
In the Database Engine Configuration step, you can perform the following tasks:
Configure the authentication mode and specify SQL Server administrators
On this screen, you can choose Windows authentication or SQL Server authentication. Also, you must add the default administrator account. To do that, click on the Add Current User button. See the following image:
Configure database directories
On this screen, you can provide the locations of the User database Data files, User database Log files, Backup files, and instance root directory. I am going to change the default locations of the user database data files and log files. See the following image:
Configure tempDB
On the TempDB screen, you can configure the following parameters of the data files of the TempDB:
- The number of TempDB files
- The initial size and auto-growth of the TempDB data files
- Location of TempDB data files
Also, you can configure the following parameters of the Logfile of the TempDB:
- The initial size and the auto-growth of the TempDB log file
- The Location of the TempDB log file
I will not make any changes to the configuration:
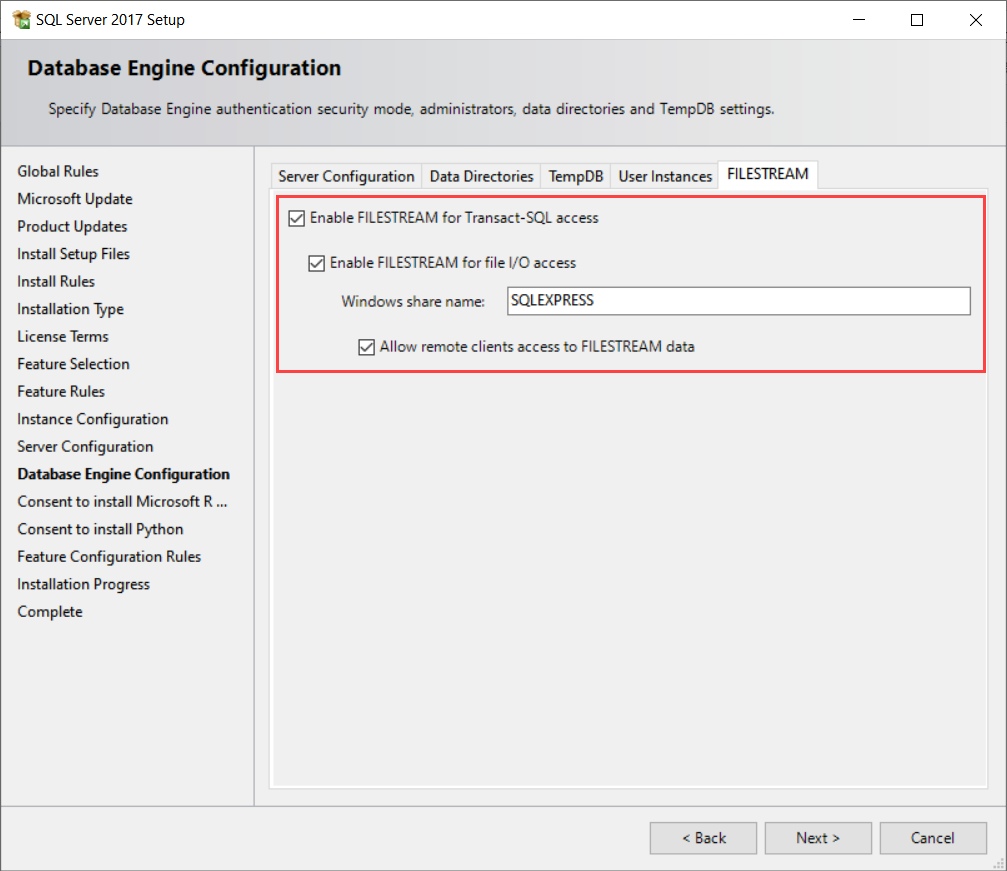
Configure the FILESTREAM
On the FILESTREAM screen, you can configure the FILESTREAM parameters. I am going to use the FILESTREAM feature hence:
- I have enabled FILESTREAM for T-SQL Access
- I have enabled FILESTREAM for the file I/O access
- I have provided the windows share name
- I have enabled remote access to the FILESTREAM data
See the following image:
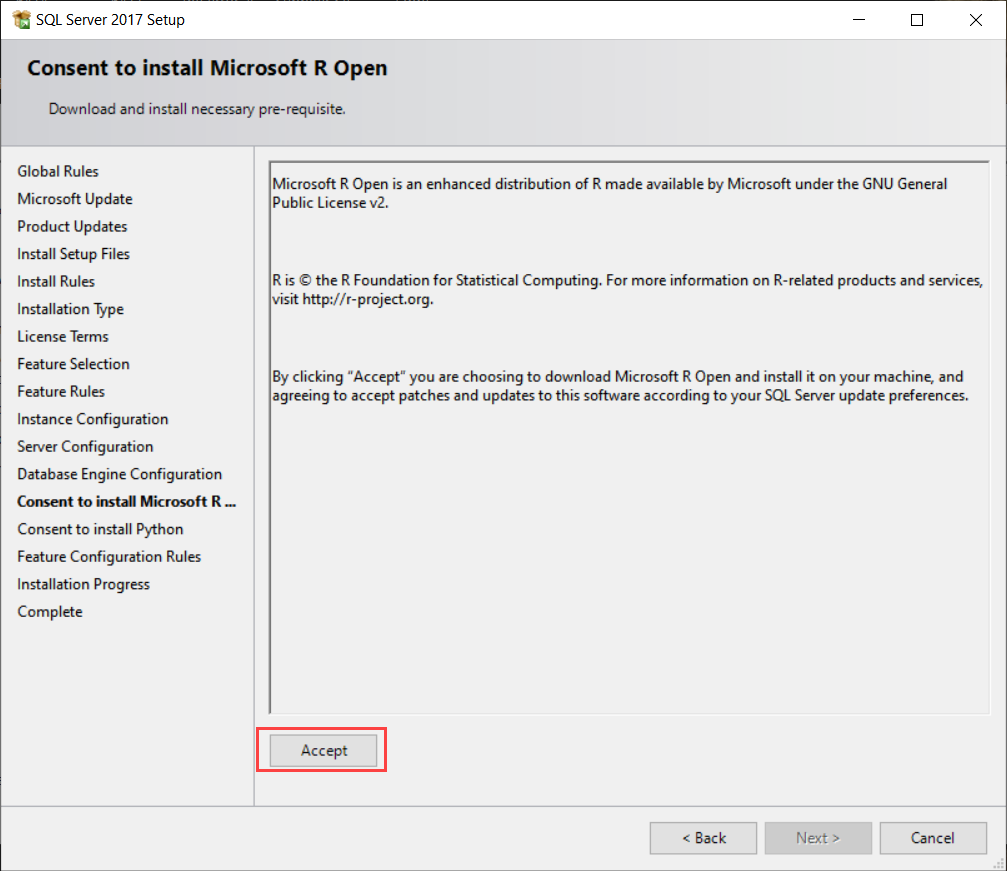
Once all the options are configured, click on Next to continue the setup process. In the Consent to Microsoft R Open step, click on the Accept button and click Next. See the following image:
Similarly, in the Consent to install Python step, click on Accept. See below:

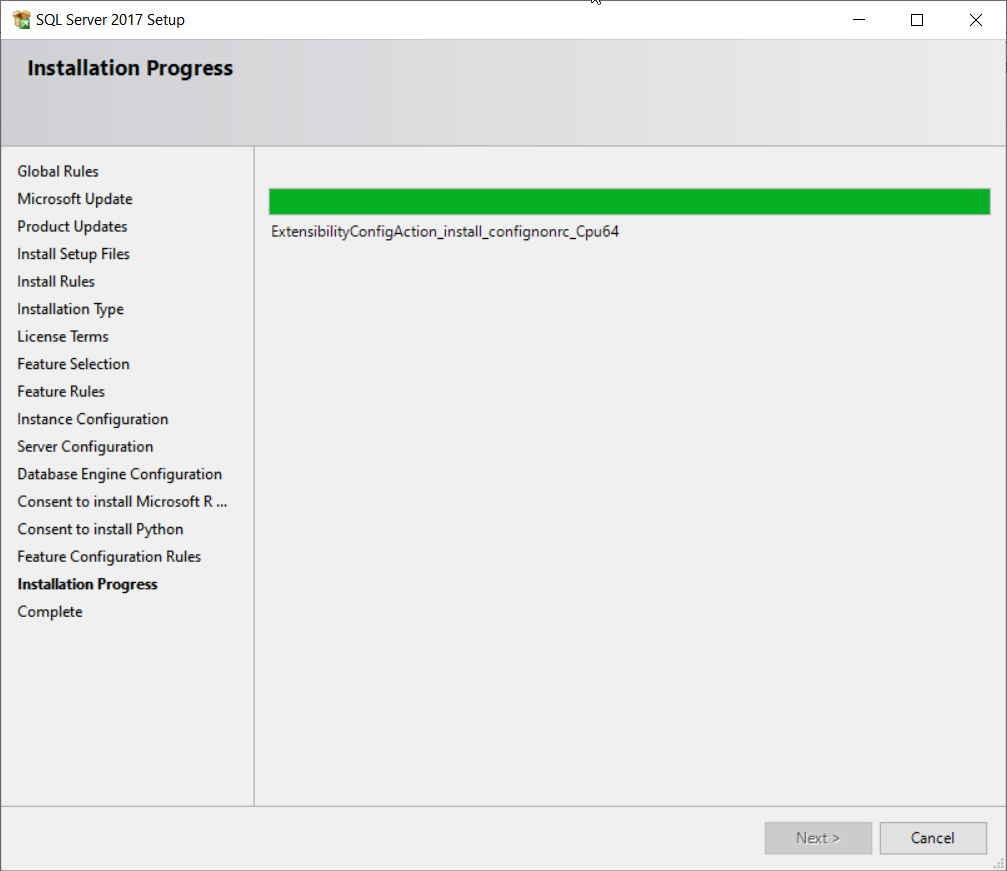
Once all parameters are configured, the SQL Server installer checks all the feature configuration rules. If all the rules are passed successfully, it will start installing the SQL Server Express edition on the computer:
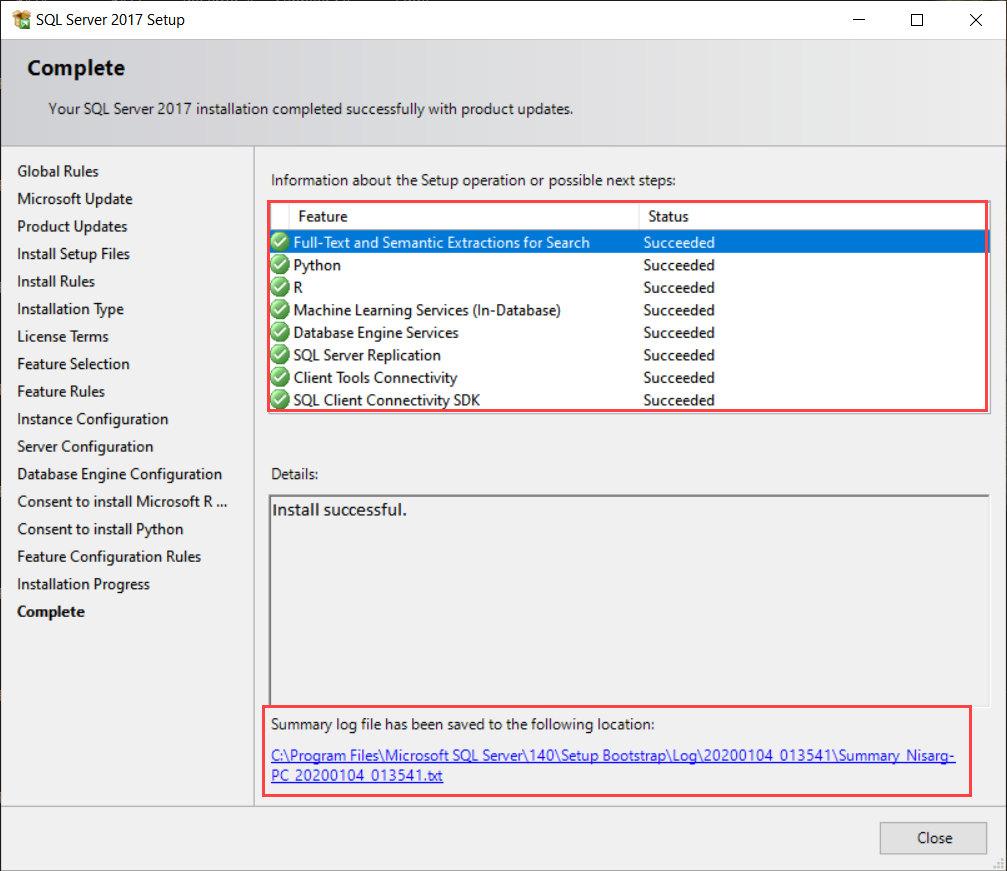
Once installation completes successfully, you can review the list of installed features and components. In case of any errors or warnings, you can review the installer logs as shown below:
You can connect to the SQL Server Express edition using SQL Server Management Studio. To do that, open SSMS and on the Connect to Server dialog box, provide the server name, choose the authentication type, and click on the Connect button:
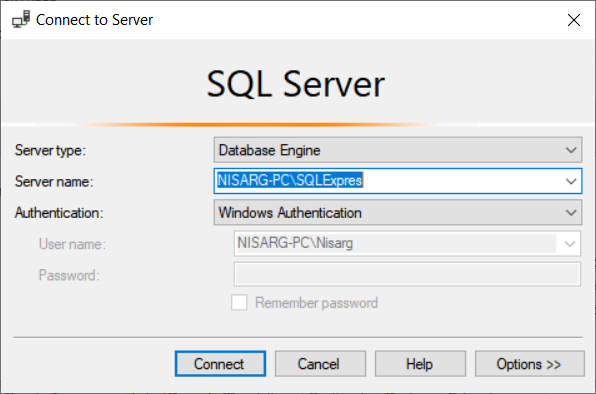
As I mentioned, I am installing a named instance; hence the server name is in <ServerName>\<InstanceName> format:
The installation of the SQL Server Express edition is completed successfully.
Summary
In this article, I have explained the step by step installation process of the SQL Server Express edition using the custom installation option.
- Author
- Recent Posts

Nisarg Upadhyay is a SQL Server Database Administrator and Microsoft certified professional who has more than 8 years of experience with SQL Server administration and 2 years with Oracle 10g database administration.
He has expertise in database design, performance tuning, backup and recovery, HA and DR setup, database migrations and upgrades. He has completed the B.Tech from Ganpat University. He can be reached on nisargupadhyay87@outlook.com
 Сейчас практически везде используются базы данных, начиная с сайтов и заканчивая приложениями. Возможности применения языка SQL безграничны. В данной статье речь пойдёт о том как установить MS SQL Server 2017 Express у себя на компьютере. В большинстве случаев это необходимо для обучения языку программирования SQL или для тестирования работ баз данных.
Microsoft SQL Server 2017 Express — мощная и надежная бесплатная система управления данными, обеспечивающая функциональное и надежное хранилище данных для вебсайтов и настольных приложений.
К примеру у Вас появилась необходимость в изучении языка SQL и для этого необходим свой SQL сервер. В этом Вам поможет MS SQL Server 2017 Express, он предоставляется абсолютно бесплатно компанией Microsoft. Скачать и установить его может каждый.
Так же сразу хочу заметить, установить SQL Server 2017 Express Вы сможете только на следующих операционных системах: Windows 10/8/8.1; Windows Server 2012; Windows Server 2012 R2; Windows Server 2016
Скачиваем MS SQL Server 2017 Express
Для начала нам необходимо скачать SQl Server. Вбиваем в любом поисковике «SQL Server 2017 Express», выбираем сайт Microsoft.
Нас перекинет на страницу где мы можем выбрать нужный нам язык и скачать MS SQL Server 2017 Express. Там же можете увить необходимые системные требования для корректной работы сервера. Нажимаем кнопку «Скачать сейчас»
Далее нам необходимо запустить файл который мы скачали.
Нам предложат выбрать тип установки, всего их три:
Базовая
- Базовая содержит только ядро СУБД SQL Server. Подходит в тех случаях, когда требуется принимать удаленные соединения или выполнять удаленное администрирование.
Пользовательский
- Наряду с СУБД SQL этот пакет содержит функции полнотекстового поиска и служб Polybase.
Скачать носитель
- LocalDB — это облегченная версия Express, которая имеет все программные функции, запускается в пользовательском режиме, быстро устанавливается, не требует настройки и имеет низкие системные требования. Пользуйтесь этой версией в том случае, когда необходим простой способ создания базы данных и работы с ней из кода. Ее можно объединить в один пакет с такими средствами разработки баз данных и приложений, как Visual Studio, или внедрить в приложение, работающее с локальными базами данных.
Затрудняетесь с выбором? Тогда выбирайте тип установки «Пользовательский»
Выбираем необходимы пункт. Указываем нужный язык и расположение носителя. Нажимаем кнопку «Установить».
Ждём пока пройдёт загрузка.
Устанавливаем и настраиваем MS SQL Server 2017 Express
После скачивания нам откроется центр установки. Нам необходимо выбрать пункт «Новая установка изолированного экземпляра SQL Server….»
Немного подождав нам откроется окно с лицензией, принимаем. Далее мы увидим правила установки, и возможные проблемы или предупреждения, которые могут помешать работе сервера. Нажимаем «Далее» Далее нам предложат выбор компонентов, по умолчанию нужные уже выбраны. Нажимаем «Далее»
Теперь нам предлагают указать имя и идентификатор для экземпляра сервера. Оставляем всё по умолчанию и нажимаем «Далее».
Далее нам предложат указать учётные записи служб и параметры сортировки. Оставляем всё как есть, галочку «Предоставить право на выполнение задач обслуживания тома службе ядра СУБД SQL Server» не ставим. Нажимаем «Далее» Затем нам предложат настроить ядро СУБД. Тут вы можете посмотреть конфигурации, каталоги данных (где они будут храниться), режим проверки подлинности. Оставляем всё по умолчанию и нажимаем «Далее».
Далее необходимо согласиться на установку Microsoft R Open. Нажать кнопку «Принять» и «Далее» Тоже самое делаем с согласием на установку Phyton. После ждём окончания установки. Может занять продолжительное время, всё зависит от вашего ПК. По окончанию просто нажимаем «Закрыть».
В случае возникновения ошибки: «Сбой установки оболочки visual studio c кодом завершения 1638…», необходимо удалить Microsoft Visual C++ 2017 и перезапустить ПК. После повторить процесс установки SQL Server 2017.
На этом пожалуй всё, надеюсь статья была вам полезной. Не забывайте пользоваться кнопками «Поделиться в соц. сетях», так же подписываться на наш Канал и группы в ВК, Twitter, Facebook.
Всем удачи и море печенек!
Table of Contents
- Installing SQL Server 2017 Express
- Installing SQL Server Management Studio
- Configuring the MSSQL Service
- Changing the authentication mode
- Adding the TestMakerFree database
- Adding the TestMakerFree login
- Mapping the login to the database
If you’re a .NET developer working with Visual Studio, you’ll most likely know SQL Server LocalDB: a specialized edition of the well-known Microsoft SQL Server engine — firstly introduced in SQL Server Express 2012 — acting as a minimal, on-demand, version of SQL Server designed for application developers. Since its first introduction LocalDB has proved itself to be a great development tool, especially when used as an «embedded database» to quickly test our Data Model without having to setup a whole DBMS service. We briefly talked about it in a couple posts some months ago, such as when we compared the Entity Framework Data Modeling patterns (Code-first, Model-first and Database-first) and in our ASP.NET MVC 5 Web Application Project Setup Guide.
Although LocalDB proved itself to be a great development choice, it’s not a good idea to use it in a production environment of any kind. The reasons for that are fairly simple to explain and understand:
- Despite having the same performances of a regular SQL Server Express instance — since they share the same database engine — the LocalDb underlying process will shut down itself if it doesn’t have any request for a while. When this happens, the next request(s) will most likely have poor performance and could even get a timeout.
- There are some (minor and fixable) issues with the LocalDB default user profile and permissions that you’ll need to fix to use it with an IIS-based production website: for further info about these problems — and their workarounds — I strongly suggest to take a look to this great two-part MSDN blog post (part 1 | part 2).
The «LocalDB in production» debate is also a recurrent topic on tech sites such as StackOverflow, which hosts some really interesting threads providing a great analysis of the pros and cons, such as:
- Is it normal to use LocalDb in production?
- Since LocalDB is for development purpose, then use what DB for production?
Having read and said all that, here come my 2 cents: although LocalDB is great, for a production machine I would strongly recommend using a standard, full-fledged and service-based instance of SQL Server: as for the chosen edition, we can either go for Express, Web, Standard, or Enterprise, depending on what we need and/or can afford.
In this post we’ll see how to properly setup and configure an instance of Microsoft SQL Server 2017 Express Edition, aka MSSQL2017, which can be downloaded for free from this Microsoft page. Needless to say, we need to install it on a machine that is reachable from our web server via a Local Area Network (LAN) or within the web server itself, although this is definitely not a recommended choice: both IIS and SQL Server are resource-intensive, hence it could be advisable to keep them in two separate environments.
In the following tutorial we’ll take for granted that we’ll have a Windows Server available and accessible either phisically or via Remote Desktop, which would be the case for a server hosted, housed, virtualized or even available as a VPS or within a public, private or hybrid cloud farm.
Installing SQL Server 2017 Express
The installation process is pretty straightforward. Unless we don’t need anything specific, we can just go for the basic type:
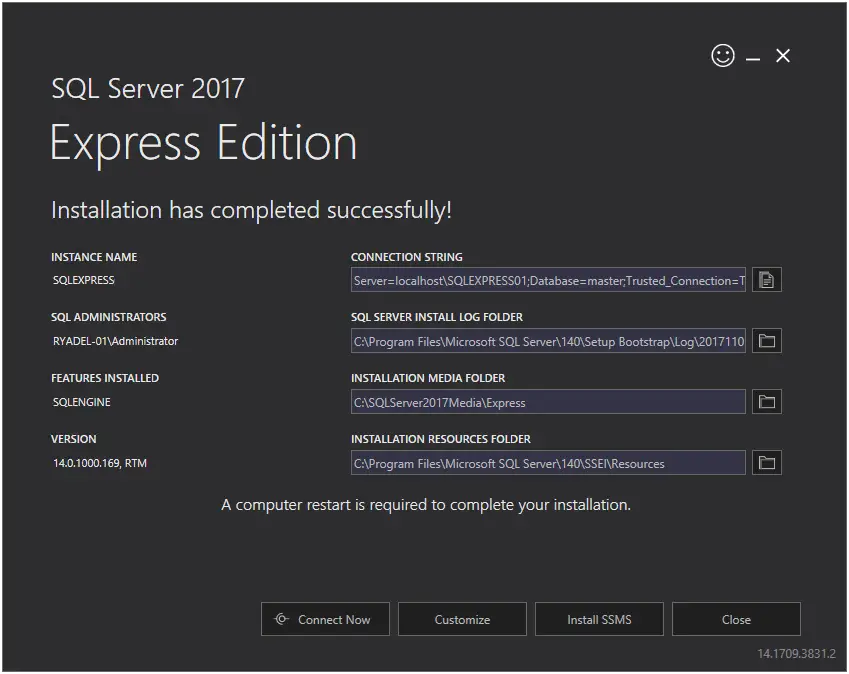
Eventually, we’ll be prompted with the Installation Complete window, which will also give us some useful info, including the database instance name and a default connection string ready for a connection test:
Installing SQL Server Management Studio
From here, we can click the Install SSMS button and download SQL Server Management Studio, a tool that we can use to create our fist sample database and also a dedicated user that can access it.
SQL Server Management Studio is a separate product and can also be retrieved for free download at the following URL.
Configuring the MSSQL Service
Once we’ve downloaded and installed it, we can launch SQL Server Management Studio and start the required steps to create our first database. We will be prompted by a Connect to Server modal window that will allow us to connect to our local SQL Server instance.
To do this, select the Database Engine server type and then, from the Server name combo box, choose <Browse for more…>. Another pop-up window will appear, from which we’ll be able to select the database engine we just installed on our server:

As for the Authentication part, we can leave Windows Authentication for now, being it the default SQL Server authentication mode: however, we’re going to change it soon enough.
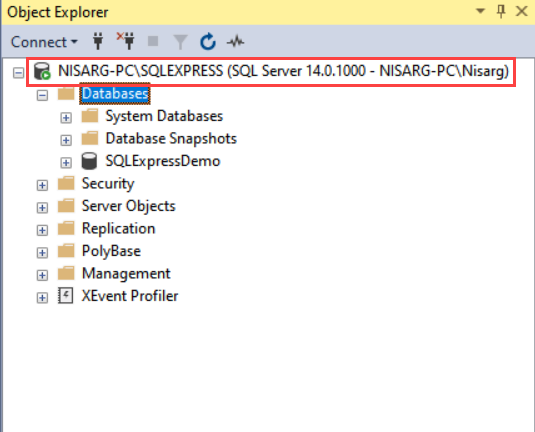
When we’re done, click on the Connect button and a Server Explorer window will appear, containing a tree view representing the structure of your SQL Server instance. This is the interface we’ll use to create our database and also the user/password that our application will use to access it.
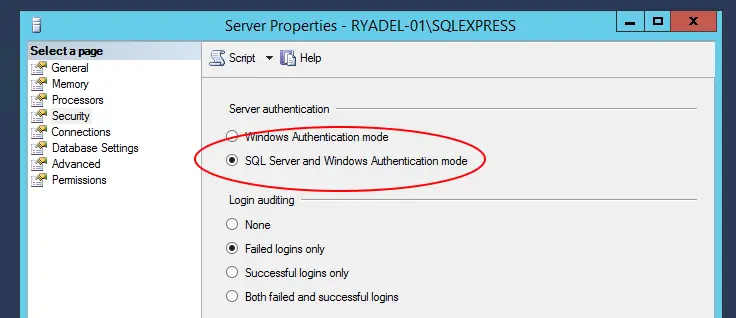
Changing the authentication mode
The first thing we need to do is to change the default SQL Server authentication mode, so we won’t be forced to use an existing Windows account. To do so, right-click on the root tree view node, which represents our SQL Server instance, and select Properties from the contextual menu. From the modal window that appears, select the Security page, then switch from Windows Authentication mode to SQL Server and Windows Authentication mode:
Adding the TestMakerFree database
Now we can create the database that will host our application’s tables. Right-click on the Databases folder and choose Add Database from the contextual menu. Give it the TestMakerFree name and click on OK.
Adding the TestMakerFree login
Go back to the root Databases folders, then expand the Security folder, which should be just below it. From there, right-click on the Logins subfolder and choose New Login. Again, give it the TestMakerFree name. From the radio button list below, select SQL Server Authentication and set a suitable password — for example, SamplePassword123$ — and click on OK. If you want a simpler password you might have to also disable the enforce password policy option. However, we advise against doing that: choosing a weak password is never a wise choice, expecially if we do that in a production-ready environment. Instead, replace the sample password we used above with a custom one and store it carefully: we’re going to need it later on.
Mapping the login to the database
The next thing we need to do is to properly map this login to the TestMakerFree database we added earlier. From the navigation menu to the left, switch to the User Mapping tab. Click on the checkbox right to the TestMakerFree database, then write TestMakerFree in the User cell and assign the db_owner membership role:
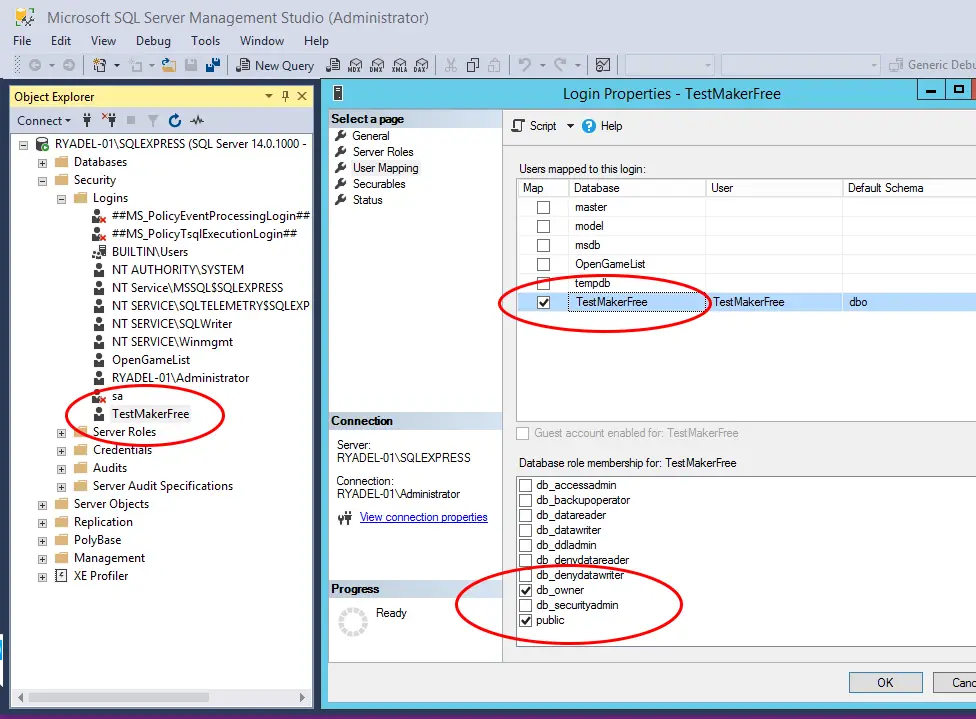
As soon as we click on the OK button, a new TestMakerFree user will be added to the TestMakerFree database with full administrative rights.
We can easily confirm that by going back to the root Databases folder and expanding it to TestMakerFree > Security > Users:
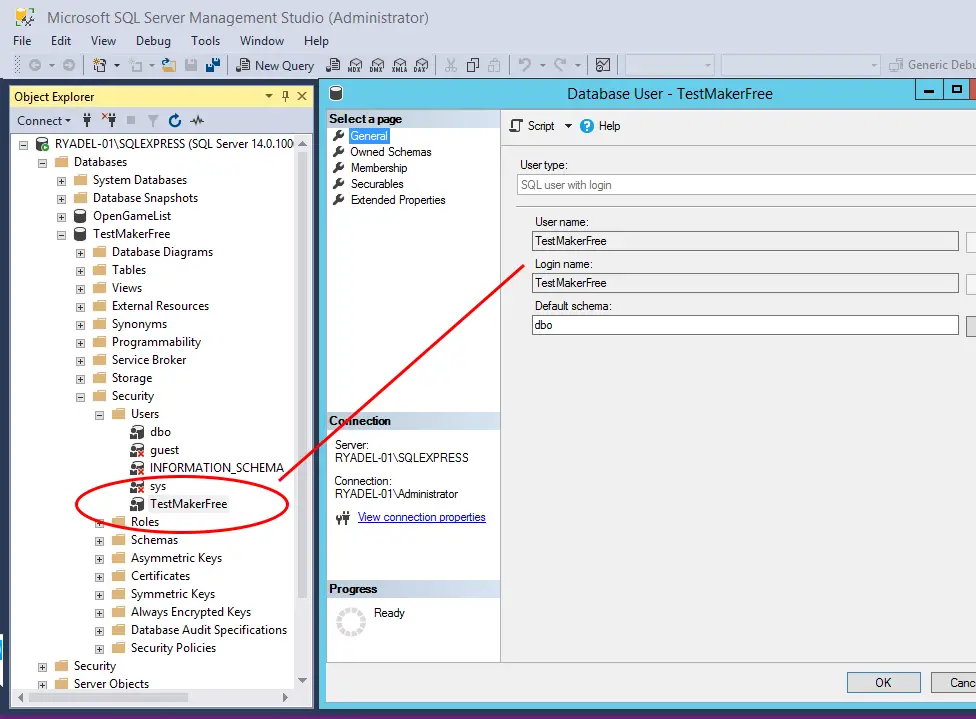
That’s it! Now we’ll be able to access our brand new TestMakerFree database with a standard connection string using the credentials we just created.
This article is part of the ASP.NET Core 2 and Angular 5 book, available as paperback, e-book and as a 26-lessons video-course. Promo Code: ASPCA50 to get it with a 50% discount! The book’s latest edition, updated to ASP.NET Core 5 and Angular 11, is available here.